Make a Dieselpunk Streamliner Christmas Card
Draw a 1930s-style streamlined train racing through a snowy night in Lopsy, with Pen-tool curves, perspective lettering, an airship and layered snow.
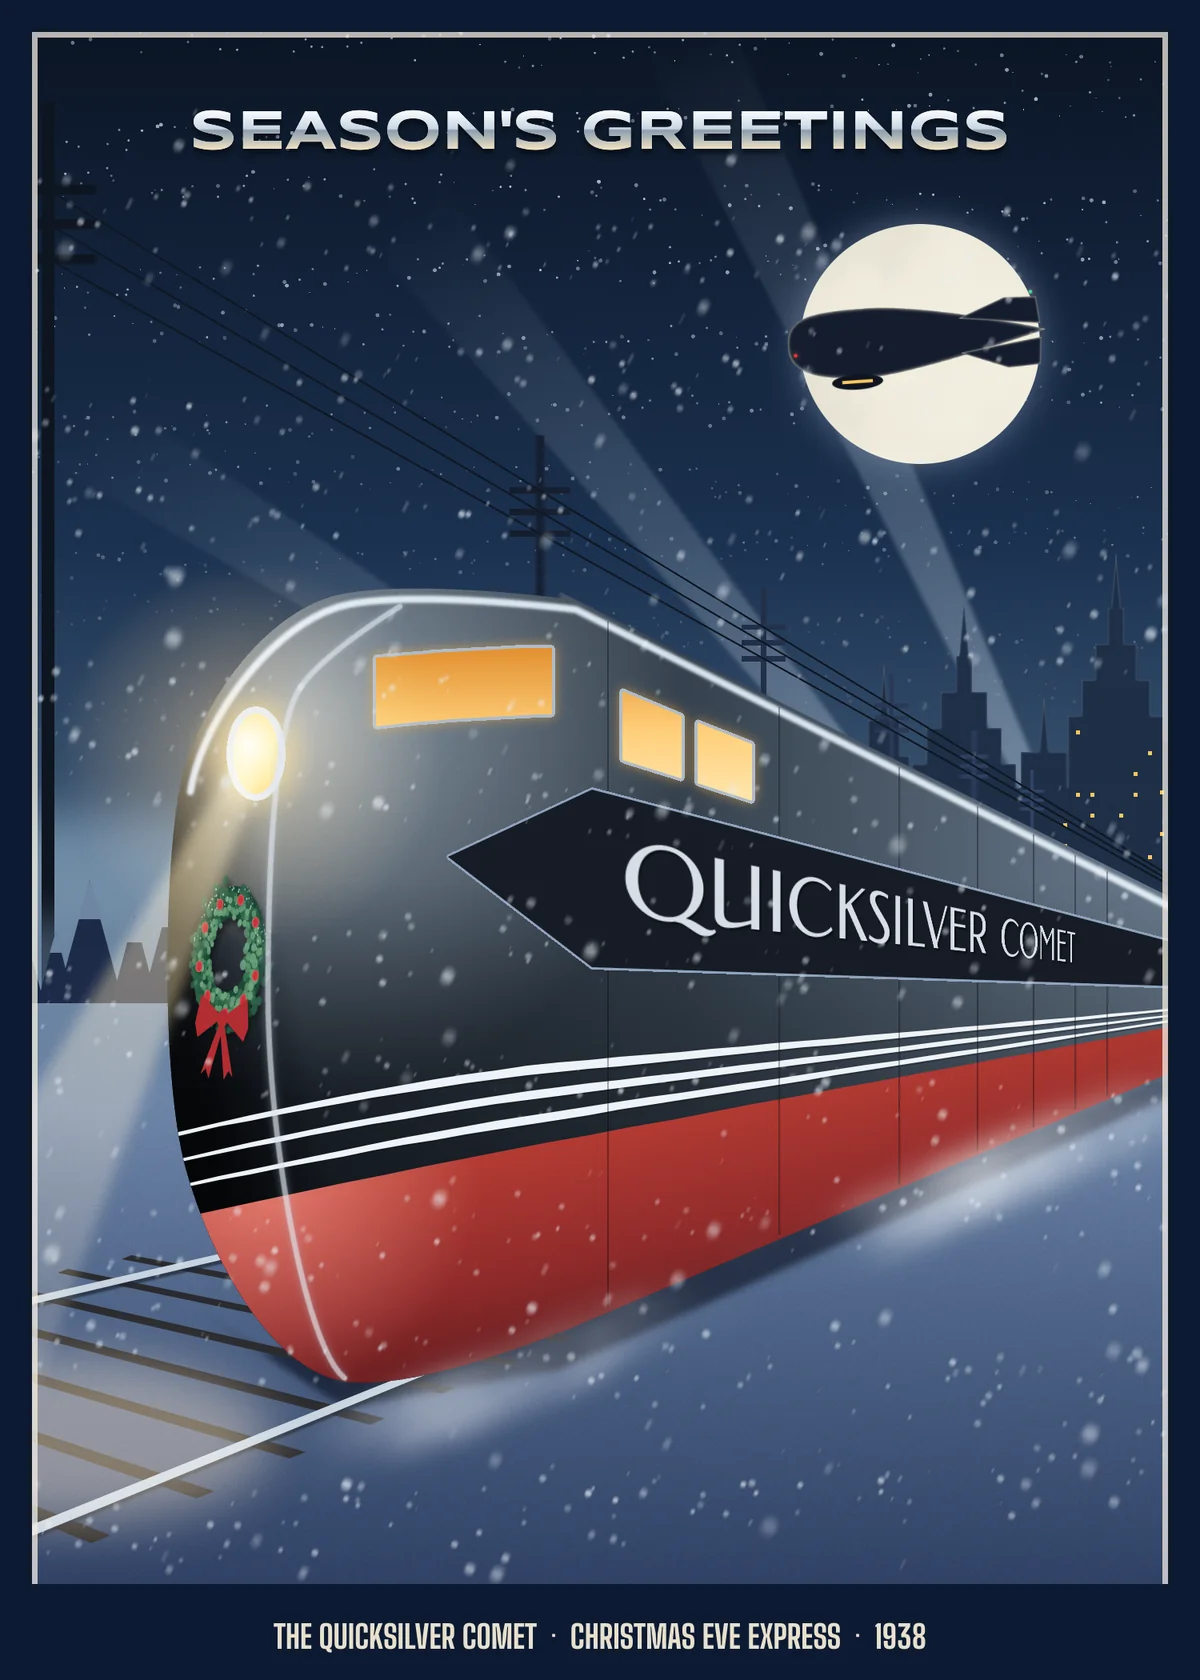
Dieselpunk borrows the look of the 1930s and 40s machine age: streamlined trains, airships, searchlights, and posters airbrushed in smooth gradients. The great railway posters of the time, like A. M. Cassandre's Nord Express, put the viewer down by the tracks. The engine looms, and the rails and telegraph wires rush off to a single vanishing point.
This card does the same for Christmas Eve. The Quicksilver Comet streamliner charges out of the dark with a wreath on its nose, under a full moon and a passing airship. Everything is drawn in Lopsy from selections, gradients, Pen paths and layer effects, with no photos.
Along the way you'll use:
- ruler guides and a vanishing point to keep the perspective honest
- the Pen tool for the airship and the locomotive's bullet nose, with Path to Selection and Enter-to-stroke
- Lasso selections combined with Shift (add), Alt (subtract) and Shift+Alt (intersect)
- Cmd-clicking layer thumbnails to paint inside shapes
- linear and radial gradients with transparent stops, plus layer masks
- the Spray tool for stars and snow, and a Brush with scatter and jitter for wreath needles
- Move-tool transforms on groups and on several layers at once, and Distort to letter the train in perspective
- Clouds, Smoke, Gaussian Blur, Motion Blur and Add Noise
- Outer Glow, Inner Glow, Stroke and Drop Shadow effects, and the Screen, Multiply and Overlay blend modes
- live text in Syncopate, Federo and Big Shoulders
The palette is cool night blues with one warm accent (the headlight) and one festive one (the red skirt):
-
Night sky
-
Moon
-
moon glow
-
Snow
-
Gunmetal body
-
Red skirt
-
Chrome
-
lamplight
-
window glow
-
Pine
-
berries
-
bow
-
Mat
-
cream type
-
Start a portrait card
Open Lopsy. In the New Document dialog, set Width to
1500and Height to2100, leave the background white and click Create. That's a 5 × 7 card at 300 dpi.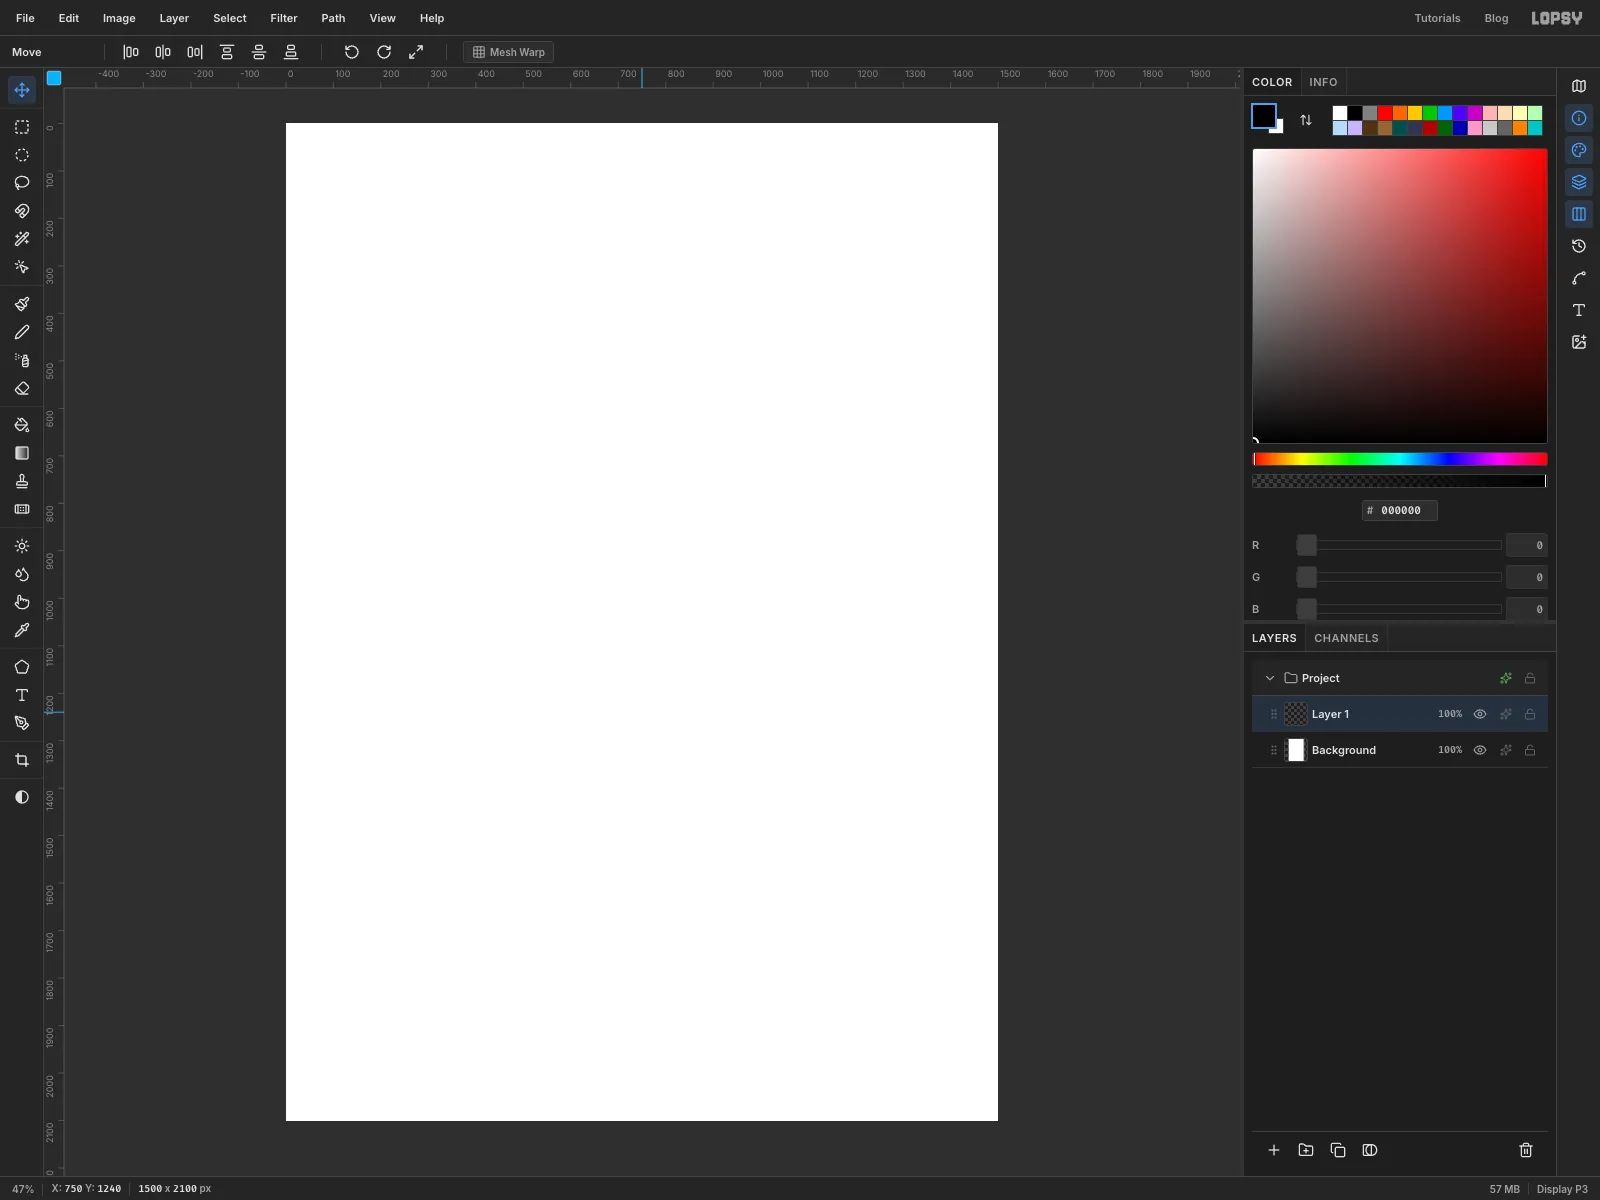
-
Place the horizon and margins
A single click on a ruler drops a guide.
- Click the left ruler at
1240. This is the horizon, and the eye level of the whole picture: everything in the distance meets it. - Click the left ruler at
120and1980, and the top ruler at100and1400. These mark a safe area: keep the title and the important parts of the picture inside them, because the edges get covered by a mat at the end.
Everything that runs into the distance (the train, the rails, the telegraph wires) heads for one vanishing point:
1700, 1240. That's on the horizon, just off the right edge of the canvas. Keep it in mind; you'll aim at it a lot.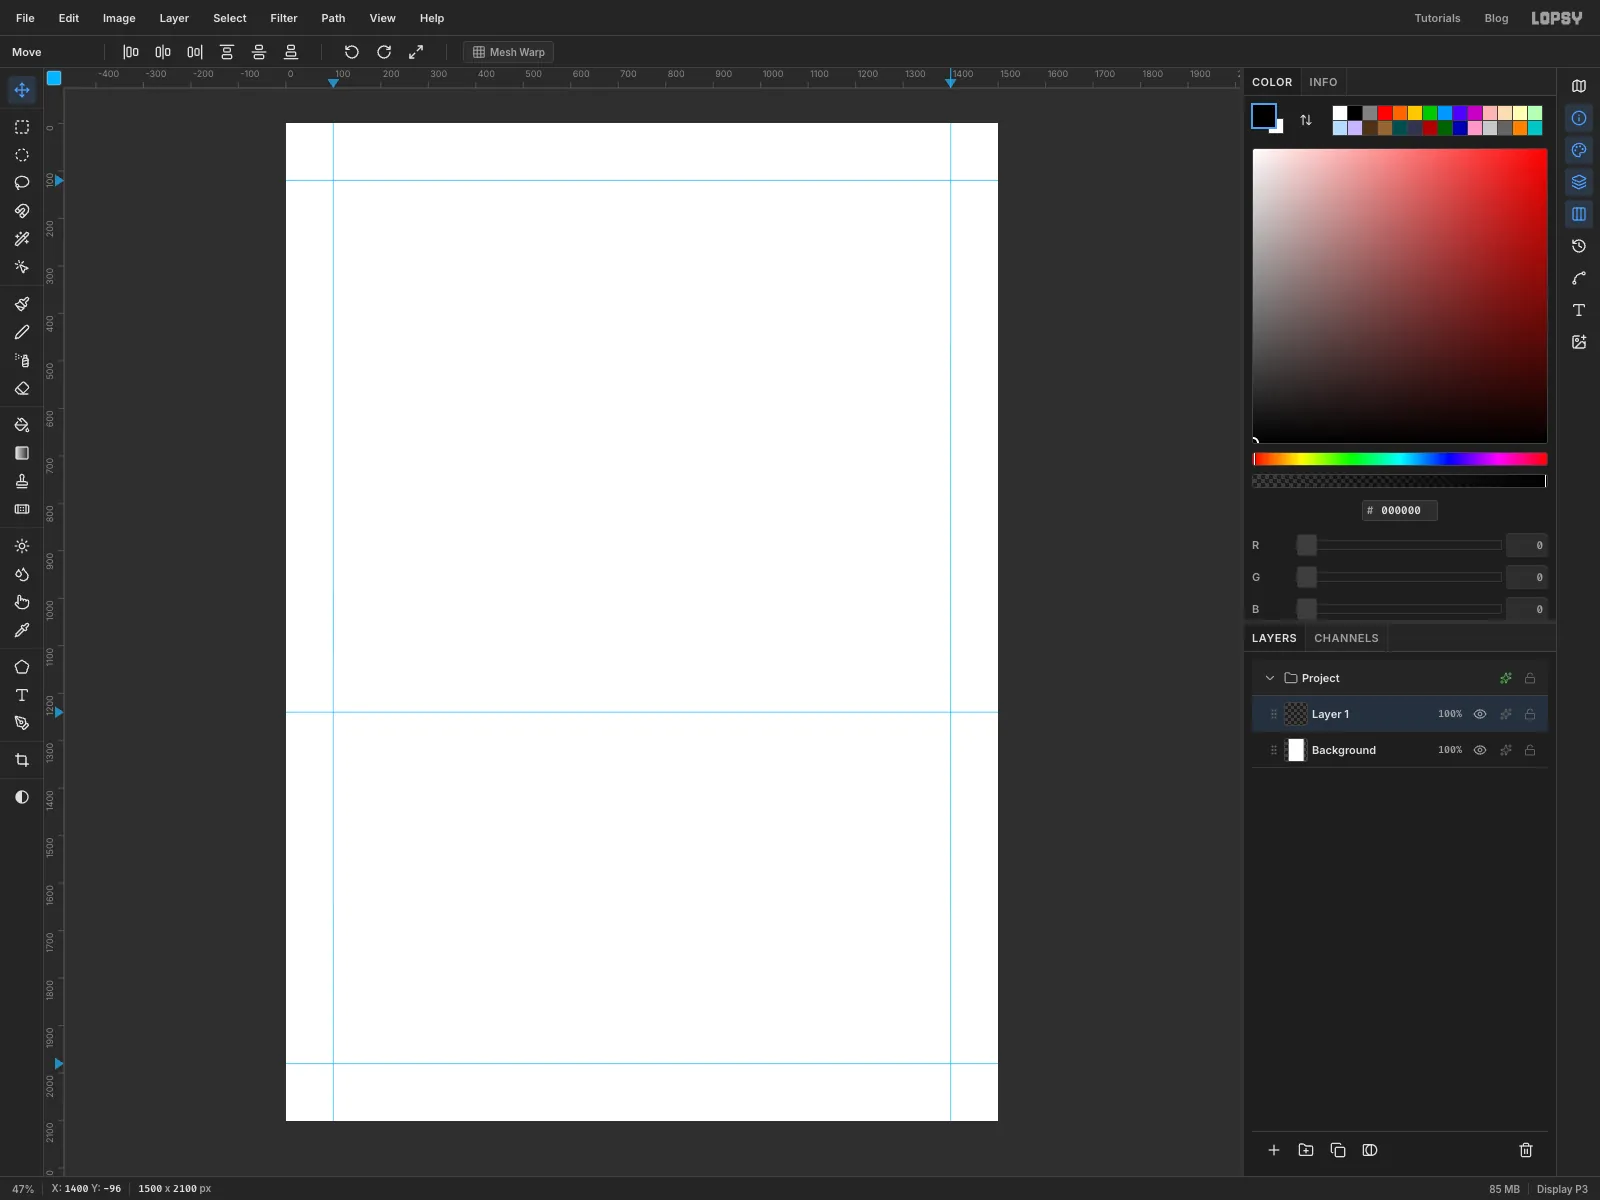
- Click the left ruler at
-
Paint the night sky
- Double-click Layer 1's name and rename it
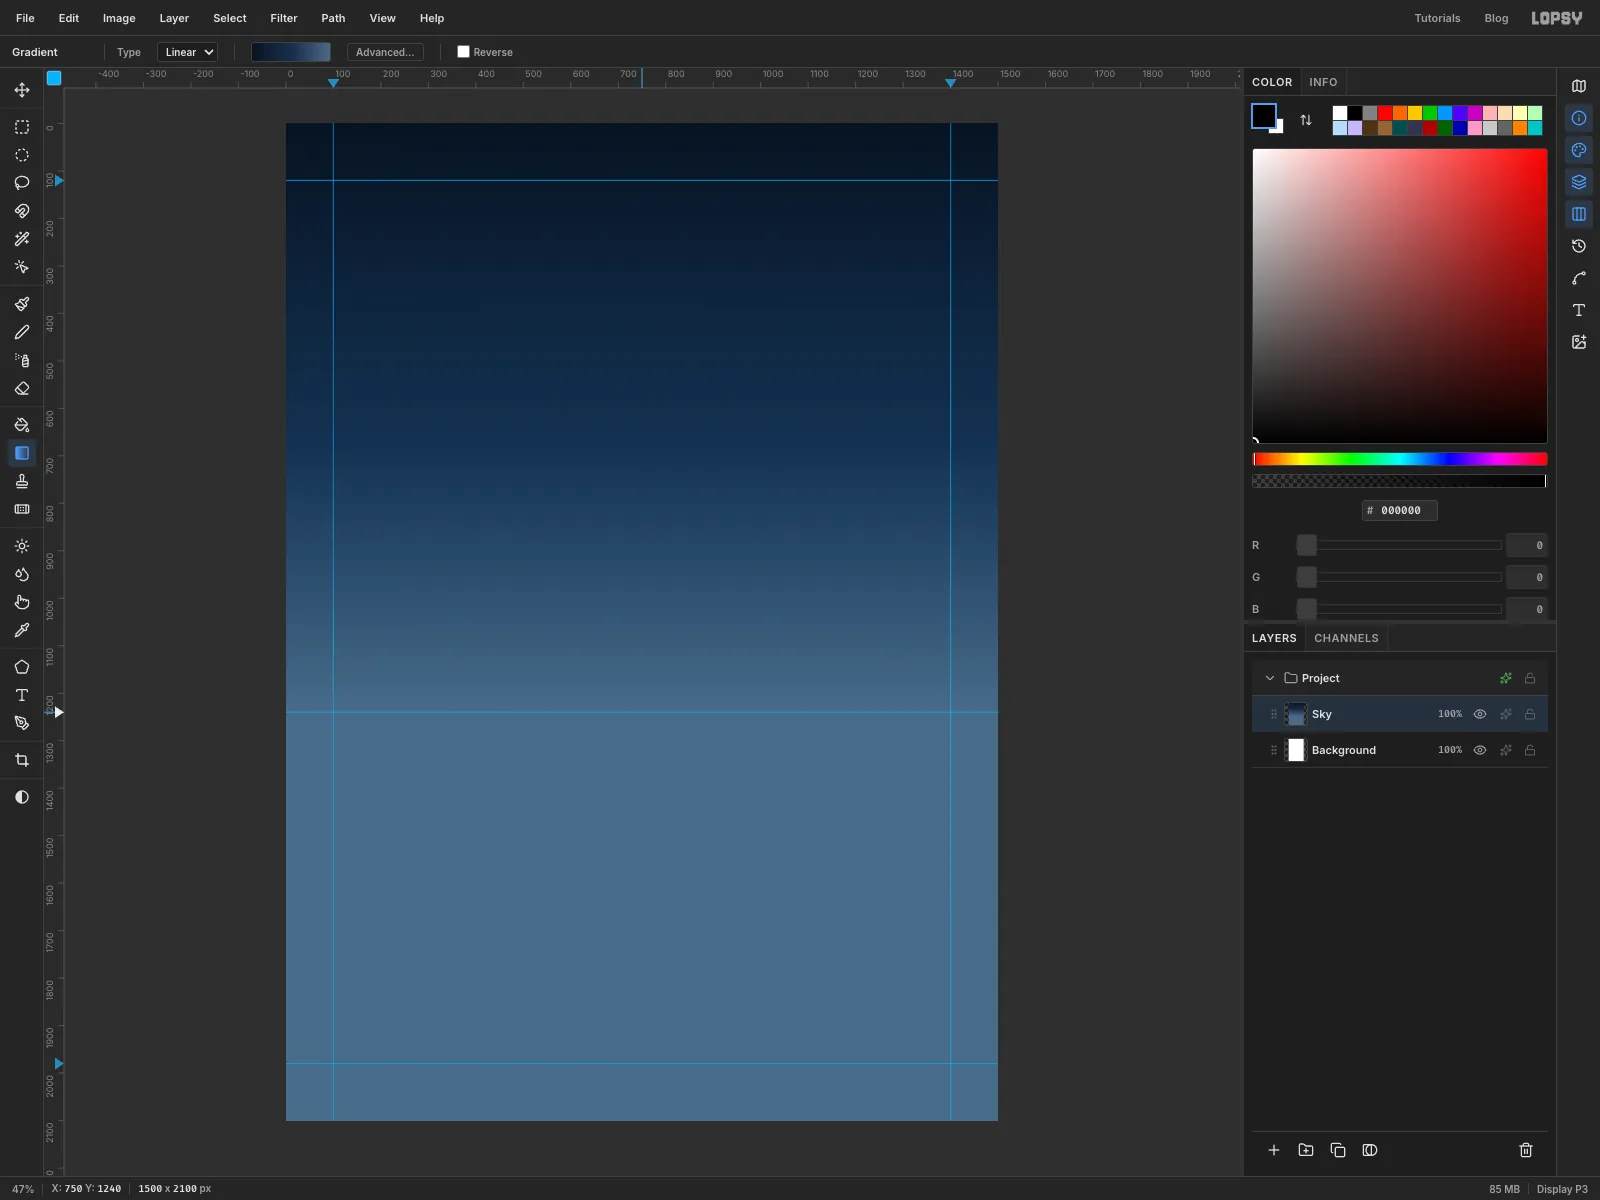
Sky. - Pick the Gradient tool, set the type to Linear and click Advanced… to open the Gradient Editor. Make three stops: at the left, just past the middle and at the right. Click Done.
- Drag from the top edge of the canvas straight down to the horizon guide.
Below the horizon the last colour carries on. The snow will cover it later.
- Double-click Layer 1's name and rename it
-
Spray a field of stars
- Click Add Layer in the Layers panel and name the layer
Stars. - Set the foreground colour to .
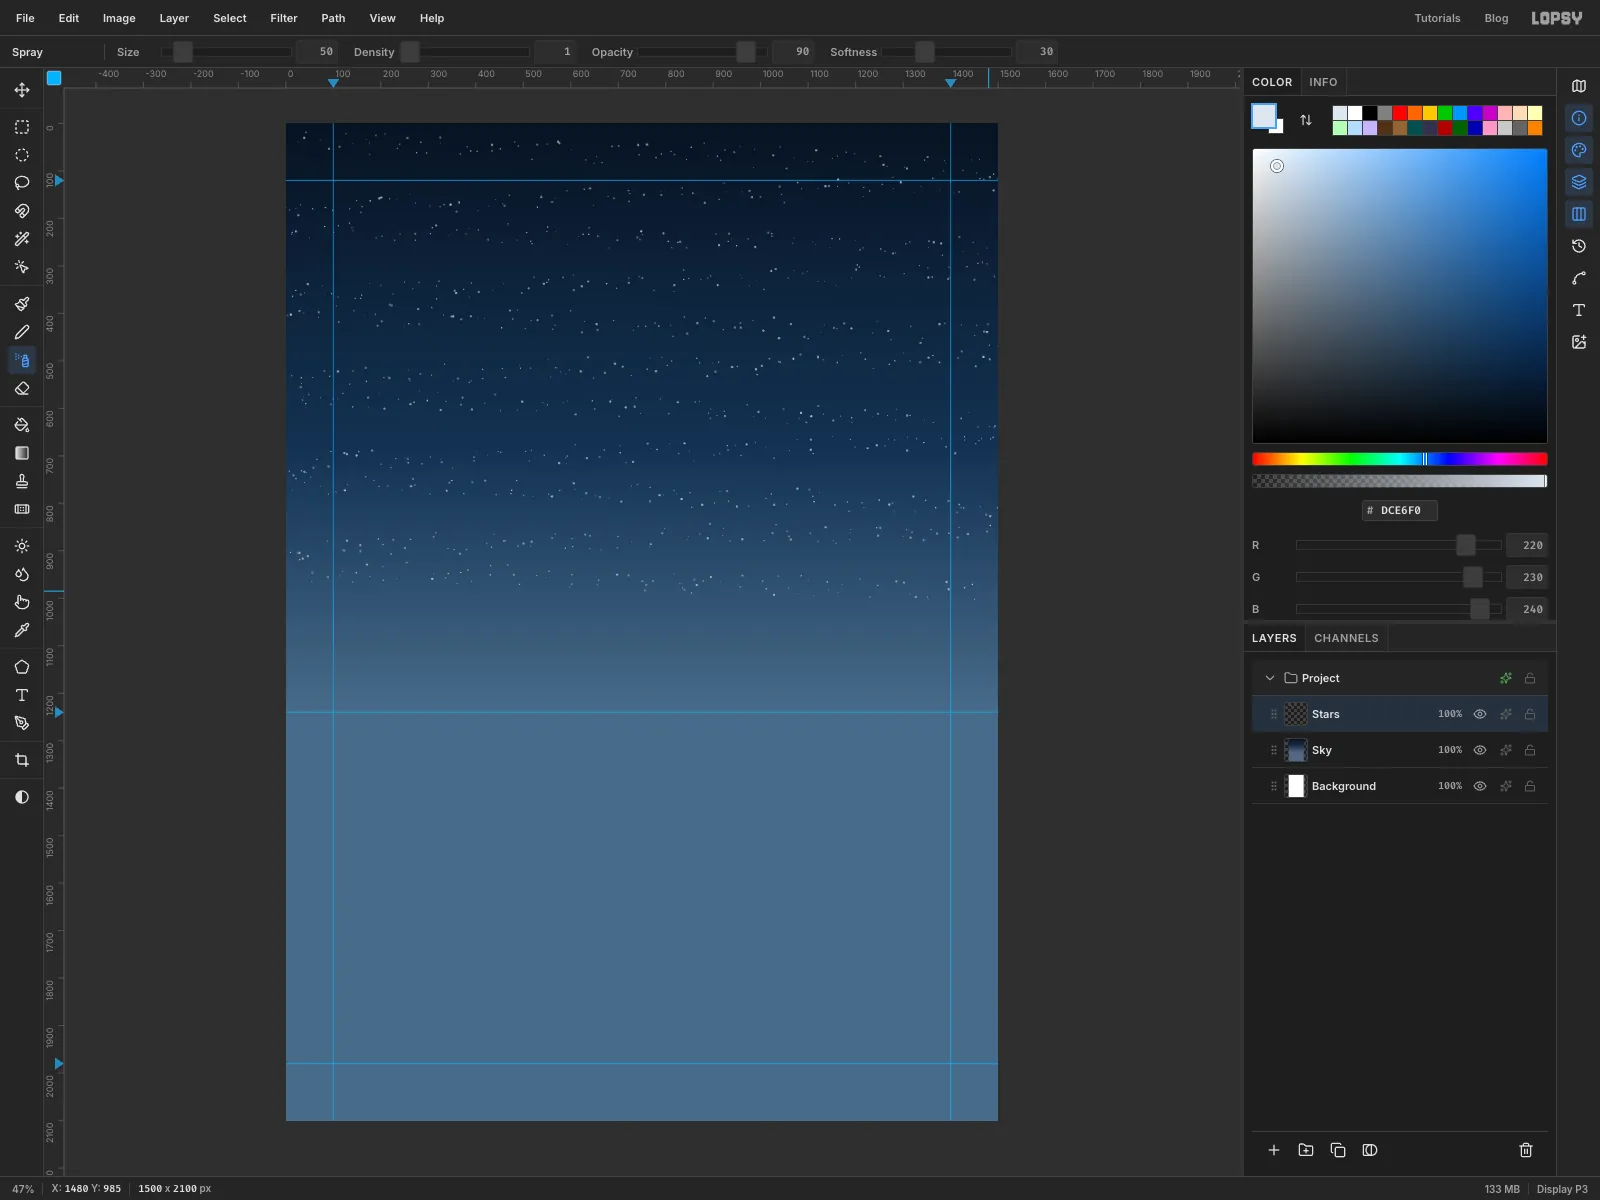
- Pick the Spray tool and set Size
50, Density1, Opacity90and Softness30. - Zigzag across the sky from the left edge to the right and back, working down in rows about 90 px apart until you're a little above the horizon.
At this size each puff leaves just one or two tiny dots, so you get a dusting of stars rather than a cloud.
- Click Add Layer in the Layers panel and name the layer
-
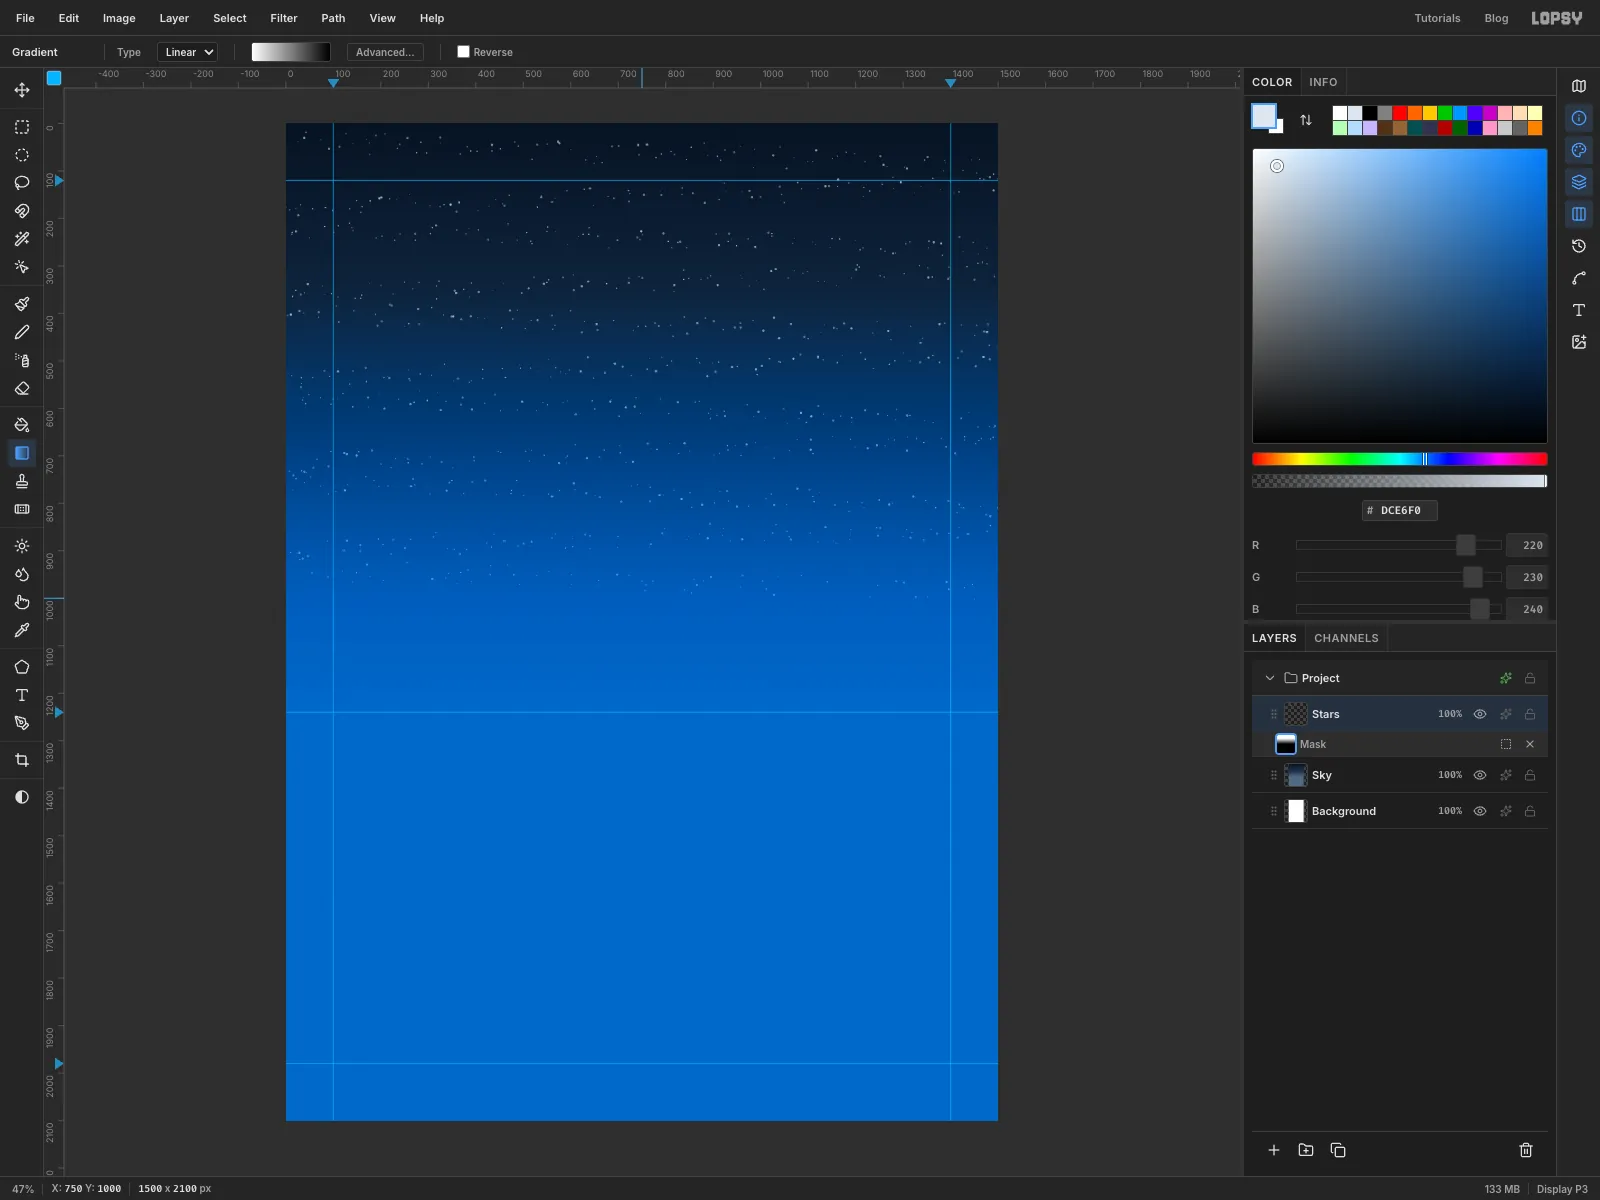
Fade the stars near the horizon
Real stars disappear into the haze low in the sky.
- With
Starsselected, click Add Mask at the bottom of the Layers panel. A Mask row appears under the layer. - Click the mask's thumbnail to edit the mask. The blue tint shows what the mask hides.
- Pick the Gradient tool and click Advanced…. Click the middle stop and press Delete in the editor to remove it, then set the two remaining stops to white on the left and black on the right. Click Done and drag from
750, 350straight down to750, 1000. - Click the
Starslayer name to go back to editing its pixels.
- With
-
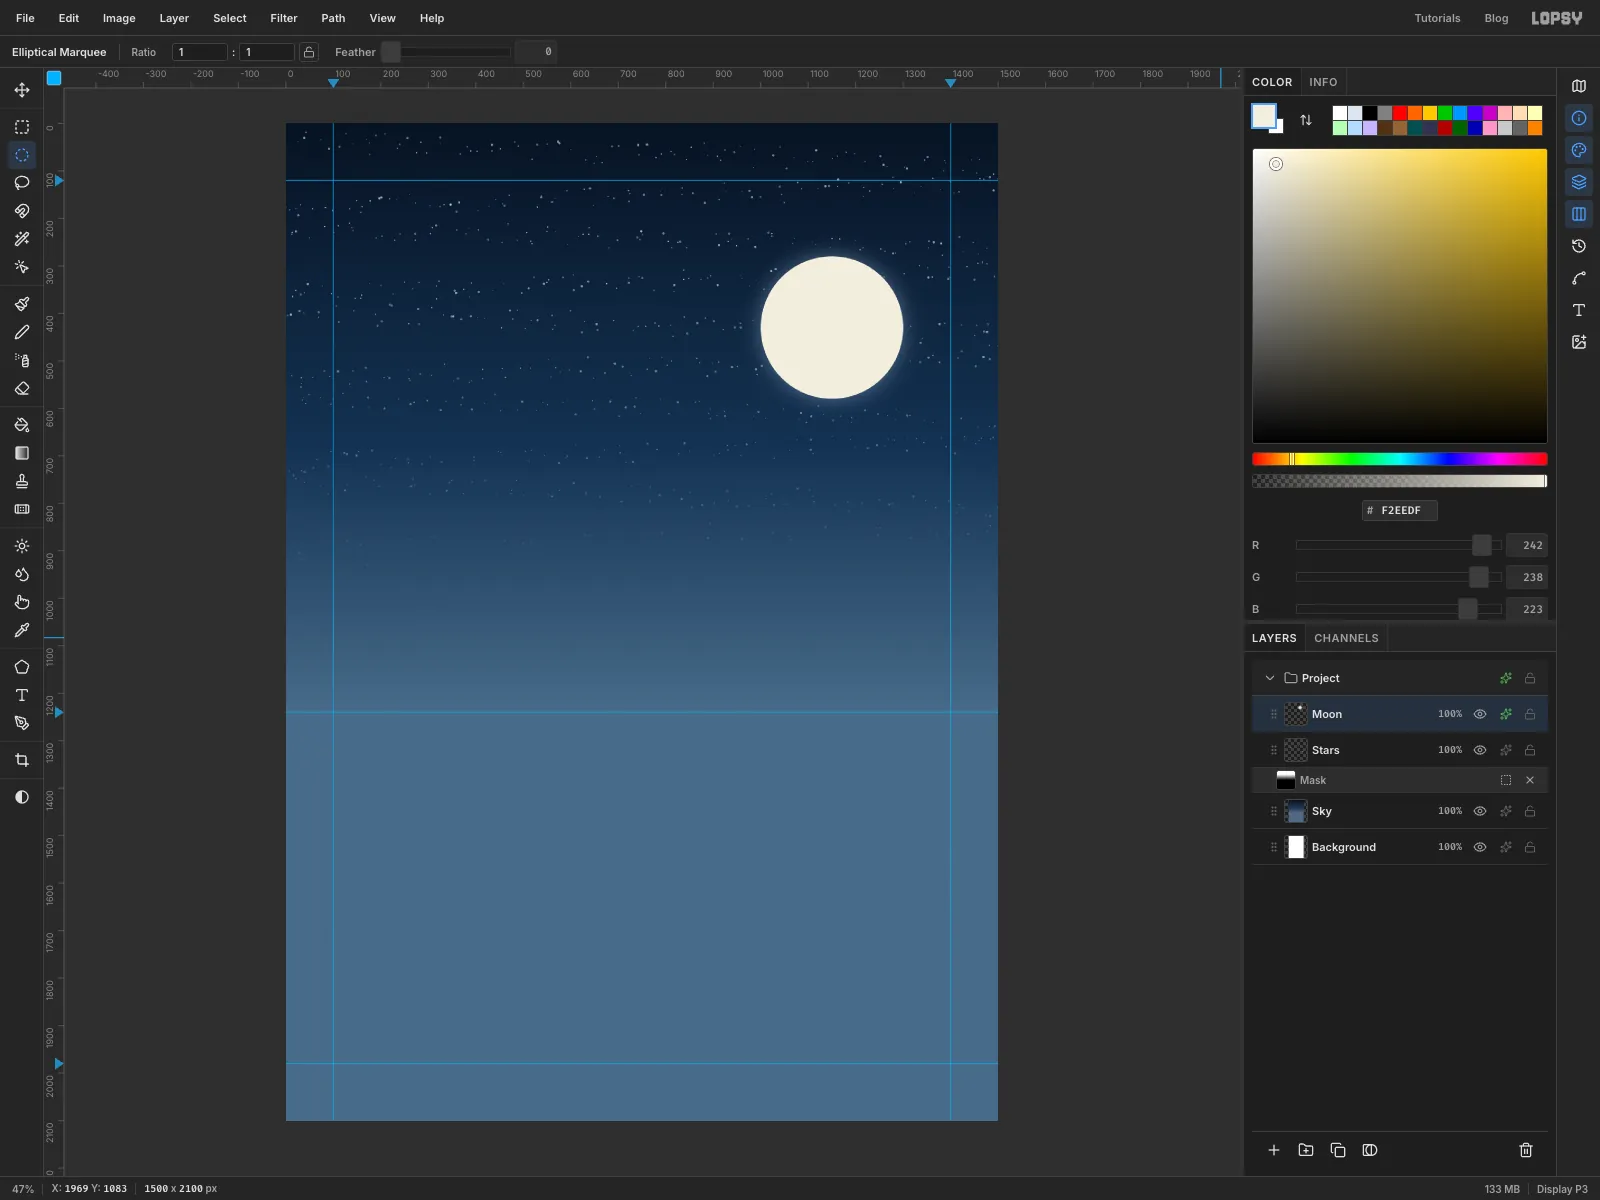
Hang a full moon
- Add a layer called
Moonand set the foreground to . - With the Elliptical Marquee, drag from
1000, 280to1300, 580for a 300 px circle. Hold Cmd while you drag to keep it round. - Fill it and deselect.
- Click the effects button on the
Moonrow (the sparkle icon) to open the effects drawer. Tick Outer Glow and set Size120, Opacity50and the glow colour to .
- Add a layer called
-
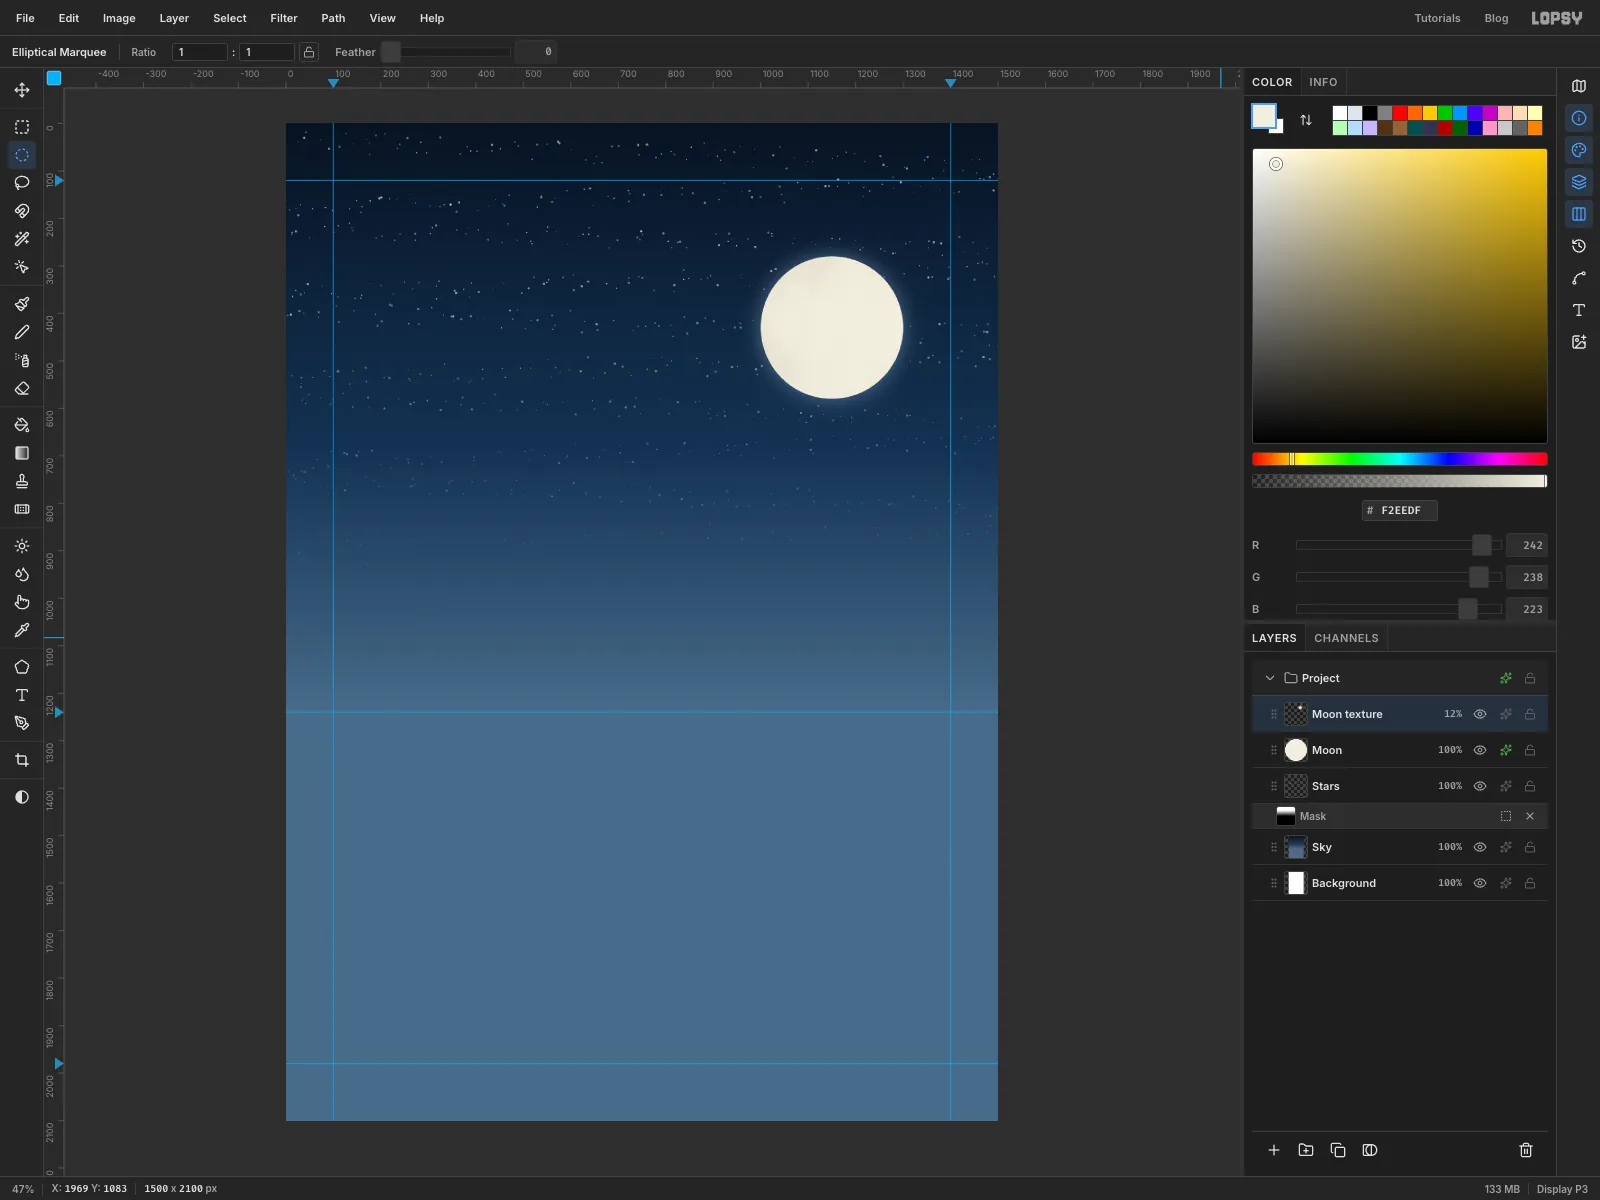
Give the moon a little texture
- Add a layer called
Moon texture. - Hold Cmd and click the
Moonthumbnail. That loads the disc as a selection. - Choose Filter → Clouds…, set Scale to
5and click Apply. The clouds stay inside the circle. - Deselect. In the effects drawer set the layer's blend mode to Multiply. Then click its opacity percentage on the row and drag it down to
12%.
Keep it subtle. A strongly mottled moon looks grey and dull.
- Add a layer called
-
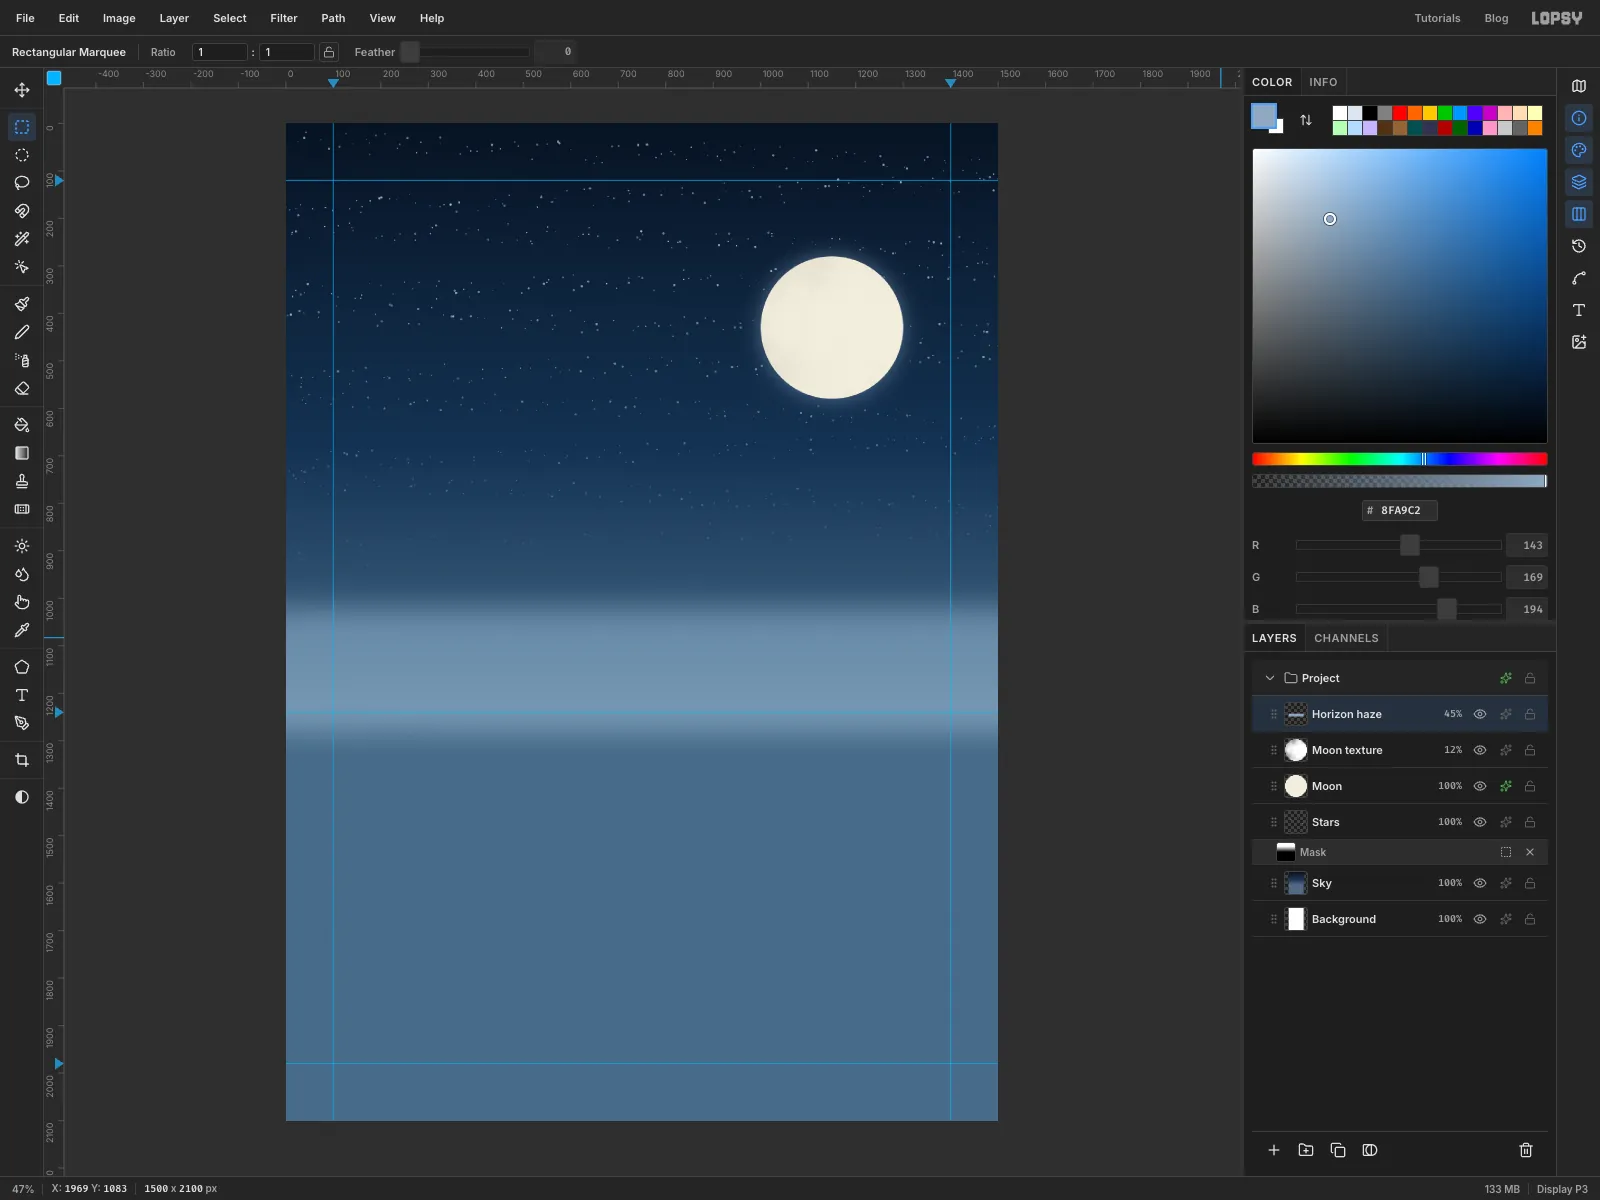
Add haze along the horizon
- Add a layer called
Horizon haze. - With the Rectangular Marquee, drag from just off the left edge at
y 1020to just off the right edge aty 1280, so the band runs edge to edge across the horizon. - Choose Select → Feather…, enter
60and apply. - Fill with , deselect, then set the layer to Screen at
45%.
- Add a layer called
-
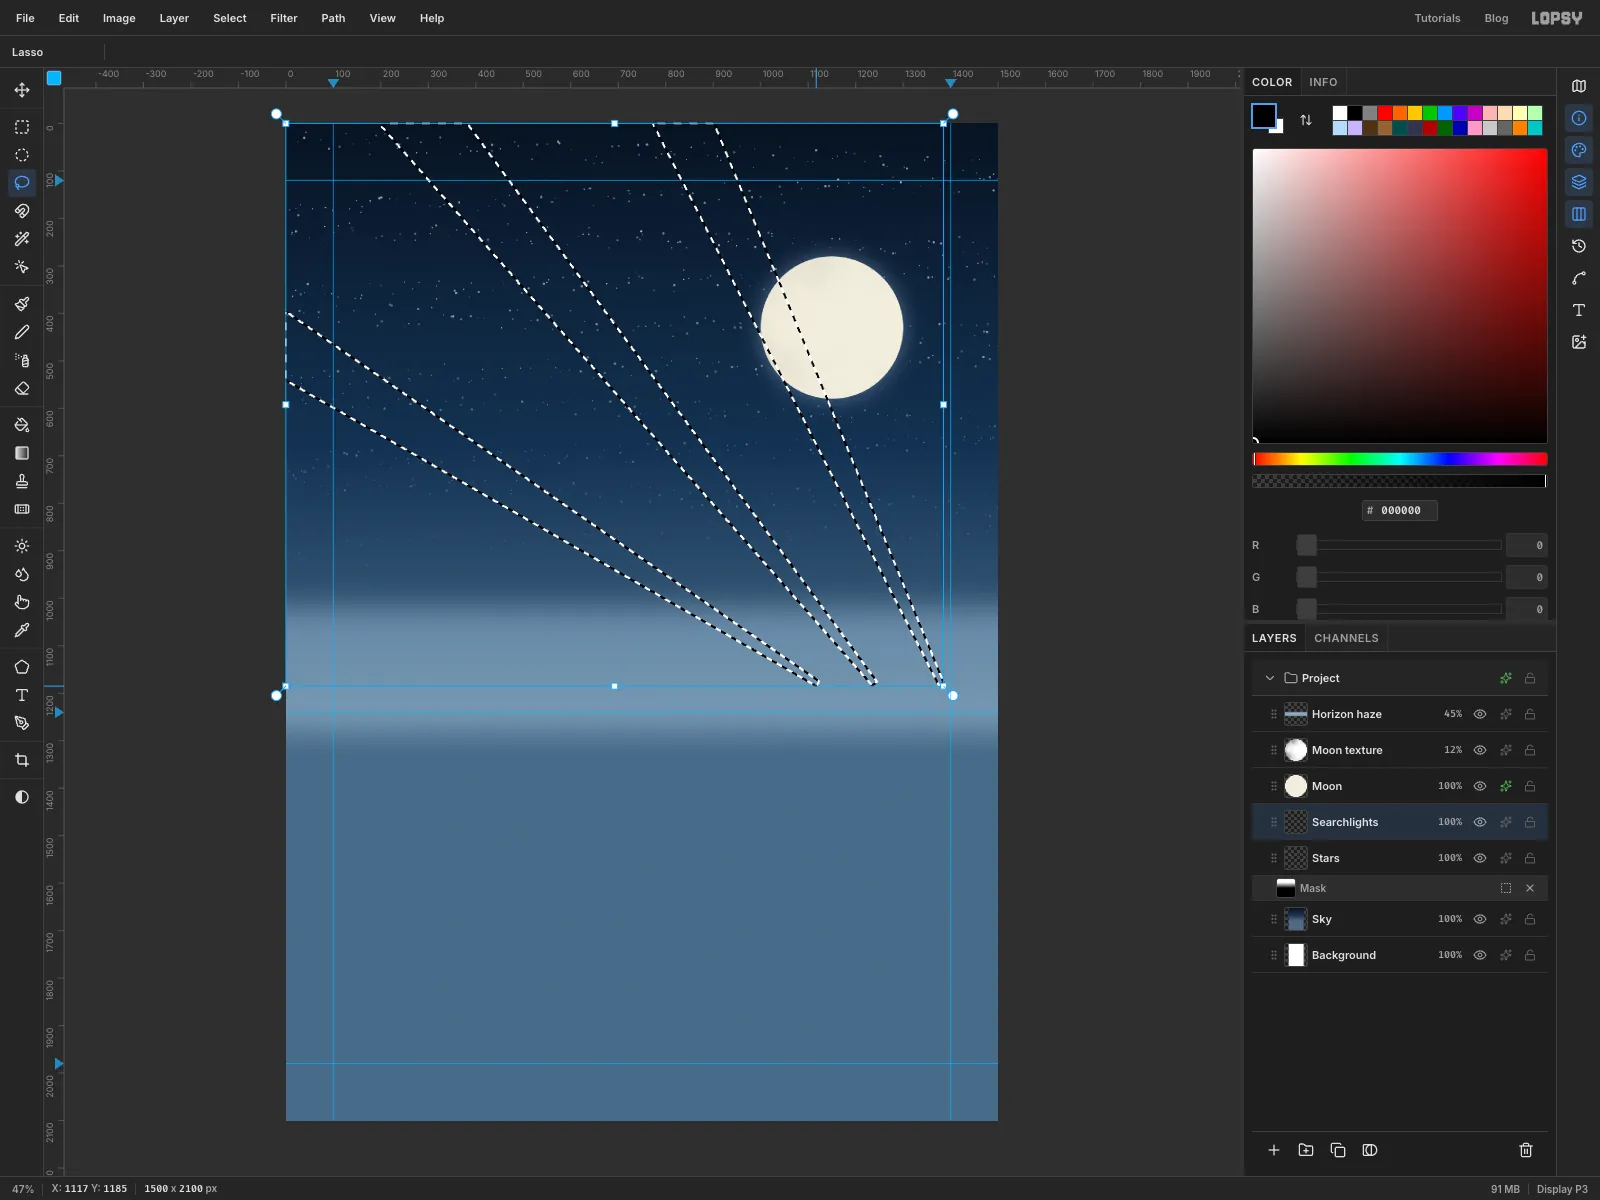
Lasso three searchlight beams
Searchlights raking the sky are a staple of 1930s premieres and expos.
- Click the
Starsrow, then Add Layer, and name the new layerSearchlights. A new layer always lands just above the one you've selected, so the beams sit behind the moon. - With the Lasso, draw a long thin wedge: start with a narrow base about 12 px wide near the horizon at
1240, 1180, and fan out to about 150 px wide at the top edge aroundx 260. - Hold Shift and draw a second wedge from
1380, 1180up to the top edge aroundx 820, ending about 120 px wide. - Hold Shift again for a third, from
1120, 1180out to the left edge aroundy 420.
Shift adds each new shape to the selection, so all three fill together.
- Click the
-
Light the beams
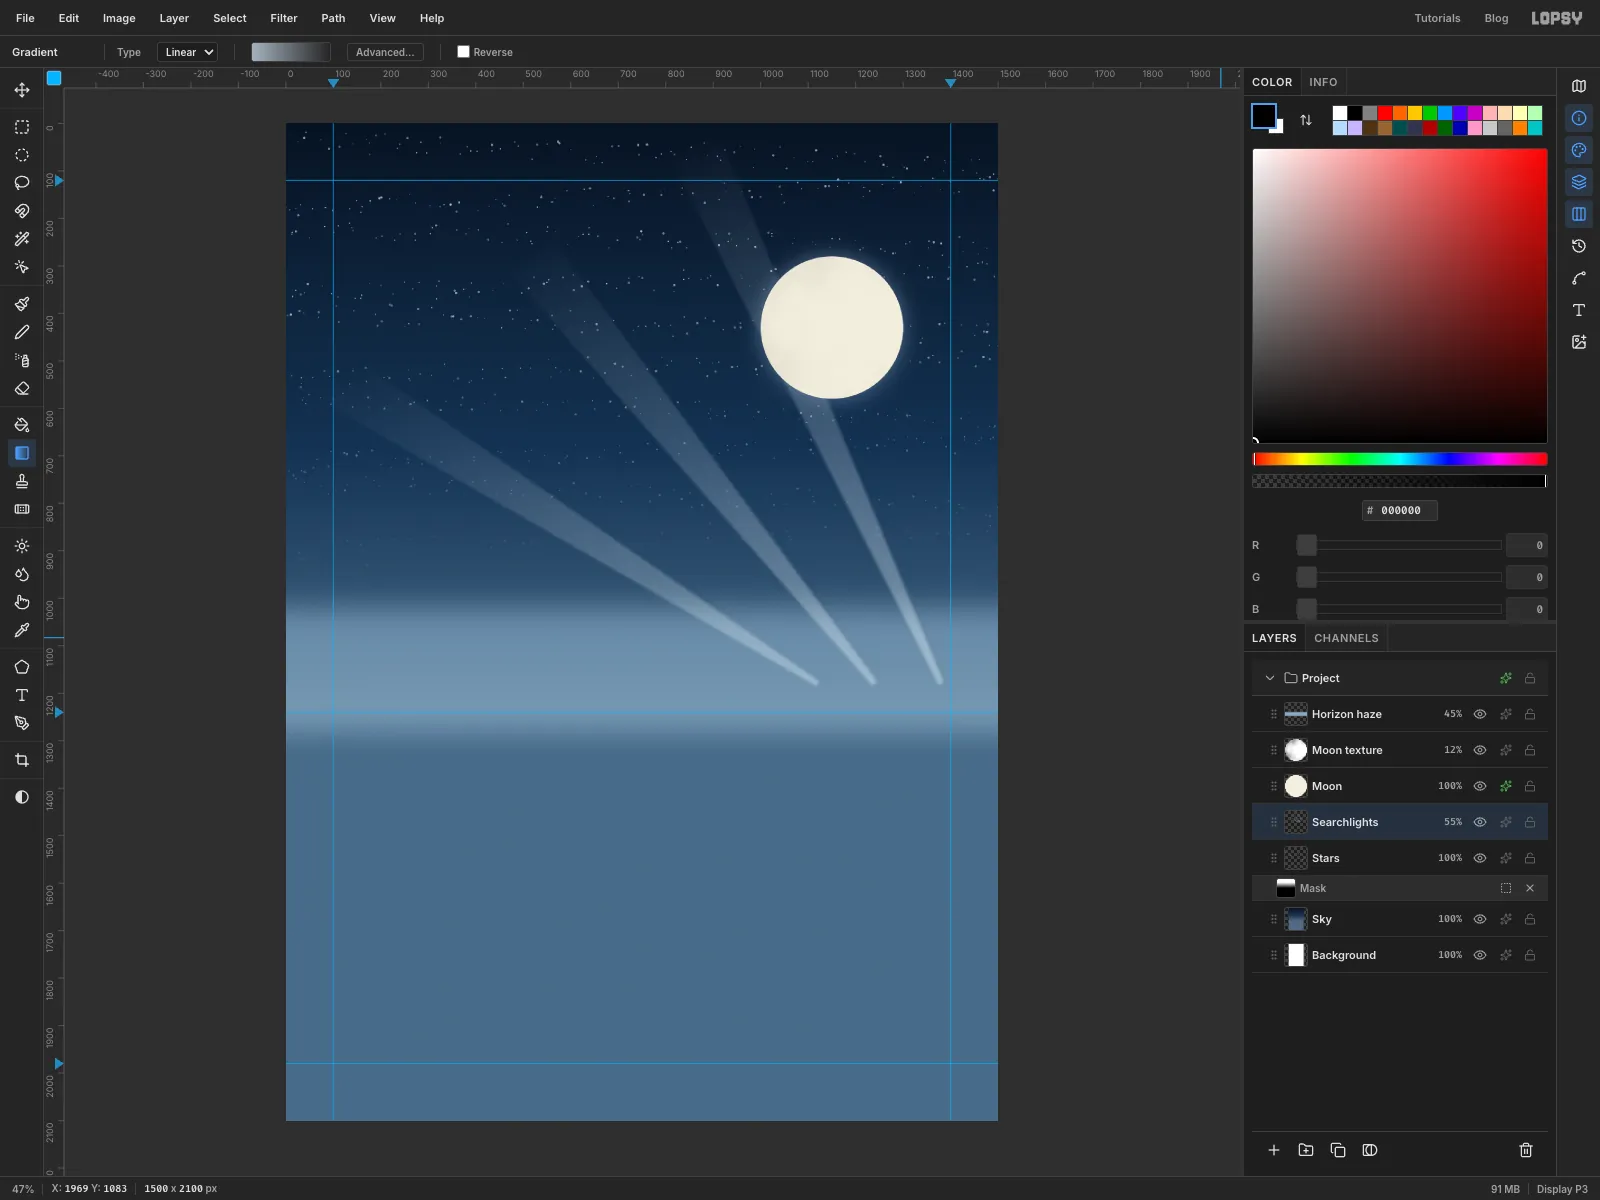
- Pick the Gradient tool and open Advanced…. Set both stops to . Drag the left stop's opacity to about
75%and the right stop's to0. - Drag the gradient from the base of the beams at
1250, 1180up towards600, 200. The beams are bright at the base and fade as they climb. - Deselect and run Filter → Gaussian Blur… with a Radius of
8to soften the edges. - Set the layer to Screen at
55%.
- Pick the Gradient tool and open Advanced…. Set both stops to . Drag the left stop's opacity to about
-
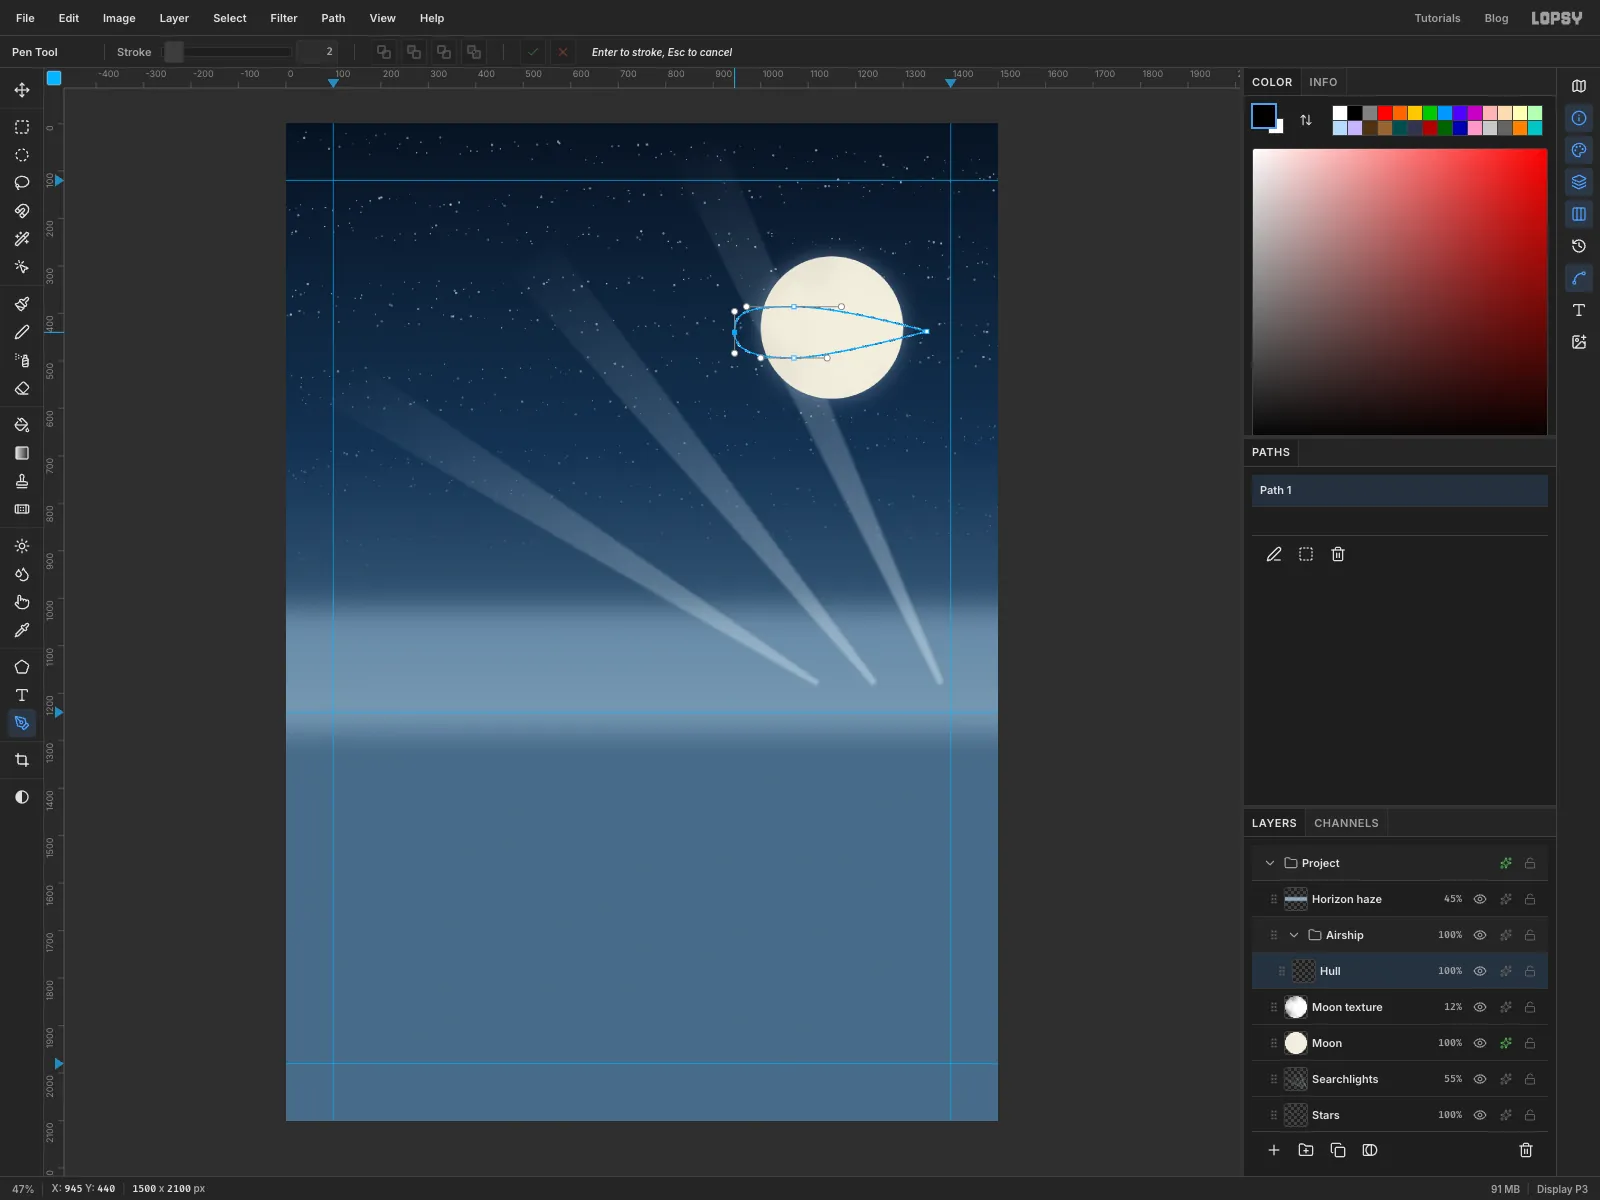
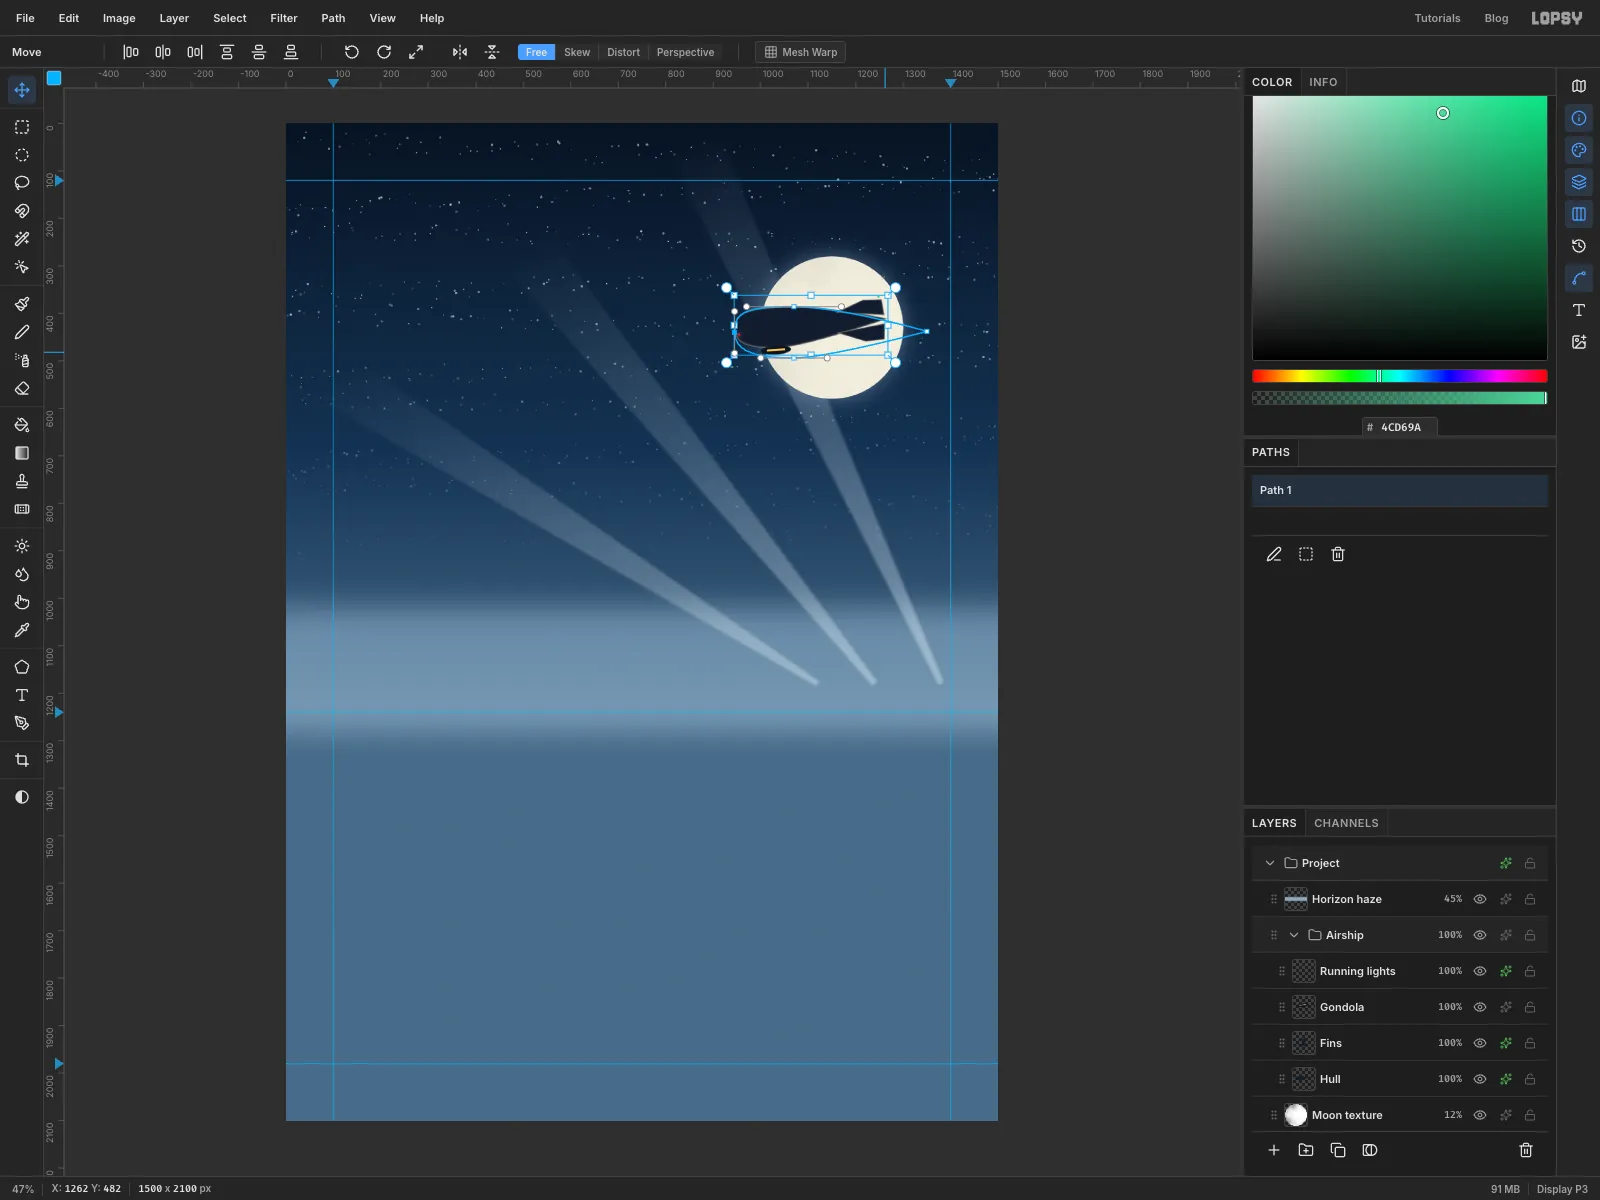
Draw the airship hull with the Pen
- Click the
Moon texturerow, then click New Group and name the groupAirship. Inside it, add a layer calledHull. - Open the Paths panel from the right-hand rail (the curved-line icon).
- Pick the Pen tool and draw a teardrop. A click places a sharp corner; a press-and-drag pulls out handles for a smooth curve.
- Press at
945, 440and drag straight up to945, 396for a round, blunt nose. - Press at
1070, 386and drag right to1170, 386for the top of the hull. - Click once at
1350, 438for the pointed tail. - Press at
1070, 494and drag left to1000, 494for the belly. - Click back on the first anchor to close the path.
- Click Path to Selection at the bottom of the Paths panel. Fill the selection with and deselect.
- Give
Hullan Inner Glow: Size6, Opacity100, colour . With the moon right behind it, the airship should be a dark silhouette with a thin rim of moonlight.
- Click the
-
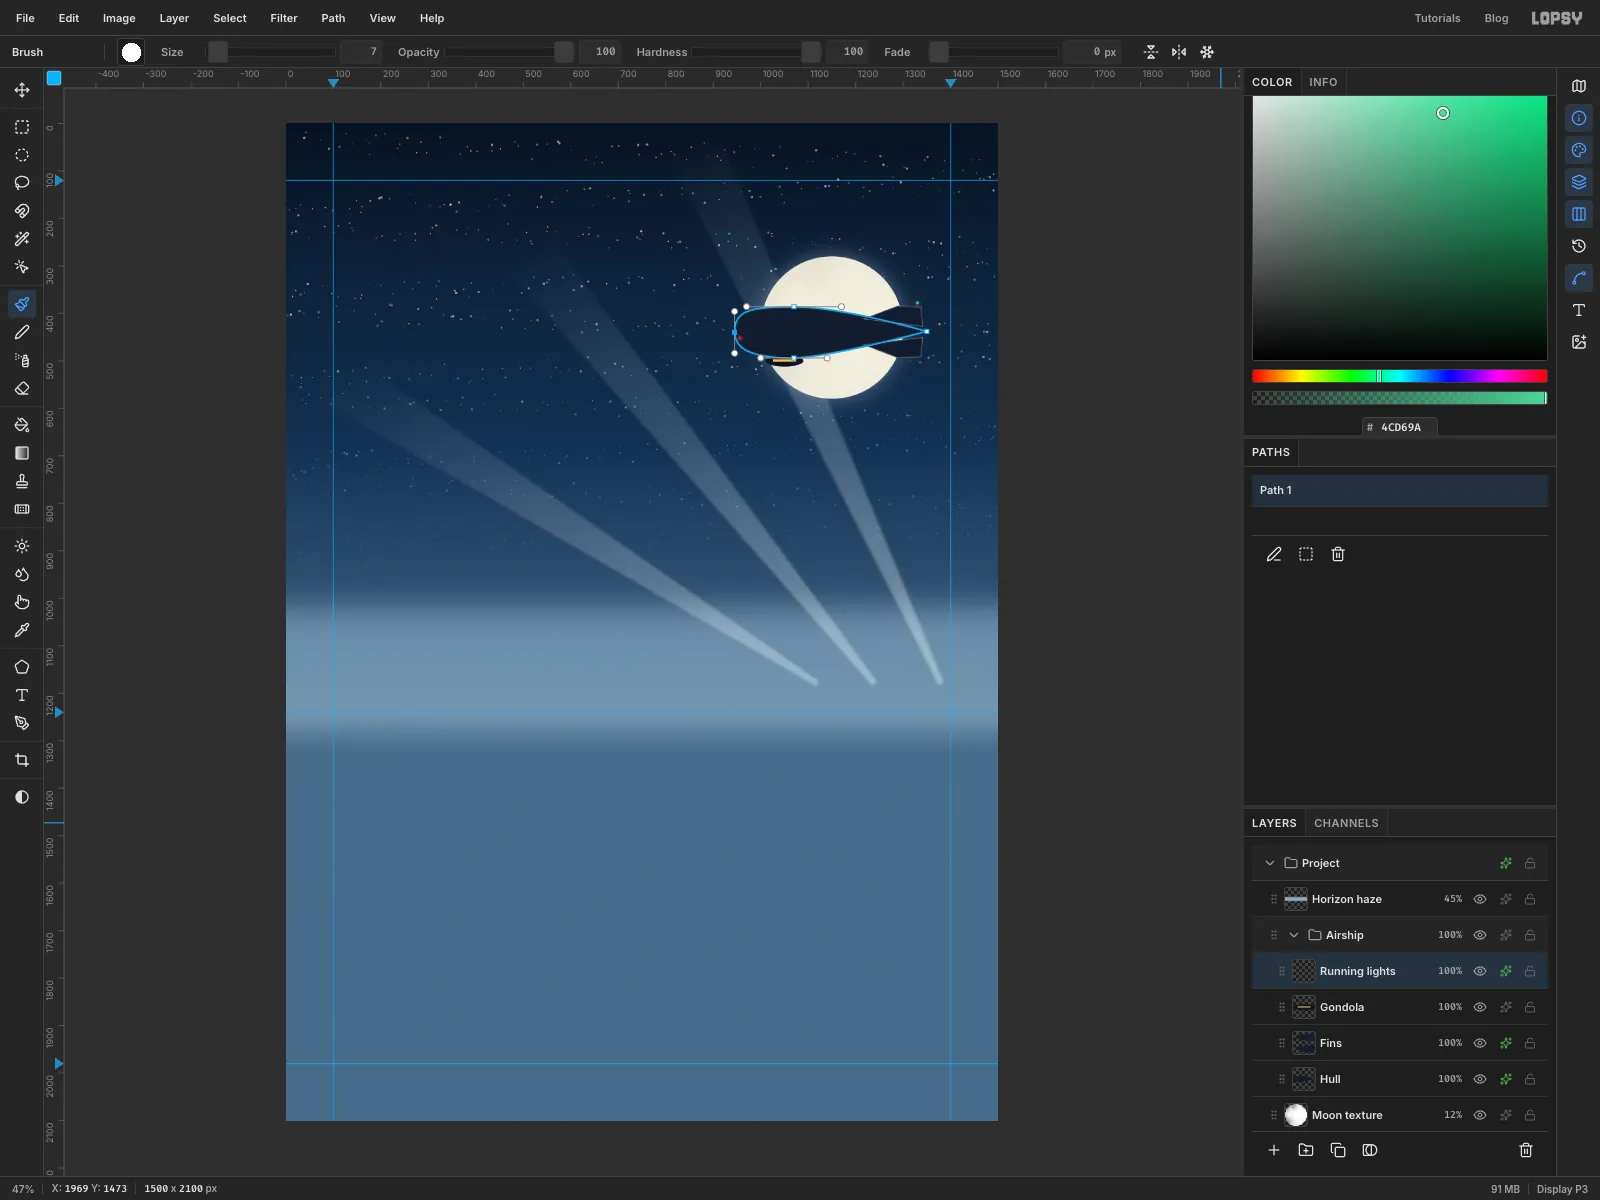
Add fins, a gondola and running lights
- Add a layer called
Fins. Lasso a small trapezoid on the top of the tail, from1215, 412up to1288, 384, across to1338, 386and down to1342, 428. Hold Shift and mirror it underneath:1215, 466,1288, 494,1338, 492,1342, 450. Fill with and give it the same cream Inner Glow at size4. - Add a layer called
Gondola. Drag an elliptical marquee from1010, 488to1090, 512under the hull and fill it with . Then draw a thin rectangle across it from1026, 497to1074, 502and fill it with lamplight . - Add a layer called
Running lights. Pick the Brush, set Size7and Hardness100. Click once at the nose with (red, port side) and once at the top fin with (green). Add a small Outer Glow (size12, opacity80, colour ).
- Add a layer called
-
Tilt and shrink the airship as one group
Because the airship parts share a group, you can transform them together.
- Press Cmd+D so nothing is selected, then click the
Airshipgroup row. - Pick the Move tool. A box with handles appears around all four layers.
- Hover just outside a corner until the cursor turns into a curved arrow, then drag to rotate the airship about 4° counter-clockwise, nose down. Press Cmd+D to commit. Cmd+D both deselects and commits a pending transform.
- Click the group row again. Hold Cmd and drag the bottom-right corner handle inwards until the box is about four-fifths of its old size. Cmd keeps the proportions. Commit with Cmd+D.
- With the group still selected, press Shift+Right four times (each press moves 10 px) to slide the airship 40 px to the right, so the moon frames it and only the tail pokes past its edge.
- Press Cmd+D so nothing is selected, then click the
-
Raise a deco skyline
- Collapse the
Airshipgroup (the arrow on its row), then click theHorizon hazerow so the next group lands above it. Click New Group, name itCity, and add a layer calledTowers. - Set the foreground to .
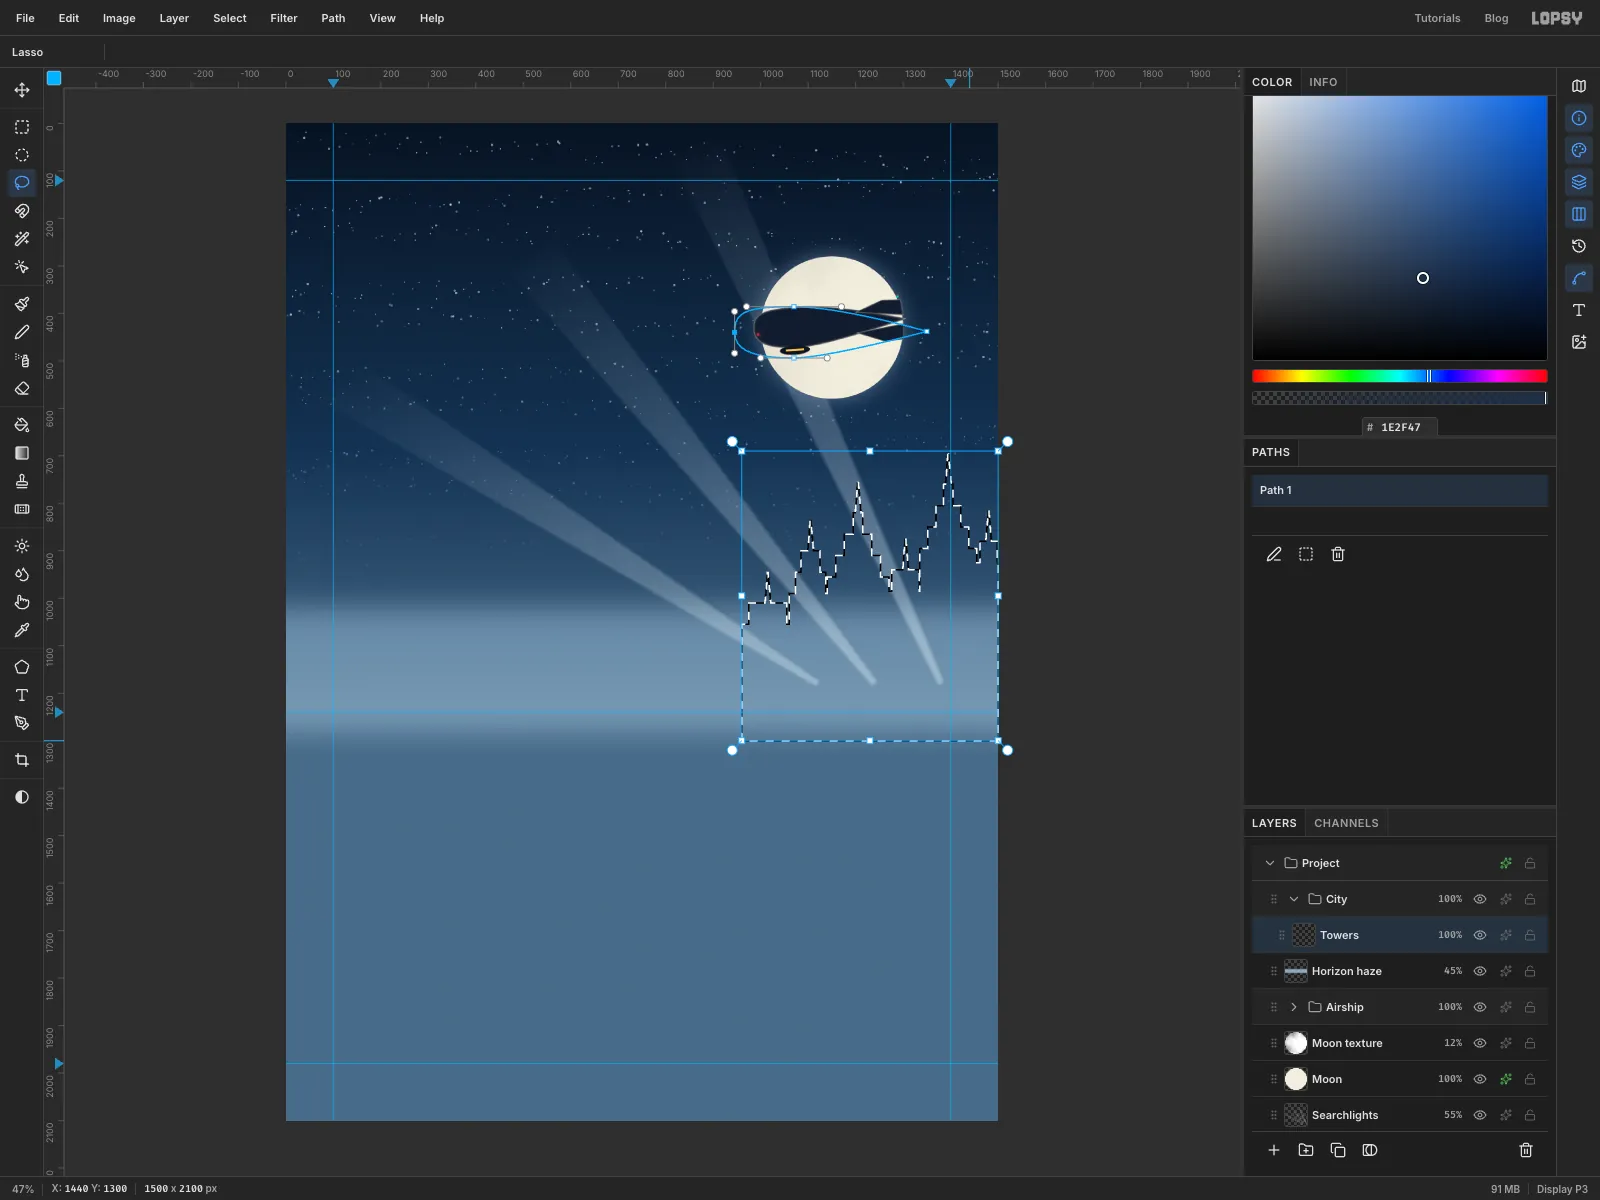
- With the Lasso, draw six skyscrapers side by side between
x 960and the right edge, each 80–130 px wide. Hold Shift for each tower after the first.
- Give each tower one to three setbacks: every 45 px or so up, step both sides in by 11–18 px, like a wedding cake.
- Finish each with a needle spire about 12 px wide at the base and 70 px tall.
- Vary the heights. The tallest, at
x 1335to1455, has its top ledge at abouty 760. The shortest stops neary 1010. - Run every base down past the horizon to
y 1300.
- Fill and deselect. Add an Inner Glow (size
4, opacity50, colour ) for a frosting of snow on the ledges.
Only their tops will show above the train's roof, so they don't need much detail.
- Collapse the
-
Switch on the windows
- Add a layer called
Windows. - Pick the Pencil, set the size to
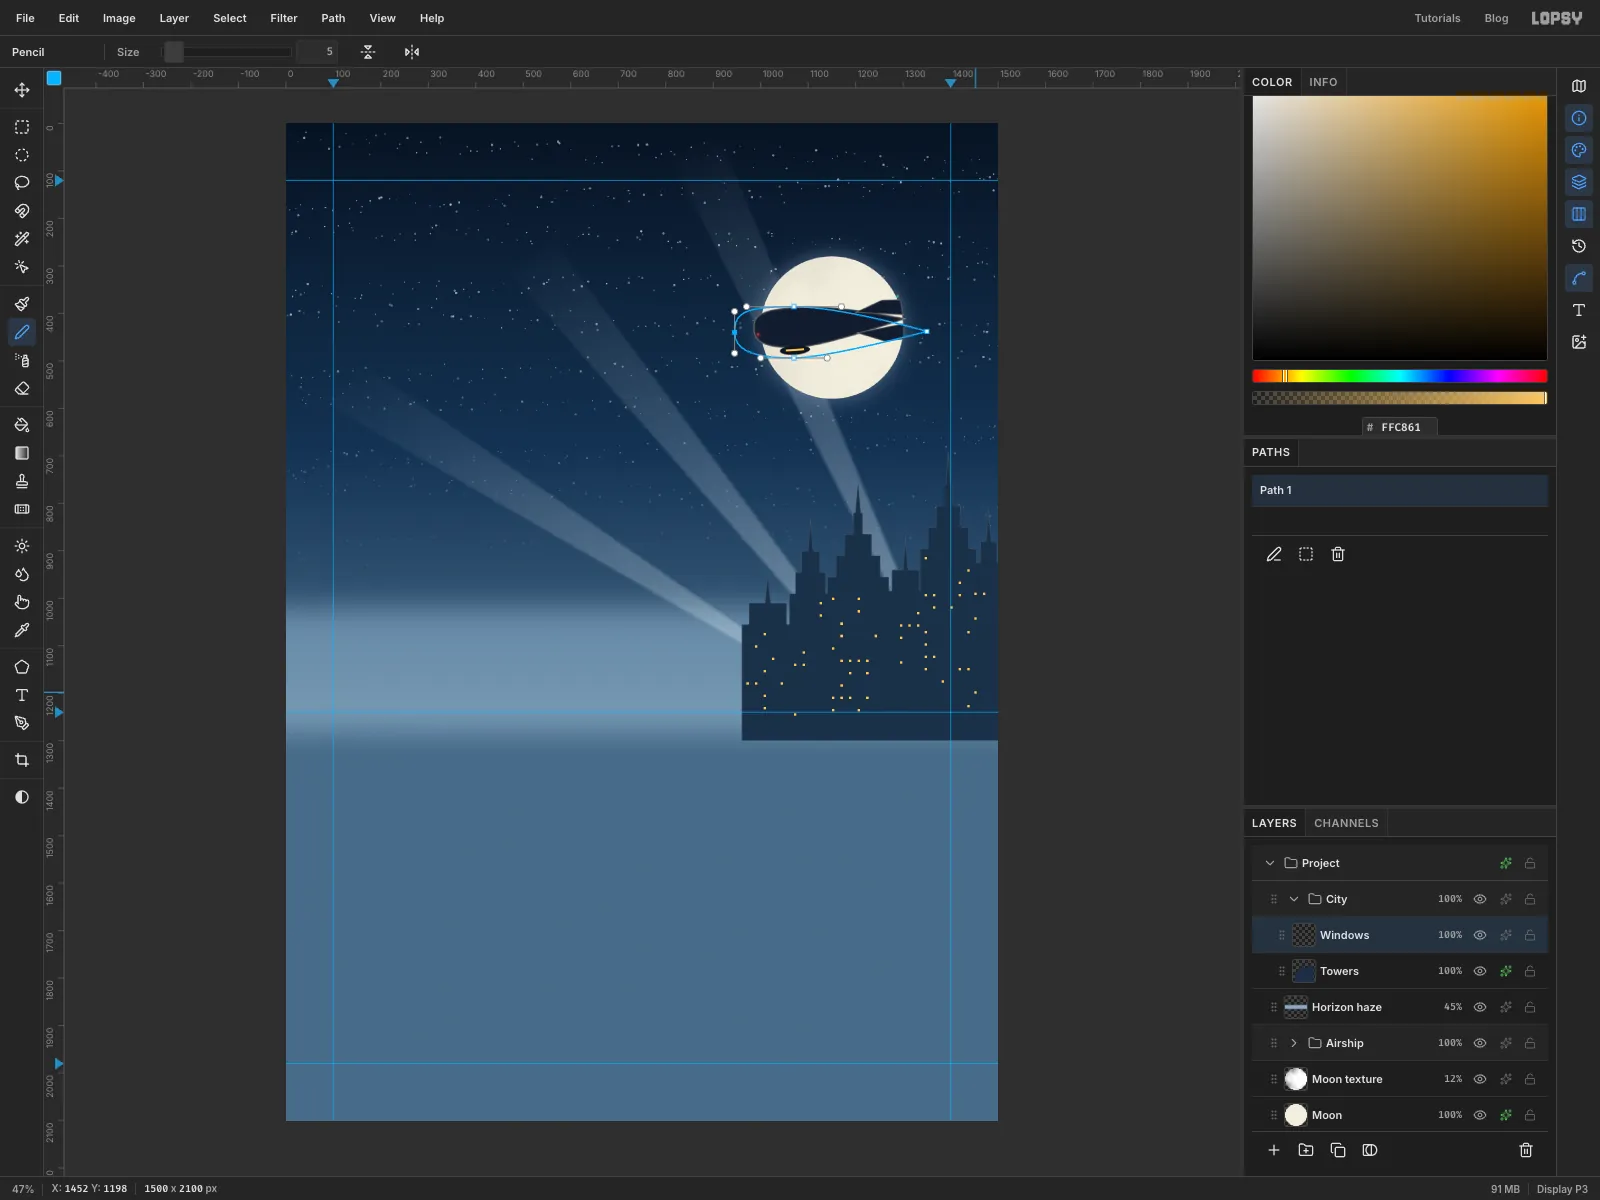
5and the colour to . - Click windows in loose rows on each tower, leaving most of the spots dark. A few lit windows per tower look more real than a full grid.
- Add a layer called
-
String the telegraph wires
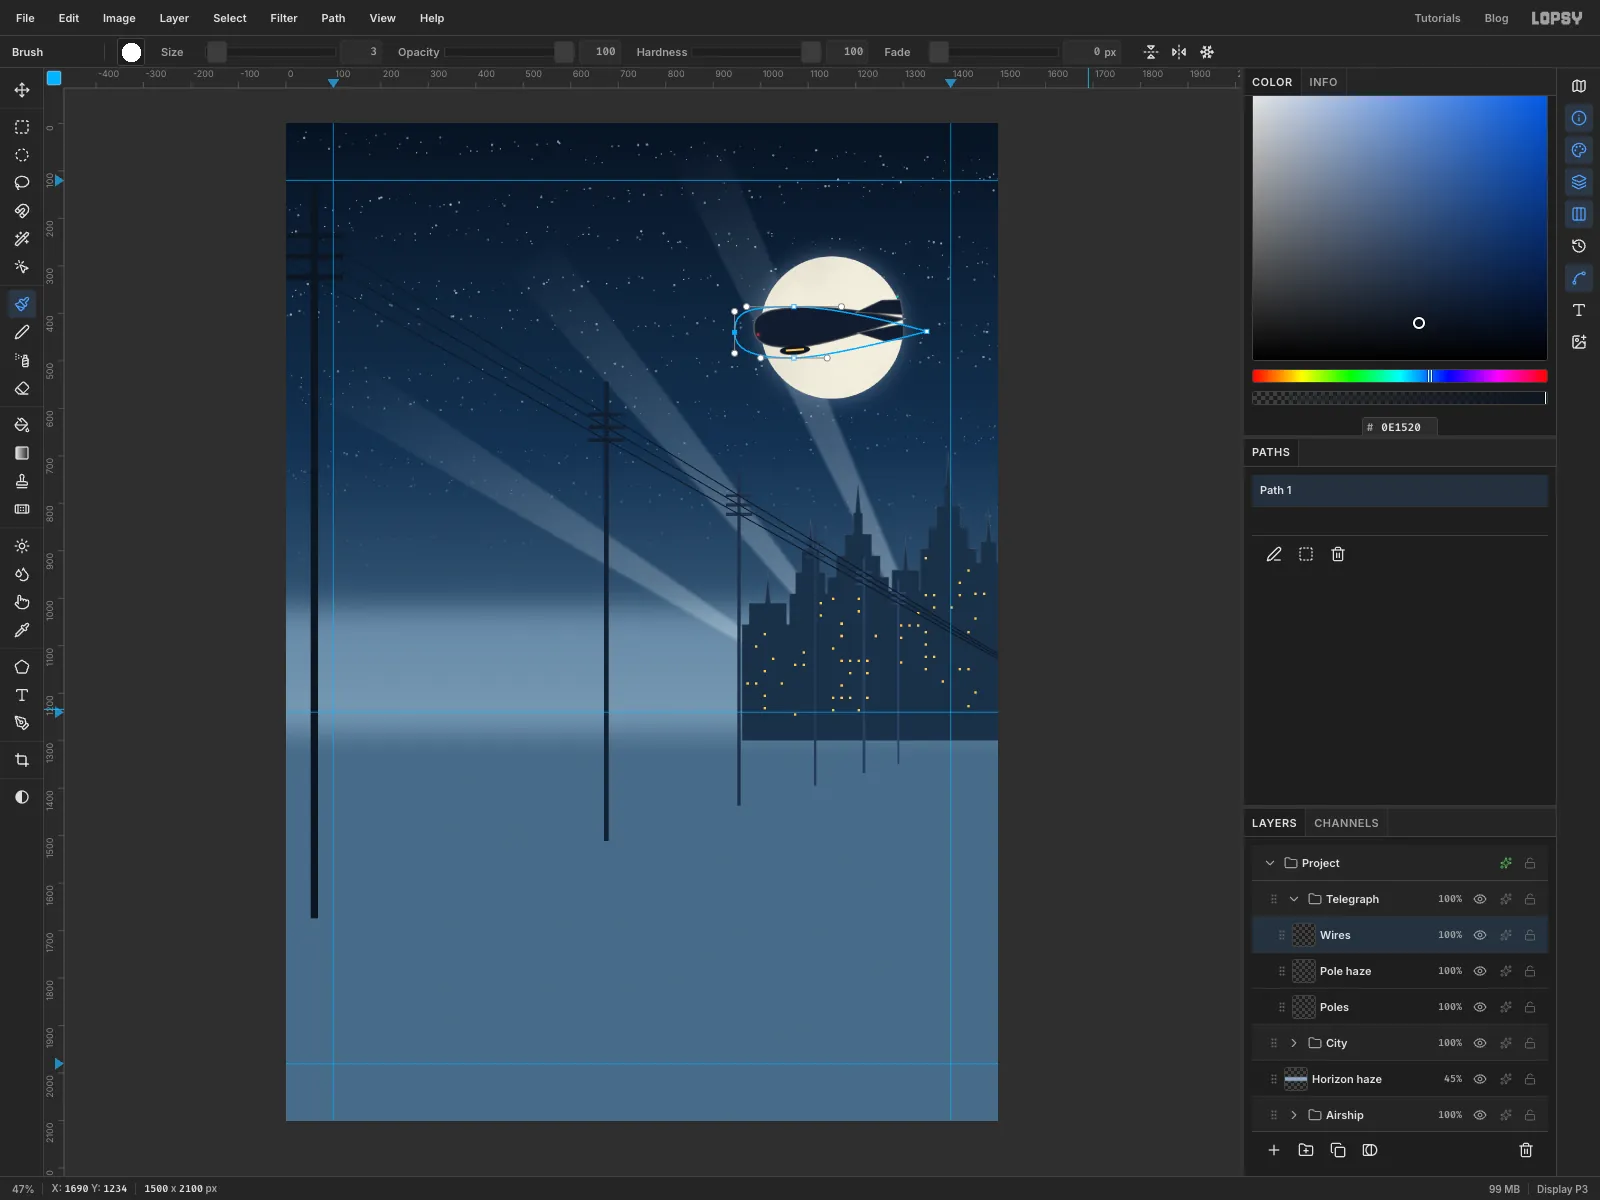
Converging wires are the most Cassandre-like thing in the picture.
The three wires will run from the left edge at
y 200,245and290straight to the vanishing point. The poles and their crossarms line up with those lines, so picture them first.- Collapse
City, click its row, then New GroupTelegraphand a layer calledPoles. Set the foreground to . - Lasso six tall, thin poles, holding Shift after the first. They get shorter, thinner and closer together as they recede:
- The nearest stands at
x 60, 16 px wide, with its top at abouty 127. - The others stand at about
x 675,954,1113,1218and1290, shrinking each time to only 4 px wide. - Each pole's top sits a little above the top wire: about 110 px for the nearest, less for each one further away.
- Run each pole down past the horizon; the snowfield will cover the bottom.
- With Shift still held, give each pole three short crossarms, one where each wire line crosses it.
- Fill and deselect.
- Add a layer called
Pole haze, Cmd-click thePolesthumbnail and drag a linear gradient from500, 700to1350, 700, fading from transparent to at 85% opacity. The far poles now fade into the night. Deselect. - Add a layer called
Wires. Pick the Brush at size3. Click just off the left edge aty 200, then hold Shift and click near the vanishing point, out in the grey area right of the canvas. Shift-click draws a straight line between the two clicks. Do the same fromy 245andy 290.
- Collapse
-
Lay down the snowfield
- Collapse
Telegraph, click its row, then New GroupGroundand a layer calledSnowfield. - Drag a rectangular marquee from just off the left edge at
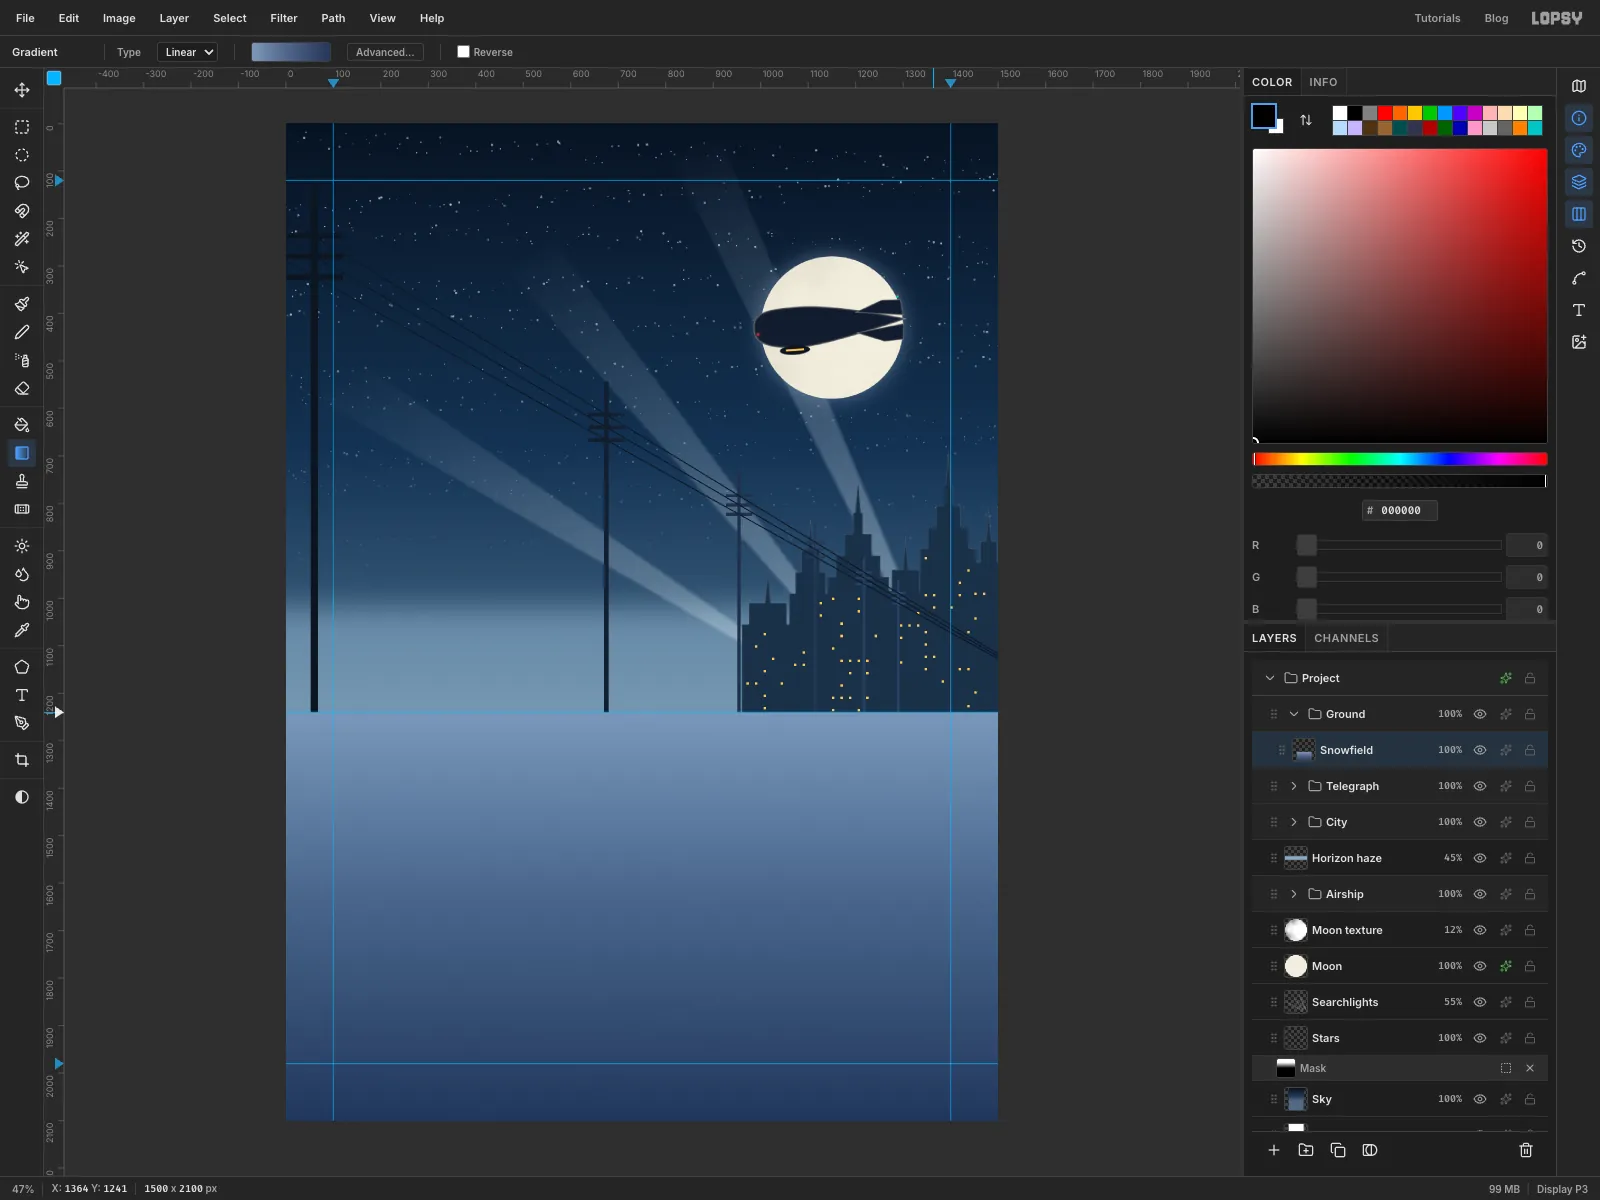
y 1236down past the bottom-right corner. - Make a three-stop gradient, → → , and drag it from the horizon straight down to the bottom edge.
- Deselect, then run Filter → Add Noise… with Amount
6and Mono for a fine grain in the snow.
It's darker at the bottom because the moon is behind the scene. That also leaves room for the headlight to light the snow later.
- Collapse
-
Lay the track
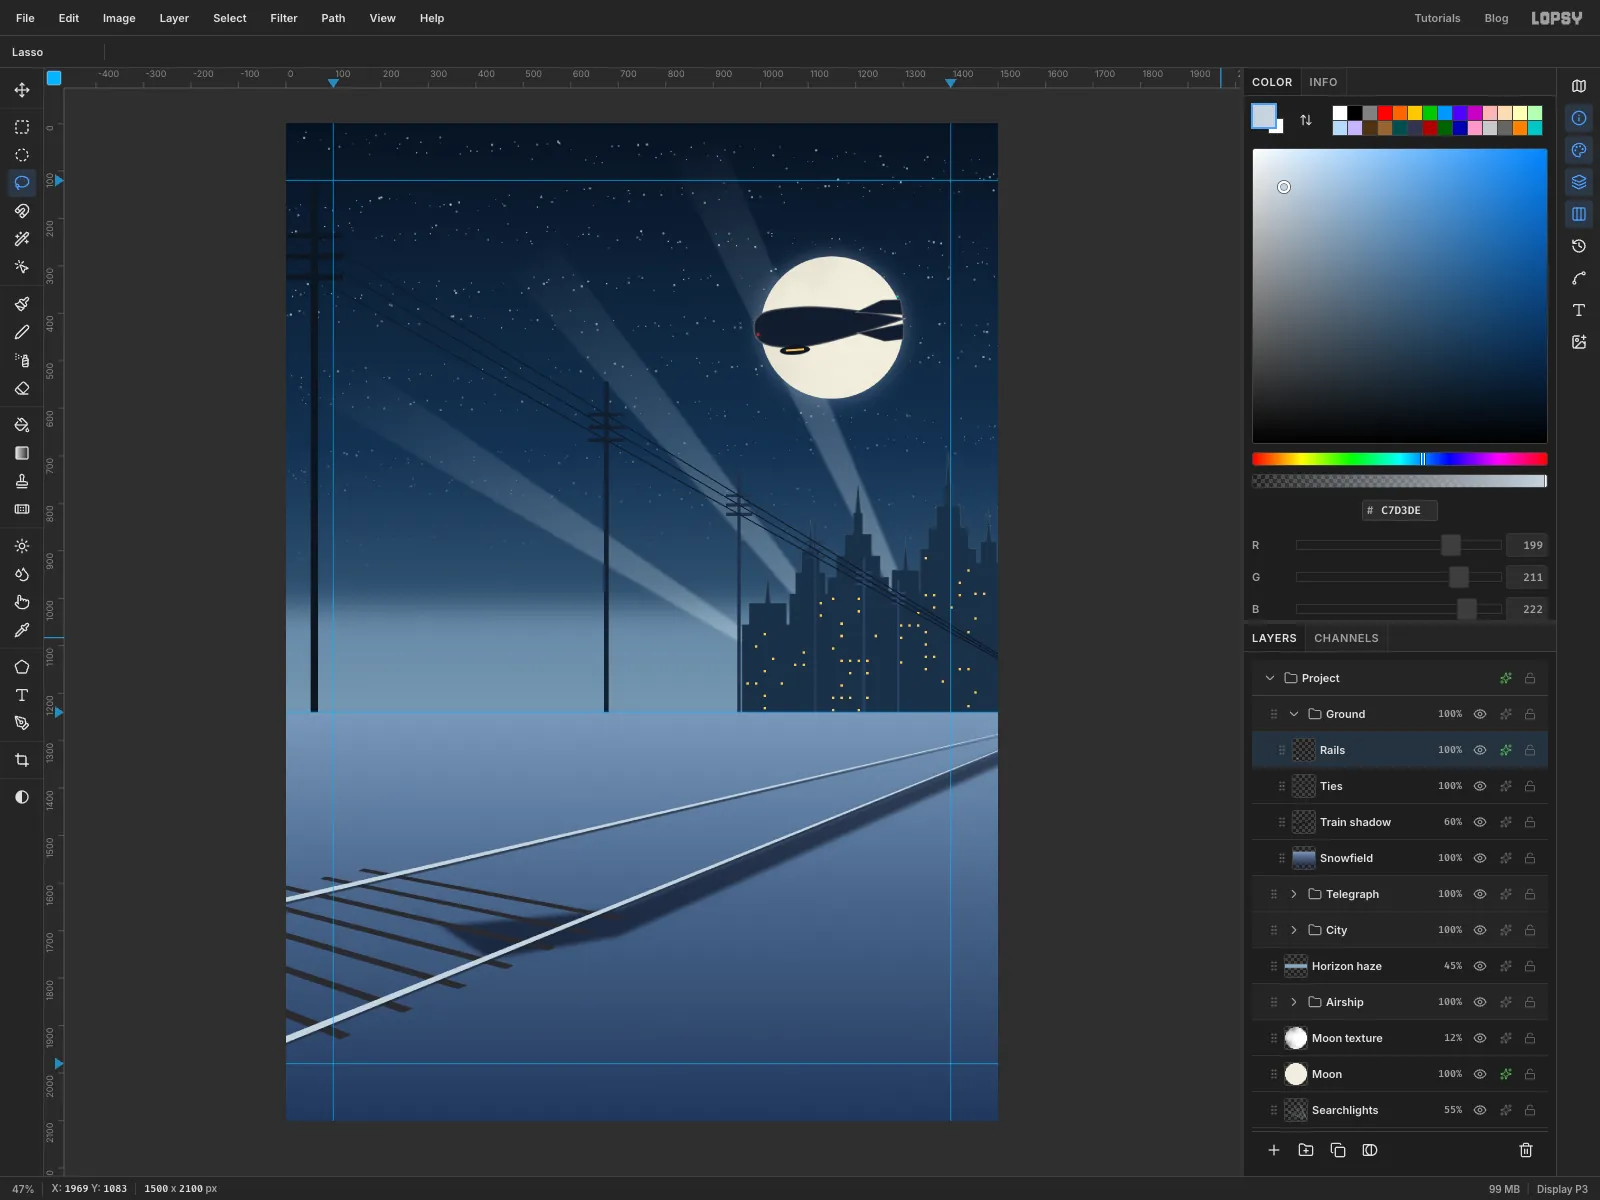
The two rails both run to the vanishing point. The near rail leaves the left edge at about
y 1922and the far rail at abouty 1630.- Add a layer called
Train shadow. Lasso the shadow the train will cast, a long thin wedge that widens under the nose:700, 1655, out to the right edge at1660, 1258and down to1660, 1282, back to700, 1712, then under the nose through430, 1760,250, 1640and330, 1690. Fill with , deselect, blur it with Gaussian Blur14, and set it to Multiply at60%. - Add a layer called
Ties. Ties are square to the rails, so in perspective they slant up to the left, towards a second vanishing point far off the left side of the picture. Lasso nine short bars, holding Shift after the first. Each one runs from the near rail up and to the left to the far rail, overhanging both a little:
- One of the nearest runs from
305, 1800up to about-143, 1668, off the left edge, and is about 22 px thick. - A middle one runs from
495, 1723to56, 1622. - The furthest you'll see runs from
645, 1663to222, 1583, only about 16 px thick. - Space the rest so they close up and thin out towards the right, and add a couple more below the nearest one, about 70 px apart along the rail, running off the lower left.
- Fill with .
- Add a layer called
Railsabove the ties. Lasso two long, thin wedges that both end in a point at the vanishing point. Hold Shift for the second one.
- The near rail starts at the left edge between
y 1922and1936. - The far rail starts between
y 1630and1640. - Fill both with .
- Give
Railsa Drop Shadow: Offset X0, Offset Y5, Blur3, Opacity70, colour .
The near rail runs under the near side of the train, so the train will sit on it rather than beside it.
- Add a layer called
-
Plant a tree line and soften the horizon
- Add a layer called
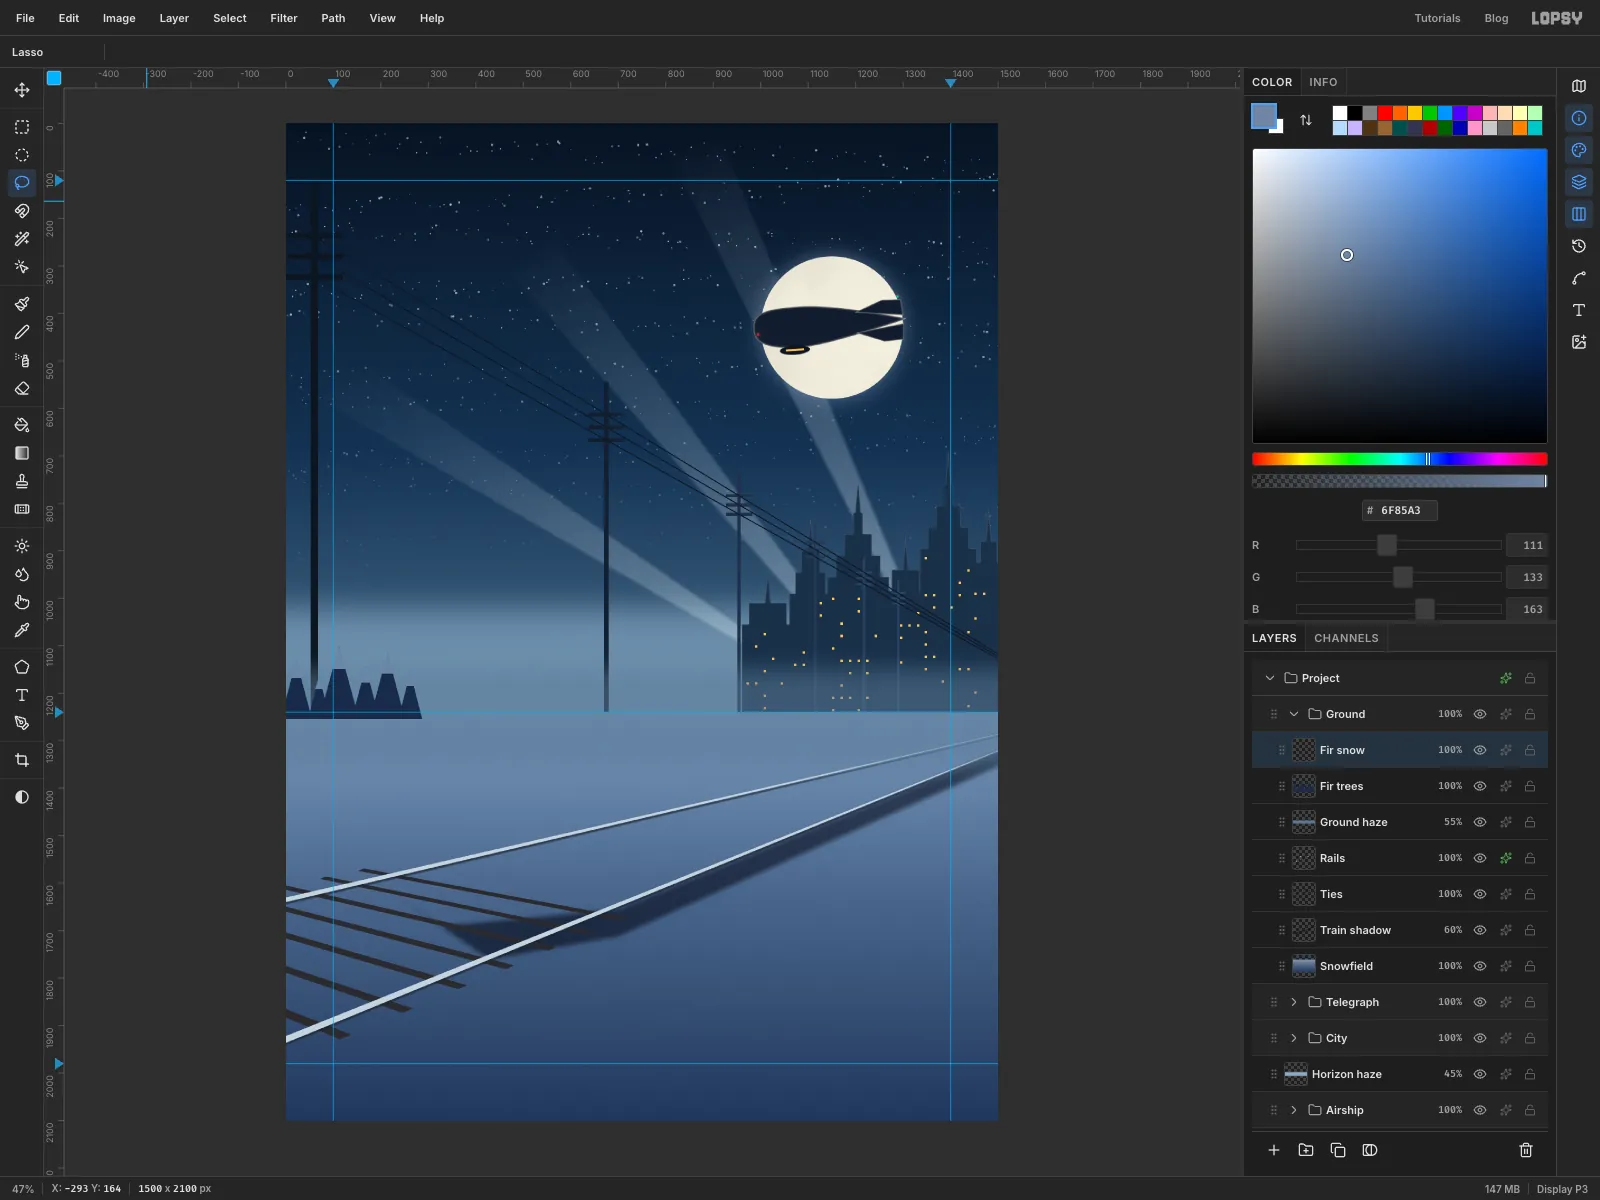
Ground haze. Drag a marquee edge to edge fromy 1150toy 1350, Feather it by50, fill with and set the layer to55%. This blurs the line where the snow meets the sky. - Add a layer called
Fir trees. On the far left, lasso six tall, narrow triangles standing on the horizon betweenx 22andx 262, between 76 and 140 px tall. Fill them with . - Add a layer called
Fir snow. For each tree, lasso a small triangle over its top third: start at the tree's tip and follow its two sides a third of the way down. Fill with .
- Add a layer called
-
Draw the bullet nose with the Pen
- Collapse
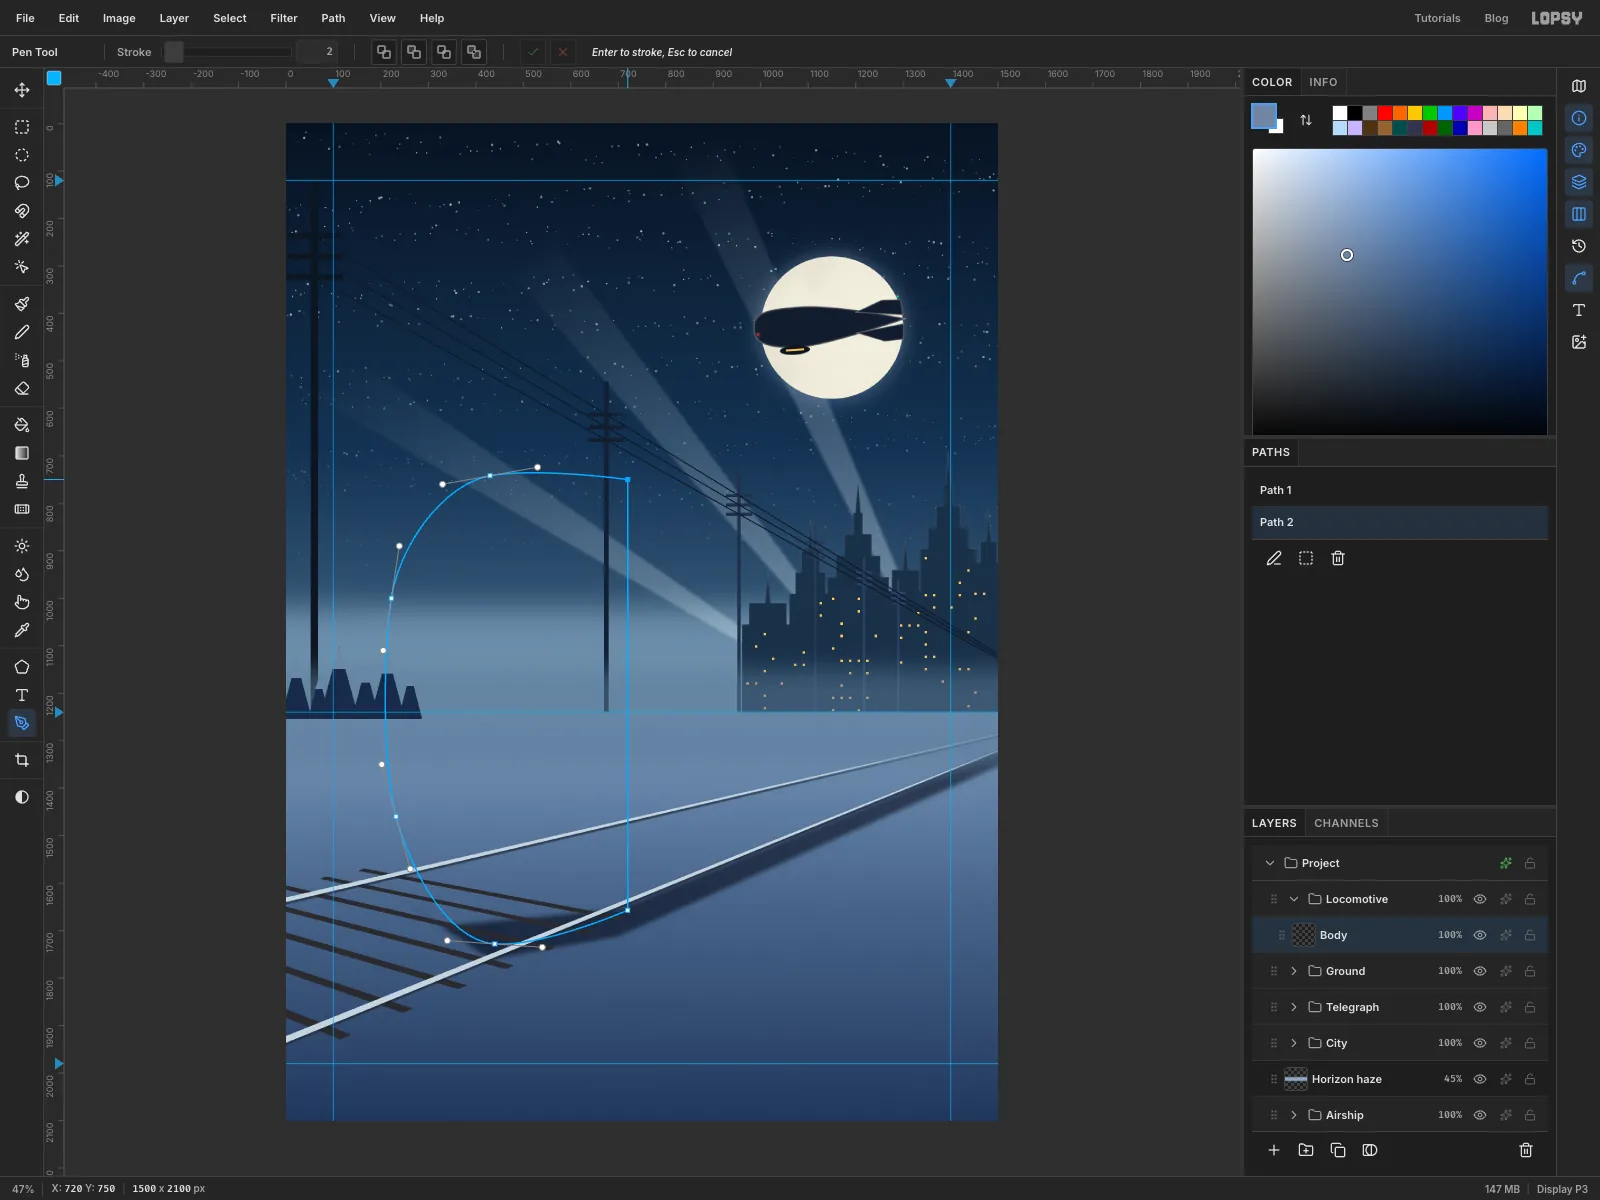
Ground, click its row, then New GroupLocomotiveand a layer calledBody. - Pick the Pen and trace the nose. Remember: click for a corner, press and drag for a curve.
- Click at
720, 750, where the nose meets the roof. - Press at
430, 742and drag left to330, 760. - Press at
222, 1000and drag down to205, 1110. This is the front of the nose. - Press at
232, 1460and drag down to262, 1570. - Press at
440, 1728and drag right to540, 1735. - Click at
720, 1657on the bottom edge. - Click the first anchor to close the path.
- Collapse
-
Add the side of the train
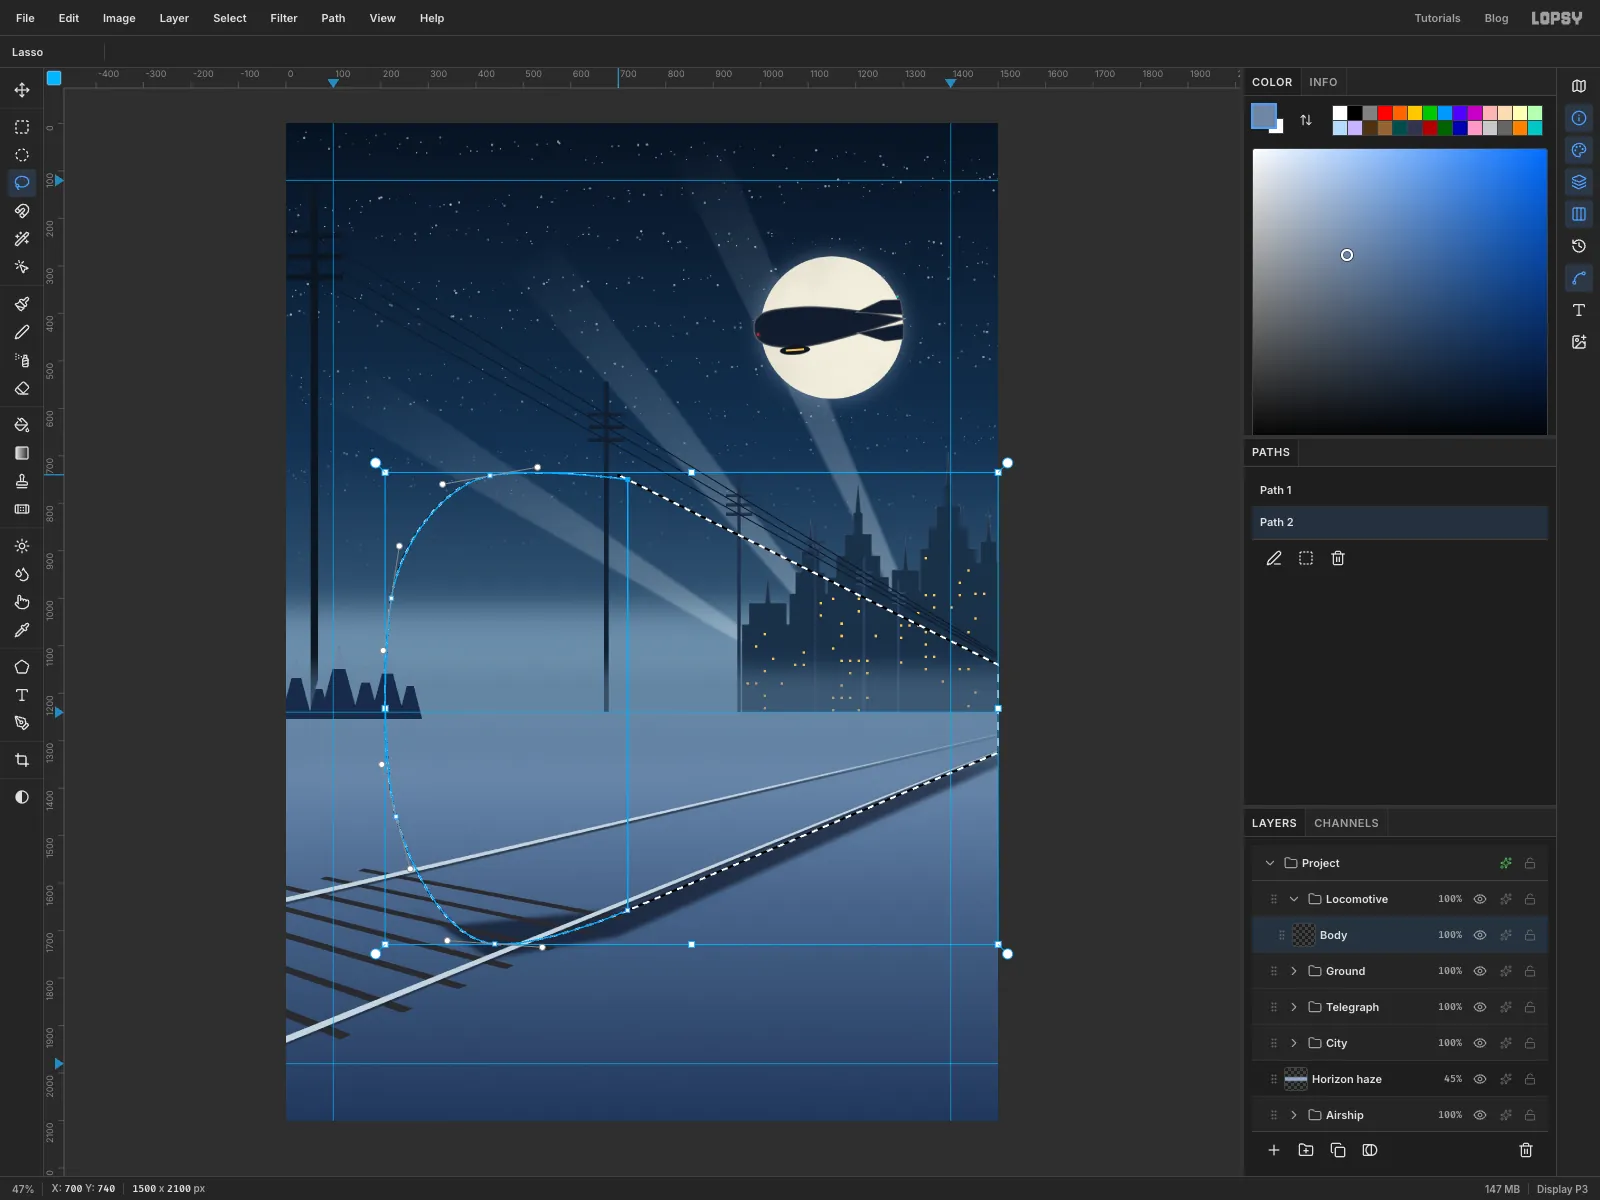
- Click Path to Selection in the Paths panel.
- Hold Shift and lasso the long side of the train. Its top and bottom edges both aim at the vanishing point.
- Start where the nose meets the roof, at
700, 740. - Go to the right edge at about
y 1220(draw a little past the edge, tox 1660). - Drop down to about
y 1257. - Come back to the bottom of the nose at
700, 1666.
Shift adds the wedge to the nose, so you have the whole locomotive selected.
-
Fill the body with gunmetal
Make a three-stop gradient, → → . Drag it horizontally from the nose (
220, 1200) to the right edge. The far end is lighter because it's further away in the haze. Then deselect.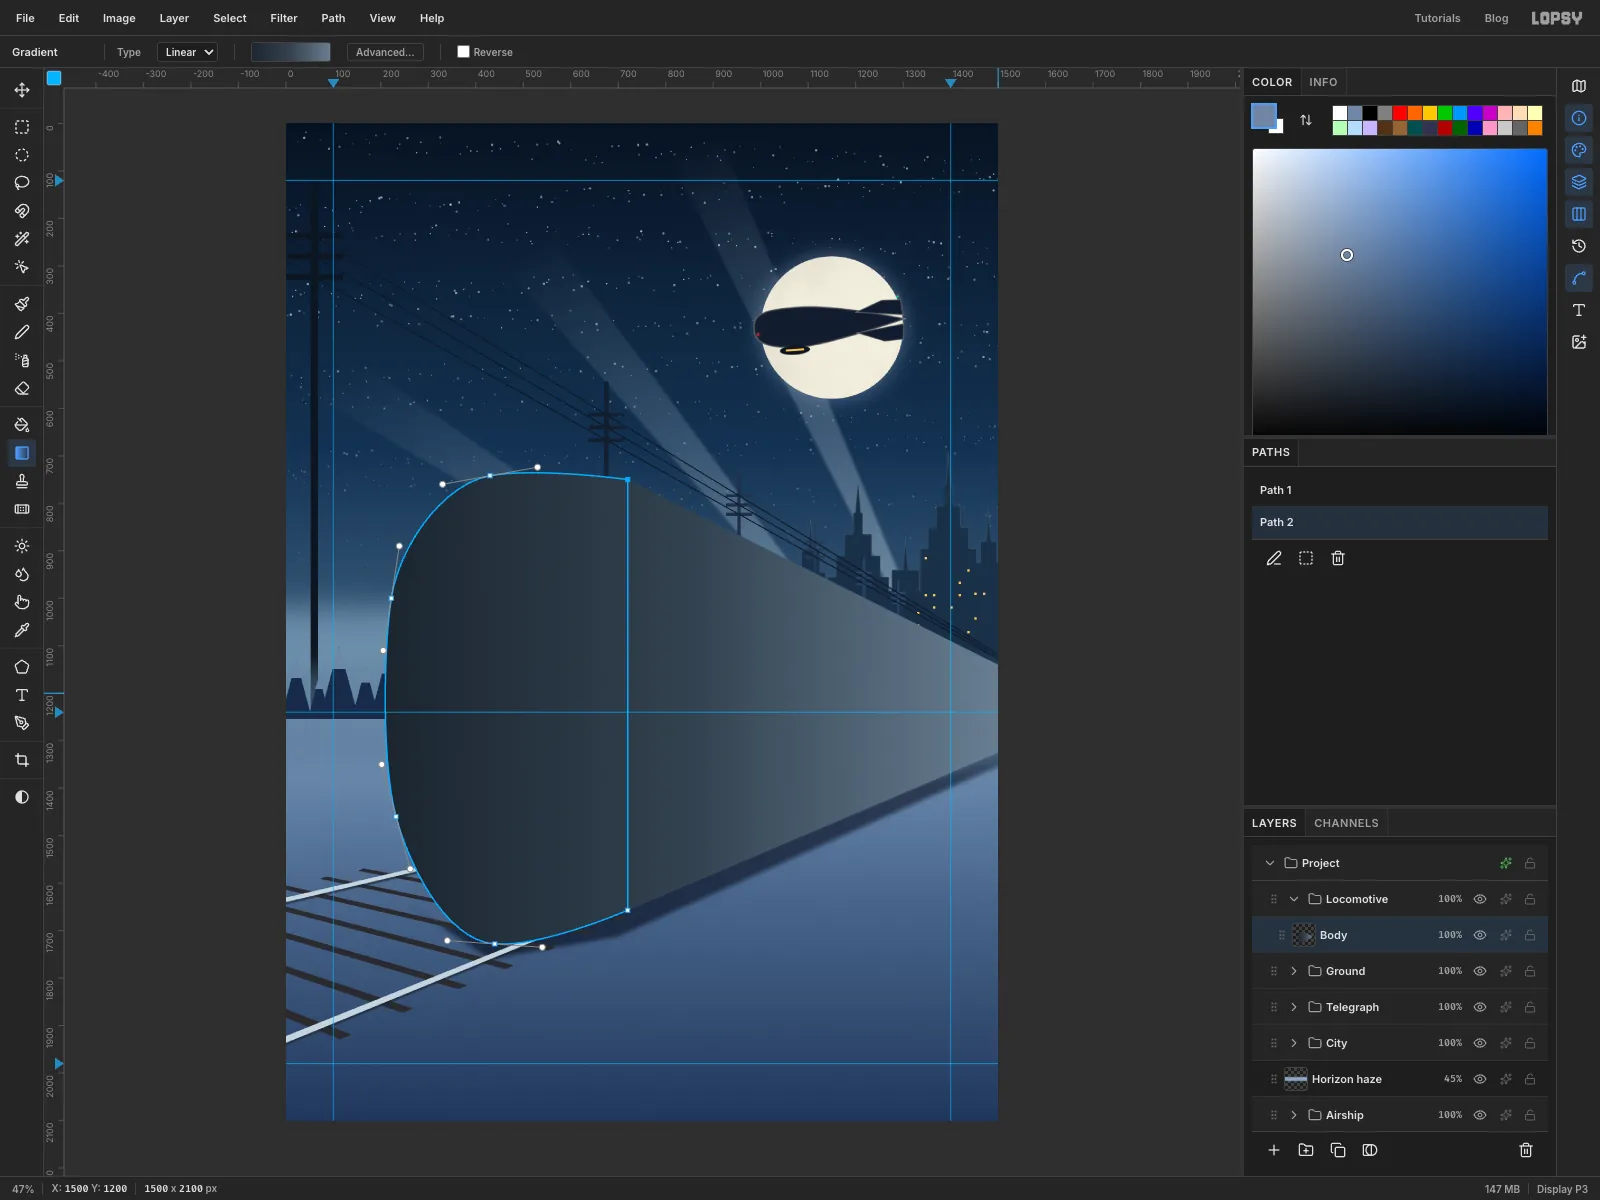
-
Model the nose with light and shade
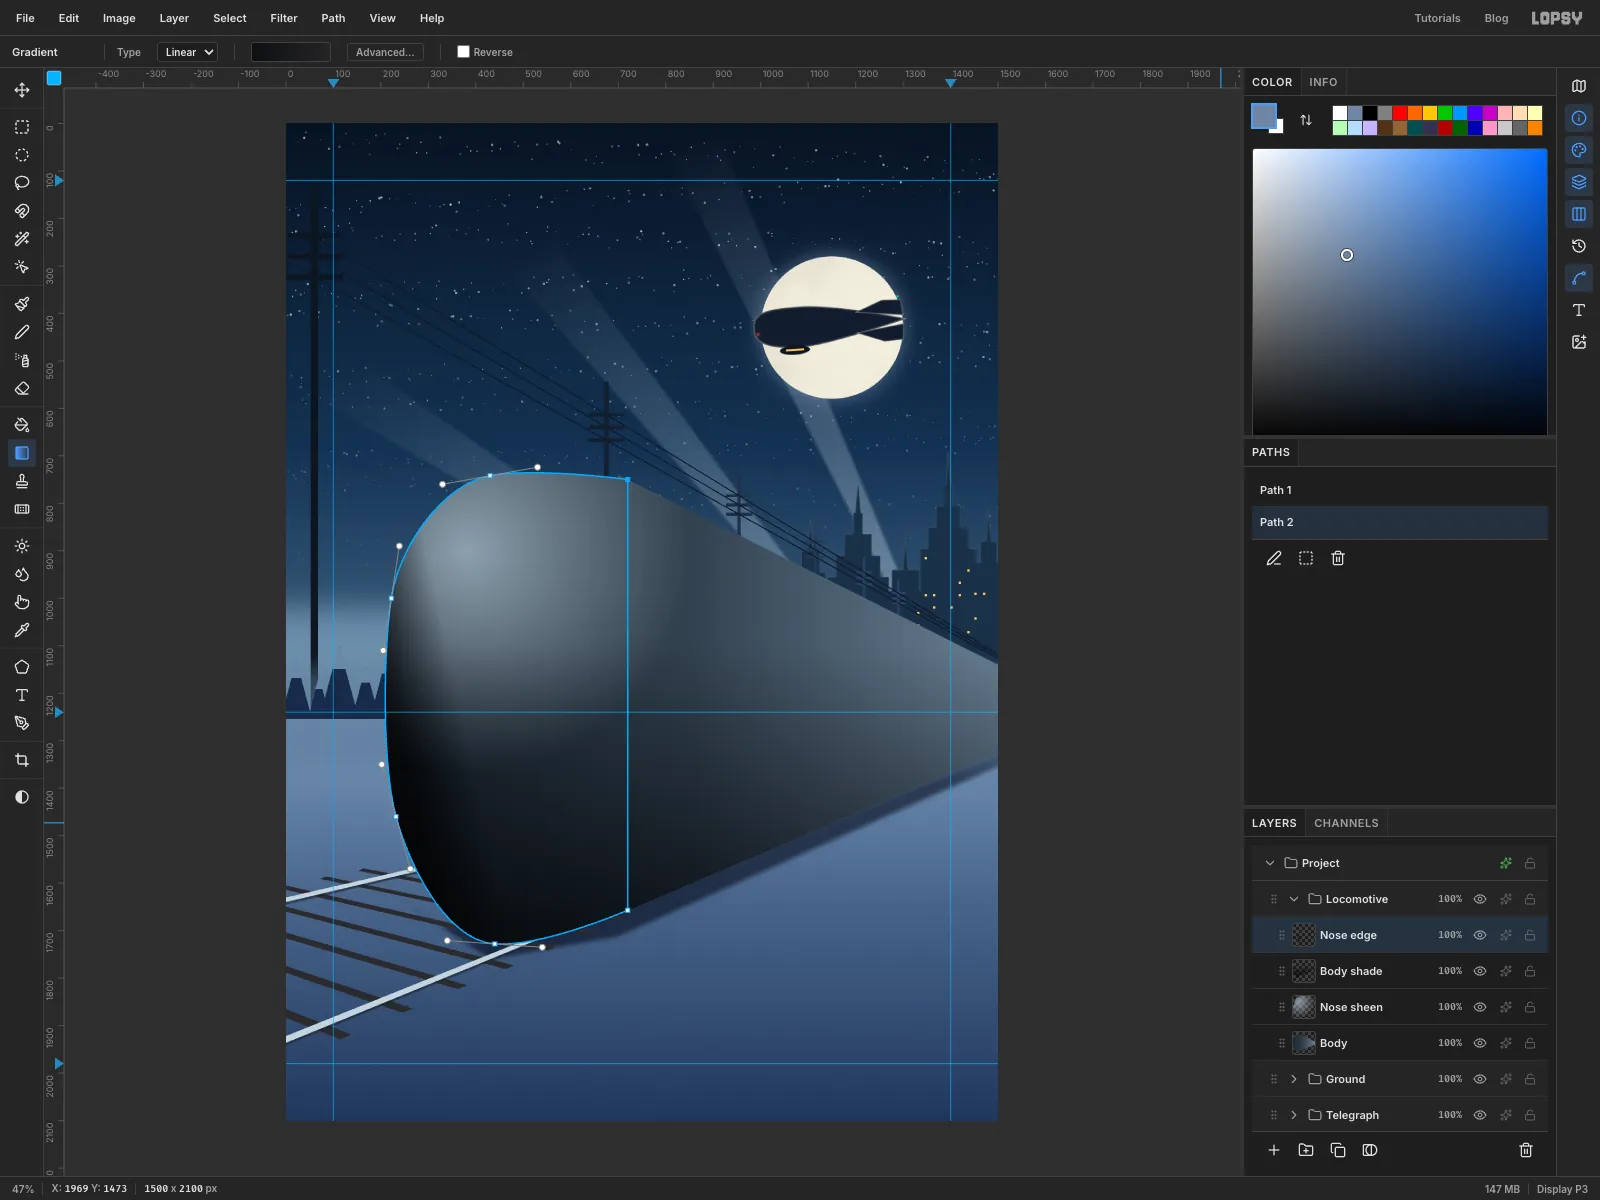
Each of these goes on its own layer. Cmd-click the
Bodythumbnail first, so the gradient stays inside the train.- Add
Nose sheen. Load the body selection and drag a radial gradient from380, 900out to760, 1180, fading from at 70% to transparent. A radial gradient is centred where the drag starts. Deselect and set the layer to Screen. - Add
Body shade. Load the body and drag a linear gradient from600, 1100down to600, 1730, fading from transparent to at 80%. Set it to Multiply. - Add
Nose edge. Load the body and drag from205, 1150to345, 1120, fading from at 75% to transparent. Set it to Multiply. The leading edge now turns away from the light, so the nose reads as round.
- Add
-
Paint the red skirt
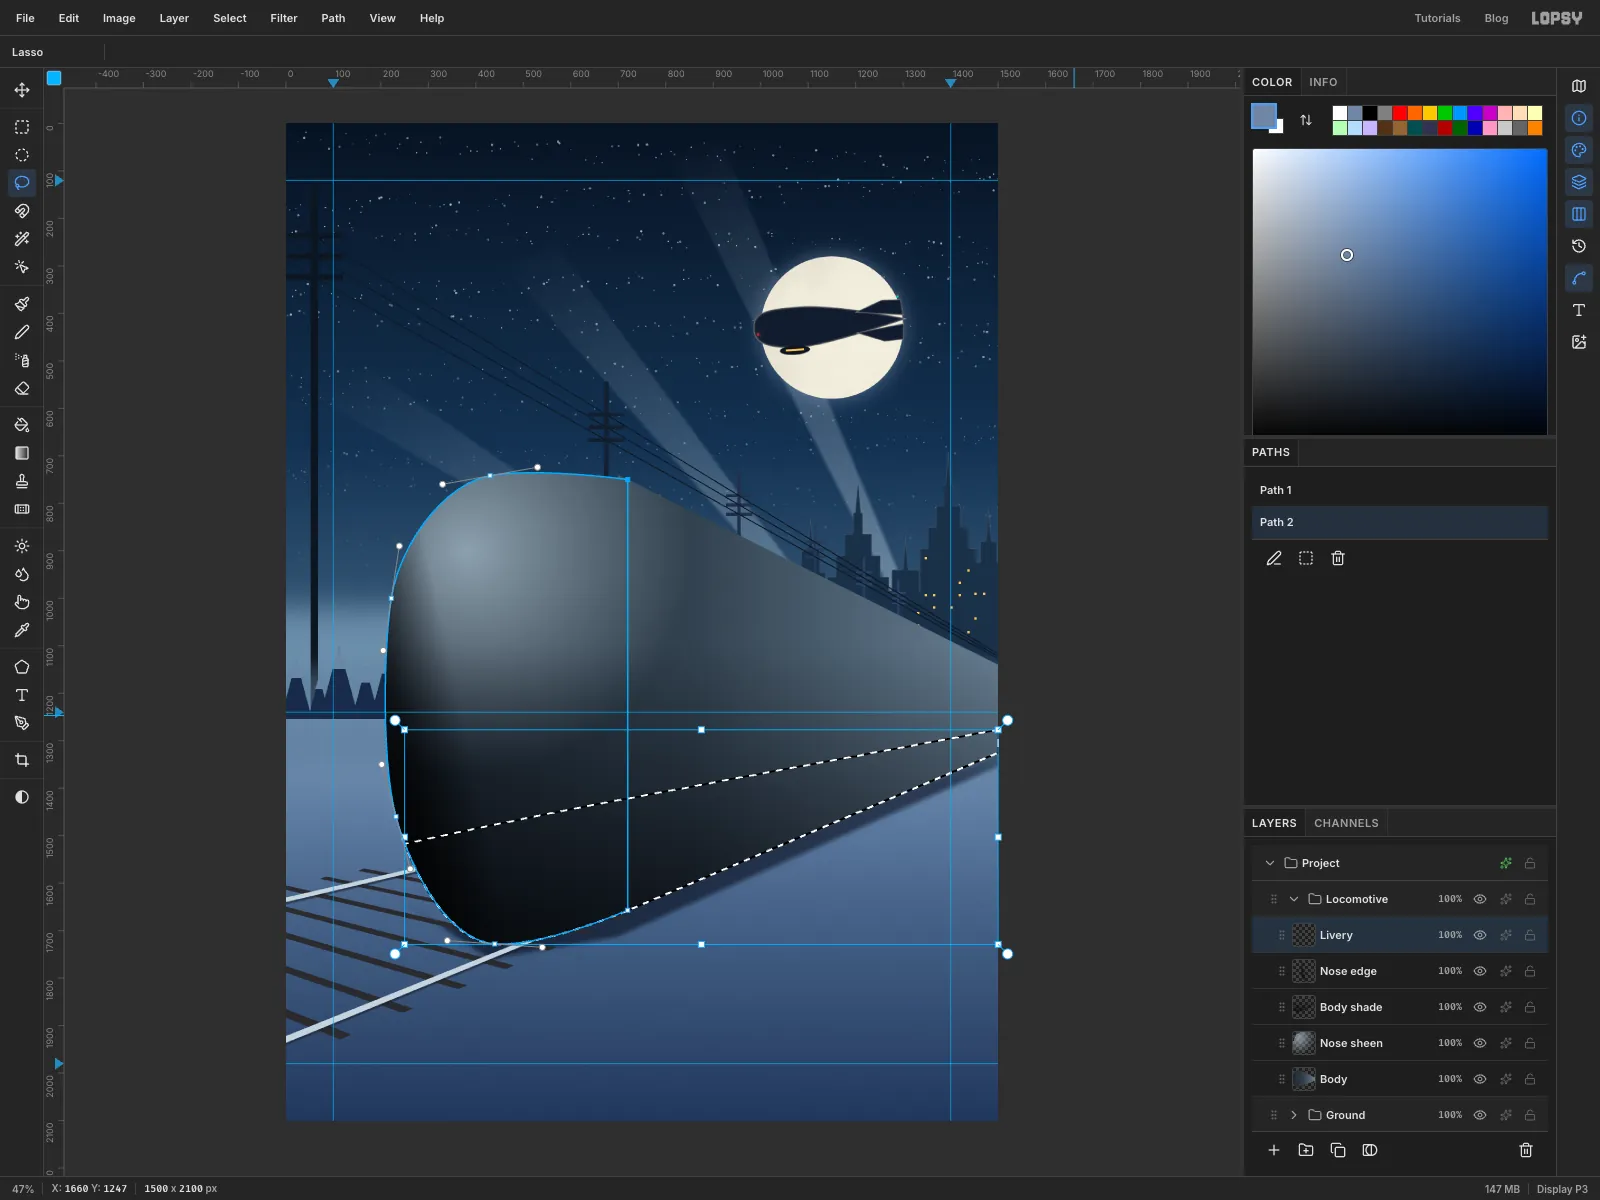
- Add a layer called
Liveryand Cmd-click theBodythumbnail. - Hold Shift+Alt and lasso around everything below the skirt line. Shift+Alt intersects, so only the part of the body inside your lasso stays selected. The line is low on the side and curves down as it wraps round the nose:
- Start just past the right edge at about
y 1247. - Pass through
1200, 1333and700, 1425. - Curve on through
450, 1475and250, 1517to the tip of the nose. - Close the lasso well below the train.
- Fill the selection with a three-stop gradient, → → , dragged from
700, 1430down to760, 1700. That's brighter at the top, like airbrushed enamel. Deselect.
- Add a layer called
-
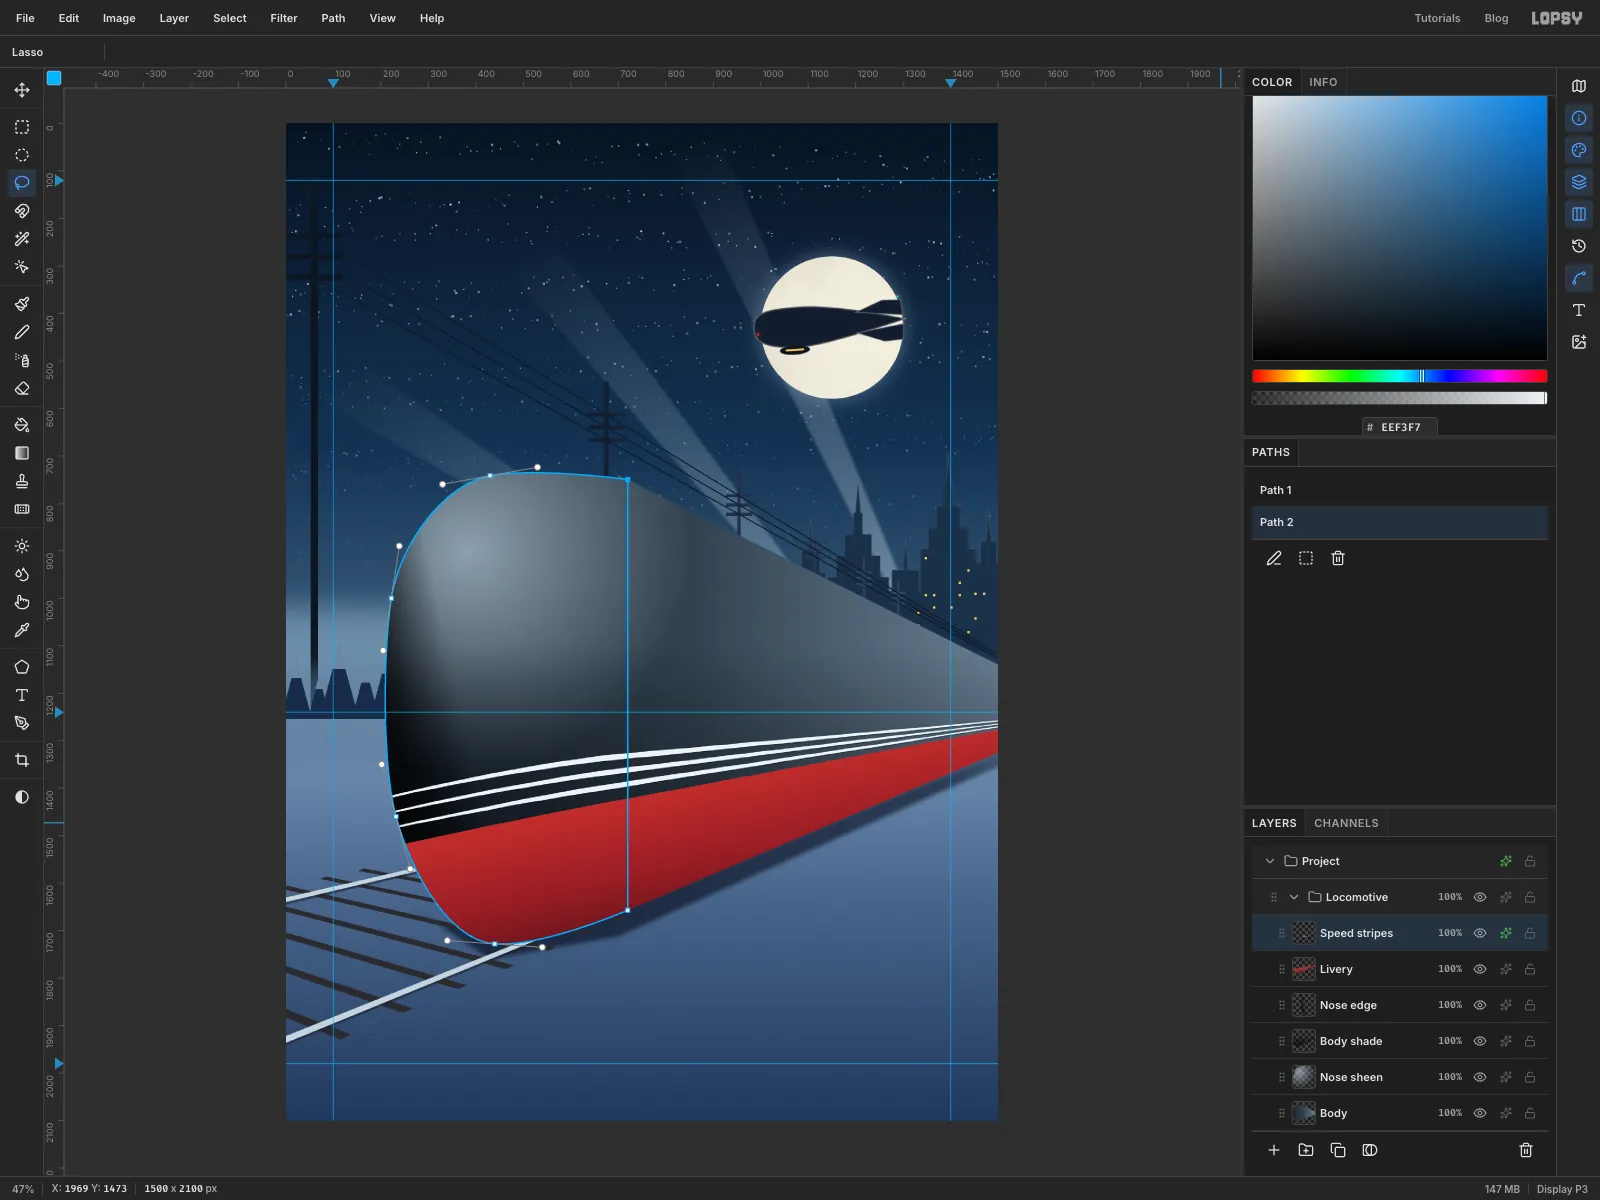
Add chrome speed stripes
- Add a layer called
Speed stripes. - Lasso three thin stripes just above the red, running parallel to the skirt line. Hold Shift after the first.
- Like everything on the side, each stripe aims at the vanishing point, so it's about 12 px thick where the nose meets the side and narrows to a point at the far end.
- Round the nose the stripes curve gently down. The top stripe passes
700, 1328and500, 1357and reaches the front of the nose at about230, 1413. The other two follow it 30 and 60 px lower. - Make each one thinner as it wraps round the front of the nose, because you're seeing that part of it at an angle.
- Draw them a little past the front of the nose. You'll trim them next.
- Fill with chrome and deselect.
- To trim the stripe ends to the body, Cmd-click the
Bodythumbnail, choose Select → Inverse, press Delete, then deselect. - Add a light Drop Shadow (offset Y
2, blur2, opacity35, colour ).
- Add a layer called
-
Catch the moonlight on the roof
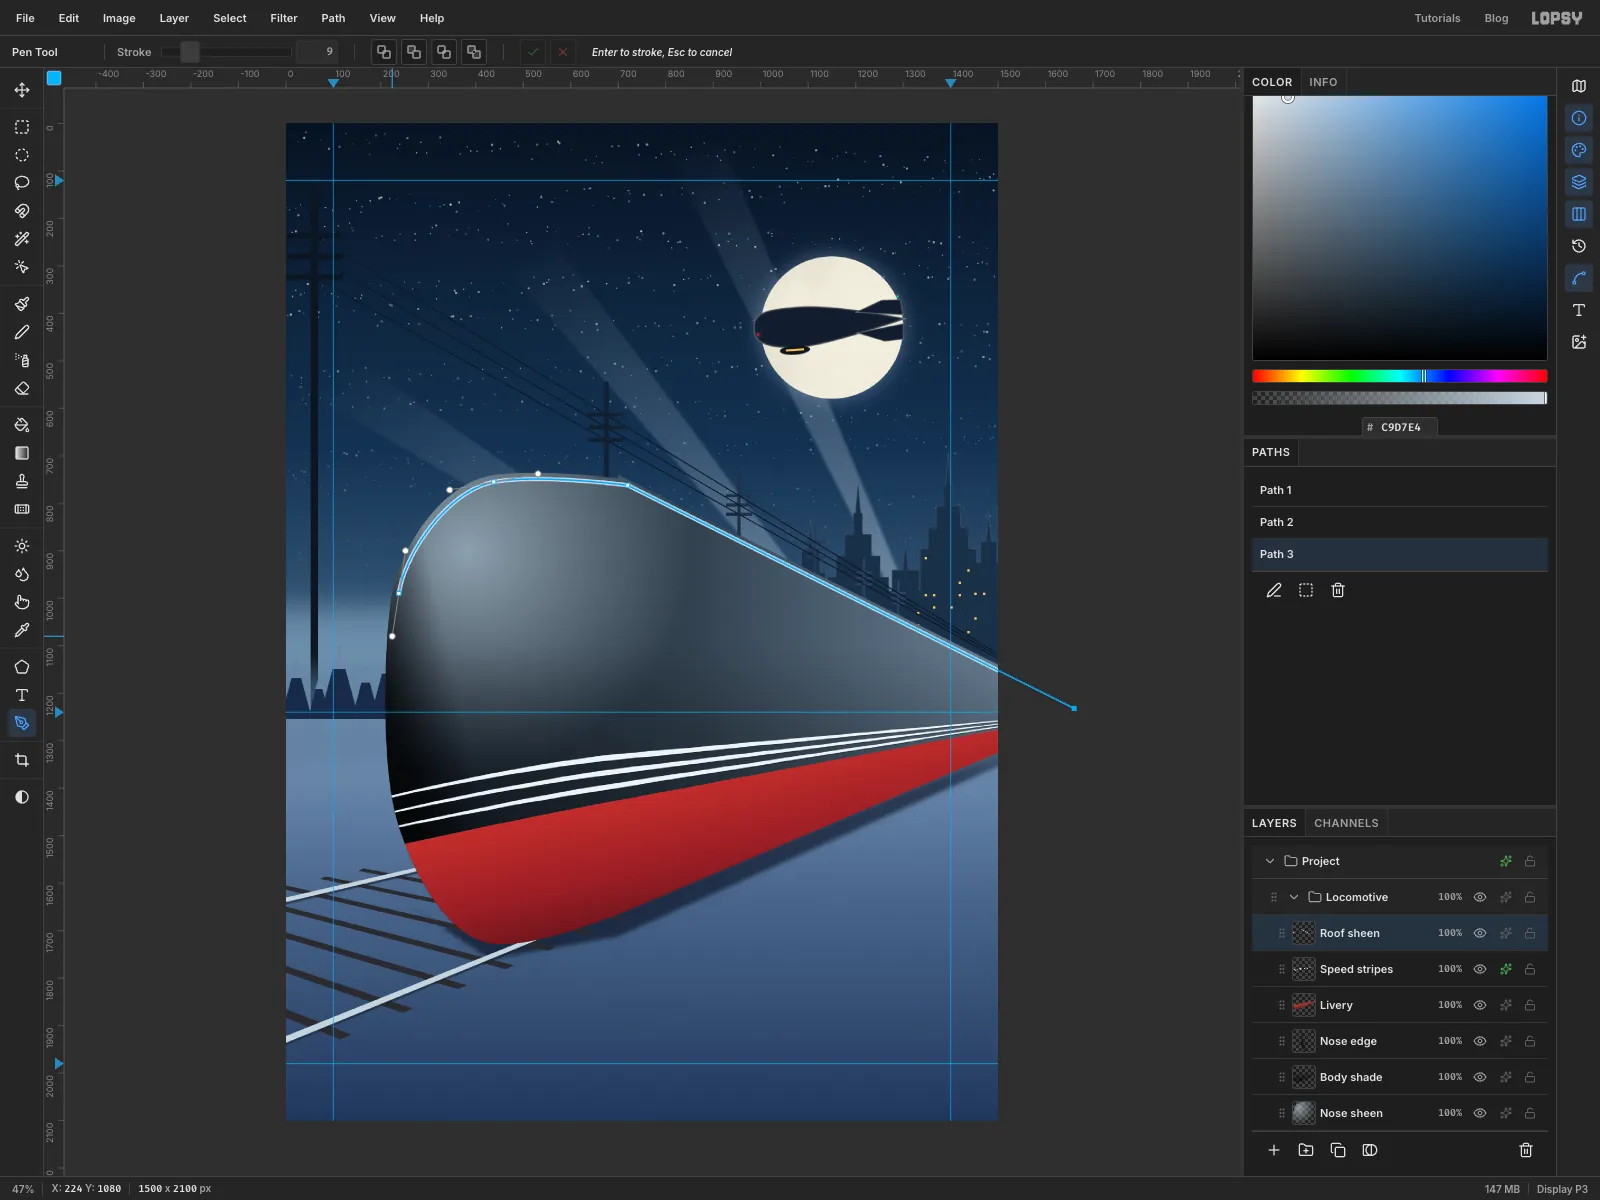
- Add a layer called
Roof sheen. - Pick the Pen, set Stroke to
9in the options bar, and set the foreground to . - Draw an open path just inside the top edge of the train:
- Click out past the right edge at about
1660, 1232. - Click at
720, 762. - Press at
438, 755and drag to345, 772. - Press at
238, 990and drag to224, 1080.
- Press Enter. The path is saved to the Paths panel and stroked onto the layer in one go.
- Blur it with Gaussian Blur
5and set the layer to Screen.
- Add a layer called
-
Run a chrome crest down the nose
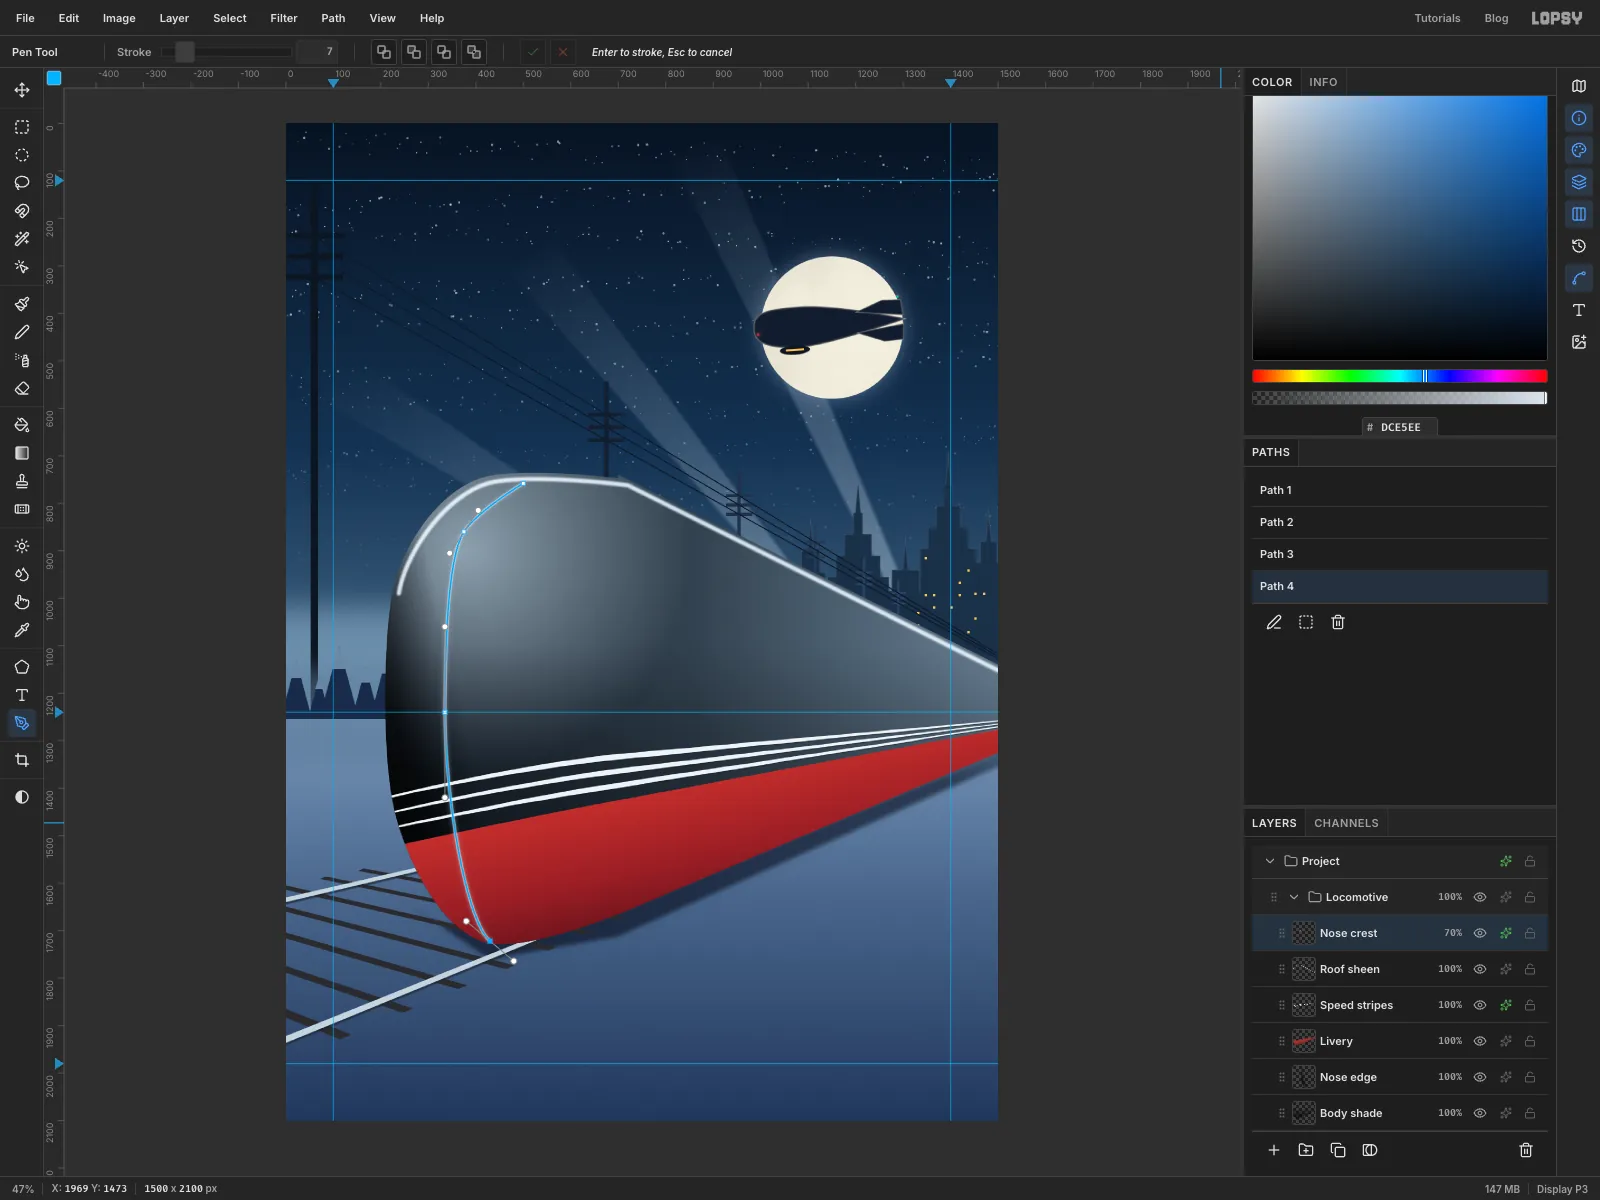
Streamliners often had a chrome strip down the middle of the nose. It also shows the nose's curve.
- Add a layer called
Nose crest, set Stroke to7and the foreground to . - Draw it from the bottom up, so your first click is well away from the roof path:
- Press at
430, 1722and drag to380, 1680. - Press at
335, 1240and drag up to335, 1060. - Press at
375, 860and drag to405, 815. - Click at
500, 758on the roof.
- Press Enter to stroke it.
- Blur it by
2, add an Outer Glow (size14, opacity45, colour ) and set the layer to70%.
- Add a layer called
-
Mark the panel seams
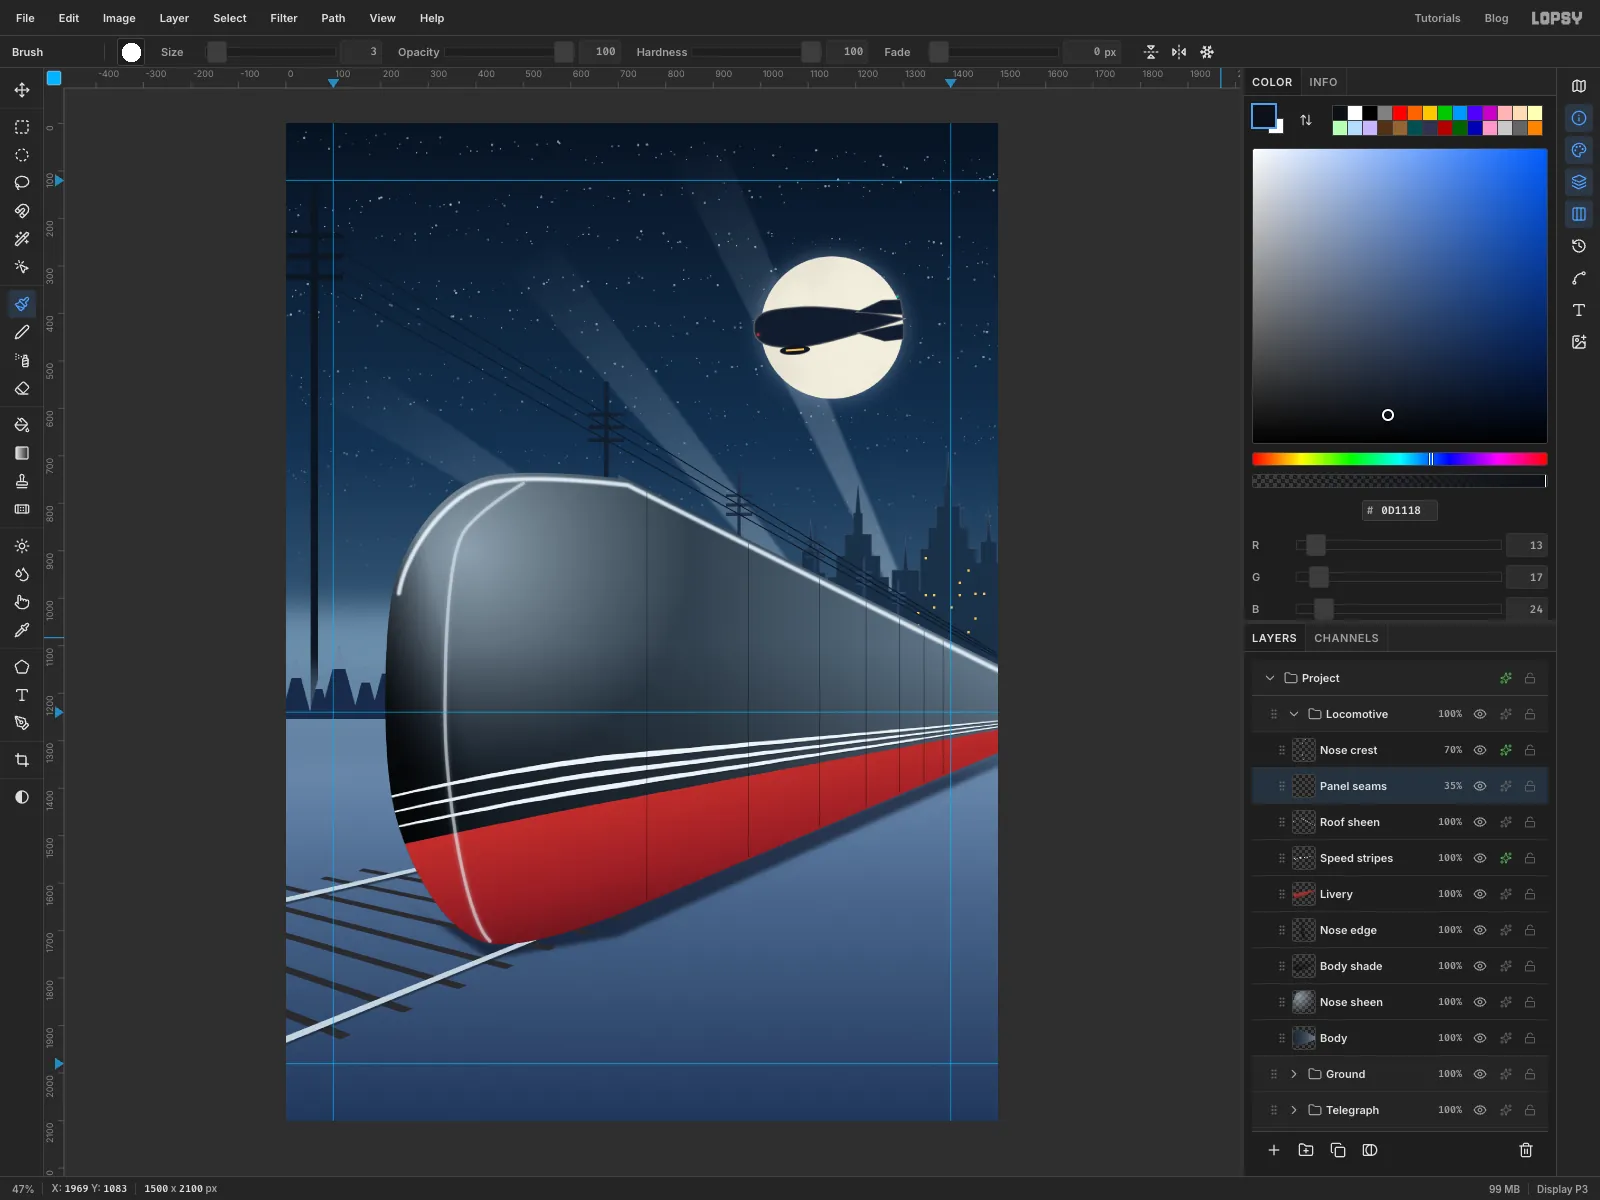
- Click the
Roof sheenrow, then add a layer calledPanel seams. The crest stays on top of everything you add to the train from here on. - Pick the Brush at size
3, Hardness100, colour . - For each seam, click just under the roof edge, then Shift-click just above the bottom edge. Vertical lines stay vertical in this kind of perspective.
- Put the seams at
x 760,974,1124,1222,1291,1343and1383. They crowd together the further away they are. - Set the layer to Multiply at
35%.
- Click the
-
Light up the cab
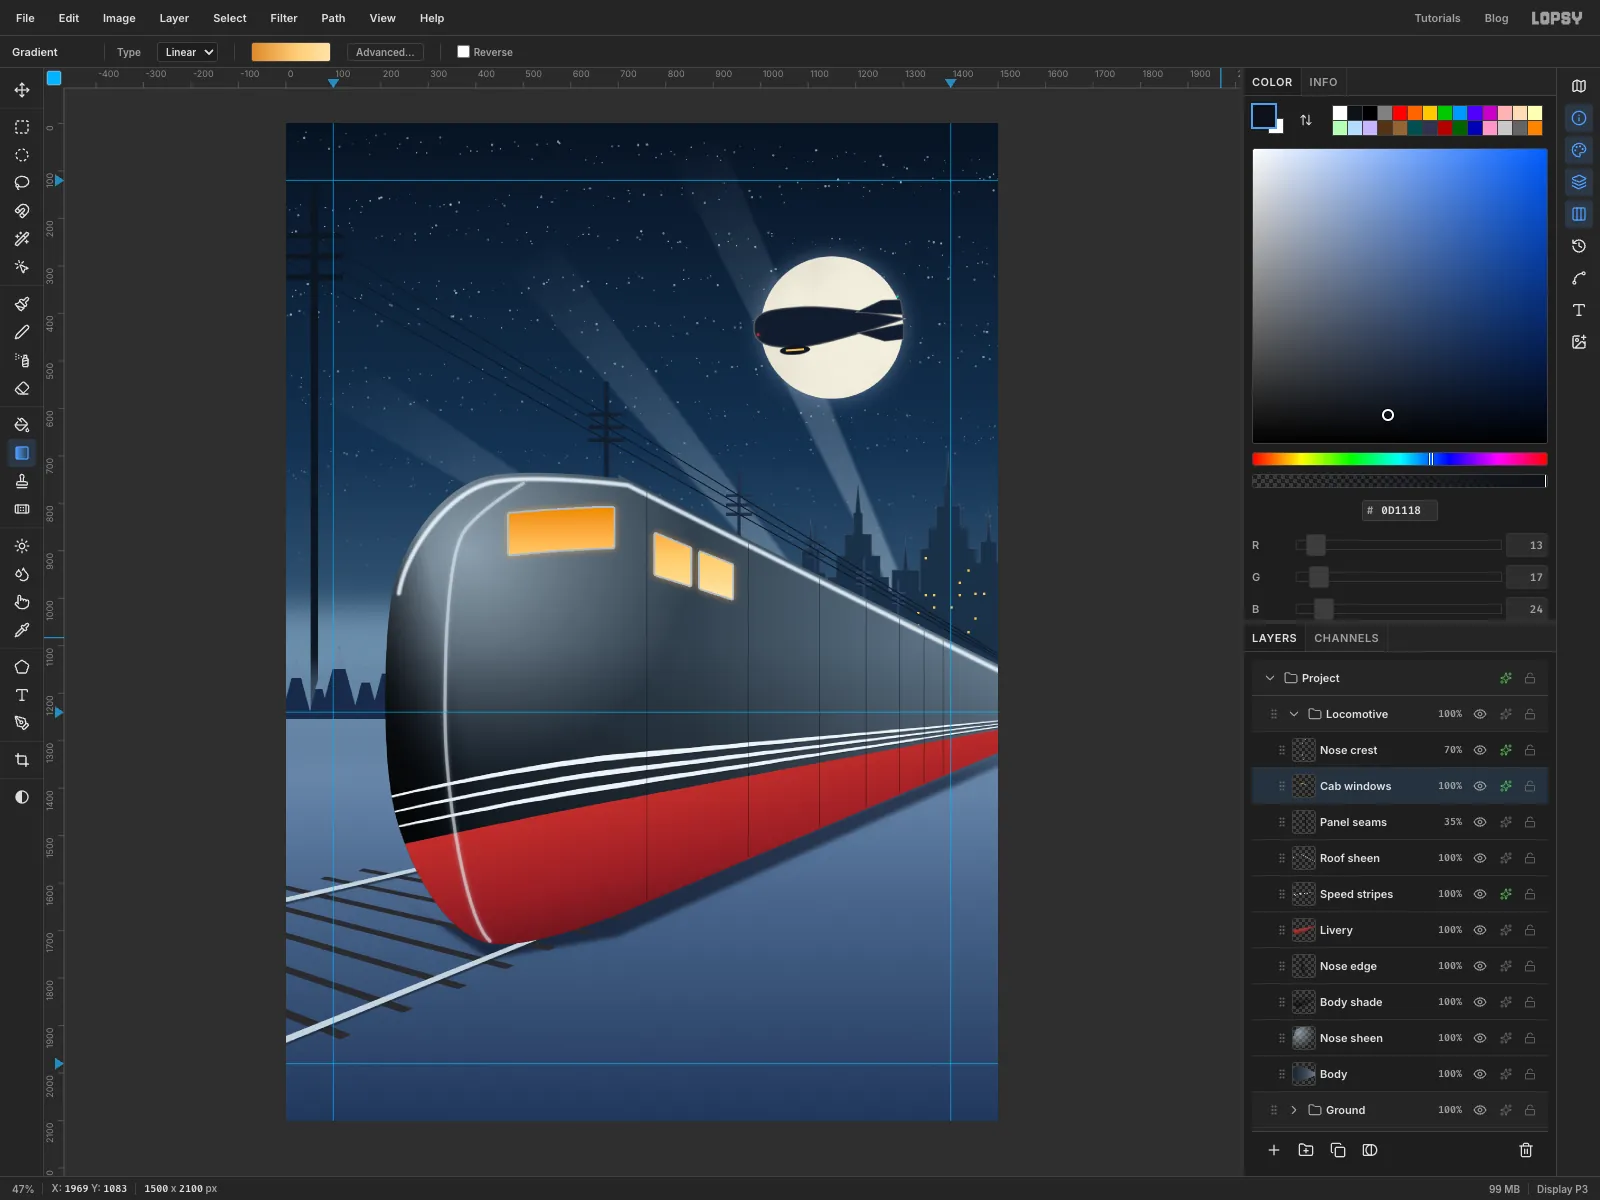
- Add a layer called
Cab windows. - Lasso the windscreen on the shoulder of the nose. Its top edge curves gently from
470, 822to690, 810, and its bottom edge from470, 908to690, 893. - Hold Shift and add two side windows on the flank. Their top and bottom edges should slope towards the vanishing point:
778, 864–852, 895along the top and778, 950–852, 973along the bottom.872, 903–940, 930along the top and872, 979–940, 1001along the bottom.
- Fill them with a gradient from through to , dragged from
y 800down toy 990, so the cab looks lit from below. - Add an Outer Glow (size
22, opacity55, colour ) and a Stroke (width4, colour ) for chrome frames.
- Add a layer called
-
Switch on the headlight
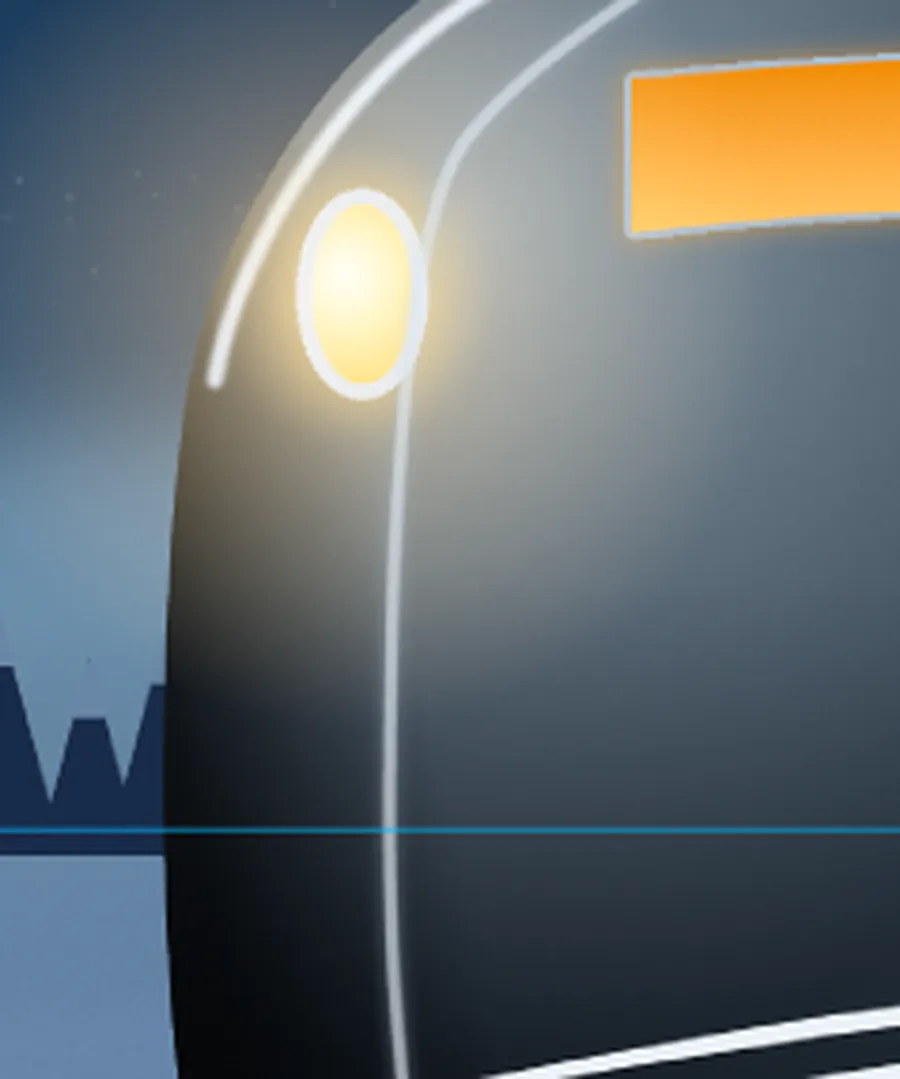
- Add a layer called
Headlight. Drag an elliptical marquee from292, 892to348, 992. It's narrower than it is tall because it sits on the curved side of the nose. - Fill it with a radial gradient from through to , dragged from just above the centre outwards. Deselect.
- Add a Stroke (width
9, colour ) for the bezel and a big Outer Glow (size150, opacity80, colour ). - Add a layer called
Headlight haloand drag a radial gradient from the lamp's centre about 240 px down: at 85%, then at 35%, then transparent. Set it to Screen. - Add a layer called
Livery glint, Cmd-click theLiverythumbnail and drag a radial gradient from330, 1470out about 270 px, from at 80% to transparent. Set it to Screen. That's the headlight's glow reflected in the red paint.
- Add a layer called
-
Build the wreath
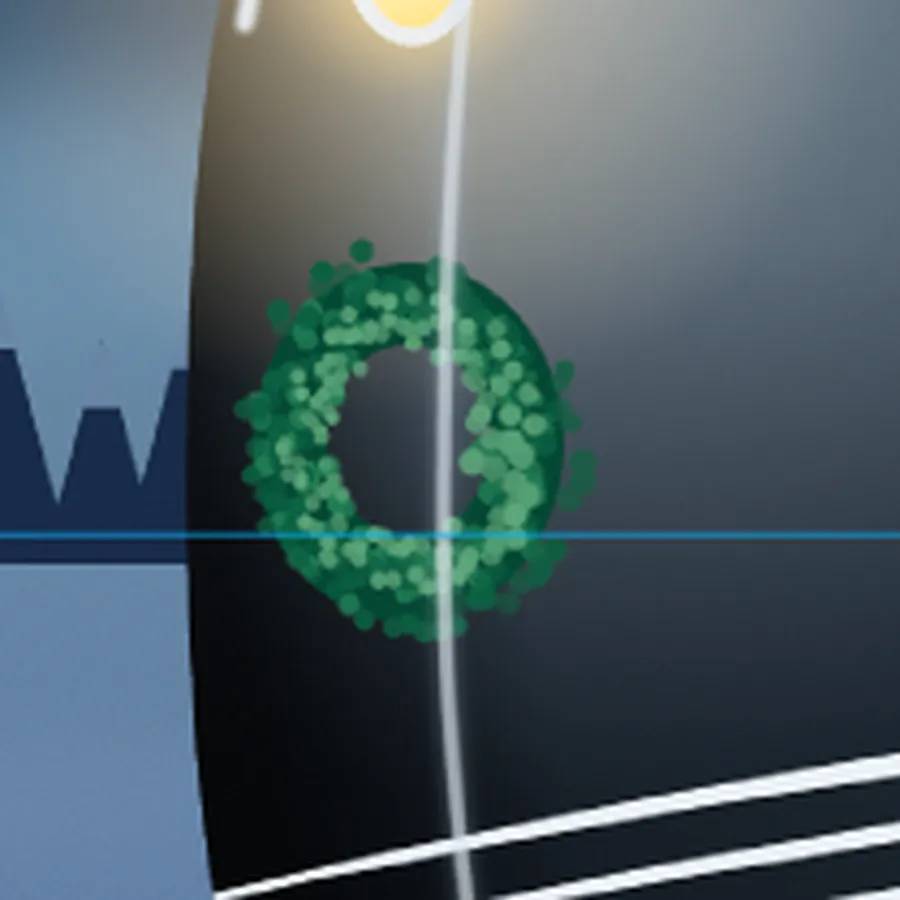
- Add a layer called
Wreath. Drag an elliptical marquee from242, 1107to394, 1283. Then hold Alt and drag a smaller one from278, 1147to358, 1243to cut out the middle. Fill the ring with and deselect. - Pick the Brush and click the brush thumbnail at the left of the options bar to open the Brushes window.
- On the Shape tab set Size
16, Hardness70and Spacing30. - On the Dynamics tab set Scatter
70, Size Jitter60and Opacity Jitter40. - Close the window.
- Paint round the ring three times in different greens. Each loop is a slightly different oval:
- round the middle of the ring.
- round the outer edge.
- round the inner edge.
The scatter breaks each stroke into clumps of needles.
- Add a layer called
-
Add berries and a bow
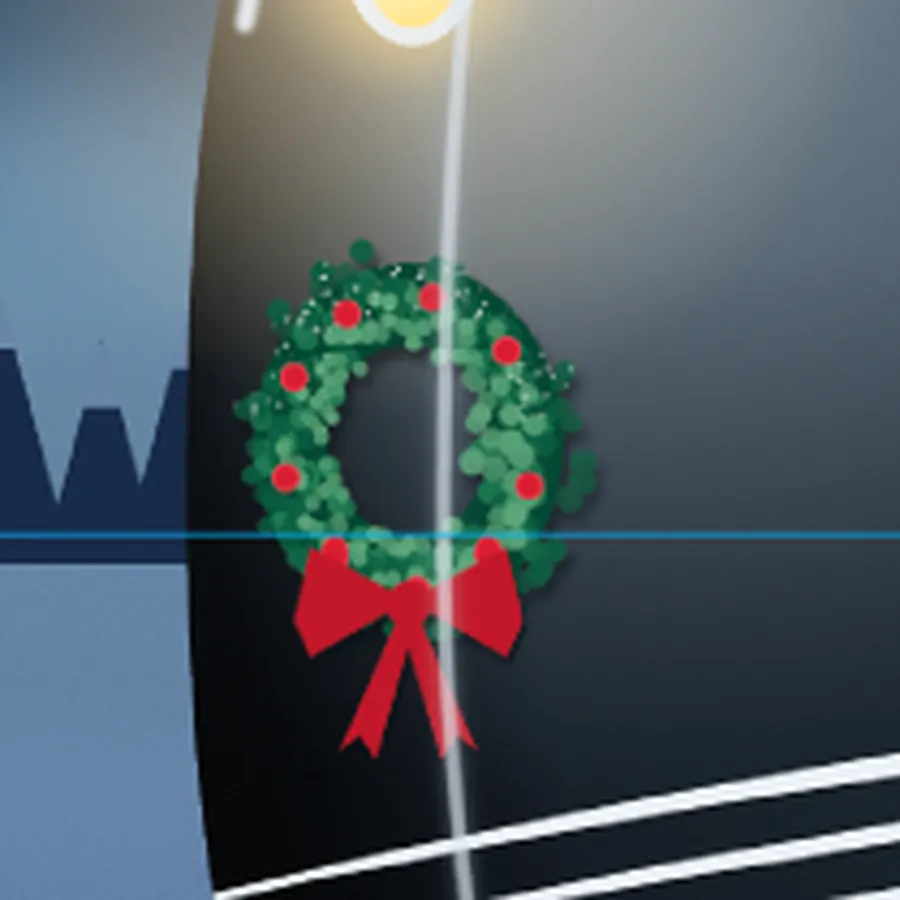
- Add a layer called
Berries. With the Elliptical Marquee, drag a small 14 px circle on the ring, then hold Shift and add eight more spaced round it. Fill with and give the layer a tiny Inner Glow (size3, colour ) for a shine. - Add a layer called
Bow. Hold Shift for each piece after the first:
- Lasso two triangular loops, each about 50 px across, meeting at the bottom of the ring around
318, 1272. - Lasso two tails about 70 px long with notched ends, hanging down from the middle.
- Use the Elliptical Marquee for a round knot about 22 px across in the middle.
- Fill with .
- Give
Bowa Drop Shadow (offset2,4, blur4, opacity60) andWreatha softer one (offset3,6, blur8, opacity55), both in , so they sit on the paint. - Add a layer called
Wreath snow. Cmd-click theWreaththumbnail, pick the Spray (Size40, Density6, colour ) and spray along the top of the ring. Deselect.
- Add a layer called
-
Turn the wreath to the curve of the nose
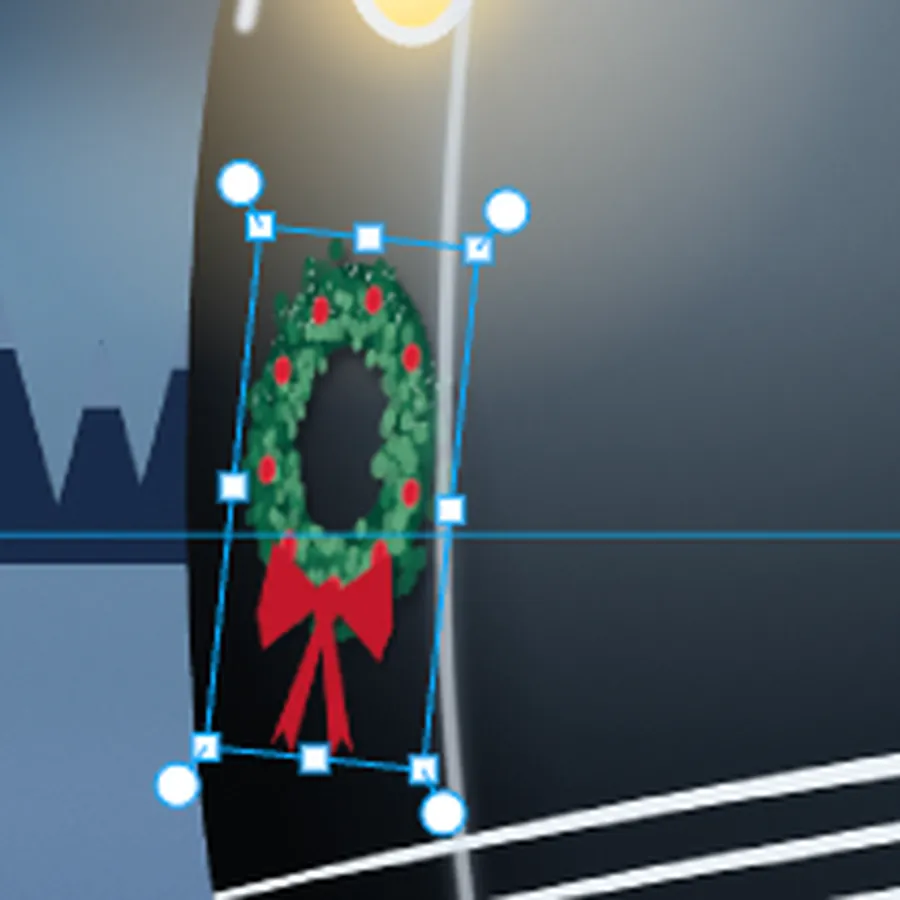
The wreath faces you straight on, but the nose is turned away. Squash it to match:
- Click the
Bowrow, then Shift-click theWreathrow. That selects all four wreath layers. - With the Move tool, a single box surrounds them. Drag the handle in the middle of the right edge to the left until the box is about 60% of its width.
- Rotate it about 6° clockwise from just outside a corner, so it tilts with the nose.
- Press Cmd+D to commit. All four layers are transformed together in one undo step.
- Click the
-
Set the name on a belt
- Click the
Cab windowsrow and add a layer calledLetter belt. - Lasso a long dark band along the side that ends in a point towards the nose, like a chrome speed whisker:
- Start at
740, 987and go along the top to the right edge at abouty 1229. - Come down the right edge to about
y 1239, and back along the bottom to740, 1209. - Finish with the point at
560, 1071.
- Fill it with and give it a Stroke (width
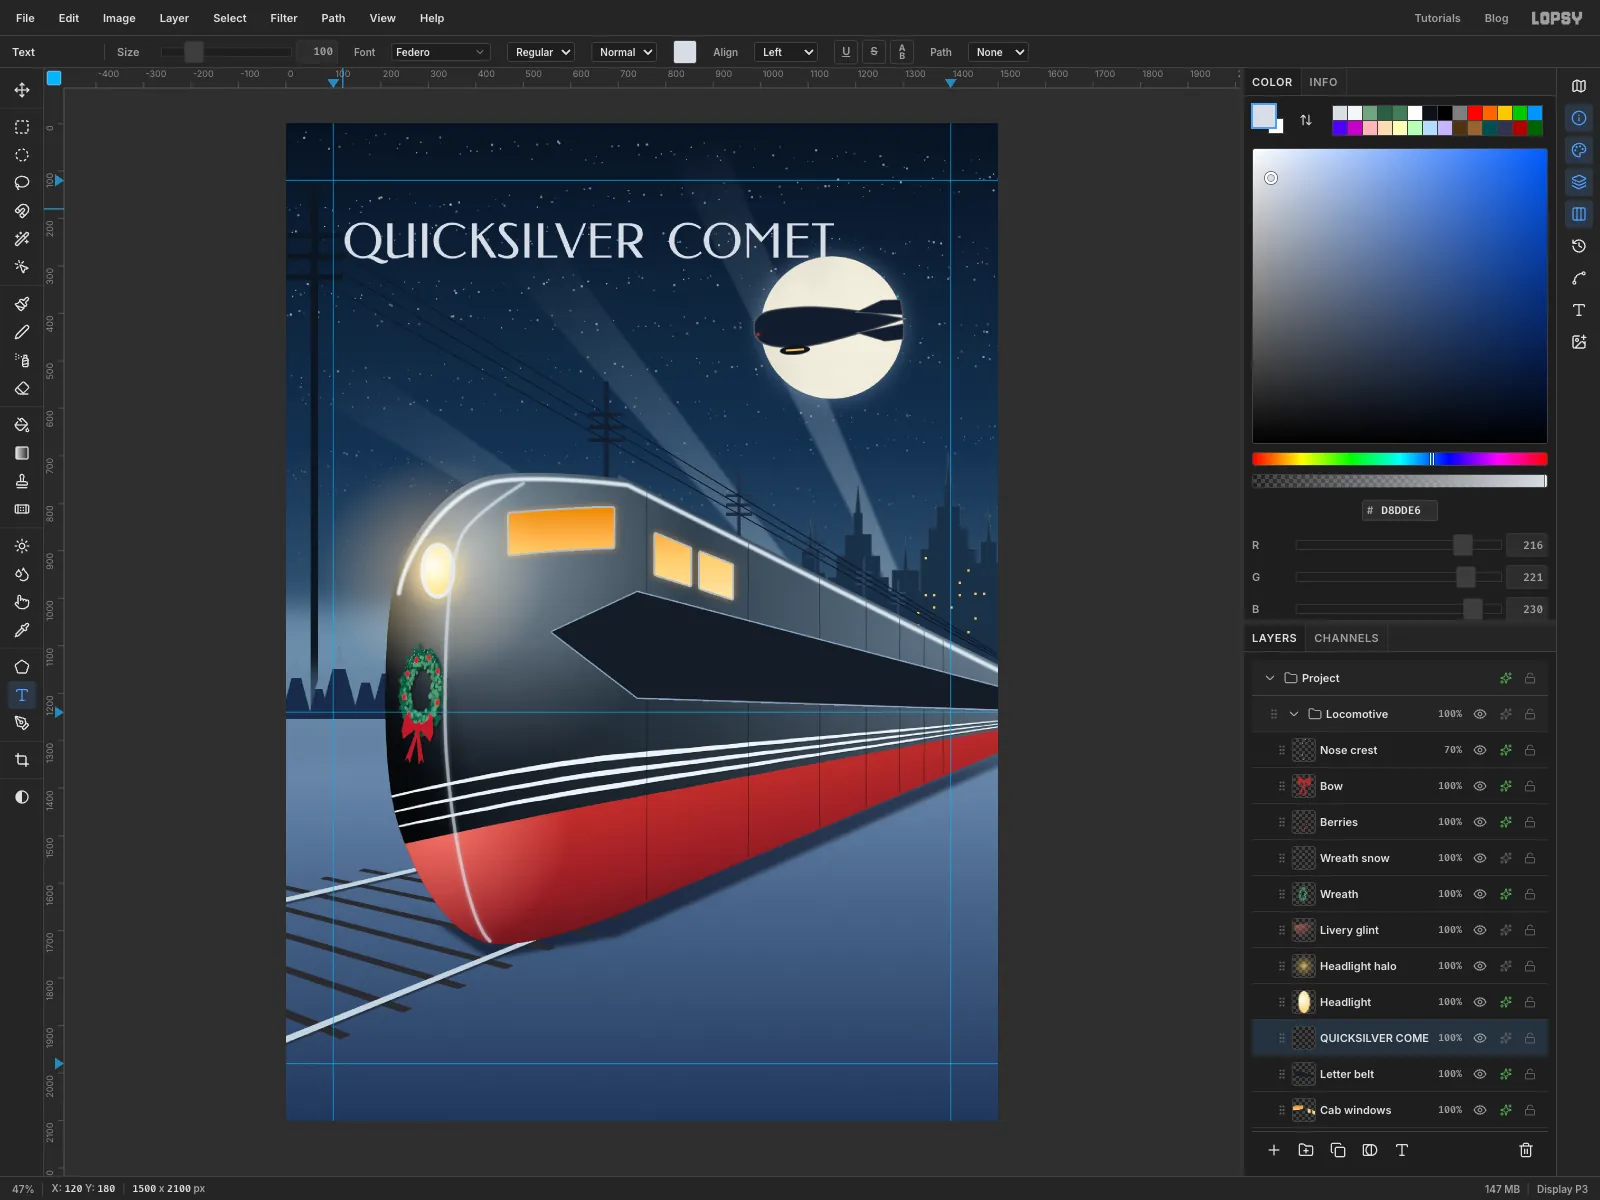
3, colour ) for thin chrome rules. - Set the foreground to . Pick the Text tool, set the font to Federo (an Art Deco face) and Size to
100. - Click in empty sky near the top left, at about
120, 180, and typeQUICKSILVER COMETwith two spaces between the words. Press Tab to commit. Make sure the whole line fits on the canvas. - Click Rasterize Layer in the Layers panel toolbar. Distort works on pixels, not live text.
The extra space keeps the two words apart once perspective squeezes the far end.
- Click the
-
Distort the lettering into perspective
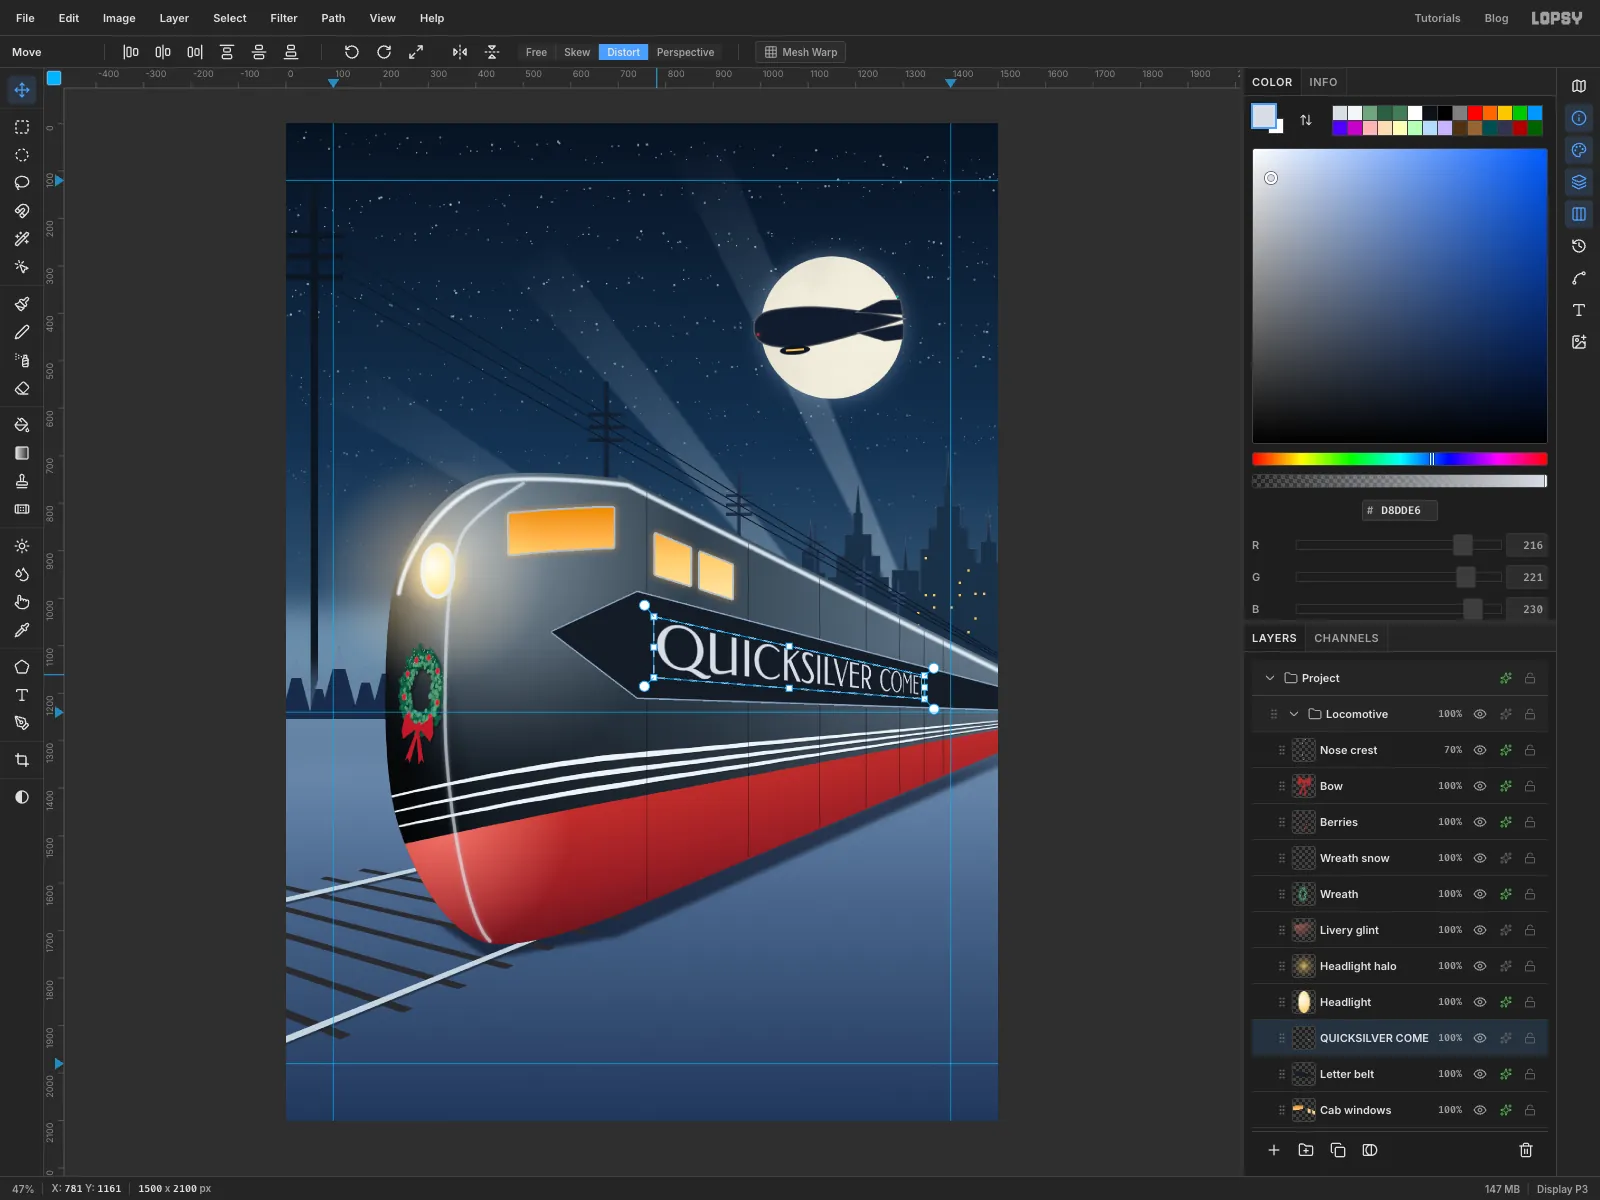
- Drag a rectangular marquee just around the lettering.
- Pick the Move tool and click Distort in the options bar. In Distort mode each corner handle moves on its own.
- Drag each corner onto the belt. Grab the handle itself (the cursor changes to a diagonal arrow):
- Top-left to
775, 1039. - Top-right to
1345, 1163. - Bottom-right to
1345, 1212. - Bottom-left to
775, 1167.
- Press Cmd+D to commit. Rename the layer
Letteringand add a small Drop Shadow (offset2,3, blur3, opacity70).
Distort is a true perspective warp, so the letters shrink steadily towards the vanishing point.
-
Throw the headlight beam
- Collapse
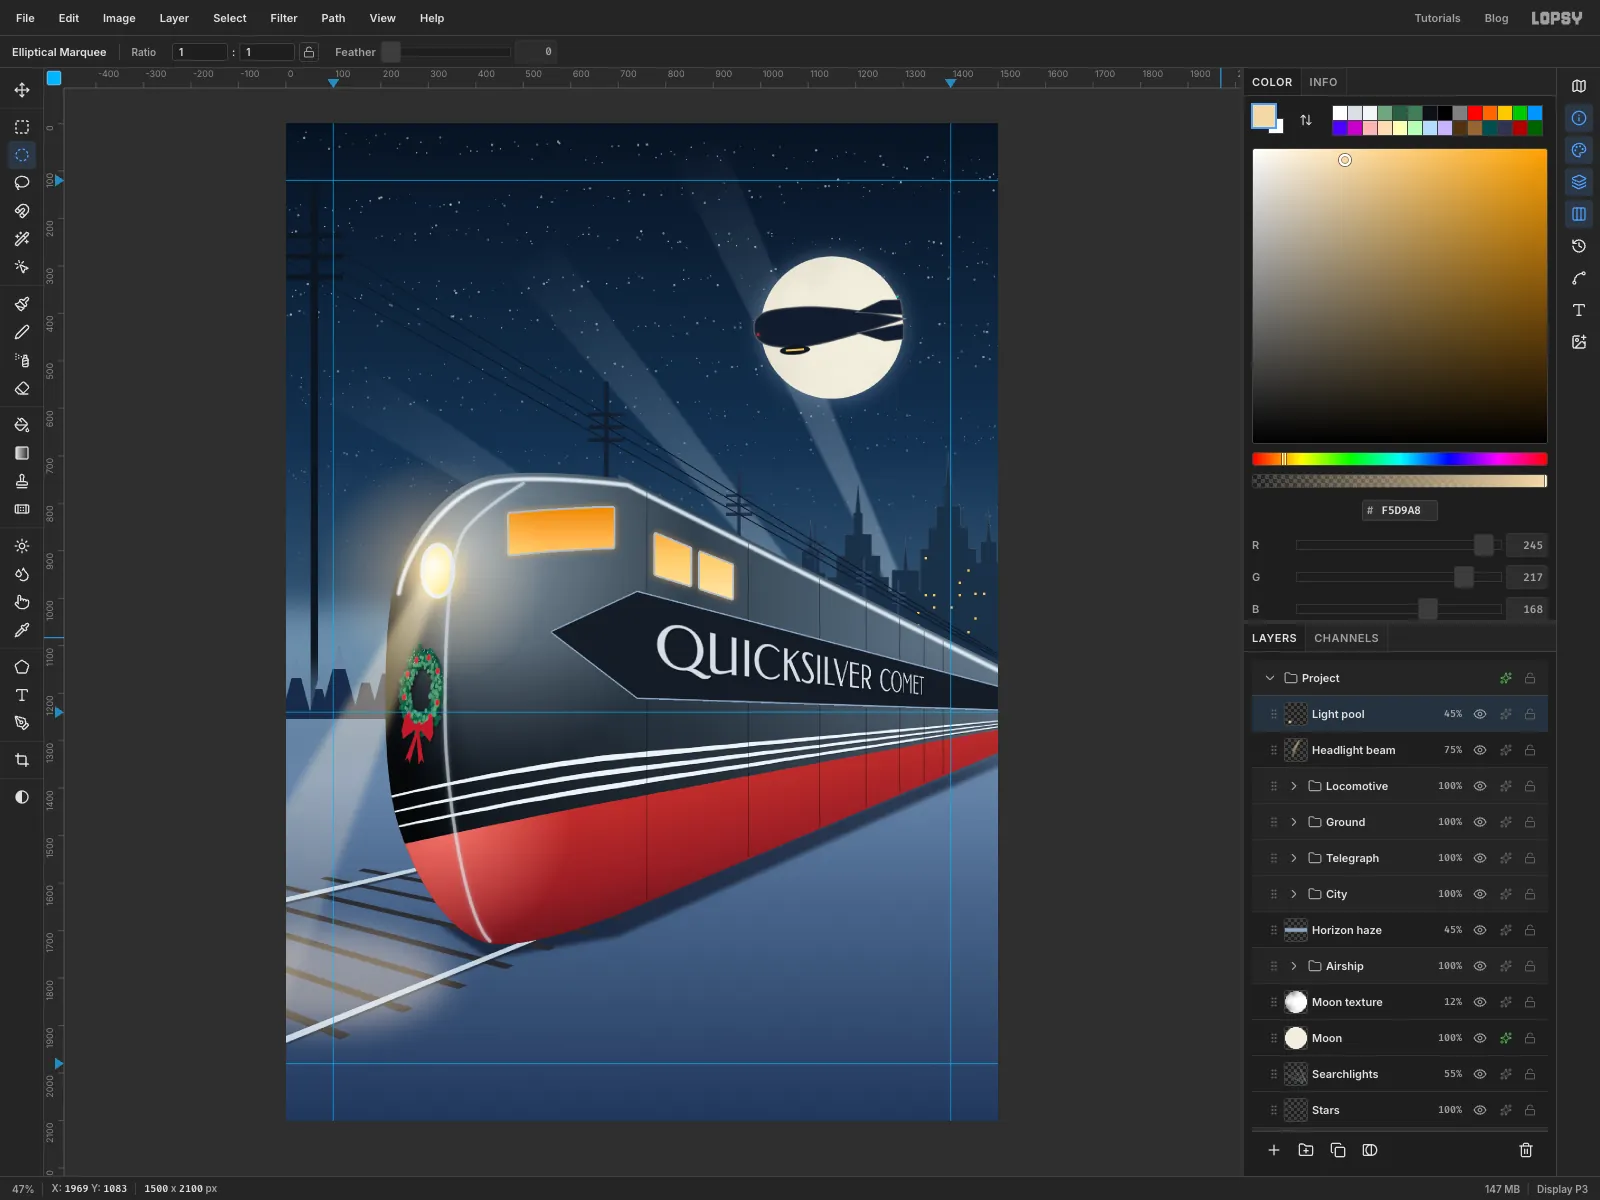
Locomotive, click its row and add a layer calledHeadlight beam. With the group collapsed, the new layer lands above it. - Lasso a cone from the lamp at
300, 940down to well off the left edge, between abouty 1700andy 2300, and back to the lamp. - Fill it with a gradient of from 75% to transparent, dragged from the lamp down towards
-60, 2000(off the canvas). Deselect. - Blur it with Gaussian Blur
24, then set it to Screen at75%. - Add a layer called
Light pool. Drag an elliptical marquee from-160, 1695(off the left edge) to340, 1905, Feather it by63and fill with . Deselect, blur it by30, and set it to Screen at45%. That's where the beam hits the snow ahead of the train.
Aim the cone low, along the track. If it lights the horizon, the trees turn into a flat grey wall.
- Collapse
-
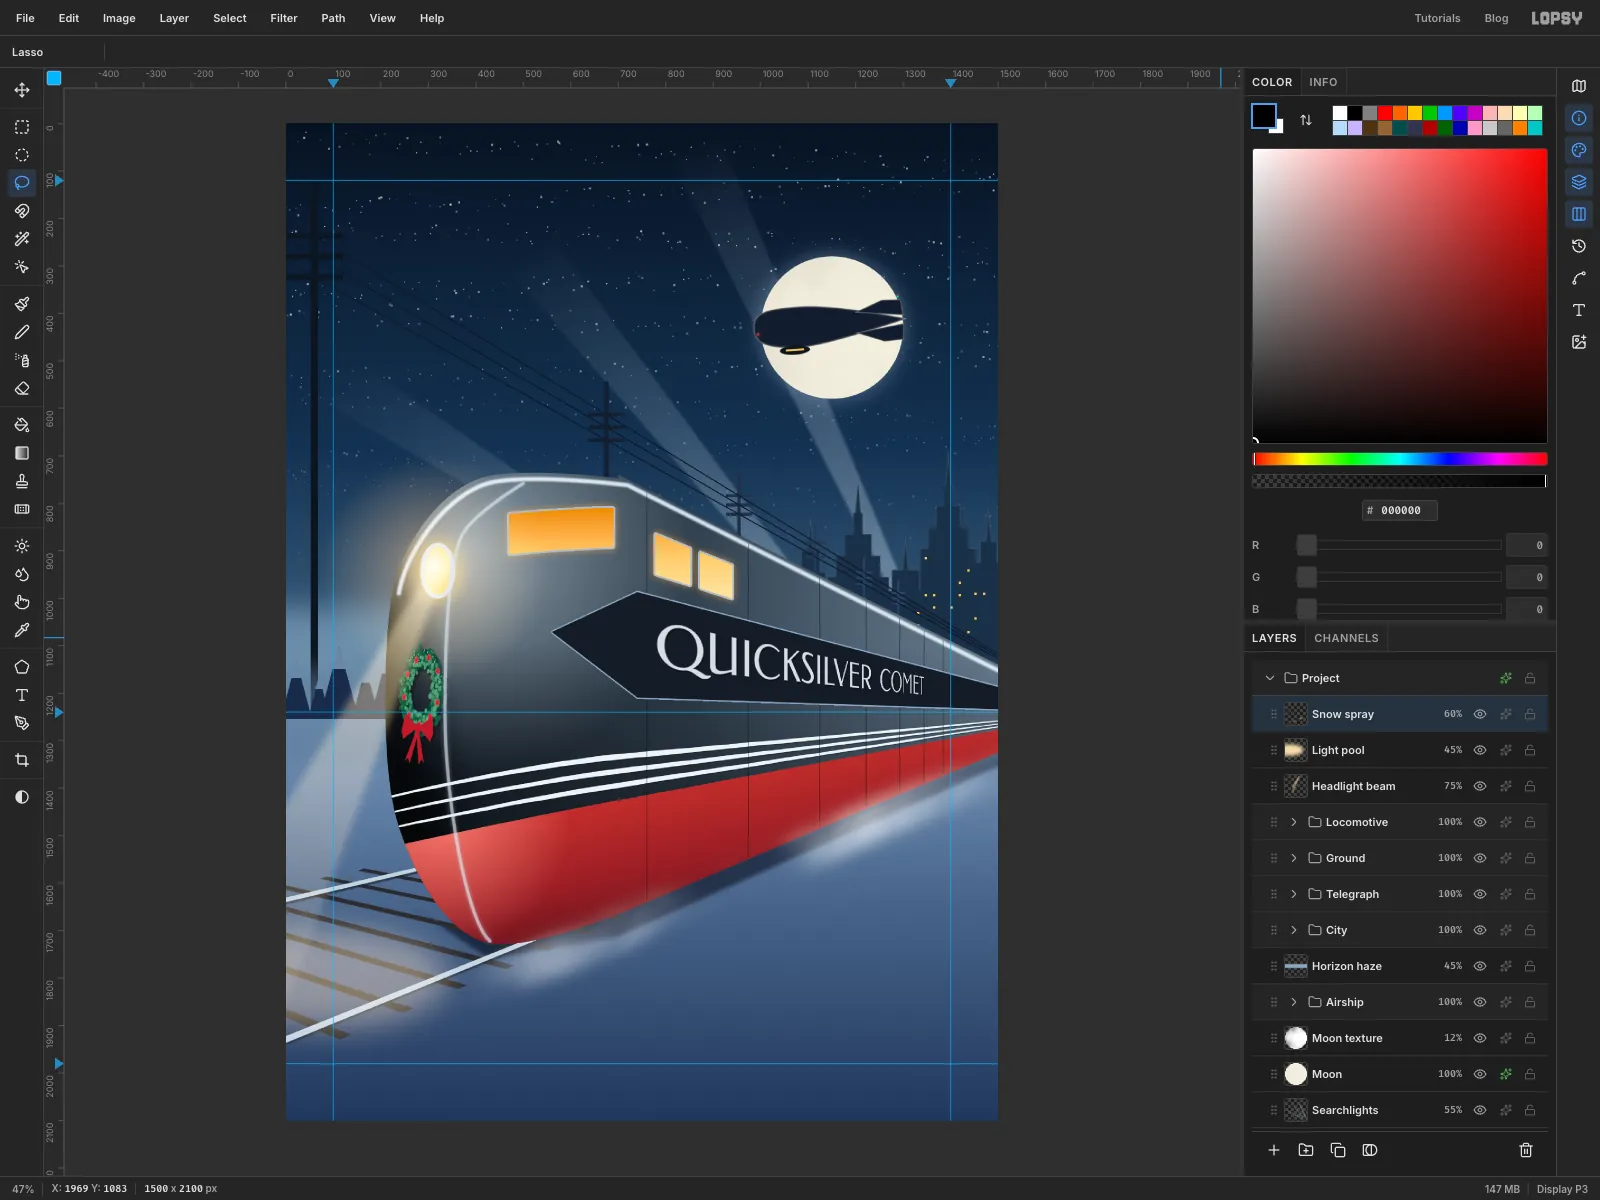
Kick up snow along the skirt
- Add a layer called
Snow spray. - Lasso a band that hugs the bottom edge of the train, from about 25 px above it to 90 px below. Start at the nose around
x 380and run past the right edge. Feather it by40. - Choose Filter → Smoke… with Scale
6and Turbulence70, then deselect. - Run Filter → Motion Blur… with Angle
156(roughly the slope of the train's bottom edge) and Distance40, so the powder streams back along the train. - Set the layer to Screen at
60%.
- Add a layer called
-
Let it snow, in three depths
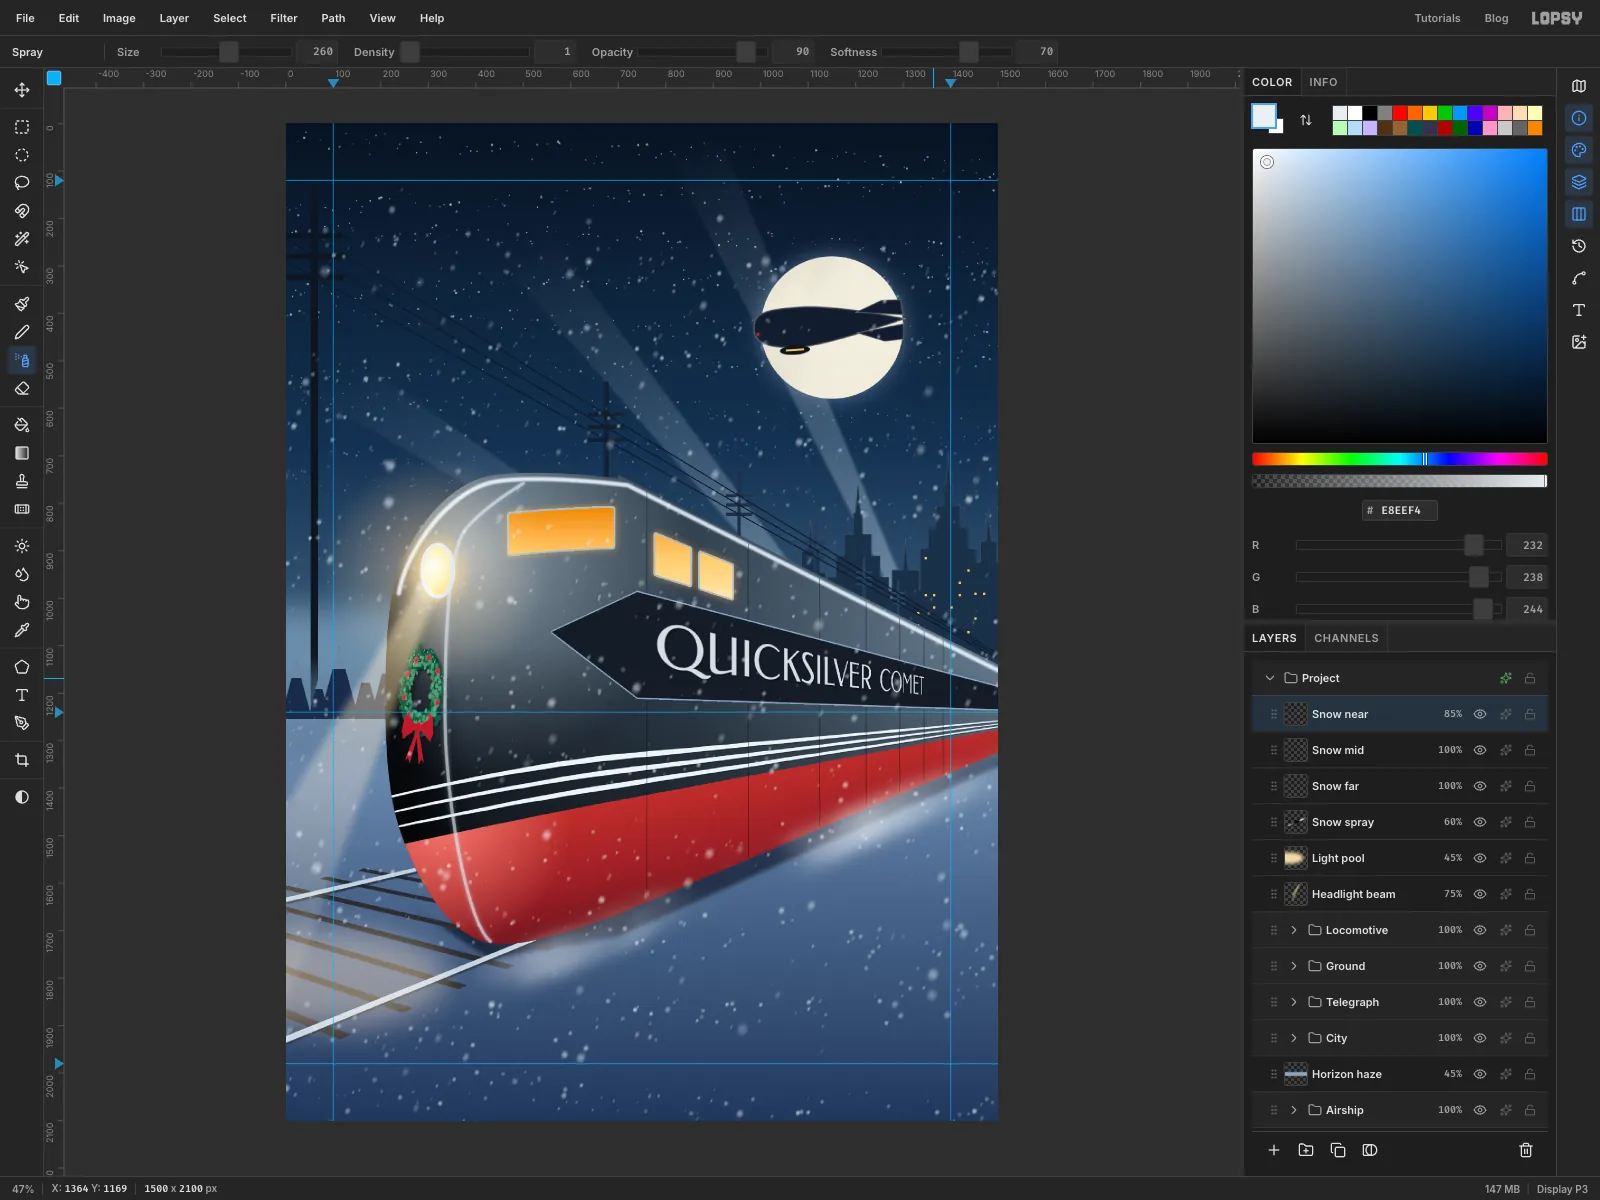
Three layers of flakes give the snowfall depth: fine and faint far away, big and soft up close. Set the foreground to and pick the Spray.
- Add a layer called
Snow far. Set Size110, Density2, Opacity80, Softness60, and zigzag from edge to edge down the whole picture in rows about 175 px apart. Run Filter → Motion Blur… with Angle115and Distance6. - Add a layer called
Snow mid. Set Size170and Density1(keep the same opacity and softness), zigzag in rows about 230 px apart, and blur it the same way with Distance9. - Add a layer called
Snow near. Set Size260, Density1, Opacity90, Softness70, zigzag in rows about 300 px apart, blur with Distance14, and set the layer to85%.
The bigger the Spray size, the bigger the flakes, so the near layer reads as closest.
- Add a layer called
-
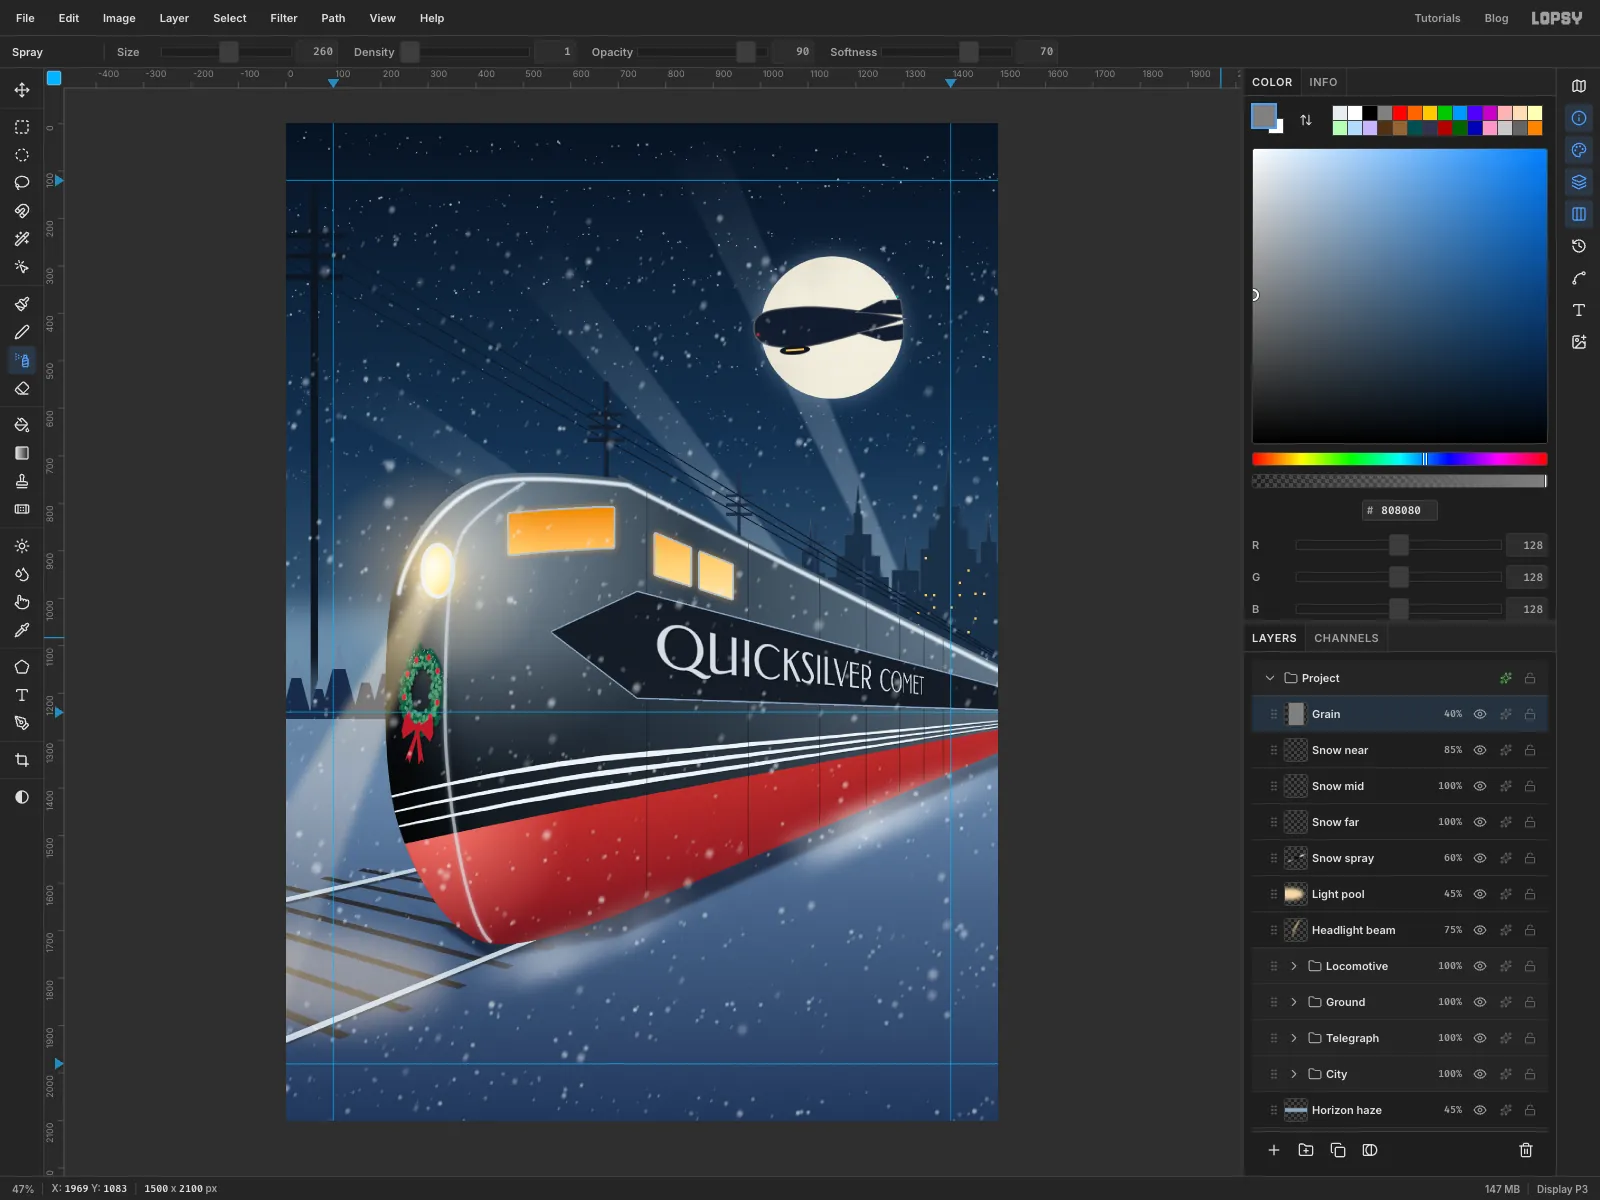
Add airbrush grain
- Add a layer called
Grainand fill it with mid-grey . - Run Filter → Add Noise… with Amount
18and Mono. - Set the layer to Overlay at
40%.
Overlay makes the grey disappear and leaves only the noise. That's the fine, speckled texture of an airbrushed poster.
- Add a layer called
-
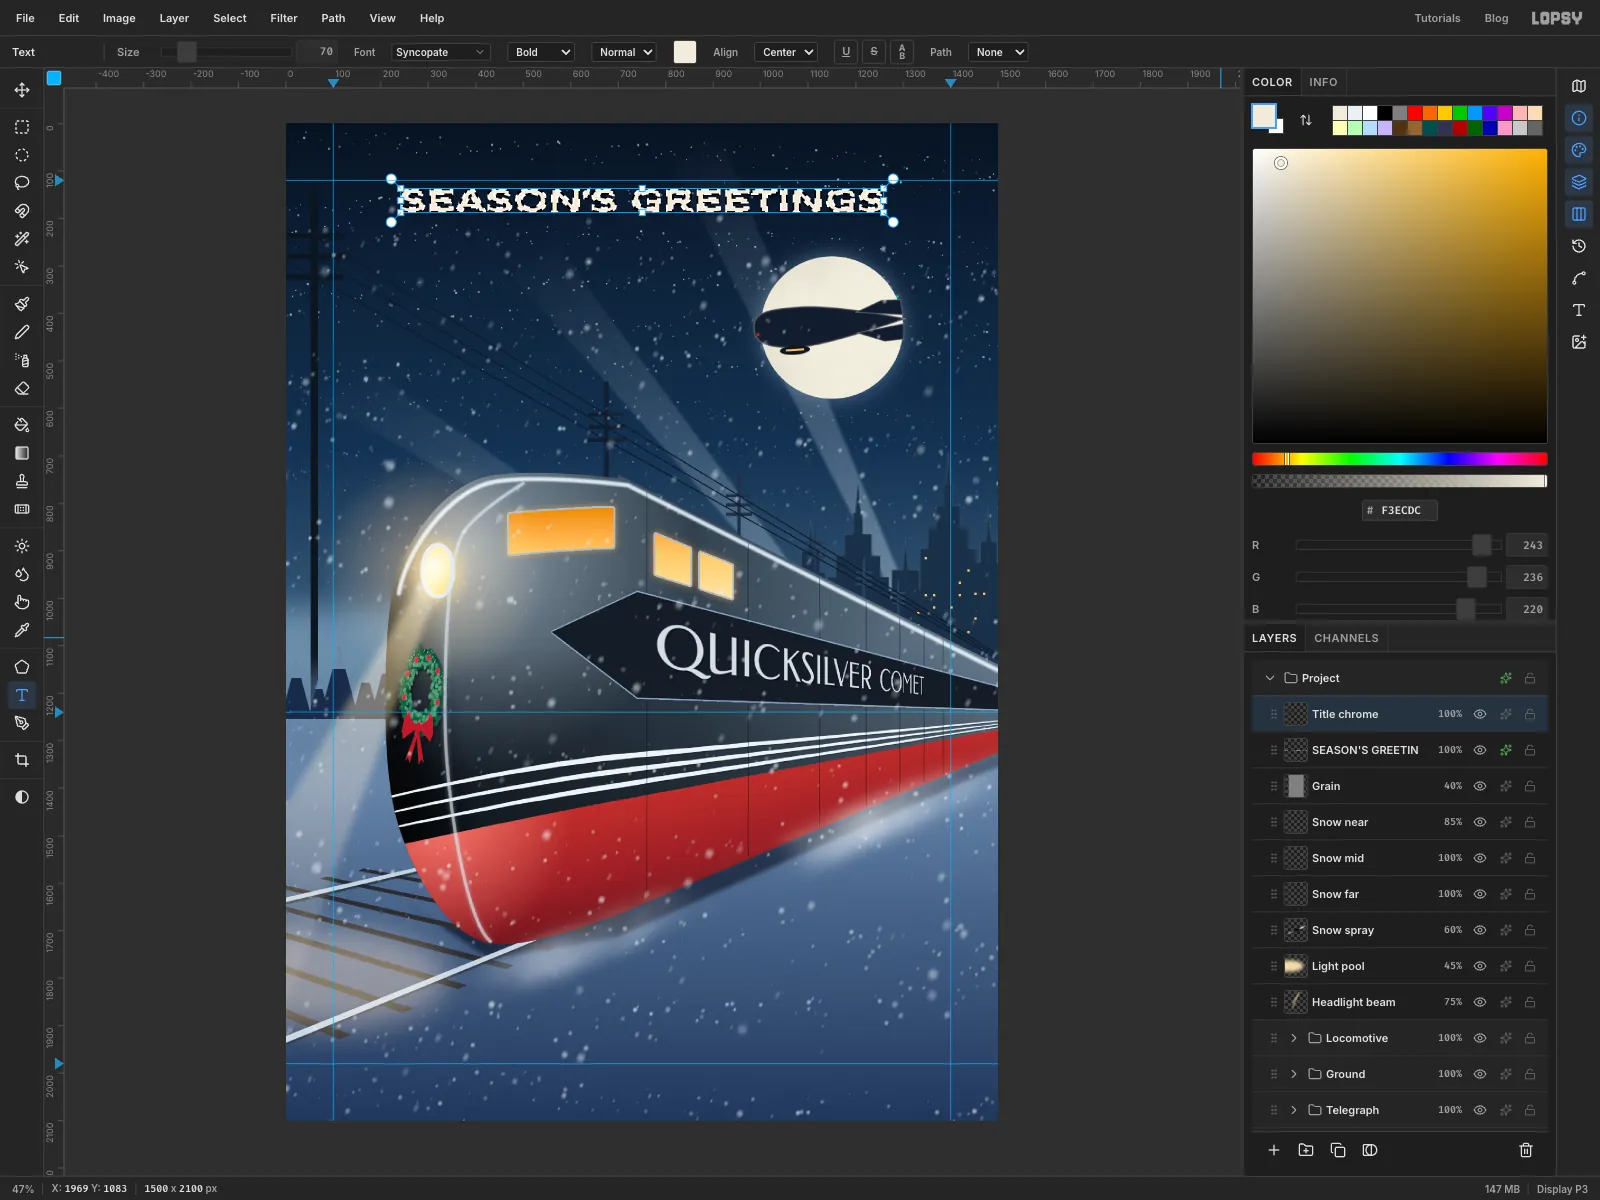
Set the greeting
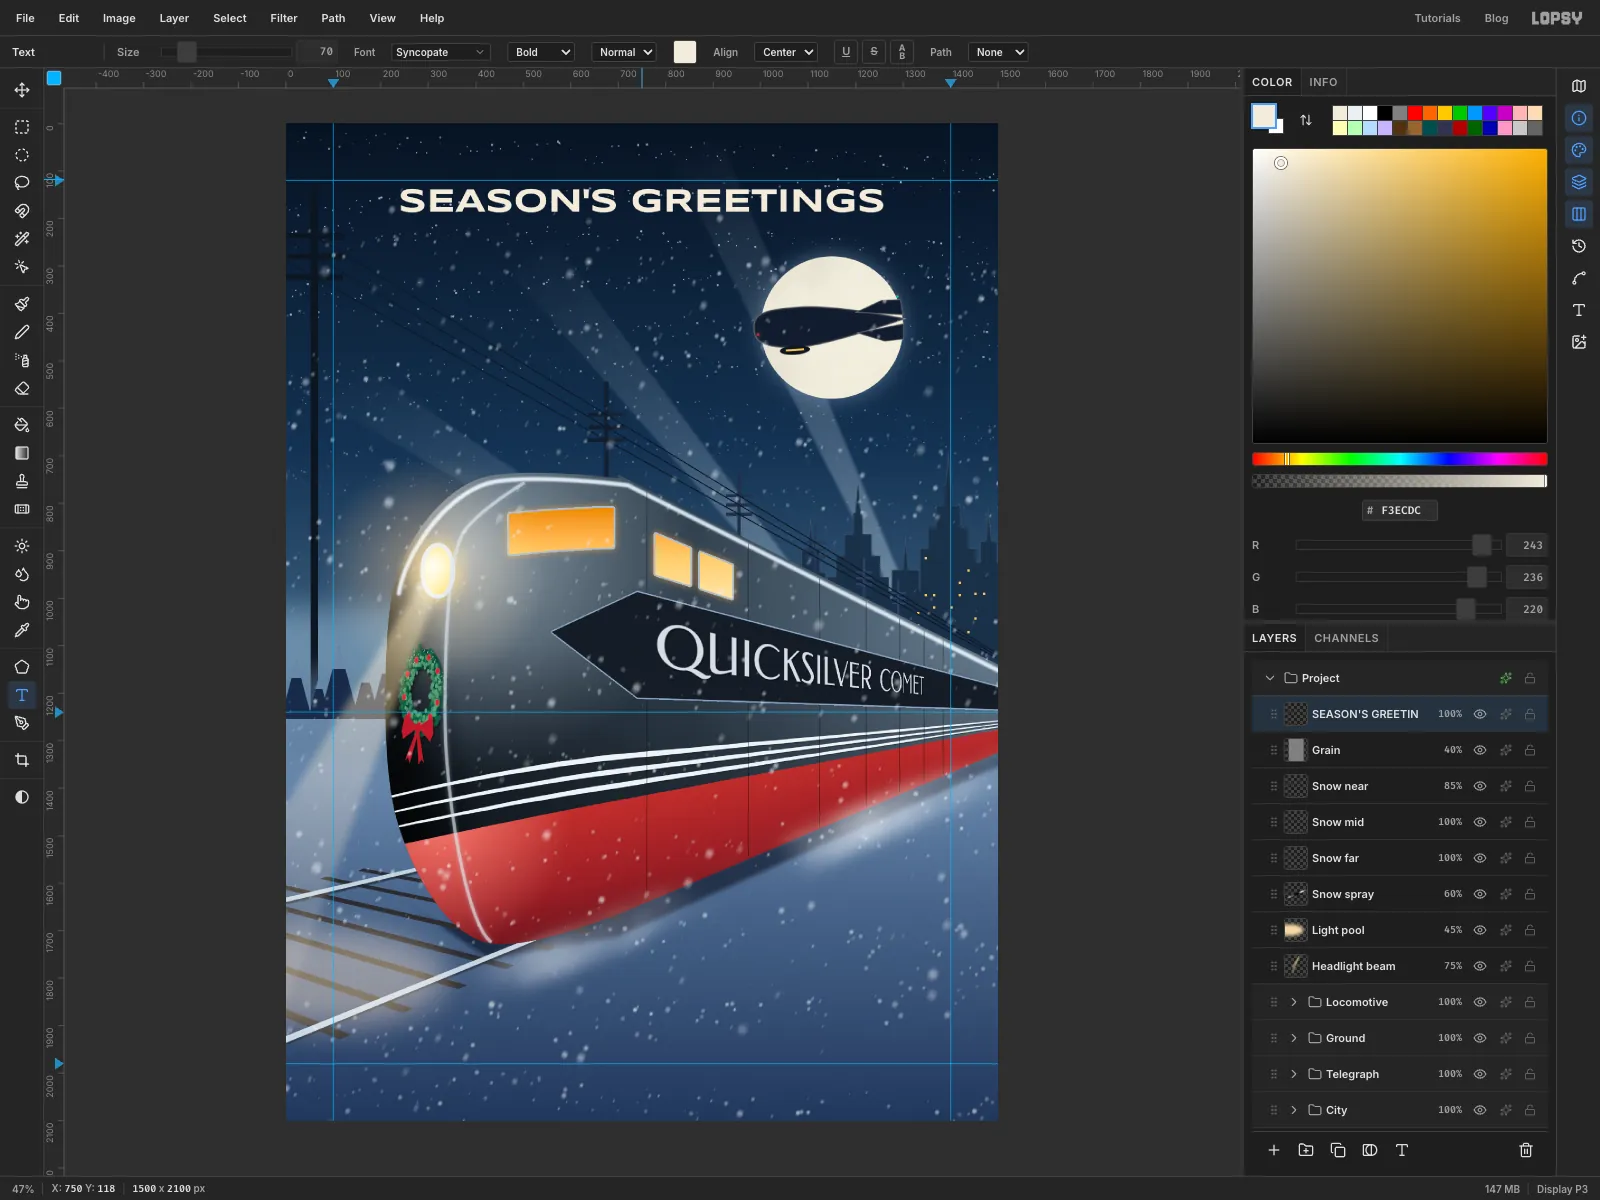
- Pick the Text tool and set Align to Center in the options bar. With centred point text, the spot you click becomes the middle of the line.
- Set the font to Syncopate, weight Bold, Size
70, and the foreground to cream . - Click at
750, 118, just on the top margin guide and halfway across, and typeSEASON'S GREETINGS. Press Tab. - Add a Drop Shadow: Offset Y
6, Blur10, Opacity80, colour .
Syncopate's very wide capitals echo the extended lettering of 1930s travel posters.
-
Plate the title in chrome
- Add a layer called
Title chromeabove the title. - Cmd-click the title layer's thumbnail. The selection follows the letter shapes.
- Make a four-stop gradient:
- at the left.
- just before the middle.
- just after the middle.
- at the right.
- Drag it from the top of the capitals straight down to their baseline (
y 137toy 187). The sharp light-to-dark step in the middle gives the classic chrome horizon line. Deselect.
The live text underneath keeps its drop shadow, and you can still edit it.
- Add a layer called
-
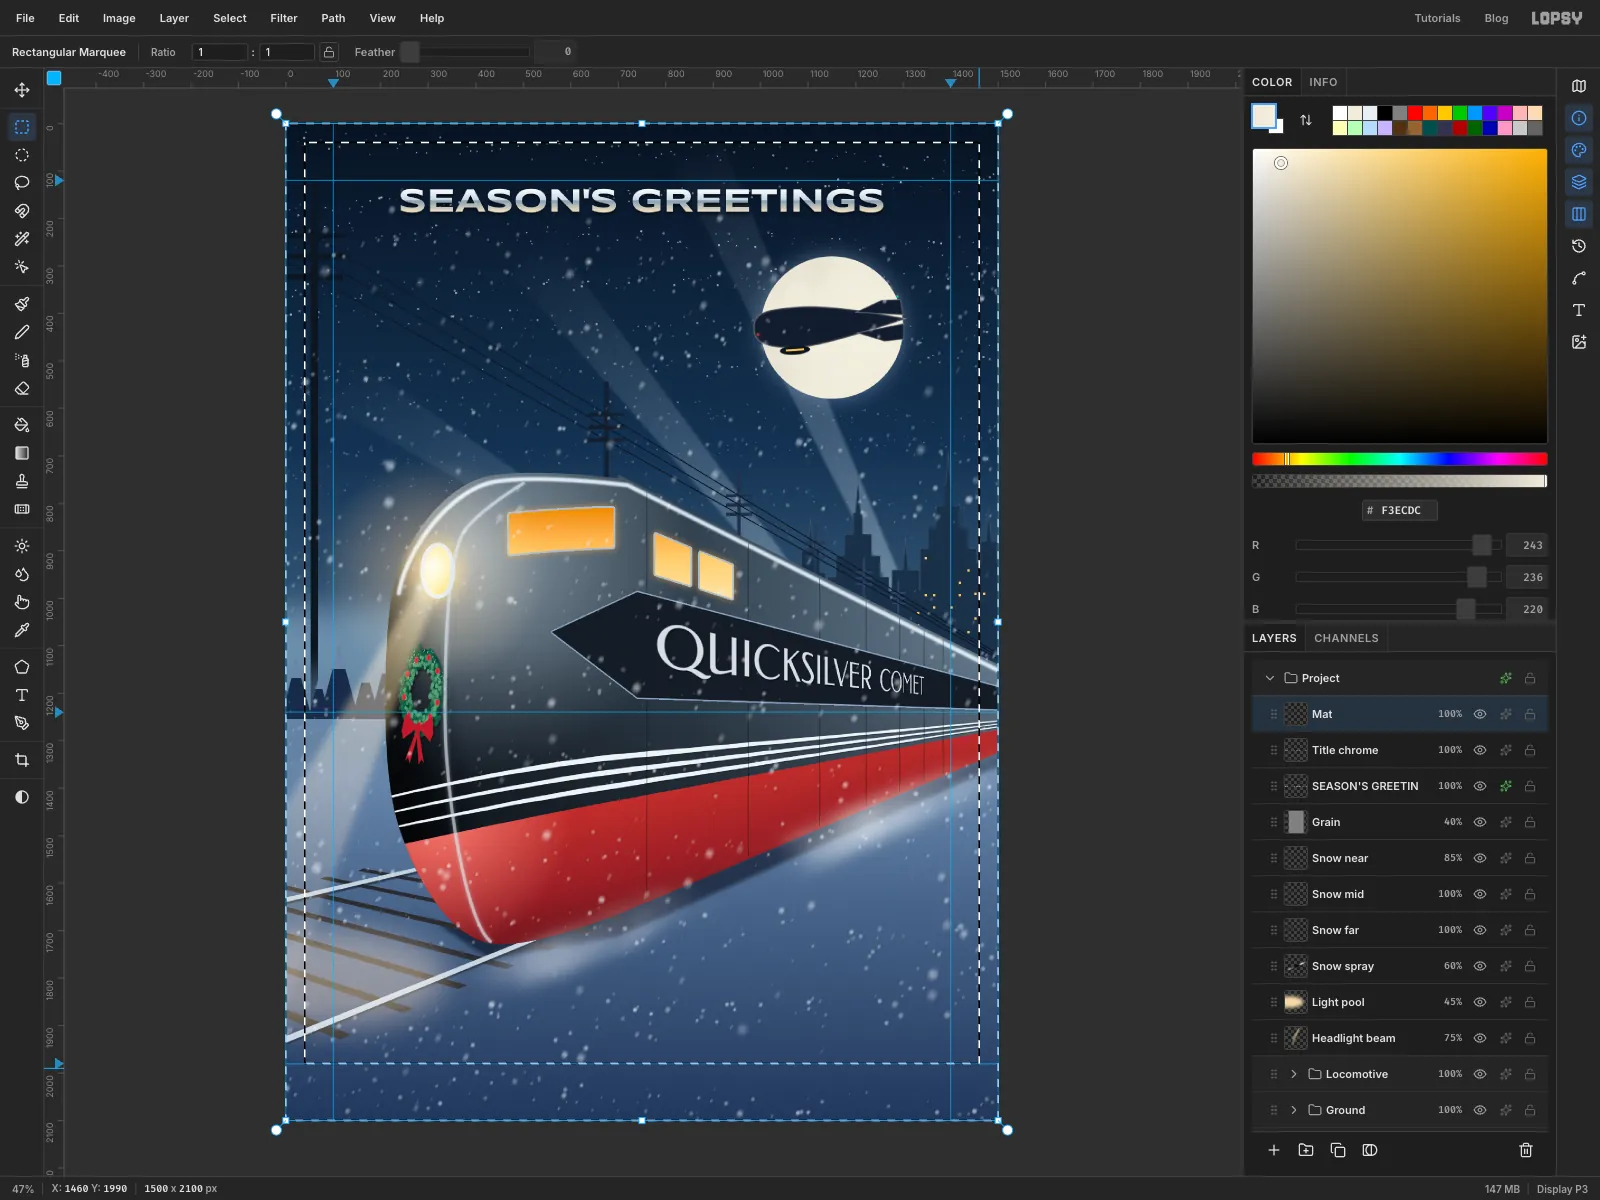
Frame it with a mat
- Add a layer called
Mat. Drag a rectangular marquee from outside the top-left corner to outside the bottom-right one, so it covers the whole canvas. - Hold Alt and drag a second marquee from
40, 40to1460, 1990. Alt subtracts it, leaving a 40 px border with a deeper strip at the bottom for the credit. - Fill with and deselect.
- Add a layer called
Frame line. Drag a marquee from40, 40to1460, 1990, then Alt-drag one from47, 47to1453, 1983to leave a 7 px ring. Fill it with cream and set the layer to75%.
The mat cleanly crops everything that ran off the edge: wires, rails, the train and the snow.
- Add a layer called
-
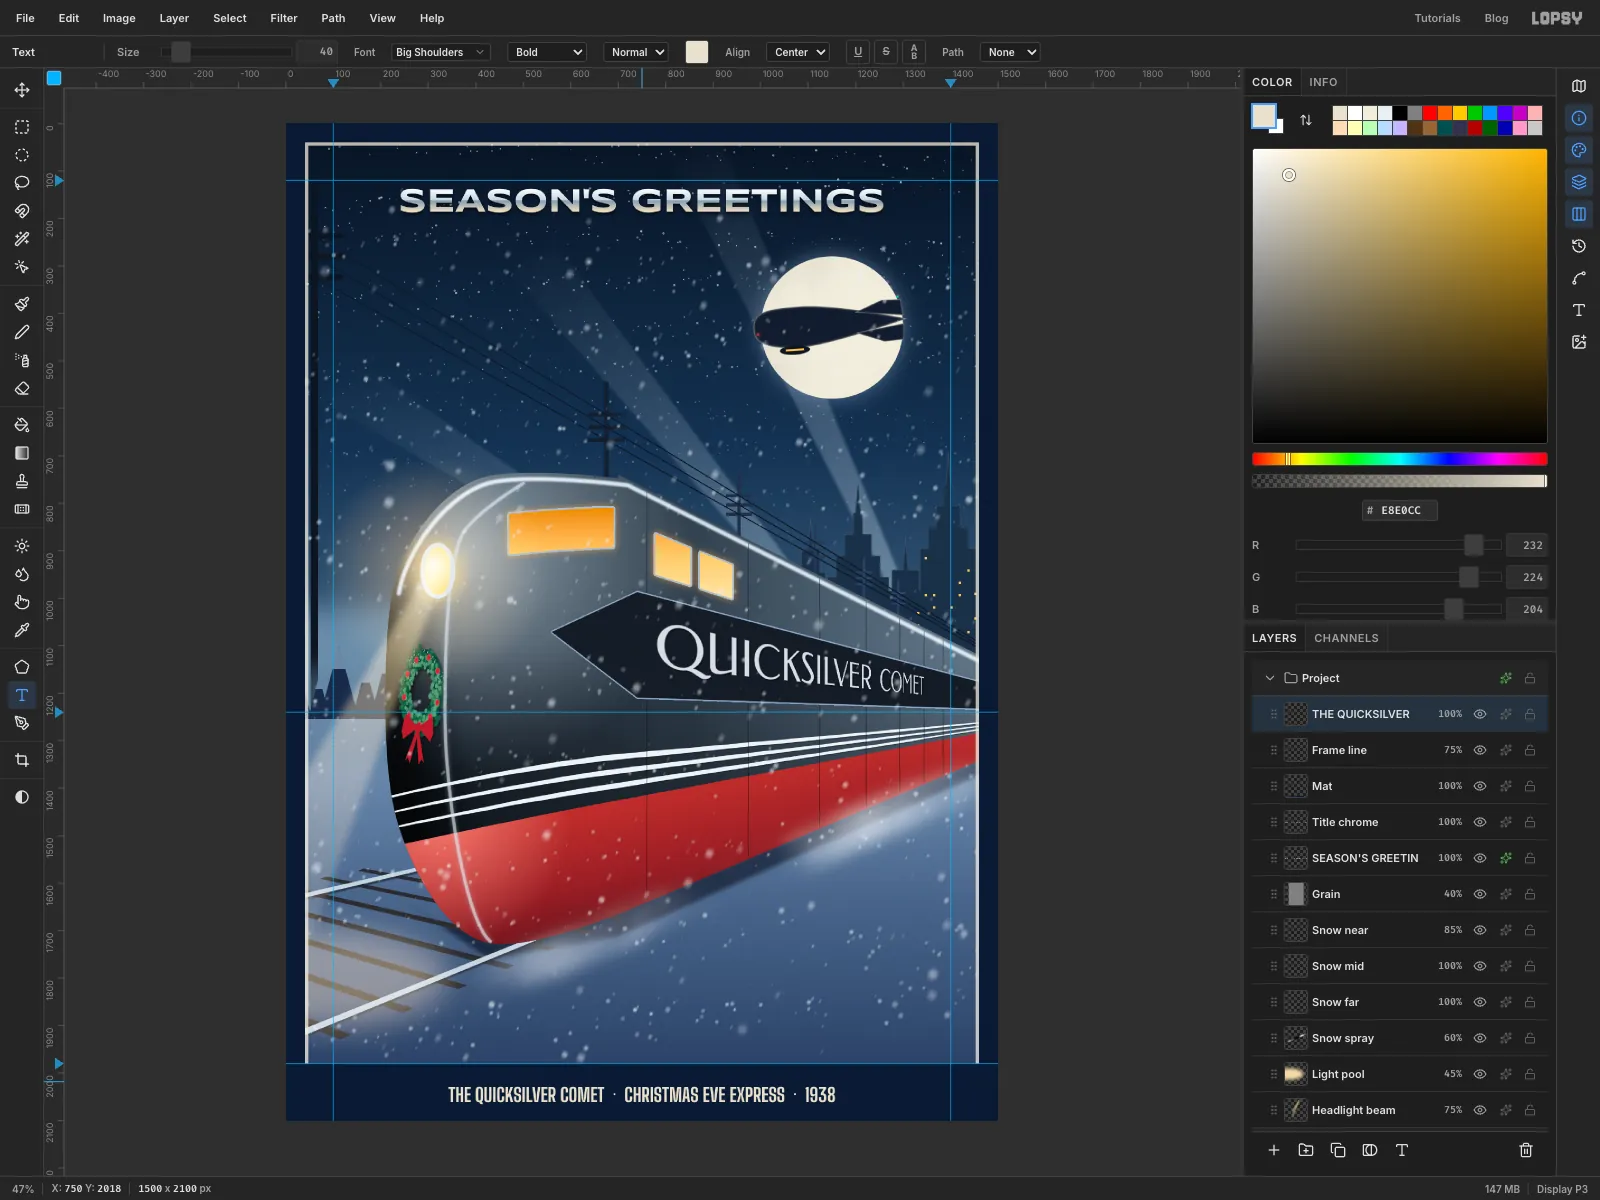
Add the credit line
- With the Text tool still set to Center, choose Big Shoulders, weight Bold, Size
40, colour . - Click at
750, 2018, in the middle of the bottom strip, and typeTHE QUICKSILVER COMET · CHRISTMAS EVE EXPRESS · 1938. Press Tab. - Choose File → Quick Export PNG to save the card, and File → Save Project to keep the layers.
The condensed caps fit the long line comfortably inside the mat, with roughly equal space above and below.
- With the Text tool still set to Center, choose Big Shoulders, weight Bold, Size