Make an Isometric Kayak Rental Flyer
Build a floating isometric harbour in Lopsy by drawing each face flat and then skewing or rotating it into place, and finish a kayak rental flyer.
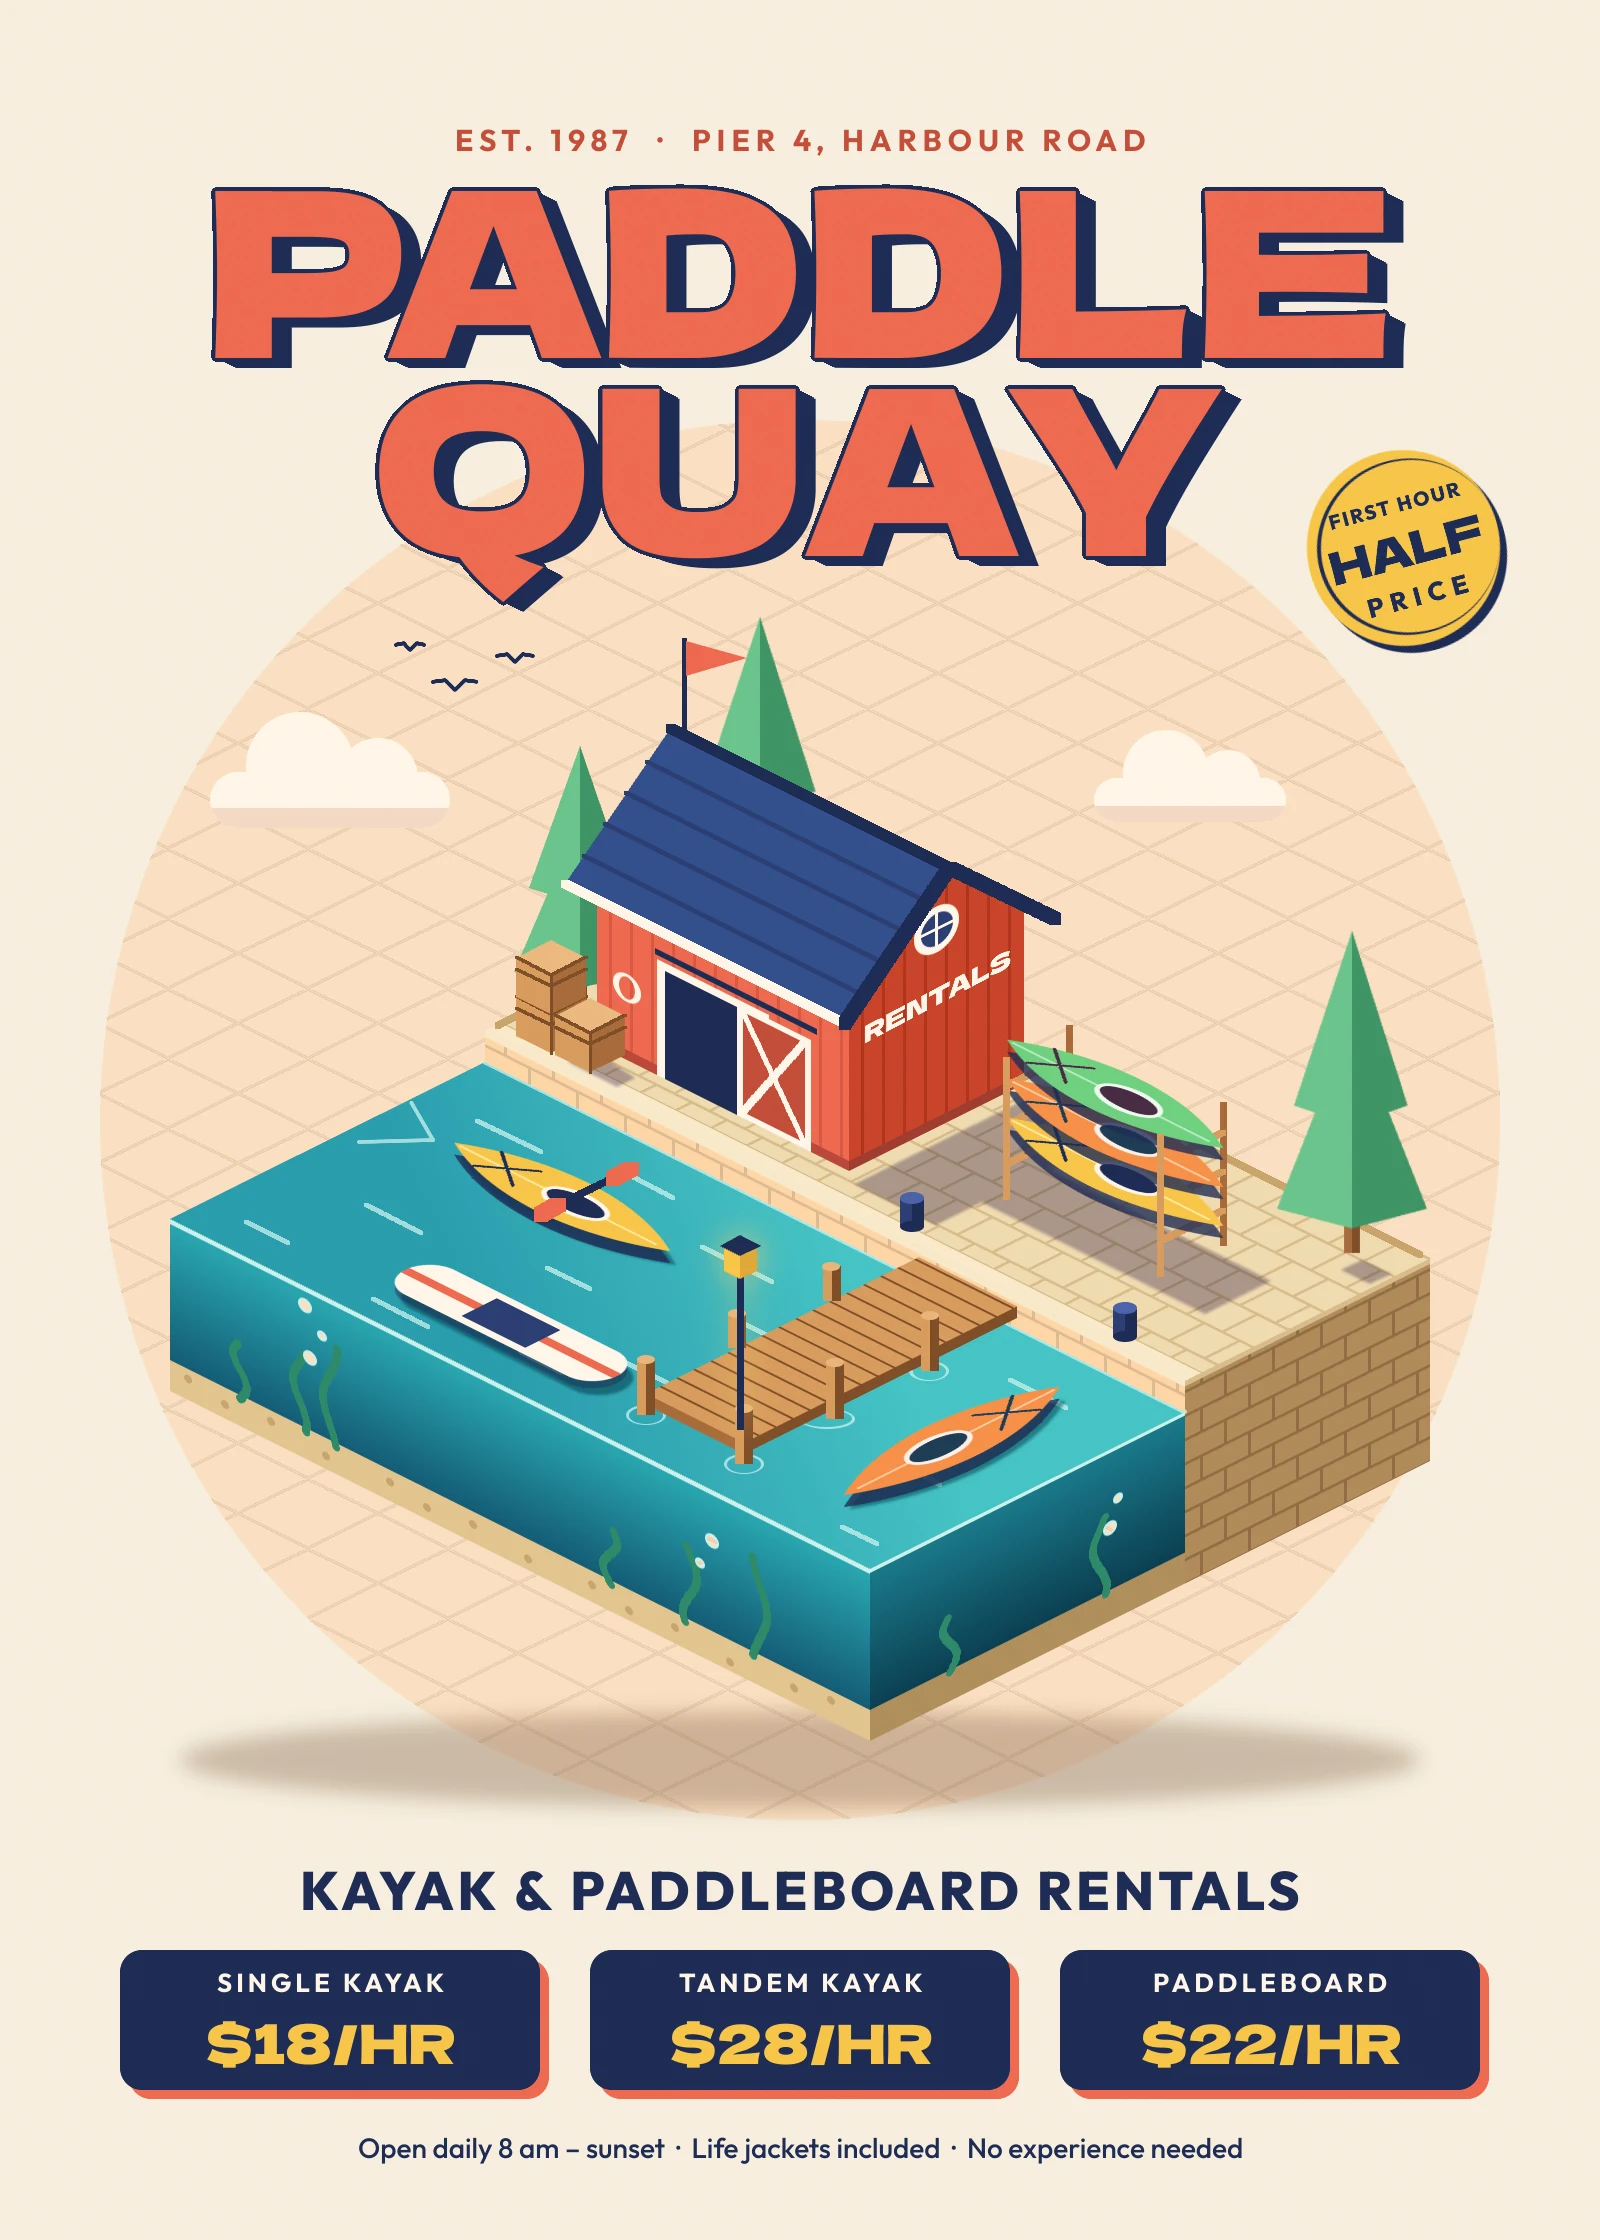
Isometric illustration draws a scene from above and to one side with no vanishing point, so every edge that's parallel in real life stays parallel on the page. It's a favourite for maps, product explainers and small-business flyers because it reads like a toy model: friendly, tidy and easy to understand at a glance.
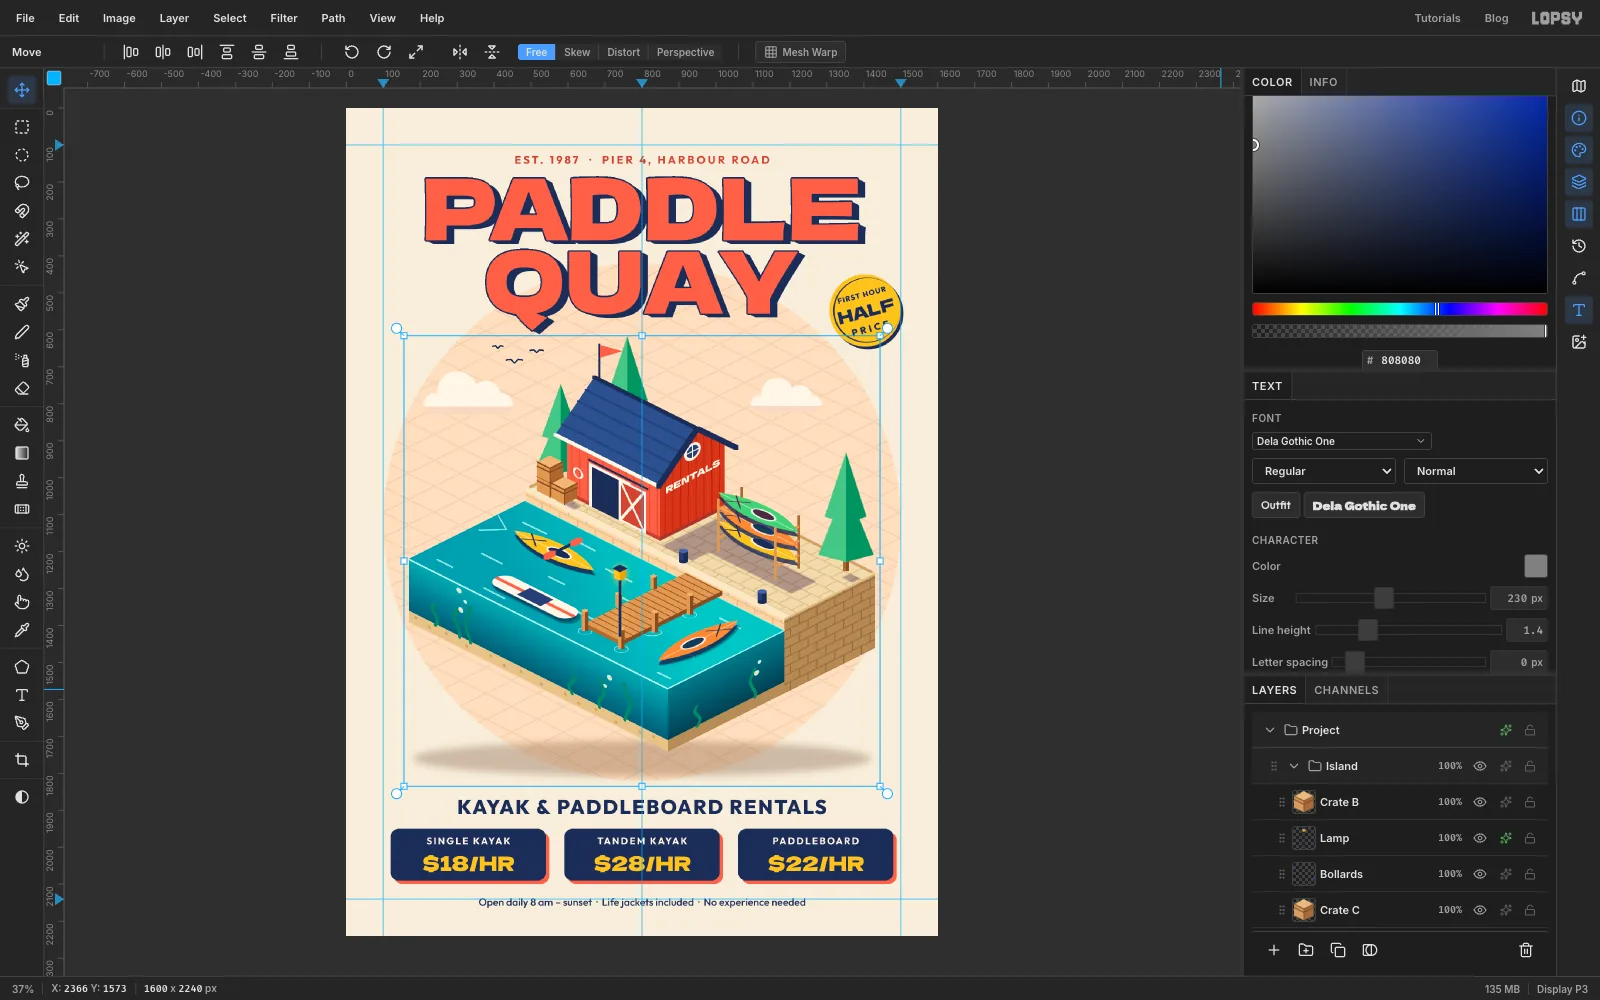
In this tutorial you'll make a flyer for Paddle Quay, a made-up kayak and paddleboard rental shop on a harbour. The picture is a floating block of quay and water, cut open at the front like an aquarium, with a boathouse, a kayak rack and a jetty on it.
The trick that makes this manageable is that you never draw a slanted shape by hand. Every wall, floor and sign is drawn flat and square-on, where it's easy, and then transformed into place:
- Walls are drawn as a plain rectangle, then Skewed: drag the right edge's handle up or down by exactly half the rectangle's width.
- Floors (paving, deck planks, kayaks, the paddleboard) are drawn flat, rotated 45°, then squashed to half their height.
Both moves give the same 2:1 slope (two pixels across for every one down), which is the standard angle for isometric pixel-style art. On this flyer one step along the floor is 70 px across and 35 px down, and one step of height is 78 px straight up.
The flyer is 1600 × 2240 px. Along the way you'll use:
- guides, exact-corner marquees and Select → Inverse
- Define Pattern for five tiles and Fill with Pattern with Row Stagger and offsets
- the Move tool's Skew mode and its rotate and scale handles, on pixels and on live text
- the Pen tool with Path to Selection for the faces you can't skew
- the Gradient, Brush and Pencil, with Shift-click straight lines
- Add Noise, Motion Blur, Brightness/Contrast, Hue/Saturation and Gaussian Blur
- Duplicate Layer, Copy and Paste, an Option-drag copy, Flip Horizontal and Merge Down
- Drop Shadow, Stroke and Outer Glow, and Multiply and Overlay layers
- the Shape tool's click-to-size dialog for rounded cards
- groups that you move and rotate as one piece
- live text in Dela Gothic One and Outfit
The palette is warm cream and peach paper with coral, navy and teal, and sunshine yellow as the accent:
-
Paper
-
sun disc
-
grid lines
-
Coral
-
navy
-
roof blue
-
trim
-
Water
-
front cutaway
-
side cutaway
-
Sand
-
paving
-
brick
-
wood
-
Kayak yellow
-
pines
-
ripples
When a step just says navy, use . Trim or white means , coral means and yellow means .
-
Set up the paper and the sun disc
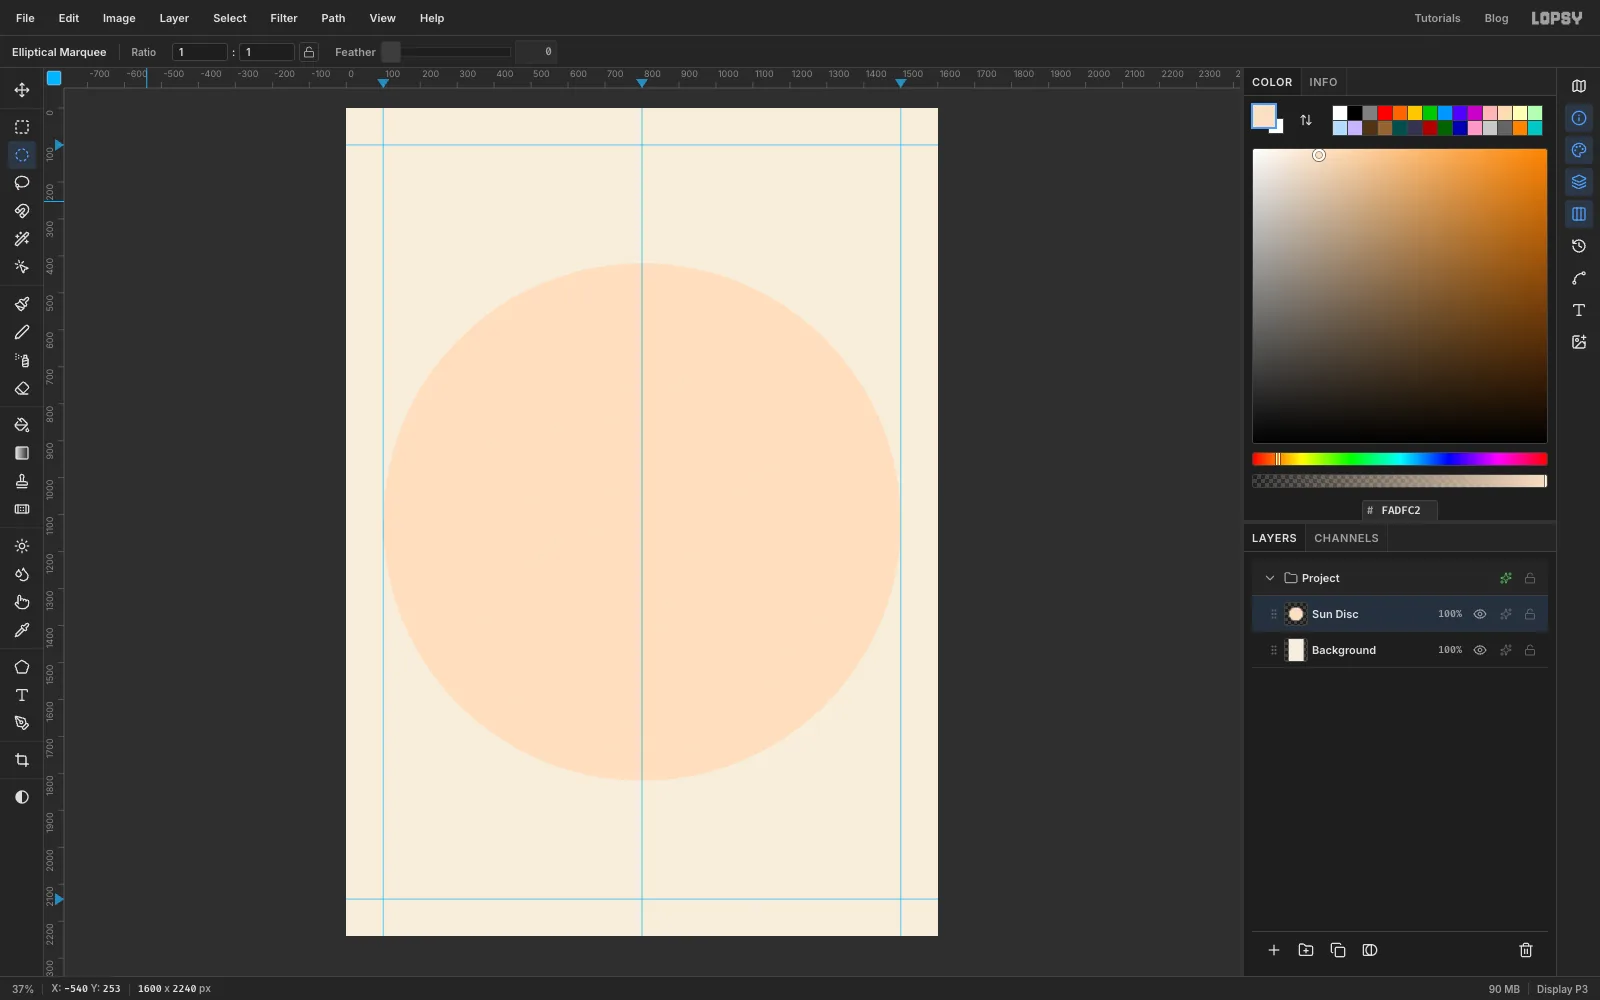
Open Lopsy and create a new document 1600 wide by 2240 tall.
- Select Background, set the foreground colour to and choose Edit → Fill.
- Click the top ruler at
100,800and1500, and the left ruler at100and2140, for the margins and the centre line. - Rename Layer 1 to
Sun Disc. With the Elliptical Marquee from the toolbox, make an exact-corner circle from100, 420to1500, 1820and fill it with . Deselect with Cmd+D.
-
Draw one tile of isometric grid
The disc gets a faint isometric grid, the kind of graph paper isometric illustrators sketch on. You only have to draw one diamond of it.
- Click Add Layer and name it
Grid Tile. - Pick the Pencil (N), set Size to
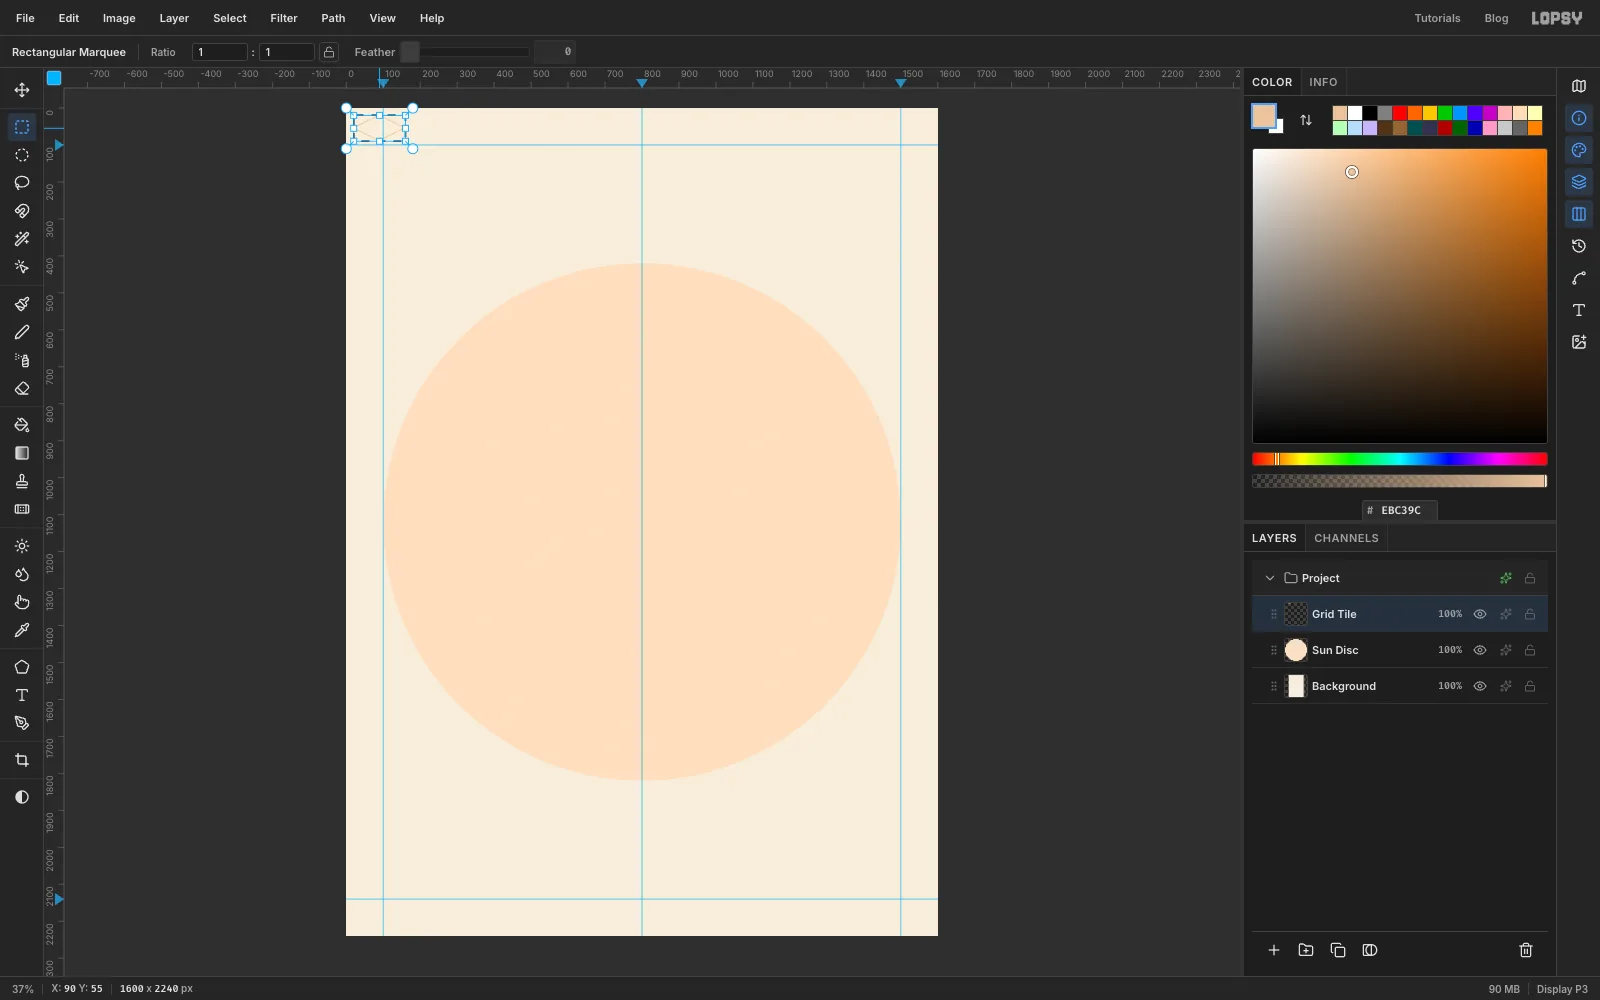
2and the colour to . - Click at
20, 55, then hold Shift and click at90, 20,160, 55,90, 90and back at20, 55. Shift-click draws a straight line from the last point, so you get a diamond 140 px wide and 70 px tall. - Make an exact-corner selection from
20, 20to160, 90, a box exactly around the diamond, and choose Edit → Define Pattern. - Deselect and delete the Grid Tile layer with the bin button. The pattern stays.
- Click Add Layer and name it
-
Fill the disc with the grid
- Select Sun Disc, click Add Layer and name the new layer
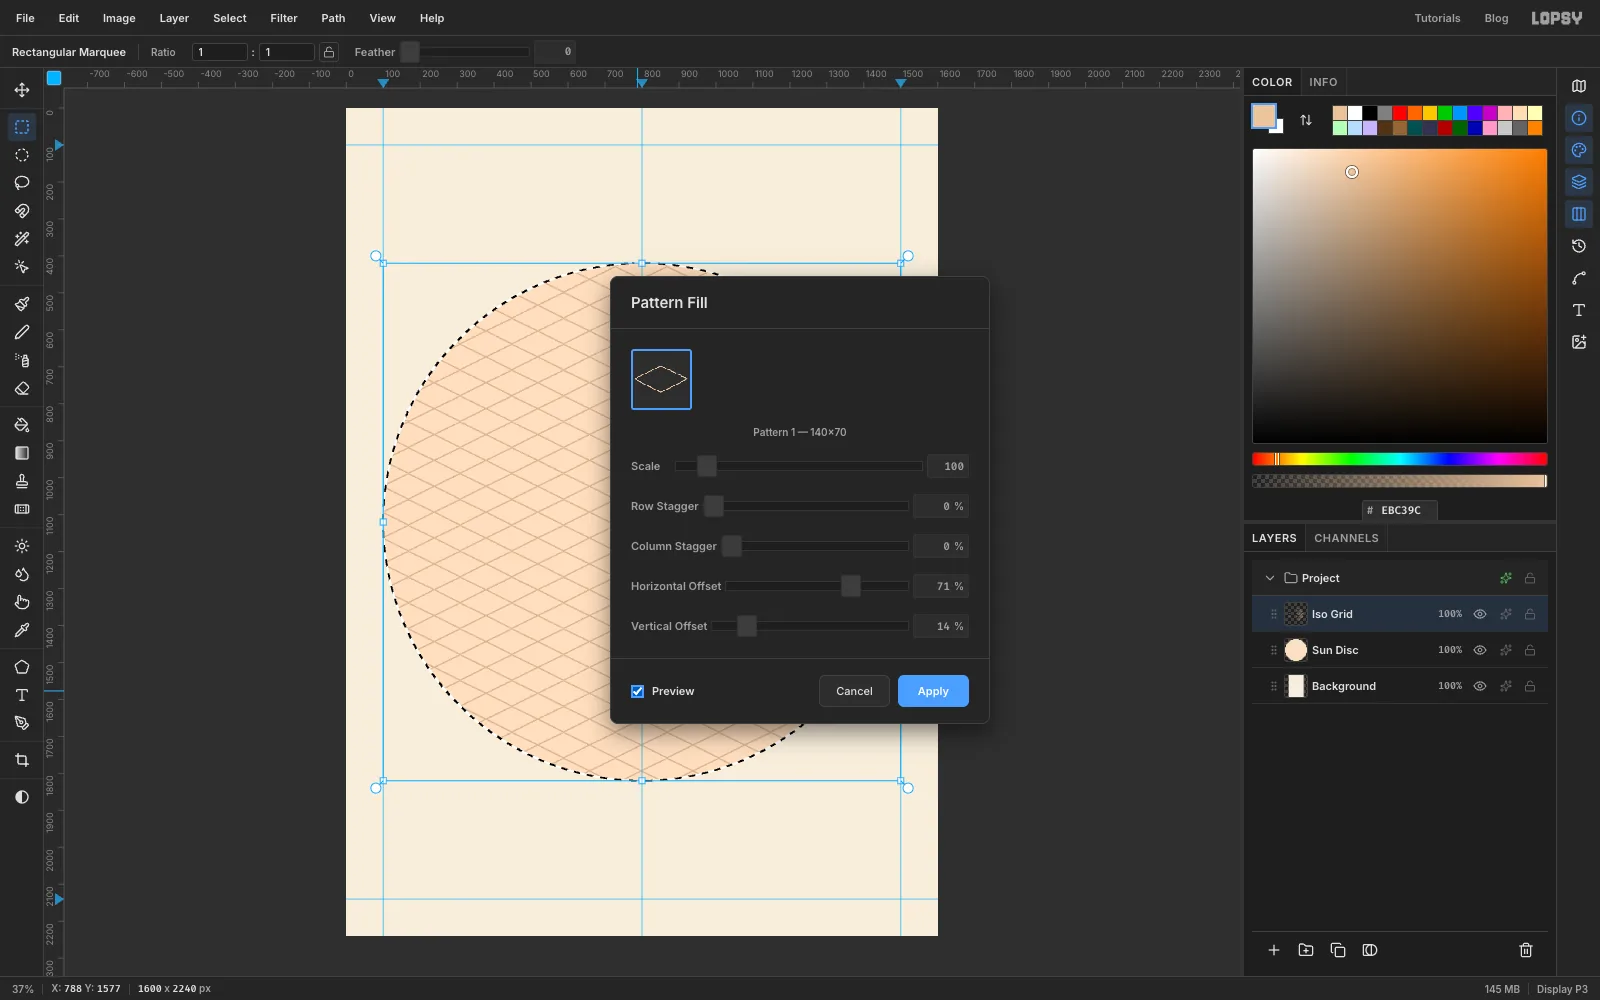
Iso Grid. It lands just above the disc. - Cmd-click the Sun Disc thumbnail to select the disc's shape.
- Choose Edit → Fill with Pattern… and click the diamond.
- Set Horizontal Offset to
71and Vertical Offset to14. That slides the grid so one of its corners lands at730, 920, which is where the back corner of the harbour block will go, so the block sits on the grid. - Click Apply, deselect, and set the layer's opacity to
35%.
- Select Sun Disc, click Add Layer and name the new layer
-
Make four texture tiles
Four more patterns will texture the brick quay, the paving, the jetty and the boathouse walls. Make a new layer called
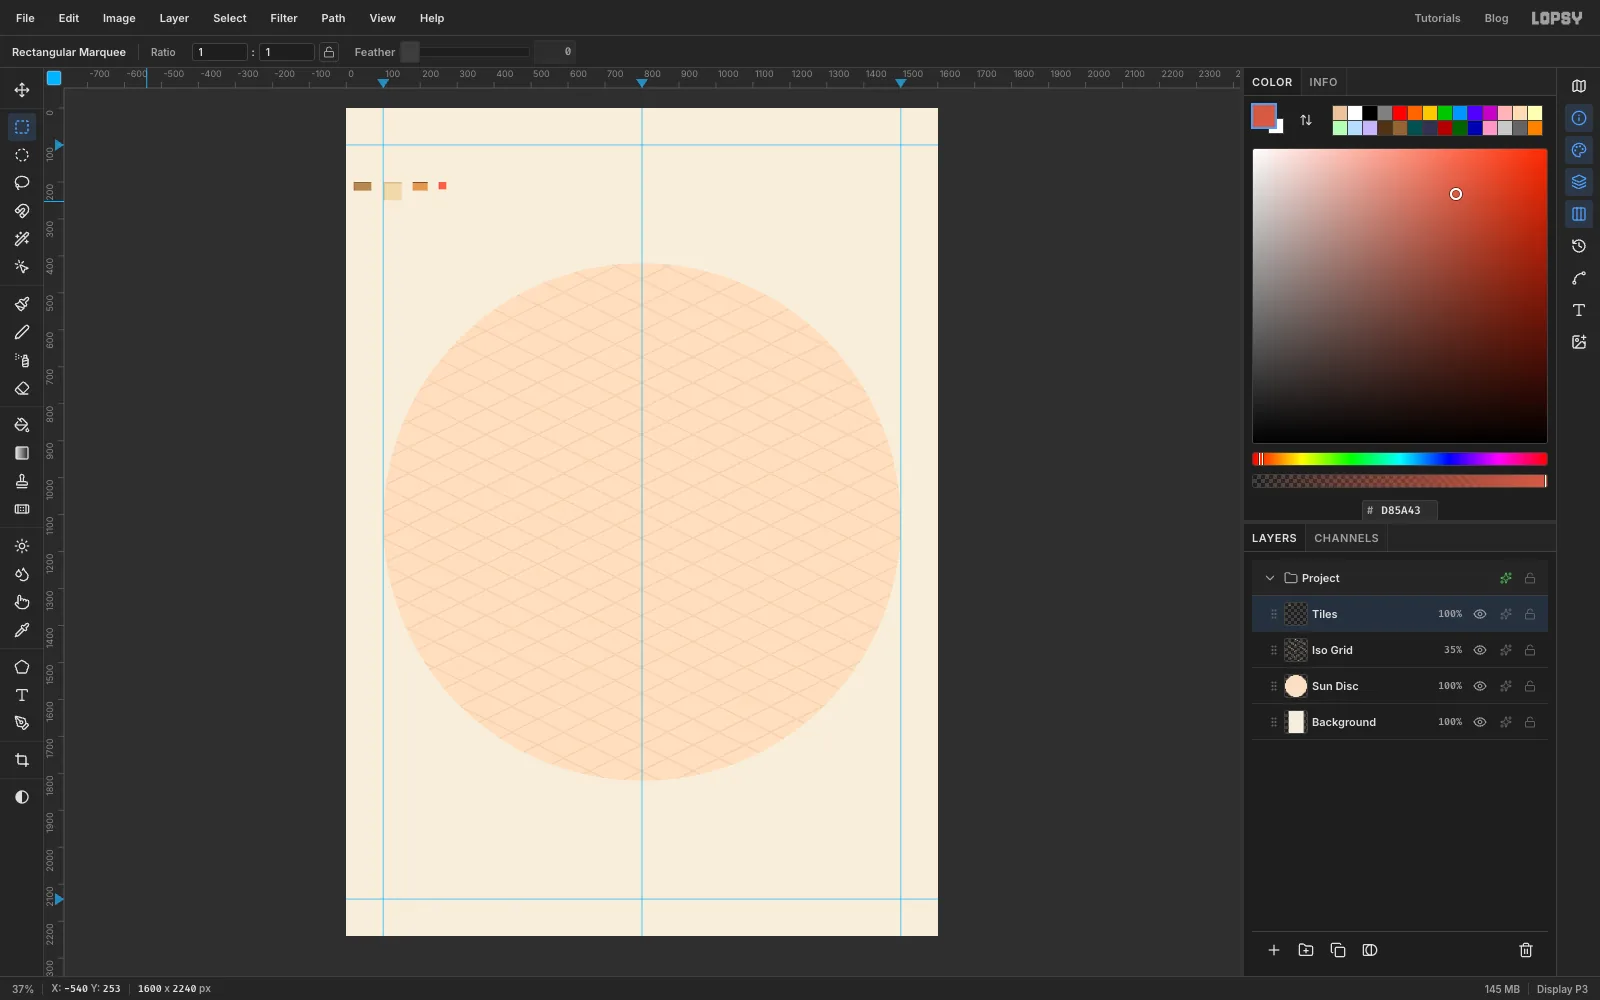
Tilesand fill each small rectangle with exact-corner selections:- Brick, 48 × 24: fill
20, 200to68, 224with . Then fill a 3 px strip along its top (20, 200to68, 203) and down its left side (20, 200to23, 224) with the mortar colour . - Paving, 50 × 50: fill
100, 200to150, 250with , with 4 px joints of along the top and left. - Plank, 40 × 24: fill
180, 200to220, 224with , with a 3 px gap of along the top. - Batten, 21 × 20: fill
250, 200to271, 220with coral , with a 3 px stripe of down the left.
Select each tile with an exact-corner marquee and choose Edit → Define Pattern. Do them in this order, so they line up in the pattern picker the same way. Then delete the Tiles layer.
- Brick, 48 × 24: fill
-
Paint the front cutaway flat
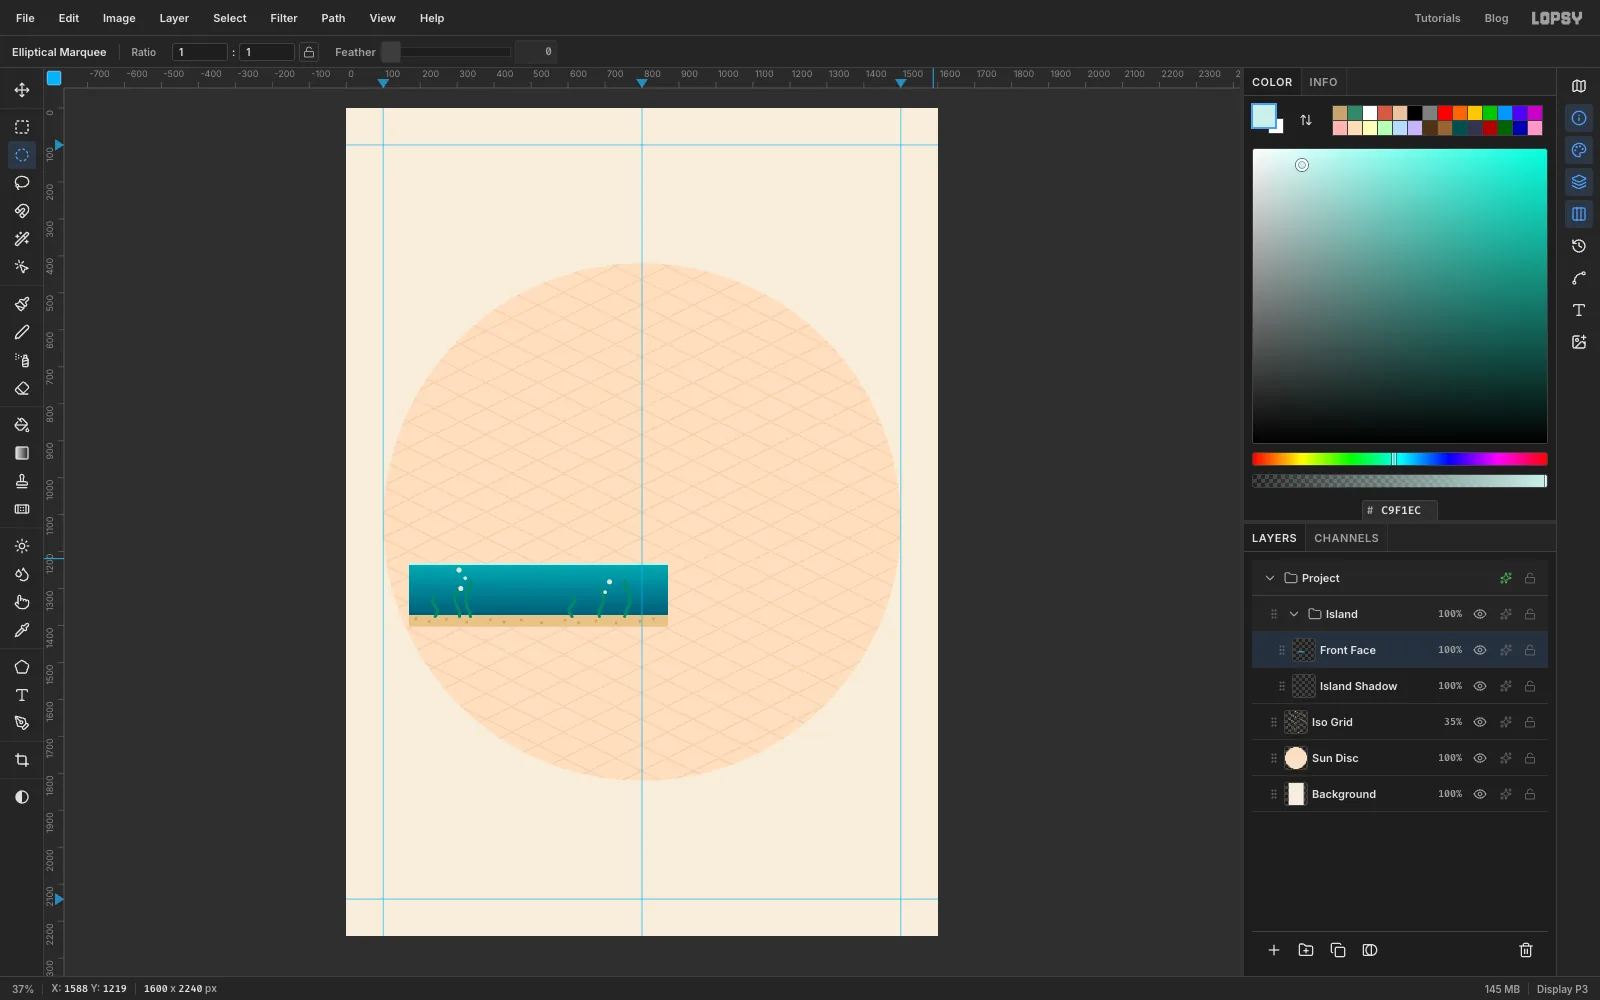
The front of the block is cut open to show the water. Draw it flat first.
- Select Iso Grid, click New Group and name the group
Island. Every layer of the harbour goes in this group. - With the group selected, click Add Layer and name it
Island Shadow. It stays empty until near the end, but the island's shadow has to sit under everything else, so its layer comes first. - Click Add Layer again and name the new layer
Front Face. - Select from
170, 1231to870, 1403. Pick the Gradient tool (G), set a linear gradient from to , and drag straight down from the top of the selection to1372. - Fill a sandy seabed from
170, 1372to870, 1403with , and a thin 5 px highlight along the very top with for the water's surface. - Pick the Brush (B) at size
9with and draw six wavy strands of seaweed up from the sand, 55 to 100 px tall. Dab a few pebbles along the sand in . - For bubbles, Shift-drag a few small circles with the Elliptical Marquee above two of the strands, fill them with , choose Select → Shrink… by
2and press Delete. That leaves thin rings.
- Select Iso Grid, click New Group and name the group
-
Skew the front face into place
- Select the whole rectangle again, from
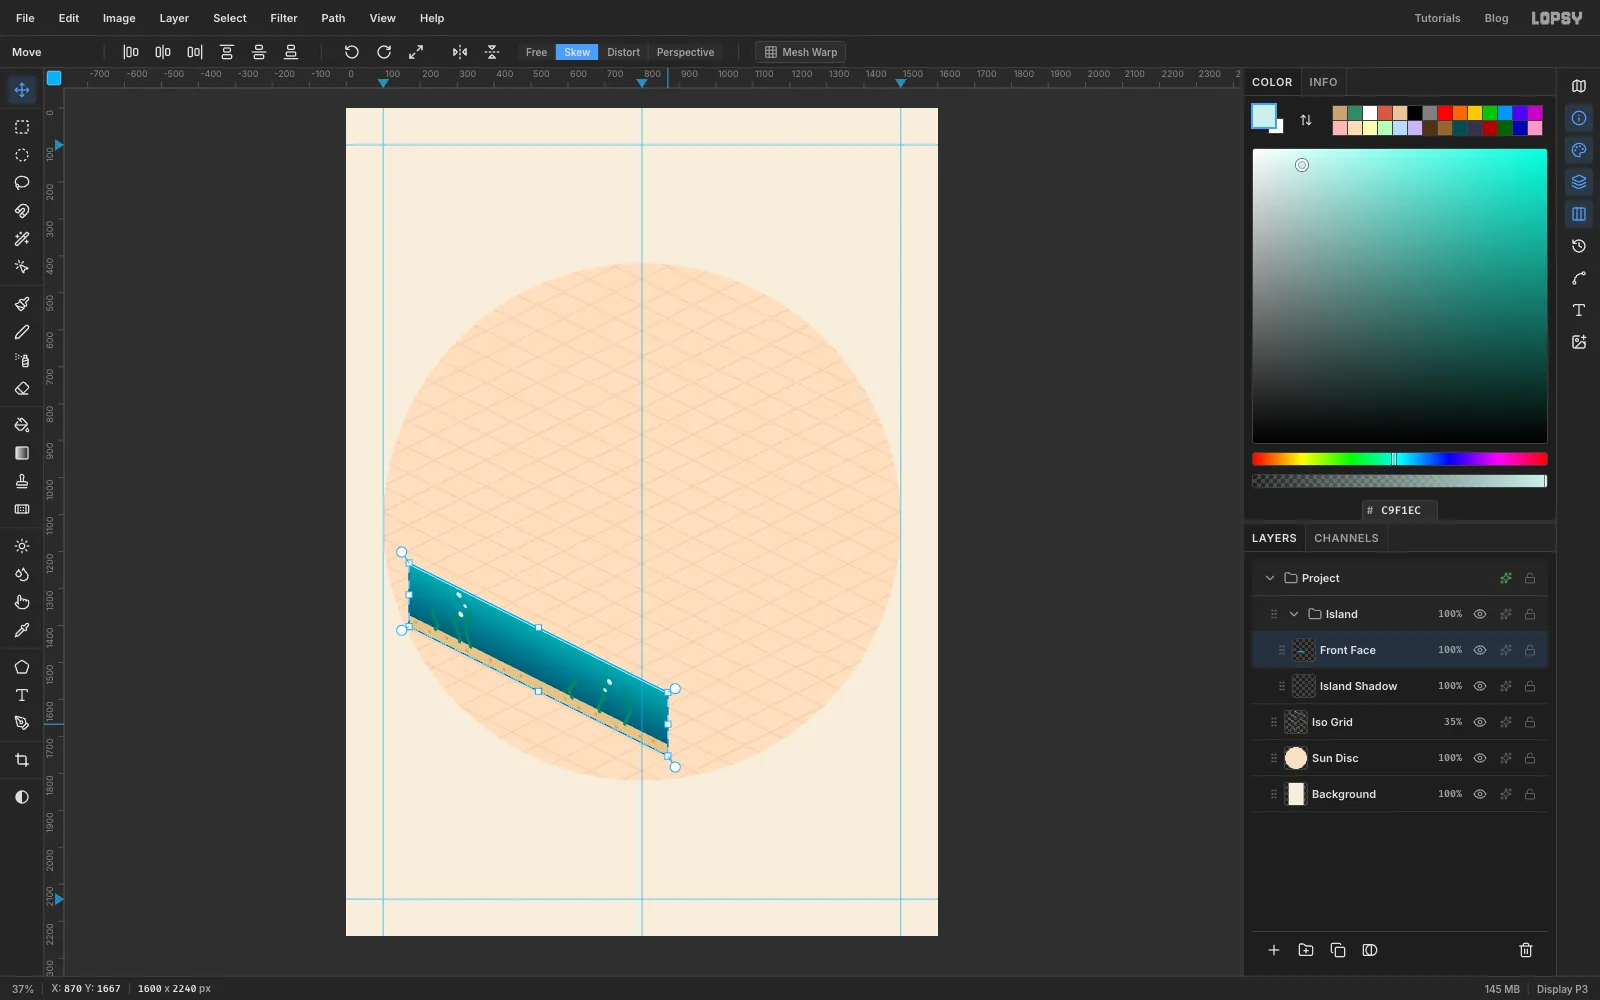
170, 1231to870, 1403. - Pick the Move tool (V) and click Skew in the options bar.
- Grab the handle in the middle of the right edge and drag it straight down by 350 px, half the rectangle's 700 px width. In Skew mode the edge follows the pointer exactly, so watch the status bar: you're dragging from about Y
1317to1667. - Deselect with Cmd+D to apply the transform.
The left edge stays put and the right edge drops, so the top edge now runs down at the isometric slope. The seaweed stays upright, just as it should.
- Select the whole rectangle again, from
-
Paint the side cutaway flat
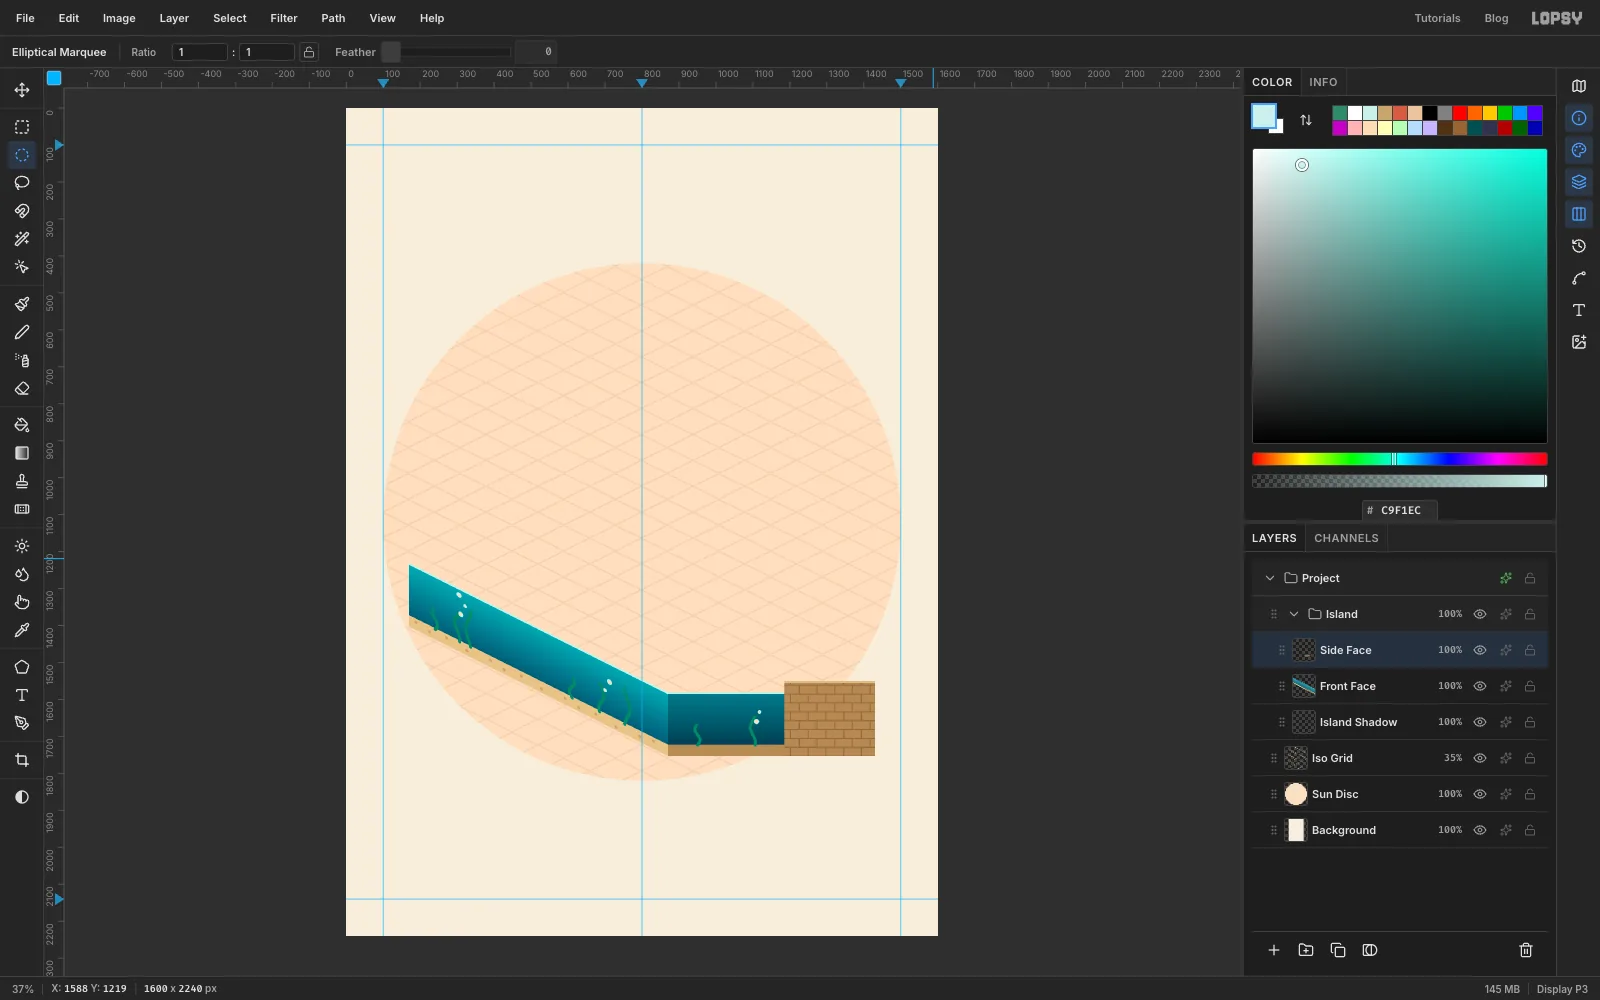
The right side of the block shows water at the front and the quay's brick wall at the back. It's in shade, so it's darker than the front.
Add a layer named
Side Faceand paint on it:- Select from
870, 1581to1185, 1722and drag a linear gradient from at the top to at the bottom. - Fill the seabed below it,
870, 1722to1185, 1753, with , and a 4 px surface line along its top with . The top 31 px above the water stay empty: that's the air between the water and the quay. - Select the brick part,
1185, 1550to1430, 1753, choose Edit → Fill with Pattern…, pick the brick, set Row Stagger to50so the rows are offset like real brickwork, and click Apply. - Fill a 6 px cap of along the top of the brick.
- Add two strands of seaweed and a couple of bubbles in the water part, as before.
- Select from
-
Skew the side face up
Select the whole side,
870, 1550to1430, 1753, switch to the Move tool in Skew mode and drag the middle-right handle straight up by 280 px, half of its 560 px width. Deselect.The two faces now meet at the front corner,
870, 1581, and the block has its shape.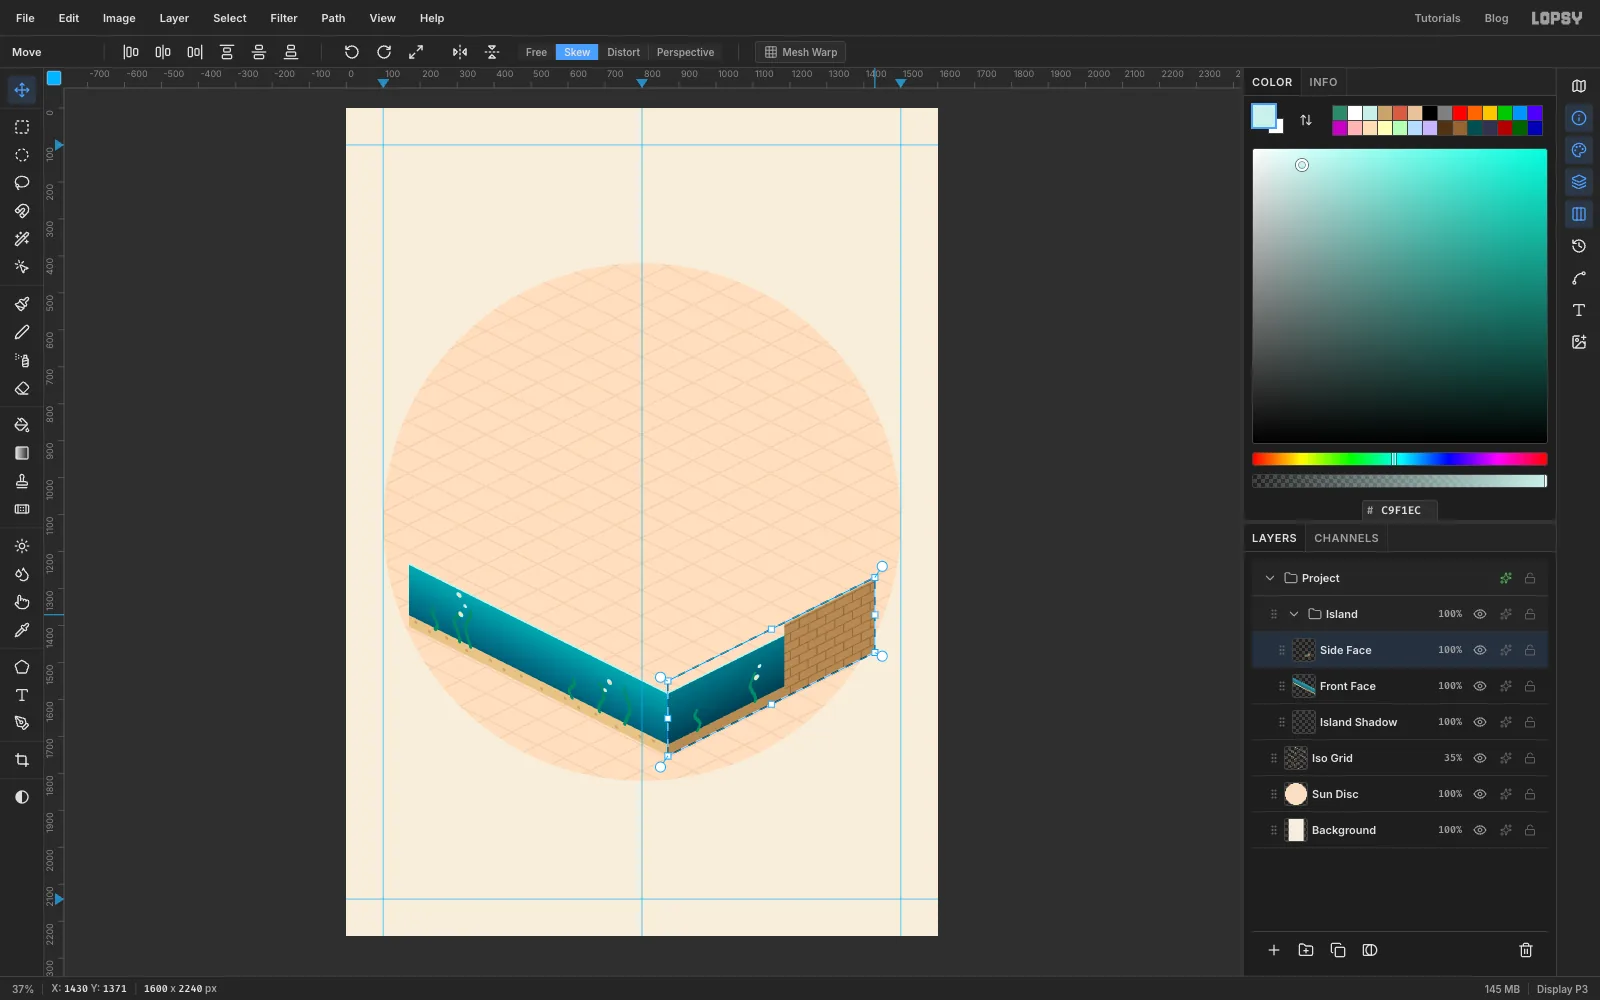
-
Lay the water surface with the Pen
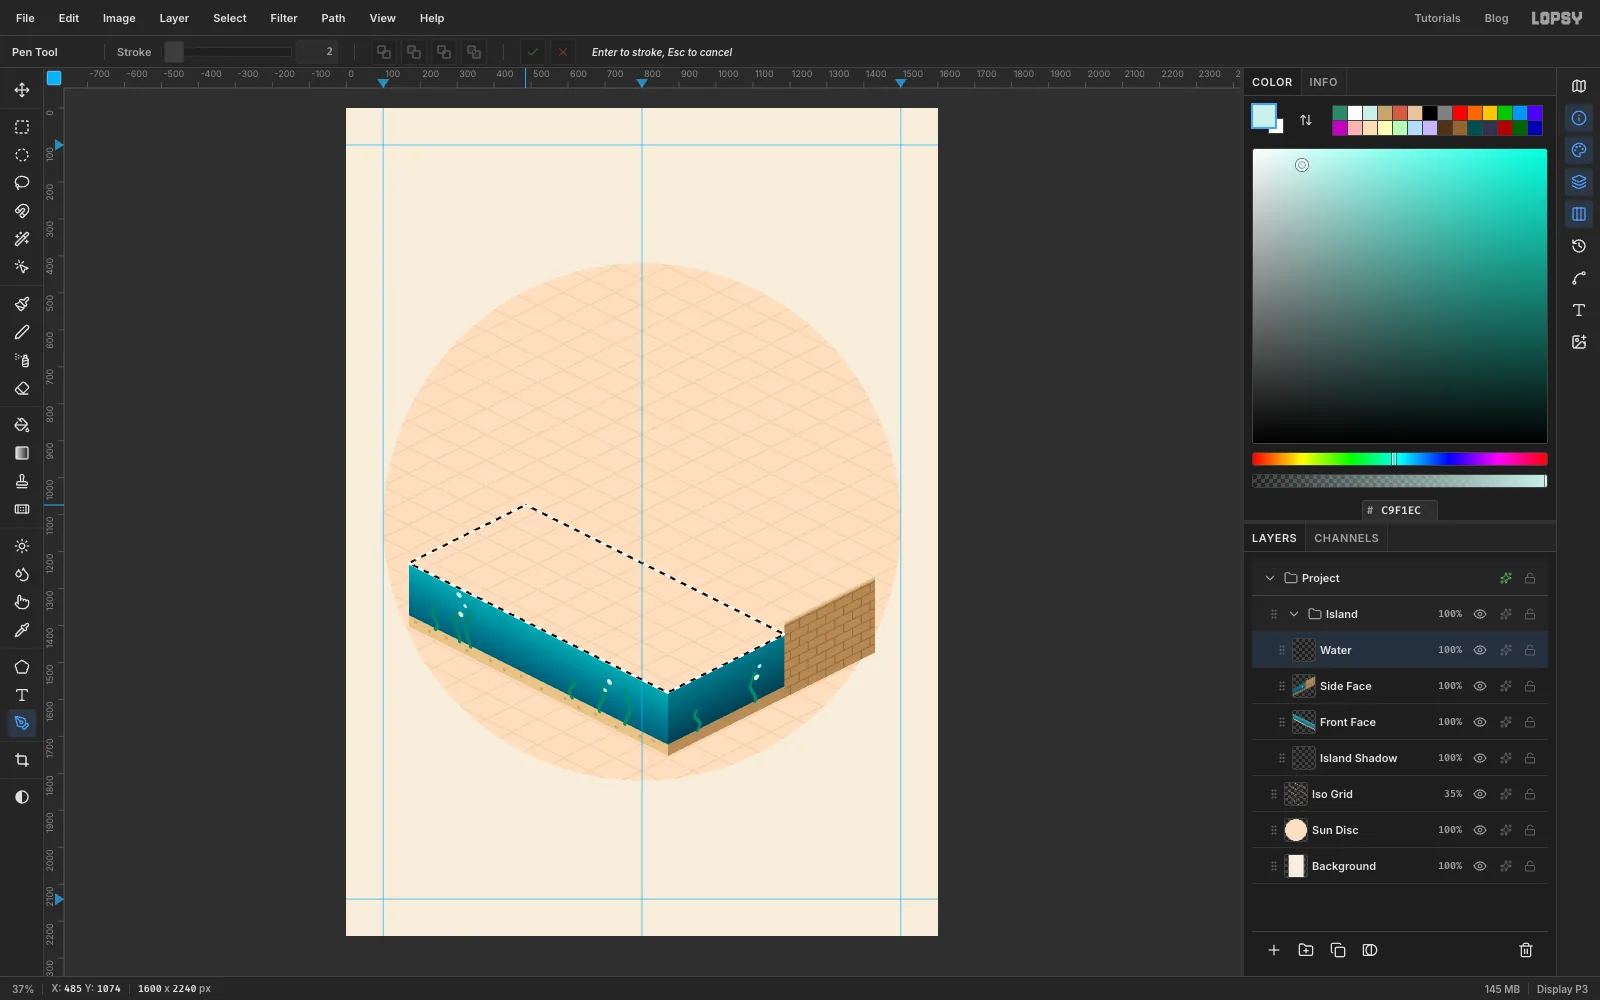
The water's surface is a parallelogram. You can't make that with a marquee, but the Pen tool (P) does it in four clicks.
- Add a layer named
Waterabove Side Face. - With the Pen, click at
485, 1074,1185, 1424,870, 1581and170, 1231, then click the first point again to close the path. - In the Paths panel, click Path to Selection, then Delete Path.
- Drag a linear gradient from at the back edge to at the front, roughly from
835, 1249to520, 1406. Deselect.
- Add a layer named
-
Add the quay wall
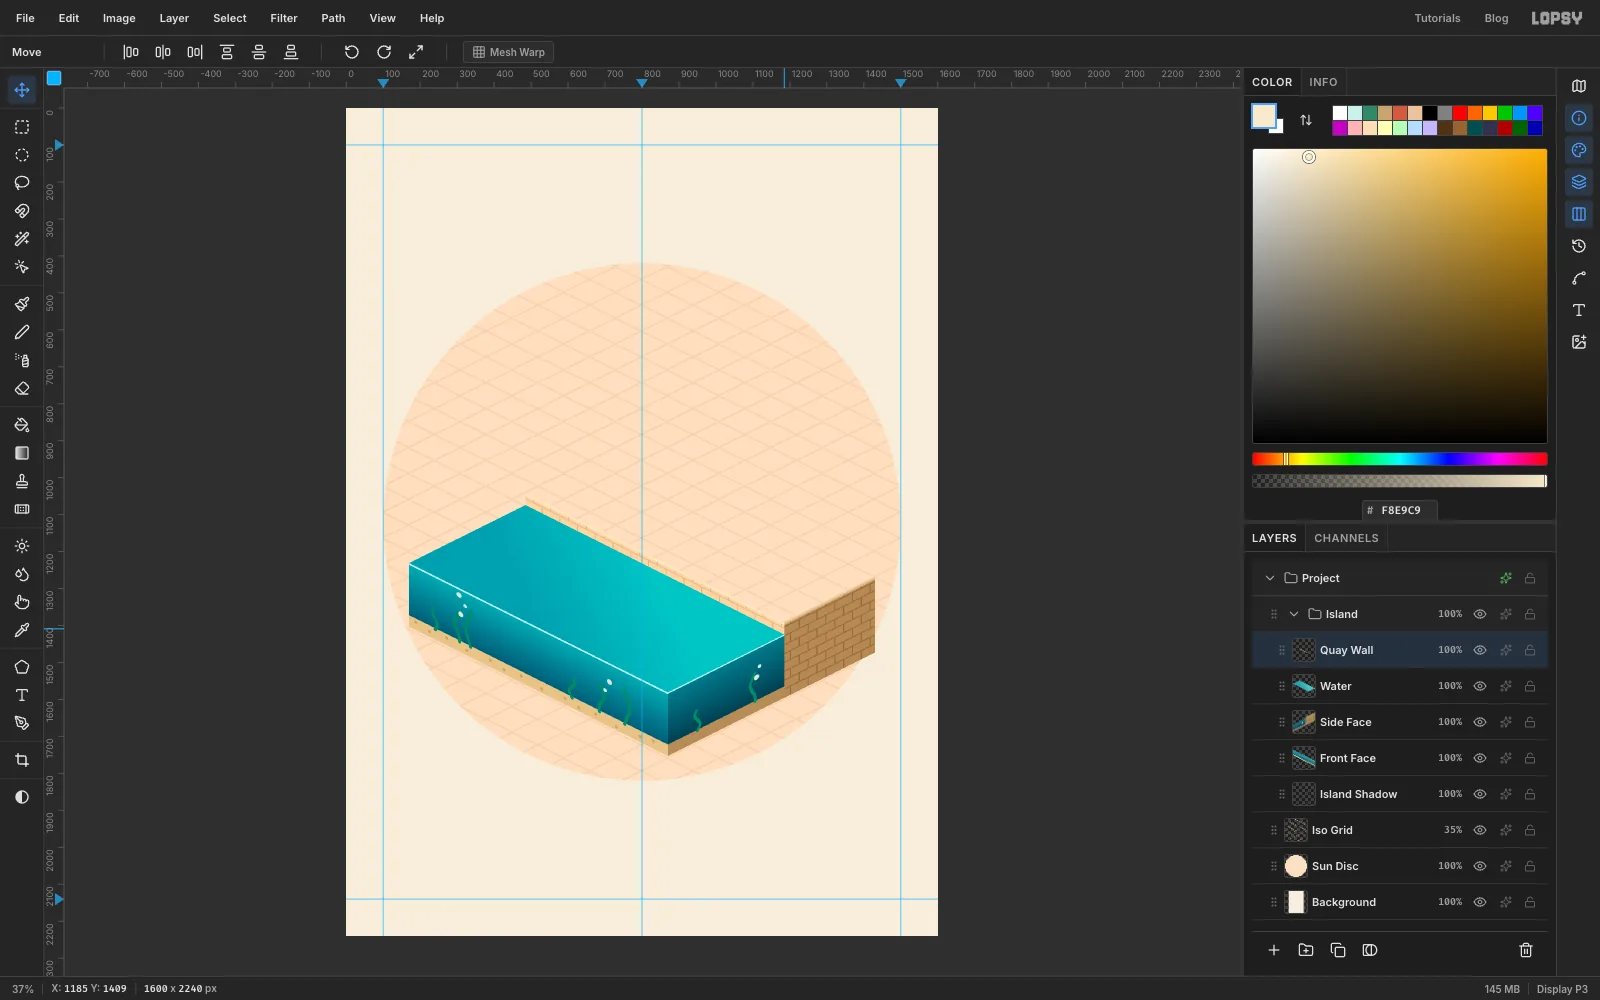
A narrow strip of wall shows between the water and the quay above it.
- Add a layer named
Quay Wall. Select485, 1043to1185, 1074and fill it with the brick pattern, Row Stagger50. - Choose Filter → Brightness/Contrast… and set Brightness to
30. This face catches the light, so it's paler than the shaded side. - Fill a 6 px coping stone of along its top.
- Select the strip again and Skew it: drag the middle-right handle down
350px. Deselect.
- Add a layer named
-
Pave the quay flat
Now the floor. Floors use the rotate-and-squash method, and that needs the flat drawing at a particular size: 99 px per grid step (70 × √2, so that it shrinks back to 70 × 35). The quay is 10 steps long and 3½ steps deep, so the flat rectangle is 990 × 347 px.
- Add a layer named
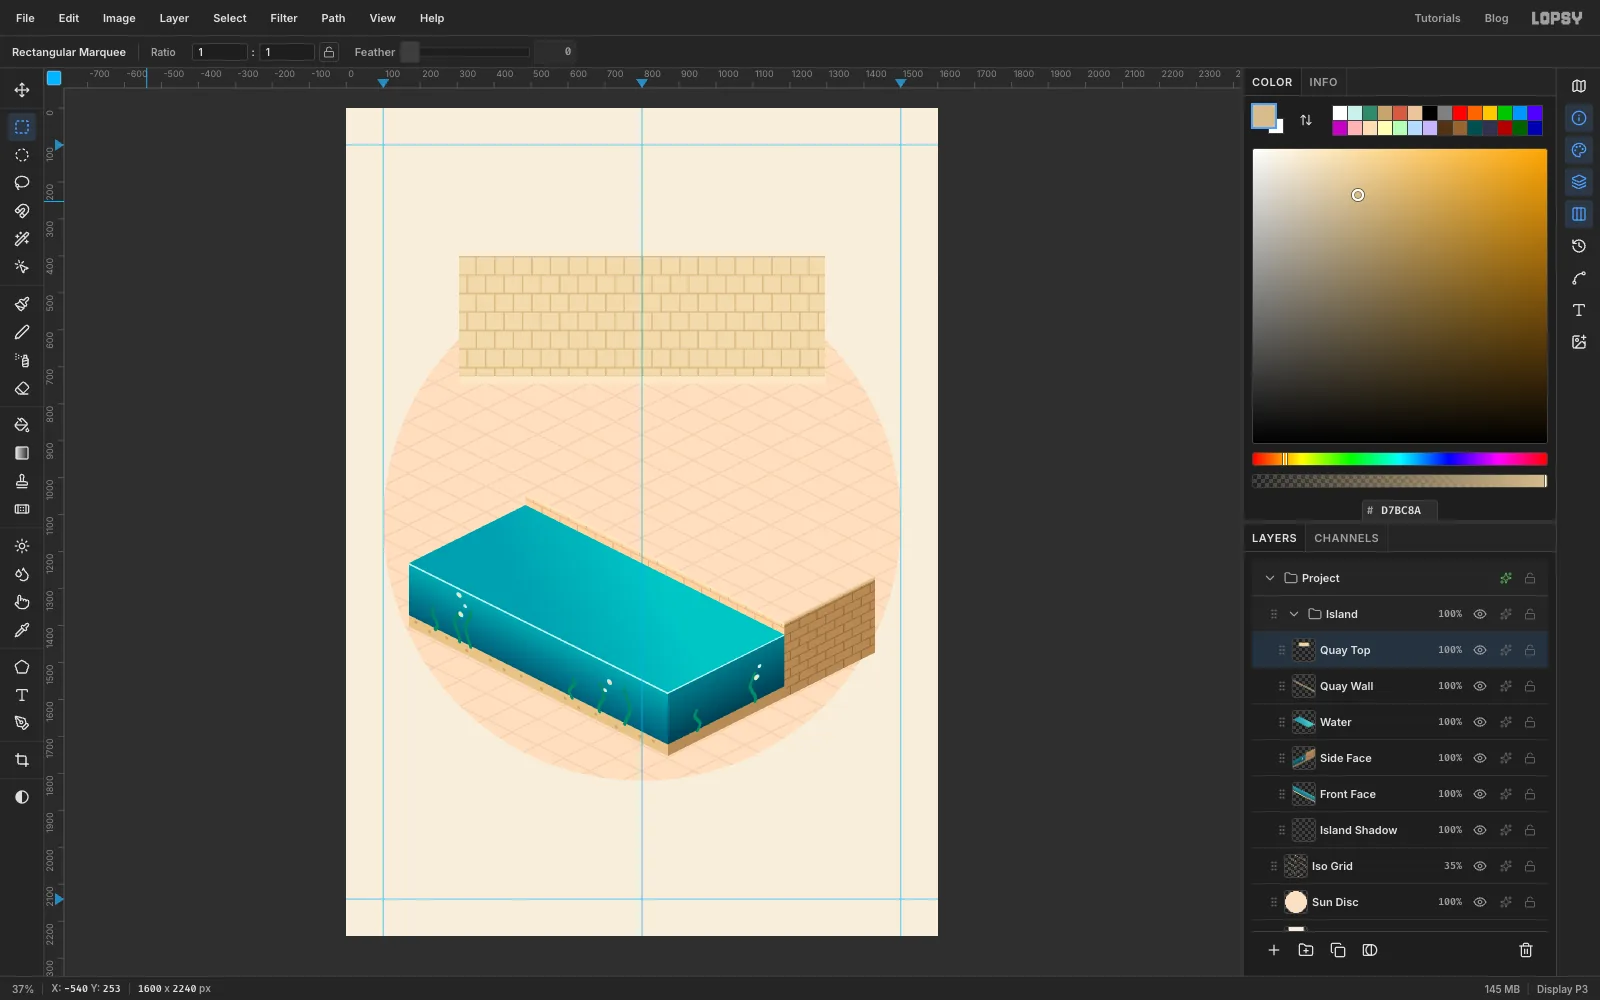
Quay Top. Select305, 400to1295, 747, anywhere empty will do. - Fill it with the paving pattern, Row Stagger
50. - Fill a 22 px kerb of along the bottom, from
305, 725to1295, 747, with a 2 px line of just above it.
- Add a layer named
-
Rotate the paving 45°
- Select the rectangle again,
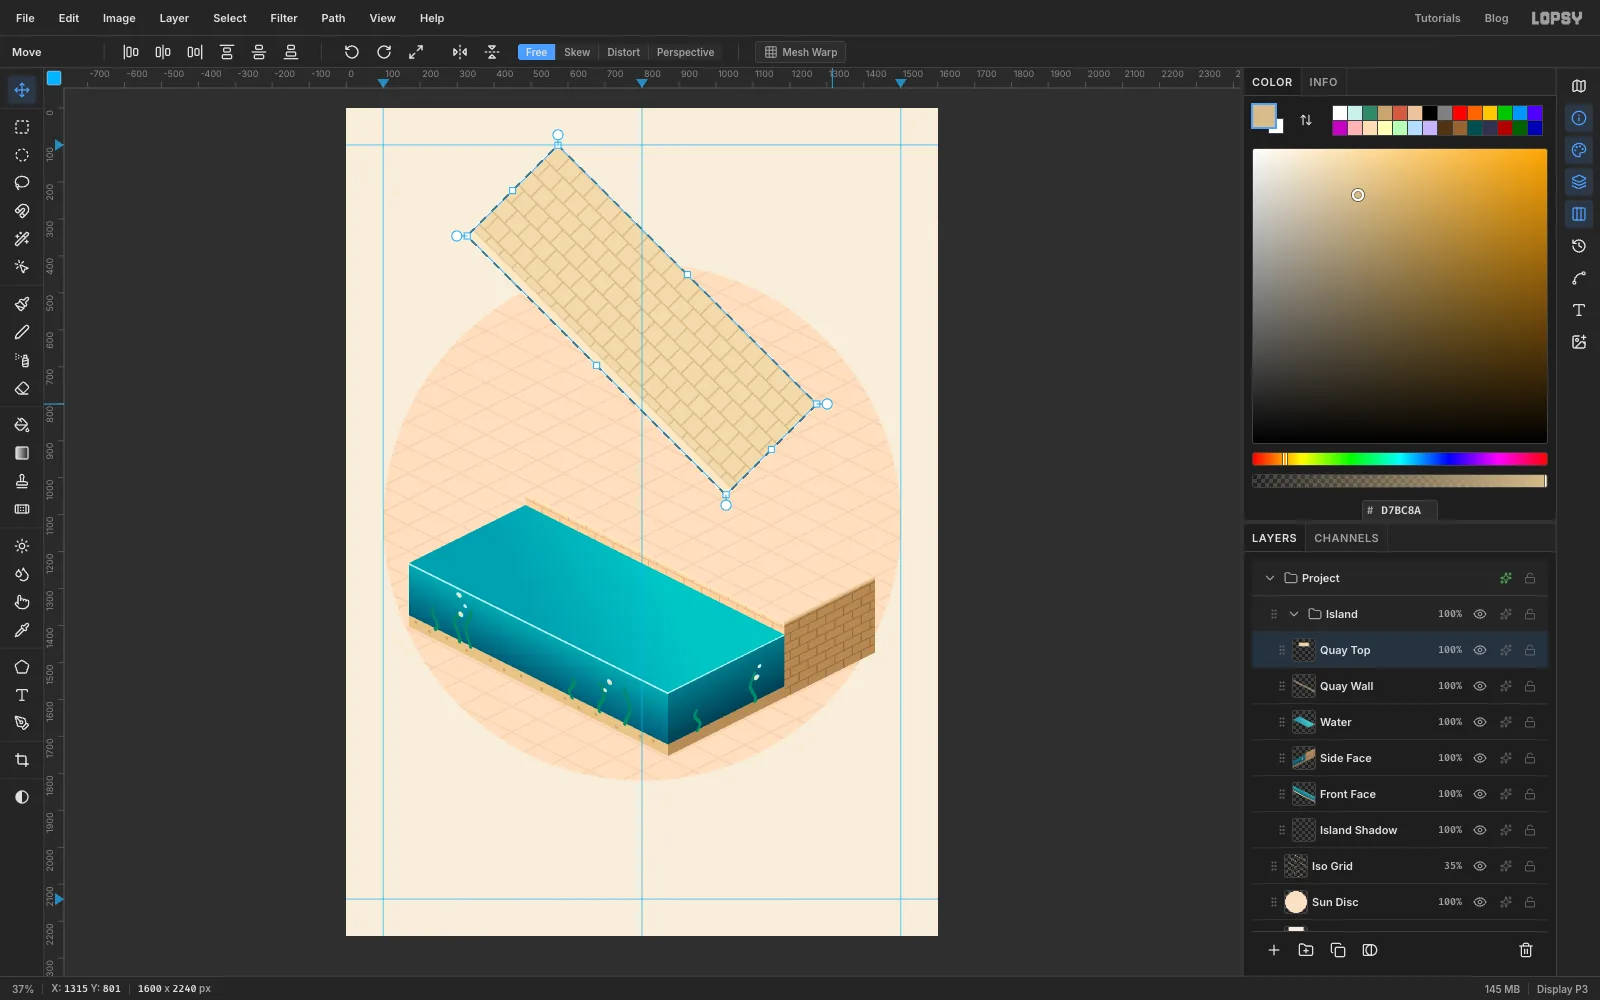
305, 400to1295, 747. - Pick the Move tool. Hold Cmd and drag the rotation handle just outside the top-right corner clockwise. Cmd snaps the angle in 15° steps, so stop at 45°.
- Deselect with Cmd+D.
- Select the rectangle again,
-
Squash the paving to half height
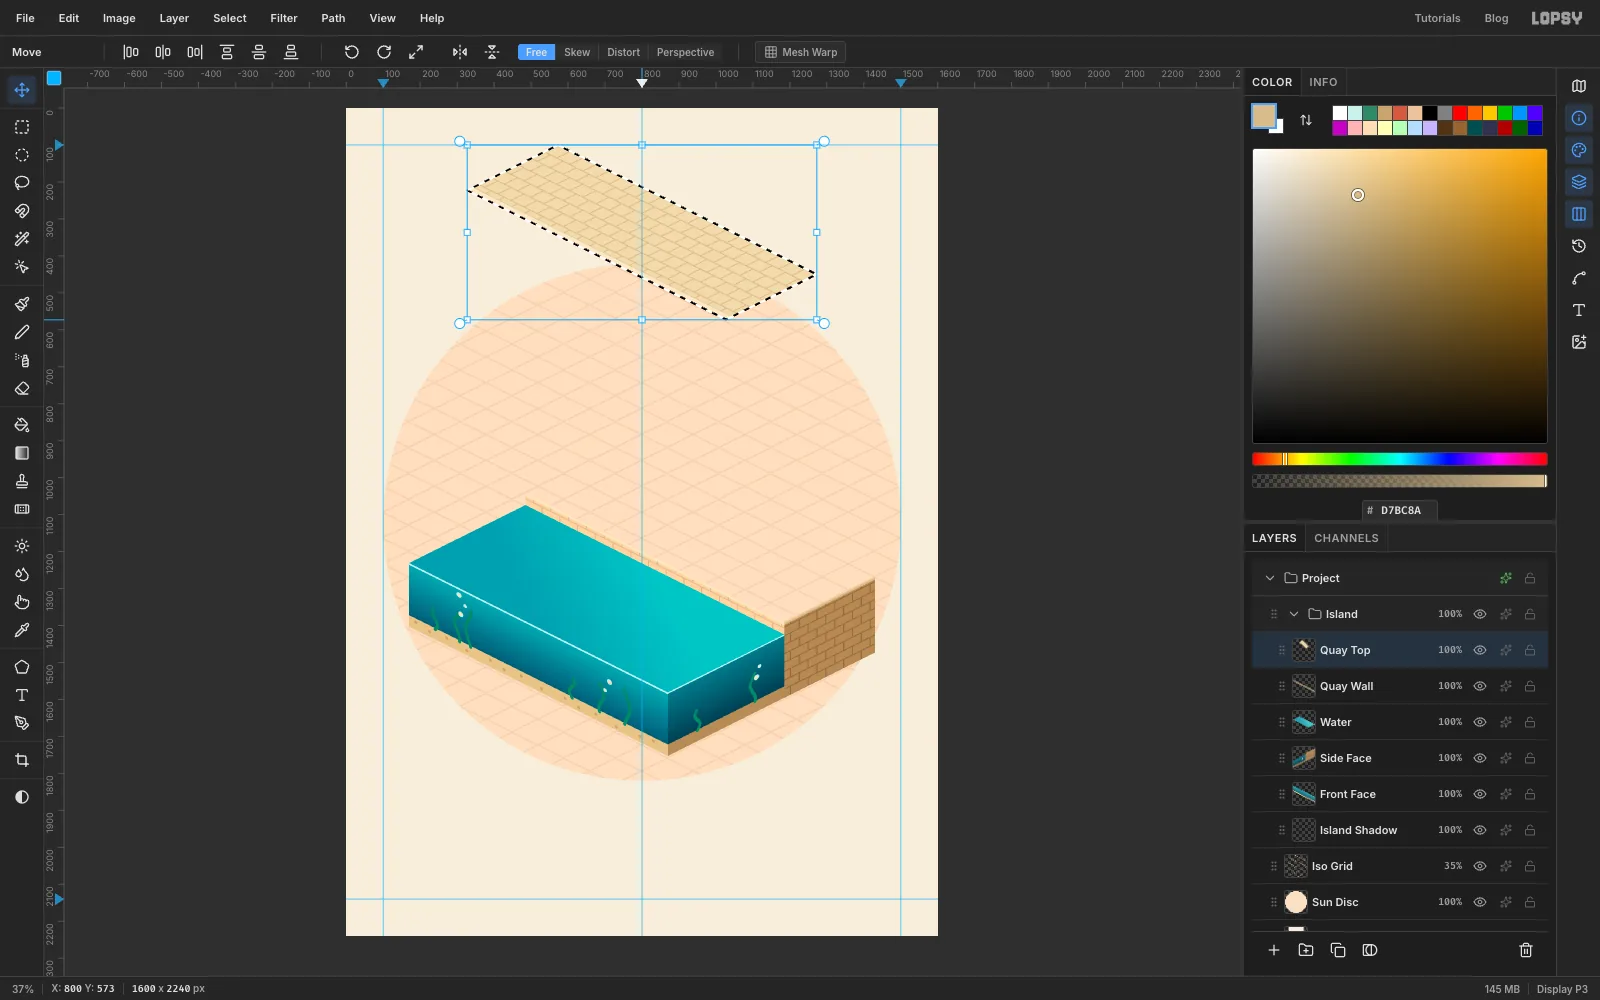
- Cmd-click the Quay Top thumbnail. The selection's box is upright again and about 945 px square.
- Grab the handle in the middle of the bottom edge and drag it straight up by half the box's height, about 473 px. Without Cmd only the height changes.
- Deselect.
The band is now an isometric floor: its long edge runs down at the same 2:1 slope as the walls.
-
Move the paving onto the block
- Drag the paving with the Move tool until its top corner is at
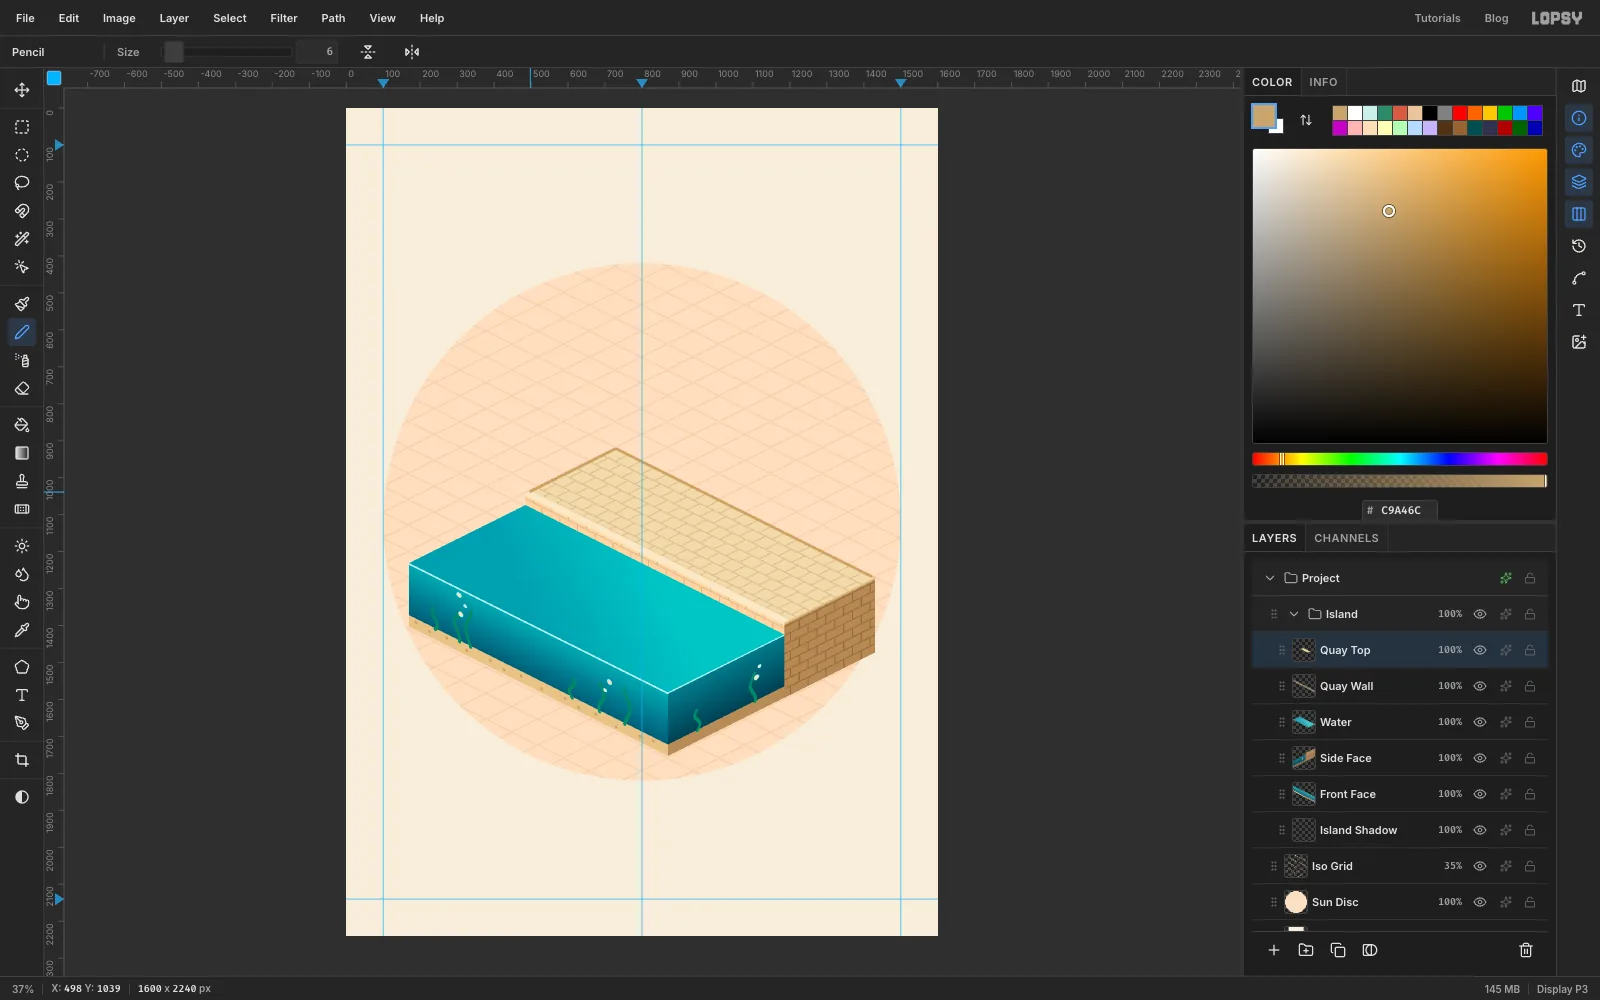
730, 920. That puts its front-left corner at485, 1042and its right corner at1430, 1270, exactly on top of the quay wall and the brick side. Use the arrow keys for the last few pixels. - Pick the Brush at size
6with . Click at1420, 1268, just inside the right corner, Shift-click at730, 923and Shift-click at498, 1039, stopping short of the kerb. This coping line marks the two back edges, so the paving doesn't fade into the grid behind it. Keep it a few pixels inside the corners: the brush's round ends would otherwise poke past them.
- Drag the paving with the Move tool until its top corner is at
-
Add ripples and foam
- Select Water and add a layer above it named
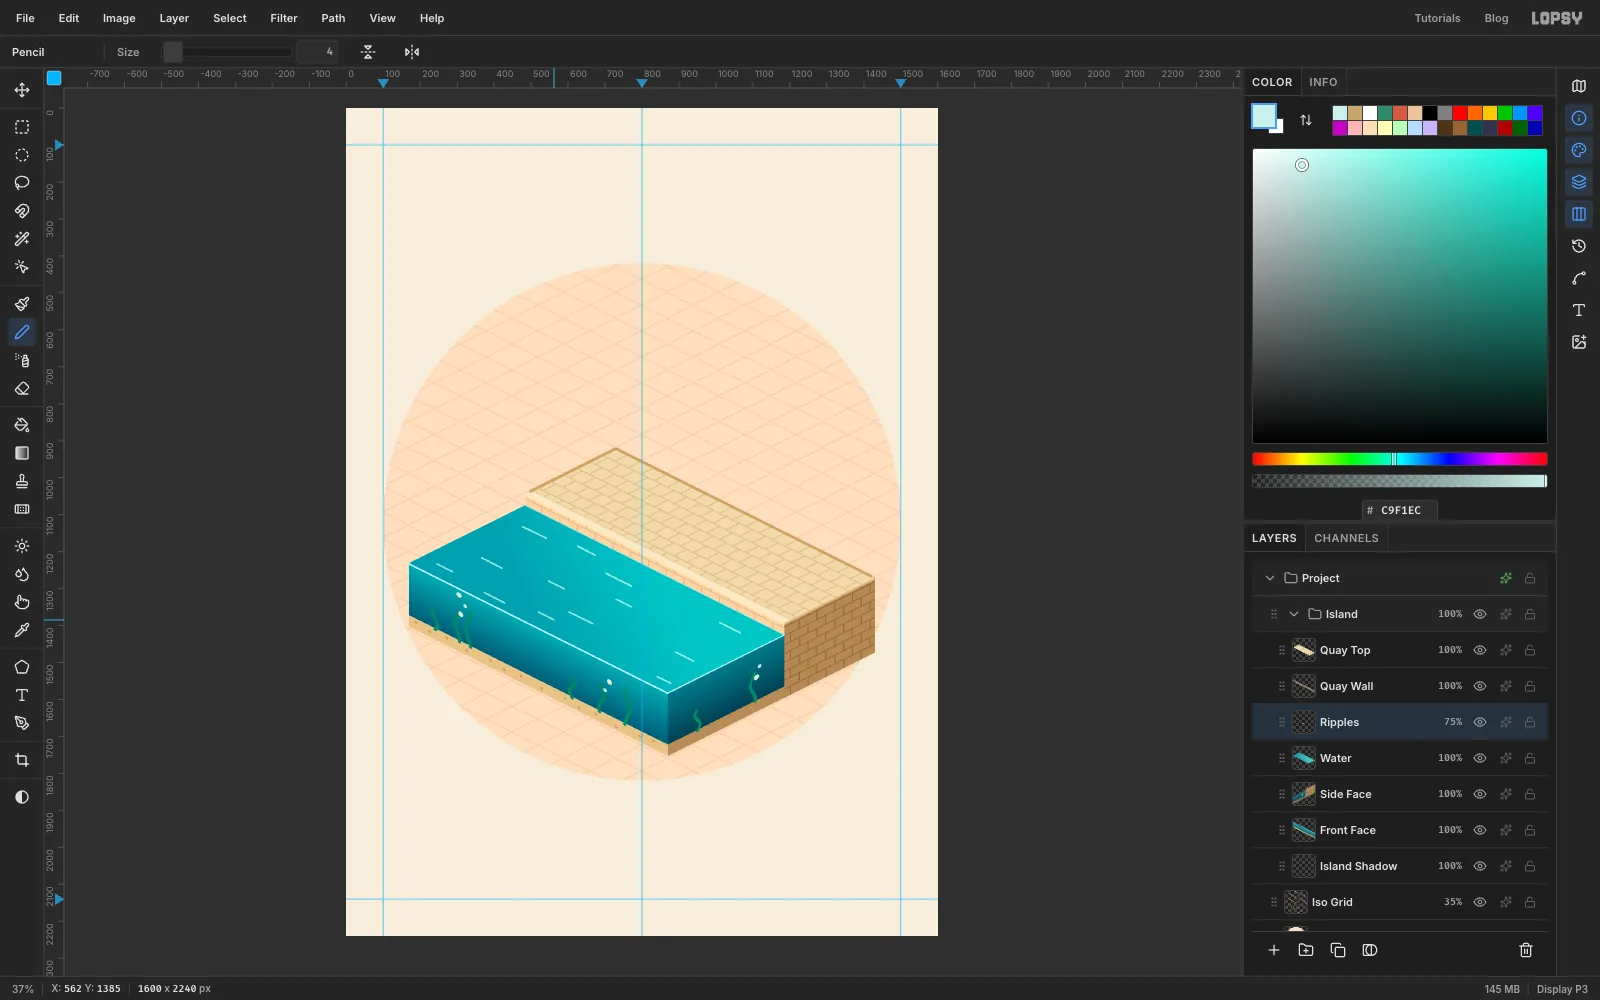
Ripples. - With the Brush at size
6and , click at485, 1074and Shift-click at1185, 1424for a line of foam along the wall. - Switch to the Pencil at size
4and draw a dozen short dashes over the water, each 40 to 70 px long. Click, then Shift-click about 60 px right and 30 px down, so every dash follows the floor slope. - Set the layer's opacity to
75%.
- Select Water and add a layer above it named
-
Texture the jetty planks
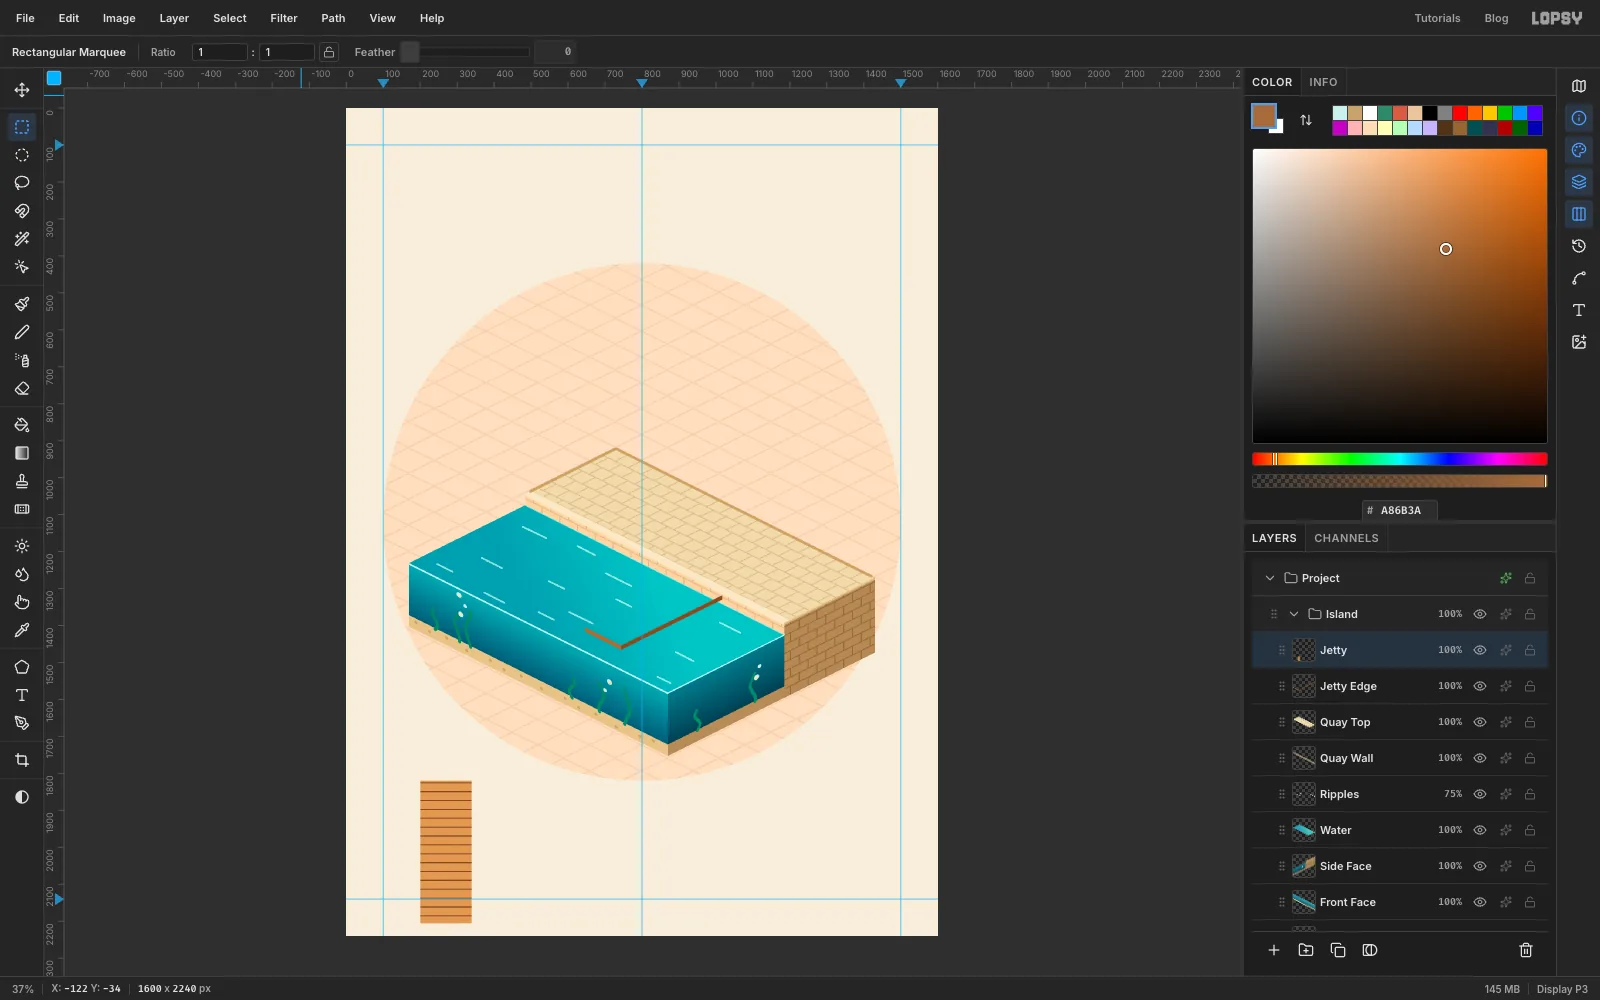
The jetty is 1.4 steps wide and 3.9 steps long, so its flat drawing is 139 × 386 px. Draw it at the bottom left of the page, out of the way.
- Select Quay Top and add two layers:
Jetty Edgefirst, thenJettyabove it. - On Jetty, select a patch wider than the deck, from
160, 1820to379, 2206, and fill it with the plank pattern. - Choose Filter → Add Noise… with Amount
14and Mono, then Filter → Motion Blur… with Angle0and Distance30. The noise smears into wood grain. - Blur also softens the edges of whatever you blur, which is why the patch is wider. Trim it to the real size: select
200, 1820to339, 2206, choose Select → Inverse and press Delete.
- Select Quay Top and add two layers:
-
Turn the planks into a jetty
- Rotate and squash the planks exactly as you did the paving: select them, Cmd-rotate 45°, deselect, Cmd-click the thumbnail, and drag the bottom handle up by half the height.
- Move the deck so its top corner is at
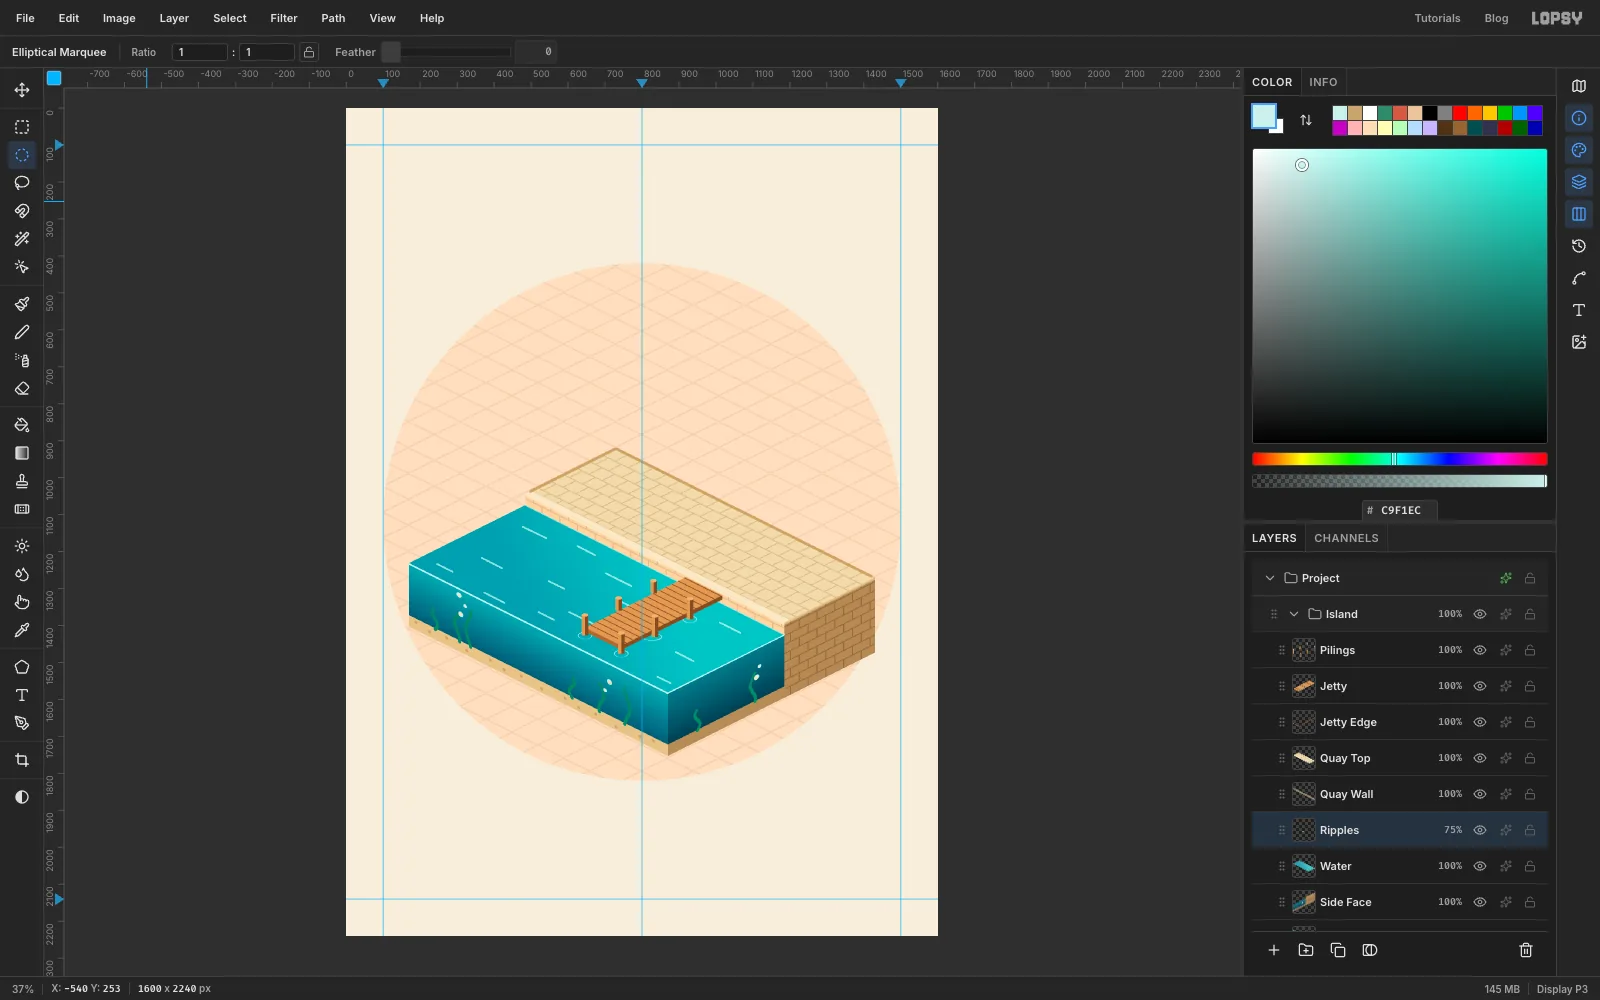
919, 1269and its left corner at646, 1405. Its back end now butts against the quay wall. - Select Jetty Edge and use the Pen and Path to Selection to fill the deck's thickness, a 12 px band under each outer edge:
- Side :
1017, 1318,744, 1454,744, 1466,1017, 1330. - End :
646, 1405,744, 1454,744, 1466,646, 1417.
- Select Jetty and add a layer named
Pilings. Each post is an 18 px wide bar standing on a point of the deck's edge: the left half , the right half , and a small ellipse 18 × 9 px on top. Each bar is centred on the X given here and runs from its top down to its foot.
- Four outer posts reach down into the water: X
930from Y1327to1383, X835from1375to1431, X744from1420to1476, and X646from1371to1427. - Two inner posts, on the far side of the deck, stop at the deck: X
832from1278to1313, and X737from1326to1360.
- On Ripples, add a ring around the foot of each outer post: an ellipse 40 × 20 px with a smaller one Option-dragged out of its middle, filled with .
-
Draw the boathouse's long wall flat
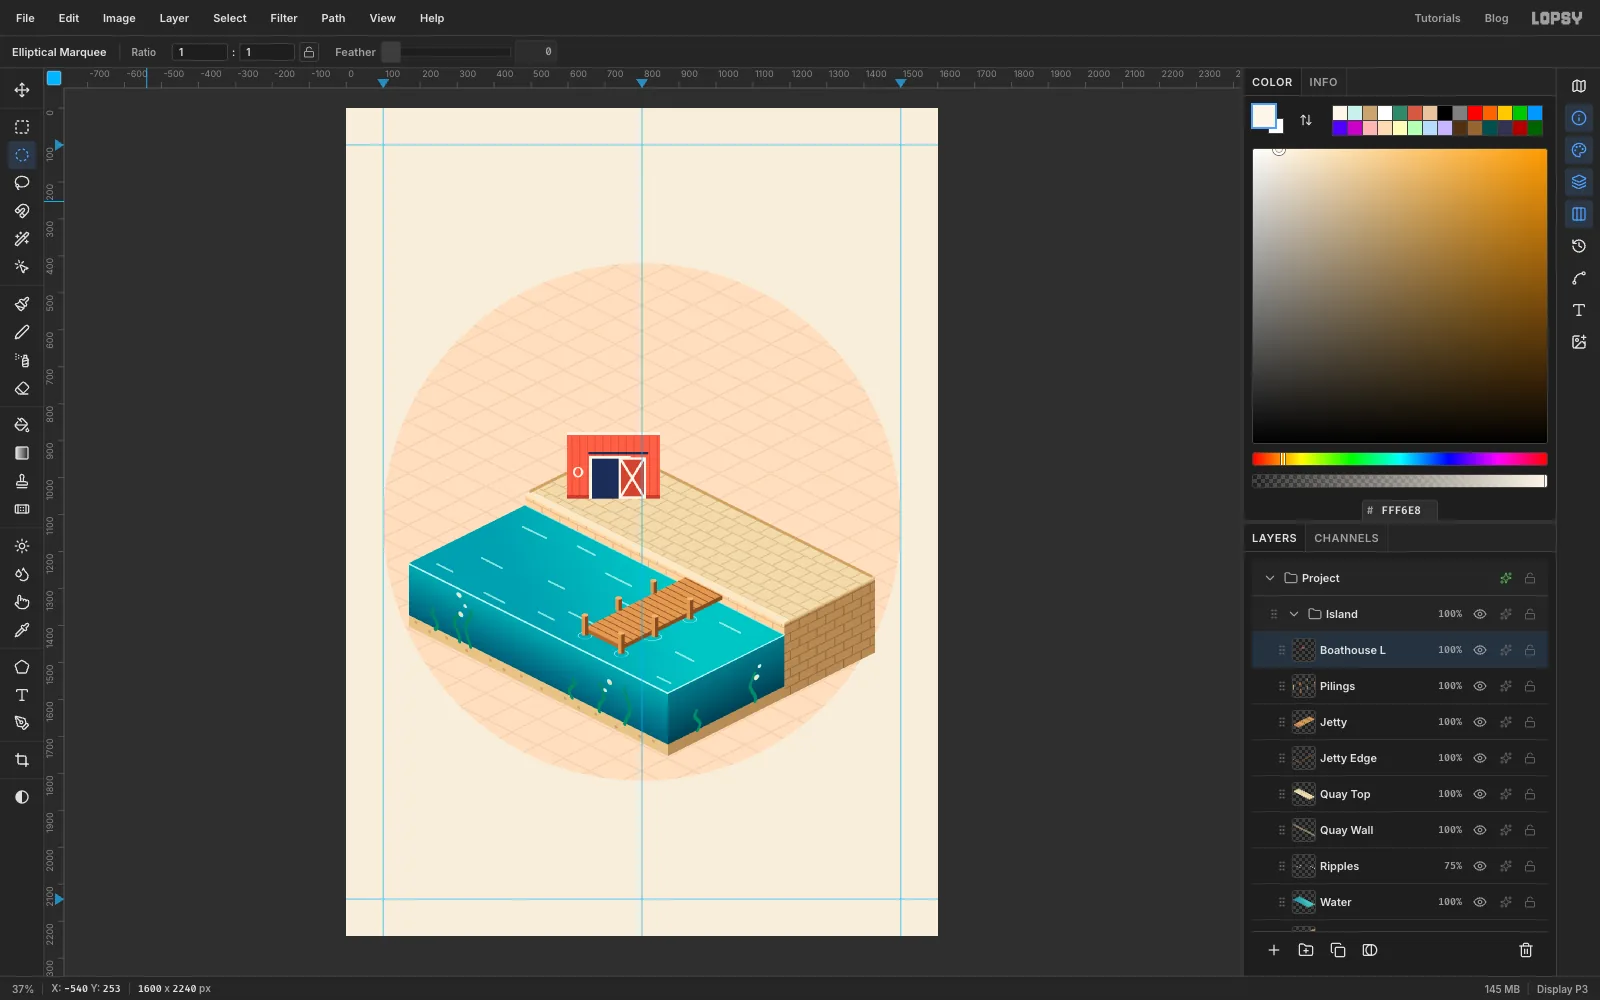
The boathouse is a box 3.6 steps long and 2.5 deep. Its long wall faces the water, so it's lit, and it's 252 × 180 px flat.
- Select Pilings and add a layer named
Boathouse L. - Select
597, 877to849, 1057and fill it with the batten pattern. - Fill an 8 px white trim of along the top and a 10 px plinth of along the bottom.
- Door: fill a navy rail from
655, 931to817, 937, a white frame from657, 941to769, 1057and the dark opening inside it,665, 949to761, 1057, with . - Sliding panel: fill
737, 945to811, 1057with trim, then743, 951to805, 1051with , and draw a white X brace across it with the Pencil at size5. - Life ring: a white ring 28 px across at
627, 985, left of the door. Make a circle, Option-drag a smaller one out of its middle, and fill.
- Select Pilings and add a layer named
-
Skew the long wall
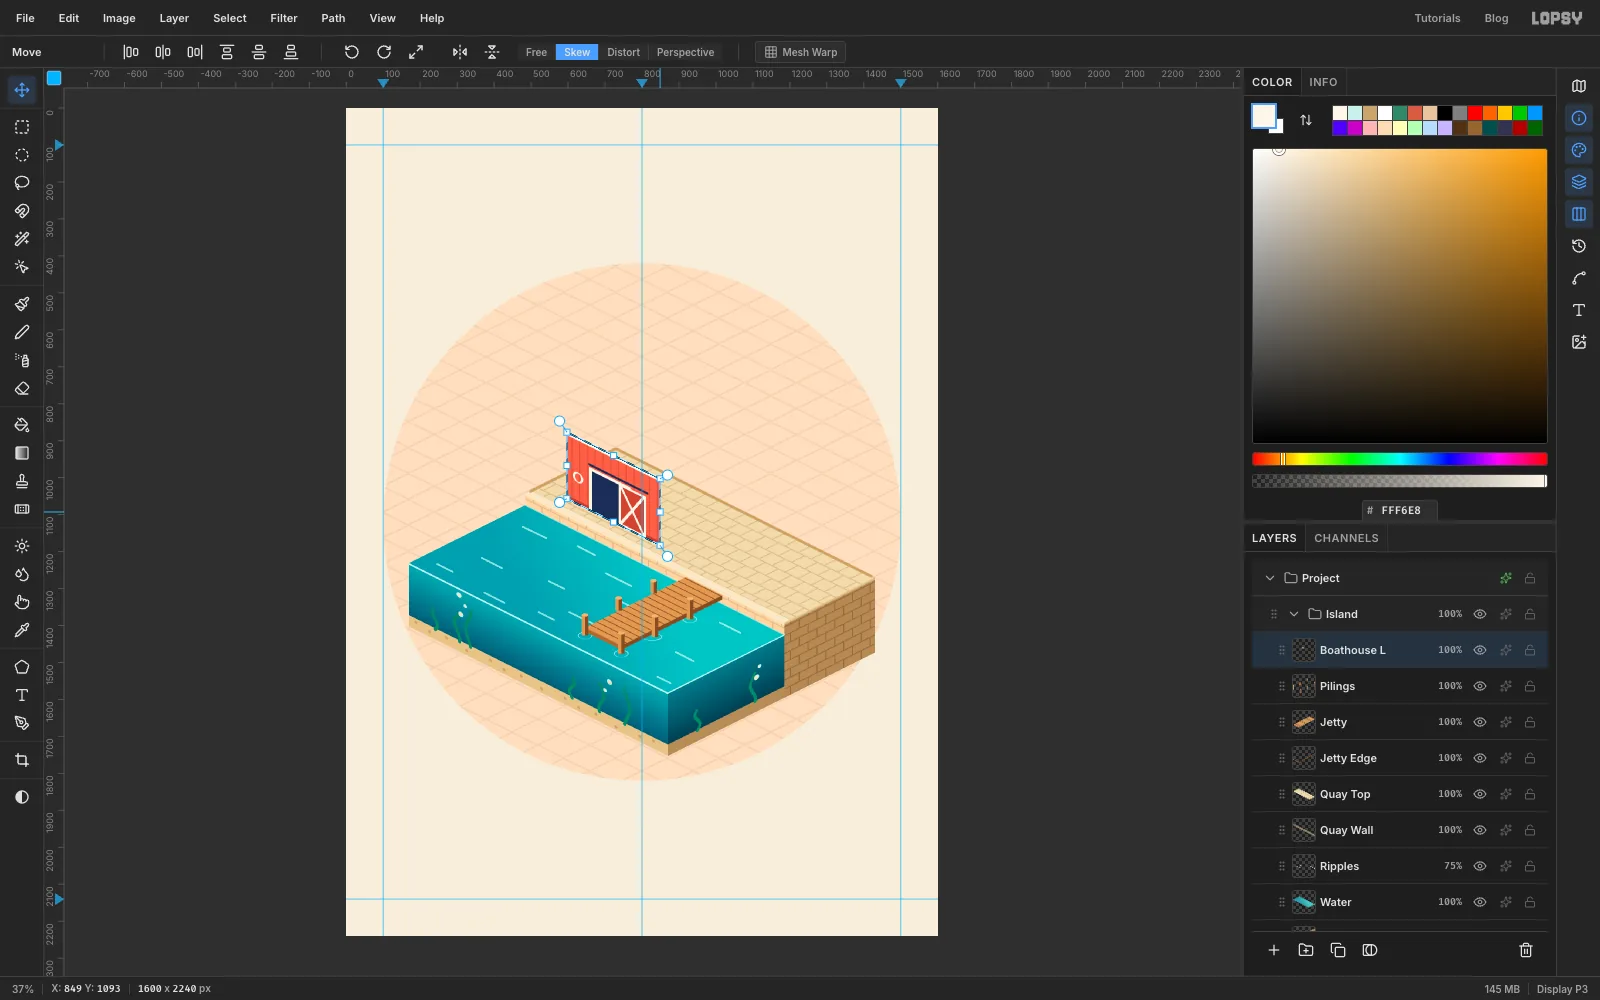
Select
597, 877to849, 1057, switch to Skew and drag the middle-right handle down by 126 px, half of 252. Deselect.The door, the trim and the ring all slant with the wall, and their verticals stay vertical.
-
Draw the gable wall flat
The short end wall is in shade, and it has a triangular gable on top.
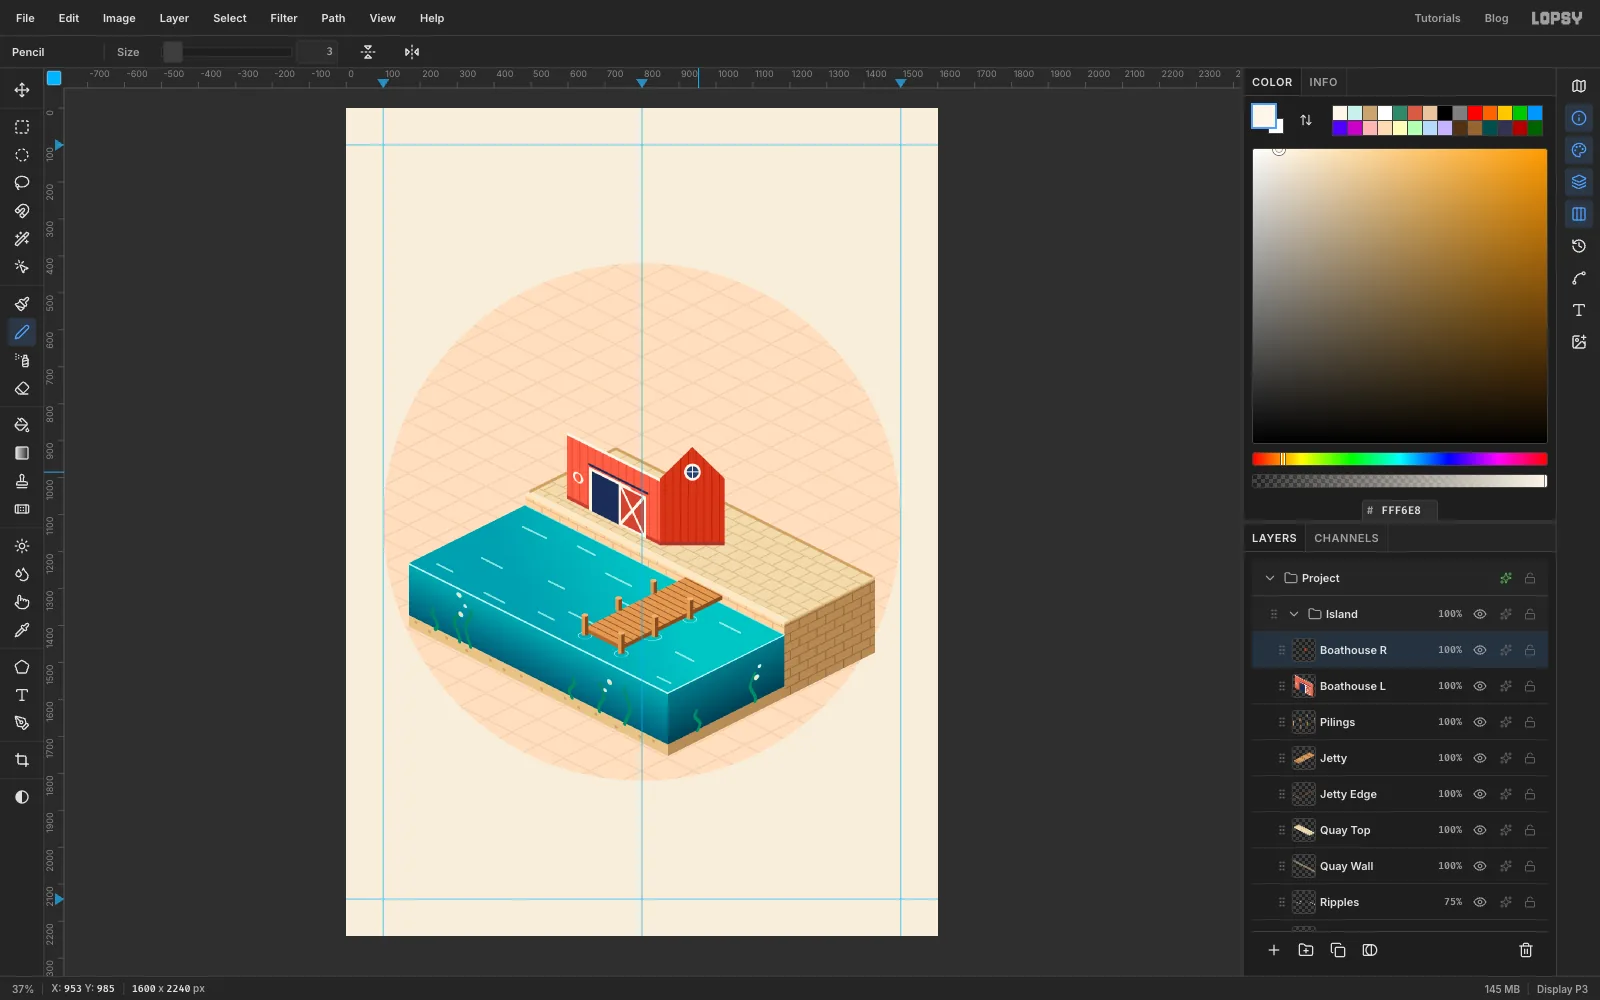
- Add a layer named
Boathouse R. - With the Pen, click
849, 1183,849, 1003,937, 917,1024, 1003and1024, 1183, close the path and choose Path to Selection. - Fill it with the batten pattern, then choose Filter → Brightness/Contrast… with Brightness
-15to put it in shade. Deselect. - Fill a 10 px plinth of along the bottom.
- Round window: fill a circle 46 px across at
937, 985with trim, a 32 px circle inside it with , and draw a white cross with the Pencil at size3.
- Add a layer named
-
Skew the gable wall up
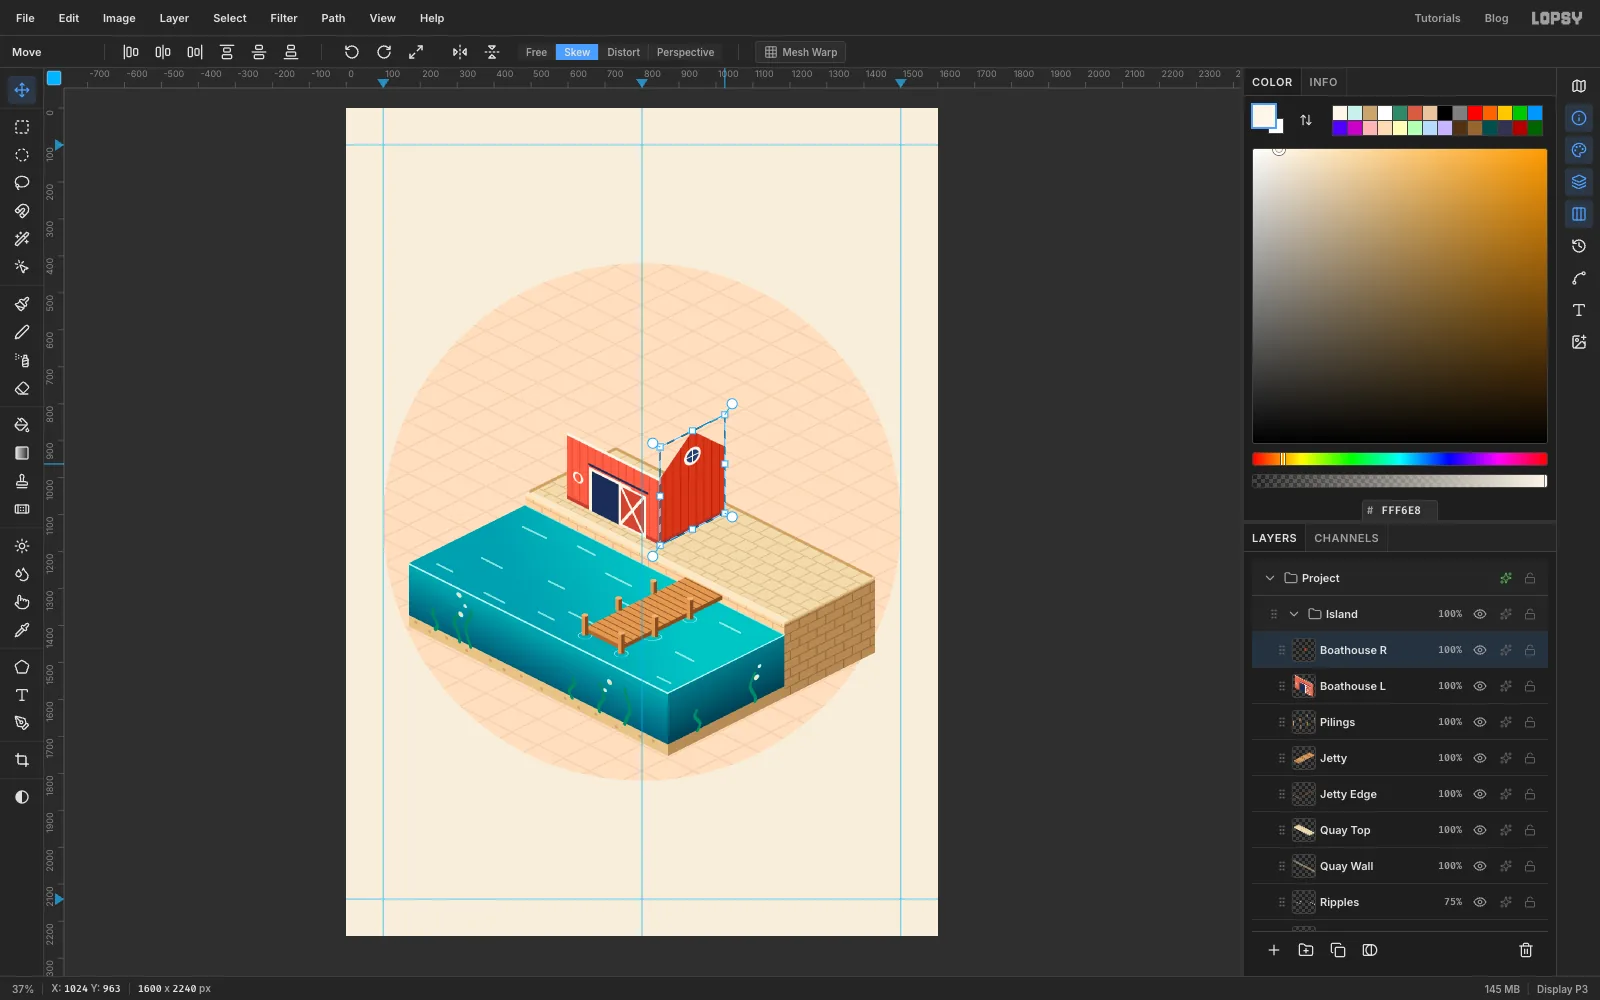
Select
849, 917to1024, 1183, switch to Skew and drag the middle-right handle up by 88 px, half of 175. Deselect.The round window becomes a tilted ellipse, which is exactly how a round window looks on an isometric wall.
-
Put on the roof
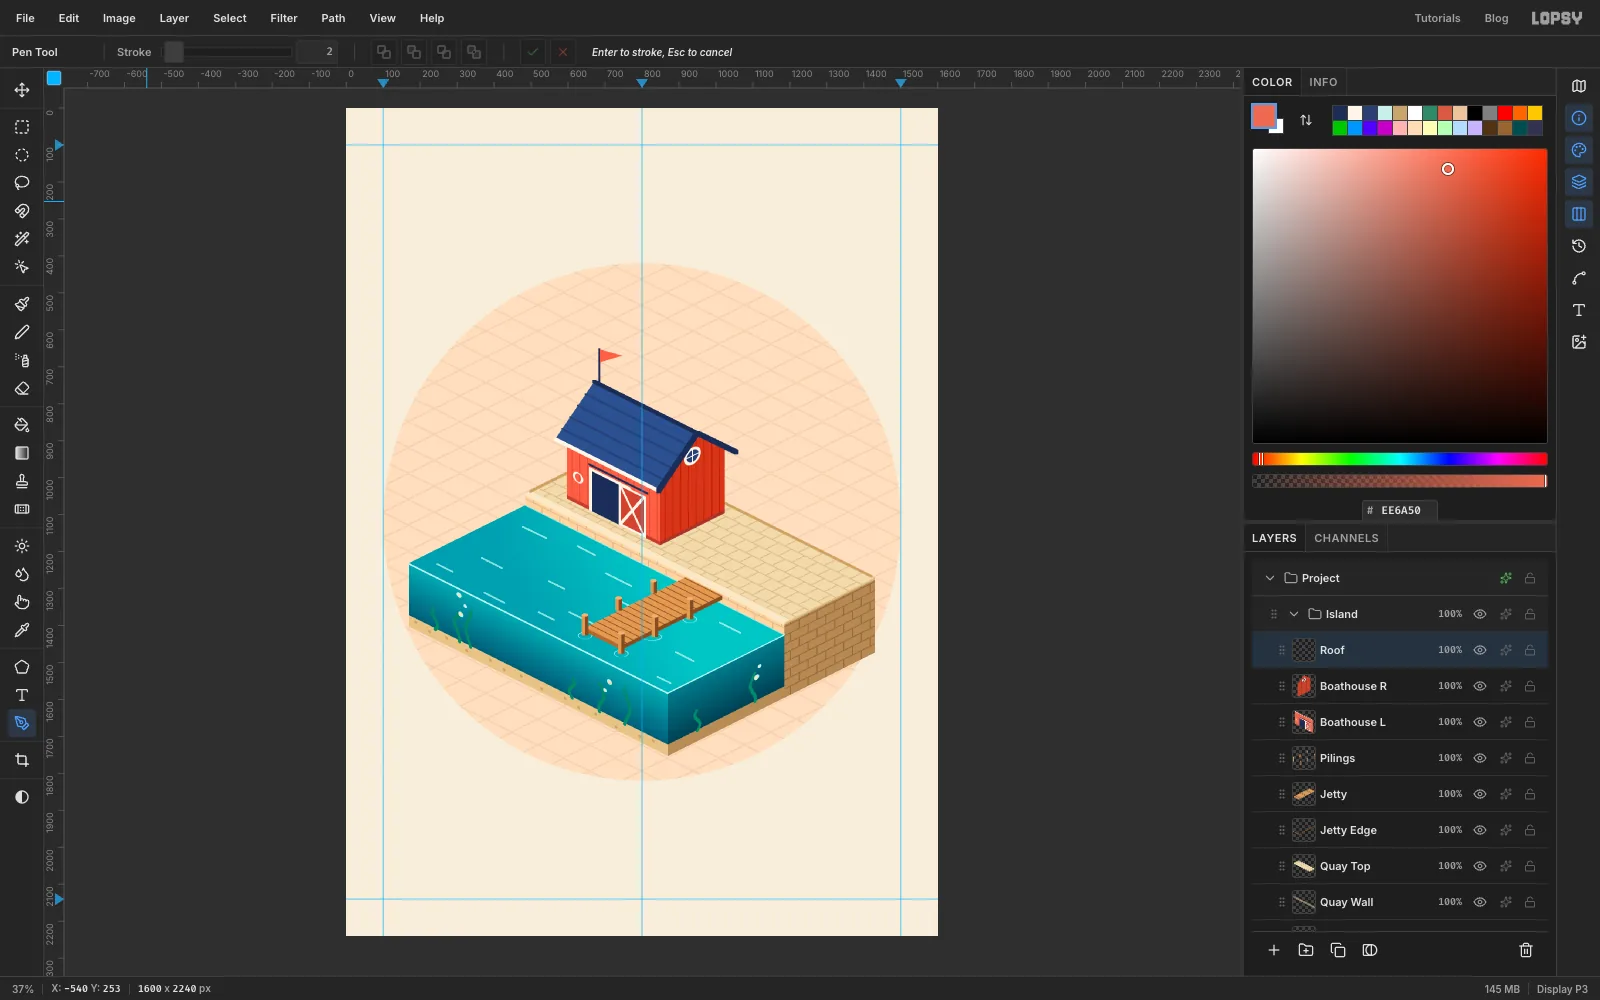
- Add a layer named
Roof. With the Pen, click the four corners of the front roof slope:670, 741and950, 881along the ridge, then846, 1036and566, 896along the eave. Close it, choose Path to Selection, fill with and deselect. - Shingles: with the Pencil at size
4in , draw four lines across the roof, parallel to the ridge, spaced evenly between the ridge and the eave. Click on the left edge of the roof and Shift-click the matching point on the right edge. - Eave and ridge: a size
8trim line along the eave from566, 896to846, 1036, and a size9navy line along the ridge. - Barge boards: size
12navy lines from the ridge's end,950, 881, down to846, 1036and down to1056, 931. They cover the end of the roof and frame the gable. - Pennant: a navy line 95 px straight up from
684, 748, and a small coral triangle flying from its top.
- Add a layer named
-
Draw one pine tree
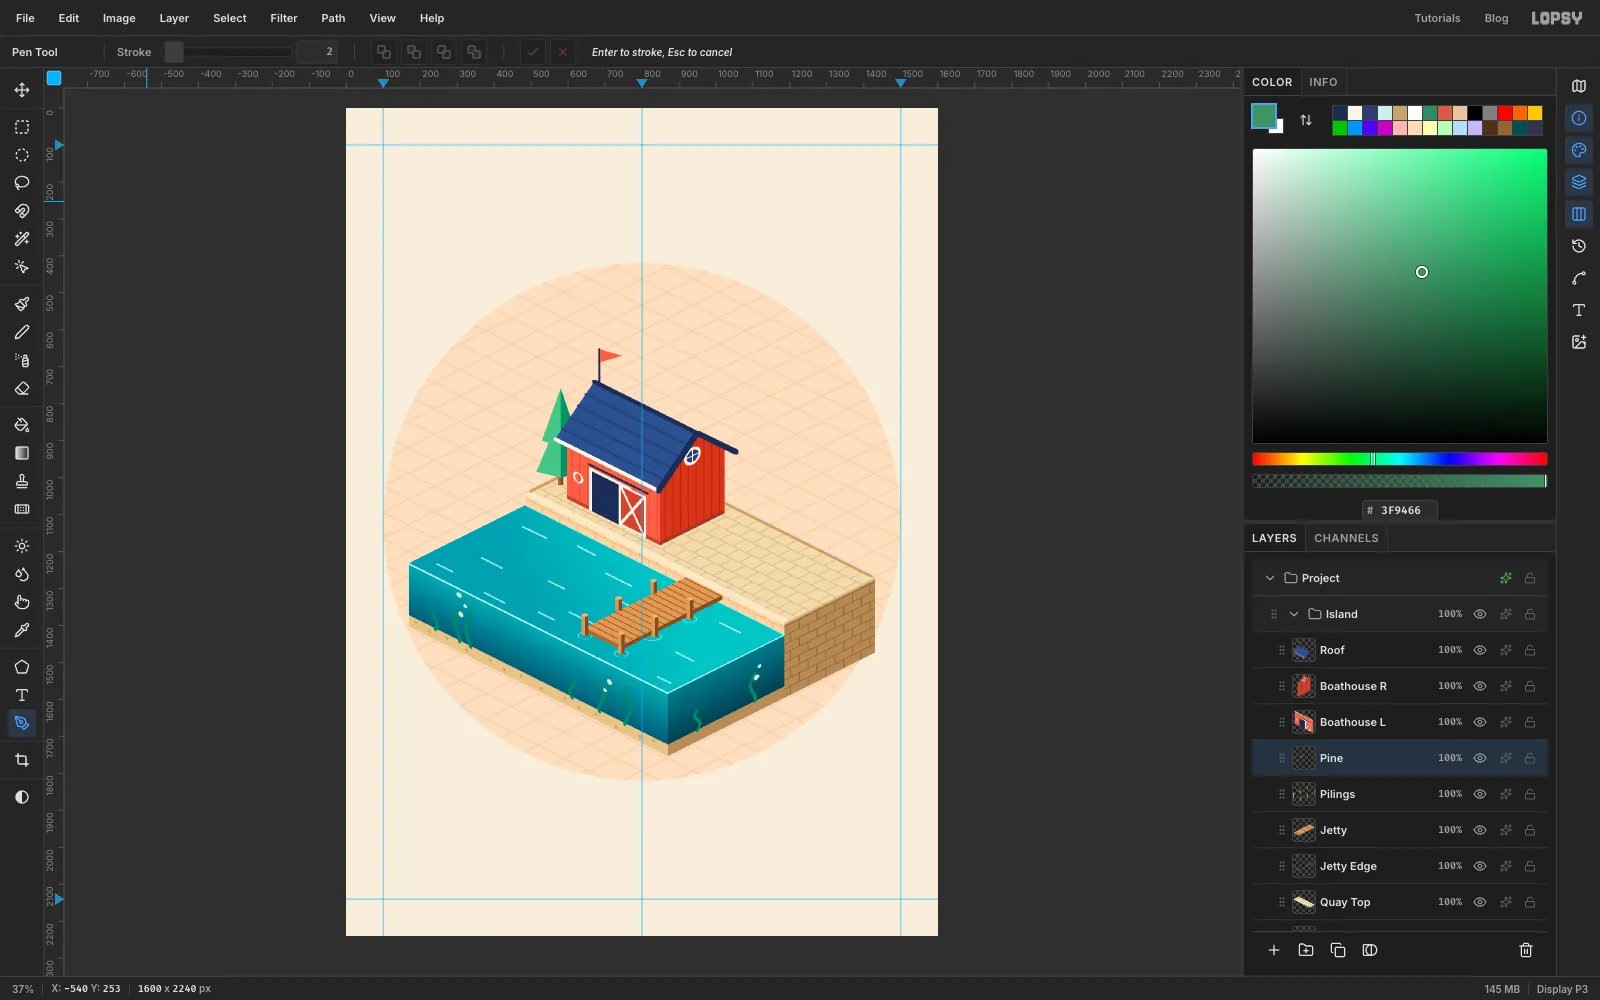
Isometric trees are easiest as cones: two stacked triangles, light on the left where the sun hits and dark on the right.
- Select Pilings and add a layer named
Pine. It goes under the boathouse, so the house can stand in front of the trees. - Trunk: a 14 × 40 px bar standing on
580, 1020, half and half . - Lower tier: with the Pen, fill the left half with . Click the tip, 190 px above the ground point, then the left corner, 36 px above the ground and 66 px to the left, then the middle point, straight under the tip and 16 px lower than the corners, so the bottom of the cone looks round. Fill the right half the same way with , using the right corner.
- Upper tier: the same again, smaller and higher: the tip 262 px above the ground, the corners 120 px above it and 50 px out to each side.
- Select Pilings and add a layer named
-
Duplicate and resize the pines
- Choose Layer → Duplicate Layer, rename the copy
Pine 2, and drag it with the Move tool so its trunk stands at751, 952, behind the boathouse. - Cmd-click its thumbnail and drag the top-right handle up and out a little to make this pine taller. It should peek well above the roof ridge. Deselect.
- Duplicate it again, name it
Pine 3, and drag it to the far right of the quay, with the trunk at1342, 1265. - With Pine 3 selected, choose Layer → Merge Down twice, and rename the result
Pines.
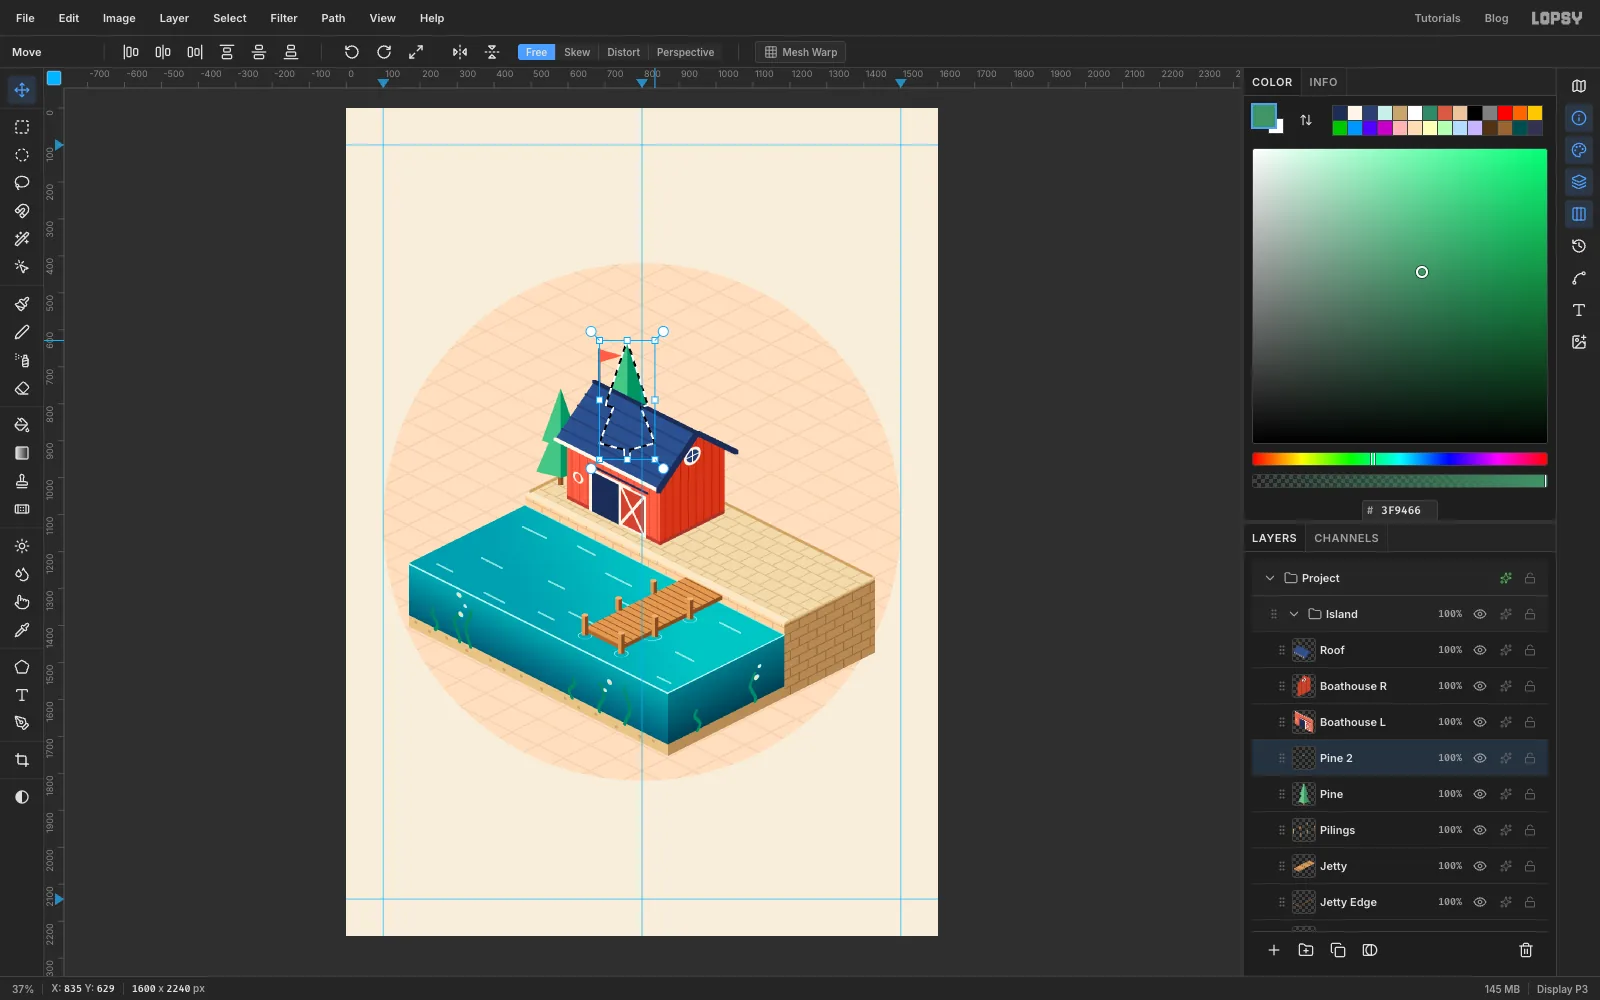
- Choose Layer → Duplicate Layer, rename the copy
-
Stack some crates
- Select Roof and add a layer named
Crate A. With the Pen and Path to Selection, fill a small isometric cube half a step on each side, standing at the front-left corner of the quay:
- Top :
552, 991,586, 1009,552, 1026,516, 1009. - Left side : the edge from
516, 1009to552, 1026, and the same edge 39 px lower. - Right side : the edge from
552, 1026to586, 1009, and the same edge 39 px lower.
- Draw a few slat lines across the sides with the Pencil at size
3. - Duplicate Layer, name it
Crate B, and press Up 39 times with the Move tool (or Shift+Up 3 times and Up 9 times) to stack it on top. - Click Crate A, Cmd-click its thumbnail, press Cmd+C and Cmd+V. Name the pasted layer
Crate Cand move it 38 px right and 19 px down with the arrow keys (Shift + arrow moves 10 px), so it sits beside the bottom crate.
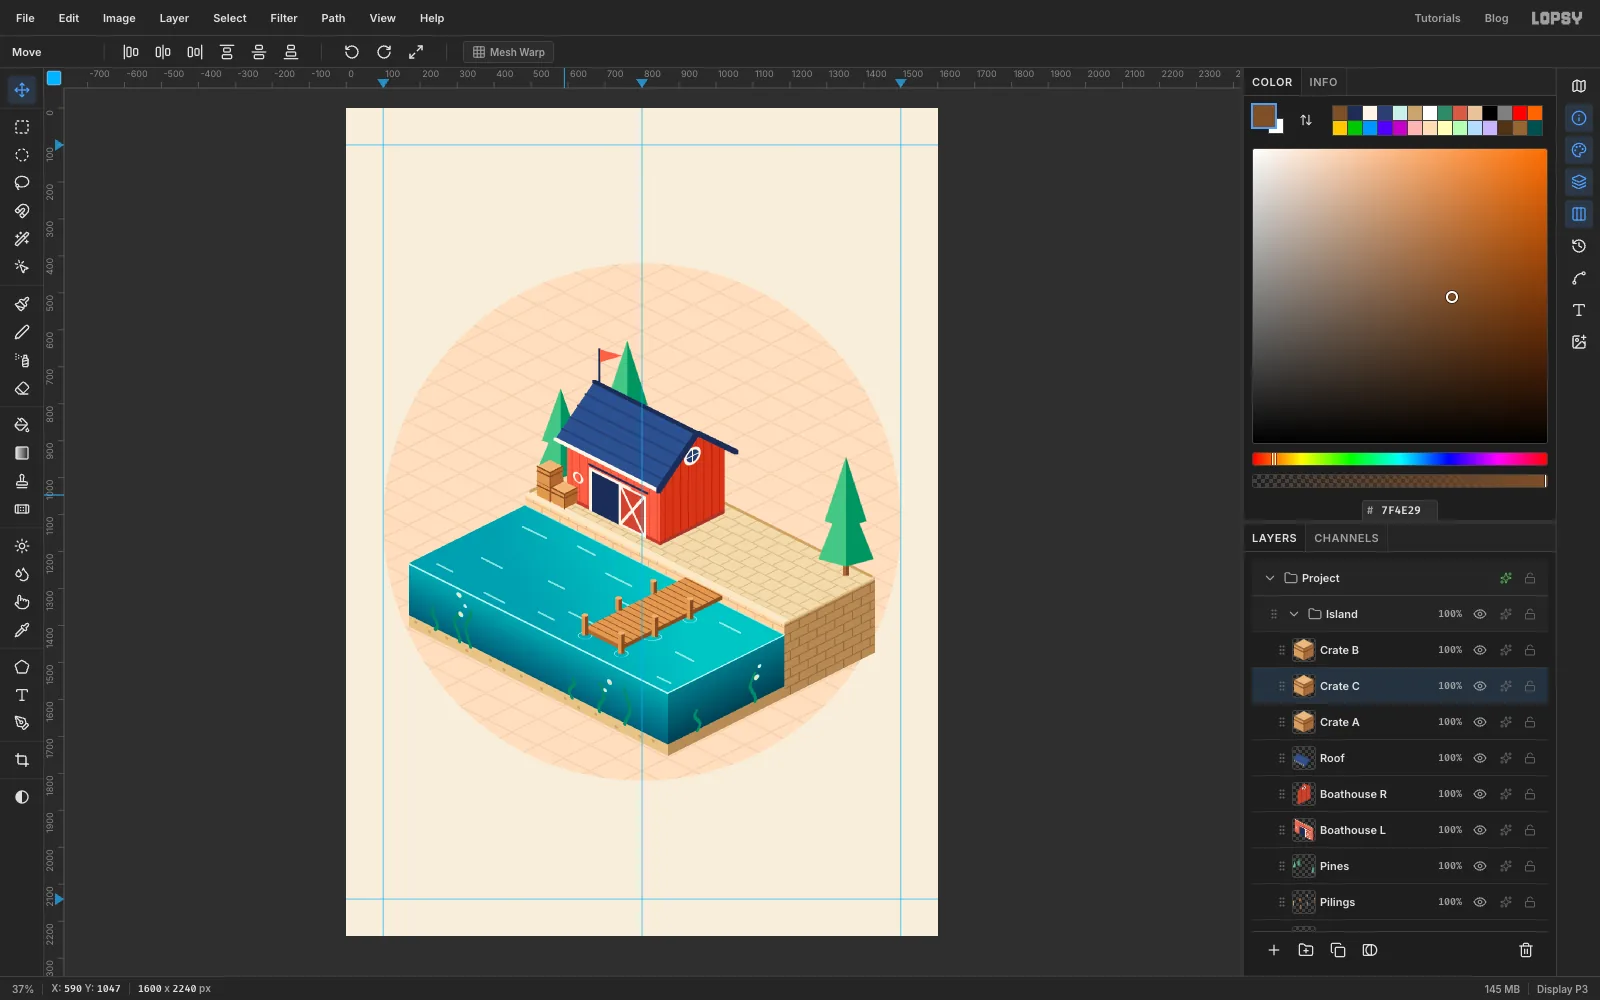
- Select Roof and add a layer named
-
Copy a bollard with Option-drag
- Add a layer named
Bollards. Draw a short navy post at912, 1238, just left of the jetty: a 24 × 28 px bar, the left half and the right half , with a 24 × 12 px ellipse at its foot in navy and one on top in . - Draw a marquee around it with a little room to spare.
- With the Move tool, hold Option and drag it along the quay edge to
1126, 1349. Option leaves the original behind and moves a copy. Deselect.
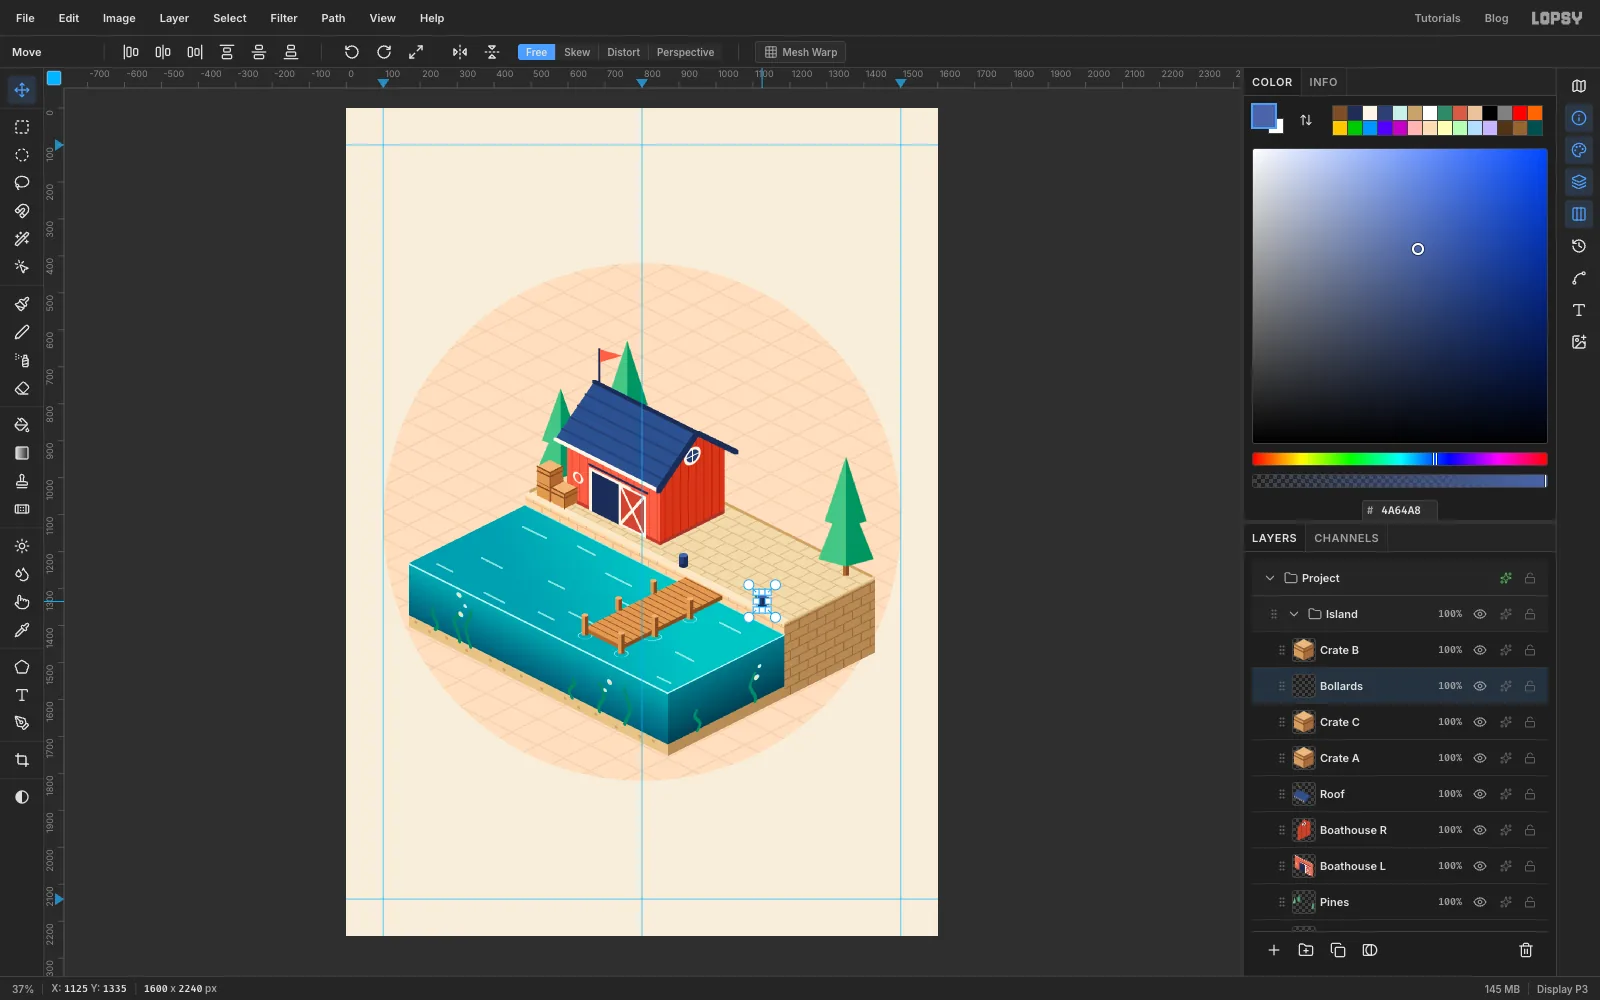
- Add a layer named
-
Light a lamp at the end of the jetty
- Add a layer named
Lamp. With the Brush at size7and navy, click at740, 1439on the deck and Shift-click at740, 1283, straight above it. - Draw the lantern on top of the post as a tiny cube, the same way as the crates, with the Pen:
- Top :
740, 1249,757, 1258,740, 1266,724, 1258. - Left side :
724, 1258,740, 1266,740, 1291,724, 1283. - Right side :
740, 1266,757, 1258,757, 1283,740, 1291. - Cap, navy: a slightly wider diamond,
740, 1247,762, 1258,740, 1268,719, 1258.
- Open the layer's effects (the ✦ on its row), turn on Outer Glow, and set Size
45, Opacity70and Glow color .
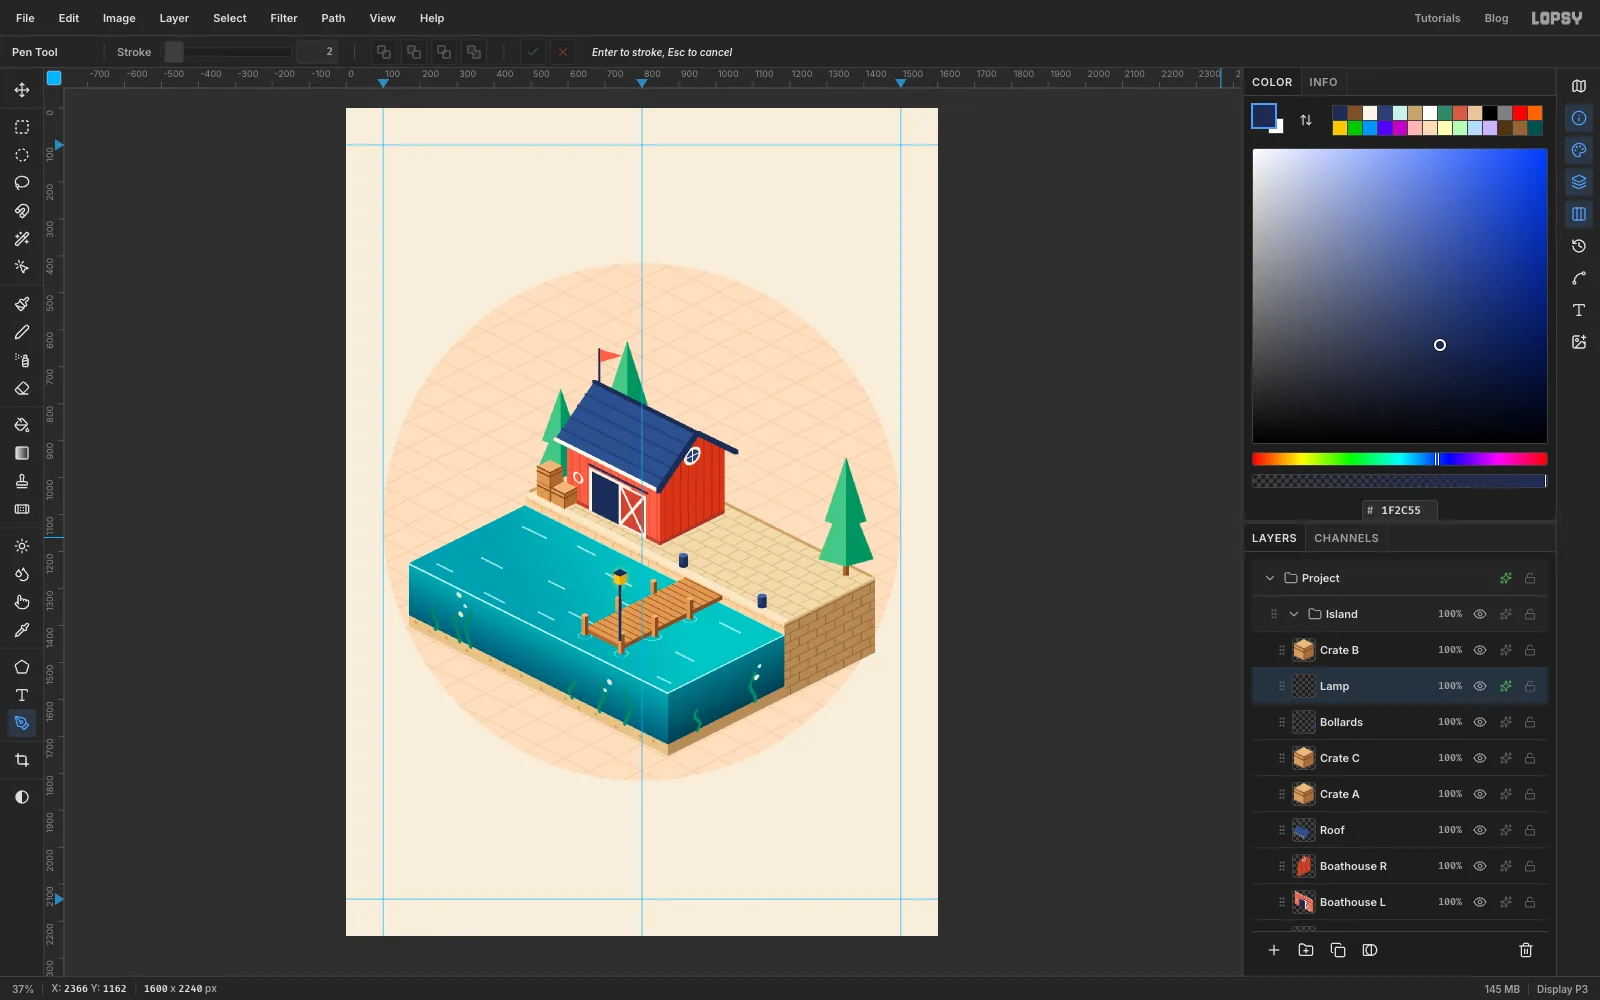
- Add a layer named
-
Cut a kayak shape from two circles
A kayak seen from above is a long, pointed lens. That's exactly what two big overlapping circles have in common.
- Select Roof and add a layer named
Rack Back. With the Brush at size7in , draw two posts straight up: from1070, 1177and from1224, 1254, each 137 px tall. Add three crossbars to each post in at size6, starting 31, 70 and 109 px above the post's foot and running 64 px left and 32 px down. On the first post that's from1070, 1146to1006, 1178, then 39 px higher each time. - Add a layer named
Kayak Yellowabove it. - With the Elliptical Marquee, drag a circle from
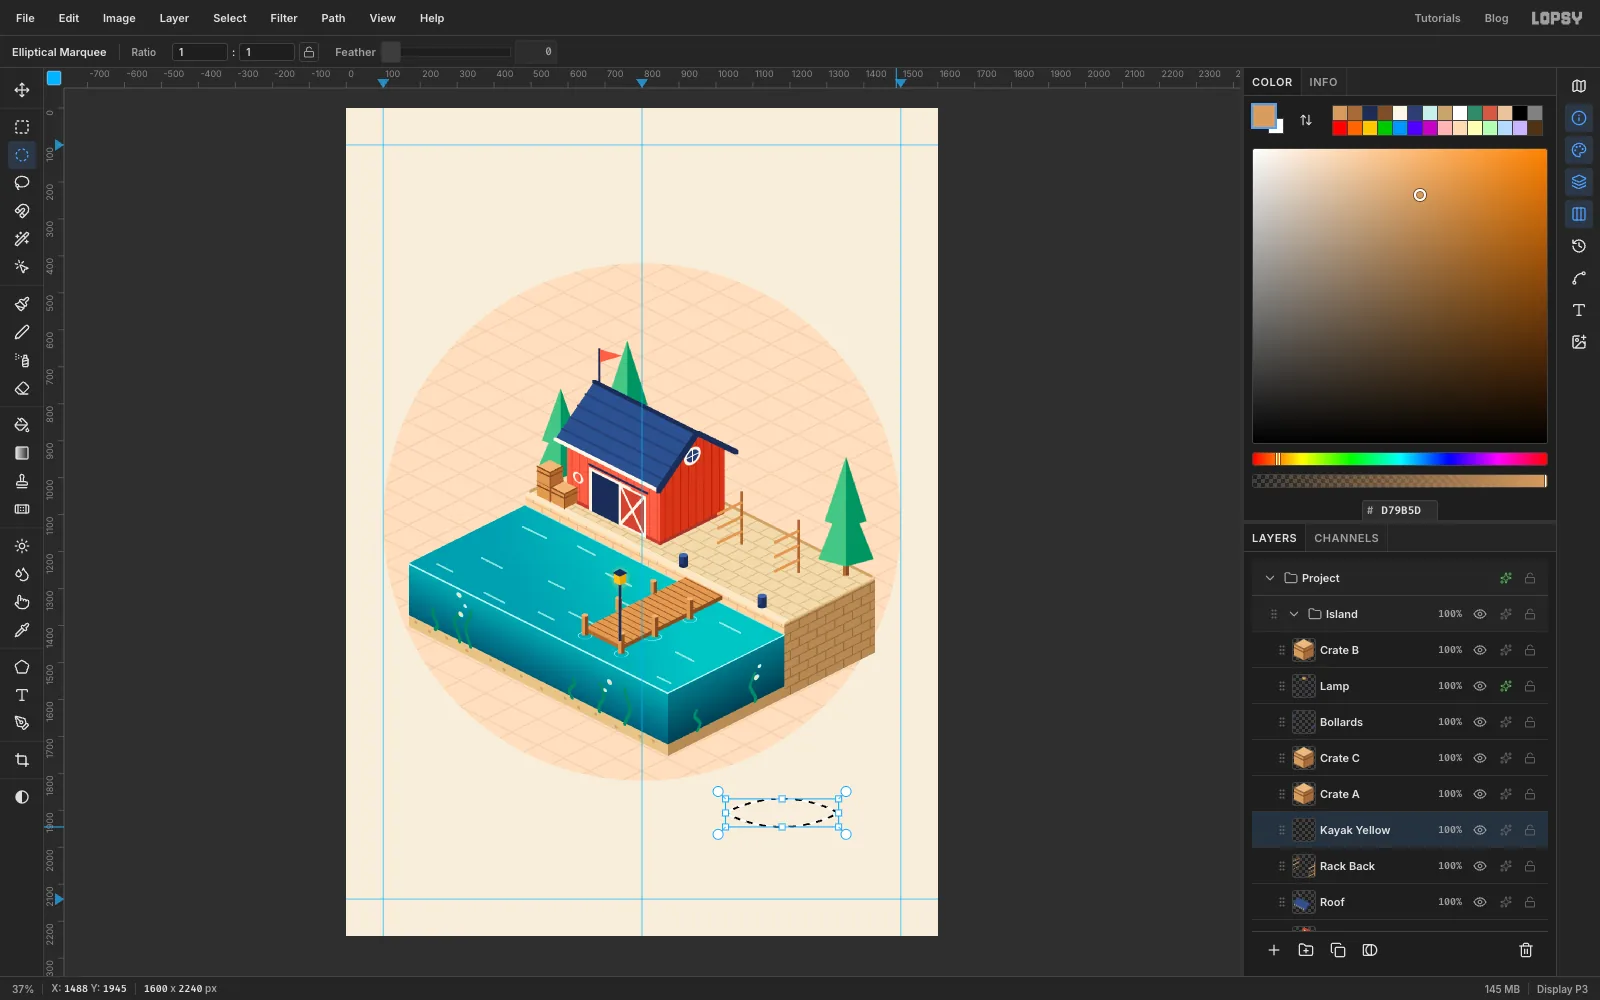
858, 1869to1488, 2499. Most of it hangs off the bottom of the page, which is fine: only its top matters. - Hold Shift and Option together and drag a second circle from
858, 1315to1488, 1945. Shift+Option keeps only the overlap: a lens 300 px long and 76 px wide, centred on1173, 1907.
- Select Roof and add a layer named
-
Decorate the kayak
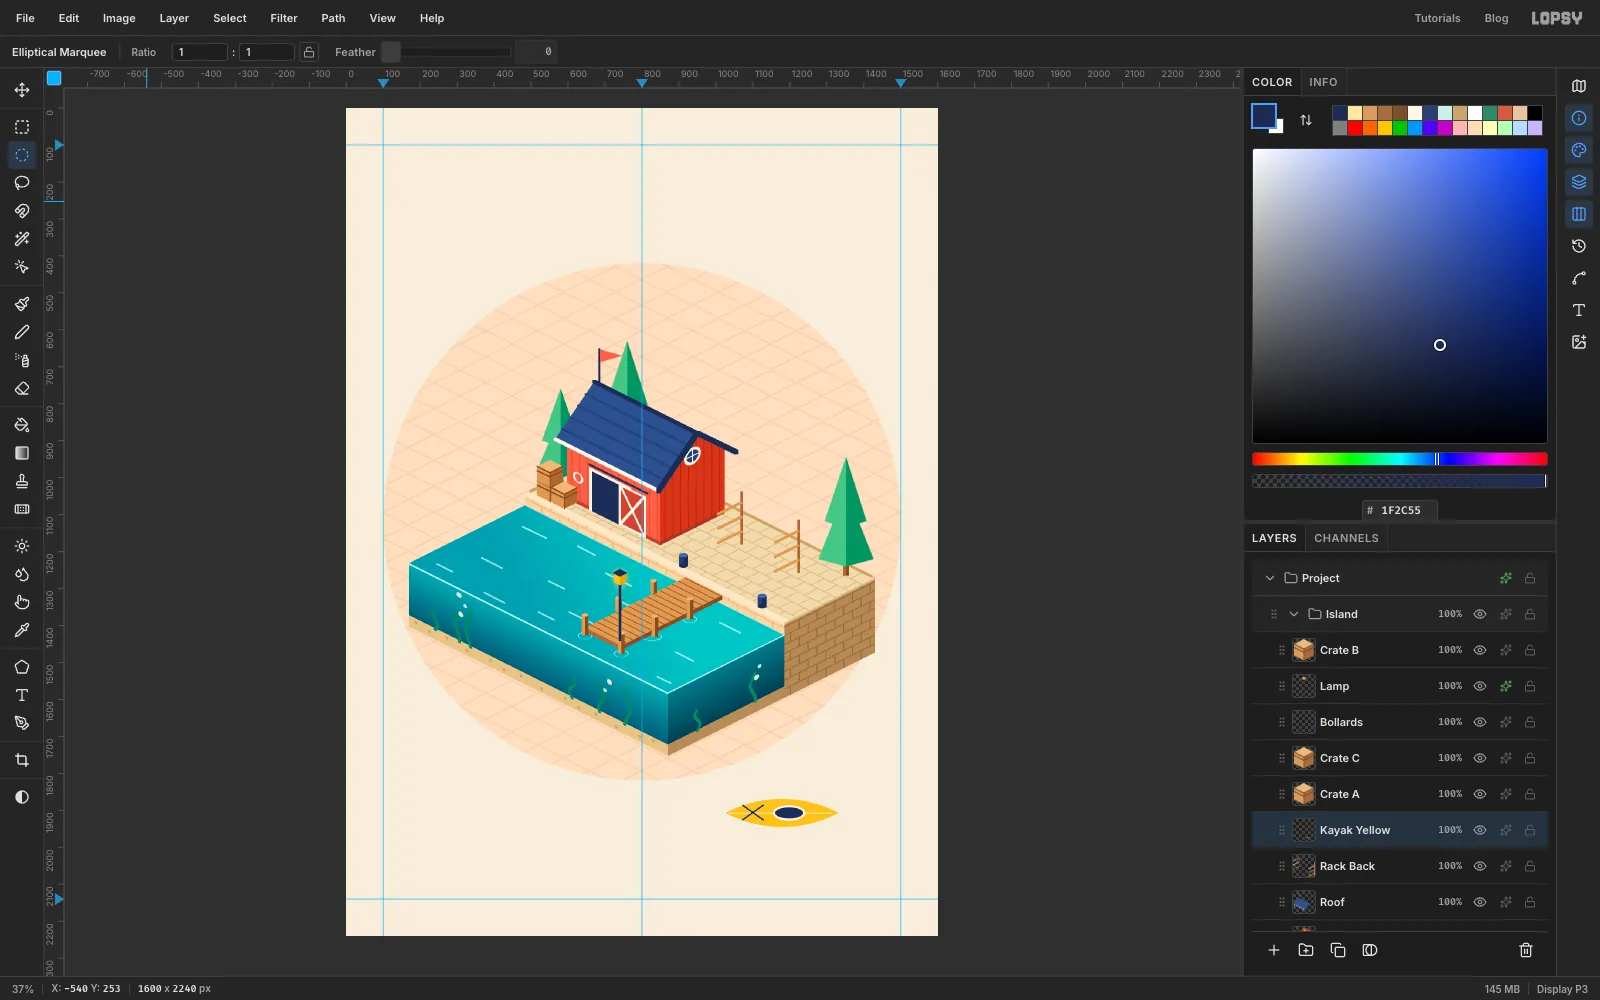
- Fill the lens with and deselect.
- Draw a pale line along its middle with the Pencil at size
3, stopping just short of both tips. - Draw an X of deck bungees near the front in navy at size
3. - Cockpit: fill an ellipse 88 × 42 px a little behind the middle with trim, and a 76 × 30 px ellipse inside it with navy.
-
Rotate and squash the kayak
- Draw a marquee around the kayak with 10 px of room on every side. The tips are anti-aliased, and a marquee drawn tight to them leaves a 1 px sliver behind when you rotate.
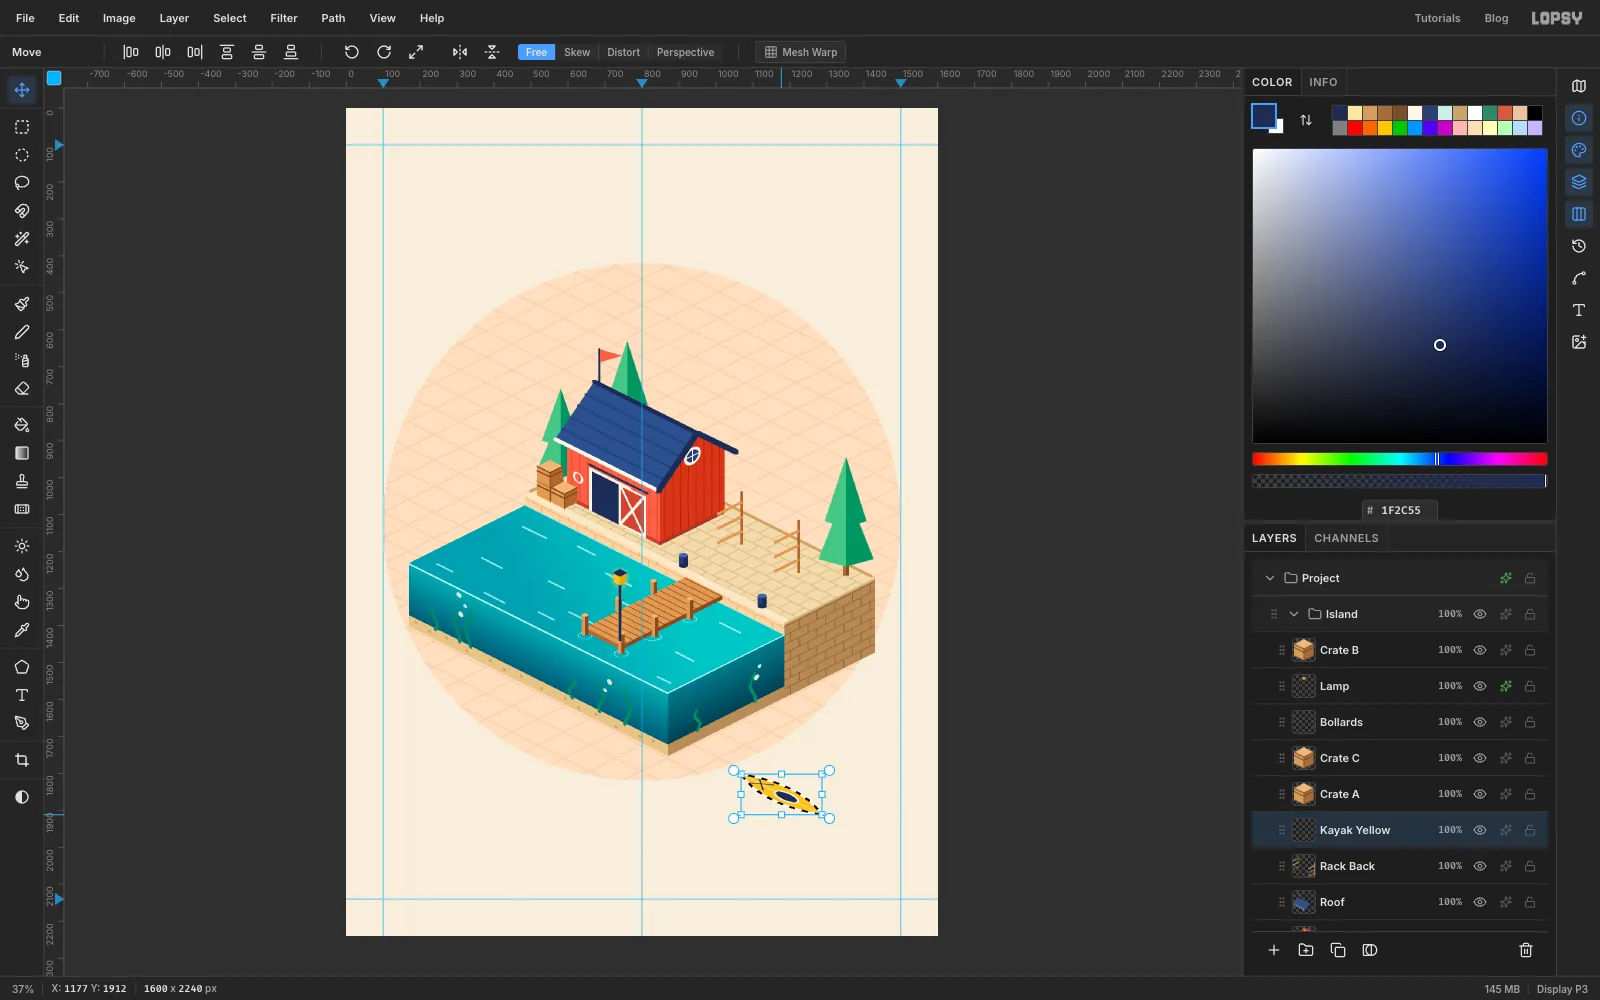
- Rotate it 45° with Cmd held, deselect, Cmd-click the thumbnail and drag the bottom handle up by half the box's height, just like the paving.
- Give it a hull: open its effects and add a Drop Shadow with Offset X
0, Offset Y12, Blur0, Opacity80and Shadow color . With no blur, the shadow reads as the dark side of the hull below the deck. - Move it so its centre is at
1115, 1183, resting on the lowest crossbars.
-
Make the other kayaks with Hue/Saturation
- Choose Layer → Duplicate Layer and name it
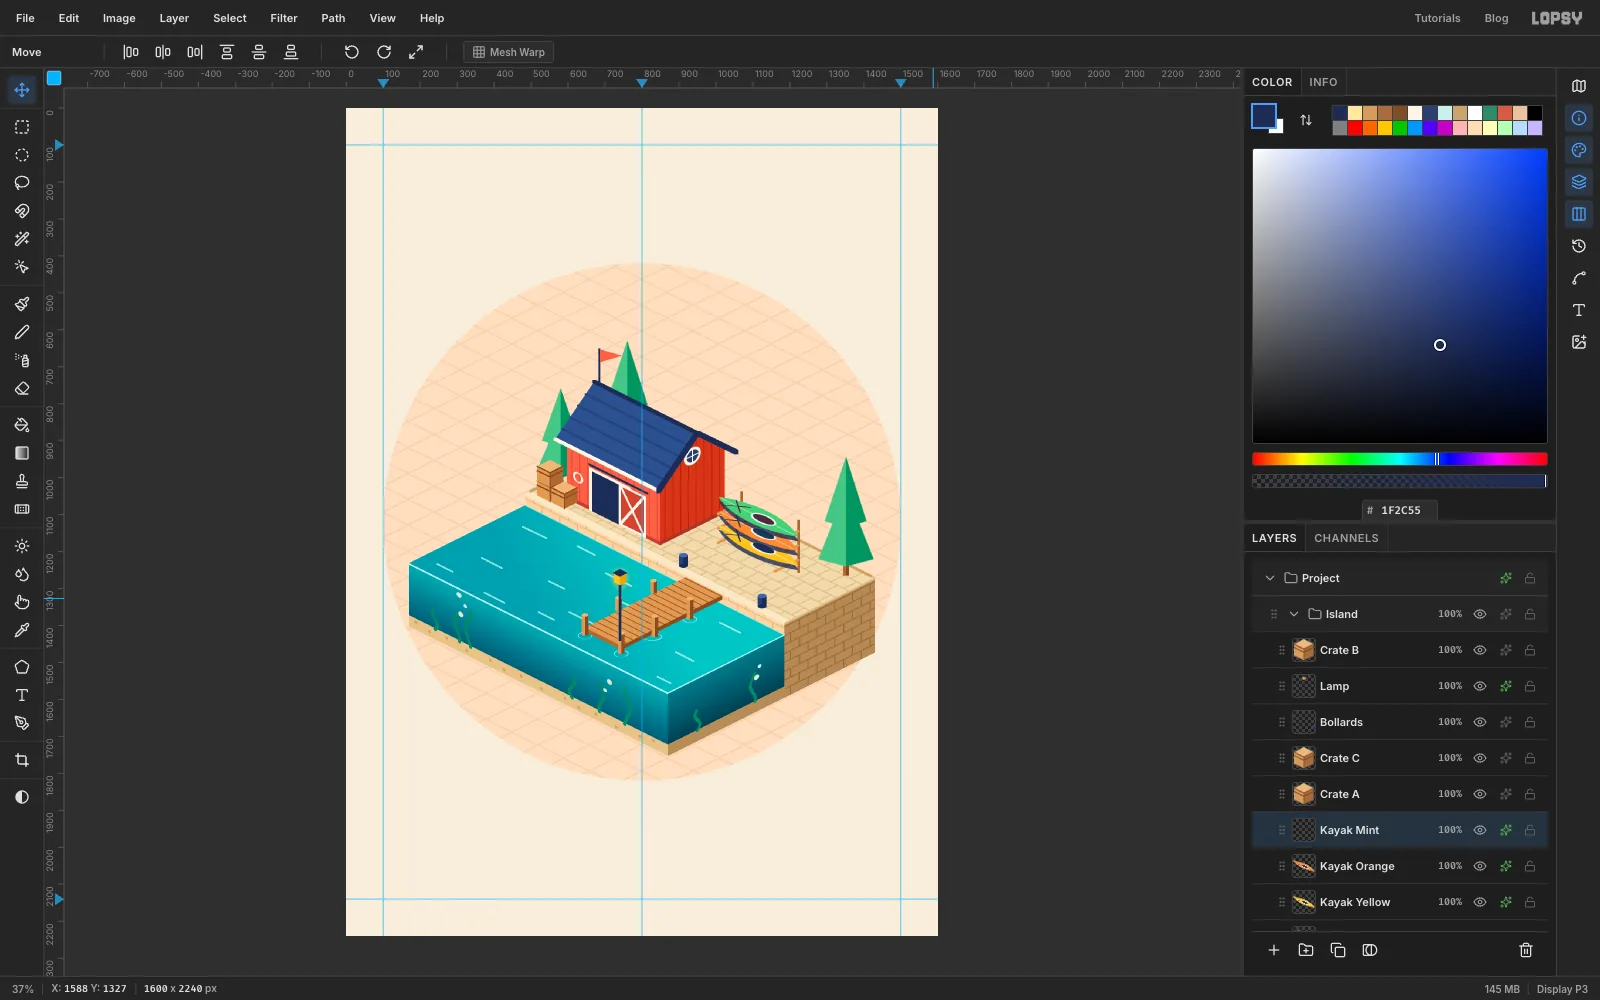
Kayak Orange. Choose Filter → Hue/Saturation…, set Hue to-18and click Apply. Press Up 39 times to lift it onto the middle crossbars. - With Kayak Orange still selected, duplicate it, name the copy
Kayak Mint, and use Hue105with Saturation-45. Lift it another 39 px.
The drop shadow copies along with each layer, so every kayak keeps its hull.
- Choose Layer → Duplicate Layer and name it
-
Add the front posts of the rack
Add a layer named
Rack Frontabove the kayaks. With the Brush at size7in , draw the two front posts straight up from1006, 1209and1160, 1286, each 137 px tall. Now the kayaks sit inside the rack, behind its front posts and in front of the back ones.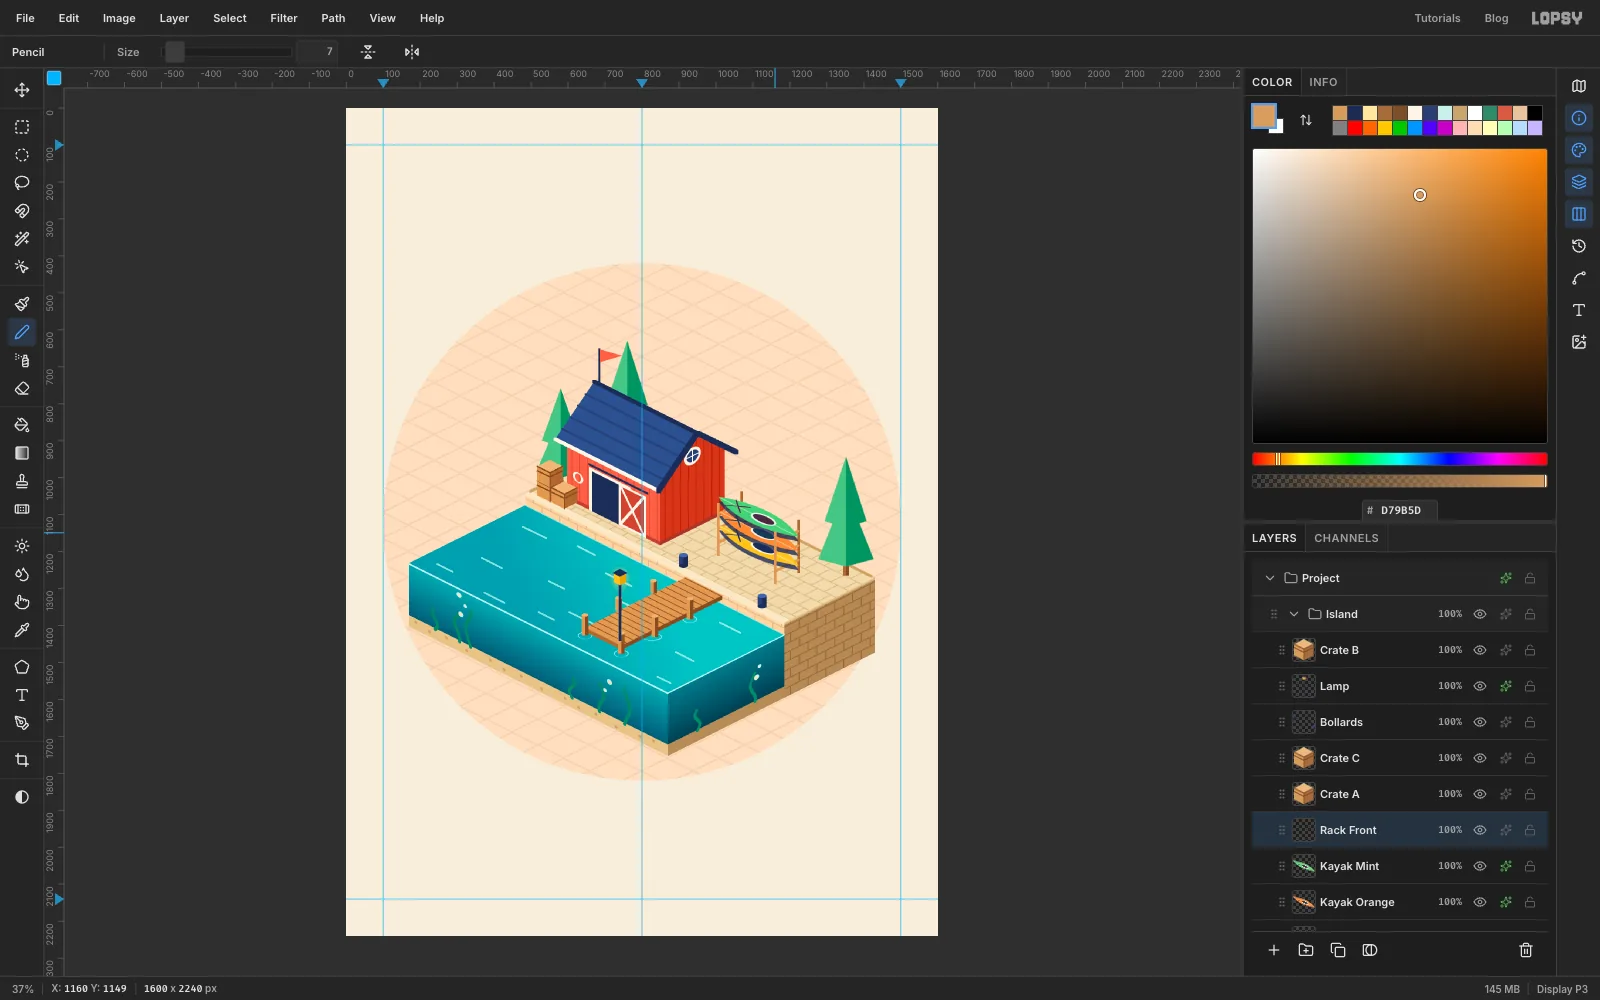
-
Flip a kayak onto the water
- Select Kayak Yellow, duplicate it, name it
Float Yellow, and drag it down onto the water so its centre is at about562, 1209. - Select Kayak Orange, duplicate it and name it
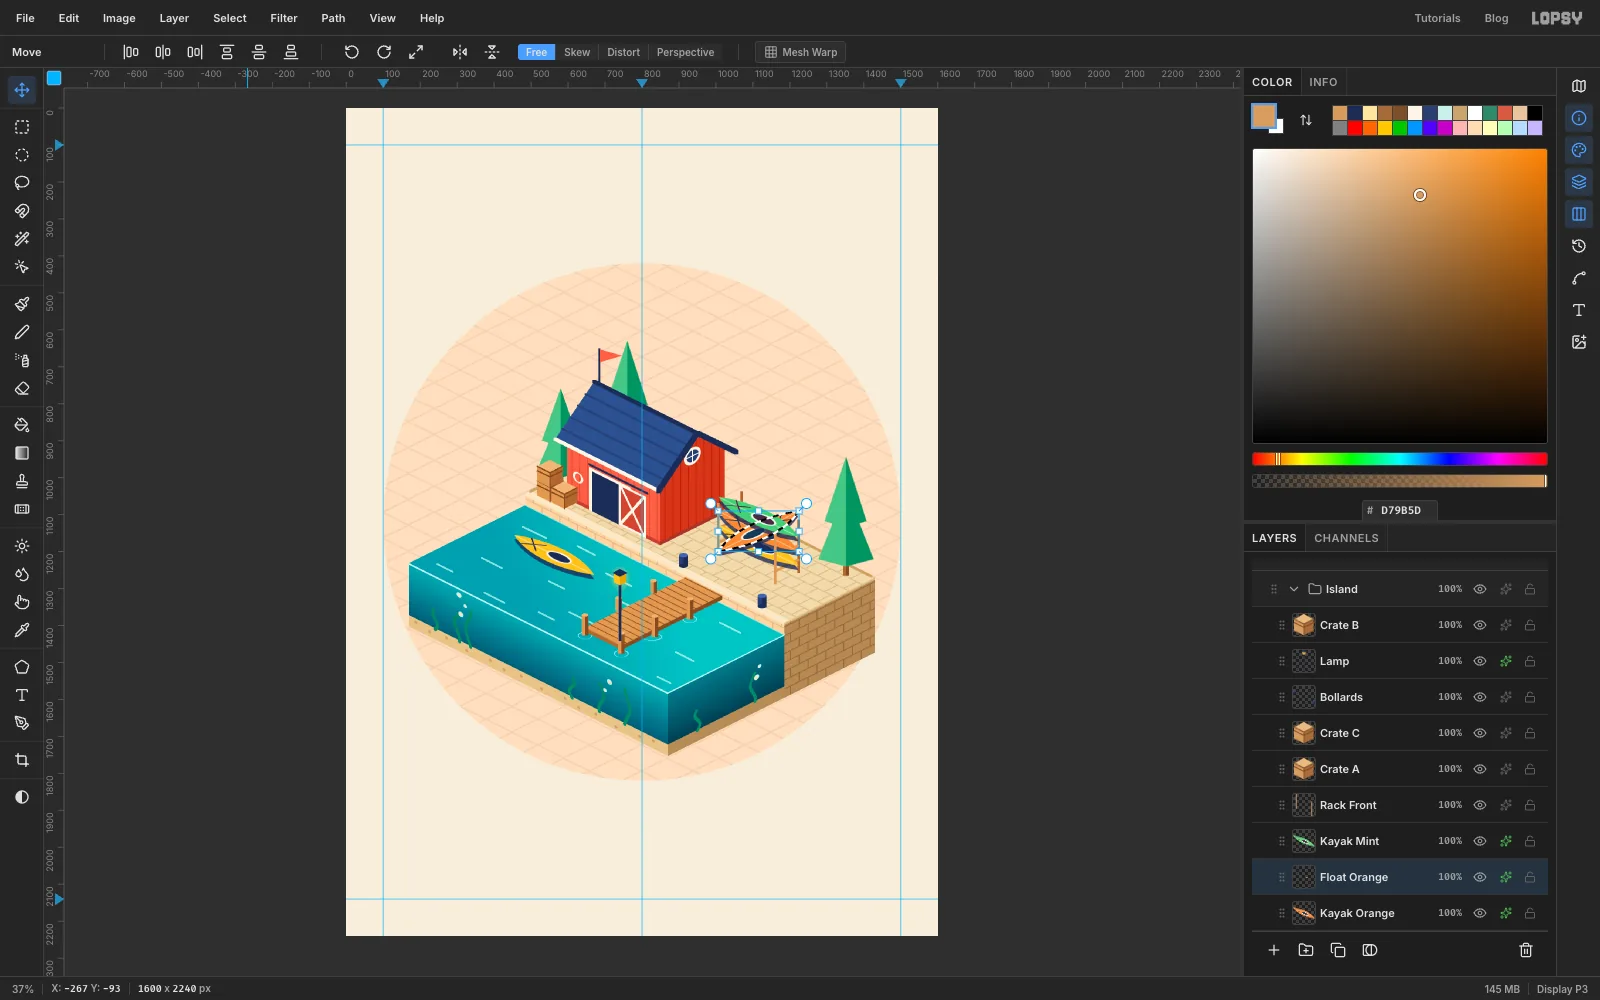
Float Orange. Cmd-click its thumbnail, pick the Move tool and click Flip Horizontal in the options bar. A kayak running along one floor axis now runs along the other one. - Deselect and drag it to about
950, 1453, beside the jetty.
- Select Kayak Yellow, duplicate it, name it
-
Make a paddleboard
- Add a layer named
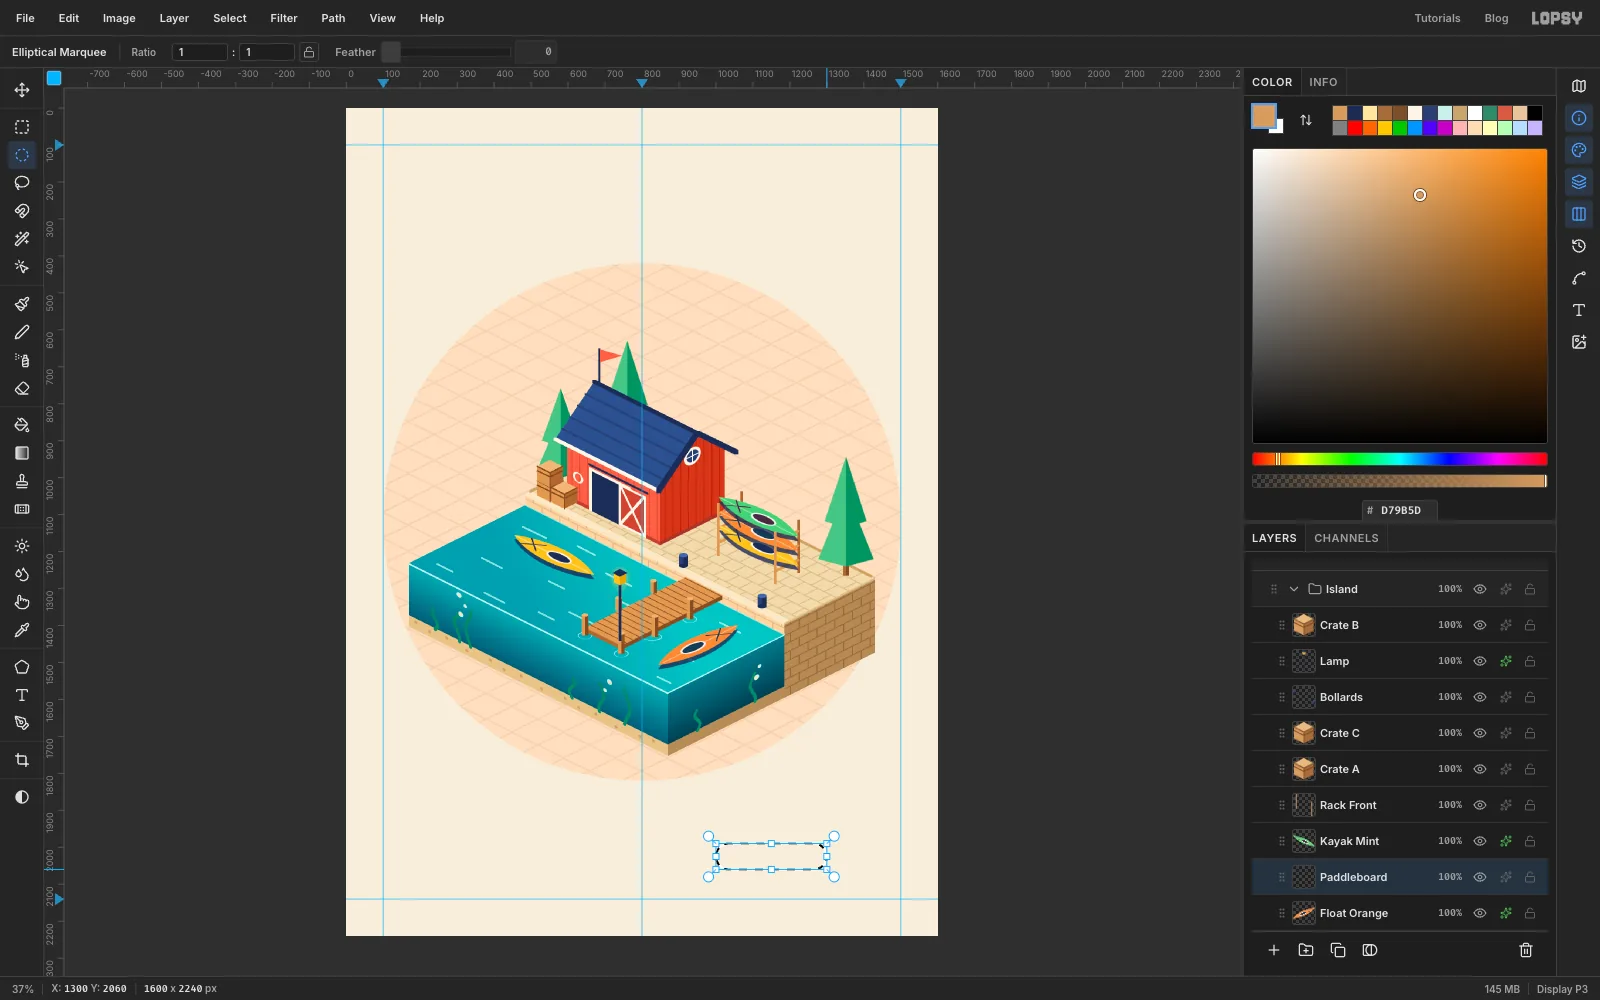
Paddleboard. Make a pill 300 × 70 px: select the rectangle1035, 1990to1265, 2060, then pick the Elliptical Marquee and Shift-drag a circle at each end, from1000, 1990to1070, 2060and from1230, 1990to1300, 2060. Shift adds each circle to the selection. - Fill it with trim. With the Rectangular Marquee, Shift+Option-drag a thin rectangle from
990, 2019to1310, 2031to keep only where it crosses the board, and fill that with coral for a stripe. Fill a navy deck pad in the middle,1105, 2000to1195, 2050. - Rotate and squash it like the kayak, give it a Drop Shadow with Offset X
0, Offset Y7, Blur0, Opacity45and navy, and move it onto the water at about510, 1334.
- Add a layer named
-
Add a paddle and a wake
- Add a layer named
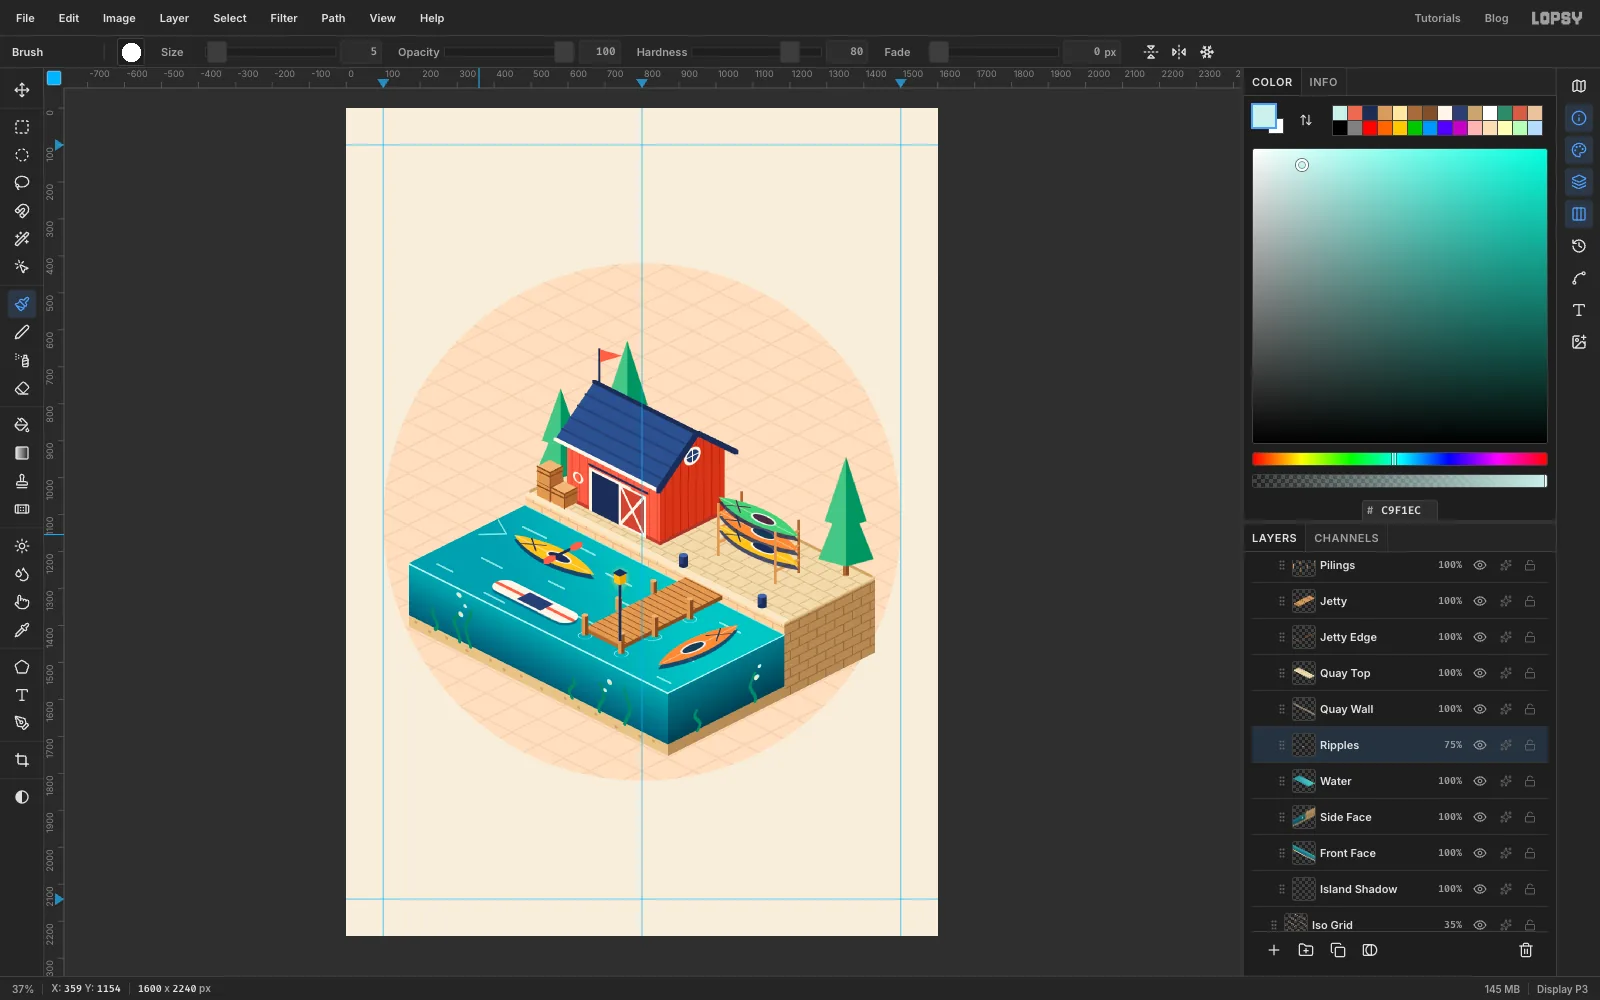
Paddles. With the Pencil, draw a navy shaft at size6across the yellow kayak's cockpit, along the other floor axis: about 80 px long, going down and to the left. Draw a short coral stroke at size14at each end for the blades. - On Ripples, draw a V of wake behind the kayak's stern with the Brush at size
5: two short lines spreading out from the back tip.
- Add a layer named
-
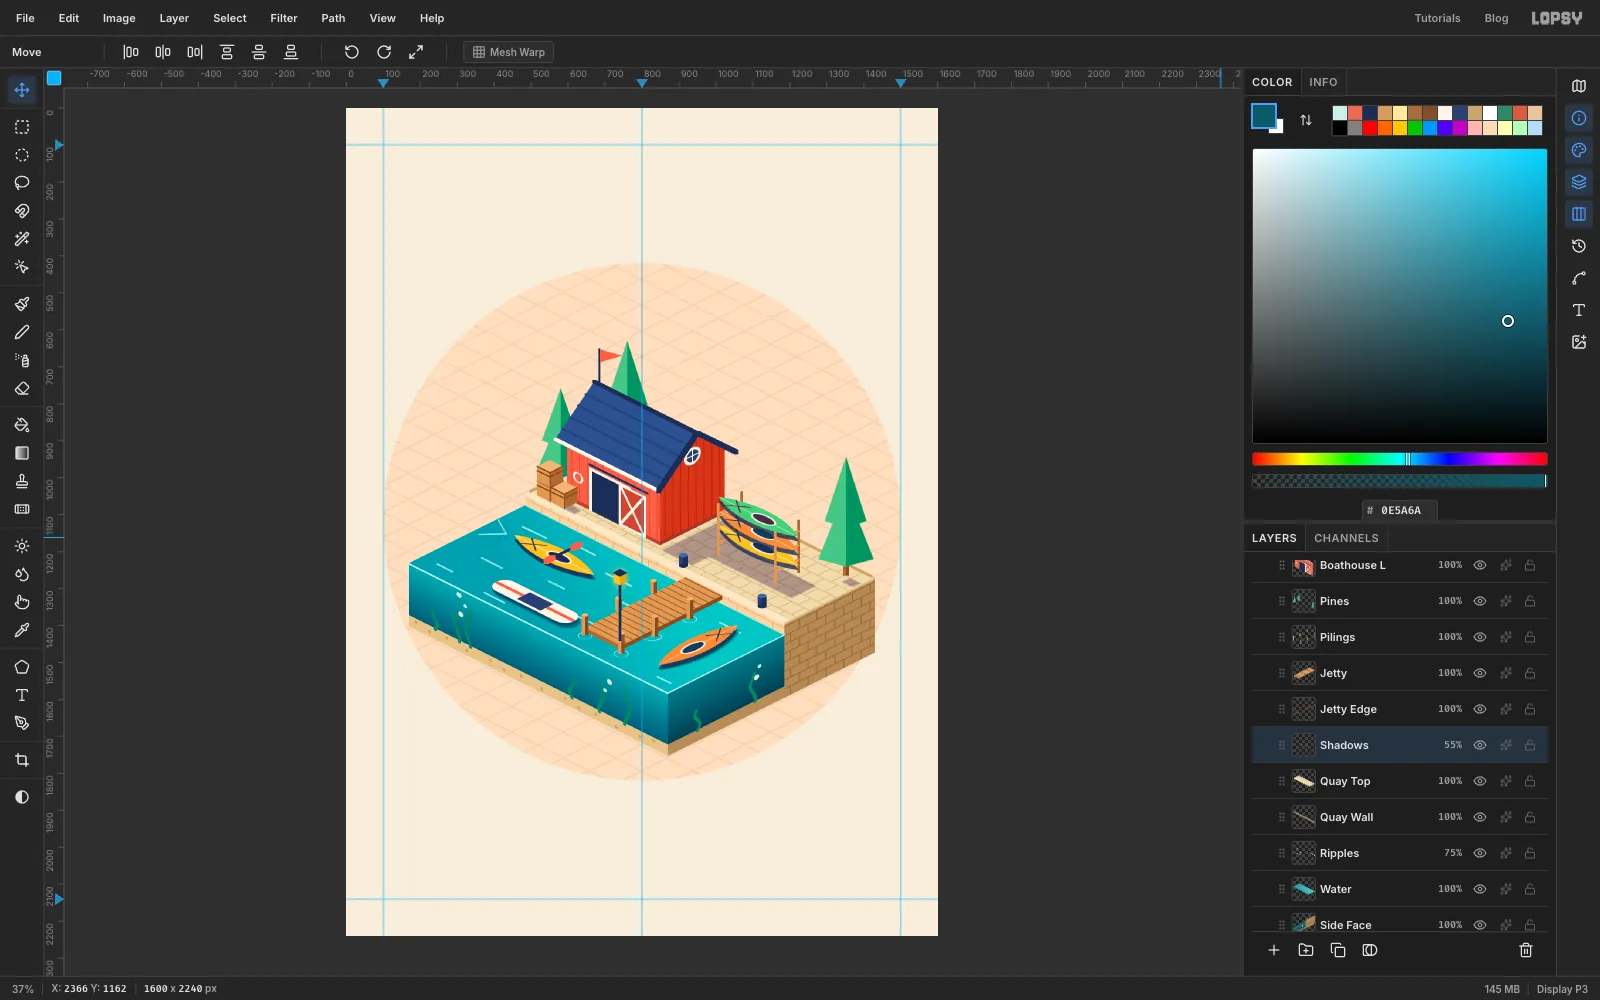
Cast the shadows
The light comes from the upper left, so shadows fall to the right.
- Select Quay Top and add a layer named
Shadowsabove it. That's above the paving, so shadows can fall on it, but under everything standing on it. - With the Pen and Path to Selection, fill these shapes with : a strip on the paving to the right of the boathouse (
1024, 1095,1066, 1154,930, 1223,849, 1182), a strip under the rack, a small one to the right of the crates and a short one to the right of the far pine's trunk. Keep them on the paving: the next step pushes every shadow a little down and right, and anything near the edge would slide off it. - Cmd-click the Float Yellow, Float Orange and Paddleboard thumbnails one at a time and fill each shape on the Shadows layer with dark teal . Deselect.
- Press Right 6 times and Down 14 times with the Move tool to push the shadows off their objects.
- Choose Filter → Gaussian Blur… with Radius
4. Set the blend mode to Multiply in the effects drawer and the opacity to55%.
- Select Quay Top and add a layer named
-
Float the island
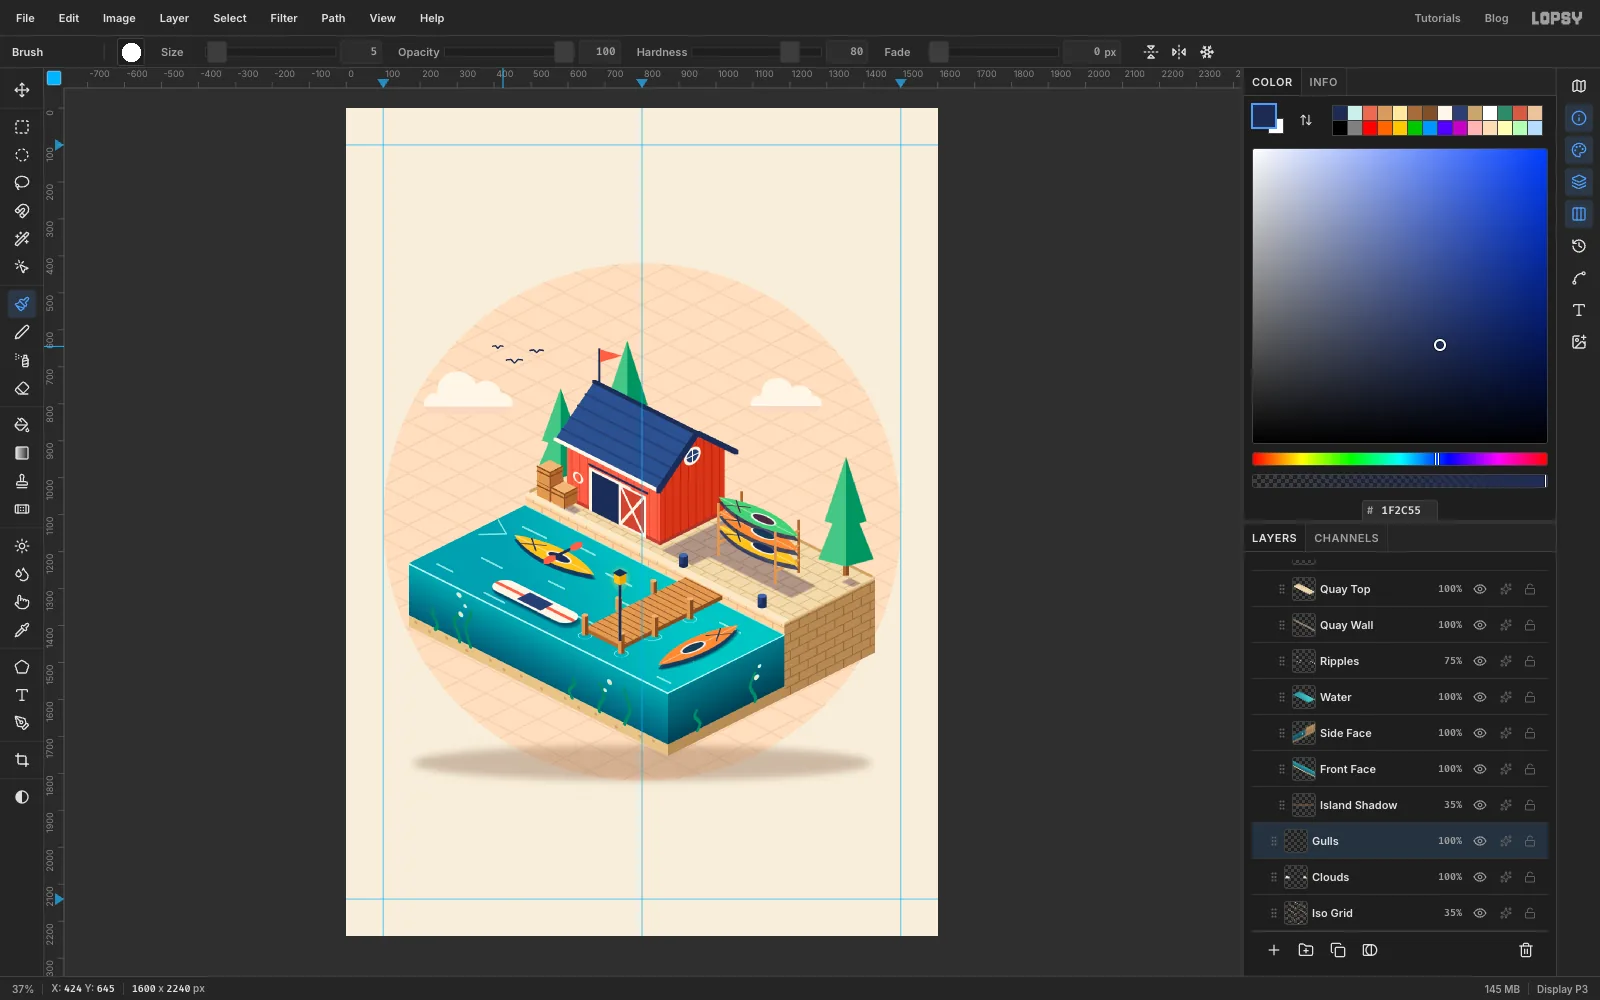
- Select the empty Island Shadow layer you made at the start, at the bottom of the group. Fill an ellipse 1240 × 96 px centred on
800, 1772with warm brown , blur it with Gaussian Blur at Radius30and set the opacity to35%. The block now hovers. - Select Iso Grid and add a layer named
Cloudsoutside the group. Each cloud is a pill 240 × 56 px with two circles Shift-added on top: one 108 px across, overlapping the pill's top a little left of centre, and a smaller 80 px one to its right. Fill it with trim, then Shift+Option-drag a rectangle over its lower half and fill that part with for a flat shaded underside. Centre one cloud's pill at330, 800, and make a second at 80% of the size centred at1190, 800. - Add a layer named
Gullsand draw three small navy "m" shapes with the Brush at size5in the sky at the upper left.
- Select the empty Island Shadow layer you made at the start, at the bottom of the group. Fill an ellipse 1240 × 96 px centred on
-
Set the headline and extrude it
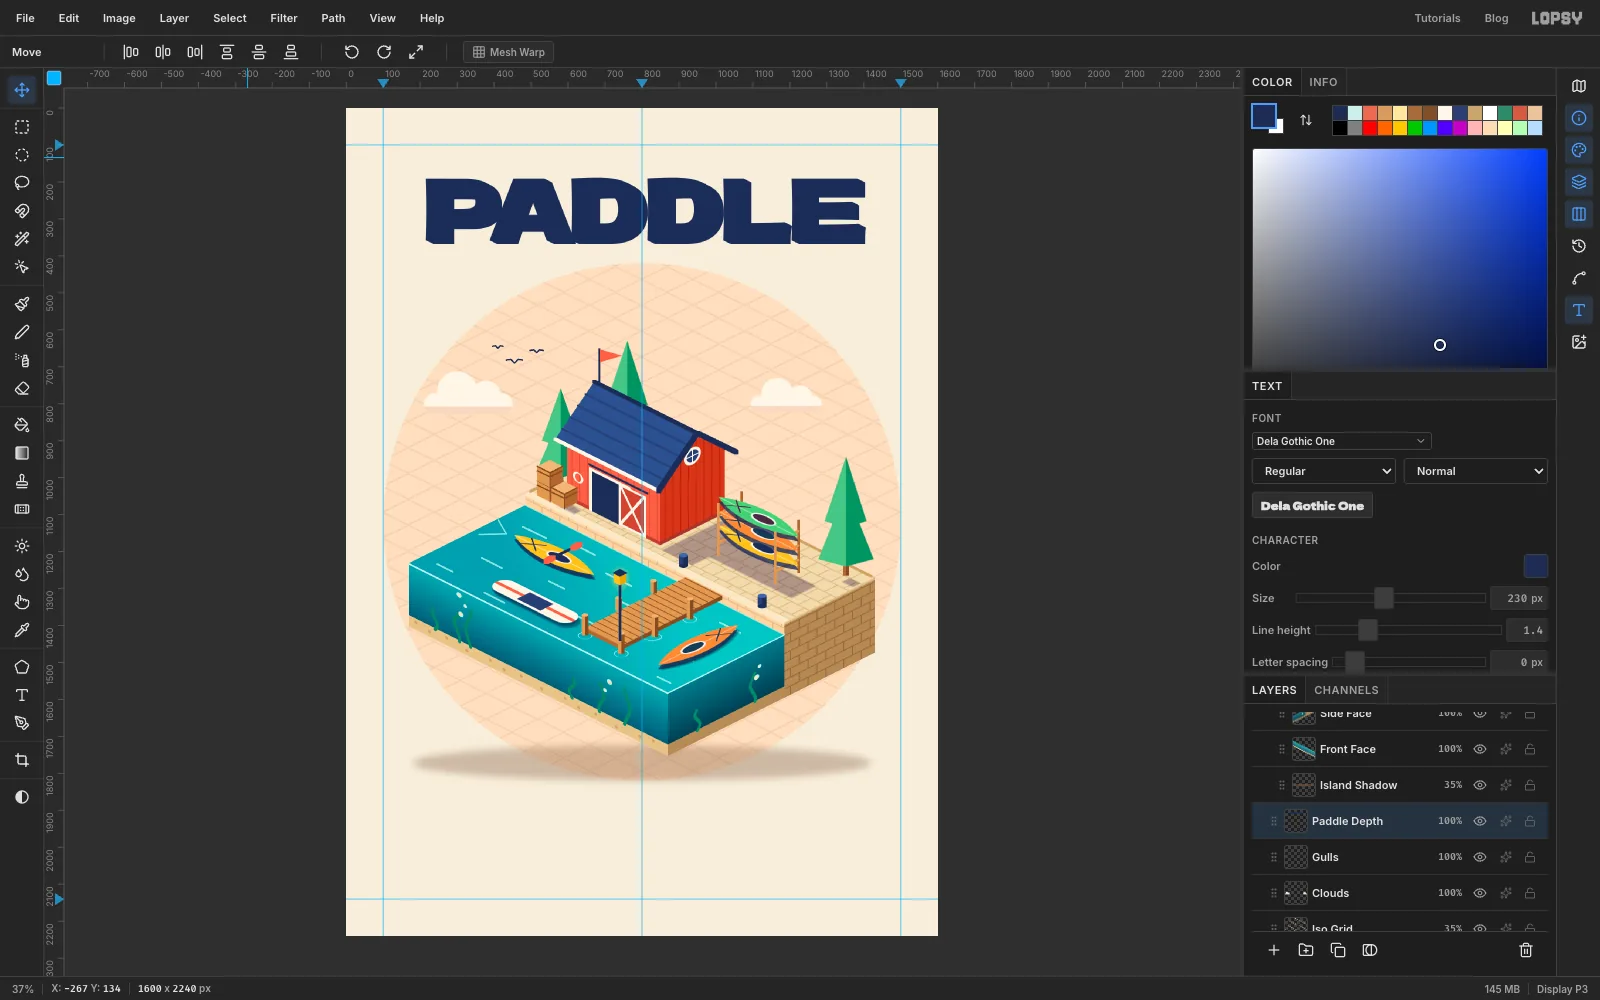
The headline gets an isometric extrusion that steps down and to the right, the same 2:1 direction as the floor.
- Select Gulls. Pick the Type tool (T), choose Dela Gothic One at Size
230and navy. Click in an empty spot, typePADDLE, press Tab to finish and name the layerPaddle Depth. - Move it so the word is centred at
800, 272. - Click Rasterize Layer at the bottom of the Layers panel.
- Now build the depth: choose Layer → Duplicate Layer, press Right twice and Down once with the Move tool, then choose Layer → Merge Down. Do this ten times in all. Each round adds a copy 2 px right and 1 px down, so the extrusion ends up 20 px right and 10 px down.
- Select Gulls. Pick the Type tool (T), choose Dela Gothic One at Size
-
Put the coral face on top
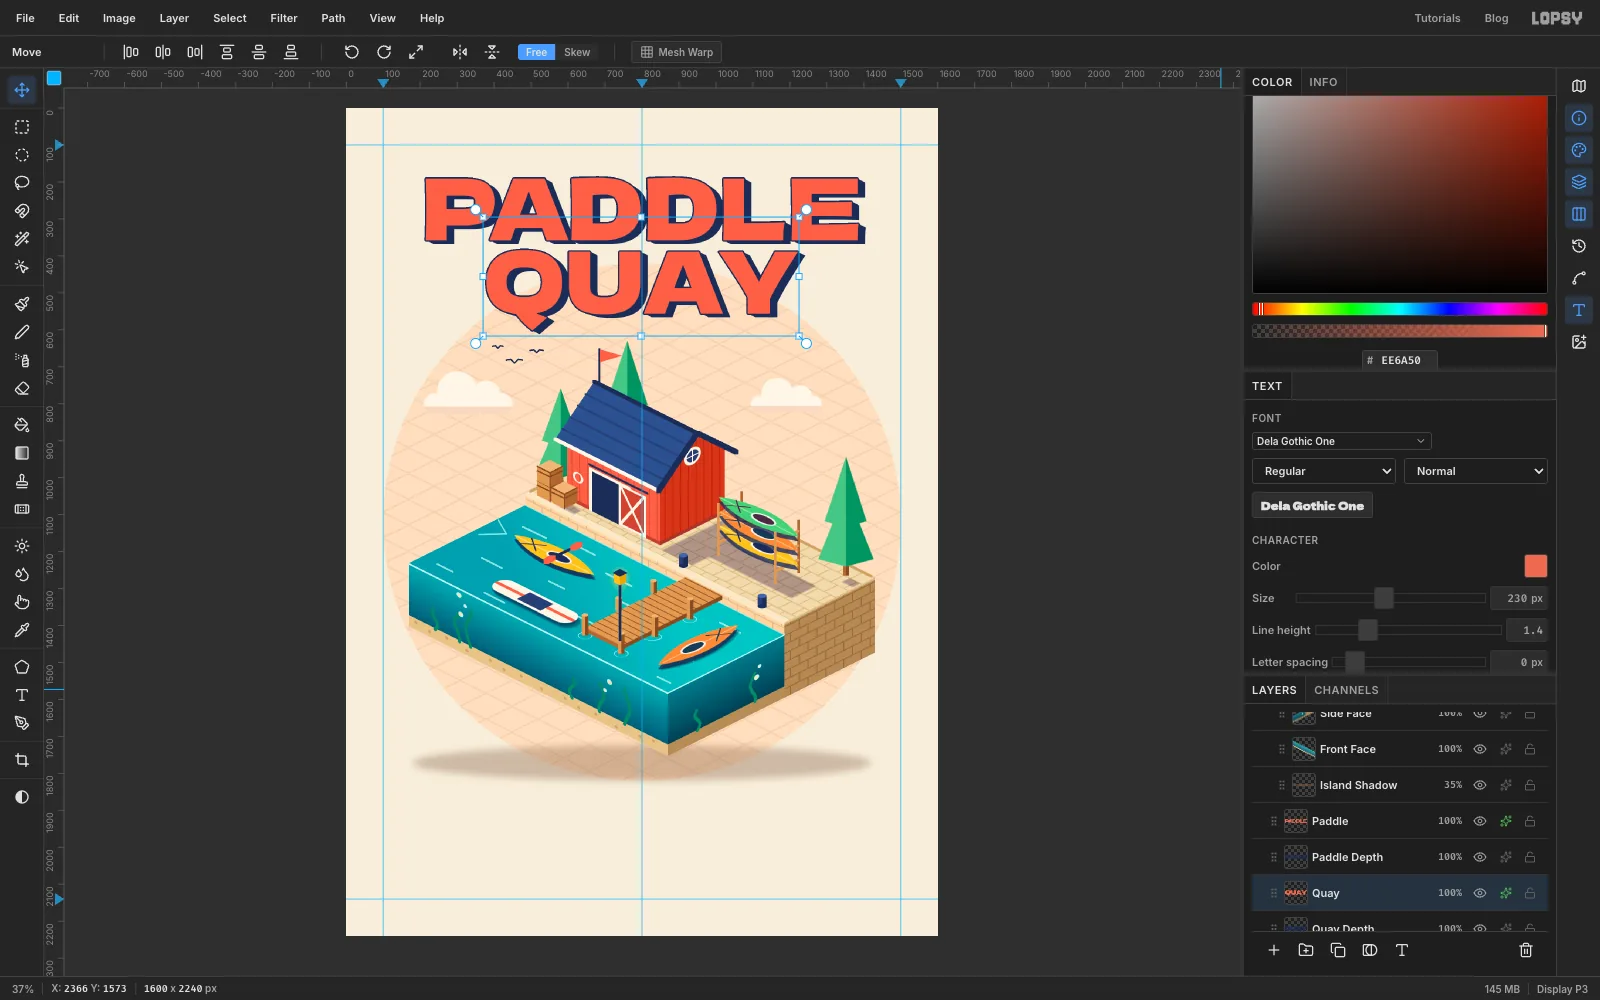
- Select Paddle Depth. Type
PADDLEagain in Dela Gothic One230, this time in coral , in an empty spot, and name itPaddle. - Move it so it's centred at
800, 272too, exactly on top of where the navy word started. The extrusion now shows only below and to the right. - Add a Stroke effect with Width
4and Stroke color . - Now the second line. Select Gulls again and type
QUAYin Dela Gothic One230, navy, in an empty spot. Name itQuay Depthand centre it at800, 492. - Rasterize Quay Depth and give it the same ten rounds of duplicate, nudge and Merge Down.
- Select Quay Depth, type
QUAYagain in coral, name itQuay, centre it at800, 492and add the same navy Stroke.
- Select Paddle Depth. Type
-
Skew a sign onto the gable
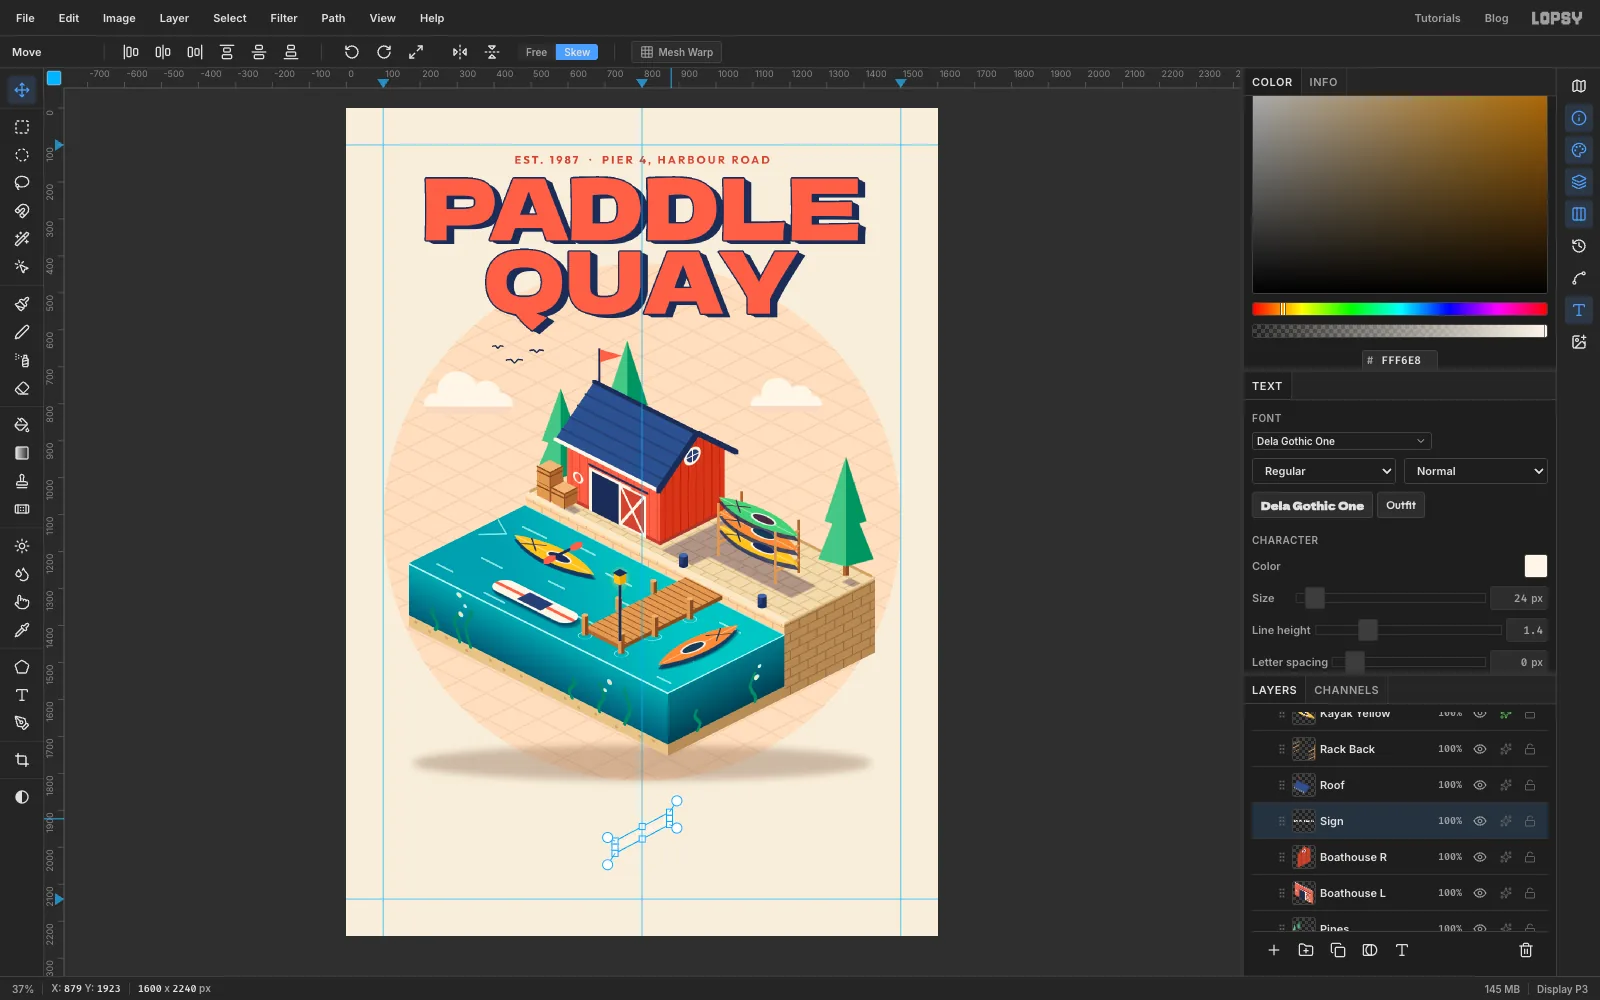
Live text can be skewed too, and it stays editable.
- Select Boathouse R. Type
RENTALSin Dela Gothic One at Size24in trim colour, in an empty spot, and name itSign. - With the Move tool, click Skew in the options bar. Drag the middle-right handle of the text's box up by half the box's width.
- Move the sign onto the gable wall, centred below the round window. Its baseline now climbs at the same slope as the wall, and the letters stand upright.
- Select Boathouse R. Type
-
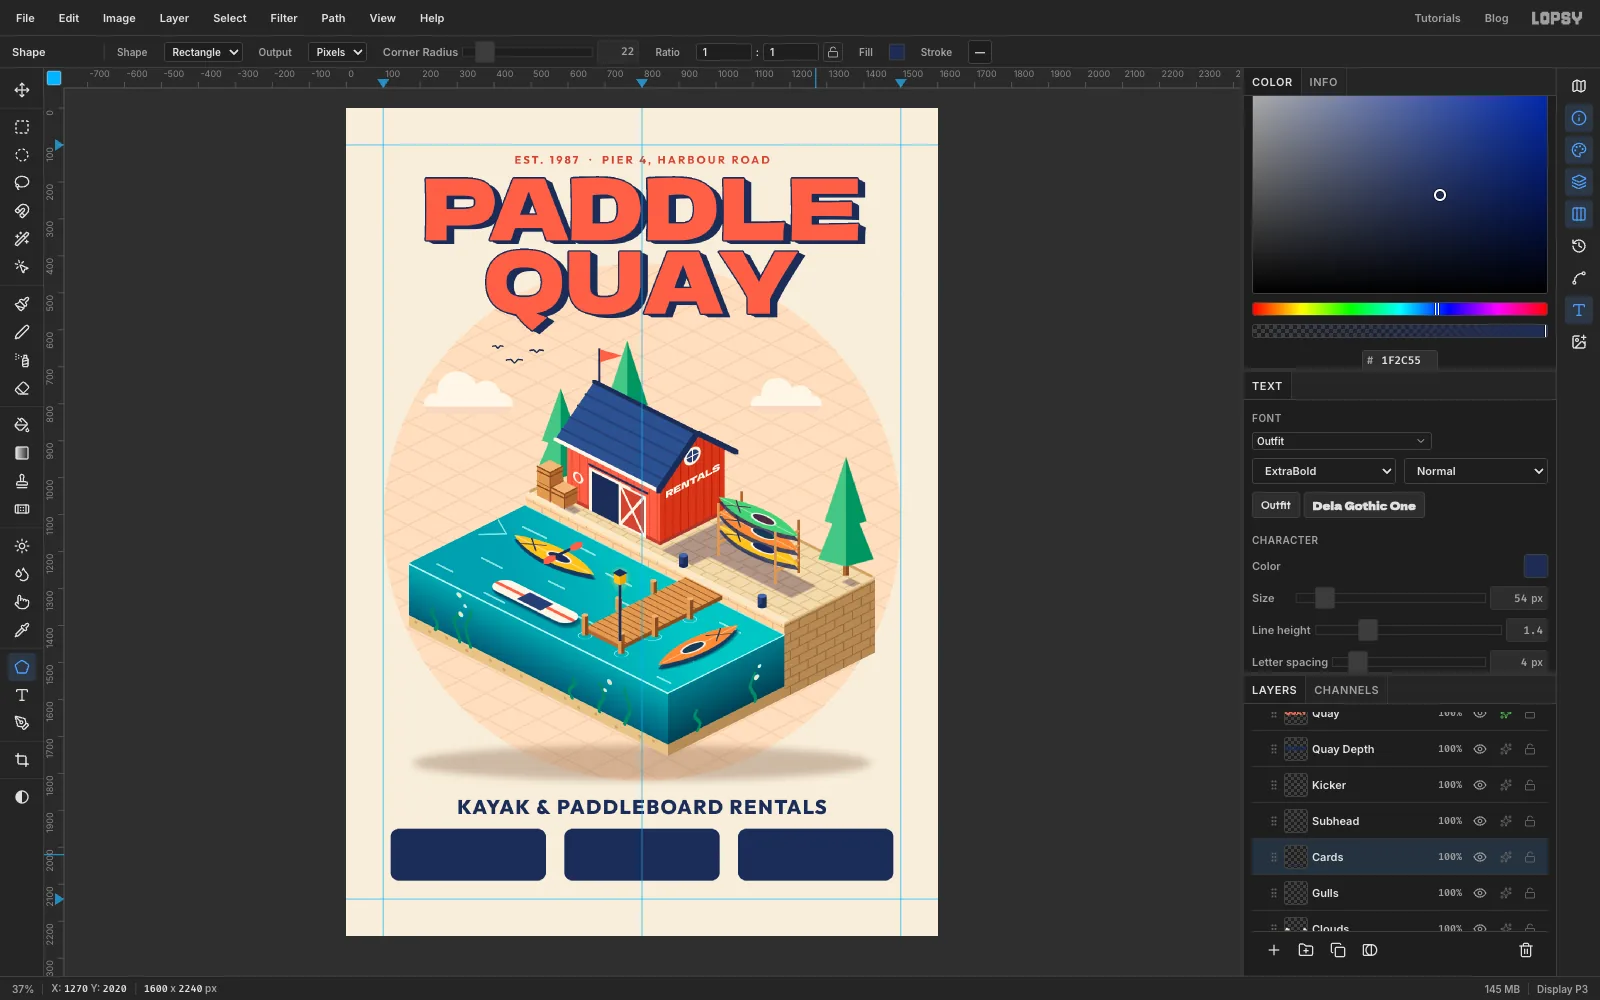
Add the kicker, subhead and price cards
- Select Gulls and type
EST. 1987 · PIER 4, HARBOUR ROADin Outfit, Bold (700), Size30, colour . Name itKicker, set Letter spacing to6in the Text panel and centre it at800, 142. - Select Gulls again and type
KAYAK & PADDLEBOARD RENTALSin Outfit, Extra Bold (800), Size54, navy, with Letter spacing4. Name itSubheadand centre it at800, 1890. - Select Gulls and add a layer named
Cards. Set the foreground colour to navy, then pick the Shape tool (U). Set Shape to Rectangle, Output to Pixels and Corner Radius to22. - Click once without dragging at
330, 2020. A dialog asks for the size: type Width420, Height140, and press Enter. The card is centred on the click. Do the same at800, 2020and1270, 2020, so the three cards span120–540,590–1010and1060–1480. - Add a Drop Shadow with Offset X
9, Offset Y9, Blur0, Opacity100and Shadow color . A hard coral offset gives the cards the same chunky, printed feel as the headline.
- Select Gulls and type
-
Write the prices and the details
The cards read
SINGLE KAYAK/$18/HR,TANDEM KAYAK/$28/HRandPADDLEBOARD/$22/HR, centred at X330,800and1270. For each card, select Cards before you type:- The name in Outfit Bold
26, trim colour, Letter spacing4, centred 38 px above the card's middle (at Y1982). - The price in Dela Gothic One
54, yellow, centred 24 px below the middle (at Y2044). Together they sit optically centred in the card, with the same margin above the name as below the price.
Finally, select Cards once more and type
Open daily 8 am – sunset · Life jackets included · No experience neededin Outfit Medium (500)28, navy, centred at800, 2150.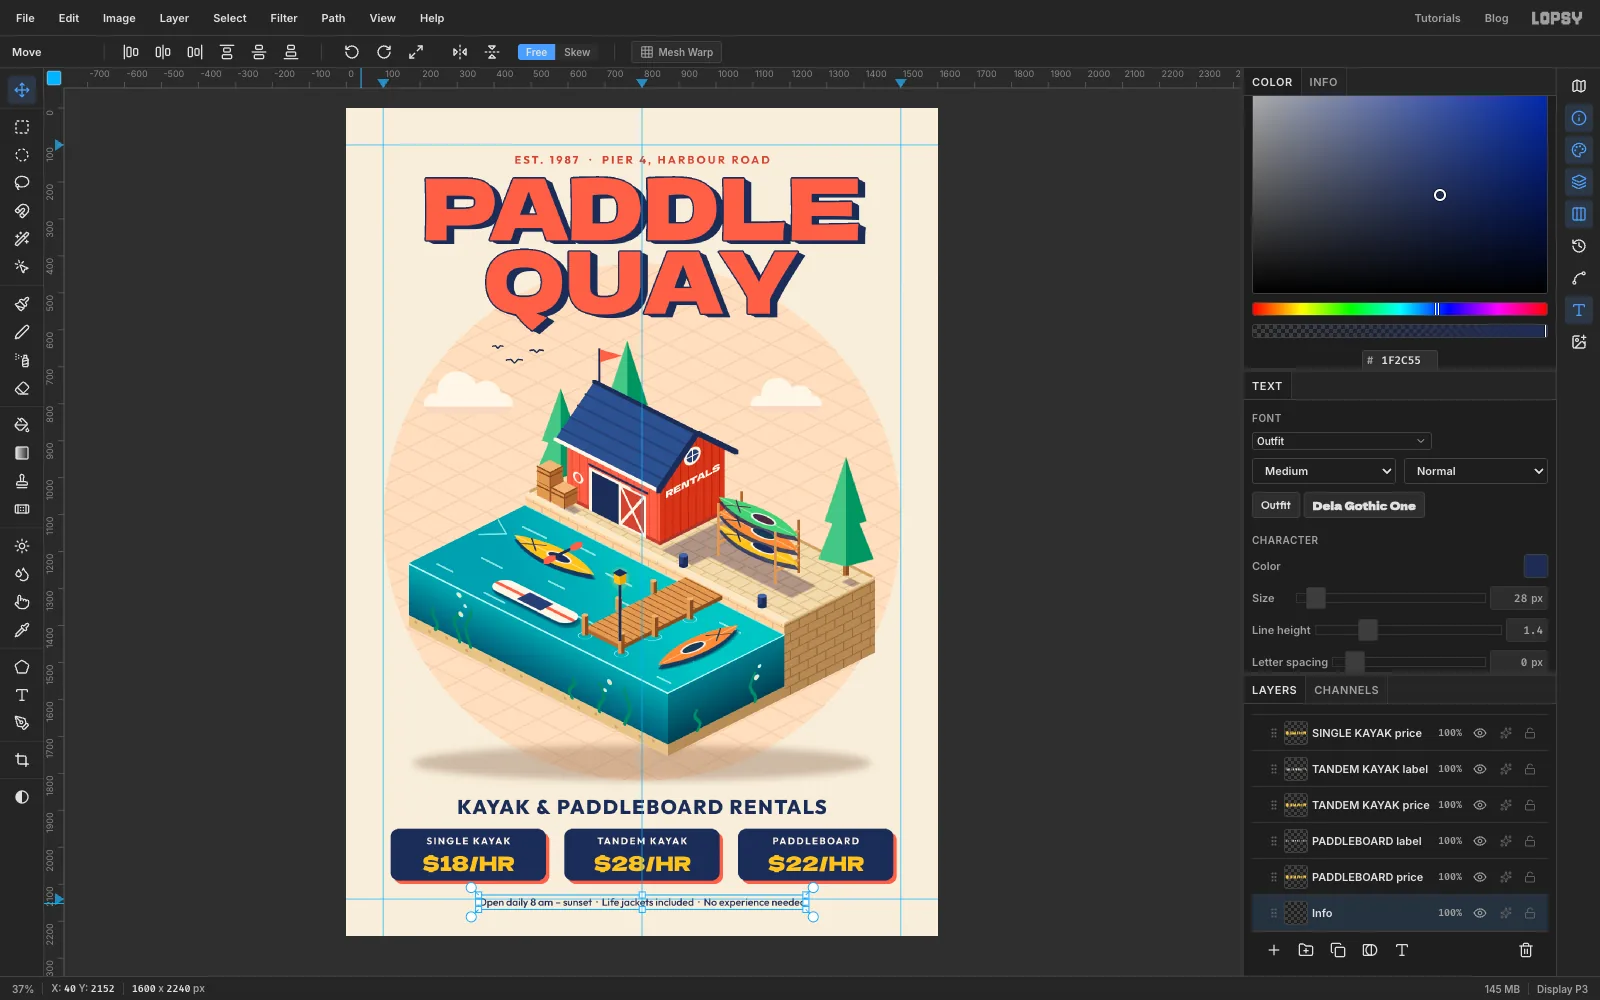
- The name in Outfit Bold
-
Make the offer badge
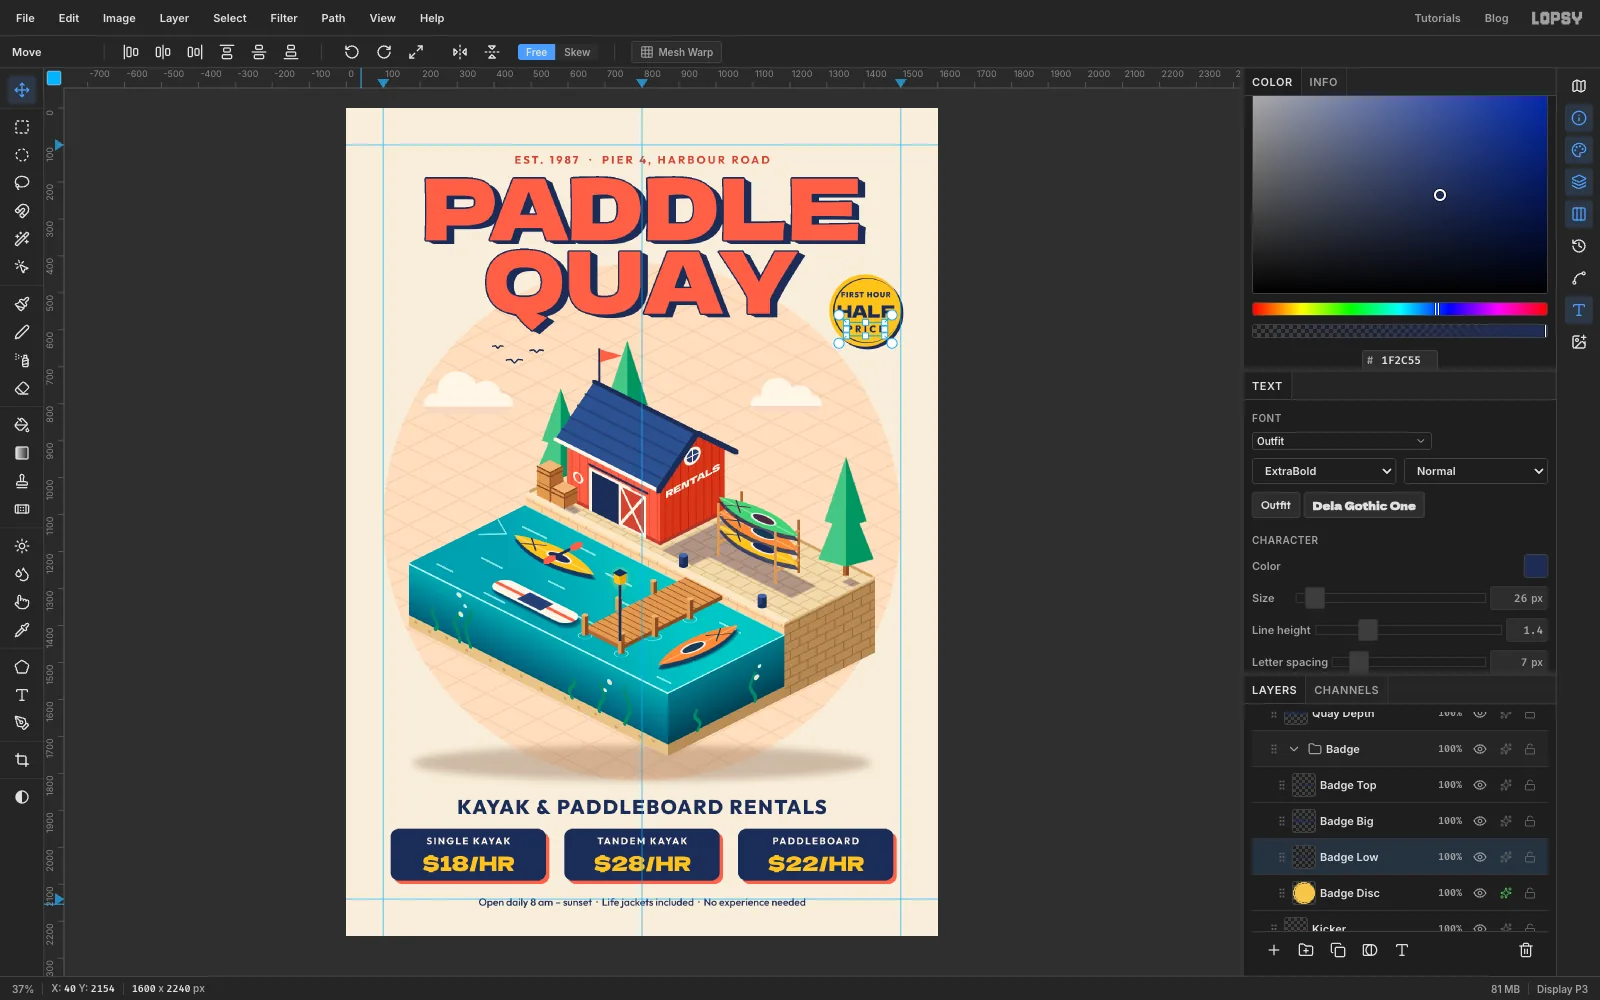
- Select Kicker, click New Group and name it
Badge. Add a layer inside it namedBadge Disc. - Fill a circle 196 px across centred on
1405, 548with yellow, far enough out that it clears the peach sun disc's edge instead of just touching it. - Add a navy ring 10 px inside the badge's edge: select a circle 176 px across on the same centre, Option-drag a 168 px circle out of its middle, and fill with navy.
- Add a Drop Shadow: Offset X and Y
7, Blur0, Opacity100, navy. - Select Badge Disc before each line, and type
FIRST HOUR(Outfit Extra Bold20, Letter spacing2),HALF(Dela Gothic One45) andPRICE(Outfit Extra Bold26, Letter spacing7), all in navy and centred on the badge's centre line, at Y504,550and597. Name themBadge Top,Badge BigandBadge Low. Navy on yellow keeps the offer readable; coral on yellow would be too faint.
- Select Kicker, click New Group and name it
-
Tilt the badge as a group
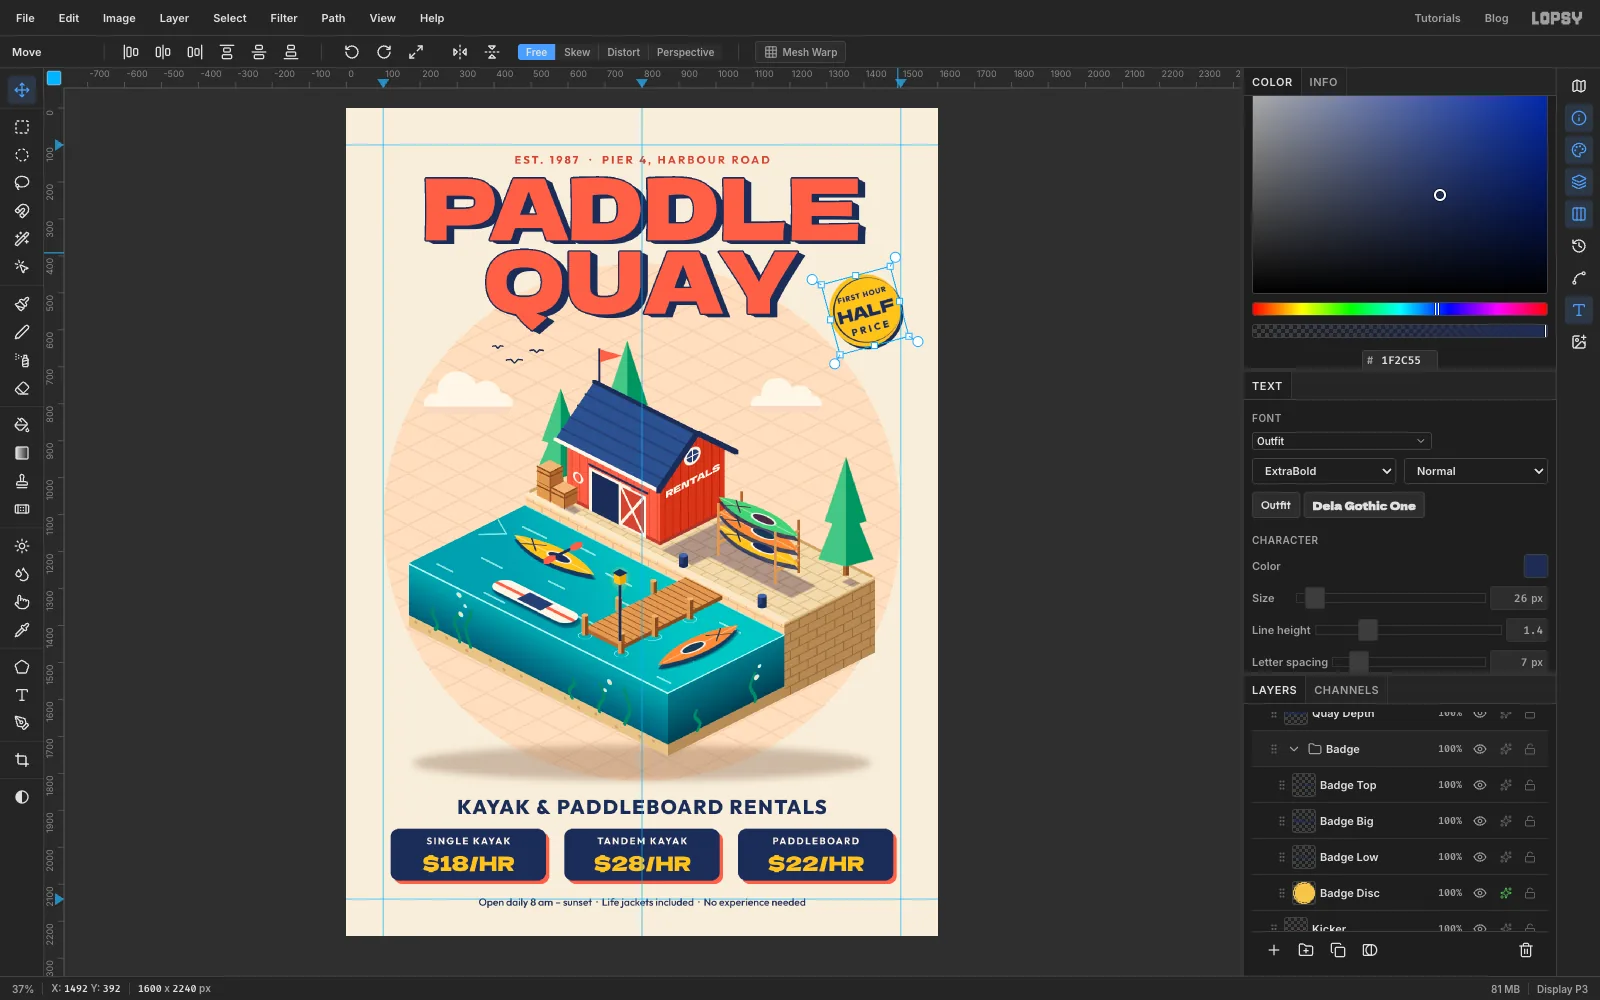
Select the Badge group itself, not a layer inside it. With the Move tool, hold Cmd and drag the rotation handle at the top-right corner anticlockwise to -15°, then press Enter. The disc and all three lines turn together, and the text is still live.
-
Add print grain
- Select Paddle, the topmost layer, and click Add Layer. Name it
Grain. It's now the top layer, outside every group, so the grain covers the headline too. - Choose Select → All, fill it with mid-grey and deselect.
- Choose Filter → Add Noise… with Amount
22, Mono and Gaussian. - Open its effects drawer, set the blend mode to Overlay, and set the opacity to
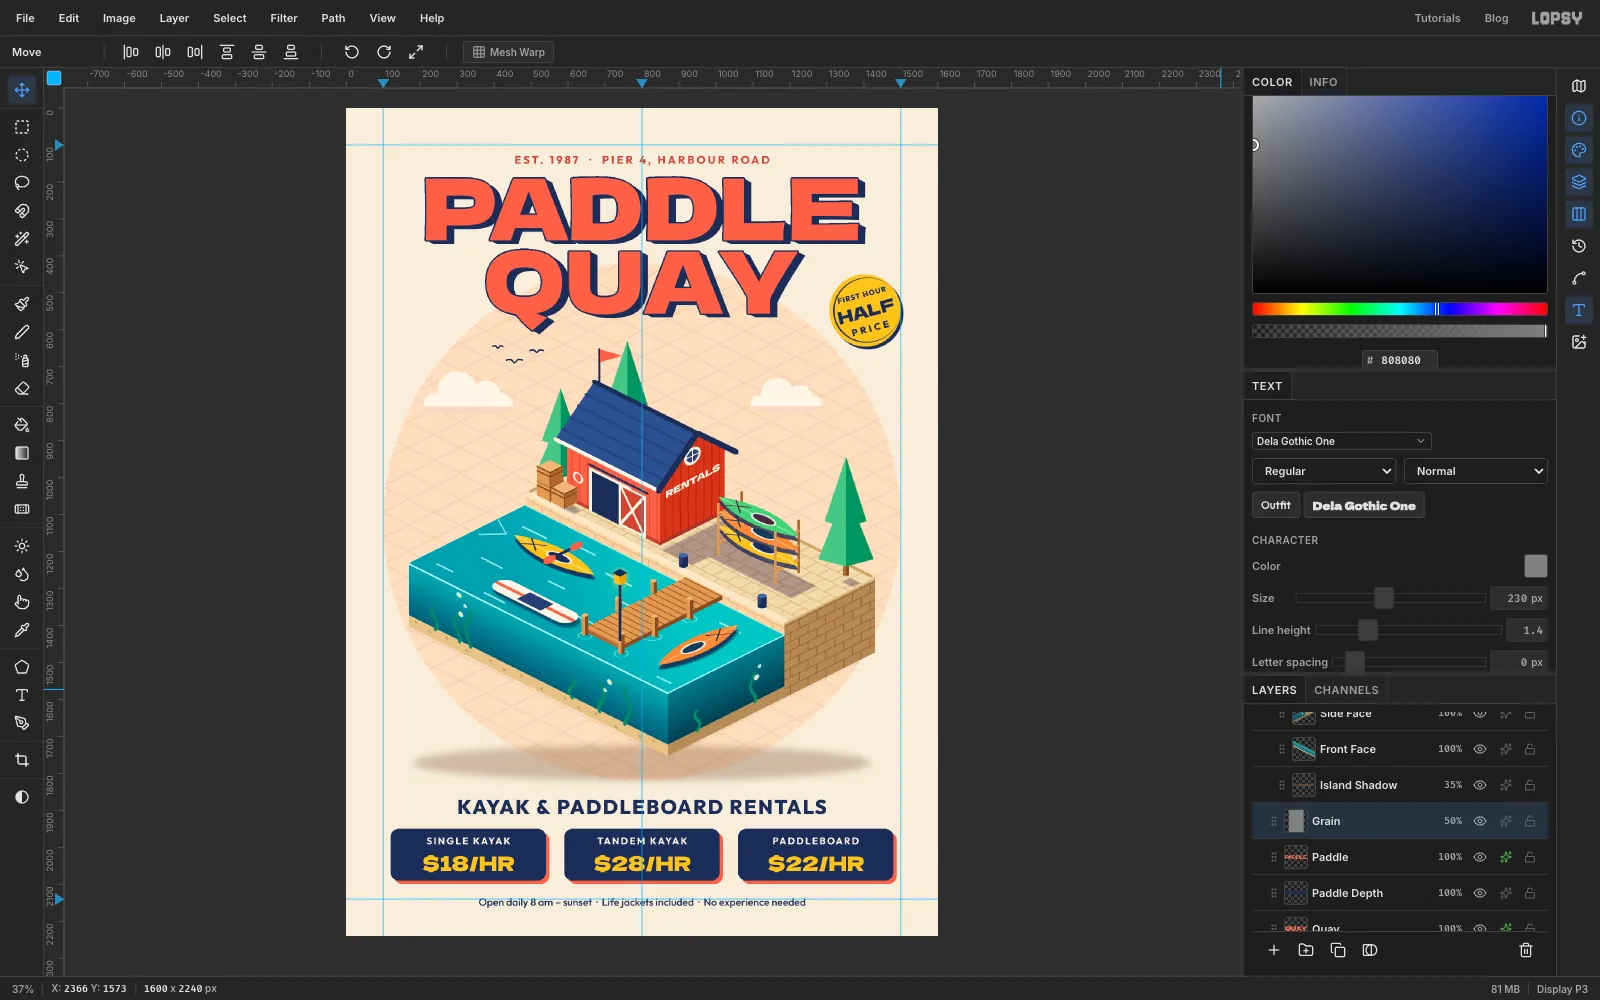
50%. Mid-grey vanishes in Overlay, so only the speckle is left, like ink on uncoated paper.
- Select Paddle, the topmost layer, and click Add Layer. Name it
-
Nudge the island and export
The island sits a little close to the subhead. Select the Island group, pick the Move tool and press Shift+Up once and Up twice: the whole harbour moves 12 px up together, shadows, sign and all.
Choose File → Save Project to keep every layer and the live text editable, then File → Quick Export PNG for the finished flyer.