Make a Screen-Print Yellowstone Magazine Cover
Design a screen-printed Yellowstone magazine cover in Lopsy, with Old Faithful, Grand Prismatic's colour rings, a bison traced from a photo, and halftone dots.
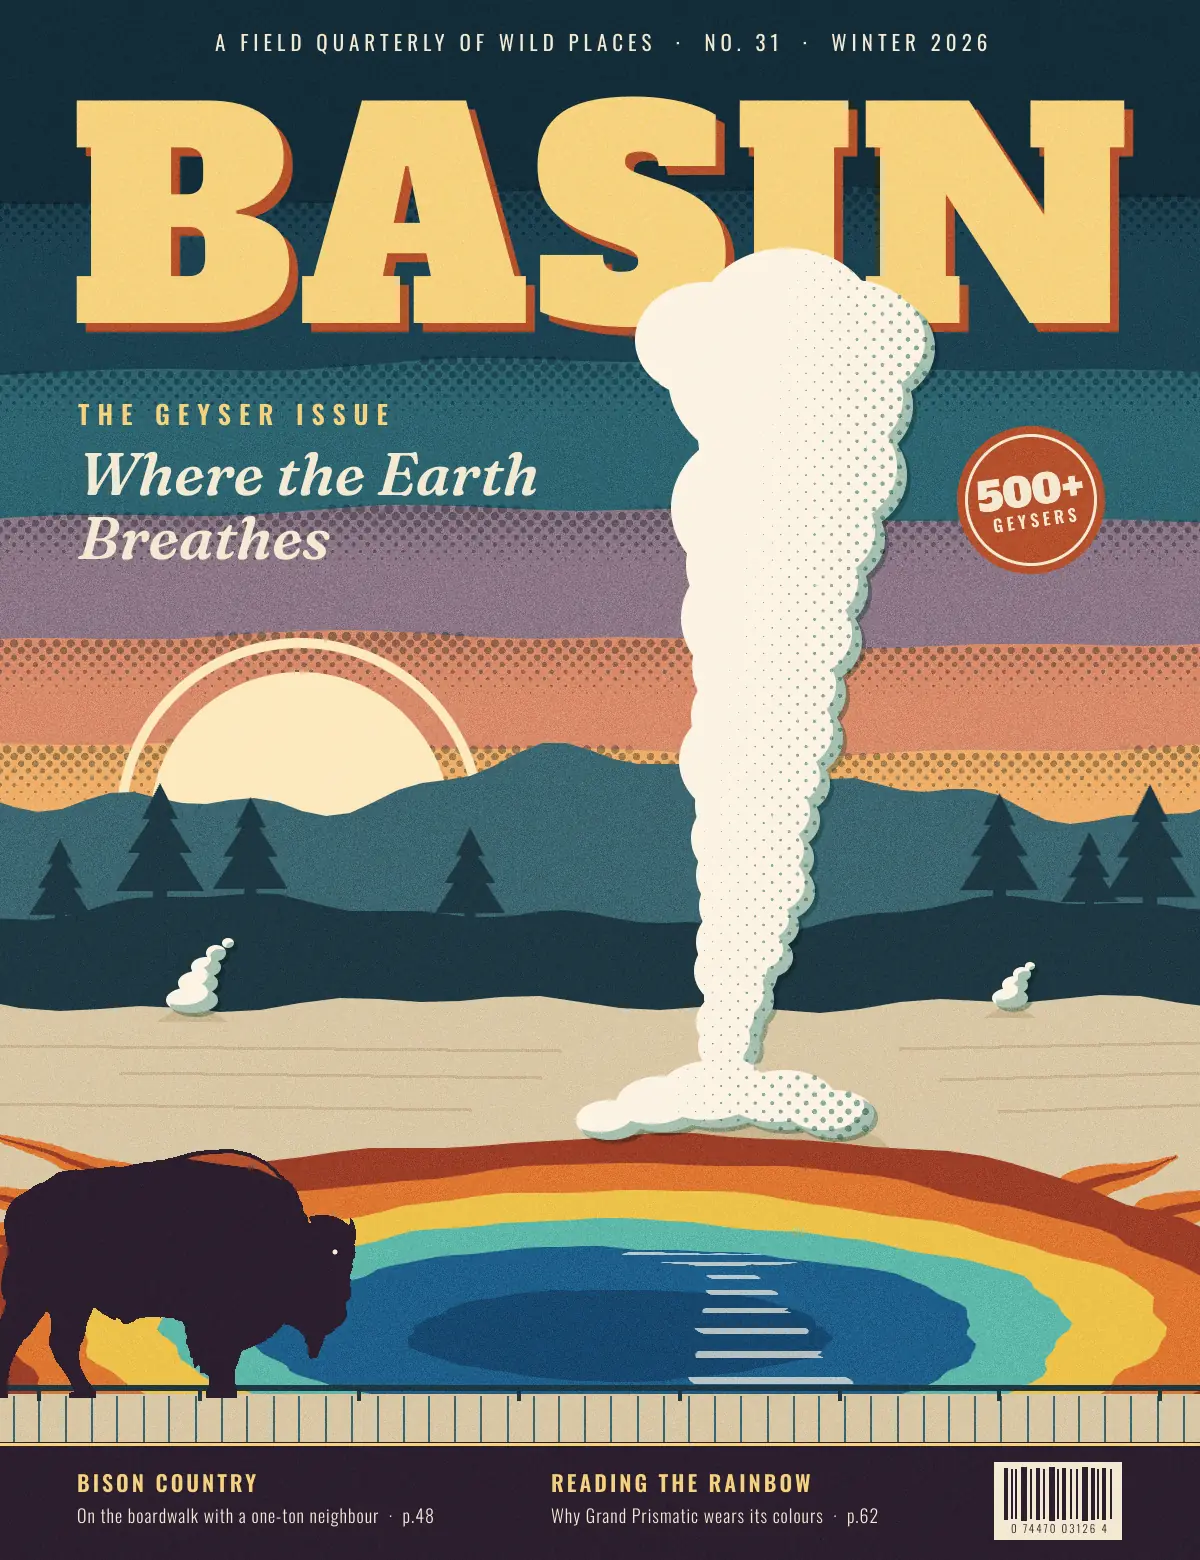
The posters that sold America's national parks were screen-printed. A printer cuts one stencil per ink, pulls each colour through a mesh screen, and builds the picture up in flat, overlapping layers. Five or six inks have to do all the work, so shapes are bold and simple, shading is done with dot screens, and the inks never land in quite the same place twice.
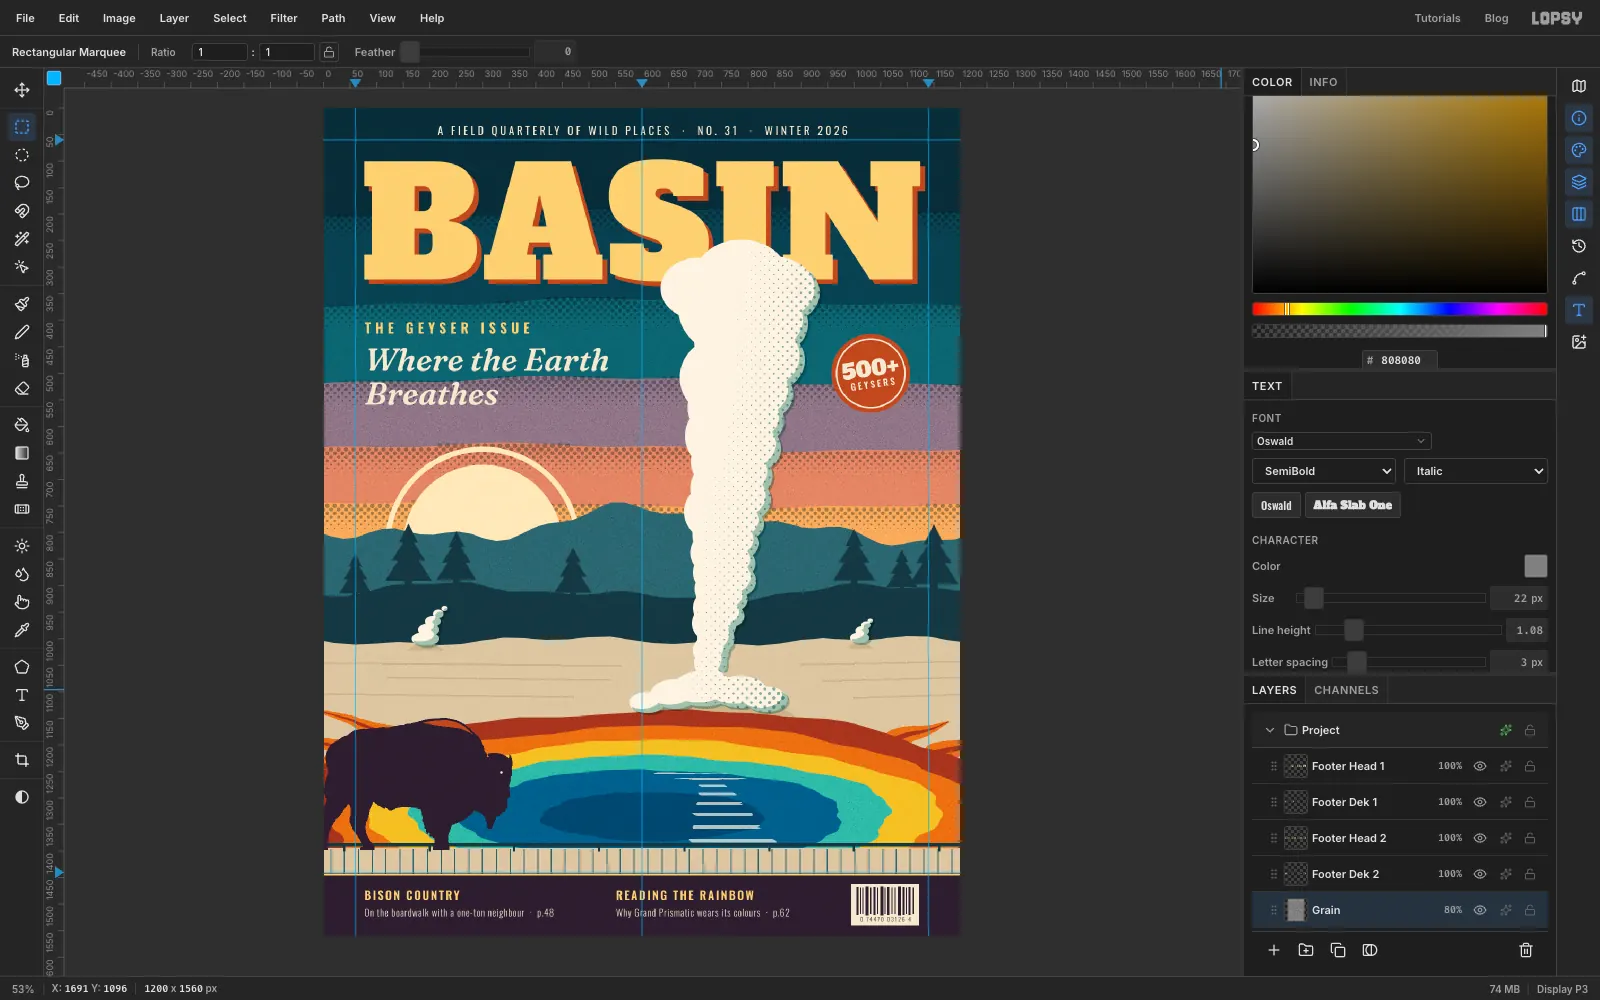
In this tutorial you'll use that look for a magazine cover: BASIN, a fictional outdoors quarterly, and its Geyser Issue on Yellowstone. It's 1200 × 1560 px, close to a US magazine page, and it has:
- a dusk sky cut into hand-cut bands, with halftone dots along each edge
- Old Faithful, built from dozens of elliptical marquees, shaded with crescents and a dot screen
- the rainbow rings of Grand Prismatic Spring, with ripples that reflect the plume
- a bison traced from a public-domain photo with Threshold and the Magic Wand, standing on a boardwalk
- a masthead the plume overlaps, cover lines, a rotated sticker, a footer band and a barcode
- grain and a little misregistration, so it looks printed rather than drawn
The tools you'll use:
- guides, the Rectangular and Elliptical Marquees and the Lasso, with Shift to add, Option to subtract and Shift+Option to intersect
- Cmd-clicking a layer thumbnail to load its shape, Select → Inverse, Shrink and Grow
- the Pen tool and Path to Selection, the Gradient, Brush (with Taper) and Pencil
- Copy, Paste, the Move tool's Flip, scale and rotate handles, and Merge Down
- Threshold, Gaussian Blur, Halftone and Add Noise, and the Magic Wand
- the Multiply and Overlay blend modes, Color Overlay and Drop Shadow
- groups, and live text in Alfa Slab One, Oswald and Fraunces
The palette:
-
Paper
-
Sky bands
-
Sun
-
far ridge
-
near ridge and pines
-
Sinter
-
mound
-
Steam
-
steam shadow
-
steam dots
-
Spring
-
Bison
-
rust
-
masthead yellow
-
Start the cover and set the guides
Choose File → New, keep the units on Pixels, and make the document 1200 wide and 1560 high.
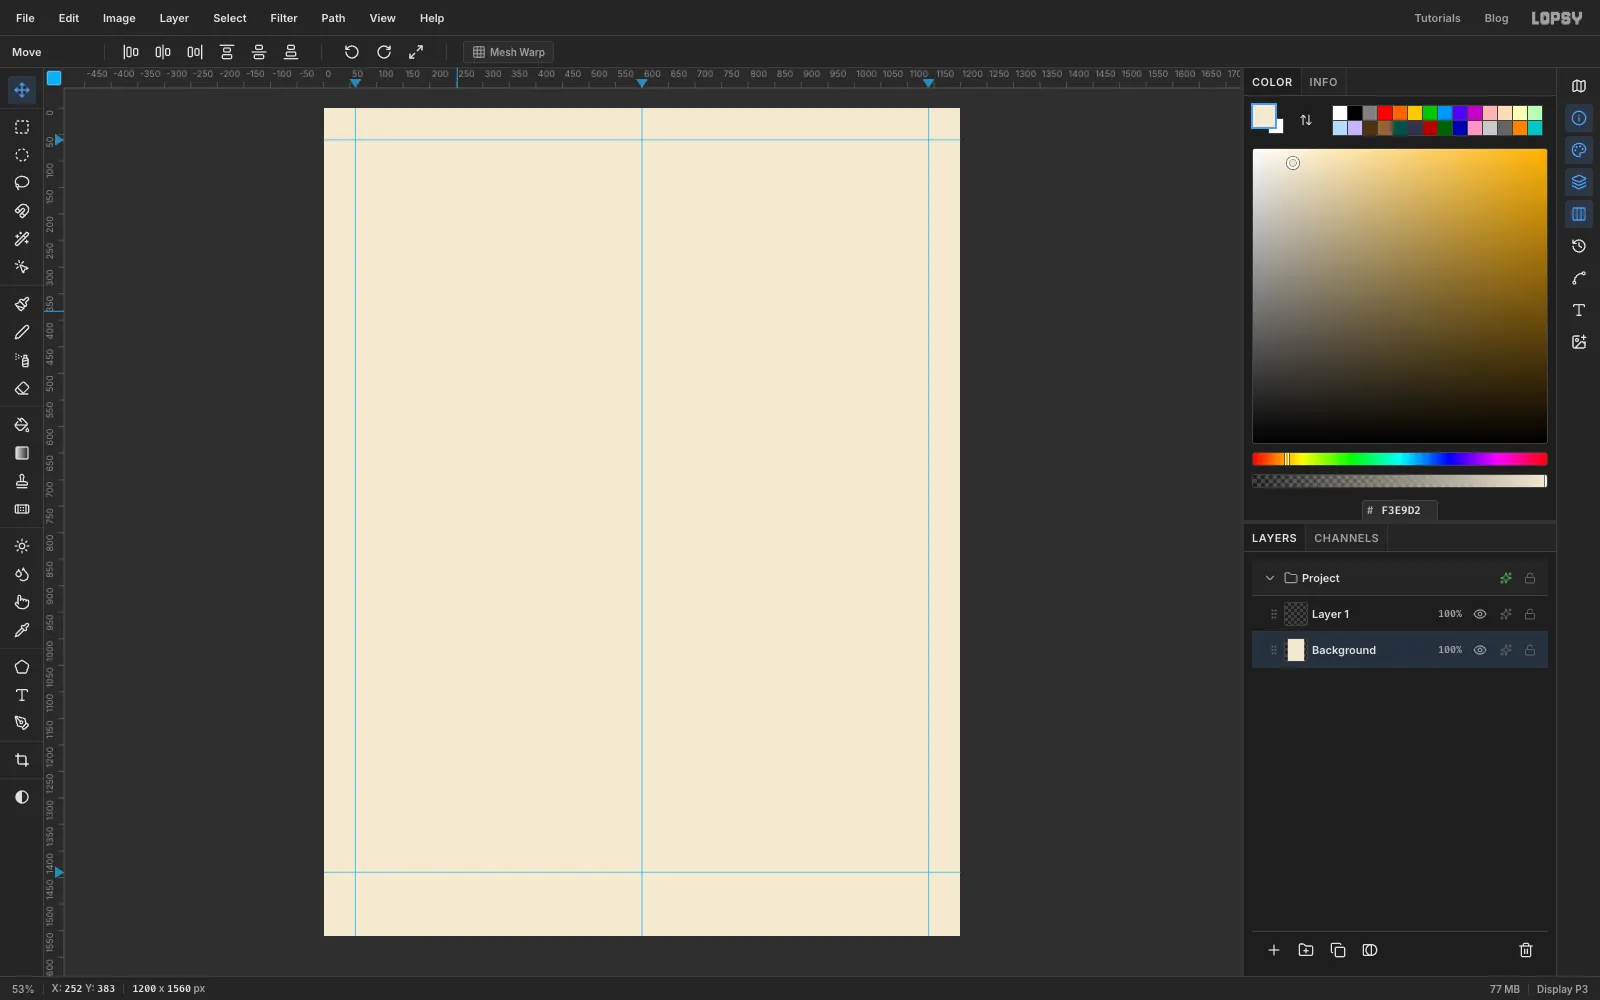
Set the foreground colour to paper , select the Background layer and choose Edit → Fill.
Click the top ruler at 60, 600 and 1140 to drop three vertical guides: two margins and a centre line. Click the left ruler at 60 for the top margin and at 1440, which is where the footer band will start.
Then open the View menu and switch off Snap to Guides. You'll draw a lot of freehand ellipses and lassos near those guides, and snapping would tug their edges onto the lines. The guides are still there to line type up against.
-
Cut the dusk sky into bands
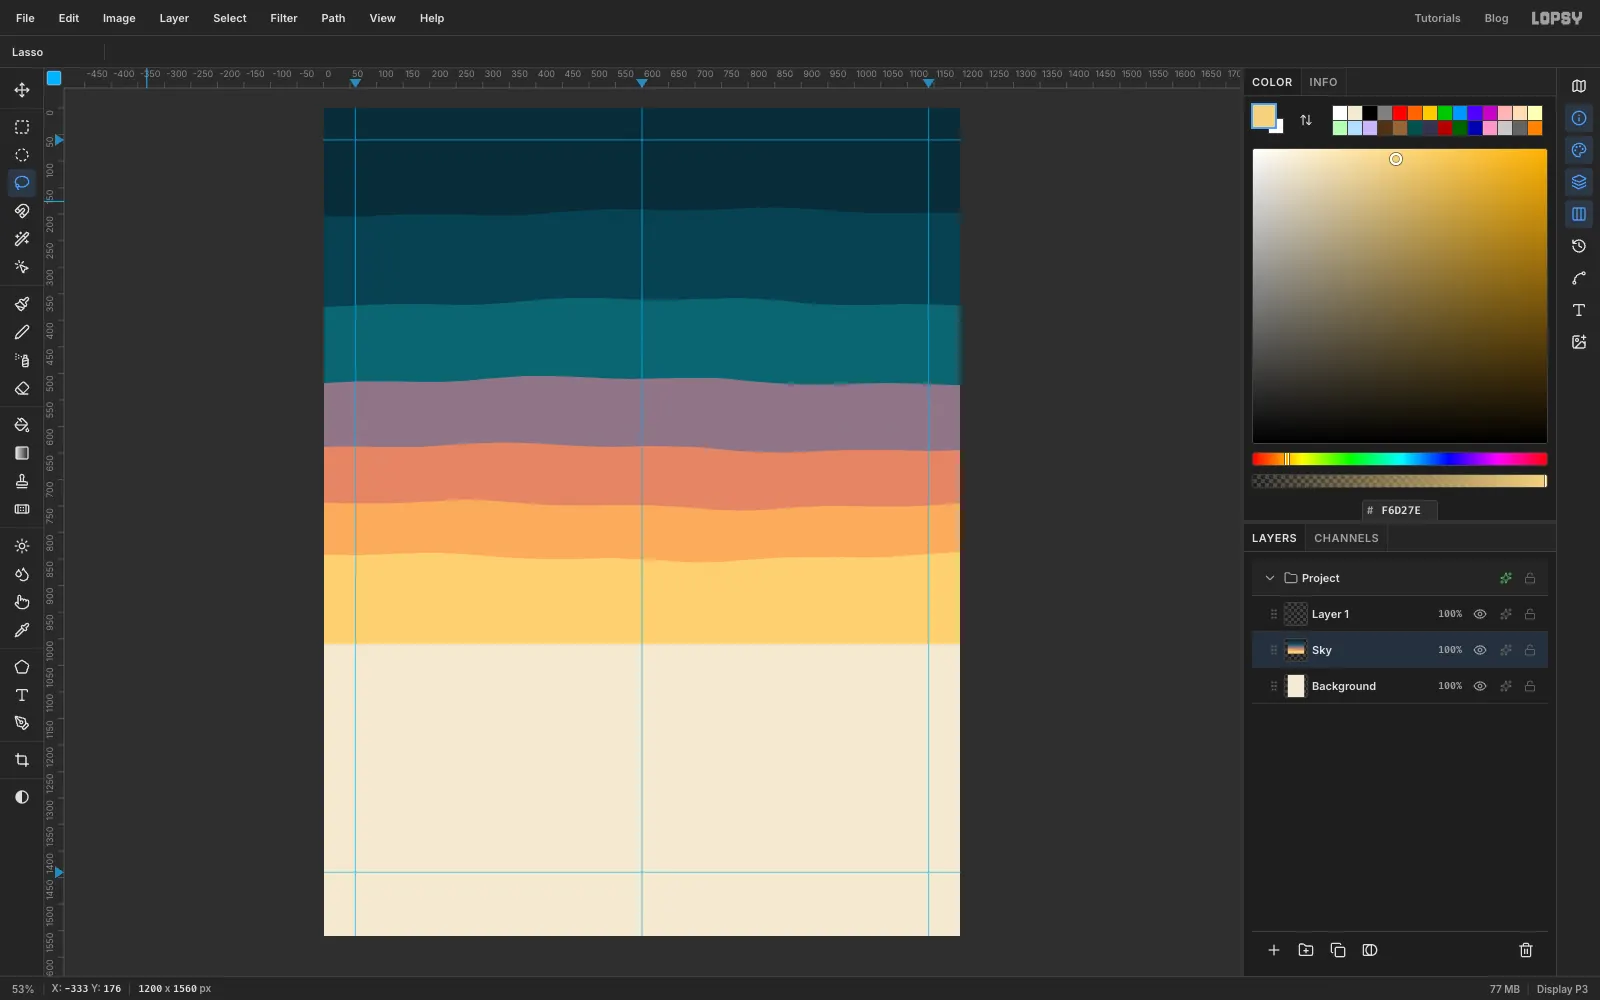
Select Background and add a layer called Sky with the + button under the Layers panel. A new document also comes with an empty Layer 1; ignore it for now and delete it at the end. With the Rectangular Marquee (M), select the full width of the page from the top down to about y 1010, and fill it with the darkest sky ink, .
Now cut each lighter band like a paper stencil. Pick the Lasso (L) and drag a loop that starts just off the left edge, runs across the page with a slight wave, goes down past the bottom of the sky and comes back. Fill it with the next ink. Each band covers everything below it, so you only need to draw each new top edge. The top edges sit at about:
- 196 for
- 366 for
- 514 for
- 640 for
- 748 for
- 846 for
Keep the waves gentle, about ten pixels up and down. You want hand-cut, not wobbly.
-
Lay a ramp along each band edge
Screen printers soften a colour change with a dot screen. You'll make one dot fringe per band edge, all on one layer.
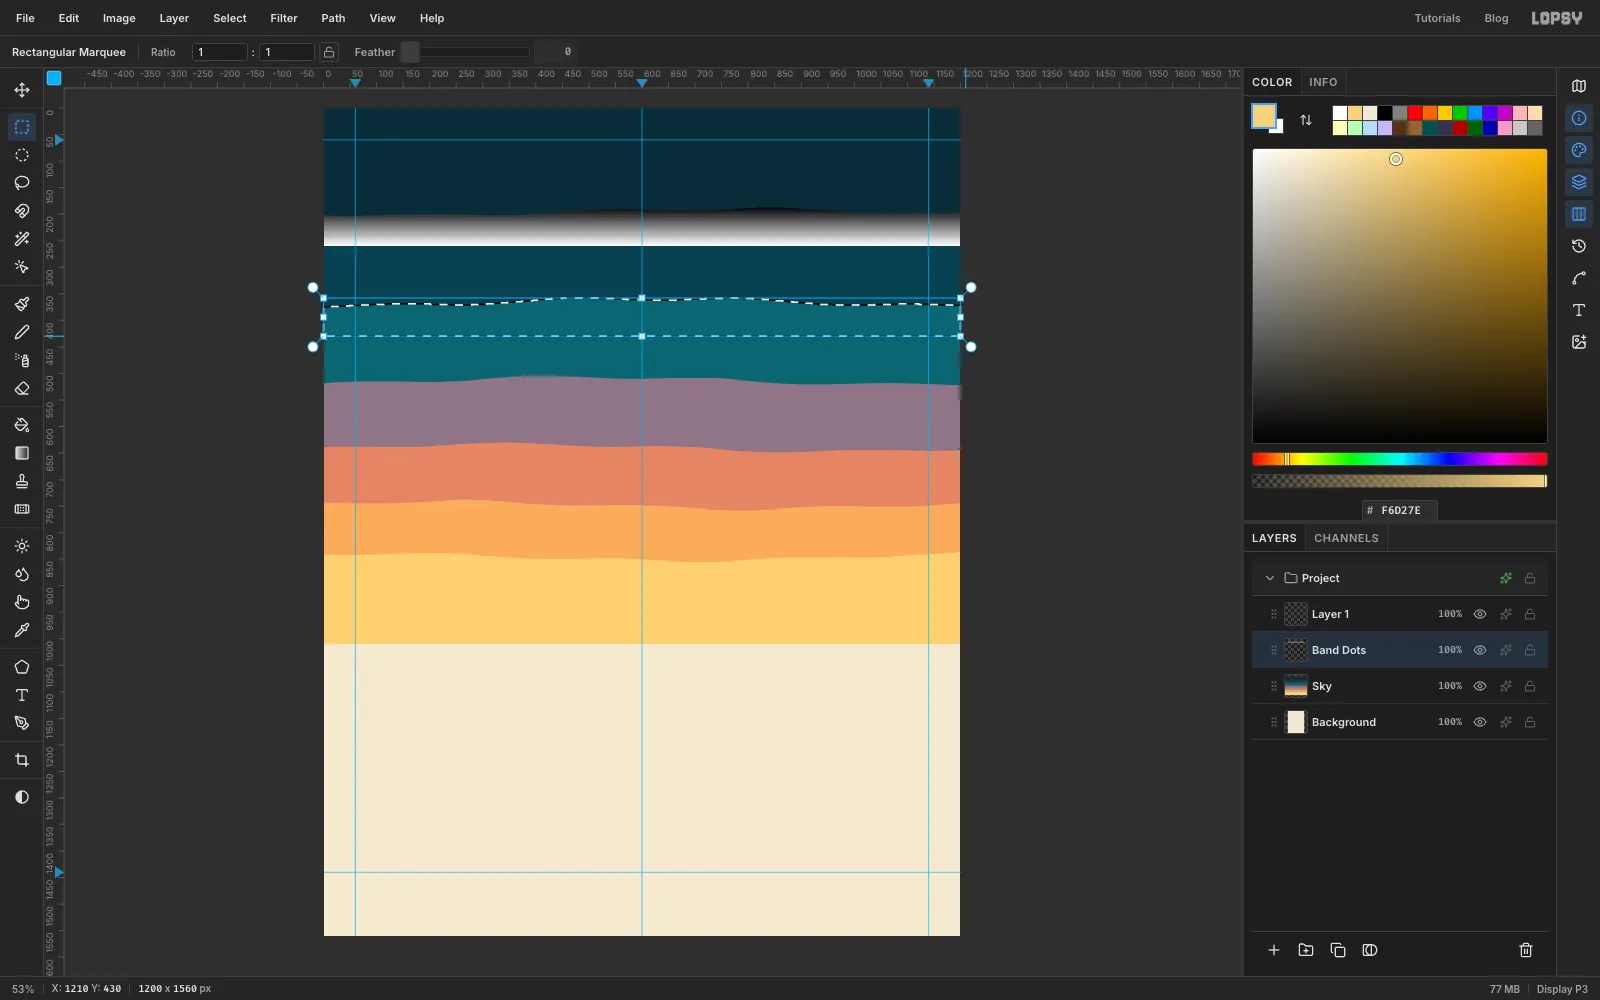
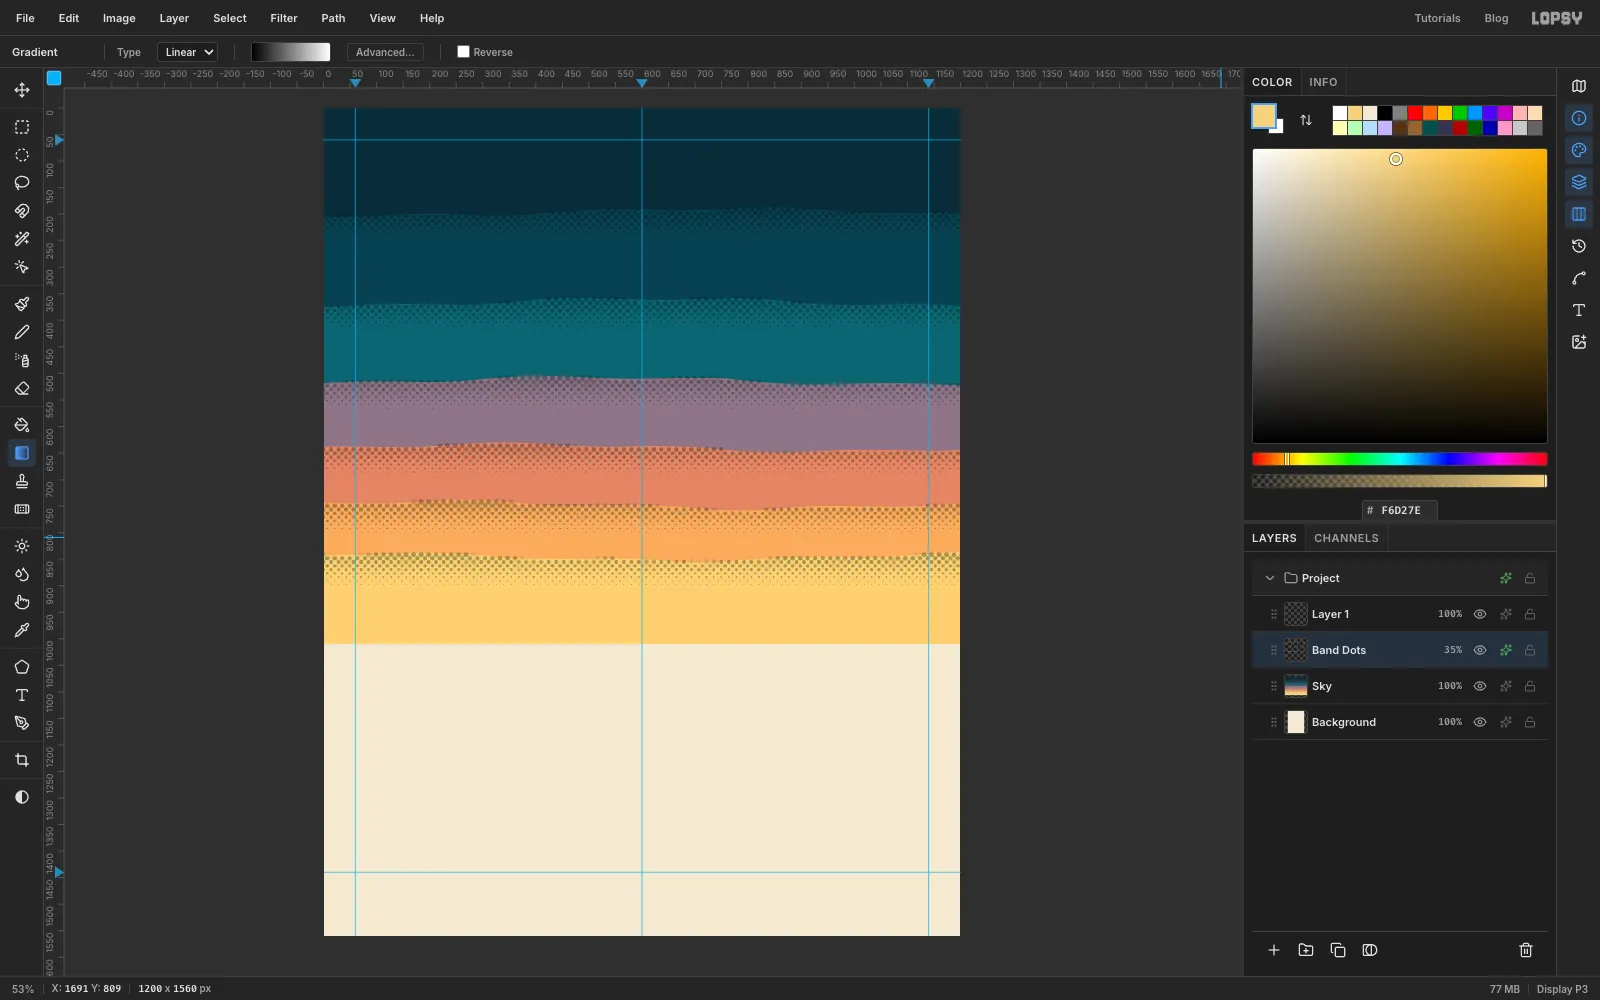
Add a layer called Band Dots above Sky. For the first edge, select Sky again, pick the Magic Wand (W) with Contiguous on, and click the second band. That selects exactly the band you cut, wavy top edge and all. Then hold Shift+Option and drag a Rectangular Marquee across the full width, from 20 px above the edge to about 64 px below it. Shift+Option intersects the two, leaving a strip that follows the wavy edge. Click Band Dots in the Layers panel before you paint into it.
Pick the Gradient tool, set it to Linear, and in Advanced… make the stops black and white . Drag from just above the edge straight down to the bottom of the strip. Repeat for the other five edges, wanding each band on Sky and painting the ramp on Band Dots.
-
Turn the ramps into dots
Press Cmd+D to deselect and run Filter → Halftone… with Dot Size 10, Angle 45 and Softness 0.3. Black becomes big dots and white prints nothing, so each ramp turns into a fringe that fades out downward.
The dots are black for now. Open the layer's effects (the ✦ button on its row), turn on Color Overlay and set it to the night ink . Then set the blend mode to Multiply and the layer's opacity to 35%. Each band now picks up a darker speckle along its top edge.
-
Set the sun with a printed ring
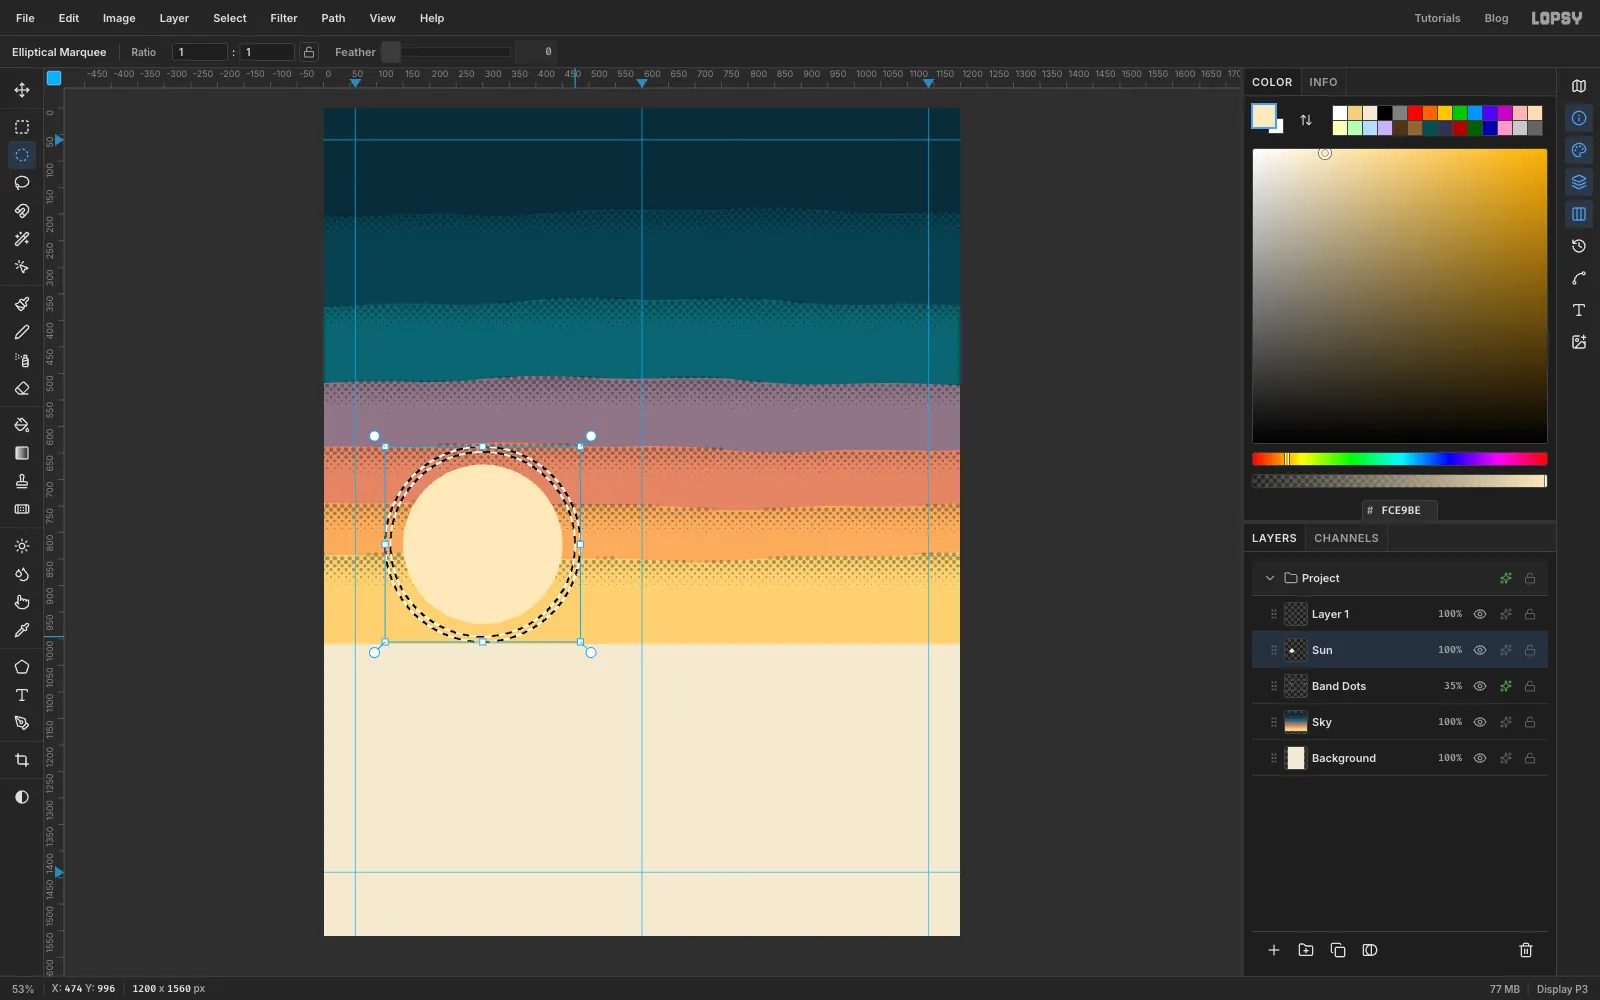
Select Band Dots and add a layer called Sun. With the Elliptical Marquee, hold Shift for a circle and drag one about 300 px across, centred at about x 300, y 822. Most of it will end up behind the hills. Fill it with .
For the ring, drag a second circle about 34 px larger all round. Then hold Option and drag a circle 10 px smaller than that, from the same centre. That subtracts the middle and leaves a thin ring. Fill it with the same cream.
-
Lay in two ridges
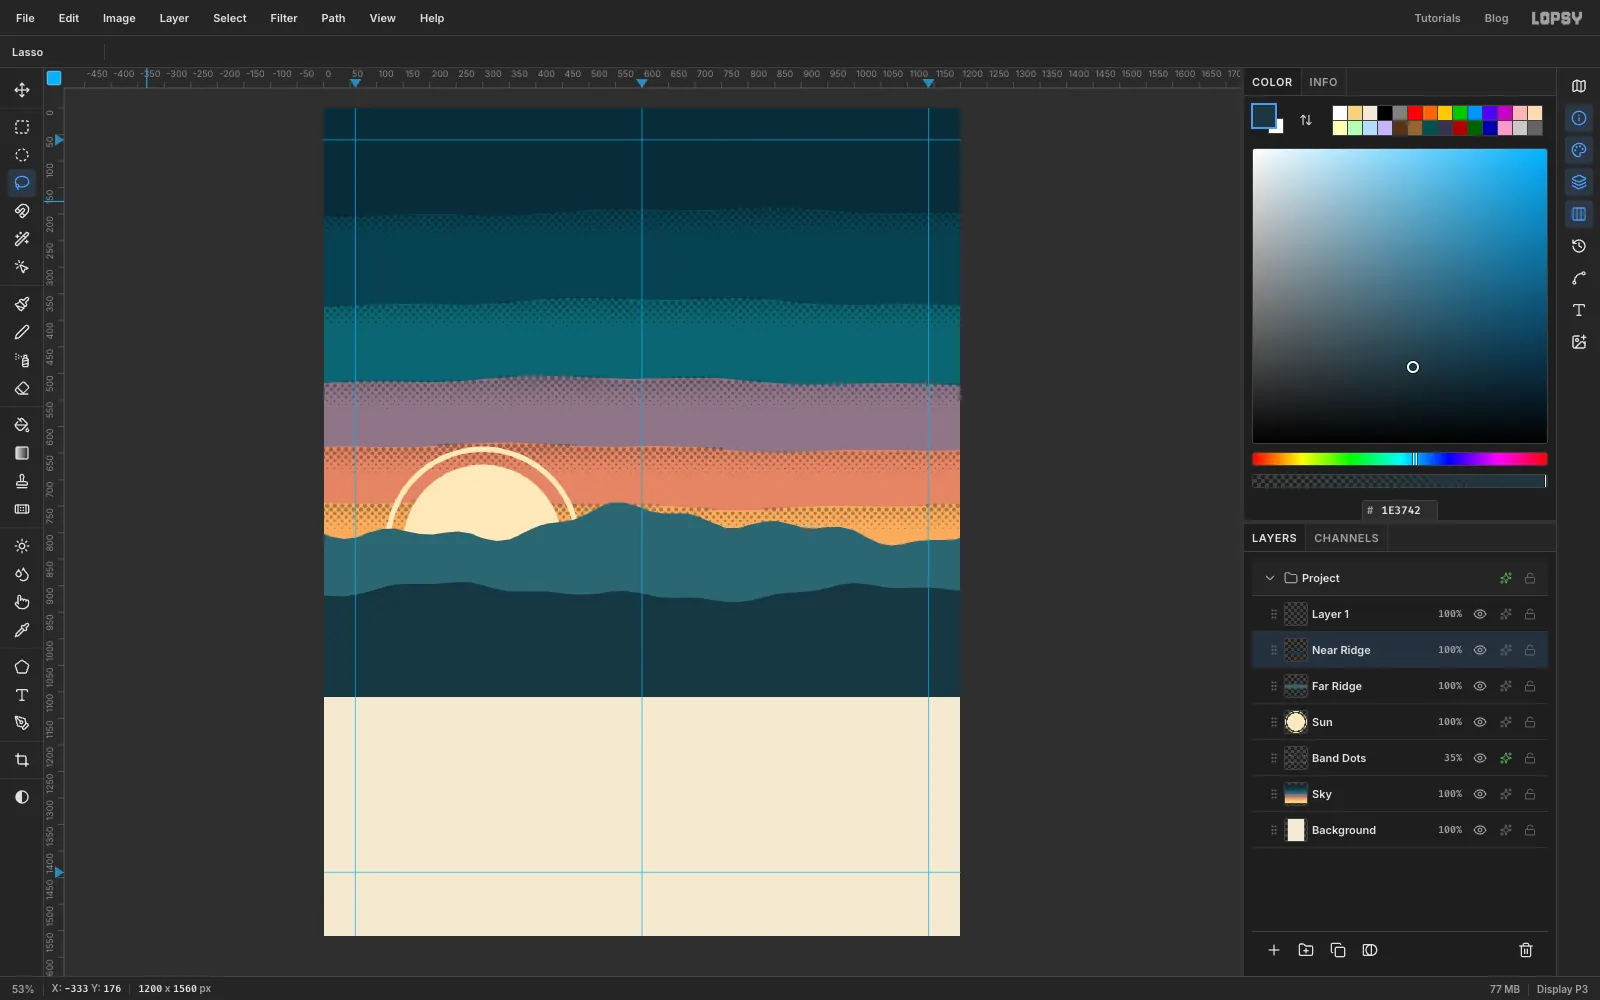
Add a layer called Far Ridge. With the Lasso, draw a ridge line across the page with soft, irregular peaks between about y 740 and 830, then run the loop down to the bottom of the sky and back. Fill it with .
Add a layer called Near Ridge and draw a lower, flatter line around y 890–935. Fill it with . The near ridge hides the bottom of the sun, so it looks like it's setting behind the hills.
-
Draw one pine with the Pen
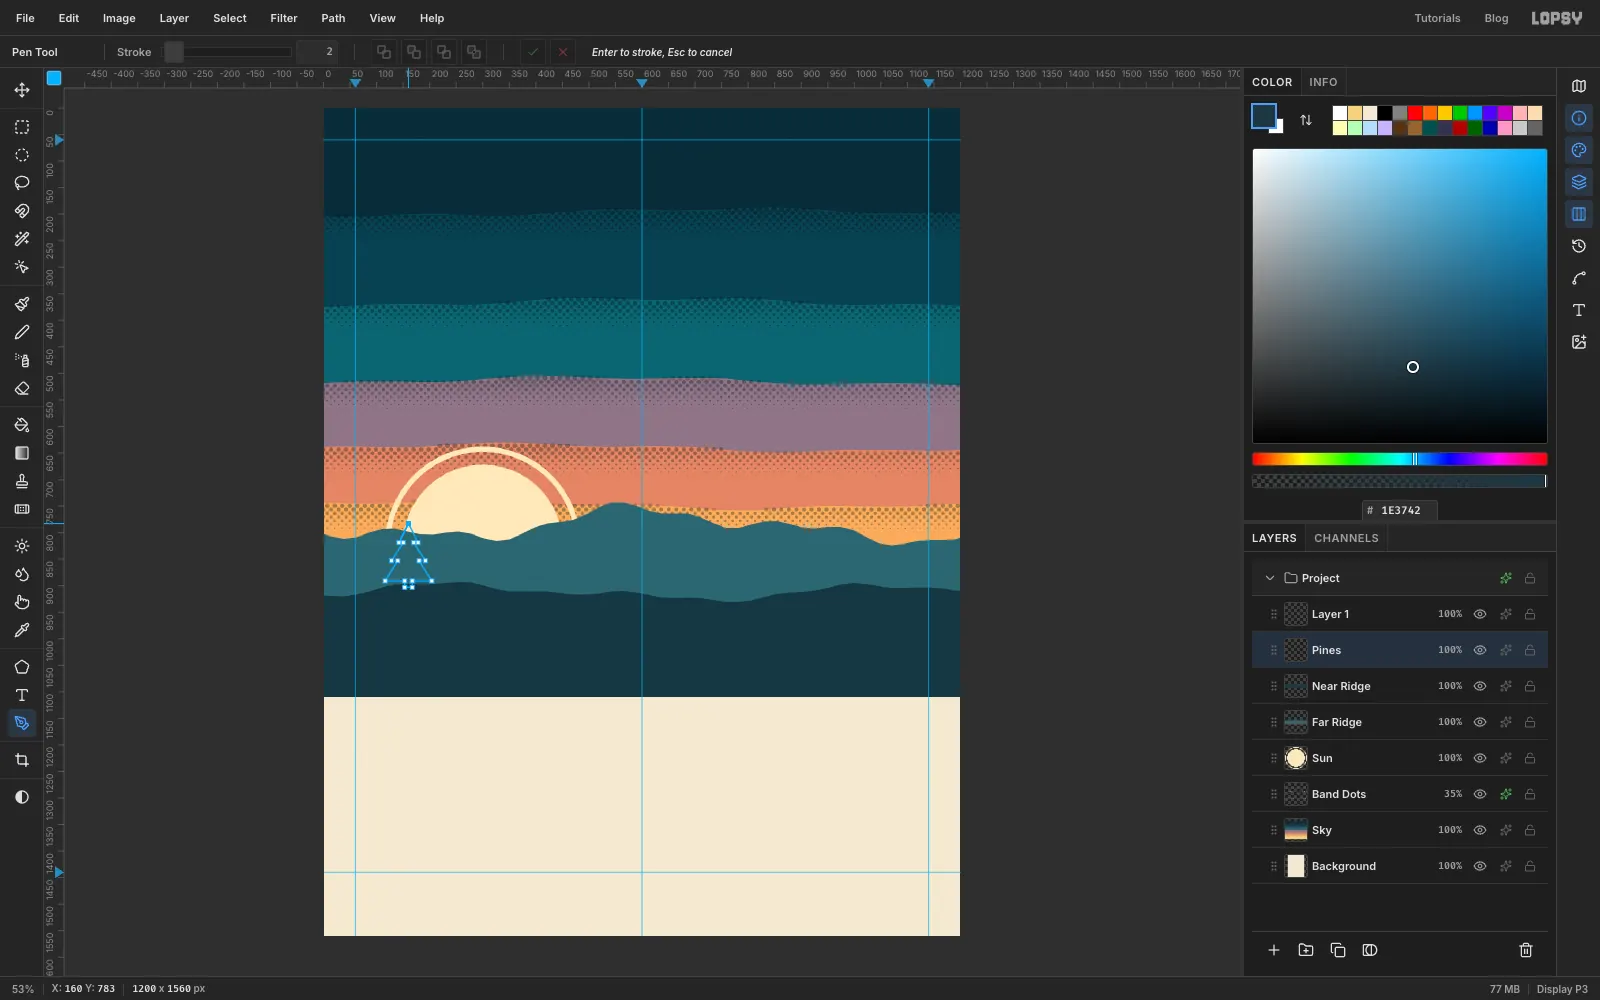
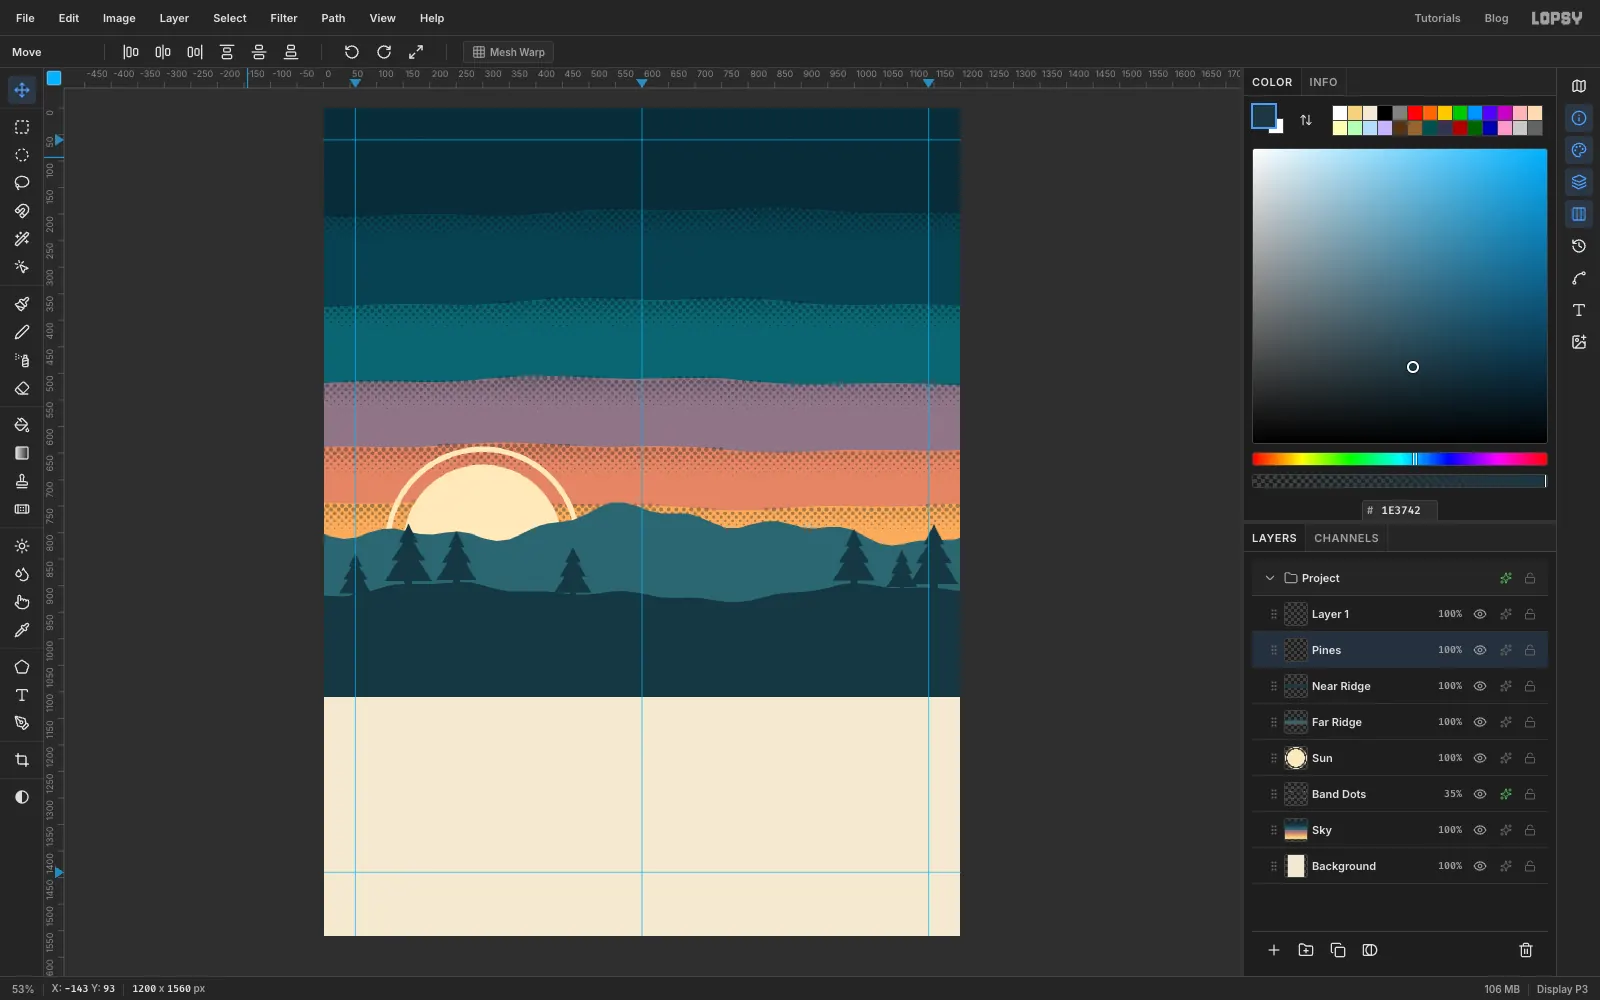
Add a layer called Pines. Pick the Pen tool (P) and click your way round a pine about 120 px tall, standing on the near ridge at about x 160. Start at the tip, then click out and back in to make three tiers that get wider as they go down, then a short trunk. Click the first anchor again to close the path.
Open the Paths panel and click Path to Selection, then Delete Path. Fill the selection with the near-ridge ink . The trees are cut from the same screen as the ridge, so they print in the same ink.
-
Copy the pine along the ridge
Marquee around the pine, press Cmd+C and Cmd+V. The copy pastes in place on its own layer, already selected, and Lopsy switches to the Move tool.
- To mirror a tree, click Flip Horizontal in the Move tool's options bar.
- To resize it, hold Cmd and drag the bottom-right handle, so it scales without stretching. Keep sizes between about 65% and 105%.
- Drag the tree by its middle so its trunk sits on the ridge, and press Enter.
Choose Layer → Merge Down to fold the copy back into Pines. Click Pines again before the next copy, since you can only copy from the active layer. Make six copies and spread them out: a cluster on the left, one near the middle and a cluster on the right.
-
Lay the basin flat, the mound and the terraces
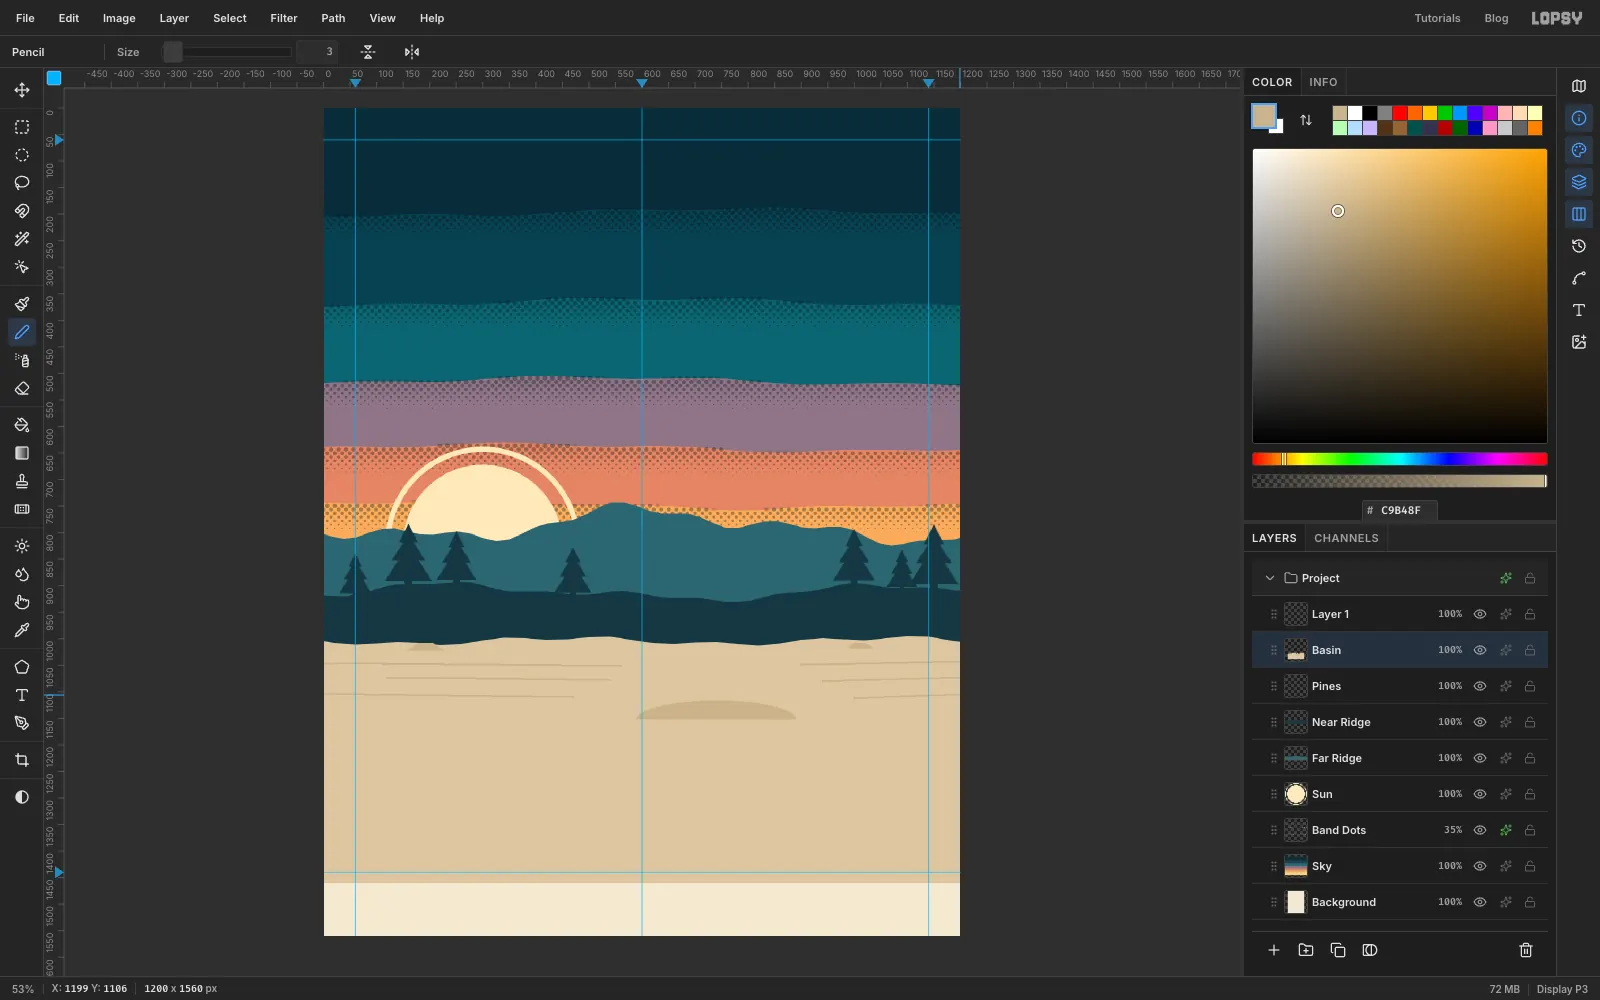
Old Faithful erupts from a flat, pale plain of sinter, the mineral crust geysers leave behind.
Add a layer called Basin above Pines. Lasso a band from about y 1004 (give the top edge a slight wave) down to near the bottom of the page and fill it with sinter .
The geyser needs something to come out of. Lasso a low dome about 300 px wide and 36 px high, centred at about x 740, sitting on the flat around y 1150. Then hold Shift and lasso two small flat-topped cones, one at each side, at about x 190 and x 1010 just below the ridge. Fill all three with .
Pick the Pencil (N) at Size 3 in the same colour, and draw a few faint terrace lines across the flat. Click where a line starts, hold Shift and click where it ends. Keep them short and slightly tilted, and leave a gap in the middle where the plume will be.
-
Build the plume from ellipses
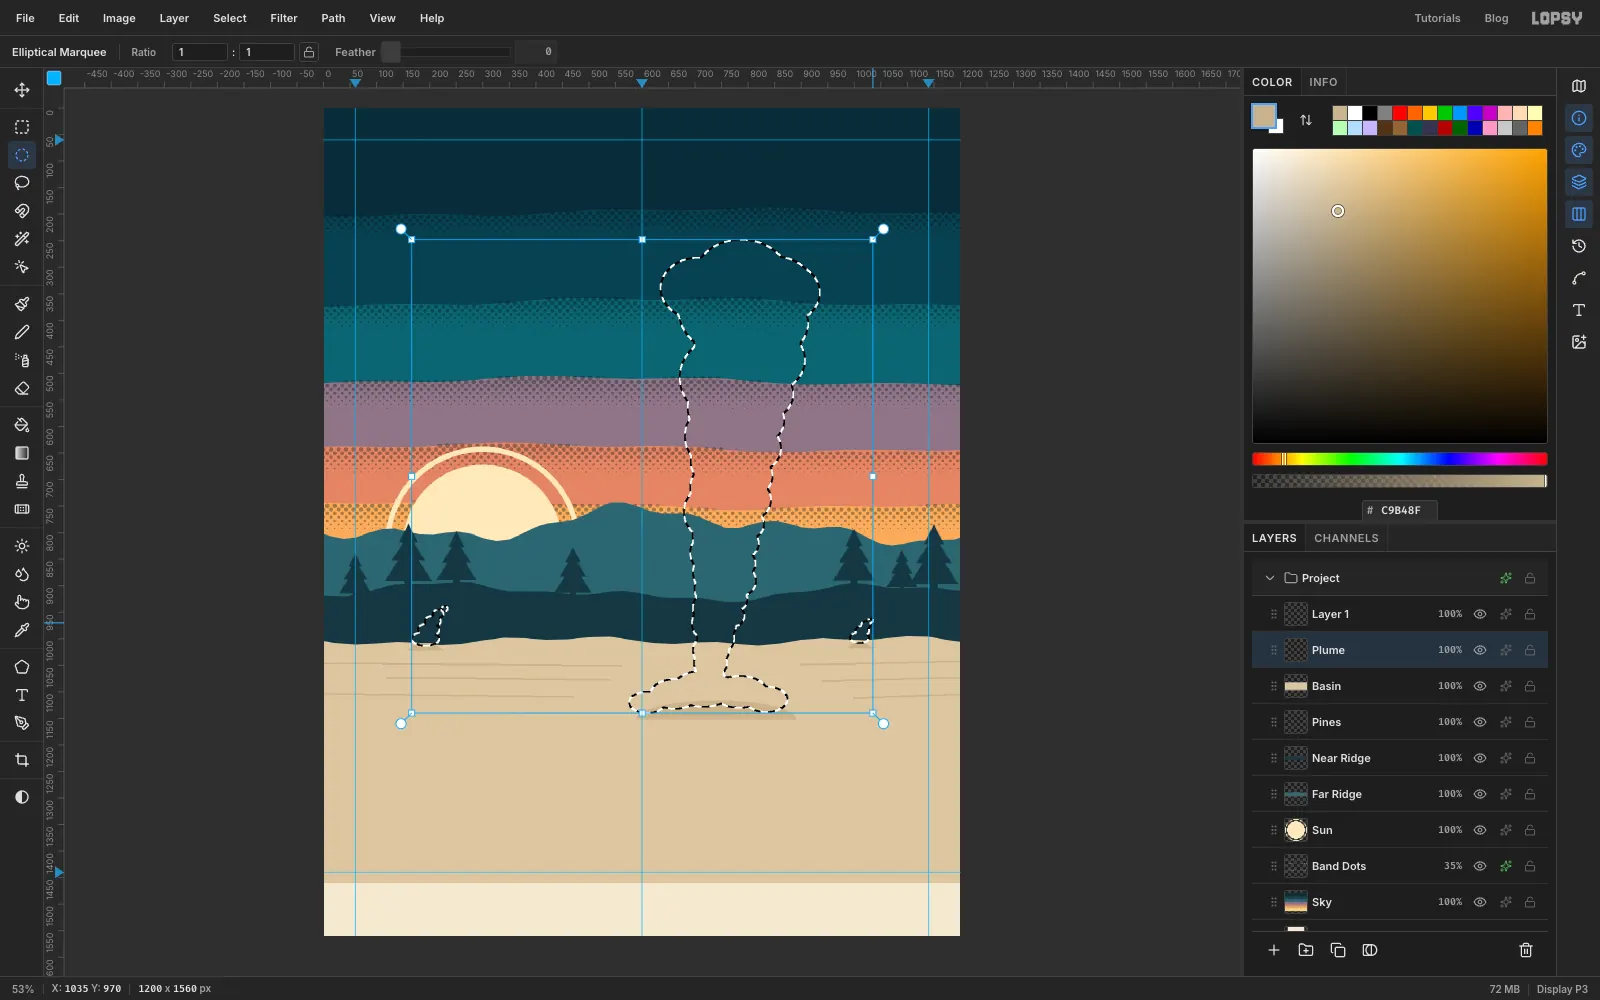
Add a layer called Plume. The plume is a union of ellipses, drawn bottom to top with the Elliptical Marquee:
- Drag the first ellipse at the vent, about 50 px wide, at x 730, y 1060.
- Hold Shift and keep adding ellipses up the column. Each one is a little bigger than the last and a little further right. By the top, at about y 330, the plume should be about 300 px wide and leaning a few degrees to the right.
- As you climb, add smaller billows off alternate sides, so the edge scallops instead of looking like a stack of balls.
- Finish the top with three big overlapping billows.
- Add five low, flat ellipses around the vent, so steam spills over the mound and onto the far rim of the spring.
- Add a short wisp of four or five shrinking ellipses over each side cone.
The top of the plume can overlap the masthead area. It will sit in front of the title later, which is a classic cover trick.
Fill the selection with steam and deselect.
-
Shade every billow with a crescent
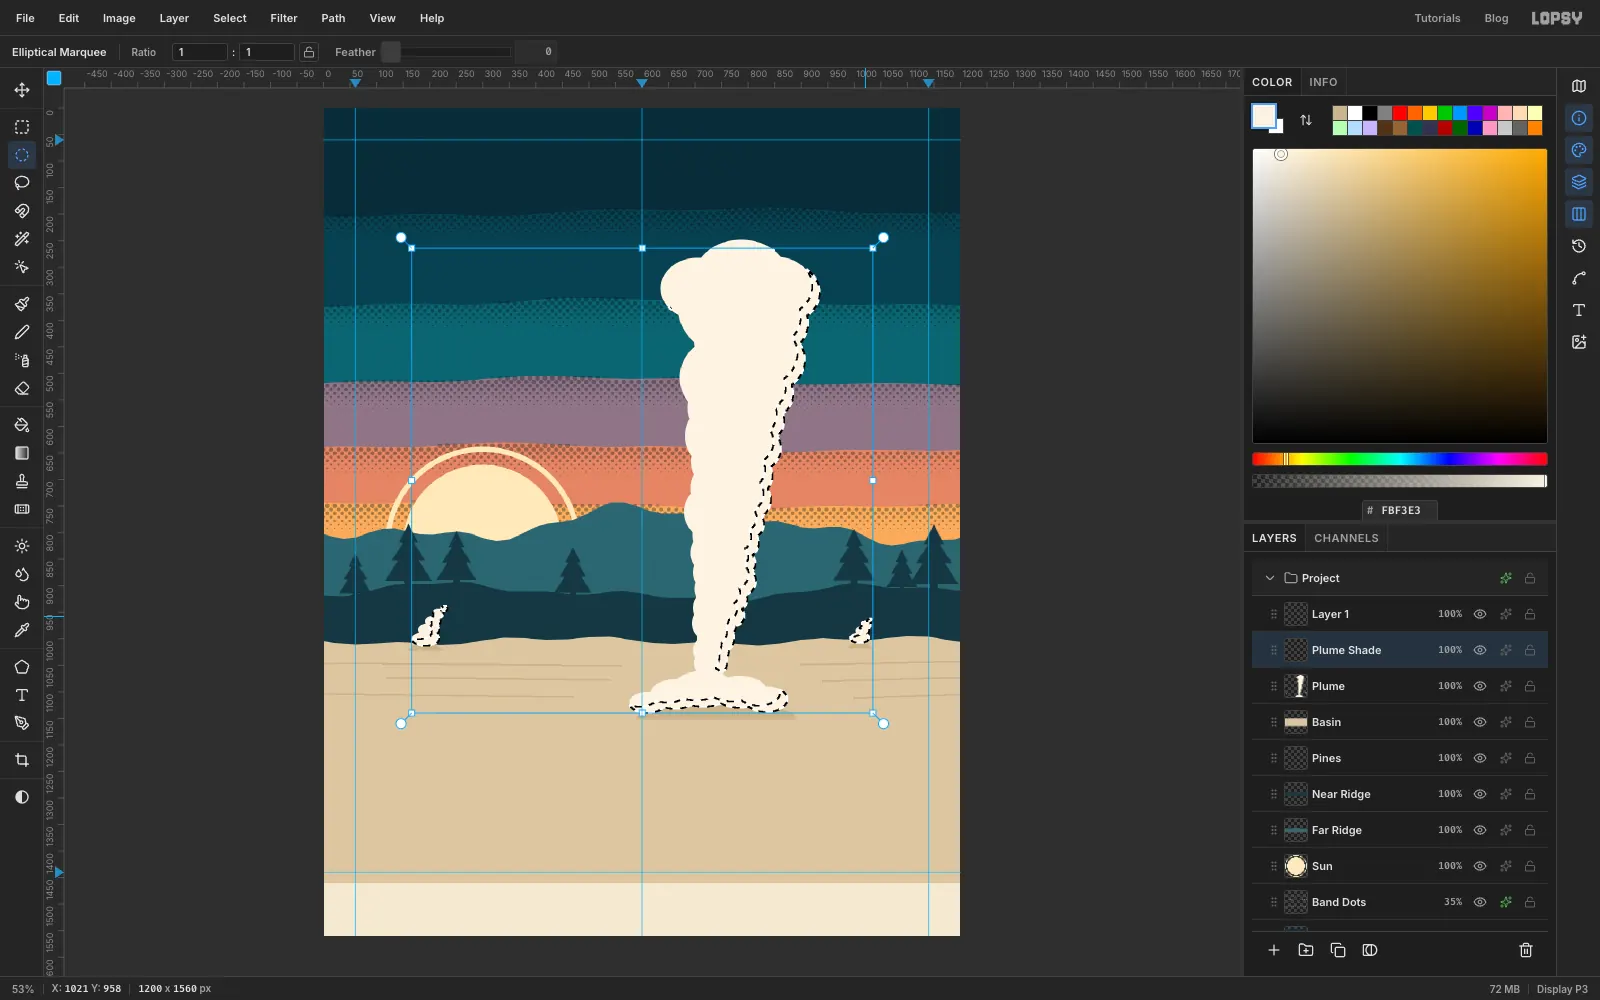
Add a layer called Plume Shade. Cmd-click the Plume thumbnail in the Layers panel to load the plume's shape as a selection.
Now go back over the billows with the Elliptical Marquee. Over each one, hold Option and drag an ellipse of about the same size, shifted about 14 px left and 12 px up. Each one subtracts most of its billow and leaves a thin crescent on its lower-right side, as if the light comes from the setting sun on the left. Most crescents end up down the plume's right-hand edge and under its billows. You don't need to be exact; uneven crescents look more printed.
Fill with steam shadow , deselect, and set the layer's blend mode to Multiply.
-
Add a dot screen to the shadow side
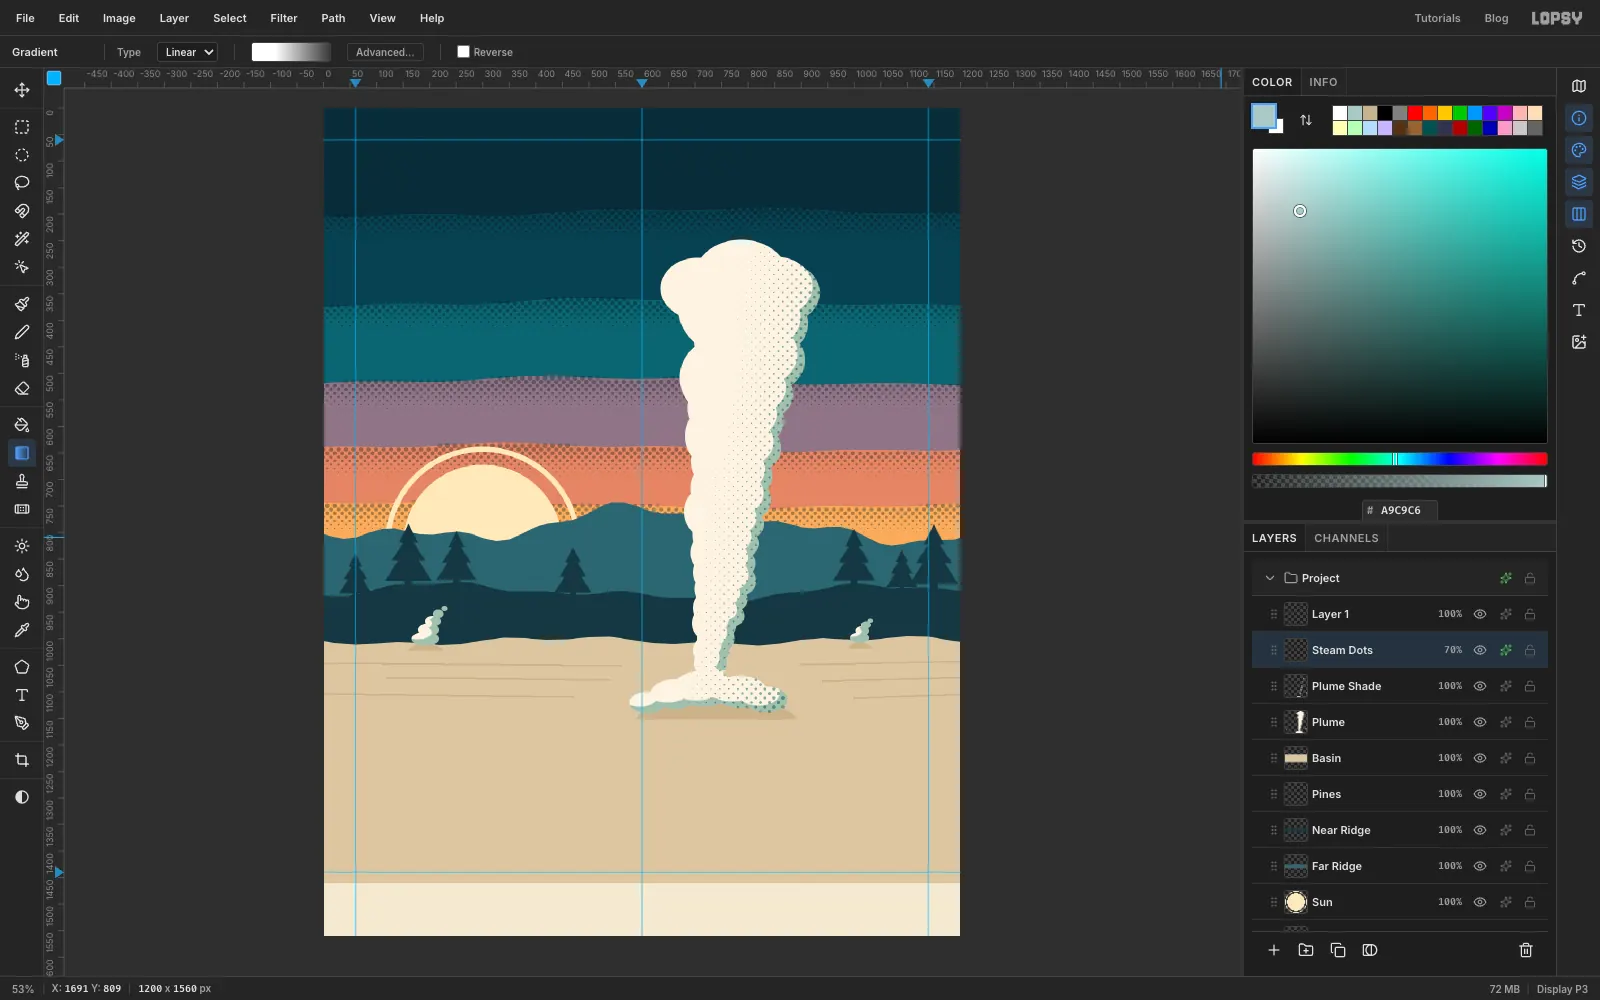
Add a layer called Steam Dots and Cmd-click the Plume thumbnail again. The small wisps look better without dots, so hold Option and drag a rectangle around each one to take it out of the selection.
Pick the Gradient, and in Advanced… make three stops: white at 0%, white again at 30%, and dark grey at 100%. Drag from the left side of the plume across to its right edge. Deselect and run Filter → Halftone… with Dot Size 12, Angle 45 and Softness 0.4.
Give the layer a Color Overlay of , set it to Multiply, and drop its opacity to 70%.
-
Start Grand Prismatic with runoff streaks
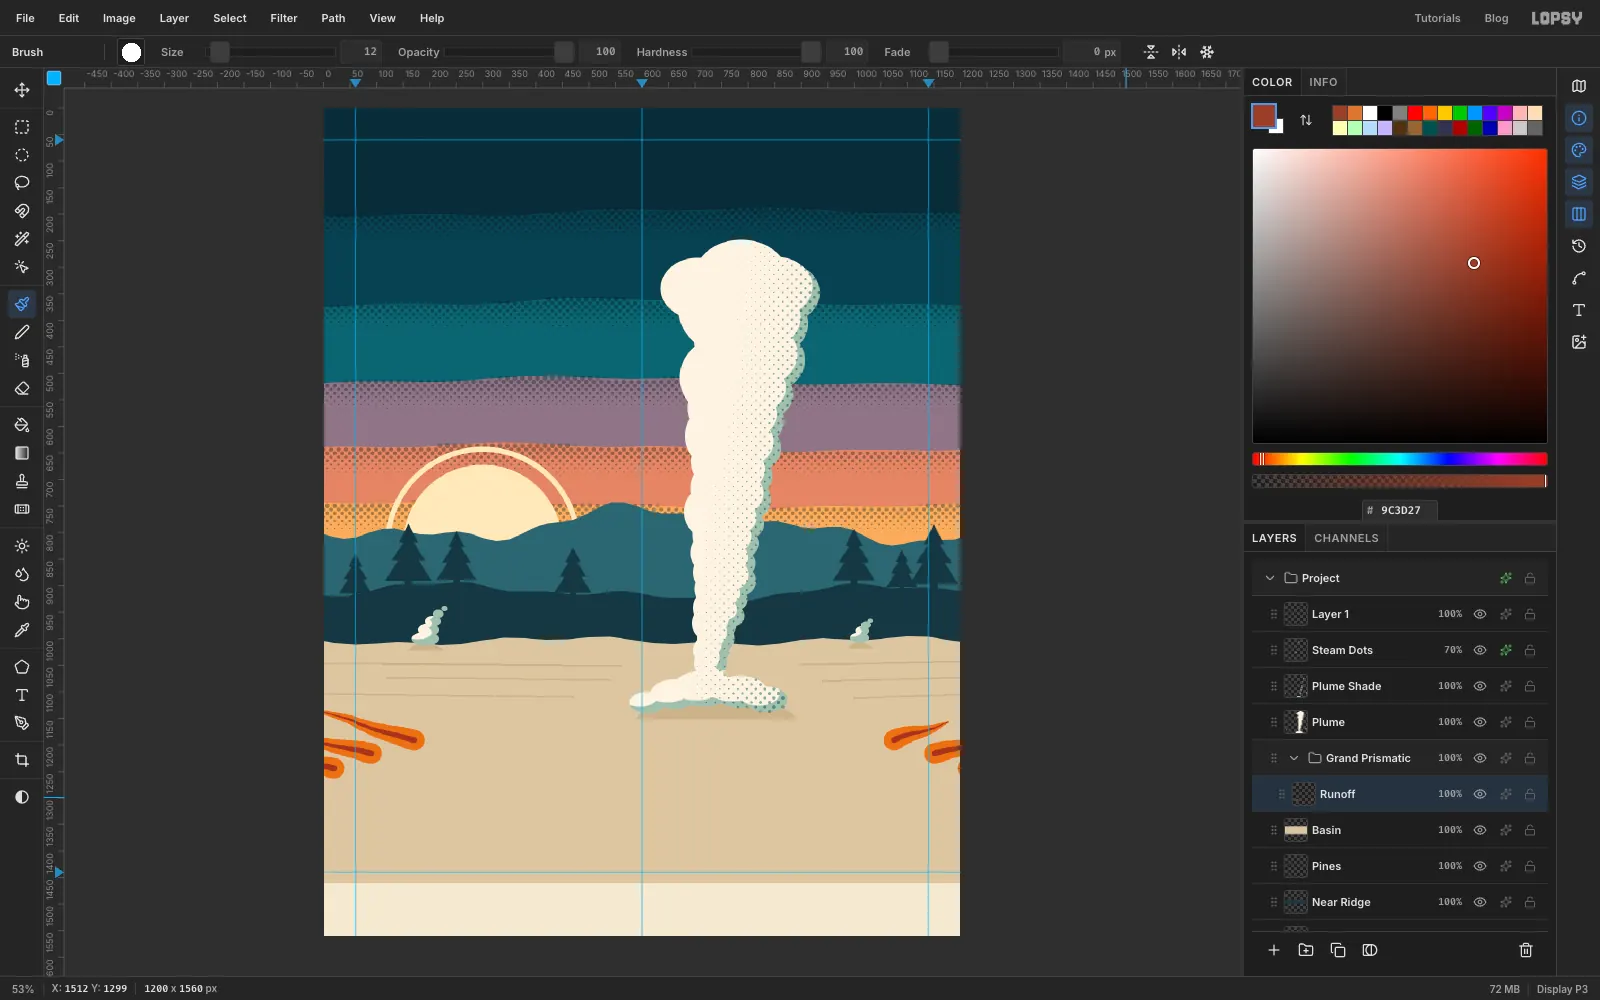
Grand Prismatic Spring is a huge hot spring ringed by bands of coloured bacteria. Orange bacterial mats stream away from its rim across the ground.
Select Basin and click New Group at the bottom of the Layers panel. Rename the group Grand Prismatic, and with the group selected add a layer called Runoff. It lands inside the group.
The spring will be a wide ellipse centred at about x 620, y 1335. Pick the Brush with a hard round tip at Size 40 and colour .
Before you paint, open the Brushes panel from the brush preview in the options bar and, on the Shape tab, set Taper. Taper is measured in pixels from where the stroke starts, and the brush shrinks to nothing at that distance, so set it a little longer than the streak you're about to draw. A 300 px streak wants a Taper of about 330.
Draw eight streaks outward from where the rim will be, three on the left and five on the right, fanning gently. Start every stroke at the rim, where the streak is fattest. In perspective a streak that runs away from you looks nearly flat, so keep them within about 10–25° of horizontal.
Then go over the same streaks with a Size 12 brush in rust for a darker vein down each one.
-
Cut the colour rings
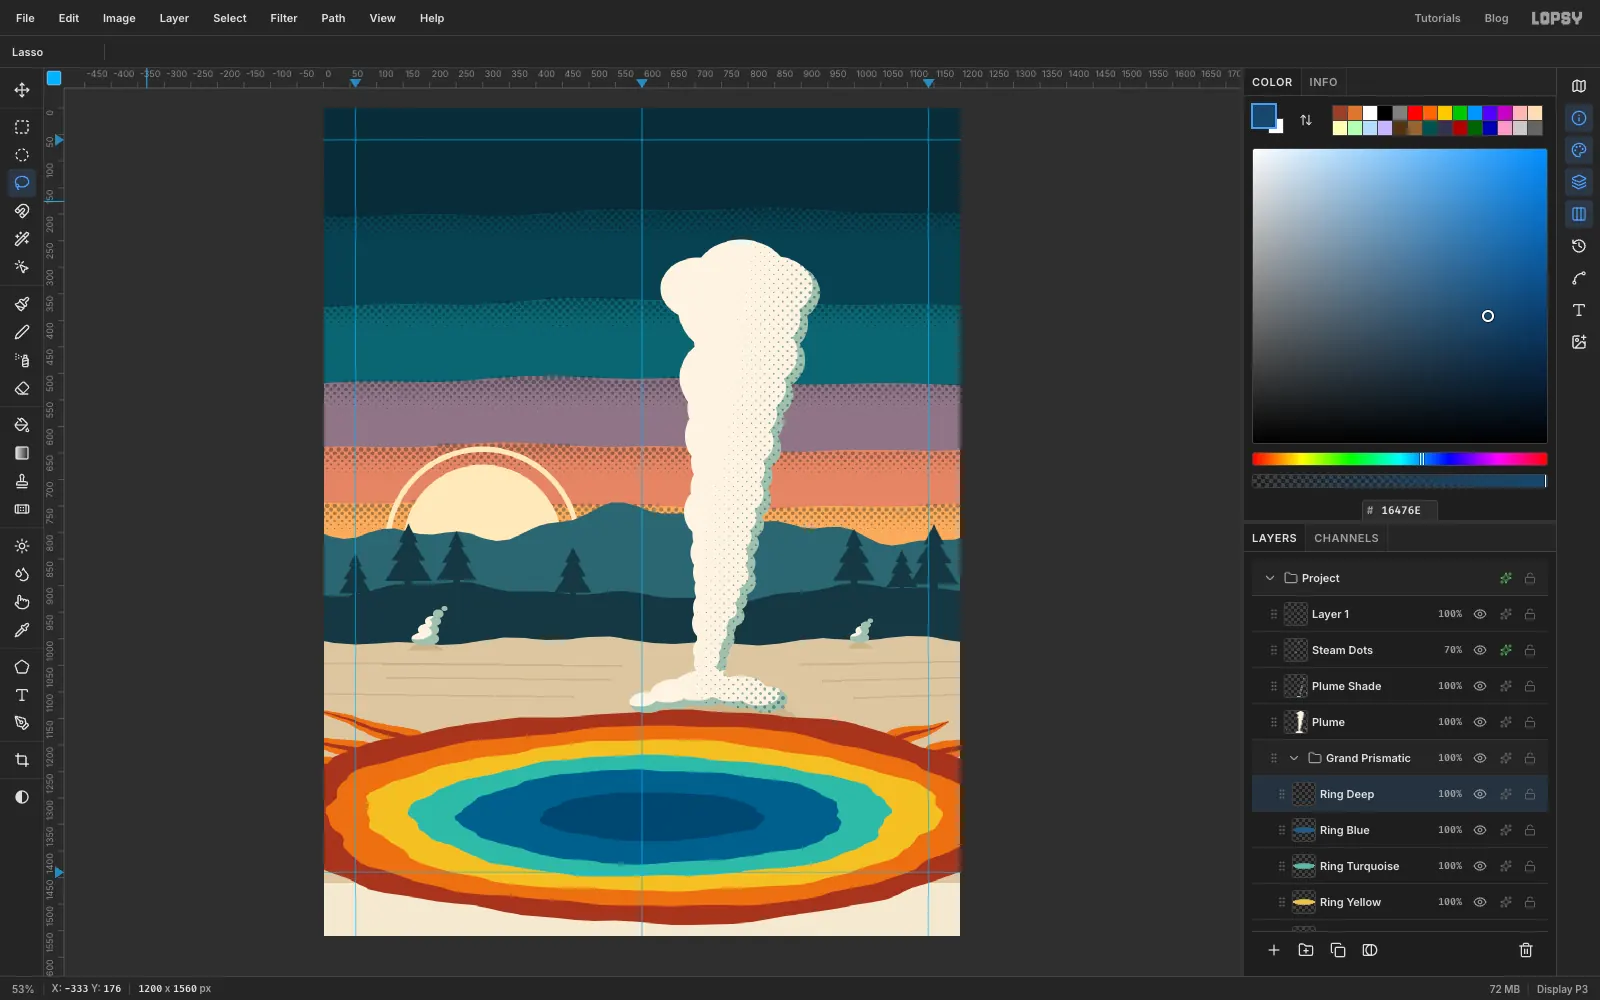
Each ring is its own layer inside the group, cut from the outside in. Draw each one with the Lasso as a slightly wobbly ellipse around the same centre, because a perfect marquee ellipse looks like a target:
- Ring Rust, about 1400 × 400 px,
- Ring Orange, about 1240 × 340,
- Ring Yellow, about 1080 × 284,
- Ring Turquoise, about 900 × 228,
- Ring Blue, about 720 × 176,
- Ring Deep, about 420 × 92,
The outer rings run off both sides of the page, which helps the spring feel enormous. The runoff streaks now poke out from under the rust ring.
-
Copy the plume for its reflection
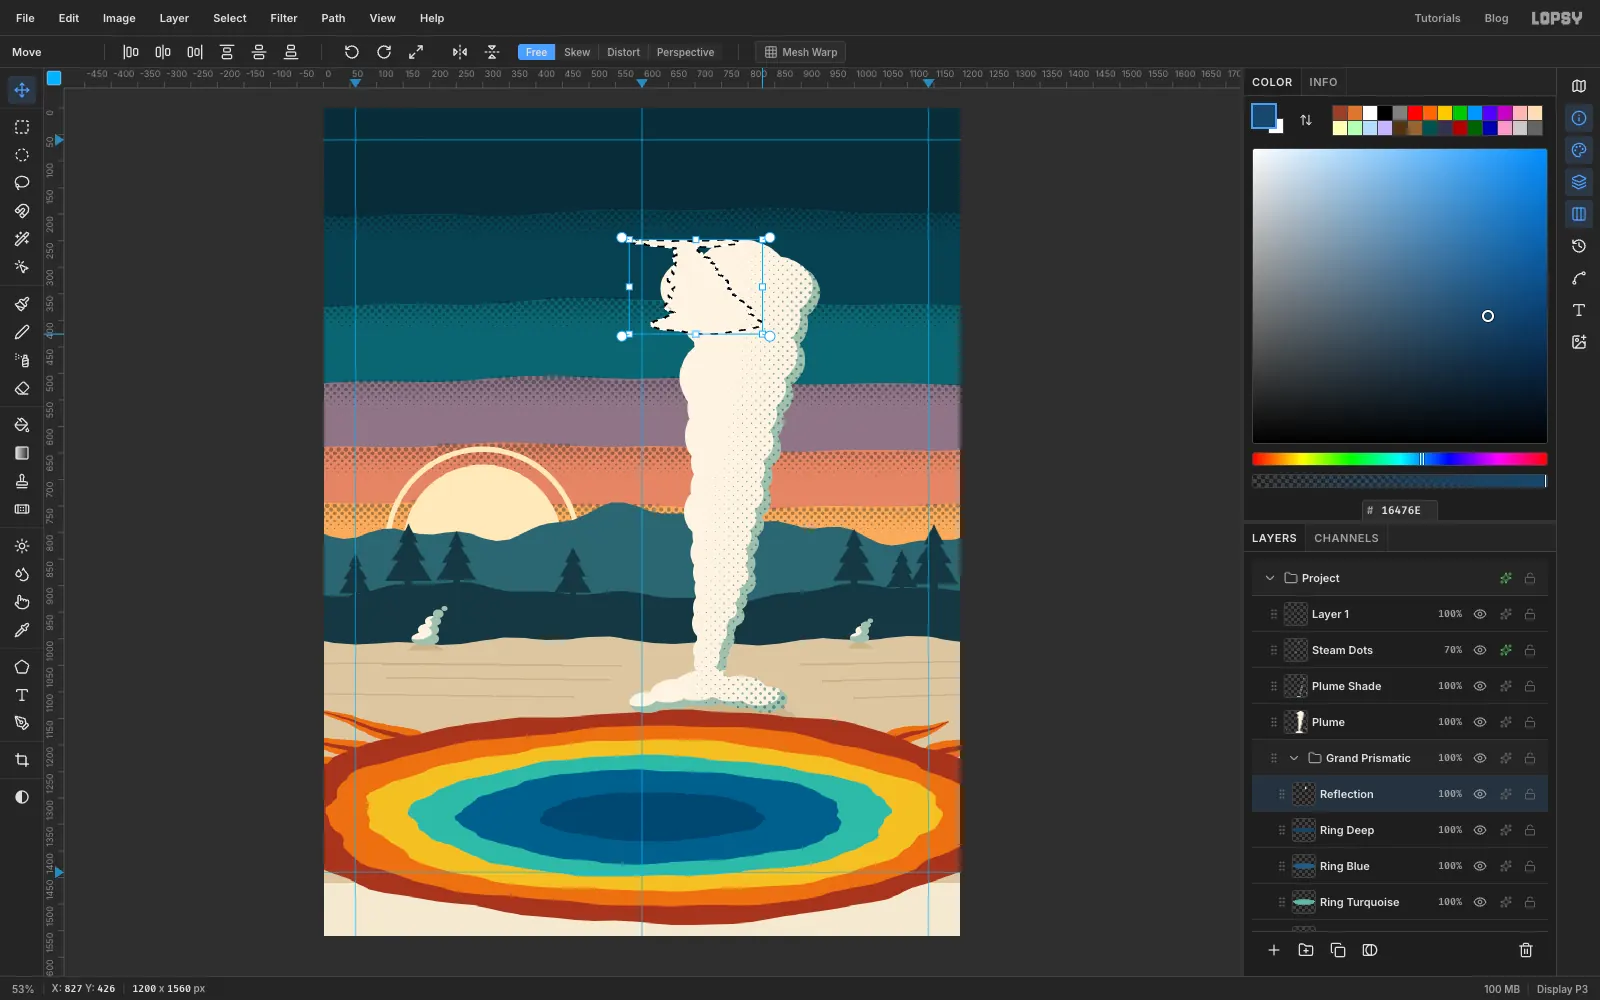
The still water should mirror the plume. Select Plume, marquee around the whole plume (leave out the two little wisps over the cones), and press Cmd+C. Select Ring Deep and press Cmd+V, so the copy lands inside the group, above the rings. Rename it Reflection.
Click Flip Vertical in the Move tool's options bar. Then drag the bottom-right handle up and to the left without holding Cmd, so you can squash it. Make it about 70% as wide and only about a fifth as tall. Reflections on a far-off pool are very short.
Drag it down so the narrow vent end sits on the far edge of the blue water, right below the real vent, and press Enter.
-
Keep the reflection in the water
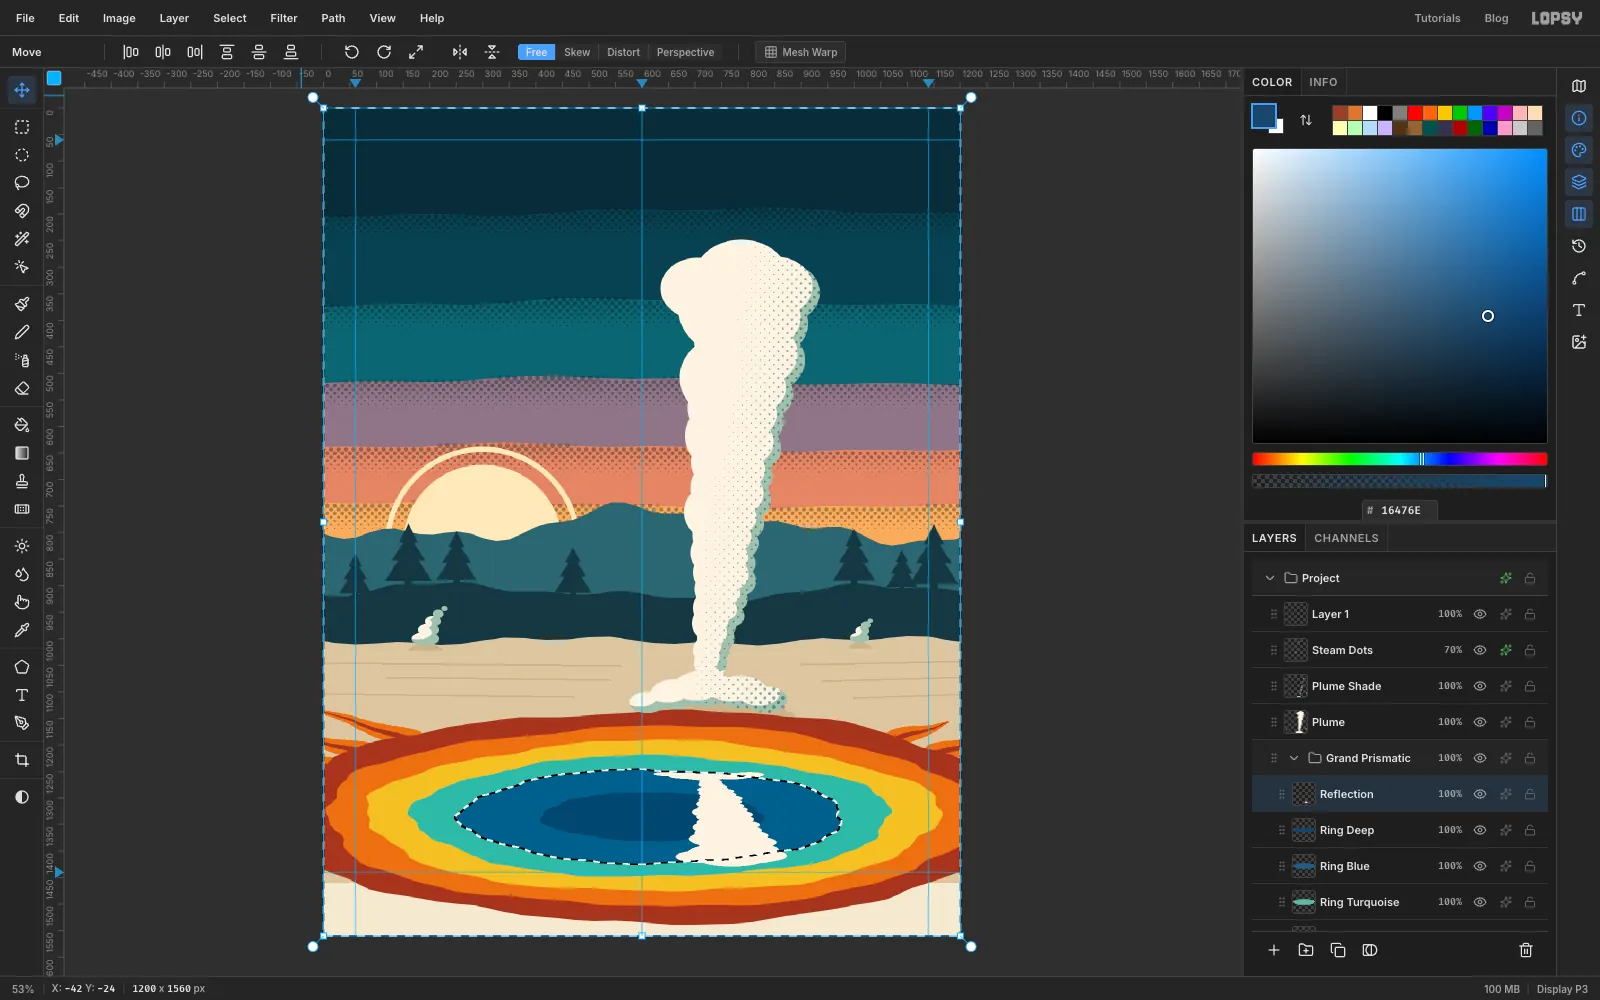
Cmd-click the Ring Blue thumbnail to load the blue water as a selection. Choose Select → Inverse and press Delete. That clears every part of the reflection that hangs over the turquoise and yellow rings.
-
Break the reflection into ripples
A soft blurry reflection looks digital. A printer would cut it as crisp dashes.
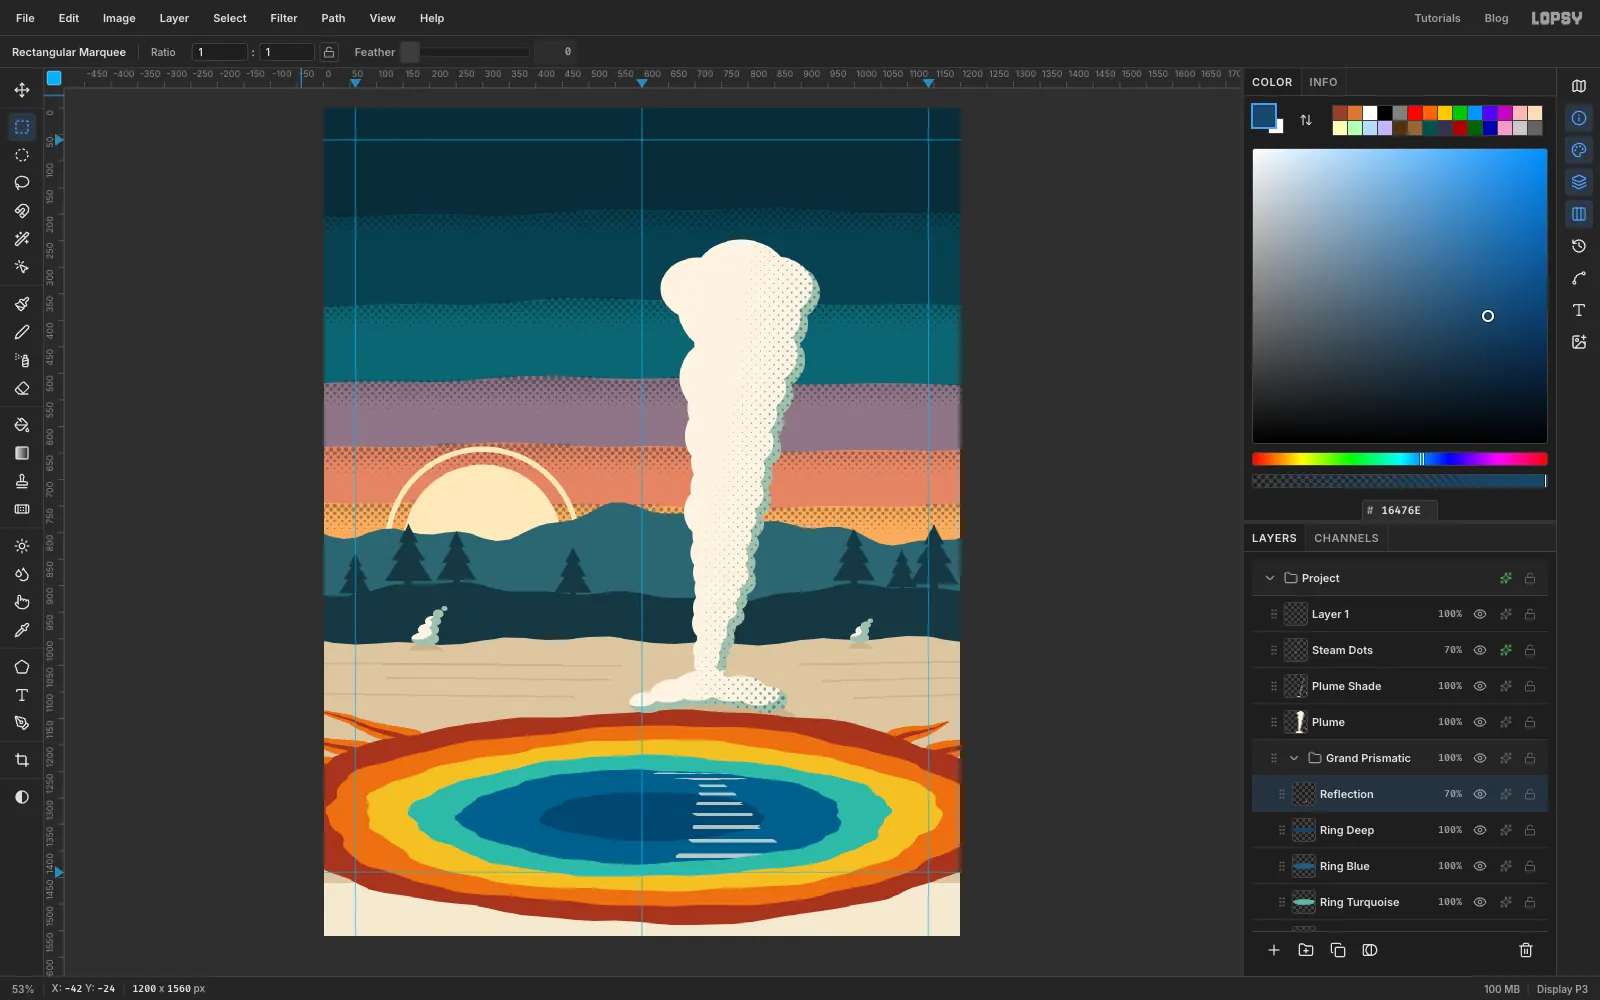
With the Rectangular Marquee, drag a thin horizontal stripe across the reflection near its top, about 3 px tall. Hold Shift and add more stripes below it. Make each one a little taller and leave a bigger gap after each, so the ripples spread out as they come toward you. Stop at the bottom of the reflection.
Choose Select → Inverse, press Delete and deselect. Set the layer's opacity to 70%.
-
Build the boardwalk
Visitors see Grand Prismatic from a boardwalk, and so will the bison. Select Steam Dots and add a layer called Boardwalk, so it sits above the spring and the plume.
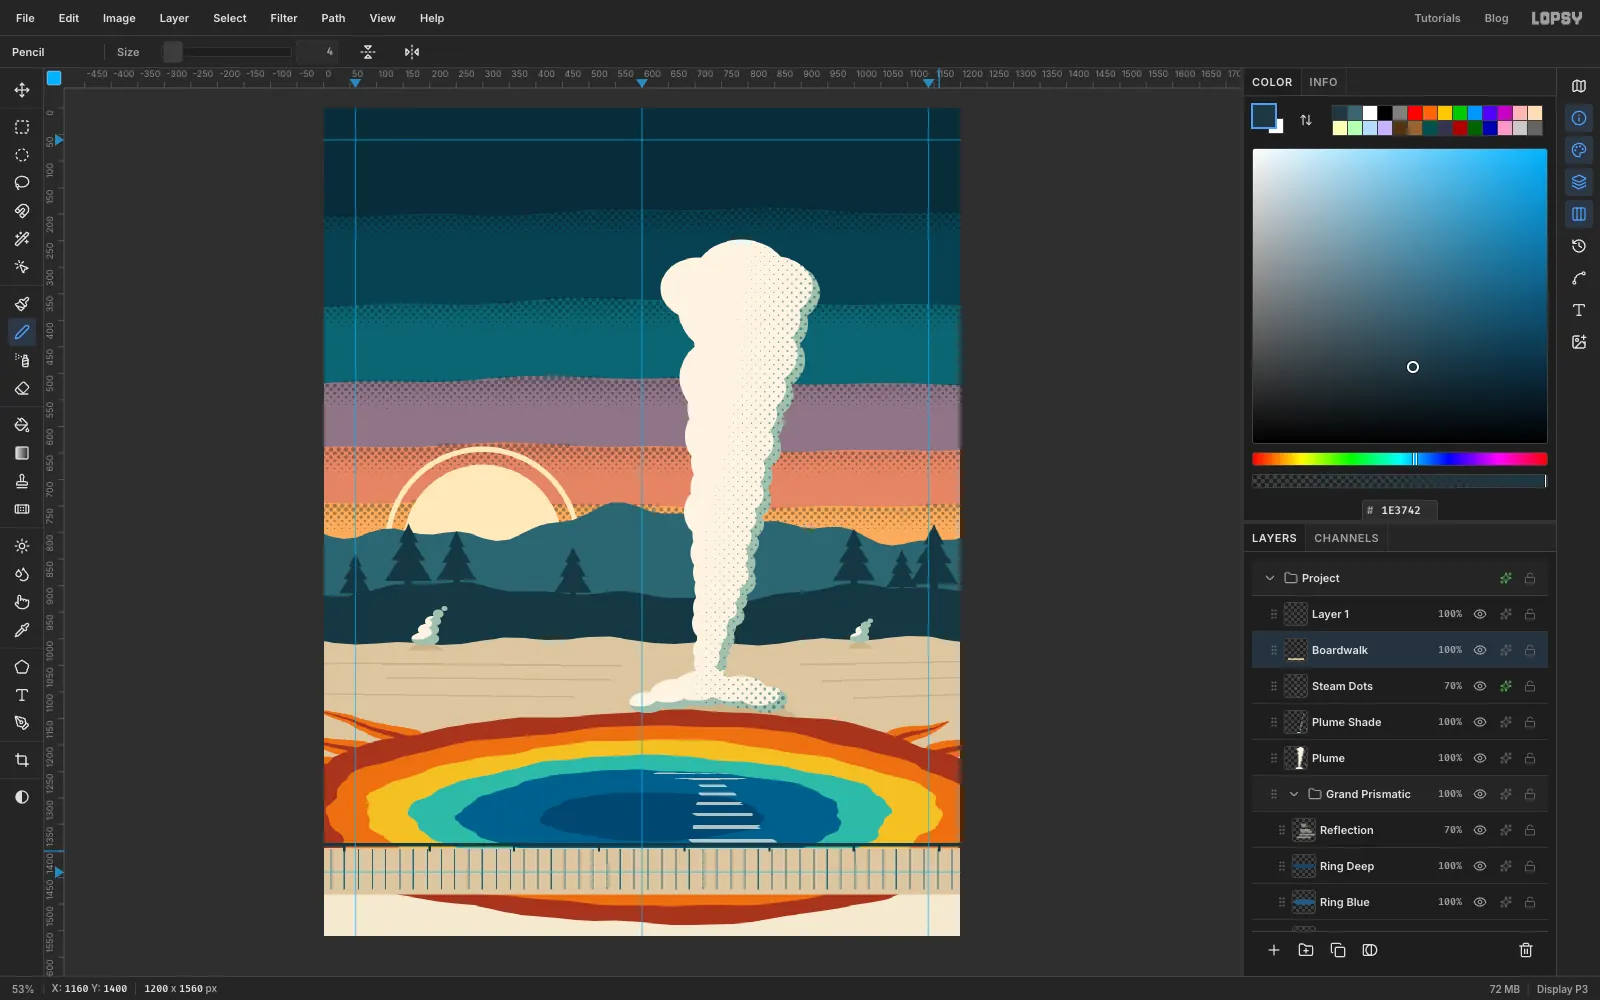
Marquee a strip from y 1394 down past the footer guide and fill it with sinter . With the Pencil at Size 2 in , draw a plank line every 26 px. Click at the top of the deck, hold Shift and click straight below.
Switch the Pencil to at Size 6 and draw a rail along the top edge of the deck, about 6 px above it. At Size 4, add a short post every 160 px, from the rail down into the deck.
-
Bring in a bison photo
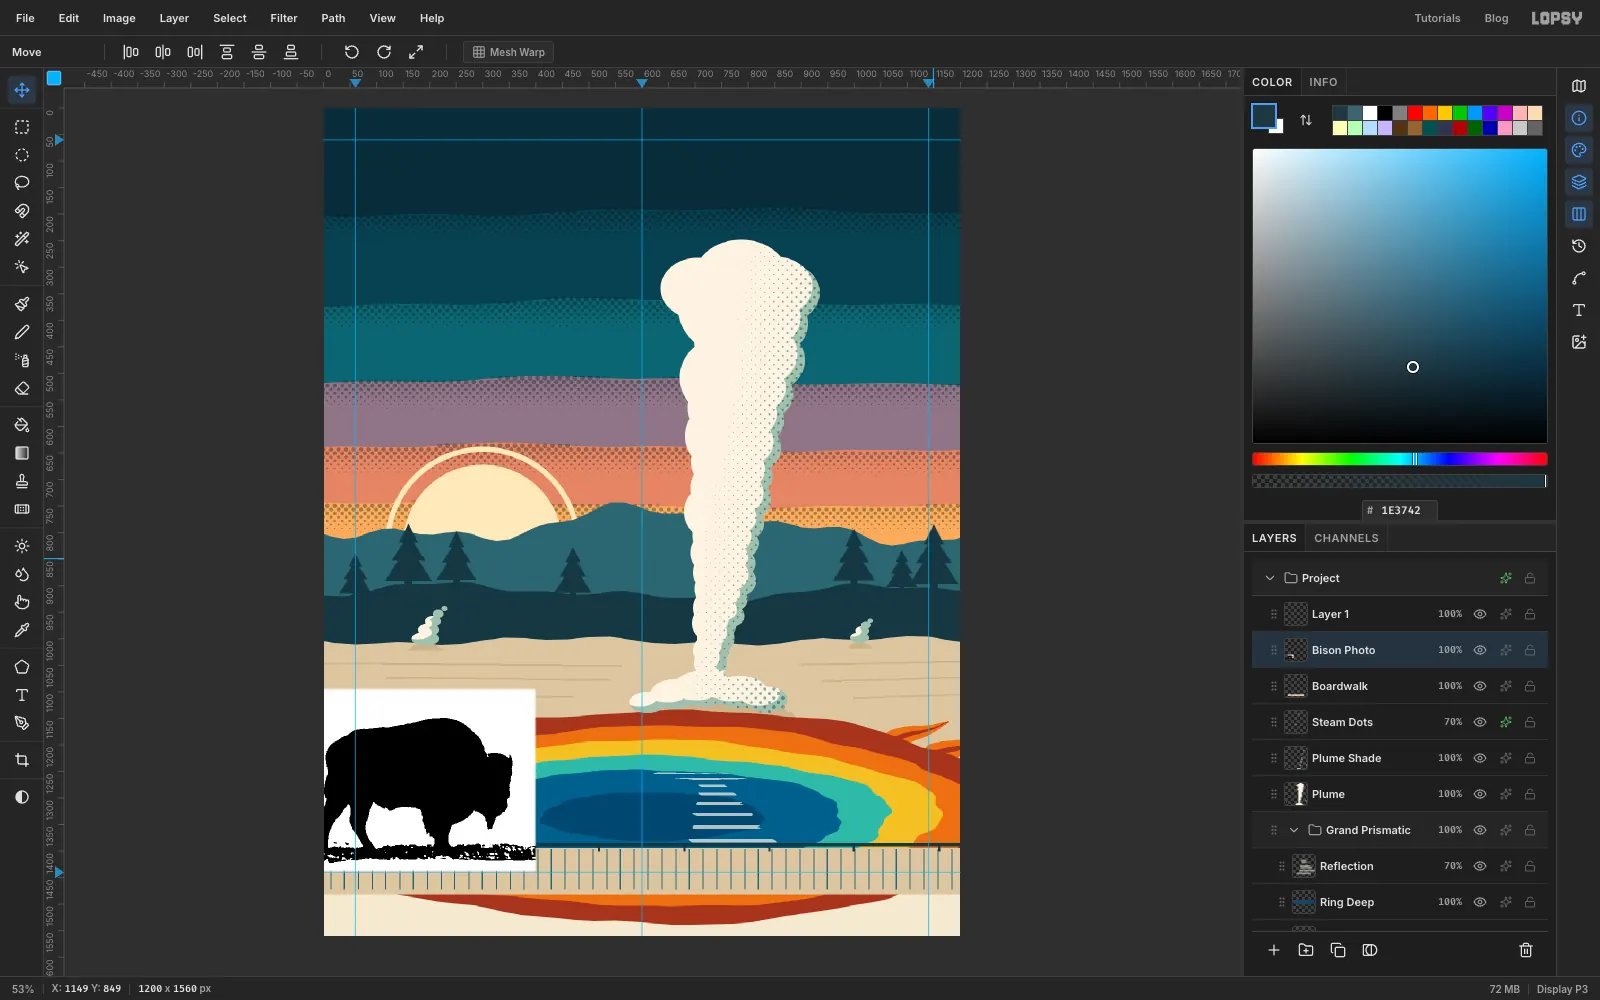
An animal drawn from memory always looks a bit off, so trace a real one. This cover uses Bison along Yellowstone Lake by the National Park Service, which is public domain on Wikimedia Commons. The full photo shows two bison, so crop it to the left-hand bull before you bring it in: open it on its own in Lopsy (or any photo app), crop to the bull with a little snow around him, and save it. He's a clean side view against snow, which is ideal for tracing.
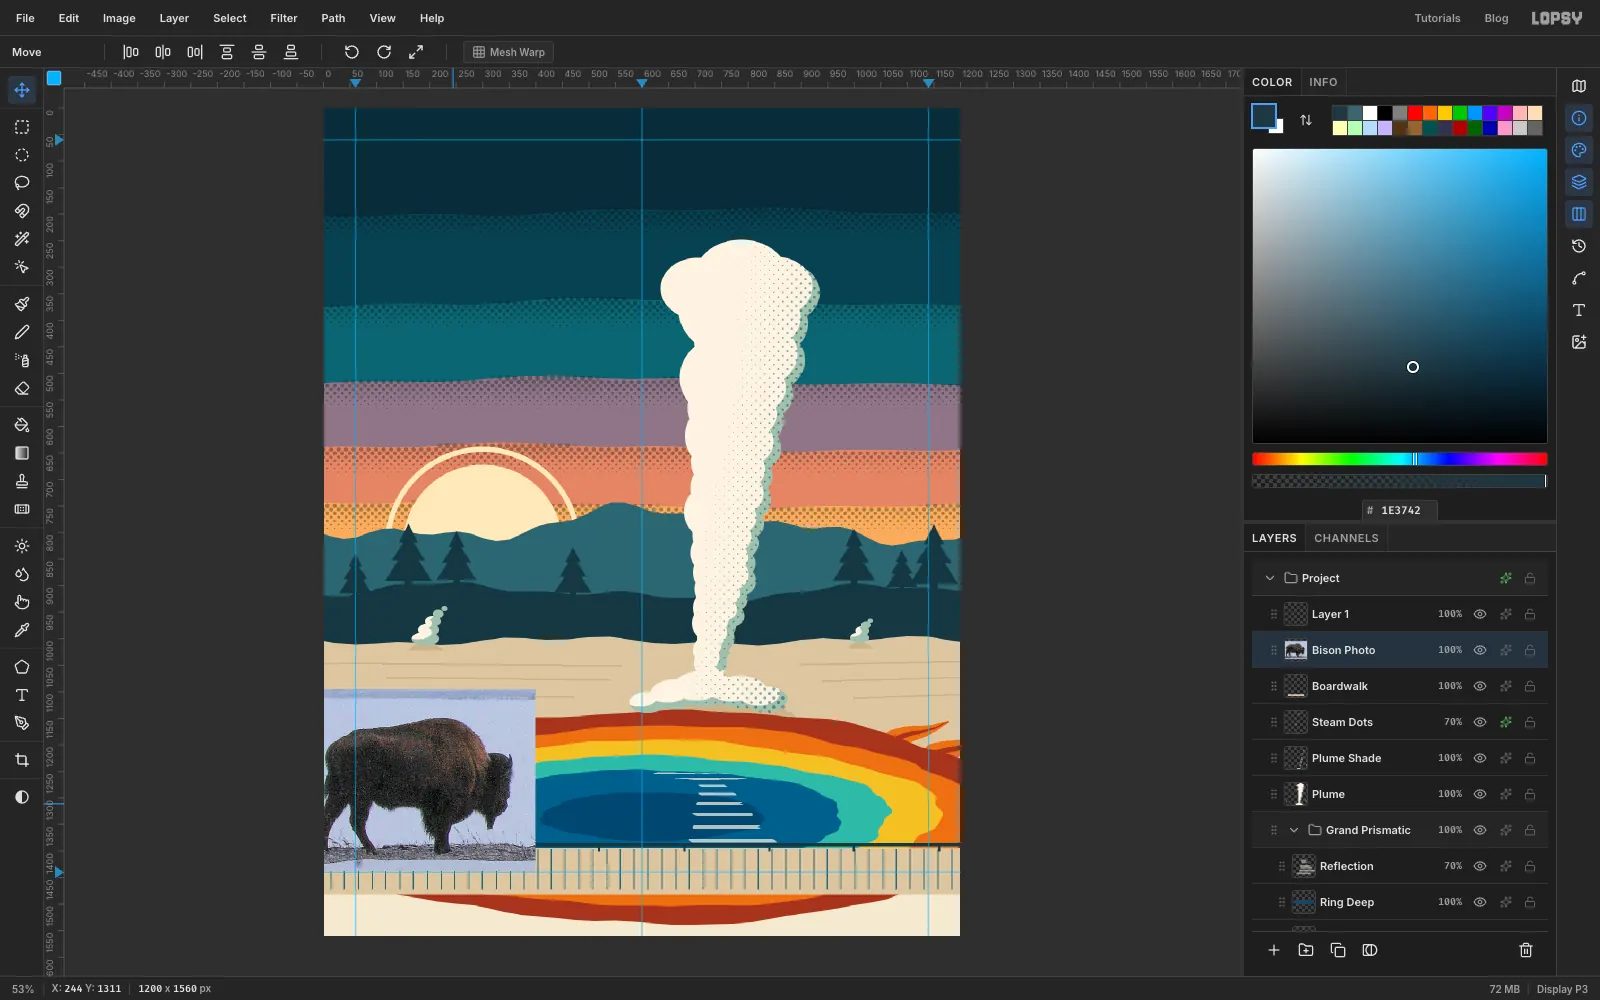
Drag the cropped photo onto the canvas. It lands at the top-left corner with its transform handles showing. Hold Cmd and drag the bottom-right handle inward until the photo is about 420 px wide, then press Enter.
Drag it to the lower left so the bison's hooves stand on the boardwalk, and let its rump run off the left edge of the page. Cropping it frees up the left side of the spring.
-
Turn the photo into ink with Threshold
Run Filter → Gaussian Blur… at Radius 4 first. The blur rounds off the fur and the JPEG noise, so the next step gives smooth edges instead of fringes.
Then run Filter → Threshold… at Level 125. Every pixel becomes black or white, so the dark bison turns into a solid silhouette against the white snow.
-
Select the bison, but not the ground
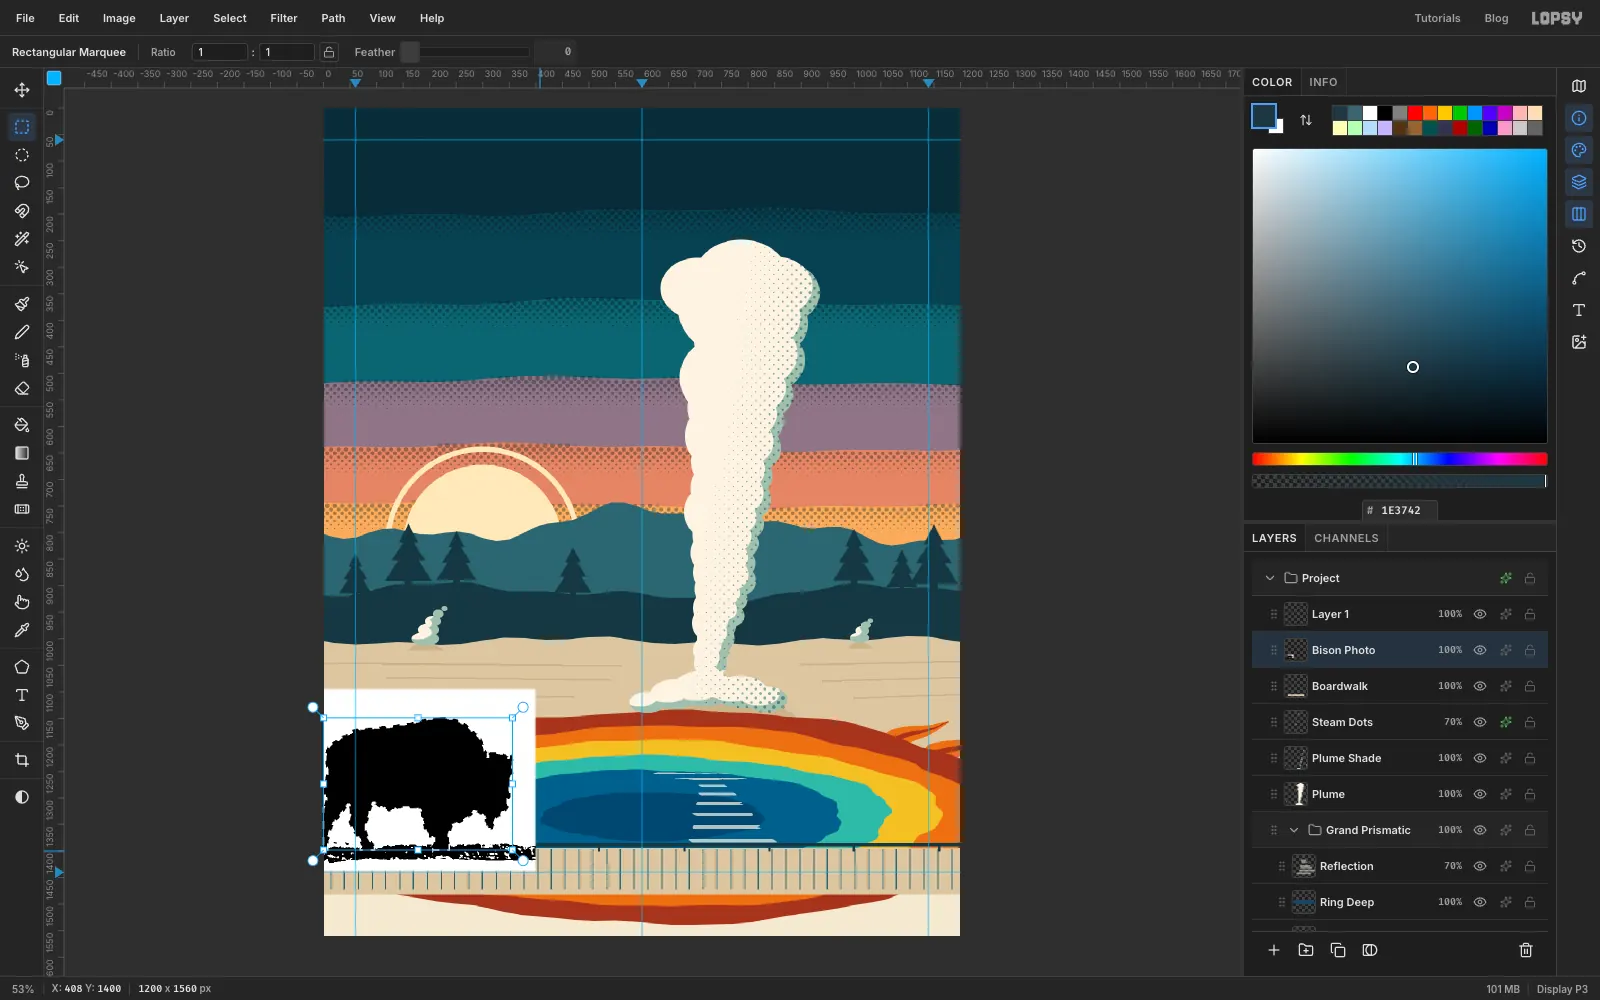
Pick the Magic Wand (W), set Tolerance to 32 with Contiguous on, and click the middle of the bison. It selects the whole silhouette, but the snowy ground strip under the hooves is attached, so you need to cut it off.
Hold Option and lasso the ground strip away. Run the loop along just under the bison's belly line, dipping down around each hoof so the hooves stay selected. Then Option-drag a small rectangle over any grass specks left by the front legs.
Add a layer called Bison and fill the selection with plum . Deselect, select the photo layer and click Delete Layer. The photo has done its job.
-
Add a rust highlight and an eye
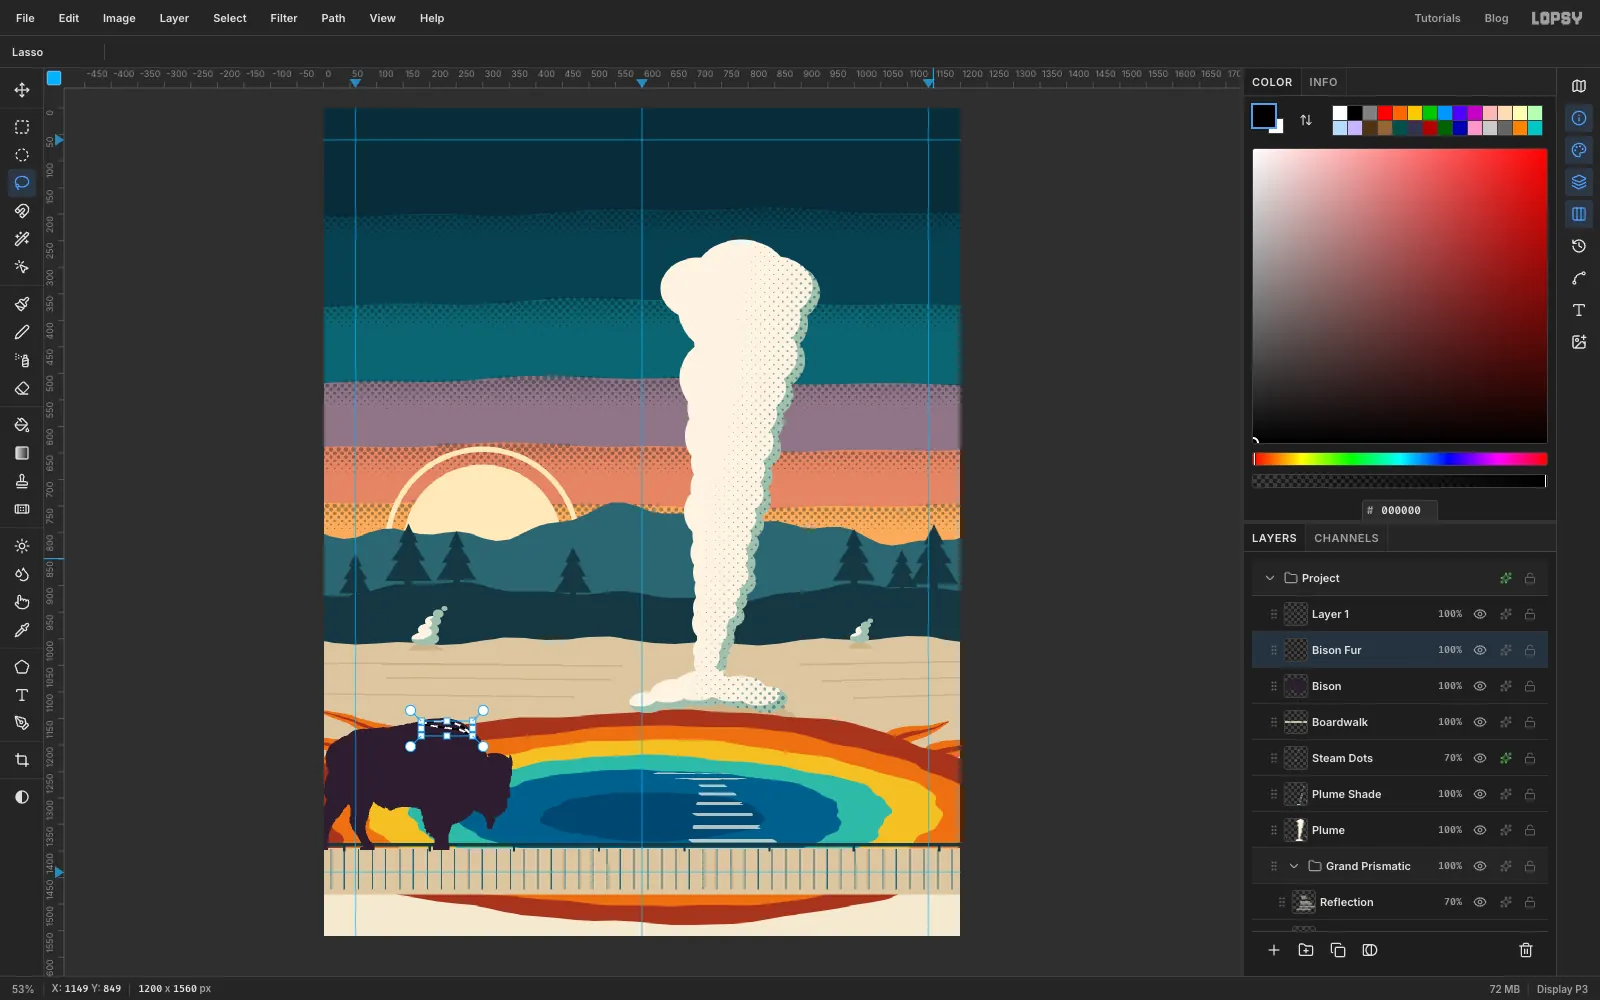
Add a layer called Bison Fur above Bison and Cmd-click the Bison thumbnail. Hold Shift+Option and lasso a crescent over the hump and shoulder: along the top of the back and down behind the head, then back along a curve about a third of the way down the hump. The intersect keeps only the part inside the bison.
Choose Select → Shrink… and shrink by 6 px. That leaves a plum rim along the back. Without it the rust melts into the rust ring behind the bison. Fill with rust and deselect.
Pick the Move tool and tap the arrow keys to nudge the highlight 2 px right and 2 px up. It's a small misregistration, as if the rust screen slipped.
For the eye, pick the Brush at Size 6 in paper and click once in the head, a little above and behind the muzzle.
-
Set the masthead
Select Band Dots in the Layers panel. New layers land above the active one, and you want the type above the dot fringes but below the plume.
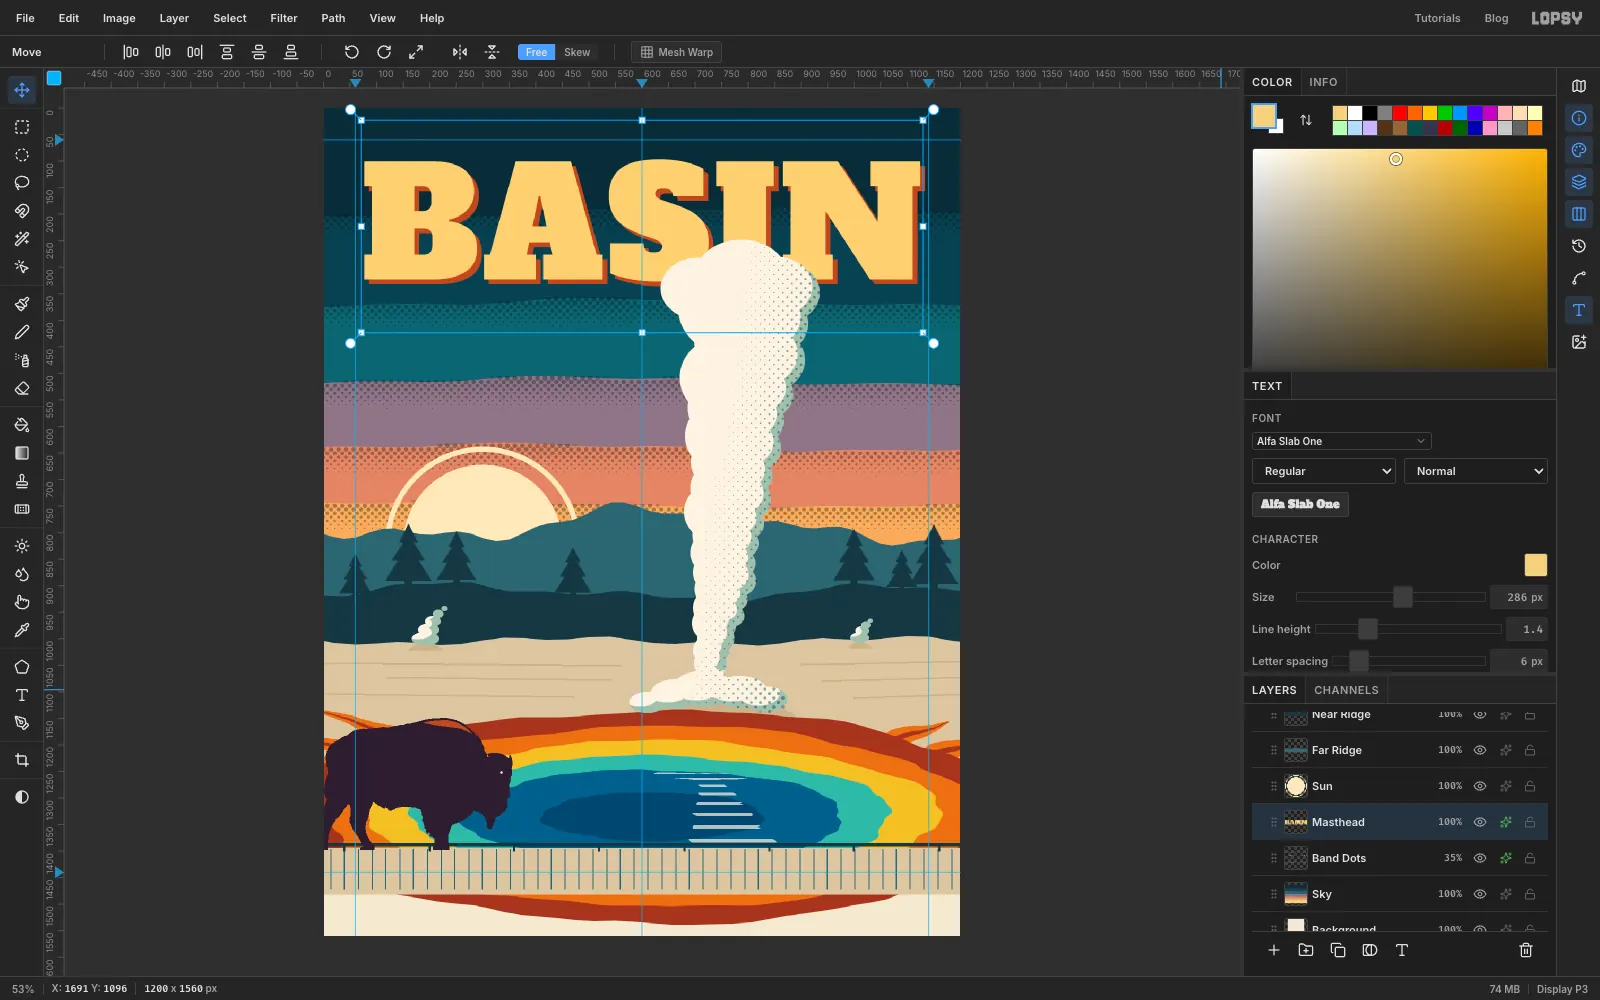
Pick the Text tool (T) and choose Alfa Slab One, with colour . Click in empty sky near the top, type BASIN and press Tab to commit it. Set the size to about 286 px, so the word fills the width just inside the margin guides, and in the Text panel set Letter spacing to 6. Double-click the new layer's name and rename it Masthead. Drag it so the tops of the letters sit about 96 px from the top of the page.
Now give it the classic second ink. Open the layer's effects and turn on Drop Shadow with Offset X 9, Offset Y 9, Blur 0, Spread 0 and Opacity 100, in rust . With no blur, the shadow reads as a second printed colour slightly out of register.
The plume's top crosses the bottom of the S and I. The tops of the letters stay clear, so BASIN still reads.
-
Add the folio, kicker and headline
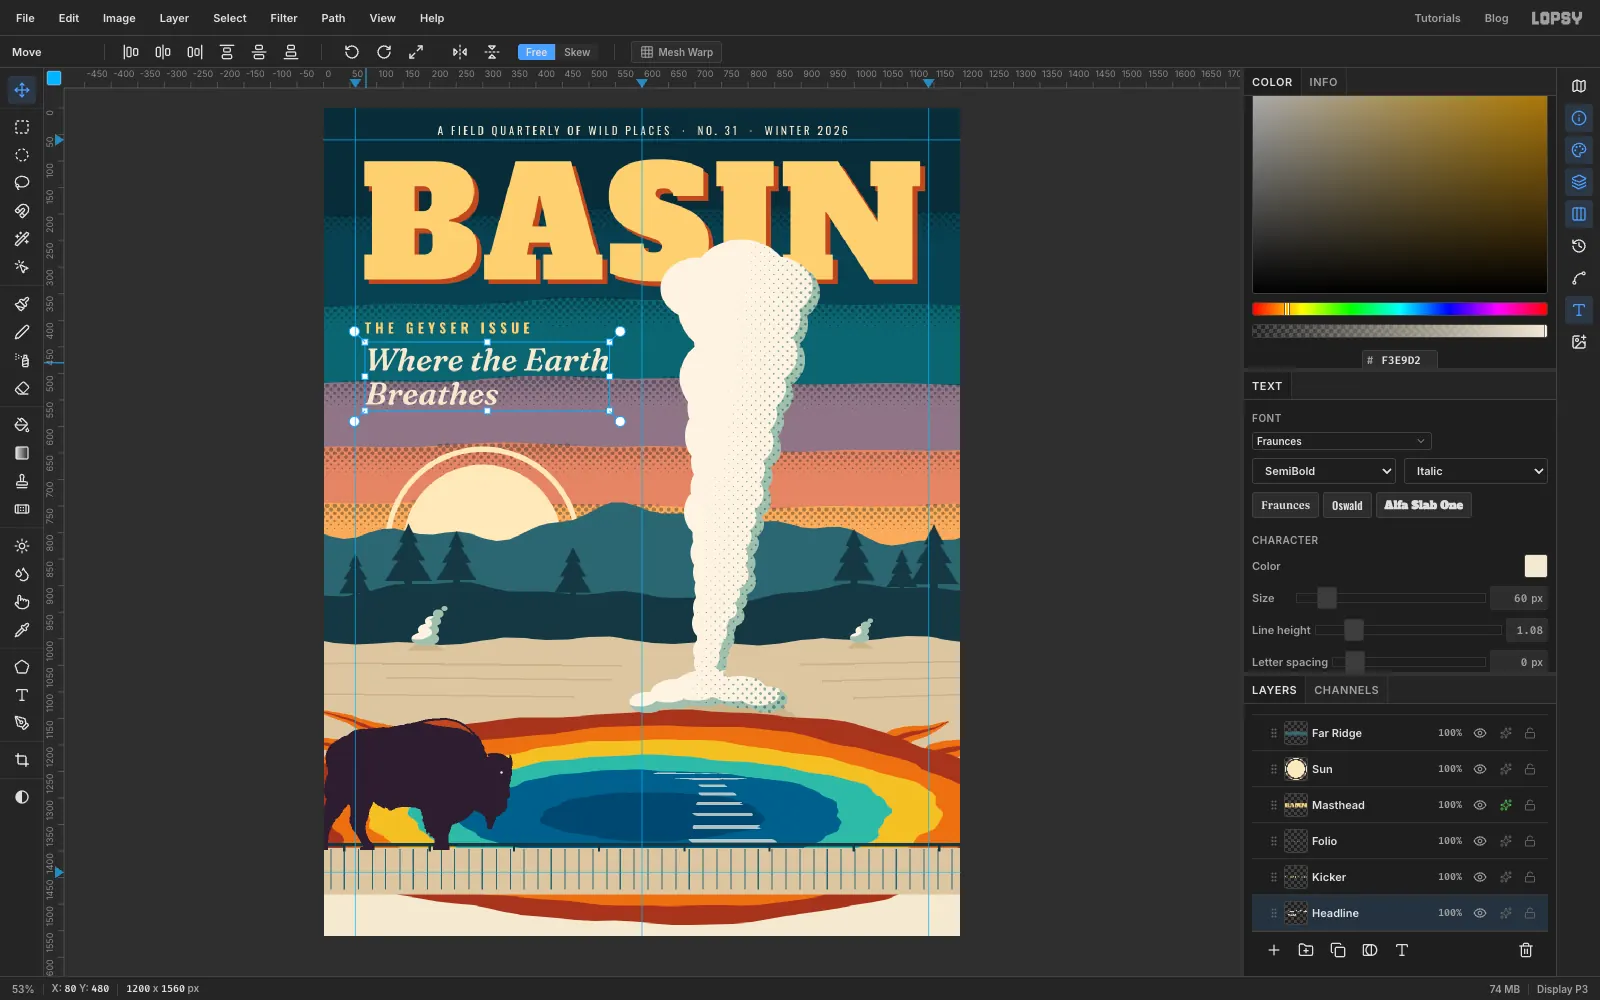
Select Band Dots again before each new piece of text, so you don't restyle the last one. Rename each text layer as you go (Folio, Kicker, Headline), since Lopsy names text layers after their words.
- Folio. Oswald at size 21, paper colour, Letter spacing 5. Type
A FIELD QUARTERLY OF WILD PLACES · NO. 31 · WINTER 2026and centre it on the centre guide, about 34 px from the top. - Kicker. Oswald SemiBold (600) at 26, masthead yellow, Letter spacing 8:
THE GEYSER ISSUE. Line its left edge up with the stem of the B, at x 78, about y 404. - Headline. Fraunces SemiBold Italic at 60, paper colour. Set Letter spacing back to 0, because new text takes the last value. Type
Where the Earth, press Return for a new line, typeBreathes, and set Line height to 1.08 for tight leading. Line it up at x 78, just under the kicker.
Check that the headline clears the sun's ring by at least 60 px. If it crowds the ring, the two shapes fight for attention.
The italic style and the tight line height carry over to the next text you make, too, so set the style back to Normal and line height to 1.4 before you start the footer.
- Folio. Oswald at size 21, paper colour, Letter spacing 5. Type
-
Print the footer band
Select Bison Fur and add a layer called Footer. Marquee from the footer guide at y 1440 down to the bottom of the page and fill it with plum . With the Pencil at Size 3 in masthead yellow, draw a rule along the top edge.
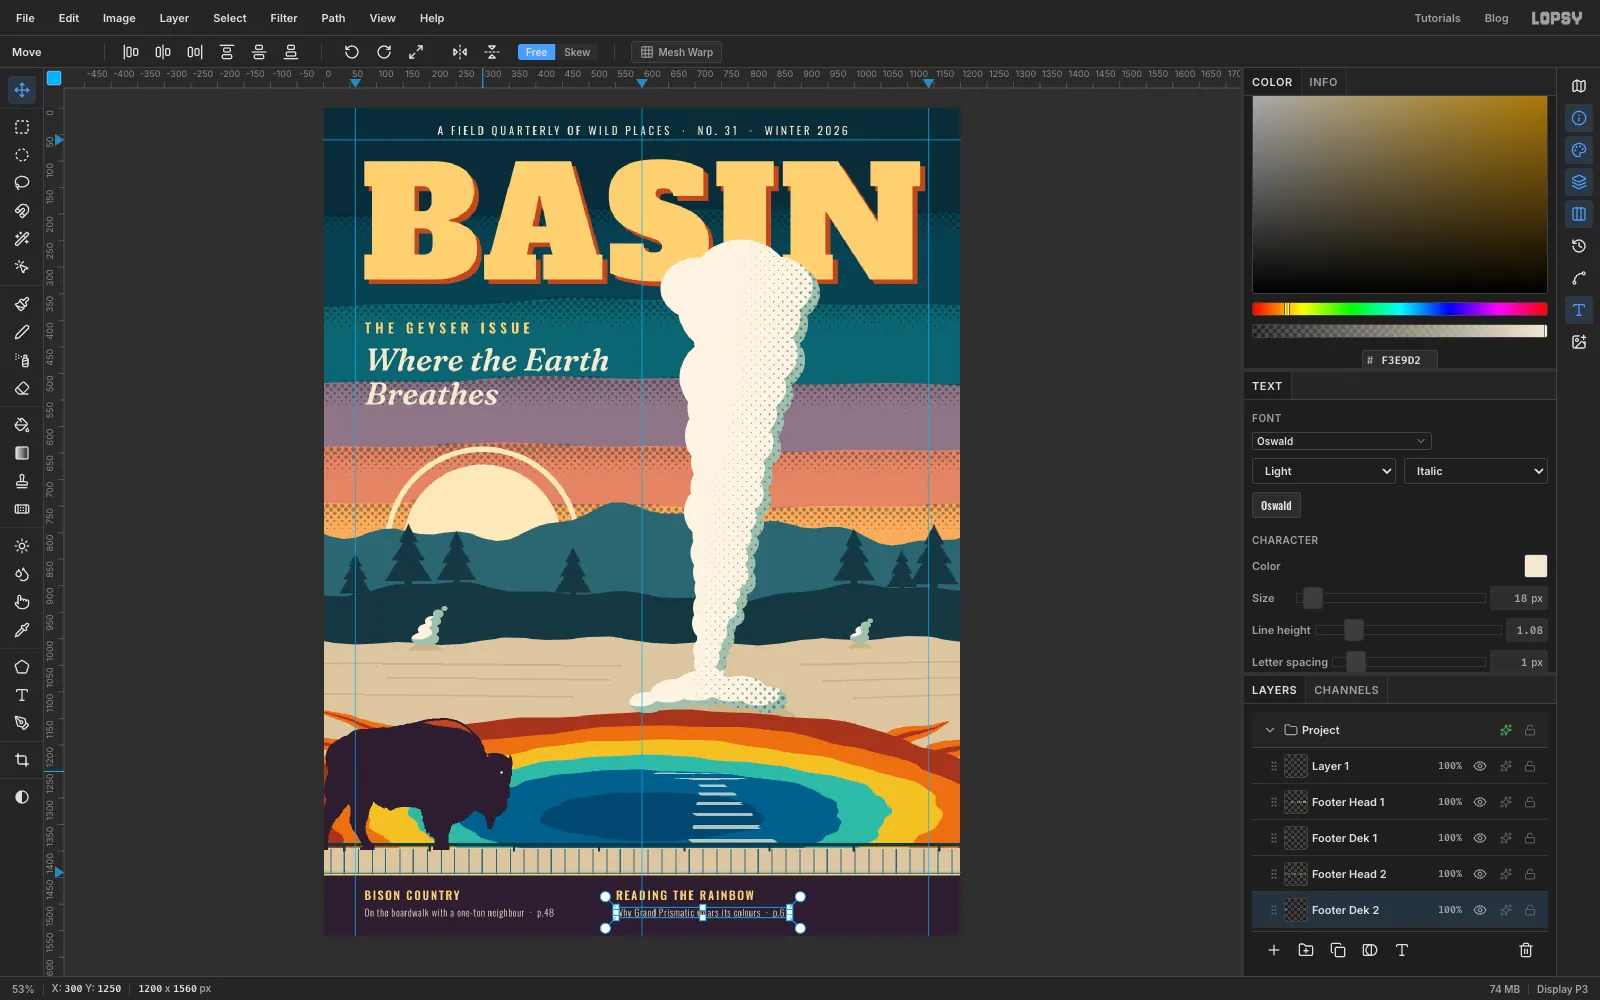
Each cover line is two text layers. Select Footer before each one, and rename them Footer Head 1, Footer Dek 1 and so on.
- Heads in Oswald SemiBold (600), size 22, Letter spacing 3, masthead yellow:
BISON COUNTRYat x 78 andREADING THE RAINBOWat x 552, both about y 1474. - Under each, in Oswald Light (300), size 18, Letter spacing 1, paper colour:
On the boardwalk with a one-ton neighbour · p.48andWhy Grand Prismatic wears its colours · p.62, about y 1508.
- Heads in Oswald SemiBold (600), size 22, Letter spacing 3, masthead yellow:
-
Draw the barcode
Add a layer called Barcode. Marquee a label from about x 994 to the right margin at 1122, and from y 1462 to 1540. Fill it with paper colour.
Pick the Pencil in plum and draw the bars as straight vertical lines, from about 9 px under the top of the label to about 20 px above its bottom. Click the top of a bar, hold Shift and click its foot. Mix Size 2, 4 and 6 bars with uneven gaps of 1 to 3 px, so it reads as a real barcode.
With Barcode selected, add Oswald text at size 11, Letter spacing 2, in plum:
0 74470 03126 4. Centre it under the bars.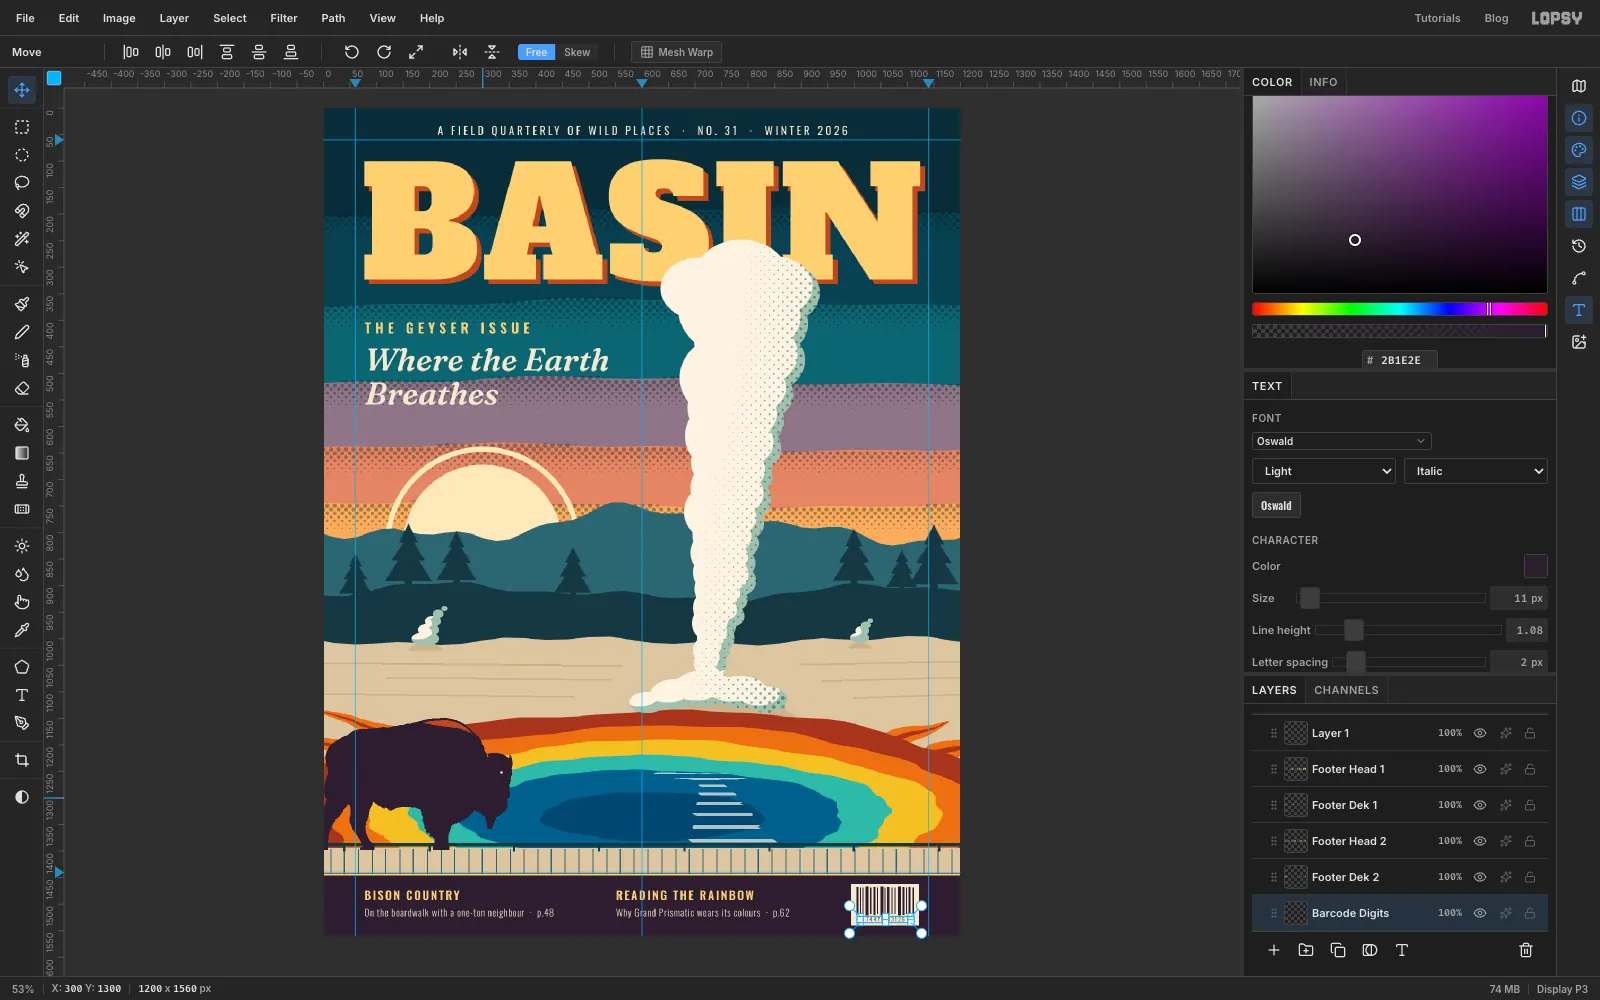
-
Add the sticker and tilt its words
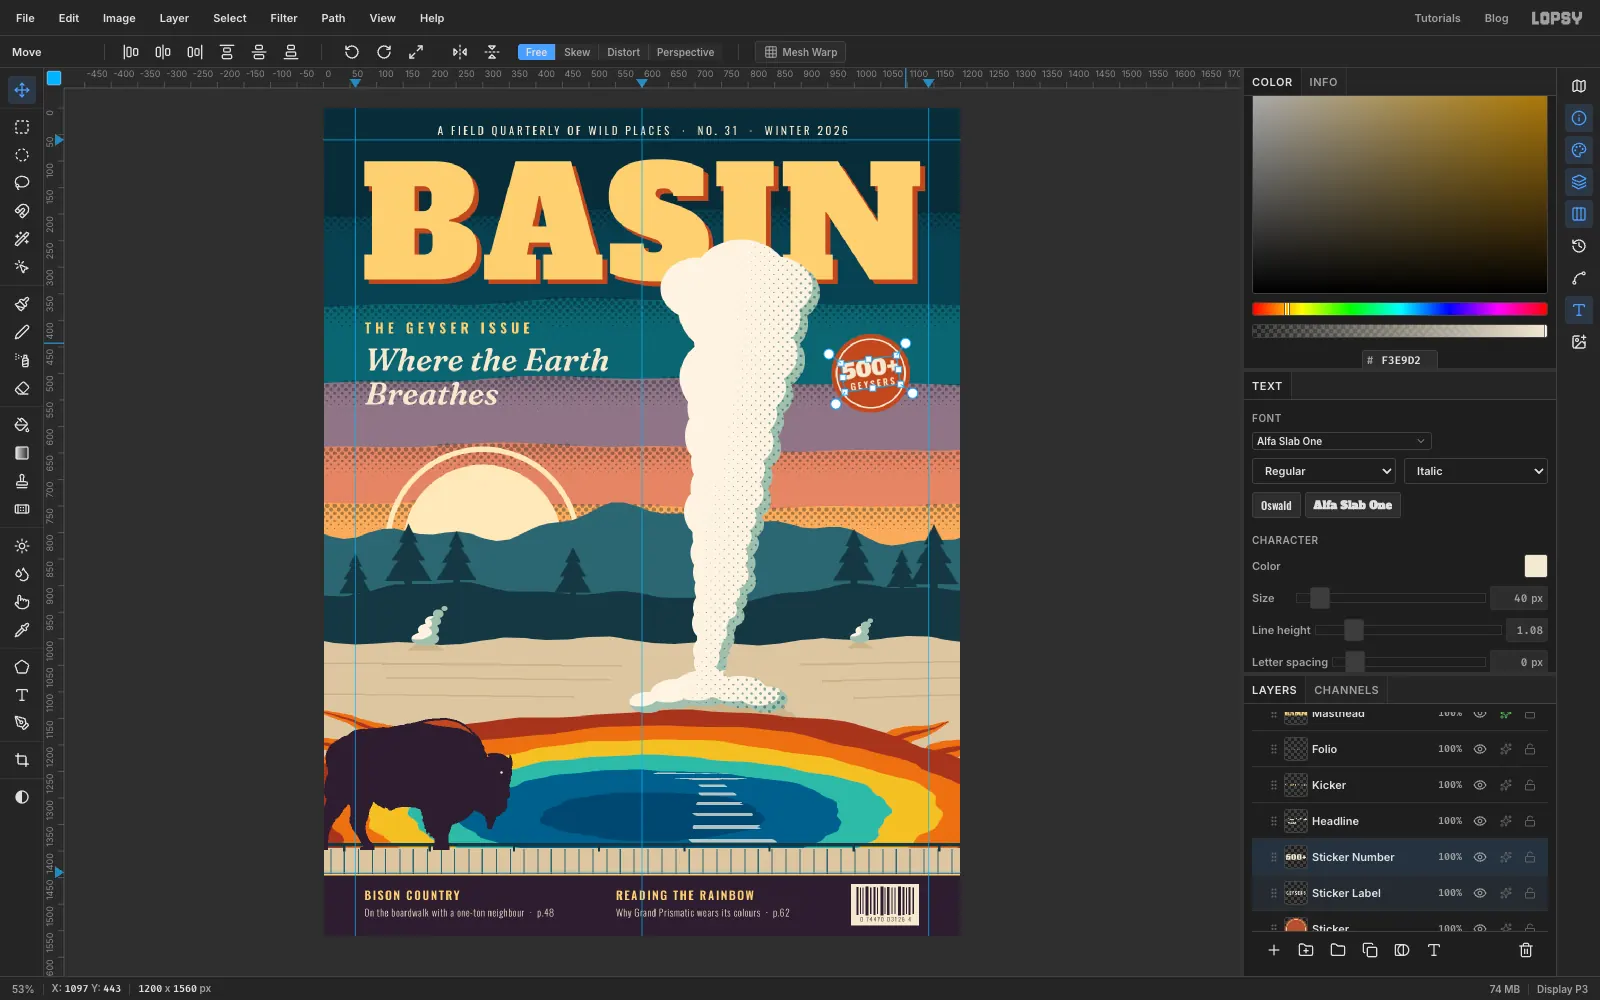
Select Band Dots and add a layer called Sticker. Drag a circle about 148 px across to the right of the plume, level with the headline and centred around x 1030, y 500, so there are at least 40 px of sky between it and the steam. Fill it with rust . For the inner ring, drag a circle 8 px smaller all round, Option-drag one 3 px smaller than that, and fill with paper colour.
Add
500+in Alfa Slab One at 40 andGEYSERSin Oswald SemiBold at 17 with Letter spacing 4, both in paper colour, and rename them Sticker Number and Sticker Label. Centre each on the circle, with the pair stacked as one block around the circle's middle.Click the Sticker Number row, then Shift-click Sticker Label so both are selected. With the Move tool, drag the rotation handle just outside a corner of the box to tilt them about 8° anticlockwise, and press Enter. They turn together around their shared centre, so they stay seated in the ring.
-
Group the type, slip a screen and add grain
Click Masthead, then Shift-click Folio, Kicker and Headline, and choose Layer → Group Layers. Name the group Cover Type. Now you can nudge all the cover type as one unit, and undo it in one step.
Real prints never register perfectly. Select Plume Shade, pick the Move tool and tap the arrow keys to slide it 4 px right and 4 px down. The crescents now spill a hair past the billows.
Select the Barcode digits layer and add a layer called Grain. It lands above all the artwork; only the footer cover lines stay above it, so the small type stays crisp. Fill it with mid-grey and run Filter → Add Noise… at 70, Mono and Gaussian. Set the blend mode to Overlay and the opacity to 80%. Mid-grey disappears in Overlay, so only the speckle shows. It gives the flat inks the tooth of paper.
Select the empty Layer 1 and click Delete Layer. Save the project with File → Save Project, and export with File → Quick Export PNG.