Design a Bauhaus Restaurant Menu for a Sherry Bar
Build a Bauhaus tapas and sherry menu in Lopsy with a diagonal bar, a geometric fig, a masked copita glass, halftone shadow and Kandinsky shape icons.
Bauhaus graphic design, from the German art school that ran from 1919 to 1933, builds a page from a few plain parts: flat primary colours, circles, squares and triangles, strong diagonals, and sans-serif type, often all lowercase. Joost Schmidt's poster for the 1923 Bauhaus exhibition is a famous example. It's built from circles, squares and blocks on a tilted cross. Wassily Kandinsky, who taught at the school, even ran a questionnaire asking which colour belongs to which shape. His own answer was a yellow triangle, a red square and a blue circle.
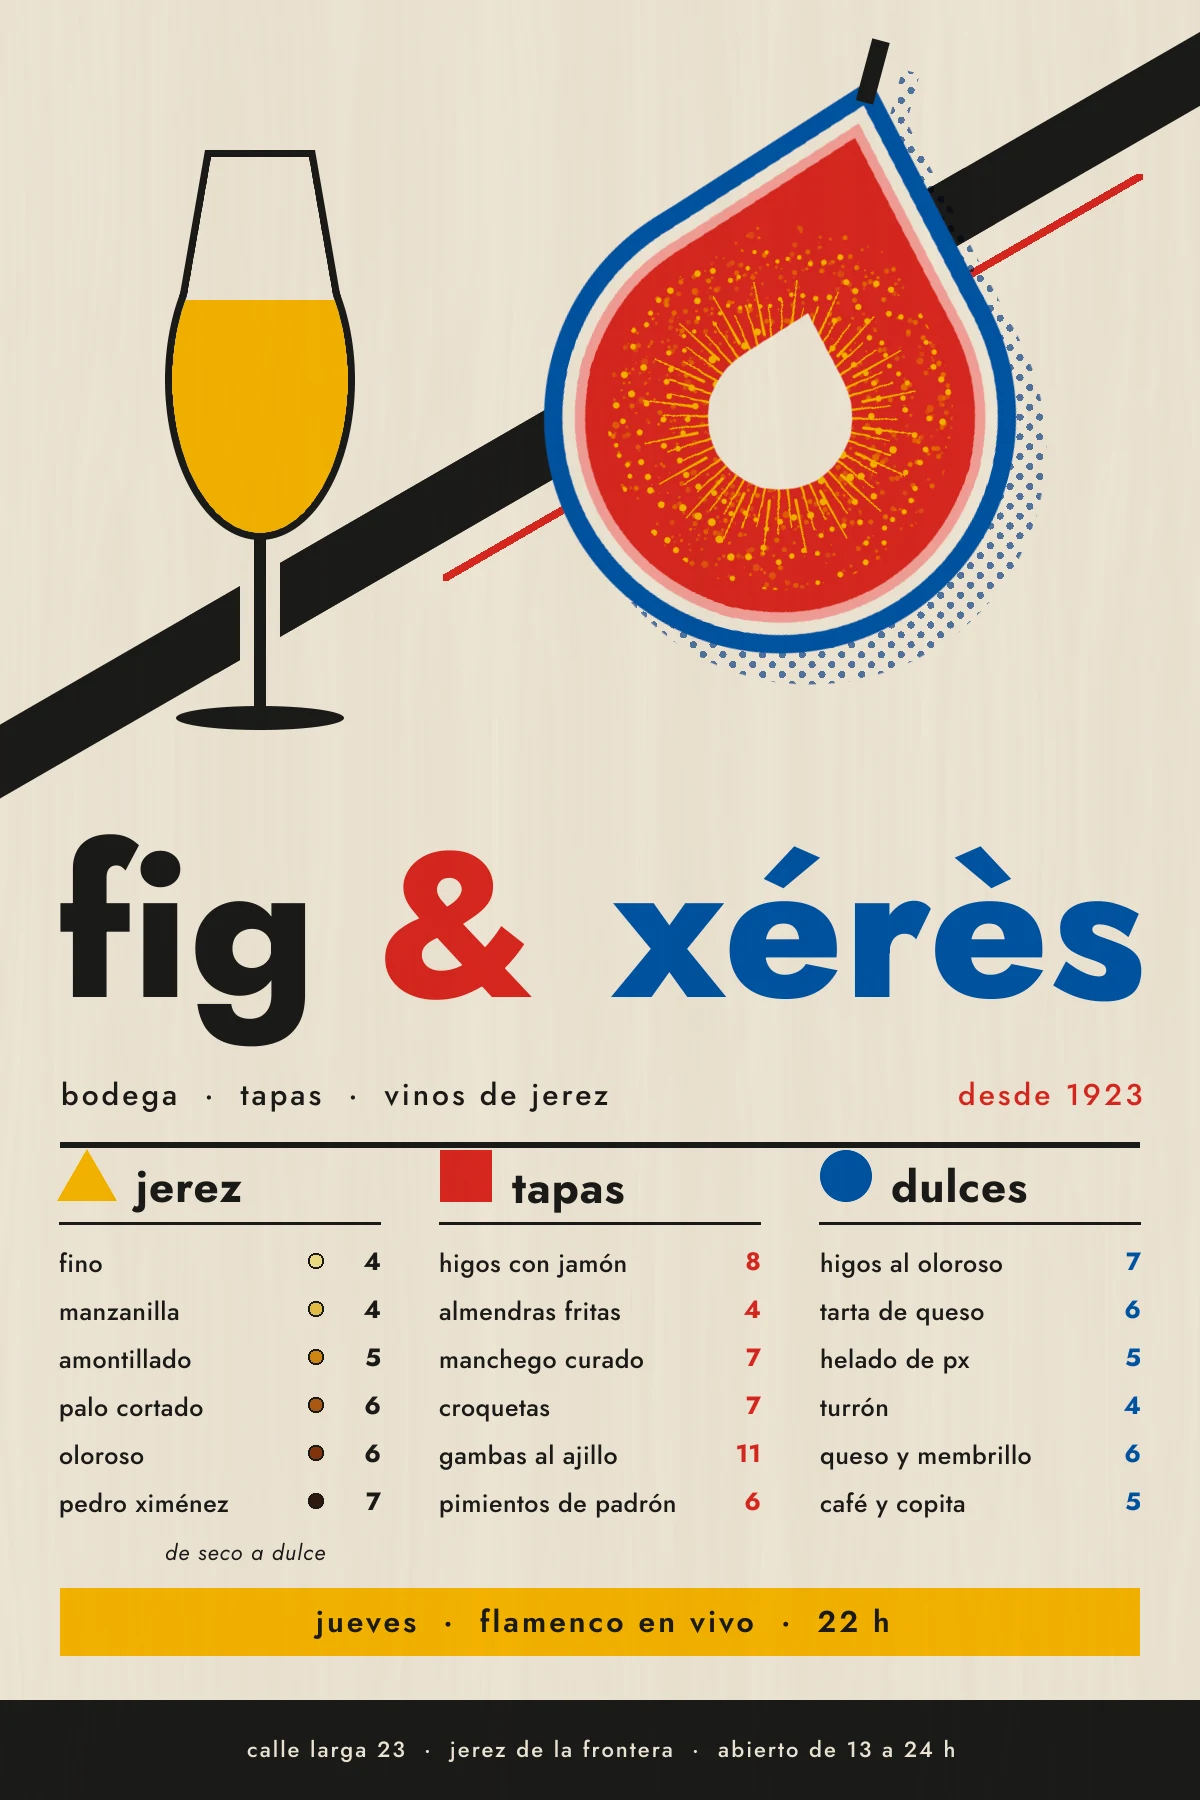
In this tutorial you'll use those ideas to design a menu for Fig & Xérès, an imaginary sherry and tapas bar in Jerez. ("Xérès" is the old French name for Jerez, where sherry comes from.) The menu is 1200 × 1800 px. It has:
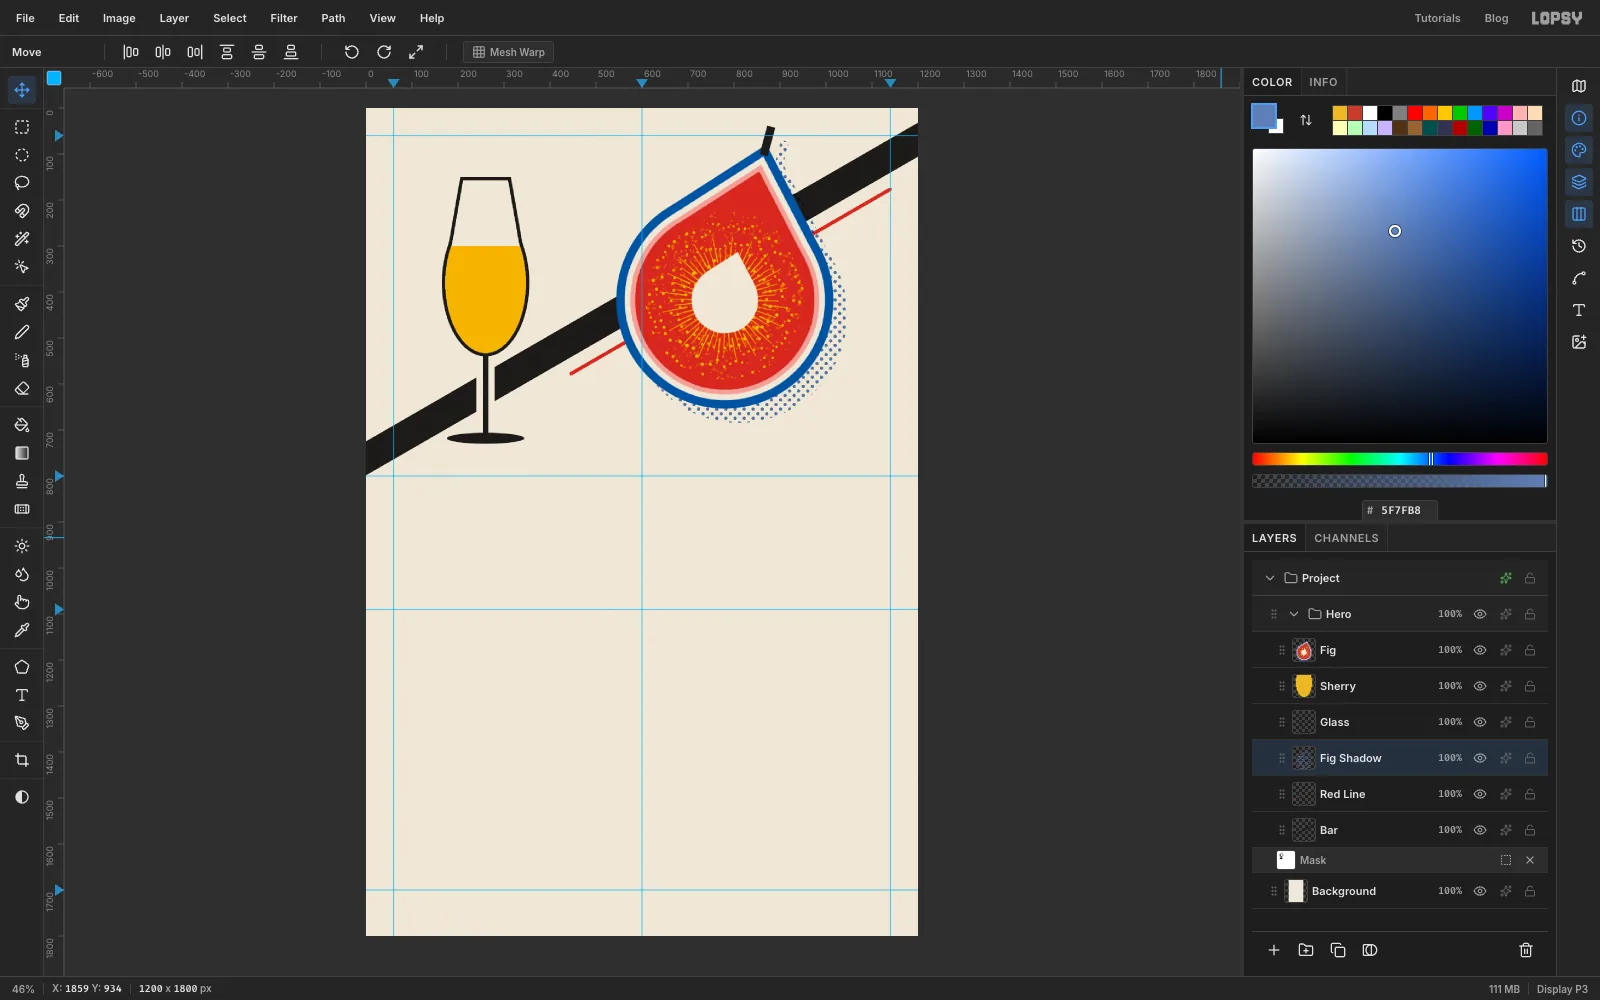
- a hero picture: a black bar on a 30° diagonal, a copita sherry glass and a halved fig, all built from simple selections
- a title in large lowercase type, with the ampersand coloured separately
- three menu columns headed by Kandinsky's triangle, square and circle, with right-aligned prices
- a key of sherry colours from dry to sweet, an event strip and a footer
The tools you'll use:
- the Rectangular and Elliptical Marquee, the Lasso, Edit → Fill and Select → Shrink / Grow / Inverse
- the Move tool's rotate handle, Duplicate Layer and Merge Down
- the Pencil, the Spray, and the Brush with Scatter and Radial Symmetry
- a layer mask, the Halftone and Fibers filters, and the Multiply blend mode
- the Shape tool, the Stroke layer effect, groups and guides
- the Text tool, including colouring a single character
The only font is Jost, a free Google Font in Lopsy's font picker. It's a close cousin of Futura, the geometric typeface designed in the Bauhaus years.
The palette:
-
Paper
-
ink
-
Bauhaus red
-
yellow
-
blue
-
Fig blush
-
shadow blue
-
Sherries
fino to pedro ximénez
-
Set up the paper and guides
- Open Lopsy. In the New Document dialog, set Width to
1200and Height to1800, then click Create. - Delete the empty
Layer 1with the bin button at the bottom of the Layers panel. - Click
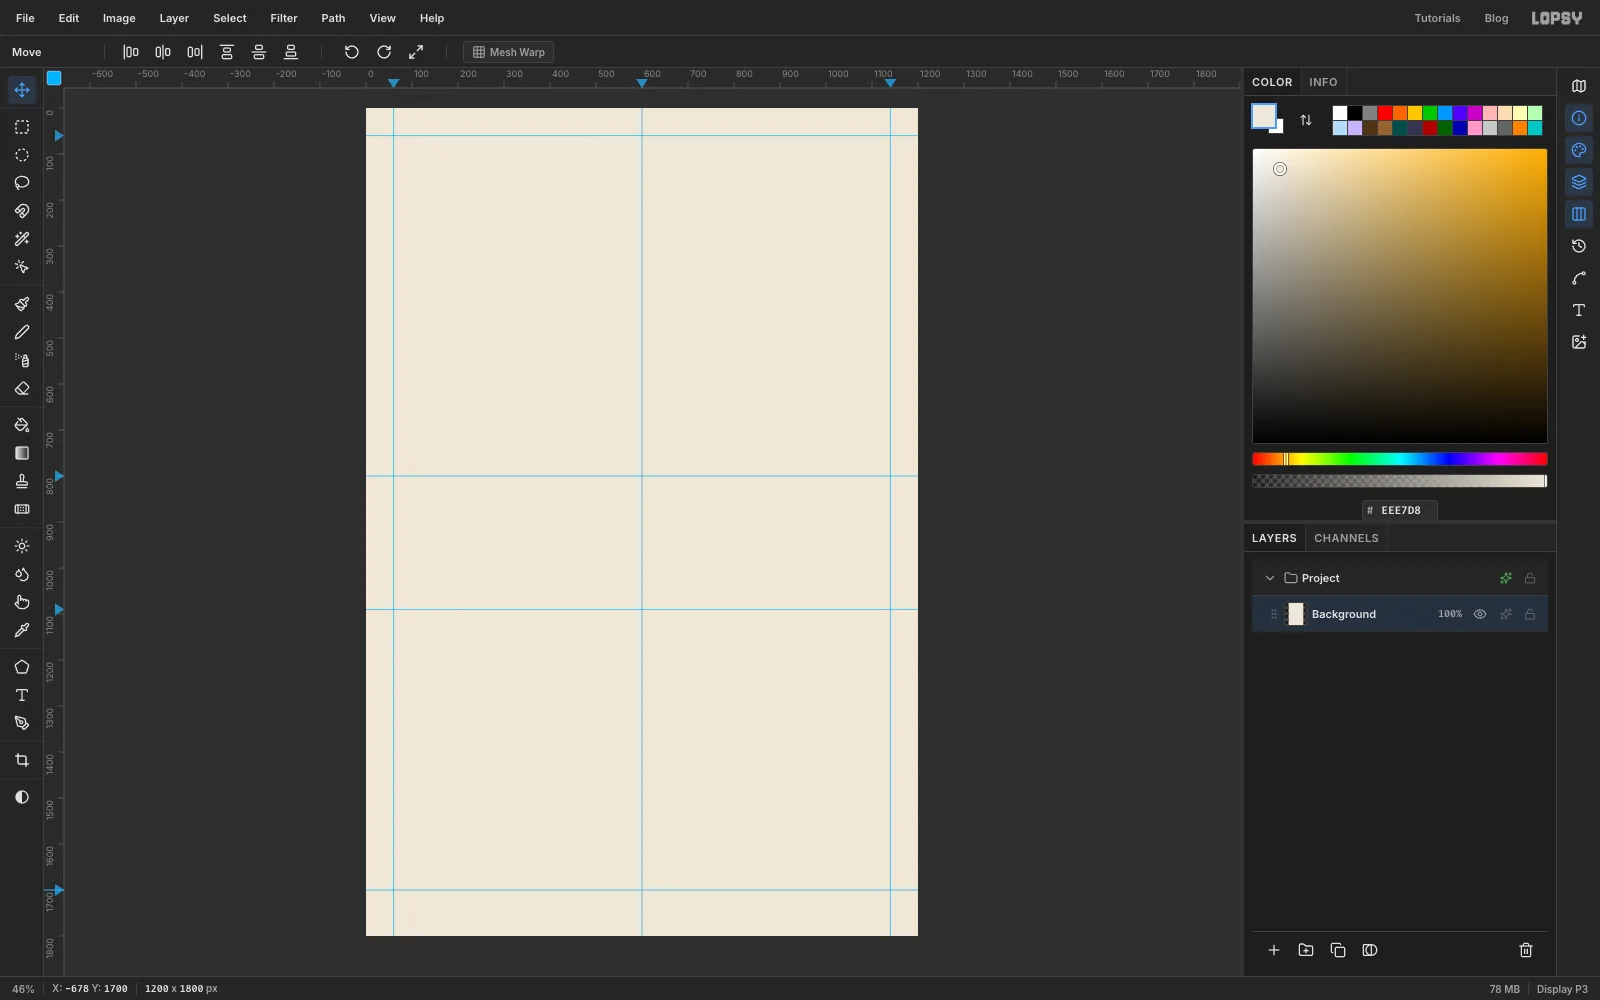
Background. TypeEEE7D8in the Color panel's hex field and choose Edit → Fill. - Click the top ruler at 60, 600 and 1140 to drop vertical guides: the two side margins and the centre line.
- Click the left ruler at 60, 800, 1090 and 1700. These mark the top margin, the bottom of the picture, the top of the menu and the top of the footer.
- Open Lopsy. In the New Document dialog, set Width to
-
Draw the black bar and rotate it
The diagonal bar gives the page its energy. You'll draw it level, then tilt it.
- Click New Group (the folder button under the Layers panel) and name the group
Heroby double-clicking its name. Click Add Layer (+) and name the layerBar. - Pick the Rectangular Marquee (M) and click once on the canvas without dragging. In the dialog that opens, enter
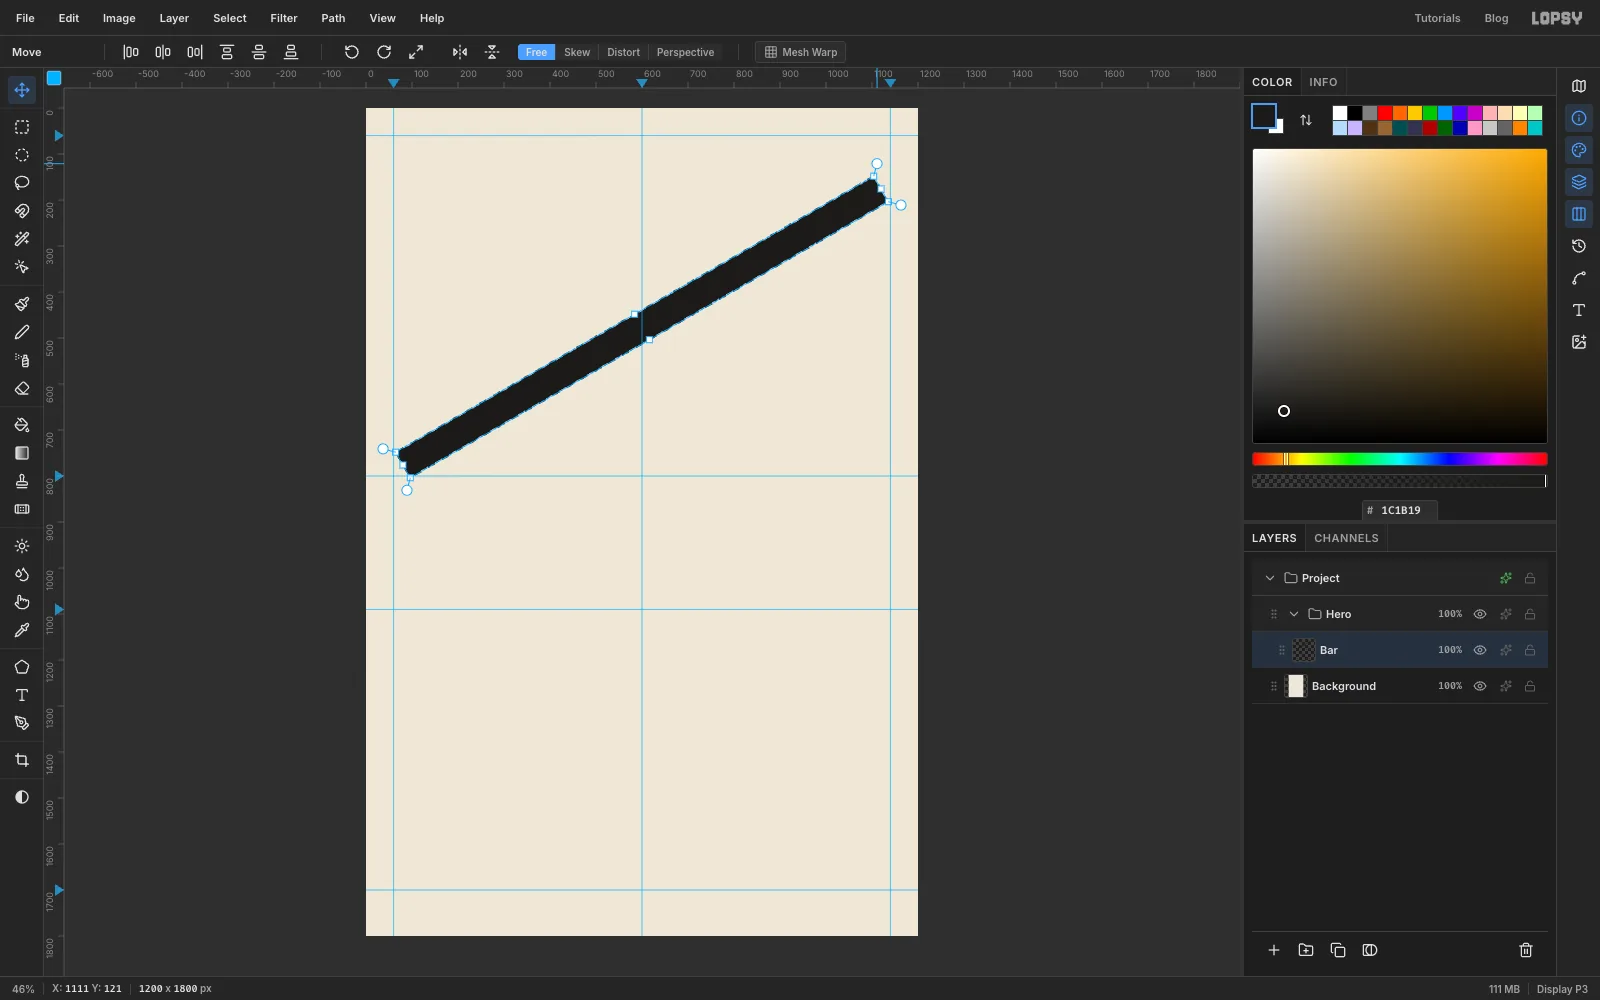
0, 444for the first corner and1200, 508for the second. That's a 64 px strip right across the canvas. - Set the colour to and choose Edit → Fill.
- Switch to the Move tool (V). Move the pointer just outside the top-right corner handle until it turns into a curved arrow. Hold Cmd so the angle snaps in 15° steps, and drag up until the bar tilts 30°, rising to the right.
- Press Enter to apply, then Cmd+D to deselect.
- Click New Group (the folder button under the Layers panel) and name the group
-
Make the bar bleed off both edges
The rotated bar is now too short to reach the edges. Make it longer with a copy.
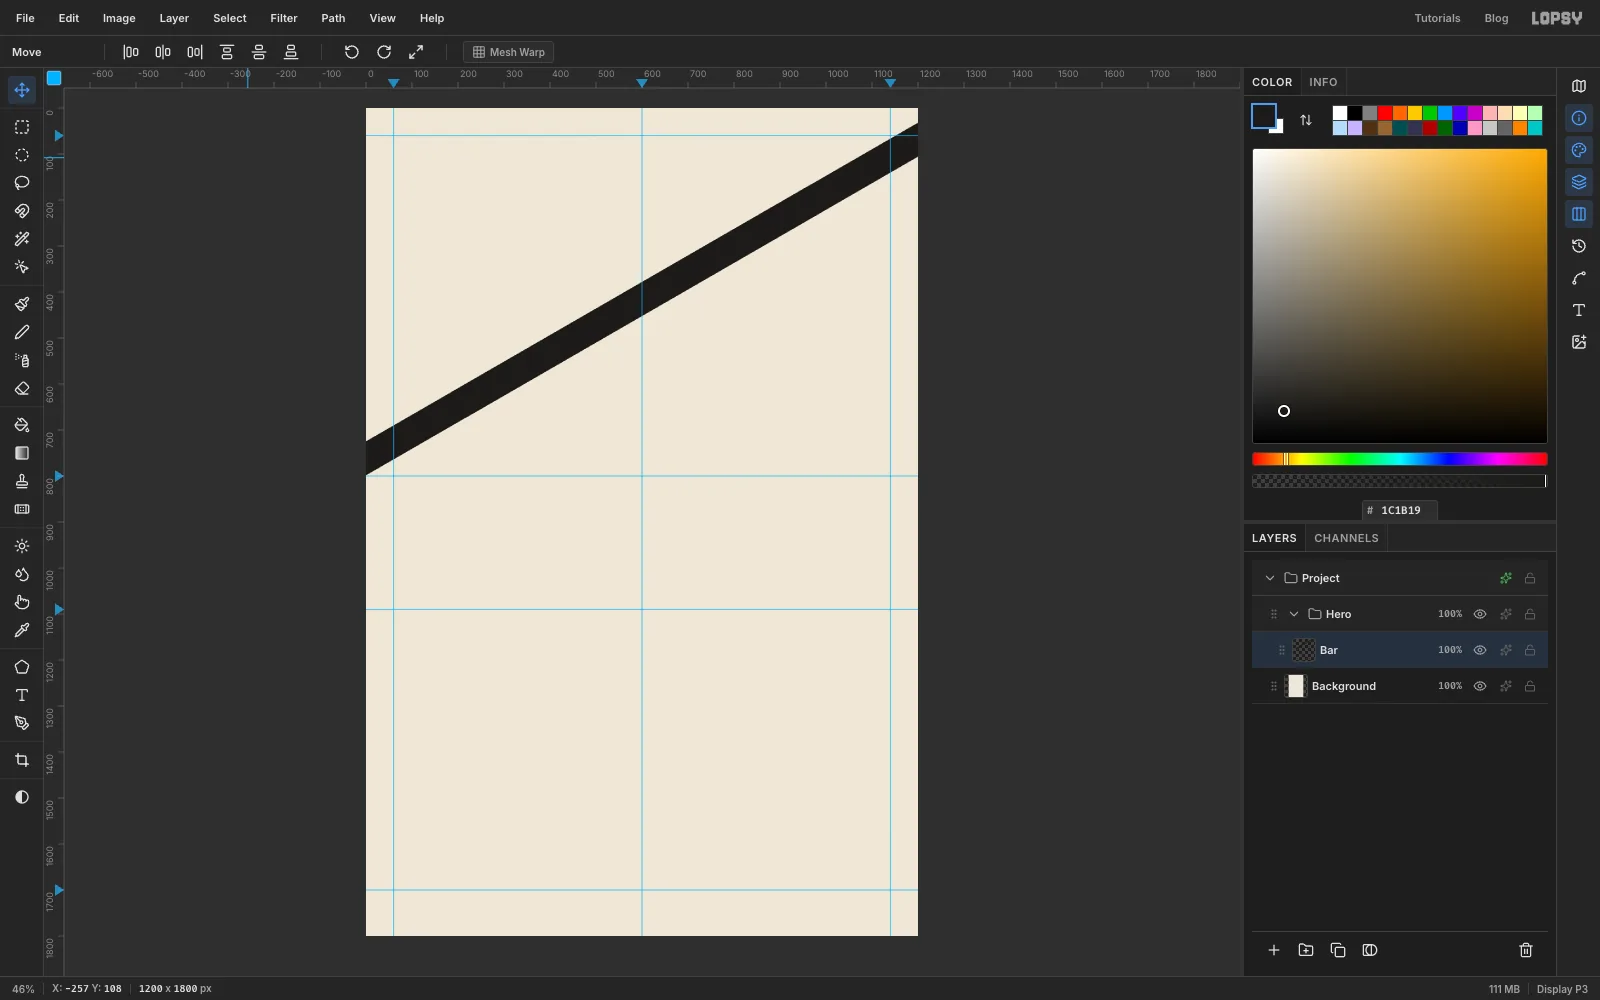
- With the Move tool, drag the bar up and to the right, about 120 px across and 130 px up, until its top end runs off the right edge of the canvas.
- Click Duplicate Layer under the Layers panel, then click the
Bar copyrow so the next drag moves only the copy. - Drag the copy back down and to the left along the bar's own slope, about 260 px across and 150 px down, until its lower end runs off the left edge. The two pieces overlap in the middle and line up exactly, because the copy travelled along the bar.
- Choose Layer → Merge Down. You now have one long bar that leaves the page at about y 760 on the left and near the top on the right.
-
Add a thin red line
- Click Add Layer and name it
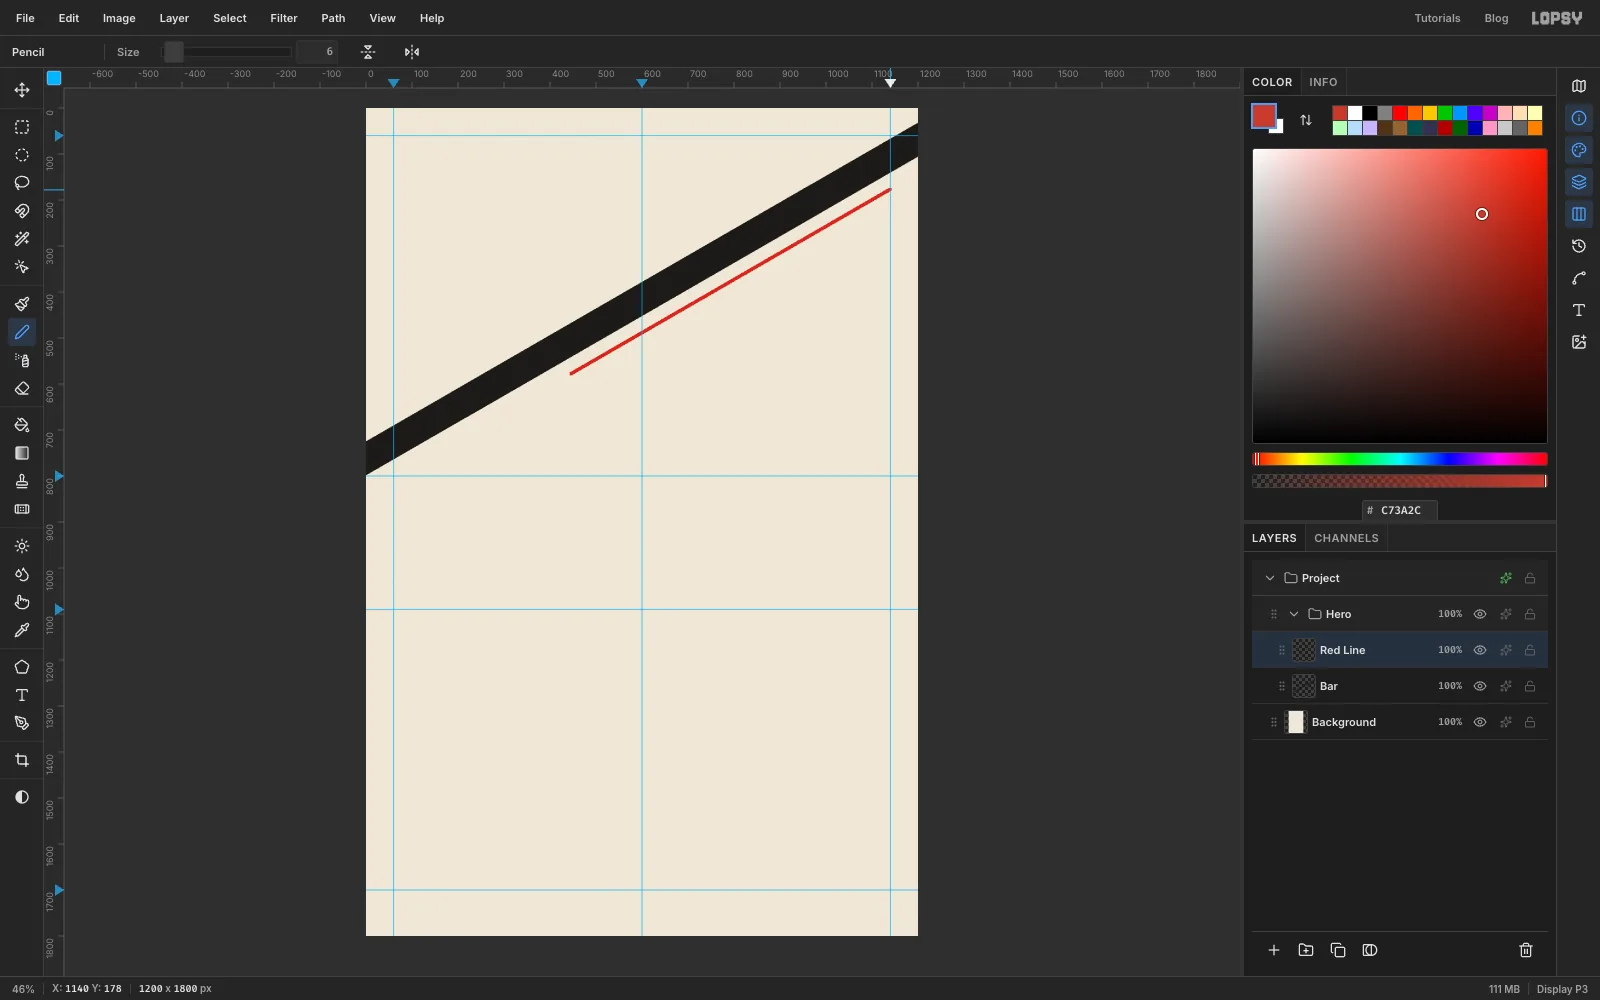
Red Line. - Pick the Pencil (N), set Size to
6and the colour to . - Click at about
446, 578, then Shift-click at1140, 178. Shift-click draws a straight line from the last point, so you get a line parallel to the bar, 64 px below it, that stops on the right margin guide.
- Click Add Layer and name it
-
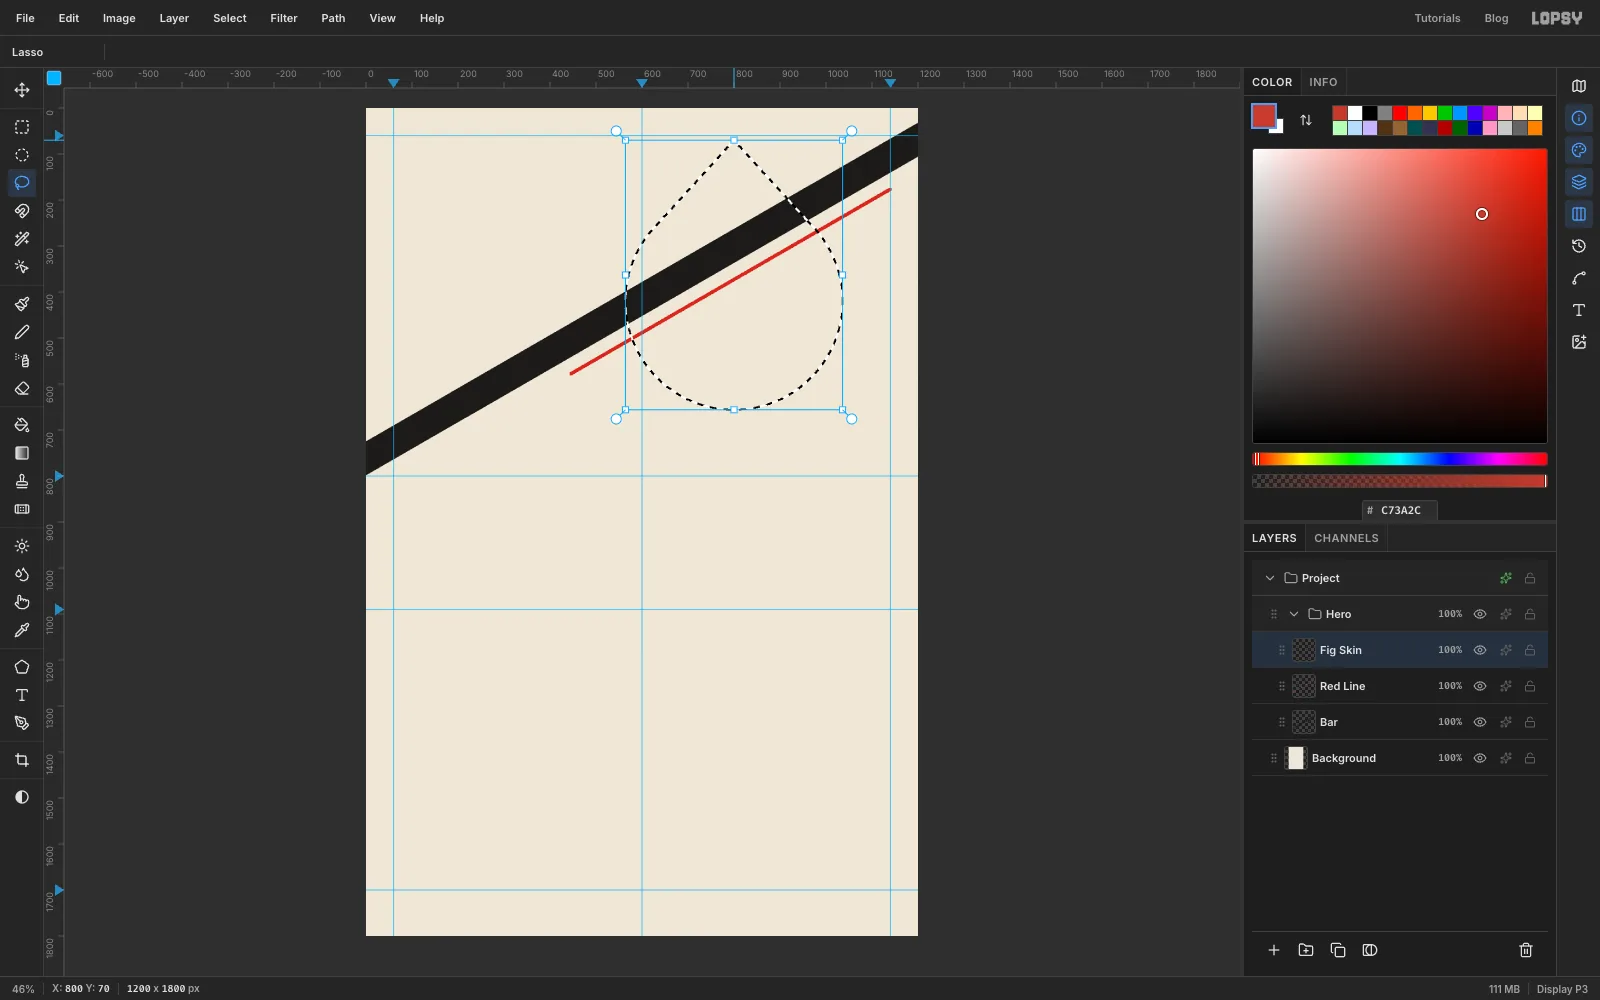
Select the fig's teardrop shape
A halved fig is a teardrop: a circle with a point at the top. You'll build it from two selections.
- Click Add Layer and name it
Fig Skin. - With the Elliptical Marquee, hold Shift and drag a circle from
564, 184to1036, 656. That's a circle 472 px across, centred on800, 420. - Pick the Lasso (L) and hold Shift to add to the selection. The Lasso is freehand, so drag slowly in straight strokes: start at the tip,
800, 70, go down to the circle's right edge where it starts to curve away (about974, 261), across through the middle of the circle, up to the matching point on the left (about626, 261), and back to the tip.
The two side points are where a straight line from the tip just touches the circle. If you land near them, the sides flow smoothly into the curve. Any wobble inside the circle doesn't matter, because the circle already covers it.
- Click Add Layer and name it
-
Fill the skin, pith and flesh rings
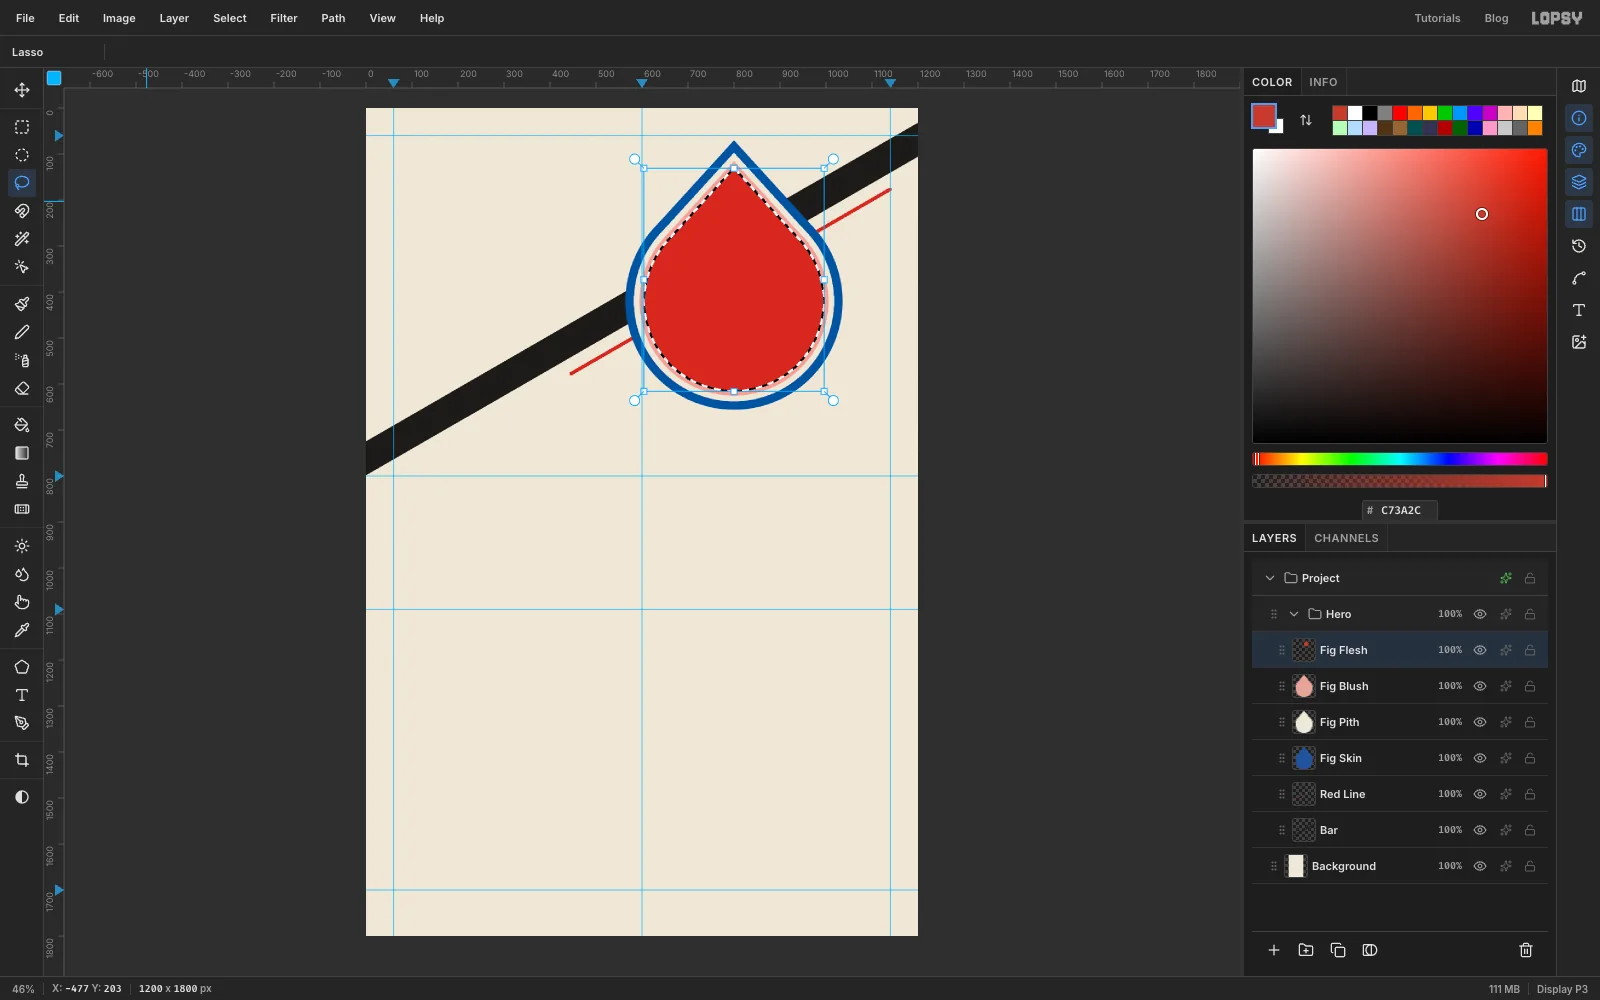
Each ring is the same teardrop, shrunk a little and filled on its own layer.
- Fill the selection with (Edit → Fill). That's the skin.
- Add a layer named
Fig Pith. Choose Select → Shrink…, enter18and click Apply. Fill it with the paper colour . - Add a layer named
Fig Blush. Shrink by12and fill with . - Add a layer named
Fig Flesh. Shrink by10and fill with .
Keep the selection: it will keep the seeds inside the flesh.
-
Speckle the seeds and start the fibres
- Add a layer named
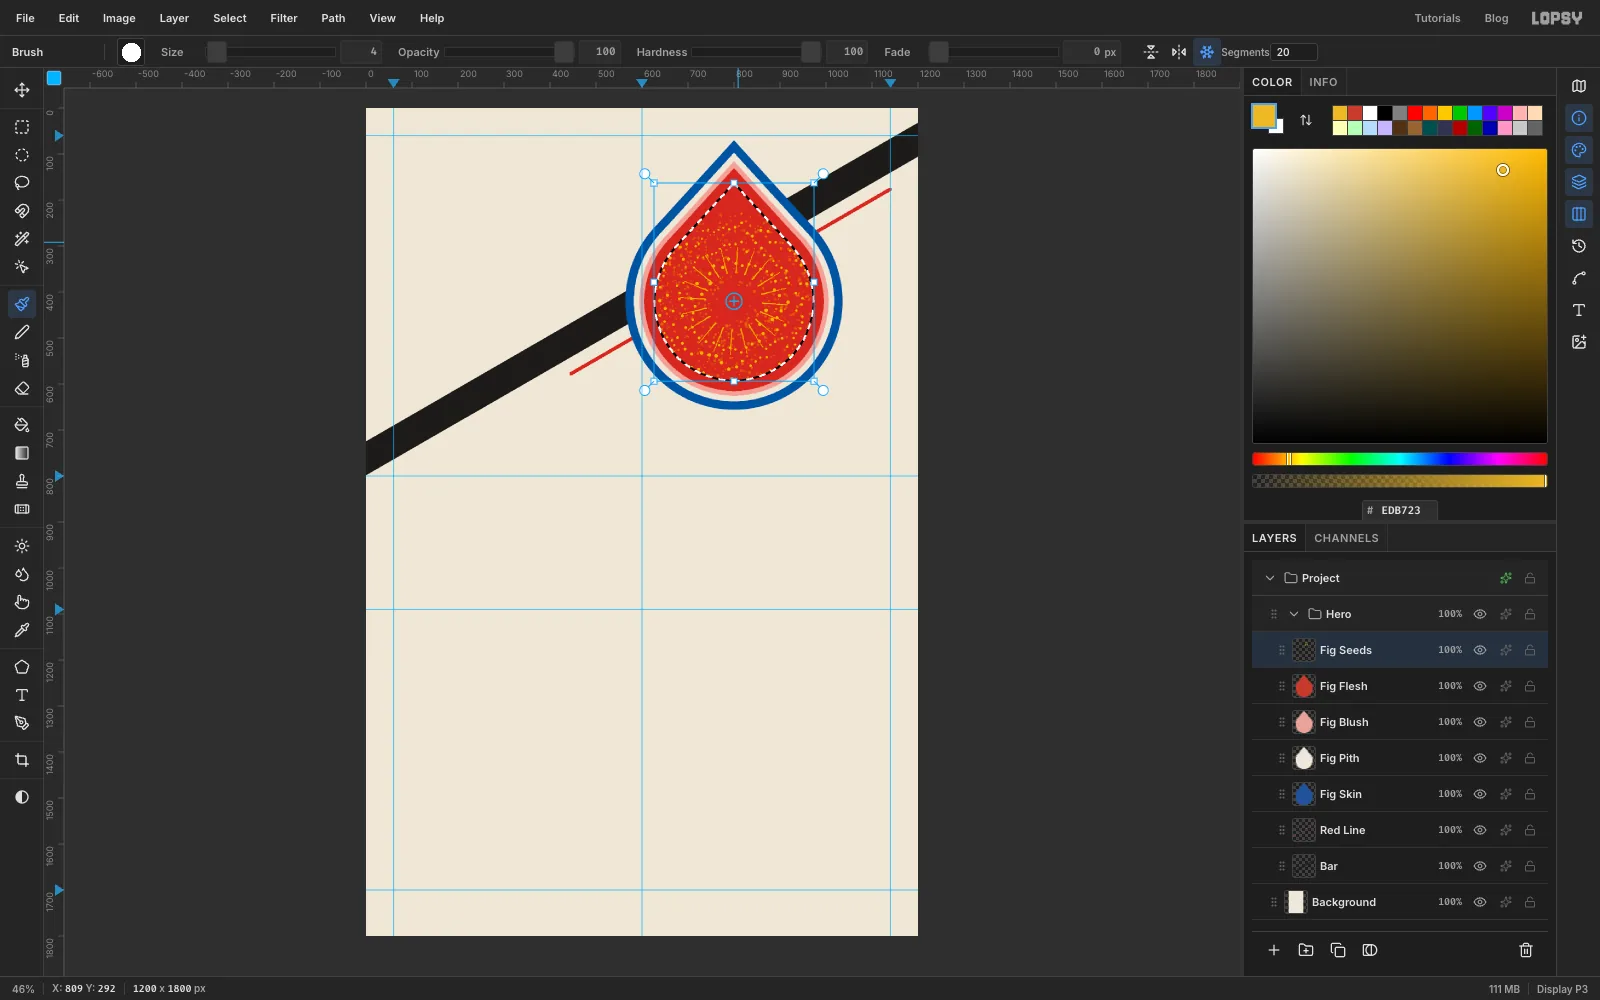
Fig Seedsand shrink the selection by22. Set the colour to . - Pick the Spray (J). Set Size to
60, Density to8and Softness to0. Drag a slow spiral from near the centre of the fig out to the edge of the selection for a fine speckle. - Pick the Brush (B) and click the brush preview at the left of the options bar to open the brush settings. On the Shape tab, set Size to
9, Hardness to100and Spacing to260. On the Dynamics tab, set Scatter to160and Size Jitter to45. Drag the same kind of spiral again. Each dab lands as a separate round seed. - For the fibres, set Scatter and Size Jitter back to
0. On the Shape tab, set Spacing to25, Size to4and Taper to60, so each stroke starts thin. - Turn on Radial Symmetry (the snowflake button in the options bar) and set Segments to
20. Cmd-click the middle of the fig (800, 420) to move the symmetry centre there. - Drag one short stroke straight outwards, from about 60 px out from the centre to about 130 px out. Lopsy repeats it 20 times around the fig.
- Add a layer named
-
Finish the fibres
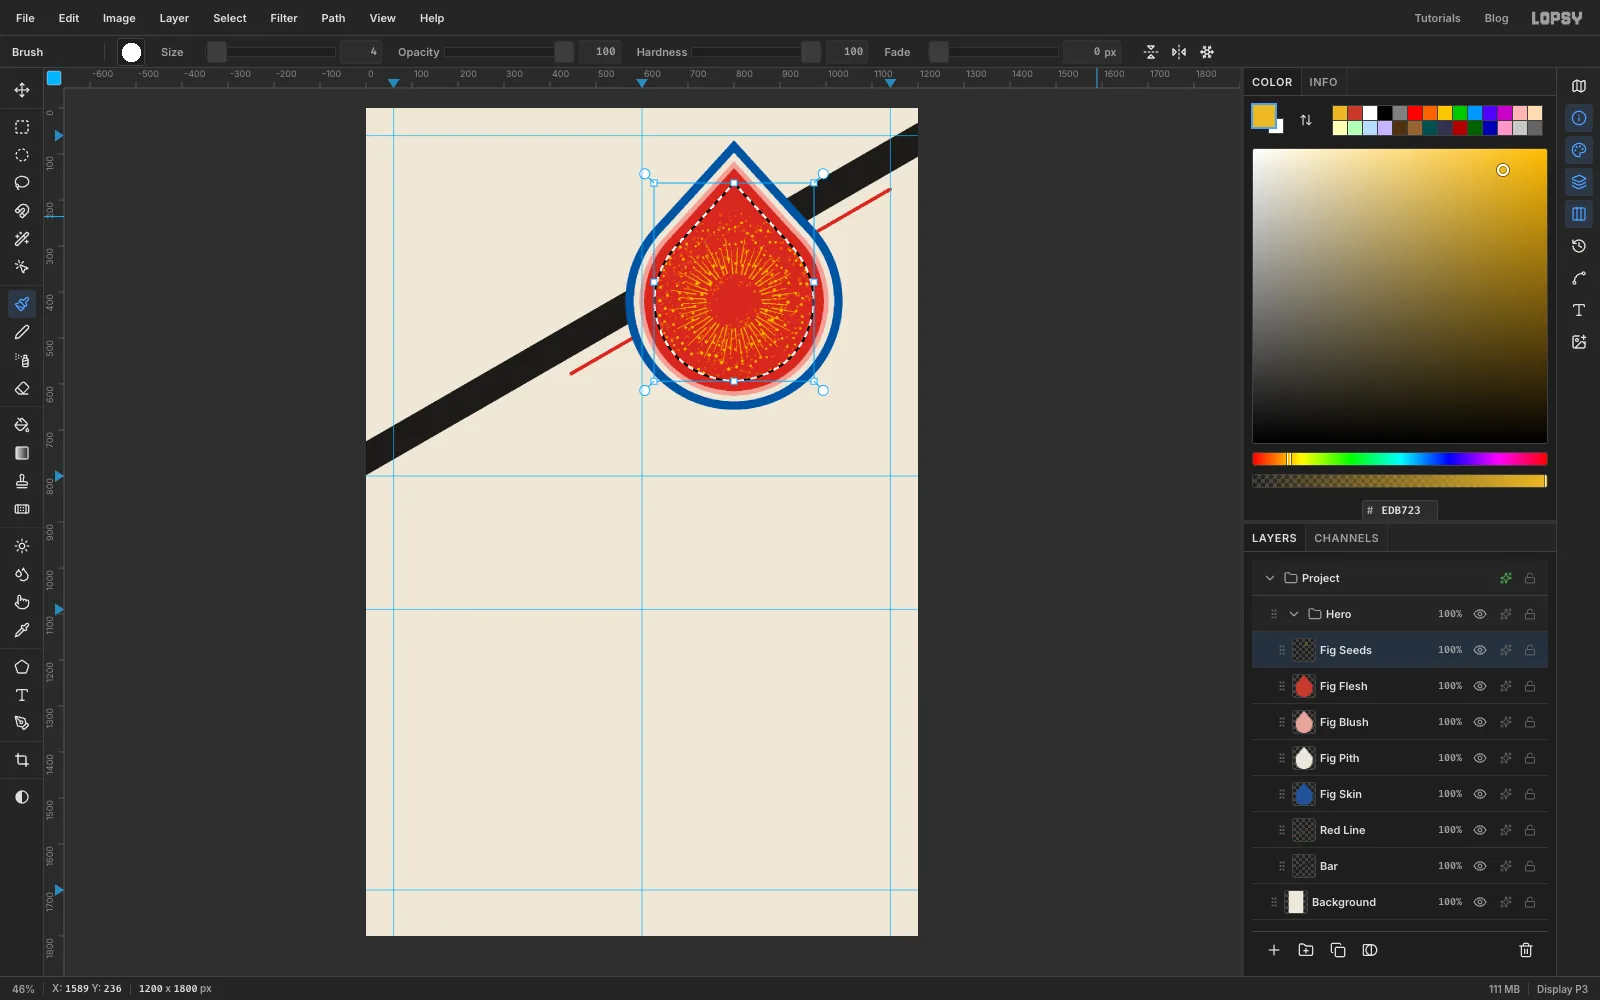
- Drag two more short strokes outwards, each at a slightly different angle from the first: one from about 85 px out to 155 px, and one from 60 px to 110 px. Different lengths keep the pattern from looking mechanical.
- Turn Radial Symmetry off again, and set Taper back to
0.
-
Cut the hollow and add the stem
- Add a layer named
Fig Heart. Shrink the selection by124. That leaves a small teardrop in the middle. Fill it with the paper colour and press Cmd+D. - Add a layer named
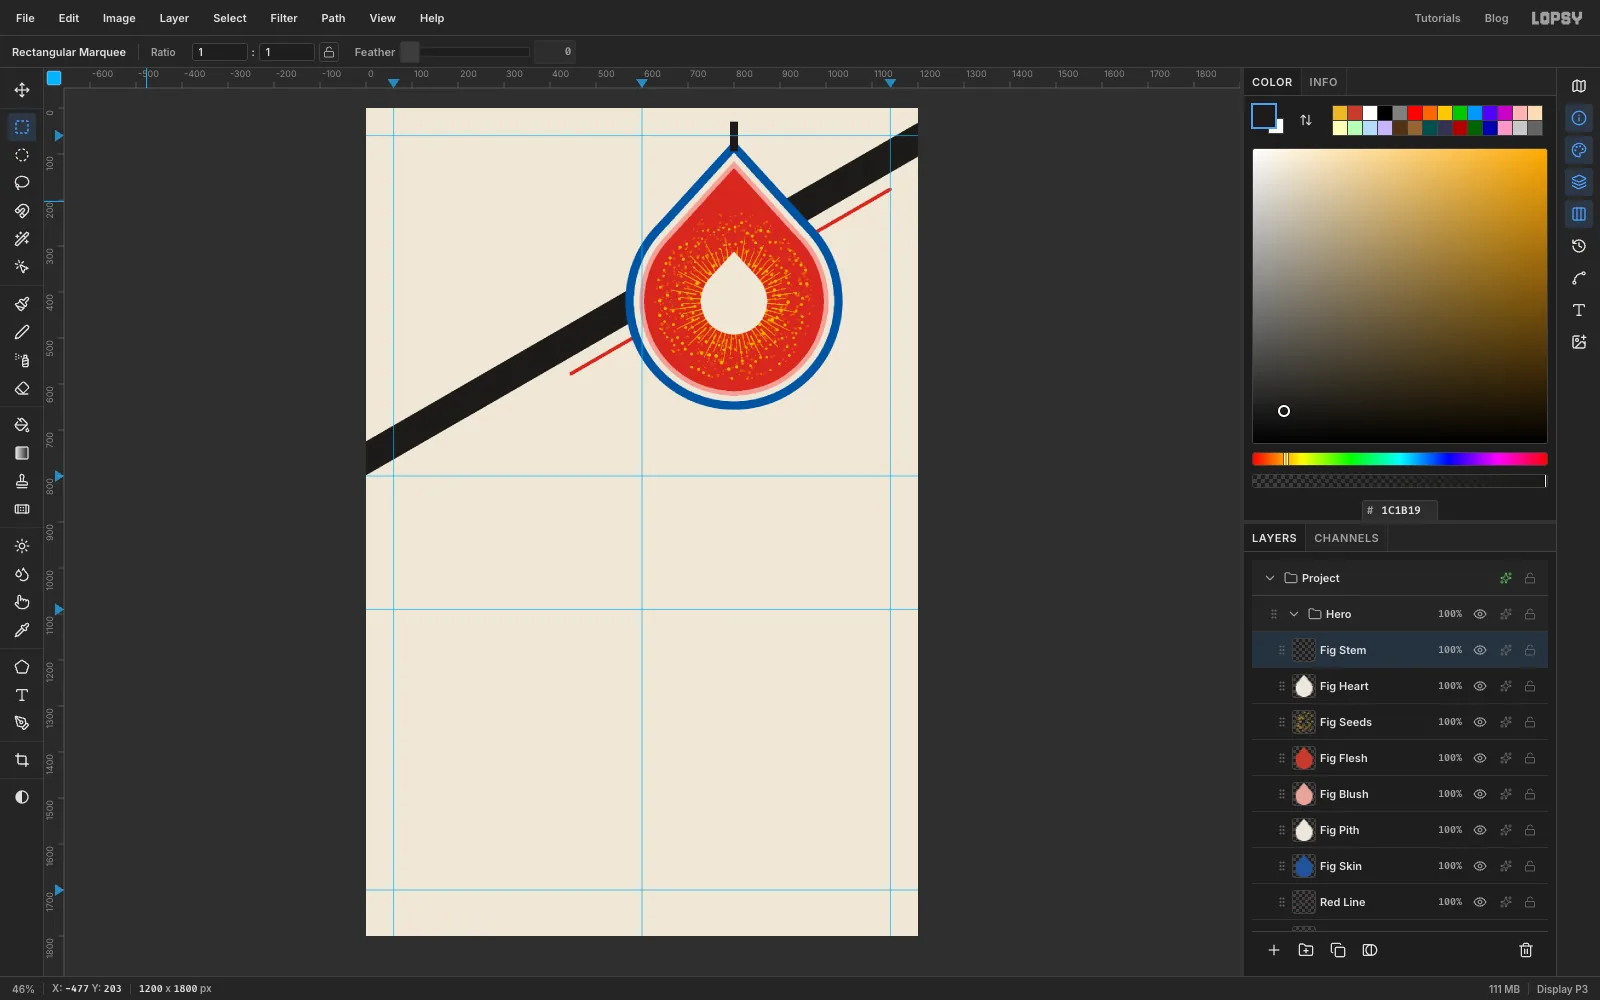
Fig Stem. With the Rectangular Marquee, draw a small upright rectangle across the tip of the fig, about 18 px wide and 64 px tall (791, 30to809, 94). Fill it with and deselect.
- Add a layer named
-
Merge the fig and tilt it
- With
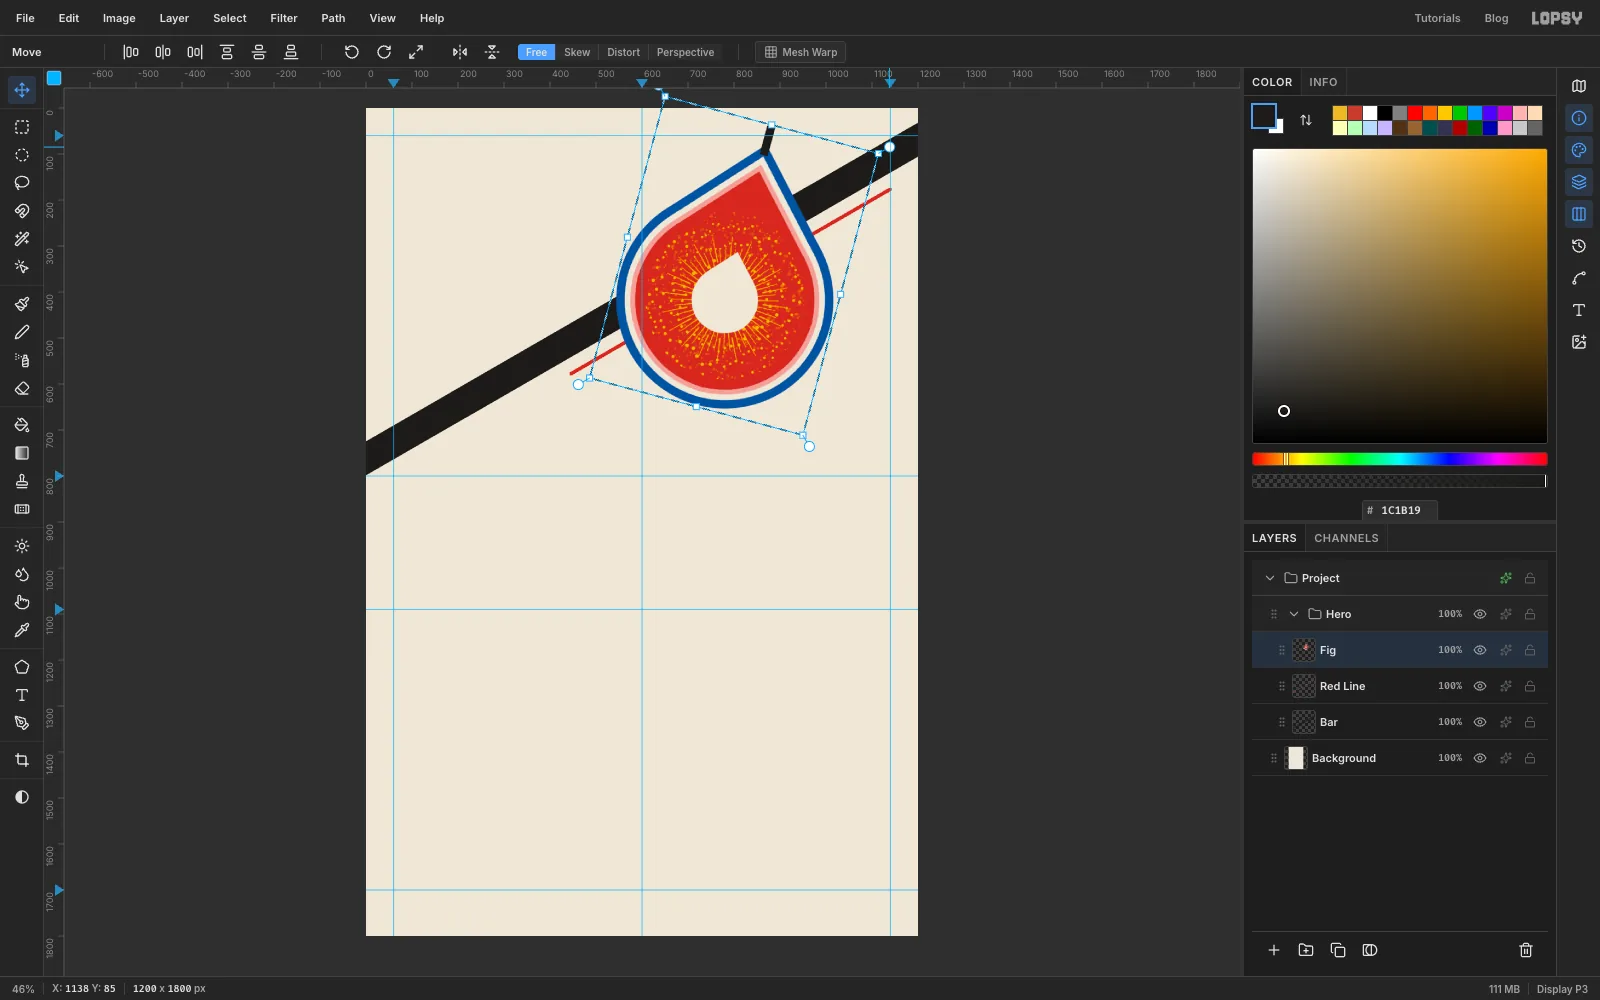
Fig Stemselected, choose Layer → Merge Down six times, until all the fig layers have become one. Rename itFig. - With the Rectangular Marquee, draw a box just around the fig. The Move tool rotates a selection around its centre, so a snug box makes the fig turn on the spot.
- With the Move tool, drag from just outside a corner handle to rotate the fig 15° clockwise, holding Cmd to snap. Press Enter, then Cmd+D.
The slight tilt keeps the fig from looking stiff next to the upright glass.
- With
-
Select the copita glass
A copita is the traditional sherry glass. It's a tulip shape that narrows towards the rim. You'll build it from an ellipse and a four-sided shape.
- Click
Red Line, then Add Layer and name the new layerGlass. - With the Elliptical Marquee, drag from
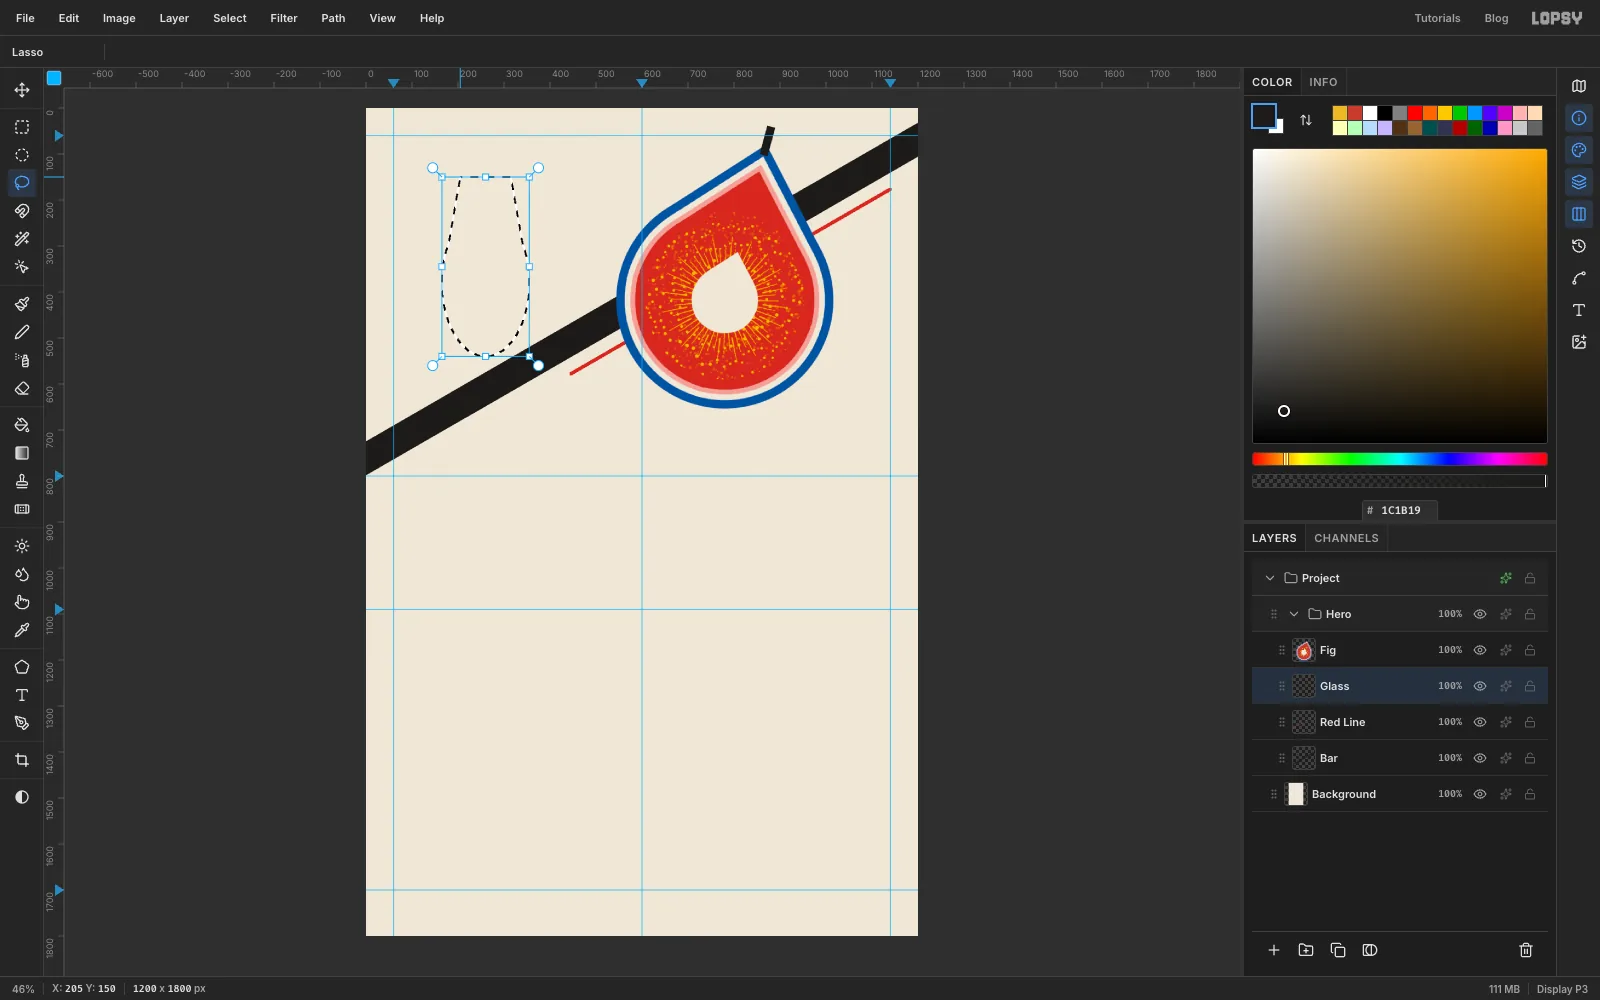
165, 220to355, 540. The bottom half of this ellipse is the round base of the bowl. - With the Lasso, hold Shift and drag four straight sides for the top of the bowl: from
205, 150across to315, 150, out and down to355, 380on the ellipse's right edge, across to165, 380on its left edge, and back up to the start. It narrows towards the top.
- Click
-
Outline the glass and mark the sherry level
- Fill the selection with .
- Choose Select → Shrink… and shrink by
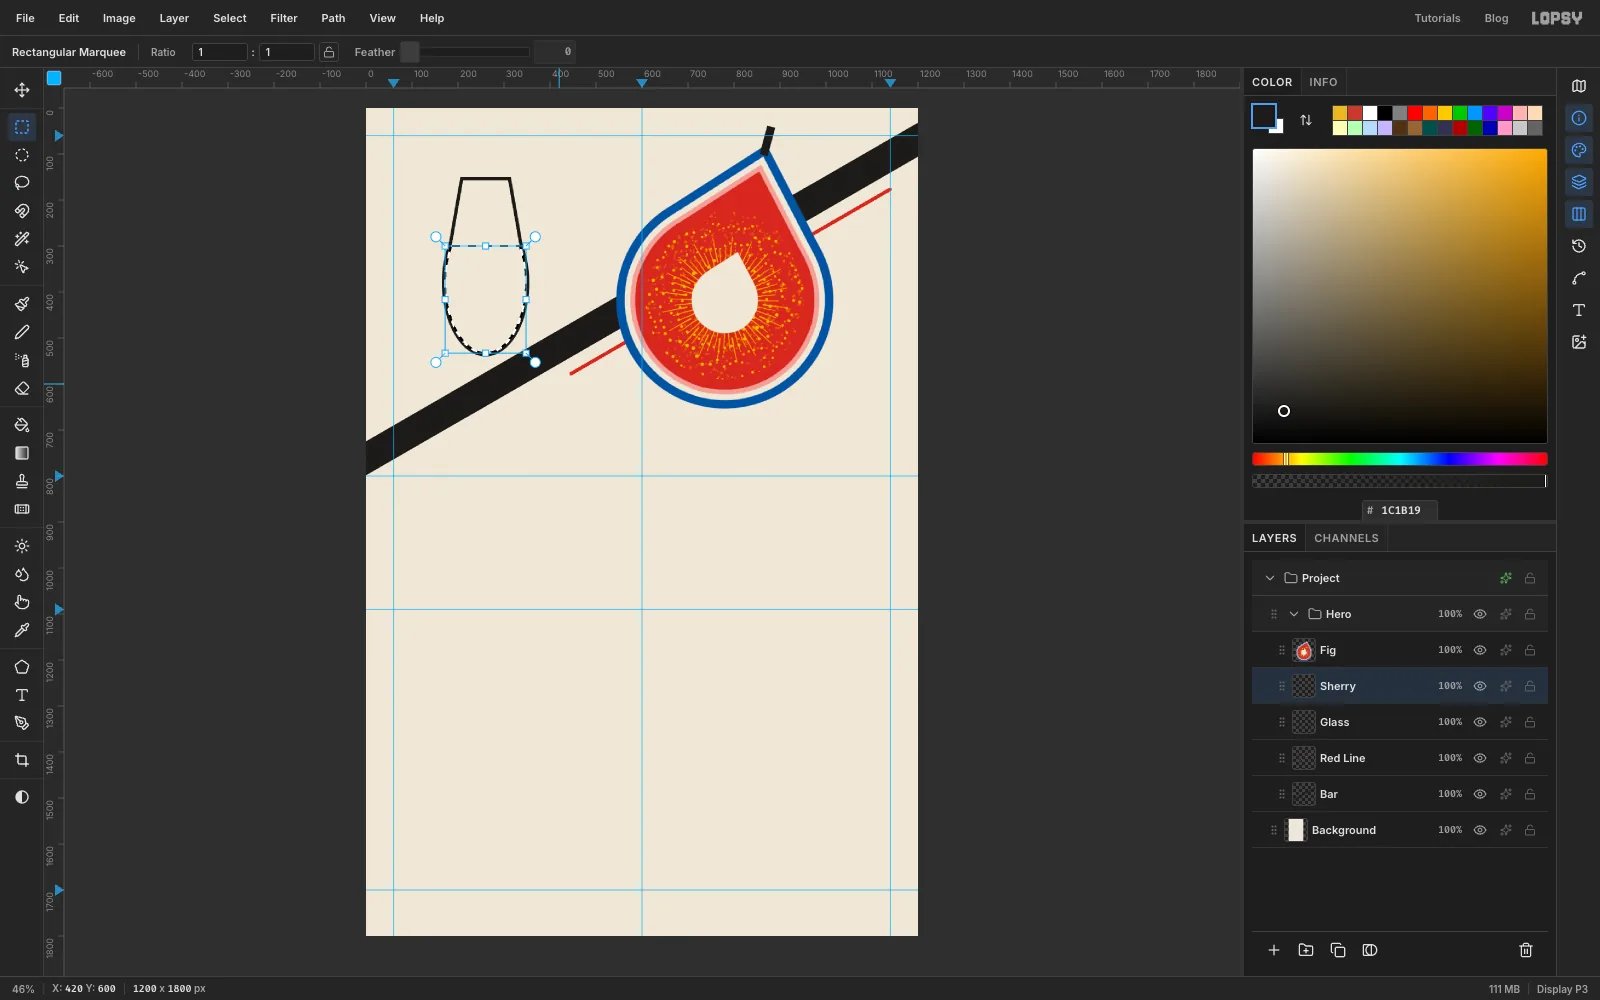
7. Press Delete (Backspace). Only a 7 px black outline is left. - Add a layer named
Sherry. The shrunken selection is still active. - With the Rectangular Marquee, hold Shift+Option and drag a box from
100, 300to well below the glass. Shift and Option together intersect, so only the inside of the glass below y 300 stays selected. That's the level of the sherry.
-
Pour the sherry and add the stem and foot
- Fill the selection with and deselect.
- Click the
Glasslayer. With the Rectangular Marquee, draw a narrow upright rectangle from254, 530to266, 716and fill it with . That's the stem. - With the Elliptical Marquee, drag from
176, 706to344, 730and fill it the same. That's the foot. Deselect.
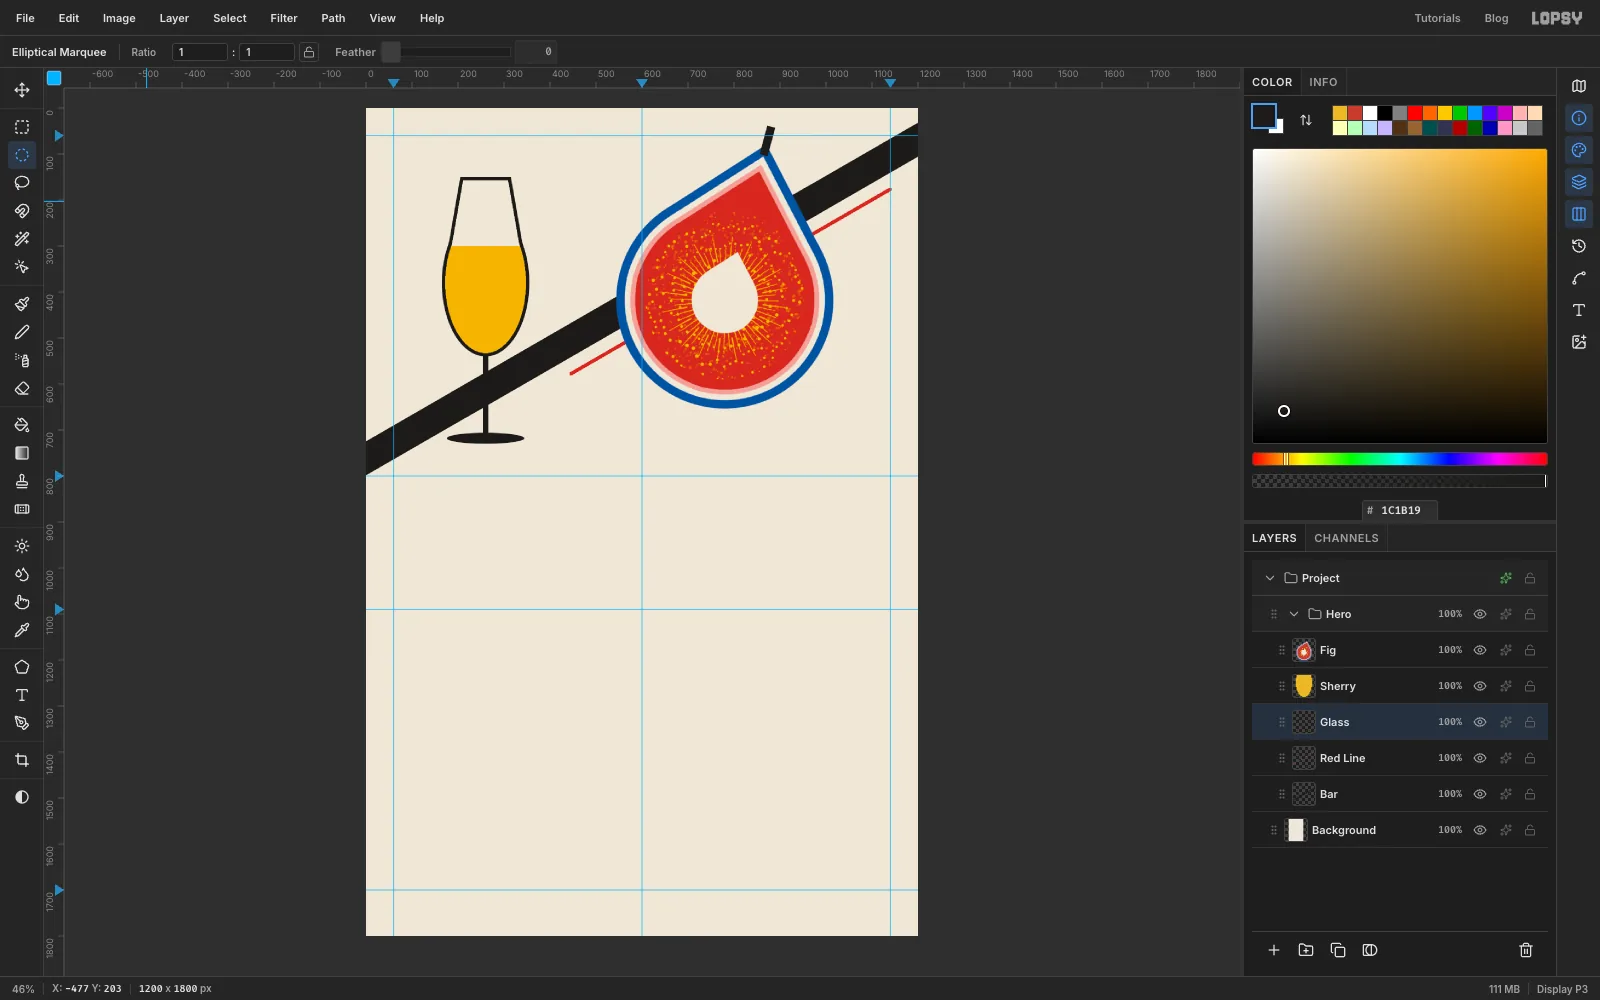
The stem now runs straight across the black bar, and the two blacks run together. You'll fix that next.
-
Select a halo around the glass
- Click the
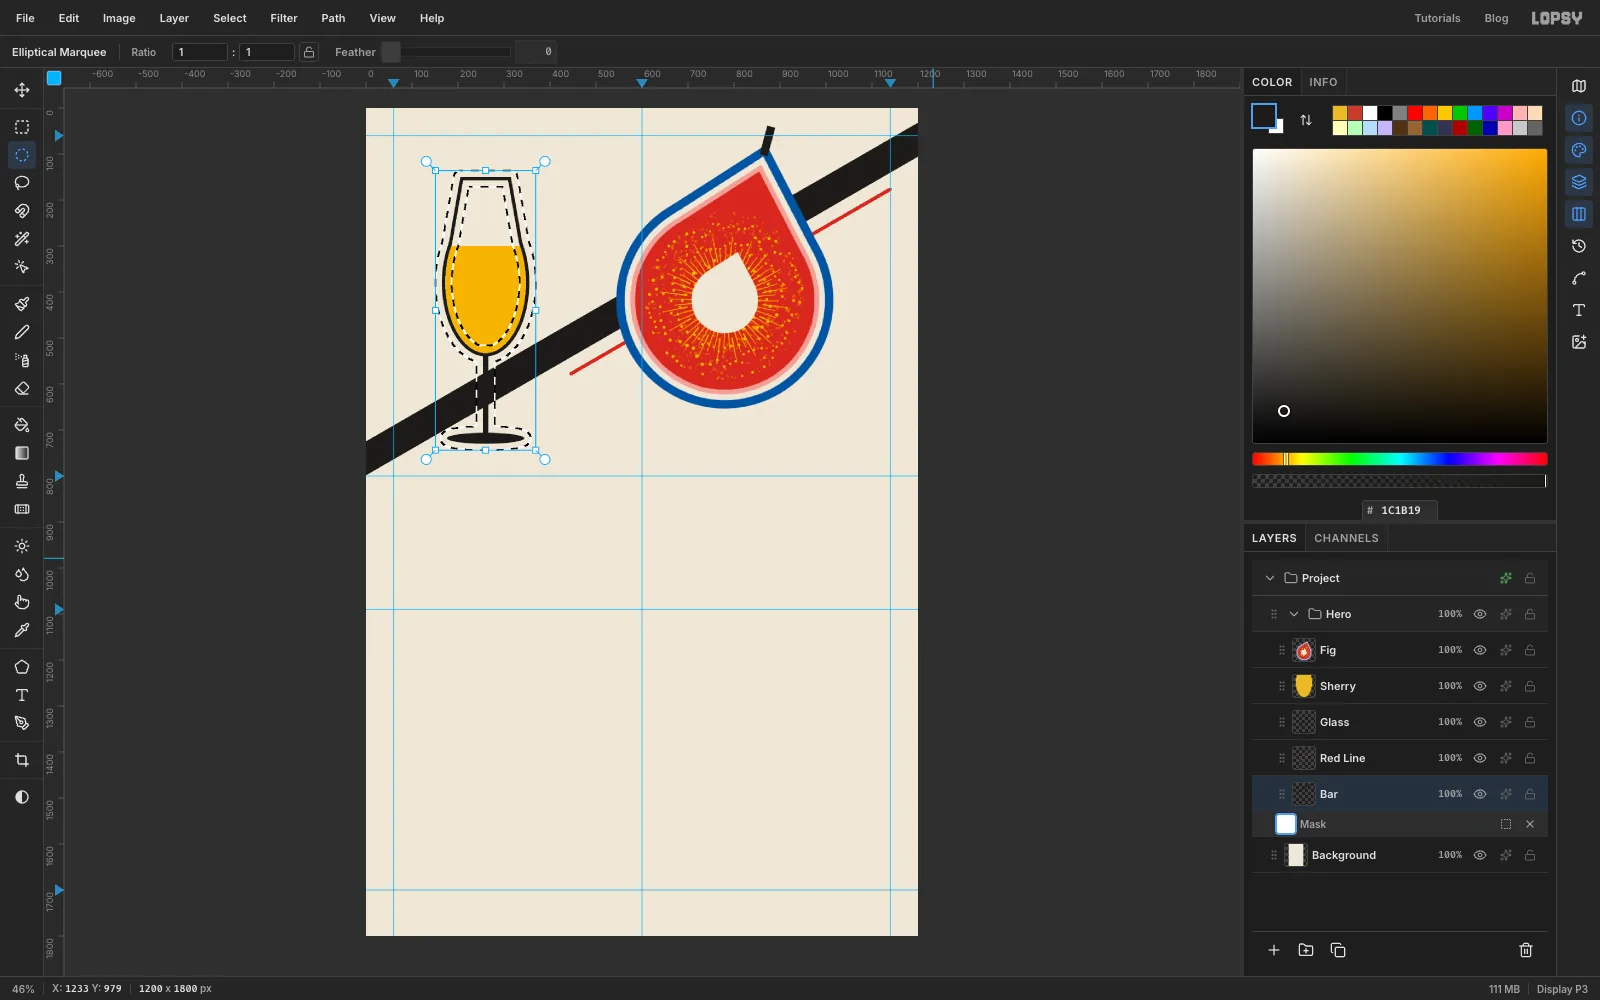
Barlayer and click Add Mask under the Layers panel. A white mask appears under the layer. - Hold Cmd and click the
Glasslayer's thumbnail. This selects everything on that layer: the outline, the stem and the foot. - Choose Select → Grow…, enter
14and click Apply. The selection now sits 14 px outside the glass all the way round.
- Click the
-
Knock the bar out behind the glass
- Click the mask thumbnail under
Barso you're painting on the mask. - Set the colour to black () and choose Edit → Fill, then deselect.
Black in a mask hides the layer. While you're editing a mask, Lopsy tints the hidden area light blue so you can see it. Click the
Barrow's name to stop editing the mask, and the blue becomes a paper-coloured gap around the glass. This old print trick makes the glass sit clearly in front of the bar.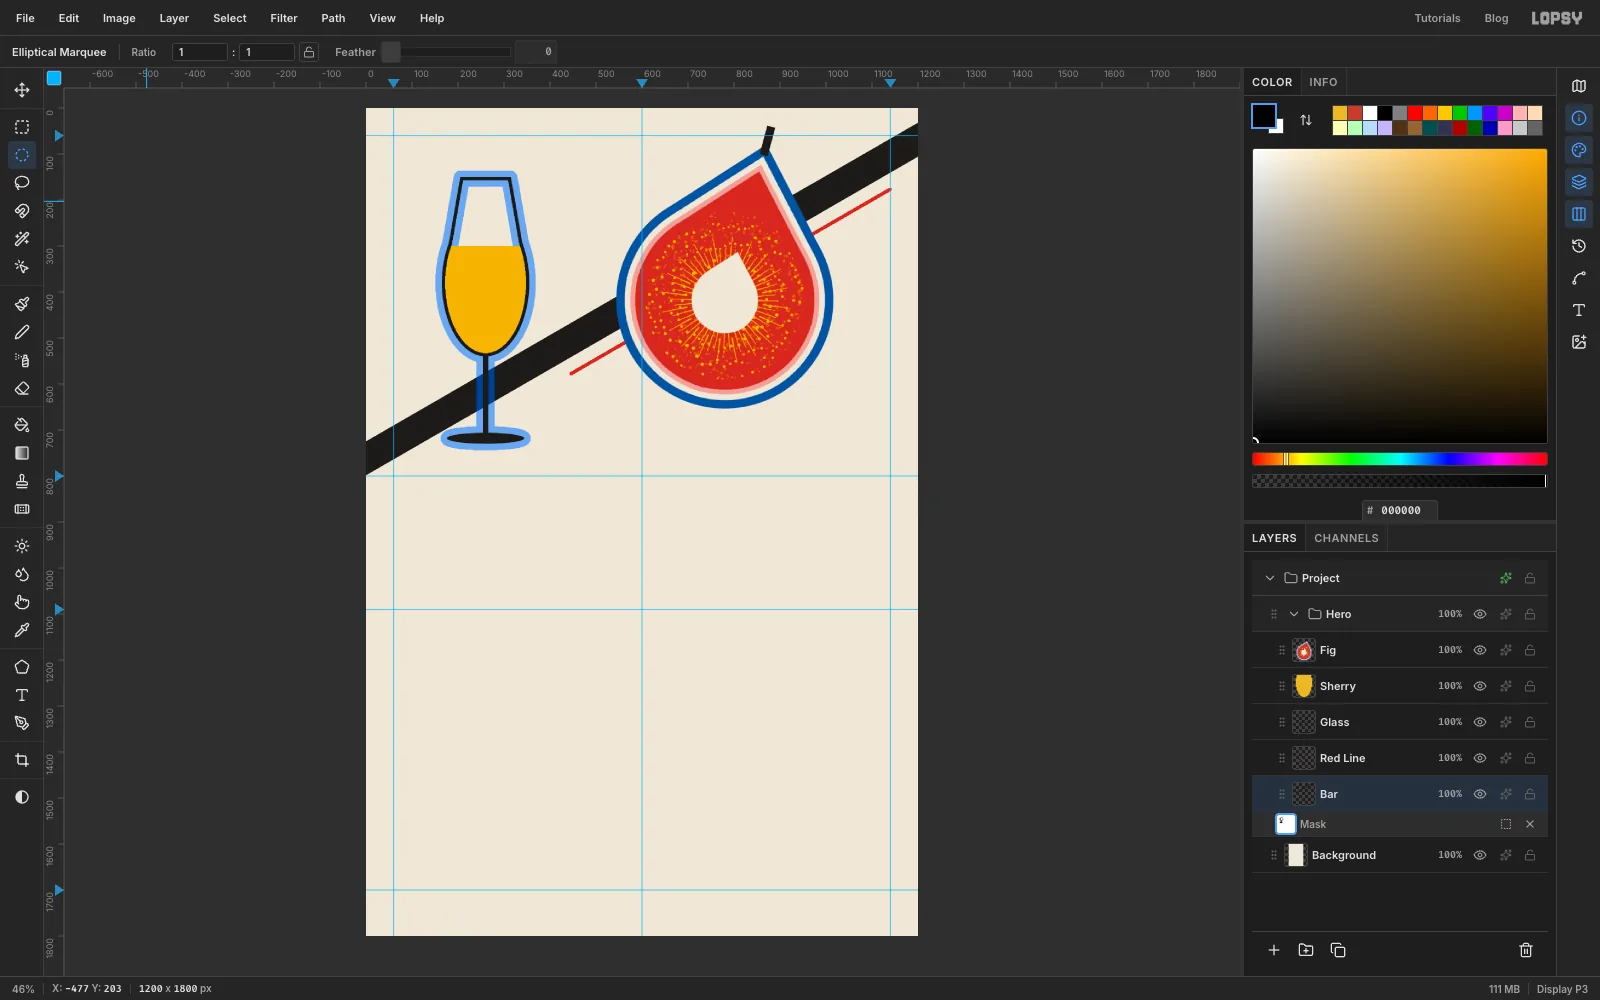
- Click the mask thumbnail under
-
Make a halftone field for the shadow
- Click
Red Lineand add a layer namedFig Shadow. - Draw a rectangle a little bigger than the fig all round, about
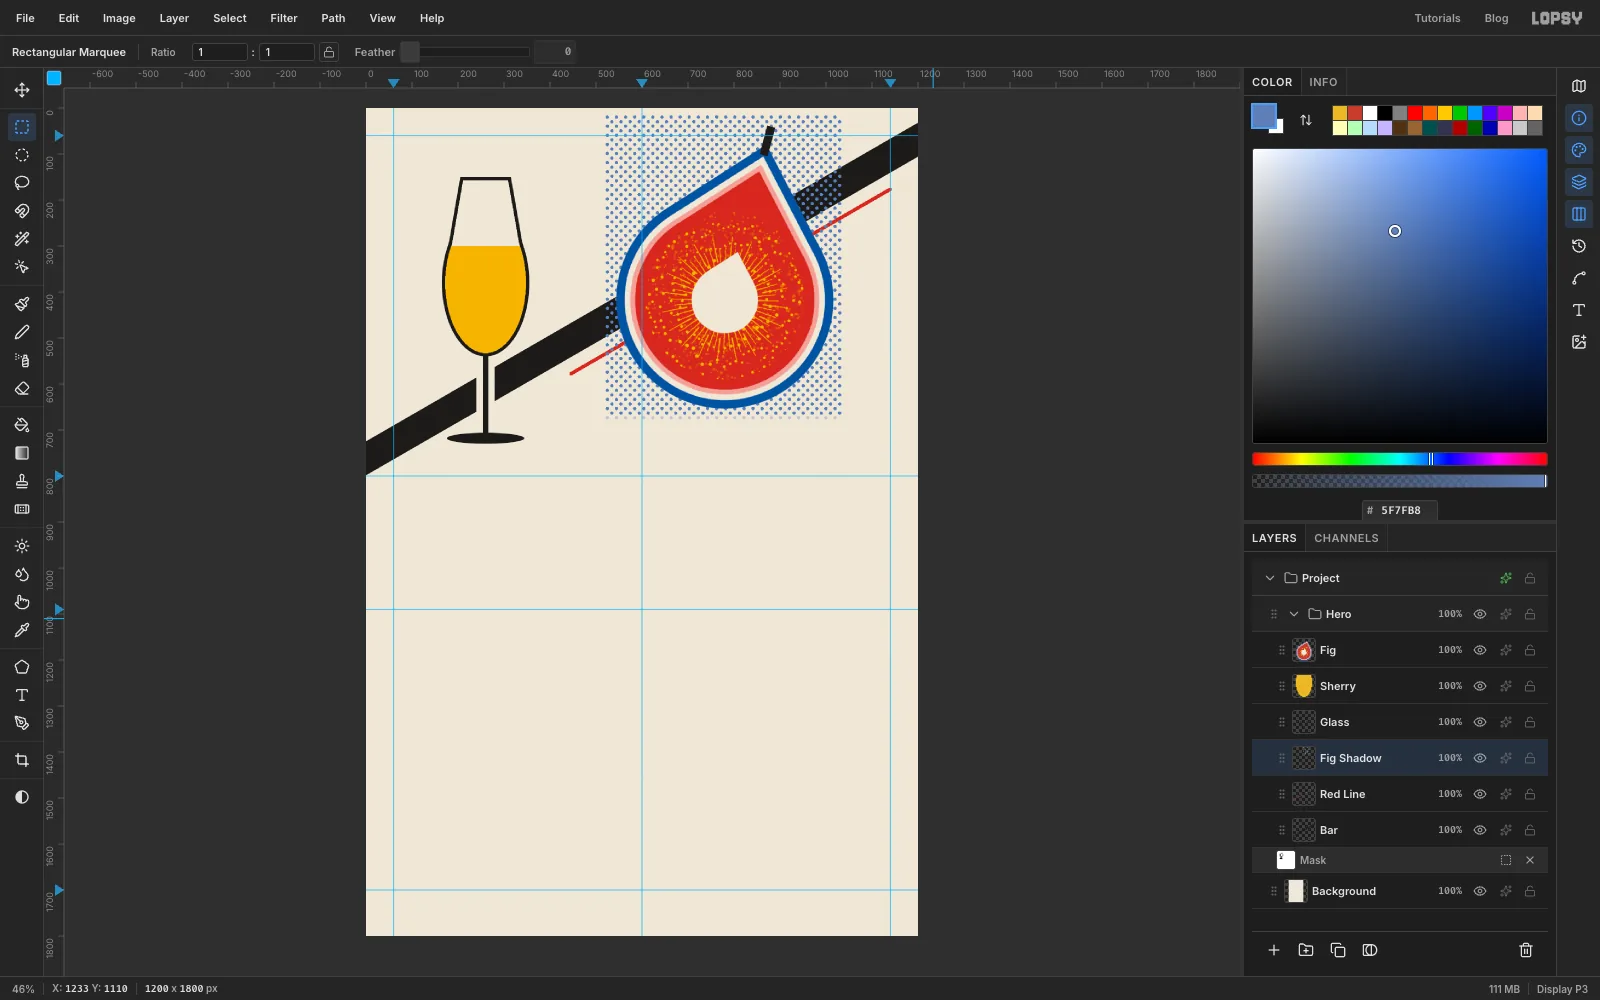
524, 18to1035, 673, and fill it with . - Deselect, then choose Filter → Halftone…. Set Dot Size to
14, Angle to45and Softness to0, then click Apply.
Halftoning a flat field, rather than the fig shape itself, gives every dot the same size, including the ones along the edge.
- Click
-
Cut the dots to the fig and offset them
- Hold Cmd and click the
Figthumbnail to select the fig's shape. - Choose Select → Inverse and press Delete. Only the fig-shaped patch of dots is left. Deselect.
- With the Move tool, drag the dots 30 px right and 30 px down.
- Click the sparkle button on the
Fig Shadowrow to open its effects drawer, and set Blend to Multiply. Where the dots cross the black bar, they disappear into the black.
- Hold Cmd and click the
-
Set the title and colour the ampersand
- Collapse
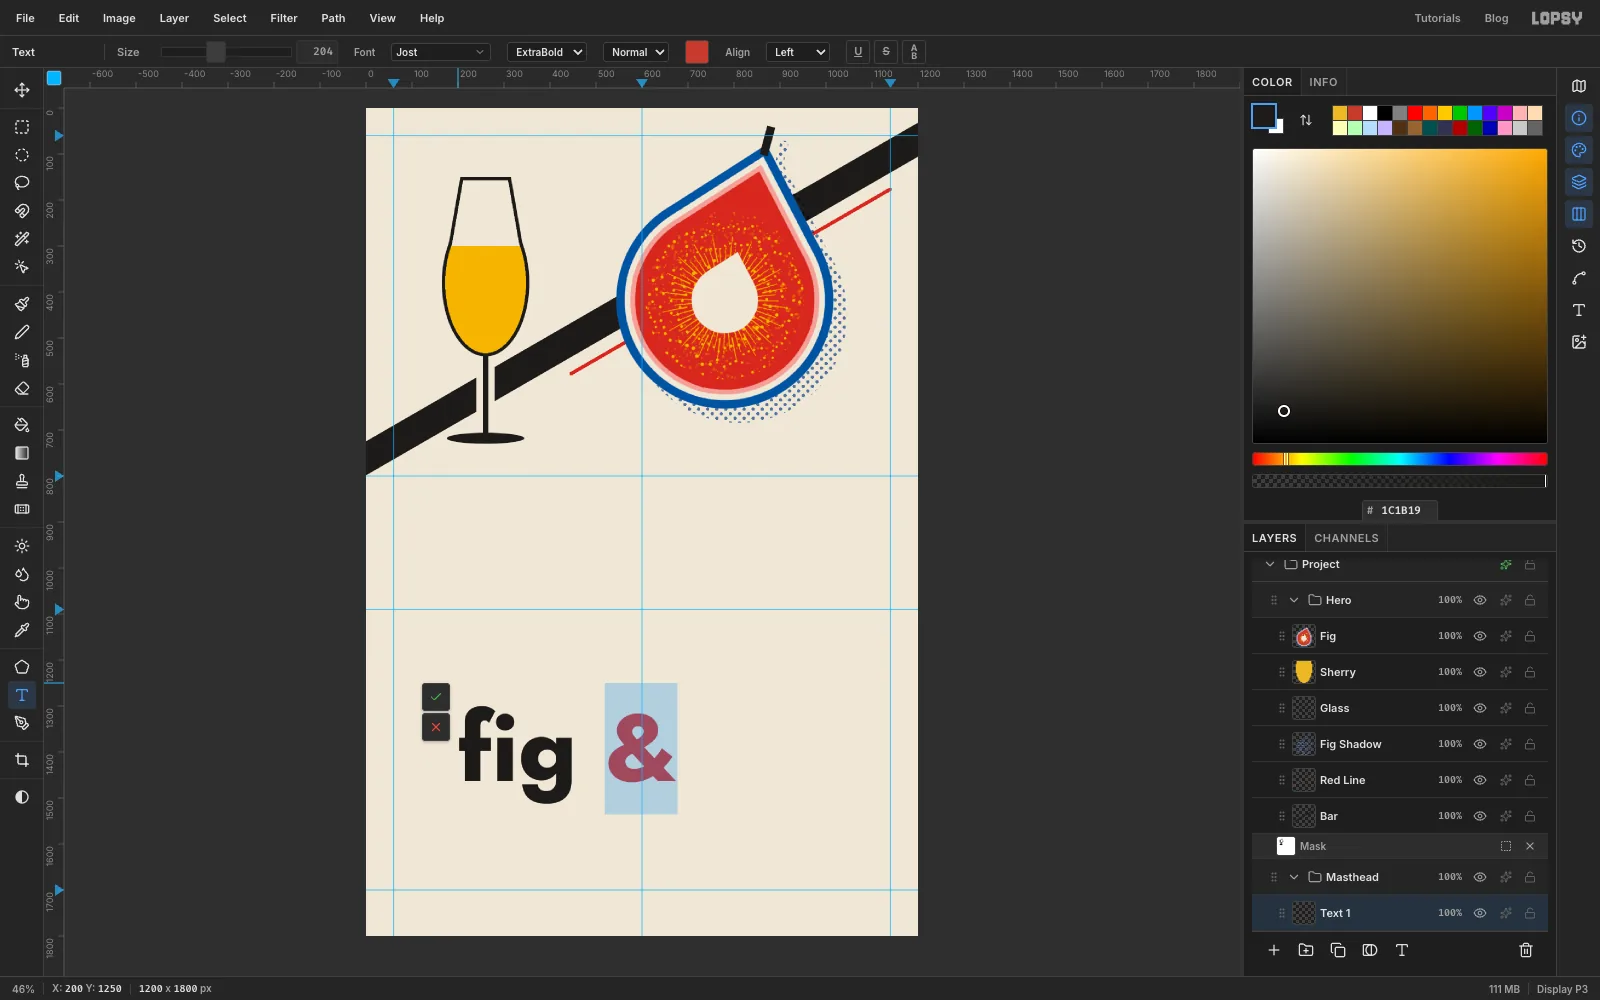
Hero. ClickBackground, then New Group and name the groupMasthead. Add a layer inside it namedRules. - Pick the Text tool (T). Choose Jost in the font picker, ExtraBold for the weight and Size
204, and set the colour to . - Click in an empty part of the canvas and type
fig &. - Press Shift+Left once to select the ampersand. Click the Text color swatch in the options bar and type
C73A2C. Only the ampersand turns red. - Press Tab to finish, then name the layer
Title. - With the Move tool, move it so the top of the f sits at y 834 and its left edge at x 60.
- Collapse
-
Set xérès on the same baseline
Setting the second word as its own layer lets you balance the spaces around the ampersand.
- Click
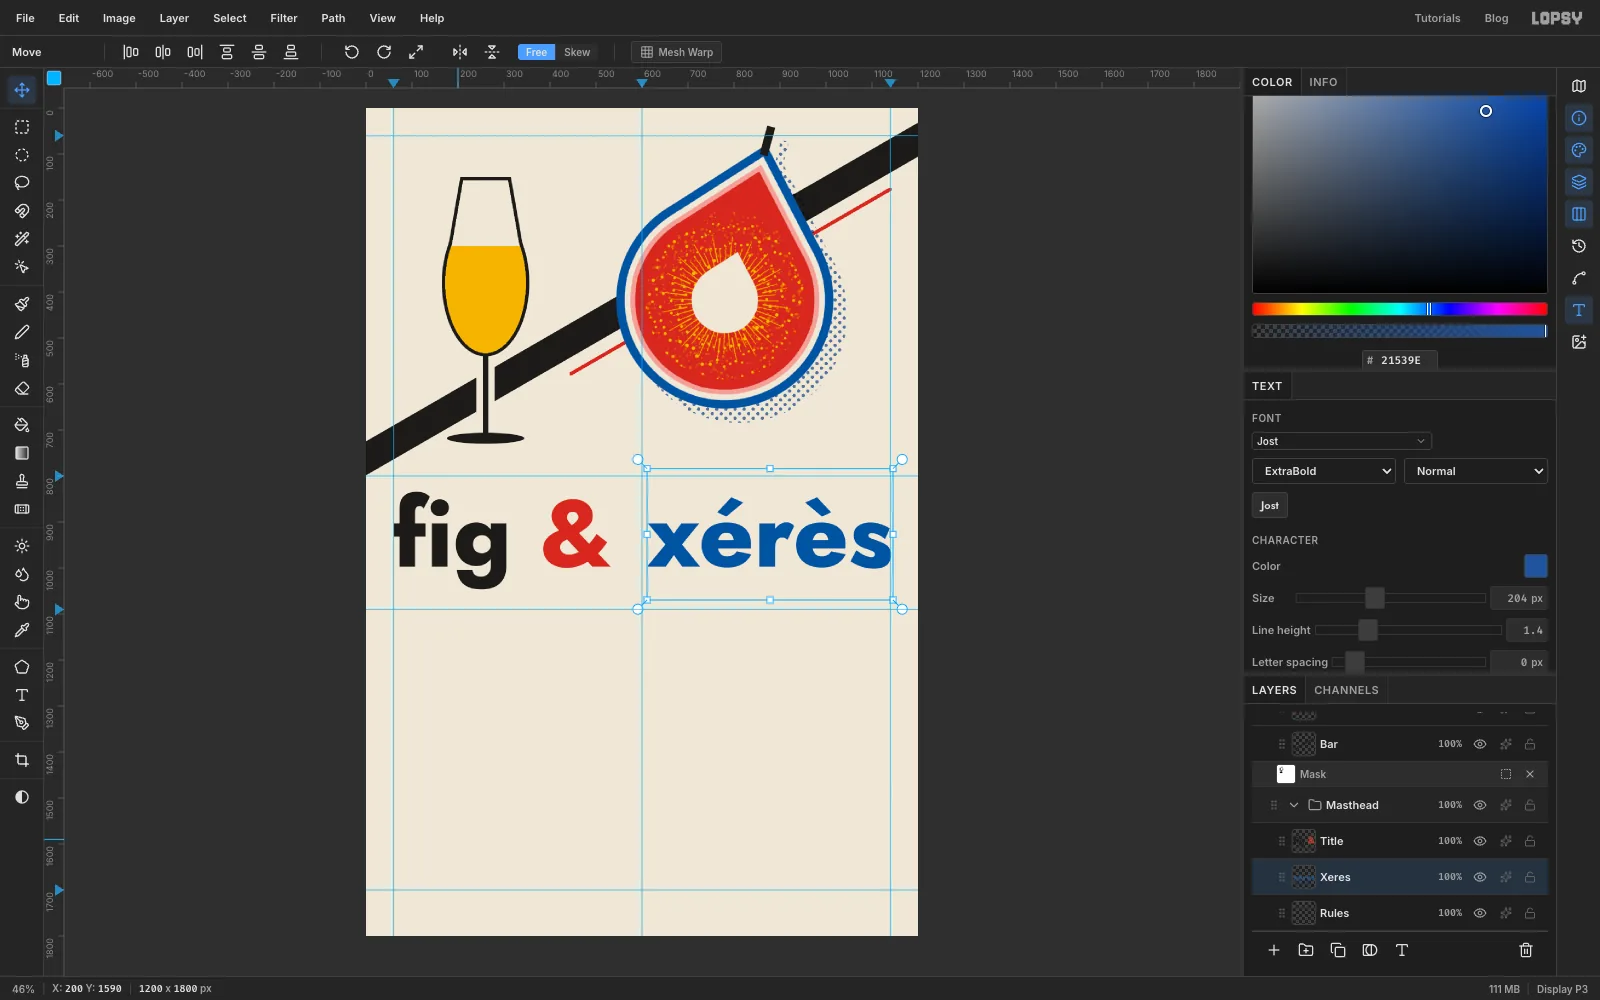
Rules, then typexérèsin empty space with the same settings, in . Name itXeres. - Move it so its right edge sits on the 1140 guide and the foot of its x sits on the same line as the foot of the f. Zoom in to check. The accents make the word's box taller, so line up the letters, not the boxes.
- Check the gaps on either side of the red ampersand. They should look the same, about 81 px each. If they don't, nudge
Titlesideways and keepXereson the margin.
- Click
-
Add the tagline, date and rule
- Click
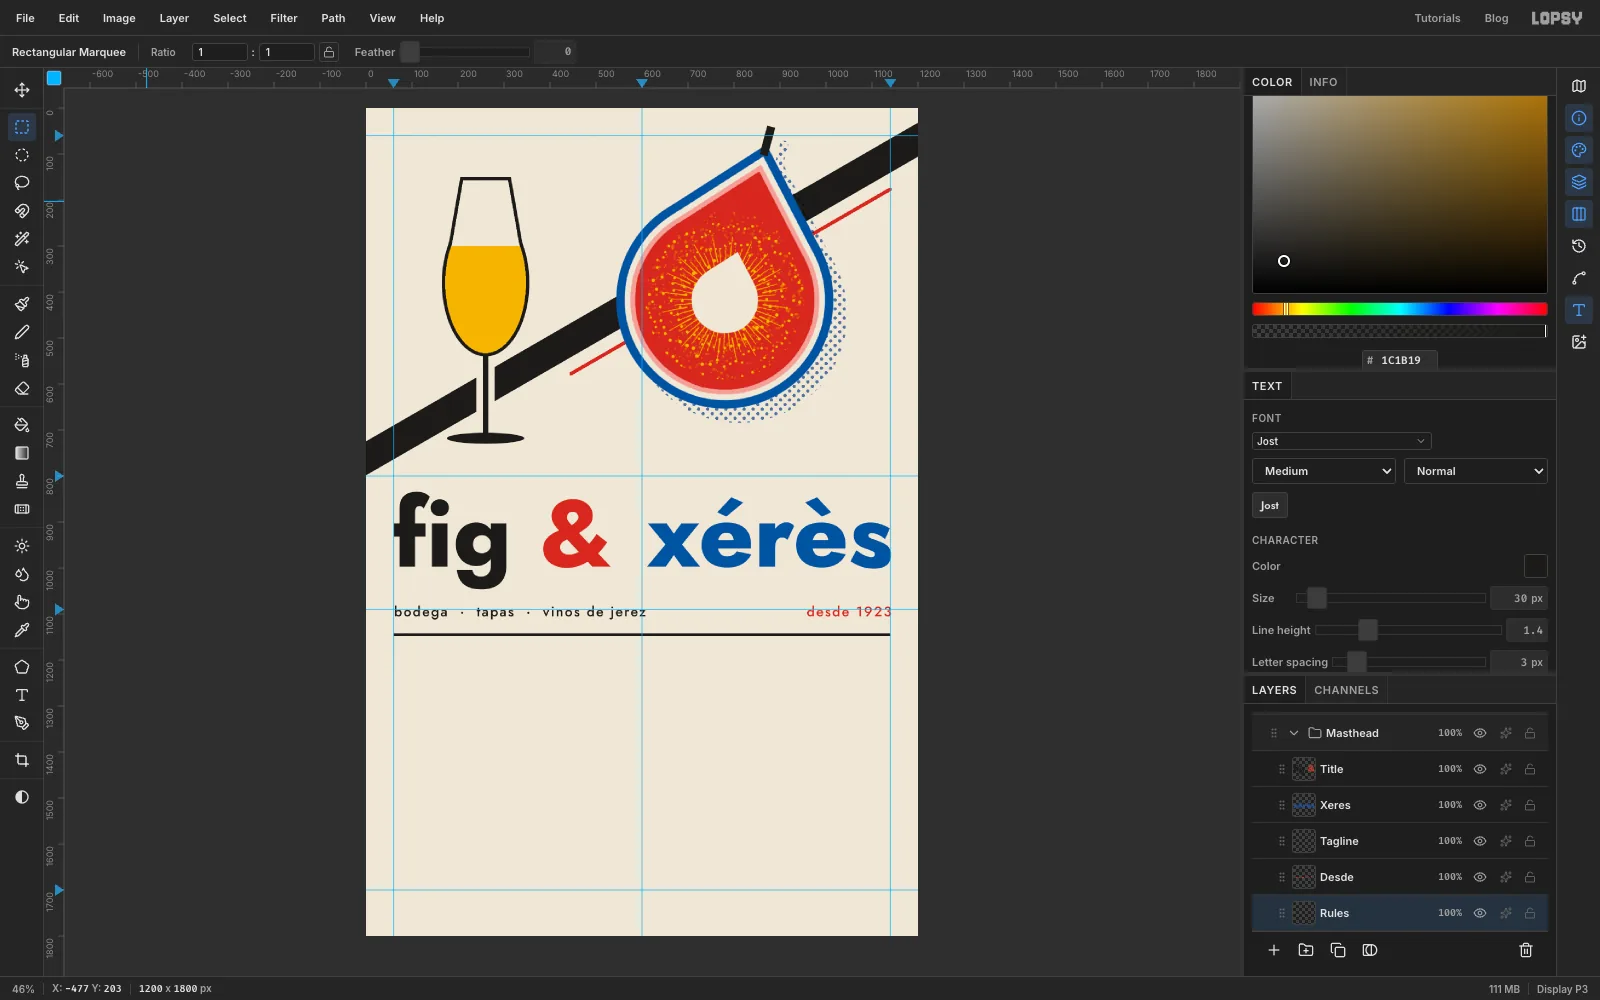
Rulesand typebodega · tapas · vinos de jerezin Jost Medium, Size30, with two spaces on each side of each dot. In the Text panel, set Letter spacing to3. Place it at the left margin, about 36 px below the bottom of the g. - Click
Rulesand typedesde 1923the same way, in . Put its right edge on the 1140 guide, with its baseline level with the tagline's. - Click
Rules. Click once with the Rectangular Marquee and enter the corners60, 1142and1140, 1148. Fill it with for a 6 px rule that stops exactly on the margins.
- Click
-
Draw the Kandinsky icons with the Shape tool
Each column gets one of Kandinsky's shapes: a yellow triangle for the sherries, a red square for the tapas and a blue circle for the sweets. The columns are 320 px wide and start at x 60, 440 and 820, with 60 px between them.
- Collapse
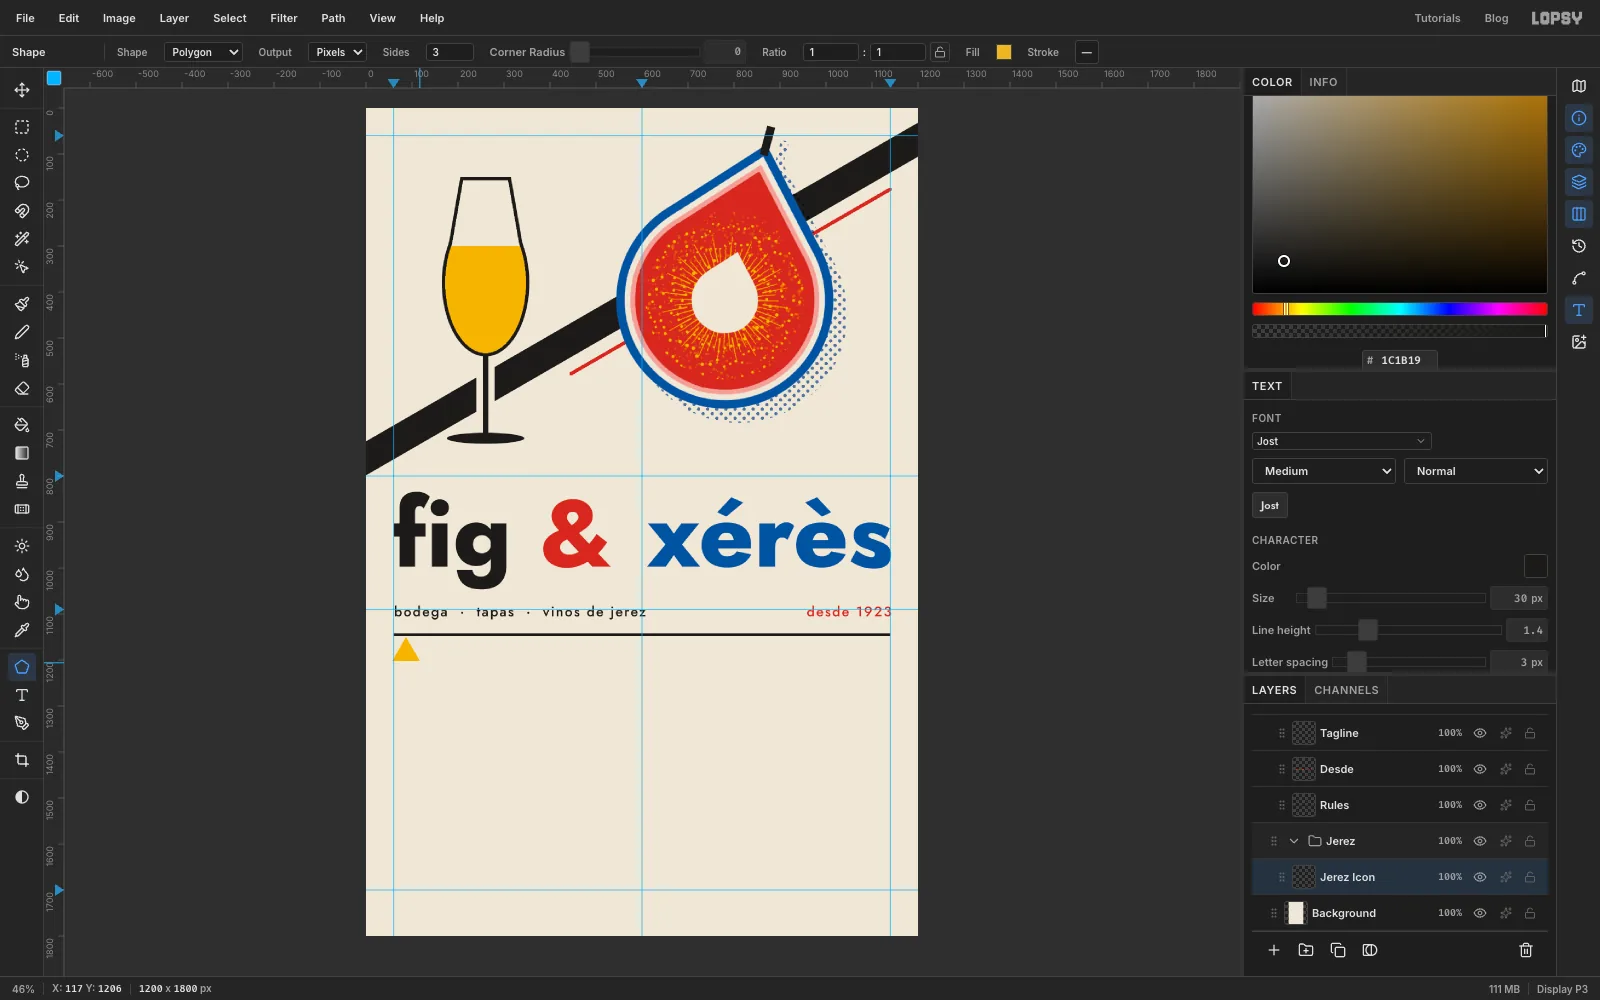
Masthead, clickBackground, make a New Group namedJerez, and add a layer inside it namedJerez Icon. - Pick the Shape tool (U). Set Shape to Polygon, Output to Pixels and Sides to
3. Click the Fill swatch and typeEDB723. If a stroke is set, click its swatch and choose Remove stroke. - Shapes draw out from the centre. Start at
87, 1176and drag diagonally down and right until the triangle is 60 px wide (52 px tall). - With the Move tool, nudge it with the arrow keys until its flat base sits on y 1201. A triangle has less ink than a square, so making it a little wider than the 52 px square and circle keeps the three icons looking the same size.
- Collapse
-
Set the sherry list and prices
- Click
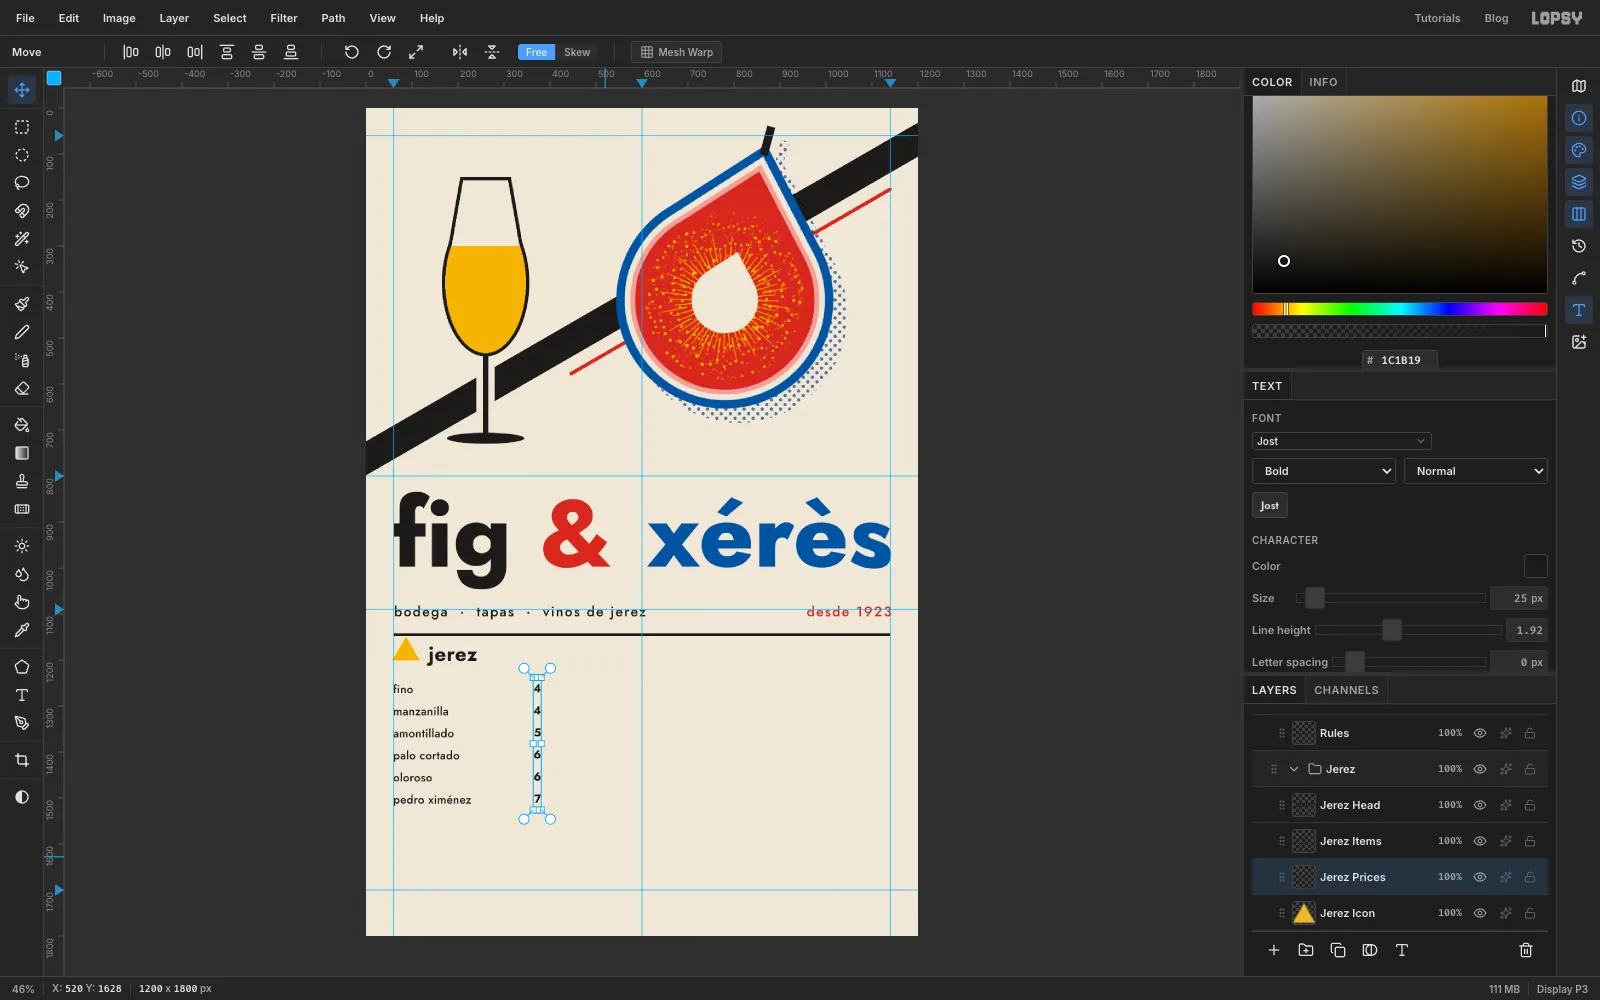
Jerez Iconand typejerezin Jost Bold, Size44, letter spacing1. Name itJerez Head. Put its left edge at x 132 and its baseline on y 1201, level with the base of the triangle. The j's tail hangs below. - Click
Jerez Iconand type the six sherries, pressing Return after each one:fino,manzanilla,amontillado,palo cortado,oloroso,pedro ximénez. Use Jost Medium, Size25. In the Text panel, set Line height to1.92(48 px from line to line) and Letter spacing to0.5. Name itJerez Itemsand move it to the left margin, with the top of the f at y 1252. - Click
Jerez Icon. With the Text tool, drag a box 320 px wide in empty space, then type the prices one per line:4,4,5,6,6,7. Use Jost Bold, Size25and line height1.92. When you're done, set Align to Right in the options bar. Name itJerez Prices. - Move the prices so the numbers' right edges sit at x 380 and each number shares a baseline with its sherry.
A dragged text box is area text, so Align Right lines the numbers up on their right edges, including two-digit prices like 11 later on.
- Click
-
Key the sherries by colour
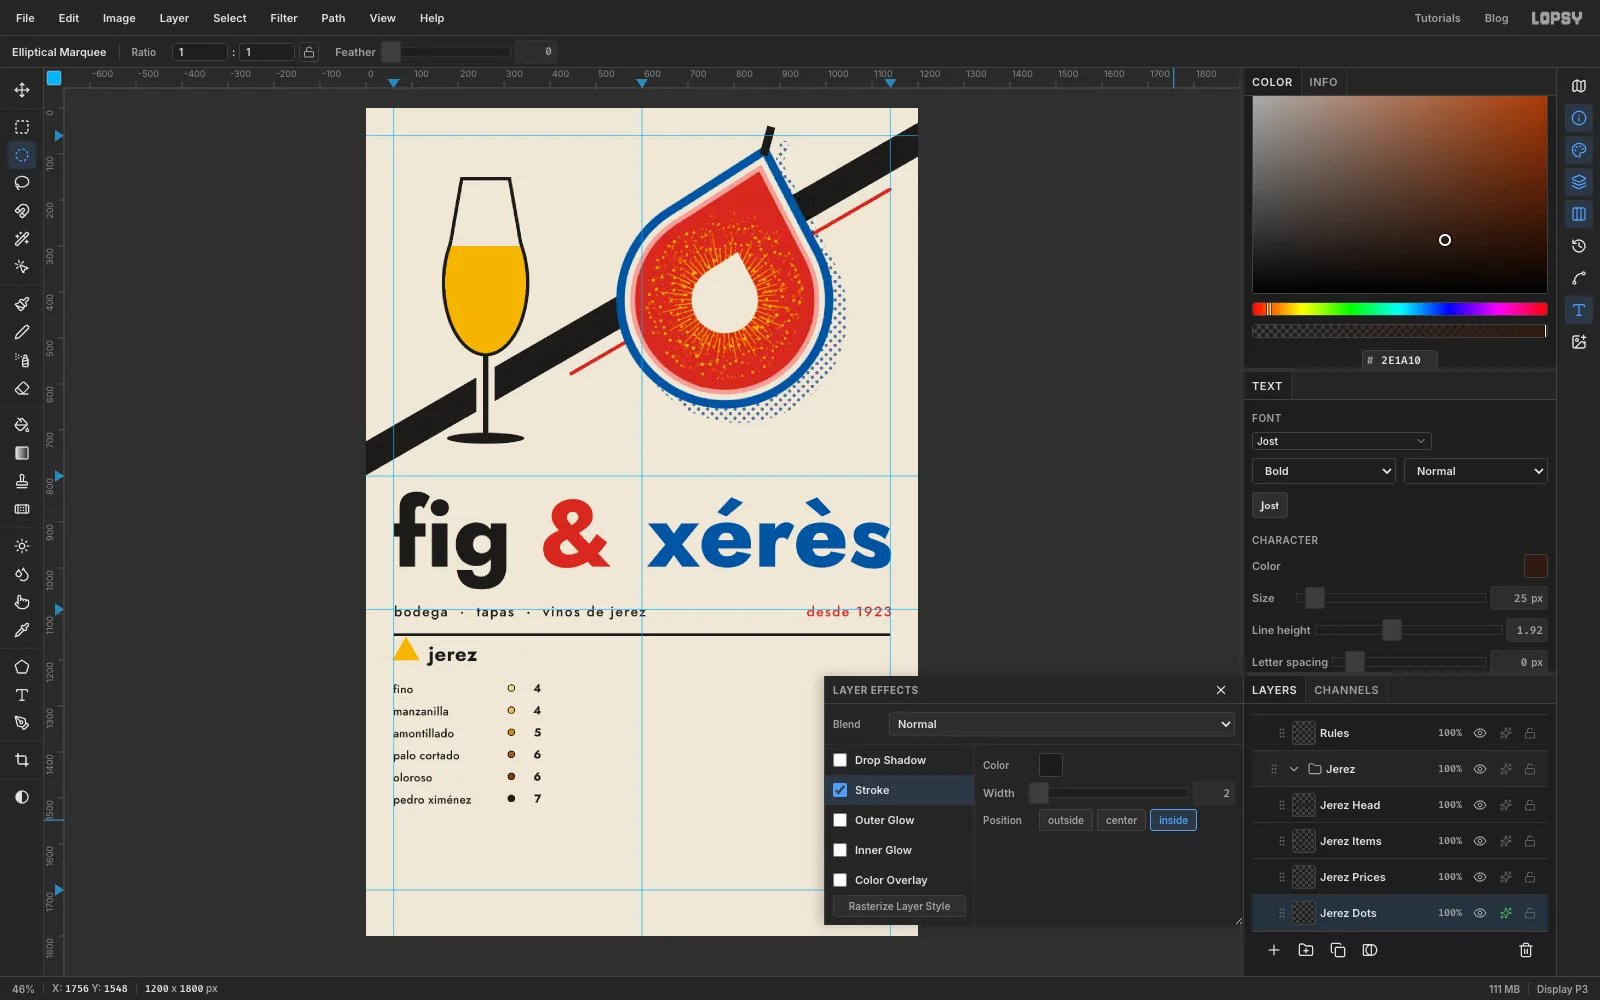
Sherry runs from pale, bone-dry fino to almost black, syrupy pedro ximénez. A dot of each wine's colour turns the list into a small chart.
- Click
Jerez Iconand add a layer namedJerez Dots. - For each line, use the Elliptical Marquee to draw a 16 px circle centred at x 316, level with the middle of the lowercase letters, and fill it with that sherry's colour. From top to bottom: , , , , , .
- Deselect. Click the sparkle button on the
Jerez Dotsrow to open its effects drawer. Tick Stroke, set Width to2, the colour to and Position to inside. The thin ring keeps the pale fino dot visible on the paper.
- Click
-
Label the key and build the tapas column
- Click
Jerez Dotsand typede seco a dulce("dry to sweet") in Jost Regular Italic, Size22, letter spacing1. Put its right edge just under the dots, at about x 324, about 26 px below the list. - Add a layer named
Jerez Rule. With the Pencil at Size3in , click at60, 1224and Shift-click at380, 1224to draw a rule under the heading. - Collapse
Jerez, clickBackgroundand make a New Group namedTapas, with a layerTapas Icon. - With the Shape tool, set Shape to Rectangle and the fill to
C73A2C, and drag from466, 1176until the square is 52 px wide. - Add the heading
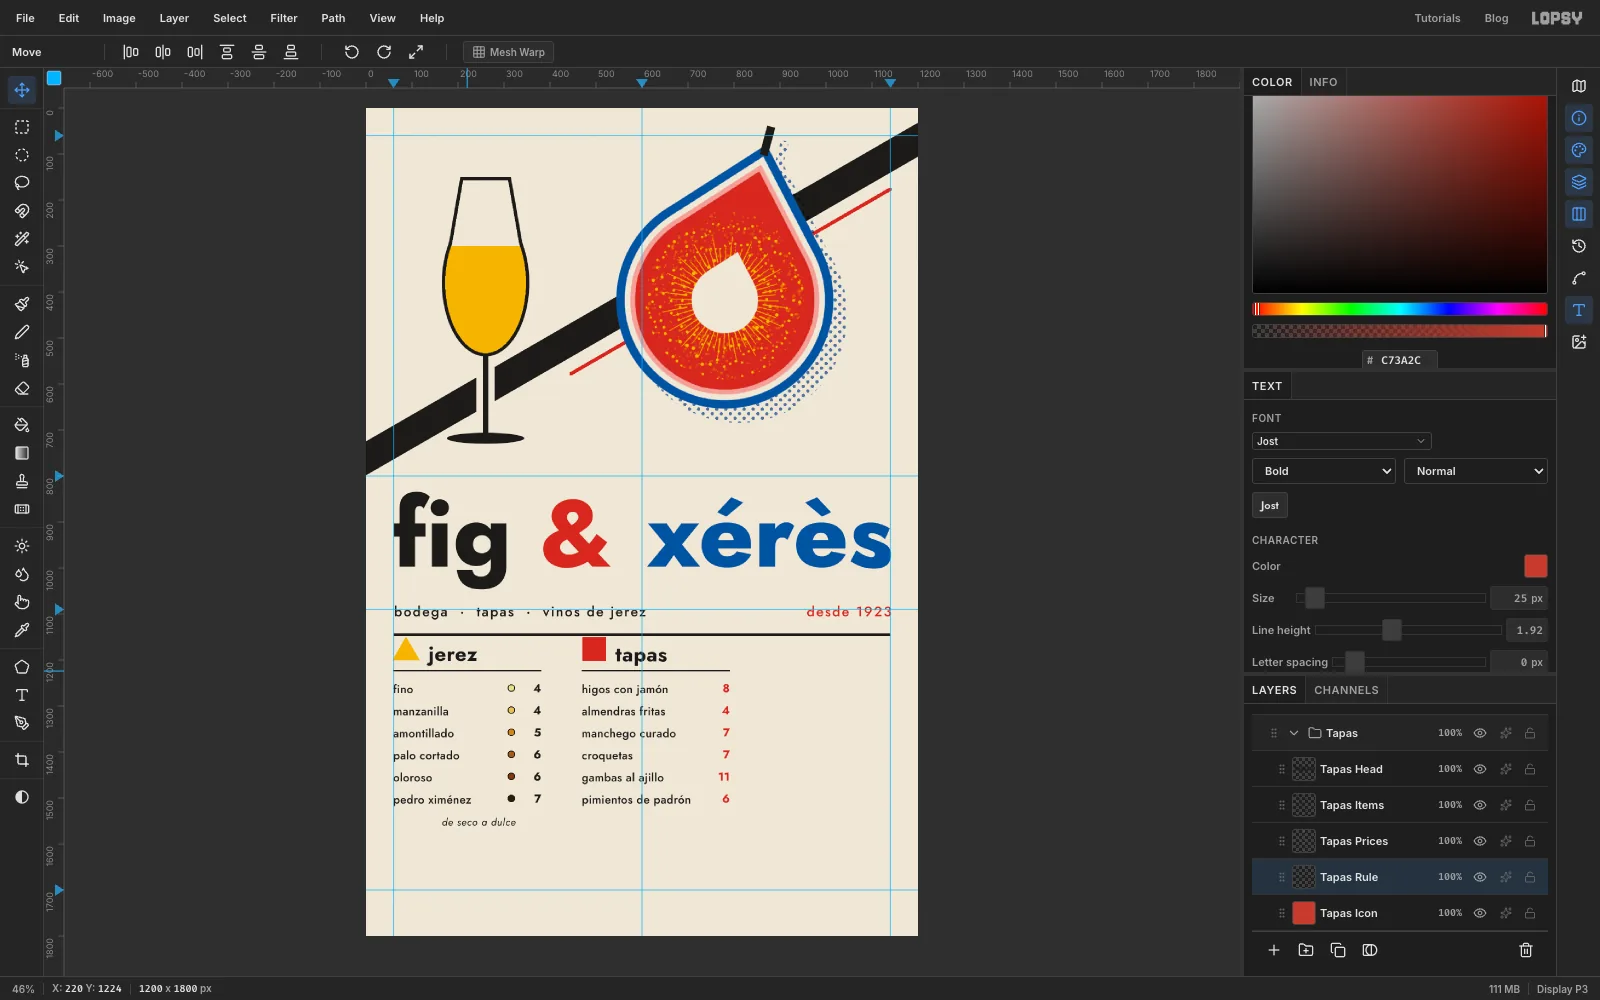
tapasthe same way asjerez, starting at x 512. Add the dishes at x 440:higos con jamón,almendras fritas,manchego curado,croquetas,gambas al ajillo,pimientos de padrón. Add the prices8,4,7,7,11,6in Bold , right-aligned at x 760. - For the rule, click the
Jerez Rulelayer and draw a marquee around the rule. Press Cmd+C, clickTapas Iconand press Cmd+V. The copy is pasted in place as a new layer. Name itTapas Ruleand, with the Move tool, nudge it right with Shift and the arrow keys until it runs from x 440 to 760.
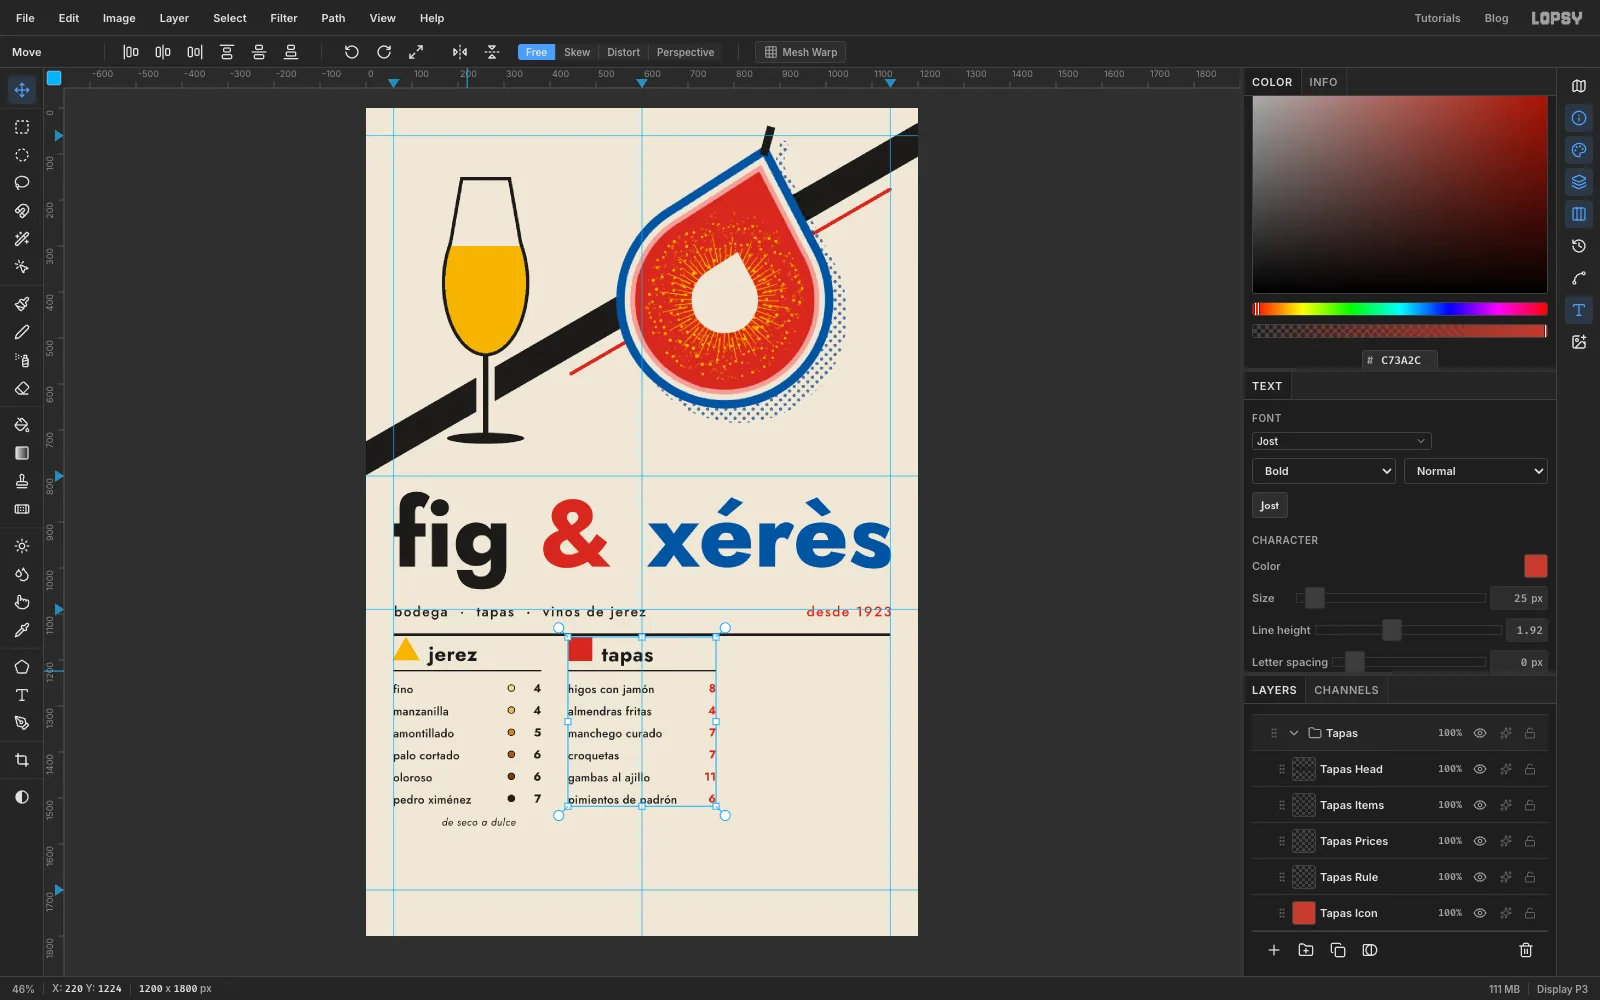
In the screenshot, the whole tapas column has landed 30 px to the right of x 440. It's an easy slip, and the next step shows the quick fix.
- Click
-
Move the whole column with its group
If a column sits off its line, don't move its layers one by one.
- Click the
Tapasgroup row and deselect. - With the Move tool, nudge it with Shift and the arrow keys. Each press moves 10 px.
Every layer in the group moves together: the icon, heading, list, prices and rule.
- Click the
-
Add the sweets column
- Collapse
Tapas, clickBackgroundand make a group namedDulceswith a layerDulces Icon. - With the Shape tool, set Shape to Ellipse and the fill to
21539E, and drag from846, 1176until the circle is 52 px across. - Add the heading
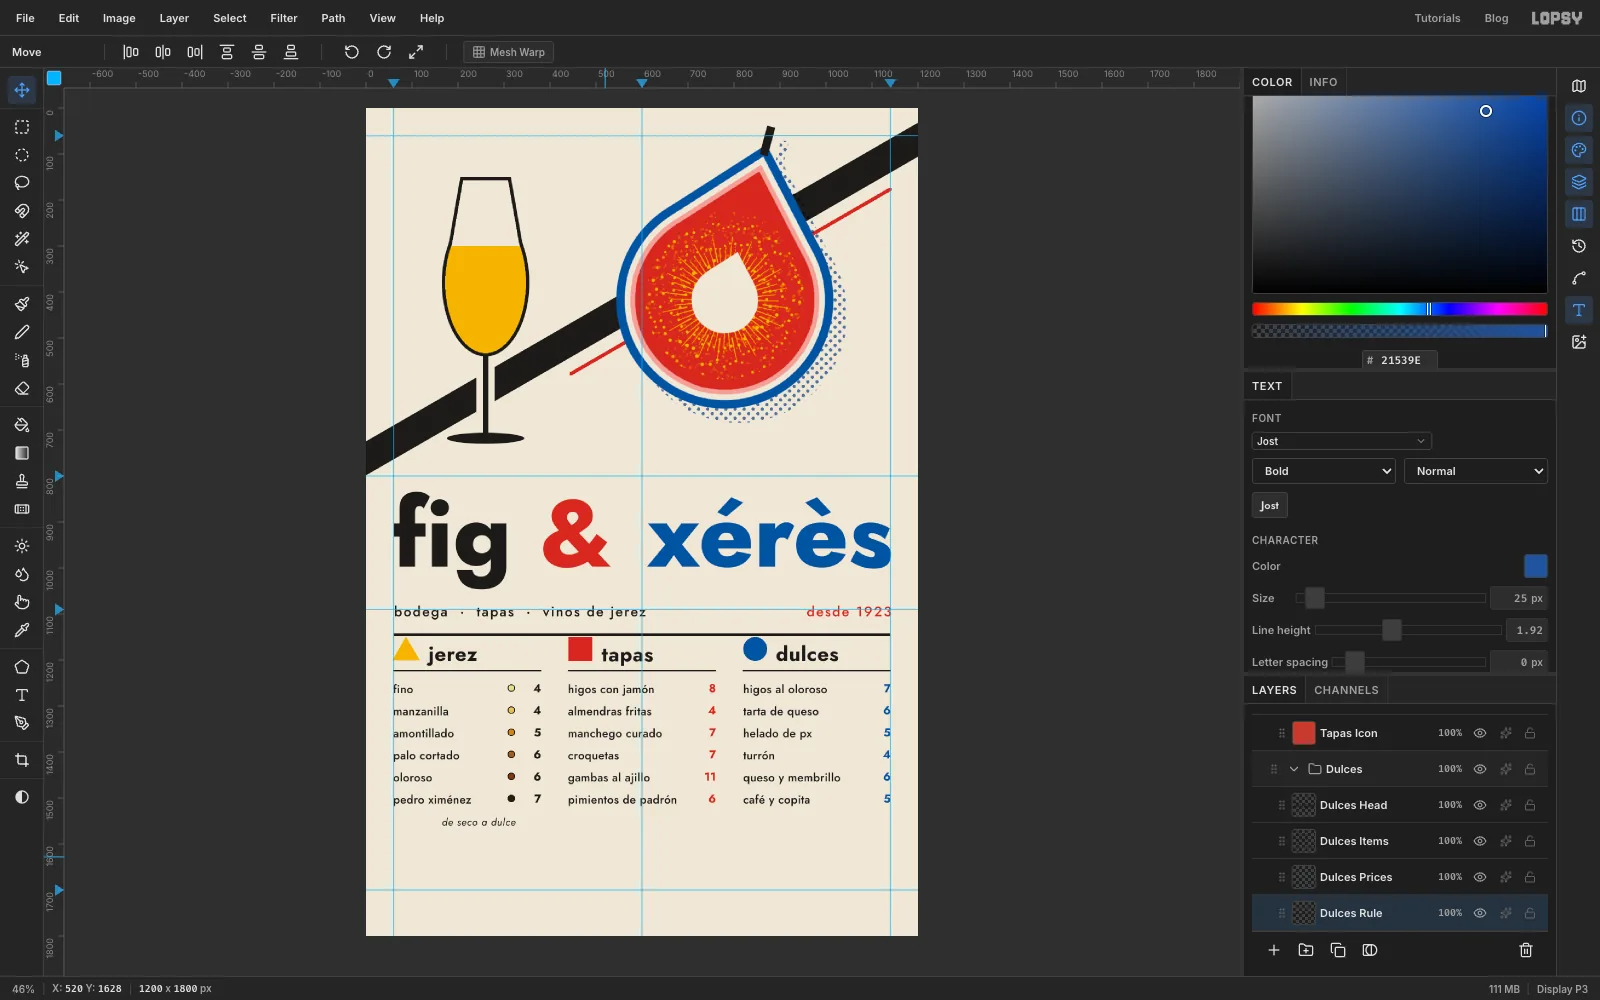
dulcesat x 892 and the sweets at x 820:higos al oloroso,tarta de queso,helado de px,turrón,queso y membrillo,café y copita. Add the prices7,6,5,4,6,5in Bold , right-aligned at x 1140. - Click
Dulces Iconand press Cmd+V again. The rule is still on the clipboard. Name itDulces Ruleand nudge it right the same way until it runs from x 820 to 1140.
- Collapse
-
Add the event strip and footer
- Collapse
Dulces, clickBackgroundand make a group namedFooter. - Add a layer named
Band. Draw a rectangle across the full width from0, 1700to the bottom of the canvas, and fill it with . - Add a layer named
Strip. Draw a rectangle from60, 1588to1140, 1656and fill it with . - Click
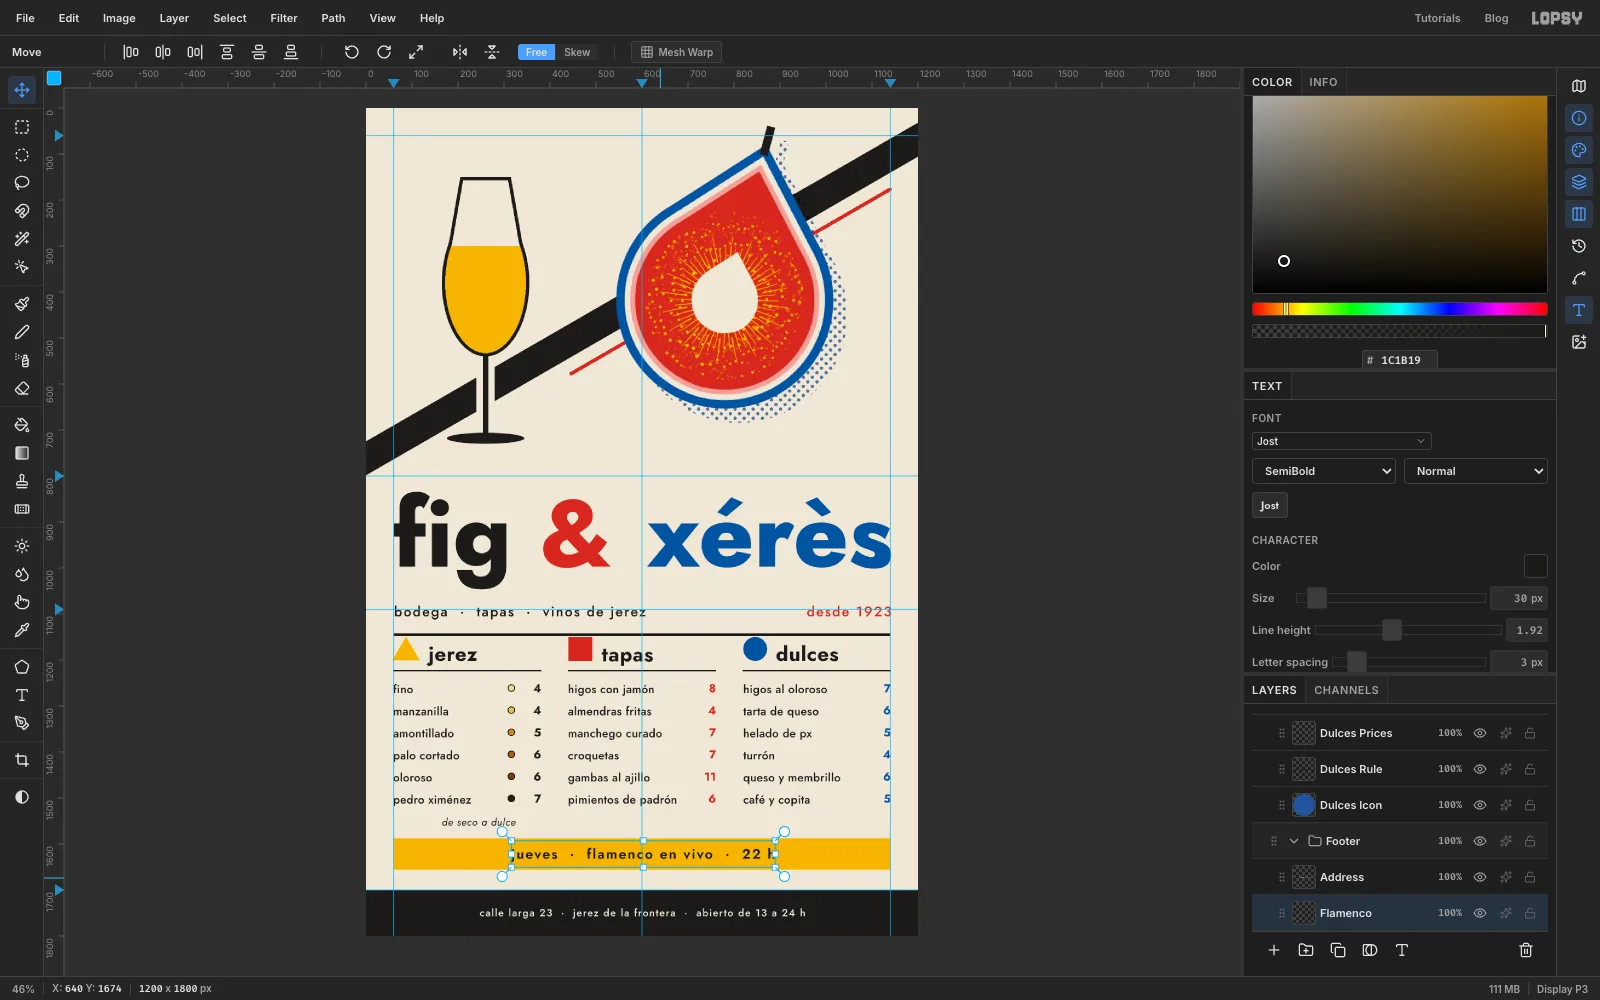
Strip, then typecalle larga 23 · jerez de la frontera · abierto de 13 a 24 hin Jost Medium, Size22, letter spacing2, colour . Name itAddress. Centre it across the page on the 600 guide, and vertically in the black band. Centre by eye on the lowercase letters, not on the tall letters. - Click
Stripand typejueves · flamenco en vivo · 22 hin Jost SemiBold, Size30, letter spacing3, in . Name itFlamencoand centre it in the yellow strip the same way.
- Collapse
-
Add a paper texture
- Expand
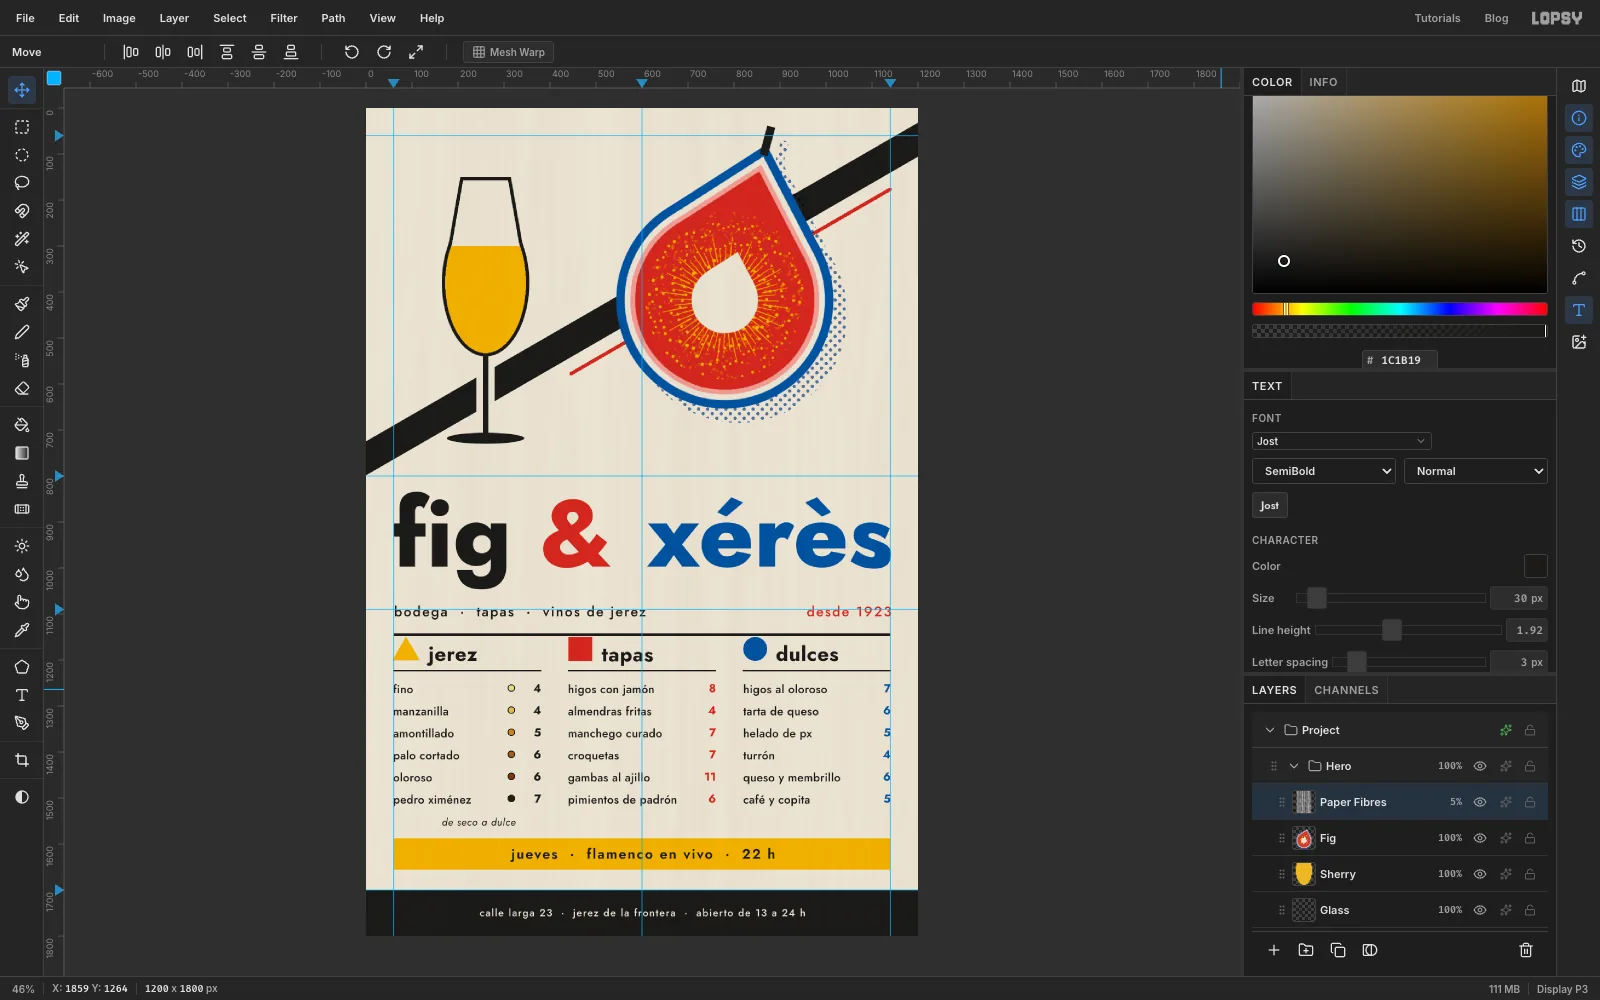
Hero, clickFig(its top layer) and add a layer namedPaper Fibres.Herois the top group, so this layer sits over everything. - Choose Filter → Fibers…, set Variance to
24and Strength to10, and click Apply. The layer fills with grey streaks. - Set the layer to Multiply and its opacity to 5%. That's just enough for a hint of printed paper without muddying the flat colours.
Save the project with File → Save Project. Then use File → Quick Export PNG for the finished menu.
- Expand