Draw a Blueprint Tattoo Flash Sheet of Zodiac Keys
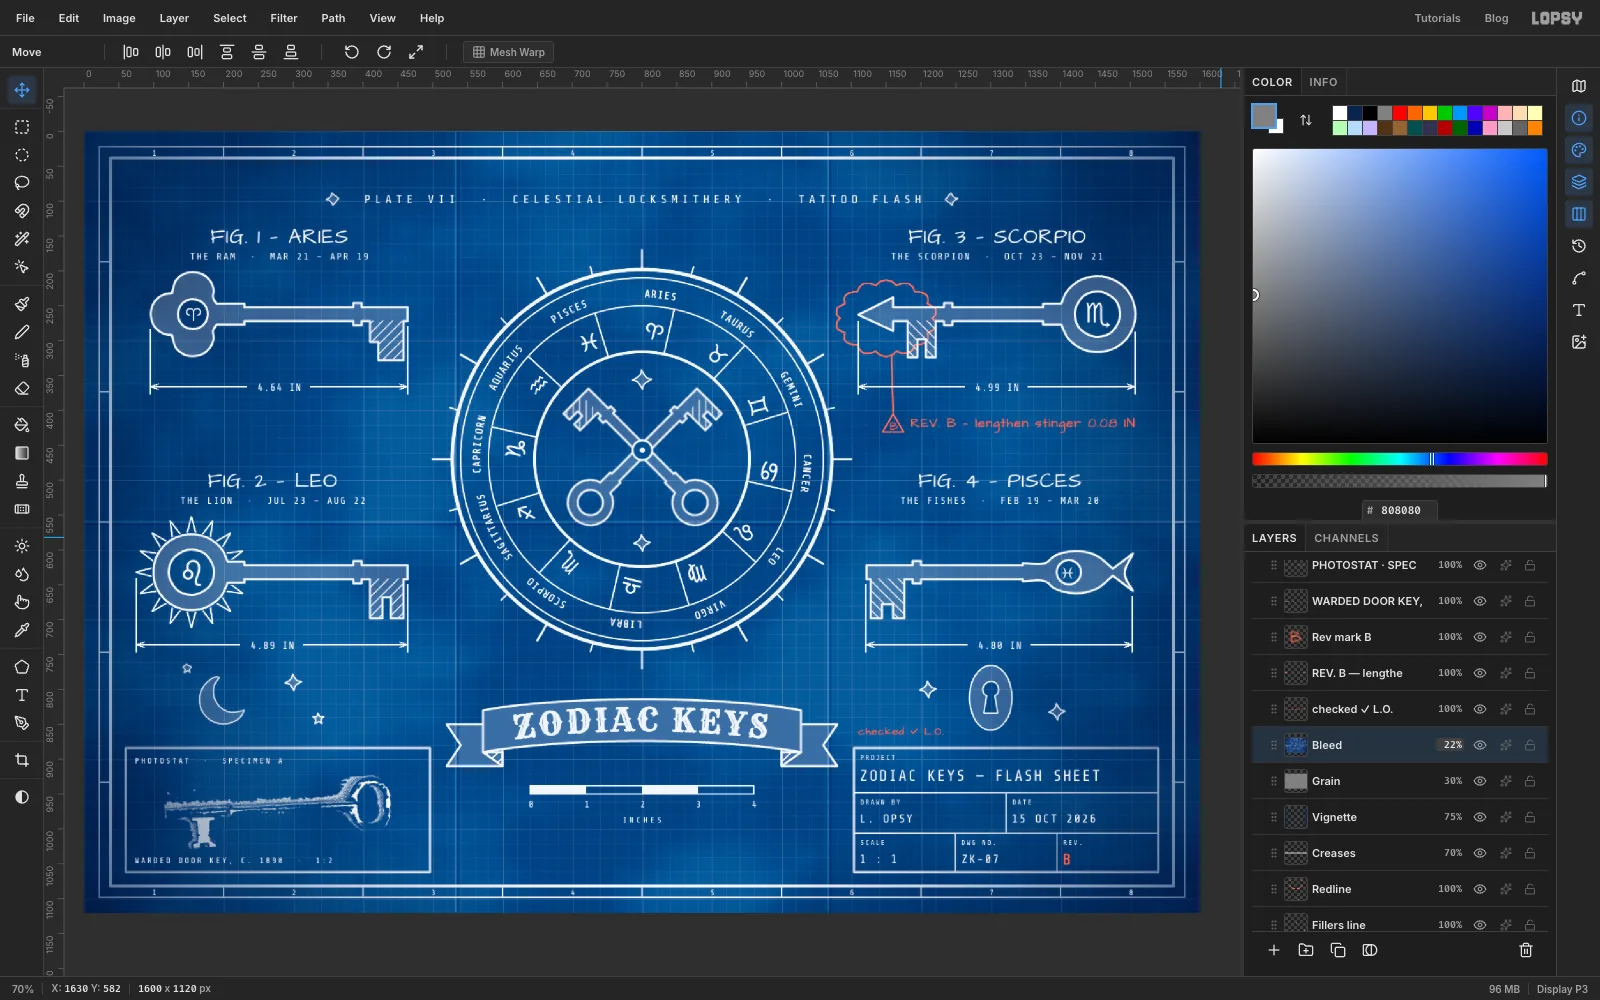
Draft a blueprint tattoo flash sheet in Lopsy with a zodiac wheel, four skeleton keys, text on a path, dimension lines, a photostat and red-pencil mark-up.
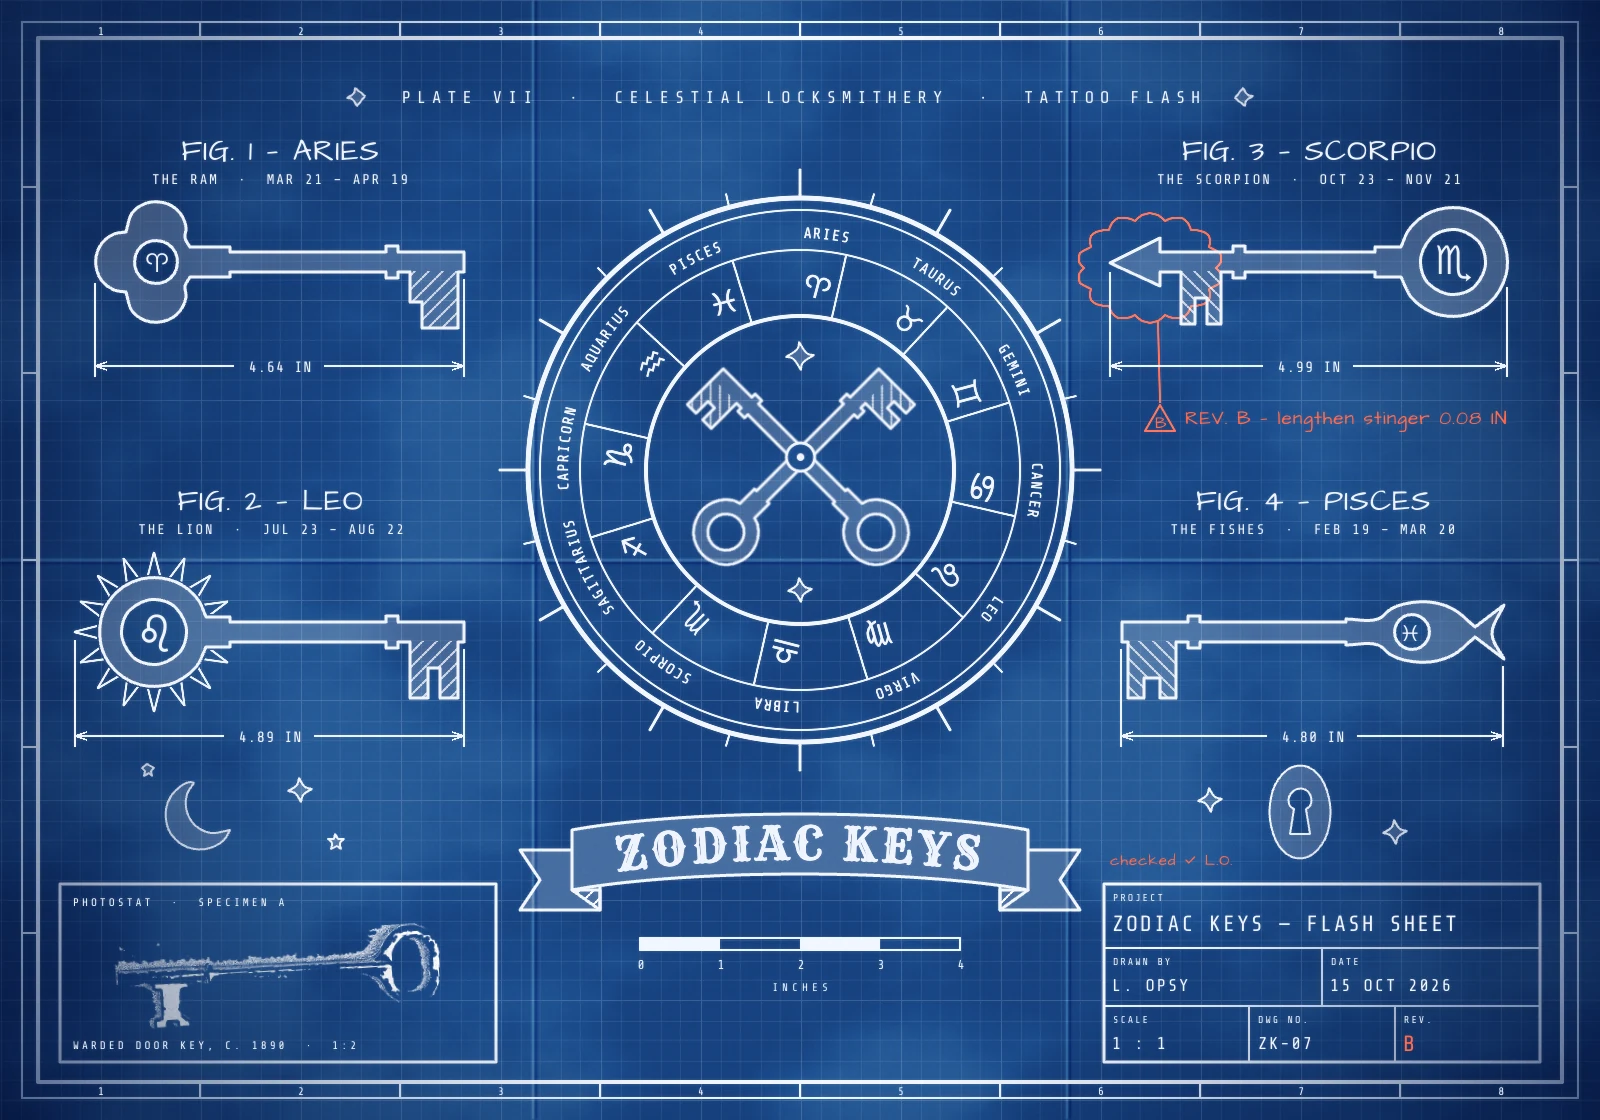
Tattoo flash is a sheet of ready-to-tattoo designs, each one bold, closed and labelled. A blueprint is the opposite: a negative print with white lines on blue, dimensions everywhere, and a title block in the corner. Put the two together and you get flash that looks like a locksmith's patent drawing.
In this tutorial you'll draw a flash sheet of four zodiac keys. Each key has a bow shaped for its sign: a trefoil ram, a sun for Leo, a stinger for Scorpio and a fish for Pisces. A zodiac wheel with crossed keys holds the centre. The sheet is 1600 × 1120 px.
Along the way you'll use:
- Define Pattern and Fill with Pattern for the drafting grid and section hatching
- the Shape tool's click-to-size dialog for the border, the wheel rings and the title block
- the Brush with Radial Symmetry for ticks, dividers and sun rays
- text on a path for the glyph and name rings and the ribbon title, in Noto Sans Symbols, Share Tech Mono, Architects Daughter and Rye
- marquees with Shift (add), Alt (subtract) and Shift+Alt (intersect), and the Lasso
- Select → Selection → Path and the Paths panel's Stroke Path for clean outlines
- group rotate, Flip Horizontal, Duplicate Layer and corner scale
- the Pen tool for a ribbon banner
- the Reference drawer, a dropped photo, the Magic Wand and Screen for a photostat
- Clouds, Gaussian Blur, Surface Blur, Add Noise, a radial Gradient and Copy Merged for the paper finish
The palette:
-
Blueprint paper
-
deep blue
vignette and crease shadows
-
Line white
-
tint white
at 16% opacity
-
Ribbon fill
-
Red pencil
-
Grain grey
-
Fill the blueprint paper
Choose File → New, enter 1600 × 1120 pixels and click Create. Delete the empty Layer 1. Click Background, set the foreground to and choose Edit → Fill.
-
Mottle the paper with Clouds
Old diazo prints are never an even blue. Add a layer named Mottling and choose Filter → Clouds… with Scale
7. Set the layer's Blend to Soft Light and its opacity to 20%. The clouds now only lighten and darken the blue underneath.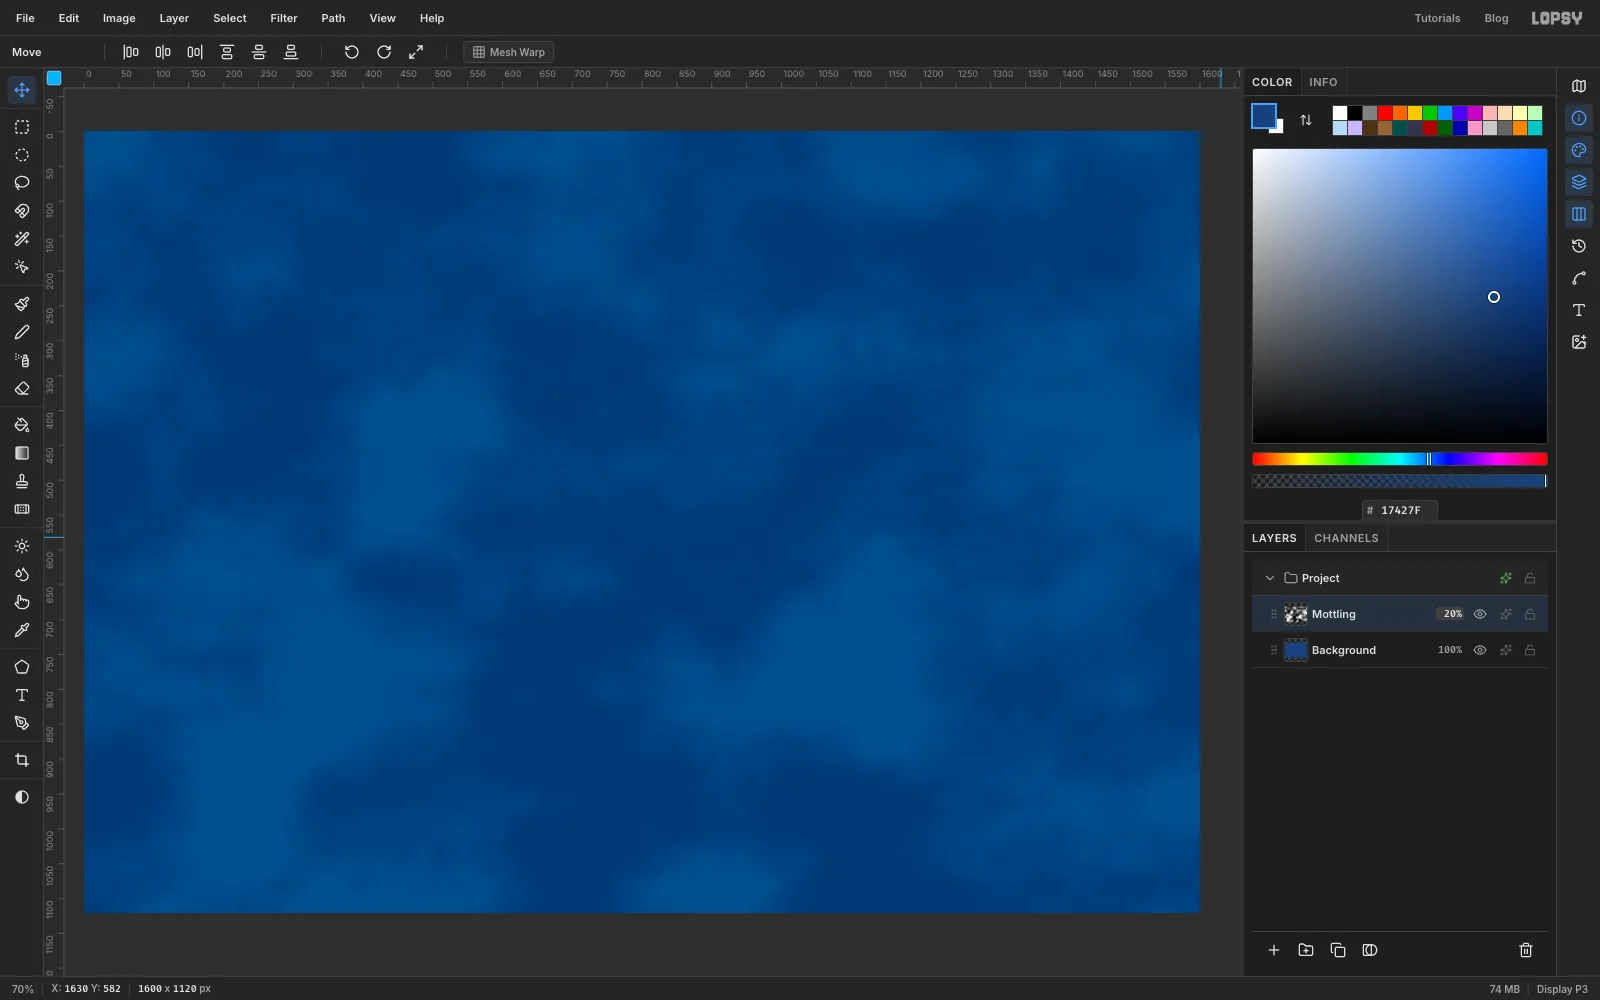
-
Draw a grid tile
Add a layer named Grid tile and pick the Pencil at Size
1. You draw one 100 px cell of the drafting grid, with a fine line every 20 px and a stronger line on the edge. Zoom in on an empty spot around250, 250.Set the foreground to white with A (alpha) at
45. Click at220, 200and Shift-click at220, 299for a straight line. Draw the other vertical lines atx240, 260 and 280 the same way, then horizontal lines aty220, 240, 260 and 280.Set the alpha back to
100. Draw one more vertical line atx200 and one horizontal line aty200. These are the major lines.Select from
200, 200to300, 300and choose Edit → Define Pattern.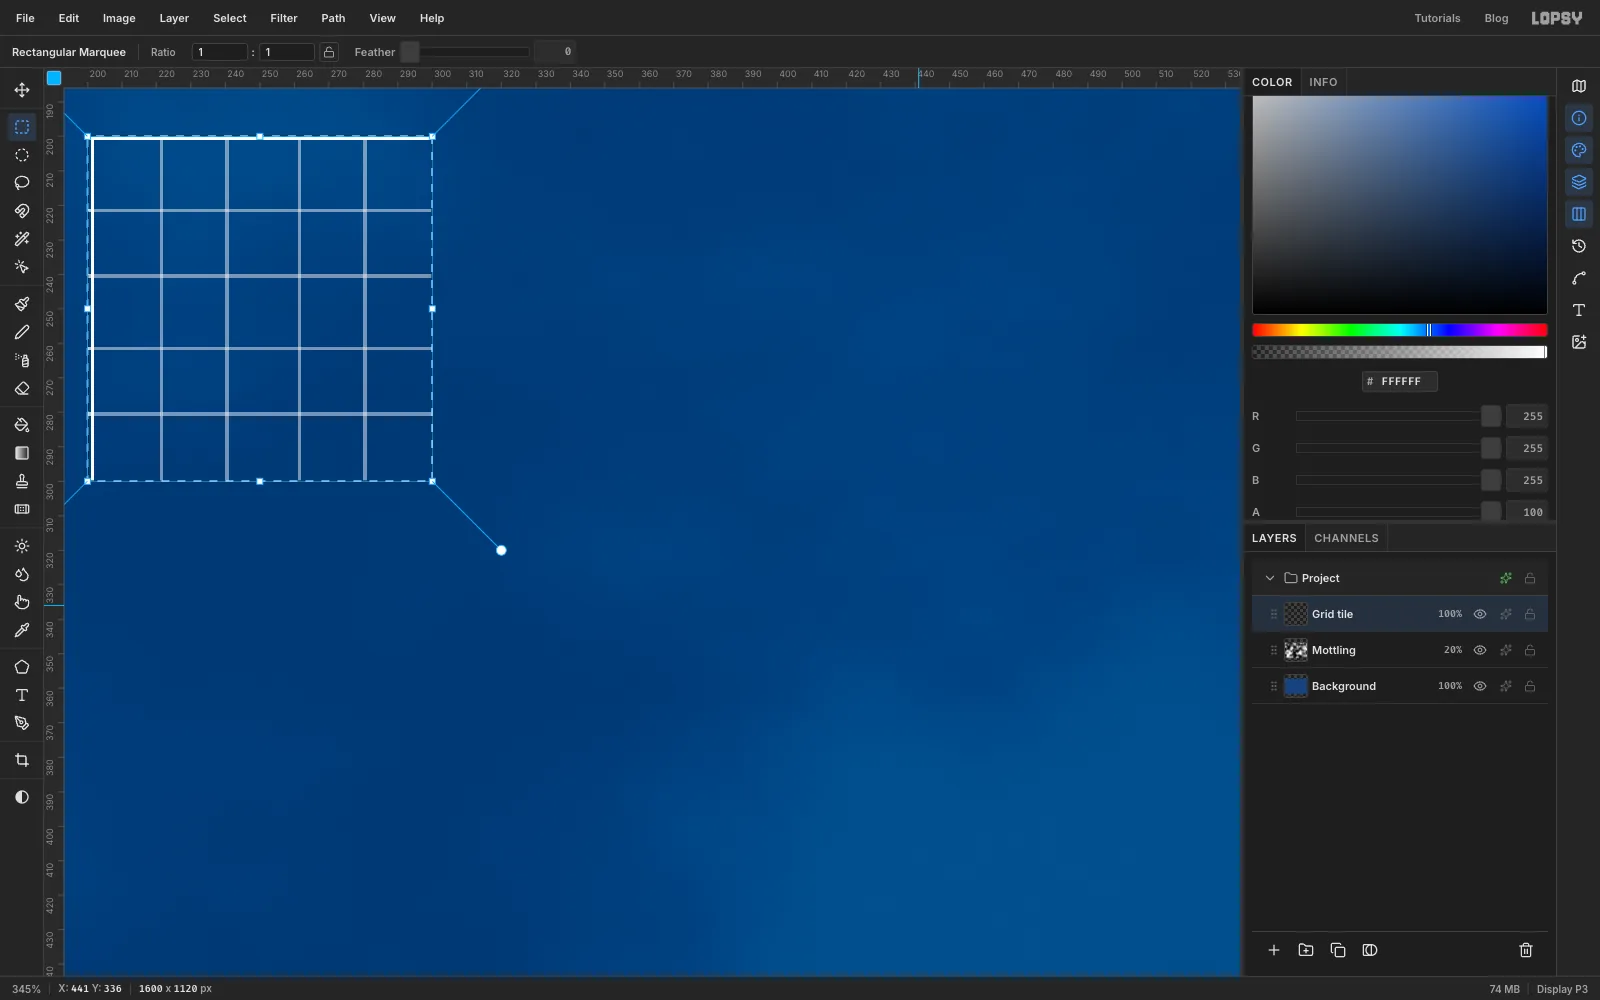
-
Fill the sheet with the grid
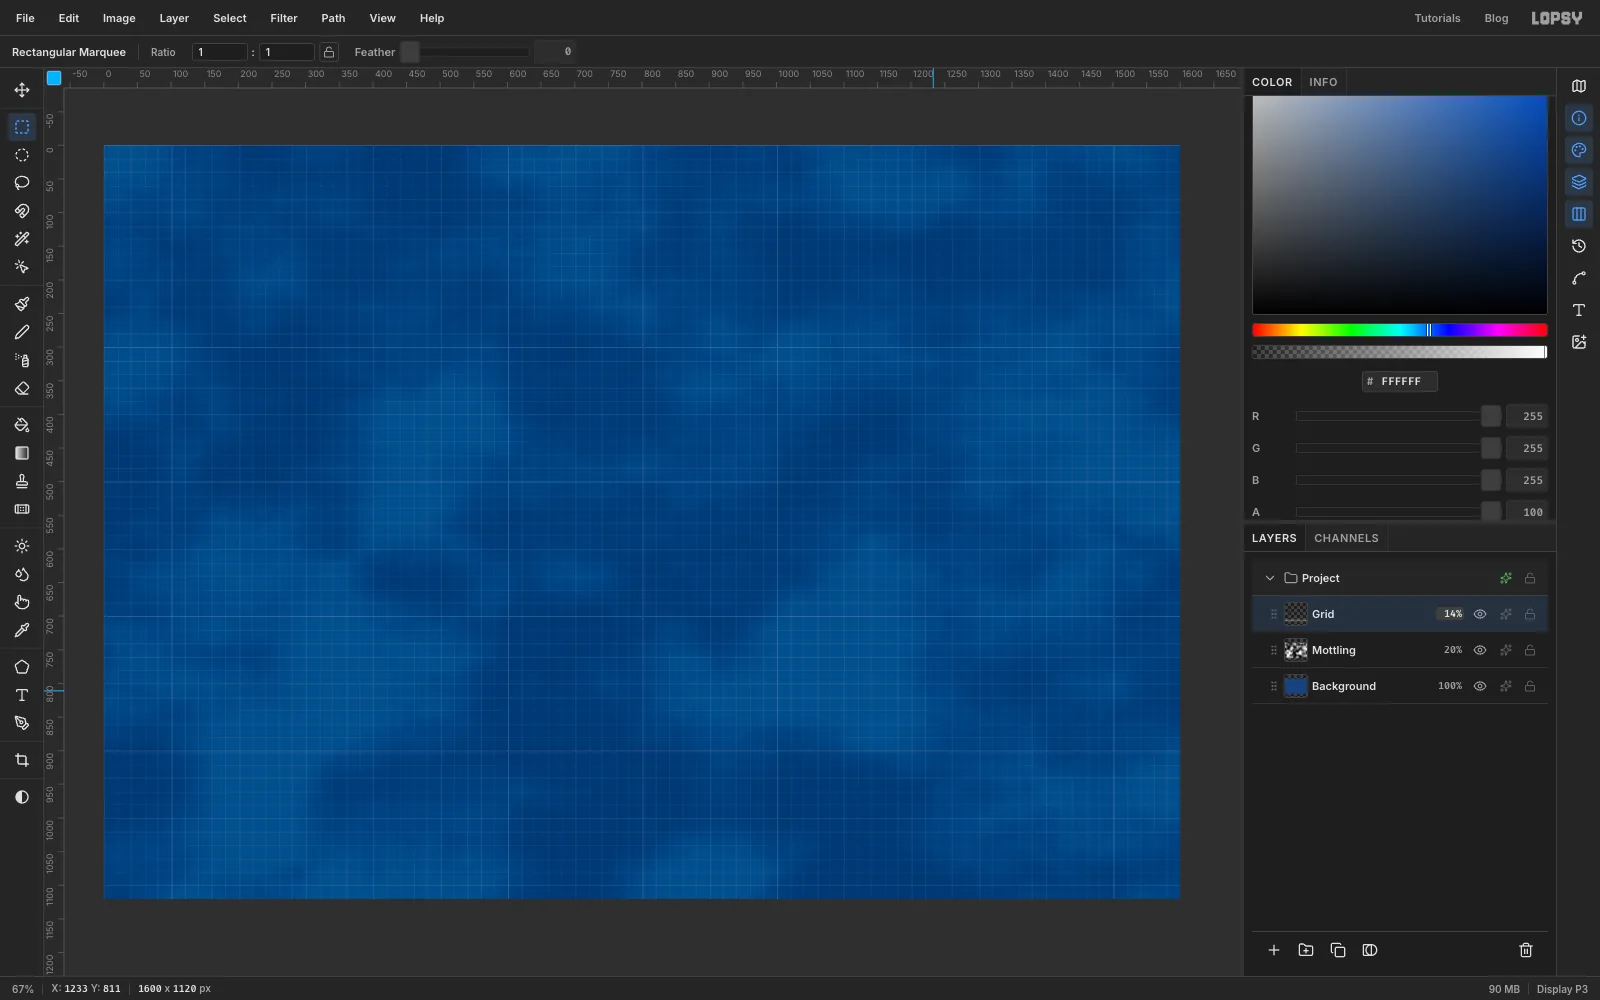
Deselect and delete the Grid tile layer; the pattern stays saved. Add a layer named Grid, choose Edit → Fill with Pattern…, pick the 100×100 tile and click Apply. Lower the layer's opacity to 14%. The pattern tiles from the top-left corner, so a major line lands every 100 px.
-
Add guides and the drawing border
Click the top ruler at
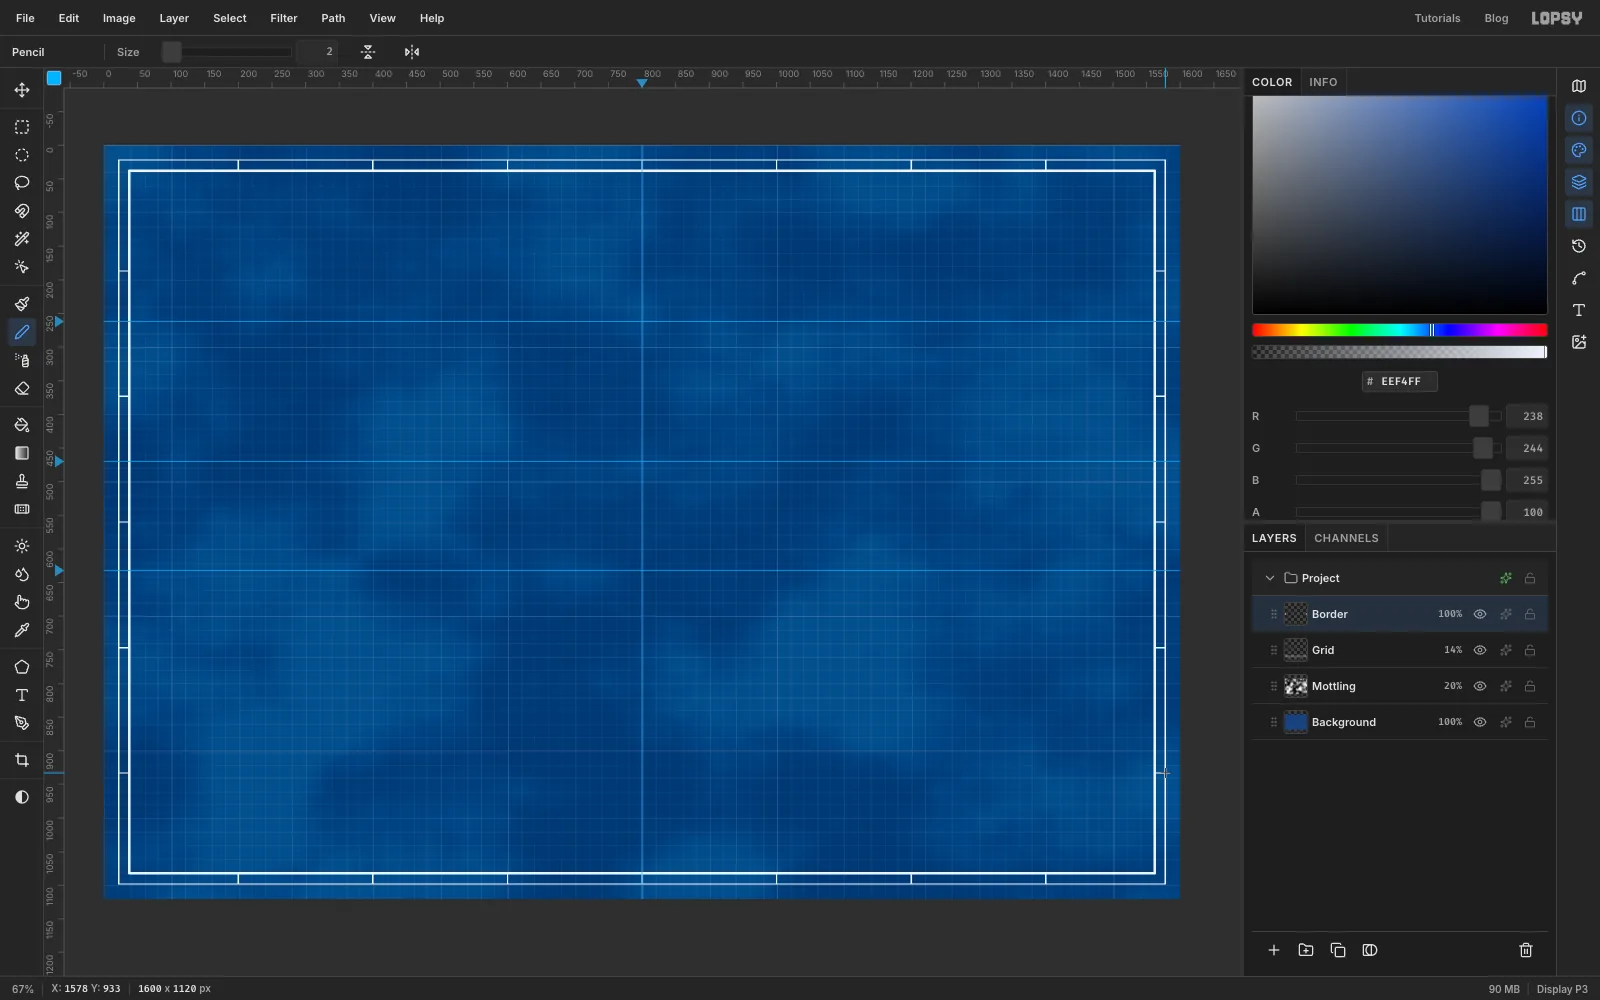
800to drop a vertical guide. Click the left ruler at470(the wheel's centre),262and632(the two rows of keys).Add a layer named Border. Pick the Shape tool and set Shape to Rectangle and Output to Pixels. Click the Fill swatch and choose Remove fill. Click the Stroke swatch and type
EEF4FF. Set Width to2.Click once in the middle of the canvas at
800, 560. Without a drag, the Shape tool asks for a size. Enter 1556 × 1076. Set Width to4, click the same spot again and enter 1524 × 1044. That gives a thin outer line and a heavier inner one.Pick the Pencil at Size
2with the same white. Draw short Shift-click ticks across the margin between the two lines: every 200 px along the top and bottom, and at every sixth of the height (about every 187 px) on the sides.The guides show where the wheel and the two rows of keys will sit. Once you've checked the layout, choose View → Show Guides to hide them. Shape and marquee drags snap to guides, and the small key parts later shouldn't jump onto them.
-
Draw the wheel rings
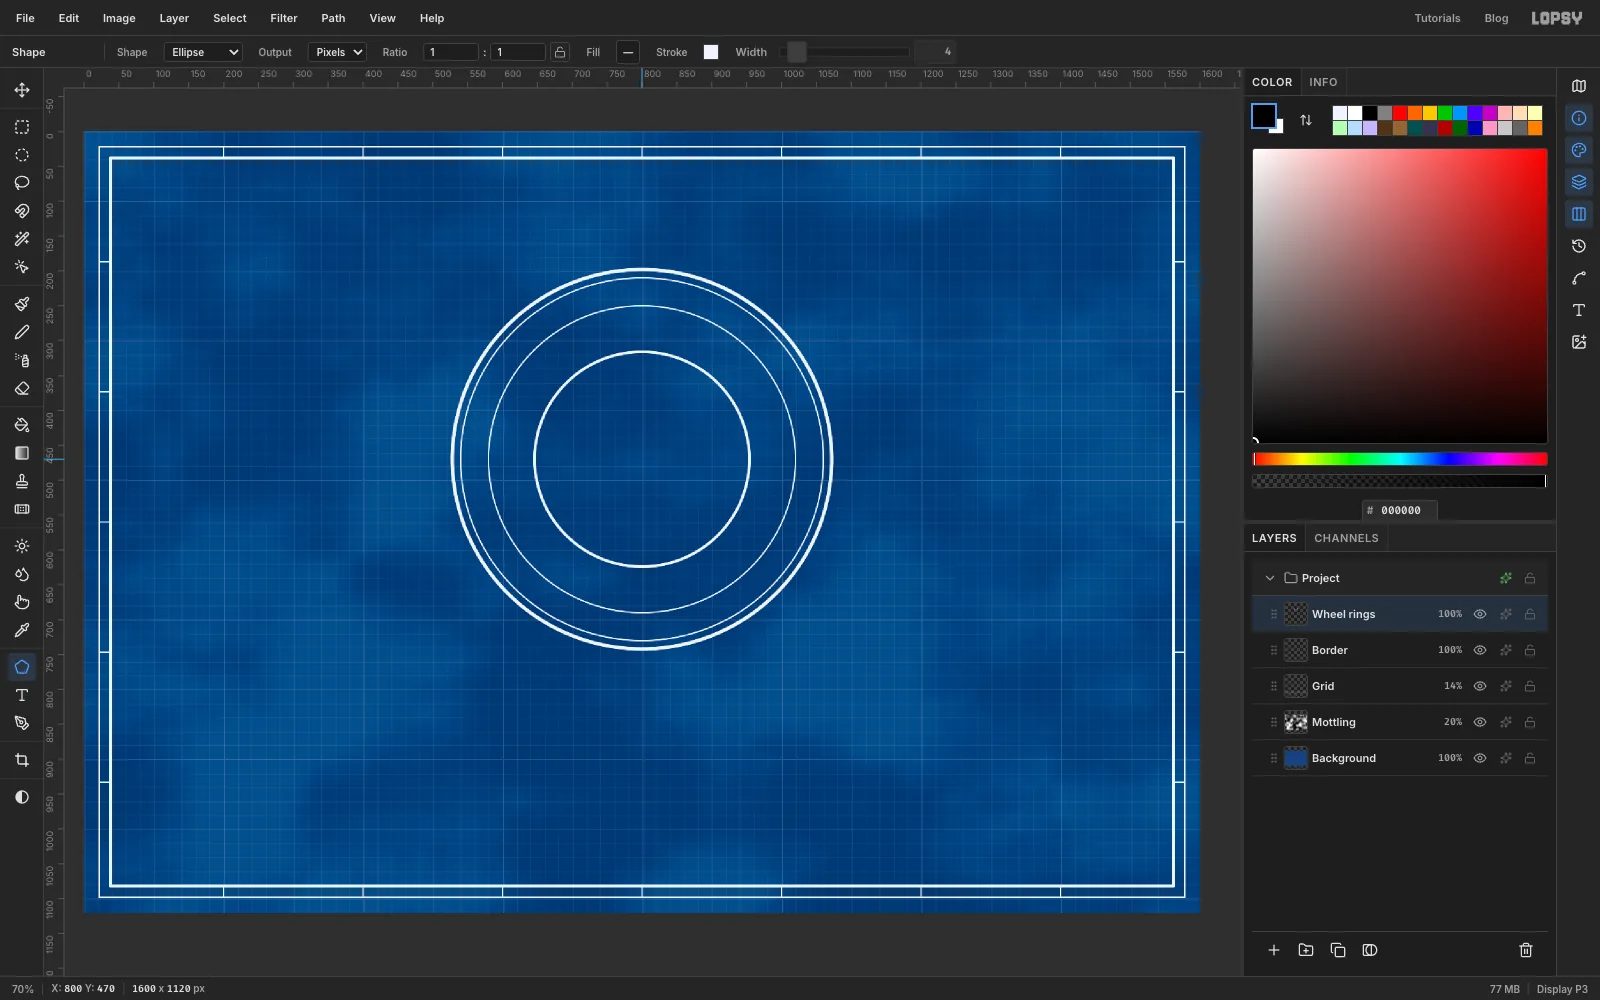
Add a layer named Wheel rings and pick the Shape tool with Shape: Ellipse, still no fill and a white stroke. Click at the wheel's centre,
800, 470, and enter each ring's size in turn:- 544 × 544 at Width
5(the outer rim) - 520 × 520 at Width
2 - 440 × 440 at Width
2 - 308 × 308 at Width
4(the inner disc)
Because each ring starts from a click at the same point, they stay exactly concentric.
- 544 × 544 at Width
-
Add tick marks with radial symmetry
Add a layer named Wheel ticks and pick the Brush. Click Radial Symmetry in the options bar and set Segments to
12. Then Cmd-click the wheel's centre to move the symmetry centre there.Set Hardness to
100and Size to4. Click just outside the rim at the top,800, 195, and Shift-click at800, 170. All twelve ticks appear at once. Set Size to3and draw a shorter tick halfway between the first two: click about 3 px outside the rim at 15° clockwise from the top, and Shift-click 11 px further out. Now there are 24 ticks, long and short.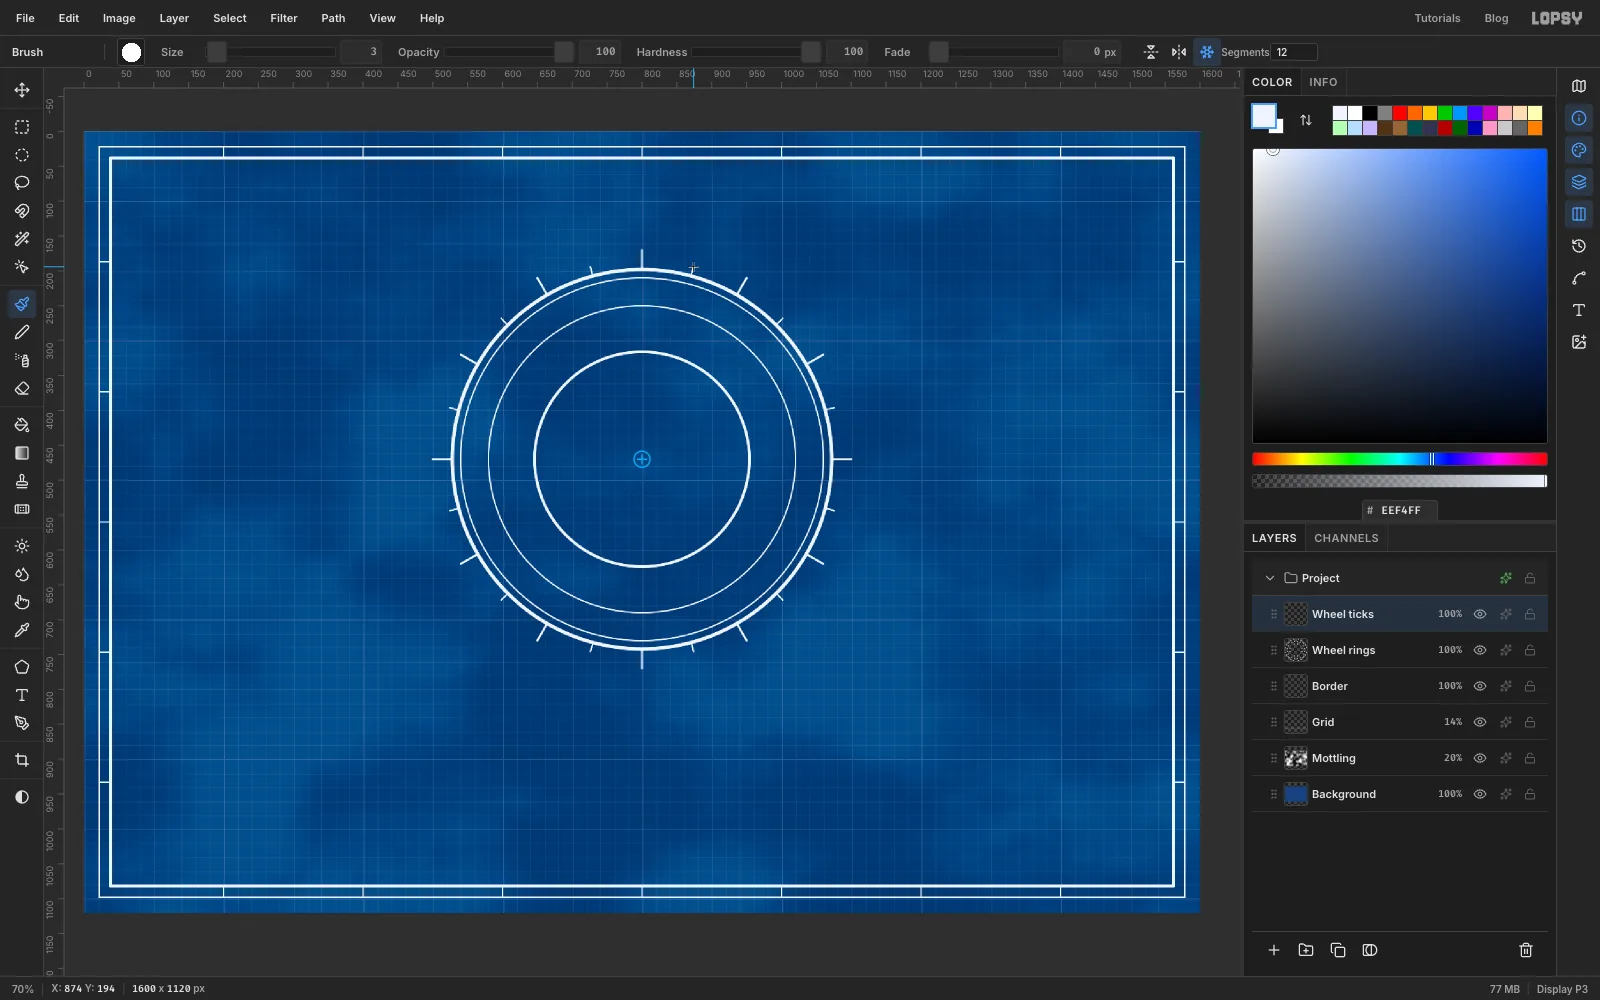
-
Set the zodiac glyphs on a circle
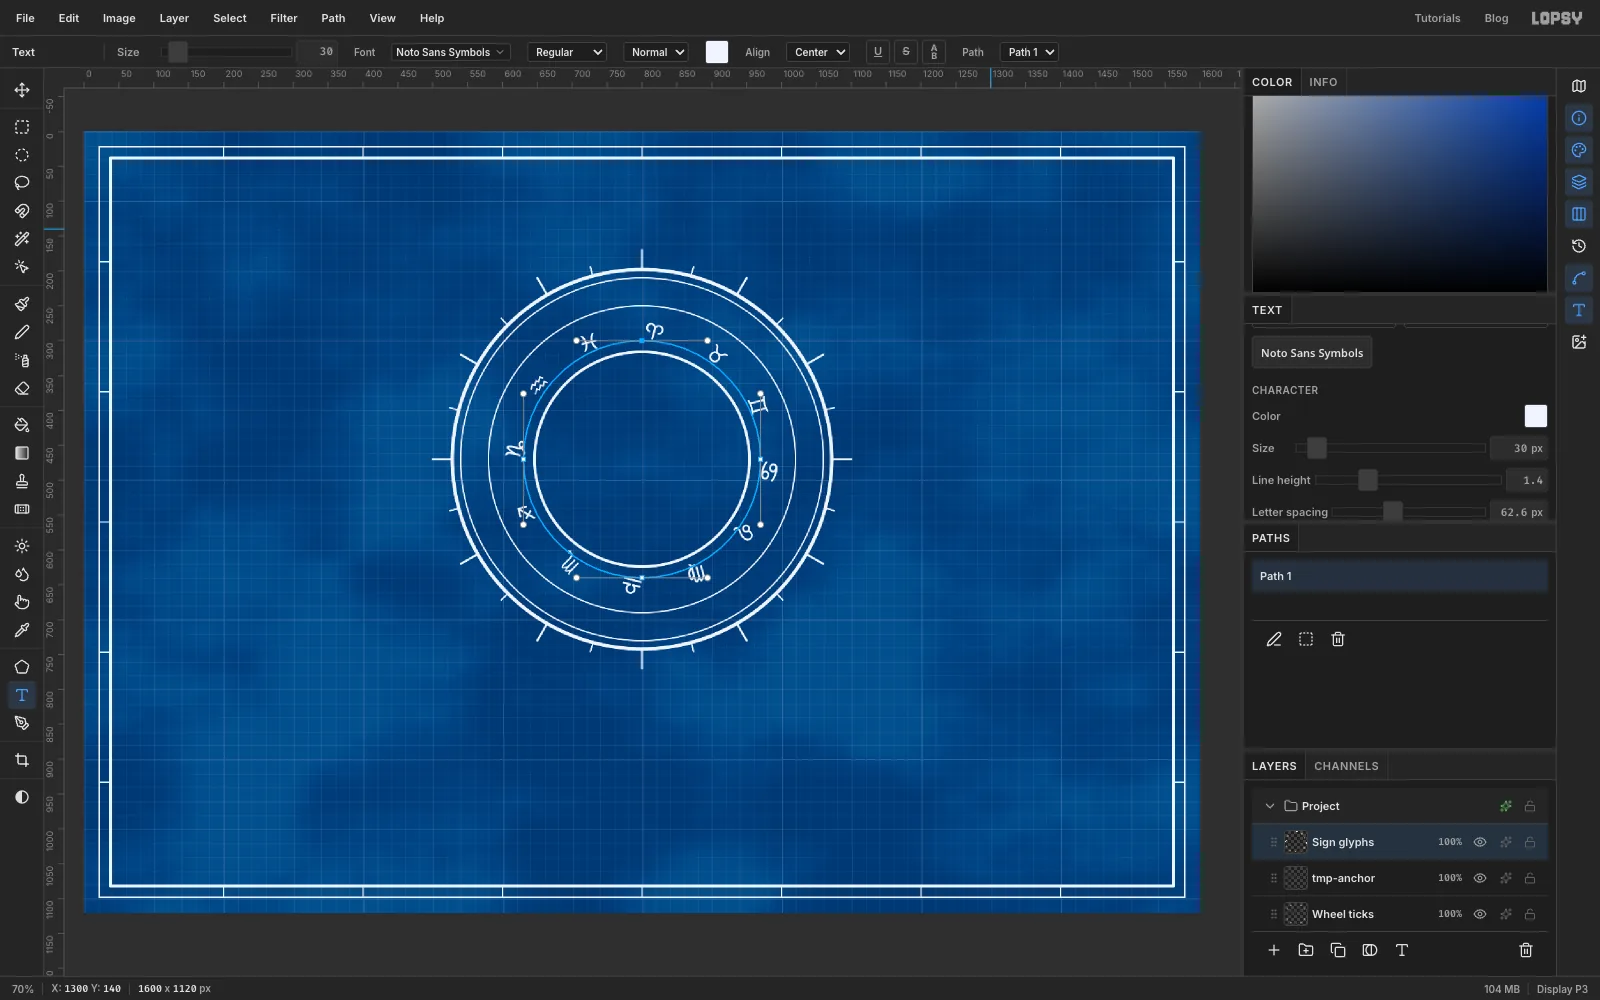
Text on a path needs a path. Pick the Shape tool, set Output to Path, and drag from the centre
800, 470out to970, 640. The Shape tool draws from the centre, so this makes a circle path with a radius of 170 px. It starts at the top and runs clockwise.Click a plain layer first, because the Text options restyle whichever text layer is selected. The screenshots use an empty helper layer named tmp-anchor for this; Wheel ticks works just as well. Pick the Text tool, choose Noto Sans Symbols at Size
30, white. In the Text panel set Letter spacing to62.6. Click an empty spot and type (or paste) the twelve signs: ♈♉♊♋♌♍♎♏♐♑♒♓. Press Tab to commit.In the options bar, set Path to the circle path and Align to Center. The glyphs wrap round the circle, one every 30°. Rename the layer Sign glyphs.
-
Add the ring of sign names
Draw a second circle path the same way, from
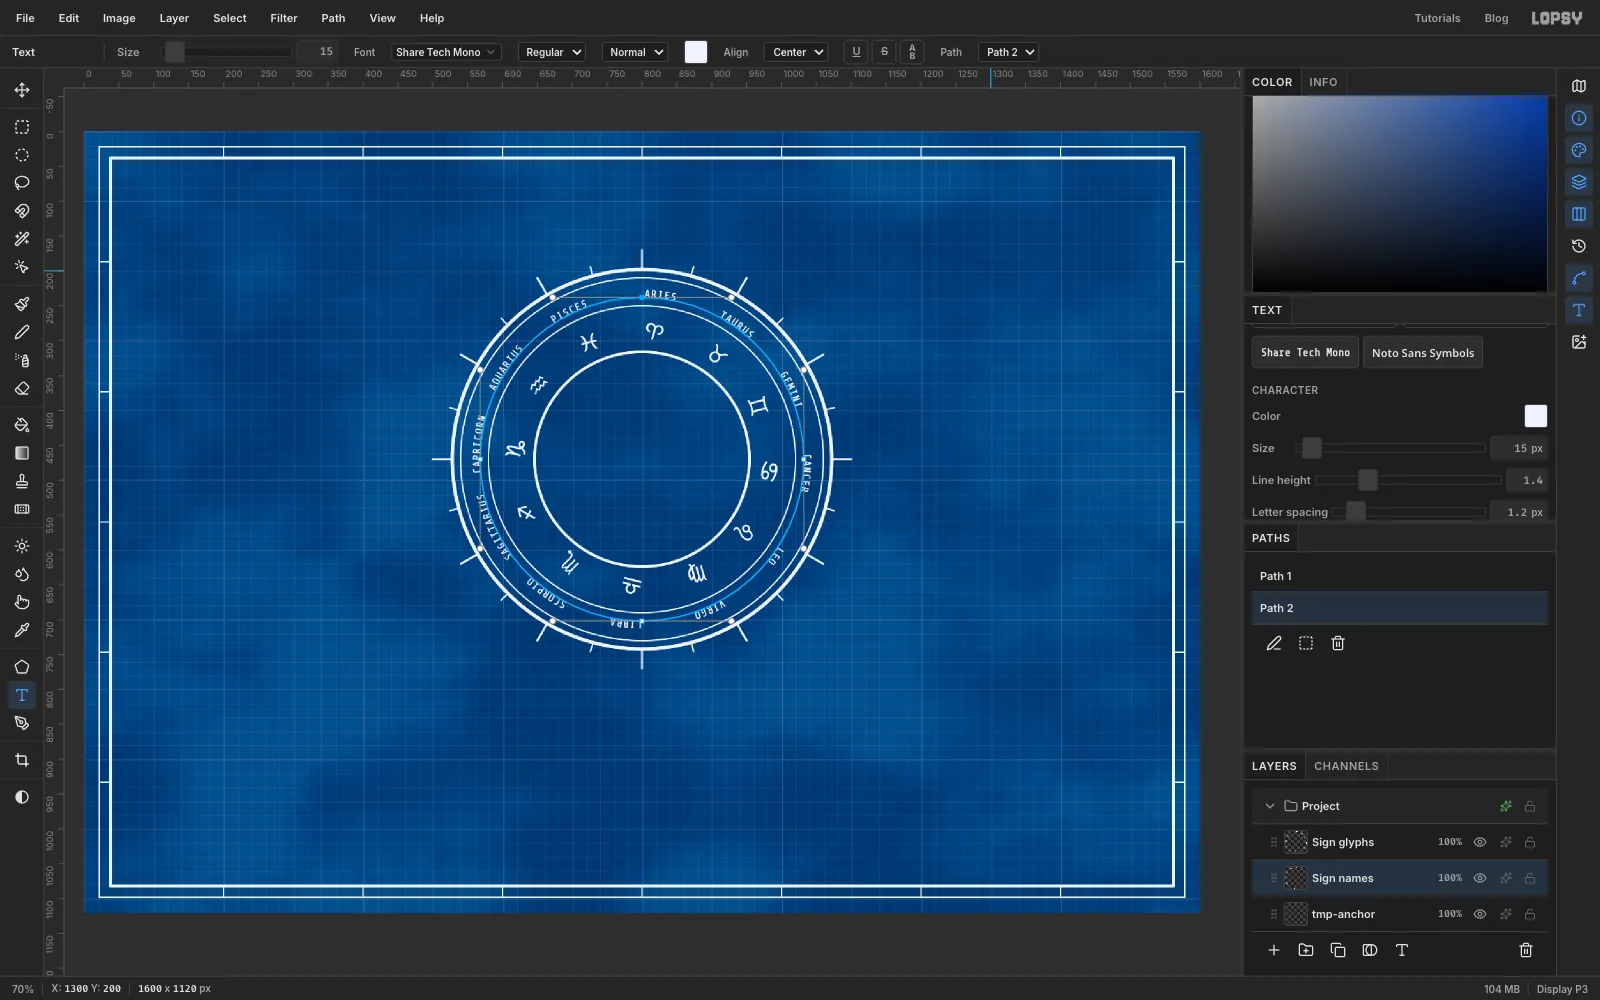
800, 470out to1032, 702(radius 232).Click Wheel ticks again. Set the Text tool to Share Tech Mono at Size
15and set Letter spacing to1.2. In a monospace face every character is the same width. Give each name a 13-character slot (the name plus spaces) and the twelve slots fill the circle exactly. Type the names starting with ARIES and pad each one with spaces so it is roughly centred in its slot. The gaps below aren't all 13; each one is the end of one slot plus the start of the next:- ARIES, 7 spaces, TAURUS, 7 spaces, GEMINI, 7 spaces, CANCER, 9 spaces
- LEO, 9 spaces, VIRGO, 8 spaces, LIBRA, 7 spaces, SCORPIO, 4 spaces
- SAGITTARIUS, 3 spaces, CAPRICORN, 4 spaces, AQUARIUS, 6 spaces, PISCES, 8 spaces
Commit with Tab, set Path to the new circle and Align to Center, and rename the layer Sign names. Each name now sits above its glyph.
-
Divide the wheel into sectors
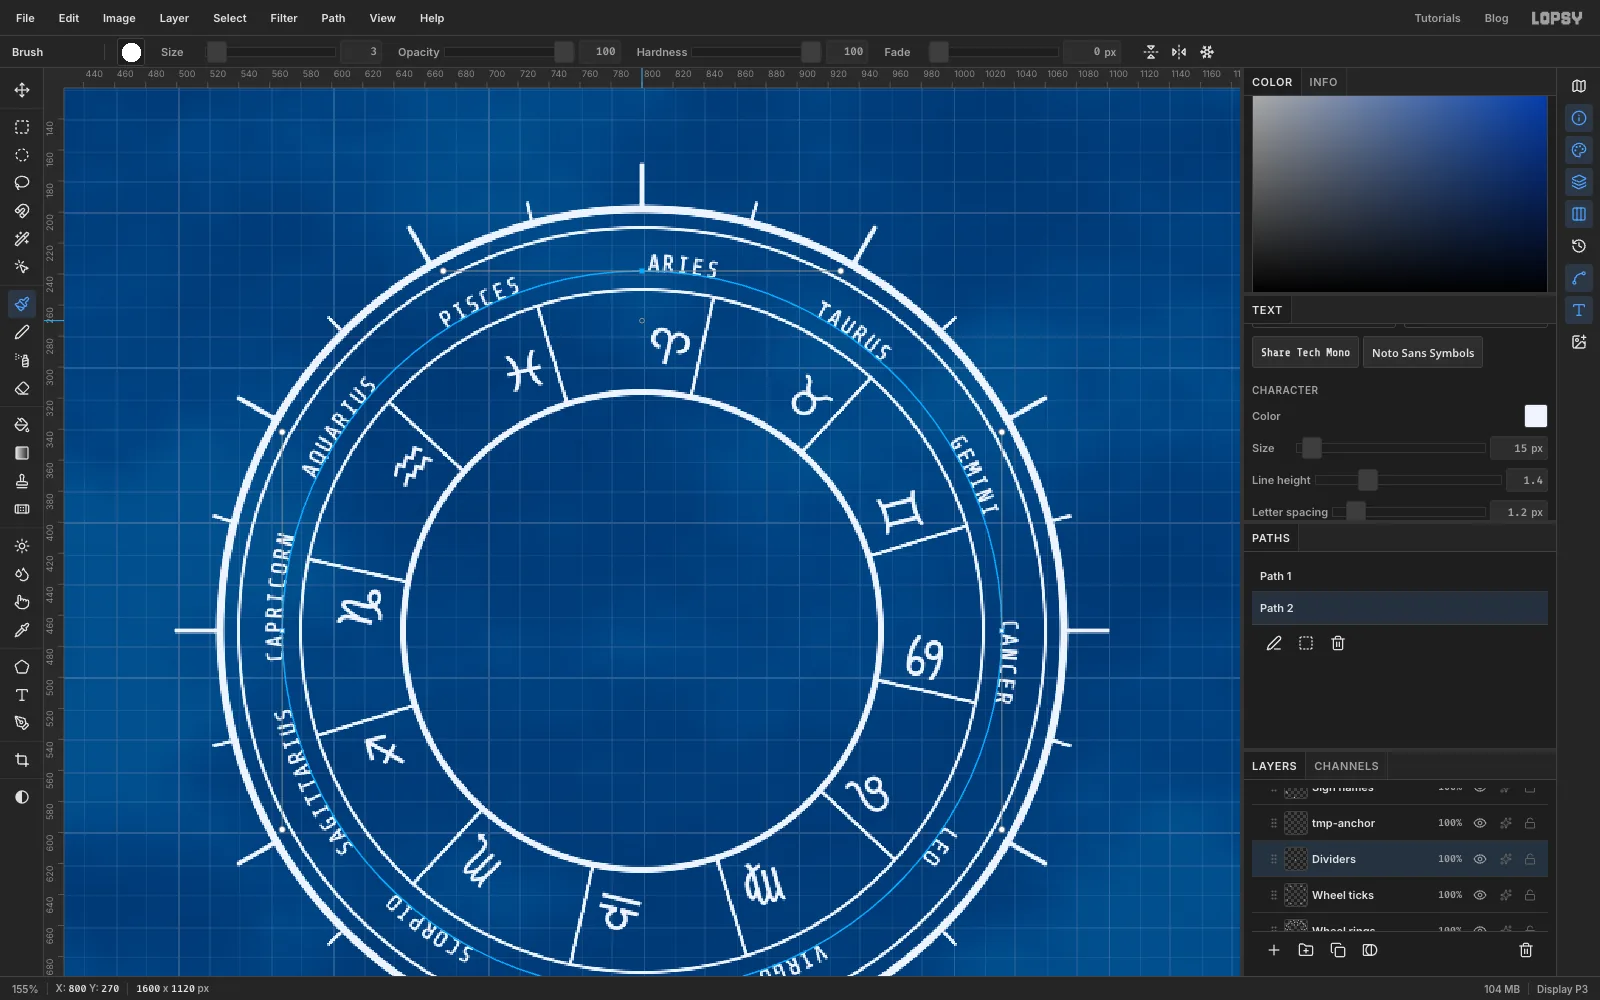
Add a layer named Dividers. With the Brush (still Radial Symmetry, 12 segments, centred on the wheel) at Size
3, draw one short line across the glyph band, from just outside the inner disc to just inside the 440 px ring. Put it in the gap between ♈ and ♉, about 12° clockwise of straight up. The other eleven land in the other gaps.Click Radial Symmetry again to turn it off.
-
Build a key from marquees
The two crossed keys in the wheel start as one plain key, built from selections.
First make the hatch pattern you'll use for cut-through parts. Add a layer named Hatch tile, pick the Brush at Size
2and Hardness100, white, and choose an empty 14 × 14 px square (this build used1300, 60to1314, 74). Draw three parallel 45° lines 14 px apart with Shift-click: one corner to corner through the square, and one through each of the two other corners, so the lines wrap seamlessly. Select the square, choose Edit → Define Pattern, deselect and delete the layer.Now add an empty layer named scratch to keep your place in the stack (you can delete it at the end) and zoom in on the wheel.
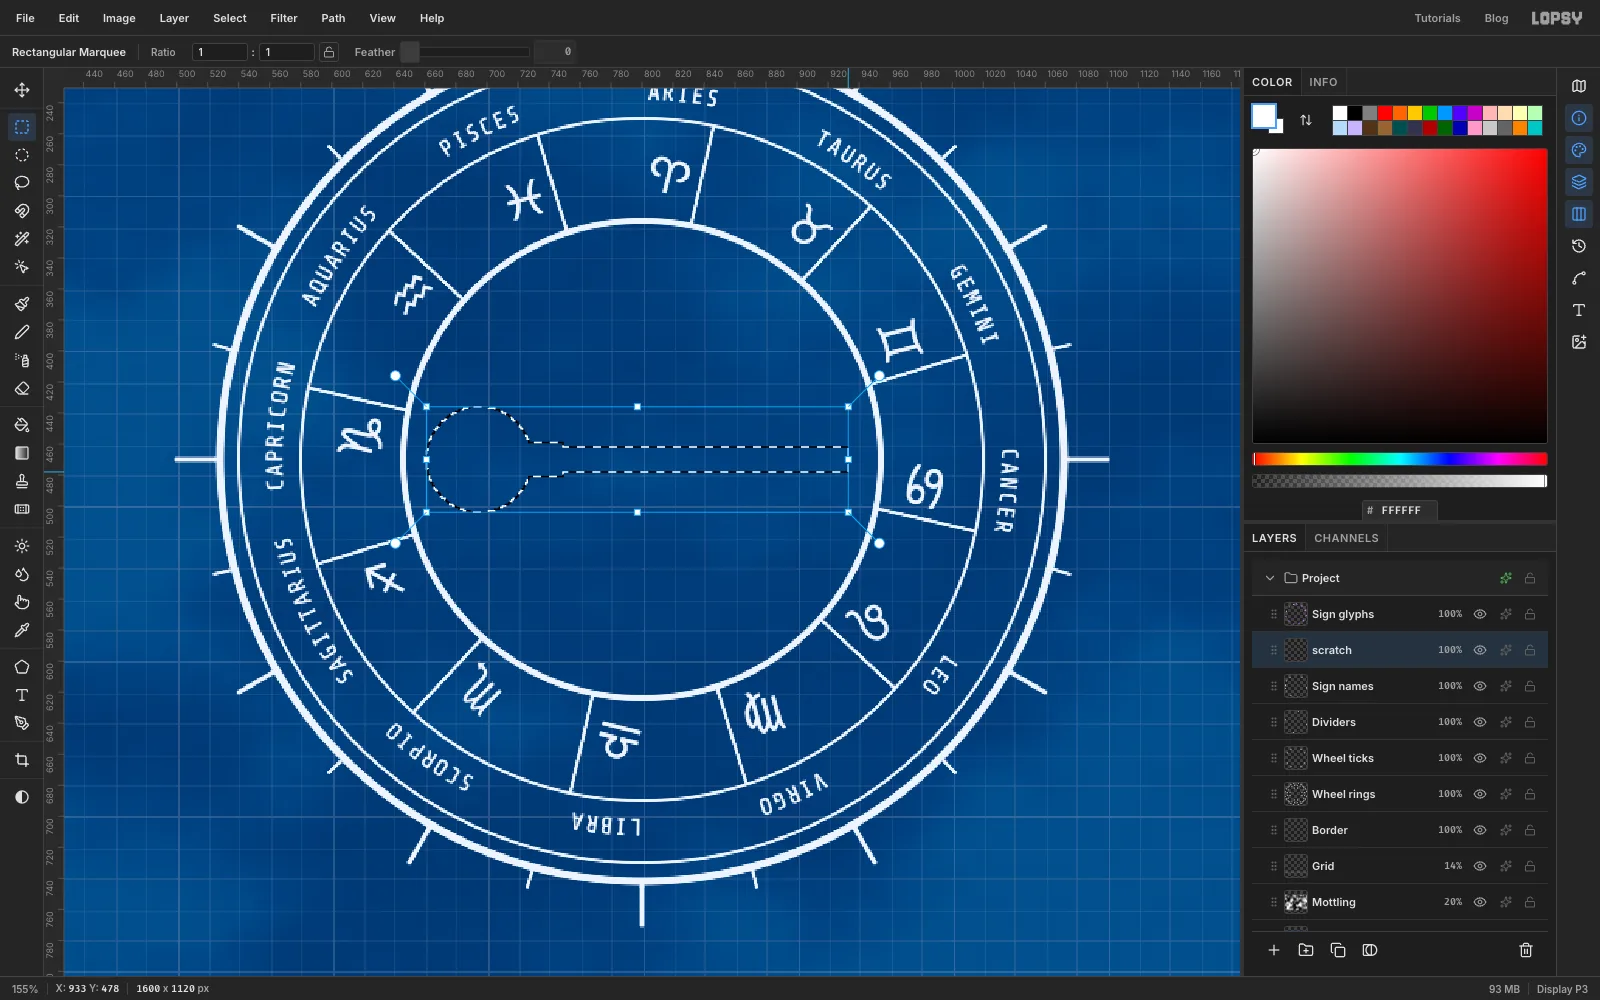
With the Elliptical Marquee, drag a circle from
661, 436to729, 504for the bow. Switch to the Rectangular Marquee and hold Shift while you drag each extra part, so it adds to the selection:- a short neck from
725, 459to749, 481 - the shaft from
729, 462to933, 478 - a collar ring from
880, 457to890, 483 - the bit (the part that turns the lock) from
897, 476to933, 516
- a short neck from
-
Cut the finger hole
Hold Alt to subtract. With the Rectangular Marquee, drag a slot into the bottom of the bit, from
910, 498to920, 518. Then pick the Elliptical Marquee and Alt-drag a circle from676, 451to714, 489for the finger hole.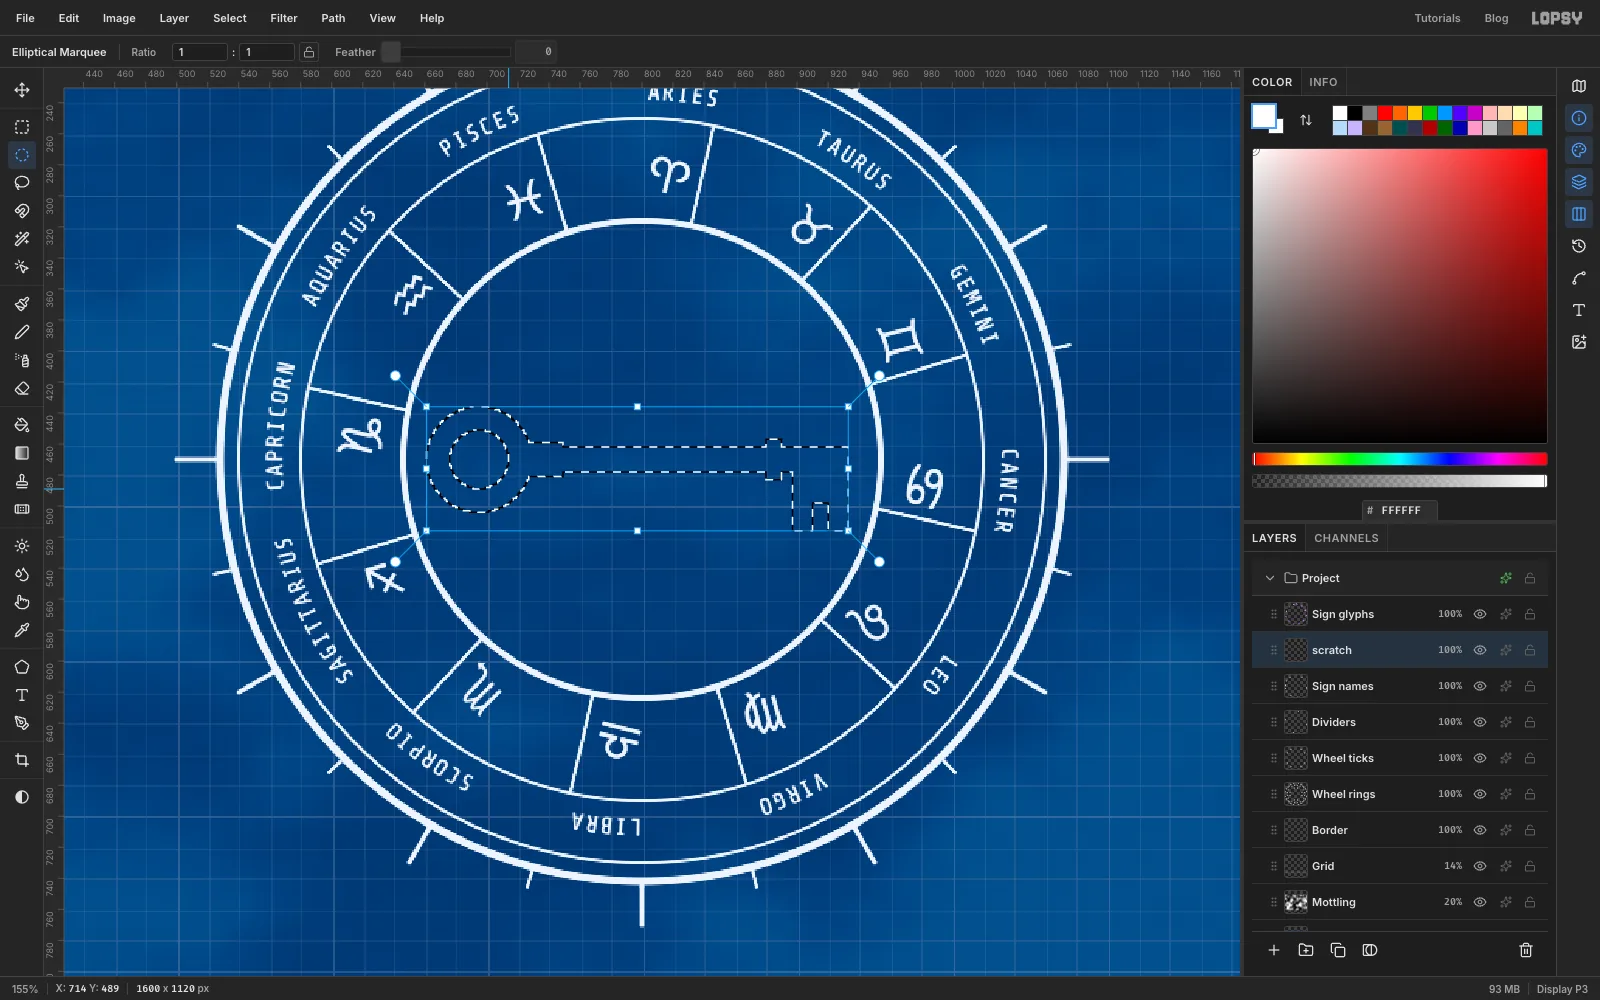
-
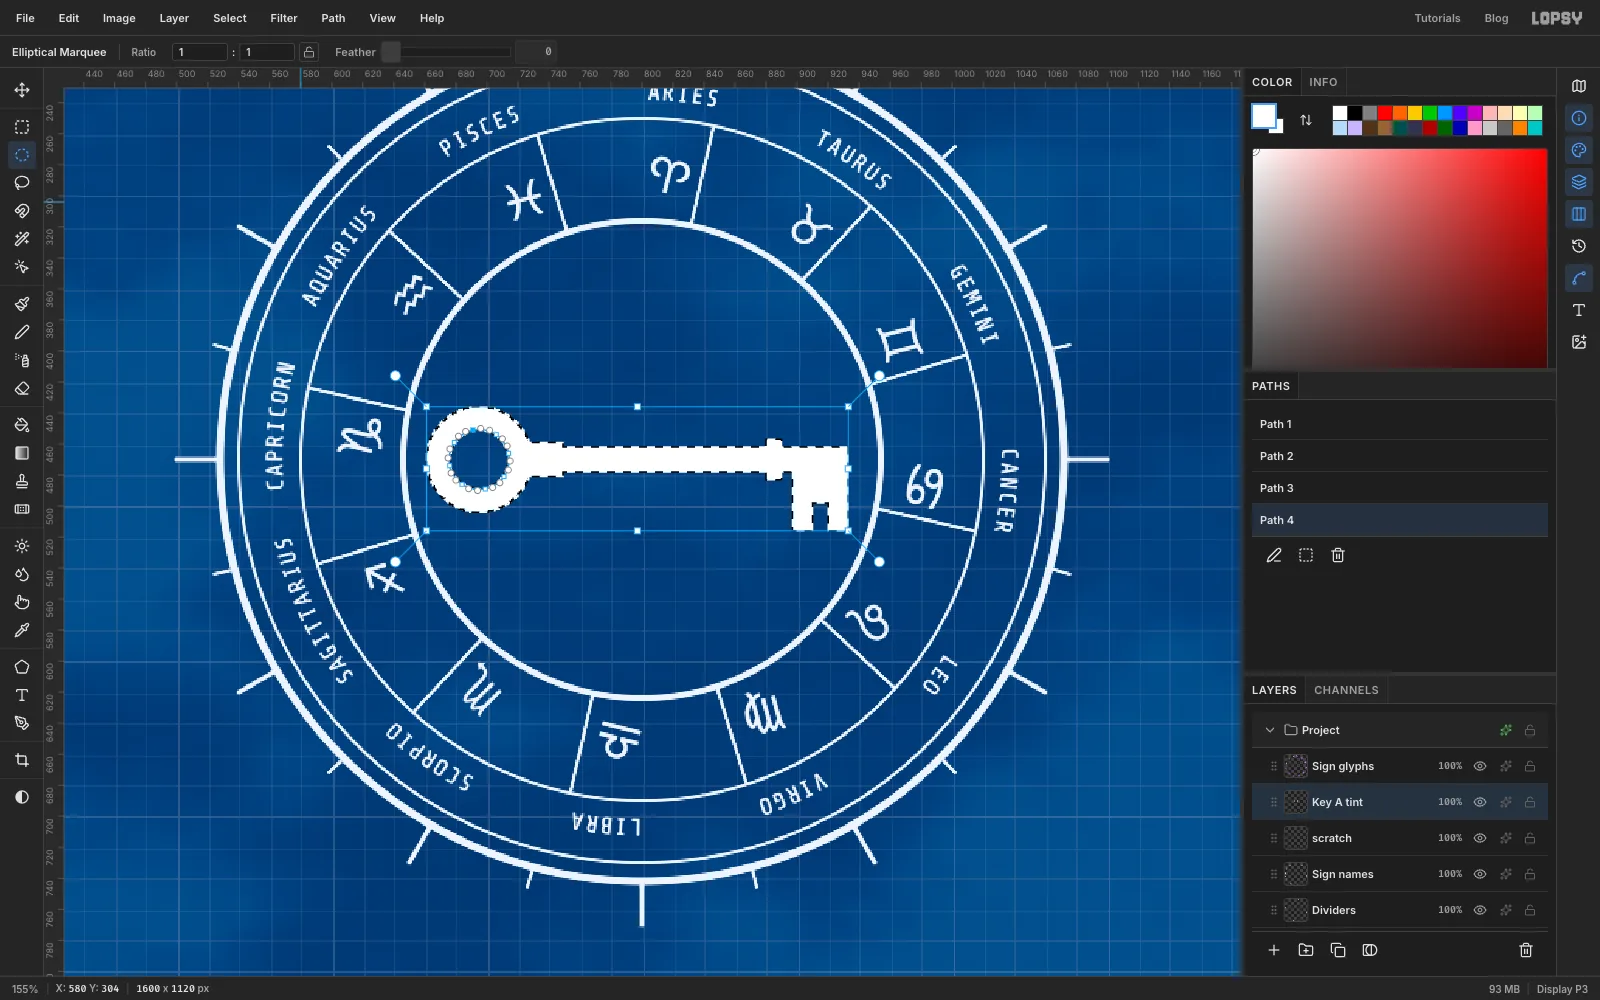
Tint the key and trace its outline
Add a layer named Key A tint, set the foreground to white and choose Edit → Fill. Keep the selection and choose Select → Selection → Path. The Paths panel gets two new paths, one for the outside of the key and one for the finger hole.
-
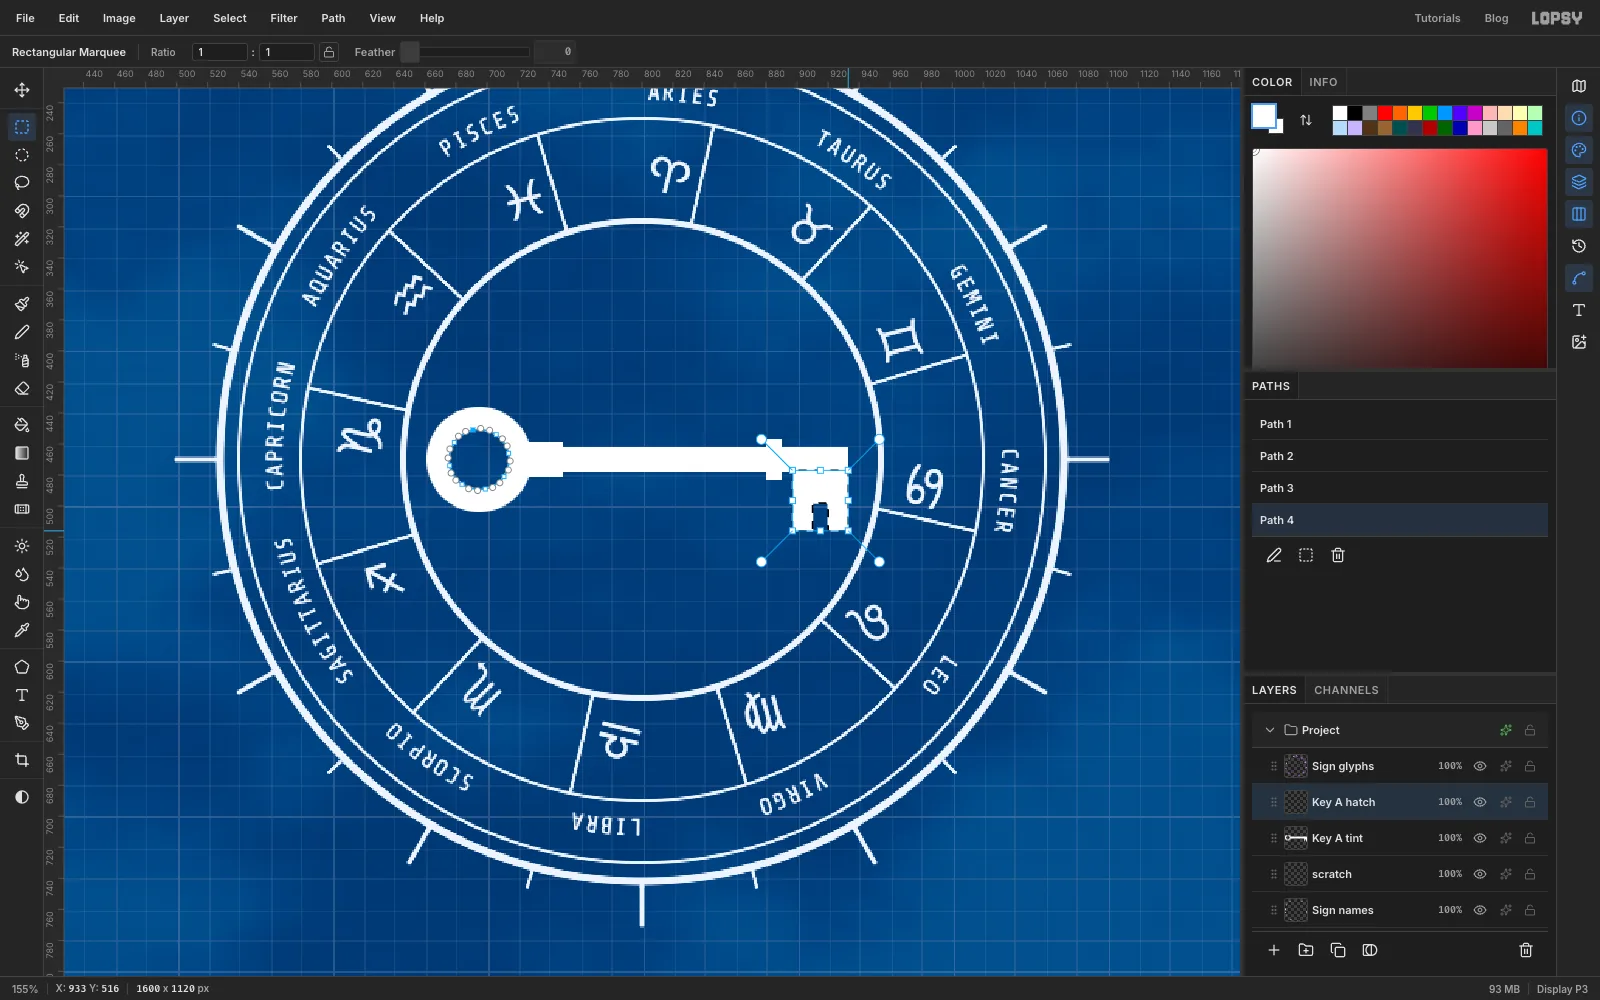
Hatch the bit
Drafters hatch a part that's cut through. The key selection should still be active from the last step. Add a layer named Key A hatch. With the Rectangular Marquee, hold Shift+Alt and drag a box around the bit. That keeps only the part of the key selection inside the box. Choose Edit → Fill with Pattern…, pick the 14×14 hatch and apply it. Set this layer to 70% and deselect. Set Key A tint to 16%, so the key is a faint wash and the hatching shows.
-
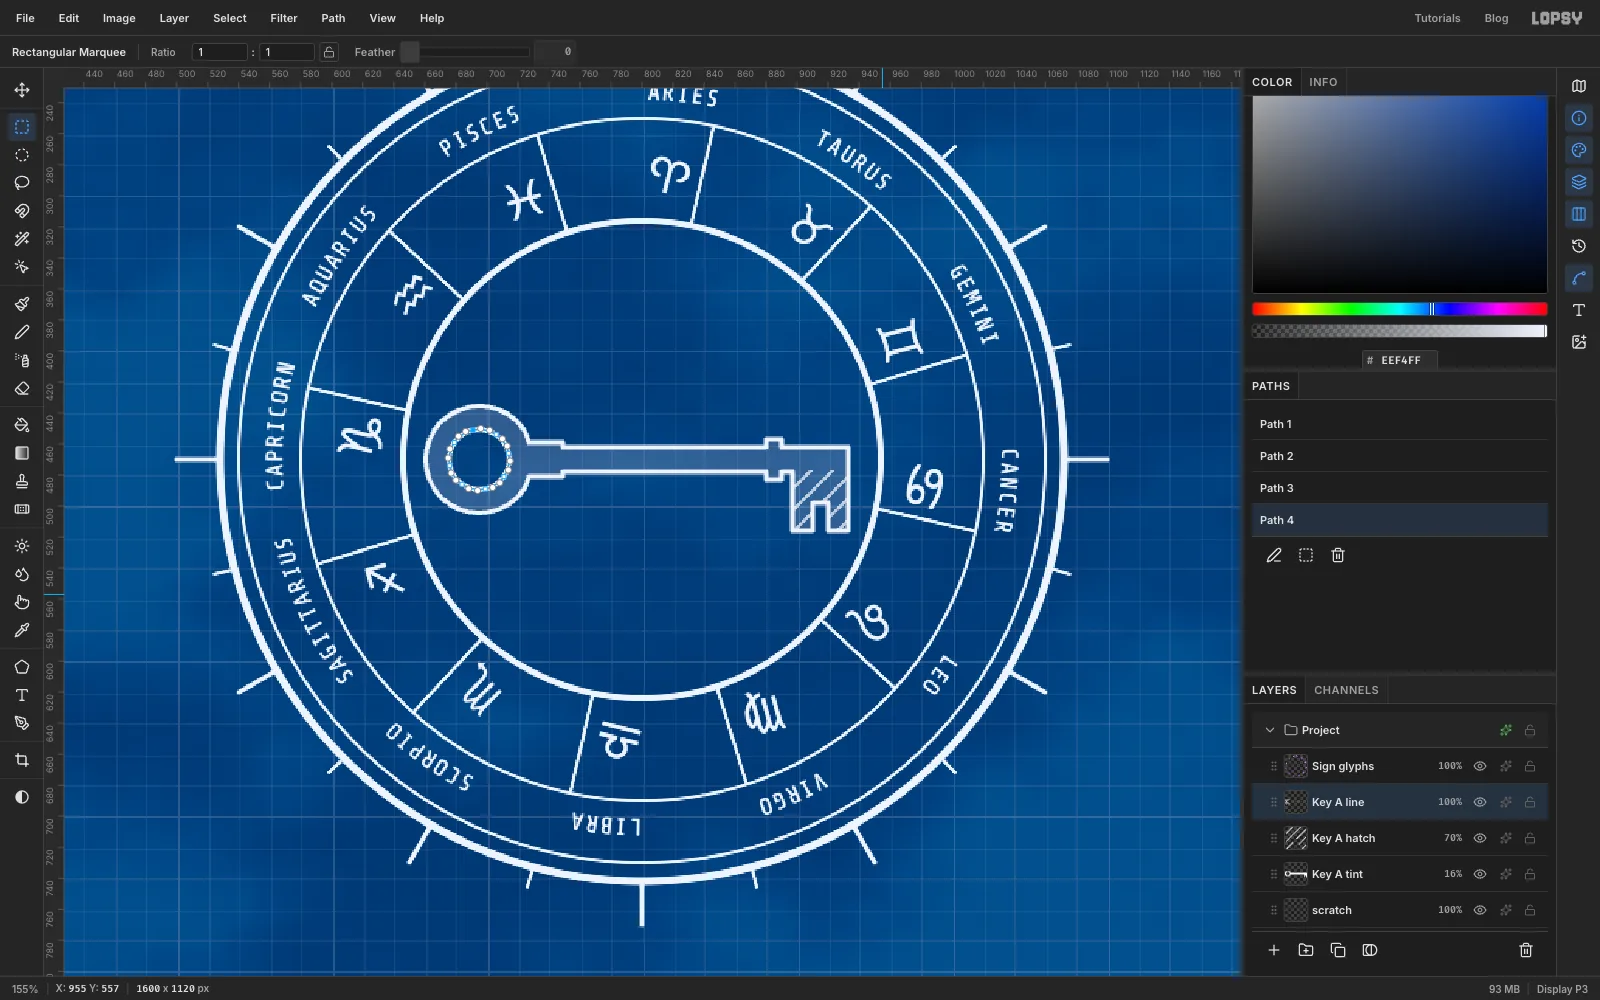
Stroke the outline
Add a layer named Key A line and set the foreground to . In the Paths panel, click the first of the two newest paths (the outline; here Path 3) and click Stroke Path. Enter Width
3and click Stroke. Do the same for the finger-hole path (Path 4).Stroke Path follows the traced curve exactly, so the line is smooth even where a marquee edge was a little stepped.
-
Group the key and rotate it 45°
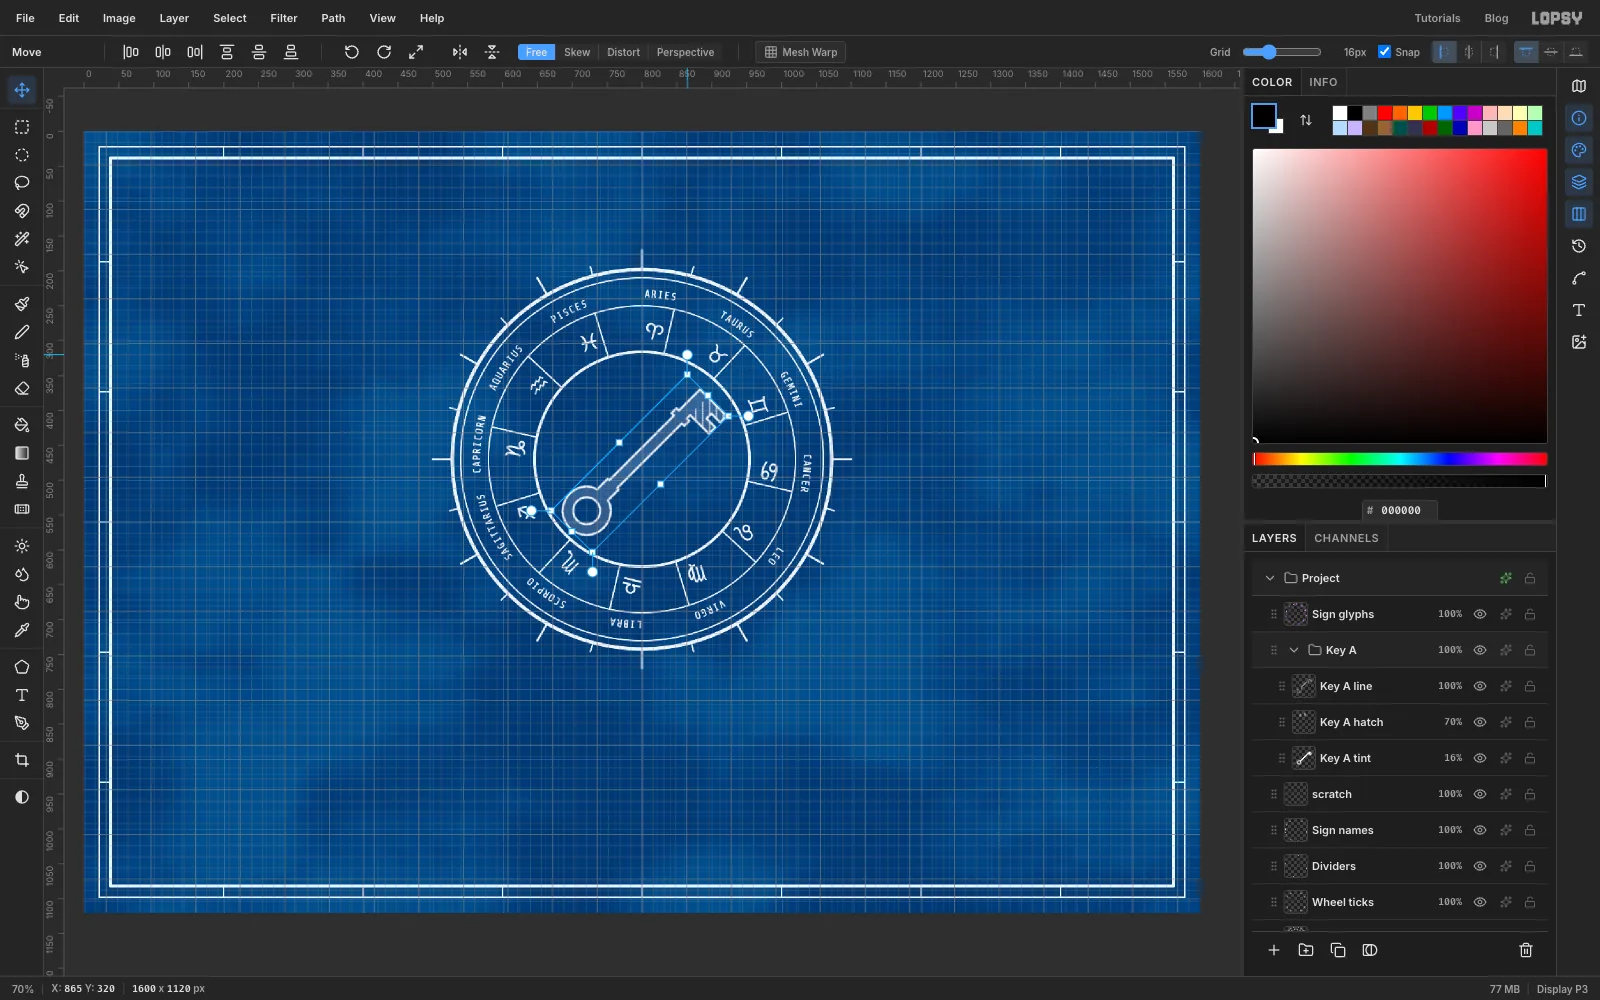
Click Key A tint, Cmd-click Key A hatch and Key A line, and choose Layer → Group Layers. Name the group Key A. Turn on View → Show Grid, because with the grid on the rotate handle snaps in 15° steps.
Click the Key A group row and pick the Move tool. With no selection, the handles frame the whole group. Drag the round rotate handle at the top-right corner counter-clockwise until the key turns 45°: bow down-left, bit up-right. Press Escape to apply it, then turn the grid off.
-
Duplicate and flip the copy
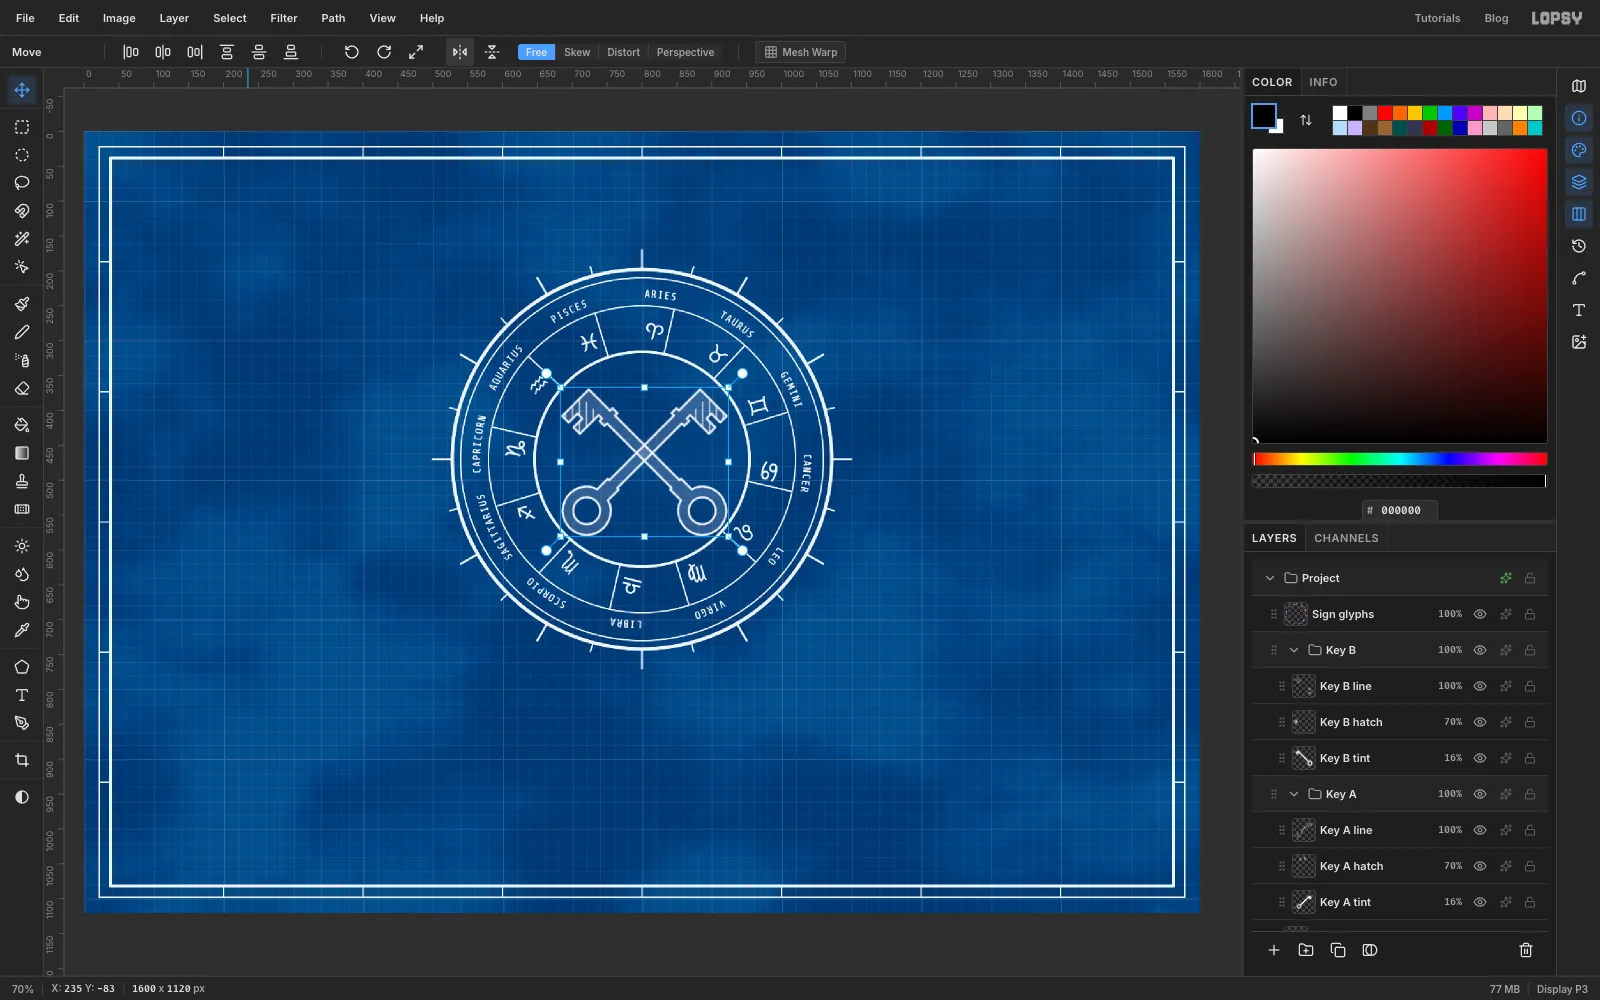
With Key A selected, choose Layer → Duplicate Layer. Name the copy Key B and rename its three layers Key B tint, Key B hatch and Key B line.
With the Move tool and Key B selected, click Flip Horizontal in the options bar. The copy mirrors in place. Nudge it with the left arrow key until the X is symmetrical about the vertical centre line. It takes about 6 px.
-
Hide the lines underneath
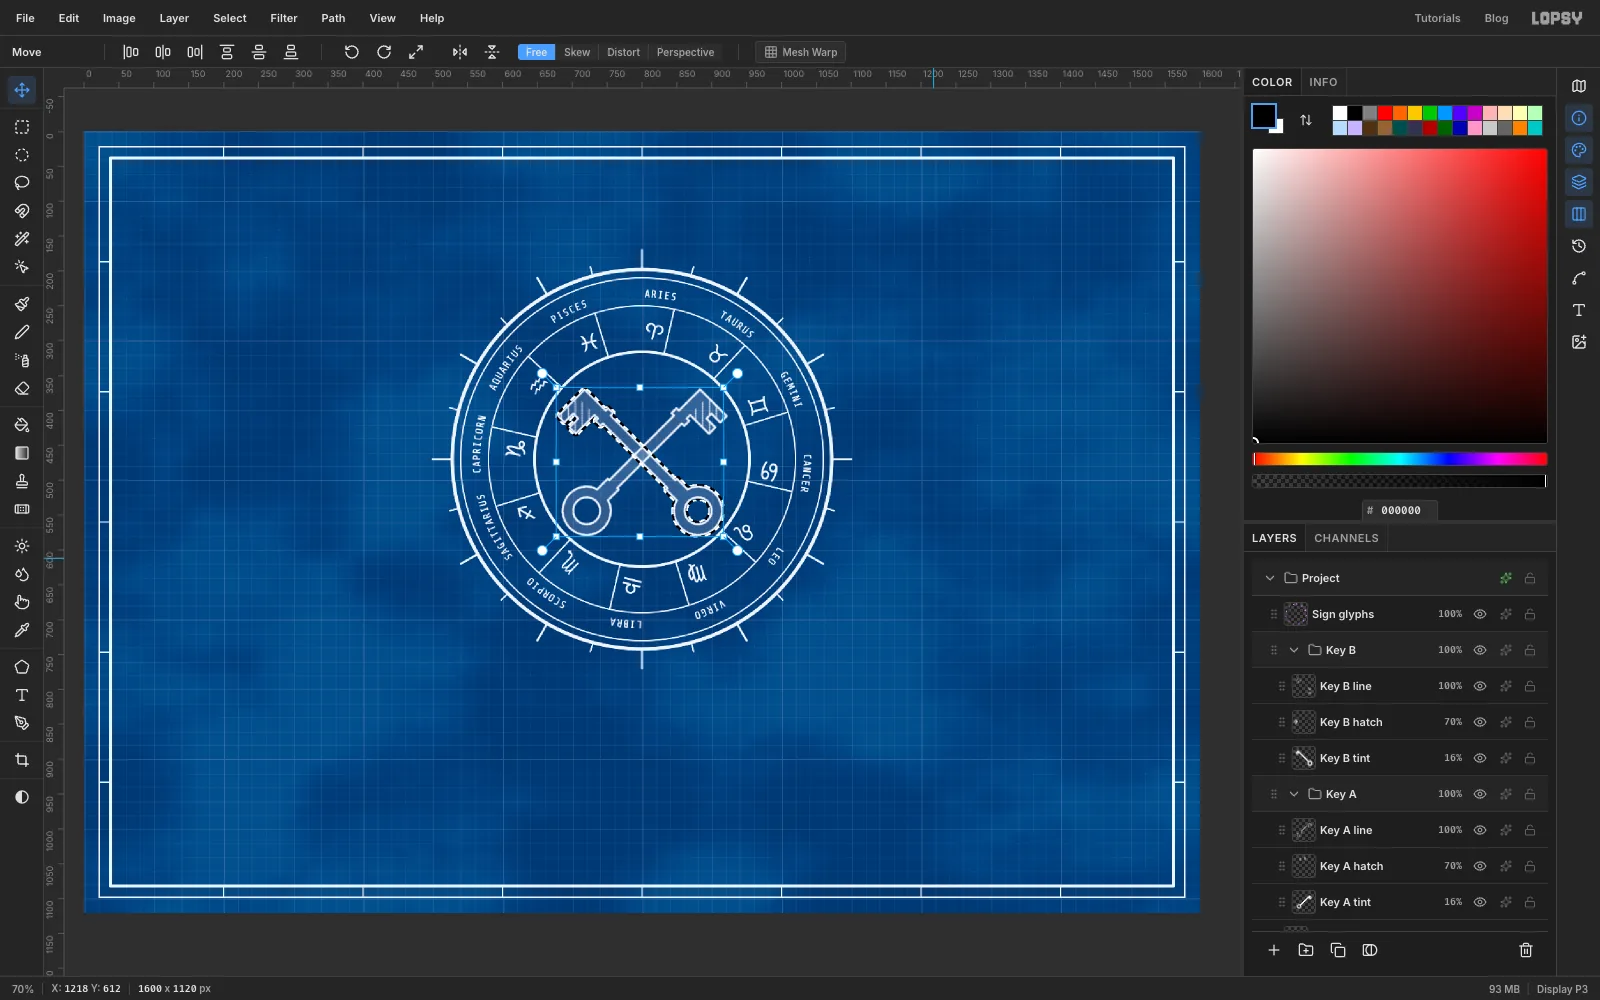
On a drawing, a part in front hides the lines behind it. Cmd-click the thumbnail of Key B tint. Its full silhouette becomes the selection, because the tint layer is solid white at a low layer opacity. Choose Select → Grow…
3.Click Key A line and press Delete. Do the same on Key A hatch and Key A tint, then deselect. Key A now passes cleanly behind Key B.
-
Rivet the crossing
Click Key B line and add a layer named Hub. Pick the Shape tool with Ellipse and Pixels. Set the fill to the paper blue and the stroke to white at Width
3, then click where the shafts cross and enter 30 × 30. Remove the stroke, set the fill to white and click the same point for an 8 × 8 dot.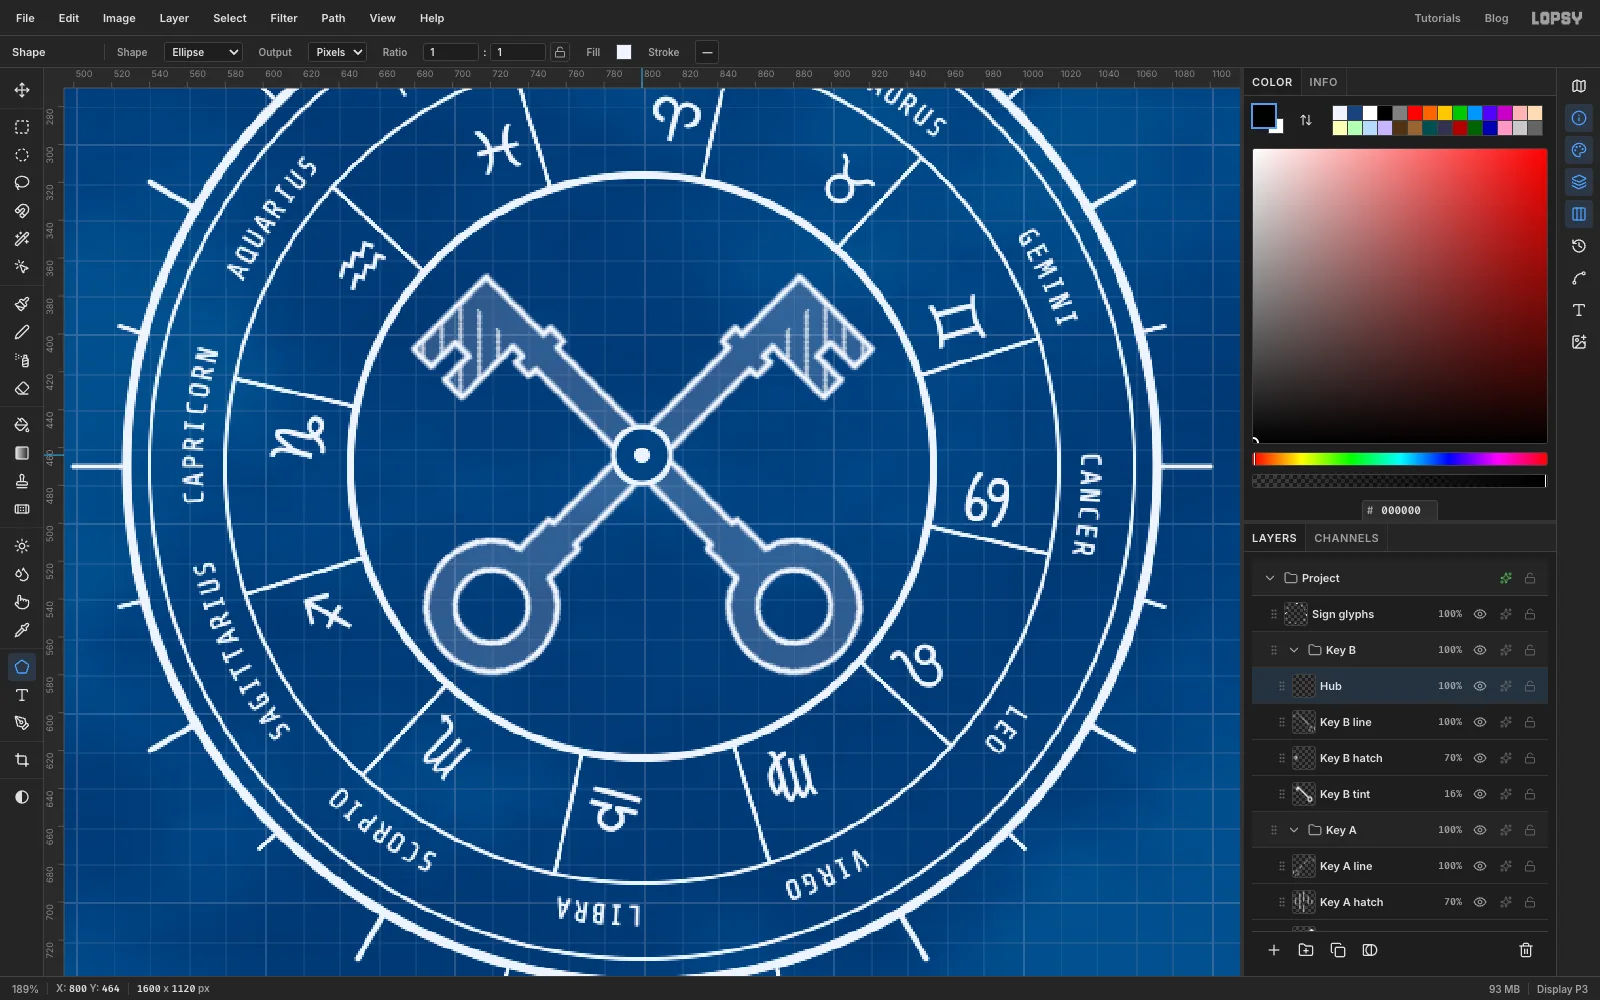
-
Scale the pair to fit the ring
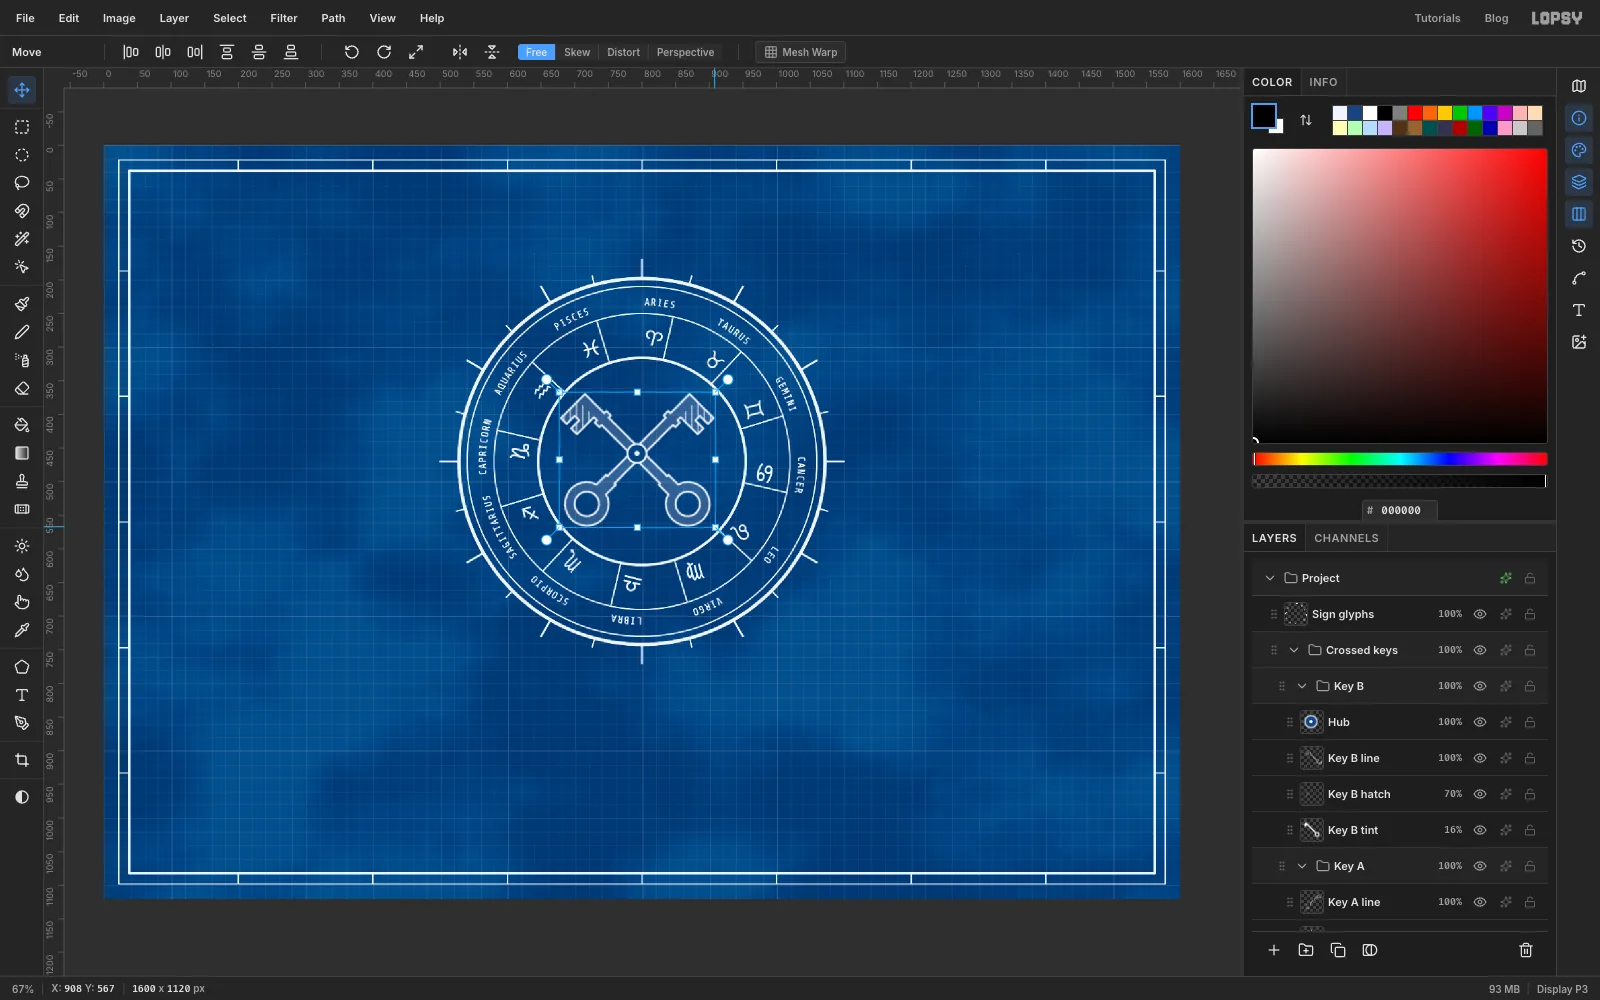
Cmd-click to select both Key A and Key B and group them as Crossed keys. With the Move tool, Cmd-drag the bottom-right corner handle inward until the pair is about 6% smaller. Cmd keeps the proportions. Press Escape, then nudge the group so the bows clear the inner ring by the same gap as the bits.
-
Build the Aries key
The four figure keys are built the same way as the plain one. Only the bow and the bit change. Collapse the Crossed keys group and click Sign glyphs, so new layers land at the top level rather than inside the group. Add an empty layer named scratch2 and zoom in on the top left.
For FIG. 1 Aries, the ram's horns become a trefoil bow. Drag a circle from
96, 232to156, 292. Shift-drag two more circles of the same size, above and below to the right,126, 202to186, 262and126, 262to186, 322, then a larger disc from122, 226to194, 298to fill the middle.Shift-add the rectangles: neck
190, 247to230, 277, shaft212, 252to464, 272, collar386, 246to398, 278, and a stepped bit410, 272to458, 302plus422, 300to458, 328. With the Elliptical Marquee, Alt-drag a circle from135, 241to177, 283for the finger hole.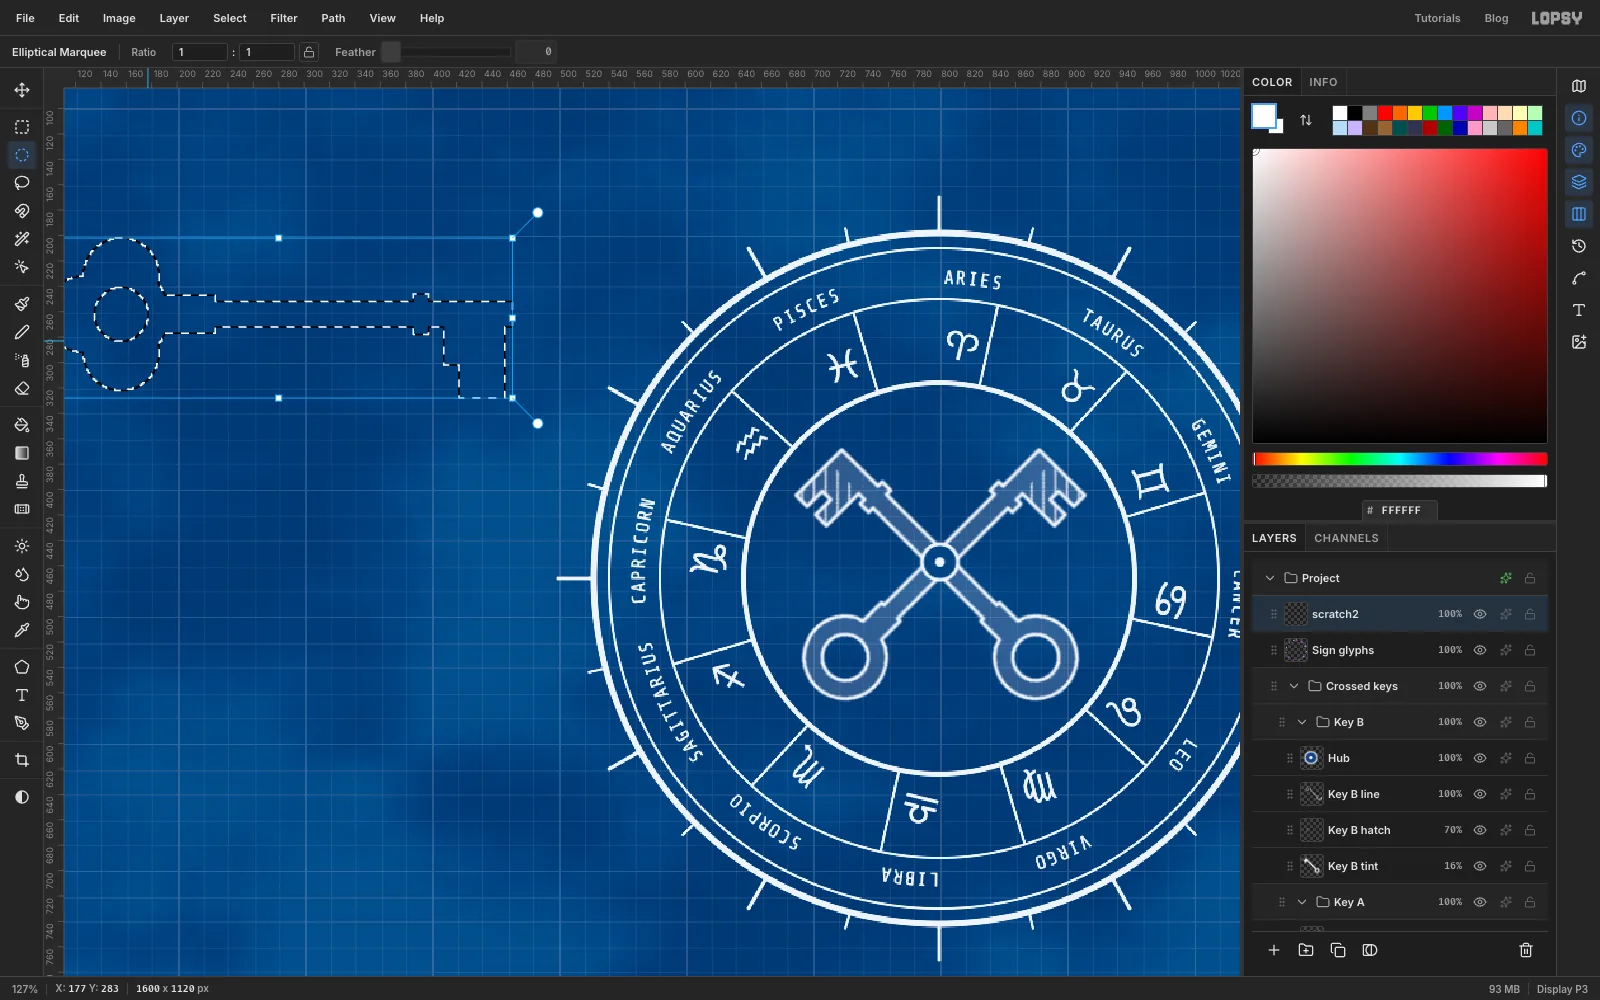
-
Tint, hatch and stroke Aries
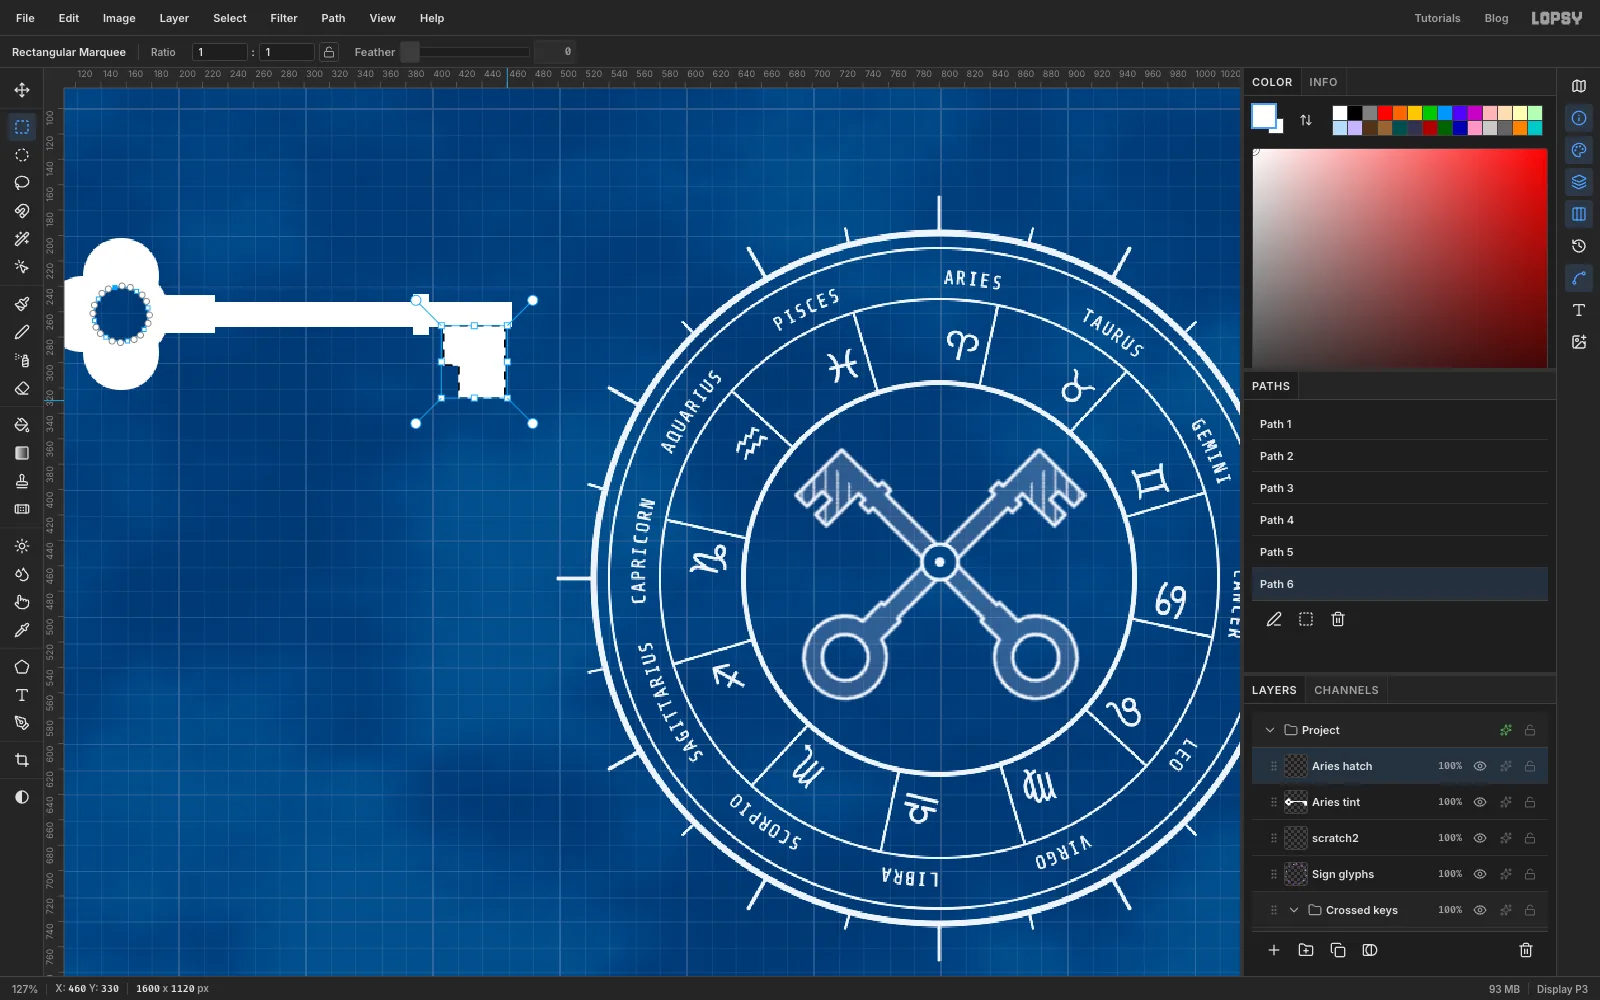
Repeat the three layers from the plain key, named Aries tint, Aries hatch and Aries line:
- Fill the selection with white on Aries tint.
- Choose Select → Selection → Path.
- Shift+Alt-drag around the bit and fill it with the hatch pattern on Aries hatch at 70%.
- Set Aries tint to 16%.
- Stroke both new paths at width 3 on Aries line.
Group the three layers as FIG 1 Aries.
-
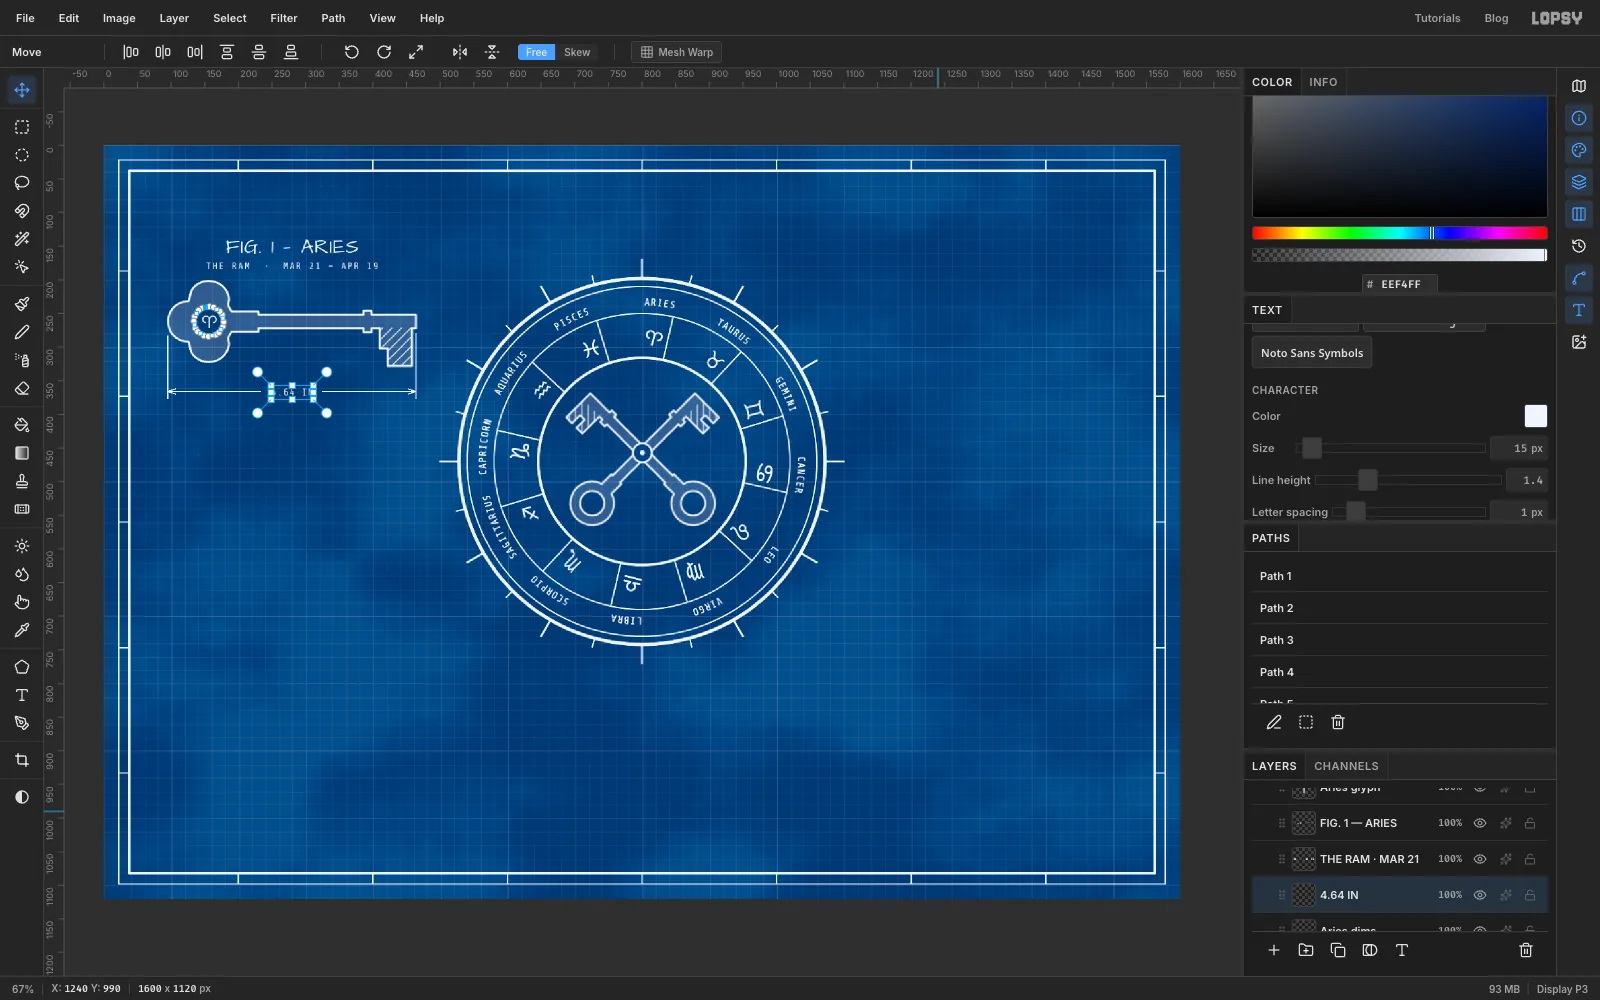
Label and dimension FIG. 1
Click Aries line so new layers go into the group. Then add:
- The glyph: ♈ in Noto Sans Symbols at
26, centred in the finger hole. - The title:
FIG. 1 — ARIESin Architects Daughter at30, letter spacing1, centred over the key aty150. - The subtitle:
THE RAM · MAR 21 – APR 19in Share Tech Mono at14, letter spacing2, centred aty178.
Type each one in an empty part of the canvas and move it into place with the Move tool and arrow keys. A click near existing text would edit that text instead.
Then add a layer named Aries dims and draw the dimension with a hard 2 px brush:
- A vertical extension line down from each end of the key.
- A horizontal dimension line between them at
y366, broken in the middle. - An open arrowhead at each end: two 12 px Shift-click strokes.
- The length in Share Tech Mono
15in the gap: the key is 371 px long, which is4.64 INat 80 px to the inch.
- The glyph: ♈ in Noto Sans Symbols at
-
Give Leo a sun for a bow
Build FIG. 2 Leo in the lower row:
- a ring bow from
100, 578to208, 686 - the same neck, shaft and collar as Aries, 370 px lower
- a forked bit
410, 642to458, 698, with an Alt slot from428, 668to440, 700 - with the Elliptical Marquee, Alt-drag the finger hole from
122, 600to186, 664
Tint, hatch and stroke it as before, on layers named Leo tint, Leo hatch and Leo line.
Add a layer named Leo rays. Pick the Brush, turn on Radial Symmetry with Segments
16, and Cmd-click the centre of the bow at154, 632. At Size3, draw one pointed ray:- Click just outside the ring, a little left of straight up.
- Shift-click about 80 px from the centre, straight up.
- Shift-click back at the ring, a little to the right.
Sixteen rays appear. Turn symmetry off.
The rays on the right run into the neck. Cmd-click the Leo tint thumbnail, Grow
3, click Leo rays and press Delete.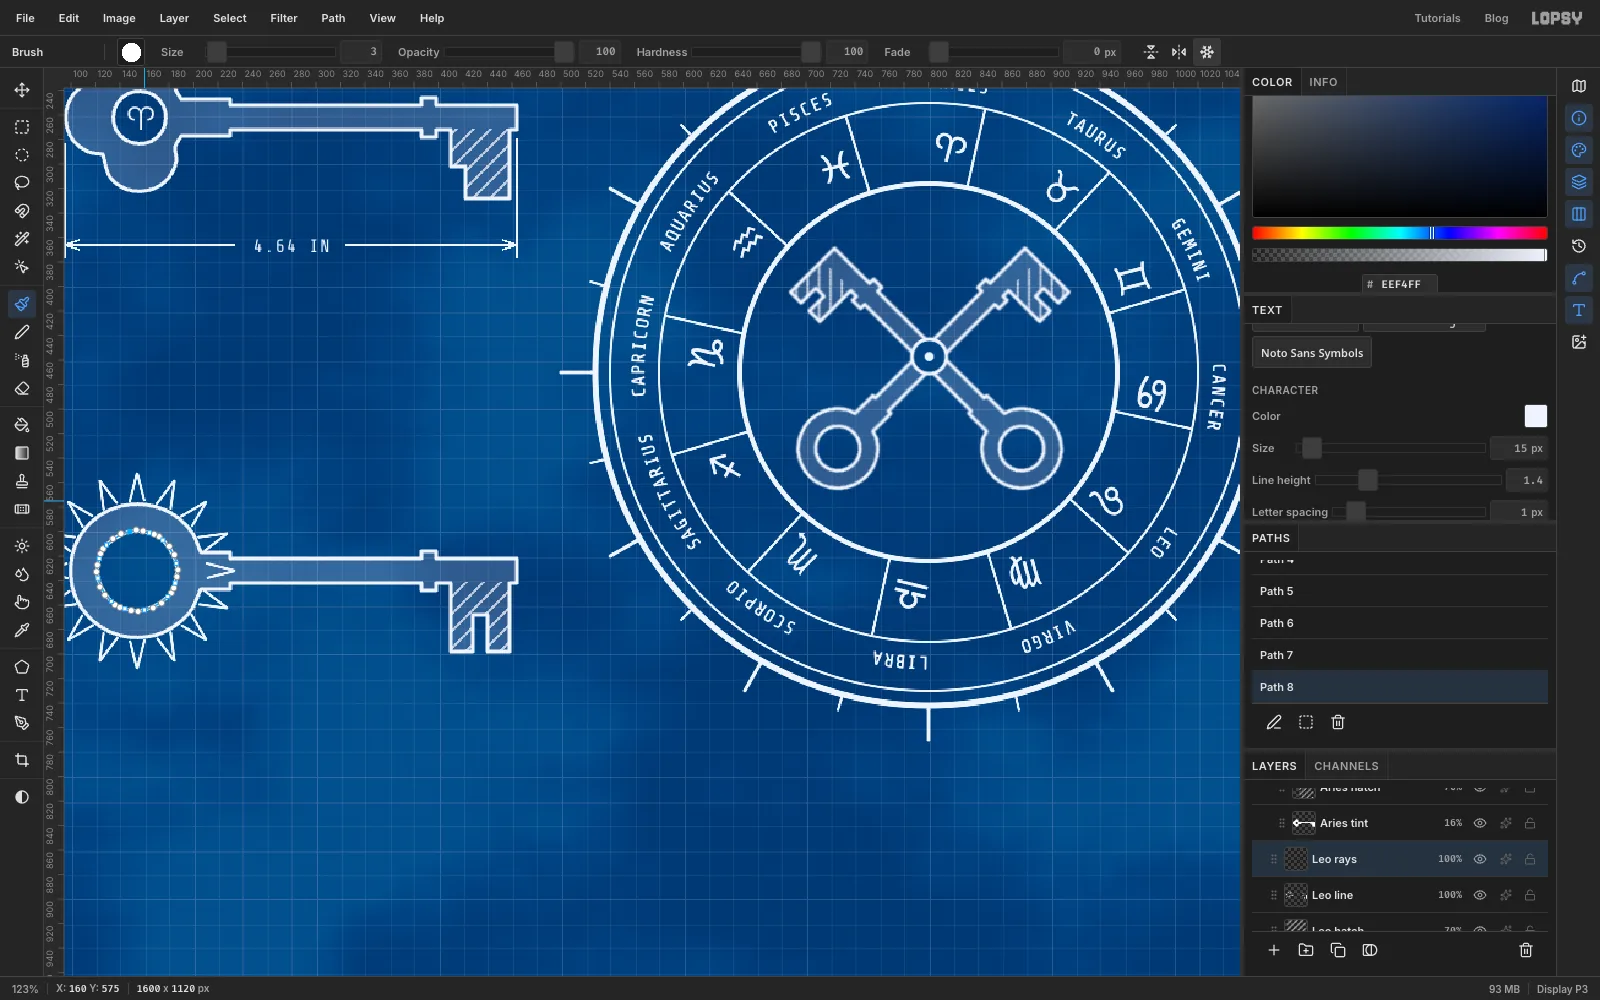
- a ring bow from
-
Finish FIG. 2
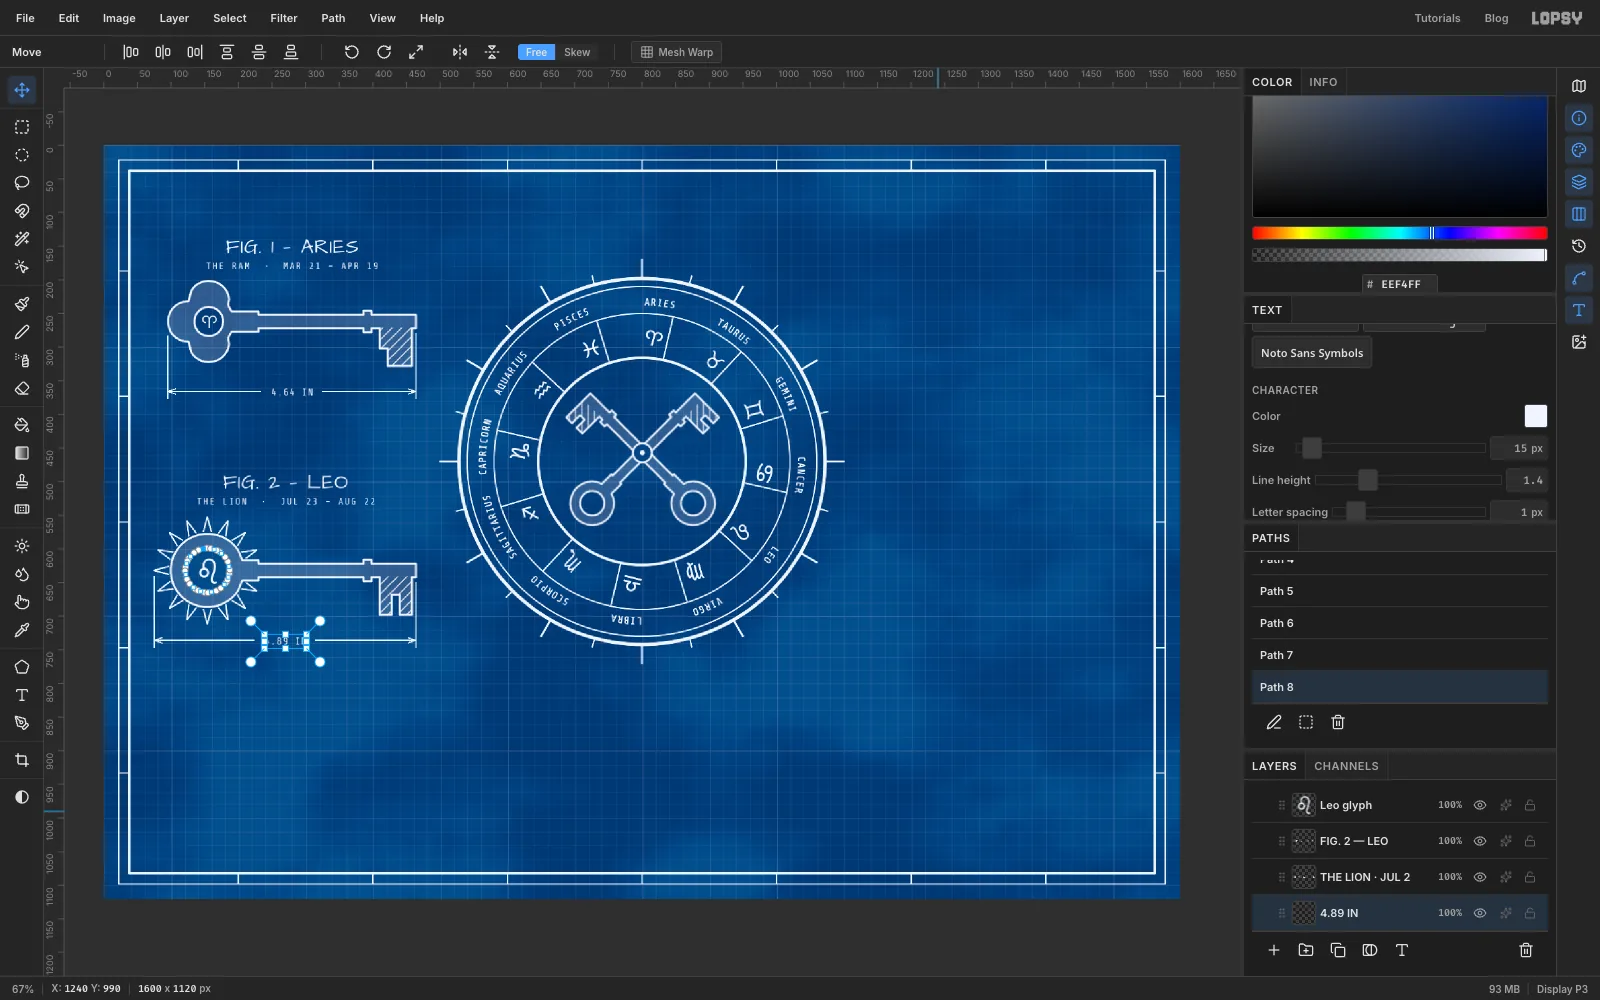
Group Leo's layers as FIG 2 Leo and label it like Aries:
- ♌ at size
40in the hole. FIG. 2 — LEOcentred aty500.THE LION · JUL 23 – AUG 22aty528.- A dimension line at
y736 reading4.89 IN.
Keeping both rows of titles on fixed lines (150 and 500) lines them up across the sheet even though Leo's rays are taller than the others.
- ♌ at size
-
Build Scorpio with a stinger
The right-hand keys are drawn the same way round as the left ones, bow on the left, and flipped afterwards. For FIG. 3 Scorpio, start in the top right:
- A ring bow from
1110, 208to1218, 316. - A neck
1210, 247to1242, 277. - A shaft
1224, 252to1464, 272. - A collar
1372, 246to1384, 278. - A bit
1396, 272to1436, 324, with an Alt slot1410, 298to1422, 326.
For the stinger, pick the Lasso. Hold Shift and trace a barbed arrowhead past the end of the shaft: from
1456, 238to the point at1508, 262, down to1456, 286, back in to1458, 262, and close. With the Elliptical Marquee, Alt-drag the finger hole from1132, 230to1196, 294. Render the key with Scorpio tint, Scorpio hatch and Scorpio line layers. Group them as FIG 3 Scorpio.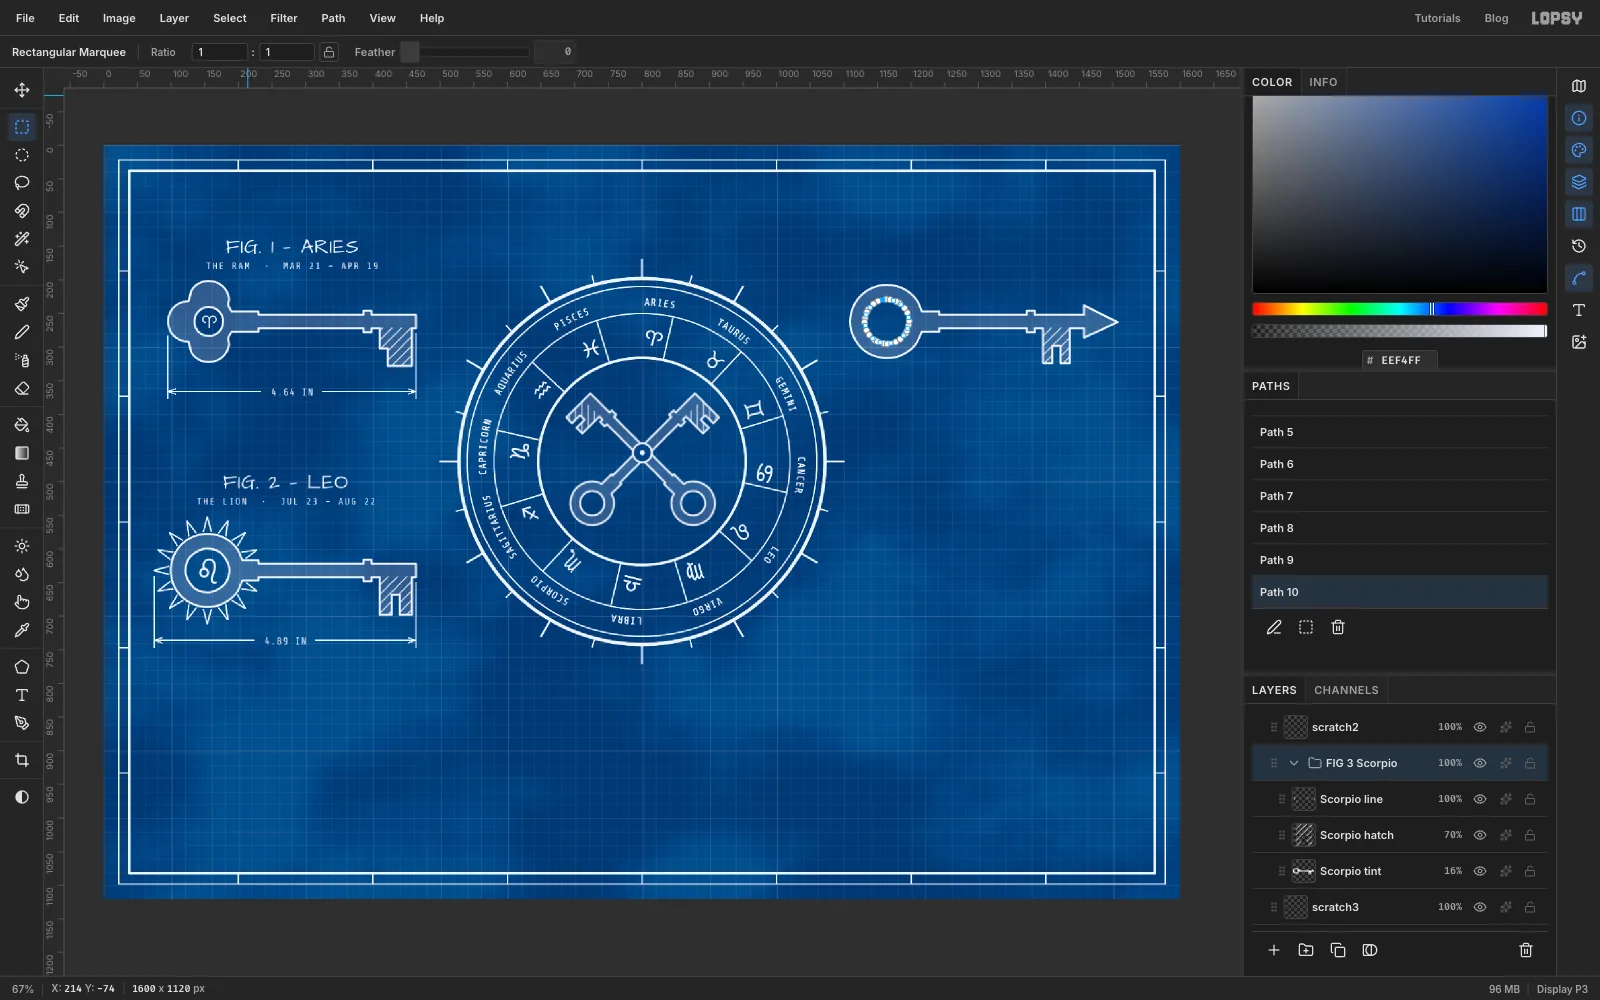
- A ring bow from
-
Flip Scorpio to face the wheel
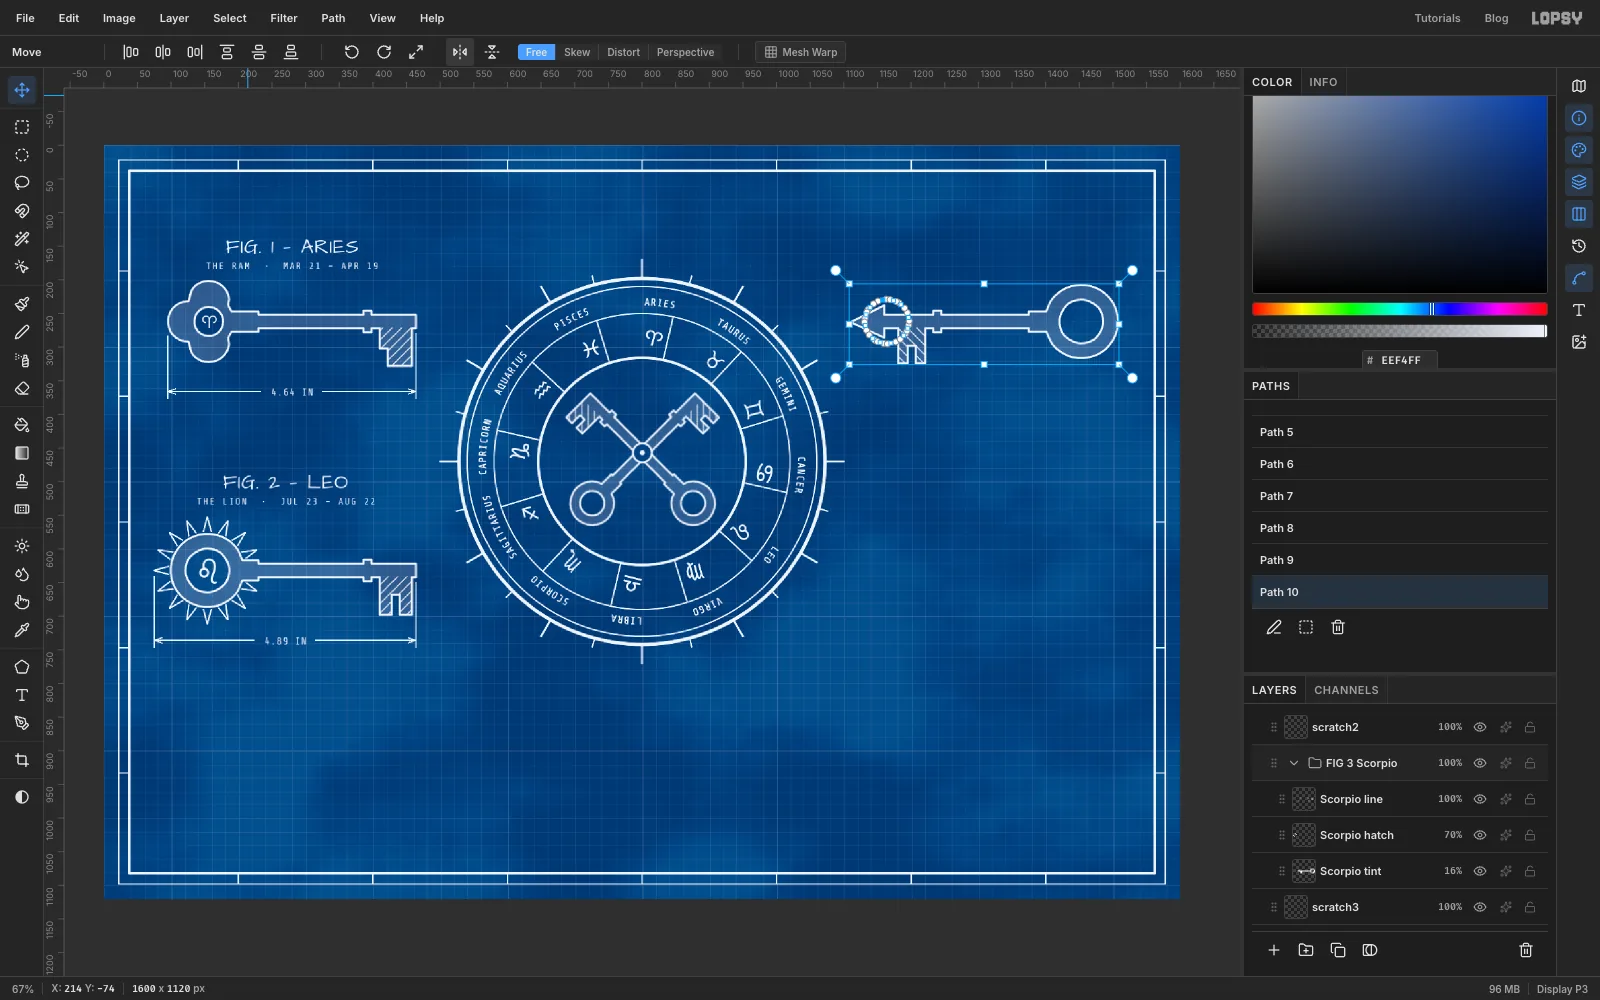
Click the FIG 3 Scorpio group, pick the Move tool and click Flip Horizontal in the options bar. The whole group mirrors about its own centre, so it stays in place. The bow is now on the outside edge and the stinger points at the wheel. Press Escape.
Do this before adding any text: a group that holds text won't flip.
-
Label FIG. 3
Add ♏ at
40in the finger hole,FIG. 3 — SCORPIOaty150,THE SCORPION · OCT 23 – NOV 21aty178, and the dimension4.99 INbelow, all as before.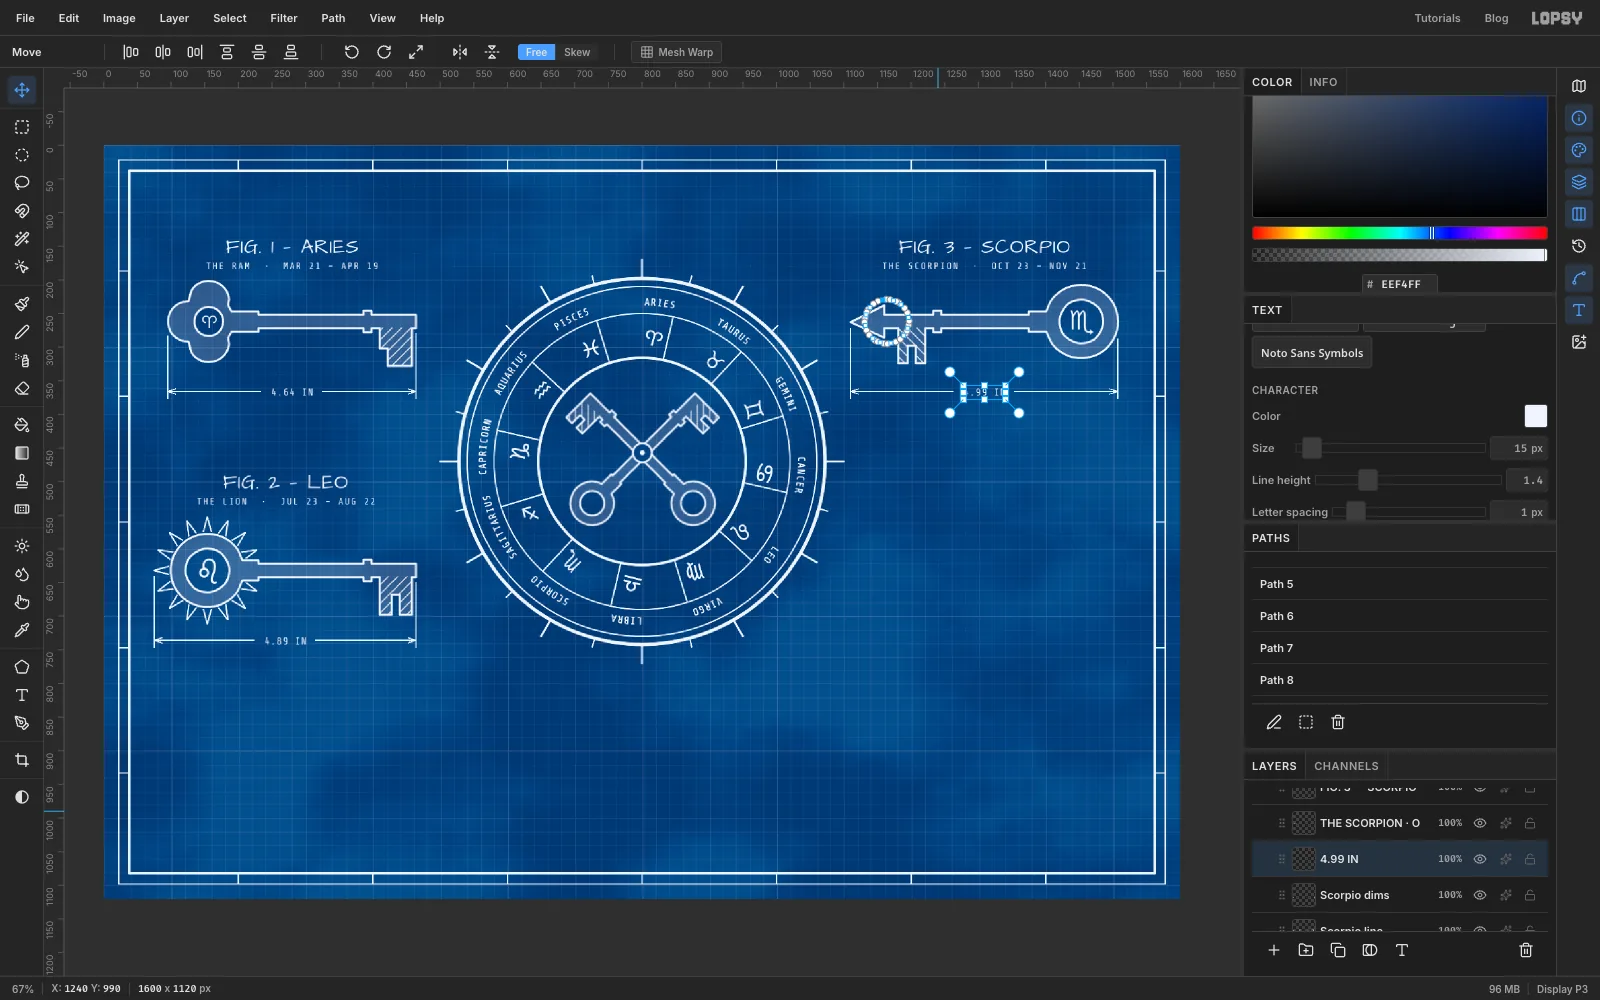
-
Build Pisces with a fish bow
For FIG. 4 Pisces, the bow is a fish. With the Elliptical Marquee, drag a circle from
1138, 530to1270, 662. Hold Shift+Alt and drag a second circle of the same size lower down,1138, 602to1270, 734. Only the overlap stays: a lens, the fish's body.Shift-lasso a forked tail on its left:
1158, 632,1122, 604,1134, 632,1122, 660. Then add the parts:- A neck
1248, 619to1280, 645. - A shaft
1260, 622to1504, 642. - A collar
1426, 616to1438, 648. - A bit
1450, 642to1498, 698, notched with an Alt box from1466, 678to1482, 706.
The eye is the finger hole: with the Elliptical Marquee, Alt-drag from
1197, 615to1231, 649.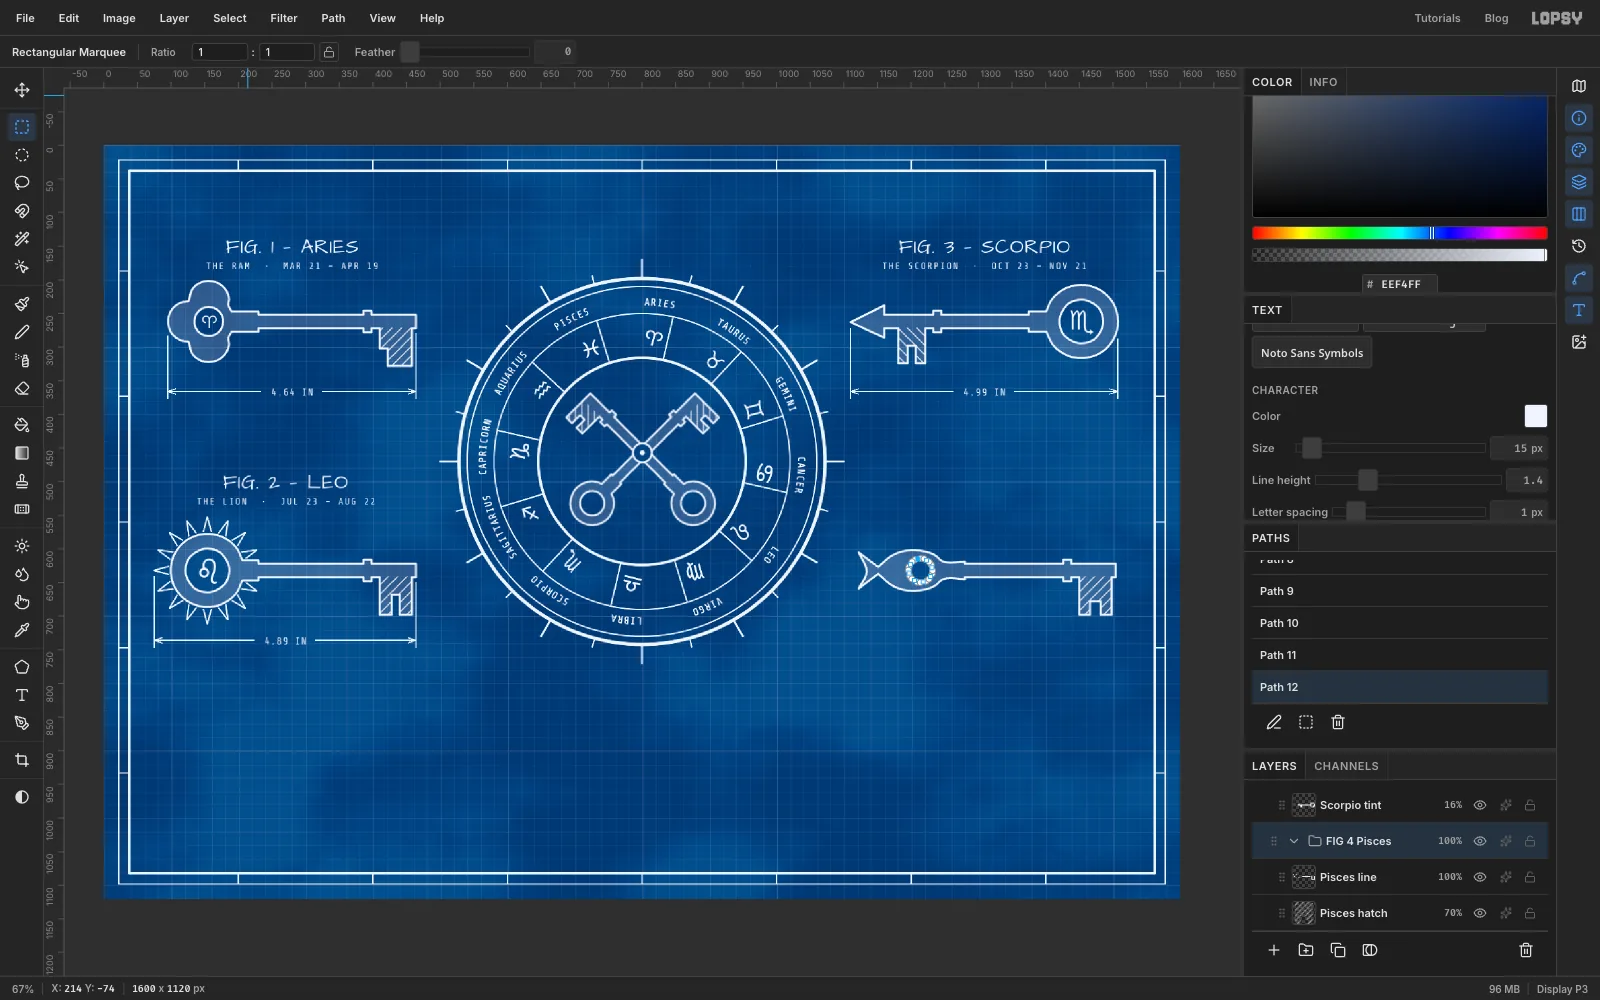
- A neck
-
Flip and label FIG. 4
Render and group it as FIG 4 Pisces, flip it horizontally, and label it:
- ♓ at about
21in the eye, which is only 34 px across. FIG. 4 — PISCESaty500.THE FISHES · FEB 19 – MAR 20aty528.4.80 INbelow.
The four keys now line up: titles on two shared lines, dimension lines on two shared lines, and the outer ends of the keys the same distance from the border on both sides.
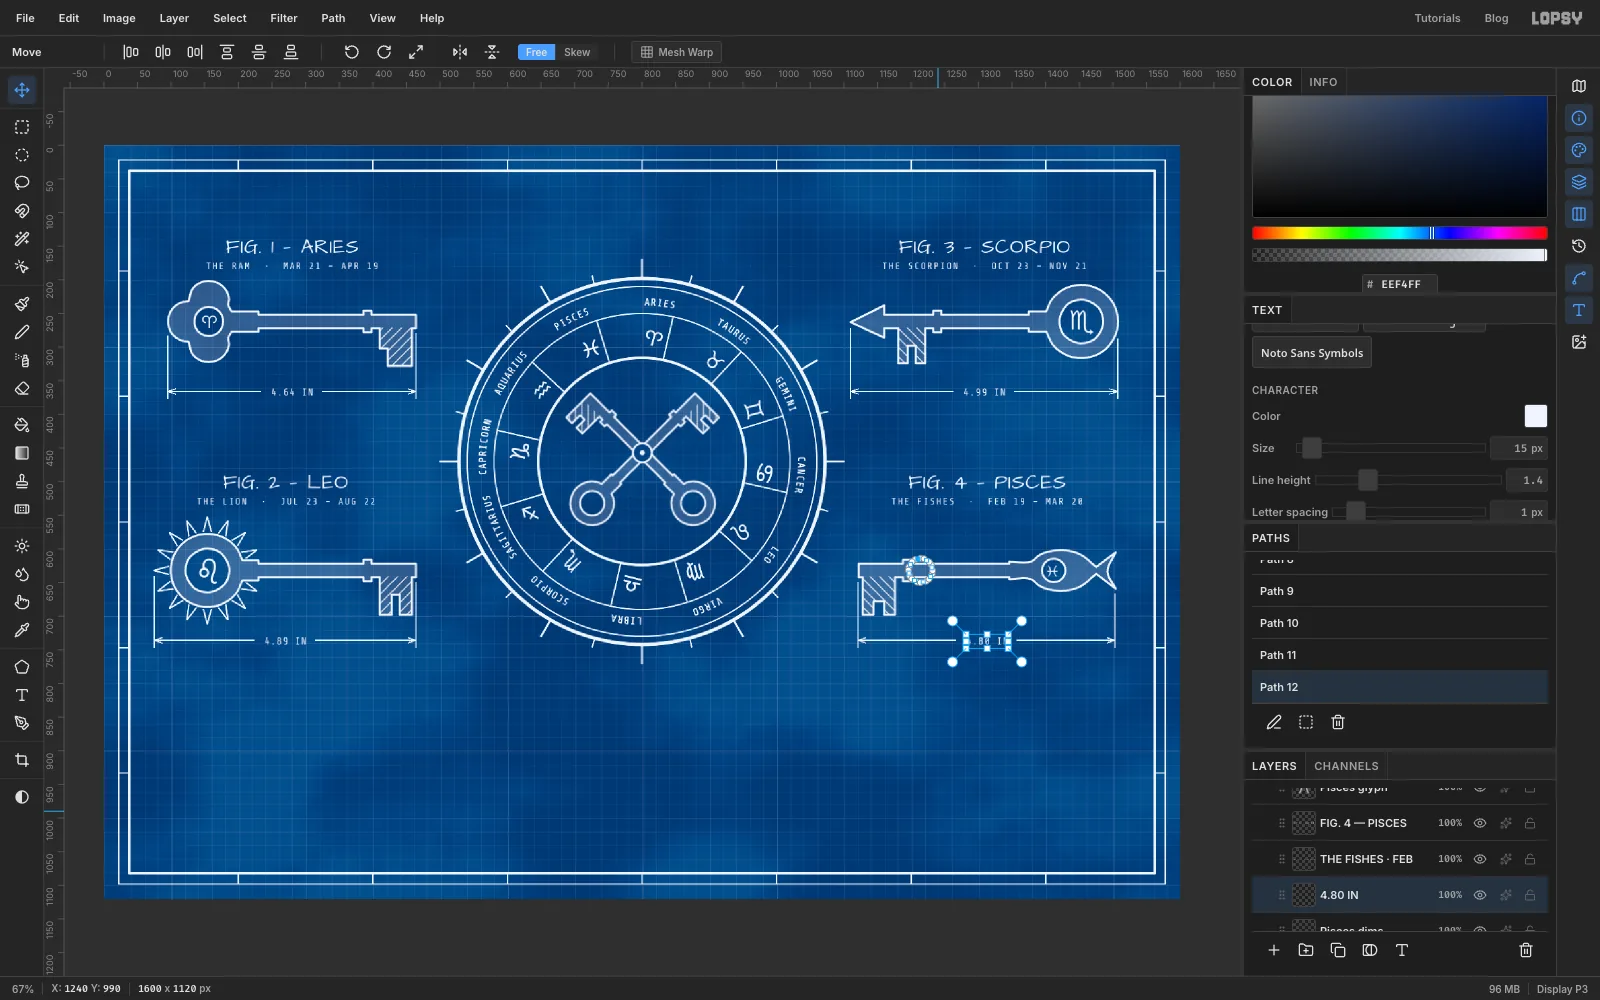
- ♓ at about
-
Draw the ribbon tails
Tattoo flash needs a banner. Click Sign glyphs (a top-level layer) and add a layer named Ribbon tails. Pick the Pen tool and set Stroke to
3.Click five corners for the left tail,
600, 850,520, 850,540, 880,520, 910and600, 910, then click the first point again to close it. In the Paths panel click Path to Selection. Fill the selection with , deselect, and with the foreground back on white, press Enter to stroke the path. Draw the right tail as its mirror image.Draw the two small fold triangles where each tail tucks behind the band. Click three Pen points and the first one again to close:
572, 890,600, 910,600, 890on the left, and the mirror image on the right. Use Path to Selection, fill each with the hatch pattern, deselect and press Enter to stroke it.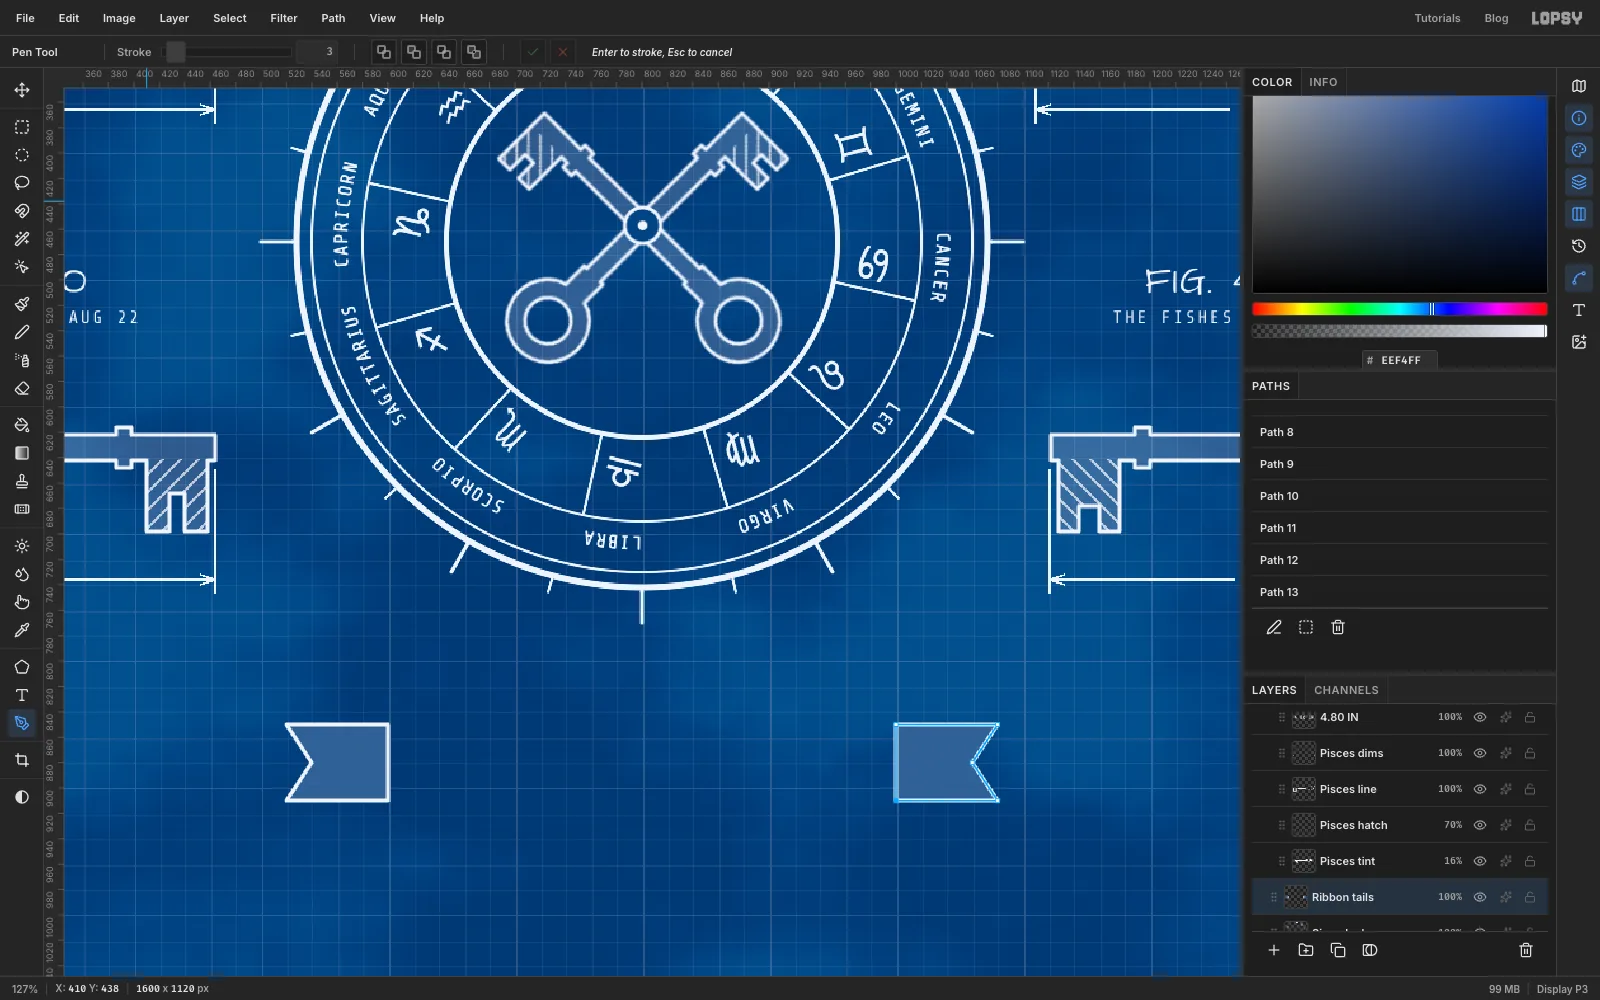
-
Draw the arched band
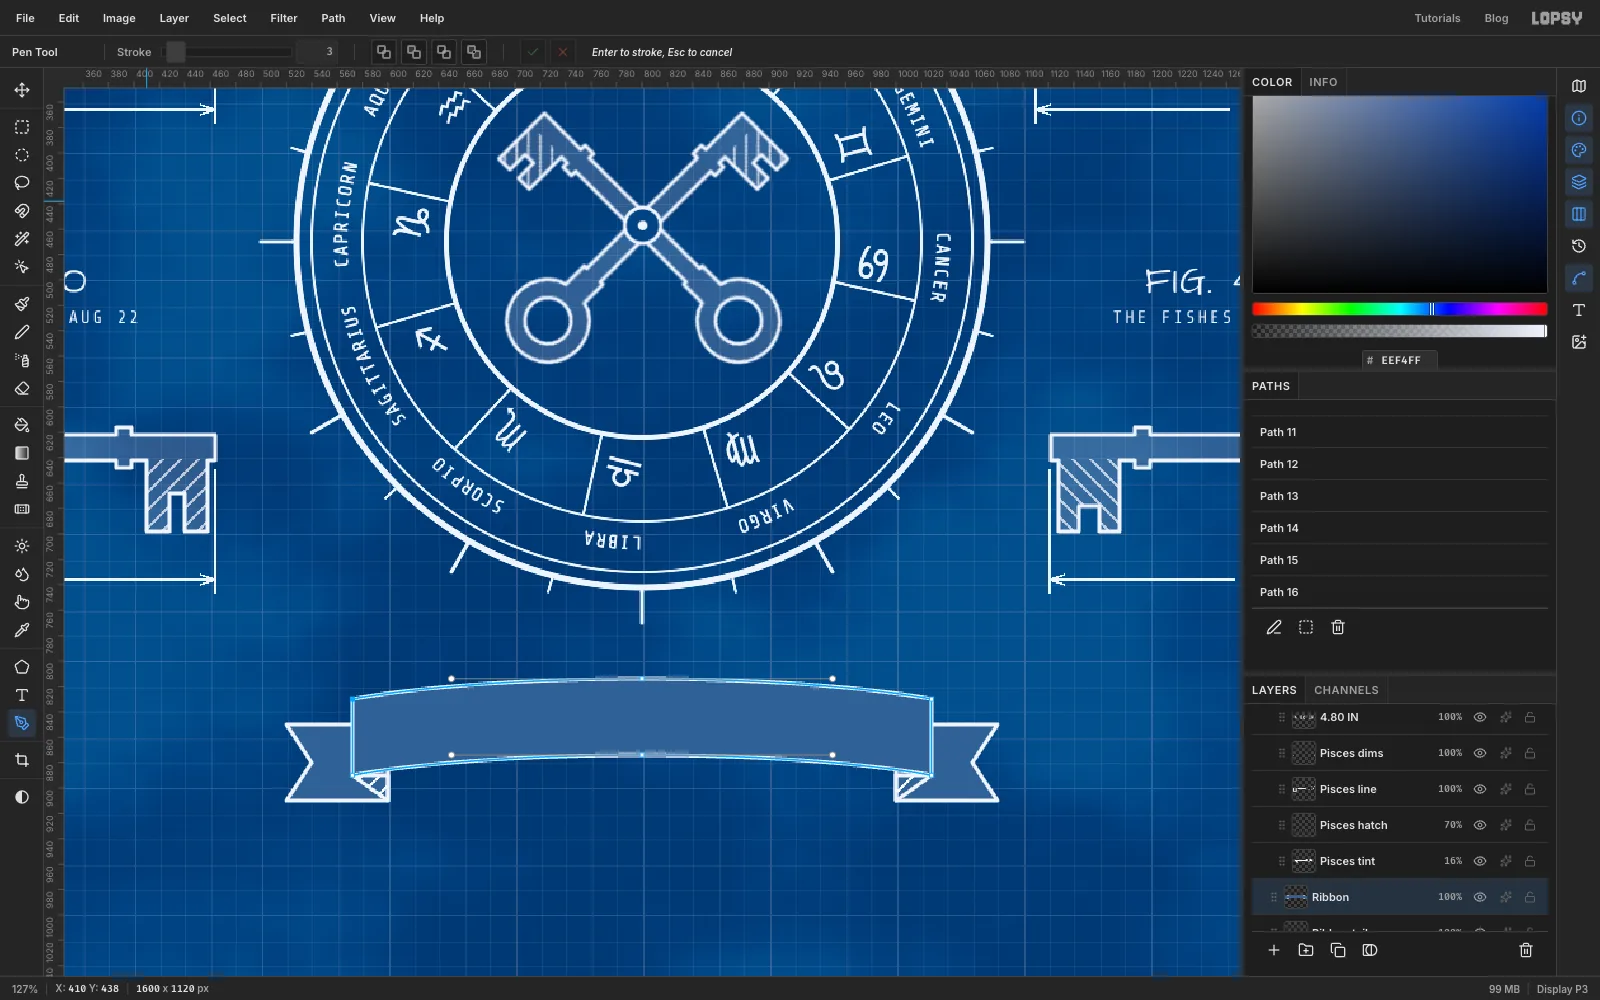
Add a layer named Ribbon. With the Pen, click
572, 830, then click and drag at800, 814out to950, 814to bend the top edge. Click1028, 830and1028, 890, then click and drag at800, 874out to650, 874for the bottom edge. Click572, 890, and click the first point to close the shape.Path to Selection, fill with , deselect, and press Enter to stroke the outline in white. The band covers the inner ends of the tails.
-
Set the title on an arch
With the Pen, click
596, 876, click and drag at800, 860out to930, 860, click1004, 876, and click the ✓ Commit path button to keep the open curve without stroking it. This is the title's baseline. It curves the same way as the band.Click a plain layer, then type
ZODIAC KEYSin Rye at Size46, letter spacing4, white. Set Path to the new curve and Align to Center. Rename the layer Title. The letters stand upright along the arch with even margins above and below.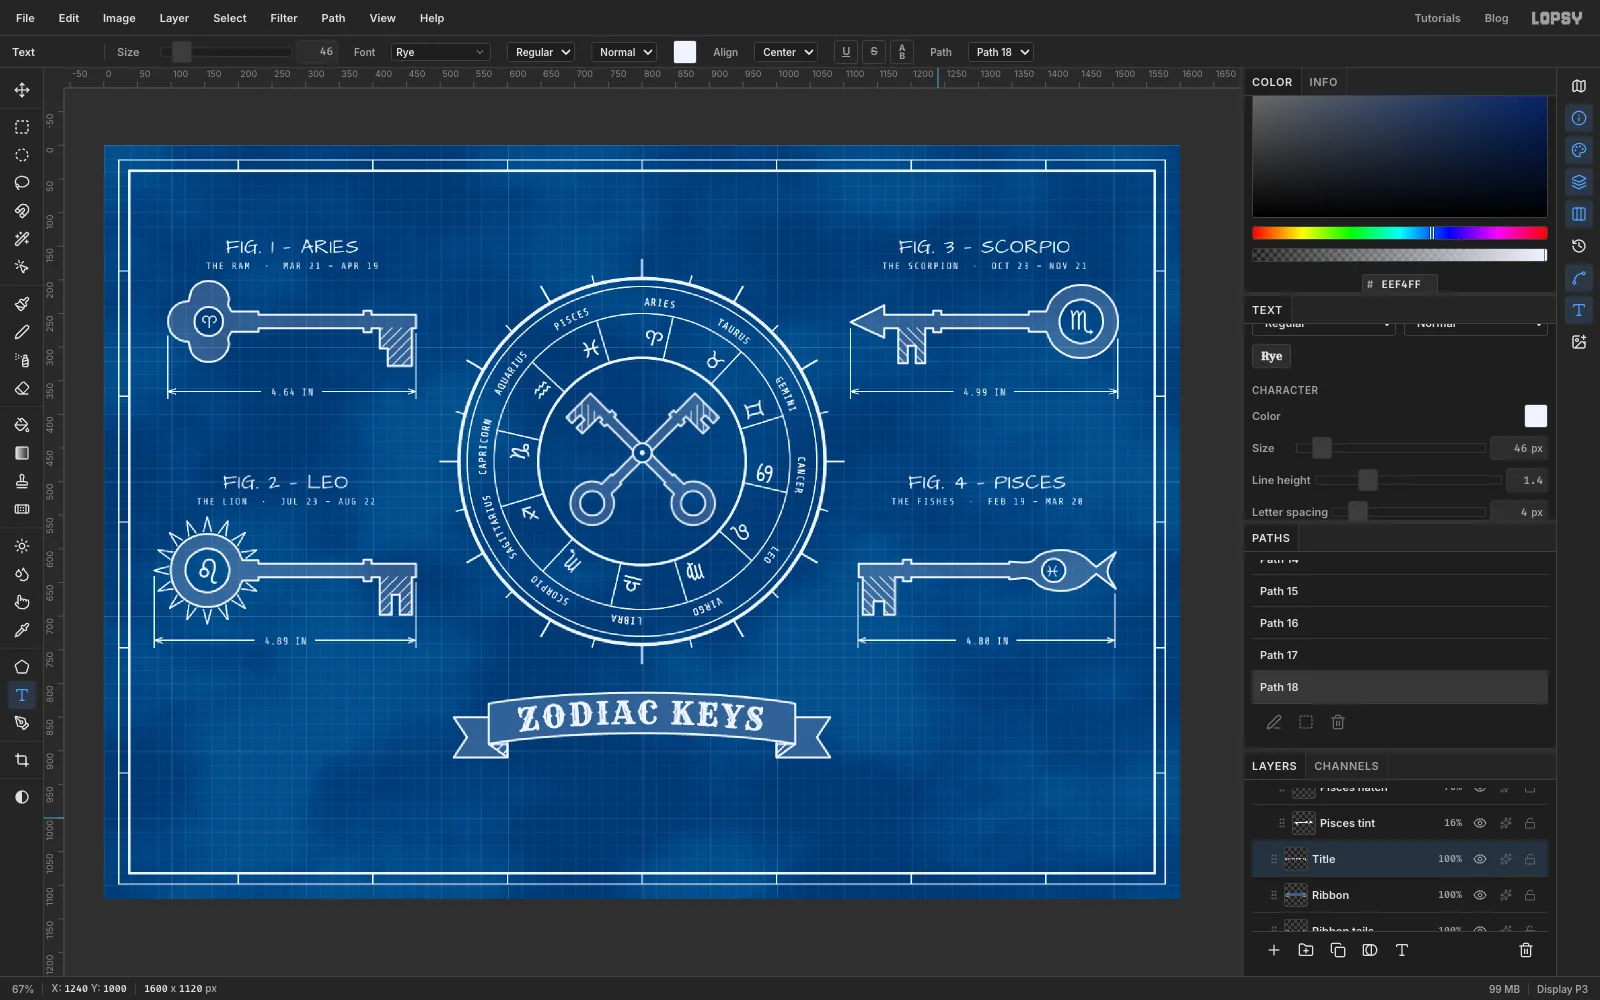
-
Add the header, zone numbers and scale bar
Add a layer named Sheet furniture. It will hold the scale bar, frames and title-block rules; text makes its own layers above it. Add the text in white:
- The header:
PLATE VII · CELESTIAL LOCKSMITHERY · TATTOO FLASHin Share Tech Mono17with letter spacing6, centred at800, 96. - The zone numbers:
12345678in Share Tech Mono11with Letter spacing194.1. Each digit plus its spacing is exactly 200 px, so the numbers fall midway between the zone ticks. Centre one copy in the top margin aty30 and another in the bottom margin.
For the scale bar, fill two 80 × 12 boxes white (
640, 938to720, 950and800, 938to880, 950). Then outline the whole bar with the Shape tool: a stroke-only Rectangle, click at800, 944and enter 320 × 12. Number the ticks0to4underneath and addINCHESbelow.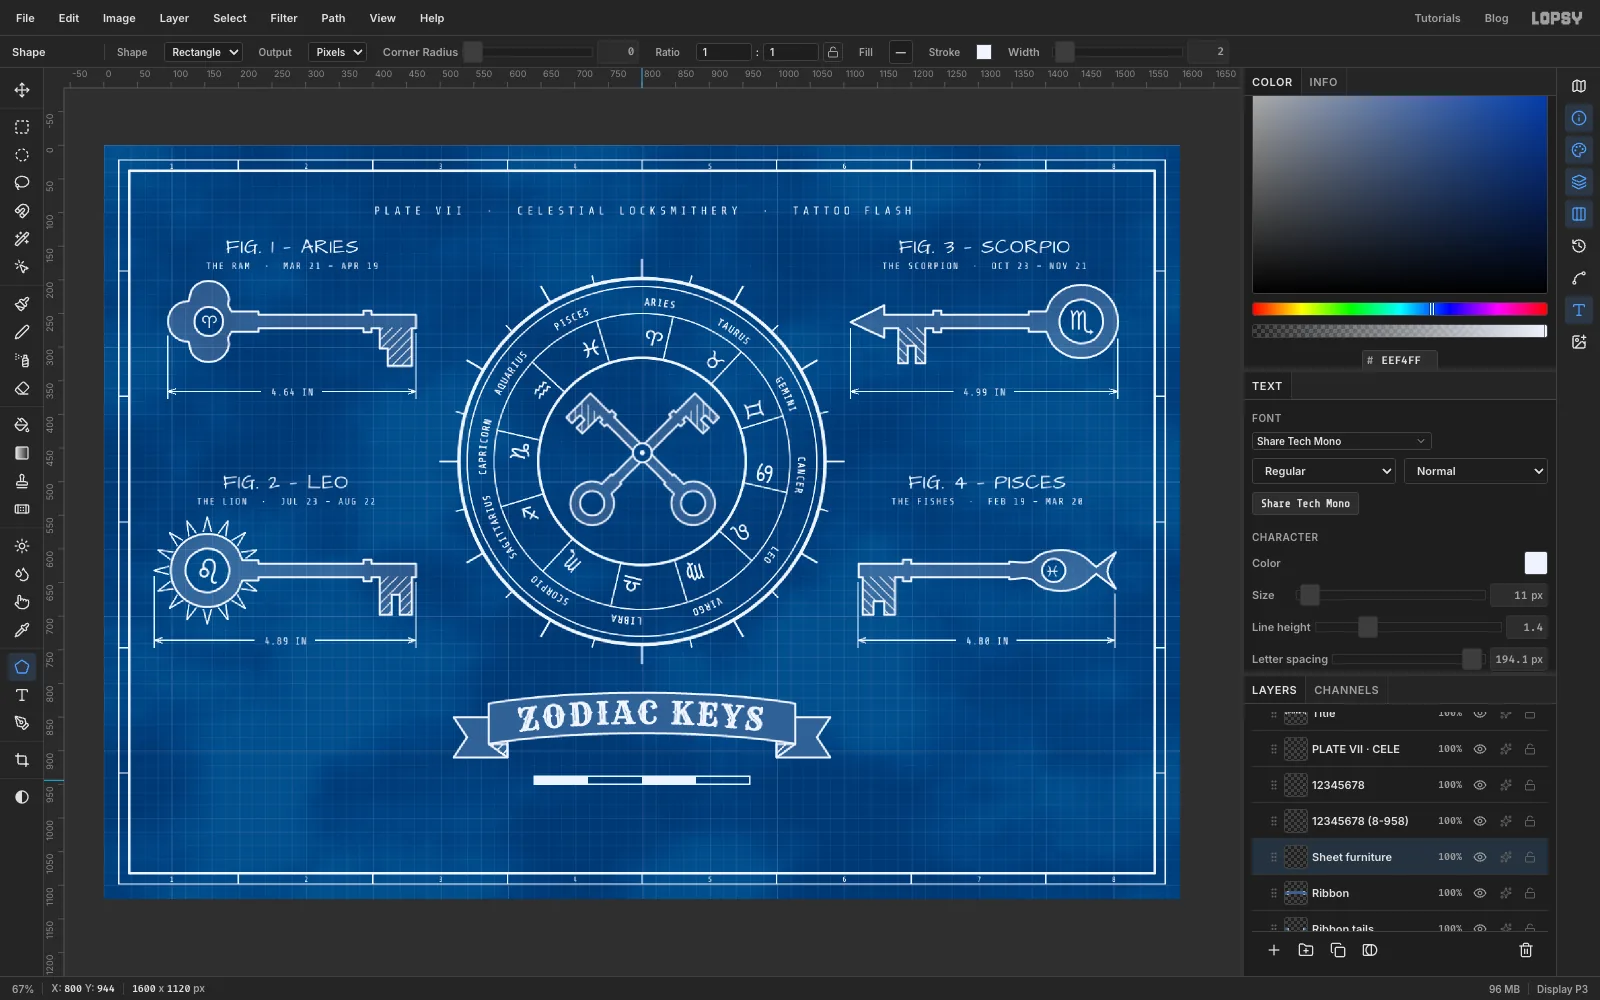
- The header:
-
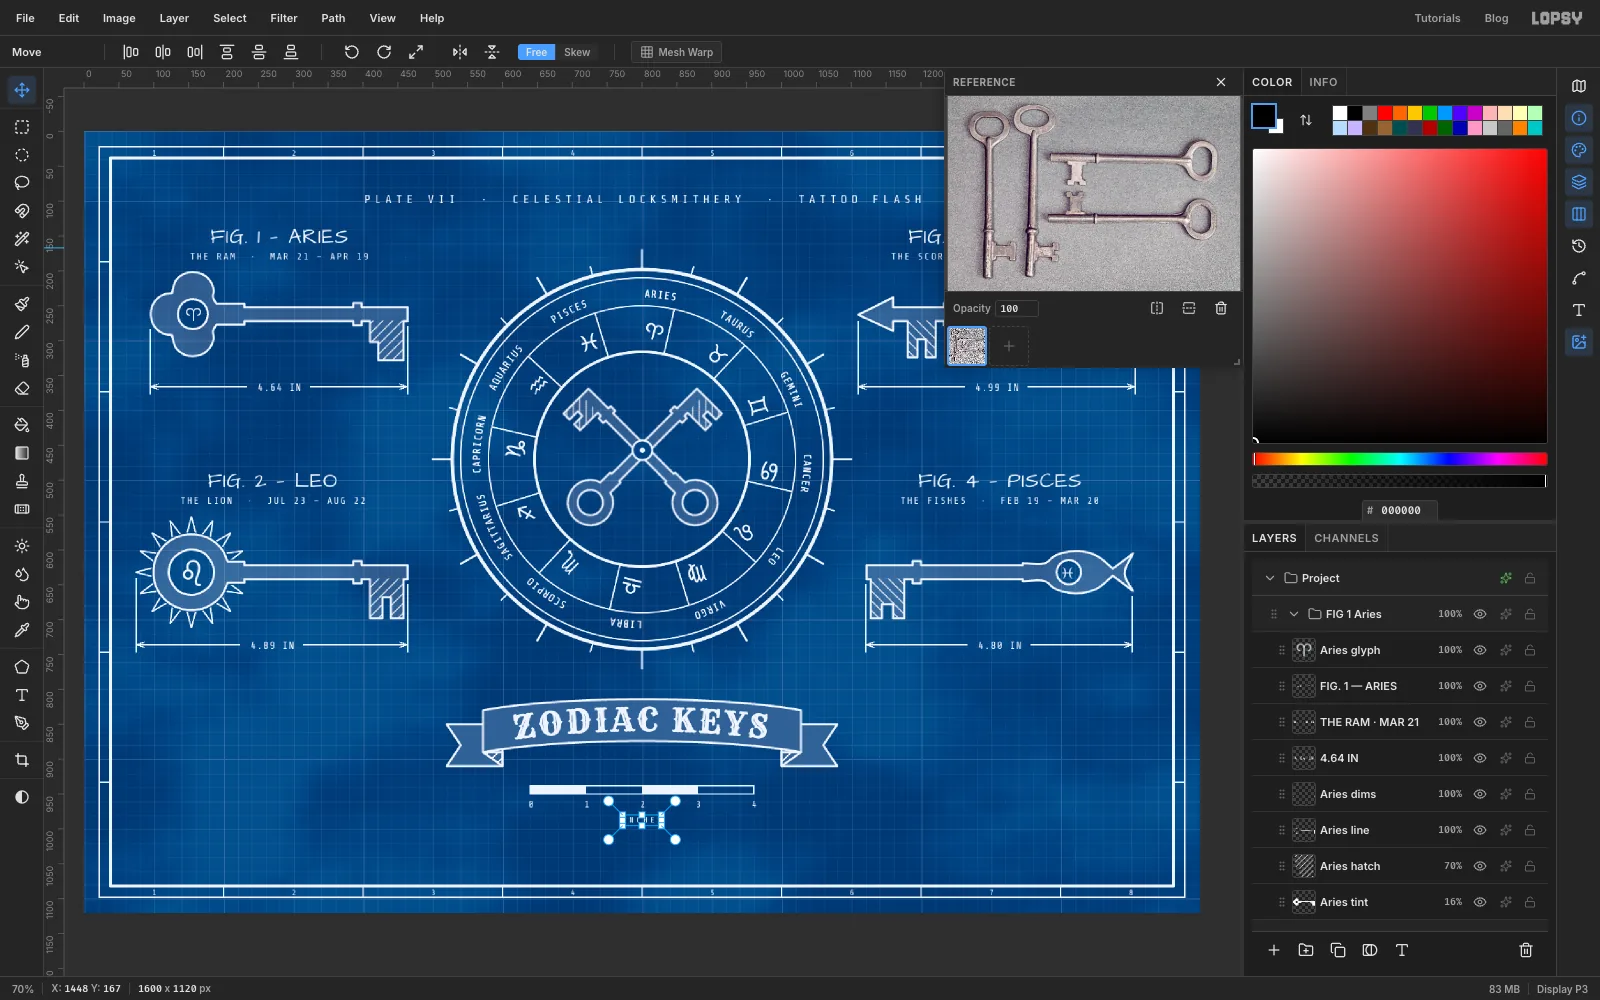
Open a reference photo
Real keys make better drawings. Click Reference in the panel toolbar, click the drop zone and choose a photo of antique keys. This one is Four Skeleton Keys on a blue background by Cindy Shebley (CC BY 2.0, Wikimedia Commons); despite the title, the felt reads grey. The drawer floats beside the canvas, so you can check proportions while you draw.
-
Drop the photo onto the sheet and crop one key
Click Mottling so the photo lands low in the stack, then drag the same photo file onto the canvas. It arrives as a new layer; rename it Photostat. Deselect.
Select from
438, 186to1188, 398, around the key lying on top right in the photo. Choose Select → Inverse and press Delete to keep just that strip.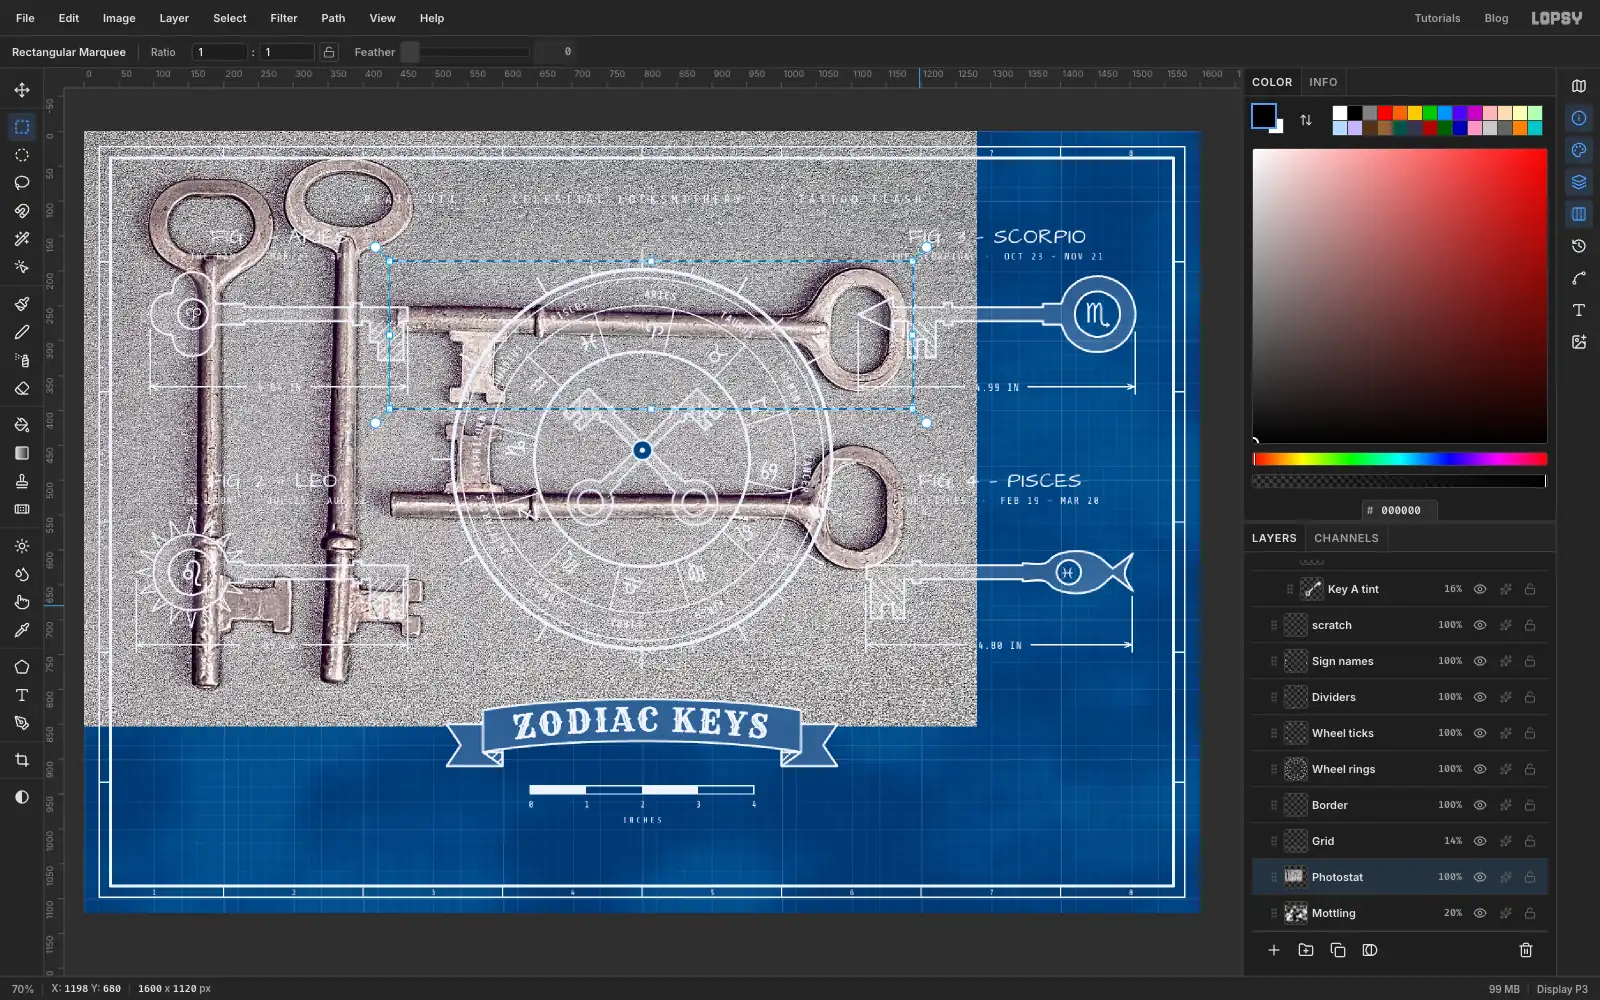
-
Cut the key out with the Magic Wand
The felt behind the key is too speckled for the wand to read directly. A blurred copy smooths it out. Choose Layer → Duplicate Layer, name the copy Photo mask, and apply Filter → Gaussian Blur… with Radius
6.Pick the Magic Wand with Tolerance
34and Contiguous on. Click the felt above the shaft, then Shift-click to add these:- the felt below the shaft
- the felt left of the bit
- two spots inside the bow's hole
Choose Select → Grow…
2.Click Photostat and press Delete. Then select from
444, 192to1182, 392, choose Select → Inverse and press Delete again to trim the blurred edge. Deselect, and delete the Photo mask layer.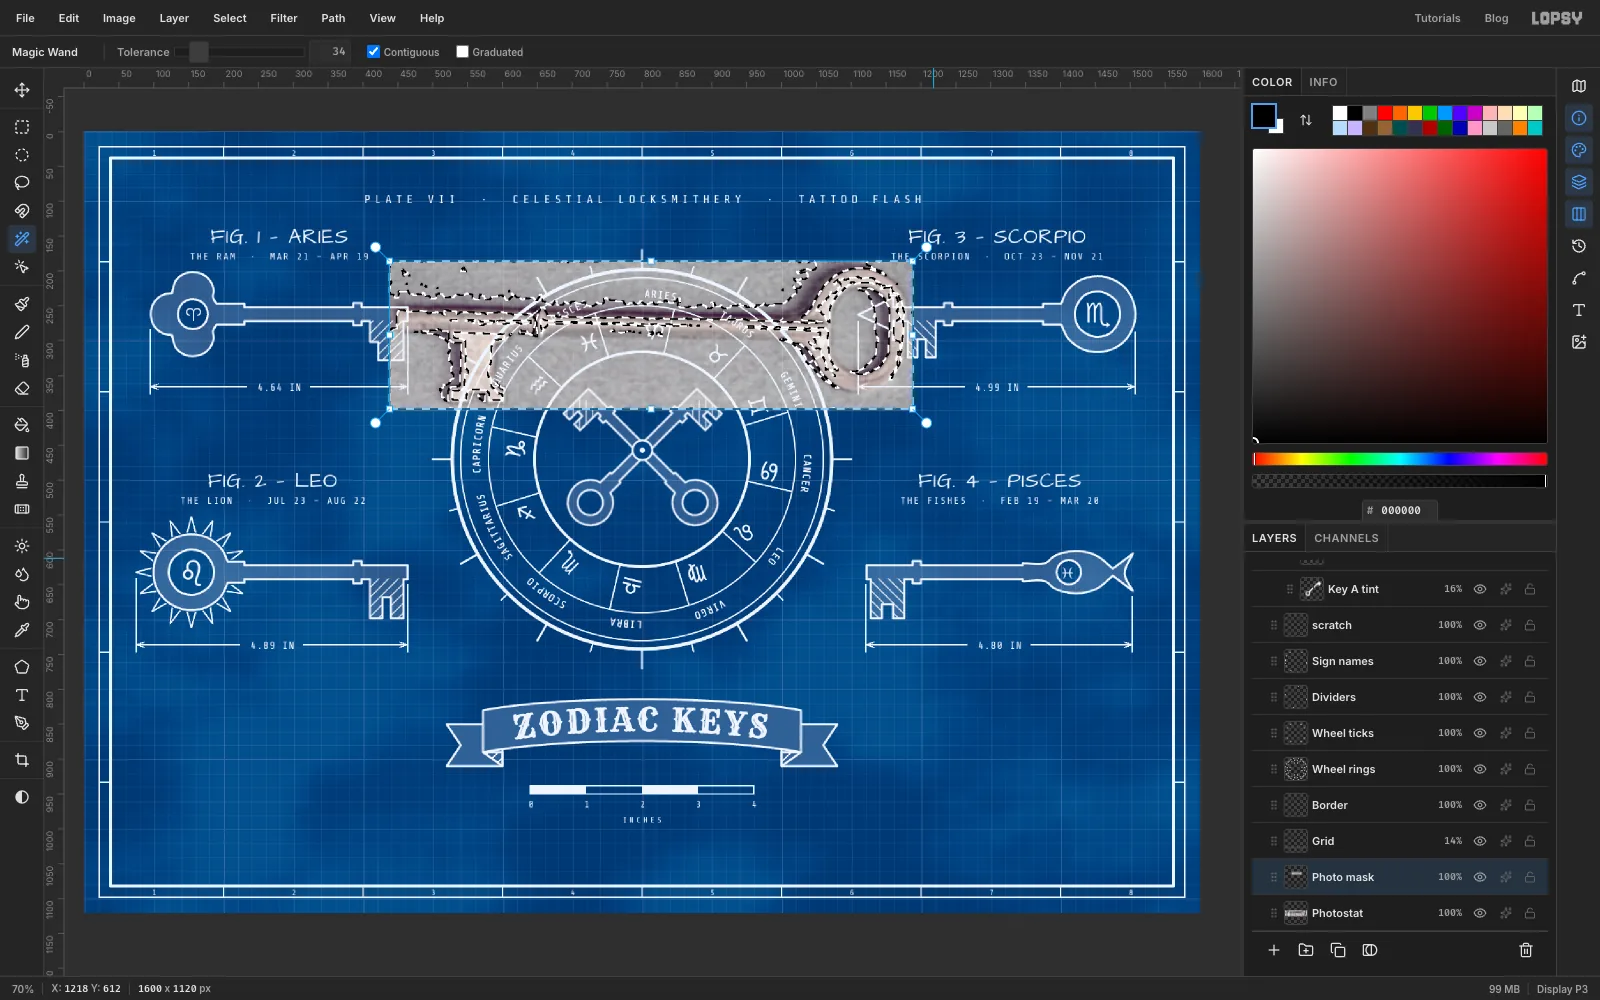
-
Turn the photo into a photostat
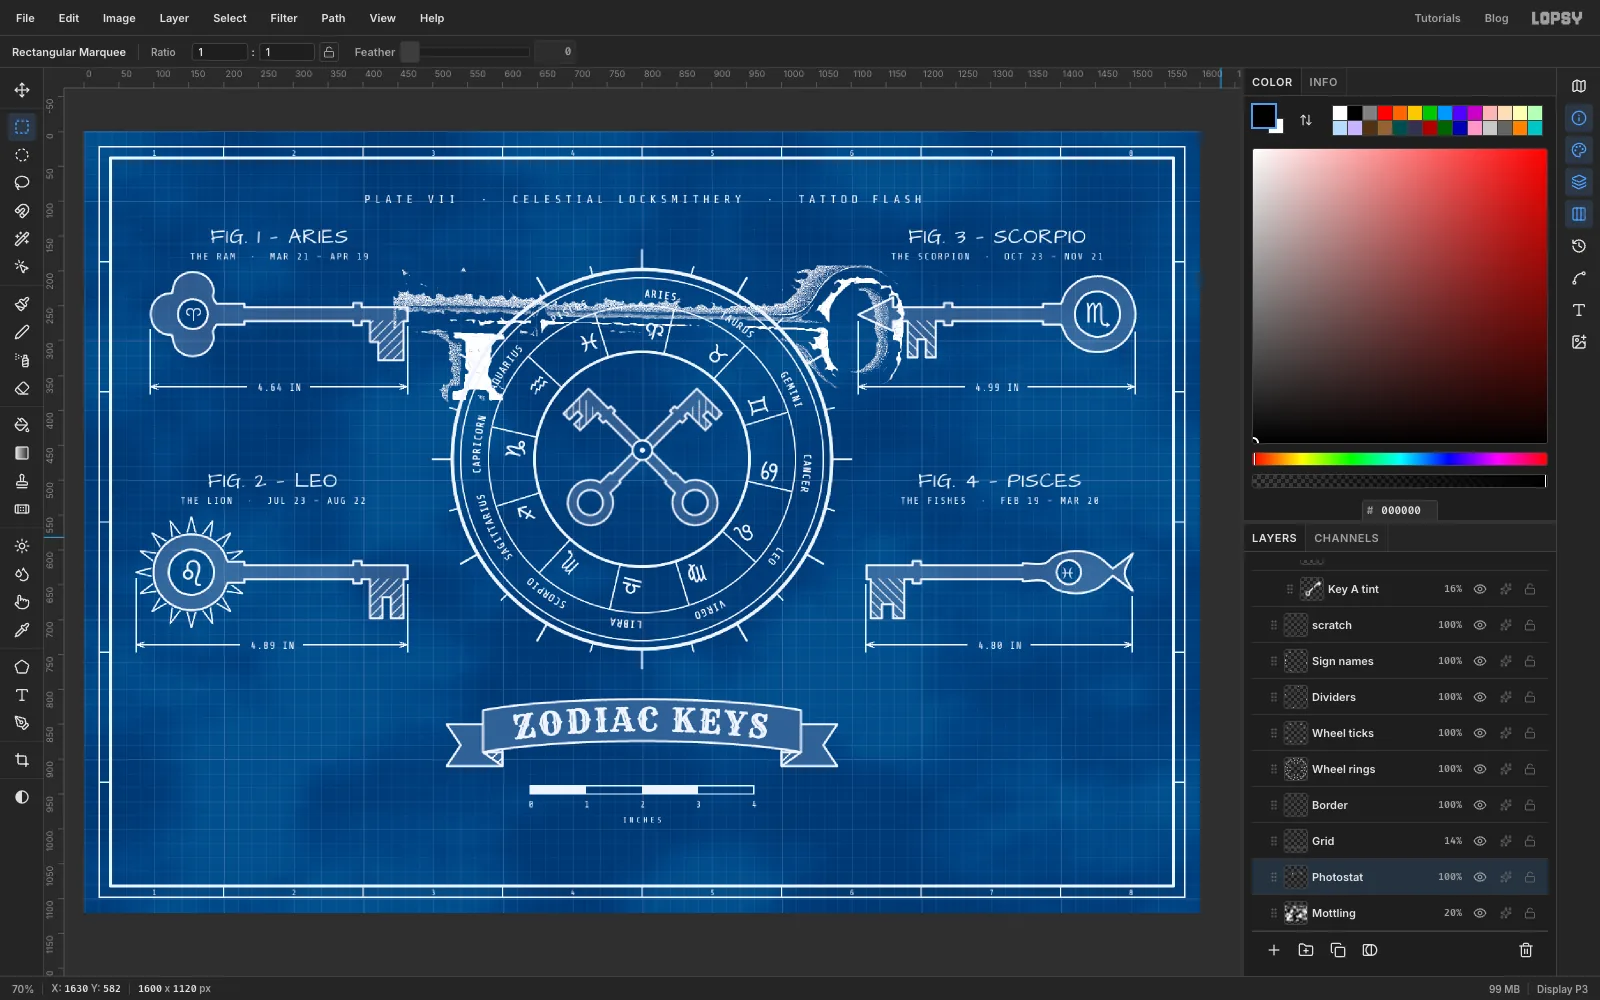
On Photostat, apply these filters:
- Filter → Desaturate.
- Filter → Surface Blur… with Radius
4and Threshold30. - Filter → Brightness/Contrast… with Brightness
15and Contrast45.
Set the layer's Blend to Screen. Dark parts of the photo vanish into the blue and the bright metal prints pale, like a photostat pasted onto the sheet.
-
Scale and tilt it into place
Cmd-click the Photostat thumbnail to select it, pick the Move tool and Cmd-drag the bottom-right handle inward until the key is a little under half its size, about 44%. Press Escape to apply.
Drag it down to the bottom-left corner, centred near
278, 975, where the photostat frame will go. Select it again and drag the rotate handle about 4° counter-clockwise. A slightly crooked paste-up looks hand-mounted. Press Escape and deselect.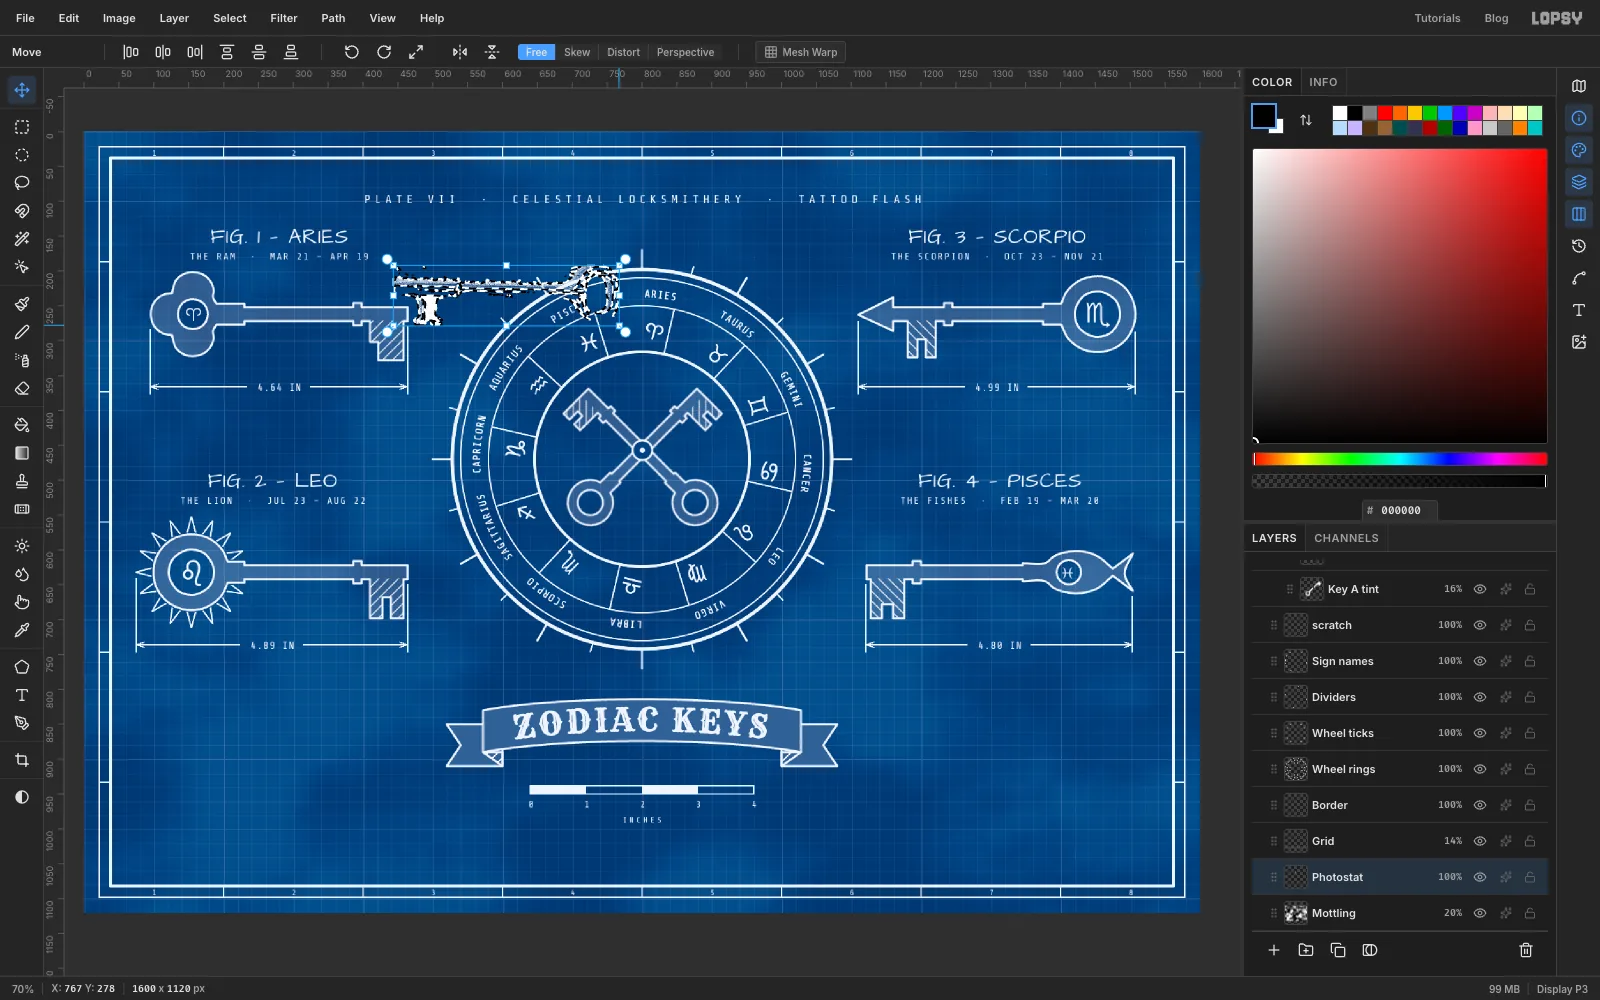
-
Draw the title block
On Sheet furniture, use the Shape tool (stroke-only Rectangle, Width
3) to draw two 436 × 178 boxes:- the photostat frame, clicked at
278, 973 - the title block, clicked at
1322, 973
Divide the title block with a 2 px hard brush and Shift-click lines:
- a full-width rule at
y948 and another aty1006 - one divider at
x1322 in the middle row - two dividers in the bottom row, splitting it into thirds
Fill the cells in Share Tech Mono. Each gets a tiny caption at
10with letter spacing2in its top-left corner, and its entry underneath:- PROJECT: ZODIAC KEYS — FLASH SHEET, at
22. - DRAWN BY: L. OPSY, at
17. - DATE: 15 OCT 2026, at
17. - SCALE: 1 : 1, at
17. - DWG NO.: ZK-07, at
17. - REV.: B, at
22, in red .
Caption the photostat box as well:
PHOTOSTAT · SPECIMEN Aat the top andWARDED DOOR KEY, C. 1890 · 1:2at the bottom, at11.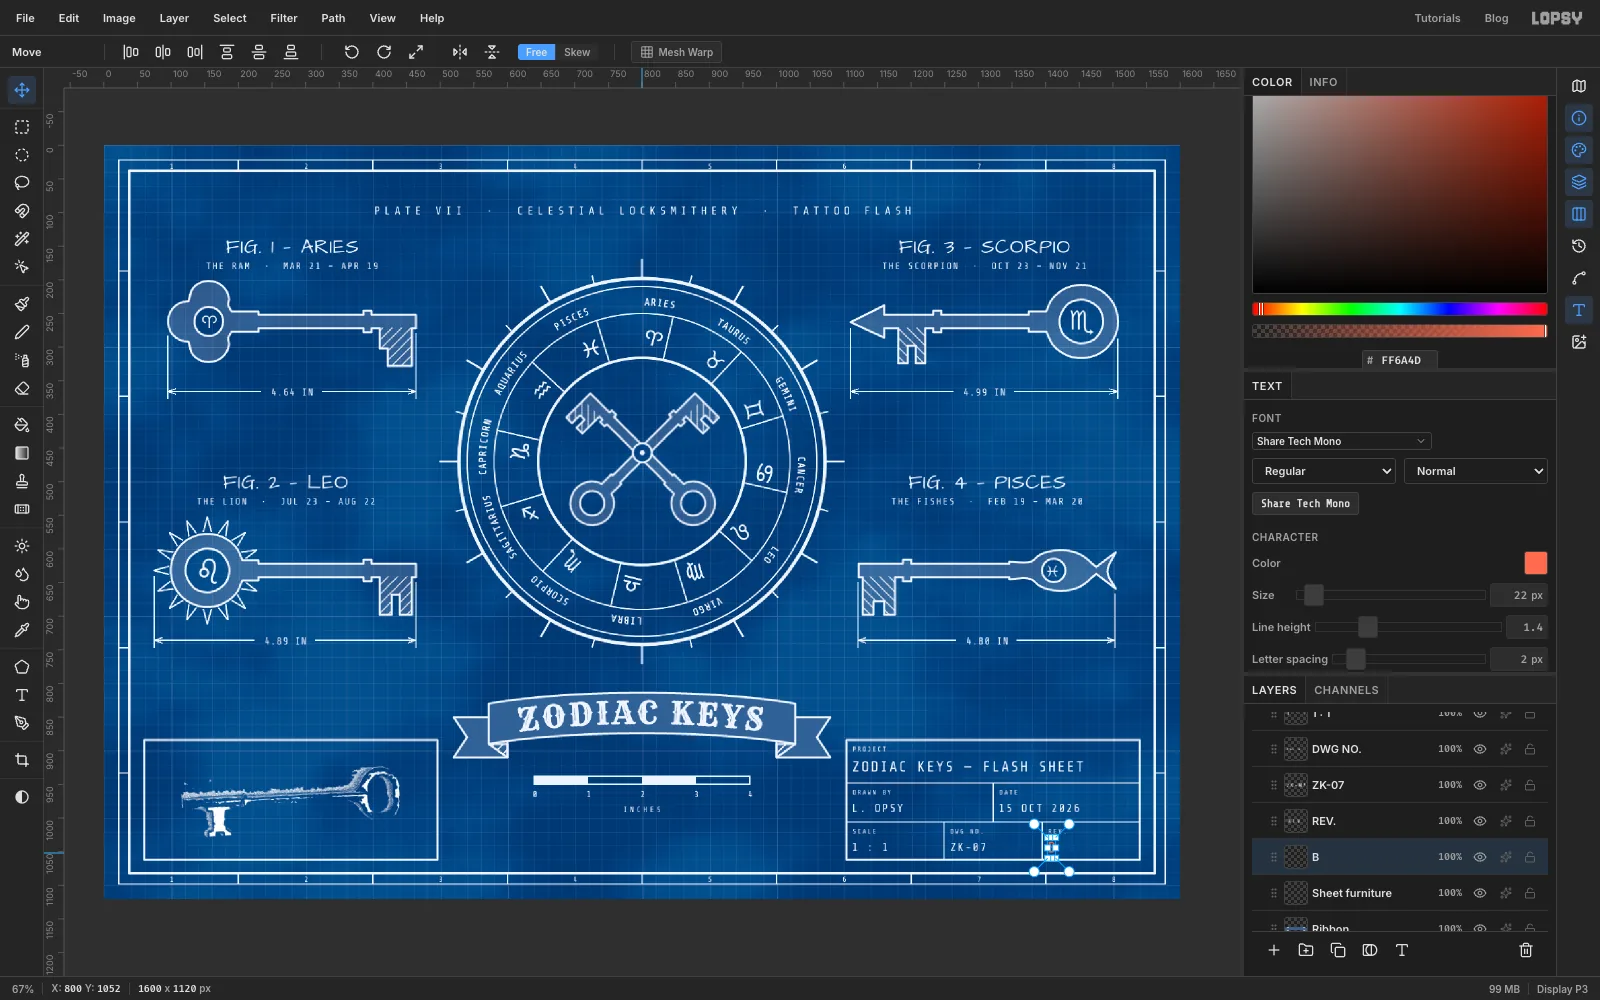
- the photostat frame, clicked at
-
Fill the gaps with a crescent moon
Flash sheets have no dead space. Add a layer named Fillers tint. With the Elliptical Marquee, drag a circle from
166, 781to234, 849. Hold Alt and drag a slightly smaller circle up and to the right,186, 773to246, 833, to bite out a crescent. Fill it with white and choose Select → Selection → Path.Make the sparkles the same way. Zoom in close and use the Lasso to trace a four-pointed star with curved, pinched-in sides, then fill it and trace it to a path. Make seven:
- about 38 px across, above and below the crossed keys at
800, 356and800, 590 - about 34 px at
300, 790and1210, 800 - about 26 px at
1395, 832 - about 28 px either side of the header, at
356, 97and1244, 97
Add two small five-pointed stars, about 16 px across, at
336, 842and148, 770. Five straight lasso sides between the points are enough.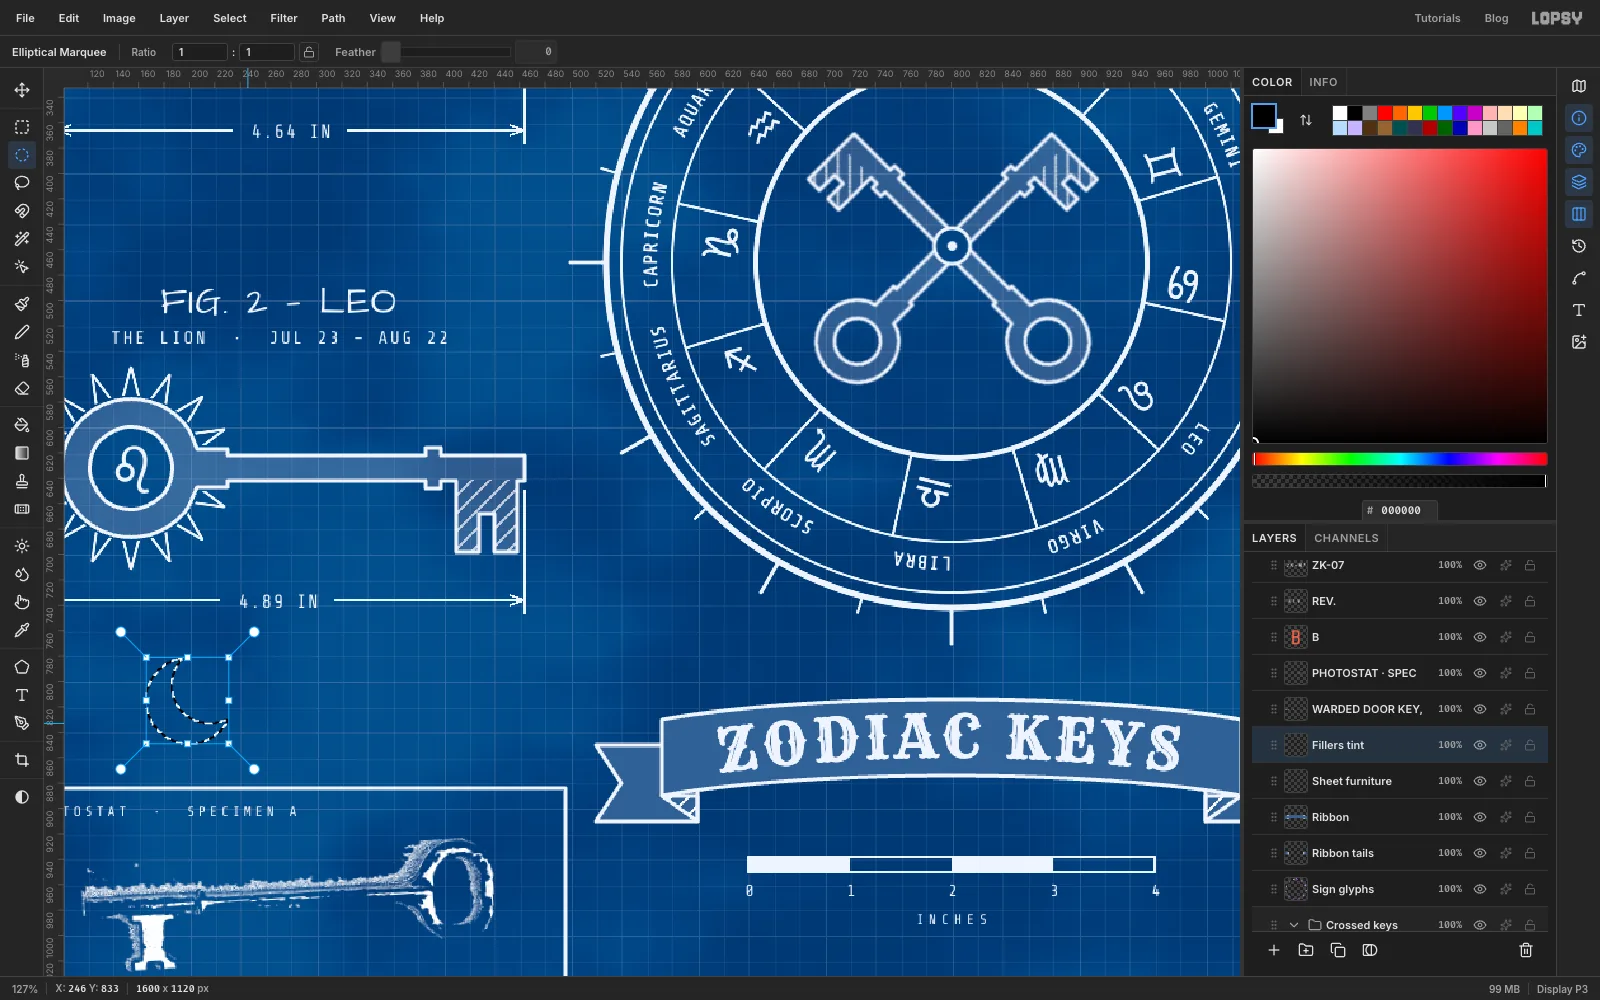
- about 38 px across, above and below the crossed keys at
-
Draw a keyhole escutcheon
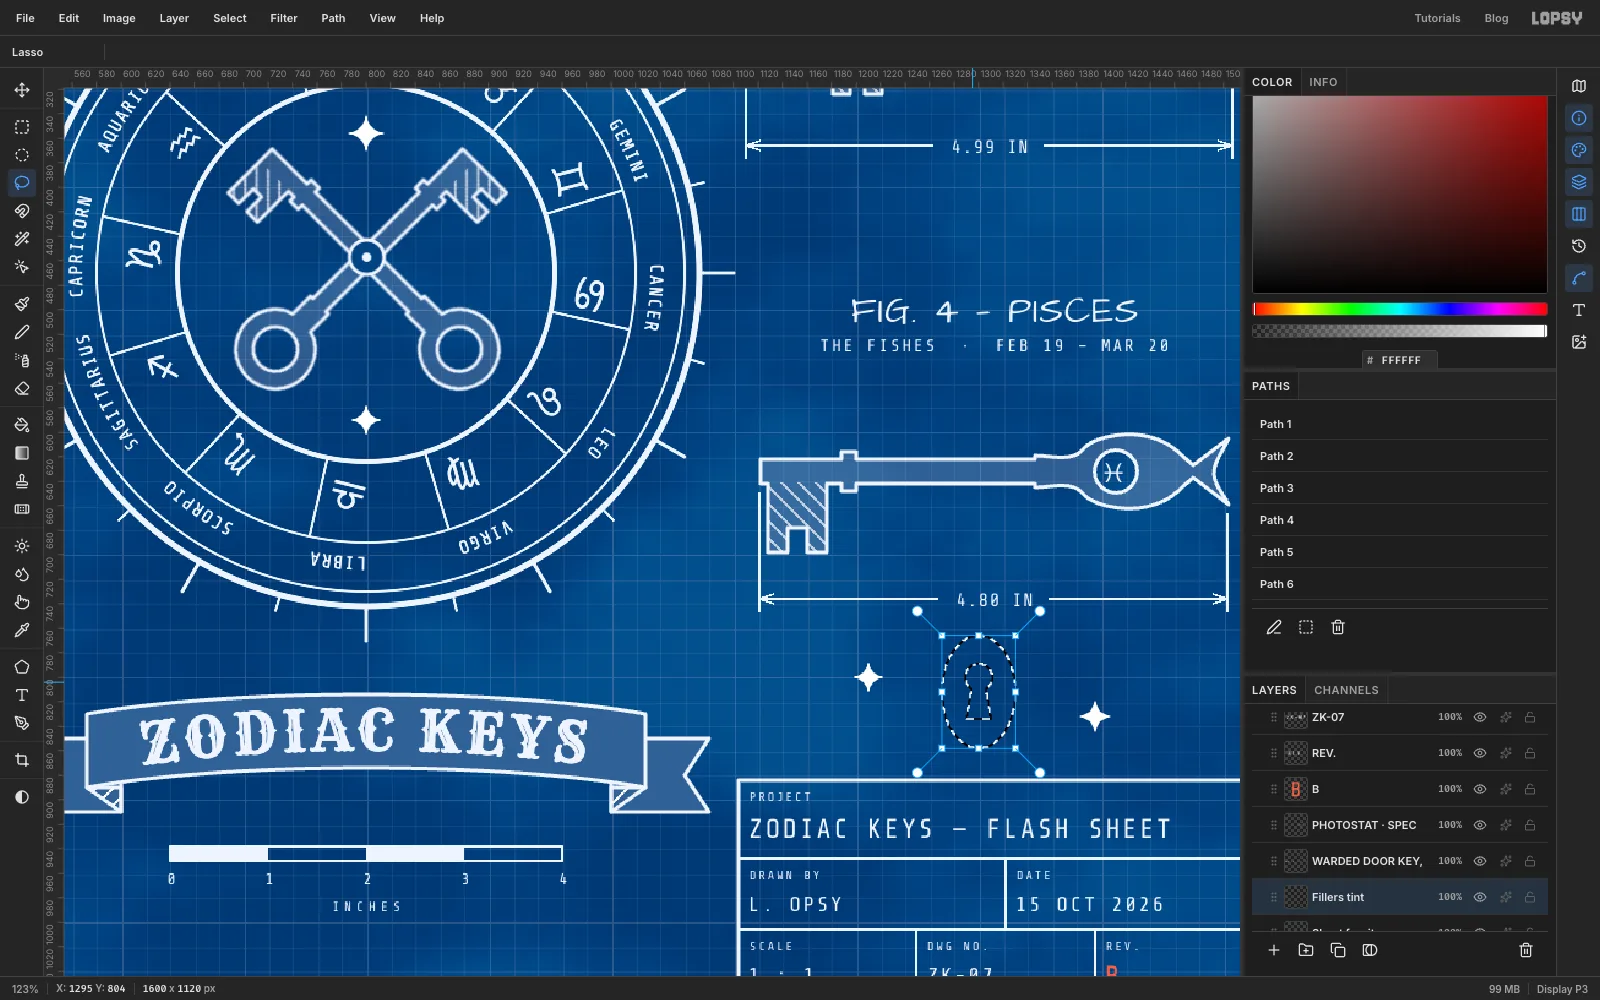
Below FIG. 4, drag an oval with the Elliptical Marquee from
1270, 766to1330, 858. Cut the keyhole out of it:- Alt-drag a small circle from
1289, 789to1311, 811. - Alt-lasso a tapering slot below it:
1295, 804,1305, 804,1310, 834,1290, 834.
Fill the oval and trace it to paths. The outline and the keyhole each become their own path.
- Alt-drag a small circle from
-
Stroke the fillers
Set Fillers tint to 16%, like the keys. Add a layer named Fillers line and stroke every filler path in the Paths panel at Width
2, slightly lighter than the keys' 3 px.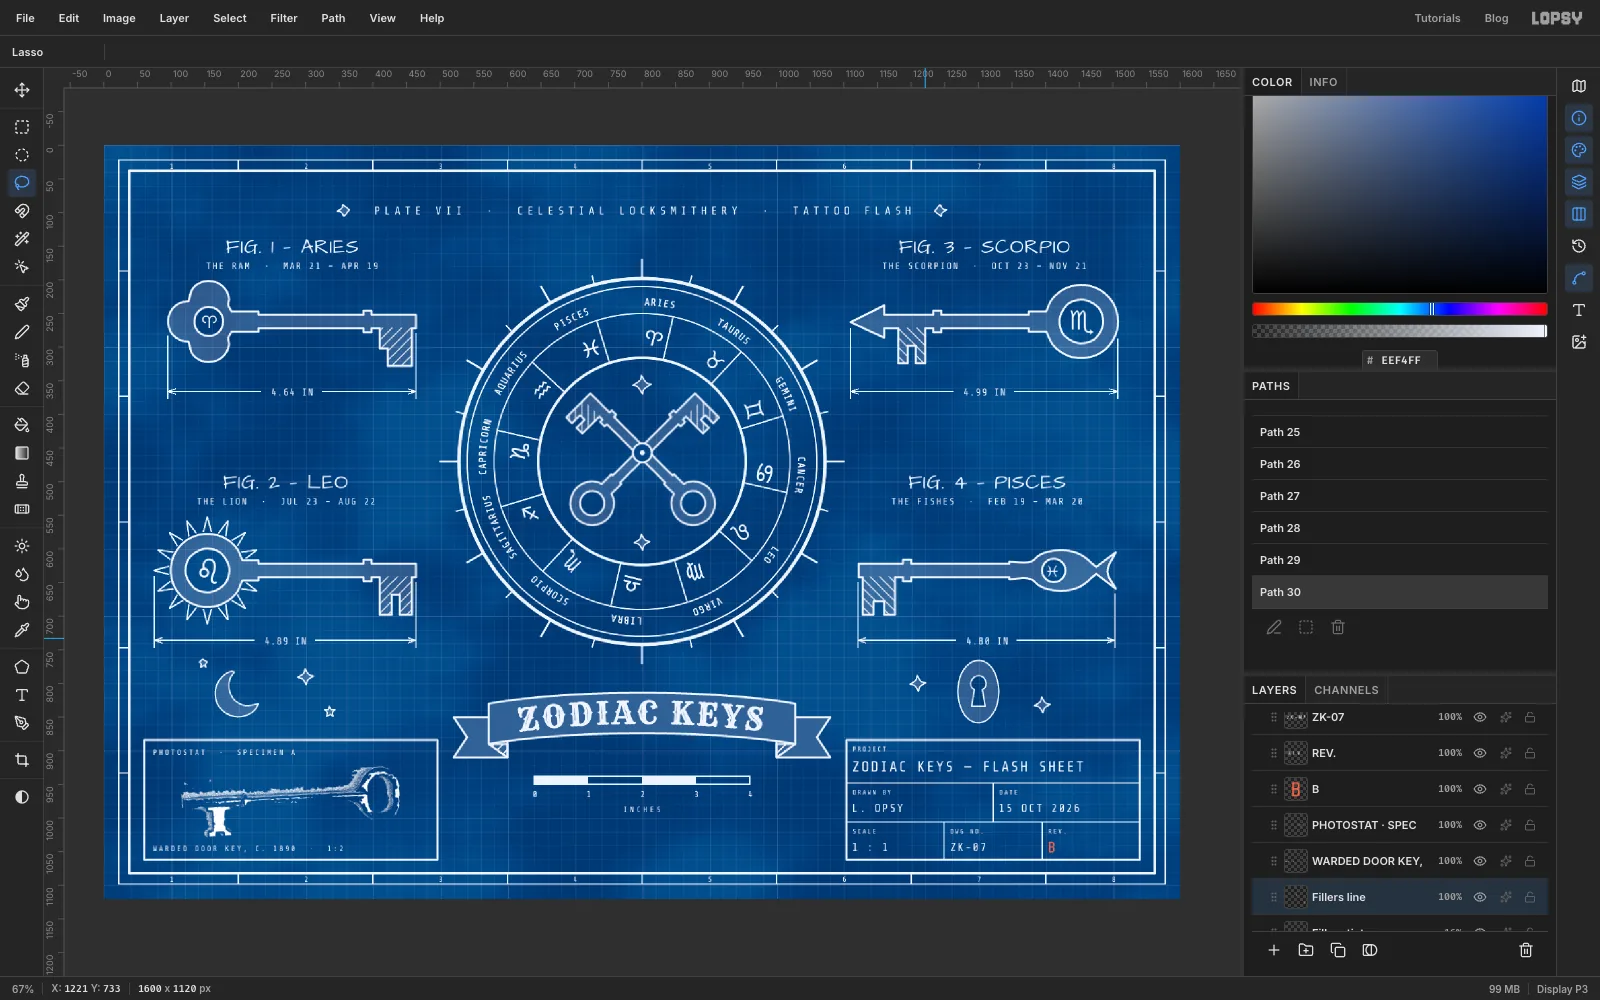
-
Mark a revision in red pencil
Blueprints get marked up. Add a layer named Redline, pick the Brush at Size
3with Hardness90, and set the foreground to . Draw a loop of small bumps all the way round the Scorpio stinger: a revision cloud. Keep the bumps roughly even and close the loop where you started.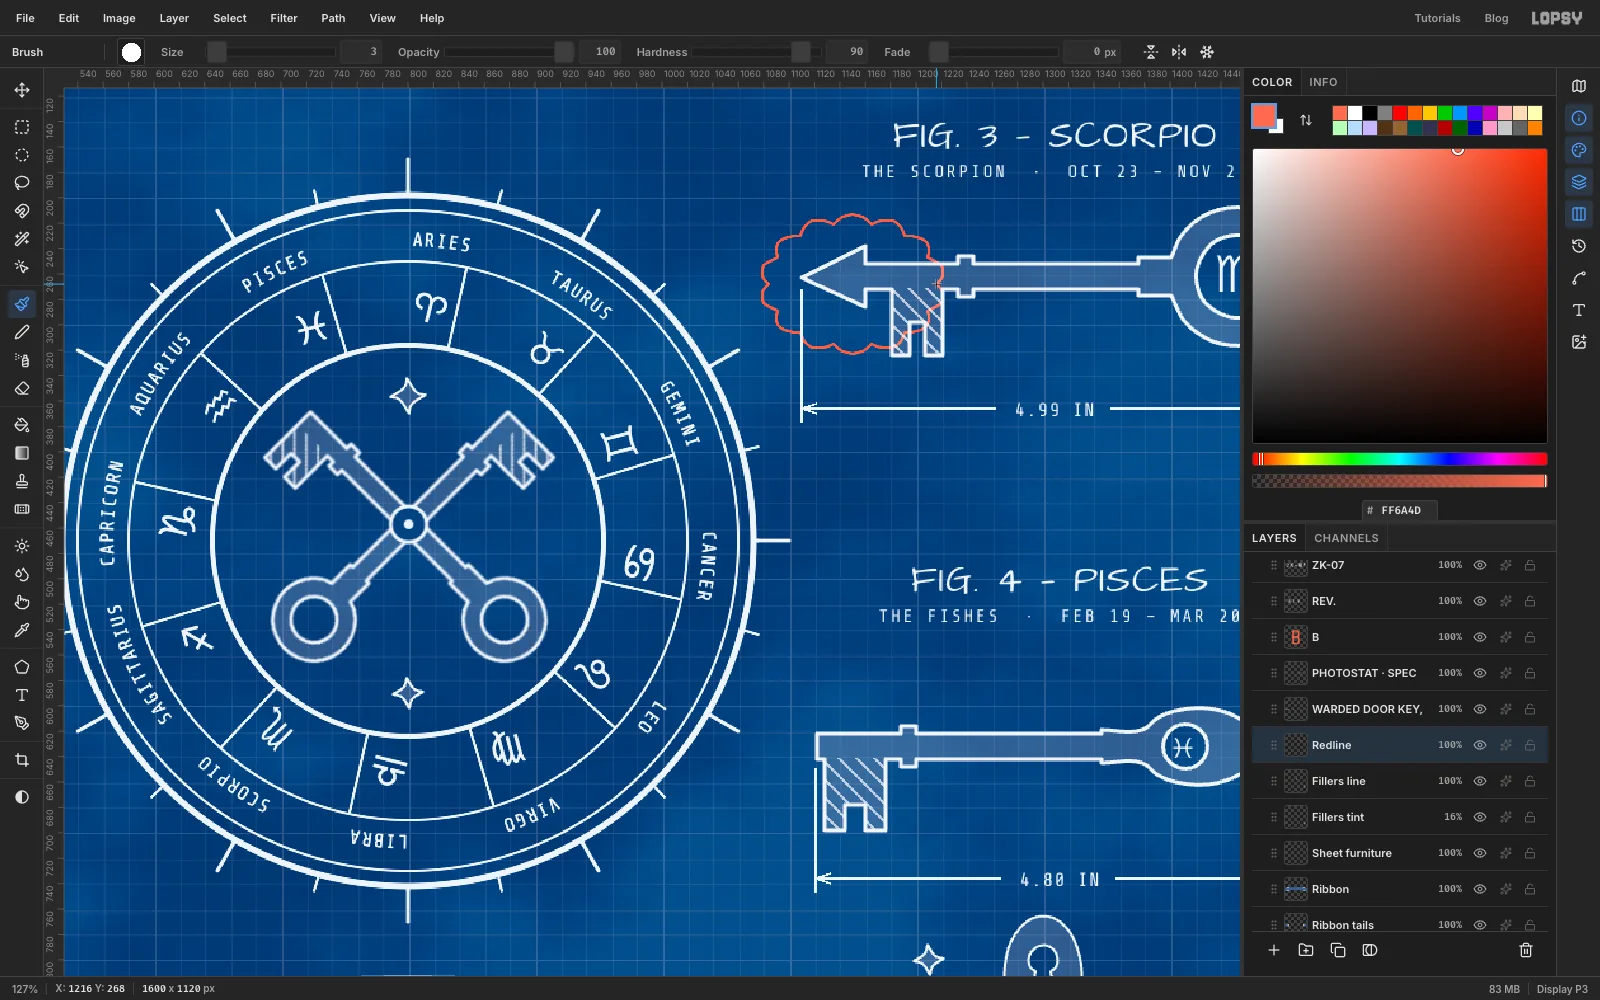
-
Add the revision triangle and note
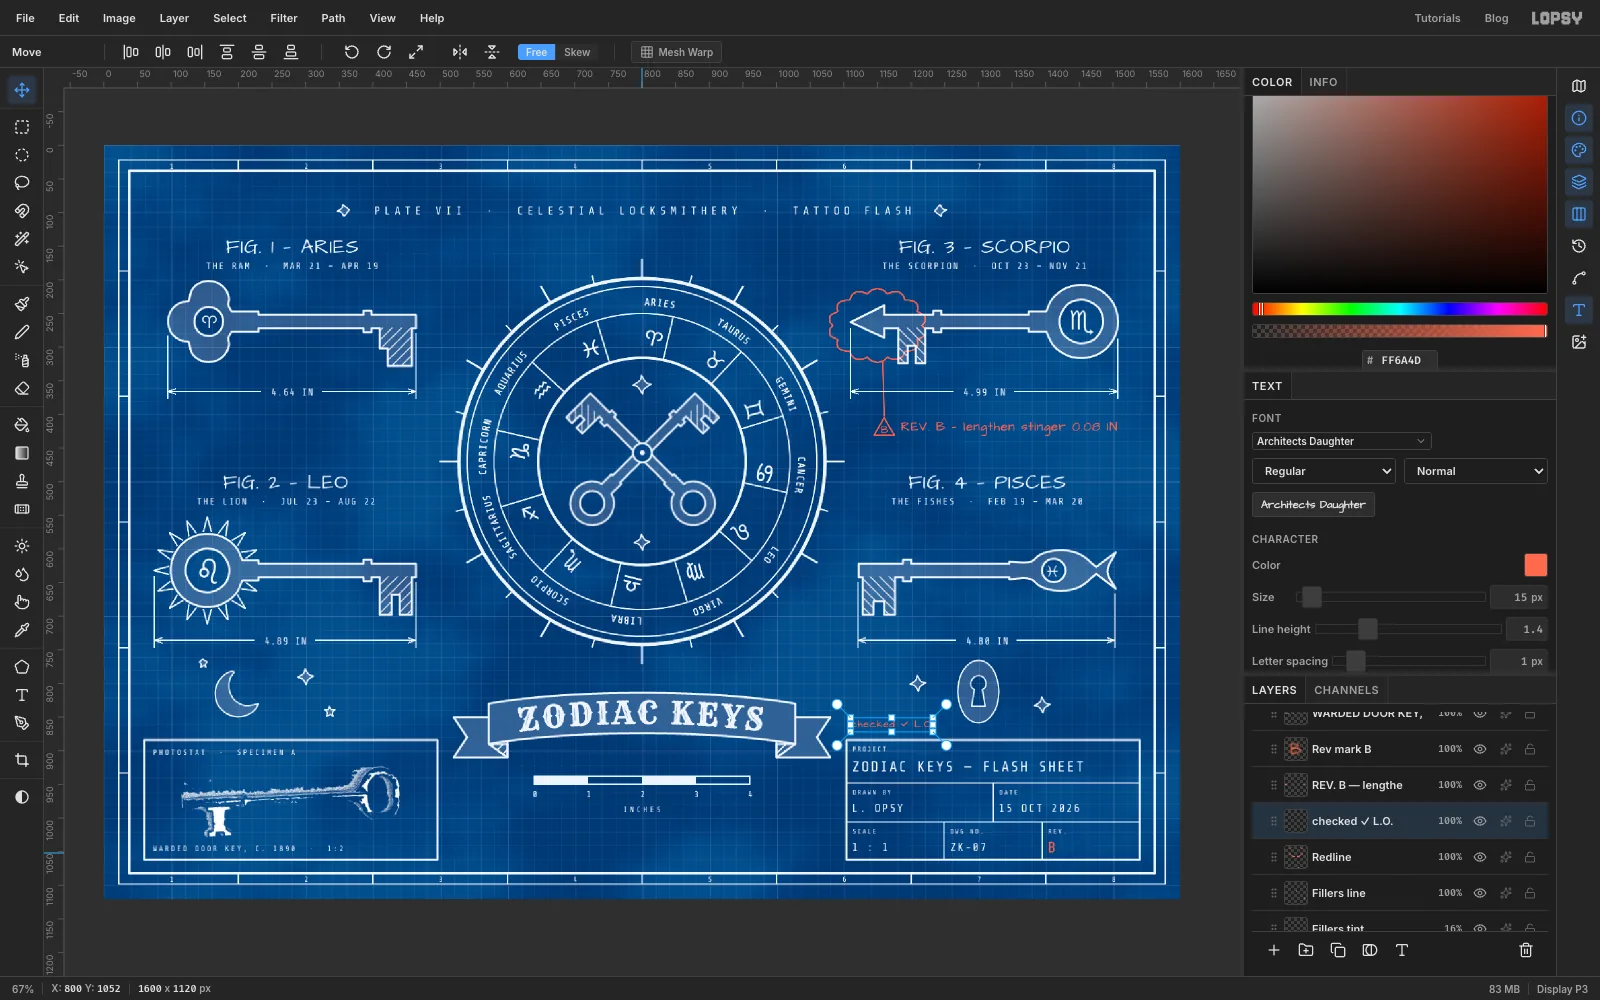
Pick the Shape tool and set Shape to Polygon with Sides
3. Set no fill and a red stroke at Width2. Click below the dimension line at1160, 418and enter 30 × 28. With the brush, Shift-click a leader line from the bottom of the cloud down to the triangle.In Architects Daughter, red, add:
Bat16, centred in the triangle (rename this layer Rev mark B, so it isn't confused with the title block's B)REV. B — lengthen stinger 0.08 INat19, to the right of the trianglechecked ✓ L.O.at15, just above the title block
Keep the note in inches: the drawing's dimensions are in inches, and mixing units on one sheet is a drafting mistake.
-
Fold the sheet
Blueprints were folded to fit in a drawer. Click Redline and add a layer named Creases, then pick the Brush at Size
4, Hardness60, white. Shift-click two full-height lines atx533 and 1067, and one full-width line aty560.Switch to the deep blue and draw a second set 3 px to the right and below, for the shadow side of each fold. Apply Filter → Gaussian Blur… at
2, set Blend to Soft Light and opacity to 70%.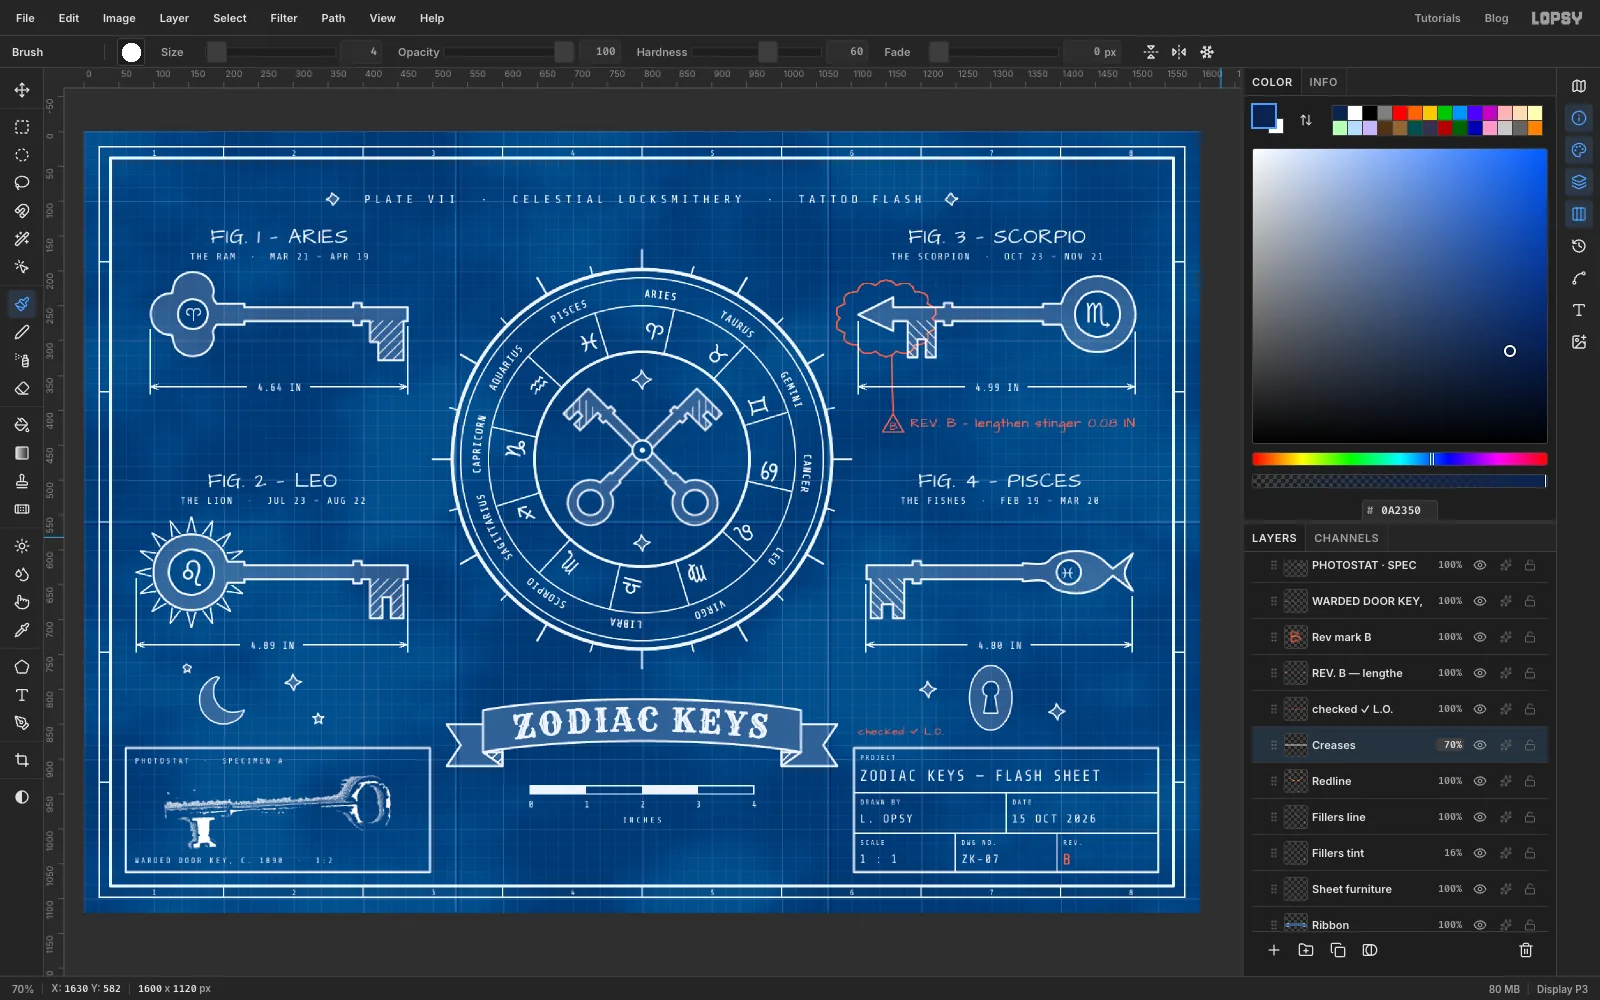
-
Darken the edges
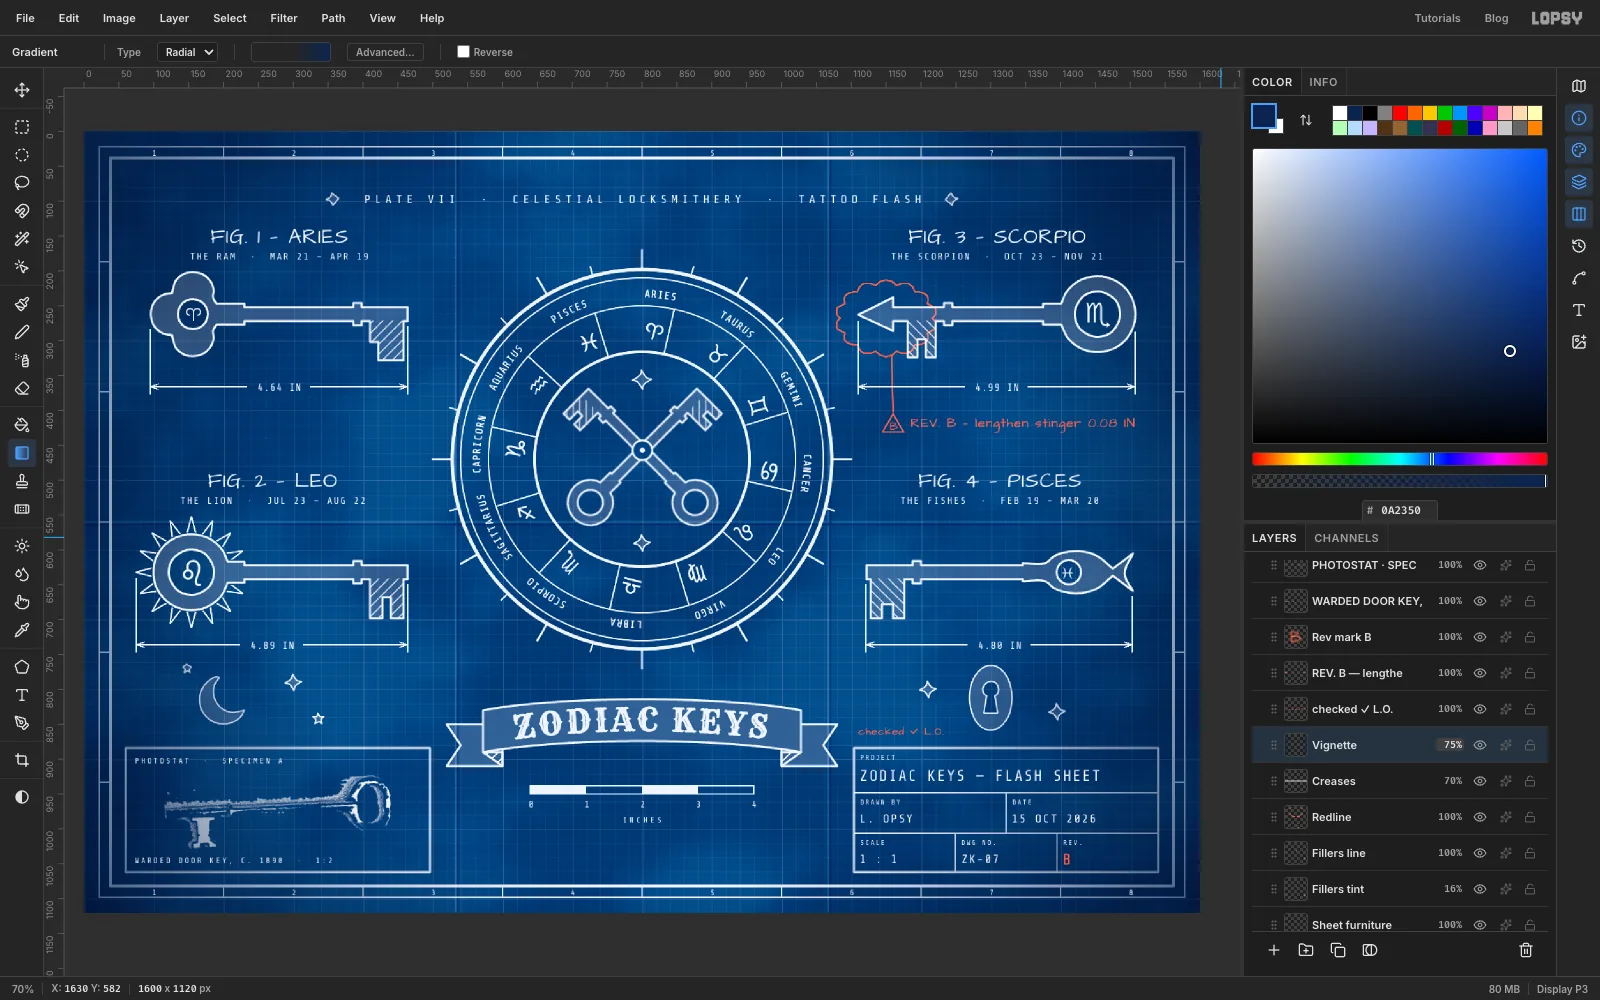
Add a layer named Vignette. Pick the Gradient tool, set Type to Radial and open the gradient editor. Use three stops, all deep blue :
- fully transparent at the left end
- fully transparent at 55%
- fully opaque at the right end
Drag from the centre of the sheet to a corner. Set Blend to Multiply and the opacity to 75%.
-
Add grain and a diazo bleed
Add a layer named Grain. Fill it with and apply Filter → Add Noise… with Amount
28and Mode set to Mono. Set Blend to Overlay and the opacity to 30%.Diazo prints bleed a little, so lines glow softly into the paper:
- Choose Select → All, then Edit → Copy Merged, and deselect.
- Choose Edit → Paste and name the new layer Bleed.
- Apply Filter → Gaussian Blur… at
4. - Set Blend to Screen and the opacity to 22%.
Export with File → Quick Export PNG and save with File → Save Project. You can delete the empty scratch layers now. Next time, swap in another four signs.