Paint a Melting Chrome Upright Piano at Dusk
Paint a surreal chrome upright piano melting onto a mirror salt flat in Lopsy, with hard-horizon chrome gradients, Liquify drips, a Voronoi crust and Bloom.
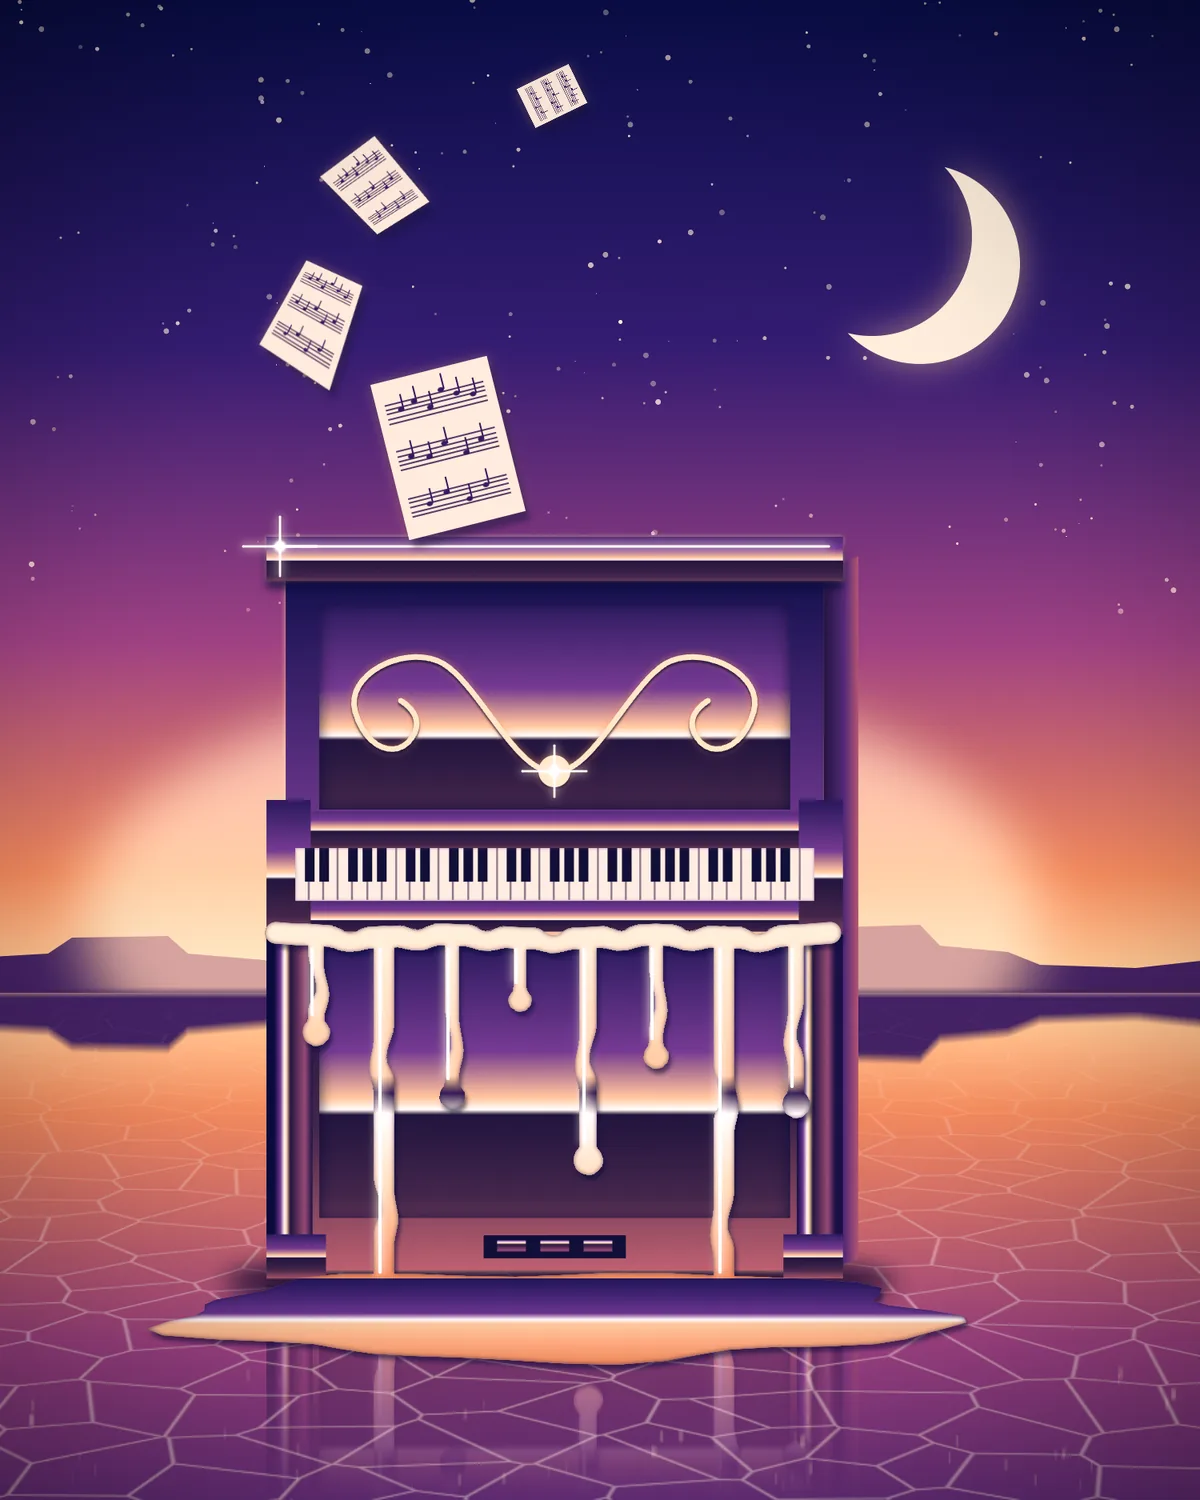
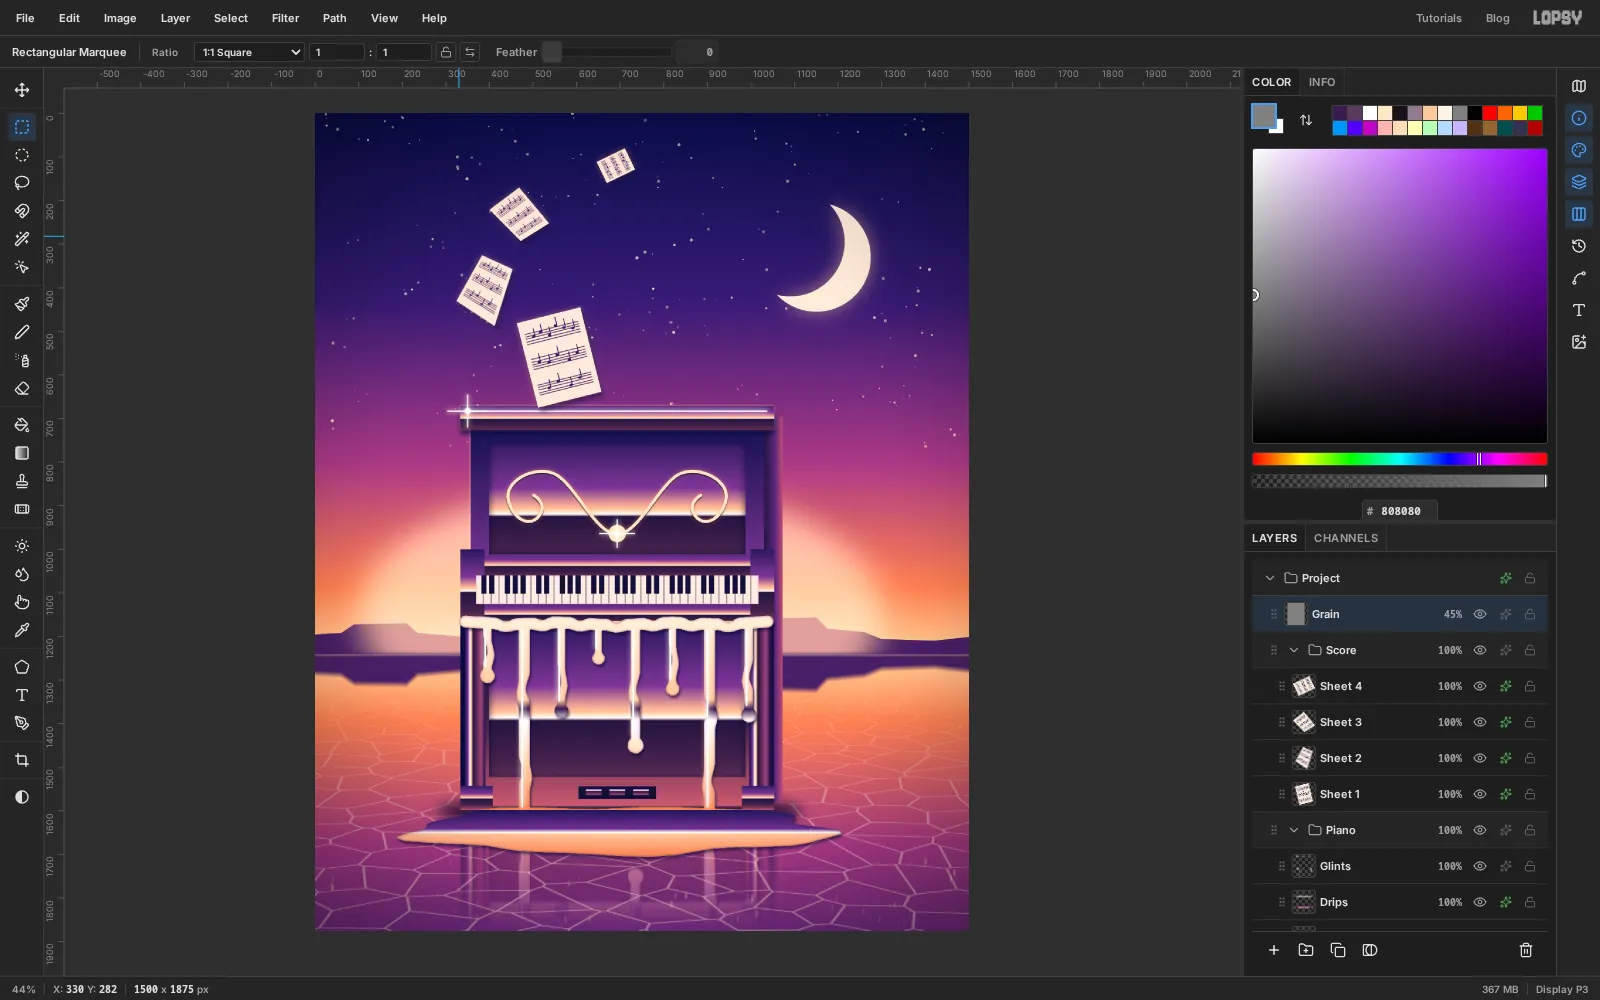
This tutorial paints a surreal piece called Upright Piano: a chrome upright piano left out on a desert salt flat just after sunset. It's melting. Liquid chrome sags off the keyboard into a puddle, and the score blows out of the top towards the moon. There's no photo and no text. Everything is drawn from gradients, selections, brushes and filters on a 1500 × 1875 px canvas, a 4:5 portrait shape that works as a print or a phone wallpaper.
The look depends on one idea. Chrome has no colour of its own; it only shows what's around it. A shiny flat panel facing you mirrors the sky in its top half and the ground in its bottom half. Where the two meet there's a sharp bright line (the reflected horizon) with a sudden drop into dark underneath. Get that hard break into every gradient and flat bands start to read as polished metal. Leave it soft and you get a retro stripe illustration instead.
Along the way you'll use:
- ruler guides, groups, reordering layers by dragging, and transforming a whole group with its handles
- the Gradient tool with multi-stop gradients from the Gradient Editor, linear and radial
- the Rectangular and Elliptical Marquee, the Lasso, and adding, subtracting and intersecting selections
- Cmd-clicking a layer thumbnail to select its pixels
- Spray, Brush, Pencil and the Pen tool (with a path stroked to pixels)
- Copy Merged, paste in place, arrow-key nudges, Flip Horizontal / Vertical, and the Perspective transform mode
- Voronoi, Invert, Motion Blur, Gaussian Blur, Liquify, Bloom and Add Noise
- Layer masks painted with a gradient
- Inner Glow, Outer Glow and Drop Shadow, the Screen, Multiply and Overlay blend modes, and the Vignette and Color Balance adjustments
The palette:
-
Dusk sky
-
Chrome
-
Stars
-
moon
-
moon glow
-
halo
-
Mesas
-
Ivory keys
-
ebony keys
-
Shadow ink
-
rim light
-
ornament
-
Score paper
-
notes
-
Set up the canvas and paint the sky
Create a new document
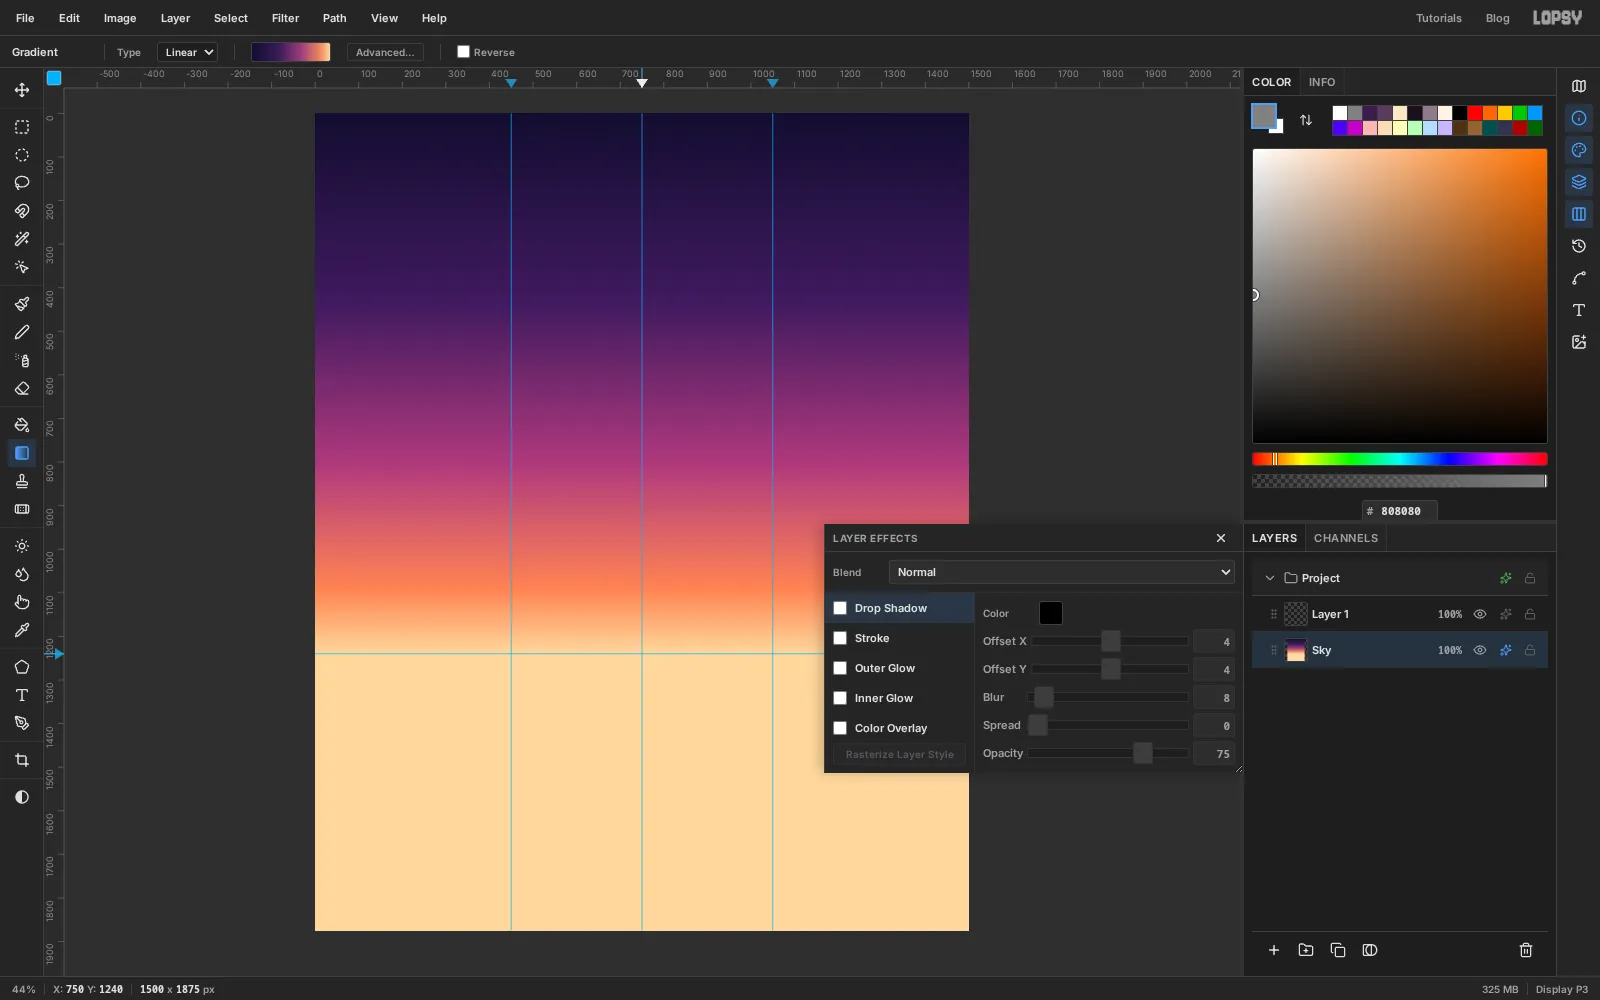
1500×1875px with a white background. Turn on View → Show Rulers, then drop four guides by clicking the rulers. Click the top ruler at x450,750and1050, and the left ruler at y1240. The horizontal guide is the horizon. The vertical ones frame where the piano will be built.- Double-click the
Backgroundrow and rename itSky. - Pick the Gradient tool, set Type to Linear and open Advanced…. Make five stops: at the left end, at about 35%, at about 65%, at about 88% and at the right end.
- Hold Shift and drag from the top of the canvas straight down to the horizon guide.
Everything below the horizon gets the last colour. That's fine, because the ground will cover it.
- Double-click the
-
Scatter the stars
The new document comes with a white
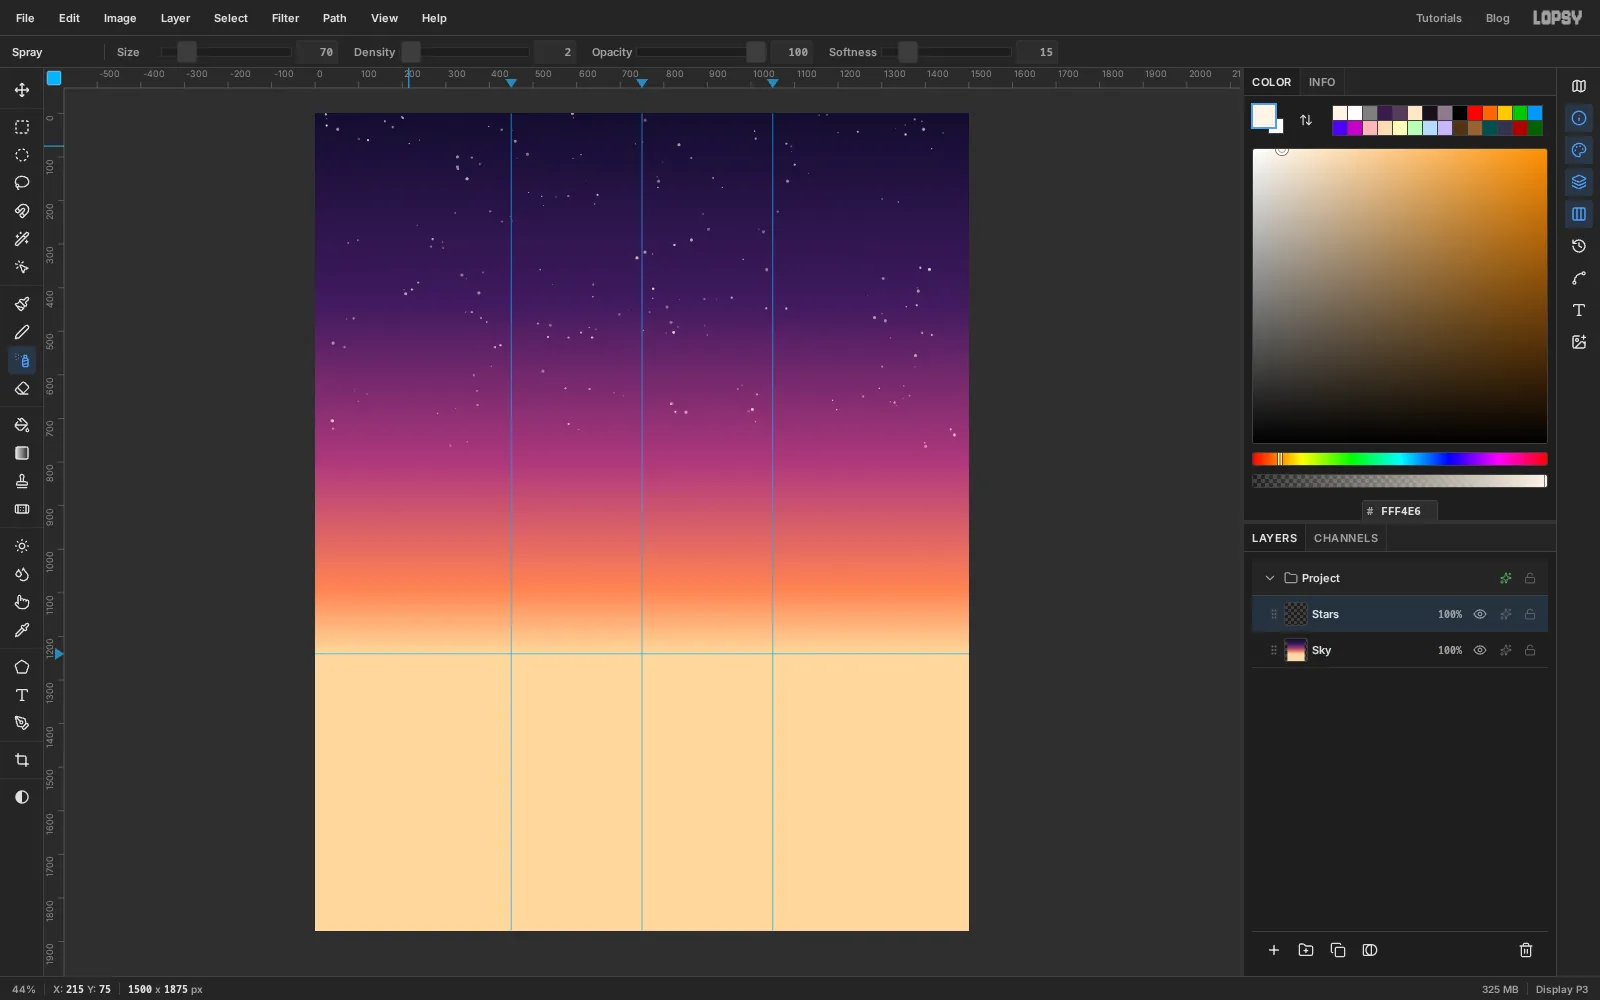
Backgroundand an emptyLayer 1above it. Double-clickLayer 1, rename itStars, and pick the Spray tool (J). Set Size70, Density2, Opacity100and Softness15, with the foreground colour .Don't drag. A drag sprays a trail of dots along your path, and the stars come out in strings. Instead, click about a hundred times at random over the top of the sky. Each click drops two small dots. Click more often near the top and less often lower down, and stop around y
760: real stars wash out in the bright glow above a sunset.Spray's Size is the width of the cloud, and it also sets the size of each dot. At Size 400 you'd get soft snowballs. Keep it small for pinpoint stars.
-
Cut a crescent moon
- With
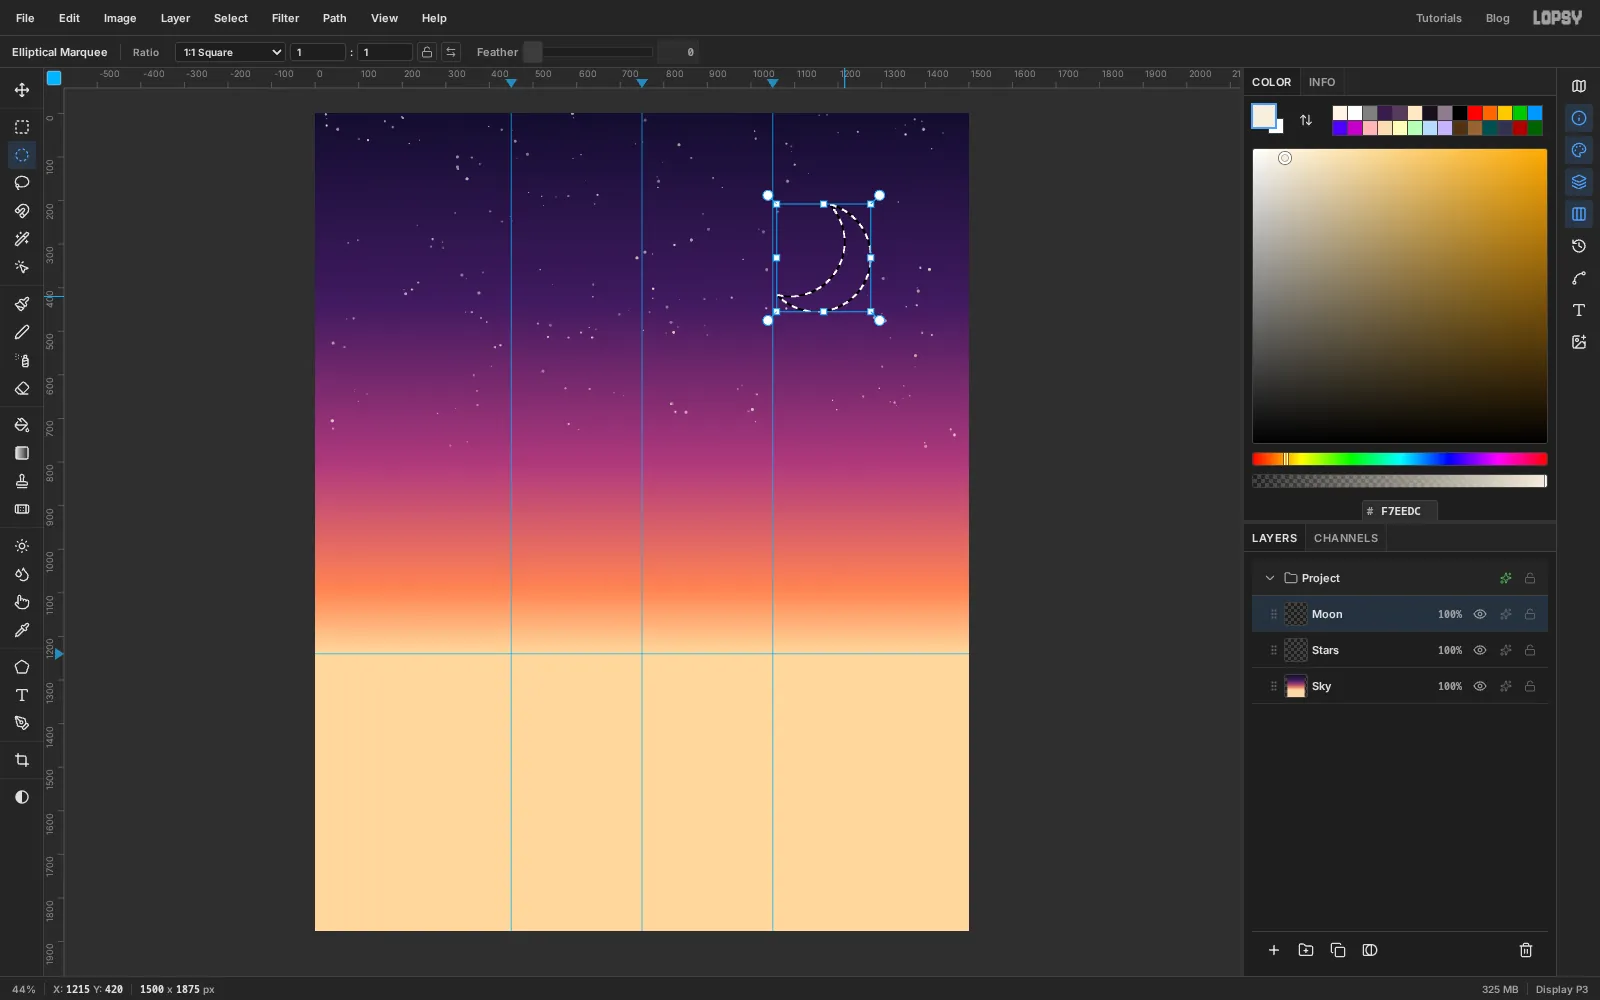
Starsactive, click Add Layer and rename itMoon. - Pick the Elliptical Marquee and hold Cmd to keep it a circle. Drag a 250 px circle in the upper right, from about
1025, 205to1275, 455. - Hold Alt and drag a second circle of the same size, 60 px further left and 35 px higher. It's subtracted from the first, leaving a crescent that opens towards the top left.
- Fill with and press Cmd+D.
- Open the layer effects (the ✦ button on the row), turn on Outer Glow, and set Size
70, Opacity55and the colour .
- With
-
Add distant mesas
Click Add Layer and name it
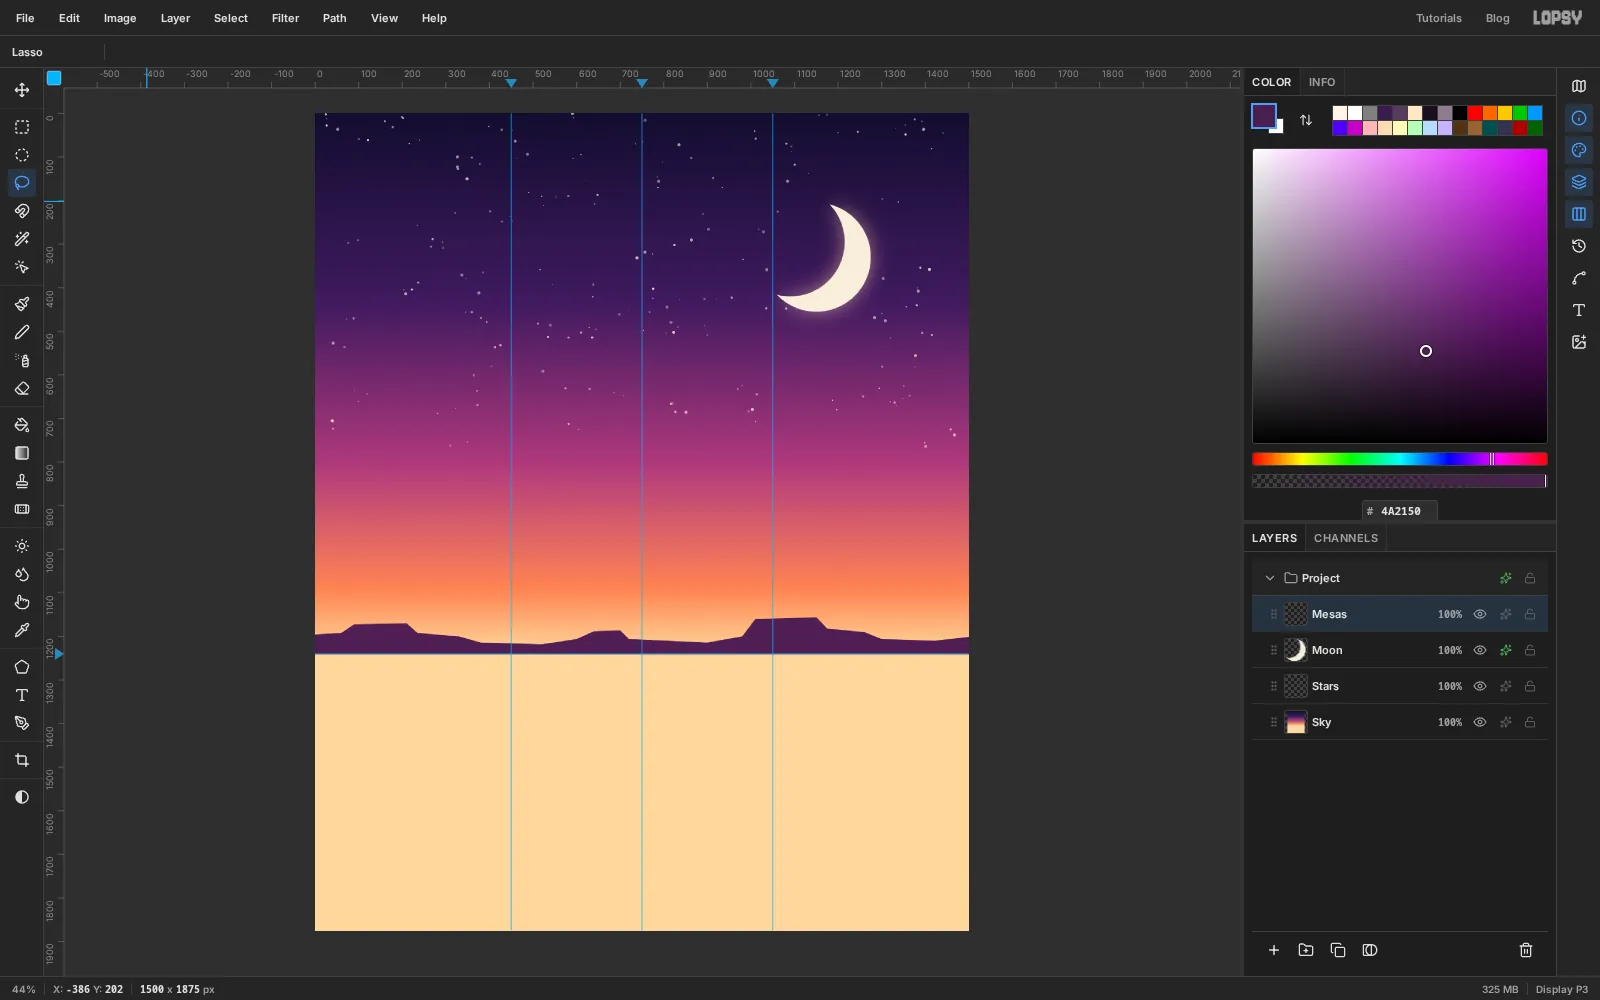
Mesas. With the Lasso (L), draw a low, flat-topped skyline along the horizon. Start below the guide at the left edge and work right. Keep the mesas short (40 to 85 px tall) and flat on top, with steep sides, a big one on the left and a bigger one right of centre. Close the shape back below the horizon guide. Fill with .Keep them low. They only need to say "desert" and give the horizon a silhouette; the piano will be the tall shape.
-
Mirror the sky into the salt flat
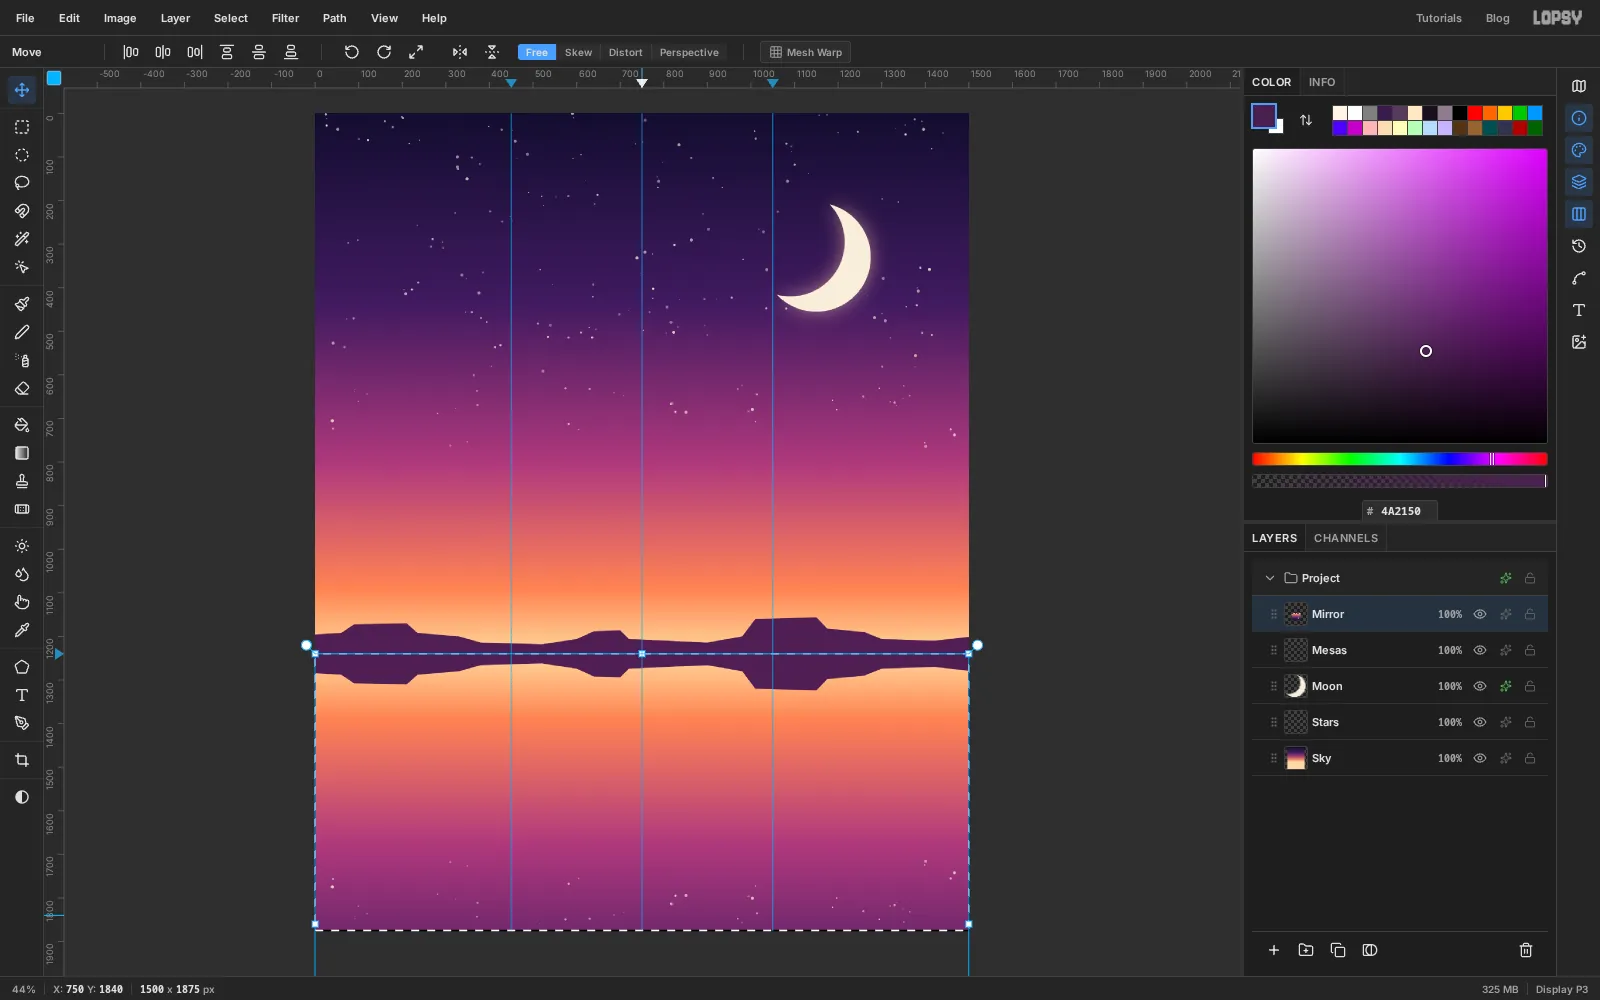
A salt flat after rain is a near-perfect mirror, so the ground is just the sky upside down.
- Drag a Rectangular Marquee (M) from the top-left corner of the canvas to the right edge at the horizon guide.
- Choose Edit → Copy Merged (Cmd+Shift+C). That copies what you see, sky, stars, moon and mesas together, rather than one layer.
- Press Cmd+V. The copy pastes in place as a new layer, already selected, and the Move tool is picked. Rename it
Mirror. - Click Flip Vertical in the options bar, then drag the selection straight down until its top edge sits on the horizon guide.
- Press Cmd+D, then run Filter → Motion Blur… with Angle
90and Distance14. A slight vertical smear makes it read as a wet surface rather than glass.
-
Make the salt crust texture
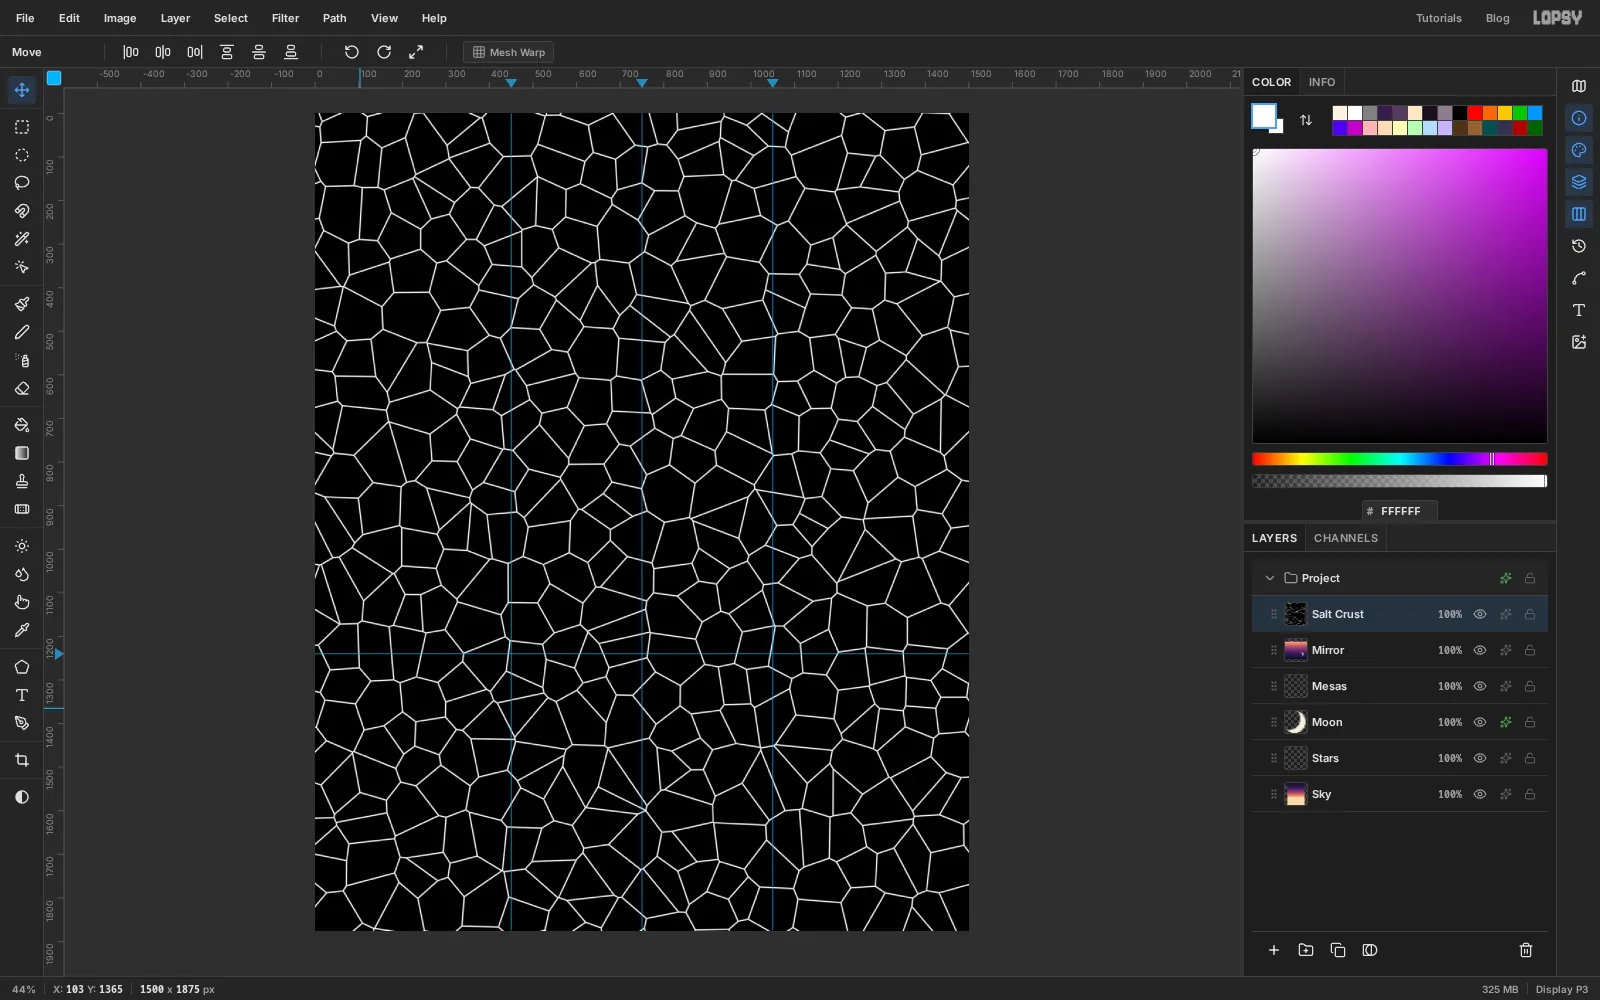
Real salt flats crack into polygons, and Voronoi draws exactly that.
- Click Add Layer and name it
Salt Crust. Fill the whole layer with white (Cmd+A, Edit → Fill, Cmd+D). - Run Filter → Voronoi… with Cells
22, Edge Width6and Seed42. You get white cells with black borders. - Choose Filter → Invert. Now the borders are white lines on black, which is what you want for a Screen blend later: black disappears and only the lines show.
- Click Add Layer and name it
-
Squash the crust onto the ground
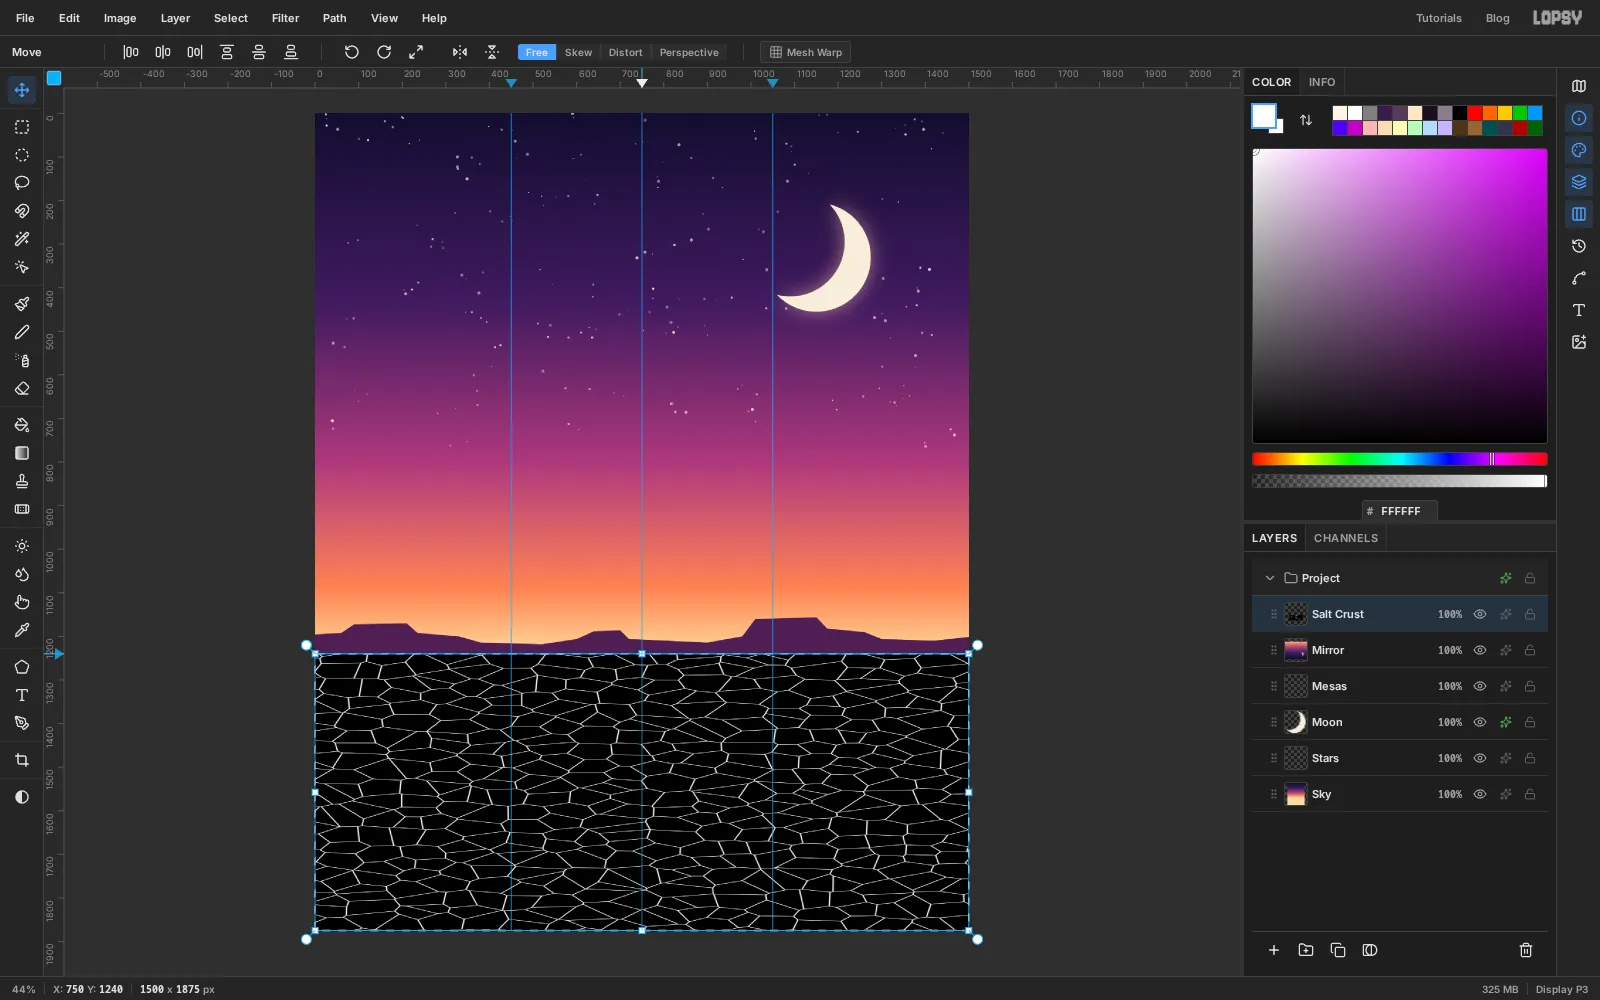
Pick the Move tool (V) and press Cmd+A. Transform handles appear around the whole canvas. Drag the top-middle handle straight down to the horizon guide. The cells flatten into wide shapes, like tiles seen from a low angle.
-
Put the crust in perspective
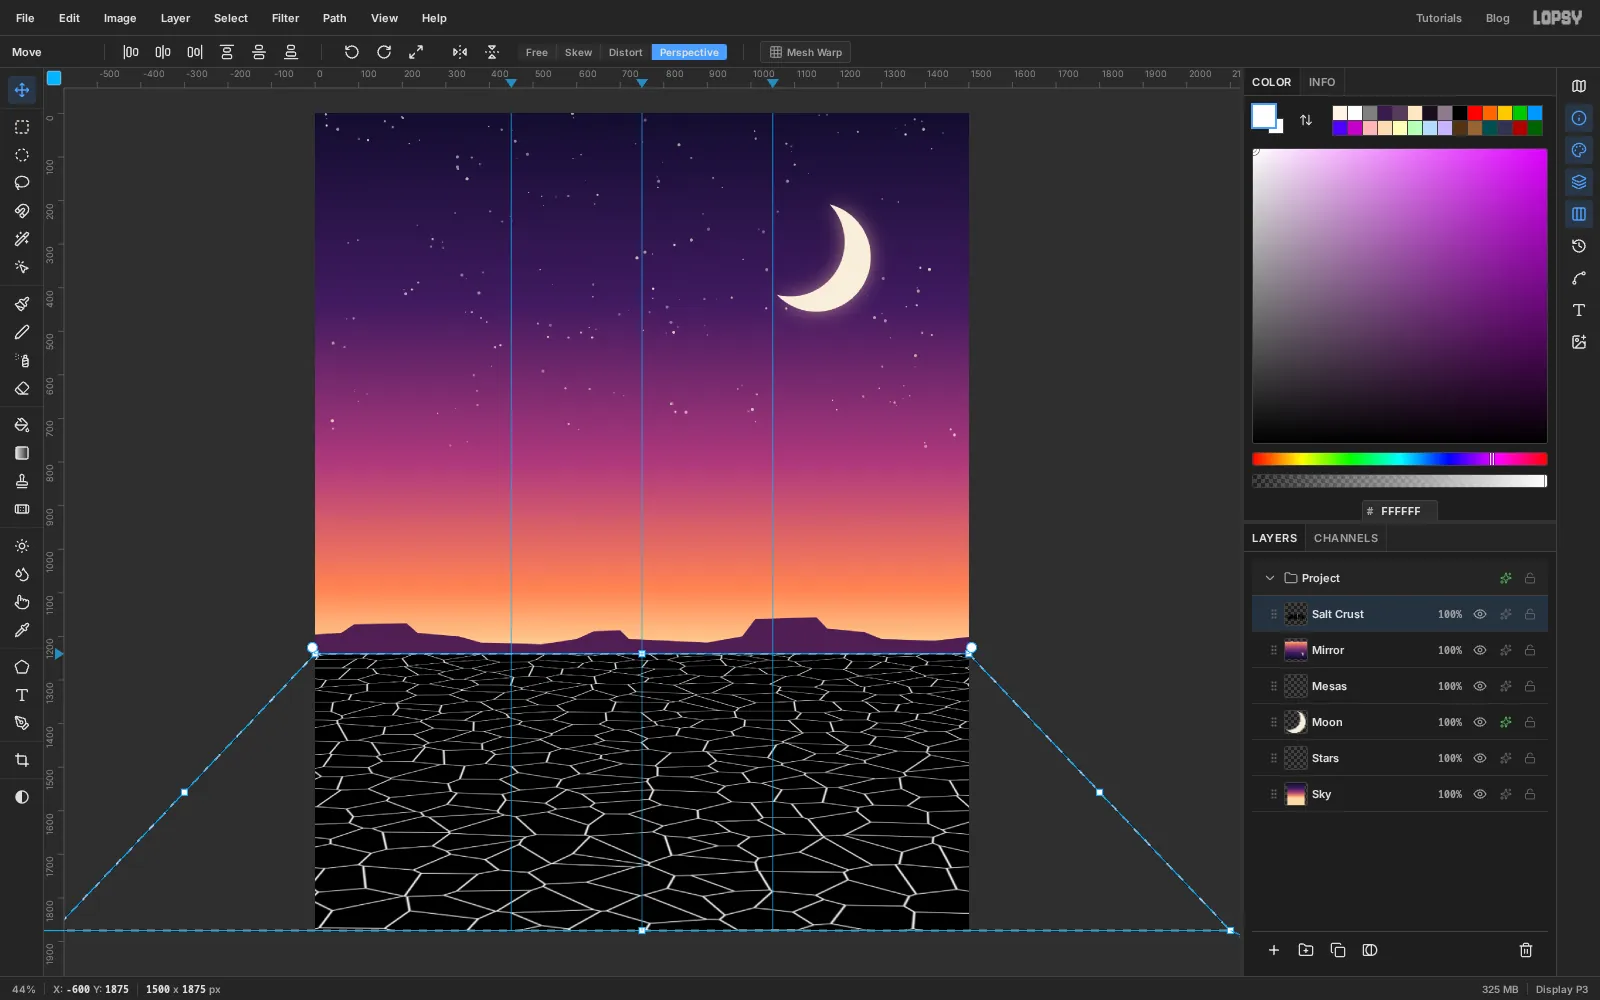
With the handles still showing, click Perspective in the options bar. Changing mode commits the squash first. Now drag the bottom-left corner handle out to the left, about 600 px past the canvas edge. In Perspective mode the bottom-right corner mirrors it automatically.
The cells now shrink towards the horizon and grow towards you, which is what sells the ground as a flat plane stretching away. Press Cmd+D to commit.
-
Blend the crust and fade it with distance
- Run Filter → Gaussian Blur… with Radius
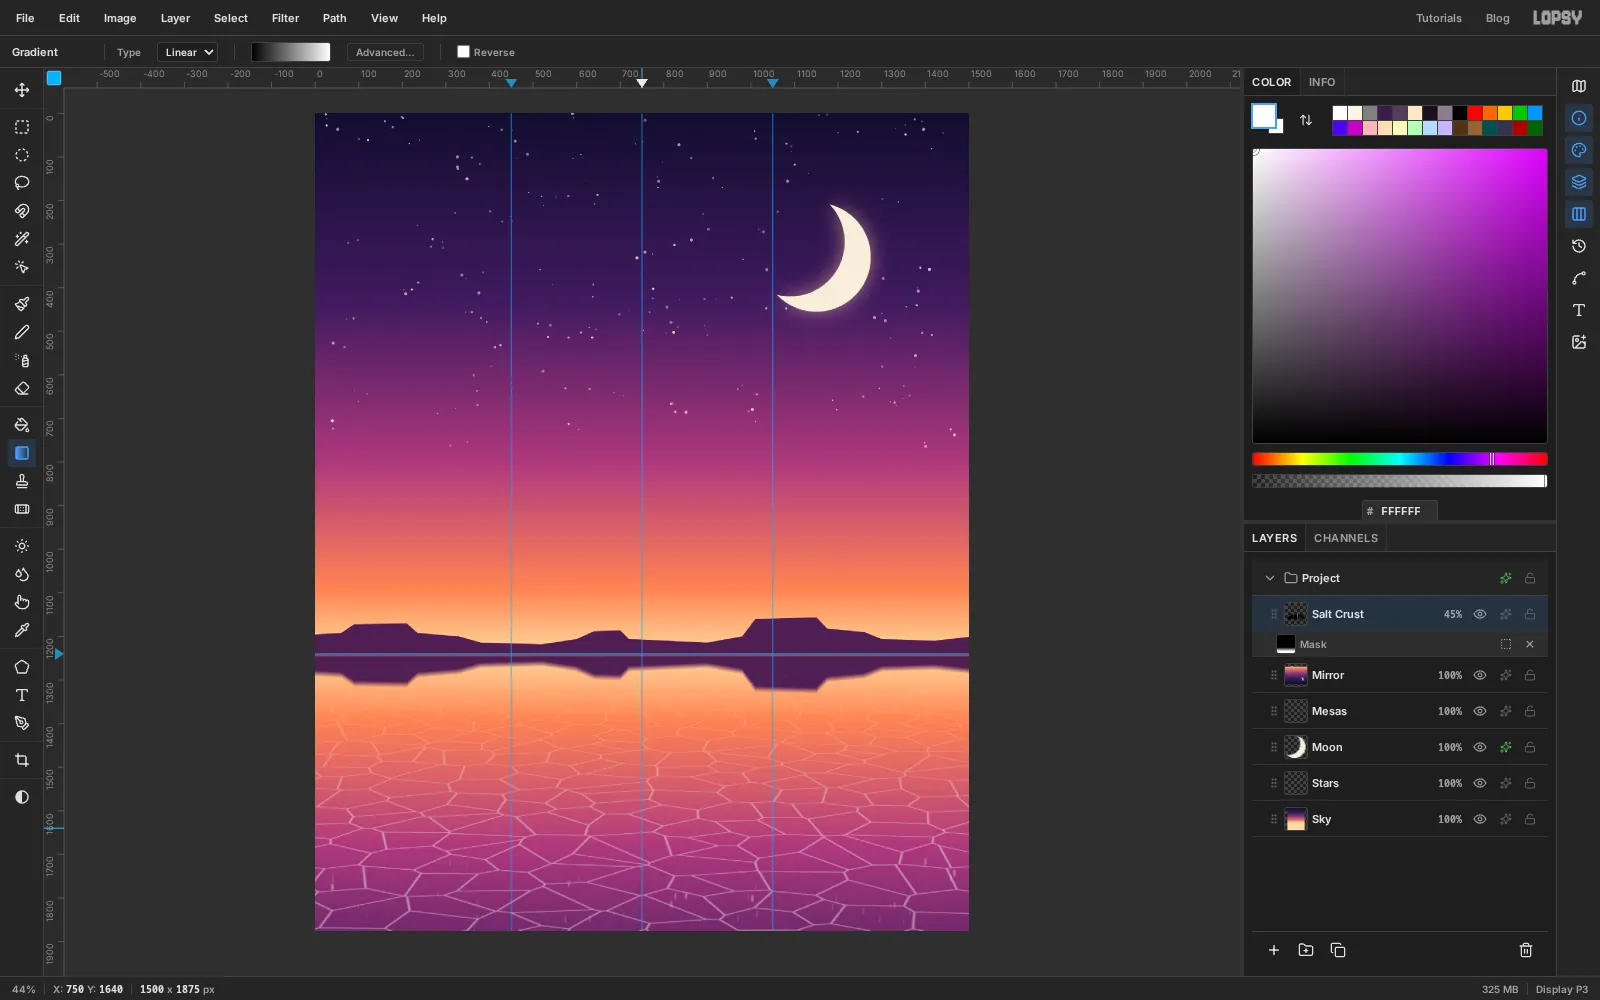
1.5to soften the lines. - In the layer effects drawer, set the blend mode to Screen. Then click the opacity on the row and set it to
45%. - Click Add Mask at the bottom of the Layers panel, then click the mask's thumbnail (
Edit mask for Salt Crust) to paint on the mask. - In the Gradient Editor, set up a two-stop gradient, black on the left and white on the right, and Shift-drag from the horizon guide down to about y
1640.
Black on the mask hides the lines near the horizon and white keeps them in the foreground. Lines that fade with distance read as depth. Lines that are bright all the way up read as a tiled floor.
- Run Filter → Gaussian Blur… with Radius
-
Add the afterglow behind the piano
Click the
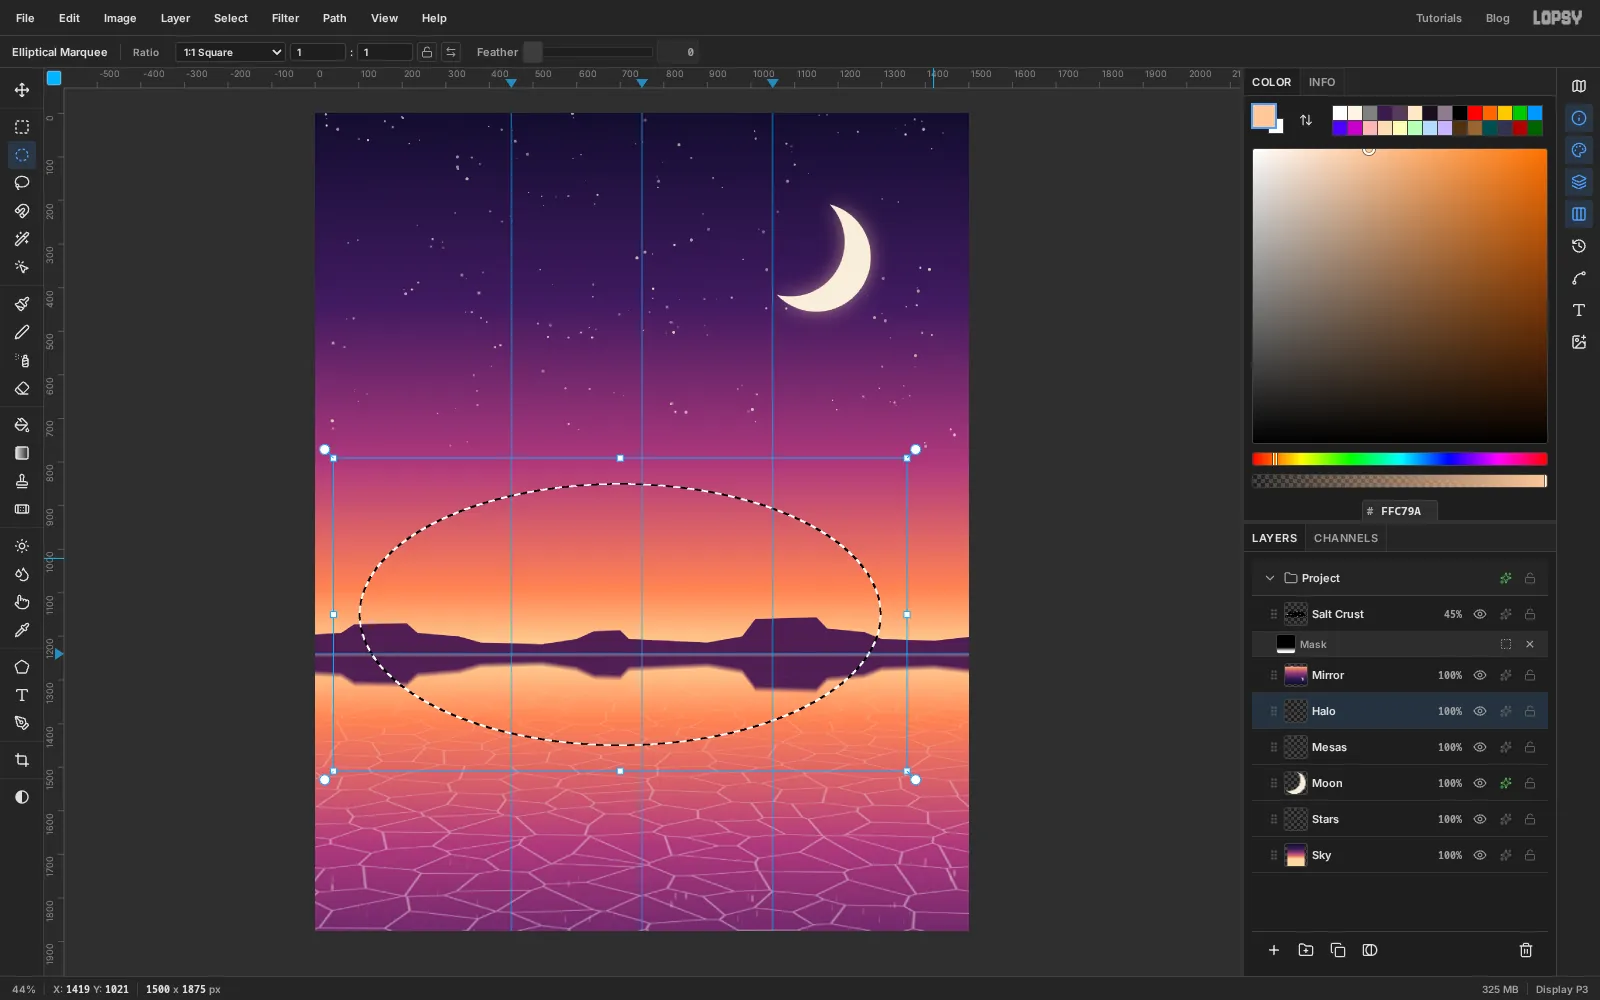
Mesasrow and Add Layer. Name itHalo.- With the Elliptical Marquee, drag a wide oval centred on about
700, 1150, 1200 px across and 600 px tall. - Choose Select → Feather… and enter
60. - Fill with , press Cmd+D, then run Gaussian Blur with Radius
60. - Set the blend mode to Screen and the opacity to
75%.
The glow sits behind where the piano will stand, so the instrument's silhouette is lit from behind.
- With the Elliptical Marquee, drag a wide oval centred on about
-
Group the backdrop
Click the top row of the stack (
Salt Crust), then Shift-clickSkyso every backdrop layer is selected. Choose Layer → Group Layers, rename the groupBackdropand collapse it with its chevron. From now on, the background stays out of the way.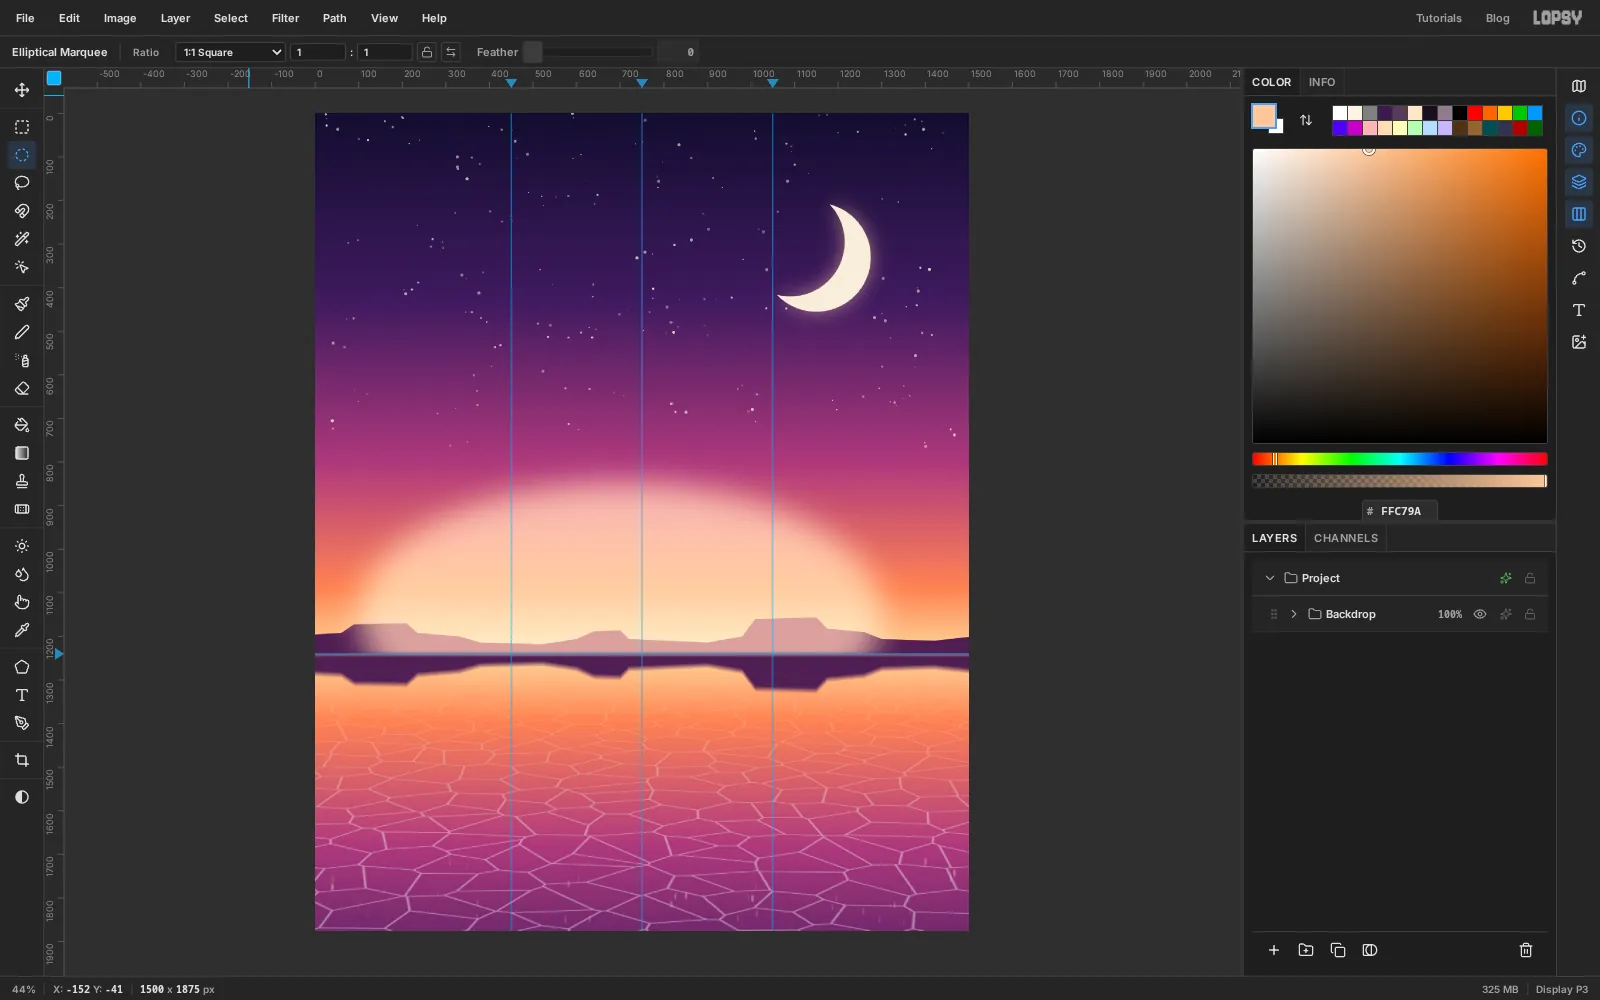
-
Start the piano with a chrome case
Click the
Backdroprow and click New Group. Because a group was active, the new group lands insideBackdrop. Drag it out by its grip (⋮⋮) until it sits aboveBackdrop, then rename itPiano.Now build the chrome gradient. This is the most important gradient in the piece, so set it carefully in the Gradient Editor:
- at 0% (the dark top of the sky)
- at 40%
- at 53% (the glow just above the horizon)
- at 56% (the specular line)
- at 57.5% (the sudden drop into the reflected ground)
- at 80%
- at 100% (a warm bounce from the ground)
The white and the dark stop sit only 1.5% apart. That's the hard break that makes it chrome.
With
Pianoactive, click Add Layer and name itCase. Marquee from470, 700to1030, 1430and Shift-drag the gradient from the top of the marquee to the bottom. Press Cmd+D.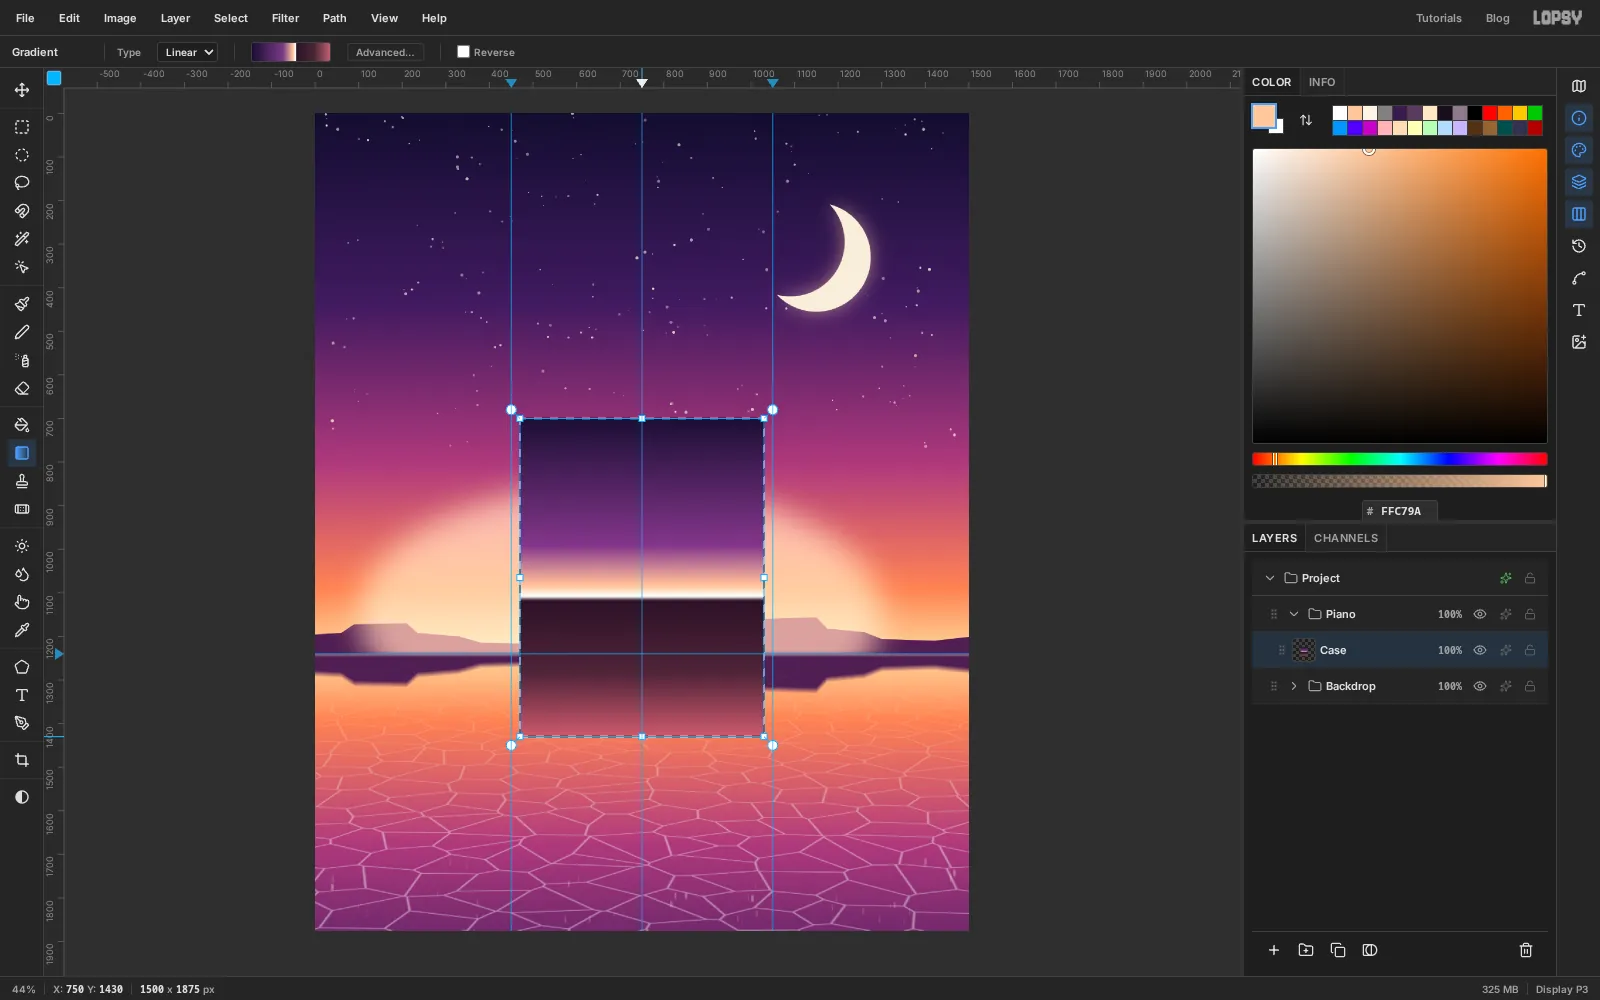
-
Build the rest of the case
Each part goes on its own layer, filled with the same chrome gradient, and each new layer lands above the last one you made, starting from
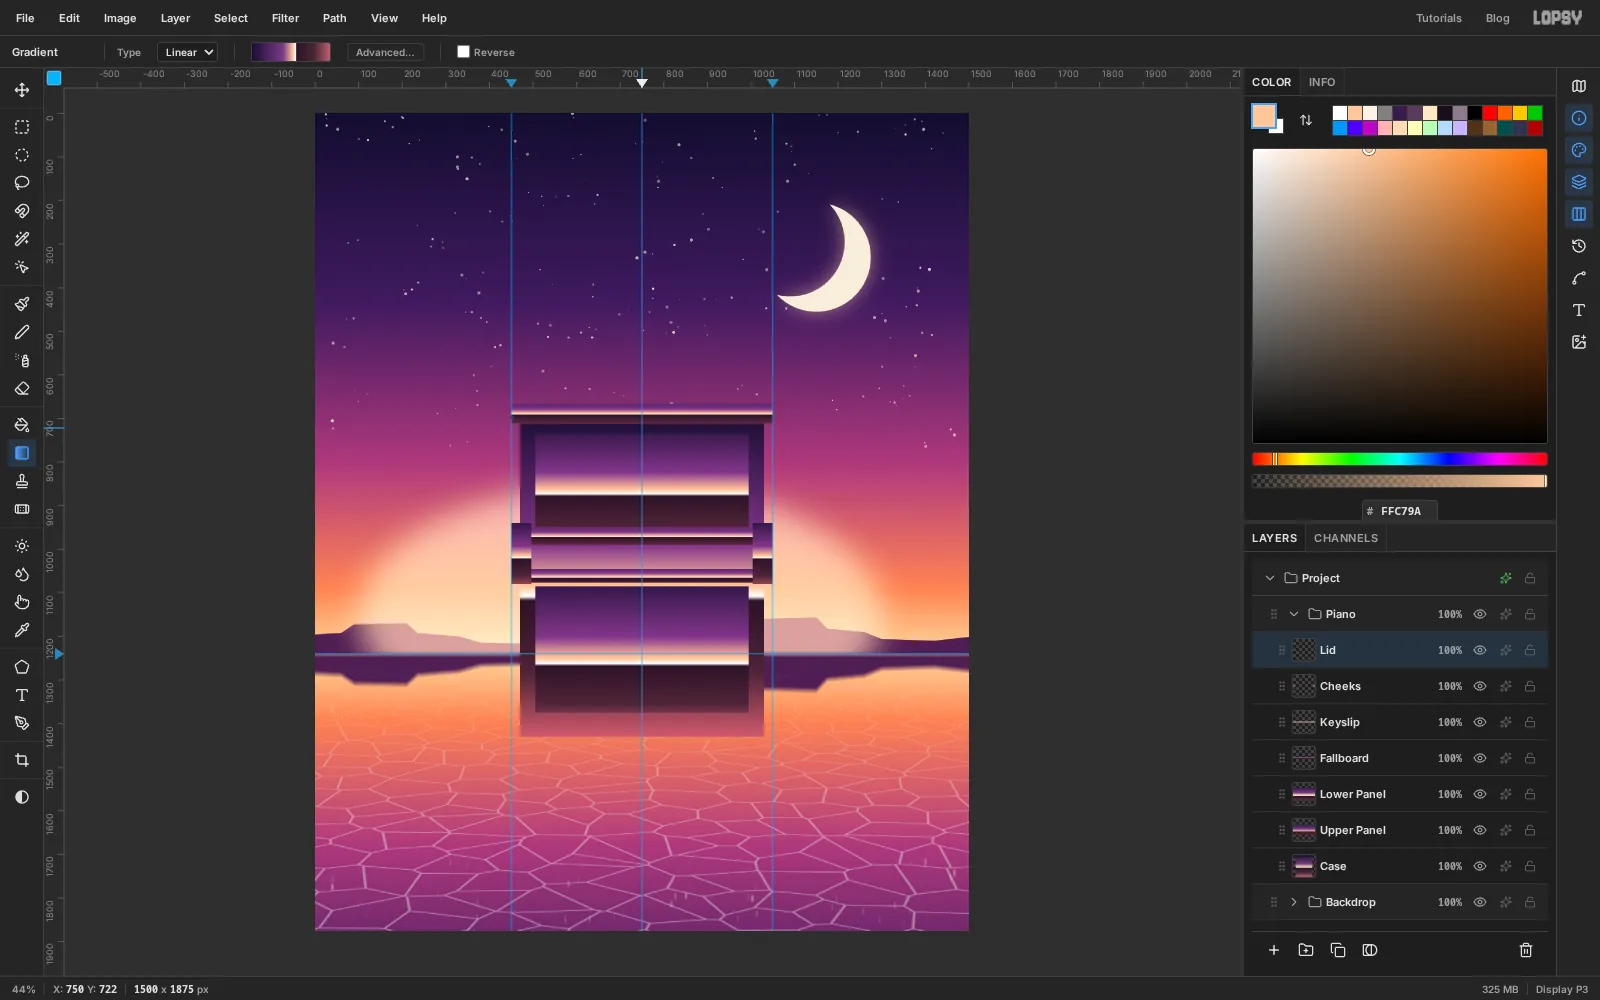
Case. Click Add Layer, name it, marquee it, then drag the gradient. The trick is to start and end the drag at different places for each part, so the bright line lands at a different height every time. Identical bands on every panel look printed; staggered ones look like separate pieces of polished metal.Upper Panel: marquee505, 735to995, 950, drag the gradient from y700to1010.Lower Panel: marquee505, 1085to995, 1375, drag from y1050to1430.Fallboard: marquee470, 952to1030, 990, drag from y935to1000.Keyslip: marquee470, 1045to1030, 1077, drag from y1030to1092.Cheeks: marquee448, 940to496, 1080, then Shift-drag1004, 940to1052, 1080, and drag from y925to1095.Lid: marquee445, 666to1055, 712, drag from y650to722.
The Cheeks layer uses one selection made of two rectangles. Holding Shift on the second drag adds it to the first, so one gradient fills both blocks the same way.
-
Draw one octave of keys
- Click Add Layer and name it
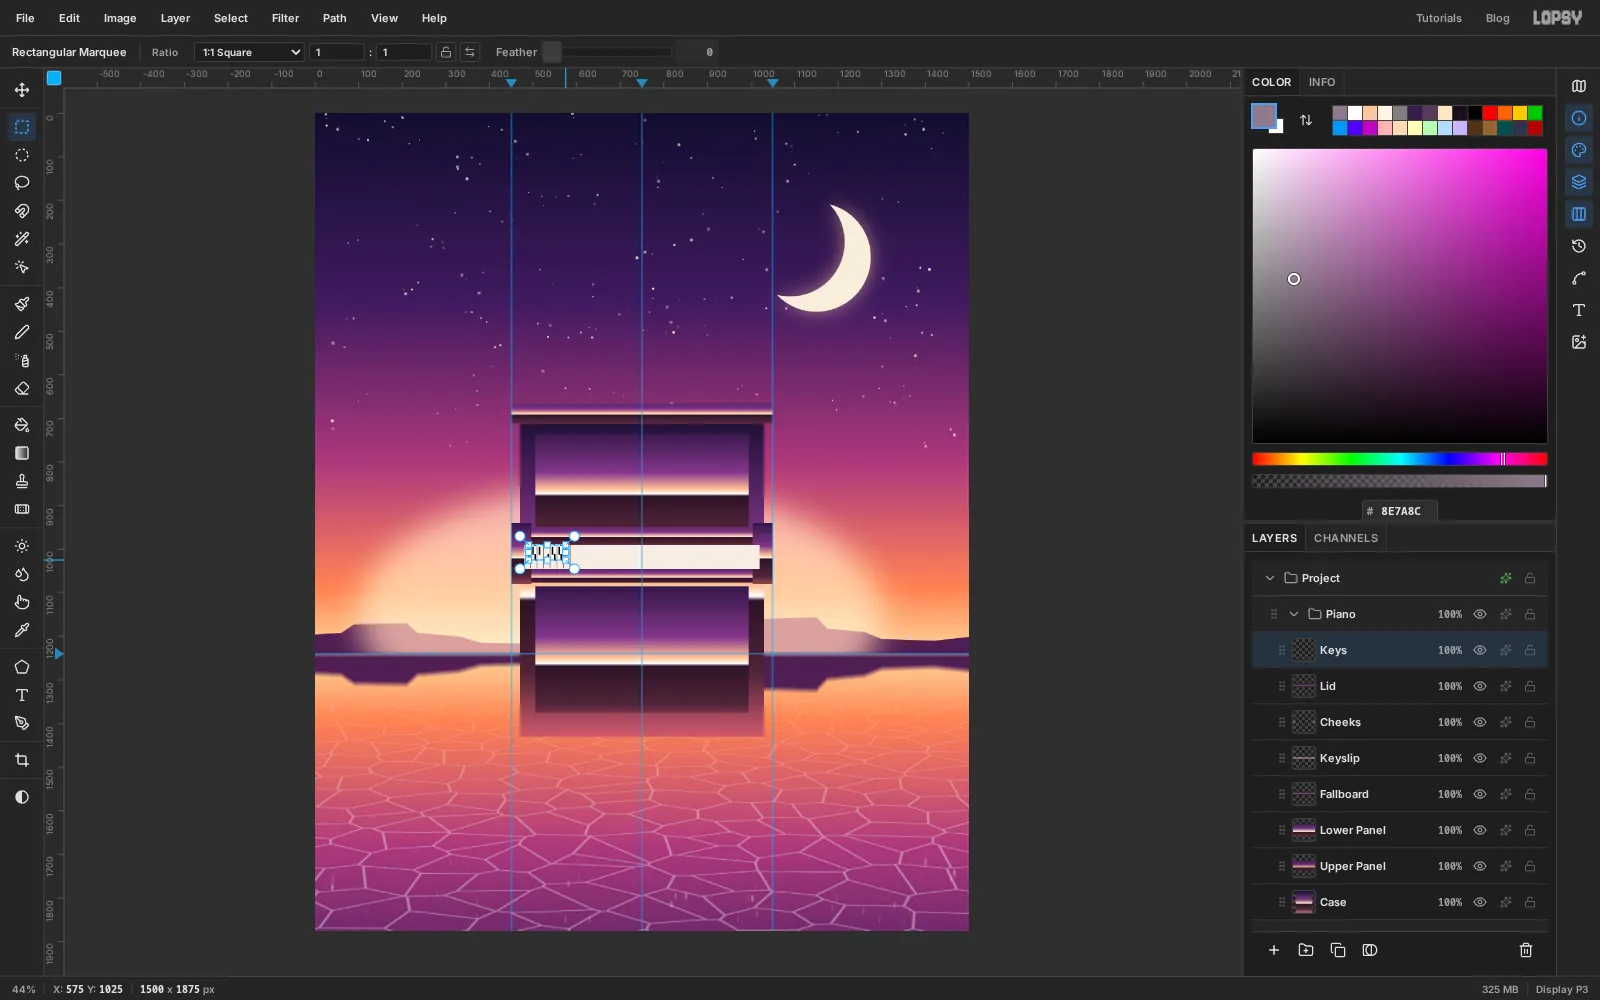
Keys. Fill a strip from480, 990to1020, 1045with . - Pick the Pencil (N), Size
2, colour . Draw the dividers between the first seven white keys: they're 15 px wide, so click at the top of x495, then Shift-click at the bottom of the strip to draw a straight line. Repeat at510,525and so on, up to585. - With the Rectangular Marquee, select the five black keys of that octave: 10 px wide and 35 px tall, starting at the top of the strip, centred on the dividers at x
495,510,540,555and570. Hold Shift for each one after the first to add it to the selection. - Fill with and press Cmd+D.
That's two black keys, a gap, then three, the pattern every keyboard repeats.
- Click Add Layer and name it
-
Repeat the octave across the keyboard
Instead of drawing 36 keys, copy the octave and step it along.
- Marquee the octave from the left end of the strip,
480, 990, to just past the seventh divider,586, 1045, so each copy brings its own right-hand divider. Press Cmd+C. - Press Cmd+V. The copy pastes in place on a new layer with the Move tool picked.
- Nudge it right with the arrow keys: Shift+→ moves 10 px and → moves 1 px. For the first copy that's 105 px: ten Shift+→ and five →.
- Press Cmd+D, then Cmd+E to merge it down into
Keys.
Repeat for 210, 315 and 420 px. Click
Keysbefore each paste so the copy lands above it. Five octaves plus the last white key fill the strip exactly. Use the keys here rather than a drag. At fit-to-screen zoom one screen pixel is about two document pixels, so a drag leaves the octaves a pixel or two out, and the black keys would drift off the 15 px rhythm. Holding Shift+→ down works too: just count to the distance in the status bar.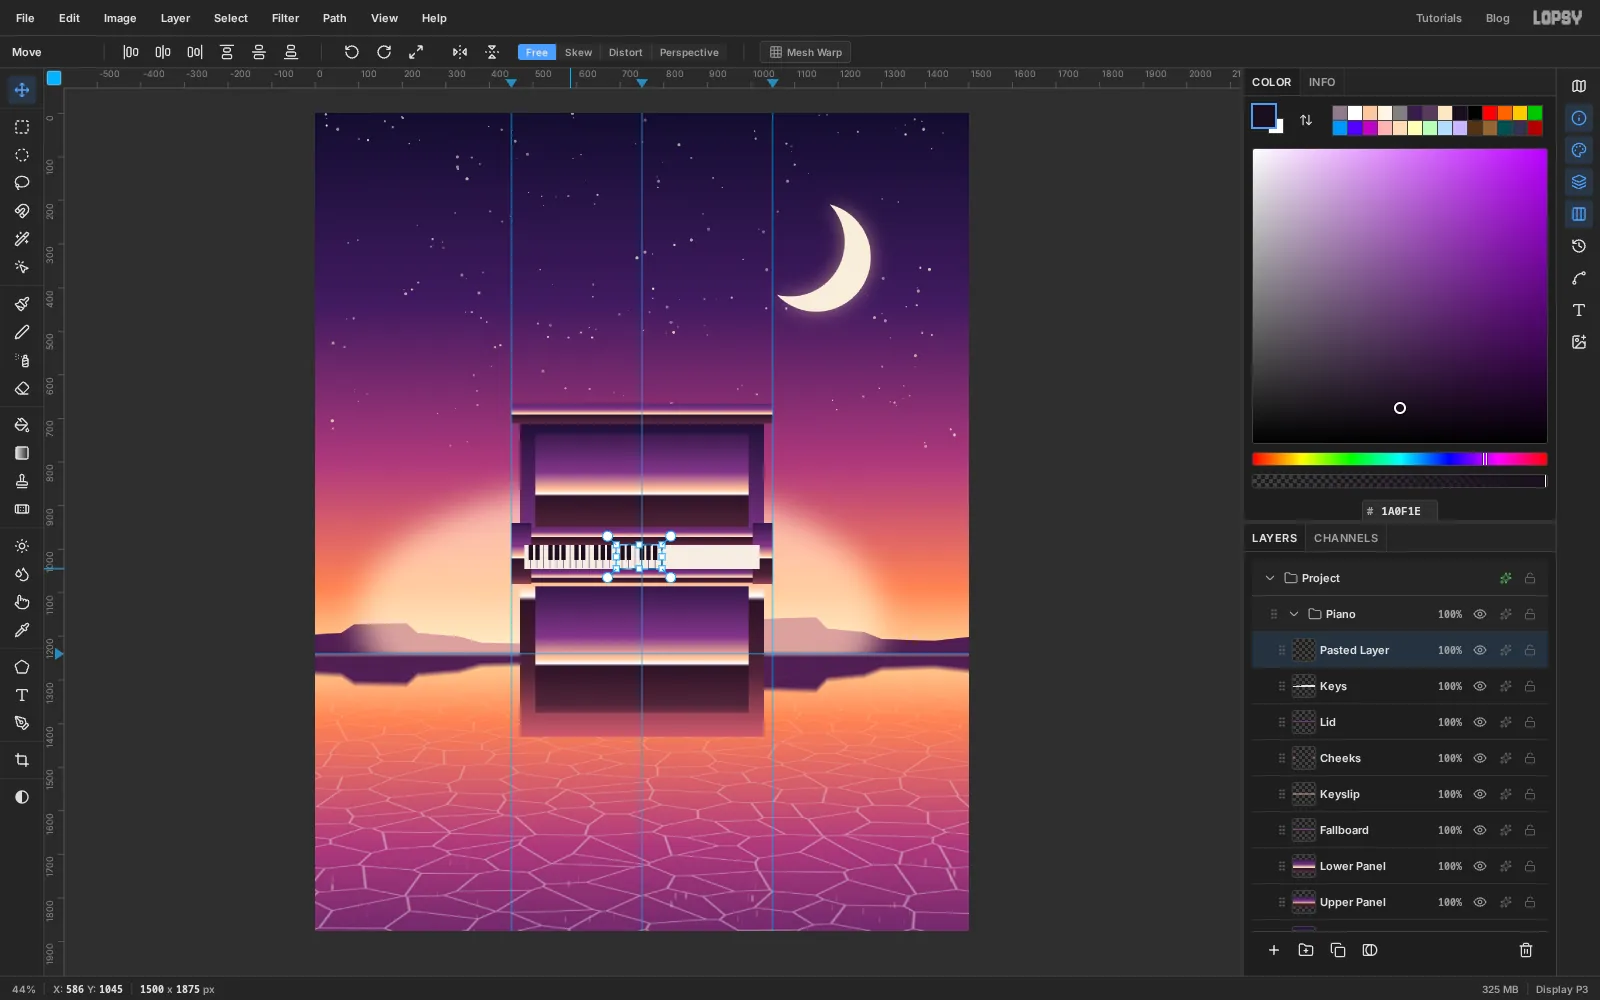
- Marquee the octave from the left end of the strip,
-
Give the piano a side
A perfectly flat front looks like a cardboard cut-out. A sliver of side panel gives the piano depth.
- Click the
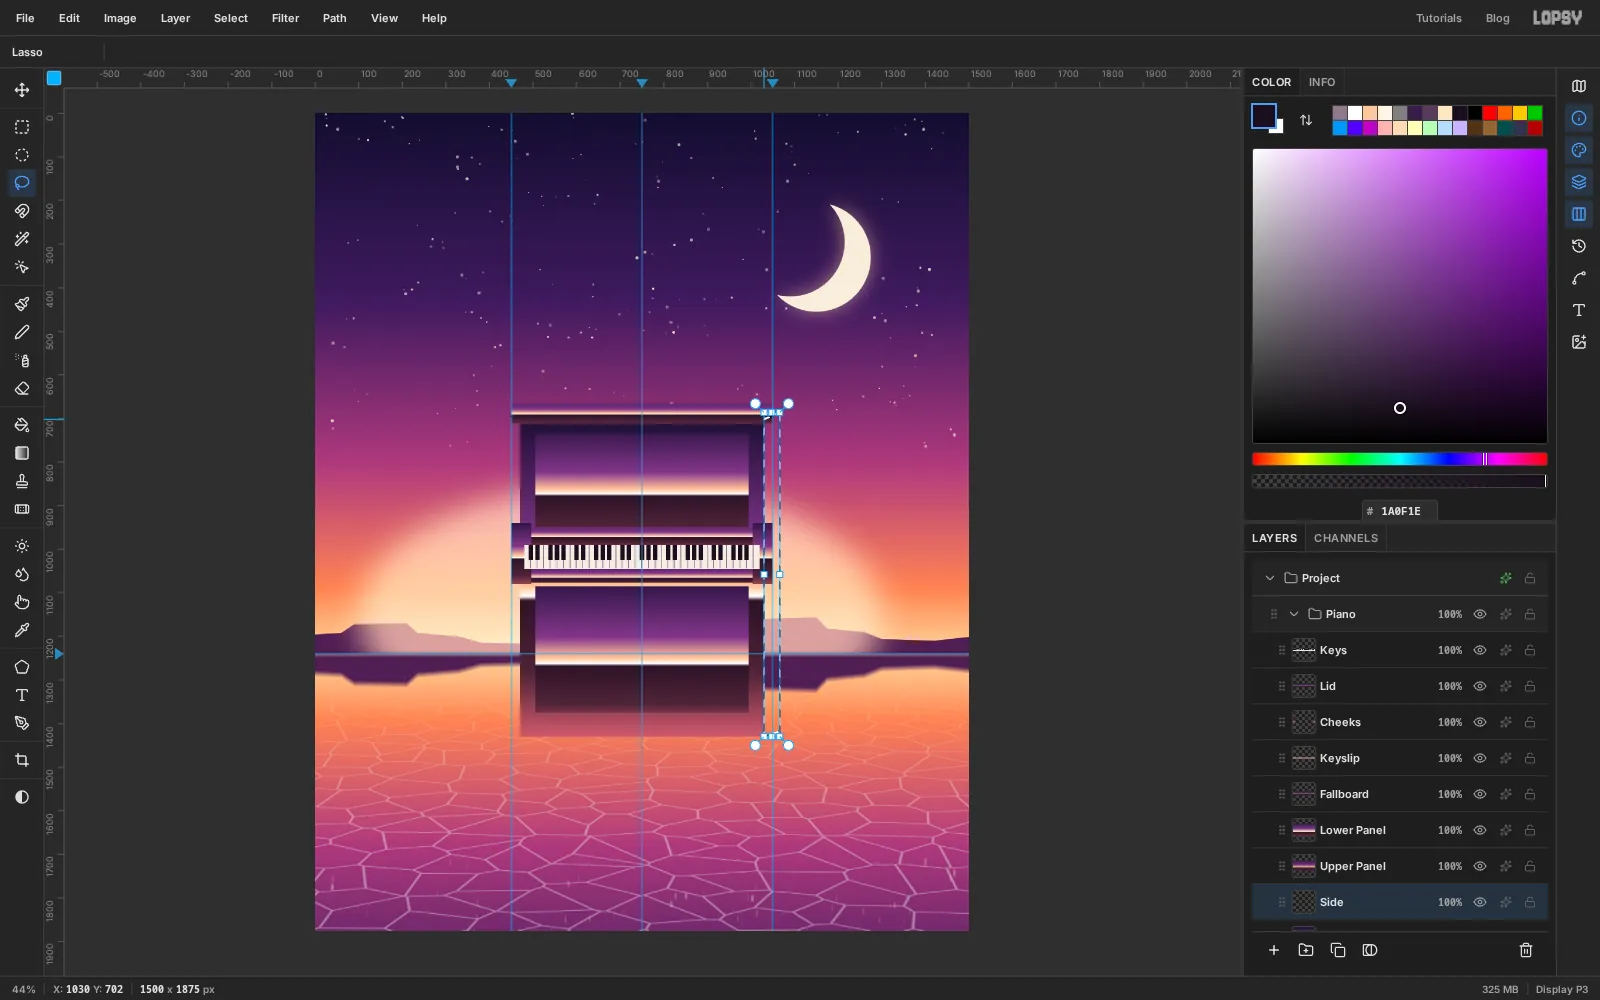
Caserow and Add Layer. Name itSide. - With the Lasso, draw a thin four-sided shape along the right edge of the case:
1030, 702, up to1066, 686, down to1066, 1418and back to1030, 1430. - Set up a three-stop gradient, , in the middle and , and Shift-drag it across the shape from left to right.
- Click the
-
Add legs, toe blocks and pedals
Legs are cylinders, so their reflection runs across them, dark at the edges with a hot white streak just left of centre. Set up a second gradient for them:
- at 0%
- at 16%
- at 27% (the hot streak)
- at 32%
- at 42%
- at 80%
- at 100%
Click the
Siderow first, so the legs stack above it.- Add Layer named
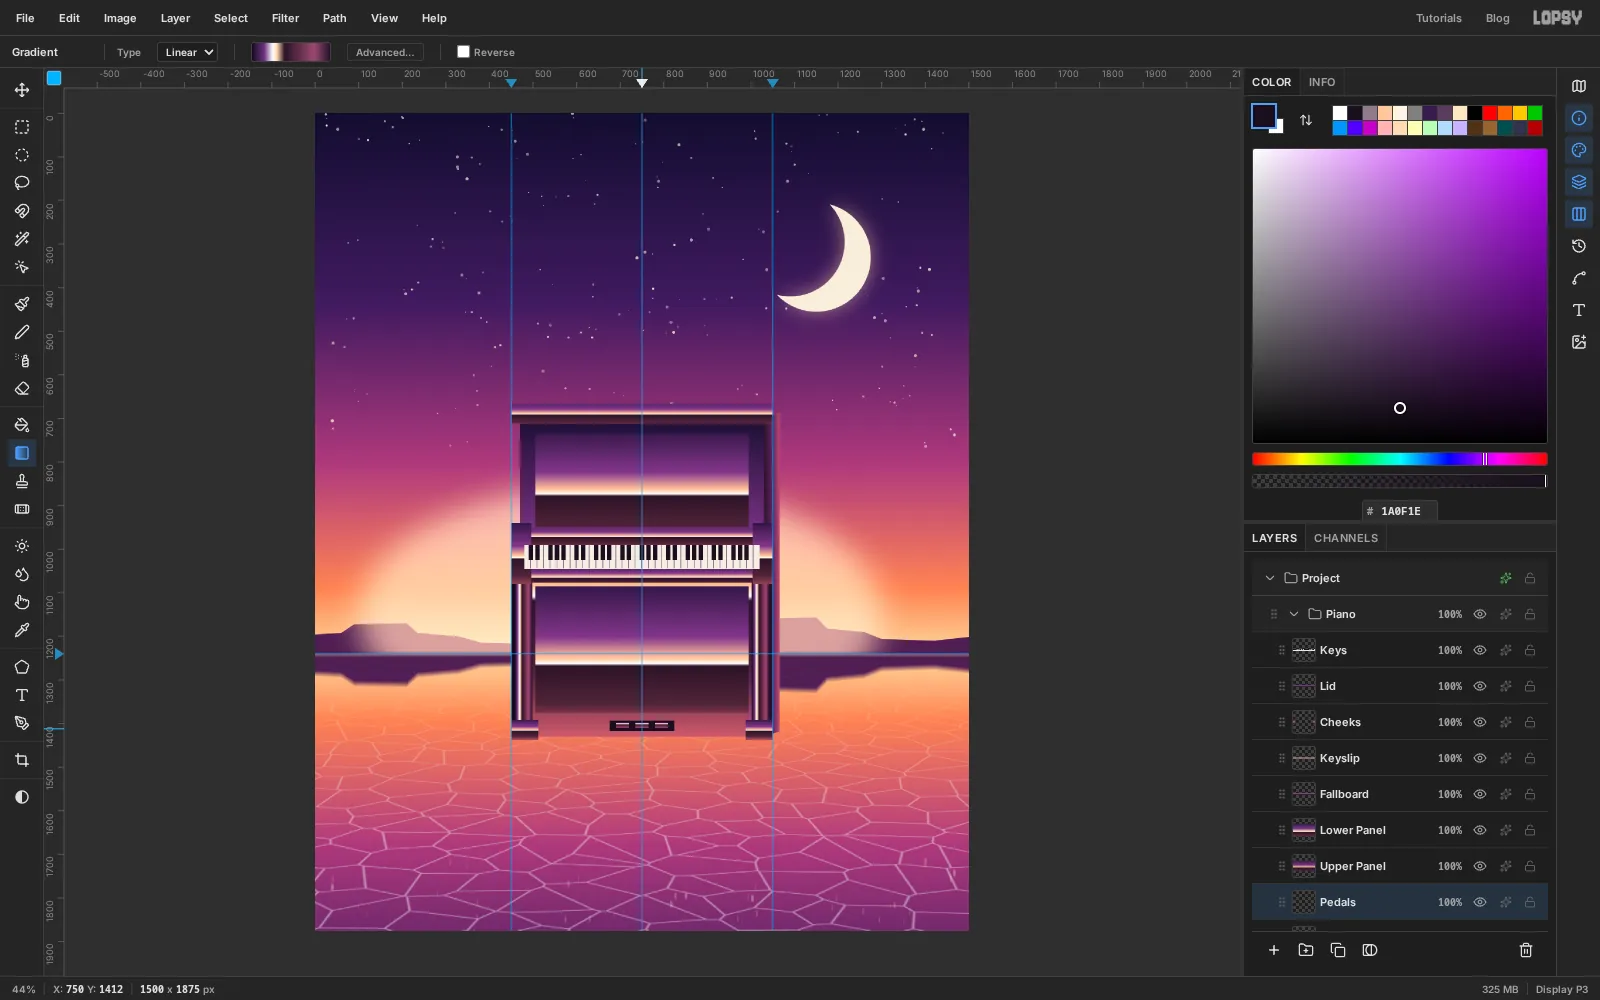
Legs. Marquee the left leg from458, 1077to498, 1397and Shift-drag the gradient from its left edge to its right edge. Do the same for the right leg at x1002to1042. - Add Layer named
Toe Blocks. Select both feet at once (444, 1392to512, 1438, then Shift-add988, 1392to1056, 1438) and fill them with the main chrome gradient, dragged top to bottom. - Add Layer named
Pedals. Fill a dark slot from676, 1393to824, 1417with . Then select three small pedals, 30 × 12 px each, inside the slot with their left edges at x690,735and780, and drag the cylinder gradient down across them.
-
Recess the panels and add a rim light
Effects do the shading. Open each row's effects drawer:
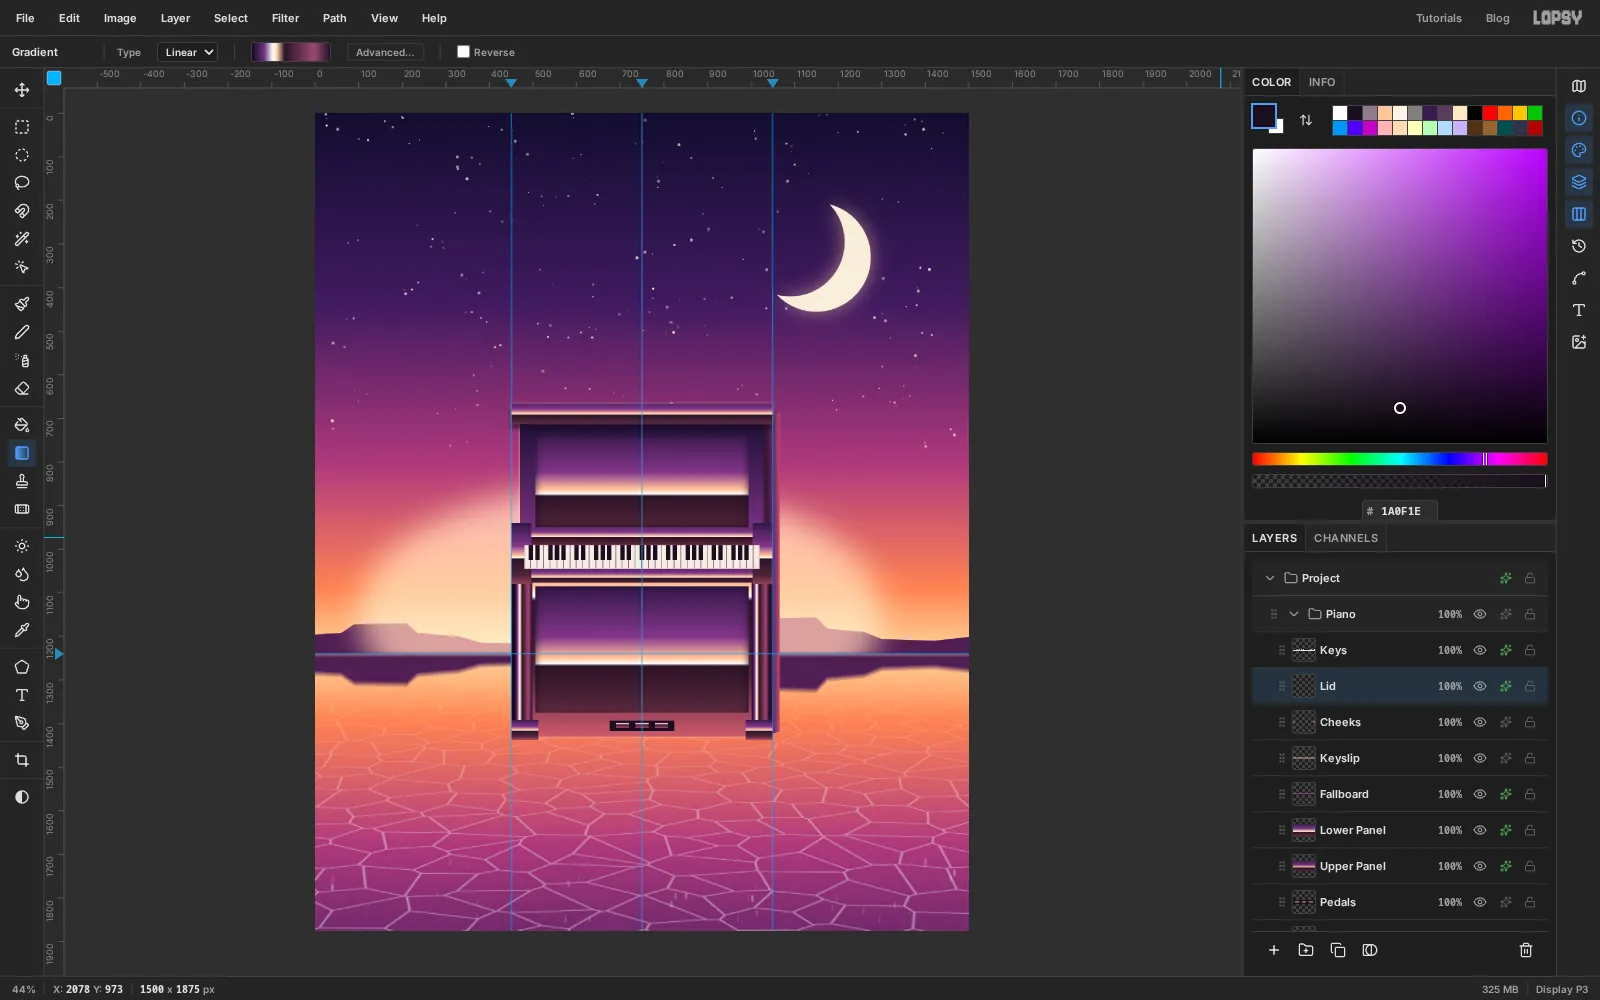
Upper PanelandLower Panel: Inner Glow, colour , Size28, Opacity85. The dark edges push the panels back into the case.Lid: Drop Shadow, colour , Offset Y10, Blur16, Opacity70. Also Outer Glow , Size8, Opacity60.Fallboard: Drop Shadow, , Offset Y6, Blur8, Opacity65.Keys: Inner Glow, , Size6, Opacity55.Case: Outer Glow, , Size10, Opacity70.
The pale outer glow on the case and lid is a rim light. It keeps the piano's warm bottom half from melting into the orange glow behind it.
-
Scale the whole piano
The piano is a little small for the canvas. Scale everything at once:
- Click the
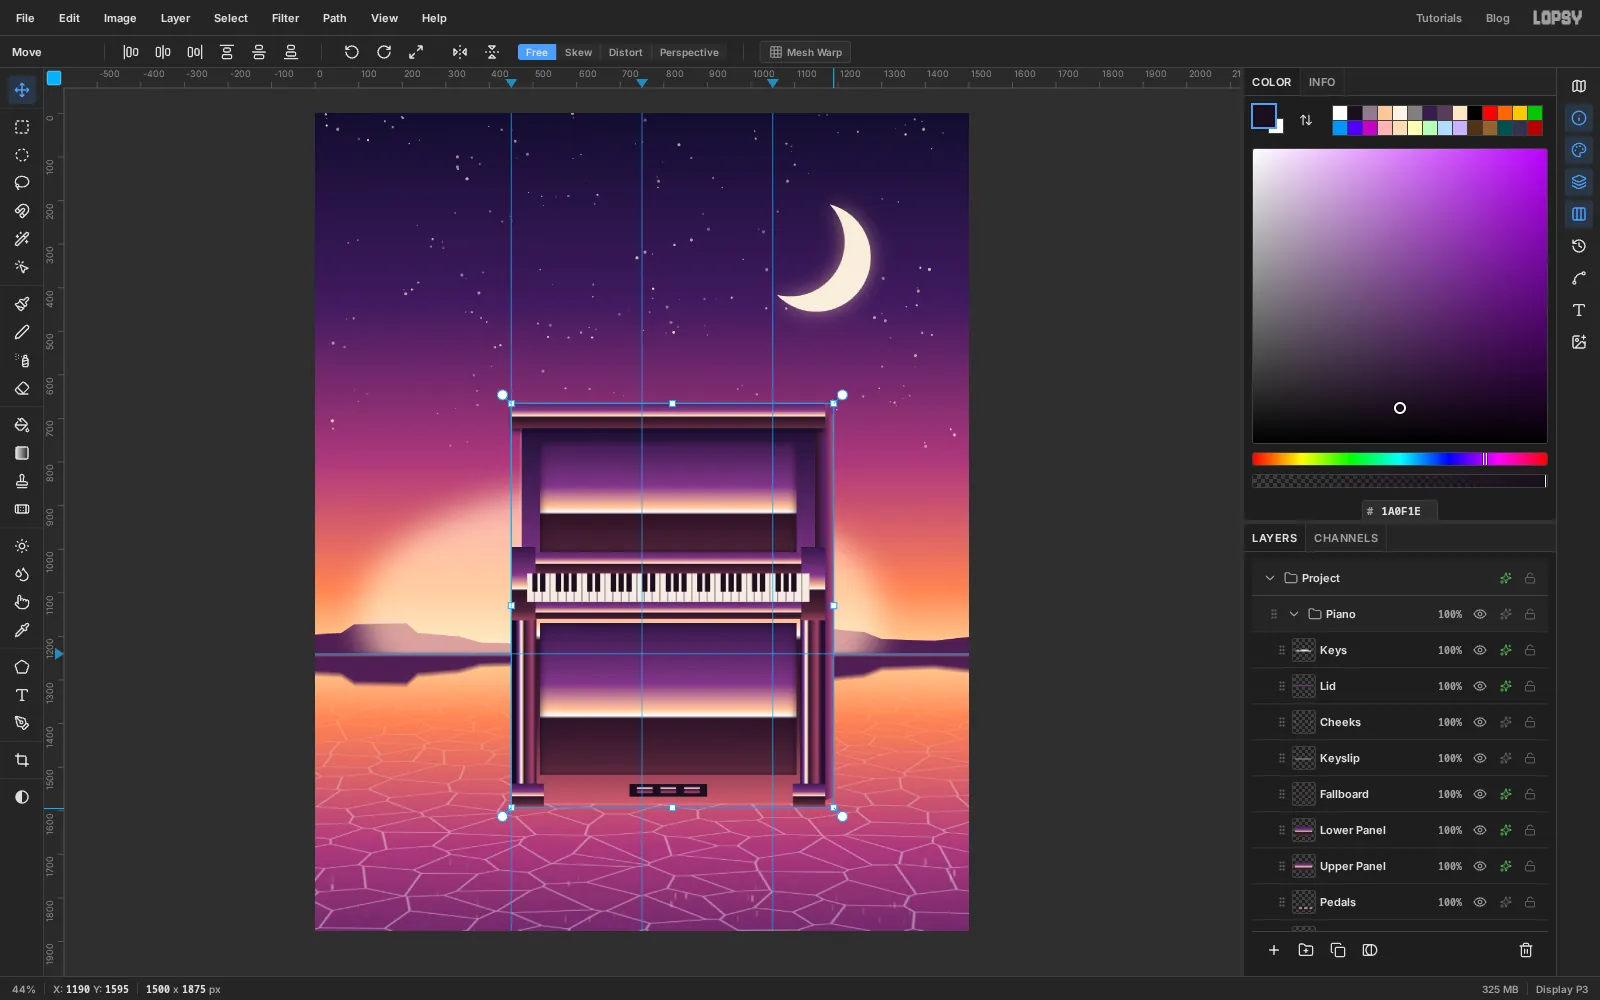
Pianogroup row and pick the Move tool. Handles appear around all of the piano's layers together. - Hold Cmd (to keep the proportions) and drag the bottom-right corner handle down and right until the box is about 120% of its size: from
1066, 1440to about1190, 1595. - Press Cmd+D to apply.
All the parts scale together, in one undo step.
- Click the
-
Move the piano off centre
A piano dead centre is static. Move it a little left, so the moon has room on the right. With the
Pianogroup still active and the Move tool picked, drag from the middle of the piano about 115 px to the left. Aim for the piano's centre at about x700and its feet at about y1597. Press Cmd+D.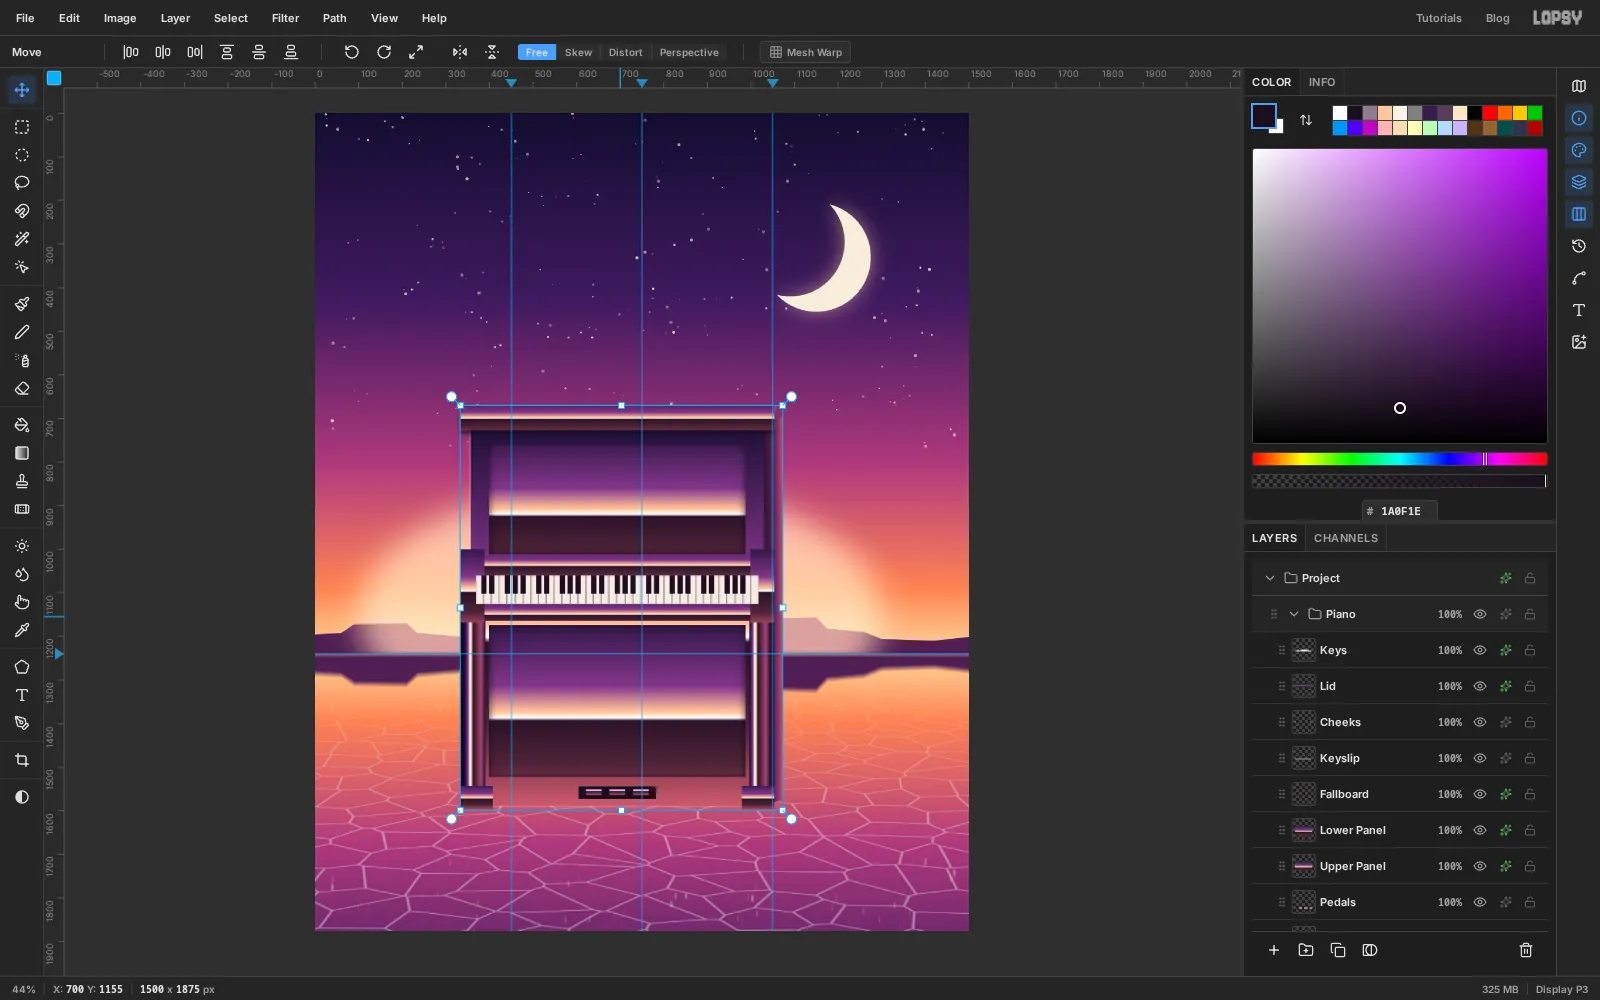
-
Draw the scroll ornament with the Pen
Click the
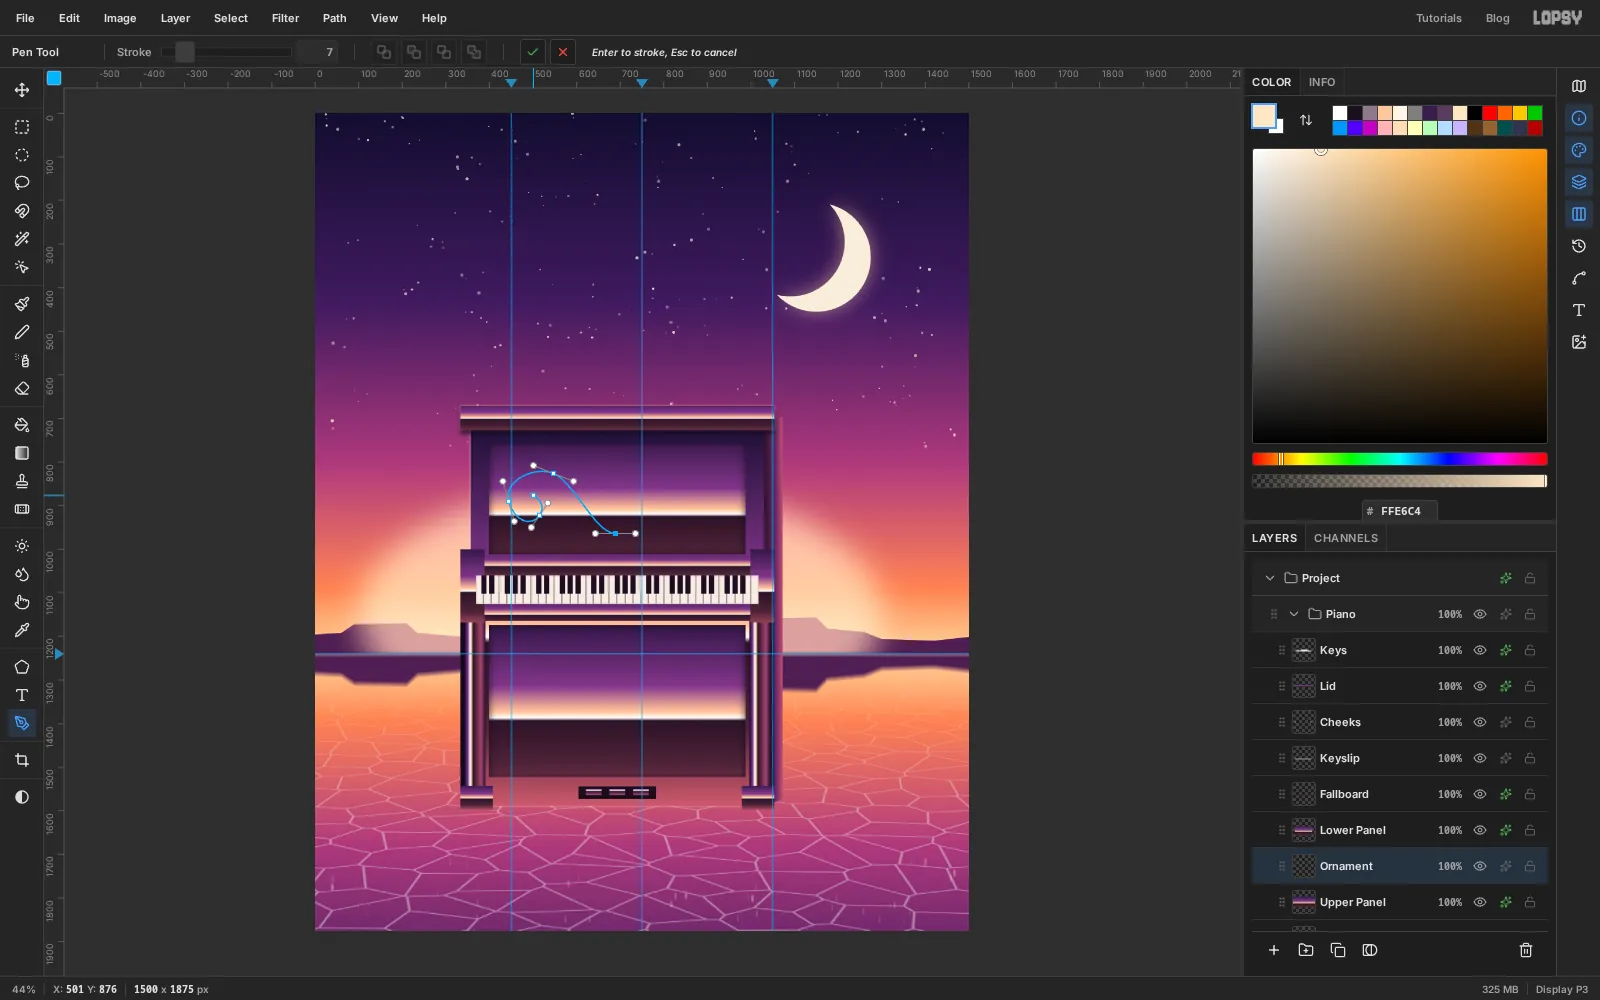
Upper Panelrow and Add Layer. Name itOrnament. Set the foreground colour to .Pick the Pen tool (P) and set Stroke to
7. Draw half of a scroll on the left half of the upper panel. Press and drag to make each smooth anchor, so the curve has handles:- Start at the centre of the panel, near its bottom edge. Drag out to the left.
- Next anchor high on the panel, about a quarter of the way in from the left. Drag up and left.
- Next anchor near the panel's left side, a little below middle. Drag down.
- Next anchor just right of that, lower down. Drag up, to start the curl.
- Single-click a little above that to end the spiral.
Press Enter. The path is saved and stroked onto the layer in the foreground colour.
-
Mirror the ornament
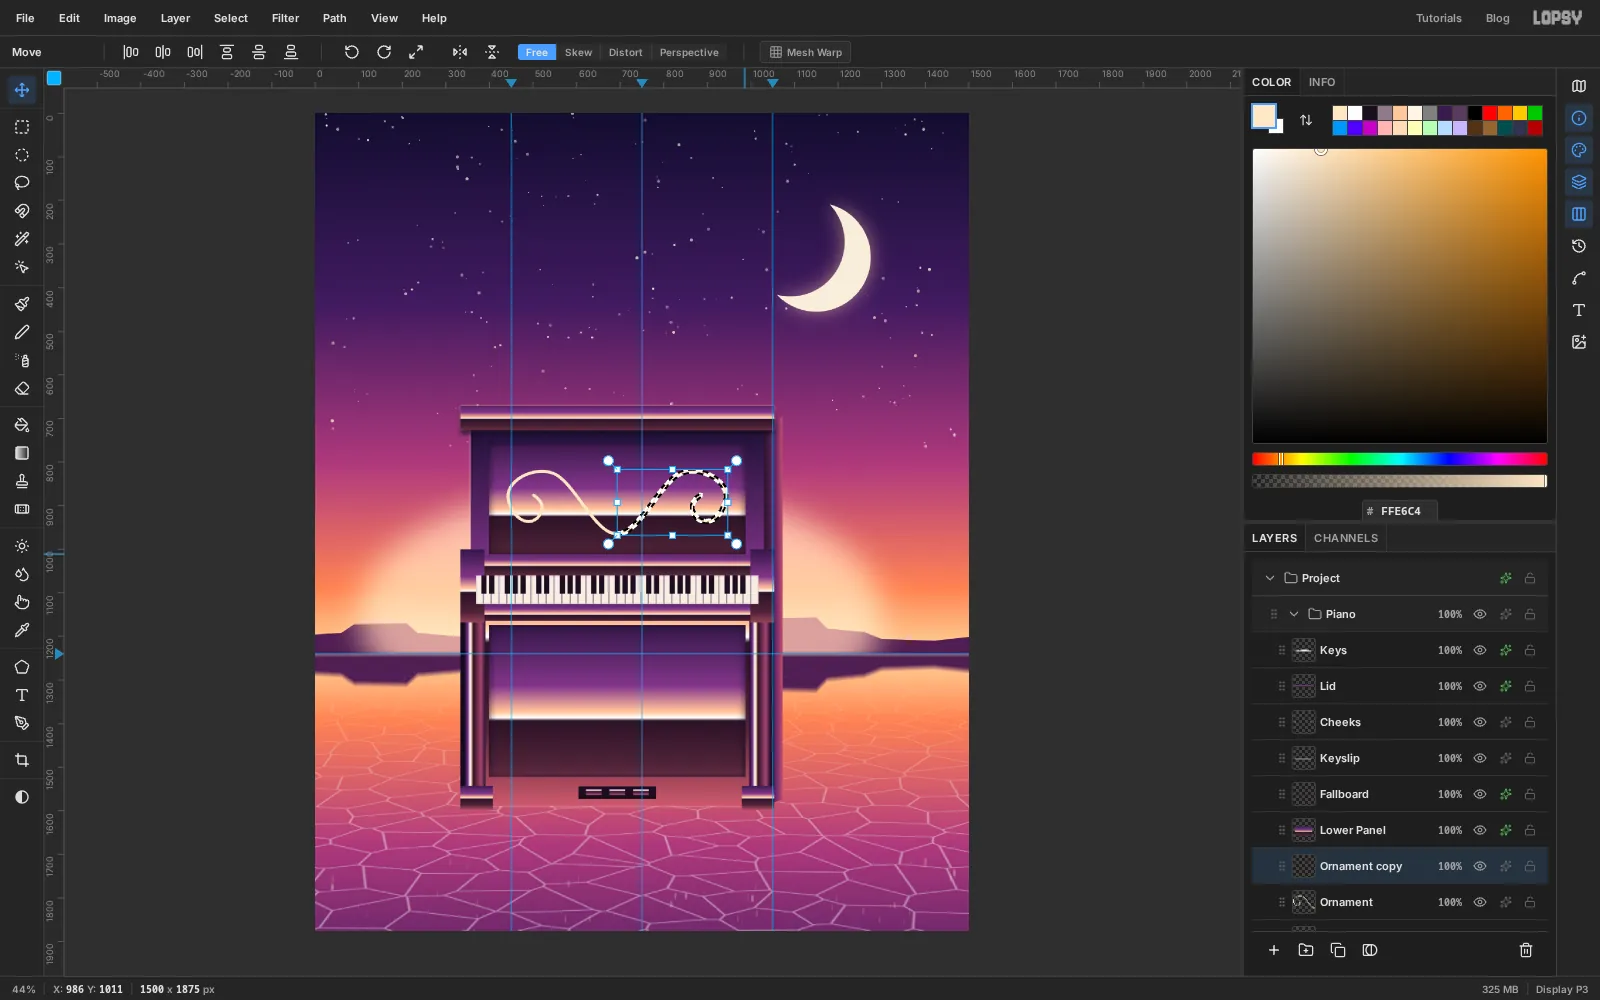
- The stroked path stays selected and its blue outline stays on screen. To clear it, click once on an empty part of the canvas with the Pen (that deselects the path and starts a new one) and press Escape straight away to throw the new one away.
- Choose Layer → Duplicate Layer.
- Marquee the whole upper panel, which after the scale and move runs from about
400, 755to986, 1011. The flip turns around the middle of the selection, and the panel is centred on the piano, so the copy lands as a mirror image on the right. - Pick the Move tool and click Flip Horizontal. Afterwards the selection shrinks to hug the flipped half: that's normal. Press Cmd+D, then Cmd+E to merge the two halves.
- Where the two halves meet, fill a 40 px circle with as a medallion.
- Give
Ornamentan Outer Glow (, Size14, Opacity60) and a small Drop Shadow (, Offset Y3, Blur4, Opacity70).
-
Paint the drips and the puddle
Click the
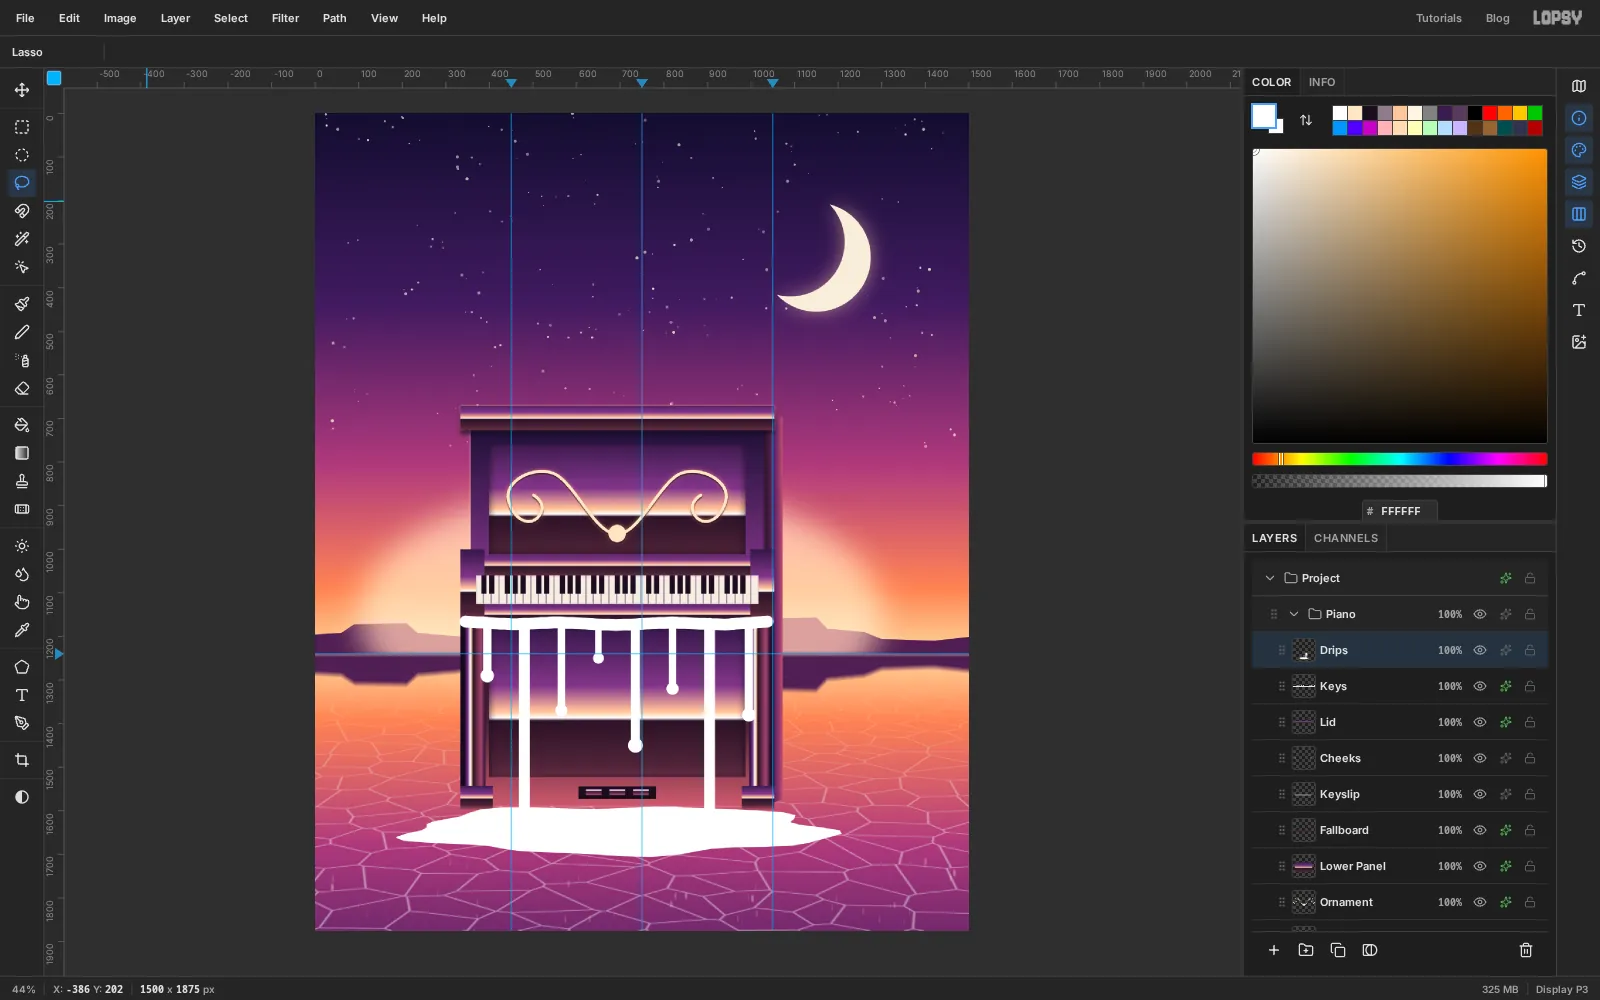
Keysrow and Add Layer. Name itDrips. Work in plain white first: you'll fill the shape with chrome afterwards.- Pick the Brush (B), Hardness
100, Opacity100, Size28. Drag a slightly wavy line along the bottom edge of the keyslip, from one side of the piano to the other. This is the molten lip. - Hang eight drips from it. For each one, set the size (16 to 26), click on the lip, then Shift-click lower down for a straight line. Vary the lengths a lot: some stop a third of the way down the lower panel, one reaches its middle. For the short ones, raise the size by about half and click once at the end to make a blob.
- Make two of the thickest drips (near x
480and905) run all the way past the feet to about y1660. - With the Lasso, draw a wide, slightly wobbly oval at the piano's feet, about 960 px across and 110 px tall, centred around
700, 1645. Fill it white. That's the puddle the long drips pour into.
- Pick the Brush (B), Hardness
-
Make the drips sag with Liquify
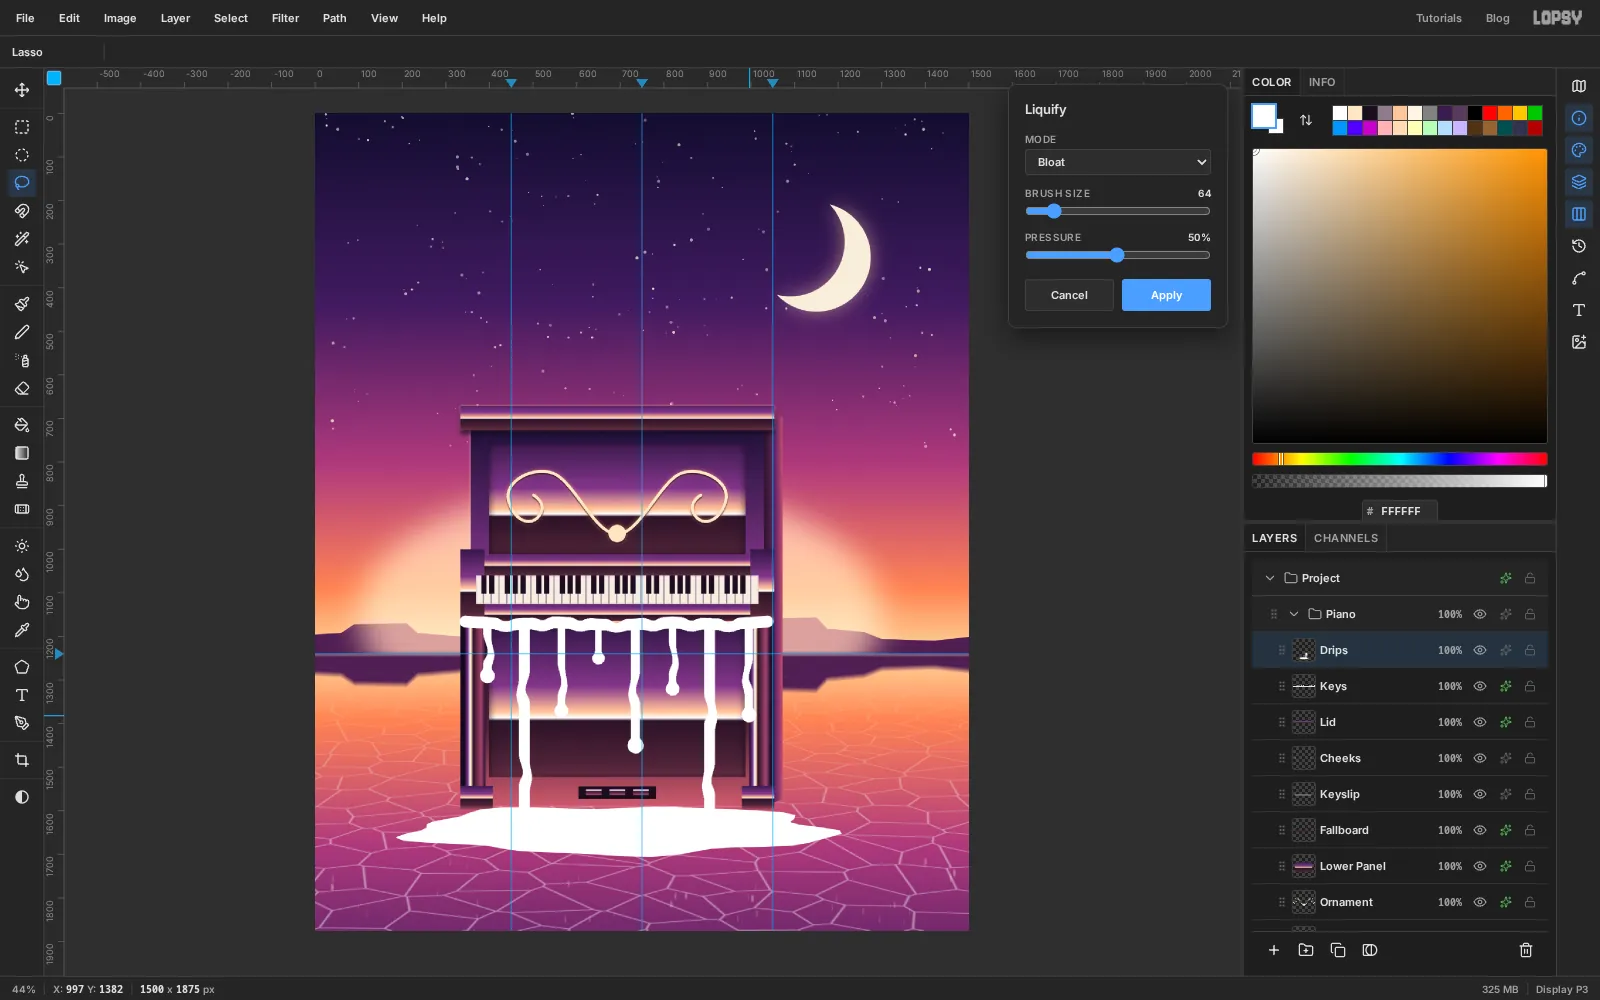
Straight brush lines look like icicles. Liquid sags.
- Choose Filter → Liquify… (Cmd+Shift+X). Leave Mode on Push Forward, with Brush Size
64and Pressure50%. - Push each drip sideways a little partway down with short diagonal drags, alternating left and right, so they wobble.
- Between drips, drag the lip down a few pixels so it sags.
- Switch Mode to Bloat and press and hold for a moment on each blob, so the ends swell.
- Click Apply.
- Choose Filter → Liquify… (Cmd+Shift+X). Leave Mode on Push Forward, with Brush Size
-
Select the drips
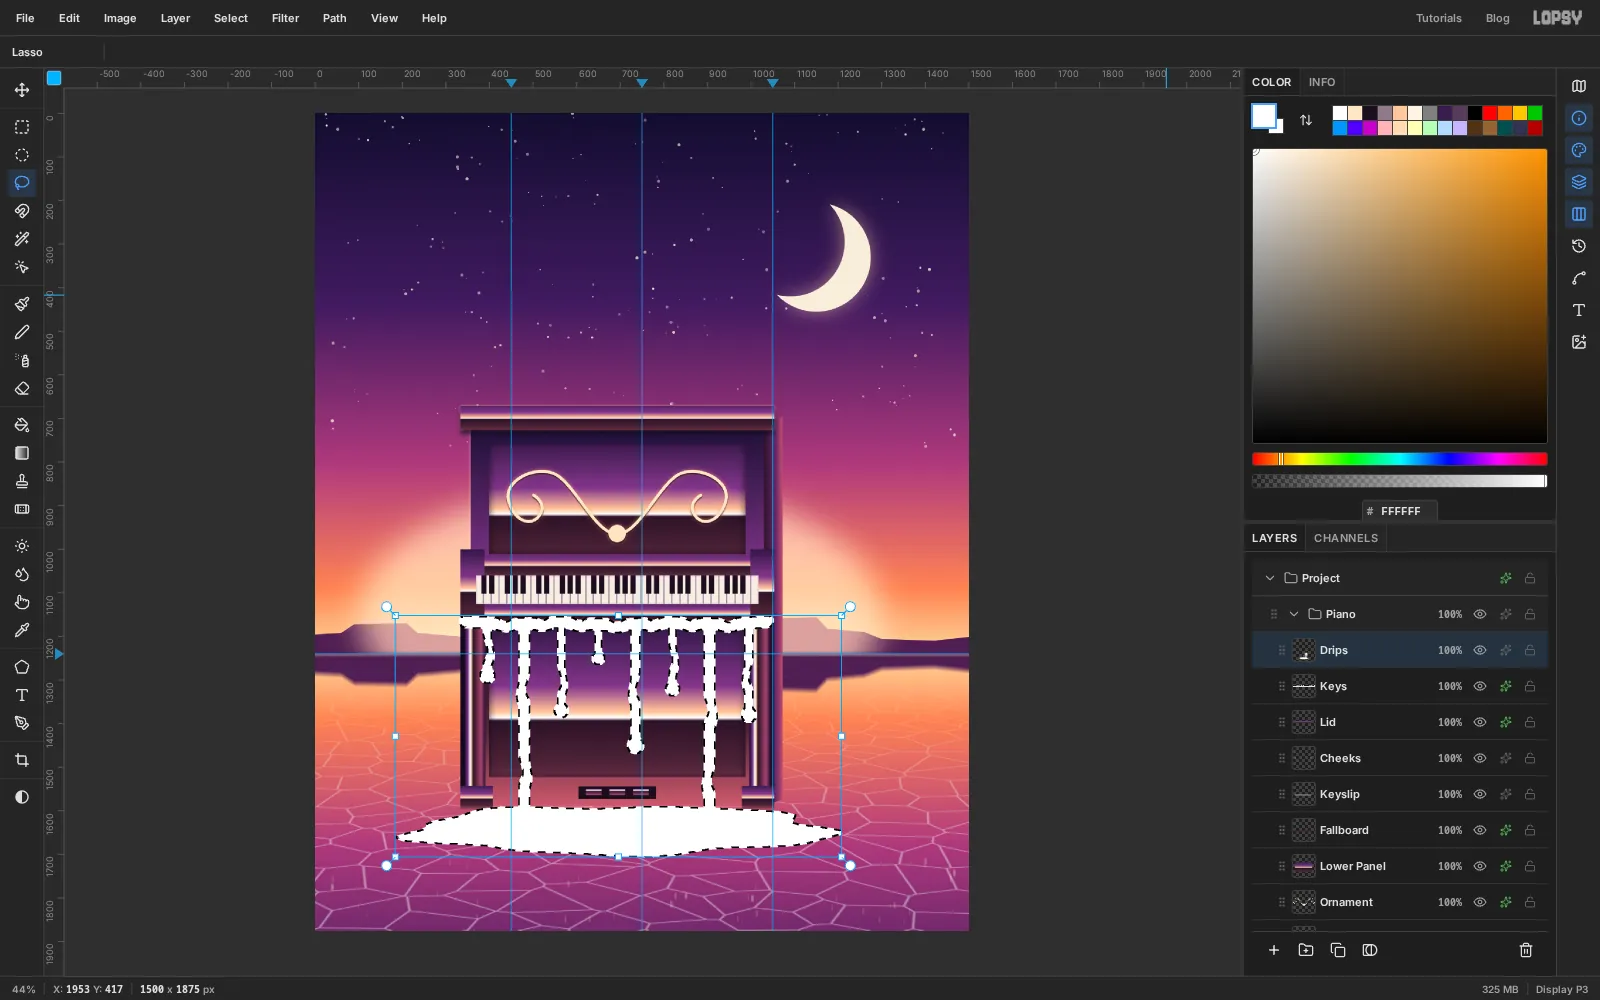
Cmd-click the
Dripsthumbnail in the Layers panel. Everything painted on the layer becomes the selection, so a gradient fills only the drips and never spills onto the panels behind them.The puddle and the drips get different chrome. The puddle lies flat, so it mirrors the dark piano right above it. The drips hang upright, like the panels. So you'll split this selection in two with an intersect: hold Shift+Alt while you drag a Rectangular Marquee, and only the part of the selection inside the new box stays selected.
-
Chrome the puddle and the drips
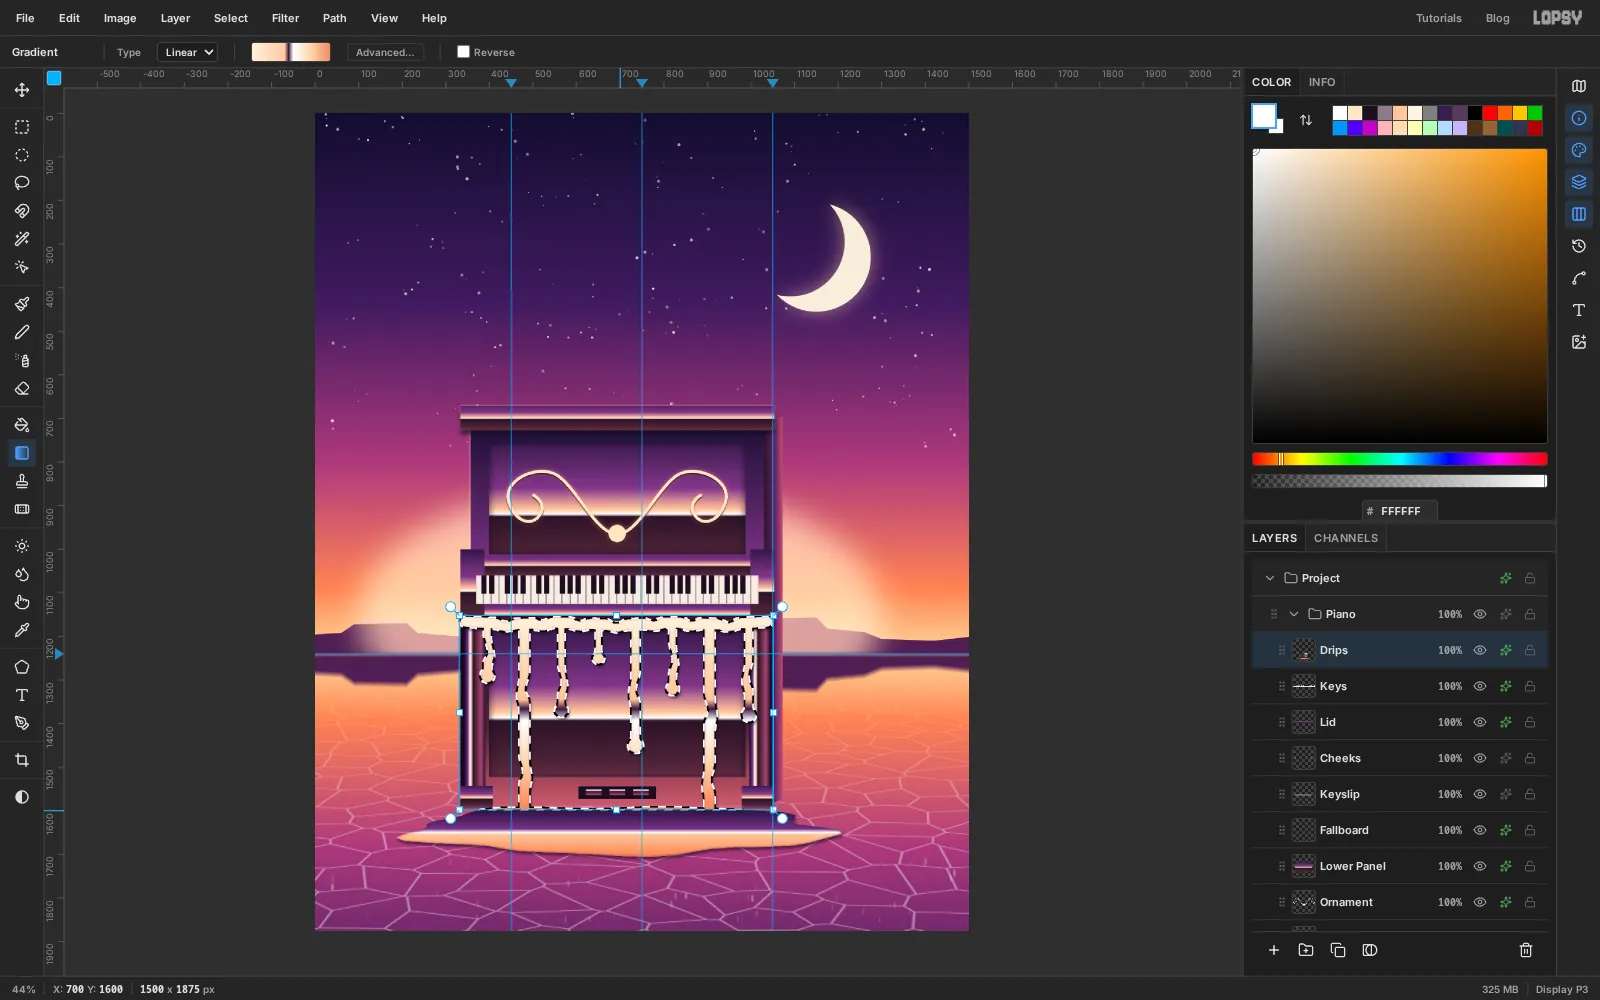
The puddle first. With the selection from the last step, pick the Rectangular Marquee, hold Shift+Alt and drag a box around just the puddle, from about y
1598down past its bottom edge. Set up this gradient and Shift-drag it from the top of the puddle to the bottom:- at 0% (the piano's dark underside, reflected)
- at 45%
- at 52%
- at 56%
- at 100%
Press Cmd+D.
Then the drips. Cmd-click the
Dripsthumbnail again, and this time Shift+Alt-drag a box from above the keyboard down to y1598, so the puddle is left out. If the drips used the same chrome as the case they'd vanish into it, so make them a lighter chrome that reads against the body:- at 0%
- at 42%
- at 47% (the horizon line)
- at 53%
- at 75%
- at 100%
Shift-drag it from the lip (about y
1160) down to y1600, then press Cmd+D.Finally, open the drawer for
Drips:- Inner Glow , Size
9, Opacity70. It darkens the edges, so each drip looks round, like a tube of liquid metal. - Drop Shadow , Offset X
3, Offset Y6, Blur8, Opacity55. It lifts the drips off the panel.
No stroke. An outline would turn the metal into a cartoon.
-
Add speculars and Bloom
Click the
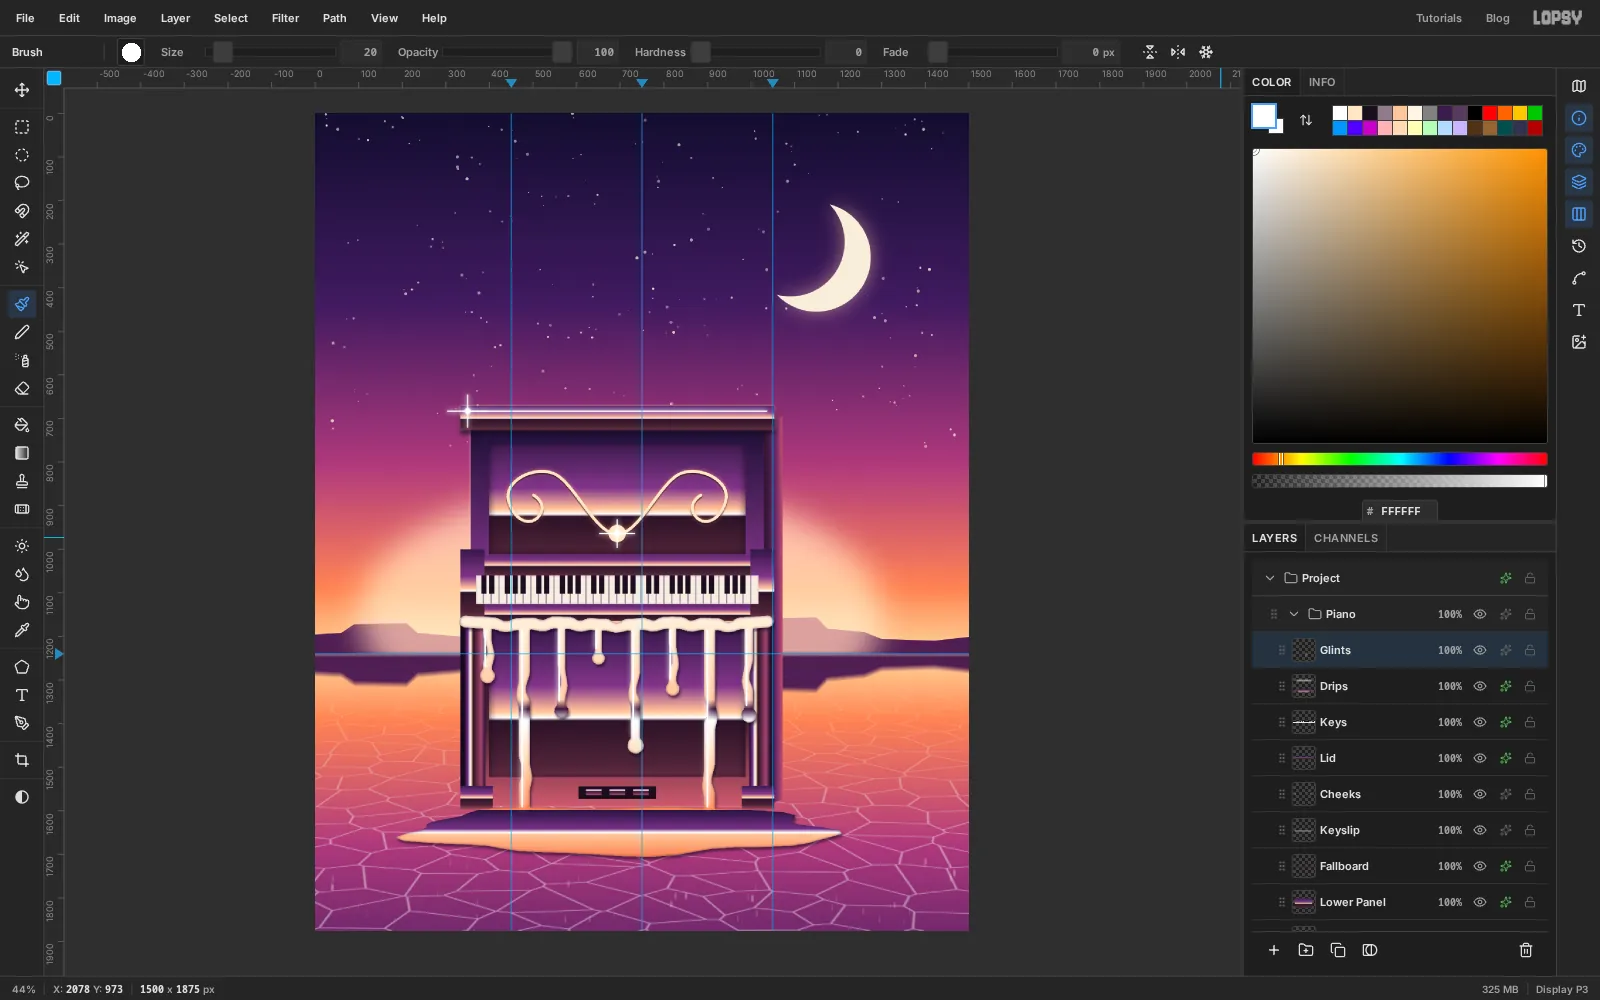
Dripsrow and Add Layer, namedGlints. It sits at the top of thePianogroup. Paint with white.- Brush, Hardness
80, Size5. Draw a straight highlight down the left side of each drip: click near the top, then Shift-click near the bottom. - Size
4: one long highlight along the top of the lid, from its left end to its right end. Keep it on the lid. - Only two star glints, on spots where light would really catch: the lid's left corner and the ornament's medallion. Set Hardness to
0. For each one, draw a short horizontal and a short vertical line through the point, then one soft dab at Size20in the middle. - Run Filter → Bloom… with Threshold
20, Radius18and Intensity160, then set the blend mode to Screen.
Resist adding more glints. Two read as light; six read as clip art.
- Brush, Hardness
-
Copy the piano for its reflection
The mirror flat should reflect the piano too.
- Click the eye on the
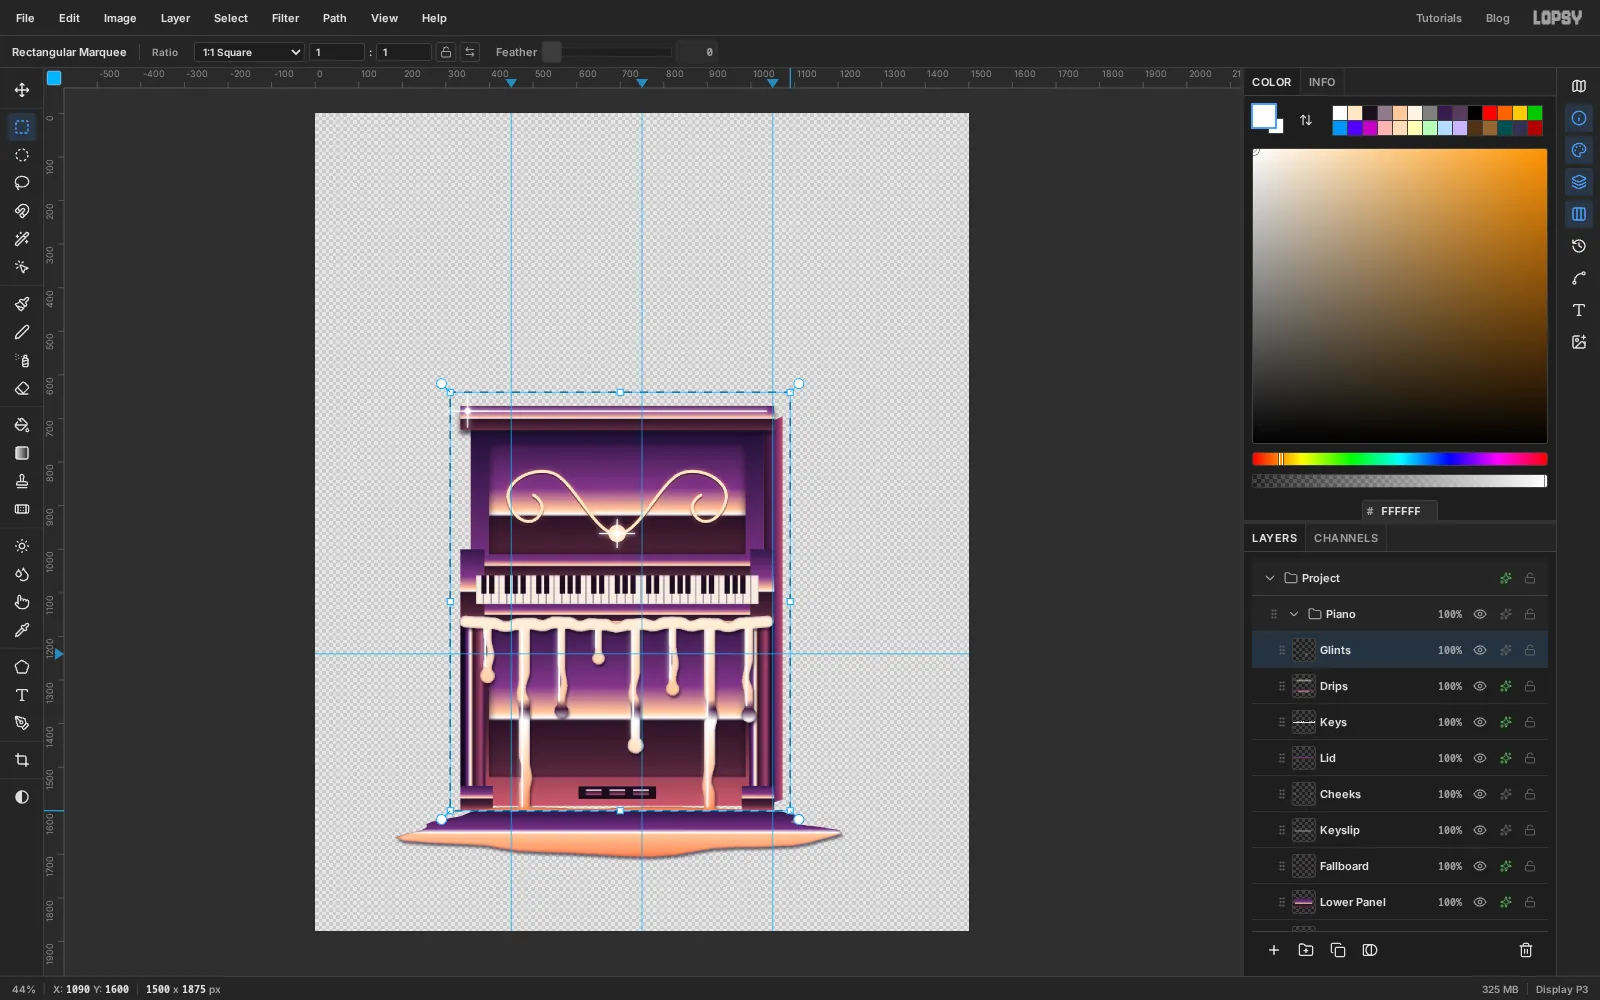
Backdroprow to hide it, so only the piano shows. - Marquee the piano from its top-left corner (about
310, 640) down to its feet (about1090, 1600). The box is 960 px tall. - Press Cmd+Shift+C for Copy Merged, then show
Backdropagain and press Cmd+D.
- Click the eye on the
-
Flip the reflection under the piano
The reflection has to meet the feet exactly, or the piano looks like it's hovering, so this time nudge it with the keys rather than dragging.
- Expand
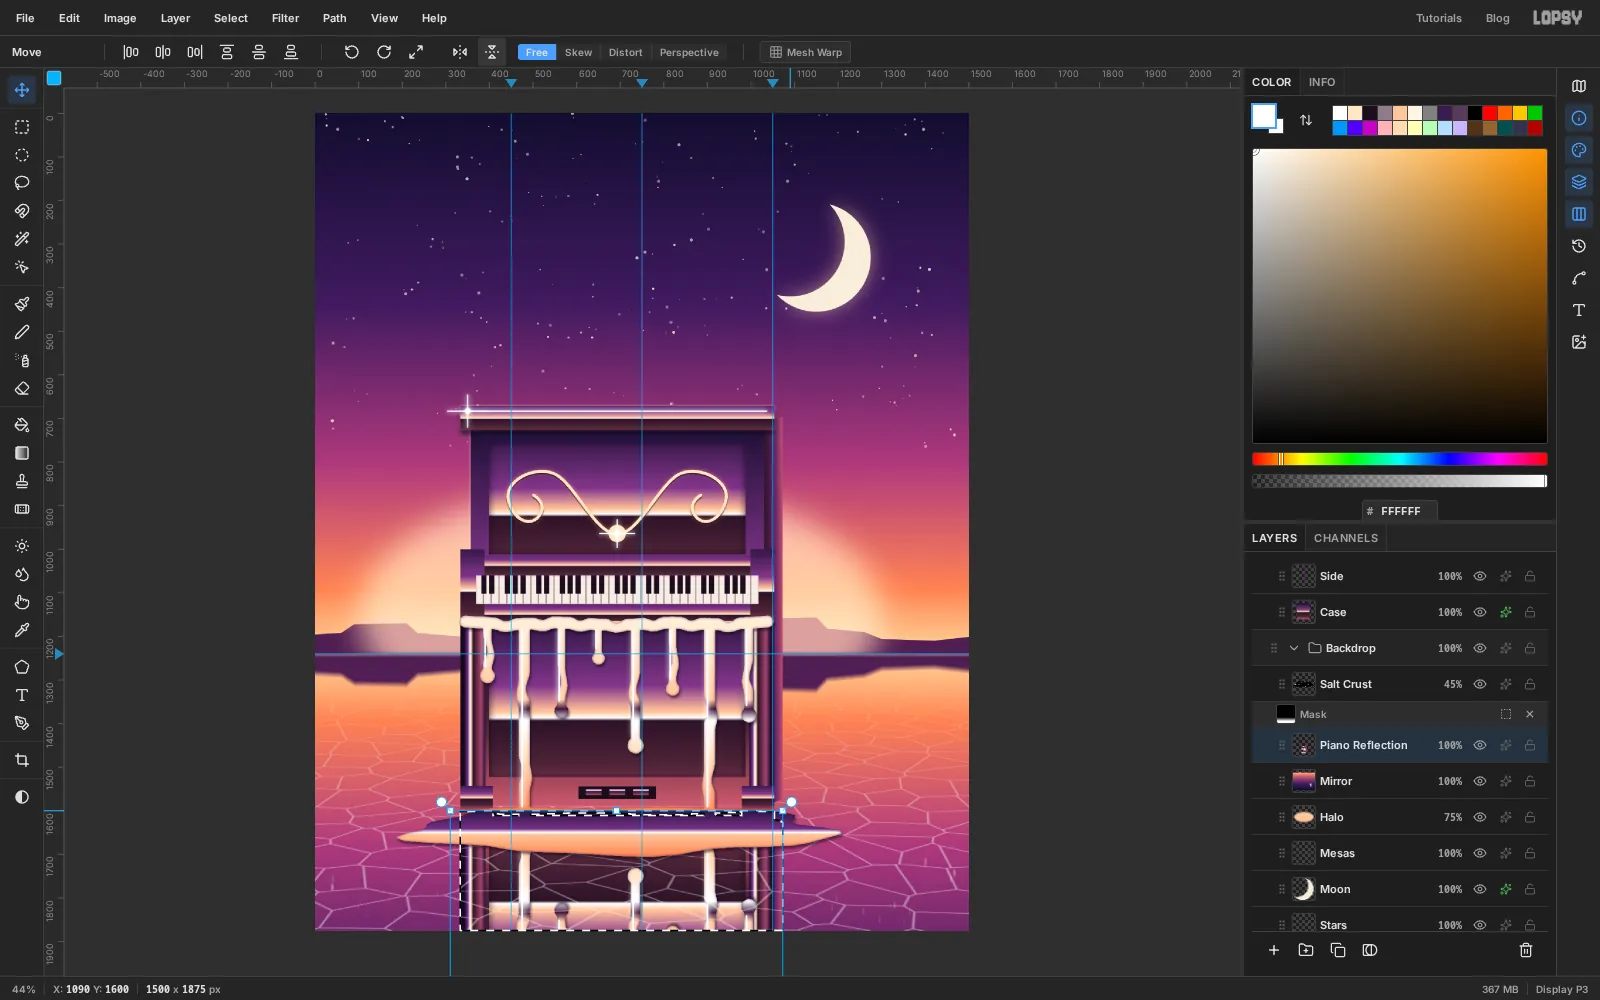
Backdropand click theMirrorrow, so the paste lands above it but below the crust. - Press Cmd+V and rename the new layer
Piano Reflection. - Click Flip Vertical. Then press Shift+↓ 96 times to move it down exactly 960 px, the height of the copy. Its top edge now meets the piano's feet.
- Press Cmd+D.
- Expand
-
Fade the reflection and ground the piano
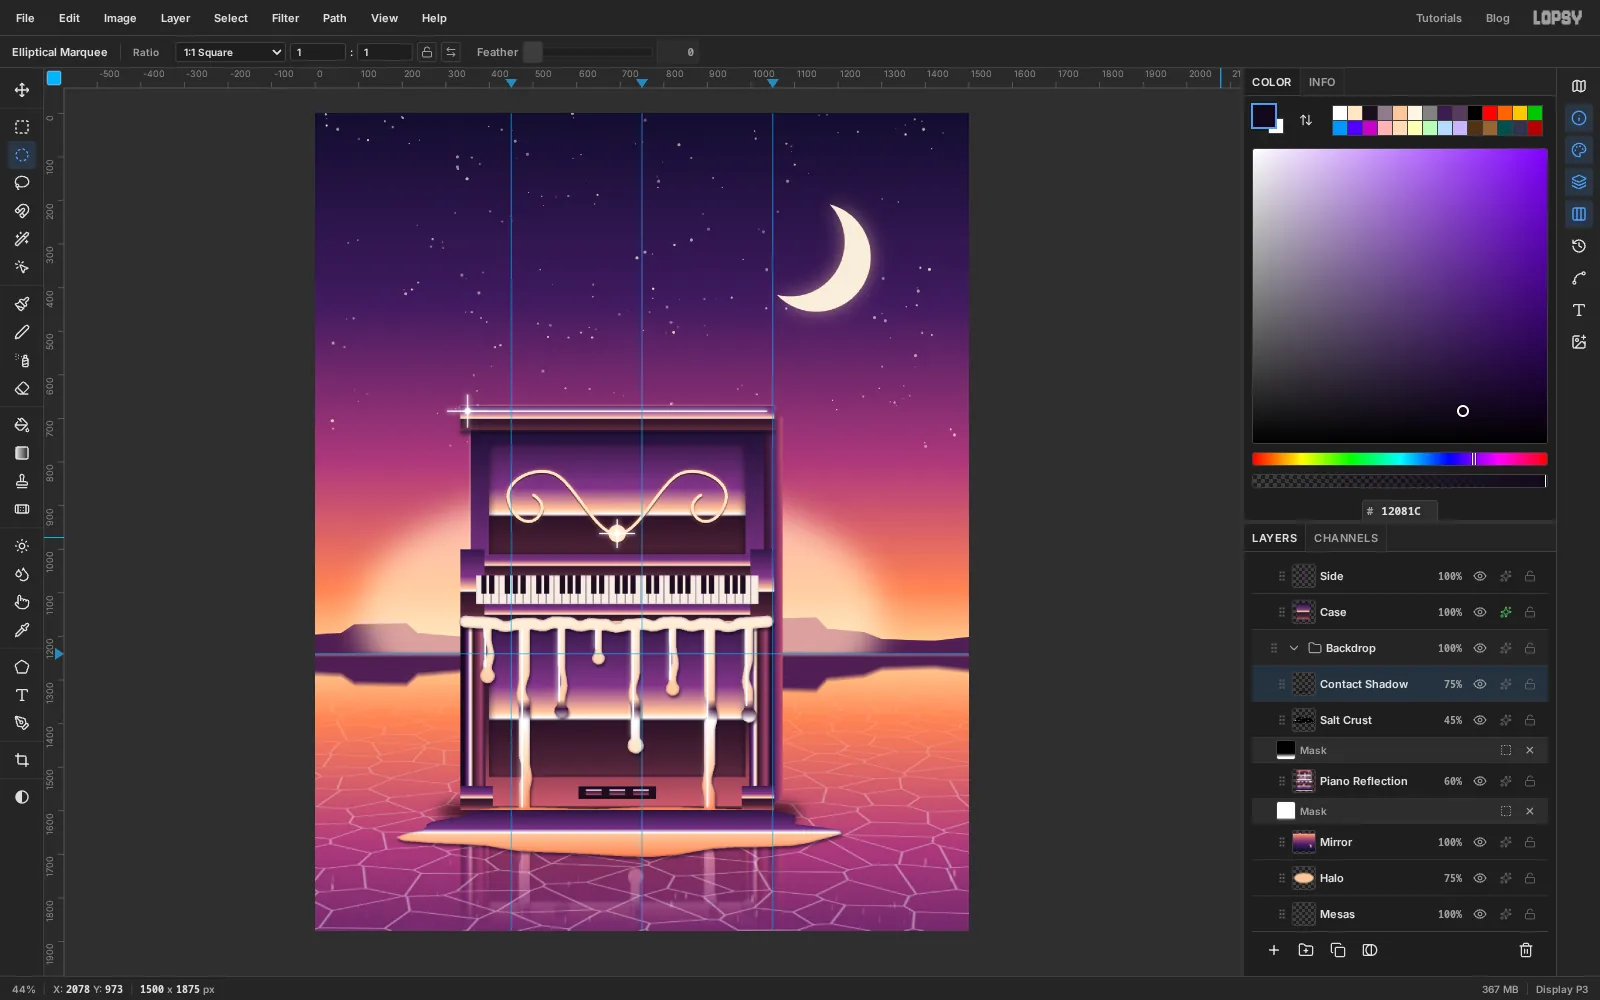
- Run Motion Blur with Angle
90and Distance8. - Add Mask, click the mask thumbnail, and drag a white-to-black gradient from y
1600(the feet) to the bottom of the canvas. Then click the layer thumbnail to leave mask editing, and set the opacity to60%. - Click
Salt Crustand Add Layer. Name itContact Shadow. Marquee a flat ellipse about 840 × 84 px centred at700, 1602, Feather it by30, fill with , and set the layer to Multiply at75%.
The contact shadow is what stops the piano from floating. It's darkest exactly where the piano touches the ground.
- Run Motion Blur with Angle
-
Draw a sheet of music
Click the
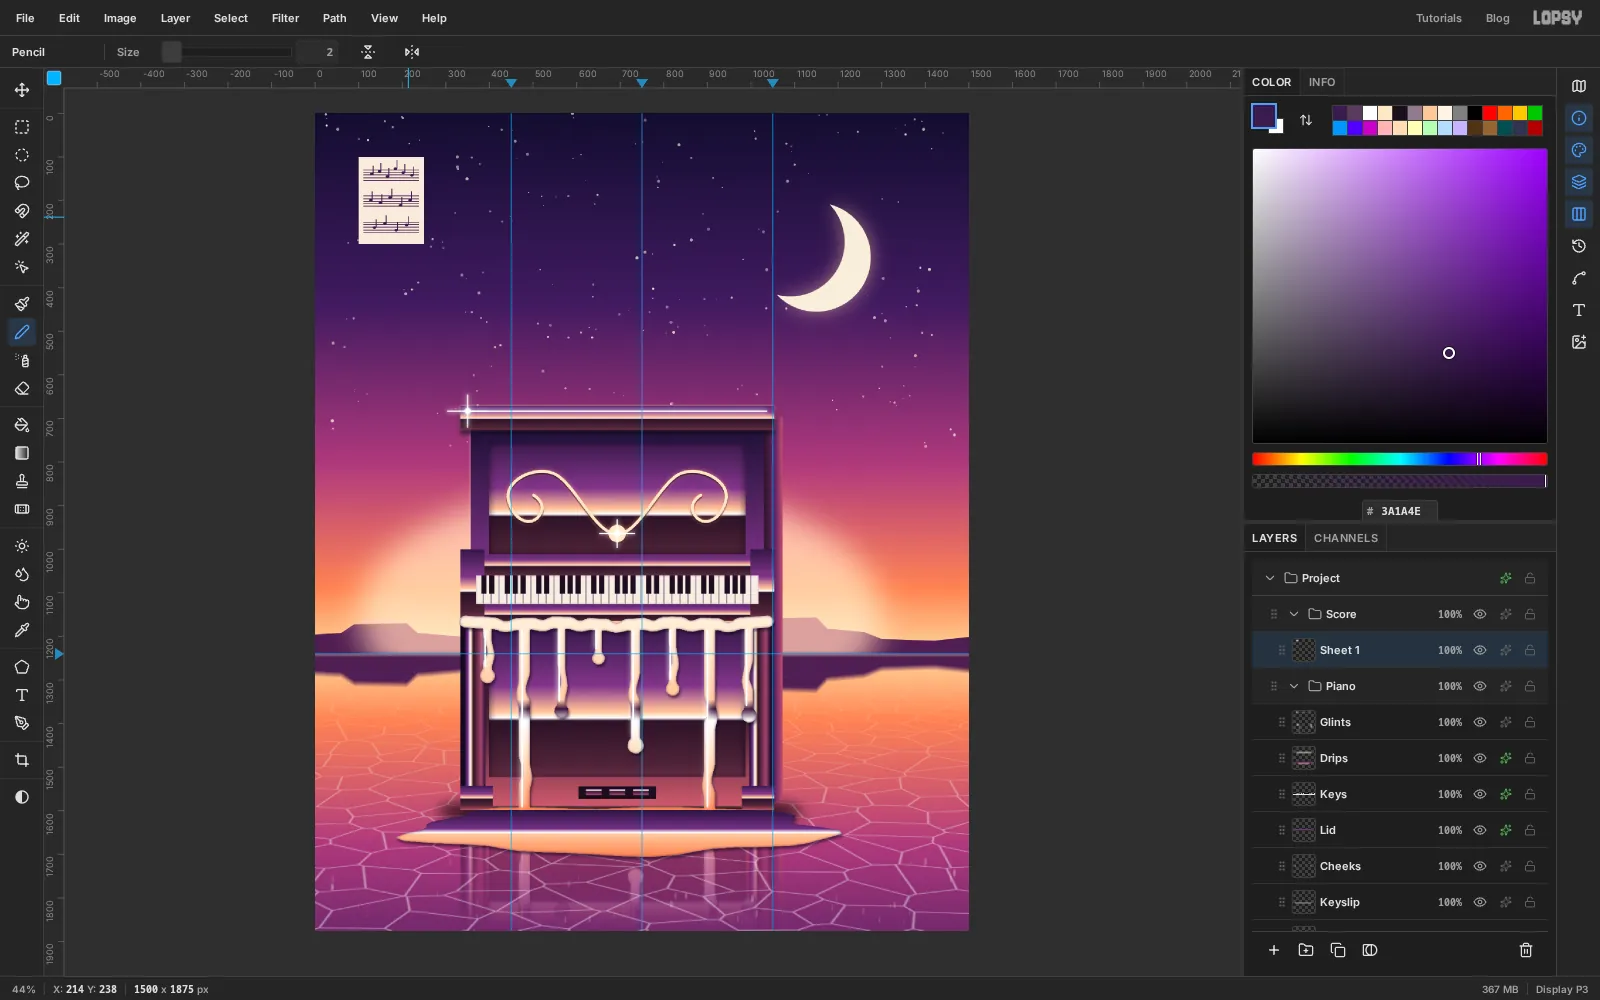
Pianogroup, click New Group, drag the new group out abovePianoand rename itScore. Then Add Layer inside it, namedSheet 1.- Fill a 150 × 200 px page from
100, 100to250, 300with . It's drawn in a corner for now and moved later. - Pencil, Size
2, colour : three staves of five lines each, 6 px apart, starting at y130,190and250. Use click and Shift-click for each line. - Select fifteen tiny ovals (8 × 6 px) on the staves with the Elliptical Marquee, holding Shift to add each one, and fill them with . Add a short stem to the right of each one with the Pencil.
- Give the layer a Drop Shadow (, Offset X
6, Offset Y10, Blur14, Opacity50) and an Outer Glow (, Size22, Opacity35). - Choose Layer → Duplicate Layer three times. The copies keep the effects. They're called
Sheet 1 copy,Sheet 1 copy copyand so on; you'll rename each one as you place it.
- Fill a 150 × 200 px page from
-
Throw the sheets into the sky
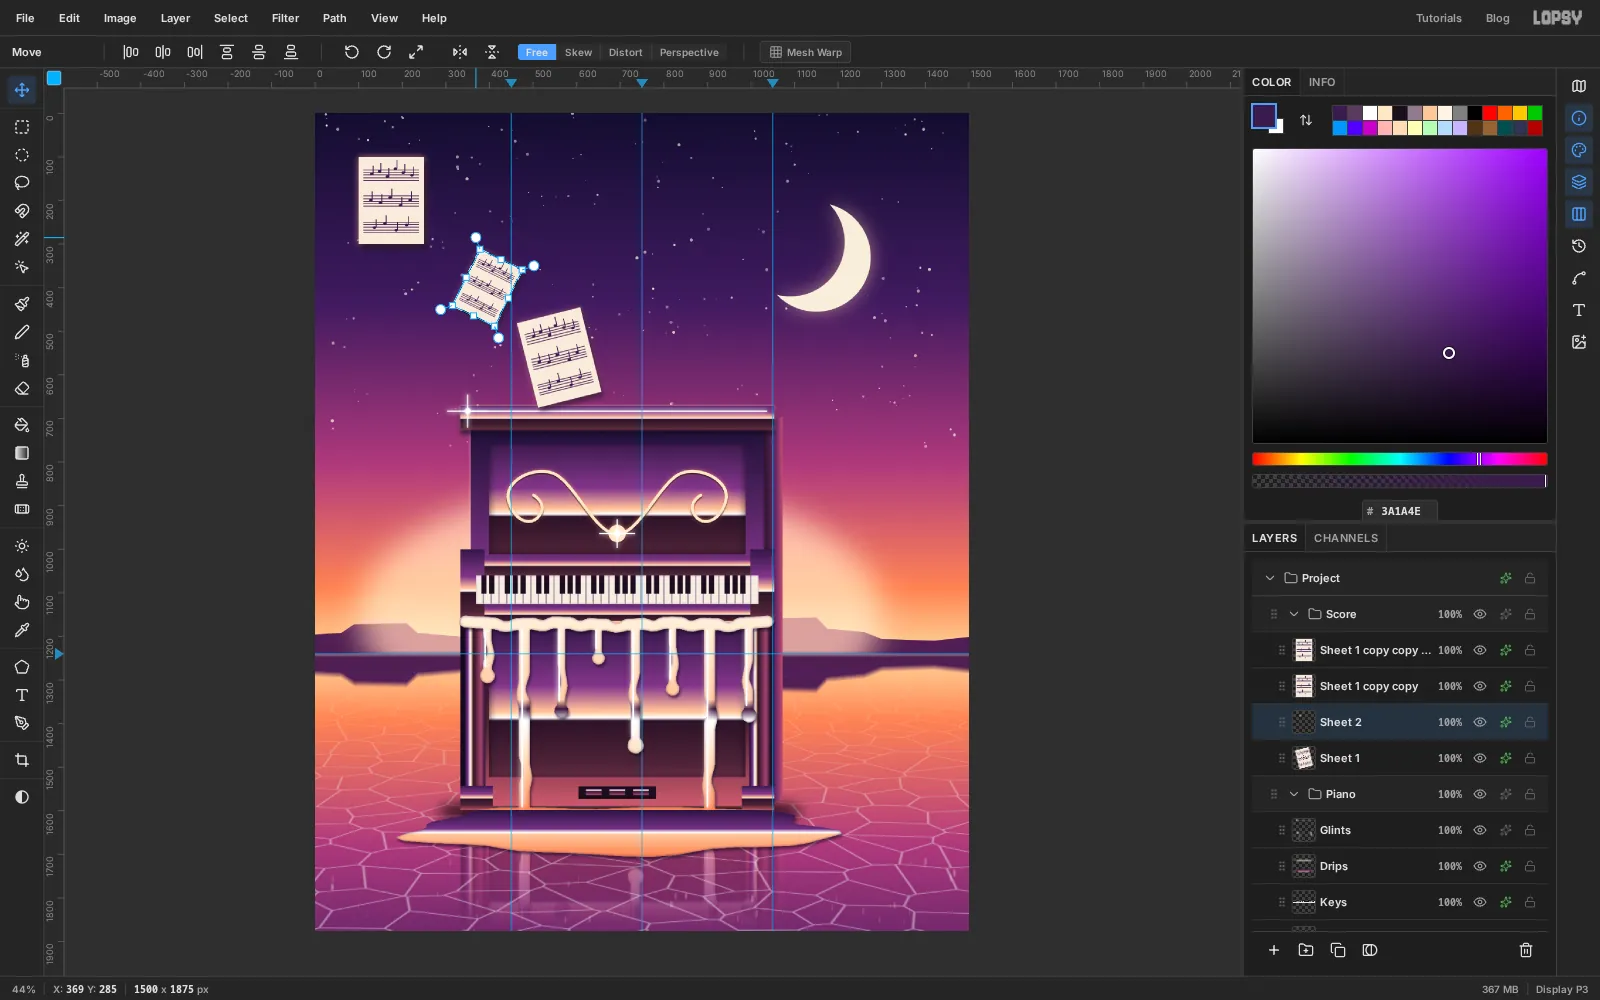
Each sheet gets its own move, scale and turn, and each one should be smaller and more tilted than the last. Work from
Sheet 1up. Click the layer's row, double-click its name to rename it (the first copy becomesSheet 2, the nextSheet 3, the top oneSheet 4), marquee the page in the corner, pick the Move tool, then:- Drag the page to its spot.
- Cmd-drag the bottom-right corner handle to shrink it.
- Drag a rotation handle (the circle just outside a corner) to turn it.
- Press Cmd+D.
Sheet 1: centred on560, 560, just breaking over the top of the lid. Full size, tilted about 14° anticlockwise.Sheet 2: centred on395, 400. About 108 × 144 px, tilted about 26° clockwise.Sheet 3: centred on470, 228. About 78 × 104 px, tilted about 38° anticlockwise.Sheet 4: centred on690, 120. About 54 × 72 px, tilted about 64° clockwise.
The page starts at 150 × 200 px, so those sizes are 72%, 52% and 36% of it. Nothing here needs to be exact: scale and turn by eye until each page is clearly smaller and more tilted than the one before.
The path goes up and left, then hooks back right towards the moon. That curve leads the eye from the piano to the moon instead of off the top of the canvas.
-
Curl two pages
Flat pages look like stickers. Bend two of them slightly with Perspective:
- Cmd-click the
Sheet 3thumbnail to select the page, and pick the Move tool. - Click Perspective in the options bar and drag the top-left corner in and down by about 12 px.
- Click Free to commit, then Cmd+D.
Do the same on
Sheet 2, pulling its top-right corner in instead.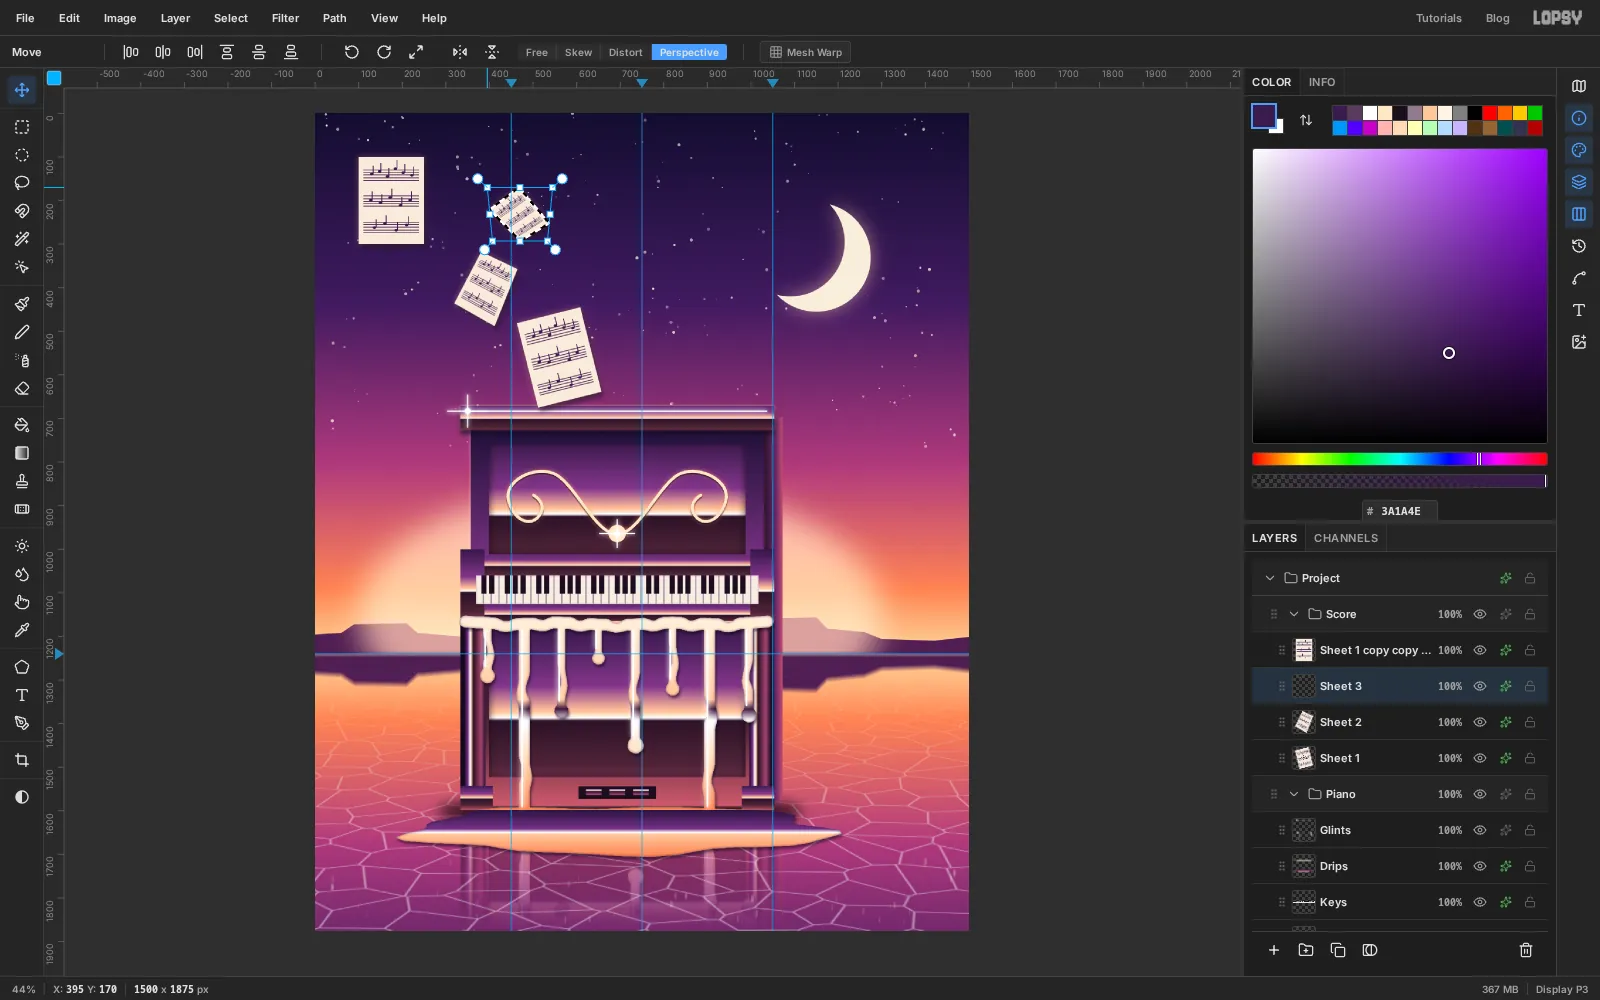
- Cmd-click the
-
Nudge the score as a group
The sheets now form a curve: out of the lid, up, and back towards the moon. Check the gaps between them. If the arc sits too close to the moon or too far left, click the
Scoregroup row, pick the Move tool and nudge with the arrow keys (Shift moves 10 px at a time). All four sheets move together, and Cmd+Z puts them back in one step.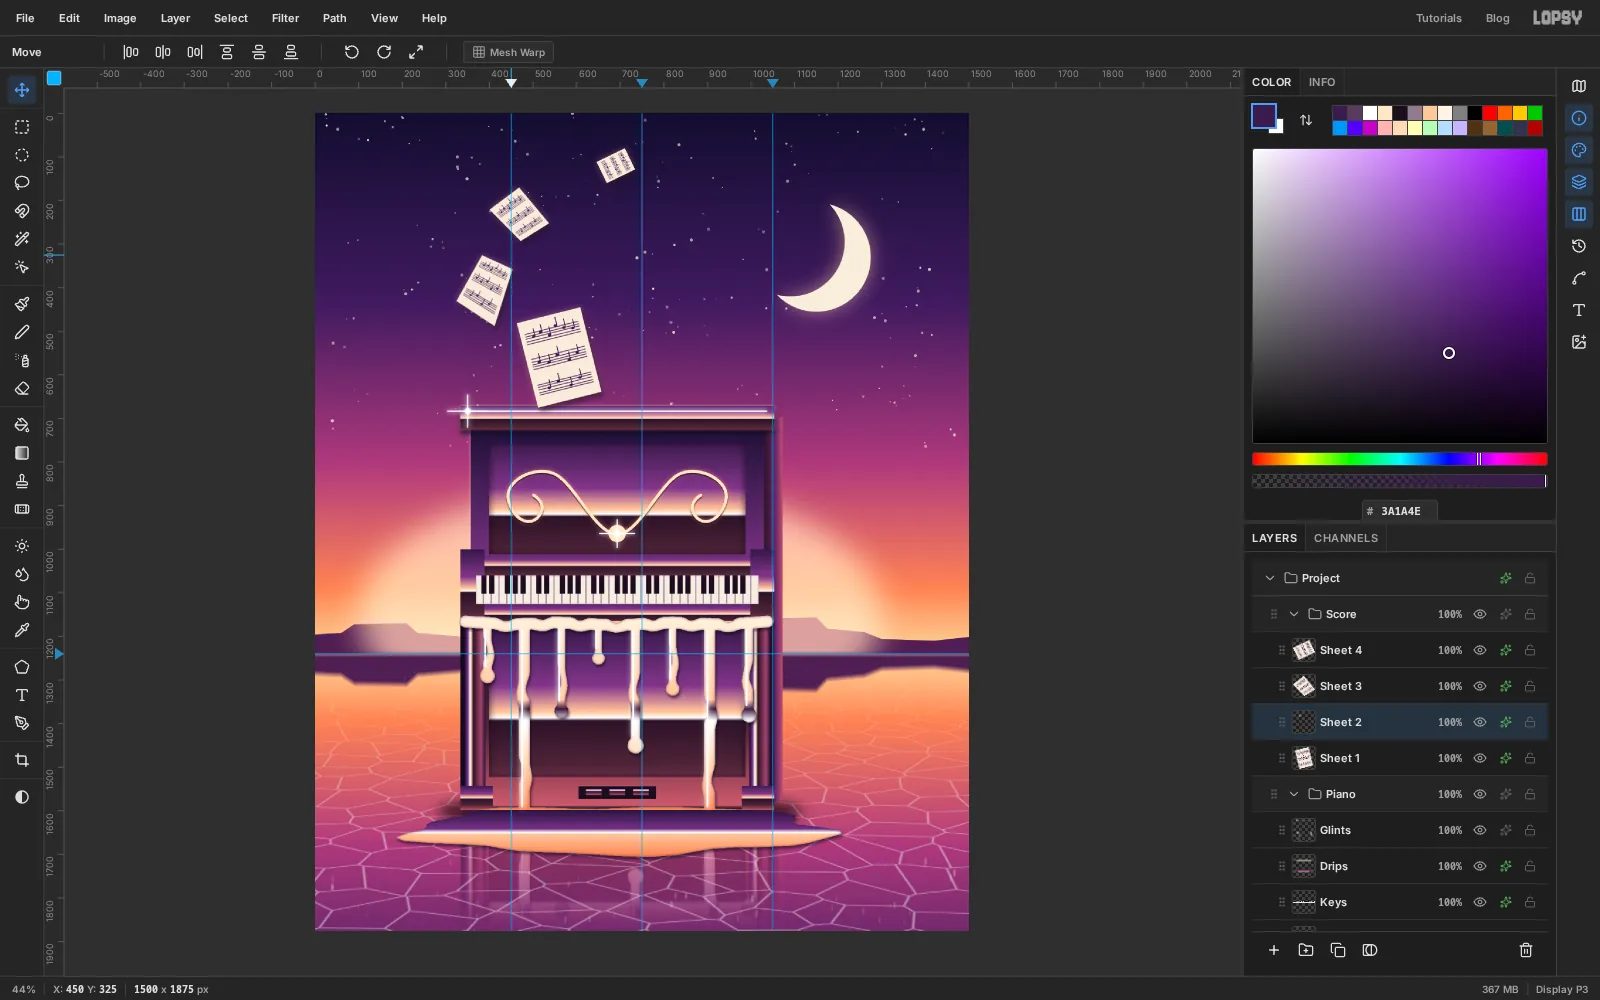
-
Add grain and the final grade
- Click
Sheet 4, Add Layer, name itGrain, and drag it above theScoregroup so it's at the very top. - Fill it with , run Filter → Add Noise… with Amount
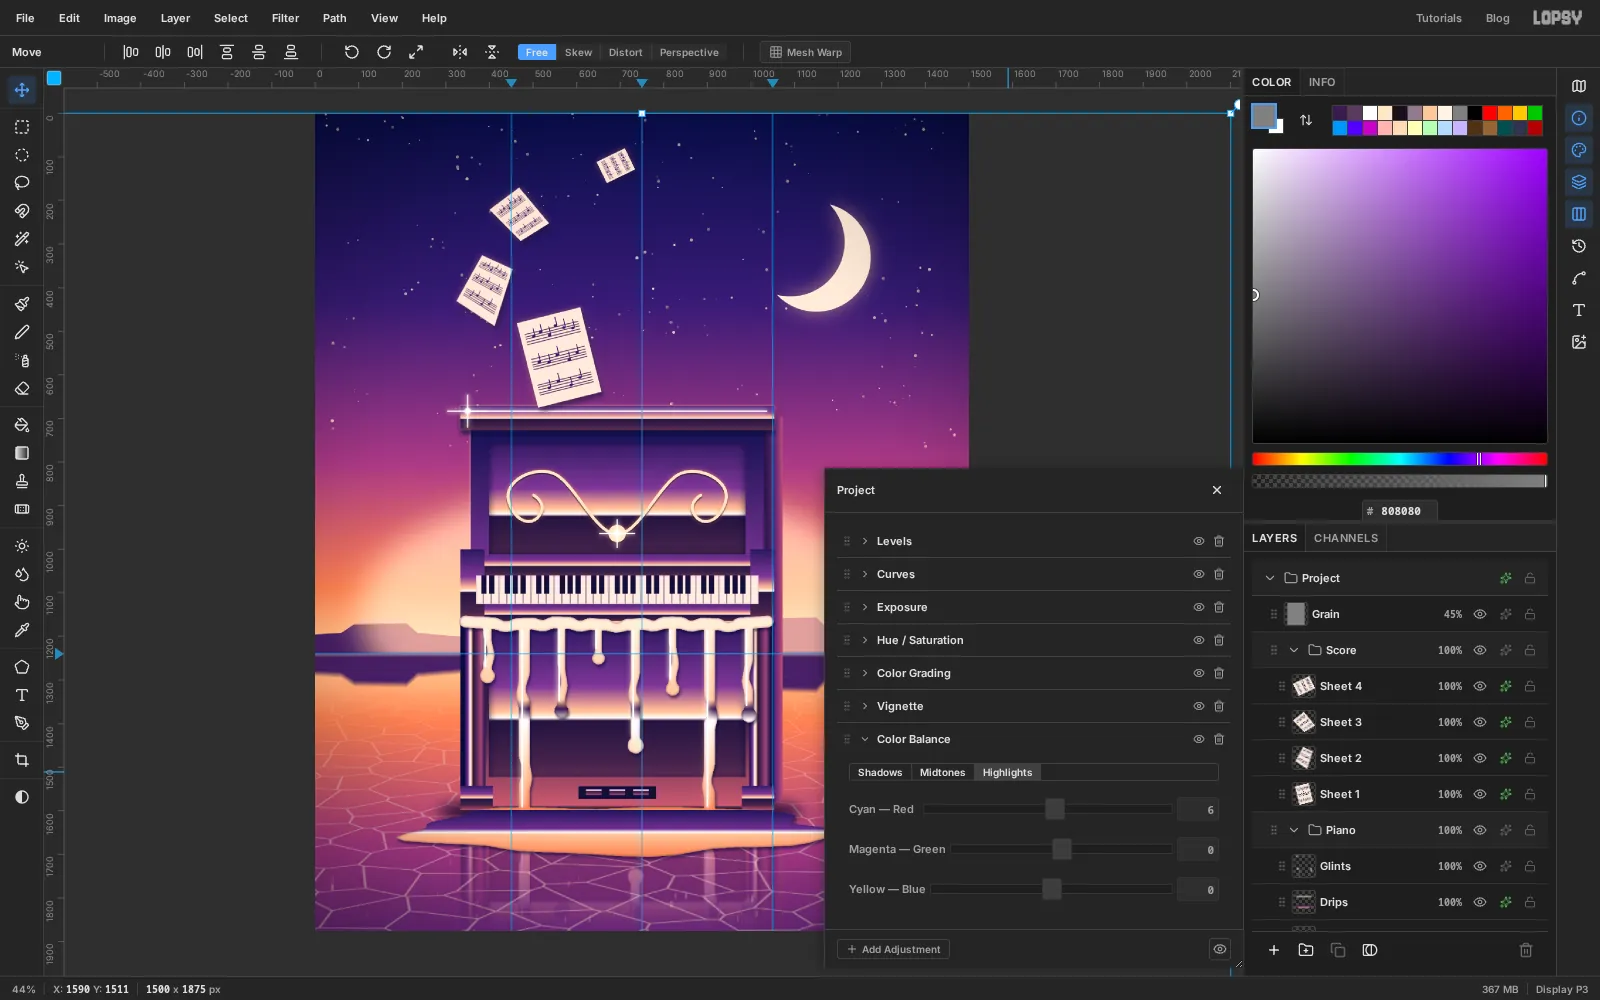
18and the Mono and Gaussian toggles on, then set the layer to Overlay at45%. Grain hides gradient banding and makes the flat digital shapes feel printed. - Click the top
Projectgroup and open its drawer (✦). The root group already lists Levels, Curves, Exposure, Hue / Saturation and Color Grading at their neutral settings. Leave those alone. Click Add Adjustment → Vignette and set its single Vignette slider to40. - Add Adjustment → Color Balance. On Shadows set Yellow — Blue to
12and Cyan — Red to-4, for cool night shadows. On Highlights set Cyan — Red to6, for warm light.
- Click
-
Export
Choose File → Quick Export PNG for the finished image, and File → Save Project to keep every layer, mask and effect editable.
If you want to push it further, try a different sky with the same chrome stops (a blue noon sky makes the piano look like a 1950s diner fitting), or move the
Halolayer to put the sunset on the other side of the piano and see how the drips' horizon line still holds.