Make a Cut-Paper Collage Flier for a Spice Shop
Build a grand-opening flier for a spice shop from a torn 1630 map, cut-out botanical plates, spice photos, torn paper labels, a luggage tag and tape.
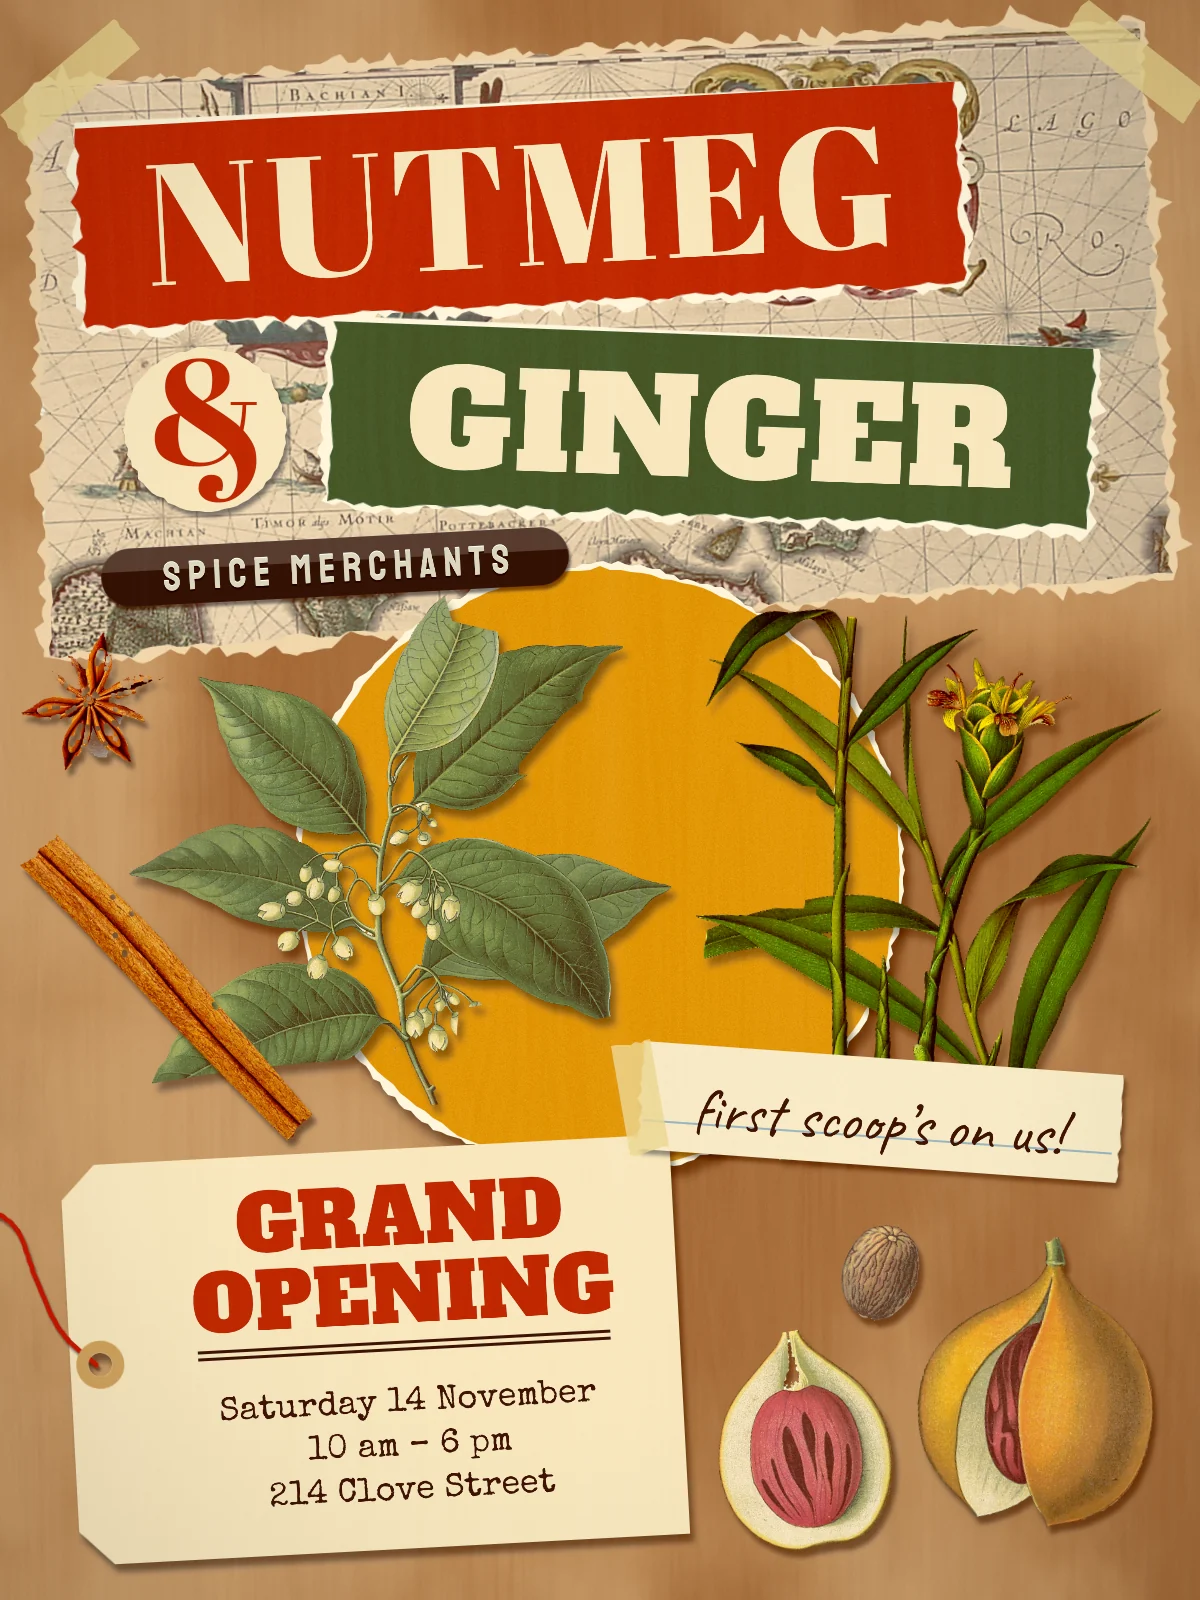
A spice shop sells things that are old, faraway and a bit romantic: seeds that people once sailed round the world for. A cut-paper collage carries that story better than a clean layout does. In this tutorial you'll make the grand-opening flier for Nutmeg & Ginger, an invented neighbourhood spice shop, on a 1200 × 1600 px page (letter-shaped, ready to print or post).
The collage is built from a few kinds of material:
- a torn scrap of a 1630 map of the Spice Islands, stained with tea
- the shop name on torn paper strips, set in two different poster typefaces
- a turmeric-yellow paper disc with two botanical prints cut out of their plates
- photo cut-outs of a cinnamon stick and a star anise
- a luggage tag on red twine for the event details, and a handwritten note for the offer
- masking tape, a black embossed label, paper grain and a warm colour grade
You'll need four images from Wikimedia Commons:
- Blaeu - Moluccae Insulae Celeberrimae.jpg, Willem Blaeu's map of the Moluccas, about 1630. Public domain. Download the original (1400 × 1072 px).
- Köhler Myristica.jpg, the nutmeg plate from Köhler's Medizinal-Pflanzen (1887). Public domain. Download the 1920 px-wide version.
- Zingiber officinale - Köhler–s Medizinal-Pflanzen-146.jpg, the ginger plate from the same book. Public domain. Download the 1920 px-wide version.
- Gewuerze 004 2024 08 10.jpg, cinnamon, star anise and cloves on white, by Friedrich Haag, licensed CC BY-SA 4.0. Download the 1920 px-wide version. The screenshots and the project file that show this photo share that license.
Along the way you'll use:
- ruler guides, the grid with Snap, Add Noise, Clouds and Fibers for the paper
- the Lasso for every torn edge and cut-out, with Shift to add and Alt to subtract
- dropping in photos, the Magic Wand, Grow, Shrink and Select → Inverse
- Cut and Paste to lift pieces onto their own layers, and the Eraser for clean-up
- scaling, rotating and flipping with the Move tool's handles, on layers and on whole groups
- live text in Abril Fatface, Alfa Slab One, Staatliches, Special Elite and Caveat, including centred area text
- Hue/Saturation to quieten the map
- the Drop Shadow and Color Overlay effects, Multiply, Soft Light and Overlay blend modes, and the Pencil and Brush
- the document's Color Grading and Vignette adjustments
The palette:
-
Kraft paper
-
torn-edge white
-
Paprika
-
cardamom
-
turmeric
-
Cream paper and type
-
note paper
-
Clove ink
-
Dymo tape
-
Masking tape
-
tea stain
-
twine
-
Dymo letters
-
eyelet brass
-
note rule
Positions are given in document pixels as x, y where things need to line up. The status bar at the bottom of the window shows the pointer's X and Y. Torn edges and cut-outs only need to be roughly right.
I renamed layers as I went (double-click a name), so the screenshots show names like Tag Headline and Note Words. Yours can keep the names Lopsy gives them.
Four habits will save you trouble:
- A single layer has no transform handles until something is selected. To scale, rotate or flip one layer, first Cmd-click its thumbnail in the Layers panel to select its pixels, then use the Move tool's handles. Hold Cmd while you drag a corner handle to keep the proportions. A whole group shows handles without a selection. Press Esc to finish a transform: it keeps the change, it doesn't cancel it.
- Collapse each group when you finish it. A new layer or group goes inside a selected group that's open, and above one that's collapsed.
- Click a raster layer before you set up new text. If a text layer is still selected, changing the font, size or colour restyles that layer. New text also borrows the last text layer's settings, so set the font, size, colour and letter spacing every time, even when you want
0. - Start new text in an empty patch of canvas, then move it into place. A click on existing text edits that text.
-
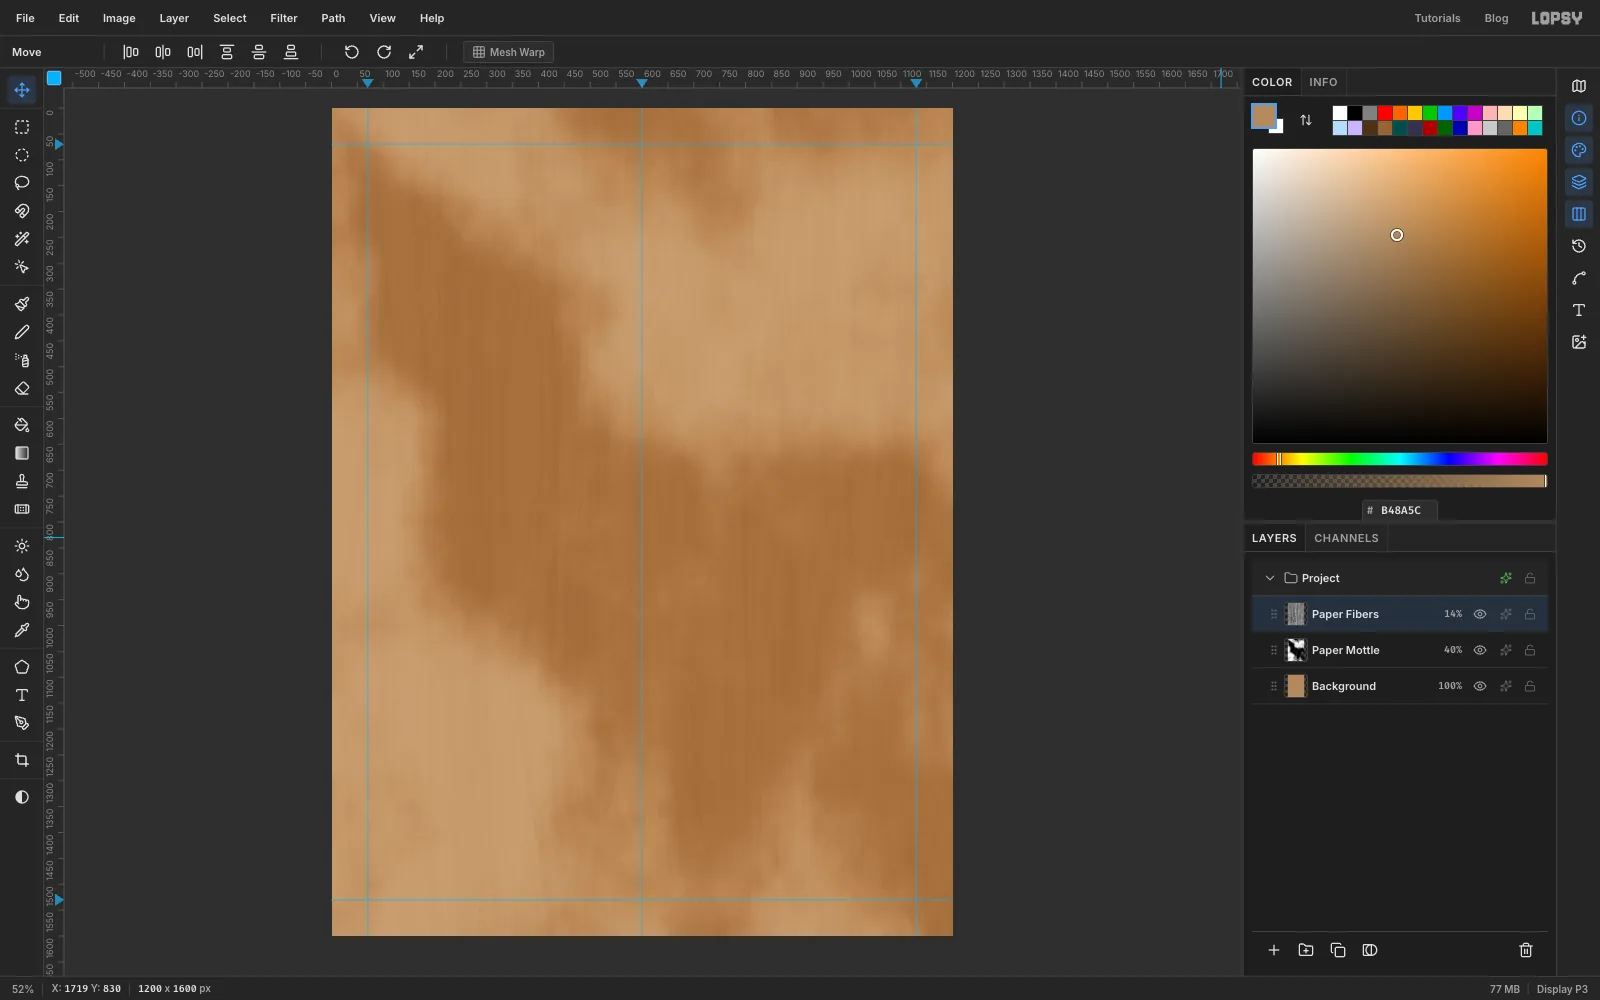
Lay down the kraft paper
- Choose File → New and make a 1200 × 1600 px document.
- Click the top ruler at
x 70,600and1130to drop three vertical guides, and the left ruler aty 70and1530for two horizontal ones. They mark a margin and the centre line. - Click Background, set the foreground to and choose Edit → Fill. Choose Filter → Add Noise… with Amount
7, Mono and Gaussian. - Double-click Layer 1 and rename it
Paper Mottle. Choose Filter → Clouds… with Scale4. Open the effects drawer (the ✦ button on the layer's row), set the blend mode to Soft Light and close the drawer. Click the opacity figure on the row and set it to40%. - Click Add Layer, name it
Paper Fibers, choose Filter → Fibers… and click Apply. Set it to Soft Light at14%.
-
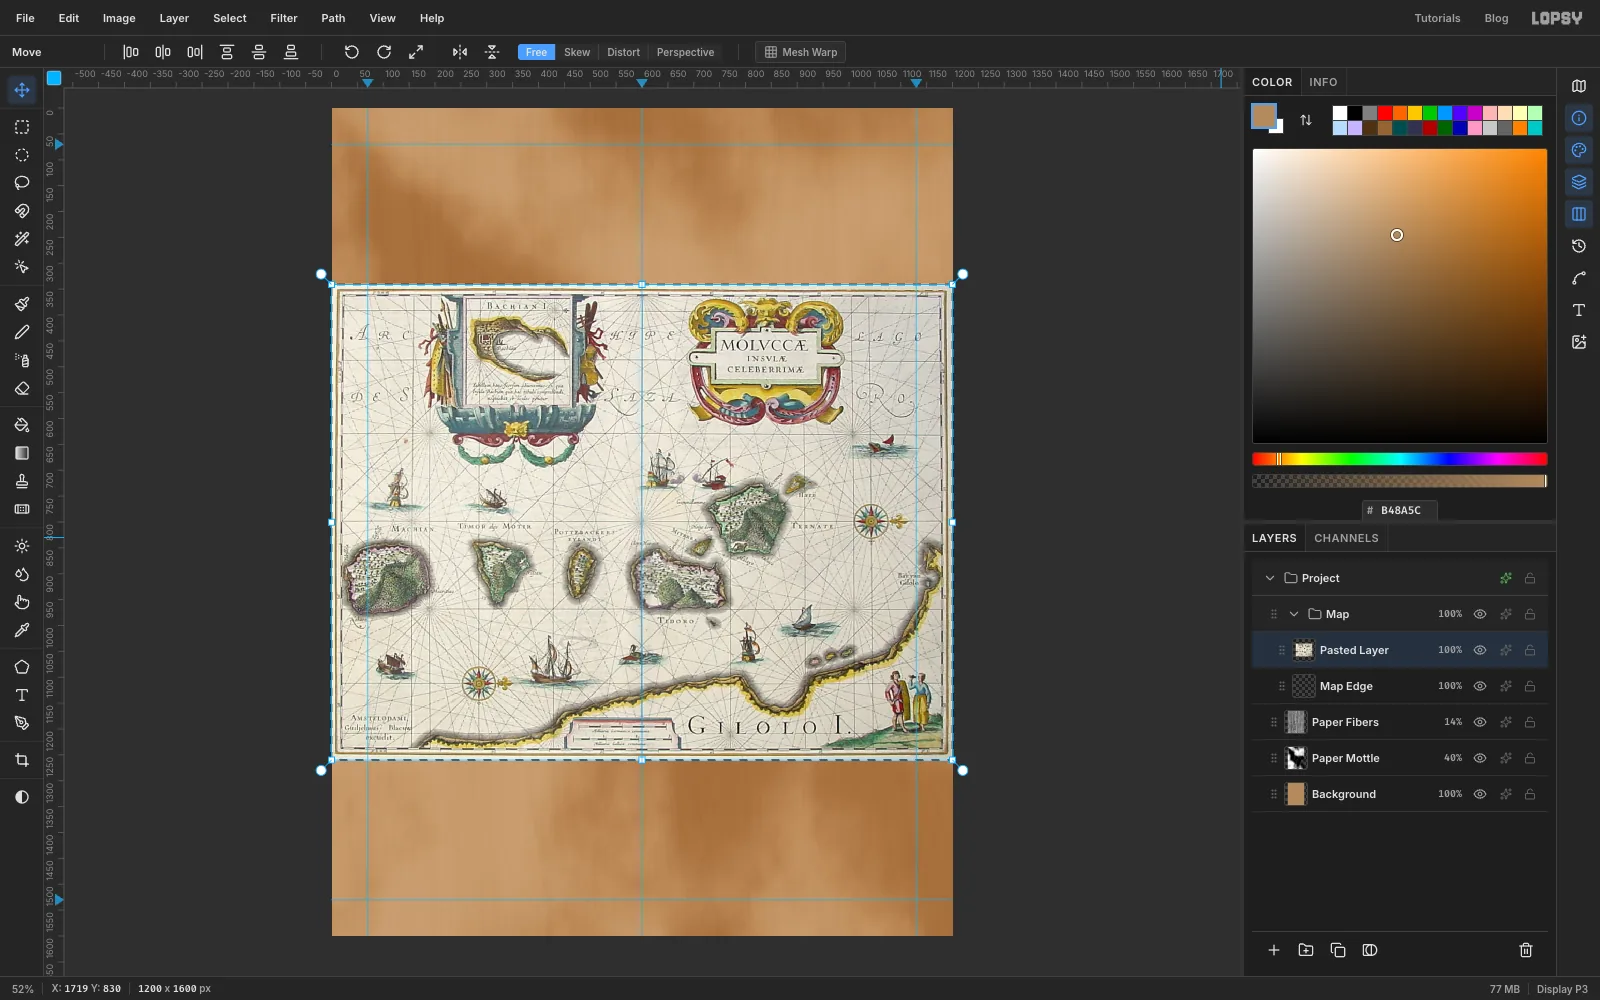
Drop in the map
- Click New Group at the bottom of the Layers panel and name it
Map. Click Add Layer (it goes inside the group) and name itMap Edge. It stays empty for now. - Drag the Blaeu map file from your desktop onto the canvas. Lopsy shrinks it to fit the page width and puts it on a new layer above
Map Edge. Rename itBlaeu Map. - Press Cmd+D, pick the Move tool and drag the map straight up by about 300 px, so the two cartouches sit just under the top of the page.
- Click New Group at the bottom of the Layers panel and name it
-
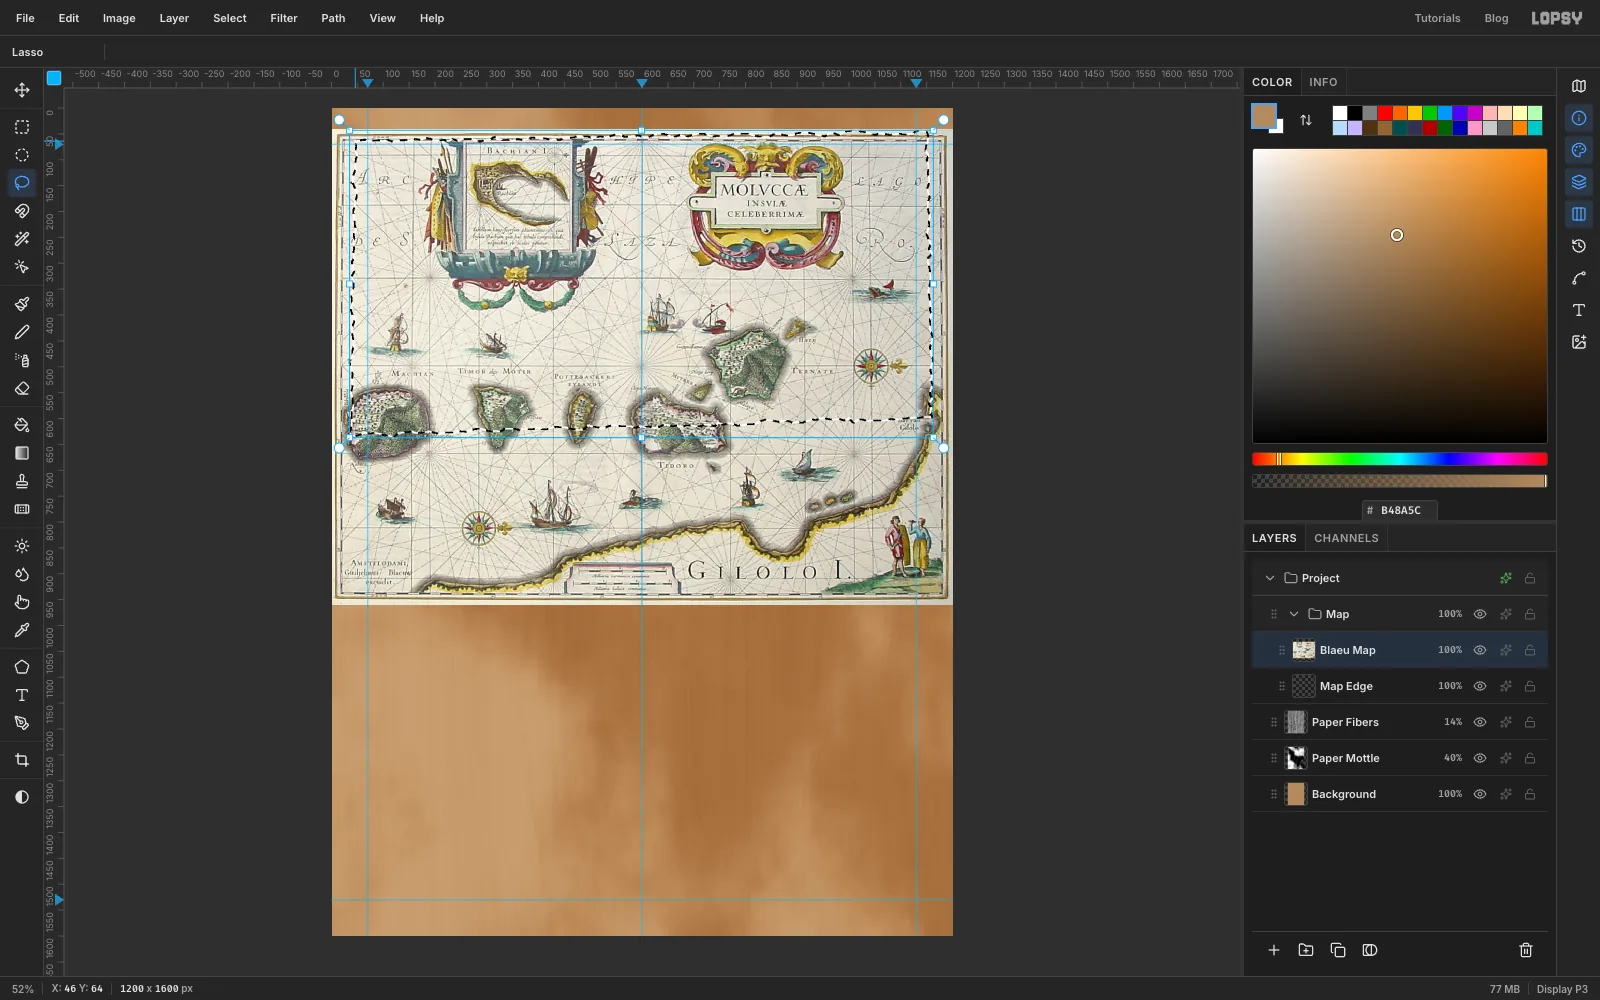
Tear it out
- Pick the Lasso. Draw a torn rectangle just inside the map's left, top and right edges, coming back across a little below the middle (around
y 600), with the right side a touch higher than the left. Wiggle the pointer a few pixels in and out as you go. Small, irregular steps look torn. - Choose Select → Inverse and press Delete, then Cmd+D.
- Choose Filter → Hue/Saturation… and set Saturation to
-40and Lightness to4. That softens the hand-colouring so the map sits back behind the type.
- Pick the Lasso. Draw a torn rectangle just inside the map's left, top and right edges, coming back across a little below the middle (around
-
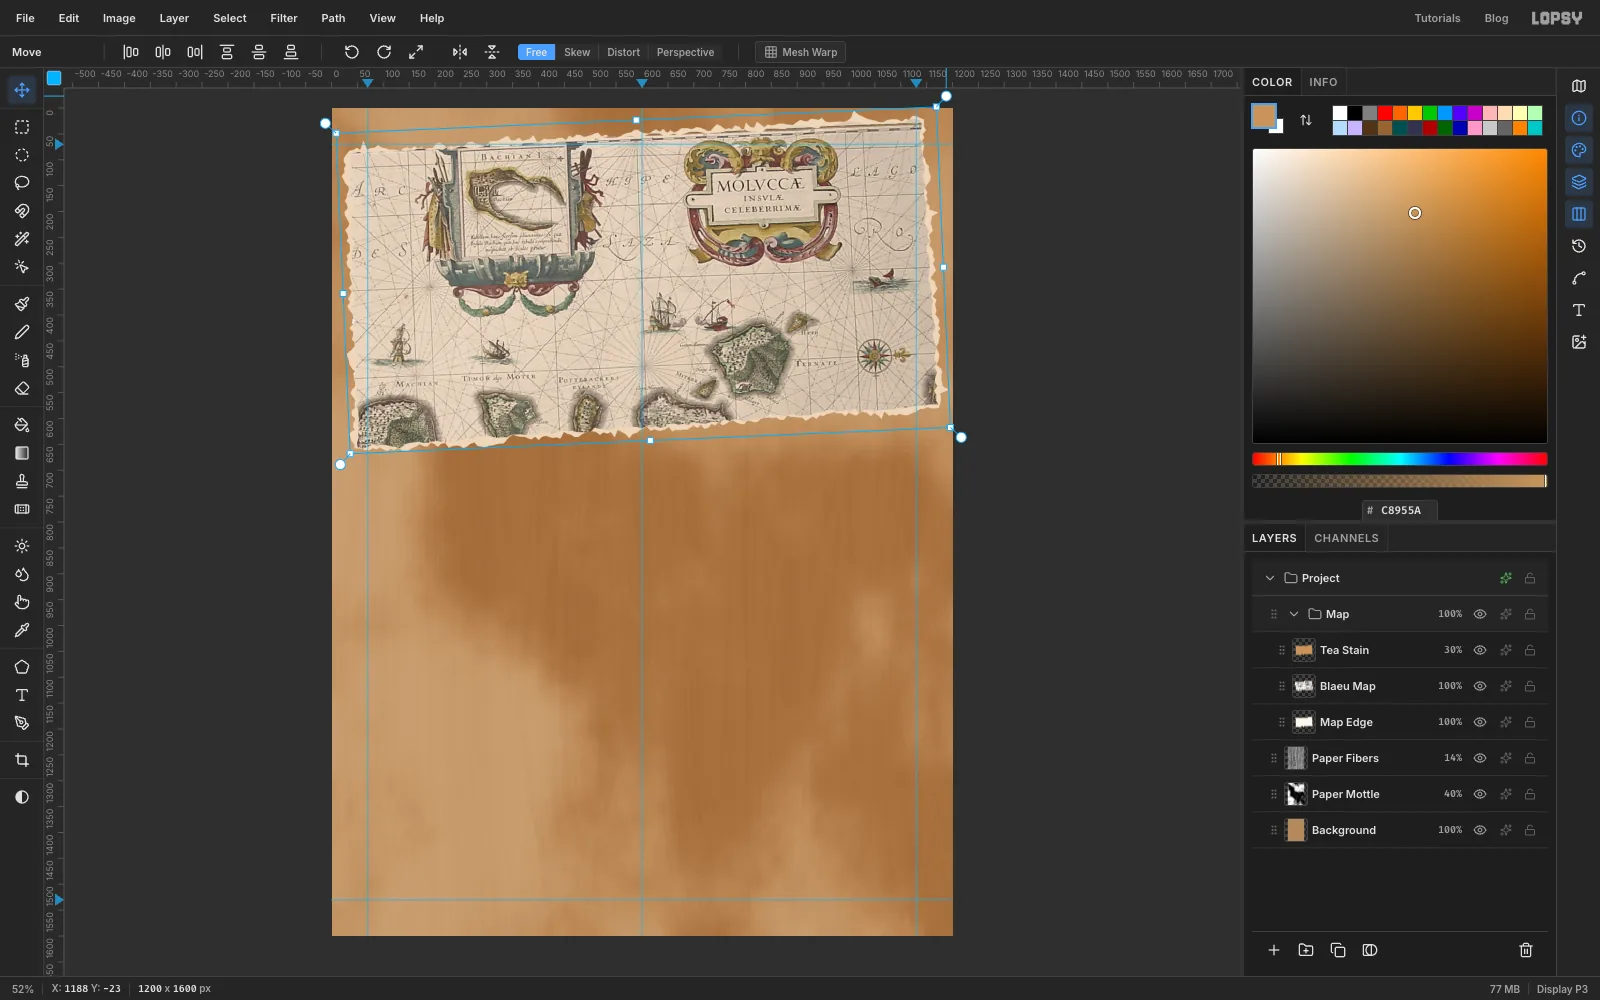
Give it a torn white edge, a tea stain and a tilt
Real torn paper shows a white core along the rip. You'll fake that with a slightly bigger white shape underneath.
- Click
Map Edge. Set the foreground to . Lasso the same torn rectangle again, about 7 px further out all round and a little rougher, then Edit → Fill and Cmd+D. The white peeks out unevenly around the map. - Click
Blaeu Mapand Add Layer. Name itTea Stain. Cmd-click theMap Edgethumbnail to select the whole scrap, fill it with and deselect. Set it to Multiply at30%. The map's cool greys warm up to match the kraft. - Click the
Mapgroup row and pick the Move tool. Handles appear around the whole scrap. Drag the round rotation handle at the top-right corner a little upward to tilt the scrap about2.5°anticlockwise, then press Esc. - Click the arrow on the
Maprow to collapse the group.
- Click
-
Cut a turmeric paper disc
- With the collapsed
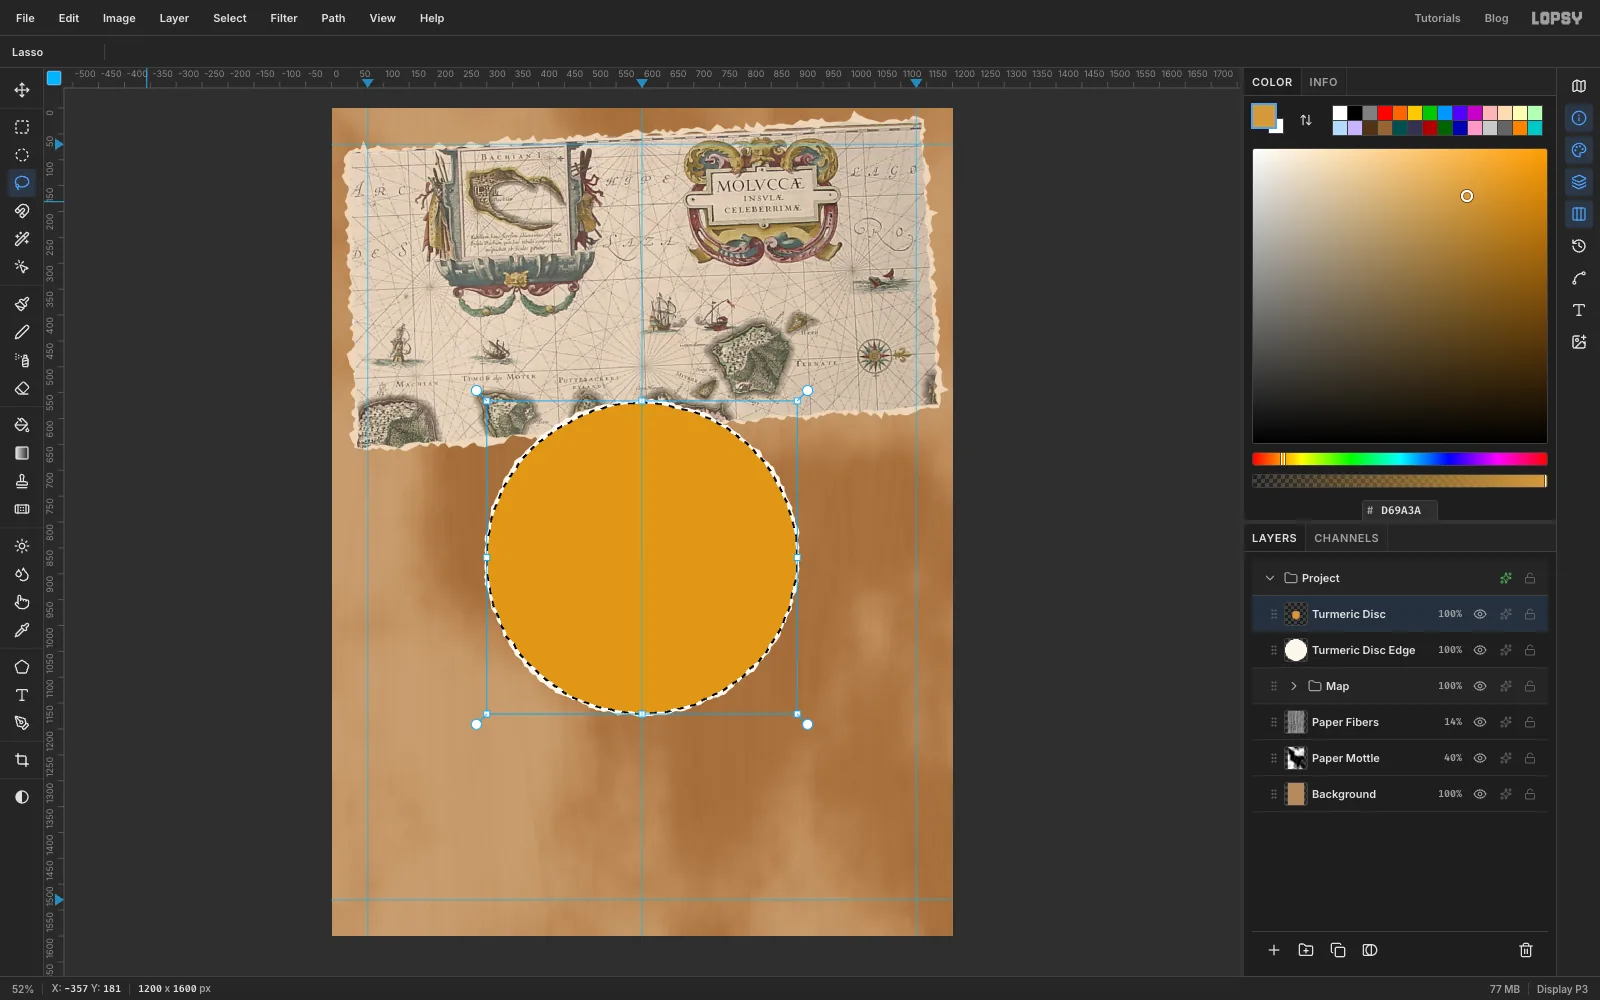
Mapgroup selected, click Add Layer and name itTurmeric Disc Edge. It goes in above the group, not inside it. - With the Lasso, draw a rough circle about 610 px across, centred on
600, 870. It overlaps the bottom of the map a little. Fill it with and deselect. - Add Layer, name it
Turmeric Disc, and draw a slightly smaller, smoother circle (about 600 px) on the same centre. Fill it with . While it's still selected, choose Filter → Add Noise… with Amount14, Mono and Gaussian, then deselect. - Click
Turmeric Disc Edge, open the effects drawer and turn on Drop Shadow: Offset X6, Offset Y10, Blur14, Opacity45.
The shadow goes on the lowest layer of the disc, so it falls under the white rim as well.
- With the collapsed
-
Drop in the nutmeg plate and wand out the white
- Click
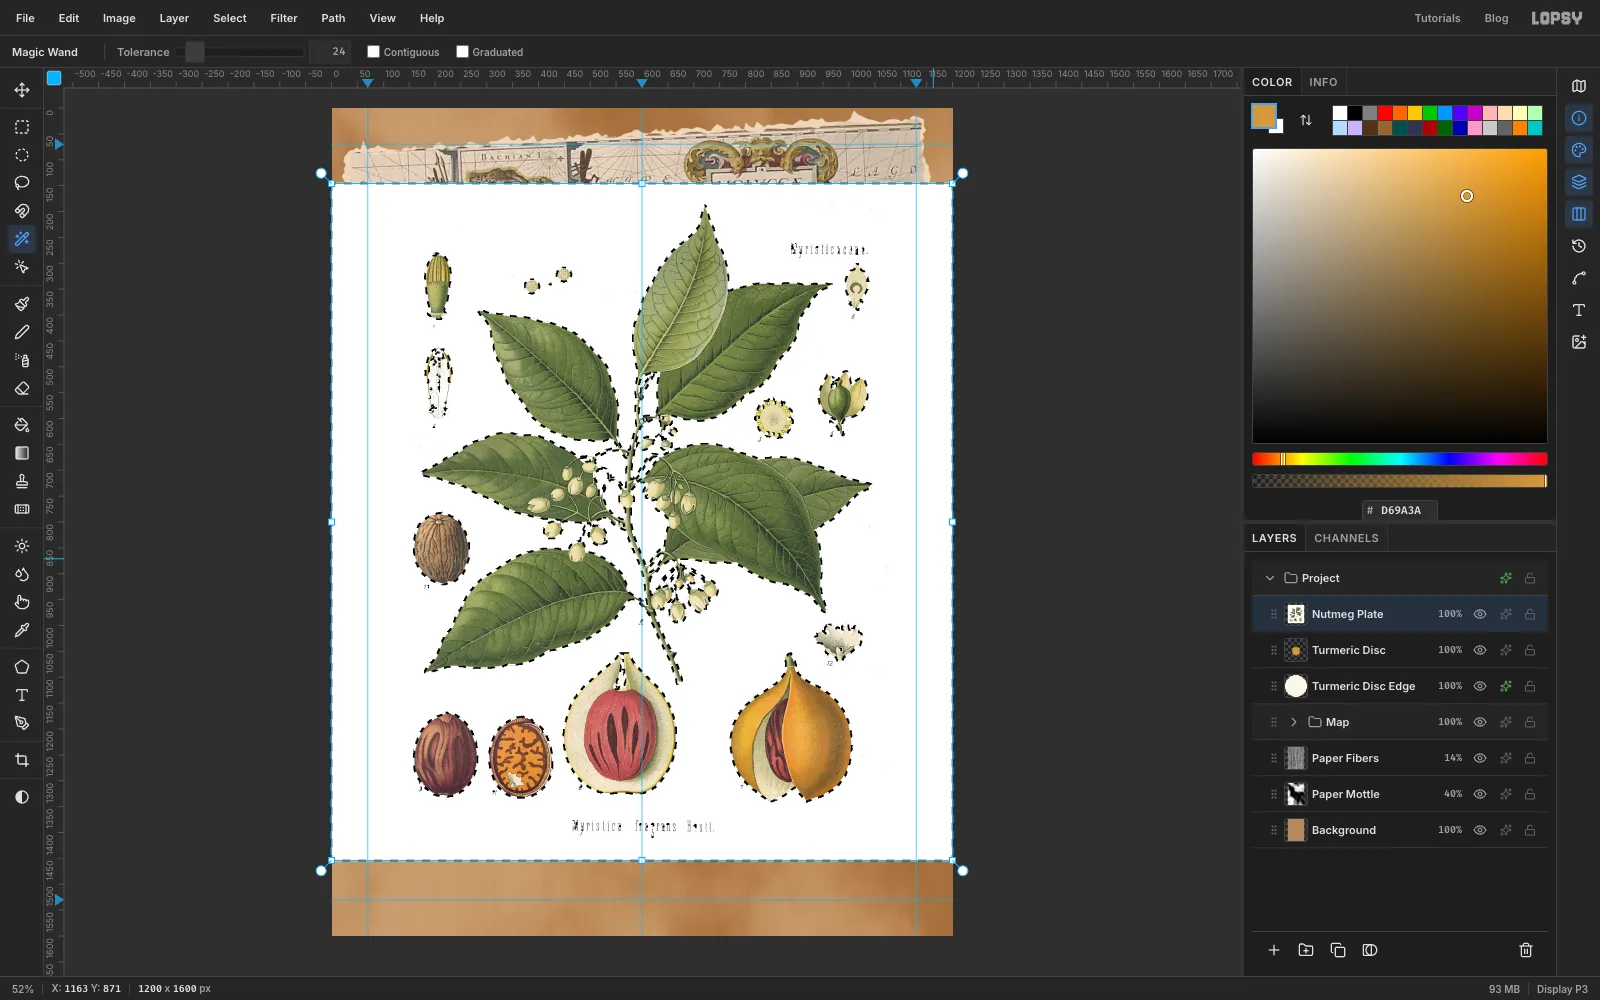
Turmeric Disc, then drag the nutmeg plate onto the canvas. Rename the new layerNutmeg Plate. - Pick the Magic Wand. Set Tolerance to
24and untick Contiguous, so one click catches every patch of white, including the gaps between the leaves. Click the white near the top-left corner. - Choose Select → Grow…, enter
1and click Apply. The extra pixel eats the pale fringe the JPEG leaves around every edge. - Press Delete and Cmd+D. Everything on the plate is now a cut-out on transparency.
- Click
-
Lift the fruit studies onto their own layers
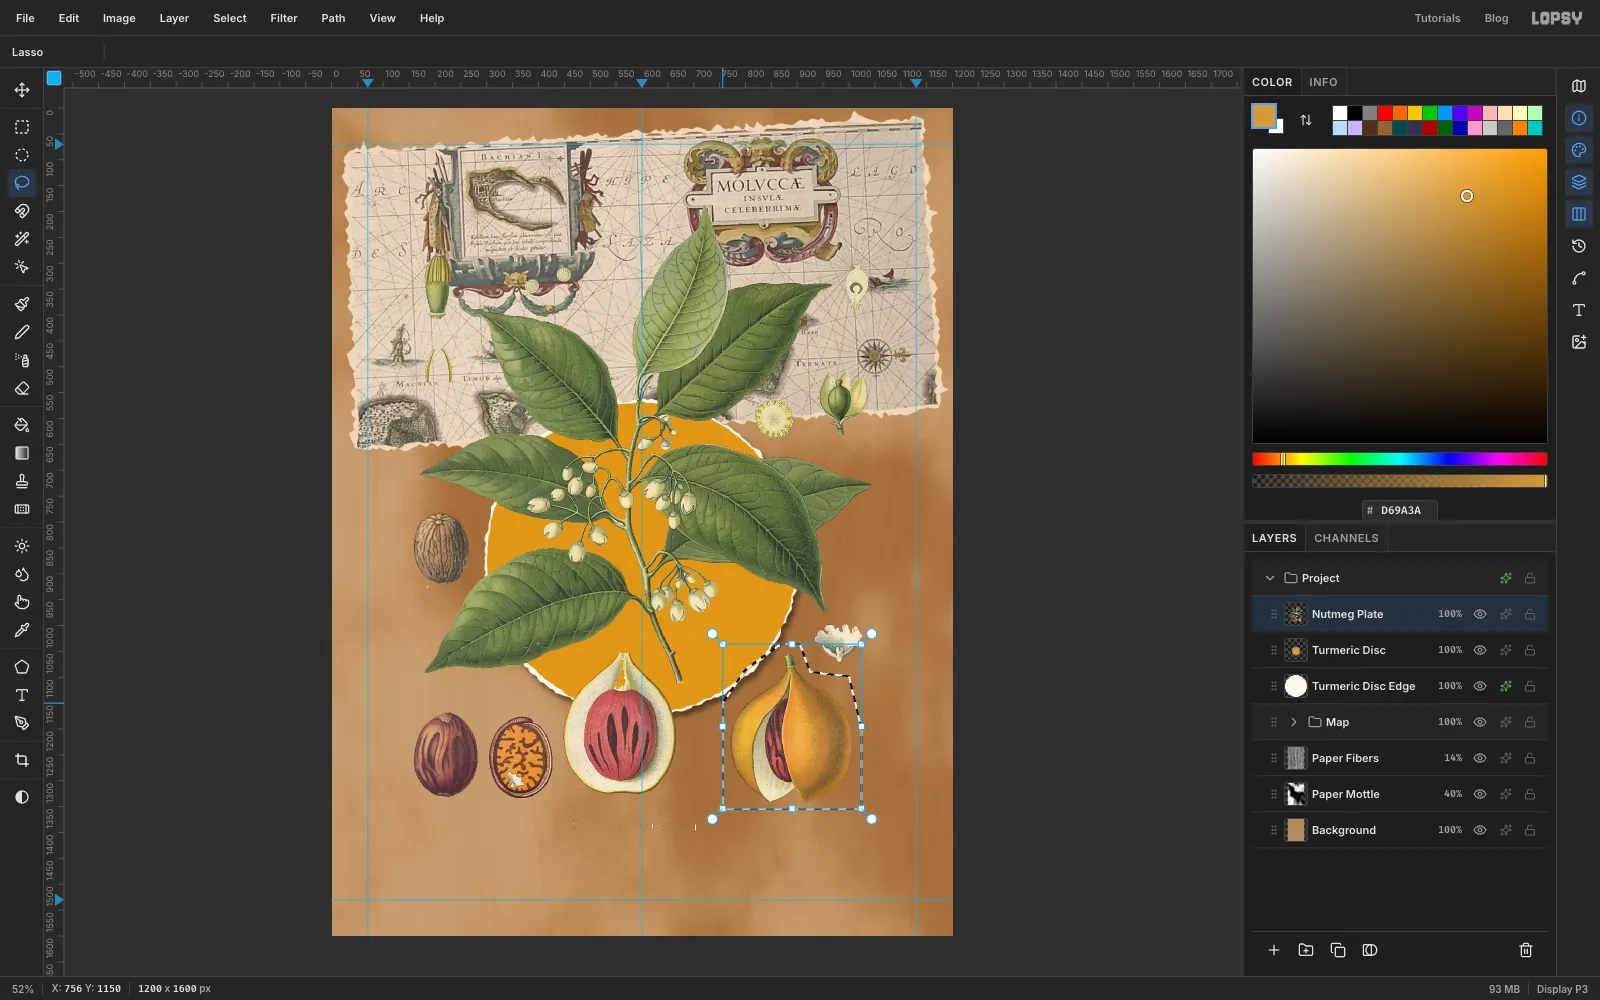
Three of the fruit studies around the bottom of the plate become separate pieces for later.
- With the Lasso, draw loosely around the opened yellow fruit at the bottom right. Keep the little white crinkled diagram above it outside your line. Press Cmd+X, then Cmd+V. The fruit pastes back in exactly the same place on its own layer. Rename it
Nutmeg Fruit. - Pick the Eraser, set its Size to
22, and click once on the small plate number7printed beside the fruit. - Click
Nutmeg Plateagain. Lasso the halved fruit with the red mace (bottom centre). Keep your line below the end of the branch's stem, which comes down just above it. Cut, paste, rename itMace Half, and erase its number8. - Click
Nutmeg Plate. With the Elliptical Marquee, drag an oval around the pale, veined whole nutmeg halfway up the left side (not the darker ones at the bottom). Cut, paste, rename itWhole Nutmeg, and erase the10under it. - Click the eye on each of the three new layers to hide them for now. They come back near the end.
- With the Lasso, draw loosely around the opened yellow fruit at the bottom right. Keep the little white crinkled diagram above it outside your line. Press Cmd+X, then Cmd+V. The fruit pastes back in exactly the same place on its own layer. Rename it
-
Cut out the branch
- Click
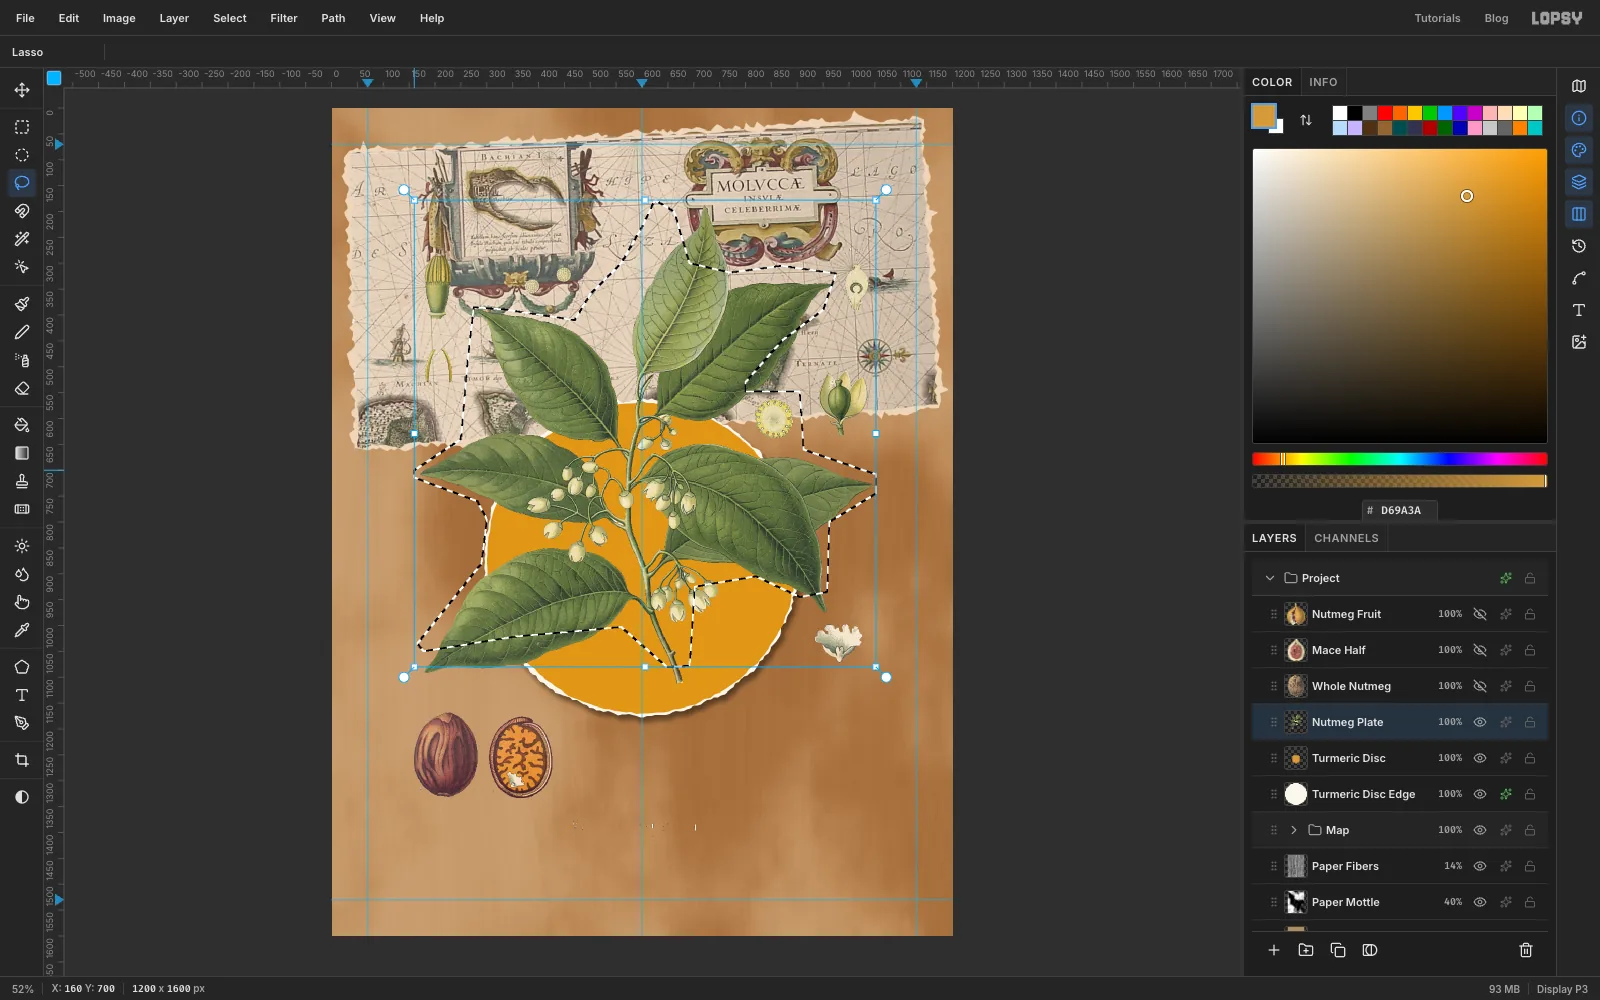
Nutmeg Plate. With the Lasso, draw around the branch: out round each leaf tip, in close to the stem, and around (not through) the little numbered diagrams and the plate's title. You don't need to hug the leaves. The background is already transparent, so a loose line is fine. - Choose Select → Inverse and press Delete. The diagrams, labels and title disappear.
- One diagram, the round pollen disc on the right, sits so close to a leaf that the Lasso can't get between them. Drag an Elliptical Marquee over just the disc and press Delete.
- Deselect and rename the layer
Nutmeg Branch.
- Click
-
Scale the branch onto the disc
- Cmd-click the
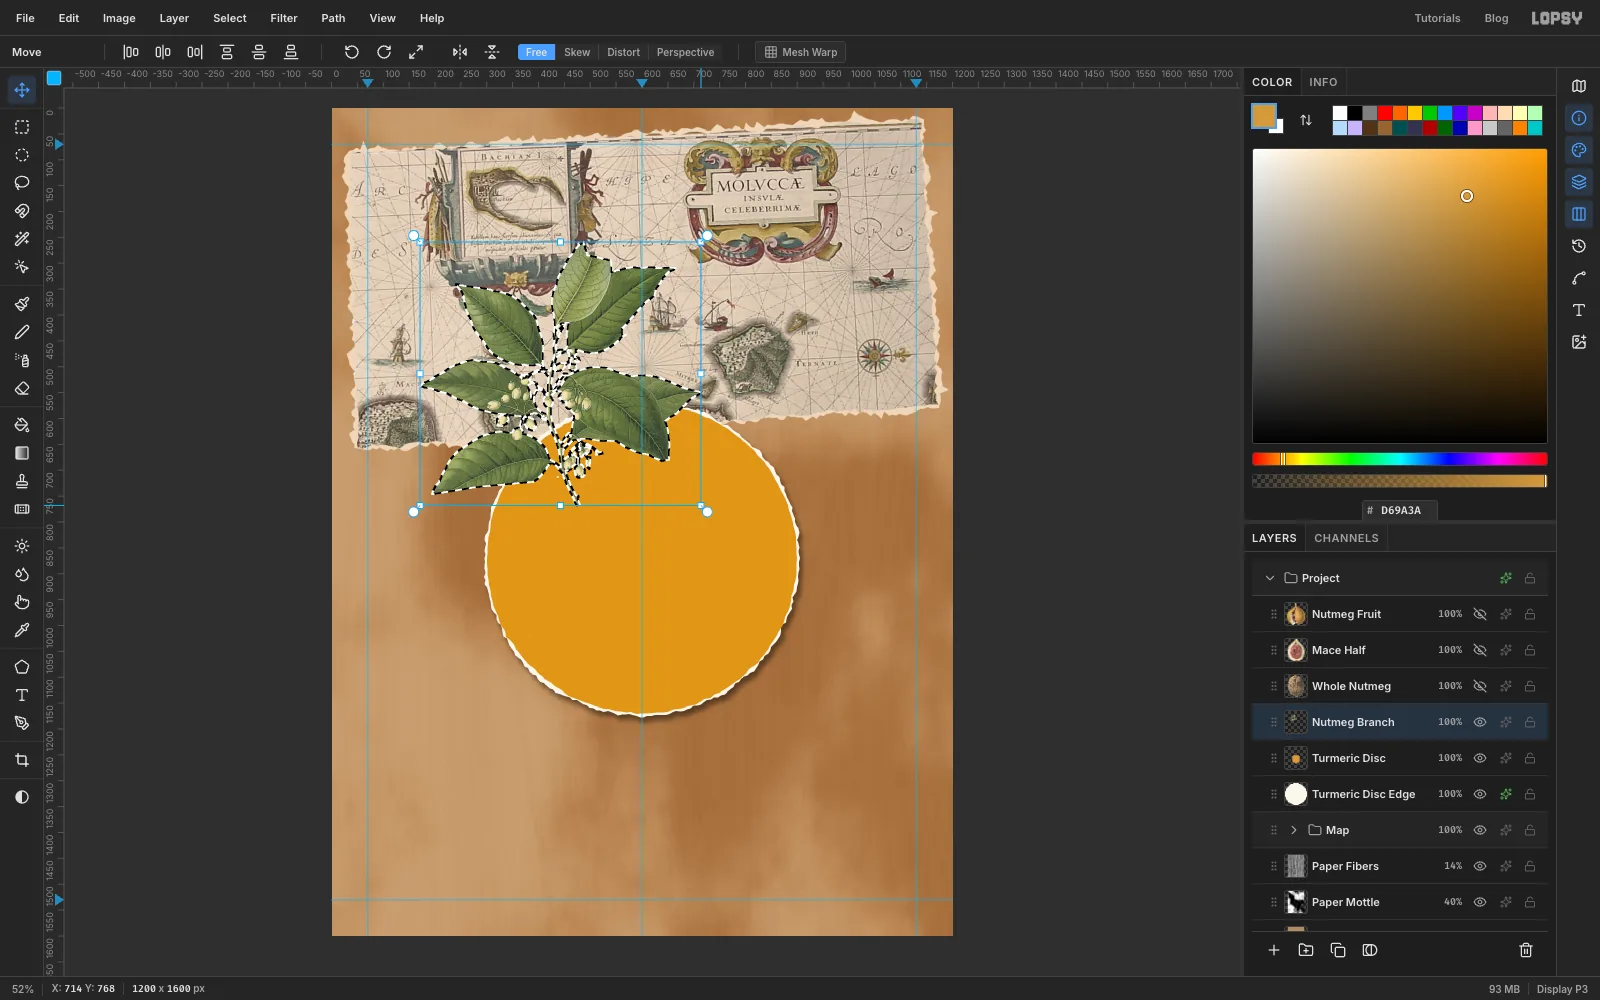
Nutmeg Branchthumbnail and pick the Move tool. - Hold Cmd and drag the bottom-right handle in towards the top-left until the branch is about 62% of its size (roughly 550 px across). Press Esc.
- Drag the branch so it's centred on about
400, 850, over the left half of the disc. Its top leaves tuck up towards the map. - Deselect, open the effects drawer and add a Drop Shadow: Offset X
5, Offset Y8, Blur10, Opacity40.
- Cmd-click the
-
Cut out the ginger plant
- Click
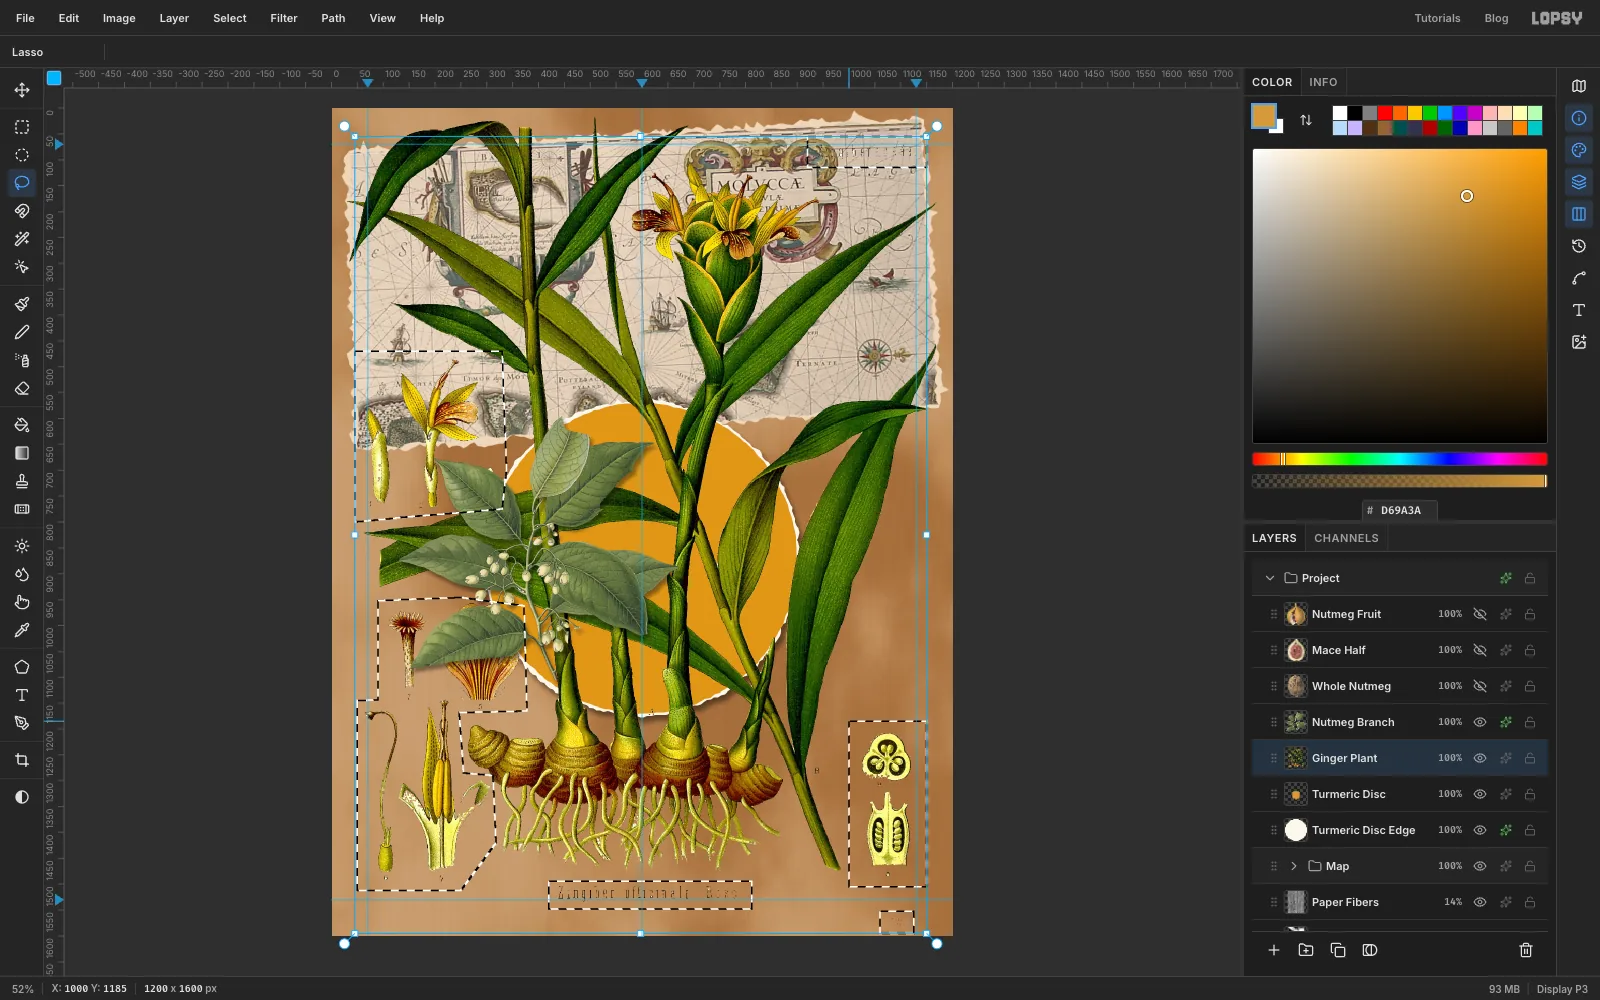
Turmeric Disc(so the ginger goes behind the branch) and drop in the ginger plate. Rename itGinger Plant. - Wand out the white exactly as before: Tolerance
24, Contiguous off, click the white, Grow1, Delete, Cmd+D. - This plate's diagrams are scattered around the plant, so loop each one instead of tracing the plant. With the Lasso, draw a loose loop around the three flower diagrams at the left. Then hold Shift and loop each of the other groups: the petal and stamen diagrams lower down on the left, the two seed sections at the bottom right, the caption under the roots, the page number and the plate title at the top right. Shift adds each loop to the selection.
- Press Delete and Cmd+D.
- Click
-
Scale and turn the ginger
- Cmd-click the
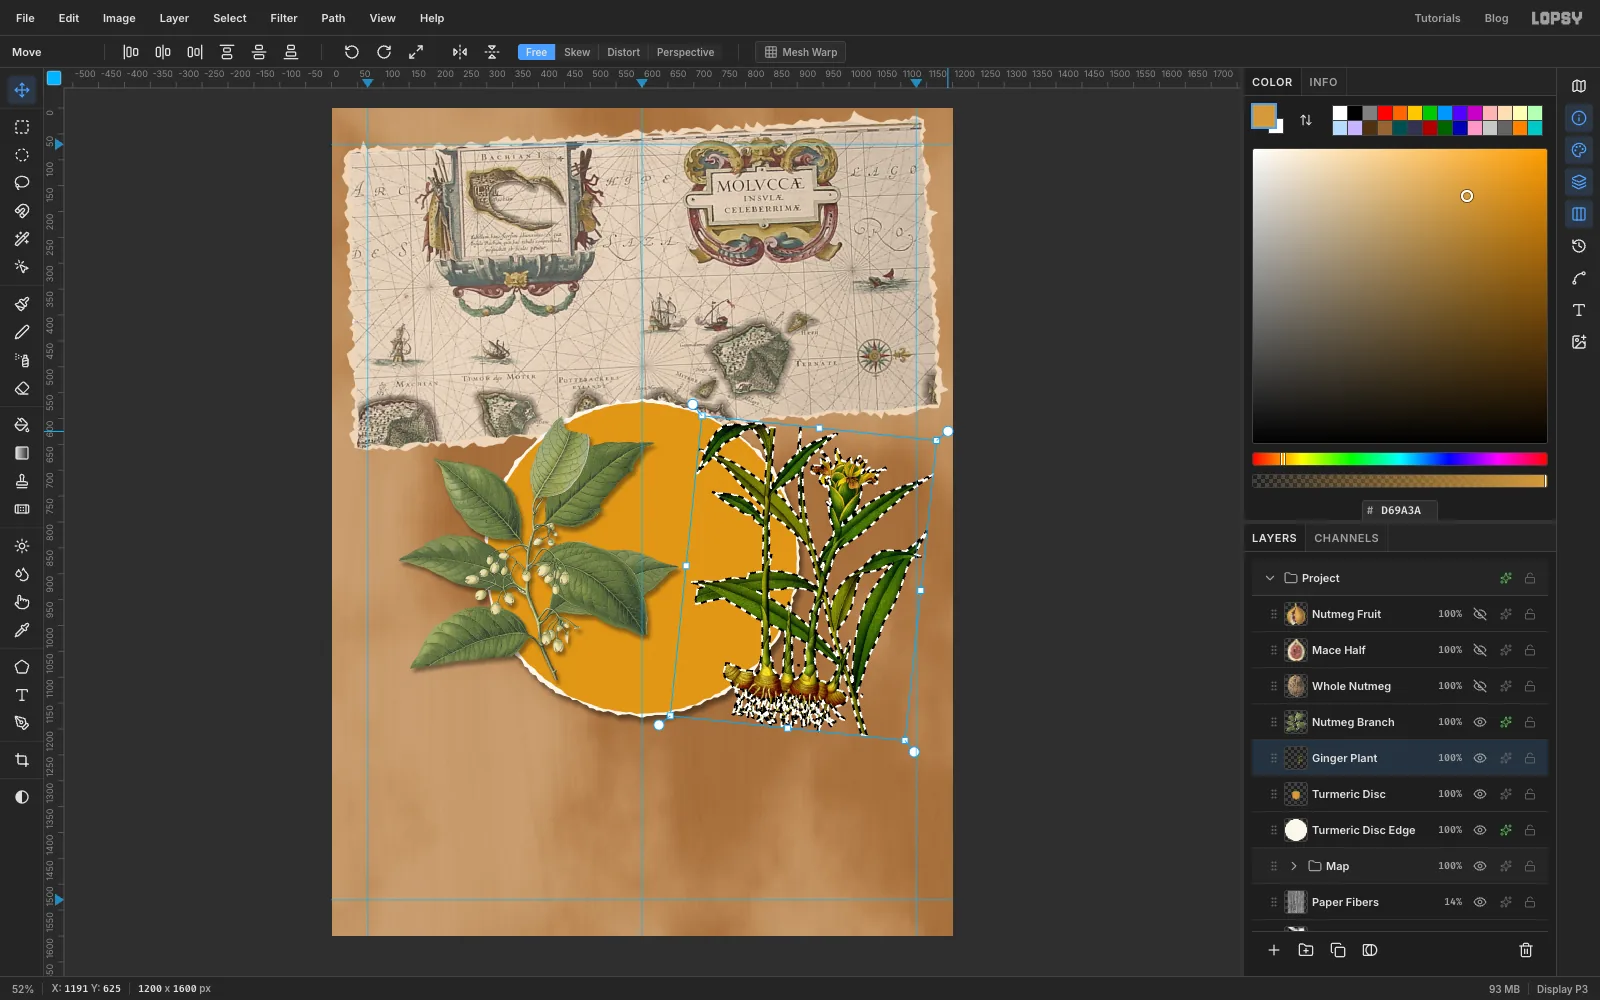
Ginger Plantthumbnail. With the Move tool, Cmd-drag the bottom-right handle until the plant is about 40% of its size, then press Esc. - Drag it so it stands to the right of the nutmeg branch, centred on about
910, 900. The two plants should only just meet, not tangle. - Cmd-click the thumbnail again and drag the top-right rotation handle down a little to lean the plant about
6°clockwise. Press Esc. - Add a Drop Shadow like the branch's, with Opacity
35.
- Cmd-click the
-
Trim the root hairs
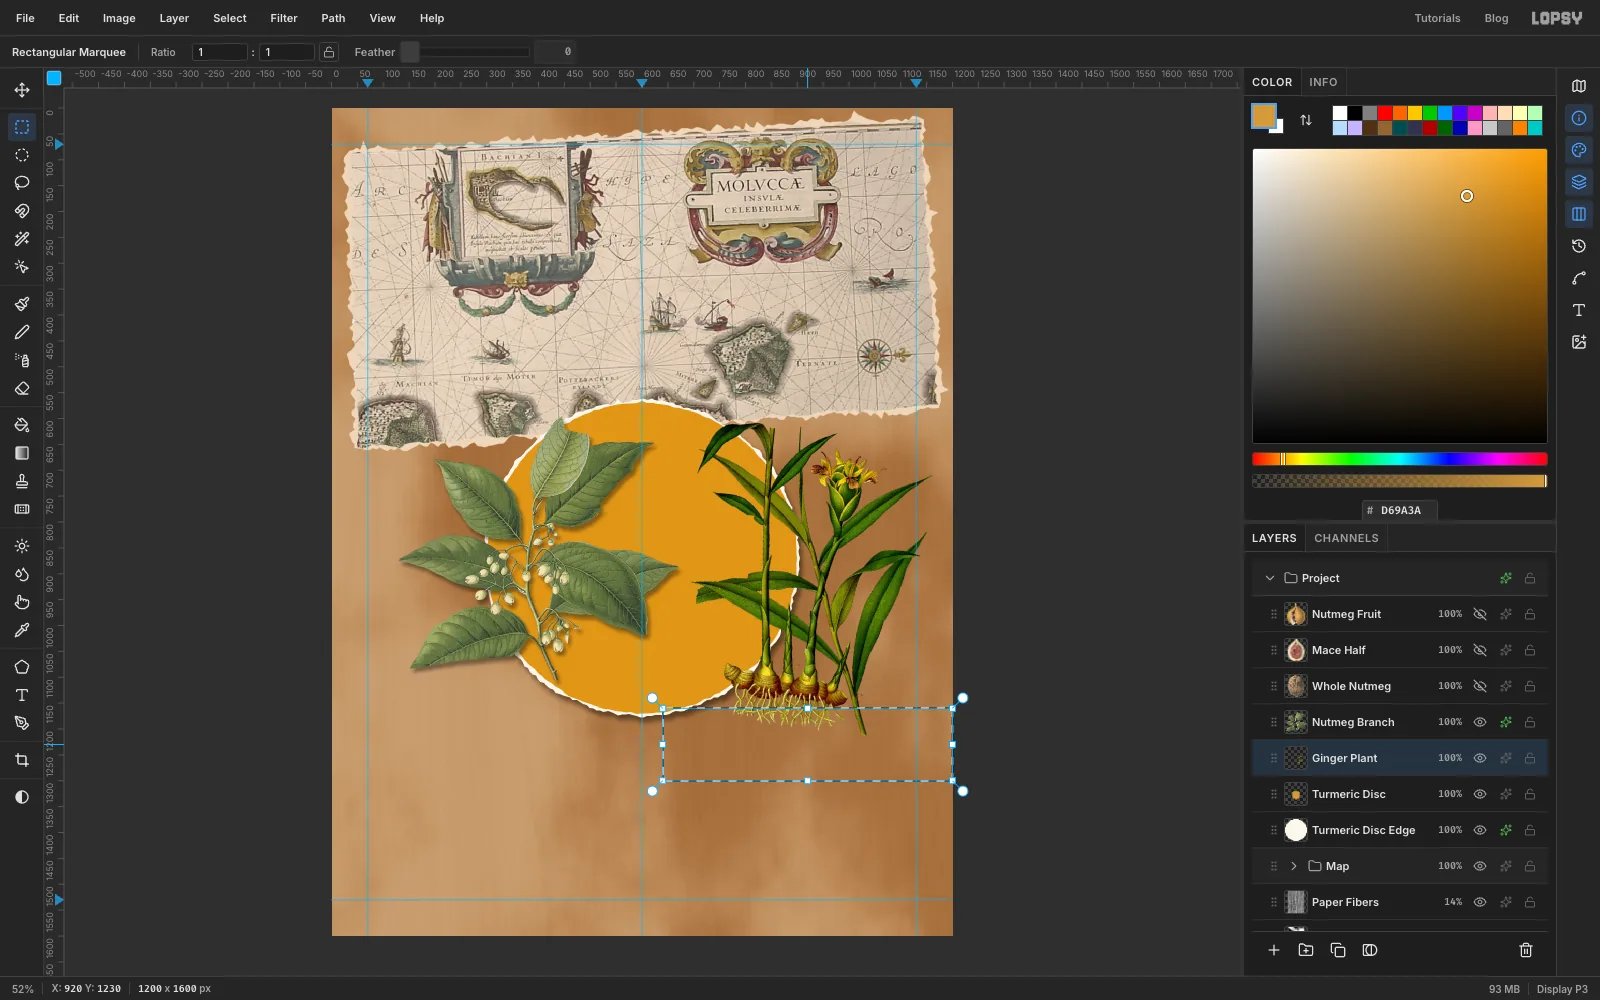
The ginger's long root hairs would run straight into the fruit studies you'll put below. They'll be hidden under the offer note later, so a straight cut is fine.
- Drag a Rectangular Marquee from about
640, 1160to past the right edge of the page at1200, 1300, just under the knobbly rhizome. - Press Delete and Cmd+D.
- Drag a Rectangular Marquee from about
-
Tear the NUTMEG strip
The title goes on two strips of torn paper, each built in its own group so you can tilt it as one piece.
- Click the top row in the Layers panel (
Nutmeg Fruit). Click New Group and name itNutmeg Label. - Add Layer inside it, called
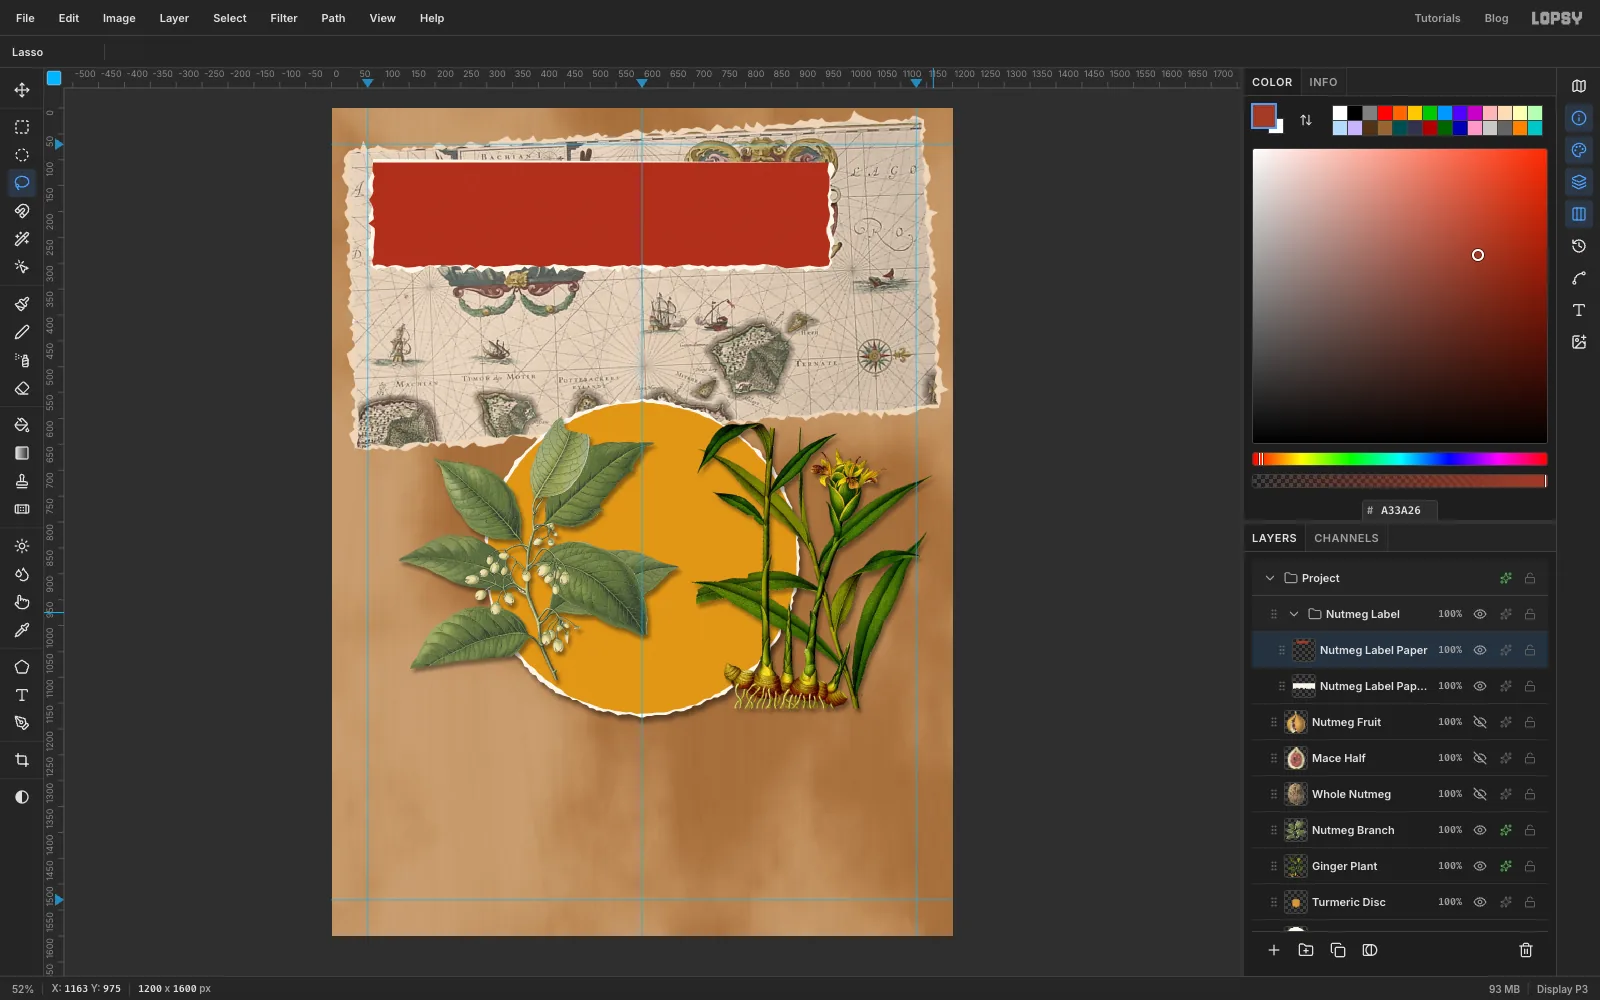
Nutmeg Label Paper Edge. Lasso a strip about 880 × 200 px centred on520, 205: a straight top edge (it was cut with scissors) and ragged ends and bottom. Fill it with . - Add Layer called
Nutmeg Label Paper. Lasso the same strip about 6 px smaller on the torn sides, and fill it with . While it's selected, add noise: Amount14, Mono, Gaussian. Deselect.
- Click the top row in the Layers panel (
-
Set NUTMEG
- With
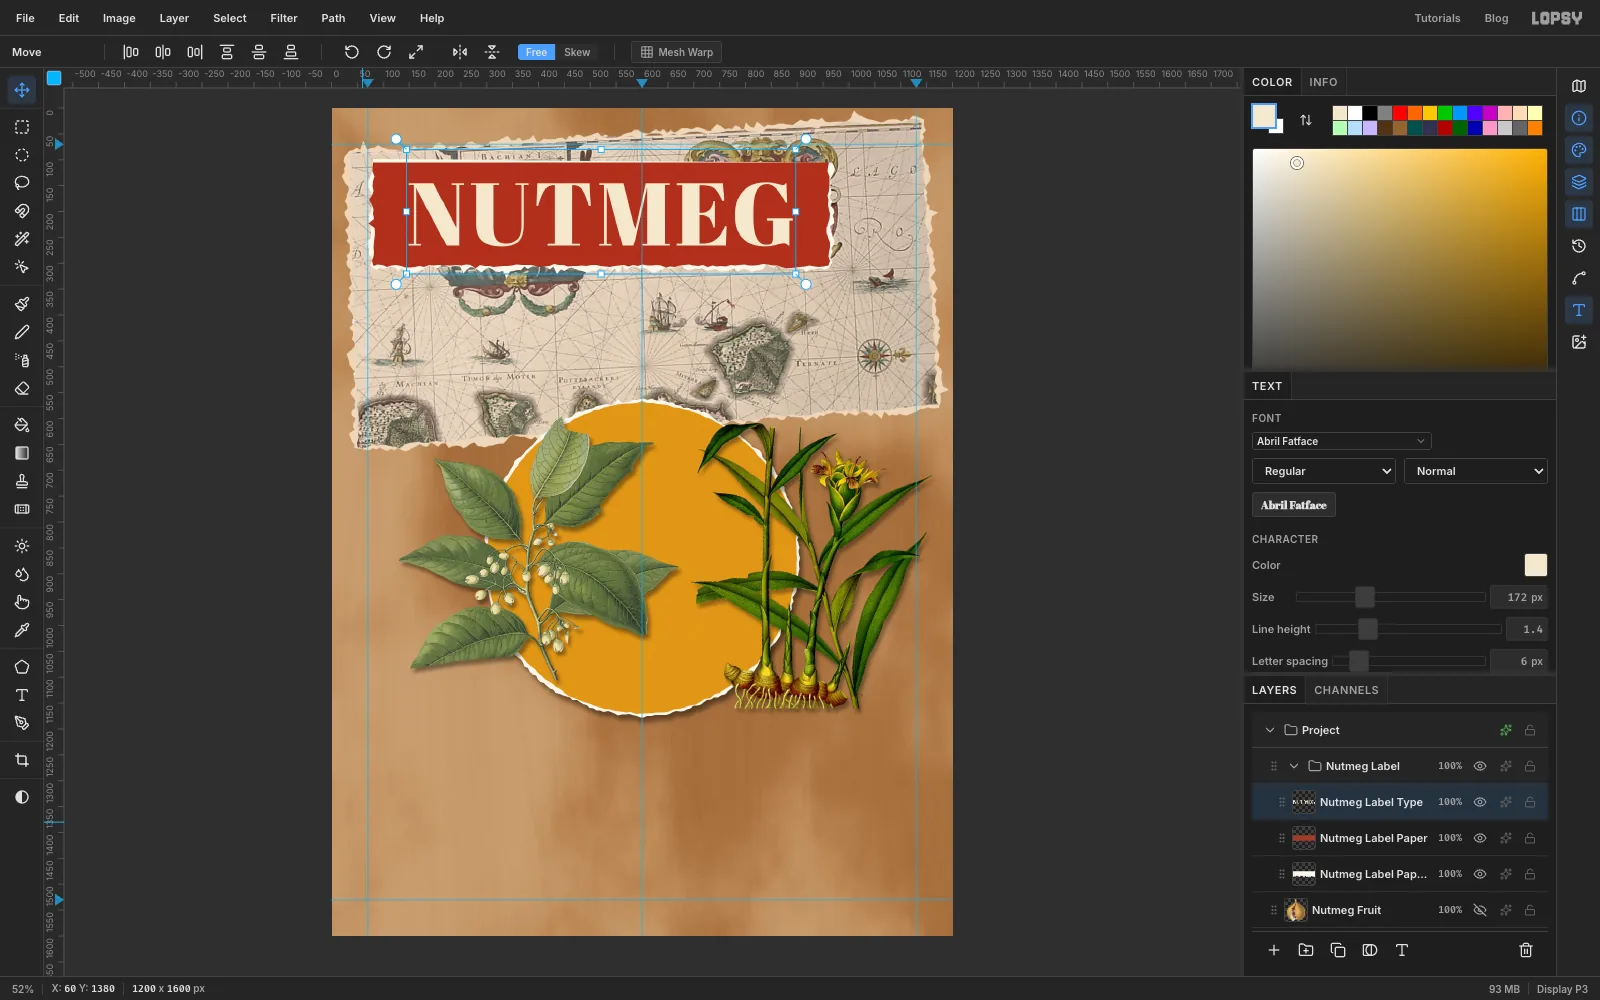
Nutmeg Label Paperselected, pick the Text tool. Set Abril Fatface, size172, colour . - Click in an empty patch near the bottom-left of the page and type
NUTMEG. Press Tab to finish. - In the Text panel, set Letter spacing to
6. - With the Move tool, drag the word onto the strip and centre it. Use the arrow keys for the last few pixels. Aim for equal space above and below the capitals (about 45 px).
- With
-
Tilt the label
- Click the
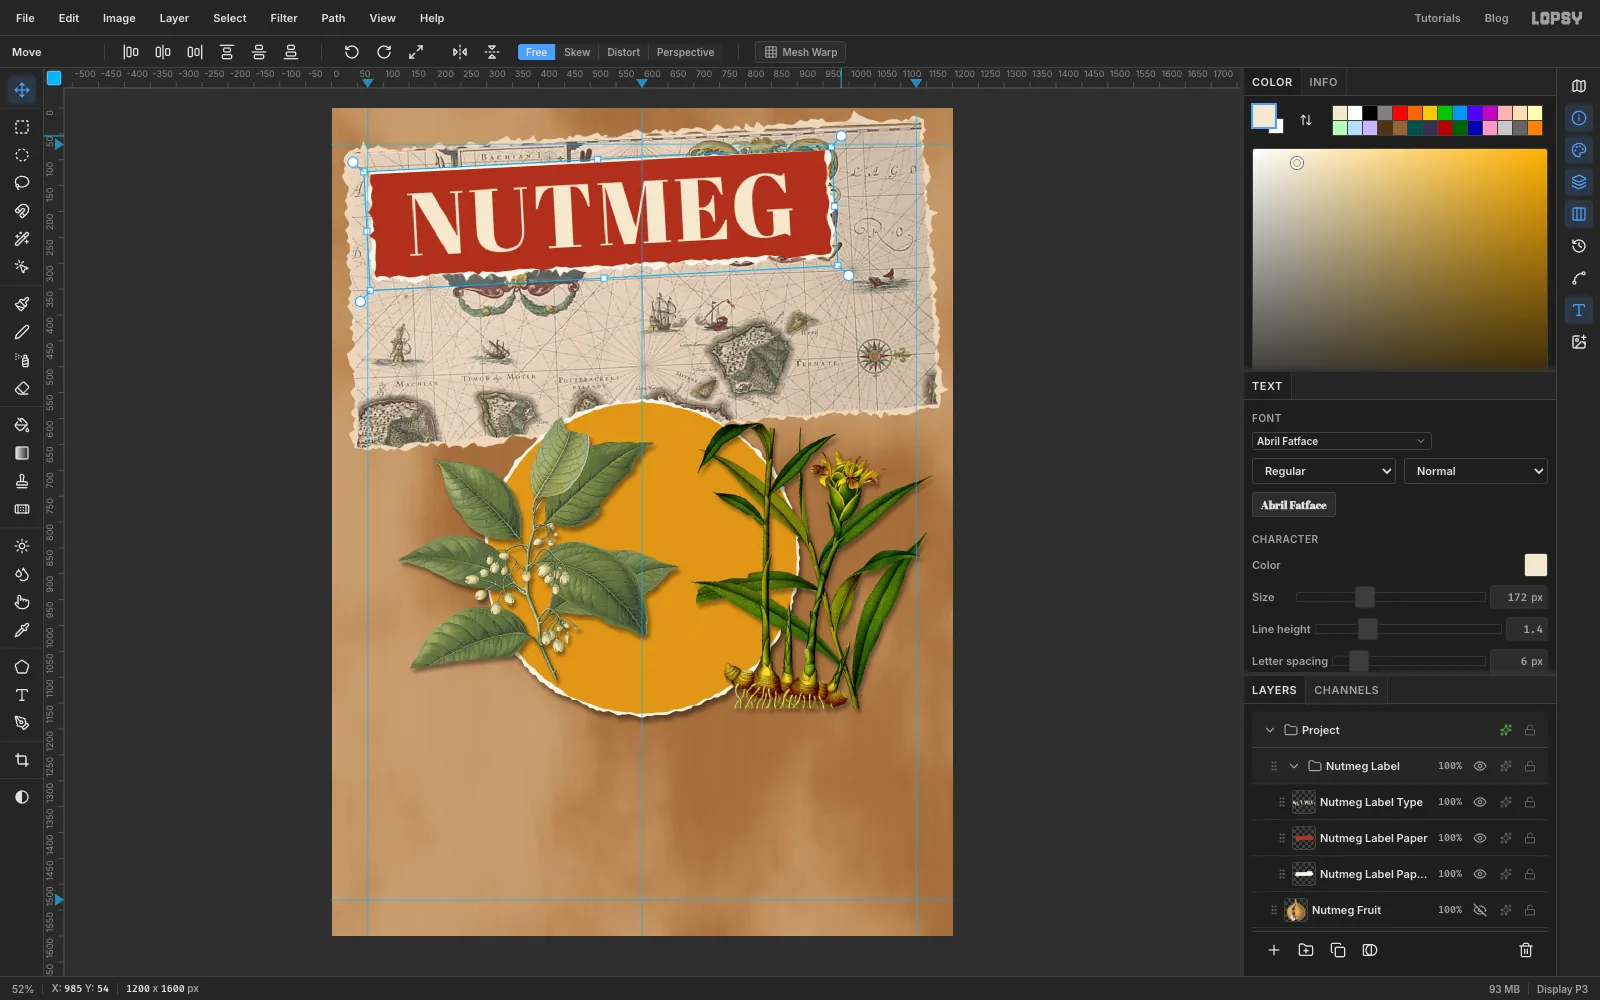
Nutmeg Labelgroup row. With the Move tool, drag the top-right rotation handle up a little to tilt the whole label about3°anticlockwise. The type rotates with its paper and stays editable. - Press Esc and collapse the group.
- Click the
-
Make the GINGER label
Repeat the last three steps for a second label, so the two names look as if they were cut from different printed papers:
- Click the collapsed
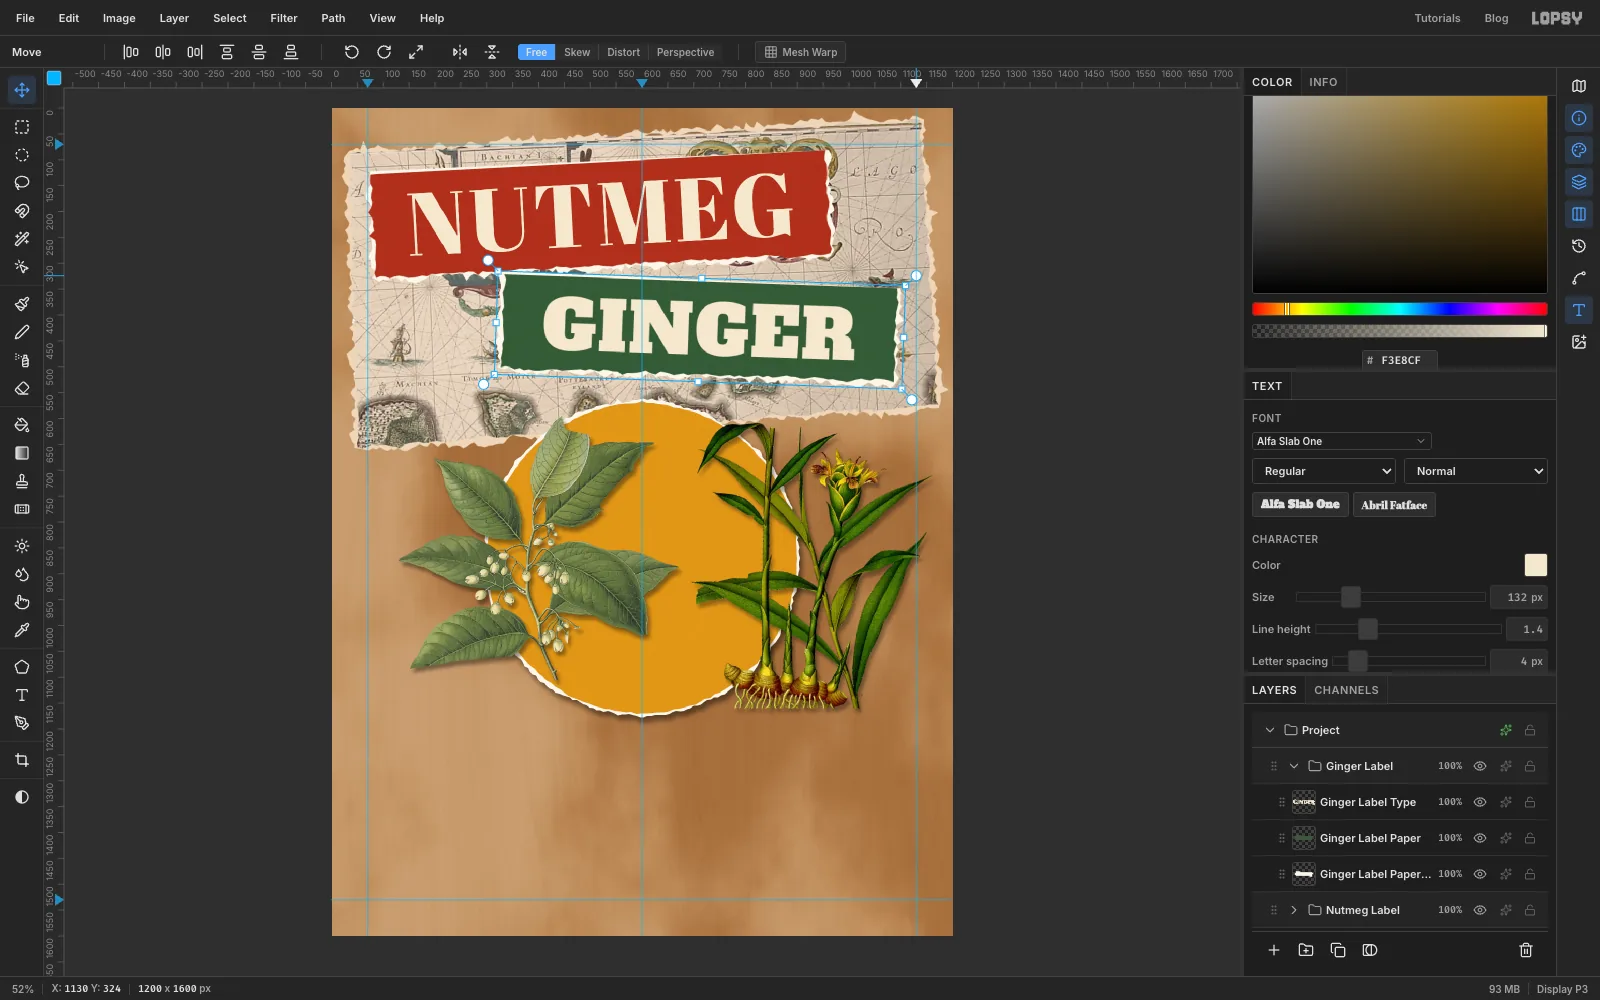
Nutmeg Labelrow and add a group calledGinger Label. - Build an edge layer and a paper layer as before: a strip about 760 × 180 px centred on
710, 425, filled with , with noise14. - Type
GINGERin Alfa Slab One, size132, colour , letter spacing4, and centre it on the strip. - Tilt the group about
2°clockwise and collapse it.
- Click the collapsed
-
Add the ampersand
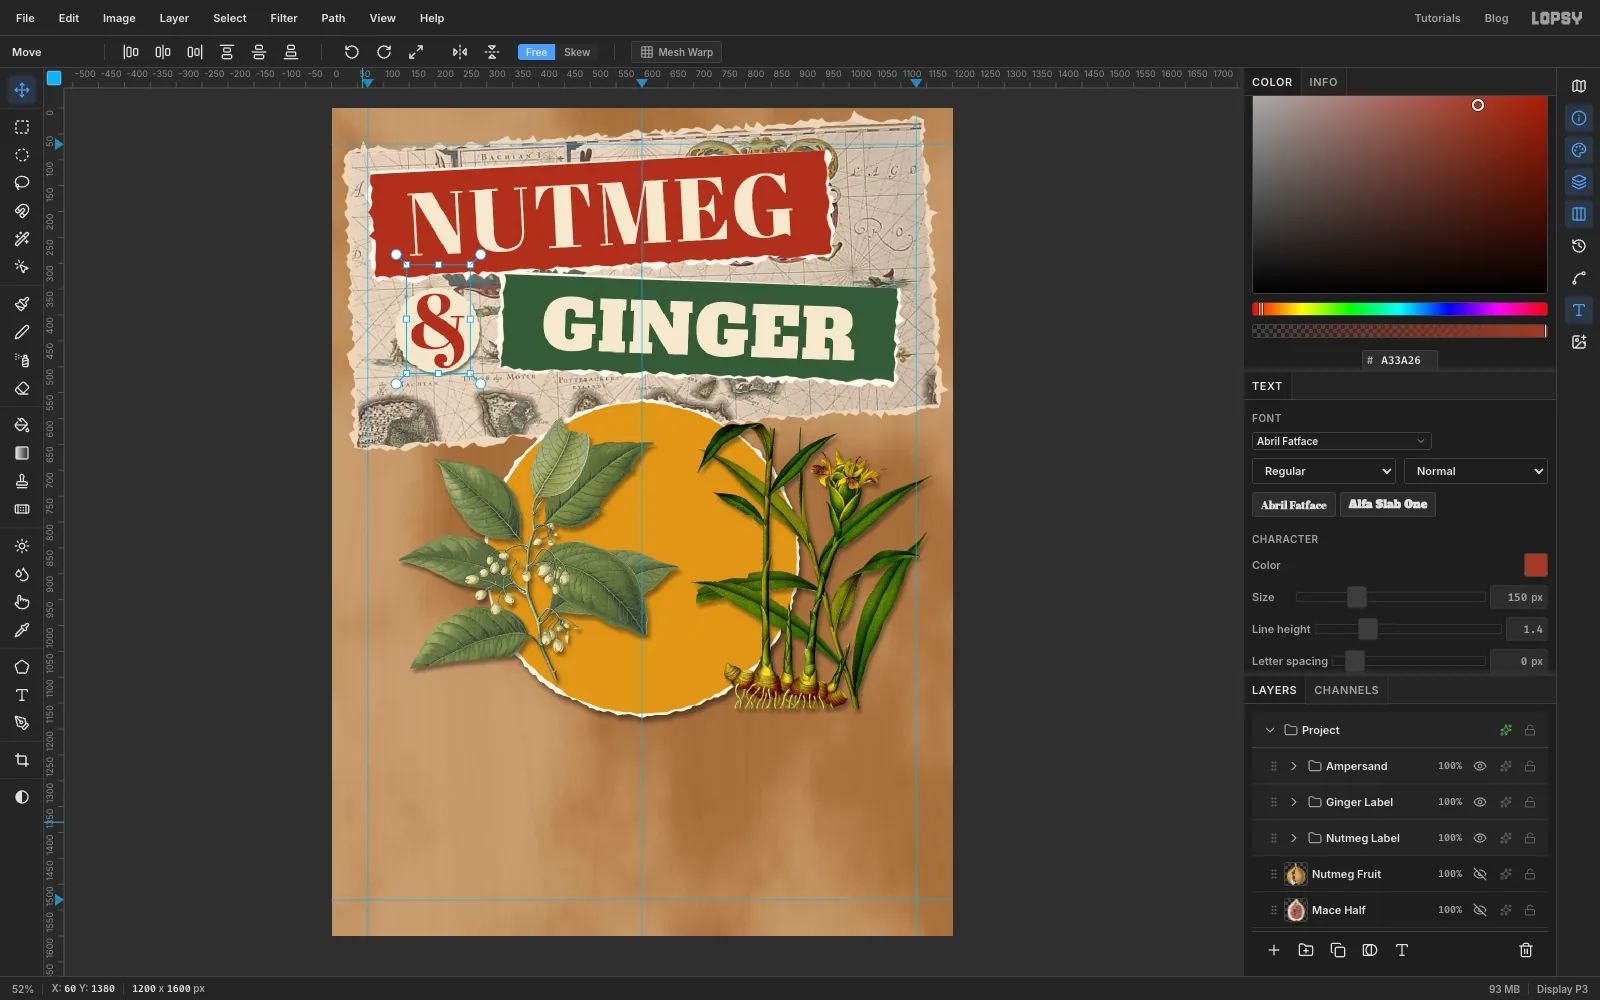
- Click the collapsed
Ginger Labeland add a group calledAmpersand. Inside it, add a layer calledAmpersand Paper. - Lasso a slightly rough circle about 164 px across, centred on
205, 430, in the gap left of the GINGER strip. Fill it with , deselect, and add a Drop Shadow: Offset X3, Offset Y5, Blur6, Opacity45. - Type
&in Abril Fatface, size150, colour , letter spacing0. Centre it on the disc, then collapse the group.
Abril's ampersand is bold enough to read at a distance. A thin script ampersand at this size reads as a squiggle.
- Click the collapsed
-
Punch a Dymo label
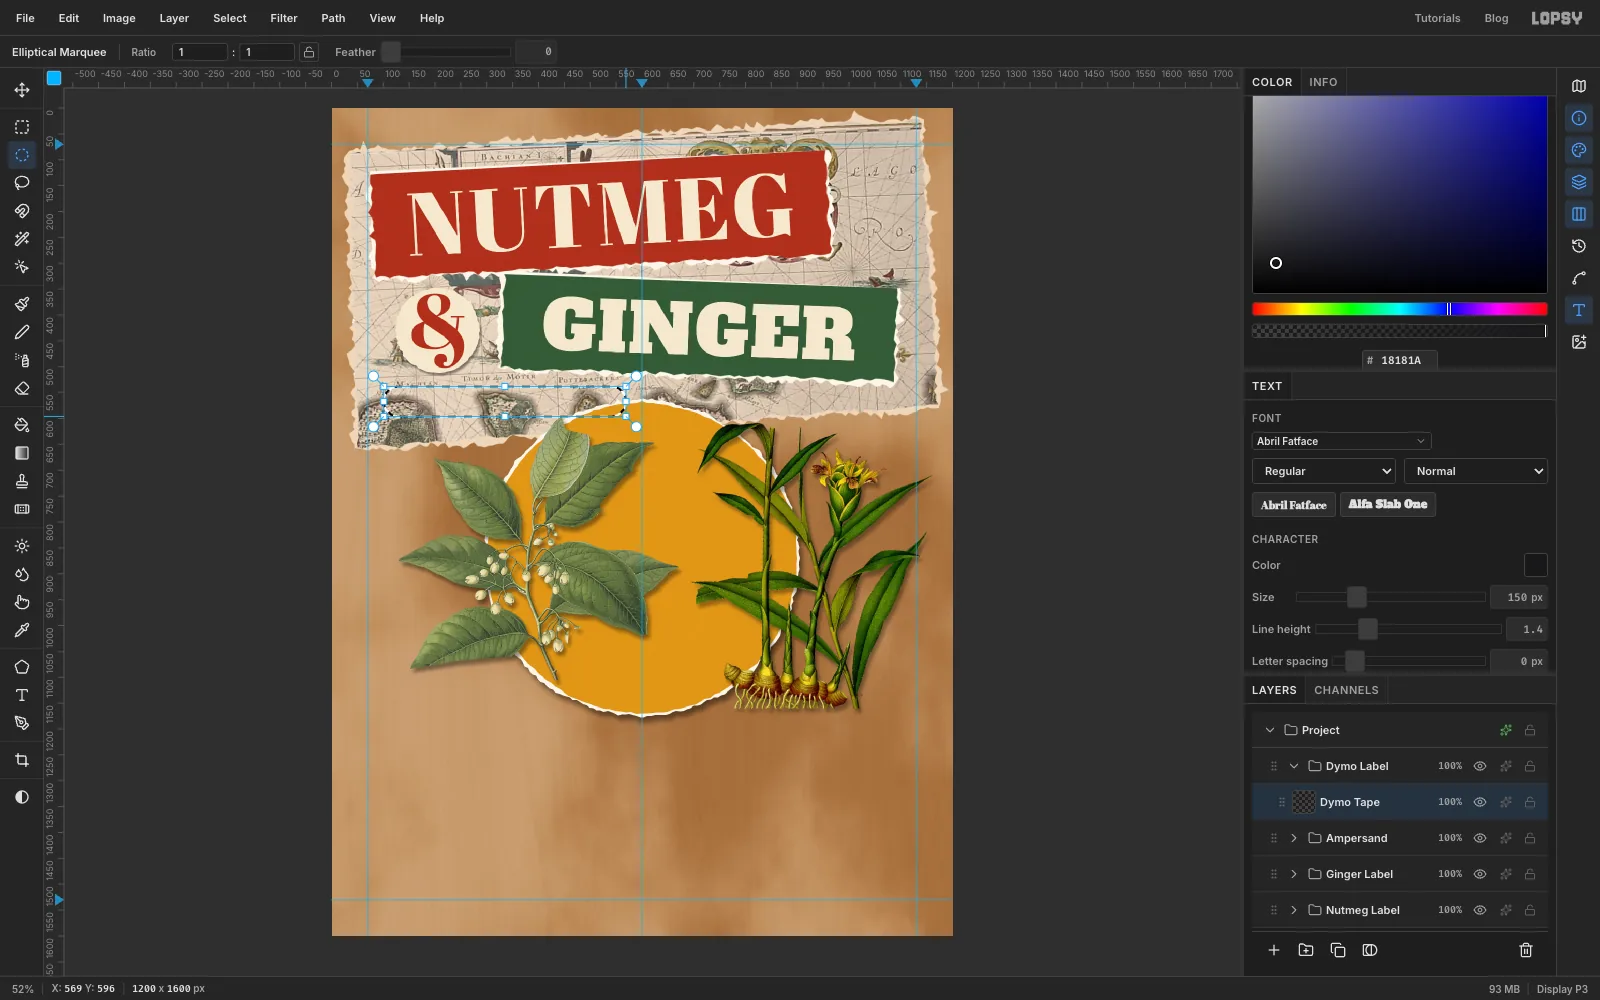
- Click
Ampersand, add a group calledDymo Label, and inside it a layer calledDymo Tape. - Drag a Rectangular Marquee about 410 × 58 px under the left half of the title, from about
130, 538. - Switch to the Elliptical Marquee. Hold Shift and drag a circle 58 px across over the left end of the rectangle, centred on its end. Do the same at the right end. You get a rounded strip, like label tape.
- Fill it with , add noise Amount
3(Mono, Gaussian), and deselect. Add a Drop Shadow: Offset X2, Offset Y4, Blur4, Opacity50.
- Click
-
Give the tape a sheen
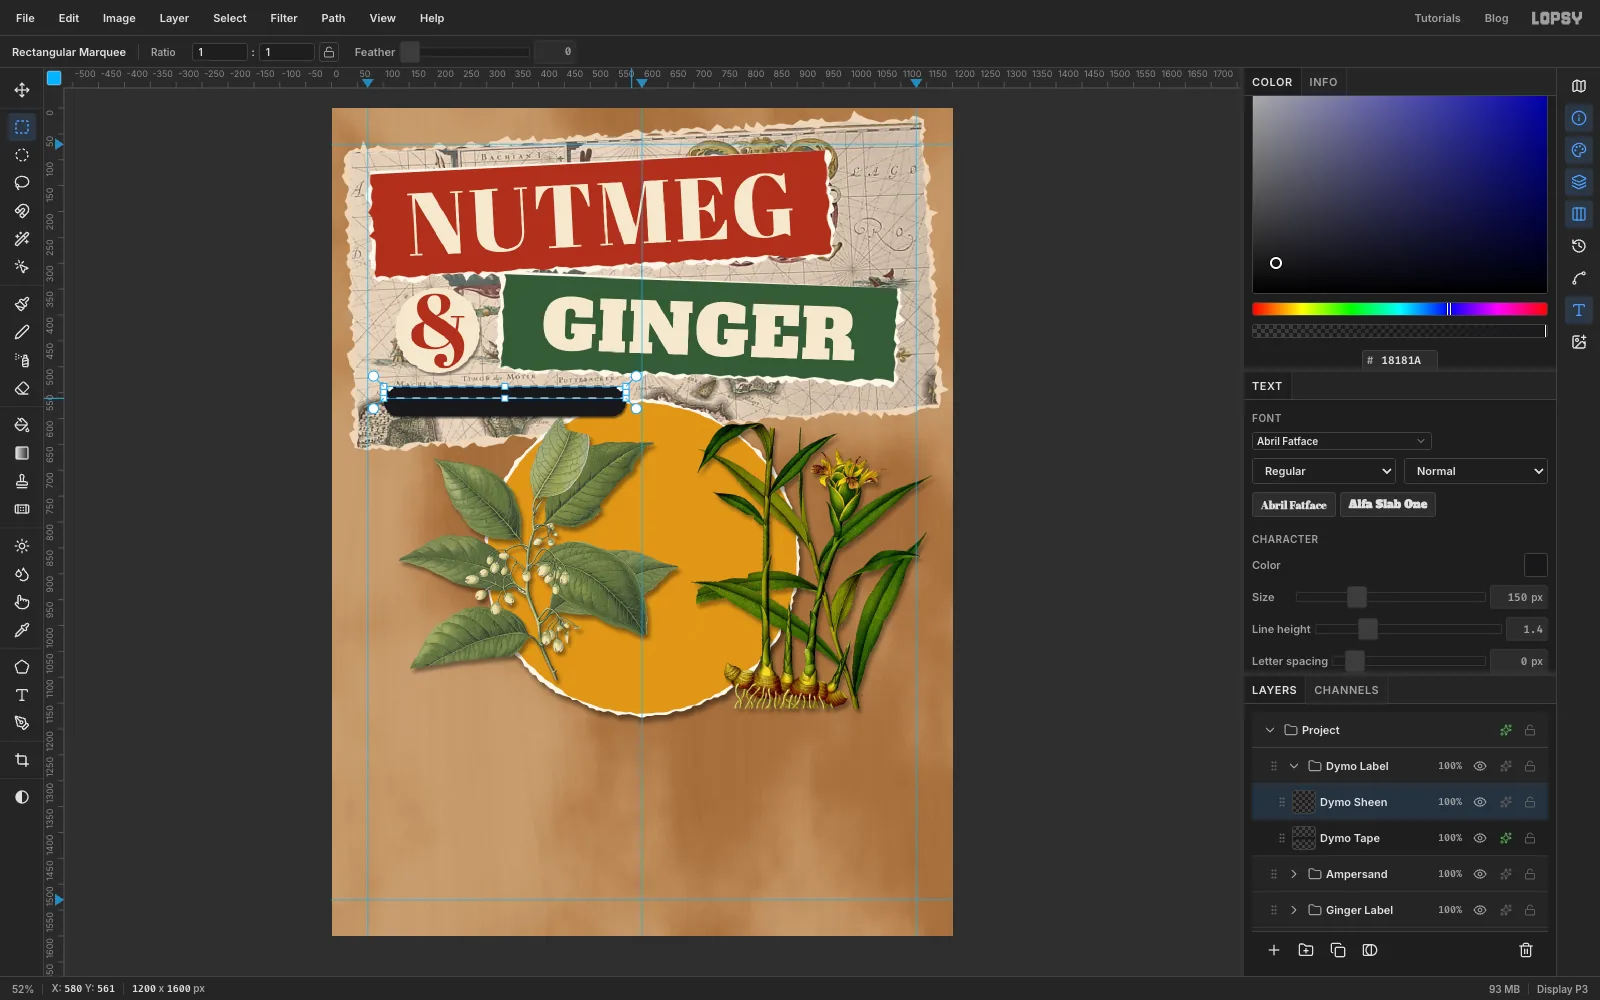
- Add Layer called
Dymo Sheen. Cmd-click theDymo Tapethumbnail. - With the Rectangular Marquee, hold Shift and Alt together and drag a rectangle over the top half of the tape, a little wider than it. Shift+Alt keeps only the overlap, so you're left with the tape's top half.
- Fill it with white, deselect, and set the layer to
18%. That's the glossy plastic catching the light.
- Add Layer called
-
Raise the letters
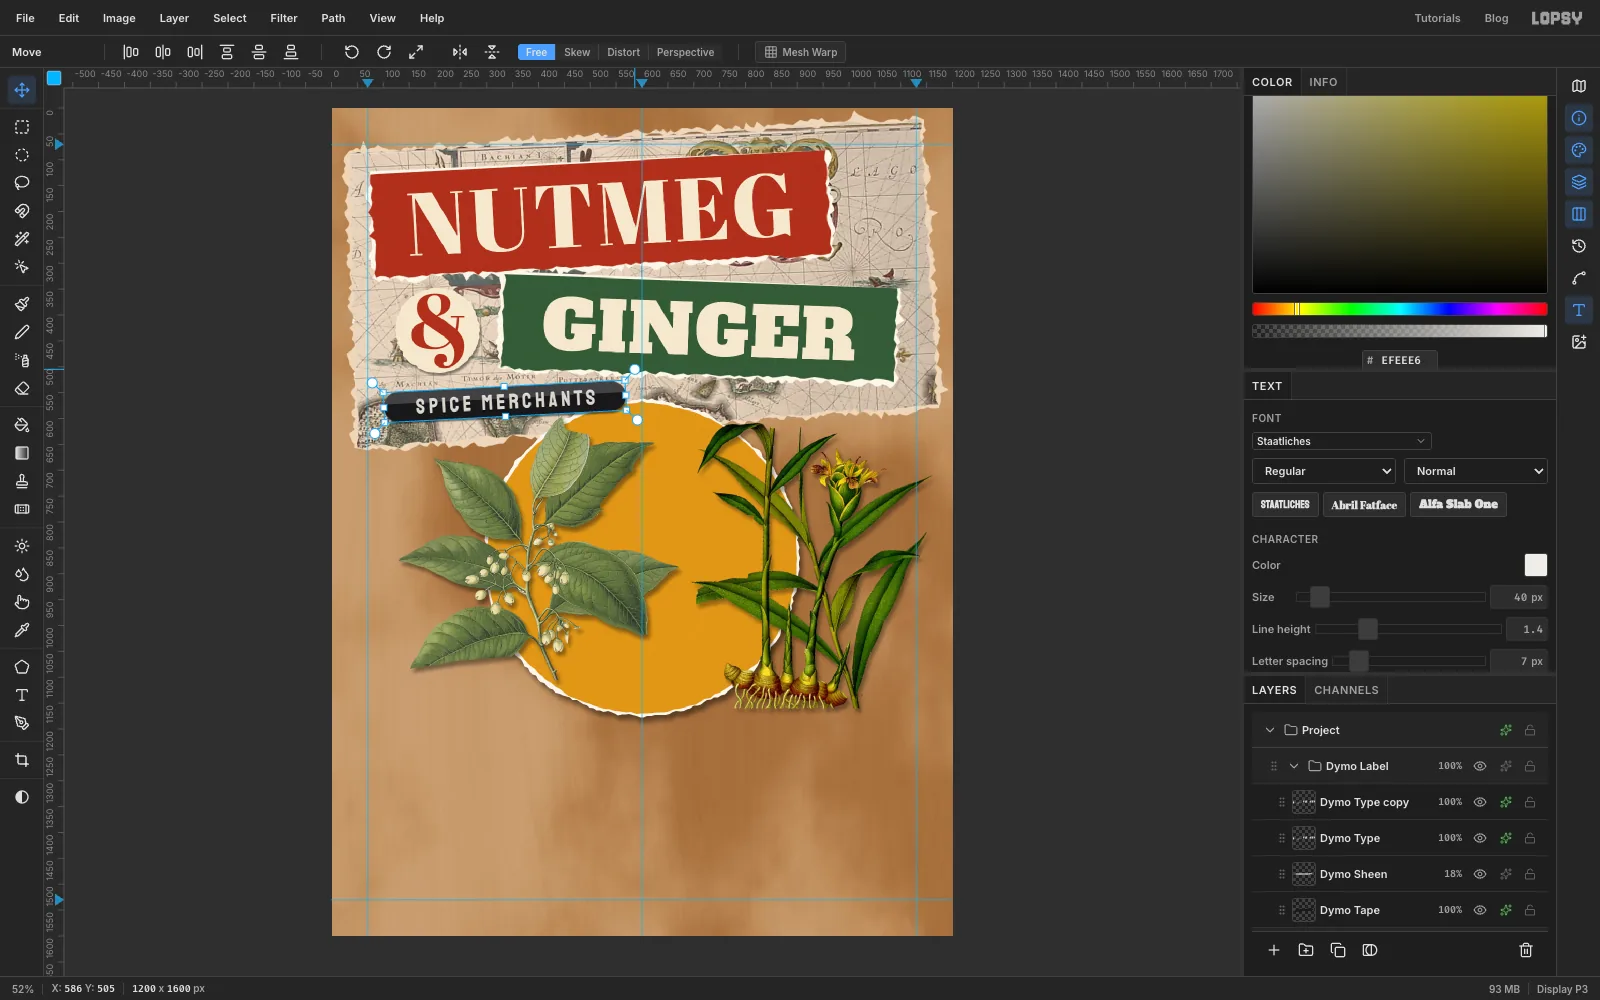
- Click
Dymo Sheen. TypeSPICE MERCHANTSin Staatliches, size40, colour , letter spacing7, and centre it on the tape. Name the layerDymo Type. - Add a Drop Shadow with Offset X
0, Offset Y2, Blur1, Opacity70. That's the dark lower edge of each pressed letter. - Choose Layer → Duplicate Layer. On the copy, turn on Color Overlay in .
- Click the original
Dymo Typeunderneath, turn on Color Overlay in white, pick the Move tool and press Up once. A 1 px white edge now shows along the top of every letter, like embossed tape. - Click the
Dymo Labelgroup, tilt it about3°anticlockwise, and collapse it.
- Click
-
Drop in the spice photo
- Click
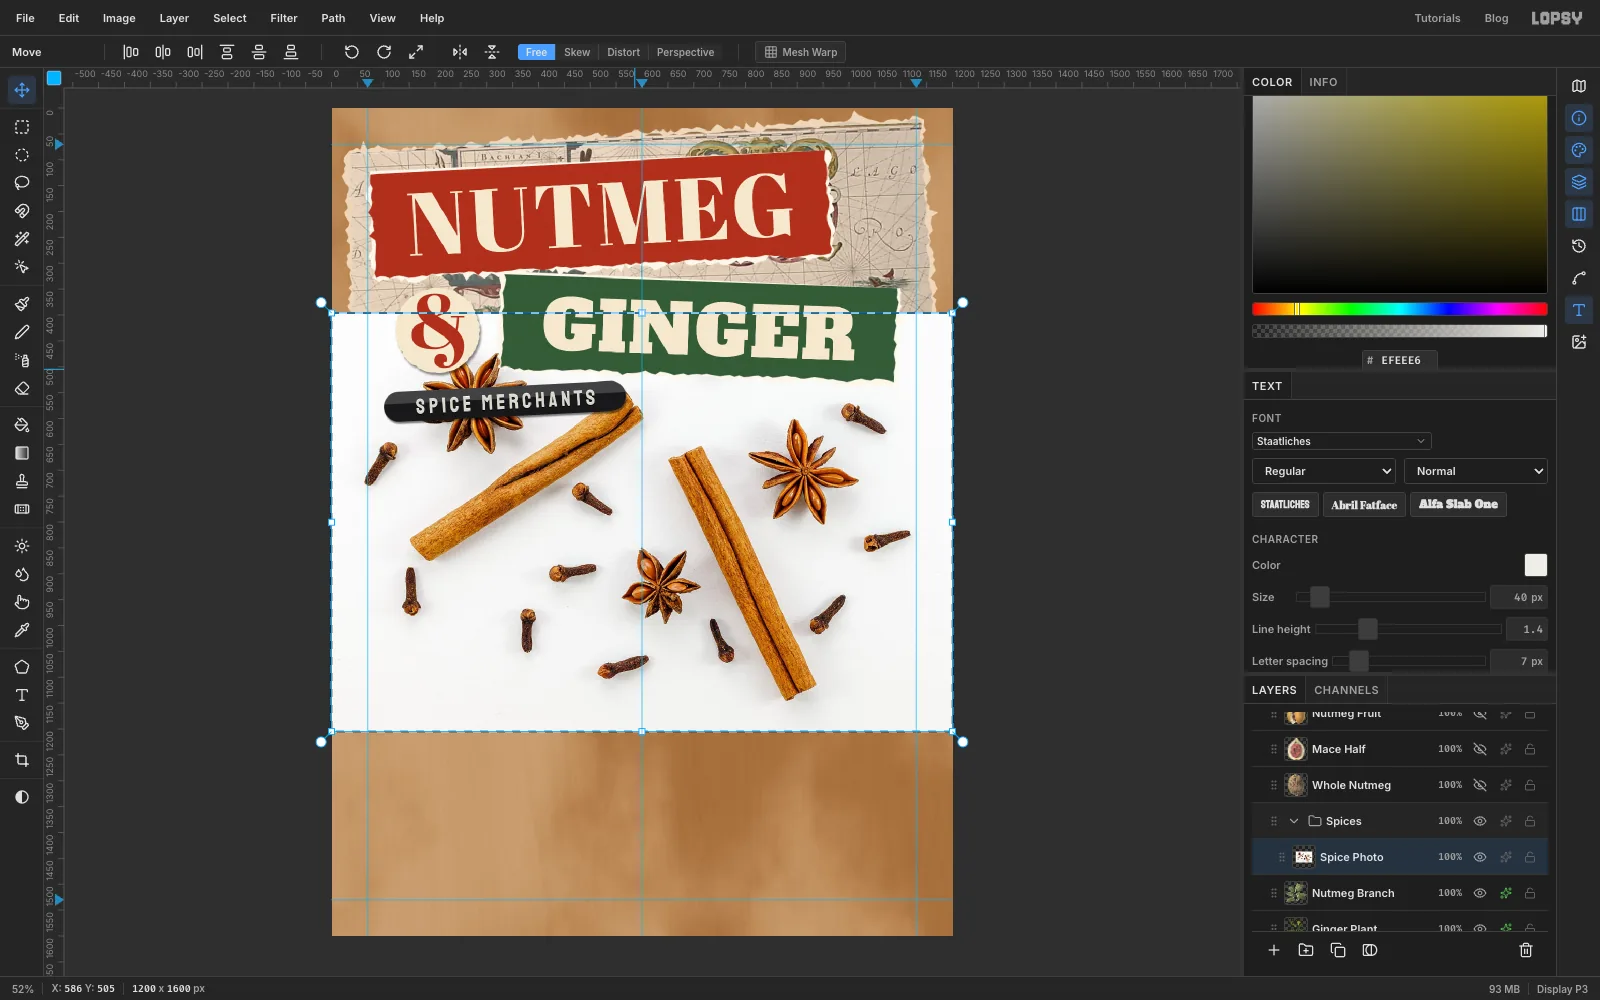
Nutmeg Branchand add a group calledSpices. It sits above the botanicals but under the three fruit studies. - Drop the spice photo onto the canvas. Rename it
Spice Photo.
- Click
-
Wand out the backdrop
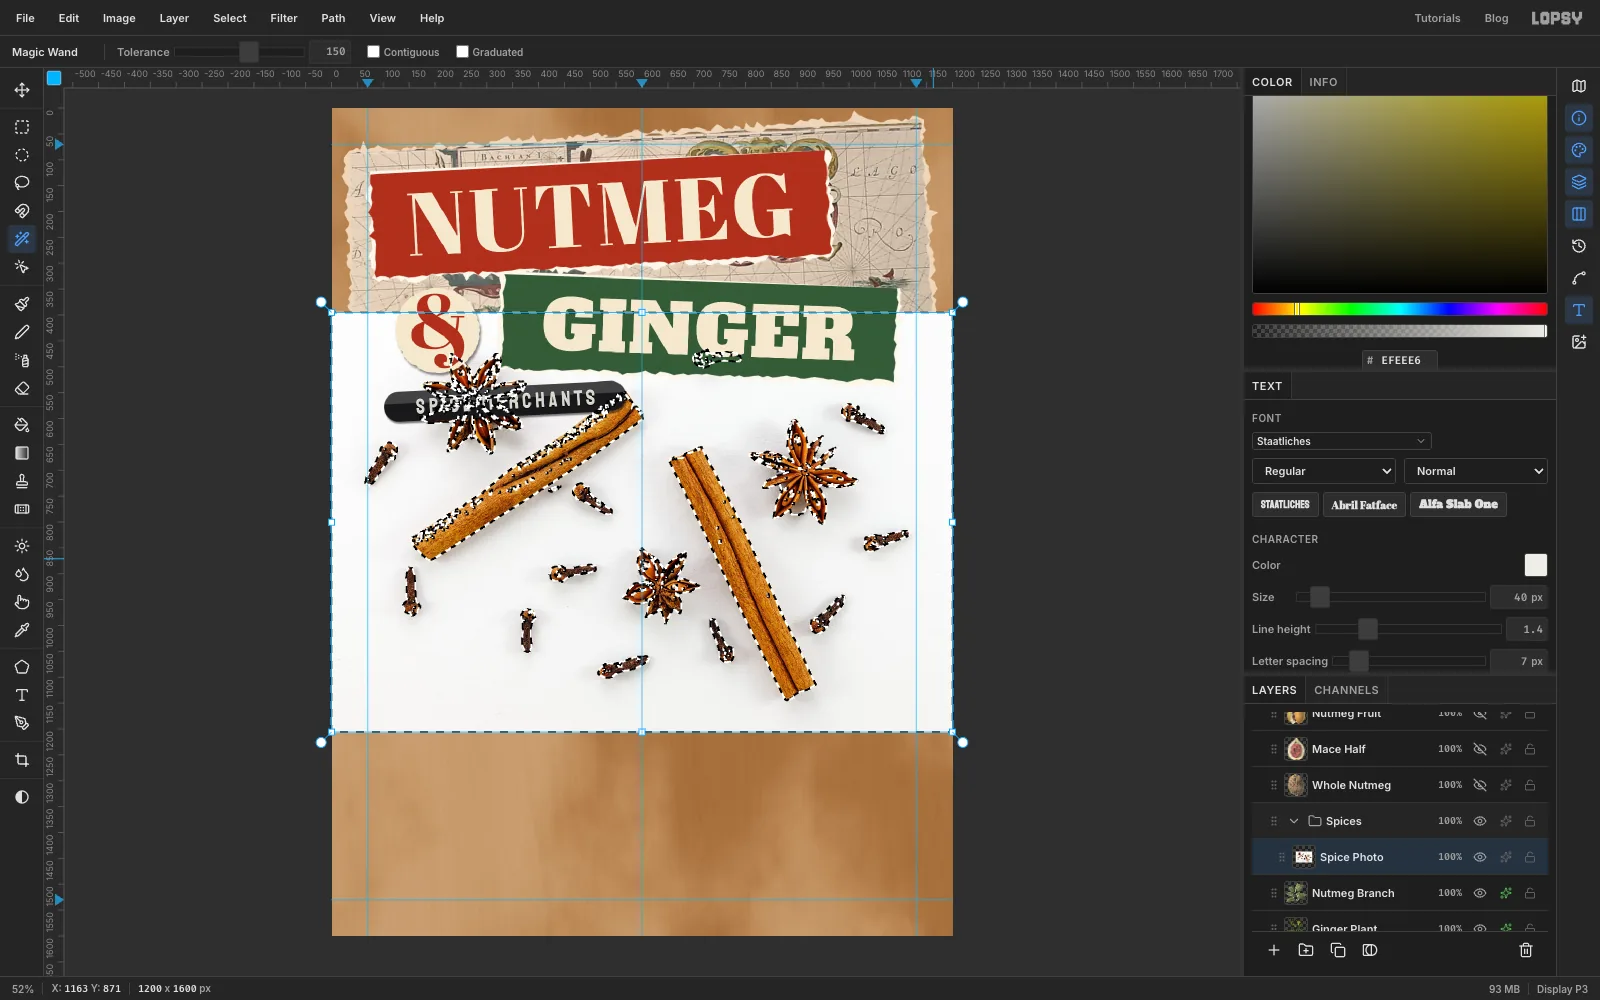
This photo has soft grey shadows on its white backdrop, so it needs a much wider tolerance than the plates.
- Pick the Magic Wand, set Tolerance to
150with Contiguous off, and click the white near the top-left of the photo. - Grow by
1, press Delete and Cmd+D.
- Pick the Magic Wand, set Tolerance to
-
Trim the shadow fringe
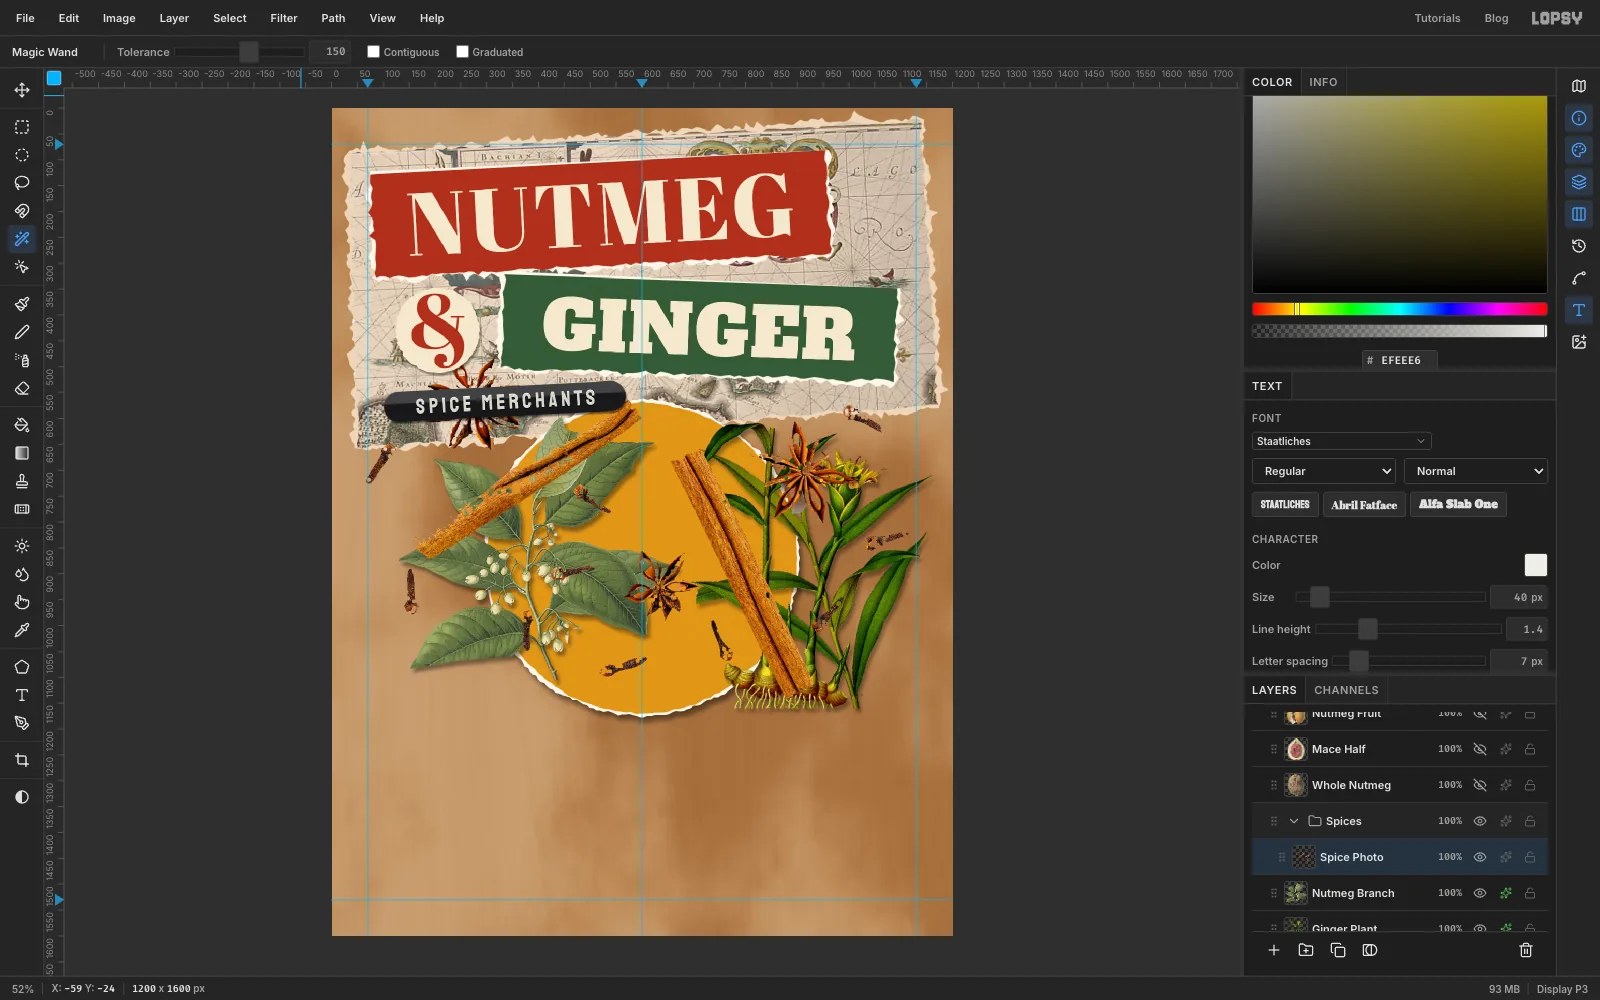
A little grey contact shadow still clings to the bottom of each piece.
- Cmd-click the
Spice Photothumbnail. - Choose Select → Shrink…, enter
2and click Apply. - Choose Select → Inverse, press Delete, then Cmd+D. The outer 2 px of every piece goes, and the grey goes with it.
- Cmd-click the
-
Cut the spices apart
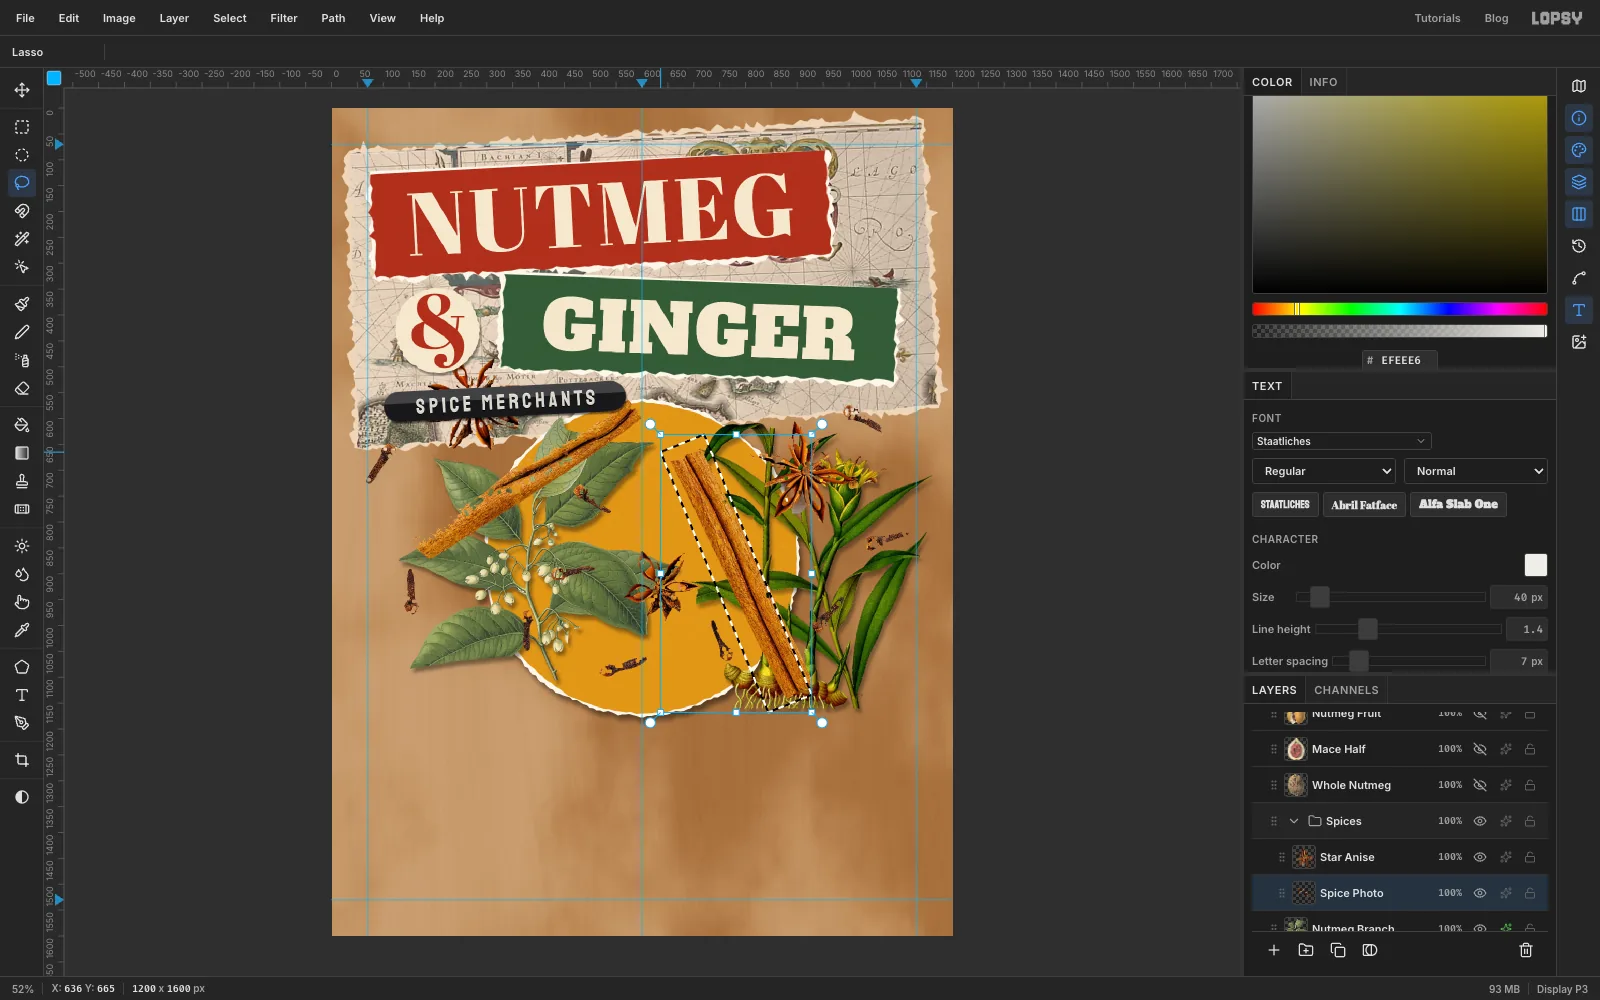
You only need two pieces from this photo.
- With the Lasso, draw a loose shape around the right-hand star anise, keeping the clove just above its top-right arm outside your line. Cut and paste it, and name it
Star Anise. - Click
Spice Photo. Lasso a narrow band along the right-hand cinnamon stick only, leaving out the small star anise next to it. Cut and paste it, and name itCinnamon Stick. - Click
Spice Photoand click the bin icon at the bottom of the Layers panel to delete the rest.
- With the Lasso, draw a loose shape around the right-hand star anise, keeping the clove just above its top-right arm outside your line. Cut and paste it, and name it
-
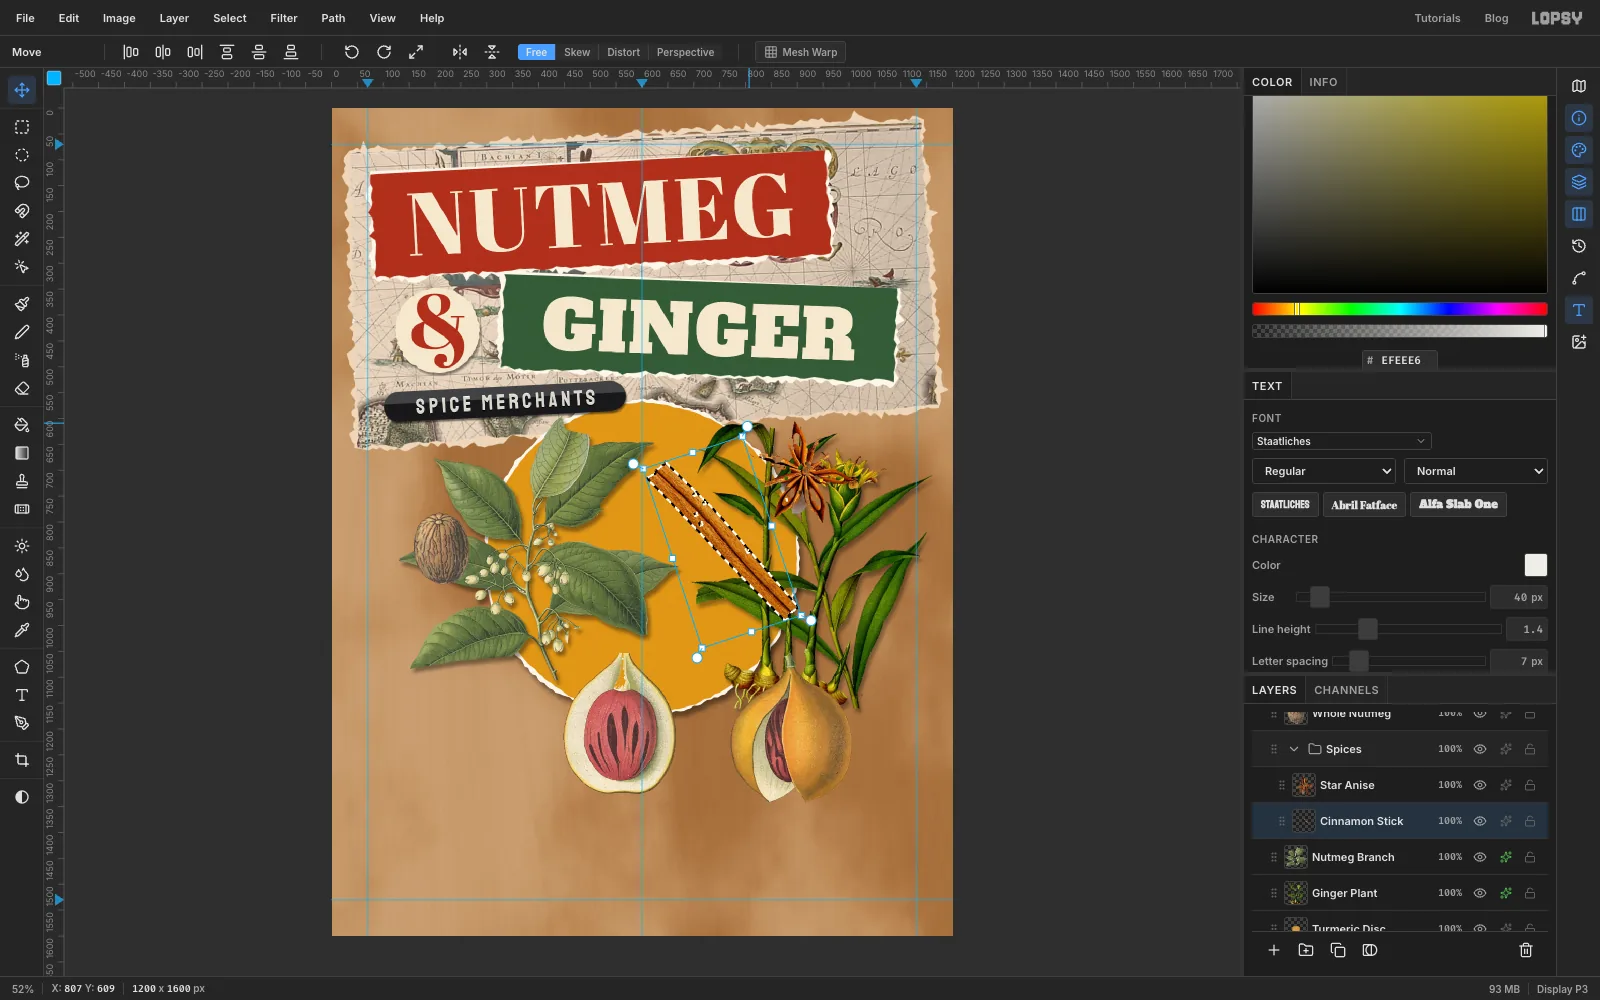
Place the cinnamon
- First click the eyes on
Nutmeg Fruit,Mace HalfandWhole Nutmegto show them again. You'll place them in the next step. - Cmd-click the
Cinnamon Stickthumbnail. With the Move tool, Cmd-drag the bottom-right handle to scale it to about 75%. - Drag the top-right rotation handle to turn it about
18°anticlockwise. Press Esc. - Drag it into the empty kraft on the left, centred on about
165, 985, so it runs from the left edge across the branch's lowest leaf.
- First click the eyes on
-
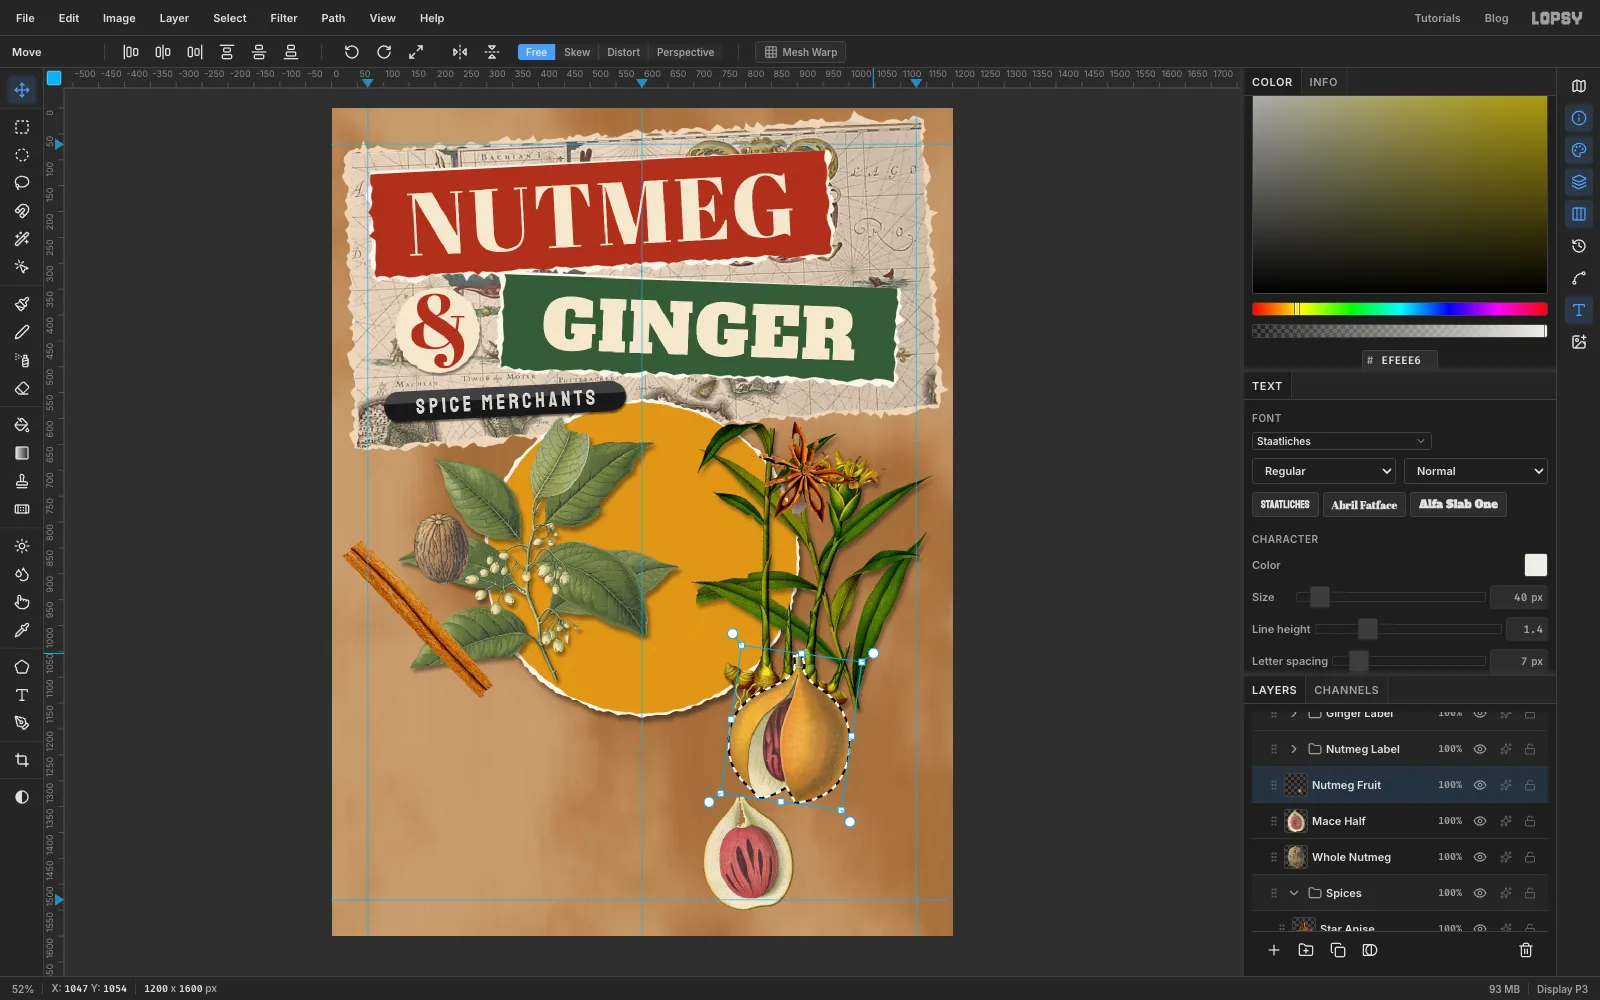
Bring back the fruit studies
Place each study the same way: Cmd-click its thumbnail, scale it with the corner handle, turn it with the rotation handle, press Esc, then drag it into position.
Mace Half: about 80%, turned about10°anticlockwise, low in the bottom-right quarter, just right of where the tag will go (aroundx 800).Nutmeg Fruit: full size, turned about8°clockwise, to its right, near the corner.Whole Nutmeg: about 70%, turned about25°clockwise, tucked into the gap above the other two.
Keep the three studies about 40 px clear of the ginger above. If they touch, the fruit looks as if it's growing out of the ginger root.
-
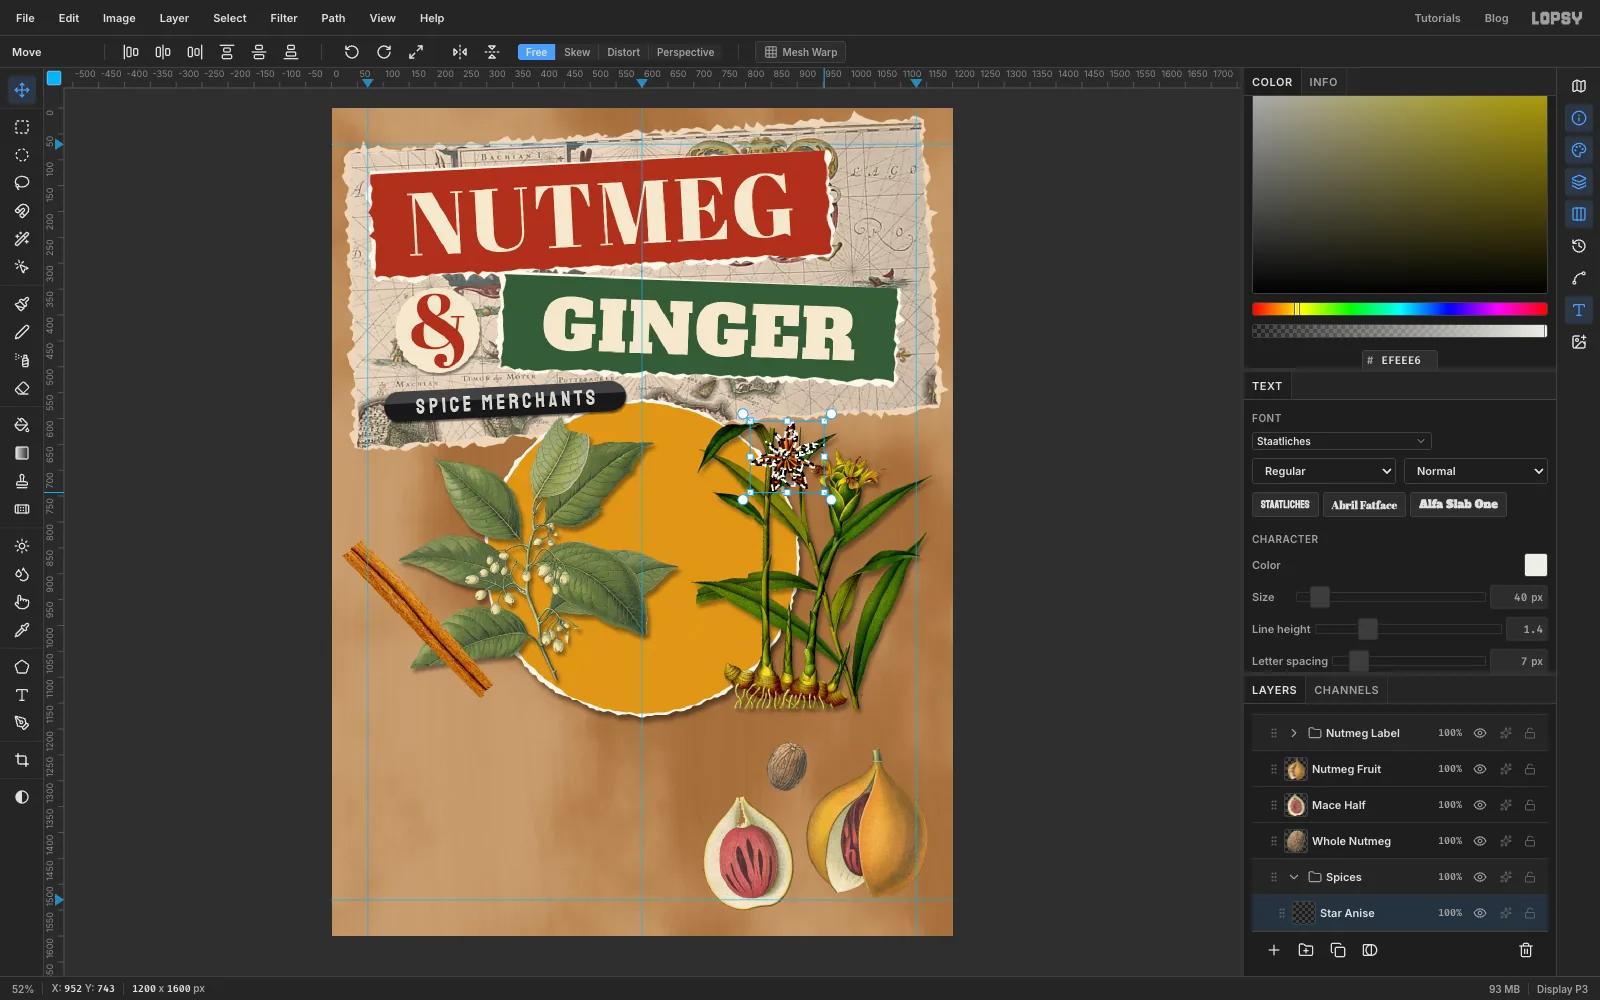
Flip the star anise
- Cmd-click the
Star Anisethumbnail and click Flip Horizontal in the Move tool's options bar. A mirrored copy looks less like the same photo pasted twice. Press Esc. - Cmd-click it again, scale it to about 70% and drag it to
92, 700, just under the left end of the map.
- Cmd-click the
-
Lift the cut-outs off the page
Give
Cinnamon Stick,Star Anise,Mace Half,Nutmeg FruitandWhole Nutmegthe same Drop Shadow: Offset X4, Offset Y7, Blur7, Opacity45. Keeping every shadow falling down and to the right is what makes separate pieces look like one pile of paper on one table.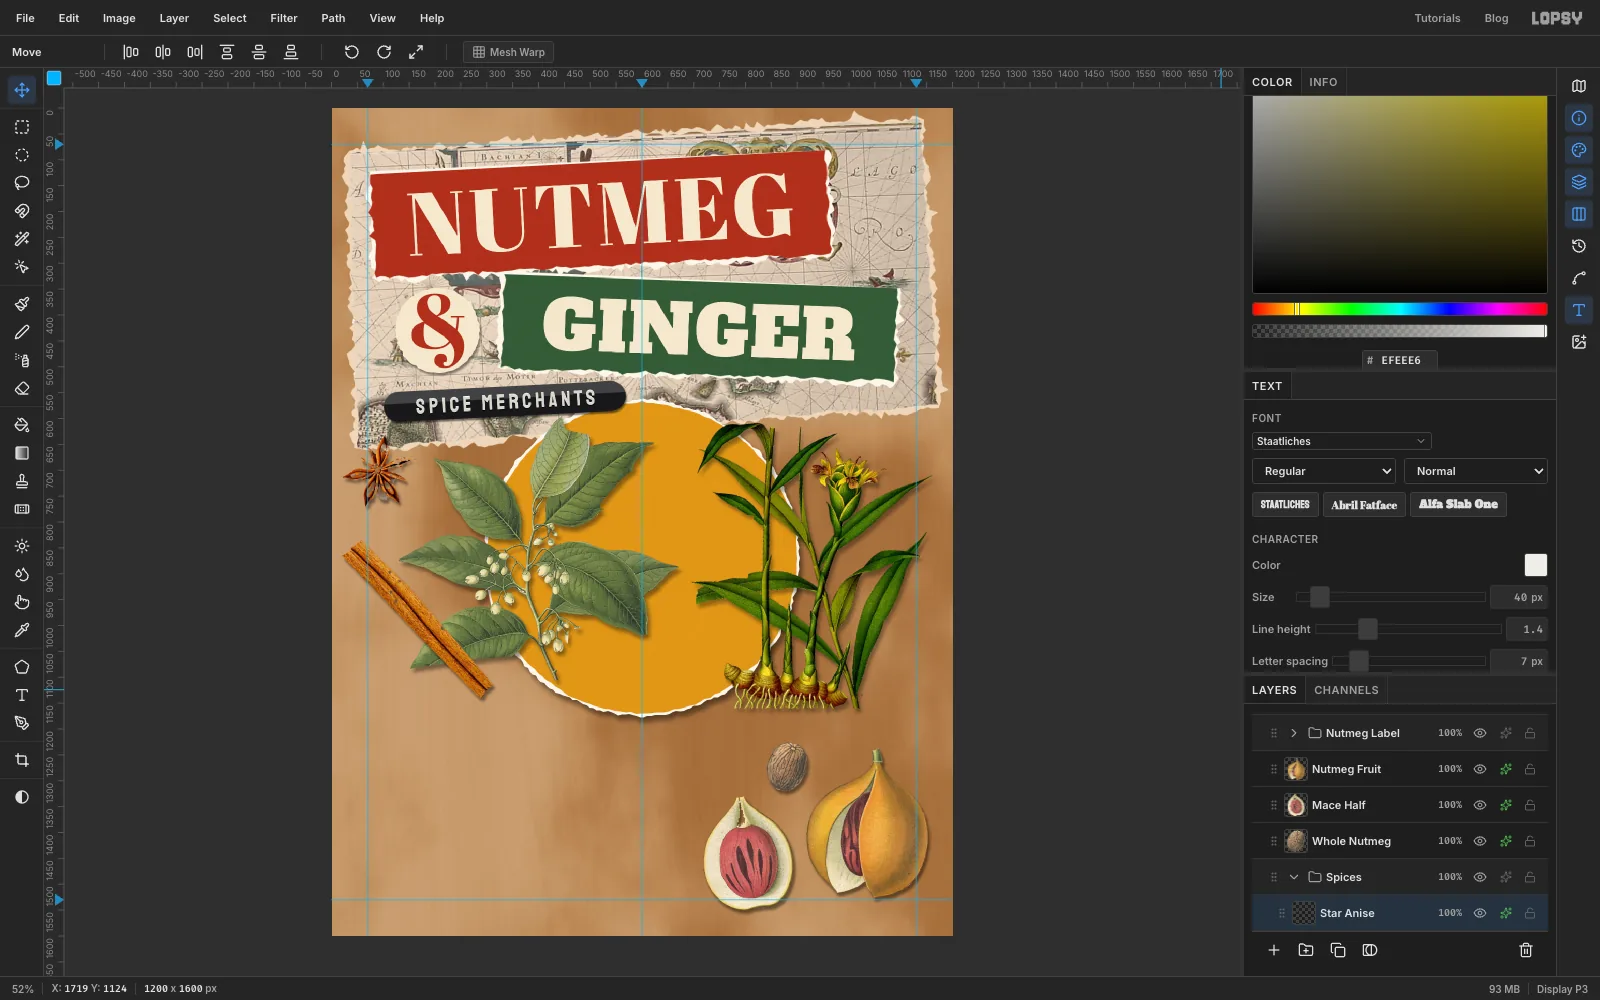
-
Draw the tag card on the grid
- Click
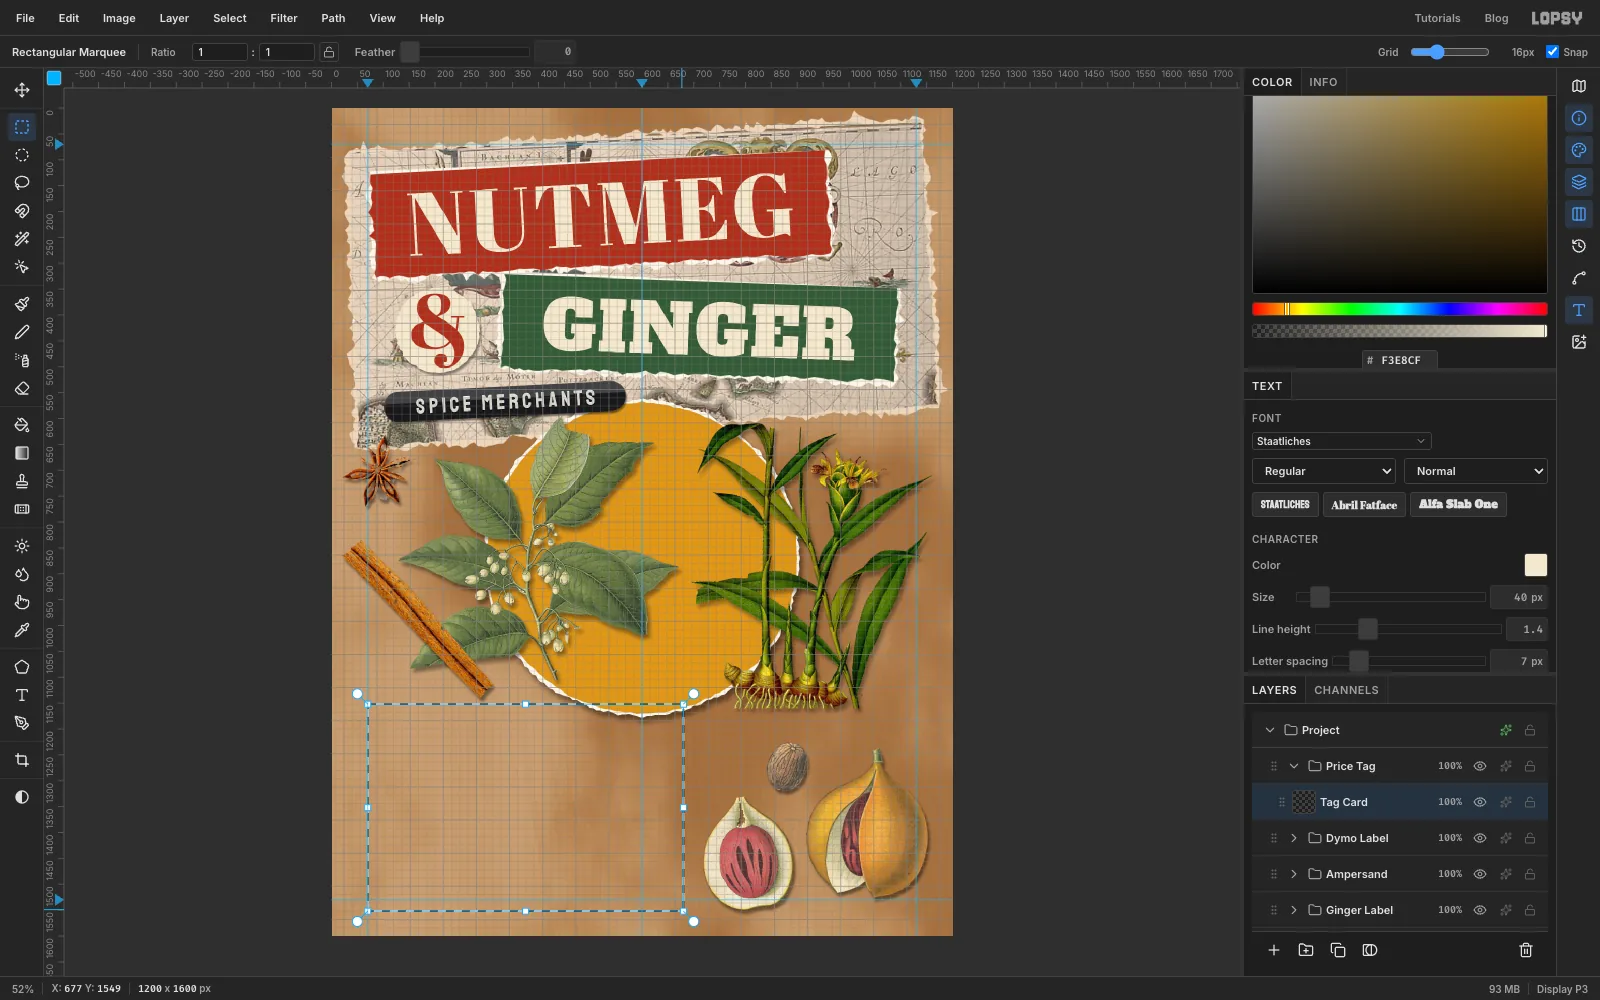
Dymo Label, add a group calledPrice Tag, and inside it a layer calledTag Card. - Press Cmd+' to show the grid, and make sure Snap is ticked in the options bar. Drag a Rectangular Marquee from about
56, 1152to680, 1552. The corners click onto grid lines, so the card comes out square and even.
- Click
-
Clip the corners
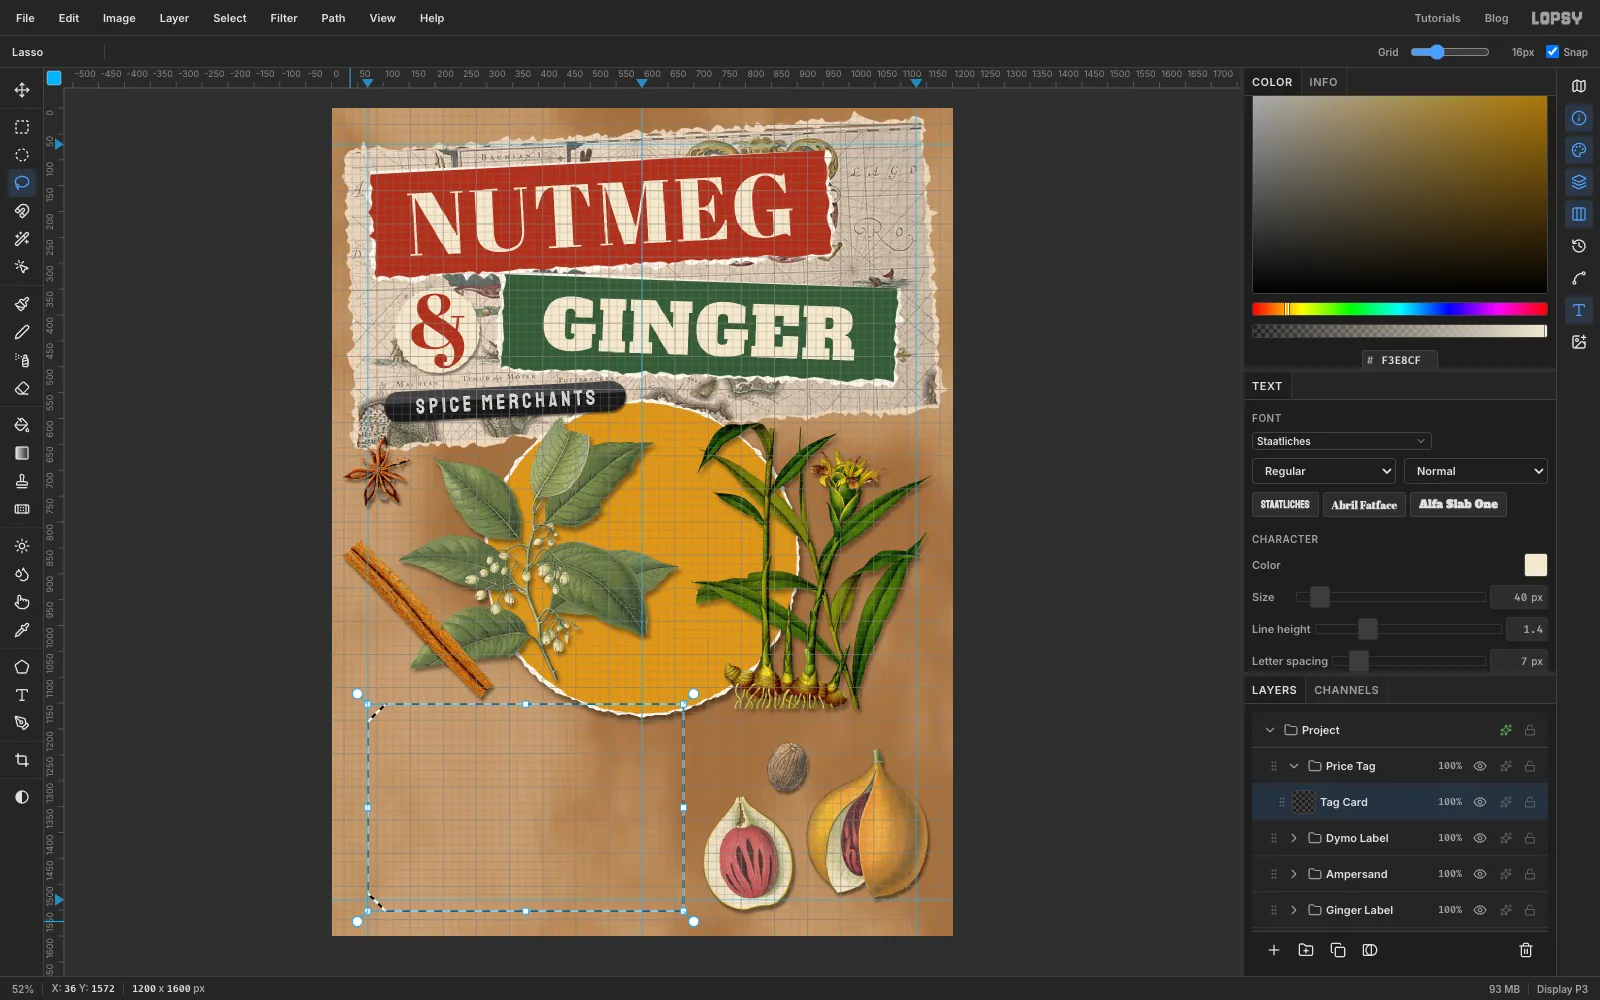
- Pick the Lasso. Hold Alt and draw a triangle over the top-left corner of the selection, cutting about 48 px off each side. Release, then do the same at the bottom-left corner. Alt subtracts from the selection.
- Fill it with , add noise Amount
4(Mono, Gaussian), and deselect. Press Cmd+' to hide the grid.
-
Punch the eyelet
- Add Layer called
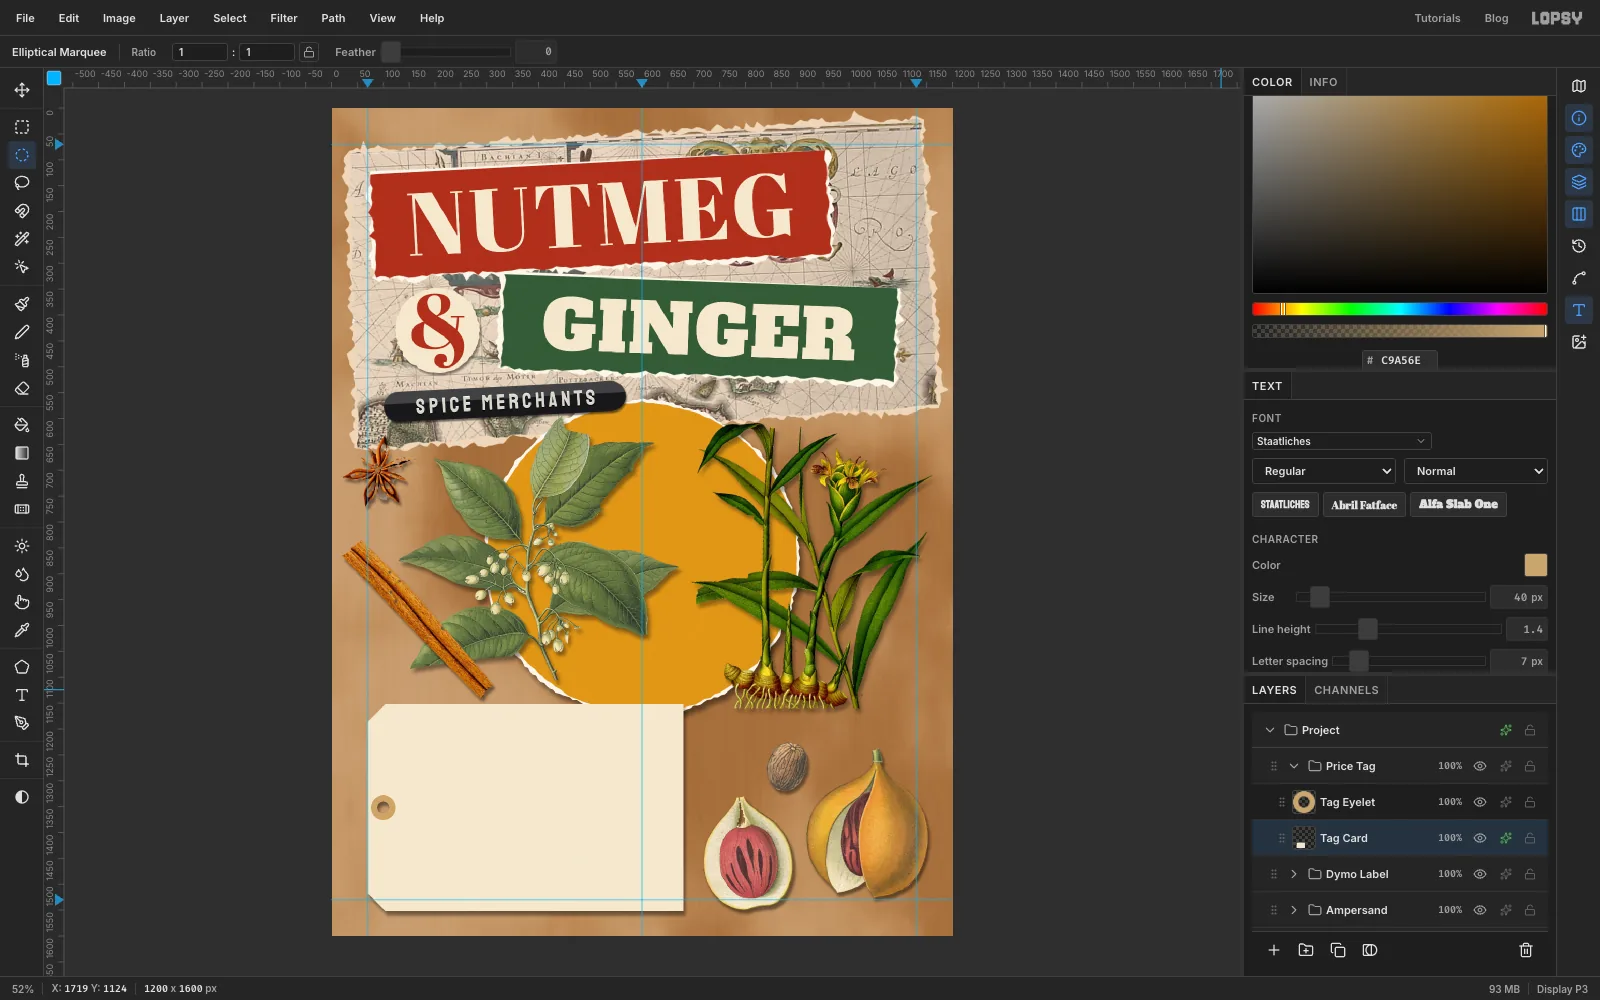
Tag Eyelet. With nothing selected, click once (no drag) with the Elliptical Marquee to open its exact-size dialog, and enter76, 1328to124, 1376for a 48 px circle. Fill it with . - Click
Tag Card. Make a 24 px circle on the same centre (88, 1340to112, 1364) and press Delete. ClickTag Eyeletand press Delete again, so the hole goes through both layers. Deselect. - Give
Tag Carda Drop Shadow: Offset X4, Offset Y8, Blur9, Opacity45.
- Add Layer called
-
Set the headline
This is the second thing anyone should read after the shop's name, so make it big.
- Click
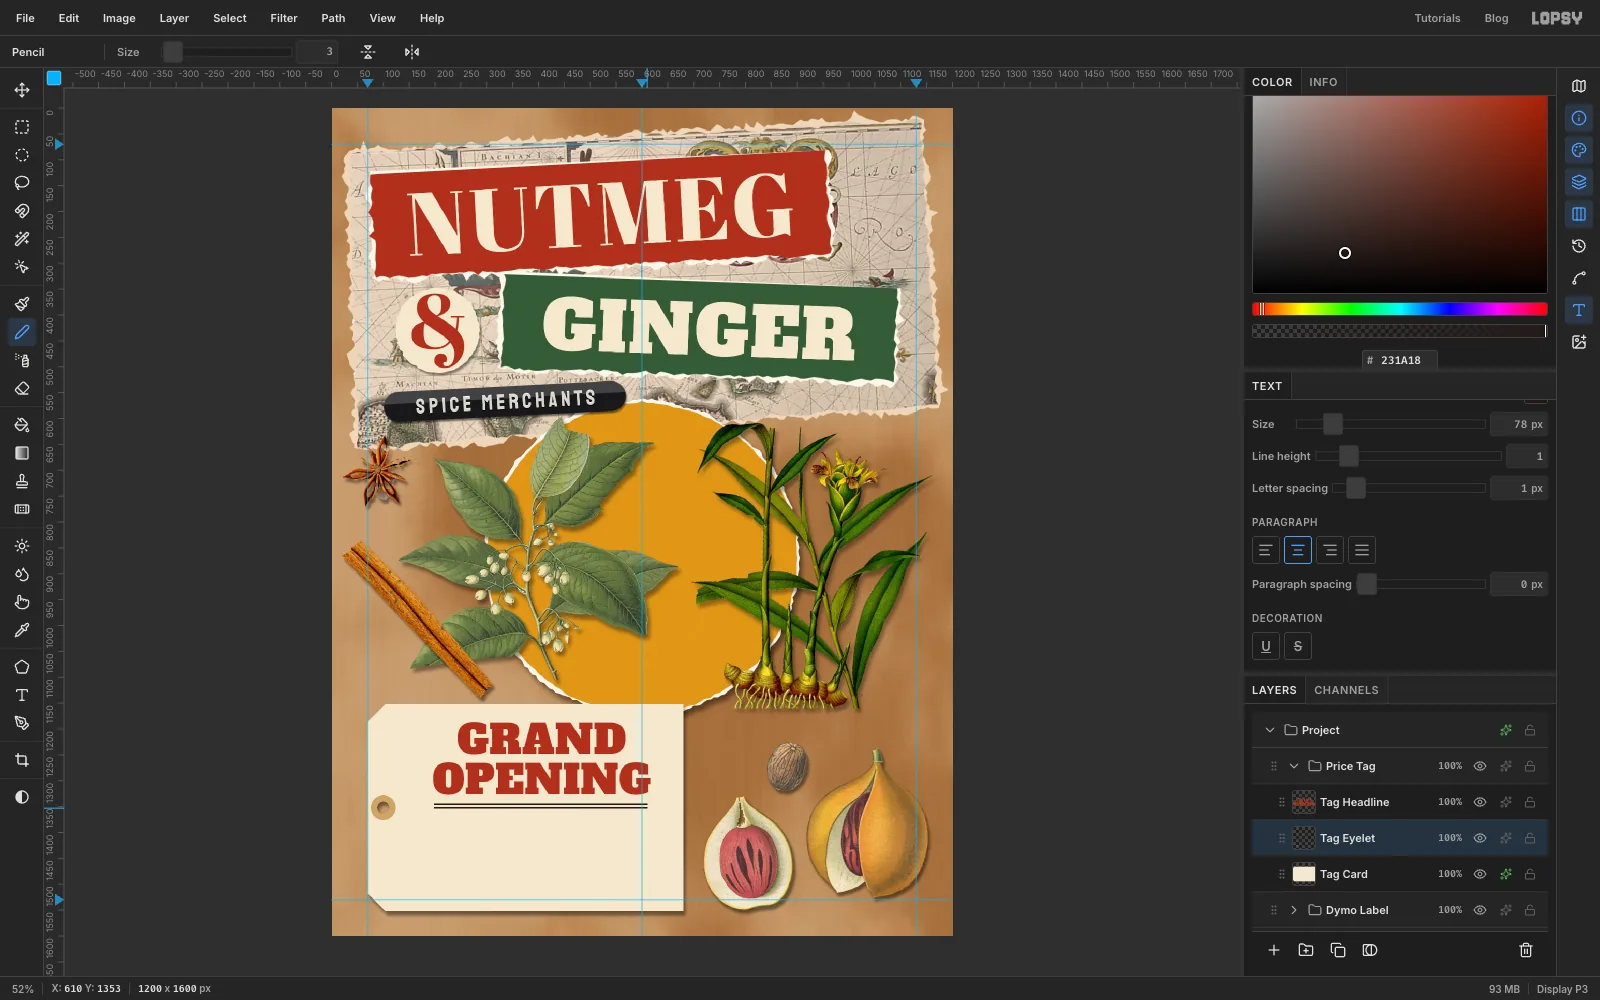
Tag Eyelet. Pick the Text tool and set Alfa Slab One, size78, colour . In the Text panel, click Align center. - Drag a text box from
140, 1172to670, 1330. That makes area text, which centres each line in the box. TypeGRAND, press Return, typeOPENING, and press Tab. - In the Text panel, set Line height to
1and Letter spacing to1. Nudge the block so it sits centred on the tag's body, to the right of the eyelet (aboutx 405). - Click
Tag Eyelet(the rule can share that layer: both are printed on the card). Pick the Pencil, size3, colour . Click just under the left end ofOPENINGand Shift-click under its right end, then draw a second line a few pixels below the first.
- Click
-
Type the details
- Click
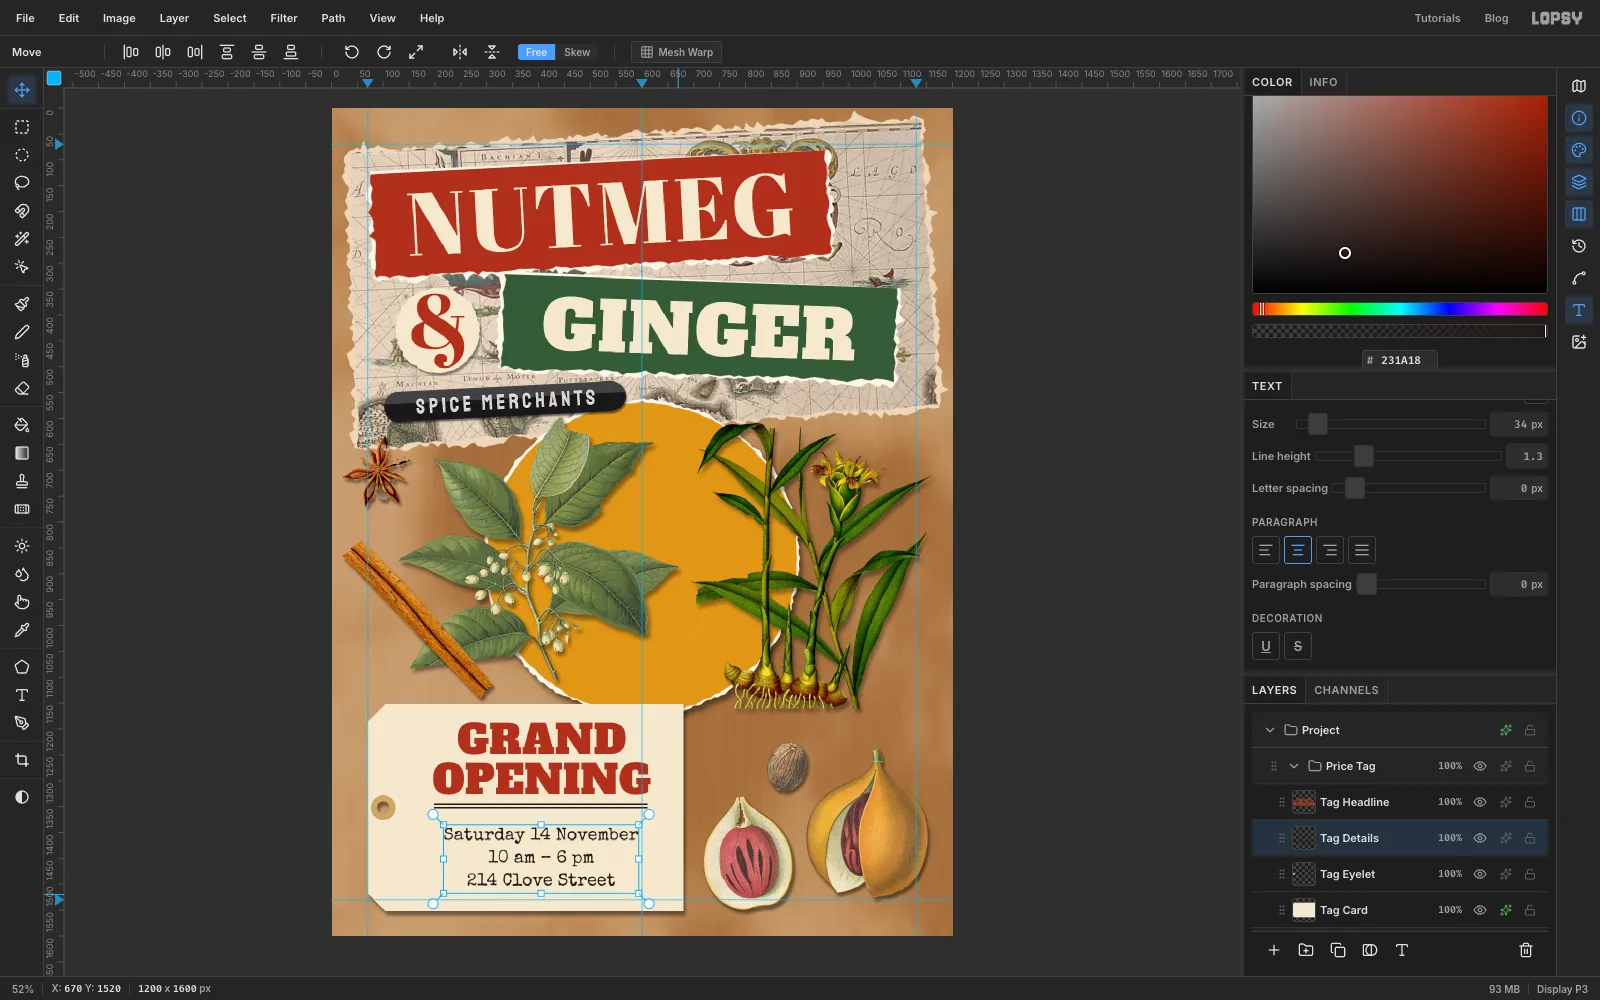
Tag Eyelet. Set Special Elite, size34, colour , with Align center still on. - Drag a text box from
140, 1372to670, 1520and type three lines:Saturday 14 November,10 am – 6 pmand214 Clove Street. Press Tab. - Set Line height
1.3and Letter spacing0. Centre the block under the rule, leaving about 50 px below the last line.
- Click
-
Thread the twine and tilt the tag
- Click
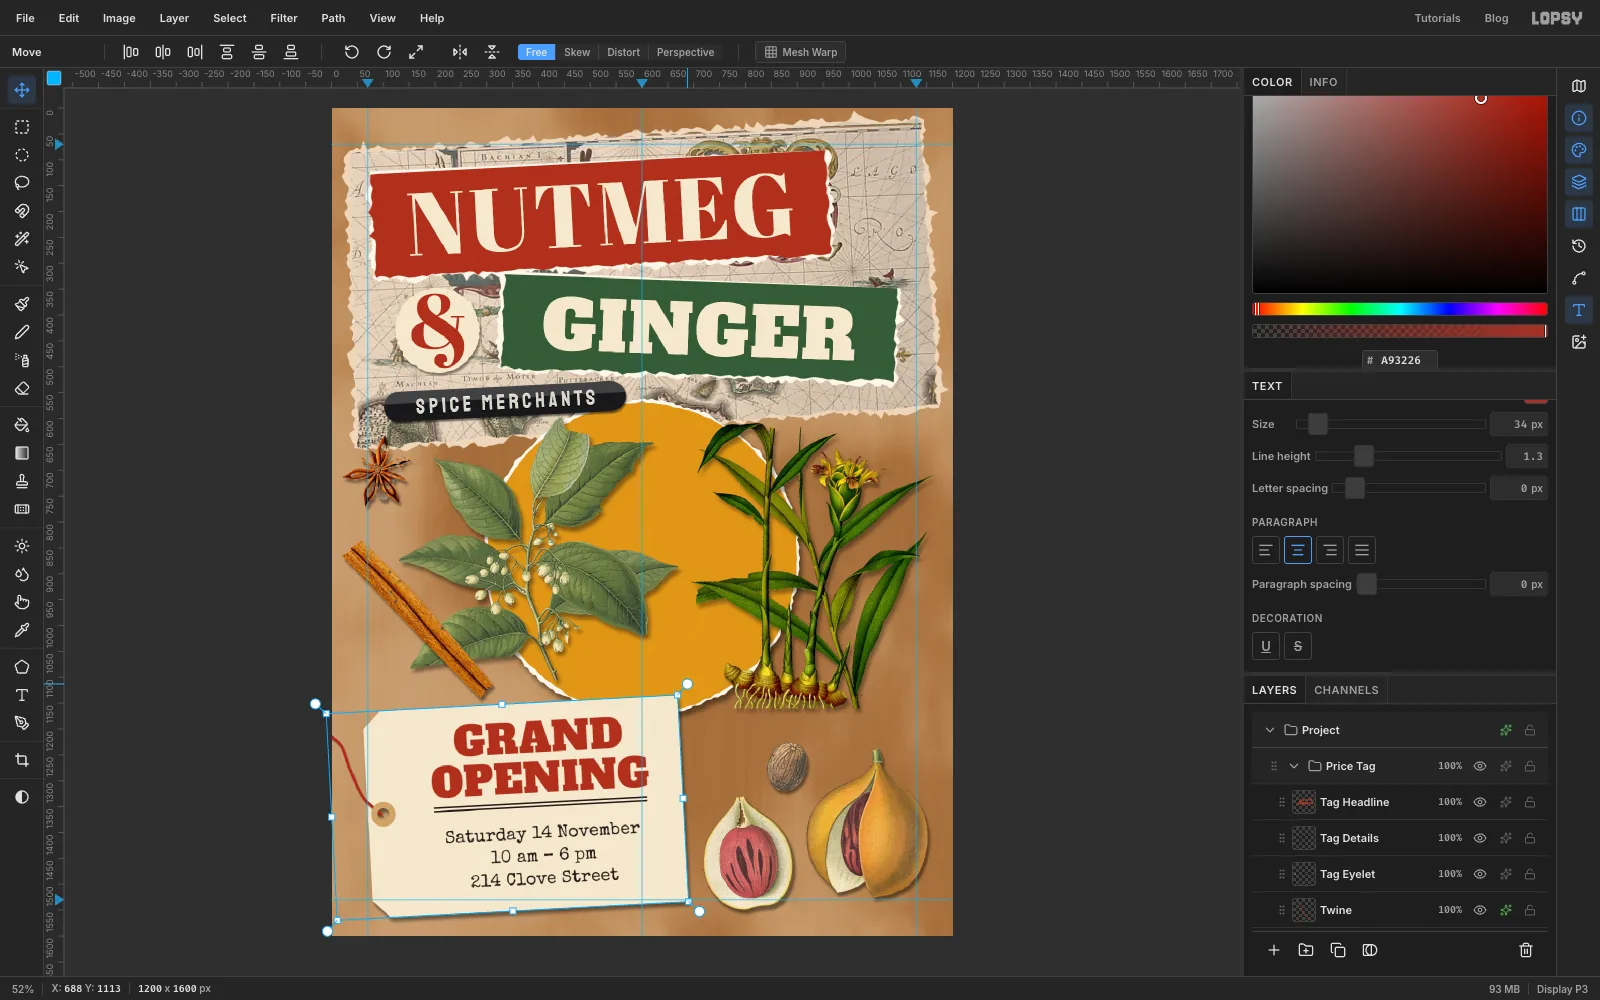
Tag Cardand Add Layer calledTwine. - Pick the Brush: size
6, hardness80, colour . Drag a gentle curve from the eyelet up and out past the left edge of the page. - Give it a small Drop Shadow (Offset Y
4, Blur3, Opacity45). - Click the
Price Taggroup, tilt it about3°anticlockwise, and collapse it.
- Click
-
Write the offer on a scrap of notebook paper
- Click
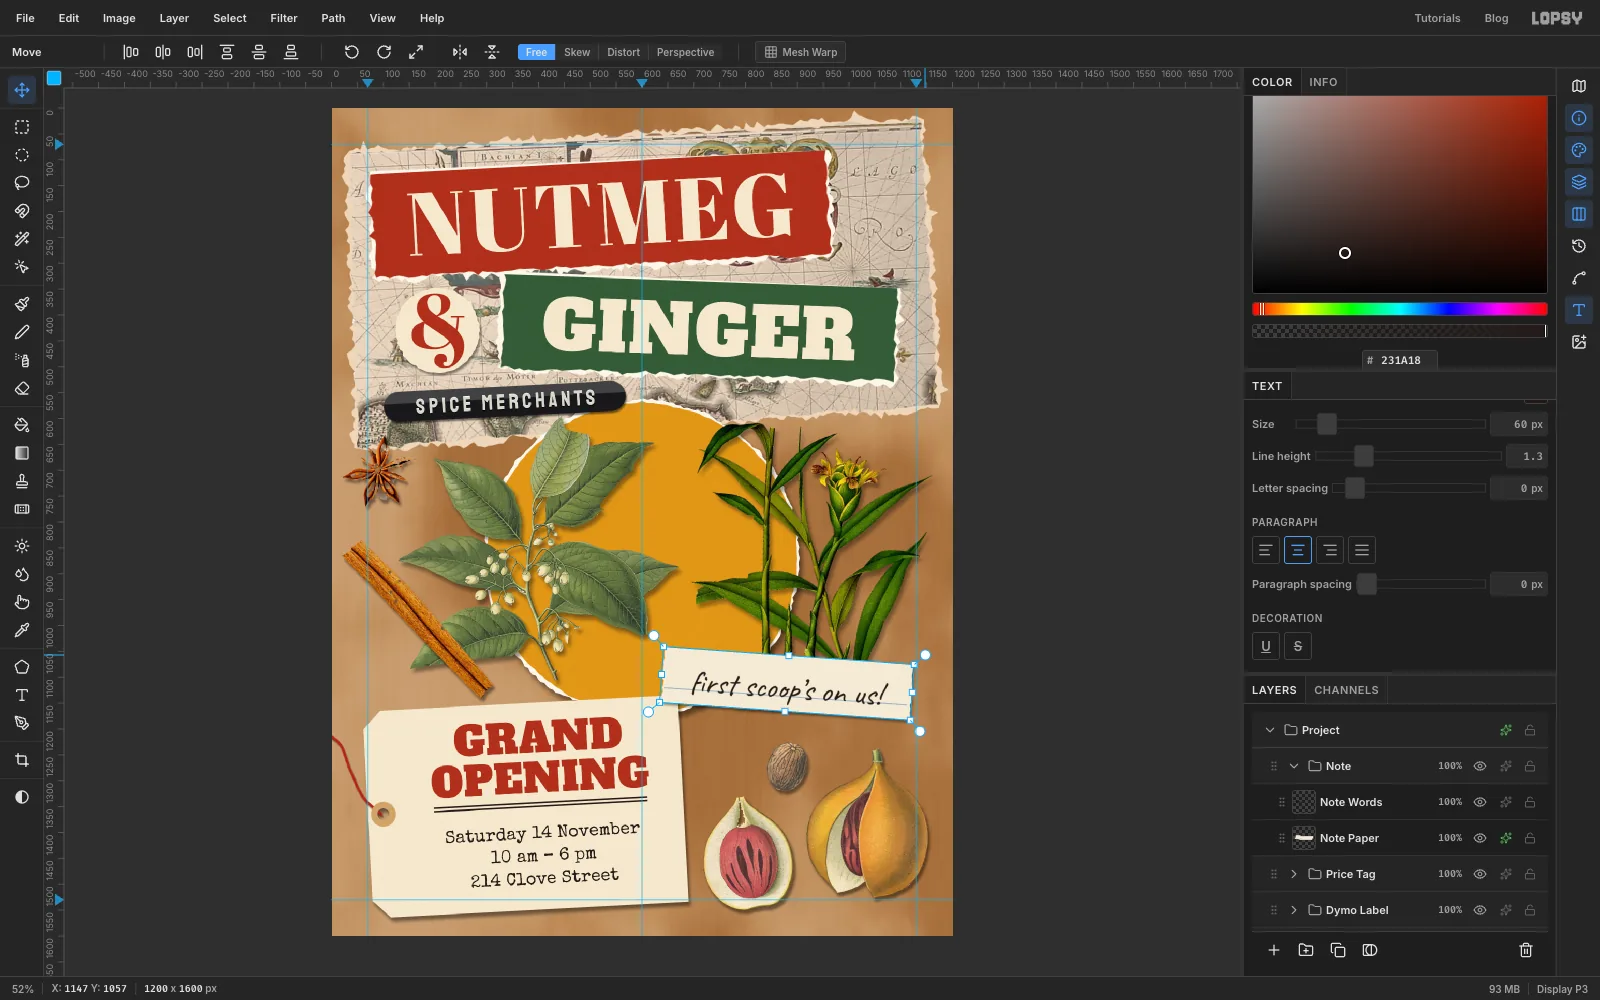
Price Tag, add a group calledNote, and inside it a layer calledNote Paper. - Lasso a strip about 480 × 108 px centred on
880, 1112, with straight long sides and torn short ends. It covers the cut ends of the ginger roots. Fill it with , add noise Amount6, deselect, and add a Drop Shadow (Offset X3, Offset Y5, Blur6, Opacity40). - With
Note Paperstill selected, pick the Pencil at size2in . Click near the left end of the strip, a little below its middle, and Shift-click near the right end. - Type
first scoop's on us!in Caveat, size60, colour , letter spacing0. Move it so the bottoms of the letters sit right on the blue rule. Only thepshould dip below it. - Click the
Notegroup, tilt it about4°clockwise, and collapse it.
- Click
-
Tape it all down
- Click
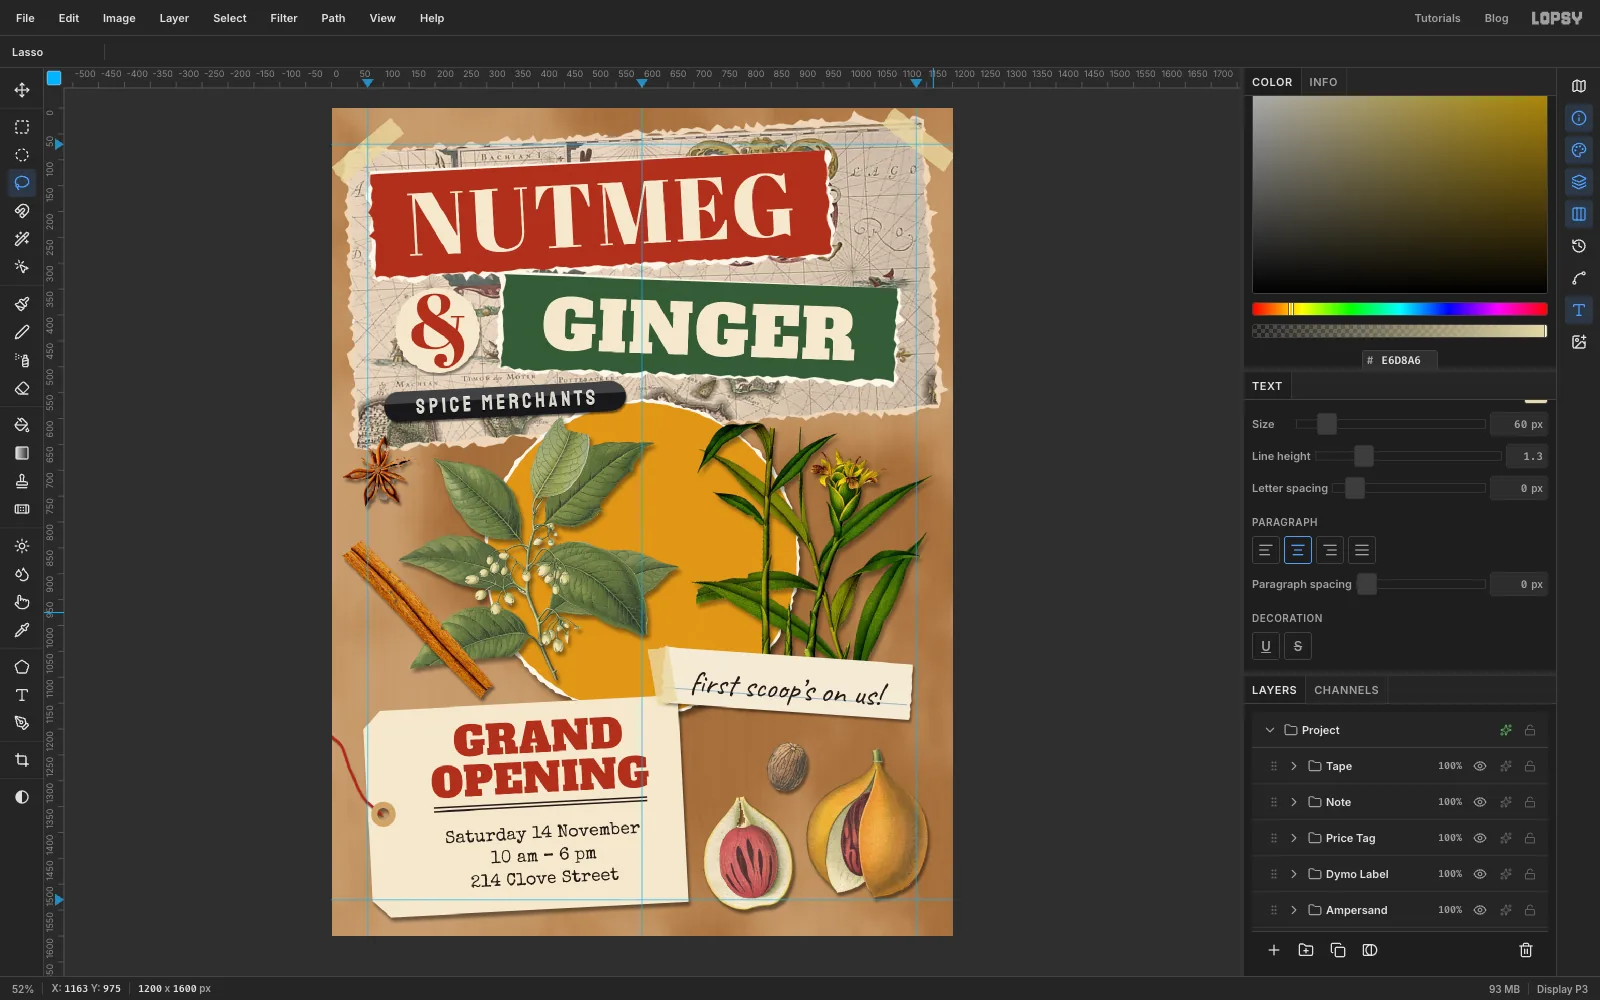
Noteand add a group calledTape. Each strip goes on its own layer inside it. - For each strip, Lasso a long thin rectangle about 40 px wide with straight long sides and ragged short ends, as if torn off a roll. Fill it with , add noise Amount
6, deselect, and set the layer to78%so the paper shows through. - Make three: one 150 px long across the map's top-left corner (turned about 40° anticlockwise), one across its top-right corner (turned the other way), and a shorter one standing almost upright over the left end of the note. Collapse the
Tapegroup.
- Click
-
Add grain and fibres over everything
One shared texture over the top makes the photos, prints and papers look printed together.
- Click the collapsed
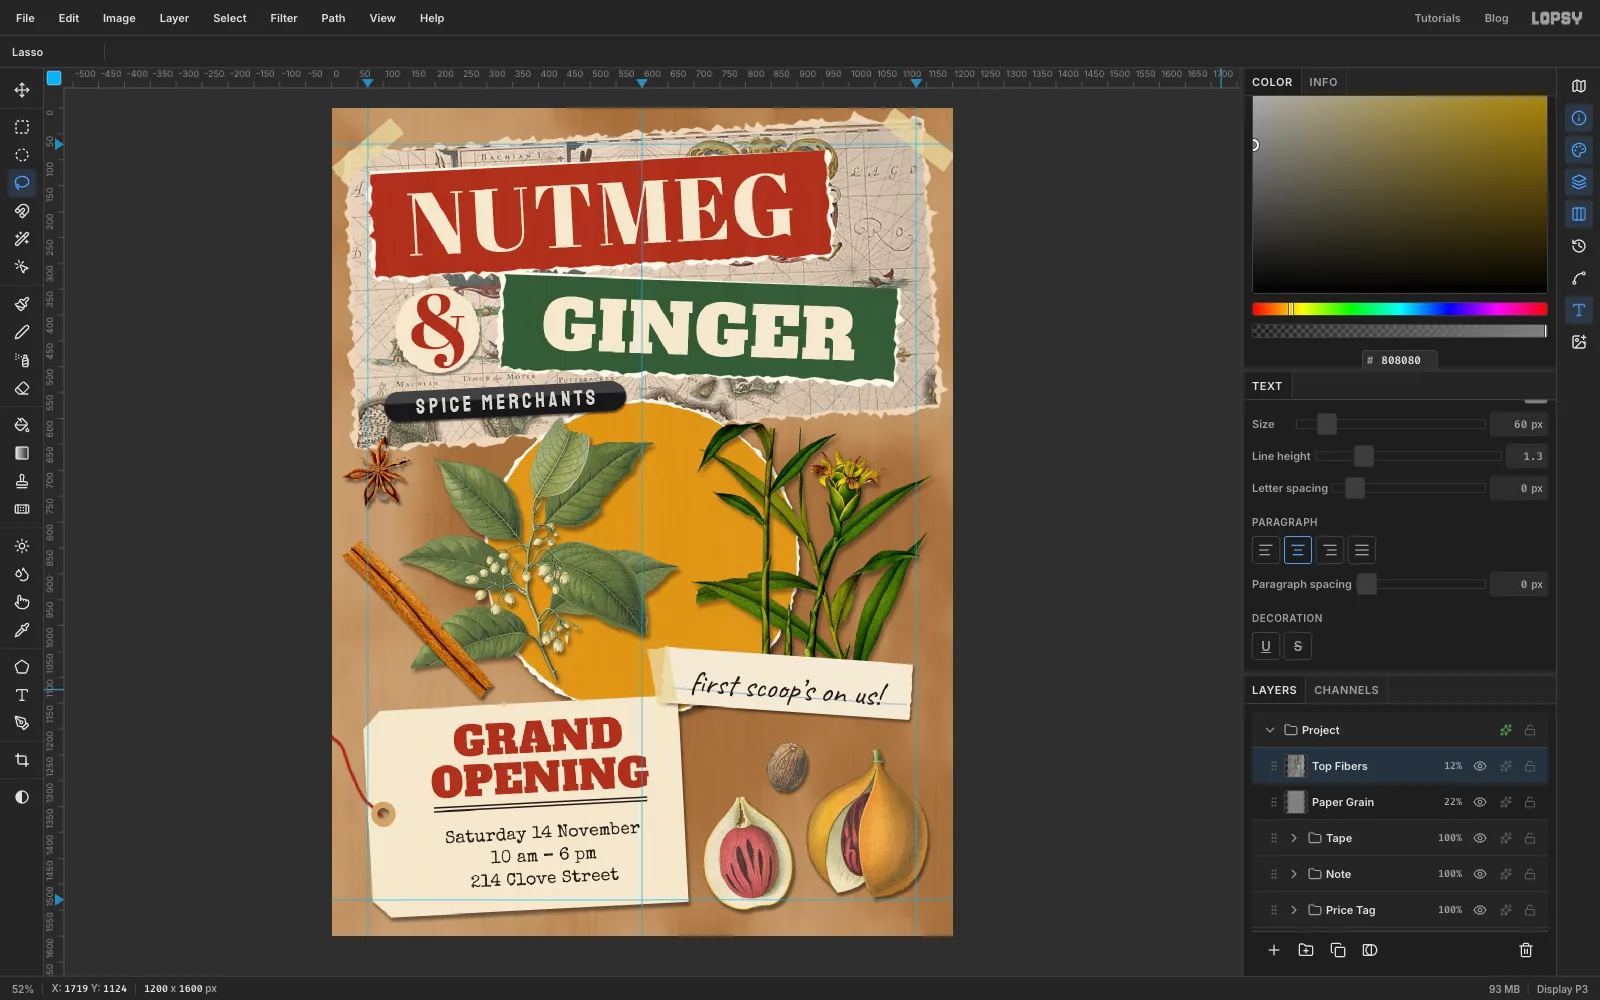
Tapegroup and Add Layer calledPaper Grain. Fill it with , add noise Amount18(Mono, Gaussian), and set it to Overlay at22%. - Add Layer called
Top Fibers. Run Filter → Fibers… and set it to Soft Light at12%.
- Click the collapsed
-
Warm it with Color Grading
- Click the green sparkle button at the right of the
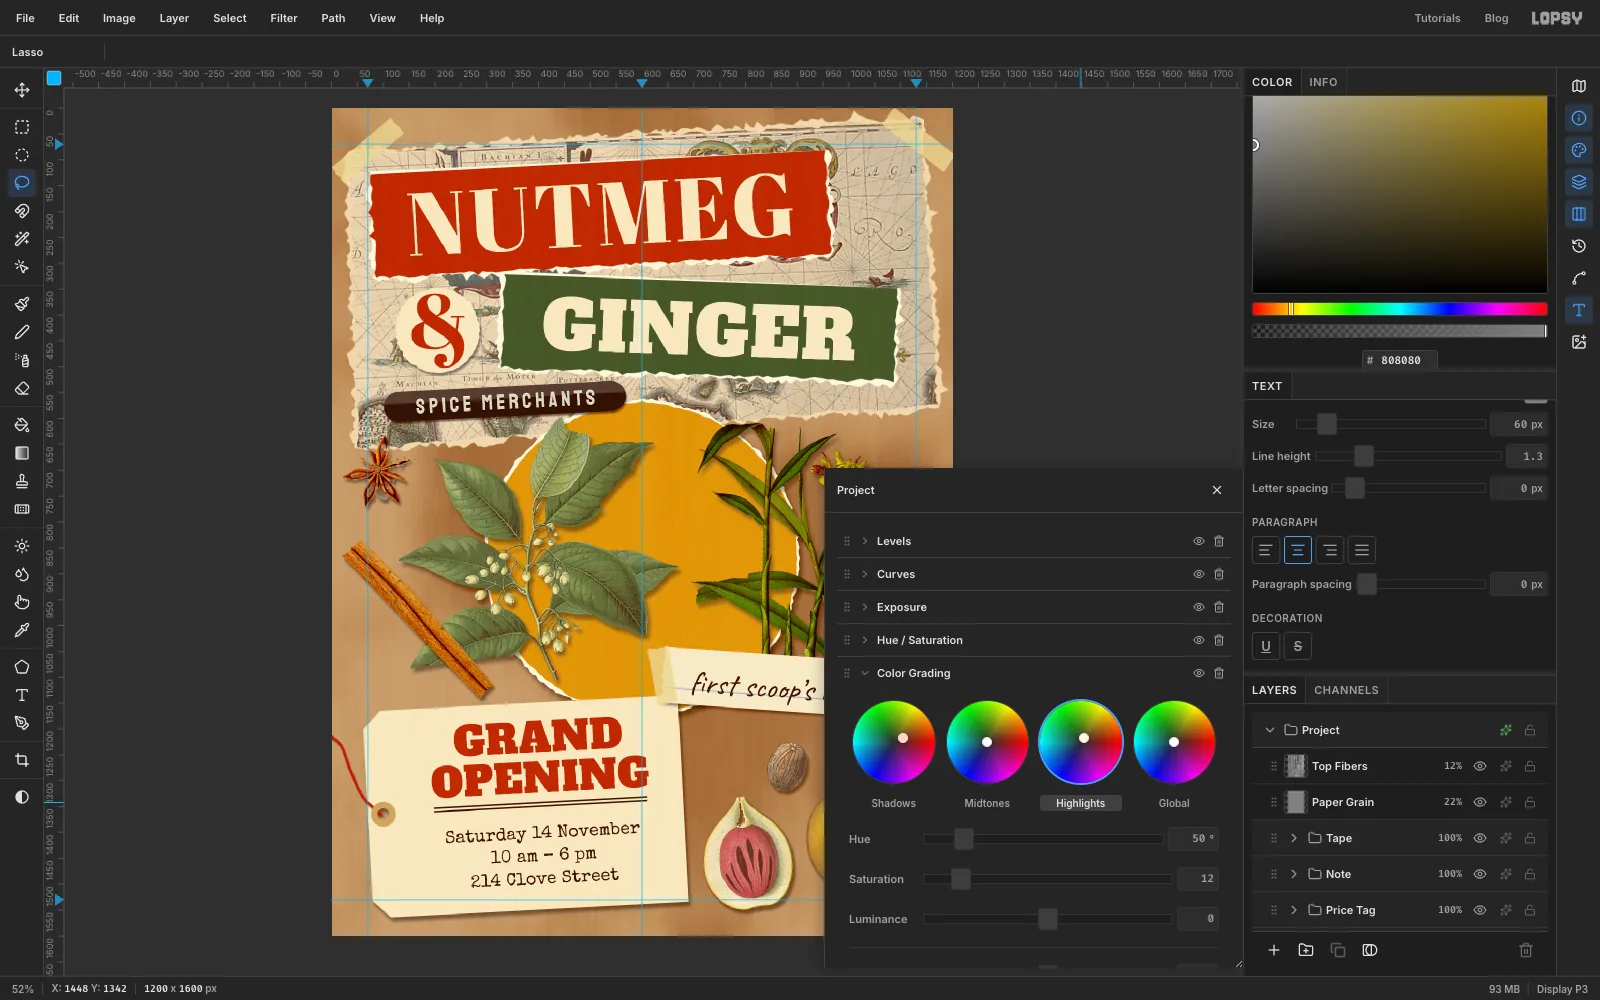
Projectrow (the top row of the Layers panel) to open the document's adjustment stack. - Expand Color Grading. Click the Shadows tab and set Hue
22and Saturation24. Click Highlights and set Hue50and Saturation12.
The shadows warm towards brown and the highlights towards gold, which pulls the cool map and the green prints into the same light as the kraft.
- Click the green sparkle button at the right of the
-
Finish with a light vignette
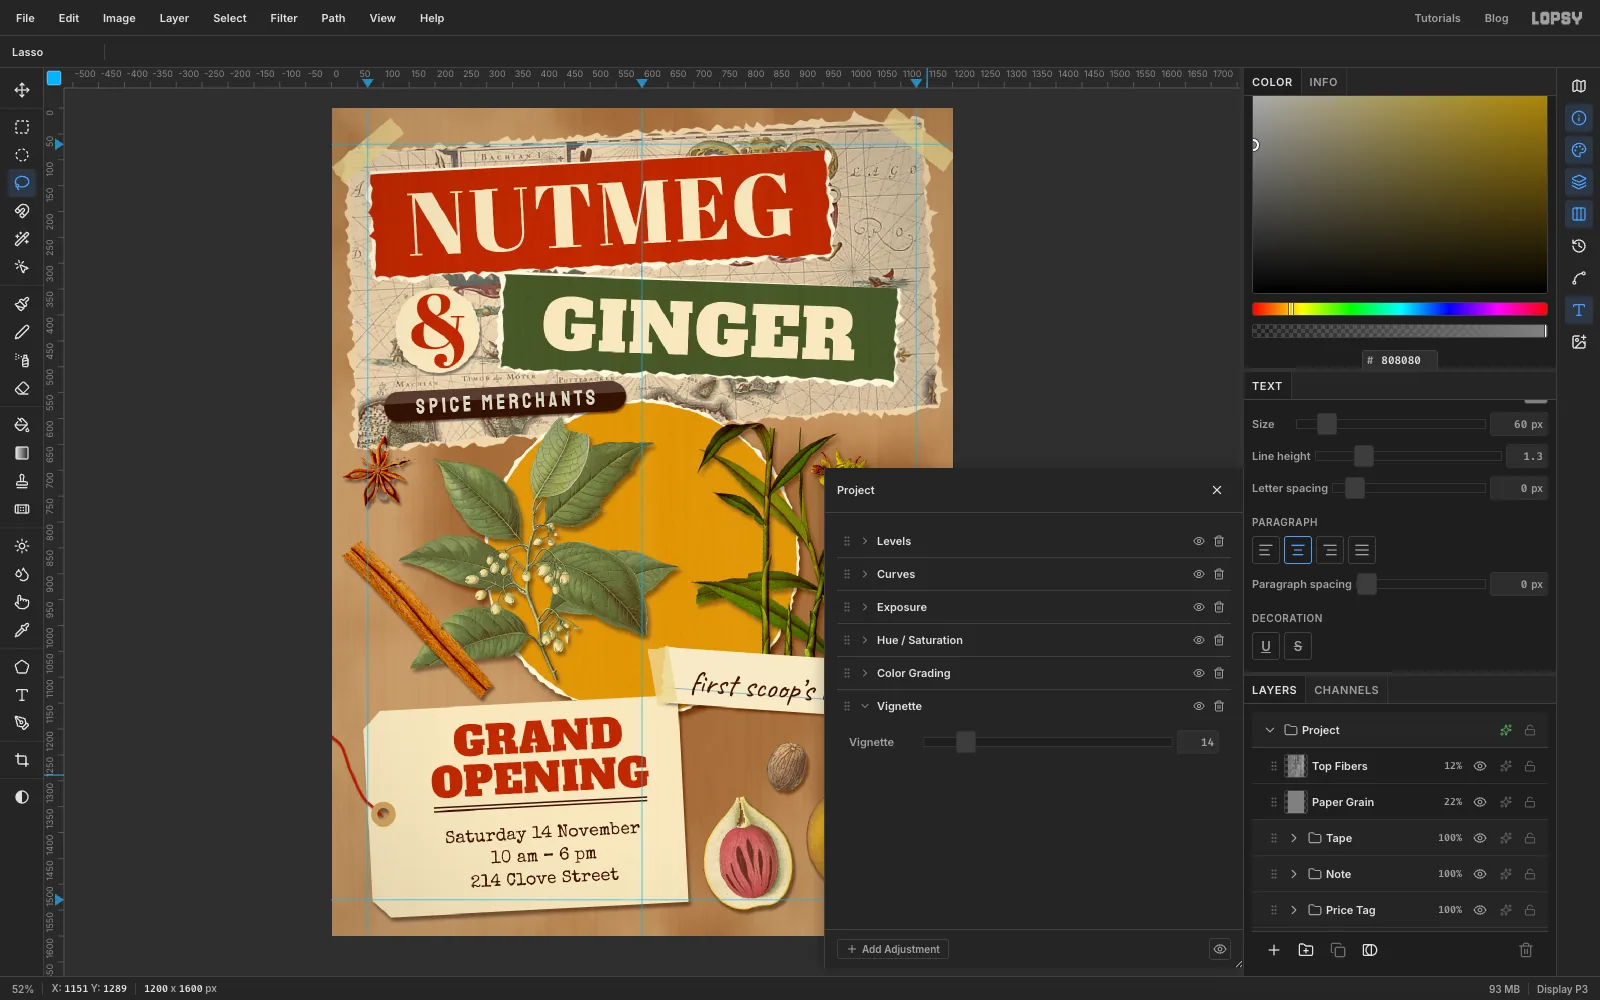
- Click Add Adjustment at the bottom of the drawer and choose Vignette. Set its Vignette slider to
14. Keep it light. Much more and the corners start to look like dirty glass. - Close the drawer, press Cmd+; to hide the guides, and step back.
Export the flier with File → Quick Export PNG, and save it with File → Save Project so you can change the date for the next event.
- Click Add Adjustment at the bottom of the drawer and choose Vignette. Set its Vignette slider to