Design a Dieselpunk Railway Website Landing Page
Design a dieselpunk landing page for a 1938 streamliner in Lopsy, with a brushed-steel locomotive on a sunburst, riveted plates, dial gauges and a ticket stub.
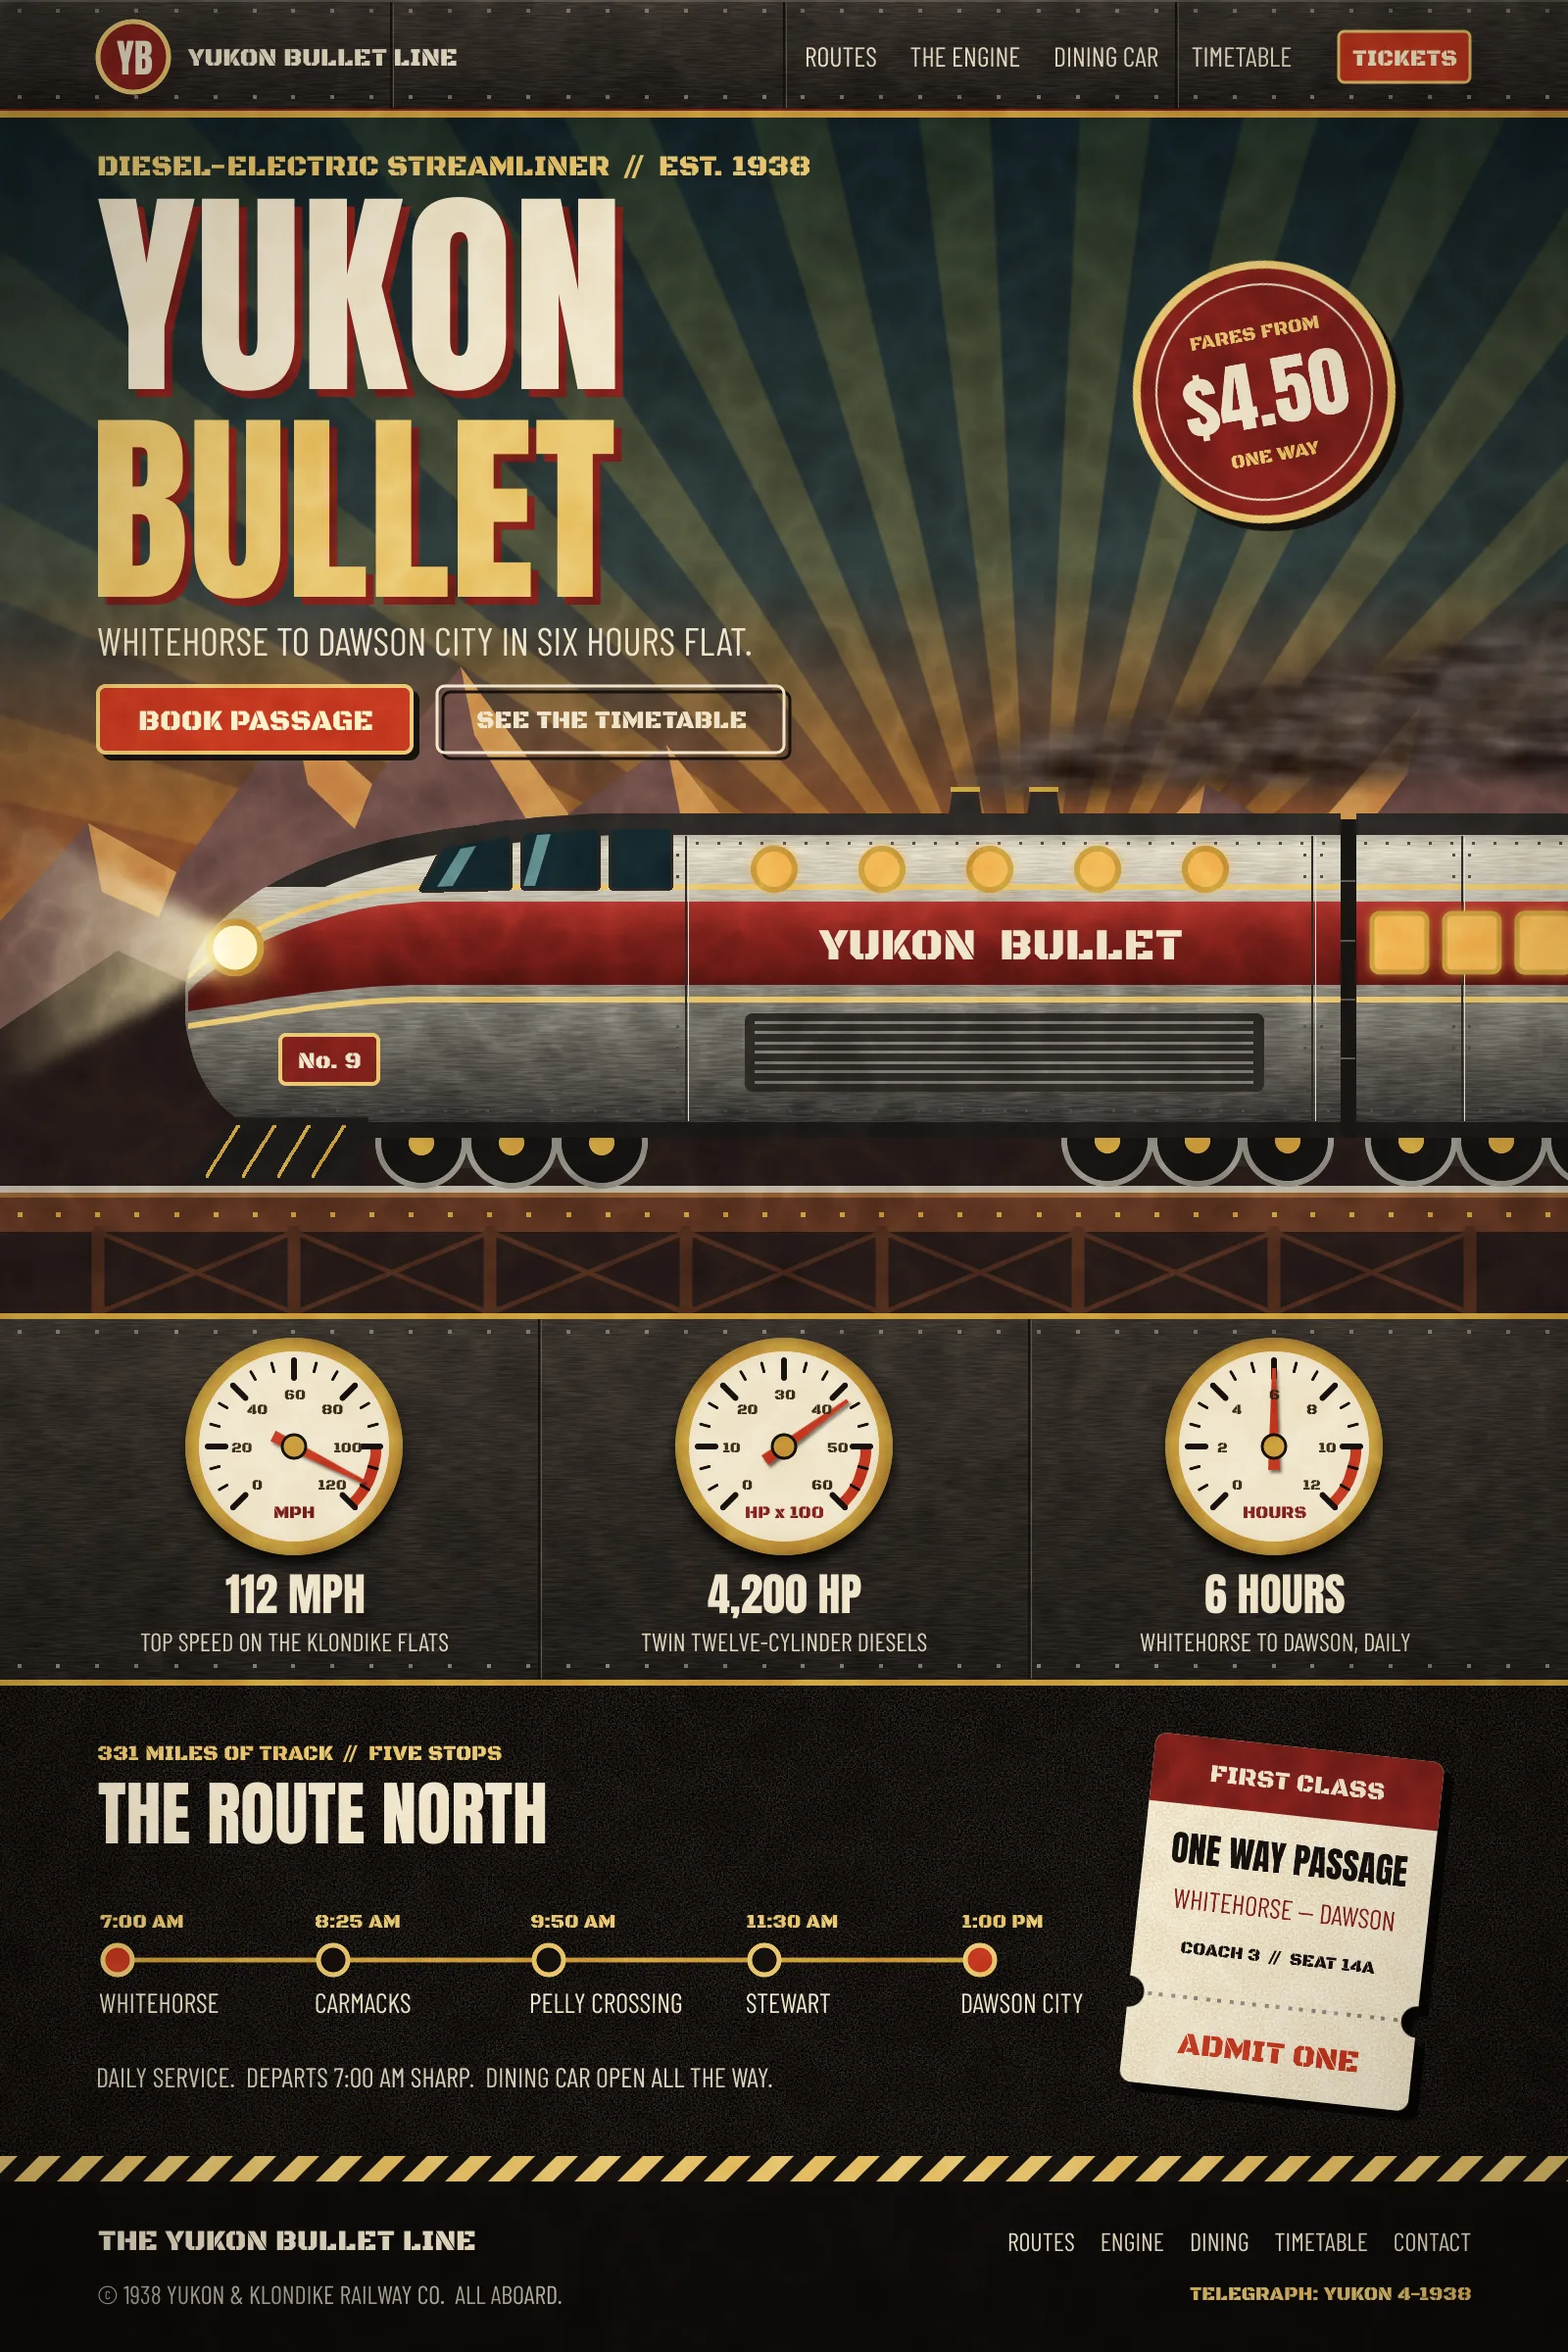
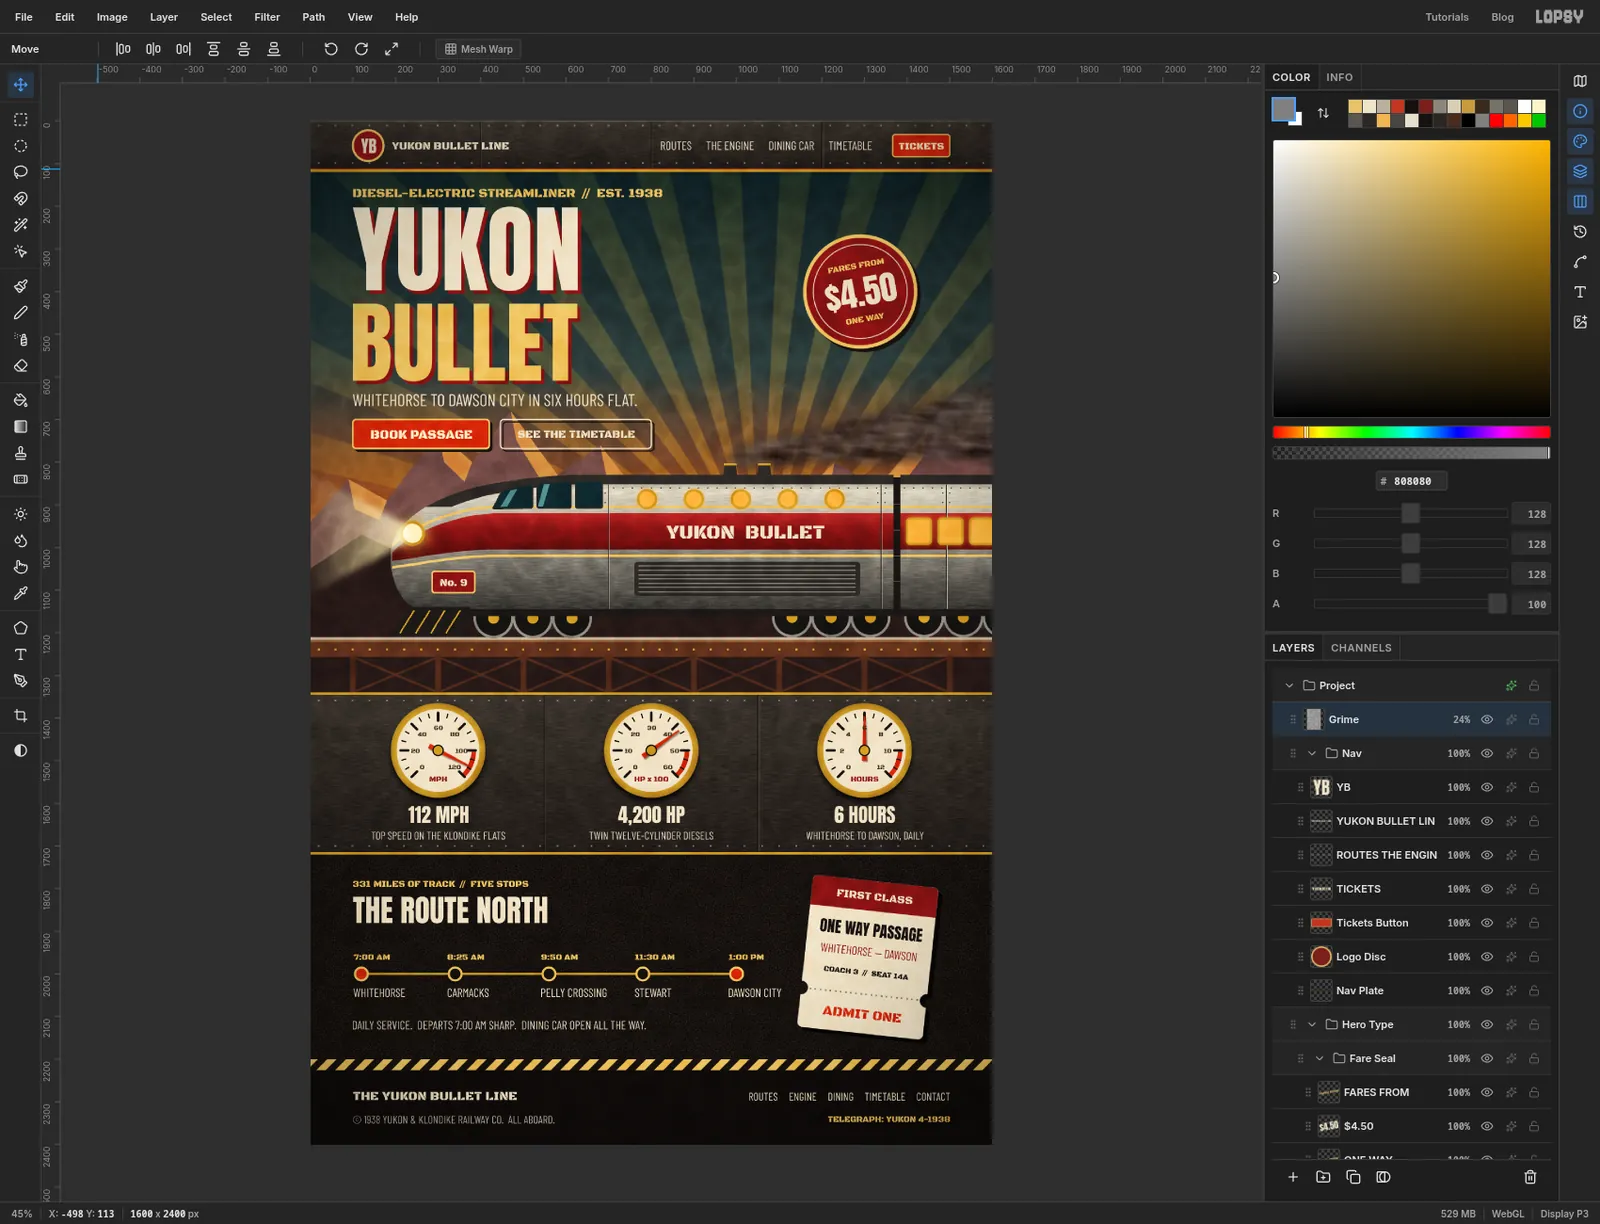
Dieselpunk is the machine age with the dial turned up: streamlined steel, rivets, brass gauges, stencil lettering and the oily optimism of a 1930s travel poster. In this tutorial you'll design a landing page for the Yukon Bullet, a made-up diesel-electric streamliner that runs from Whitehorse to Dawson City, as a 1600 × 2400 px web comp.
The page has five parts, top to bottom: a riveted nav bar, a hero with the locomotive crossing a trestle at dusk, a gauge band with three dials, a route section with a ticket stub, and a footer. You'll draw the locomotive from scratch with selections and shapes, then set the type on top.
Along the way you'll use:
- guides, marquees that snap to them, Edit → Fill and the Gradient tool inside selections
- Filter → Sunburst, Texture (Grain, Streaks and Rough) and Motion Blur
- the Lasso with Shift to add shapes, and Cmd-clicking a layer thumbnail to reuse its outline
- the Shape tool for wheels, portholes, plates and buttons
- copy and paste, Merge Down, and the Pencil and Brush with Shift-click lines
- the Brush with Radial Symmetry, and the Eraser
- Drop Shadow, Outer Glow, Inner Glow and Stroke effects, plus Screen, Soft Light and Overlay blend modes
- groups, rotating a whole group with the Move tool, and a Vignette adjustment on the root group
- text in Anton, Black Ops One and Barlow Condensed
The palette:
-
Soot
-
iron
-
steel
-
pale steel
-
Oxblood
-
signal red
-
Brass
-
gold
-
lamp amber
-
Cream
-
warm grey
-
Sky
-
Far range
-
lit rock
-
near range
-
Rust
-
dark rust
Two habits will save you time throughout:
- New text needs an empty spot. A Text-tool click inside an existing text's box edits that text instead of starting a new one, and changing the font or size while a text layer is selected restyles it. So before each new piece of type, click an ordinary pixel layer in the Layers panel, click the Text tool on an empty part of the page (the bottom is free until the footer), type, press Tab to finish, and then drag the text into place with the Move tool (V). Arrow keys nudge it 1 px, and Shift+arrow 10 px.
- The Shape tool draws from the centre. Press where the middle of the shape should be and drag out to a corner. Where a step gives a shape's edges, it also gives the centre to press on.
- Finishing a transform. After you rotate something with the Move tool's handles, press Cmd+D. It commits the transform as well as dropping any selection.
-
Set up the page and guides
Choose File → New, set the size to 1600 × 2400 px and click Create. Double-click
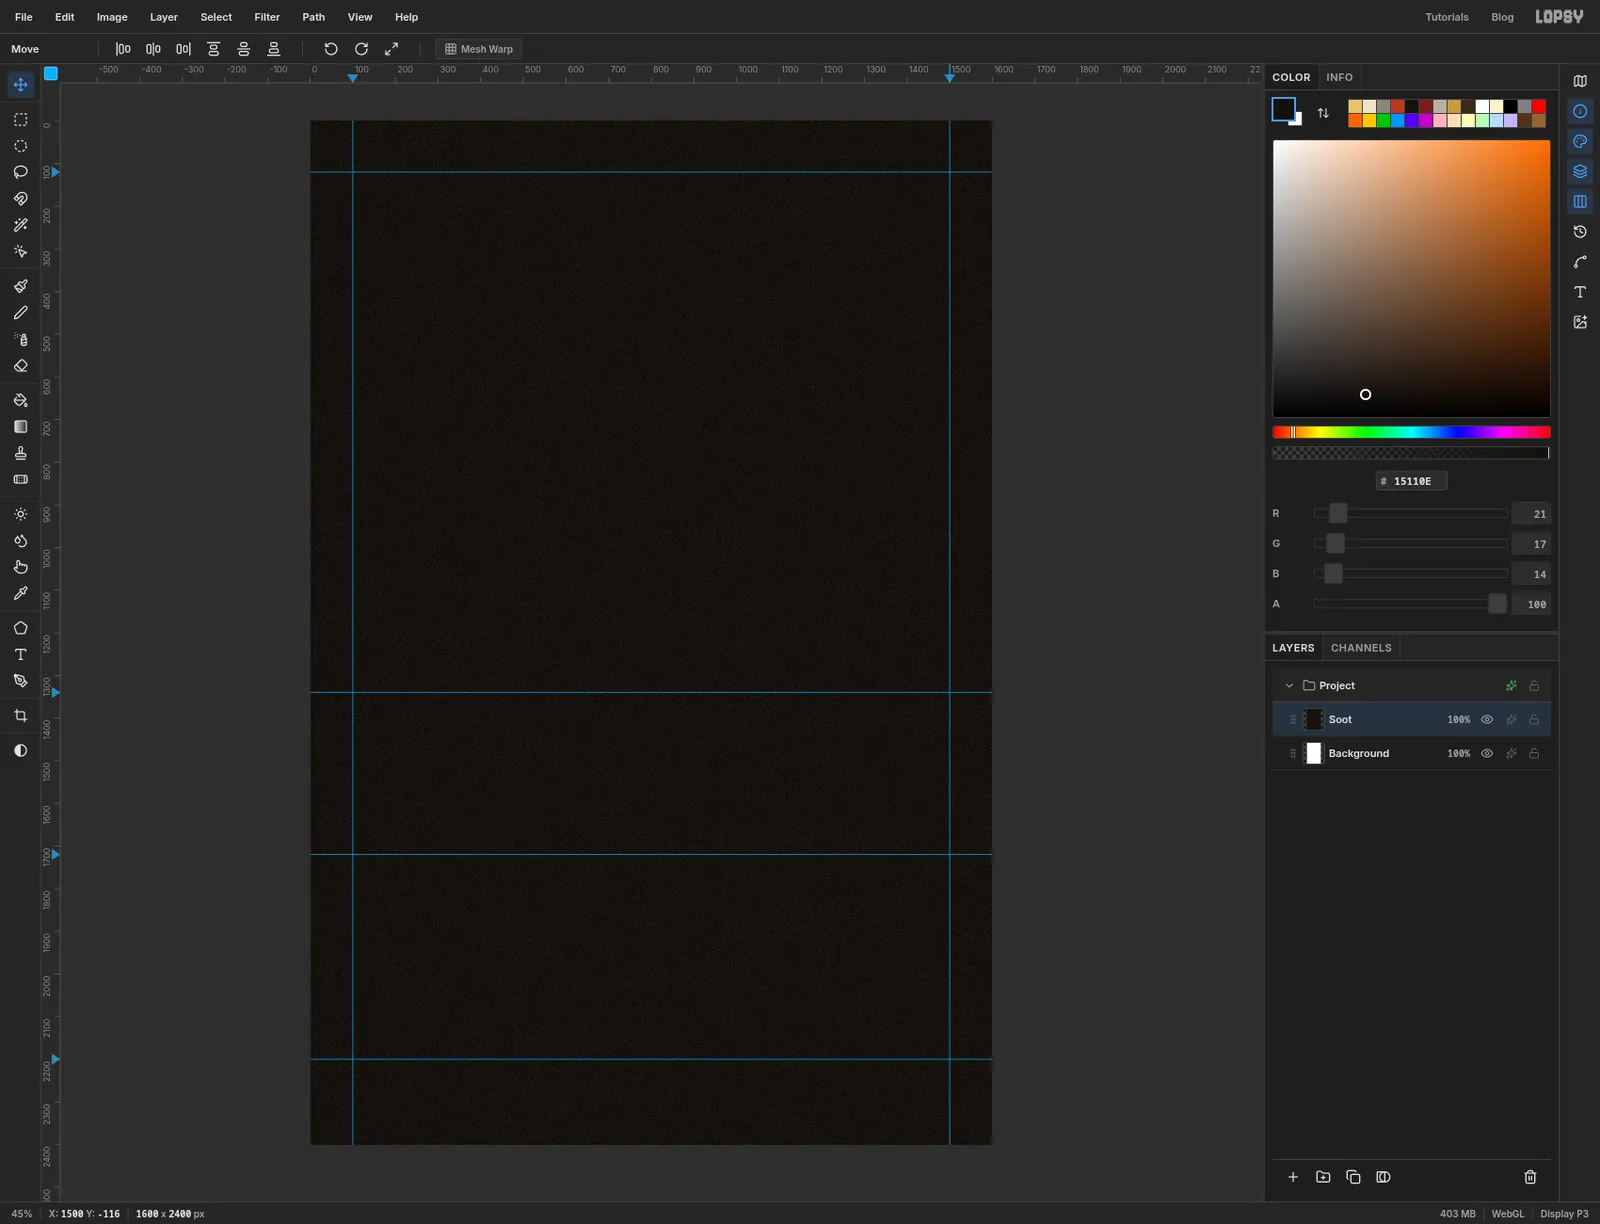
Layer 1's name and rename itSoot. Set the foreground colour to , press Cmd+A, choose Edit → Fill and press Cmd+D.A flat dark page looks like a screen. A little tooth makes it look like painted metal. Choose Filter → Texture…, leave Type on Grain, set Amount
14and Size2, and click Apply.Now the guides. Click the left ruler at 120 (bottom of the nav bar), 1340 (bottom of the hero), 1720 (bottom of the gauge band) and 2200 (top of the footer). Click the top ruler at 100 and 1500 for the page margins. Everything on the page lines up to those two margins.
-
Paint the dusk sky
Click Add Layer at the bottom of the Layers panel and name it
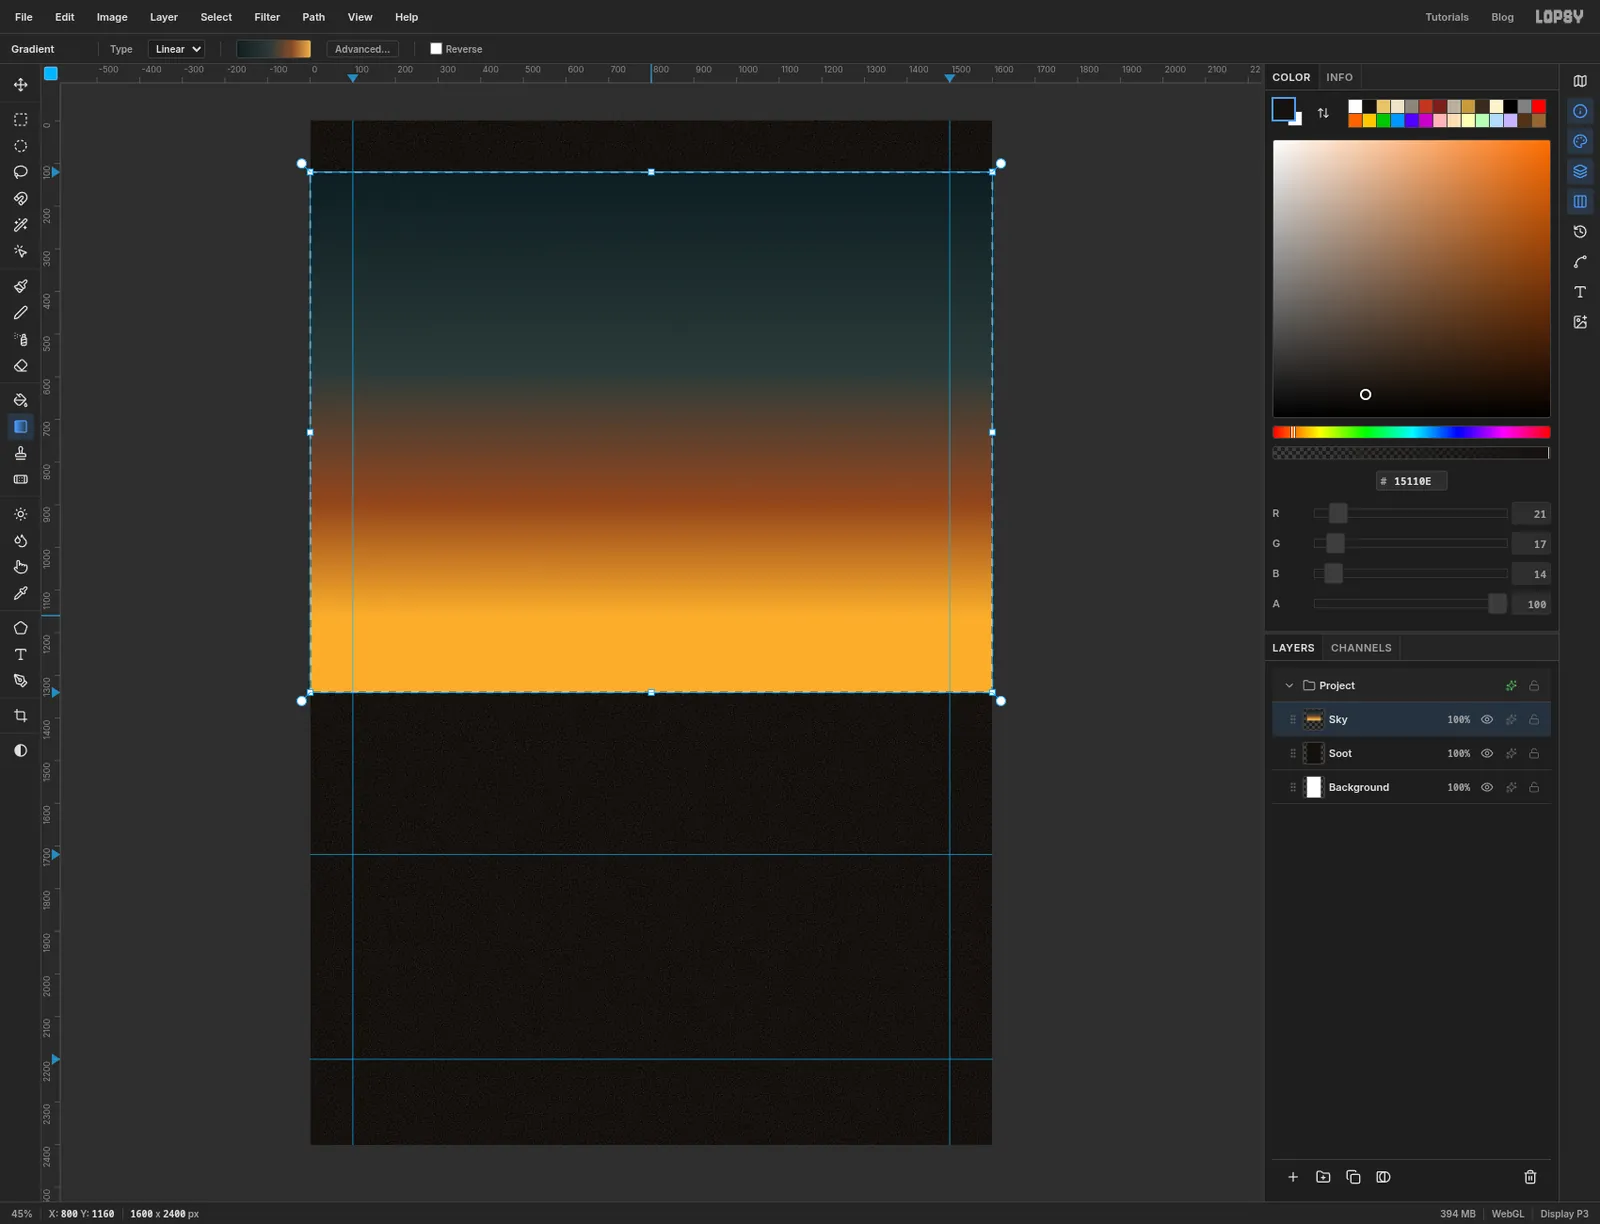
Sky. Pick the Rectangular Marquee (M) and drag from just off the left edge on the 120 guide to just off the right edge on the 1340 guide. The marquee snaps to both guides.Pick the Gradient tool (G), leave Type on Linear and click Advanced… to open the Gradient Editor. Set four stops:
- at the far left
- at 45%
- at 75%
- at the far right
Click Done, then drag straight down from the top of the marquee to about y 1160. Ending the drag above the bottom of the marquee leaves a band of solid amber along the horizon. Keep the selection.
-
Add the sunburst
Click Add Layer and name it
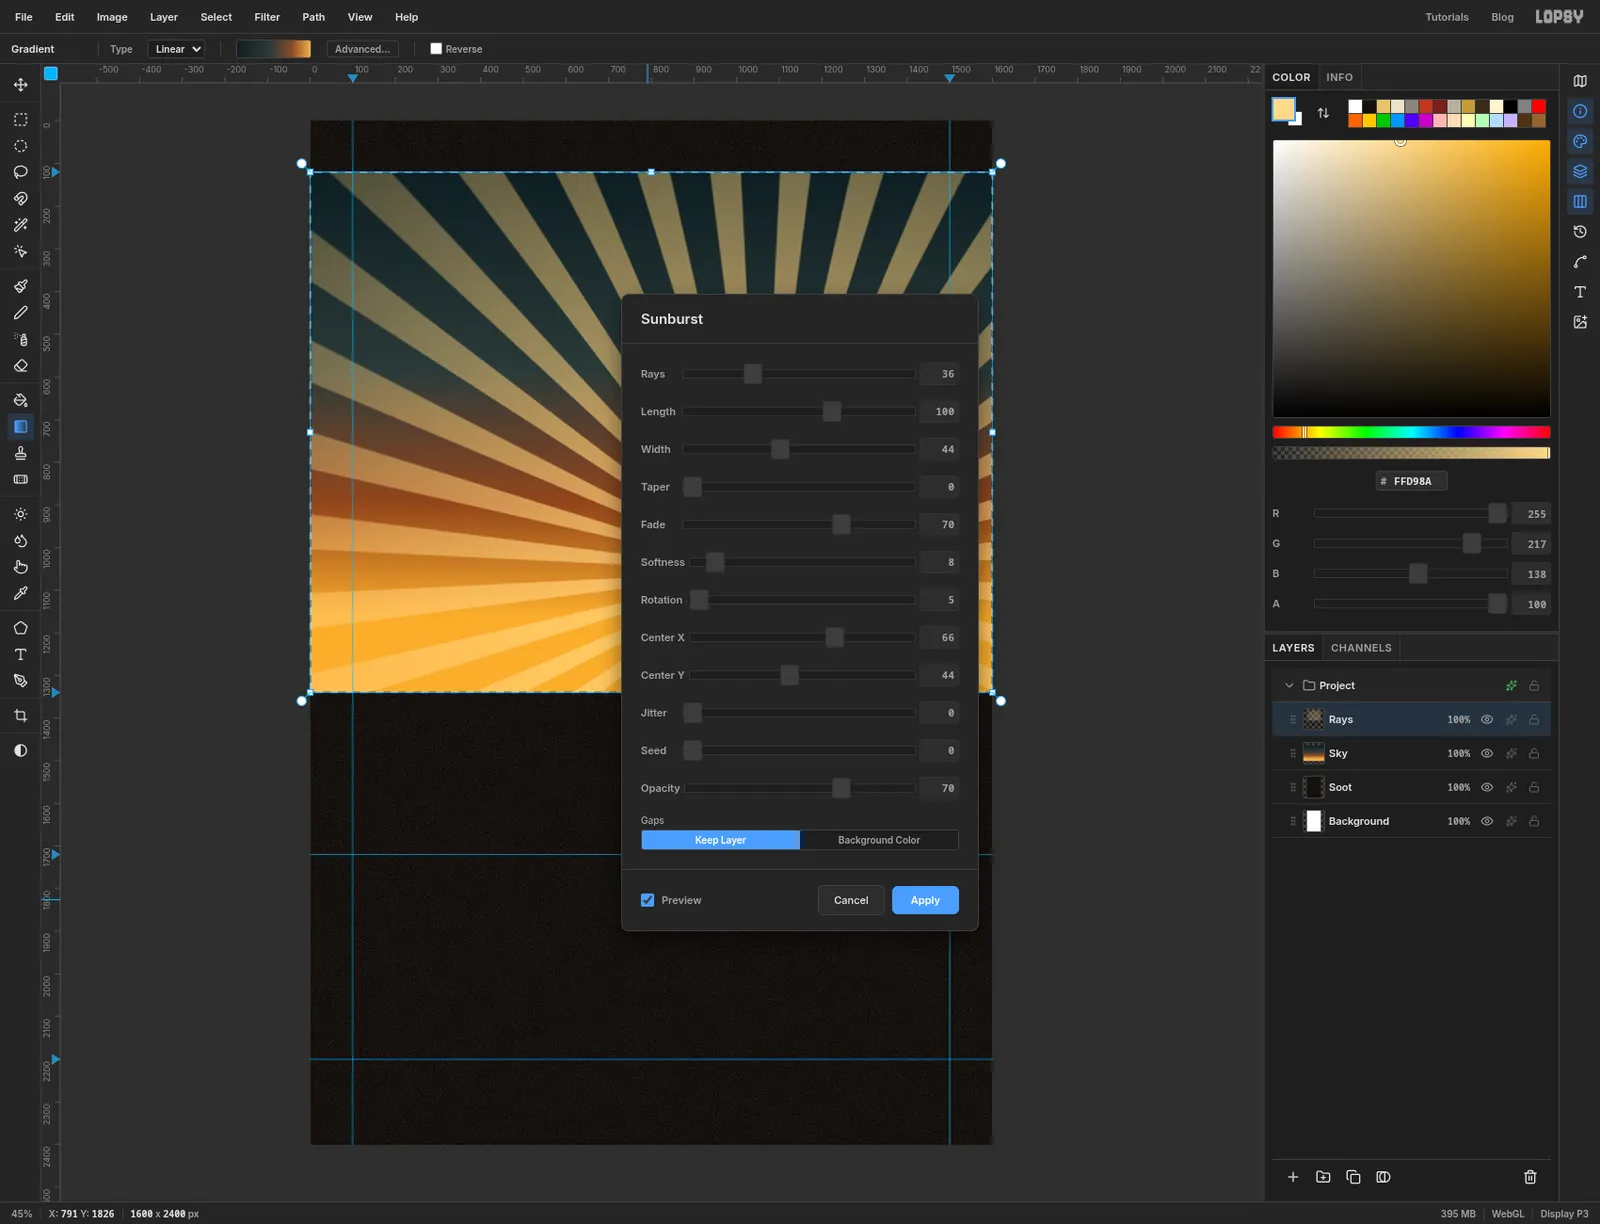
Rays. Set the foreground to . Sunburst paints in the foreground colour.Choose Filter → Sunburst… and set:
- Rays
36, Width44, Fade70, Softness8, Rotation5 - Center X
66and Center Y44, which puts the sun at about 1056, 1056, low on the horizon and right of centre - Opacity
70
Click Apply and press Cmd+D. The selection you kept confines the rays to the hero.
Click the ✦ button on the
Raysrow to open the effects drawer and change the blend mode to Soft Light. The rays turn from flat stripes into bands of light that take their colour from the sky behind them. Close the drawer.Before you go on, open the View menu and untick Snap to Guides. From here you'll draw many small shapes near the margins, and you don't want them jumping onto a guide. Later steps still marquee full-width bands between guides. For those, either watch the Y readout in the status bar as you drag, or tick Snap to Guides for that one marquee and untick it again afterwards.
- Rays
-
Cut the mountains
Click Add Layer and name it
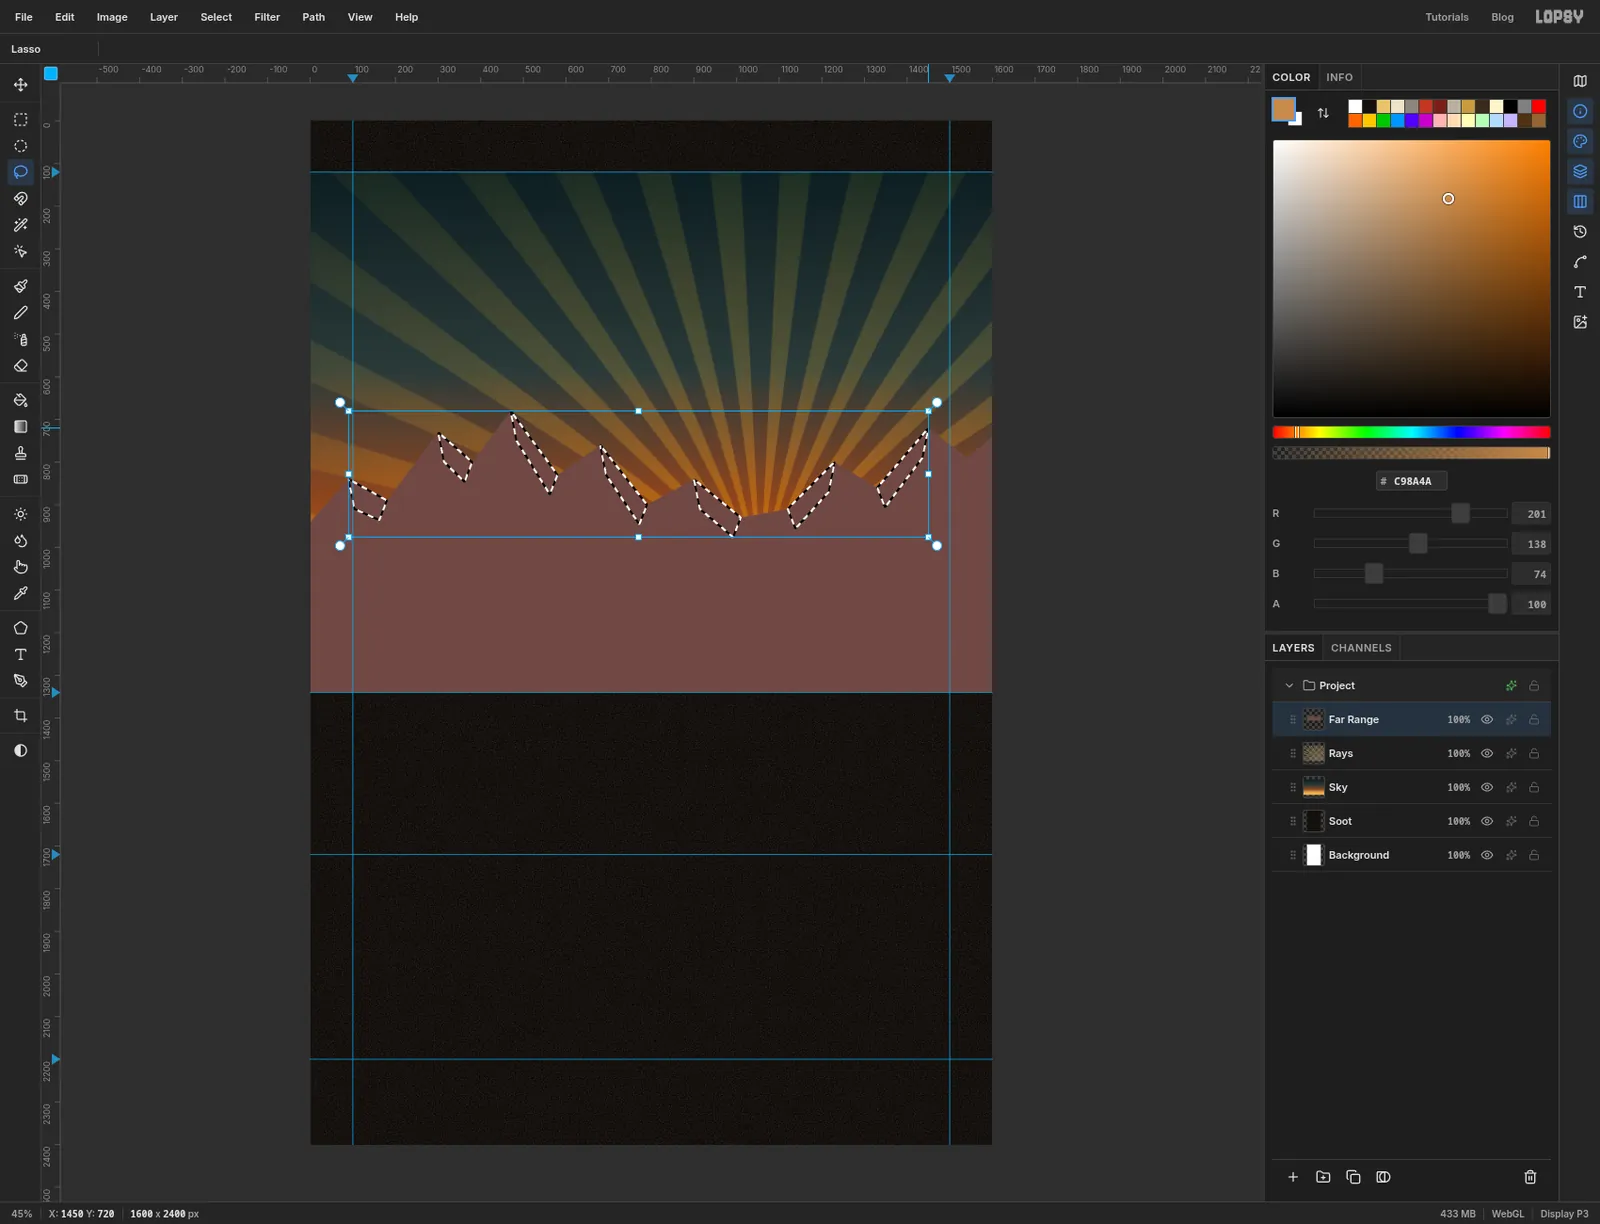
Far Range. Pick the Lasso (L) and draw a jagged range right across the hero: start off the left edge at about y 940, zigzag up and down across the page with peaks between y 680 and y 840 and valleys between y 800 and y 930, dip to its lowest around x 1050 where the sun sits, and finish off the right edge. Then run down the right side, along the 1340 guide and back up to the start. Fill with and press Cmd+D.Straight segments are what you want here. The poster look comes from flat, faceted shapes.
Now light the peaks. Each peak gets one bright face on the side that looks at the sun: the right side for peaks left of x 1056, the left side for peaks right of it. With the Lasso, draw a narrow four-sided sliver from a summit down its sunward slope to the valley. Hold Shift and draw the next one, and keep going until every peak has one. Fill them all at once with and press Cmd+D.
-
Add the near range
Click Add Layer and name it
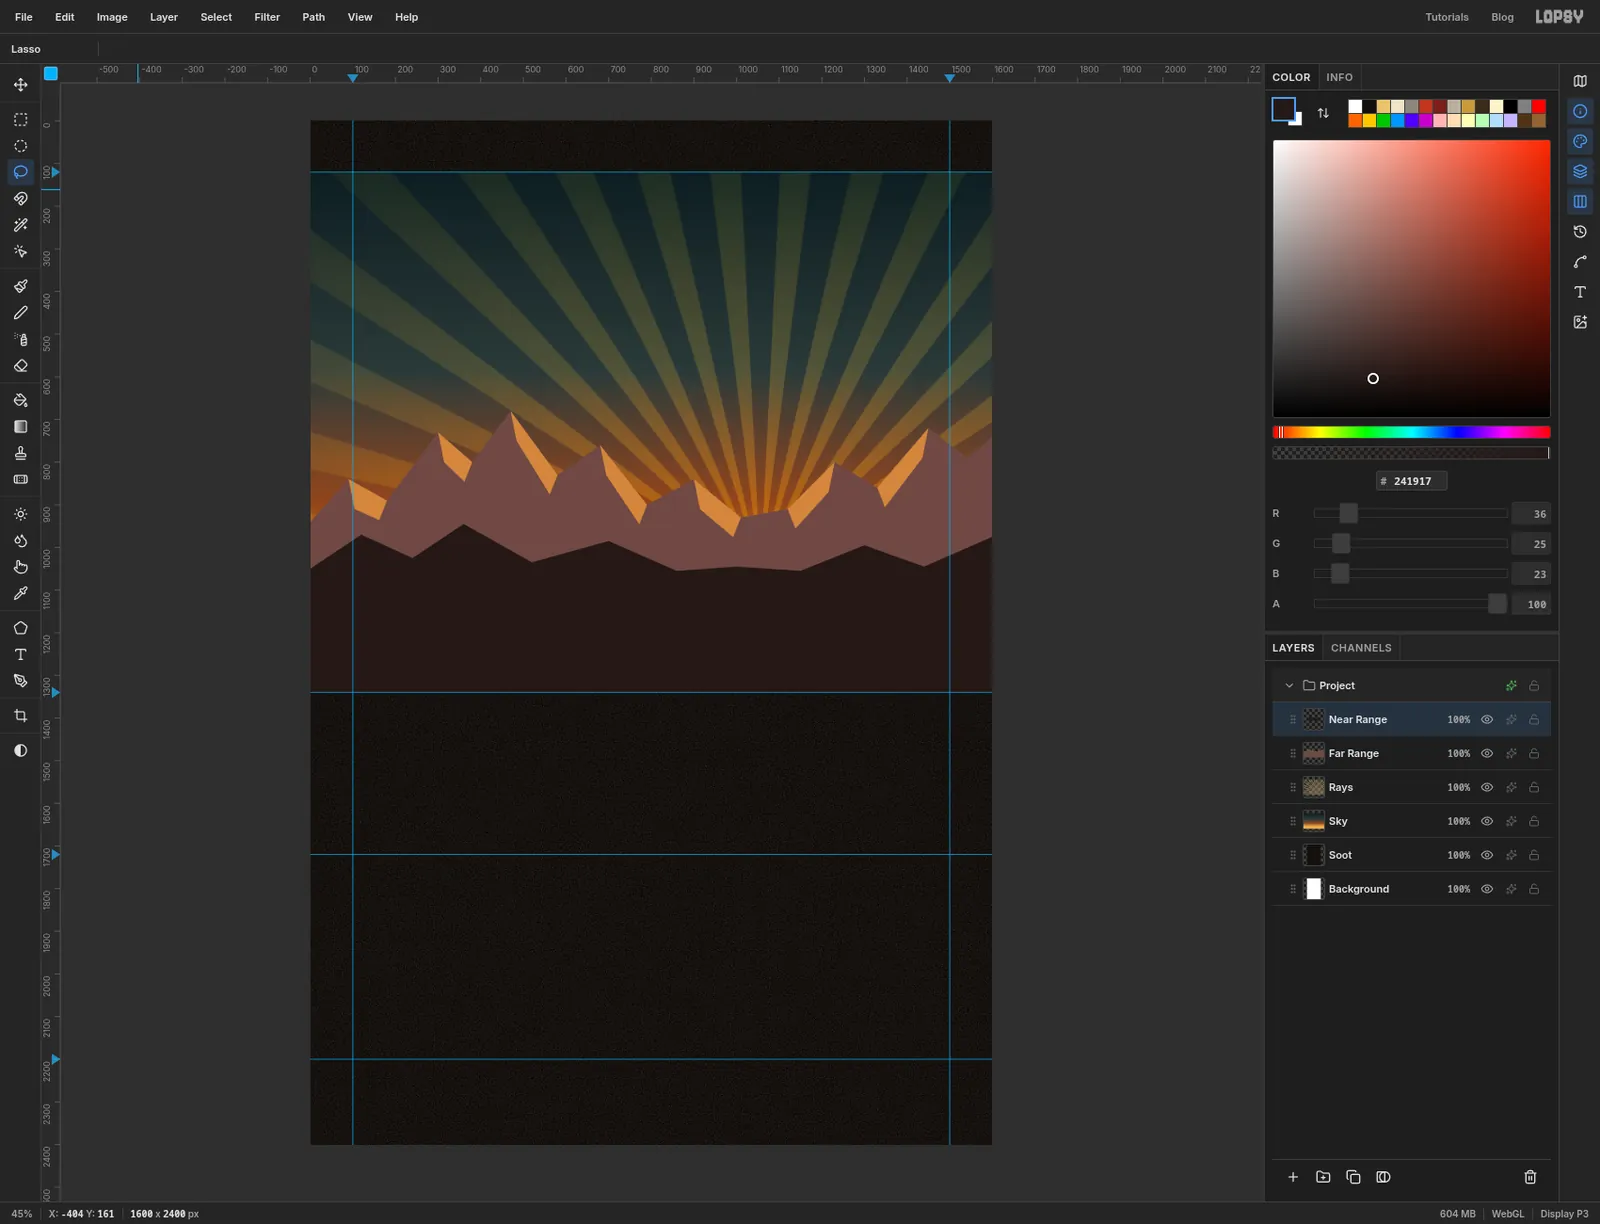
Near Range. Lasso a second, lower range in front of the first, with gentle peaks between y 945 and y 1055, closing along the 1340 guide. Fill it with .Three values now do the work of depth: bright sky, mid-tone far range, dark near range. The train will sit against the dark one, which is why its steel will stand out.
-
Build the trestle
Click Add Layer and name it
Trestle. With the marquee, drag three full-width bars and fill each one:- the rail, from y 1210 to 1217, in
- the girder, from y 1217 to 1257, in rust
- a highlight along the top of the girder, from y 1217 to 1222, in
Pick the Brush (B), set Size
14and Hardness100, and set the foreground to dark rust . Click at 100, 1257, then Shift-click at 100, 1340. Shift-click draws a straight line from the last point, so that's one post. Repeat every 200 px across the page, ending at x 1500.Drop the Size to
6and draw the bracing the same way: in each bay, click the top of one post and Shift-click the bottom of the next, then click the top of that next post and Shift-click the bottom of the first.For the rivets, pick the Pencil (N) at Size
5, set the foreground to brass , and click a dot every 40 px along y 1240.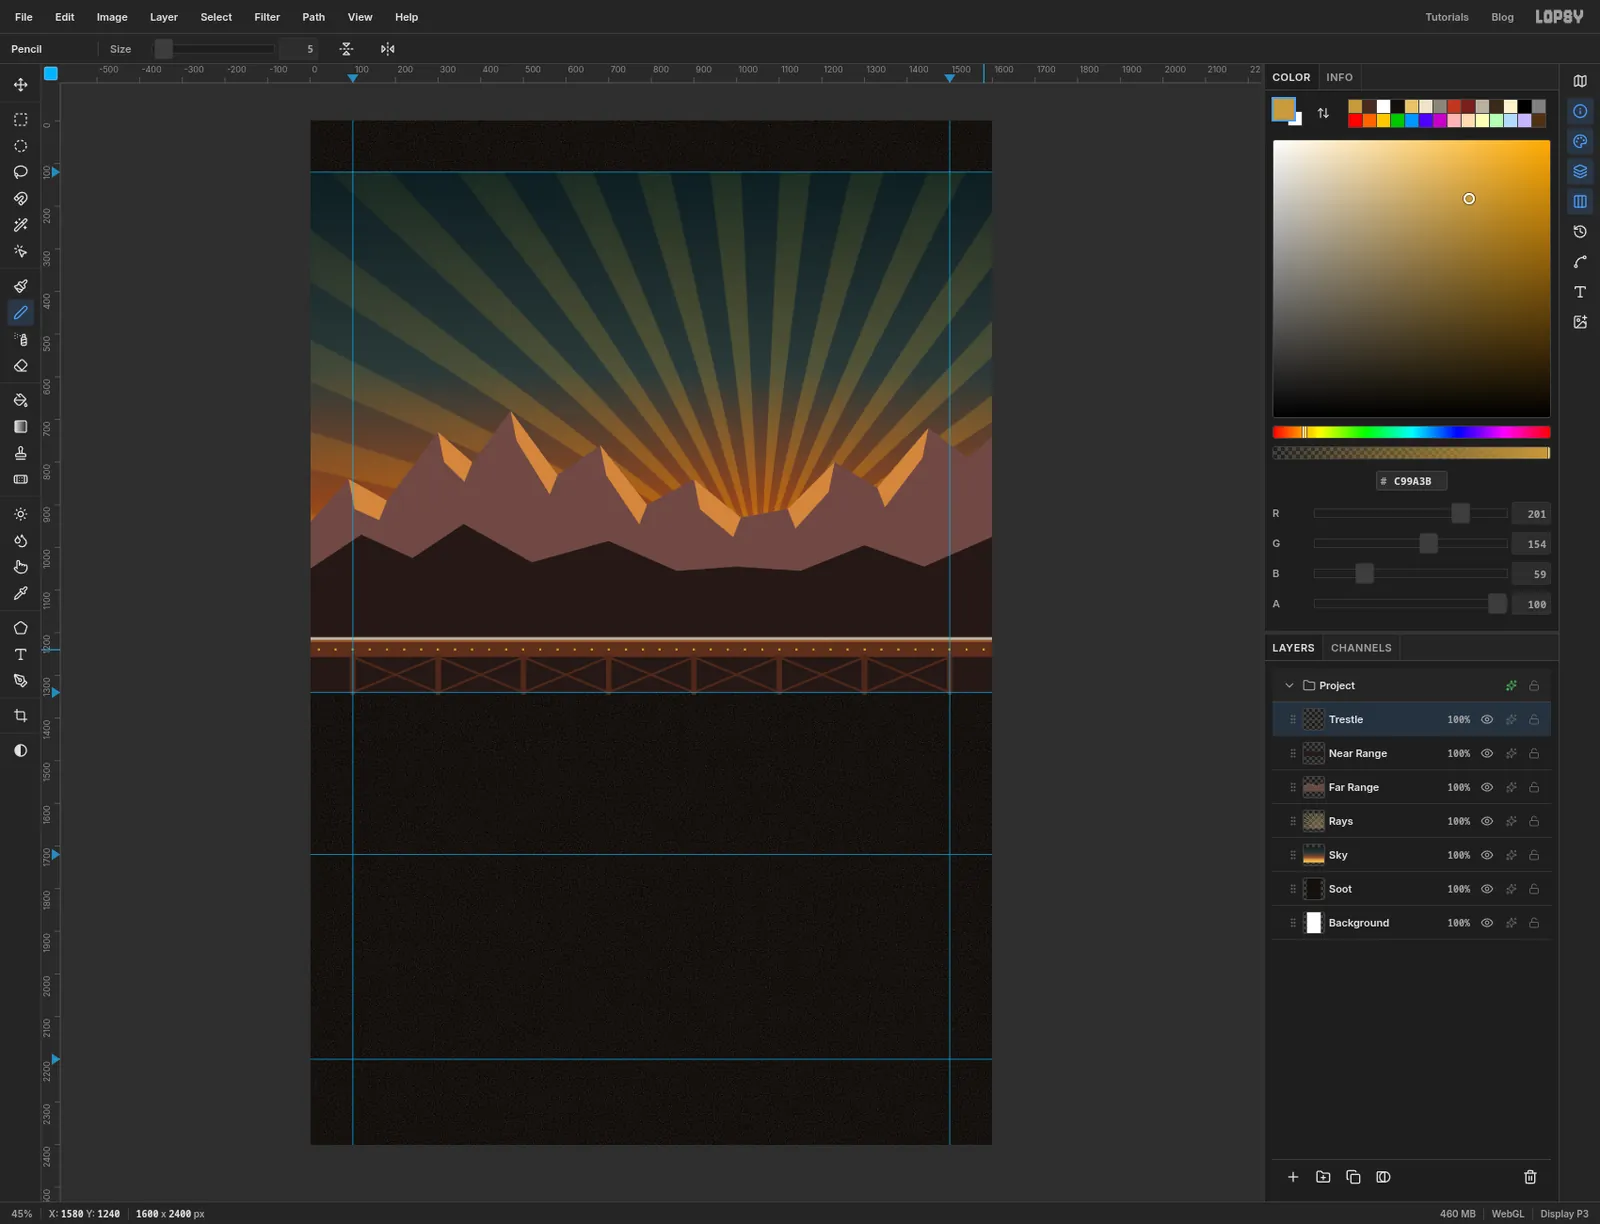
-
Draw one wheel truck
Click New Group in the Layers panel and name the group
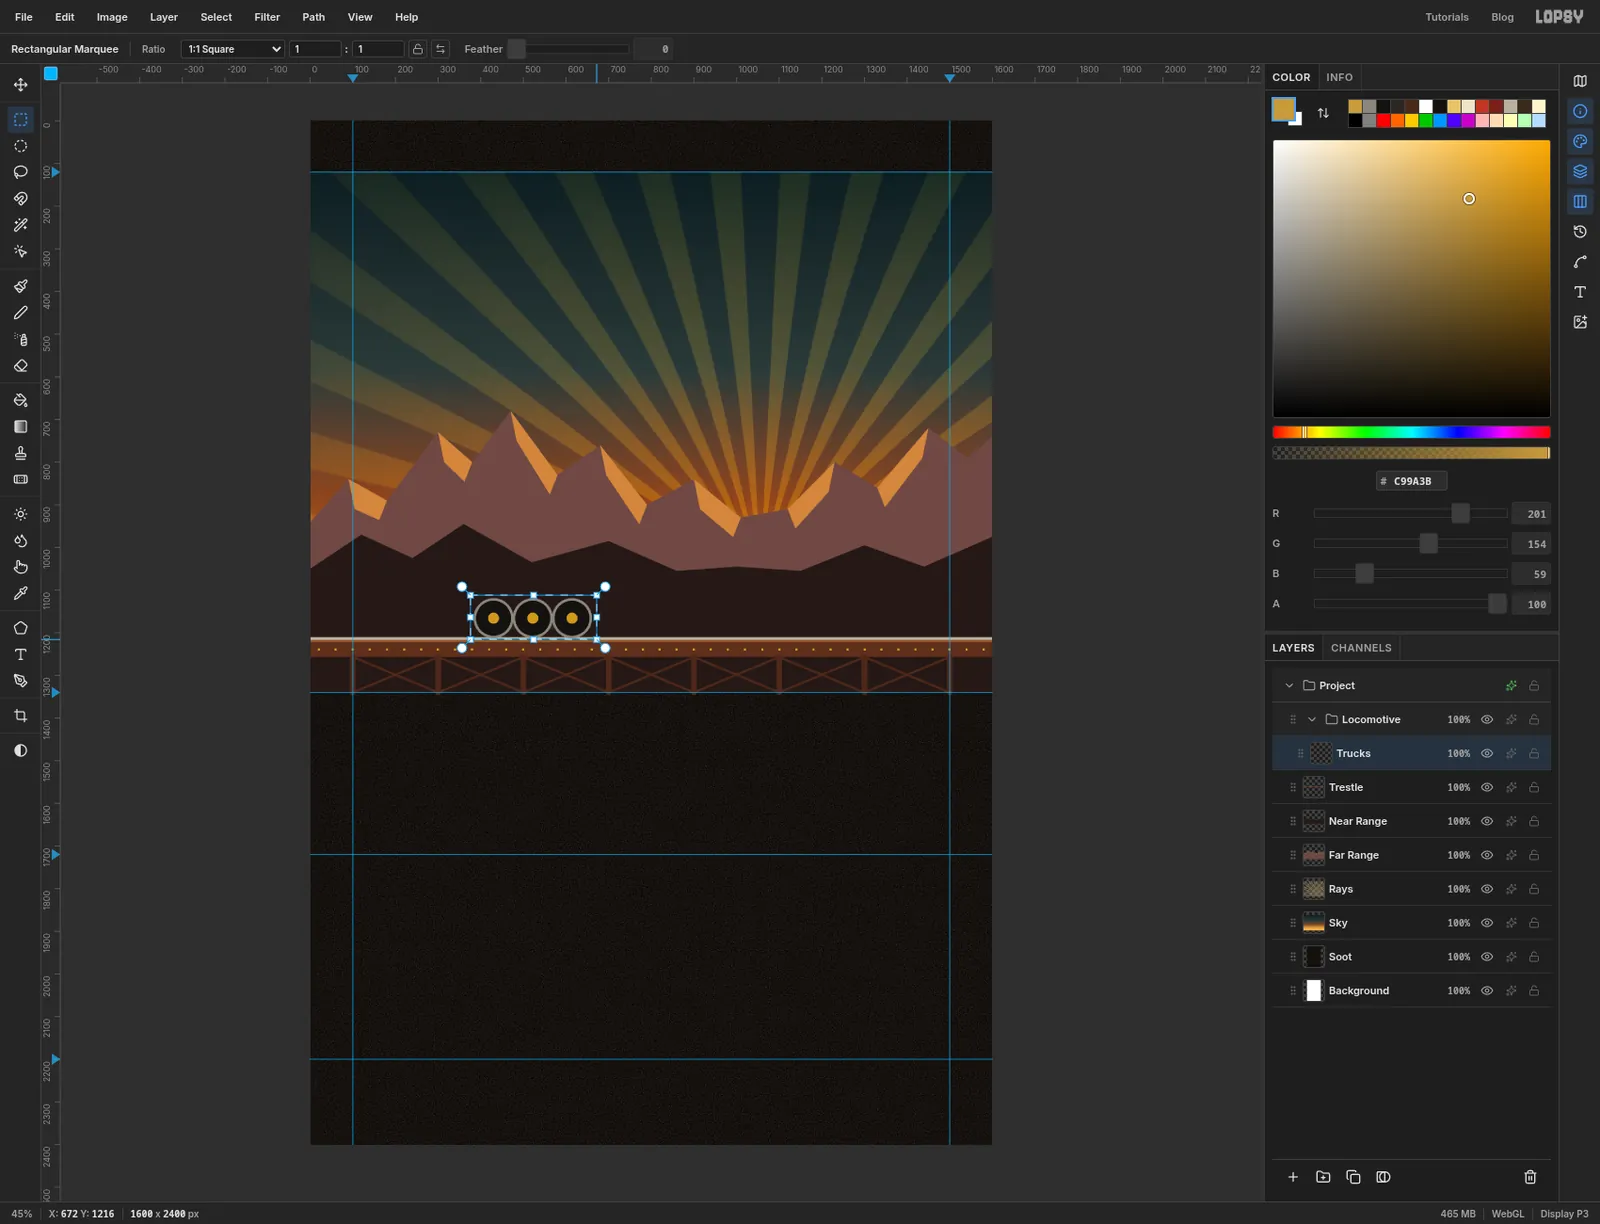
Locomotive. With the group selected, click Add Layer and name itTrucks. A new layer goes inside the selected group.Pick the Shape tool (U) and set Shape to Rectangle. Click the Fill swatch and set it to , leave Stroke off, and set Corner Radius
8. Drag from the centre at 522, 1171 out to 658, 1192 for the truck frame.Switch Shape to Ellipse. Set Fill to , click the — next to Stroke to add a stroke, set its colour to steel and Width
6. Draw three wheels 88 px across, centred at 430, 1166, 522, 1166 and 614, 1166. Their bottoms rest on the rail.Remove the stroke (click the Stroke swatch, then Remove stroke), set Fill to brass , and draw a 26 px hub in the middle of each wheel.
Now pick the Rectangular Marquee and drag around the whole truck, from about 376, 1112 to 672, 1216.
-
Paste two more trucks
Press Cmd+C, then Cmd+V. The copy arrives on its own
Pasted Layer. Pick the Move tool (V) and drag it right, holding it level, until its left wheel starts at about x 1083. Check that its wheels still sit on the rail.Press Cmd+V again and drag the second copy to x 1393. It hangs off the right edge of the page. That's the first truck of the coach, and letting the train run off the page makes it feel longer than the screen.
Press Cmd+D. With the top
Pasted Layerselected, press Cmd+E twice to merge both copies down intoTrucks.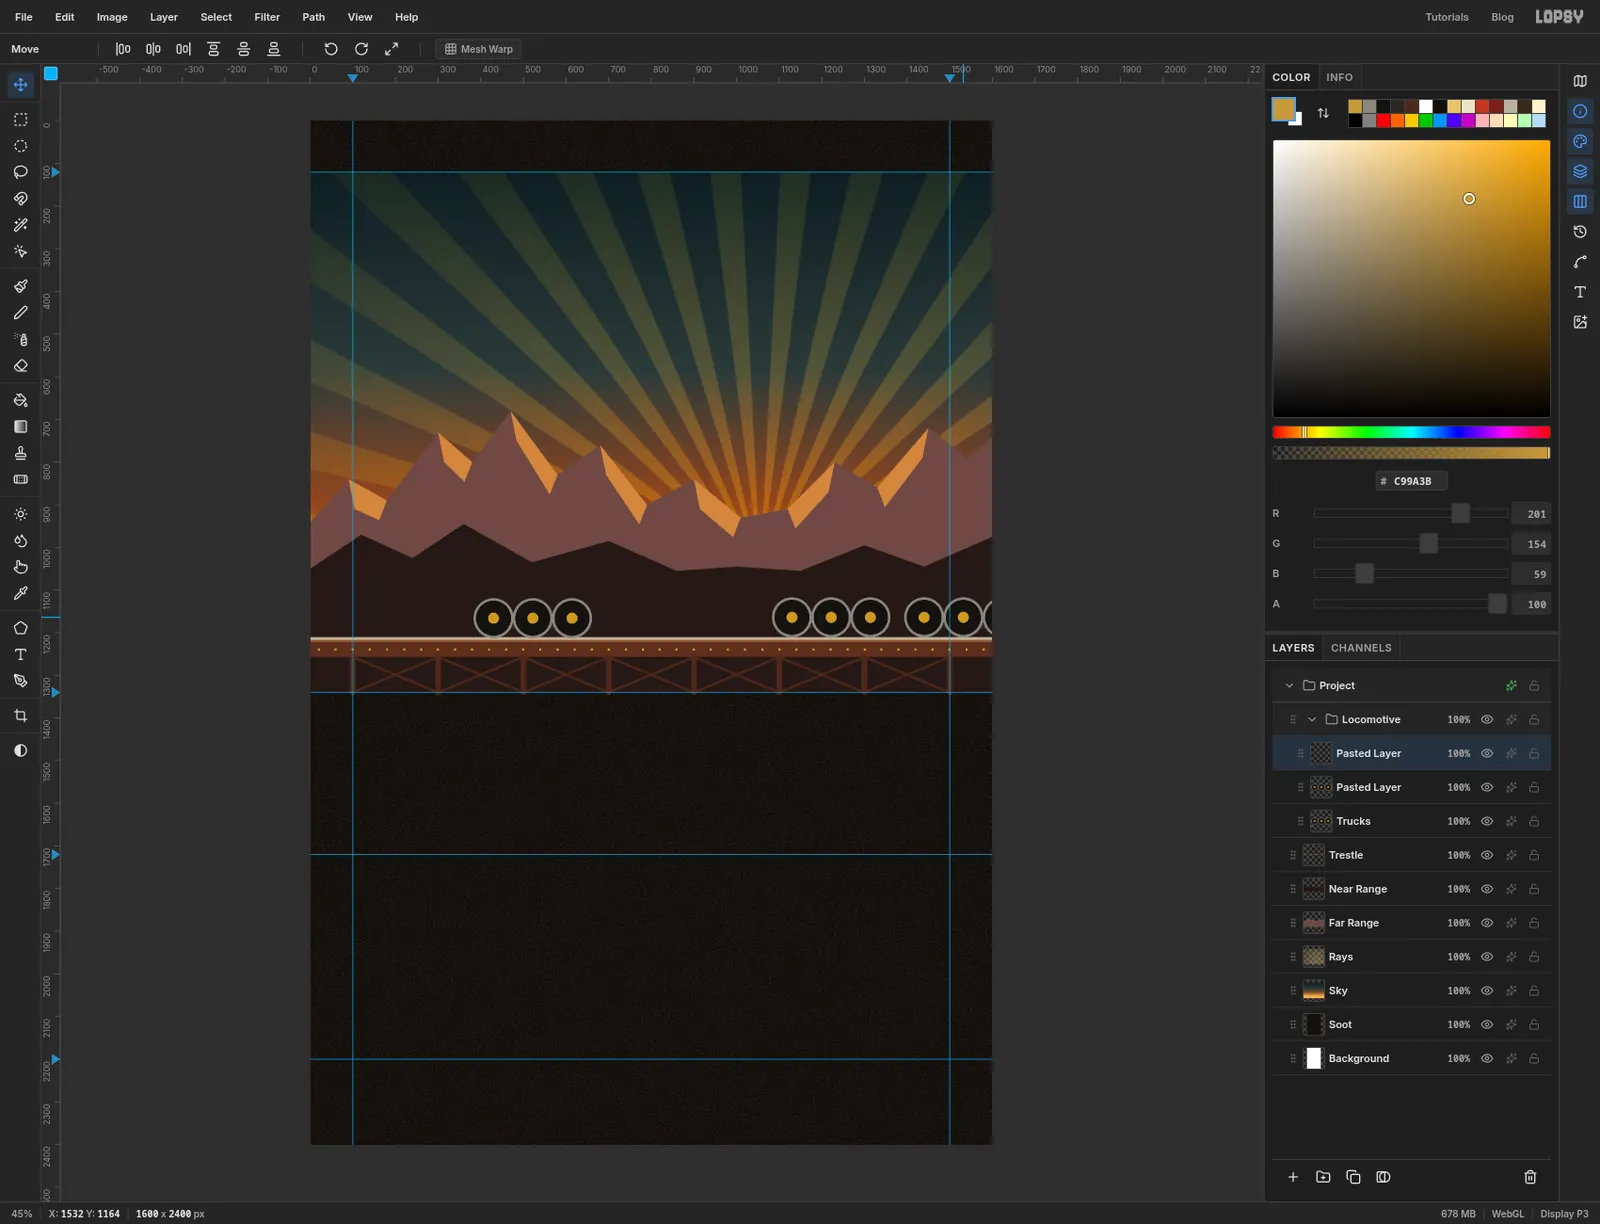
-
Shape and shade the body
Click Add Layer and name it
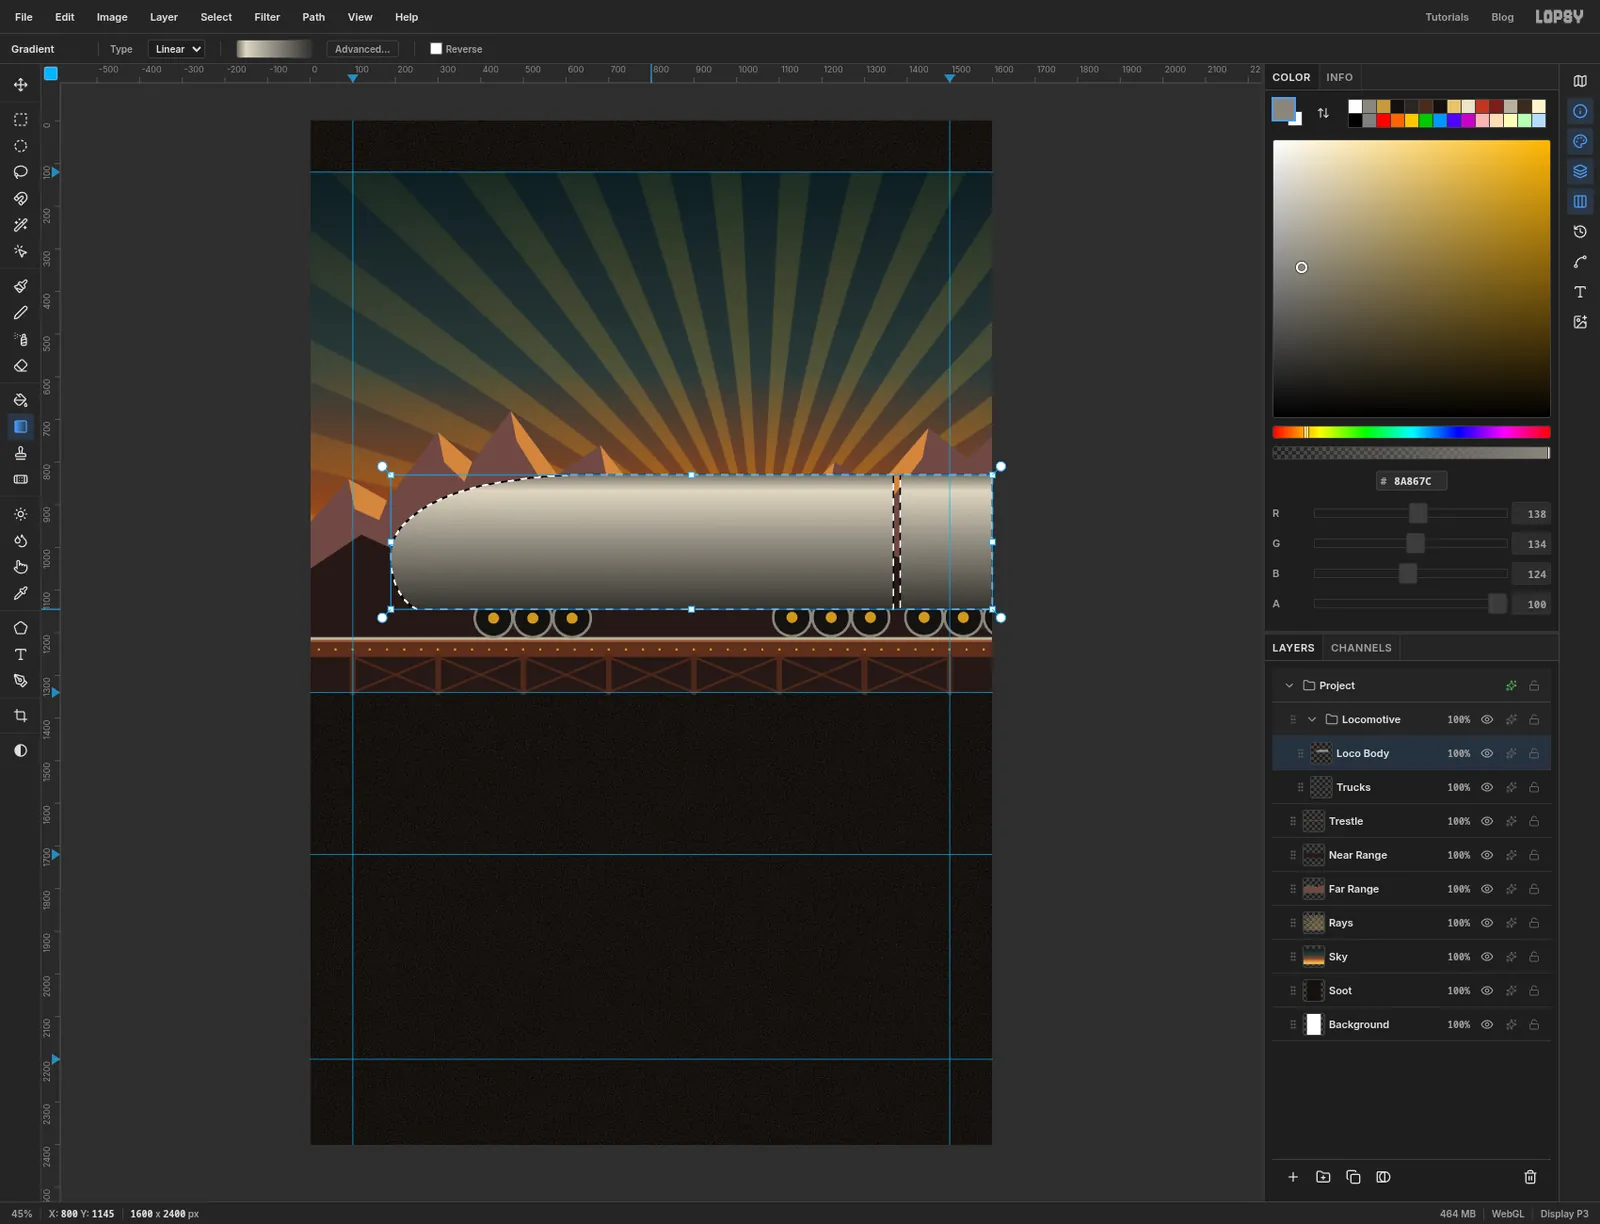
Loco Body. The engine is a long box, 315 px tall, with a bullet nose on the left: the front bulges forward to a blunt tip about halfway up, then leans back as it rises and flattens into the roof.With the Lasso, start under the nose at about 250, 1145. Curve up and out to the tip at about 190, 1000, then sweep back up to the right so the line has levelled into the roof by x 640, at y 830. Run straight along the roof to x 1368, drop straight down to y 1145 and come back along the bottom to where you started.
Take the nose slowly. It's the one curve on the page that has to be smooth. If it wobbles, press Cmd+Z and draw it again.
Add the coach: pick the Rectangular Marquee, hold Shift and drag from 1384, 830 to the right edge at y 1145. The narrow gap between the two is where the coupling goes.
Pick the Gradient tool, open Advanced… and set five stops: at the left, at 12%, at 45%, at 80% and at the right. Drag from the roof at y 830 straight down to y 1145. The bright stop near the top is the highlight on a rounded roof, and the dark end tucks the belly into shadow.
With the selection still active, choose Filter → Texture…, click Streaks, set Amount
10and Size2, and click Apply. Streaks at angle 0 run along the body like brushed steel. Keep the amount low. At high amounts it stops looking like metal and starts looking like wood grain. Press Cmd+D.The body covers the top of the wheels, which is what a streamliner's side skirts do.
-
Paint the livery
Click Add Layer and name it
Livery. With the Lasso, draw a band that starts as a point on the nose at about 192, 1020, opens out as it sweeps back, and settles into a straight stripe from y 920 to y 1005 by about x 440. Carry it right off the right edge of the page.Pick the Gradient tool and set three stops: , oxblood at 45%, and . Drag from the top of the band to the bottom, then press Cmd+D. A lighter top edge makes the band look like it wraps around the body.
The band probably overshoots the nose and bridges the coupling gap. Trim it to the body: hold Cmd and click the
Loco Bodythumbnail to load its outline as a selection, click theLiveryrow, choose Select → Inverse and press Delete. Press Cmd+D.Click Add Layer and name it
Pinstripes. Two thin gold stripes follow the band, one 18 px above its top edge and one 12 px below its bottom edge, each about 6 px deep. A freehand lasso won't hold a line that thin for 1,200 px, so build each stripe in two parts: drag a Rectangular Marquee for the long straight run from about x 440 to the right edge, then pick the Lasso, hold Shift and add the short curved tail that follows the band down the nose. Add the second stripe to the same selection with Shift too. Fill with gold and trim to the body the same way as the band.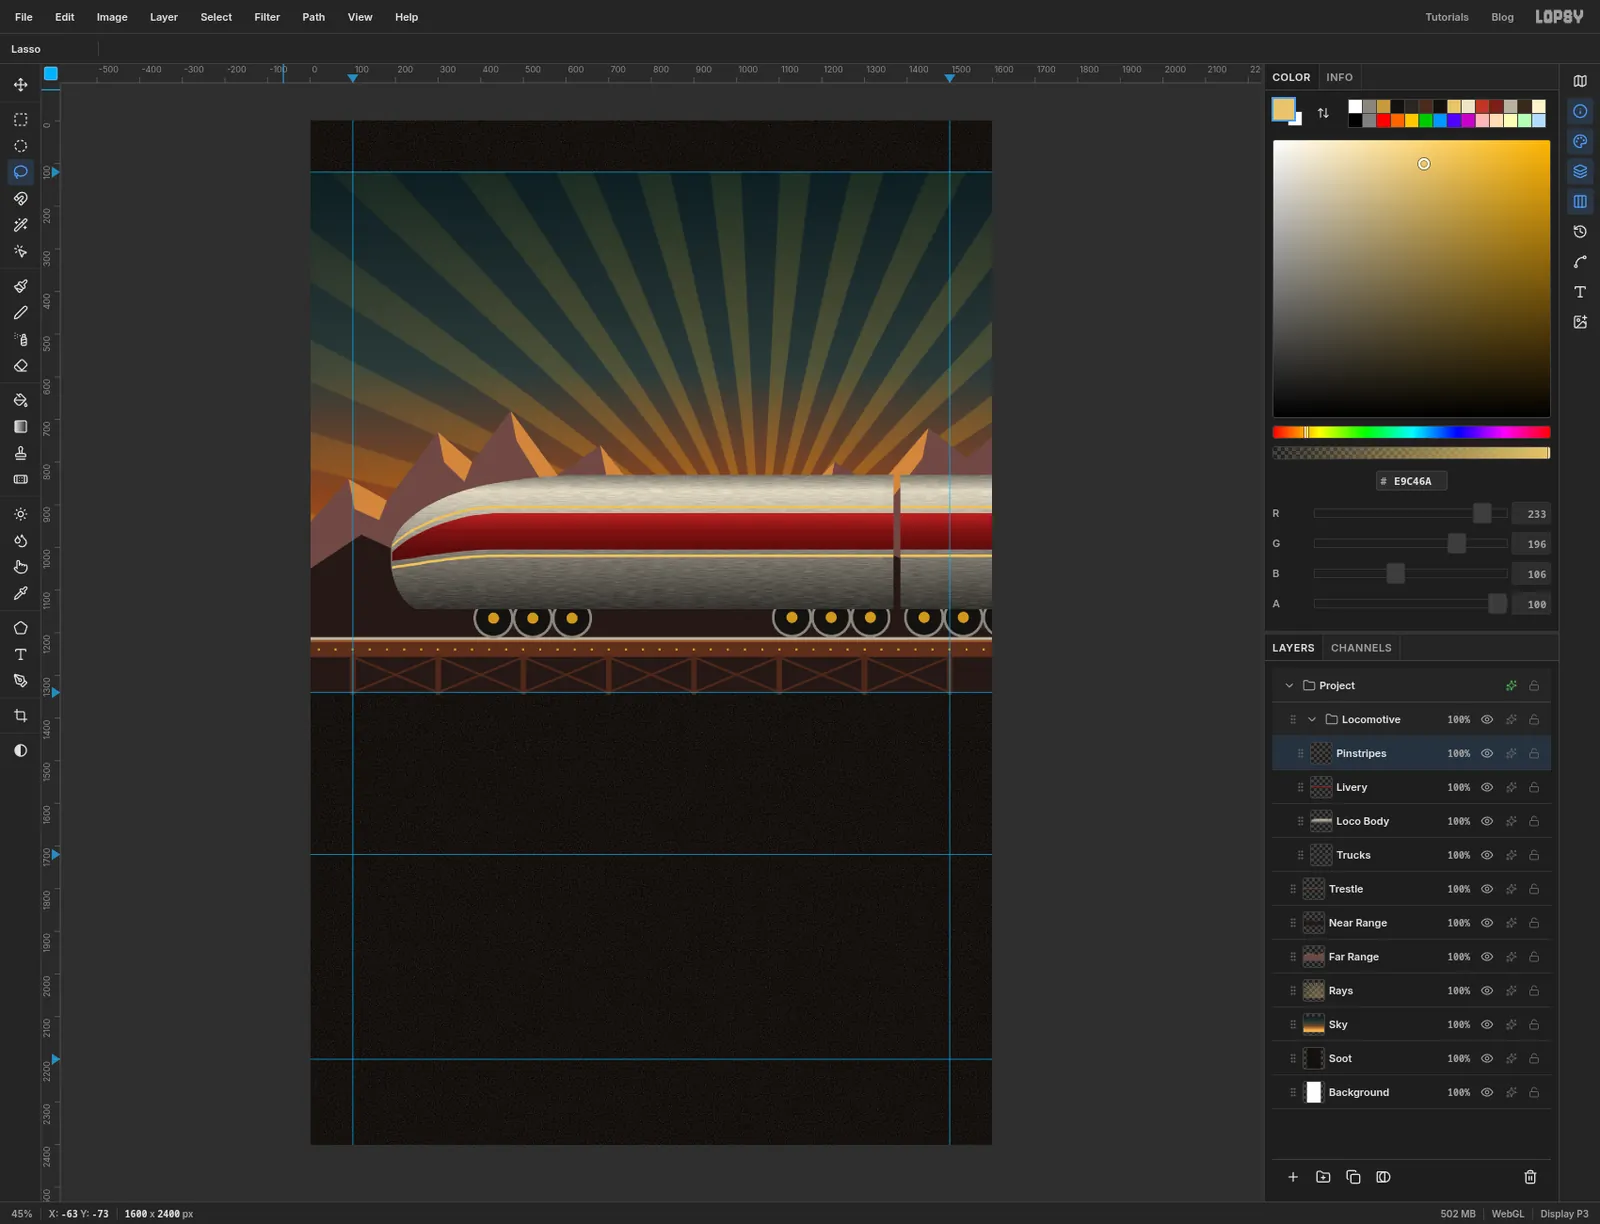
-
Cut the roof
A dark roof that follows the curve of the nose is easy to get by subtraction. Click Add Layer and name it
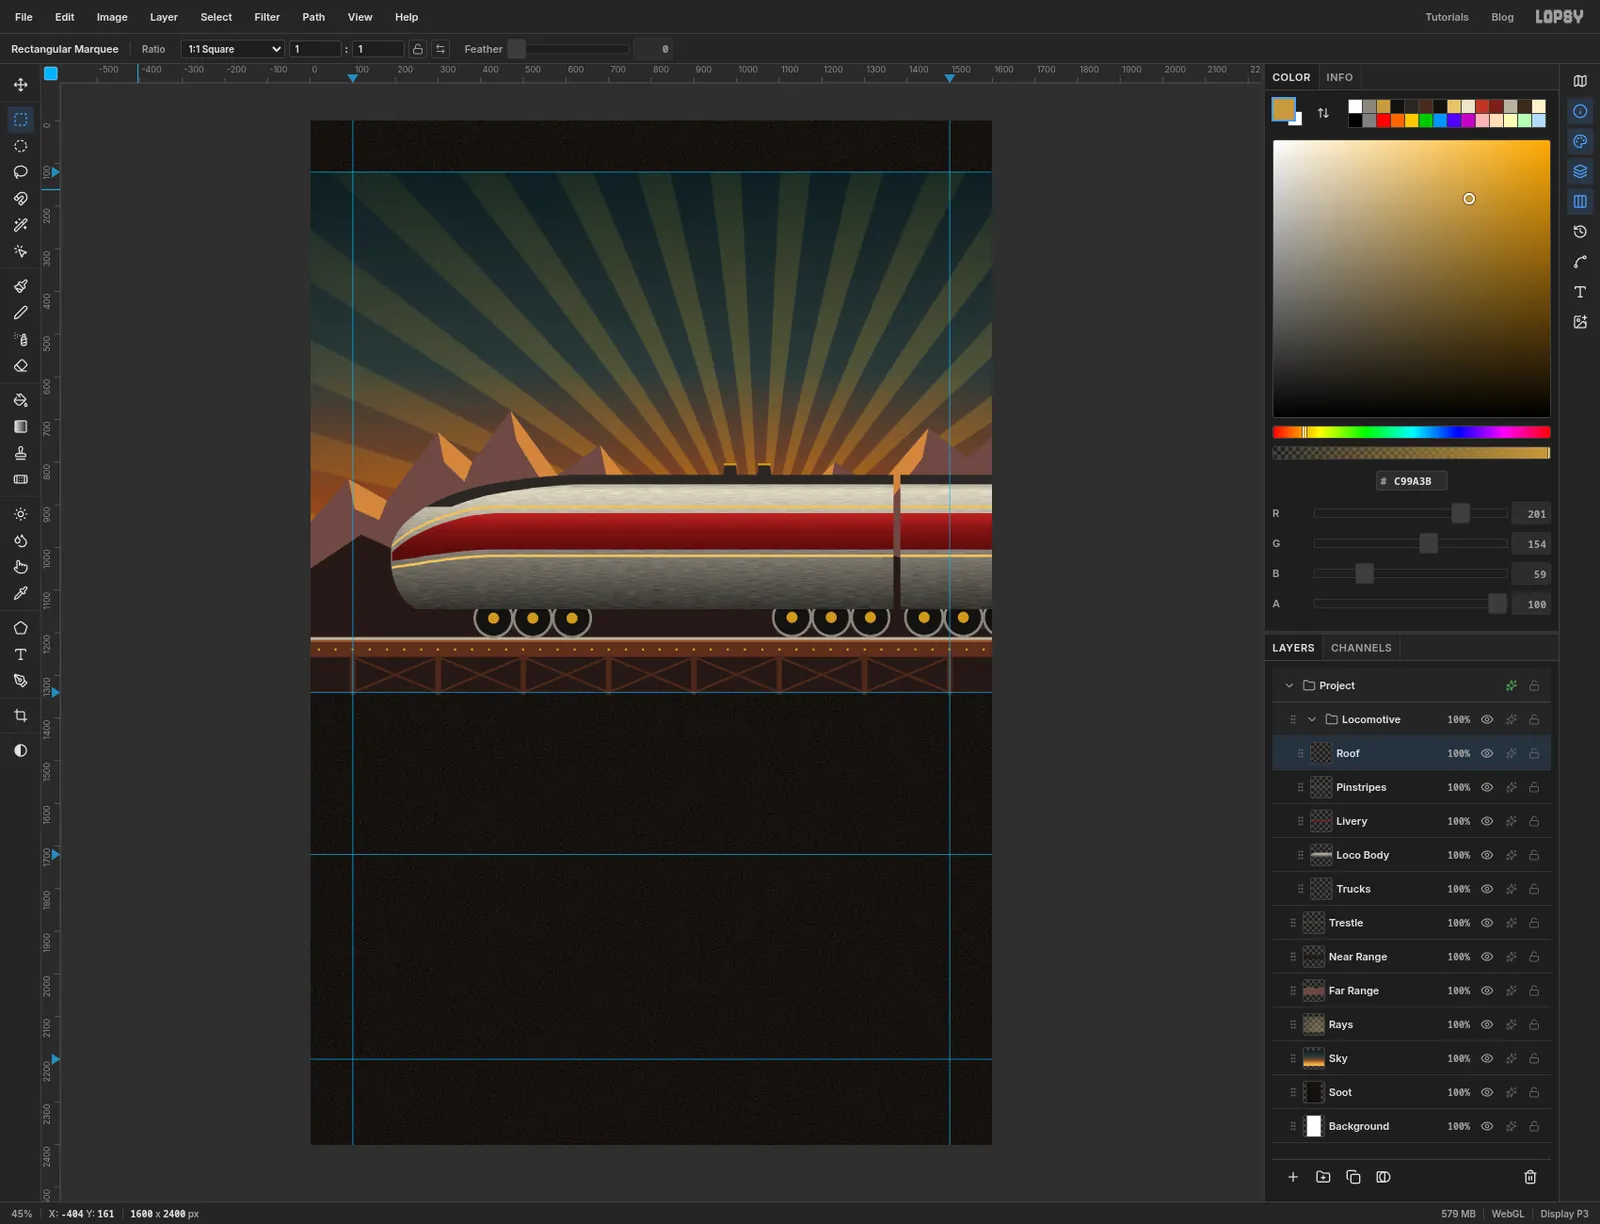
Roof. Cmd-click theLoco Bodythumbnail, set the foreground to iron , choose Edit → Fill and press Cmd+D. The whole train goes dark.Now cut away everything except a strip along the top. With the Lasso, trace the top edge of the body again, but about 22 px lower and 16 px further right, from the nose to the right edge. Then loop down around the bottom of the train and back to the start. Press Delete and Cmd+D.
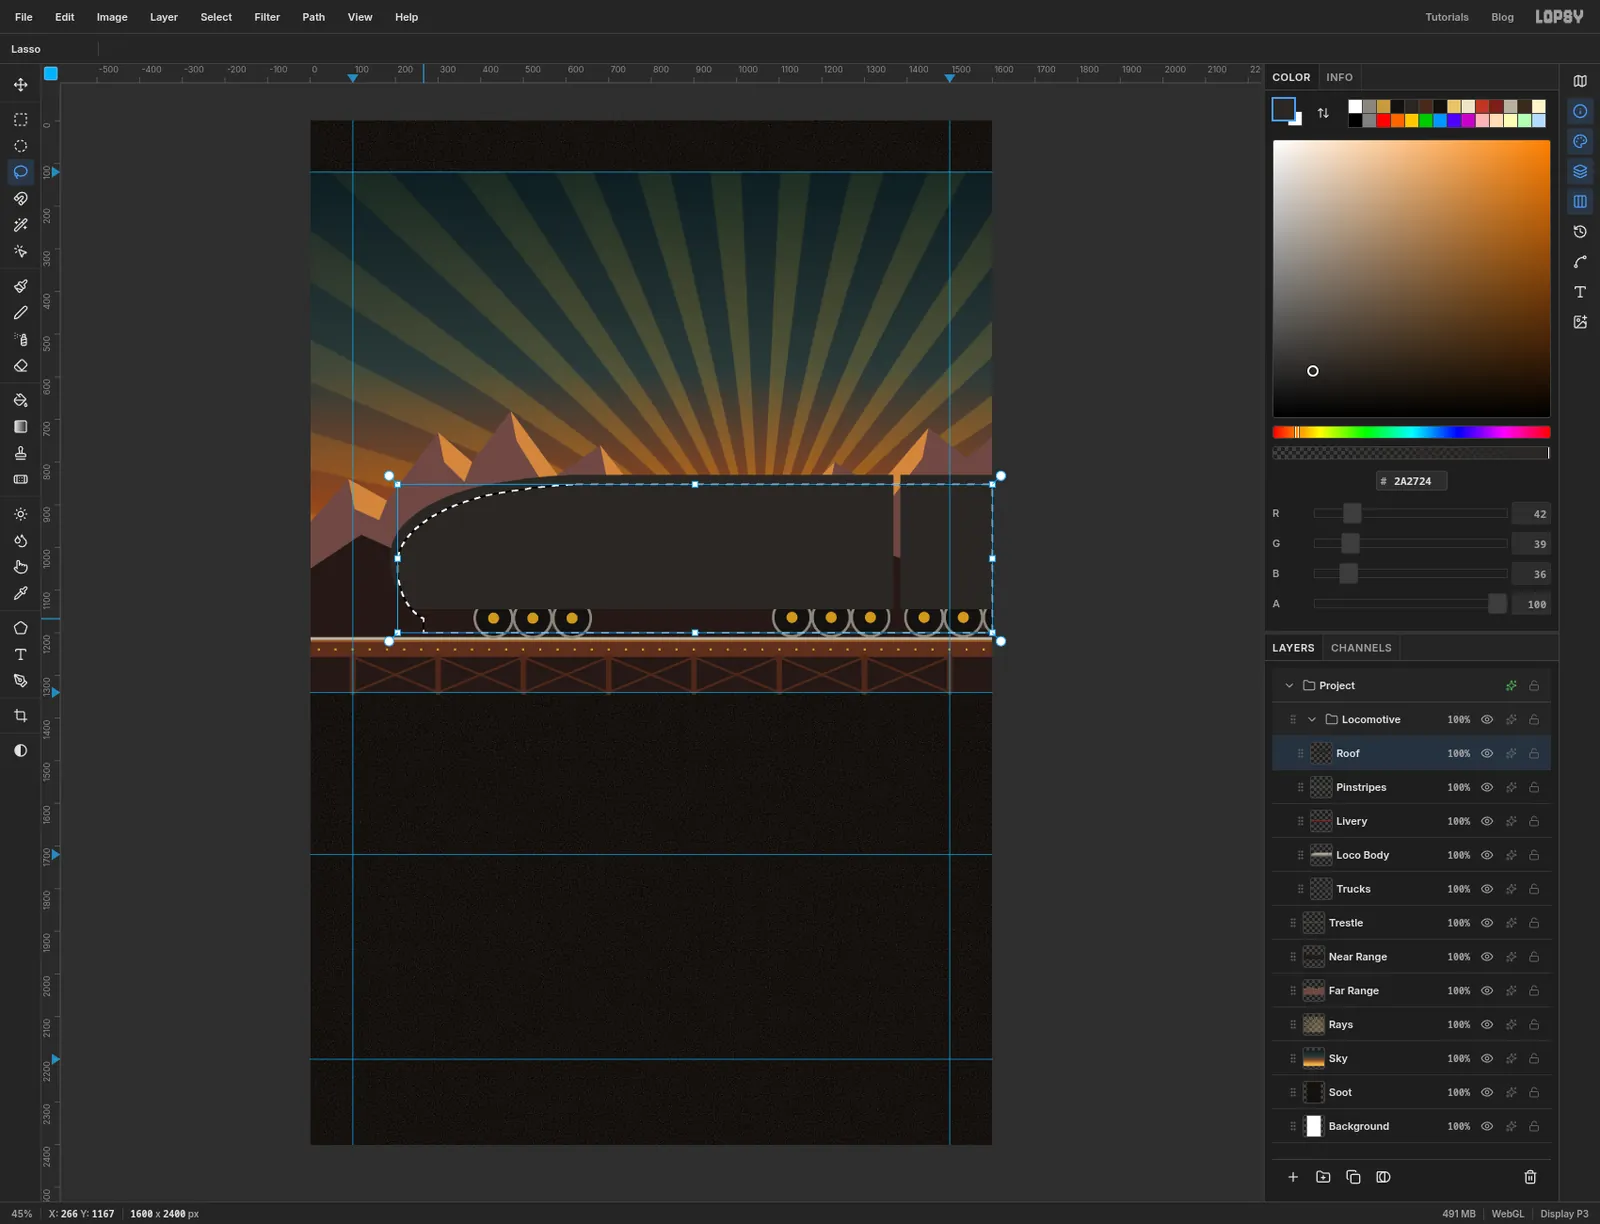
-
Finish the roof and stacks
A thin dark edge is left running down the front of the nose. Remove it: drag a marquee over the nose below y 905 and left of x 440, and press Delete. The roof now thins out to nothing as it comes over the cab.
Add two exhaust stacks on the same layer. Lasso a small trapezoid sitting on the roof, 34 px wide at the base and 26 px tall, at x 968, and Shift-lasso a second at x 1048. Fill with iron. Then marquee a 30 × 5 px cap on top of each and fill it with brass .
-
Add seams and rivets
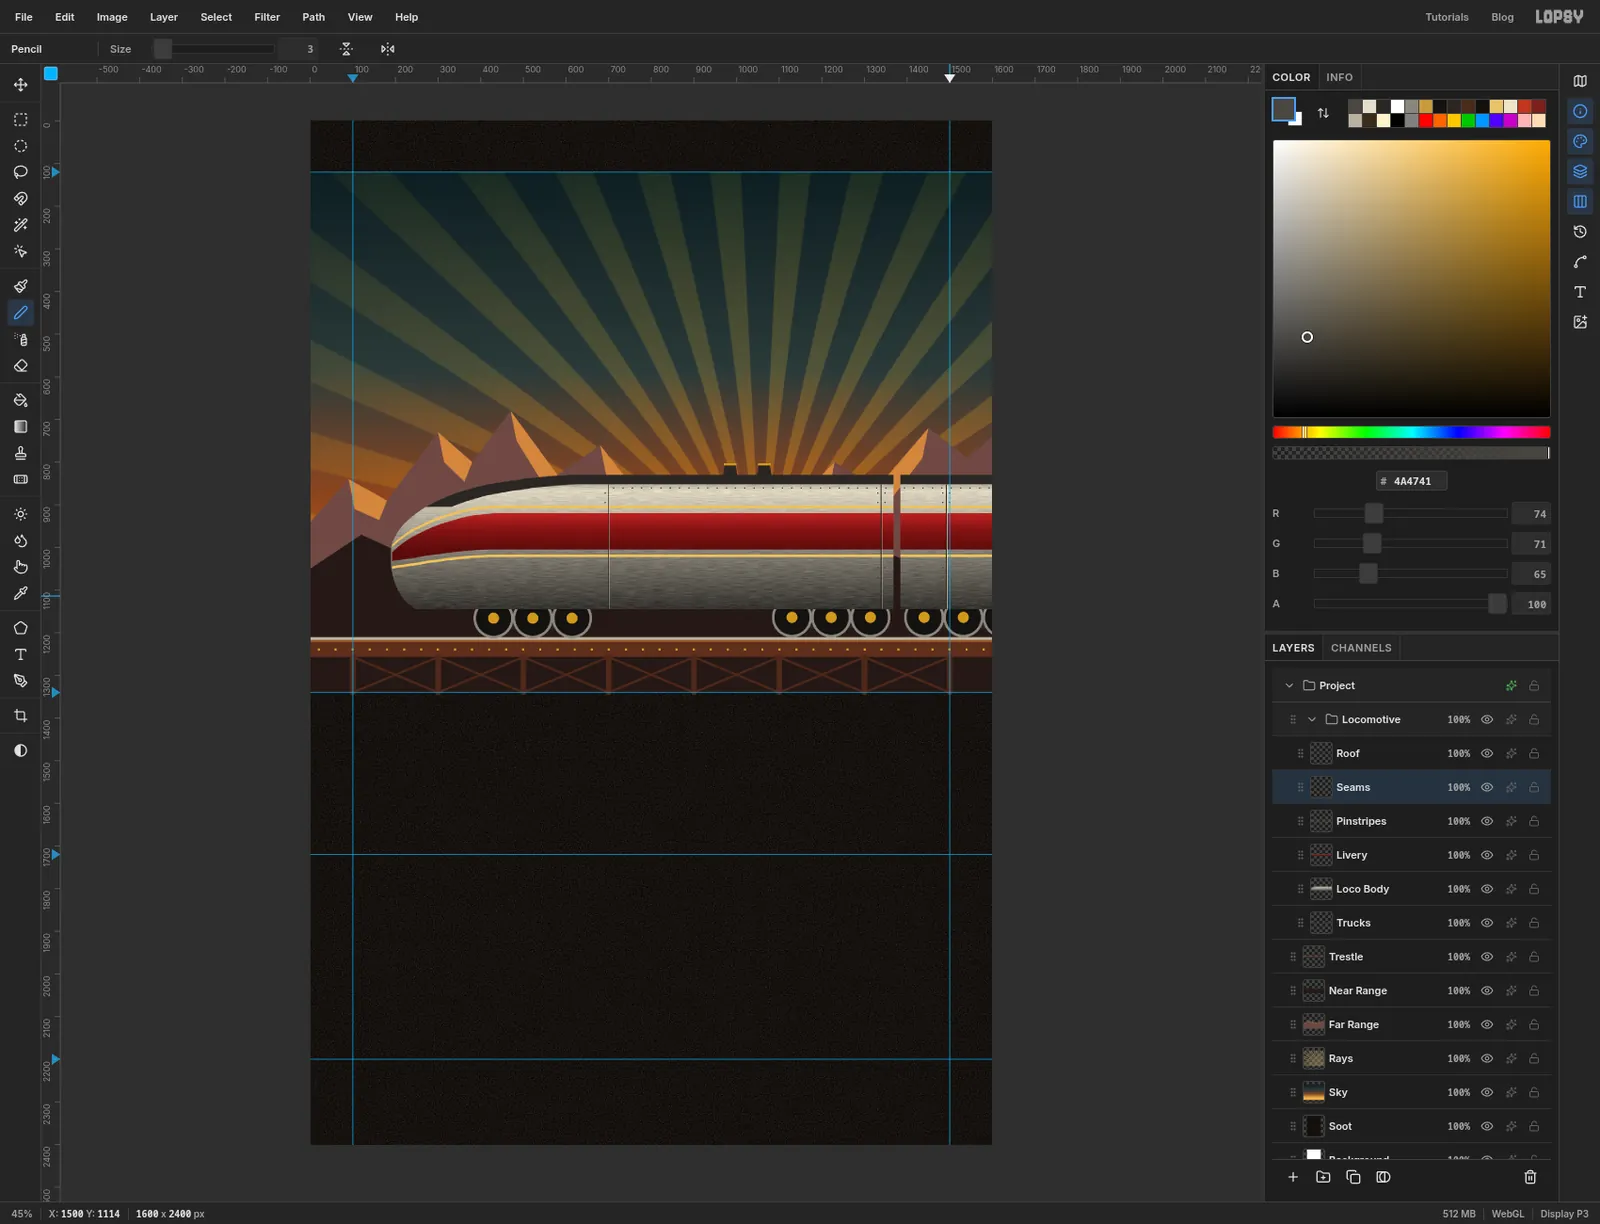
Flat steel reads as plastic. Seams and rivets say it was built in a shop. Click the
Pinstripesrow, click Add Layer and name itSeams, so it sits under the roof.Pick the Pencil at Size
2with the foreground on iron. Click the body just under the roof at x 700 and Shift-click at the bottom edge for a vertical seam. Do the same at x 1340 and x 1492. Then switch to Size1and , and draw a second line 2 px to the right of each. A dark line with a light one beside it looks like a lapped joint catching the light.For the rivets, set Size
3and the foreground to , and click dots about 22 px apart:- along the bottom of the body at y 1134
- under the roof at y 861, from the first seam back
- in a short column on each side of every seam, above and below the red band
It's a lot of clicking, and it's the cheapest detail on the page for what it adds.
-
Fit the glass, grille and pilot
Each of these goes on its own layer inside
Locomotive, aboveRoof.Glass. Lasso three cab windows between y 846 and y 908: a windscreen that slants forward at the front, from about x 430 to 520, then two upright panes ending at x 684. Fill with . Lasso two thin slanted slivers inside the front panes and fill them with for reflections. Open the effects drawer, tick Stroke and set Width3in iron.Portholes. With the Shape tool on Ellipse, fill lamp amber and stroke brass at Width6, draw five 42 px portholes centred on y 887 at x 790, 900, 1010, 1120 and 1230. Switch to Rectangle with Corner Radius8and stroke Width5, and draw three coach windows inside the red band, each about 56 × 60 px, centred on y 962 at x 1428, 1502 and 1576. The last one runs off the page. Open the effects drawer, tick Outer Glow and set Size14, Opacity60and the colour to .Grille. Draw a rectangle in iron, radius8, that spans x 760–1290 and y 1034–1114: press at its centre, 1025, 1074, and drag to the bottom-right corner. Then with the Pencil at Size3in , Shift-click seven horizontal slats across it, 10 px apart.Underframe. Marquee and fill a soot-dark skirt along the bottom of the body from y 1145 to 1161, and fill the coupling gap between the engine and coach with .
For the pilot, stay on
Underframeand lasso a wedge under the nose: about 140 px wide where it meets the body at y 1140, kicking forward to the left as it drops, and 180 px wide where it meets the rail. Fill it with , then pencil four slanted brass bars across it at Size3.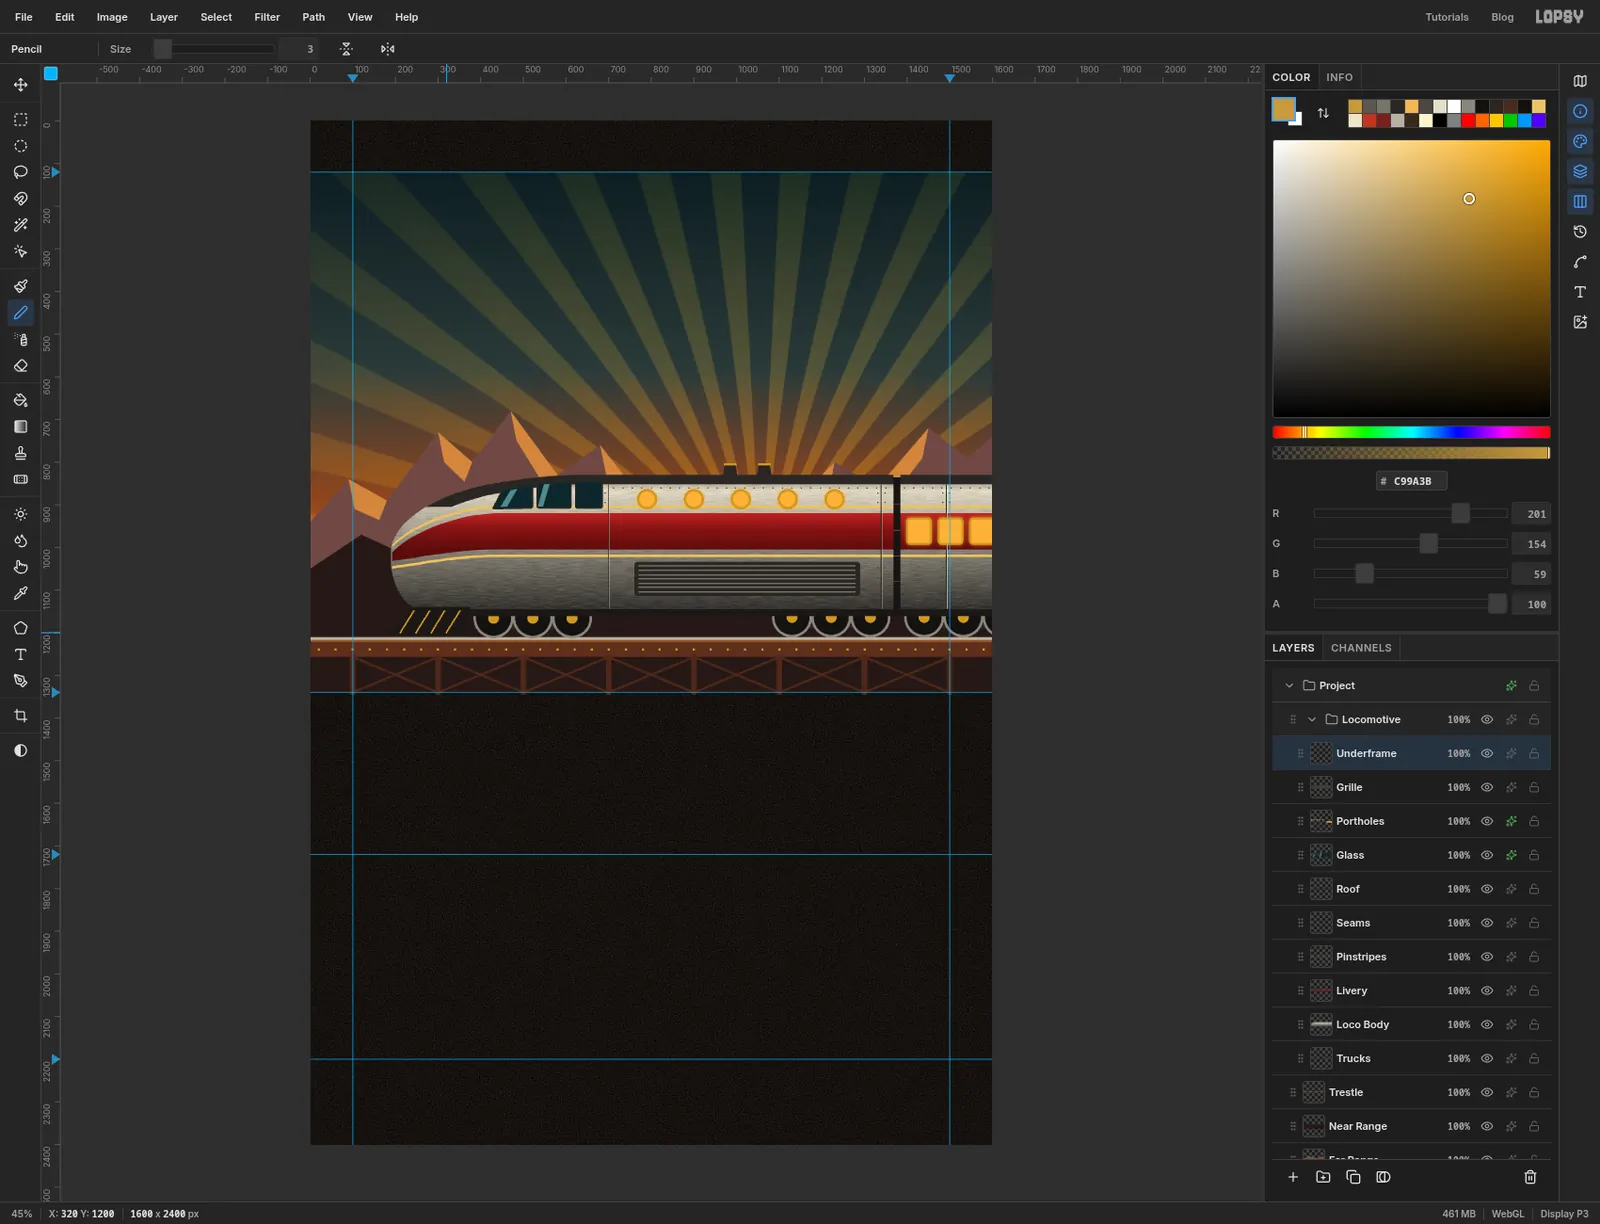
-
Light the headlight
Click Add Layer and name it
Nose Plate. Draw a 100 × 50 px rounded rectangle centred at 336, 1081, low on the nose, filled oxblood with a gold stroke at Width4. Set the type on it:No. 9in Black Ops One at 24 in cream , centred on the plate. Then setYUKON BULLET(two spaces) in Black Ops One at 46 in cream and centre it in the red band above the grille.Click Add Layer, name it
Headlight, and draw a 52 px ellipse centred at 240, 967, filled with a brass stroke at Width7. In the effects drawer tick Outer Glow and set Size50, Opacity95and the colour to .Click Add Layer and name it
Beam. Lasso a wedge that starts narrow at the lamp and opens out to the left edge of the page, from about y 830 to y 1110 there. Choose Select → Feather… and enter16. In the Gradient Editor, set both stops to . Each stop's colour picker has an Opacity slider under the hue bar: set the first stop to about 90% and the second to about 5%. Drag from the lamp to the left edge, and press Cmd+D. Set the layer's blend mode to Screen so the beam only ever lightens what's behind it.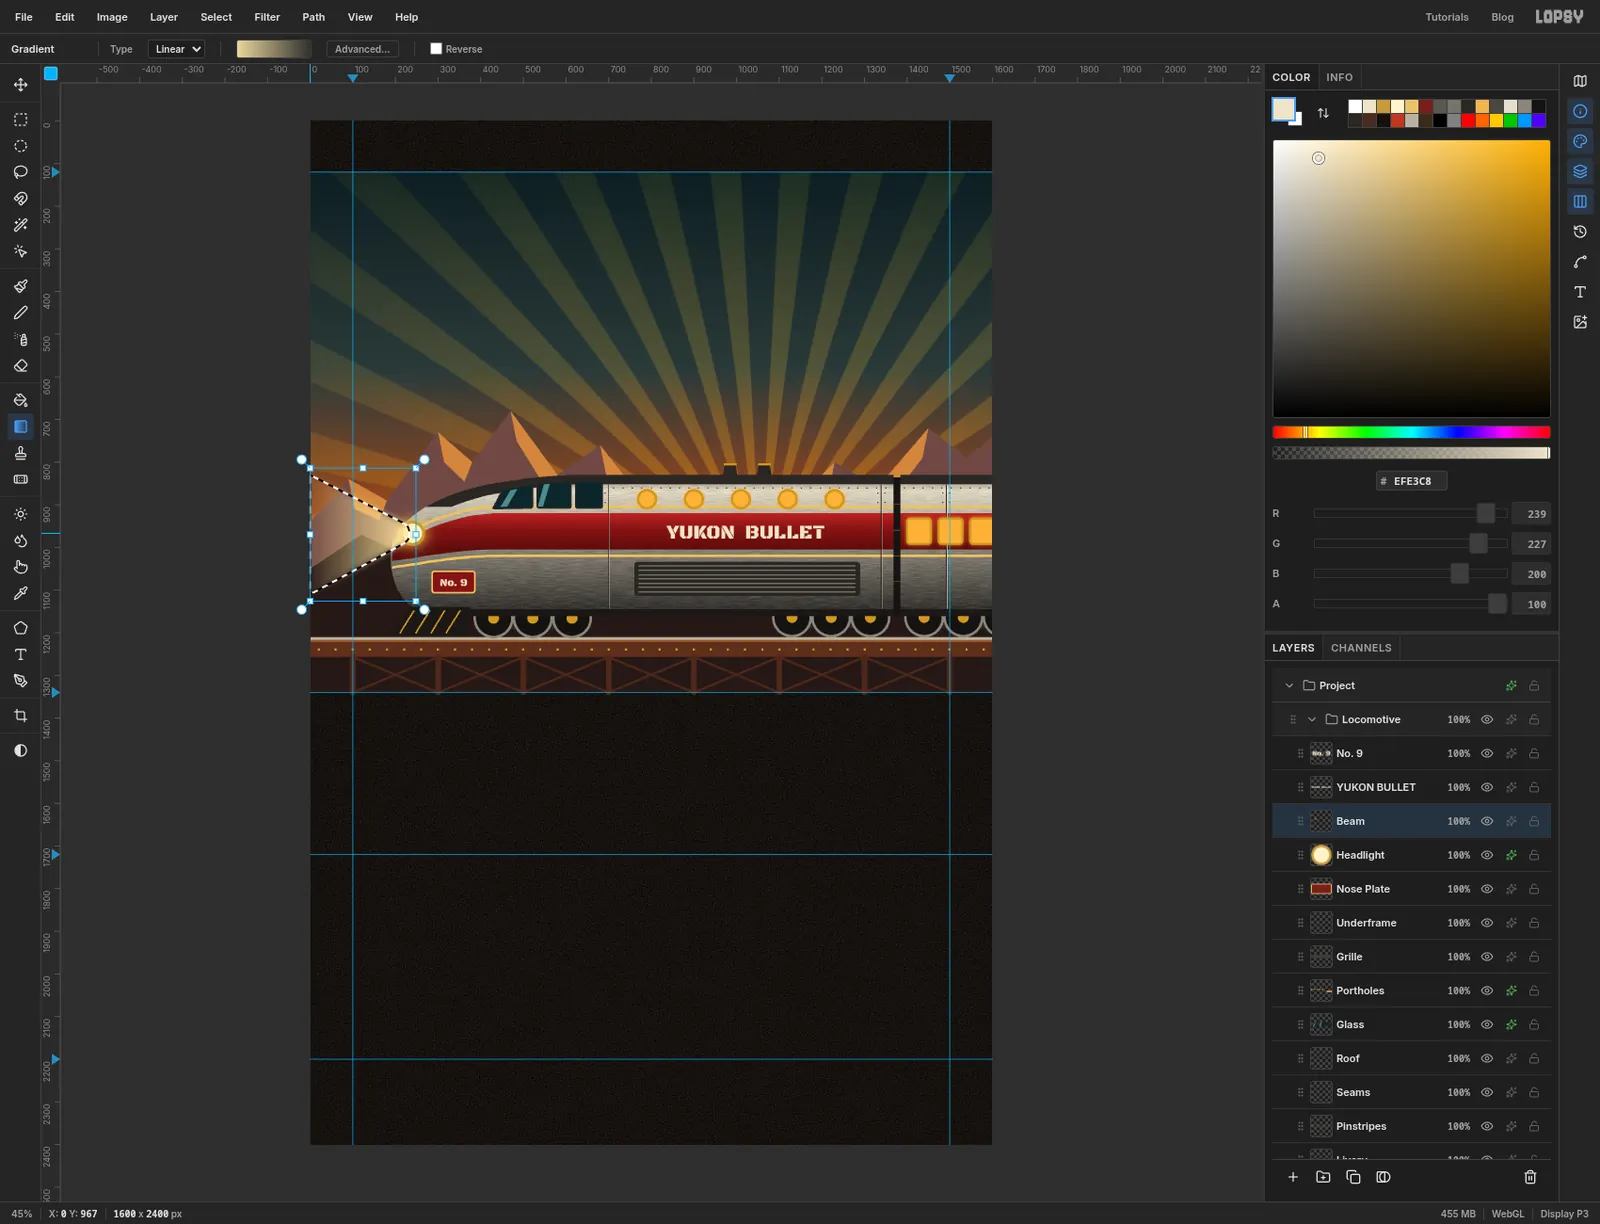
-
Trail the exhaust
The smoke goes behind the train. Click the
Trestlerow, click Add Layer and name itExhaust. Lasso a plume that starts at the stacks and widens as it trails up and to the right, reaching from about y 610 to y 800 at the right edge. Make its top edge lumpy. Choose Select → Feather… and enter22.Fill it with . Then choose Filter → Texture…, click Rough, and set Amount
45, Size40and Detail60. Rough at a large size breaks the flat fill into billows.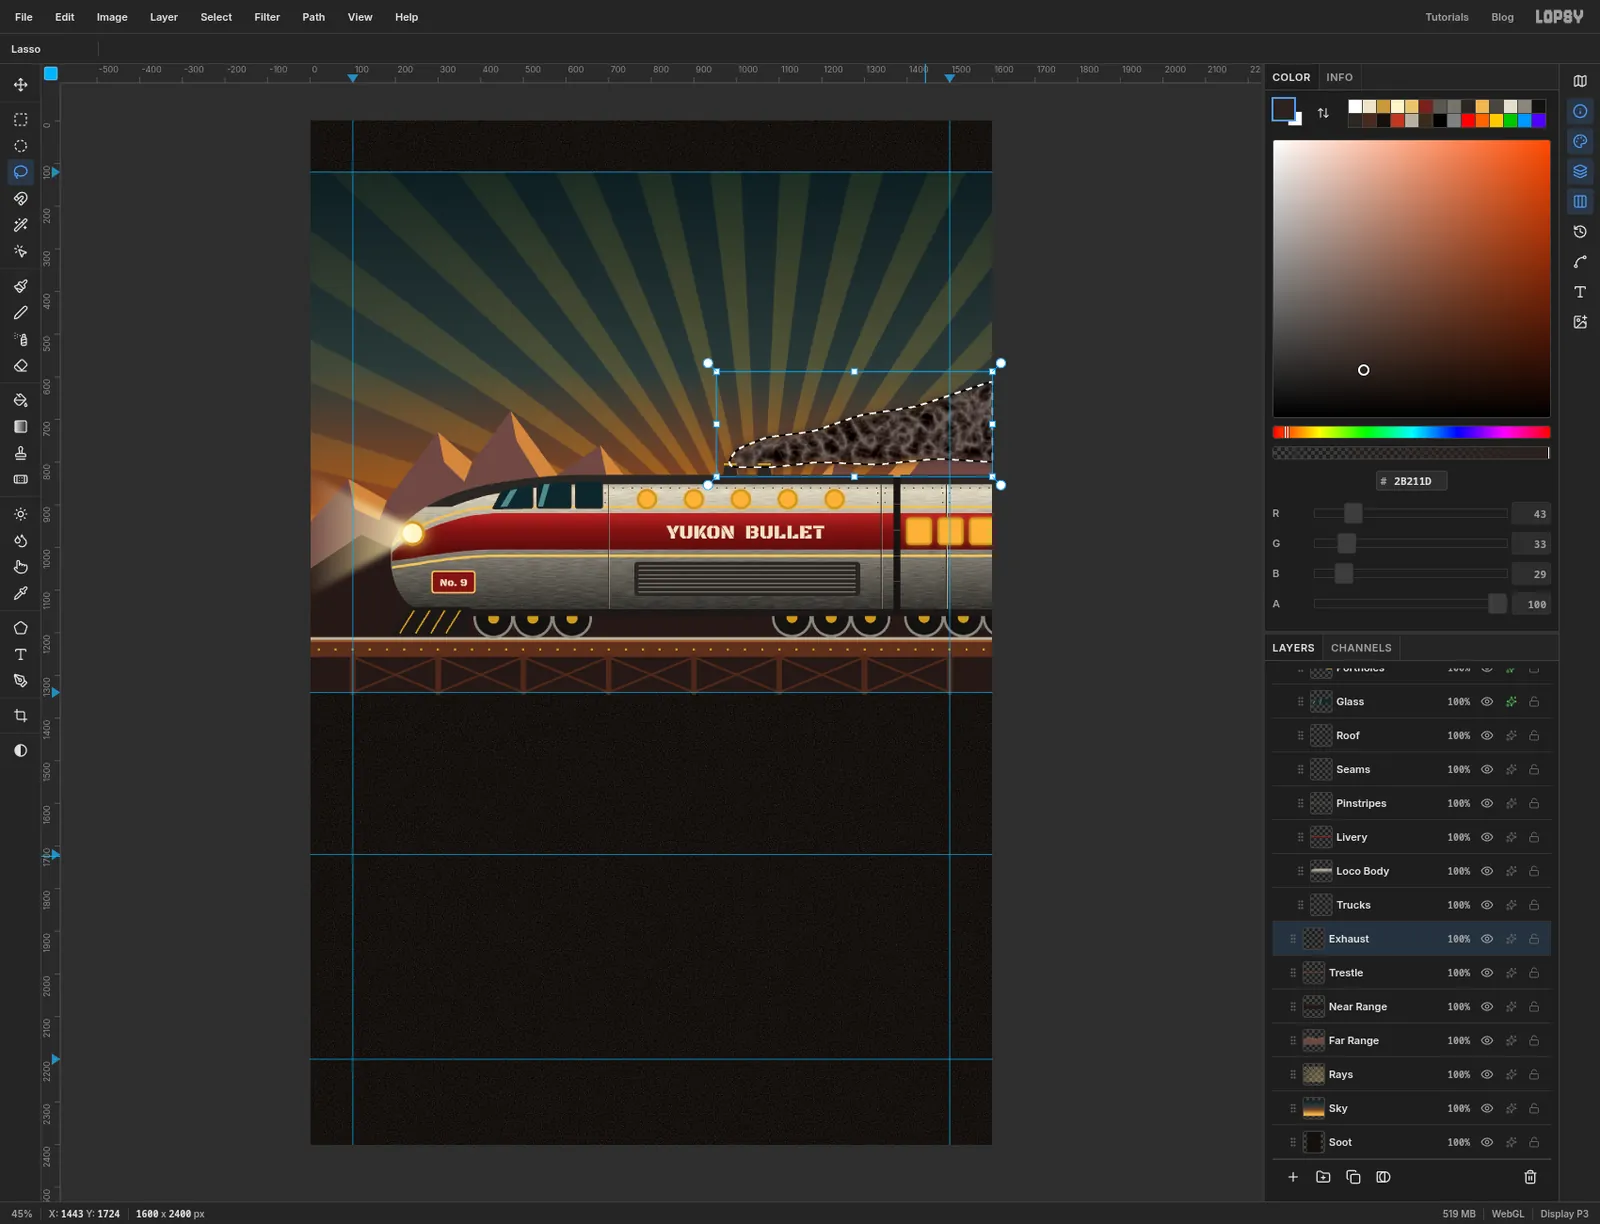
-
Blur the smoke
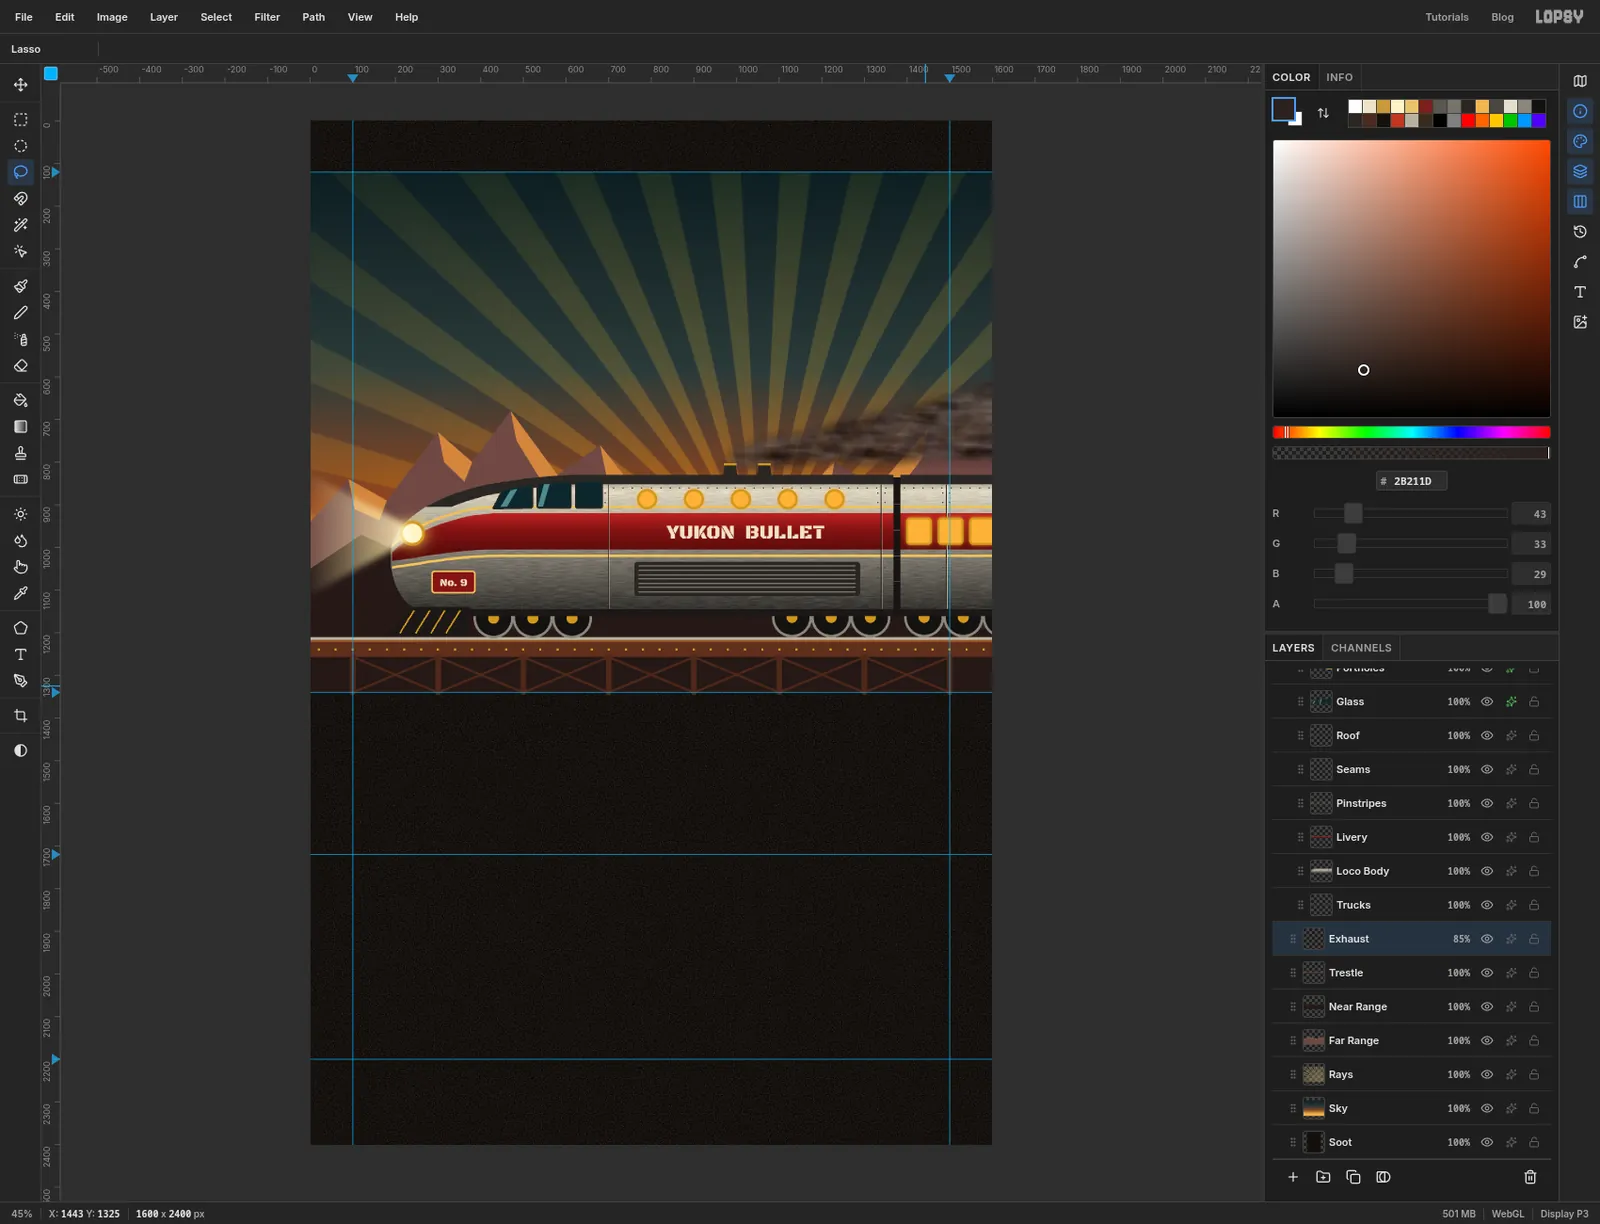
Press Cmd+D and choose Filter → Motion Blur… with Angle
0and Distance50. The smoke streaks back along the direction of travel. Click the opacity percentage on theExhaustrow and set it to 85%.Dark, dirty smoke is the difference between this and a travel poster. Deco is clean. Dieselpunk has soot on it.
-
Set the headline
Click the
Locomotivegroup, click New Group and name itHero Type. It lands insideLocomotive, because that's the group you had selected. Drag it by the grip at the left of its row up onto the top edge of theLocomotiverow, so it sits on its own above it. You'll do the same for every section group from here on. Inside it, add a layer namedButtons. You'll draw on it shortly, and it gives you an ordinary layer to click before each new text.Set three lines of type, all with their left edge on the 100 guide:
DIESEL-ELECTRIC STREAMLINER // EST. 1938in Black Ops One at 30, gold, with the top of the letters at y 158YUKONin Anton at 226, cream, with the letters from y 200 to y 398BULLETin Anton at 210, gold, starting at y 428
The two sizes are different on purpose.
YUKONhas five letters andBULLEThas six, so at the same size the lines end raggedly. At 226 and 210 both come out about 527 px wide and the headline locks up into one block.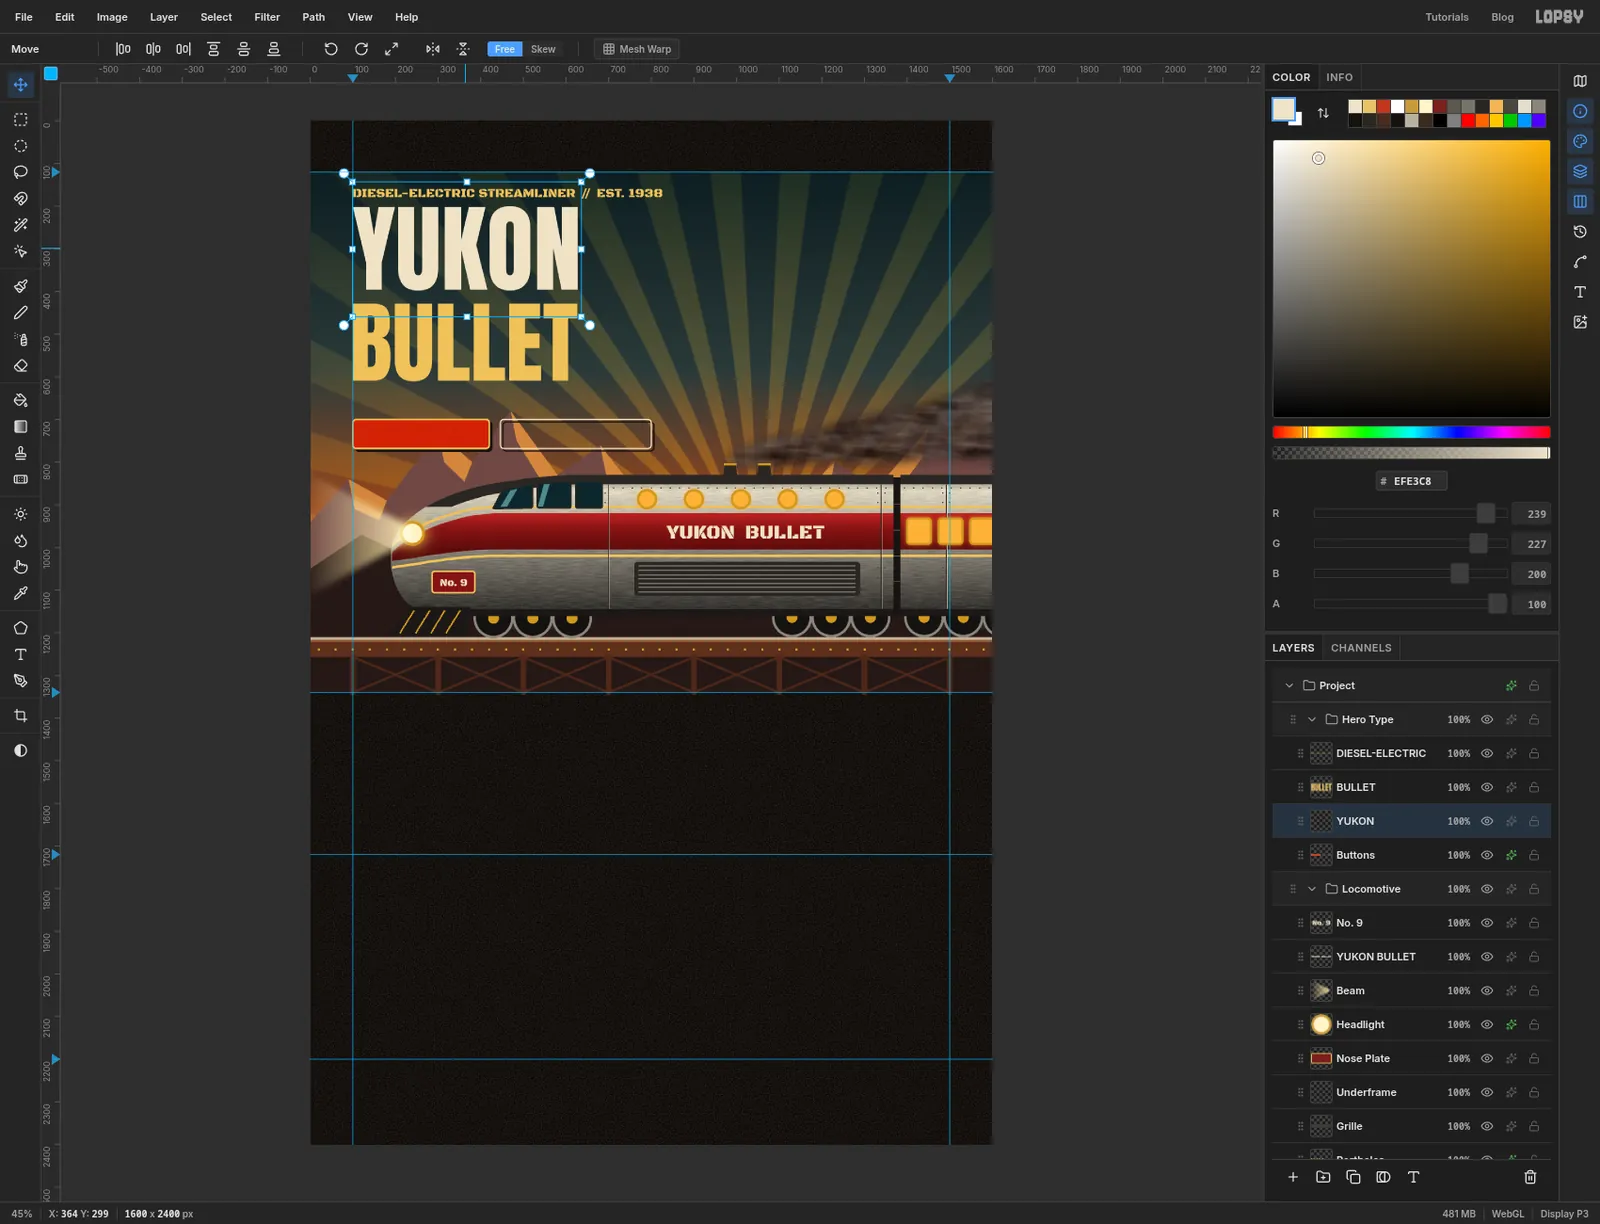
-
Finish the hero type
Click
YUKON, open its effects drawer, tick Drop Shadow and set Offset X8, Offset Y8, Blur0, Opacity100and the colour to oxblood. With zero blur the shadow is a solid offset copy, like a second ink on a poster. GiveBULLETthe same shadow.Set the sub-copy:
WHITEHORSE TO DAWSON CITY IN SIX HOURS FLAT.in Barlow Condensed at 40, cream, left edge on the guide, top of the letters at y 640.Click
Buttonsand draw two rounded rectangles with Corner Radius8:- the main button, 320 × 68 px with its left edge on the 100 guide and its top at y 700 (centre 260, 734), filled signal red with a gold stroke at Width
4 - a second one beside it, 354 px wide and the same height (centre 623, 734), with no fill and a cream stroke at Width
3
Give
Buttonsa Drop Shadow with Offset X6, Offset Y6, Blur0in soot.Set
BOOK PASSAGEin Black Ops One at 30 in andSEE THE TIMETABLEat 26 in cream. Centre each in its button: equal space left and right, and equal space above and below the capitals. There's 60 px of clear sky between the buttons and the roof of the train, so nothing crowds.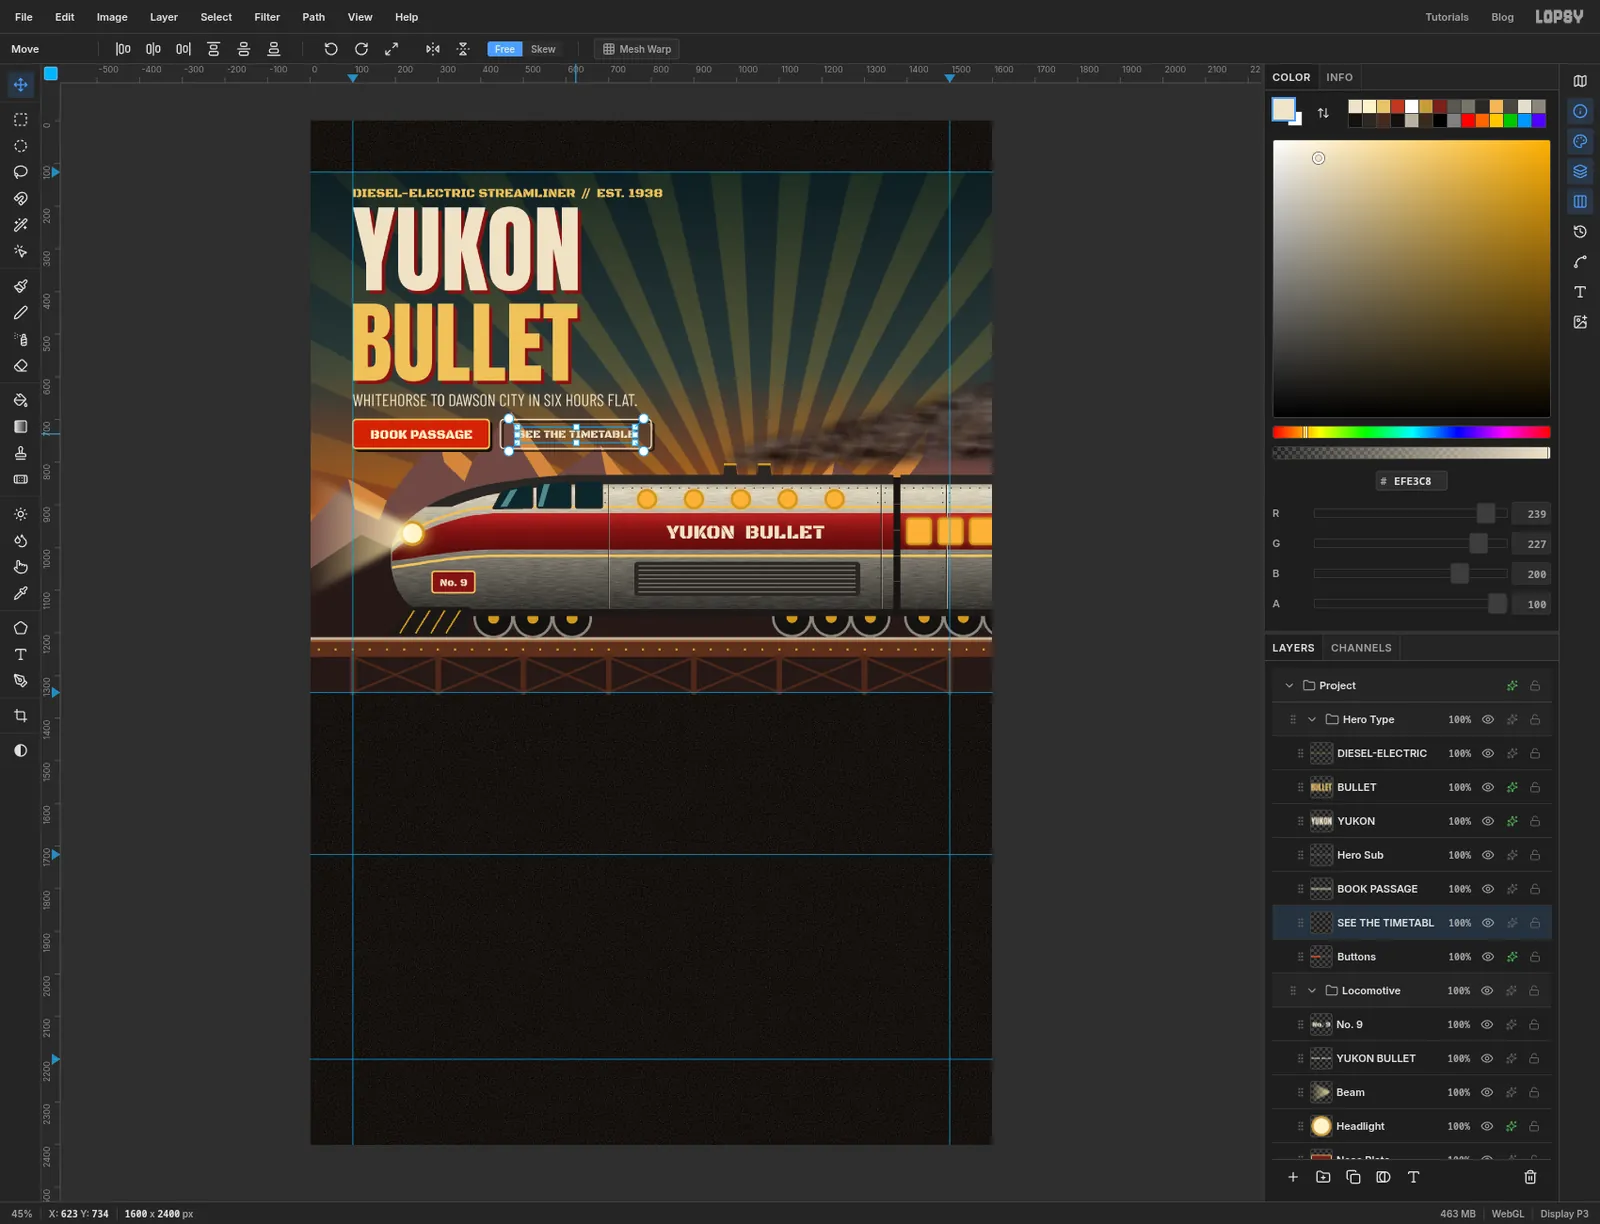
- the main button, 320 × 68 px with its left edge on the 100 guide and its top at y 700 (centre 260, 734), filled signal red with a gold stroke at Width
-
Build the fare seal
Click the
Hero Typegroup, click New Group and name itFare Seal. It nests insideHero Type, which is where you want it. Add a layer namedSeal Disc.With the Shape tool on Ellipse, draw a 260 px disc centred at 1290, 400, filled oxblood with a gold stroke at Width
8. Then, with no fill and a cream stroke at Width2, draw a 220 px ring on the same centre. Give the layer a hard Drop Shadow:8,8, Blur0, soot.Set three centred lines inside the ring:
FARES FROMin Black Ops One at 20, gold, near the top$4.50in Anton at 78, cream, dead centreONE WAYin Black Ops One at 20, gold, near the bottom
Check the price against the inner ring. Text in a circle has less room than it seems, because the ring closes in above and below the middle. At 78 the
$and the last0clear the ring by about 25 px on each side.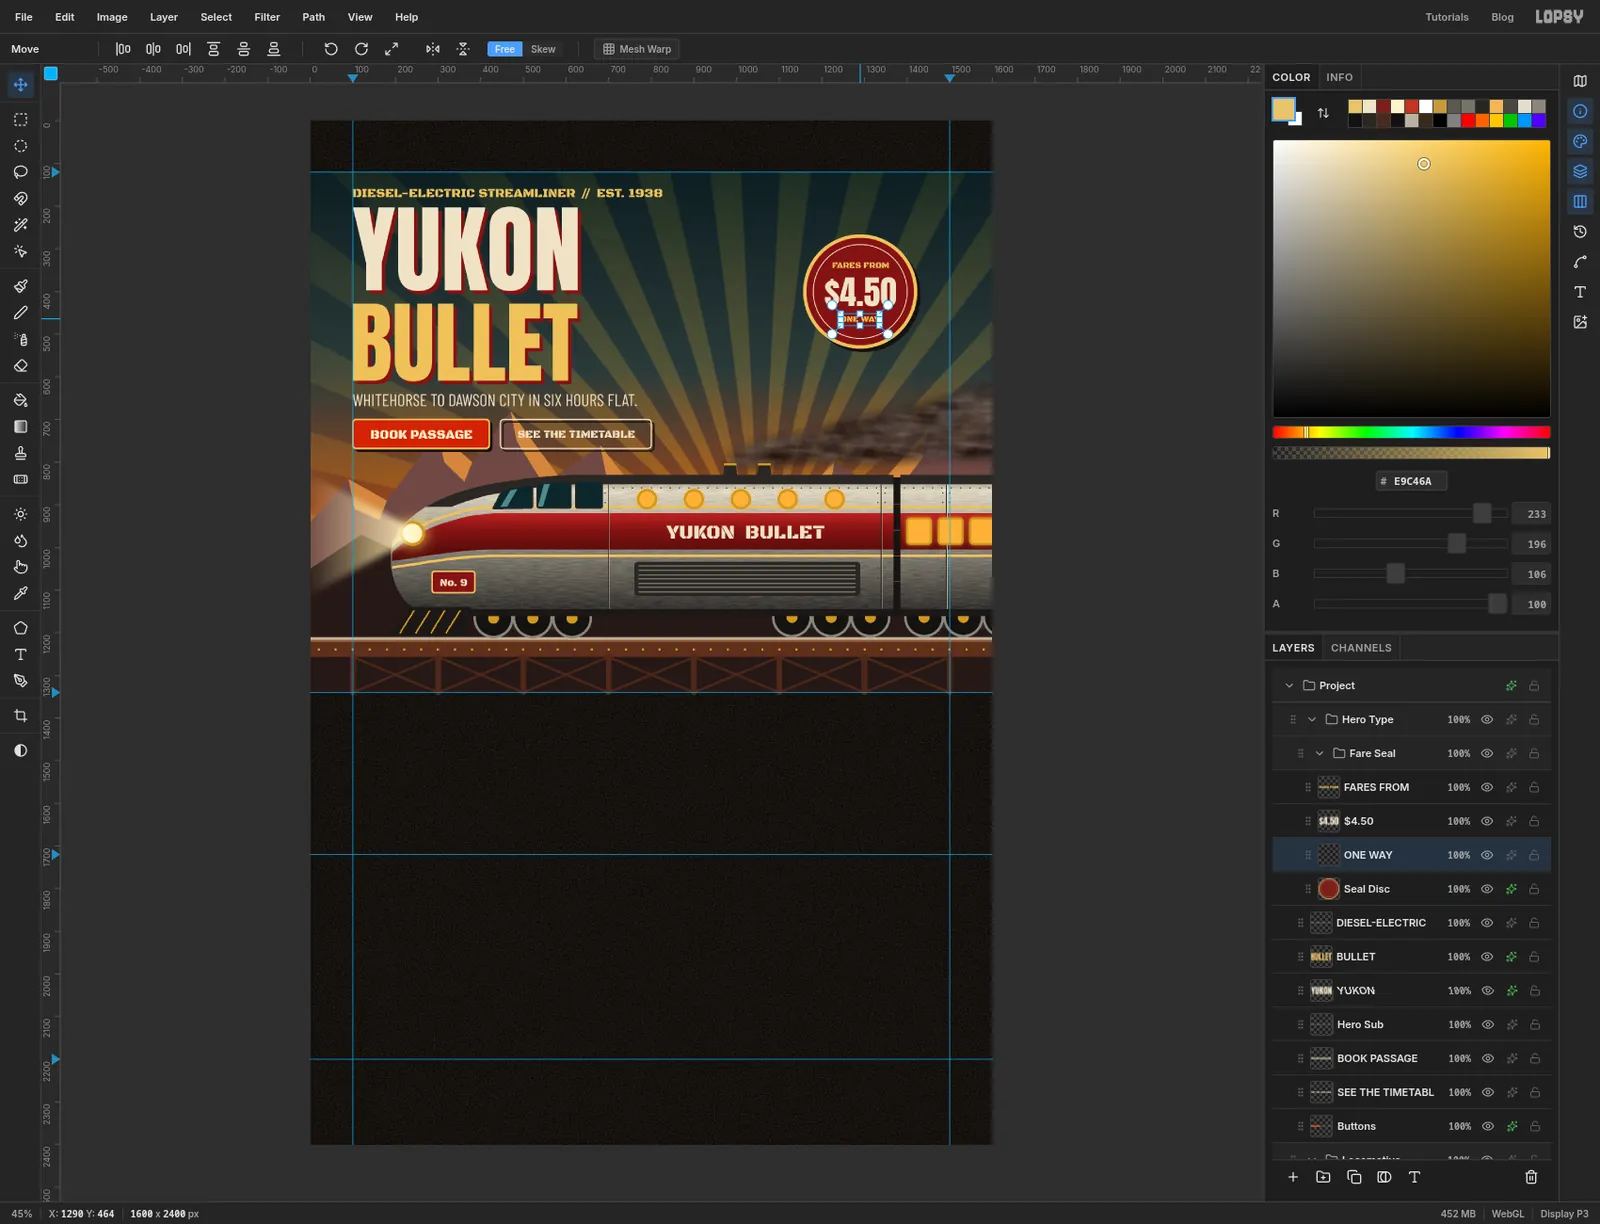
-
Tilt the seal
Click the
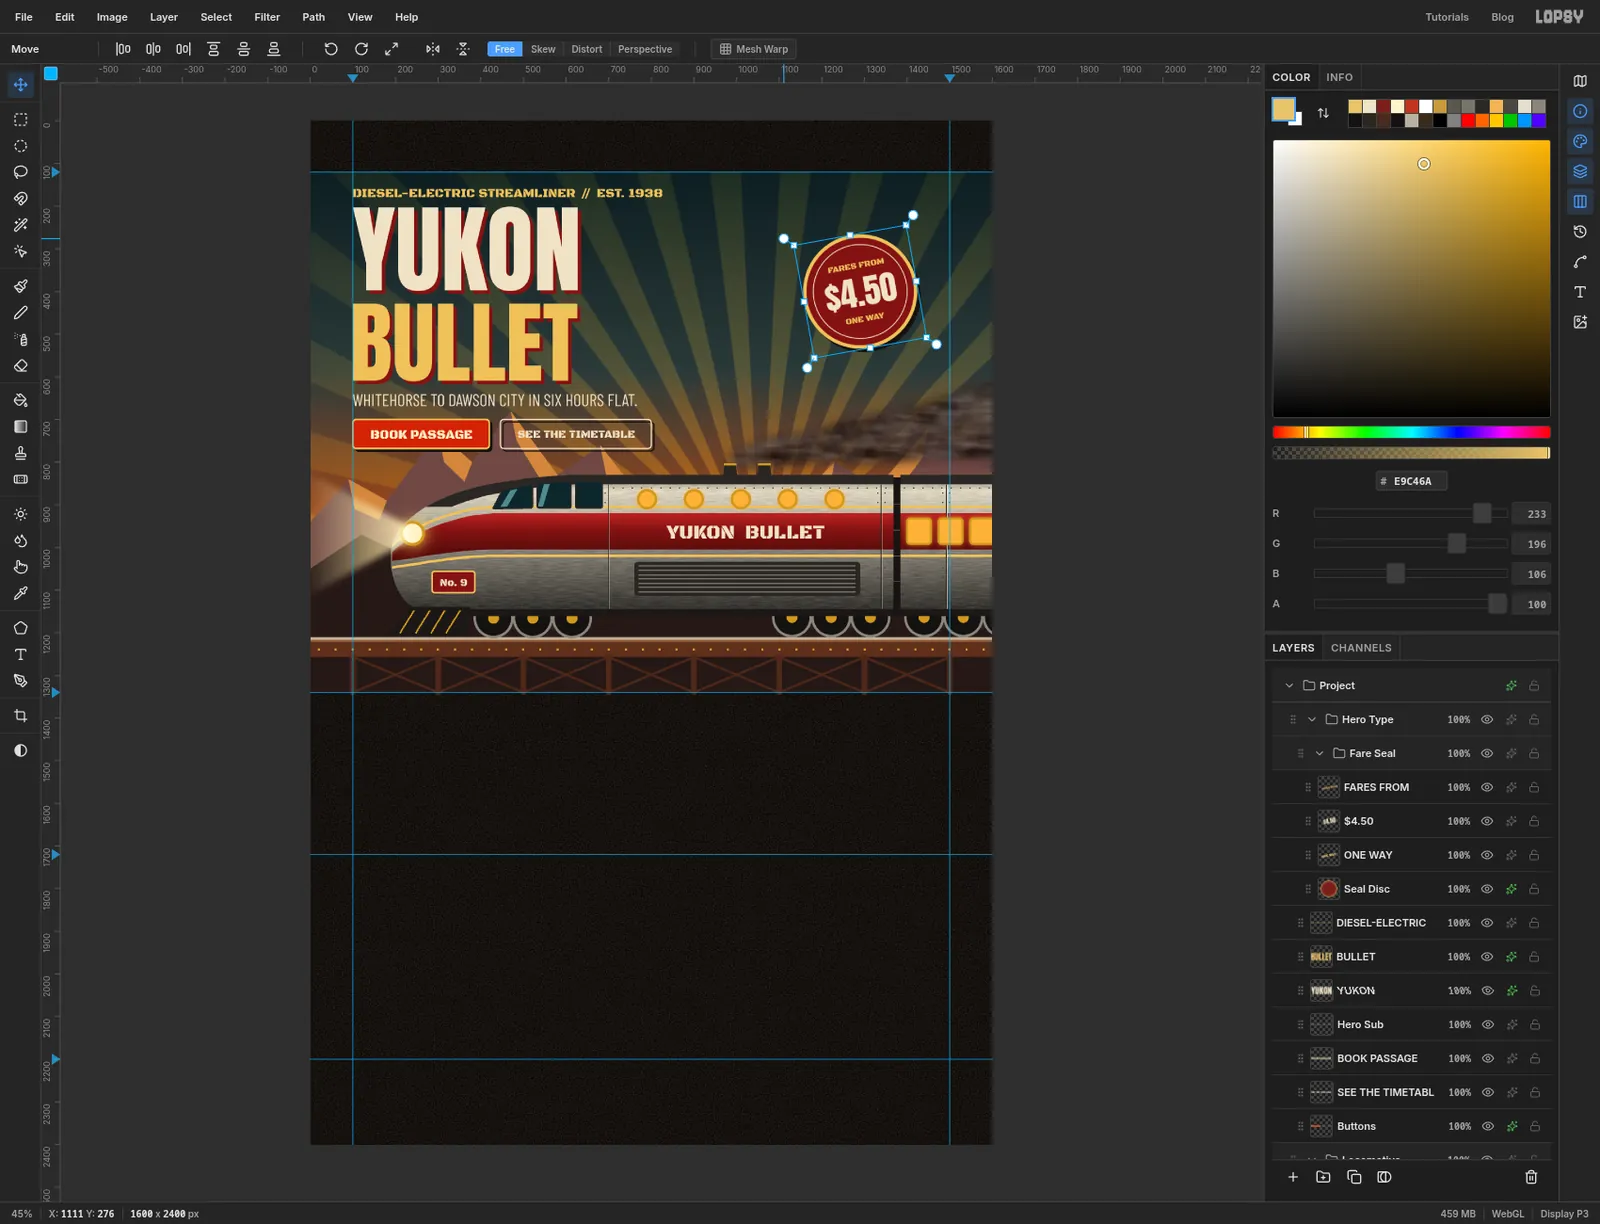
Fare Sealgroup so the whole group is selected, and make sure nothing is selected on the canvas (Cmd+D). Pick the Move tool. Handles appear around everything in the group. Drag just outside a corner to rotate, and turn the seal about 10° anticlockwise, so the price climbs to the right. The disc, the ring and all three lines of text turn together, and the text stays editable. Press Cmd+D to commit the turn.A tilted seal on a square grid looks stamped on afterwards, which is the point.
-
Rivet the nav bar
Click the
Hero Typegroup, click New Group, name itNavand drag it out aboveHero Type, to the top of the stack. Inside it, add a layer namedNav Plate.Marquee the strip above the 120 guide. Fill it with a two-stop gradient from at the top to at the bottom, then apply Filter → Texture… with Streaks, Amount
6and Size1.5. Press Cmd+D.Dress the plate, all on the same layer:
- a brass bar along the bottom from y 113 to 120, with a 2 px oxblood line just above it, and a 2 px highlight along the very top
- three vertical plate seams with the Pencil at x 400, 800 and 1200: a 2 px soot line with a 1 px line beside it
- rivets at Size
4in , every 40 px along y 12 and y 100
Add a layer named
Logo Discand draw a 72 px oxblood disc with a gold stroke at Width5, with its left edge on the 100 guide and centred on y 58. Then set the type, all centred on y 58:YBin Anton at 40, cream, centred in the discYUKON BULLET LINEin Black Ops One at 26, cream, starting at x 192ROUTES THE ENGINE DINING CAR TIMETABLE(six spaces between each) in Barlow Condensed at 28, cream, ending about 30 px short of where the button will go
Add a layer named
Tickets Button, draw a signal-red rounded rectangle, 134 × 52 px with its right edge on the 1500 guide (centre 1433, 58), with a gold stroke at Width3, and centreTICKETSin it in Black Ops One at 24.Look at where the plate seams fall. In the screenshot the seam at x 1200 runs through the end of
DINING CAR. A seam through a word looks like a mistake, so select the links and nudge them left with the arrow keys, about 18 px, until that seam sits in the gap beforeTIMETABLE.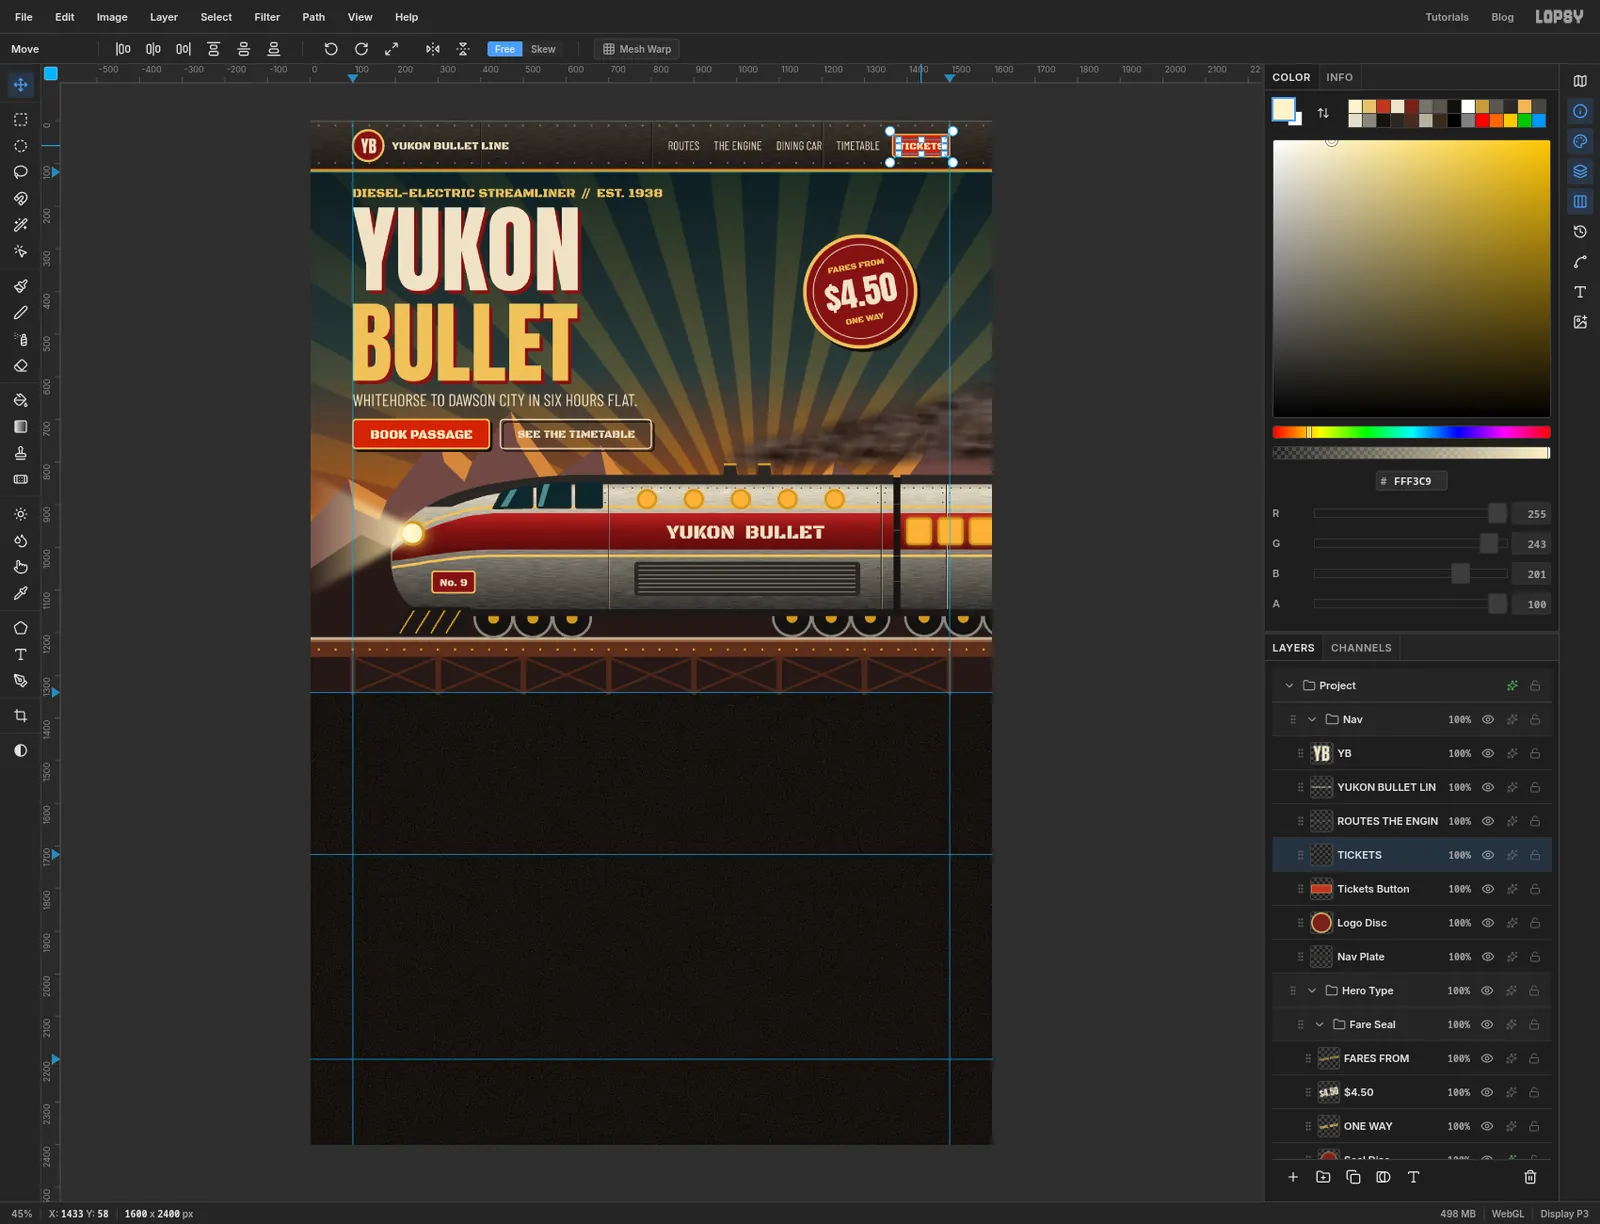
-
Build the gauge band and paint the ticks
Click the
Exhaustrow, click New Group and name itGauges. Add a layer namedGauge Plate, marquee the band between the 1340 and 1720 guides, and repeat what you did for the nav plate:- Fill the marquee with a two-stop gradient from at the top to at the bottom.
- Apply Filter → Texture… with Streaks, Amount
6and Size1.5, then press Cmd+D. - Marquee a 6 px bar along the very top of the band and another along the very bottom, and fill both with brass.
- With the Pencil, draw plate seams from bar to bar at x 550 and x 1050: a 2 px soot line with a 1 px line beside it. They fall between the dials.
- Click rivets at Size
4in every 40 px, in one row 20 px below the top bar and one 14 px above the bottom bar.
Add a layer named
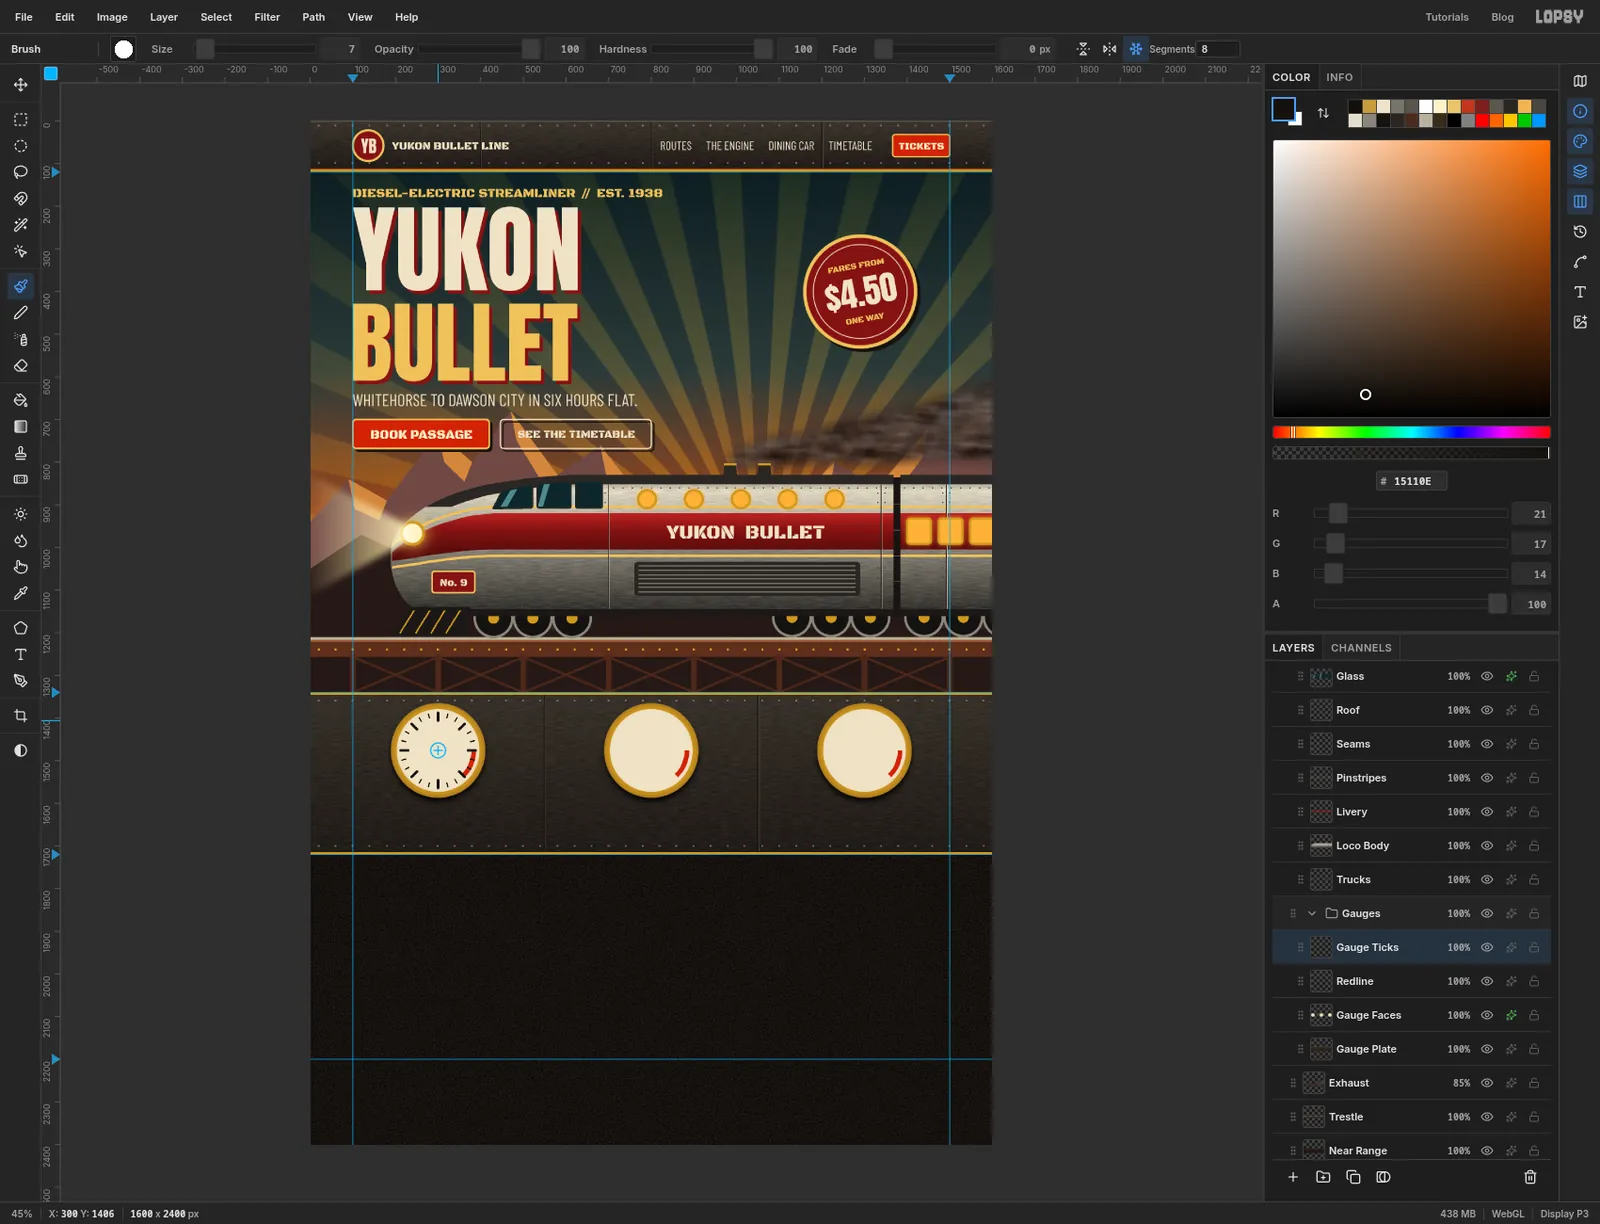
Gauge Faces. With the Shape tool on Ellipse, fill cream and stroke brass at Width14, draw three 208 px dials centred at 300, 1476, 800, 1476 and 1300, 1476. In the effects drawer tick Inner Glow (Size26, Opacity55, colour ) and Drop Shadow (Offset Y10, Blur18, Opacity80, black). The inner glow shades the rim so the face sits down inside the bezel.Add a layer named
Redline. Lasso a short curved band just inside the rim of each dial, from the 3 o'clock position round to between 4 and 5 o'clock, and fill all three with signal red.Add a layer named
Gauge Ticks. Pick the Brush at Hardness100with the foreground on soot, and click Radial Symmetry in the options bar. A Segments field appears. For each dial:- Cmd-click the centre of the dial. That moves the symmetry centre there without painting.
- Set Segments
24and Size4, and paint one short stroke at 12 o'clock, from 88 px above the centre down to 79 px above it. Twenty-four minor ticks appear. - Set Segments
8and Size7, and paint a longer stroke from 88 to 70 px above the centre for the major ticks.
Click Radial Symmetry again to turn it off.
-
Erase the bottom of each scale
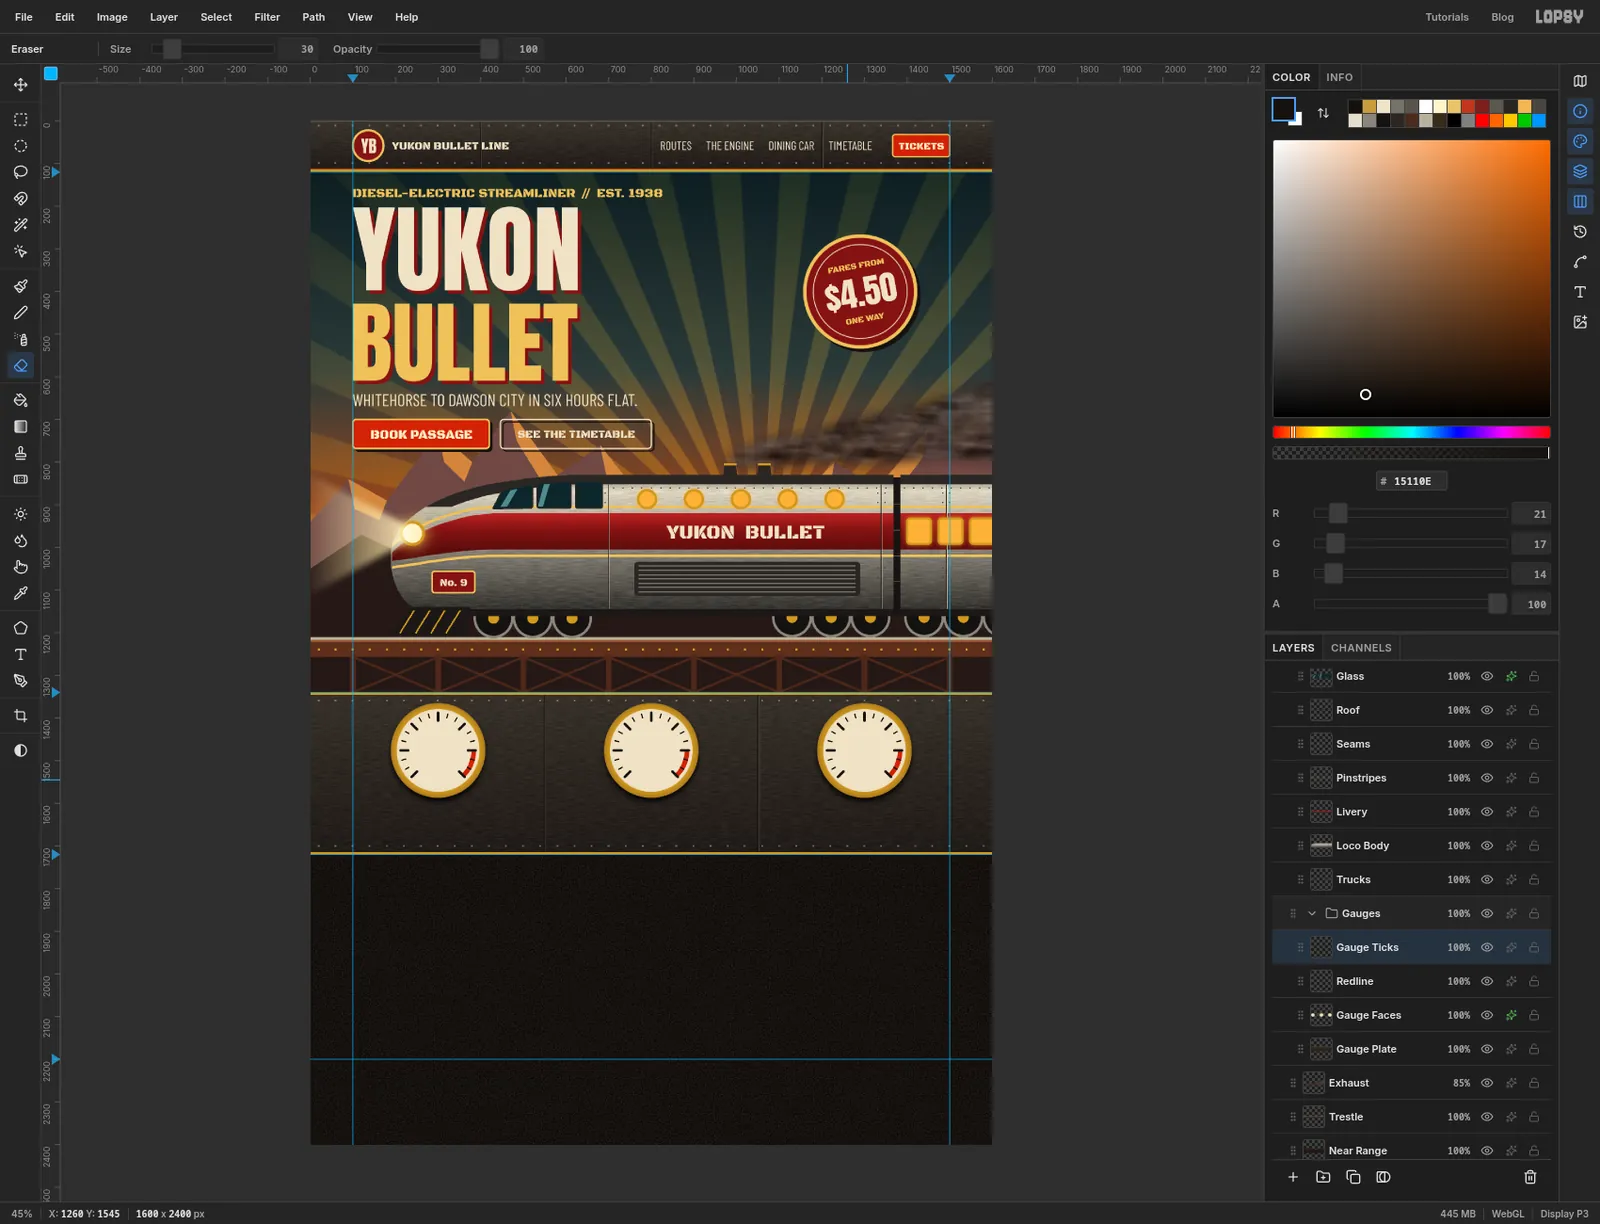
A real gauge has a gap at the bottom. Pick the Eraser (E) at Size
30, stay onGauge Ticks, and wipe a short arc across the bottom of each dial, between about 5 and 7 o'clock. Leave the major ticks at lower left and lower right. Those are zero and full scale.The red arc now sits under the last two major ticks, where a redline should be.
-
Number the scales
Add a layer named
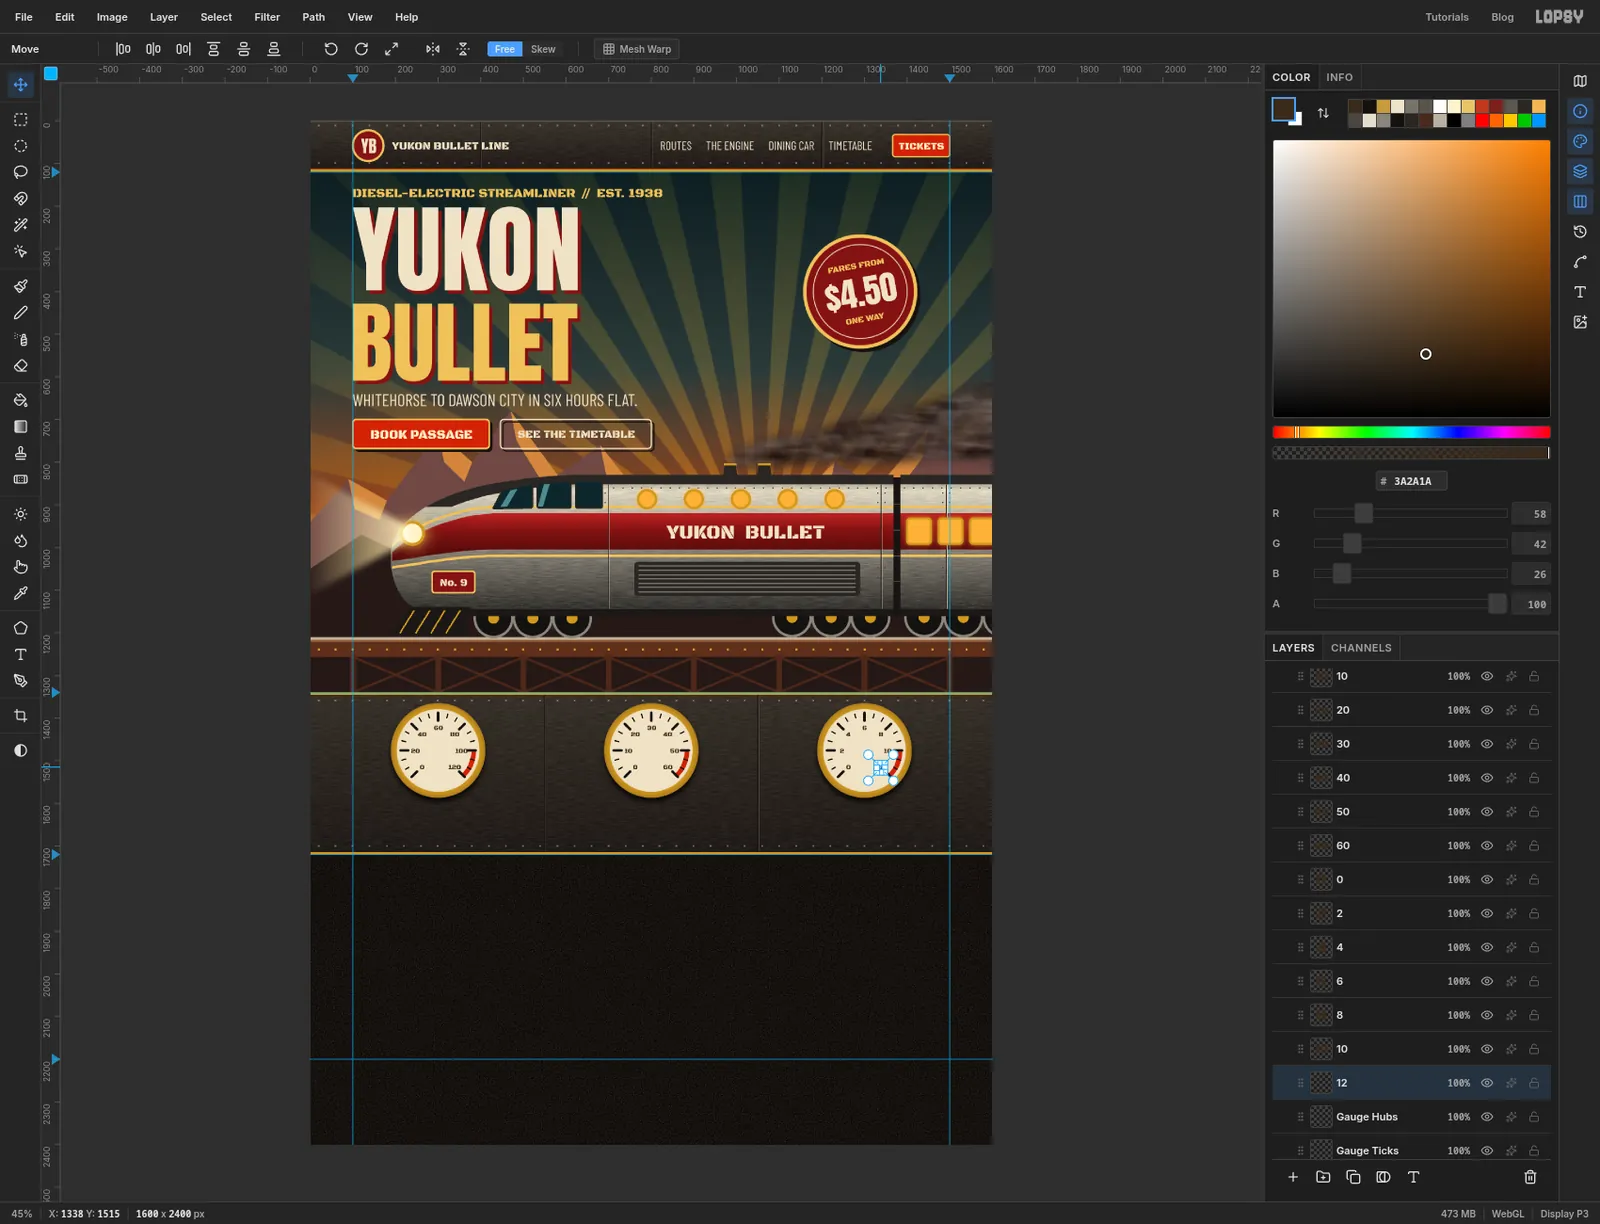
Gauge HubsaboveGauge Ticks. You'll draw on it in the next step, and for now it's the layer to click before each numeral.Each dial has seven major ticks, so each gets seven numbers, set in Black Ops One at 15 in and placed just inside its tick:
- first dial:
0,20,40,60,80,100,120 - second dial:
0,10,20,30,40,50,60 - third dial:
0,2,4,6,8,10,12
Zero goes at lower left and the numbers climb clockwise. Then set a unit label in the gap at the bottom of each face, in Black Ops One at 18 in oxblood:
MPH,HP x 100andHOURS.Twenty-one tiny text layers is tedious, but numerals are what turn three clocks into three instruments.
- first dial:
-
Turn the needles
Click
Gauge Ticks, add a layer and name itNeedle 1. On the first dial, lasso a long thin needle pointing straight up: about 12 px wide at a tail 24 px below the centre, tapering to a point 80 px above it. Fill with signal red.Now drag a Rectangular Marquee around the needle that's centred on the dial's centre: from 270, 1386 to 330, 1566. The Move tool rotates a selection around the middle of the marquee, so centring the marquee on the hub makes the needle pivot where it should.
Pick the Move tool and drag just outside a corner of the box to swing the needle clockwise, past 3 o'clock, until its tip sits a little short of the
120tick, well into the red. That's 112 on a 0–120 scale. Press Cmd+D.Make
Needle 2andNeedle 3the same way on the other two dials, each on its own layer and each with a marquee centred on its own hub. Turn the second clockwise until it points just past the40tick, and leave the third pointing straight up at6. Give each needle a soft Drop Shadow: Offset X2, Offset Y3, Blur4, Opacity50.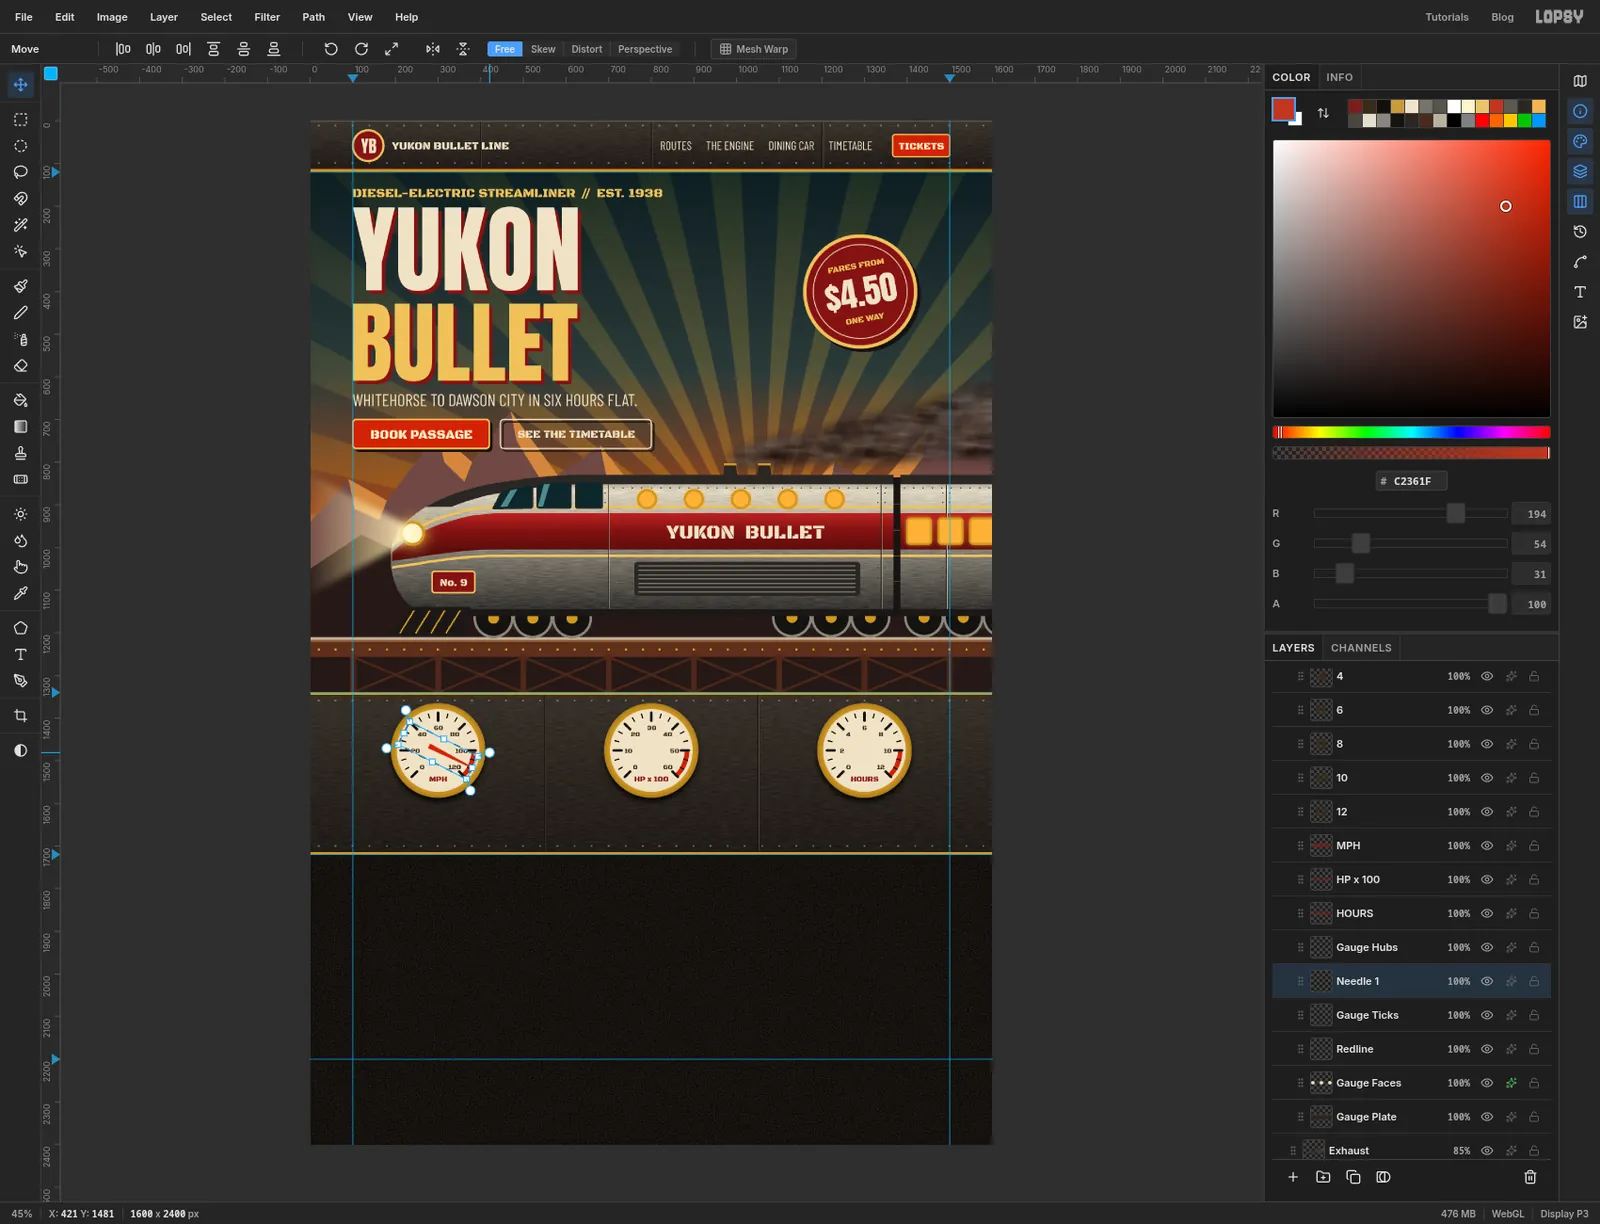
-
Cap the hubs and caption the gauges
Click
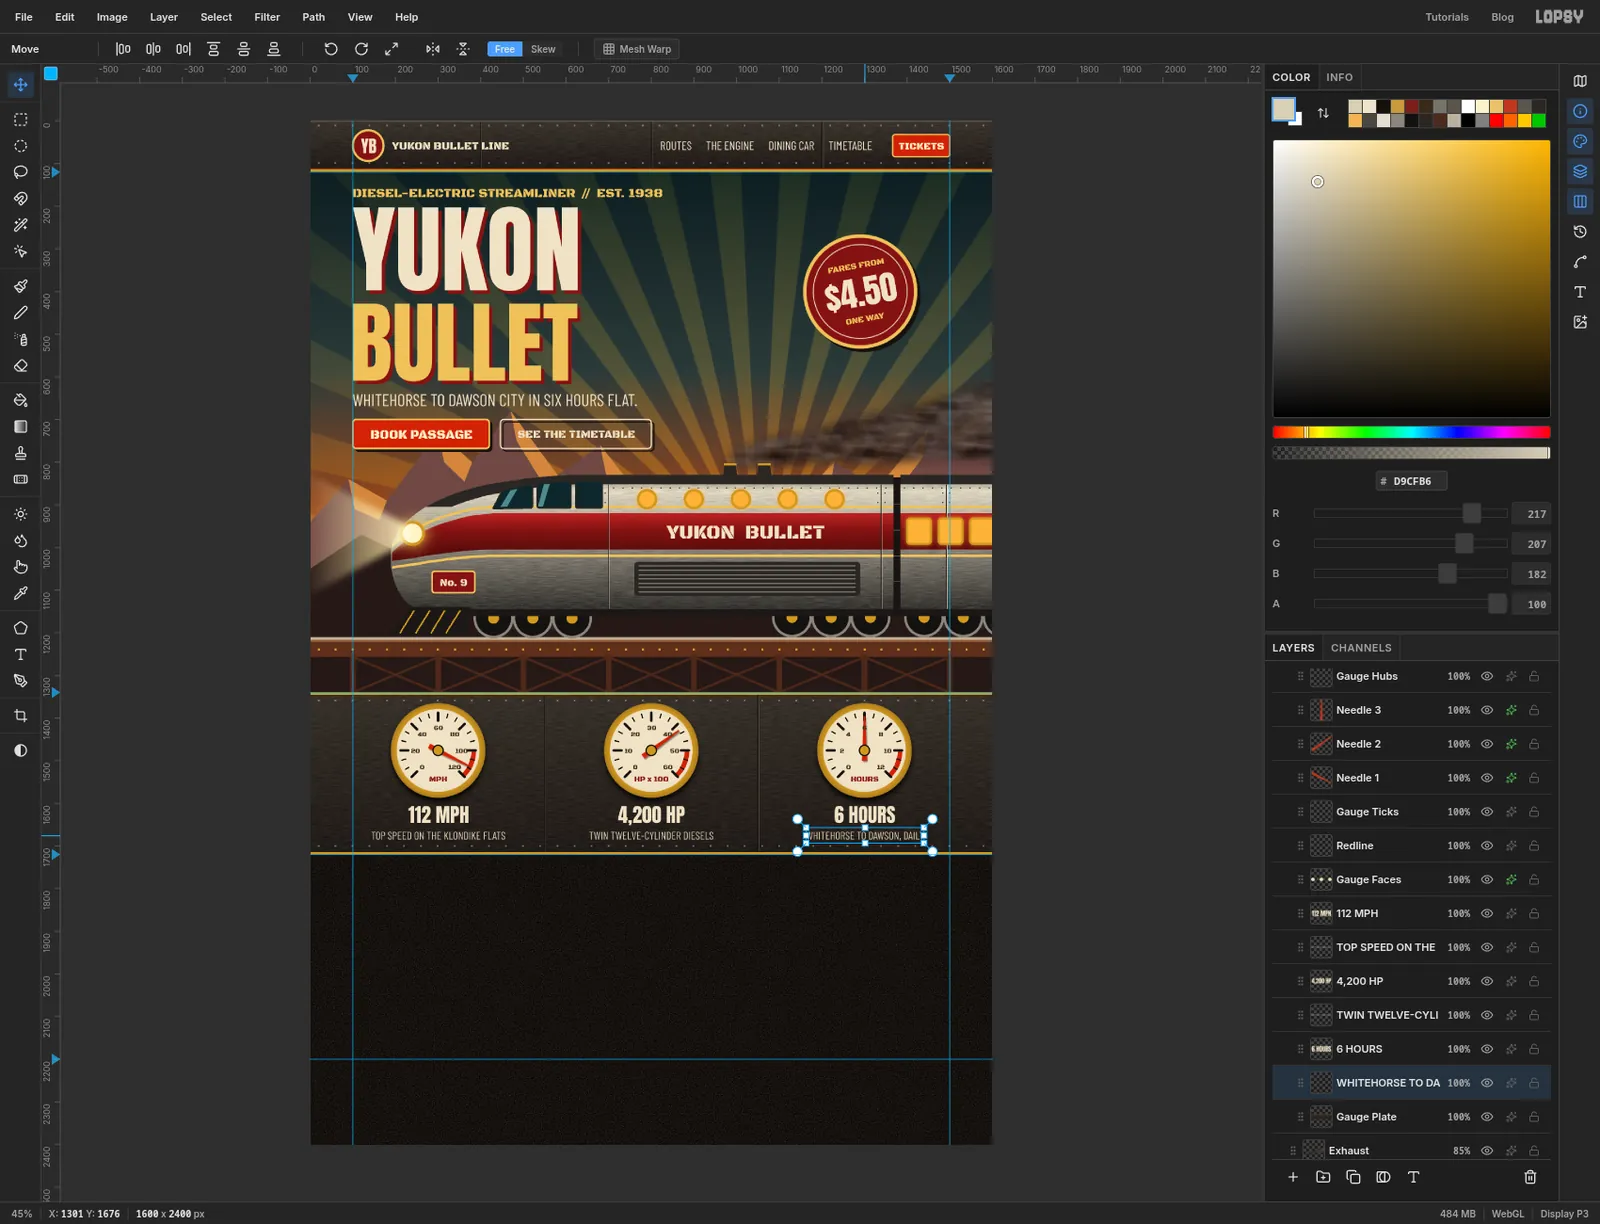
Gauge Hubsand draw a 24 px brass disc with a soot stroke at Width3on the centre of each dial. The needle layers were added aboveGauge Ticks, which puts them underGauge Hubs, so the discs cap the needles. If yours ended up the other way round, dragGauge HubsaboveNeedle 3.Under each dial, centred on it, set two lines:
- the figure in Anton at 46, cream, with the top of the letters at y 1606:
112 MPH,4,200 HP,6 HOURS - a caption in Barlow Condensed at 26 in warm grey , at y 1666:
TOP SPEED ON THE KLONDIKE FLATS,TWIN TWELVE-CYLINDER DIESELS,WHITEHORSE TO DAWSON, DAILY
Thin condensed type on a textured plate needs a light colour. A mid grey would disappear here.
- the figure in Anton at 46, cream, with the top of the letters at y 1606:
-
Lay out the route
Click the
Gaugesgroup, click New Group, name itRouteand drag it out aboveGauges. Add a layer namedRoute Line. Pick the Brush at Size6, Hardness100, in brass. Click at 120, 2000 and Shift-click at 1000, 2000.Add a layer named
Stations. With the Shape tool on Ellipse and a gold stroke at Width5, draw five 30 px dots on the line at x 120, 340, 560, 780 and 1000. Fill the first and last with signal red and the three between with soot.Set the type:
- above each dot, the time in Black Ops One at 20, gold:
7:00 AM,8:25 AM,9:50 AM,11:30 AM,1:00 PM - below each dot, the stop in Barlow Condensed at 28, cream:
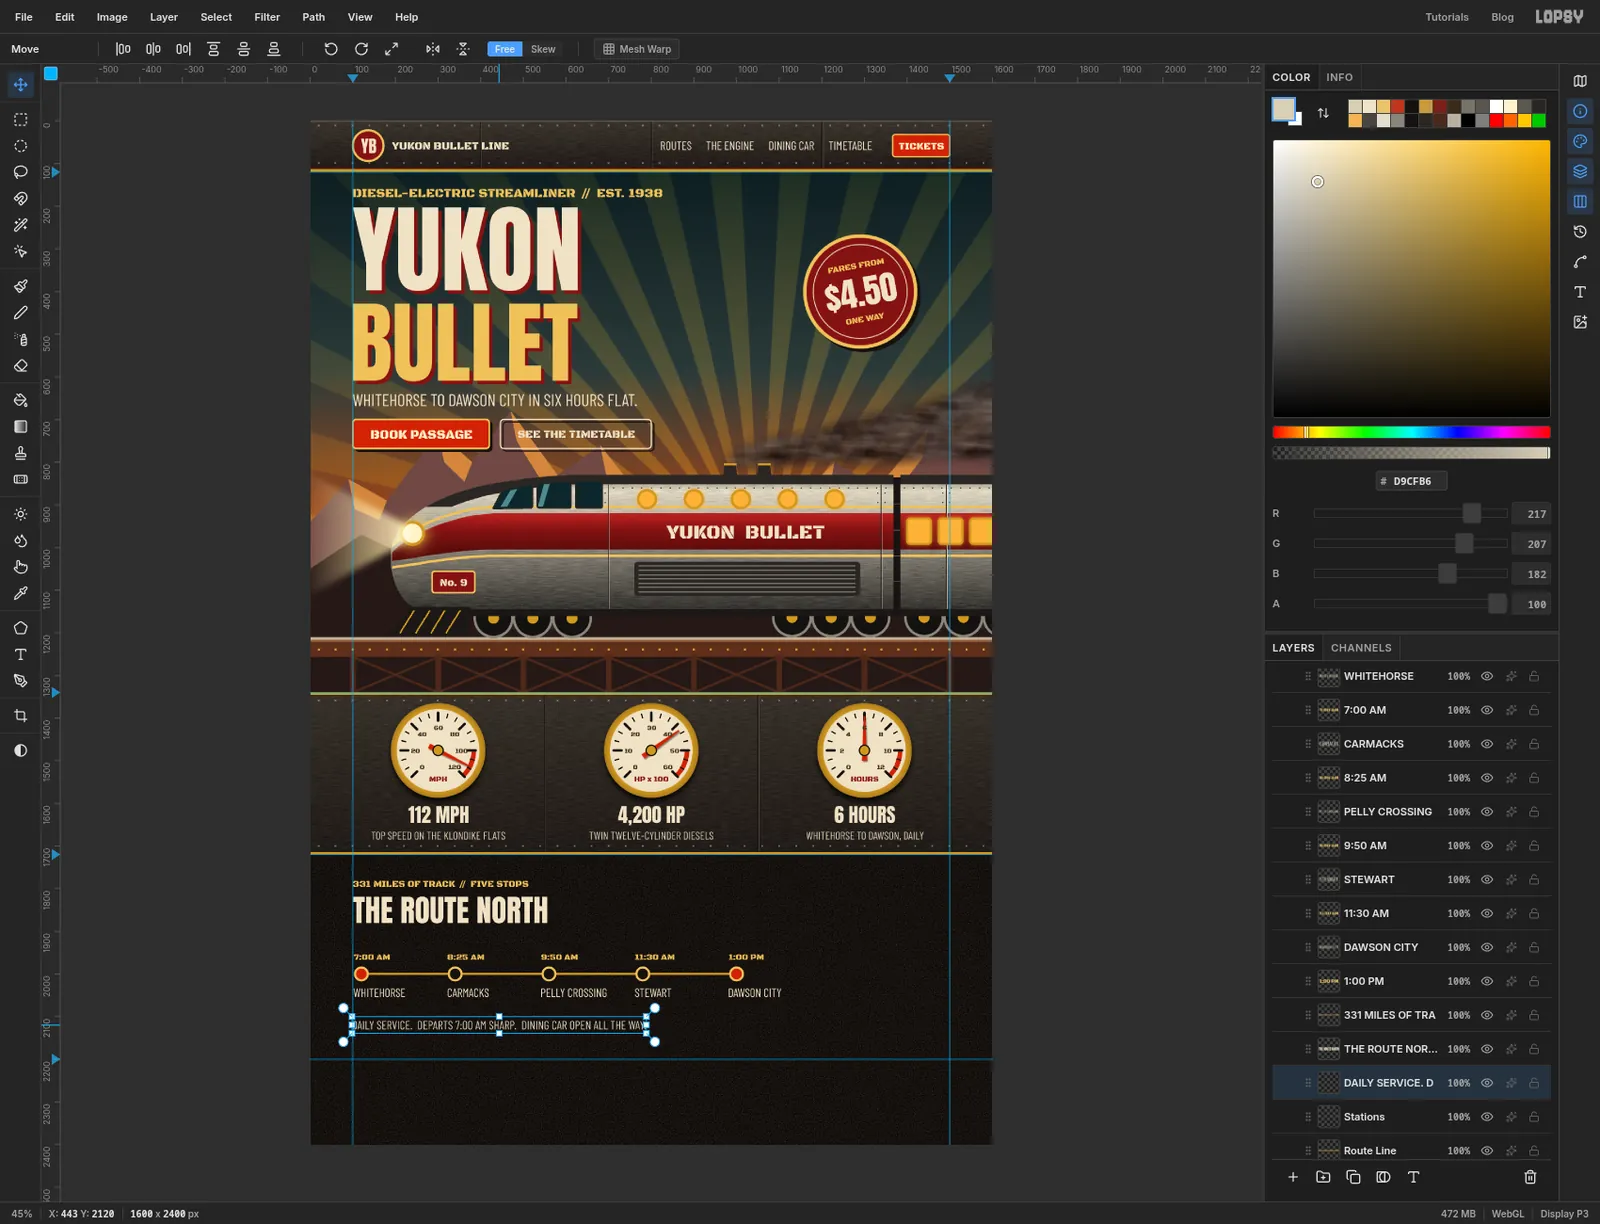
WHITEHORSE,CARMACKS,PELLY CROSSING,STEWART,DAWSON CITY 331 MILES OF TRACK // FIVE STOPSin Black Ops One at 22, gold, at y 1780THE ROUTE NORTHin Anton at 72, cream, at y 1818DAILY SERVICE. DEPARTS 7:00 AM SHARP. DINING CAR OPEN ALL THE WAY.in Barlow Condensed at 28, warm grey, at y 2110
Line up each time and stop name with the left edge of its dot, not its centre. The first dot's left edge is on the 100 guide, so the whole section hangs from the same margin as the headline.
- above each dot, the time in Black Ops One at 20, gold:
-
Punch the ticket
Click the
Routegroup, click New Group and name itTicket. Add a layer namedTicket Paper.Draw a cream rounded rectangle with Corner Radius
12, 296 × 358 px, centred at 1308, 1961. Its left edge is at x 1160 and its top at y 1782. Apply Filter → Texture… with Grain, Amount12and Size2for a card-stock tooth.Add a layer named
Ticket Band. Marquee the top 70 px of the ticket and fill it oxblood. Its square corners poke out past the ticket's round ones, so trim it: Cmd-click theTicket Paperthumbnail, clickTicket Band, choose Select → Inverse, press Delete and then Cmd+D.Click
Ticket Paper. Pick the Elliptical Marquee and set Ratio to 1:1 Square in the options bar so it draws circles. Drag a 32 px circle that straddles the ticket's left edge, centred on y 2048, about three-quarters of the way down. Hold Shift and drag a matching circle on the right edge. Press Delete to punch both notches, then Cmd+D.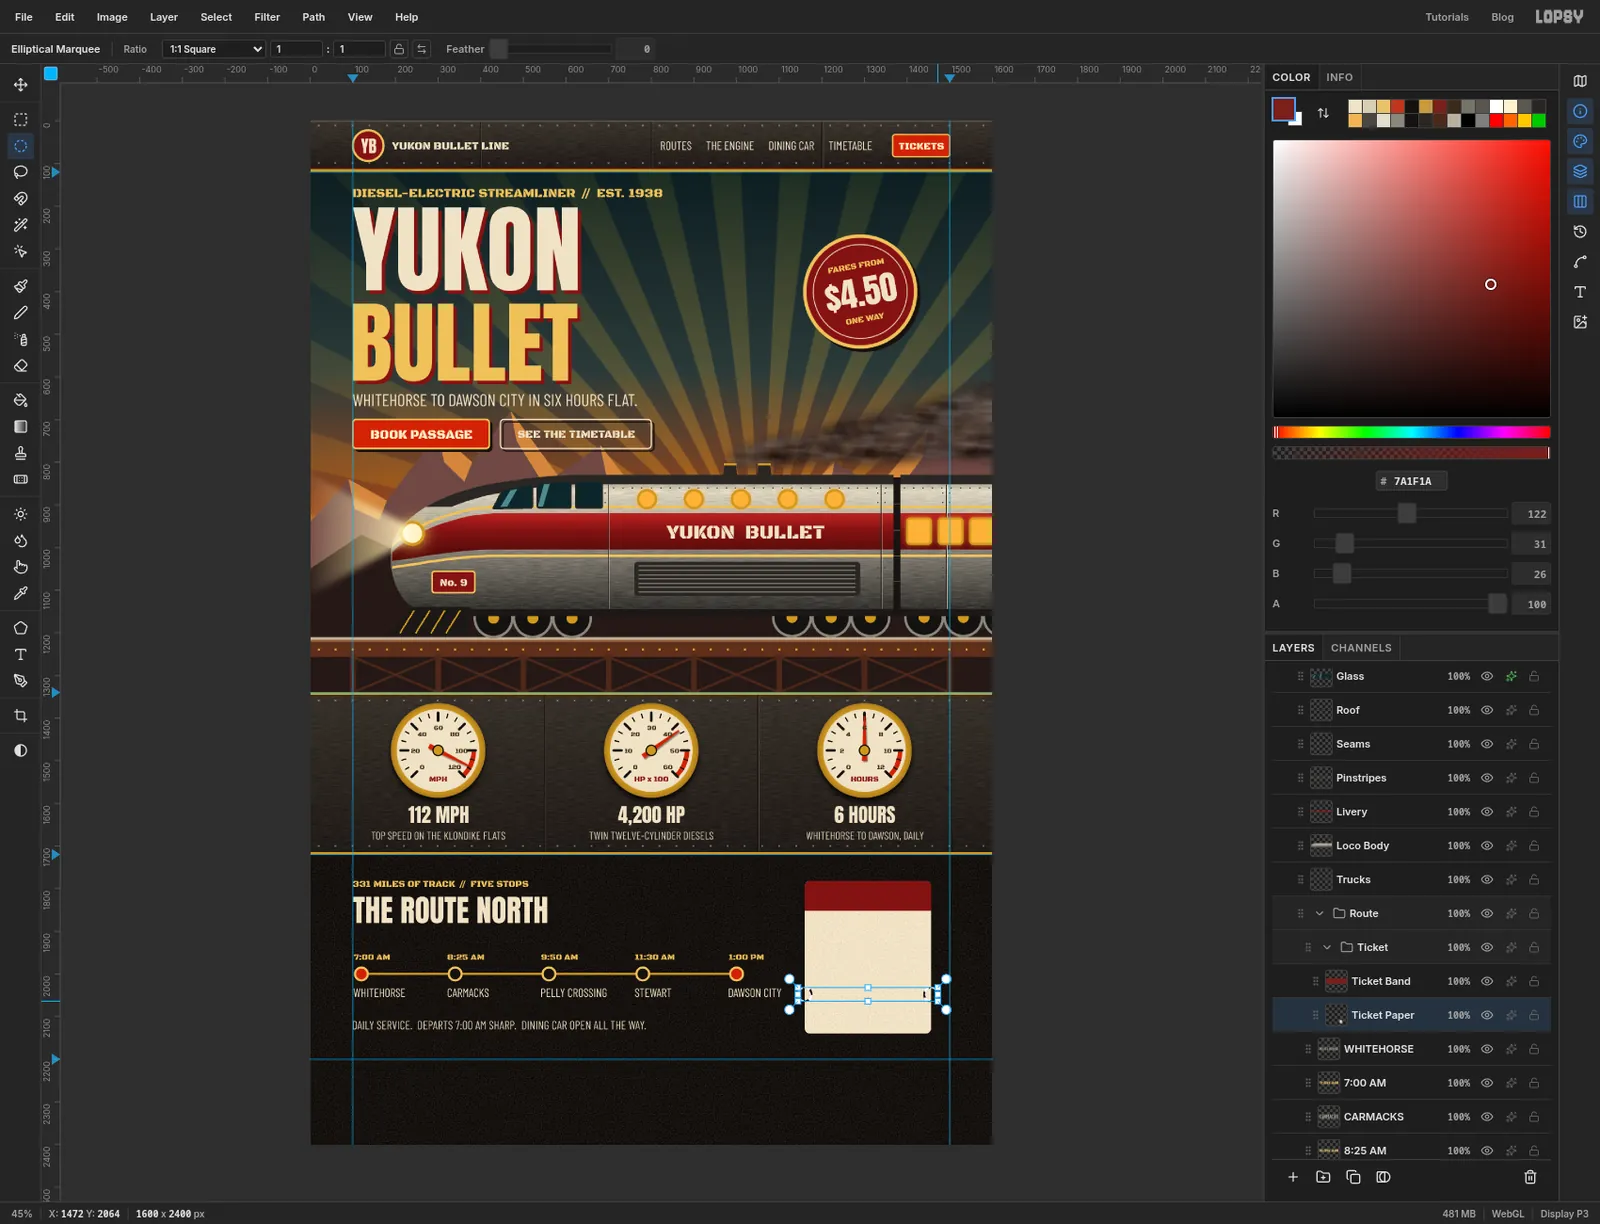
-
Print the ticket
Give
Ticket Papera Drop Shadow with Offset X10, Offset Y10, Blur0, Opacity70, black.Add a layer named
Ticket Perfabove the band. With the Pencil at Size4in steel, click a row of dots 12 px apart from one notch to the other.Set five centred lines on the ticket:
FIRST CLASSin Black Ops One at 26, cream, in the middle of the bandONE WAY PASSAGEin Anton at 36, sootWHITEHORSE — DAWSONin Barlow Condensed at 28, oxbloodCOACH 3 // SEAT 14Ain Black Ops One at 18, sootADMIT ONEin Black Ops One at 32, signal red, in the middle of the stub below the perforation
Keep at least 28 px between the widest line and the edges of the ticket.
ONE WAY PASSAGEis the one to watch.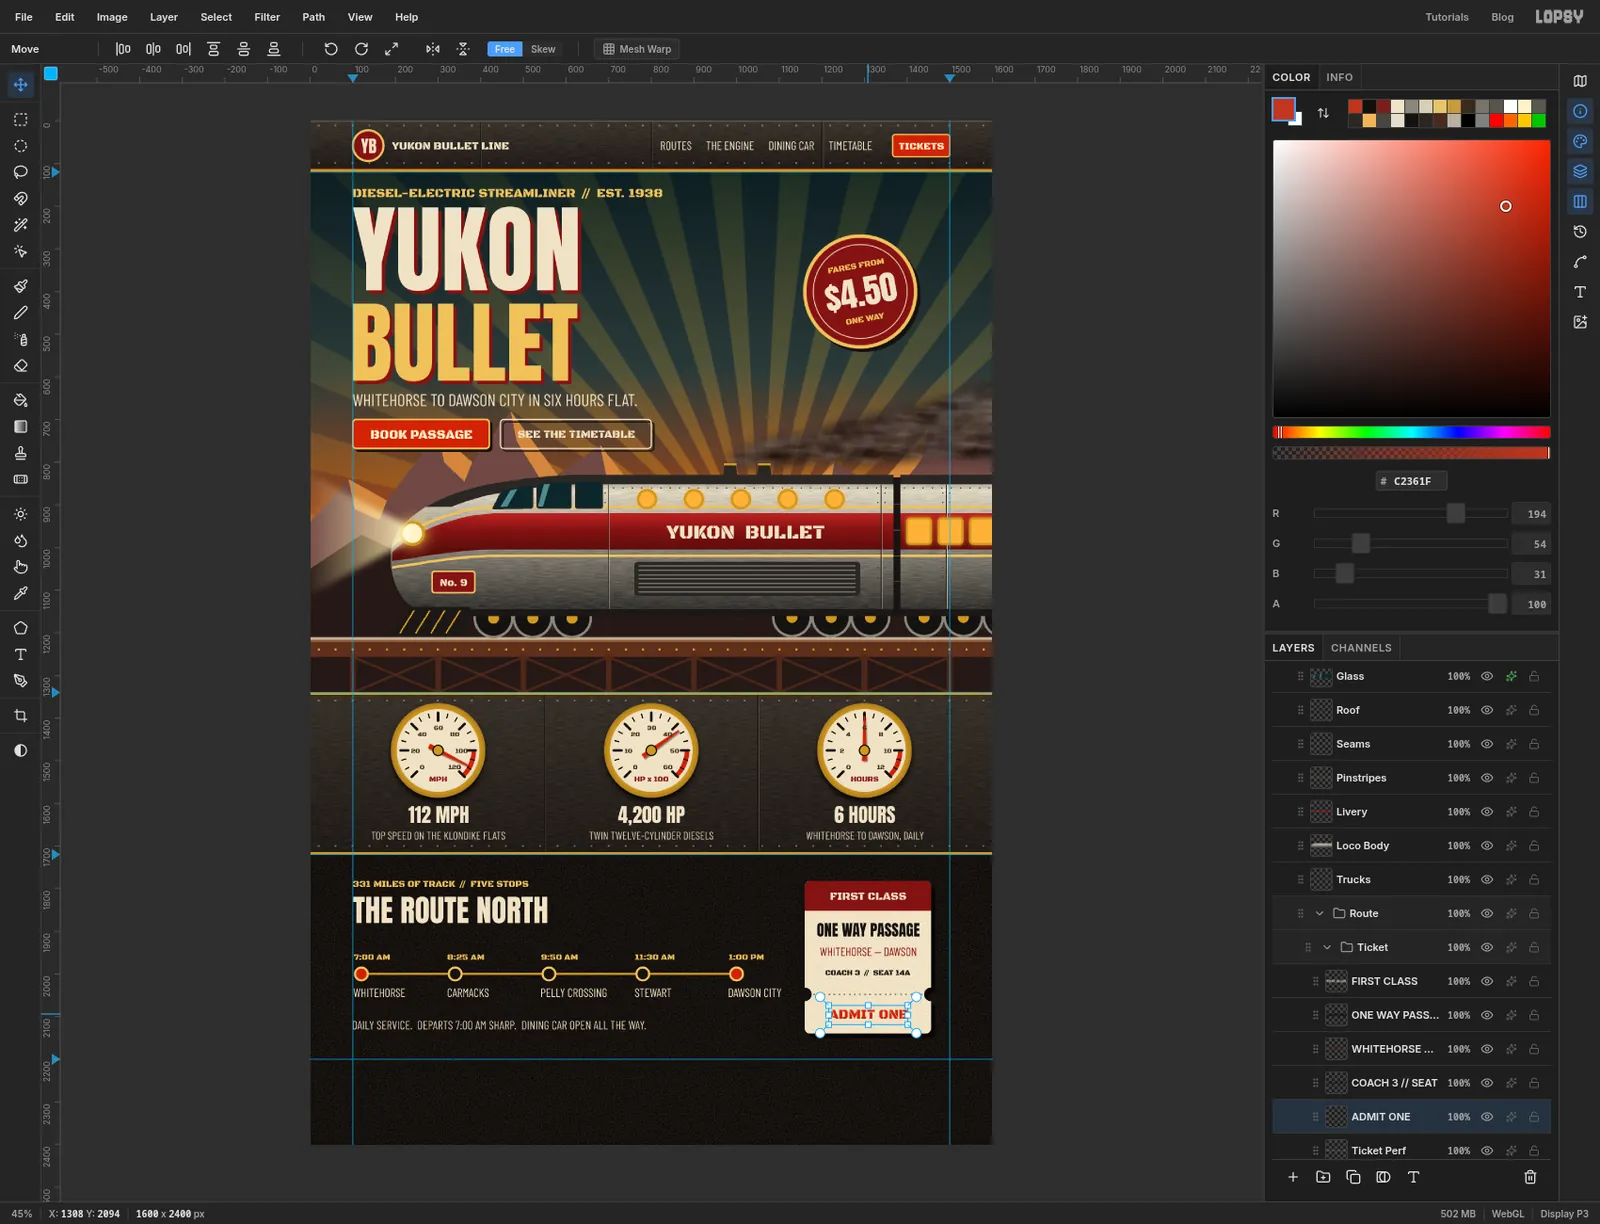
-
Tilt the ticket
Click the
Ticketgroup, press Cmd+D and pick the Move tool. Rotate the group about 6° clockwise. Paper, band, notches, perforation and all five lines turn as one. Press Cmd+D to commit.After the turn, the ticket's corners should stay inside the 1500 guide and clear of the brass bar above, and there should be a comfortable gap between
DAWSON CITYand the ticket. If the ticket crowds either one, select theTicketgroup and drag it with the Move tool.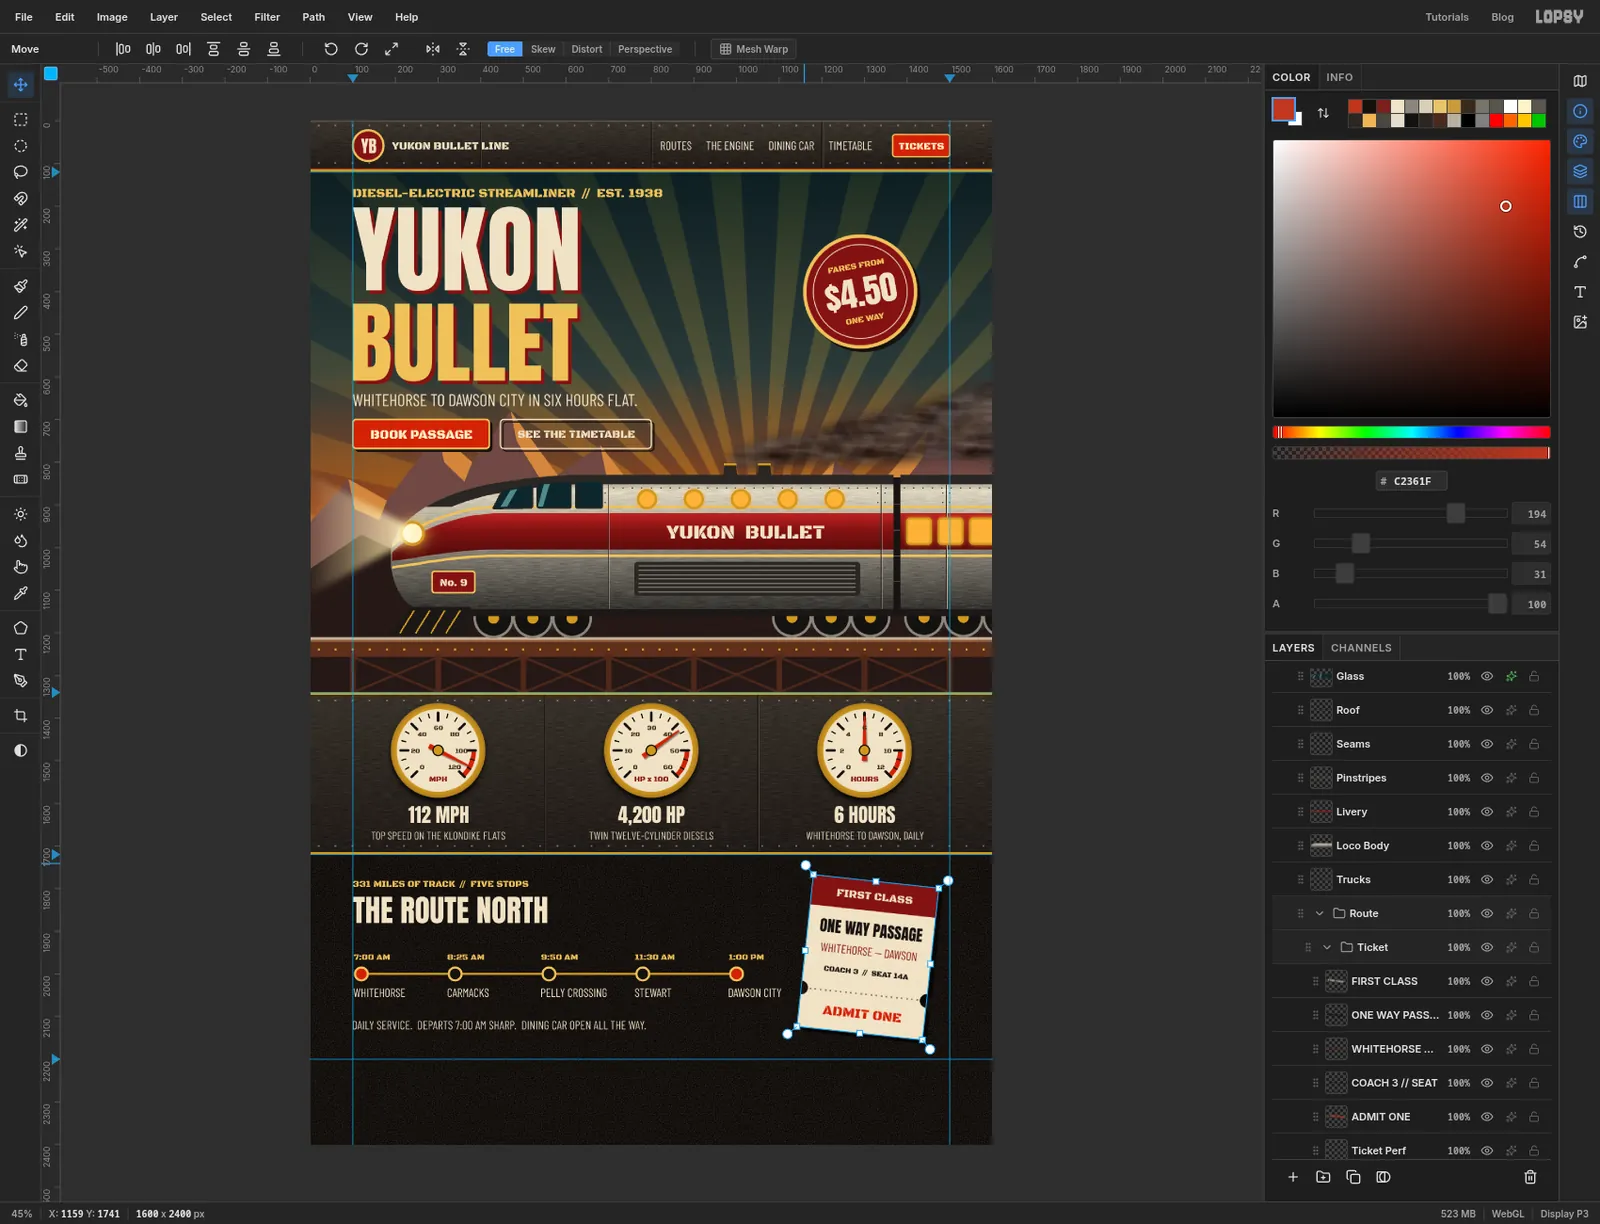
-
Stripe the footer
Click the
Sootrow, click New Group and name itFooter. Add a layer namedFooter Plate, marquee from the 2200 guide to the bottom of the page and fill it with .Add a layer named
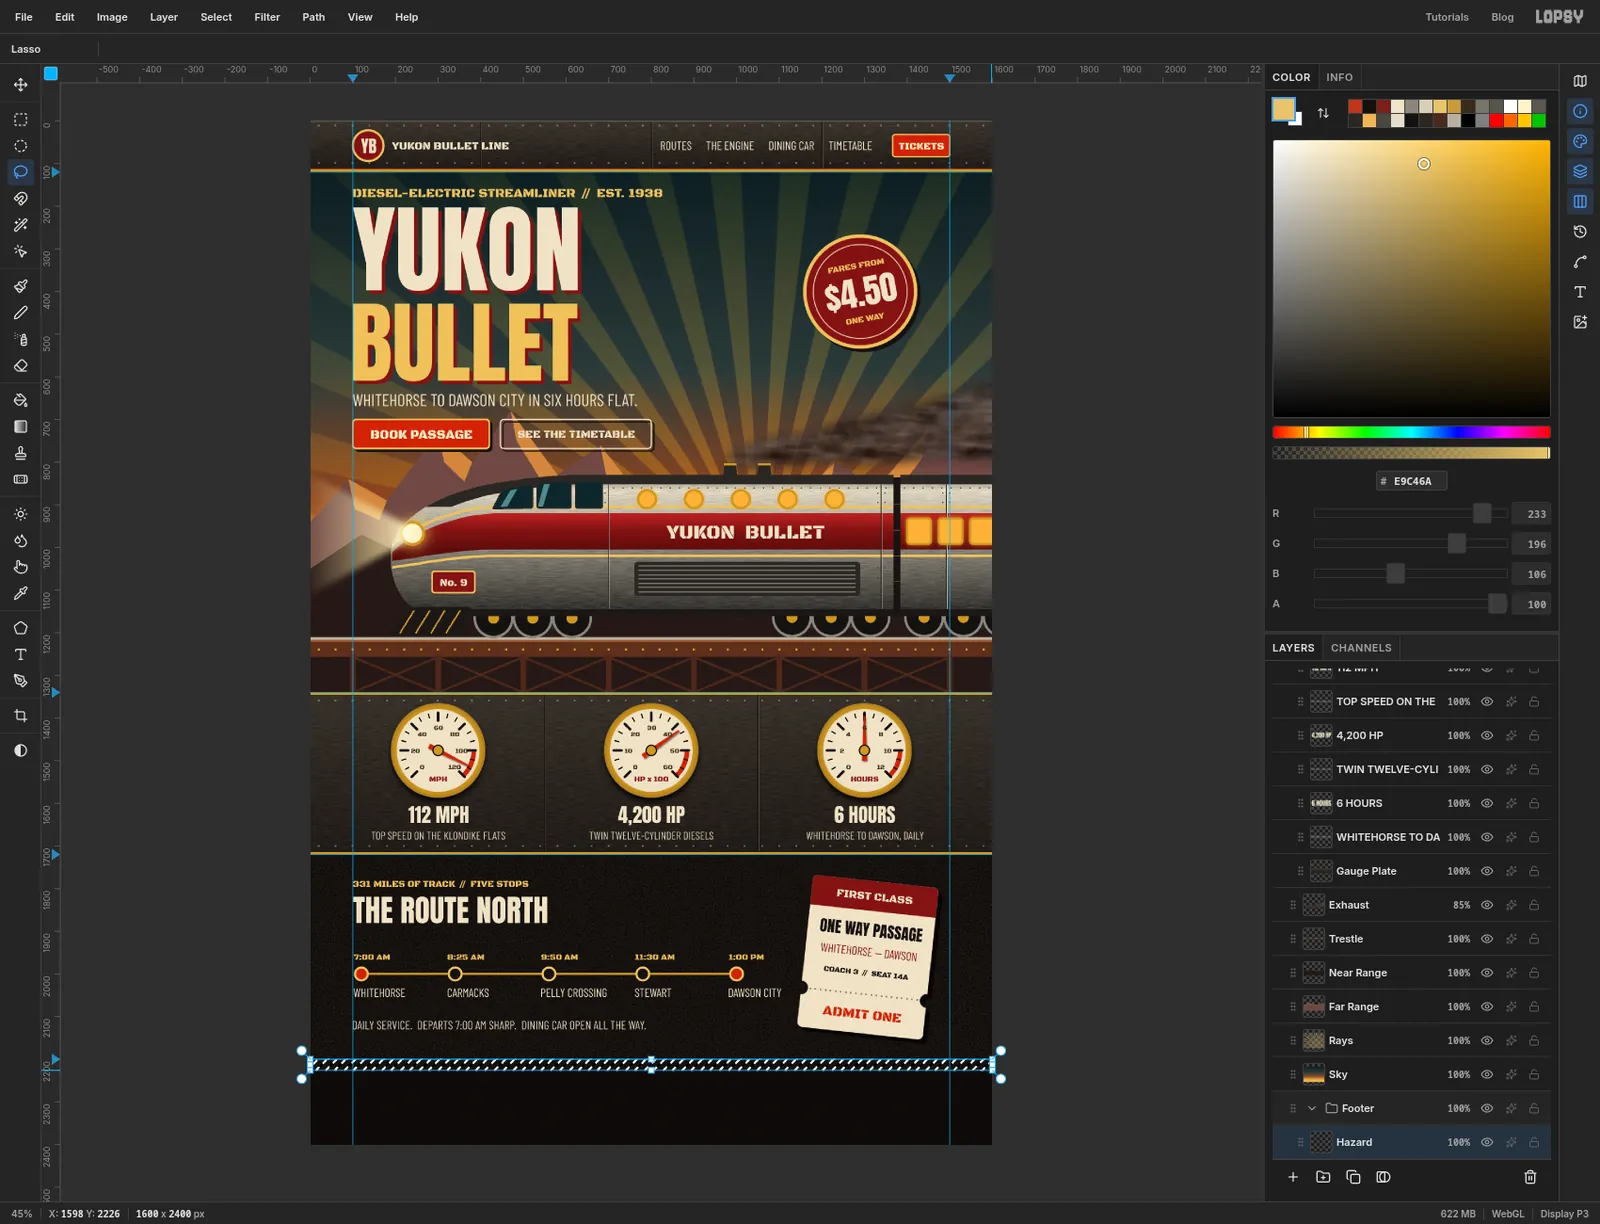
Hazard. Marquee a full-width band from y 2200 to 2226 and fill it with soot. Then pick the Lasso and draw a slanted bar across the band: 22 px wide and leaning to the right, so its top is 26 px further right than its bottom. Hold Shift and draw the next one 44 px along. Keep going right across the page. Let each bar overshoot the band a little above and below. There are about three dozen bars, and they don't need to be identical: a hand-painted hazard stripe never is. If your wrist gives out, fill the first six, marquee that run, press Cmd+C and Cmd+V, drag the copy along with the Move tool, and repeat, then merge the copies down with Cmd+E.Fill them all with gold. Then marquee the strip just above the band and press Delete, and do the same just below it, to trim the overshoot to clean edges.
-
Set the footer
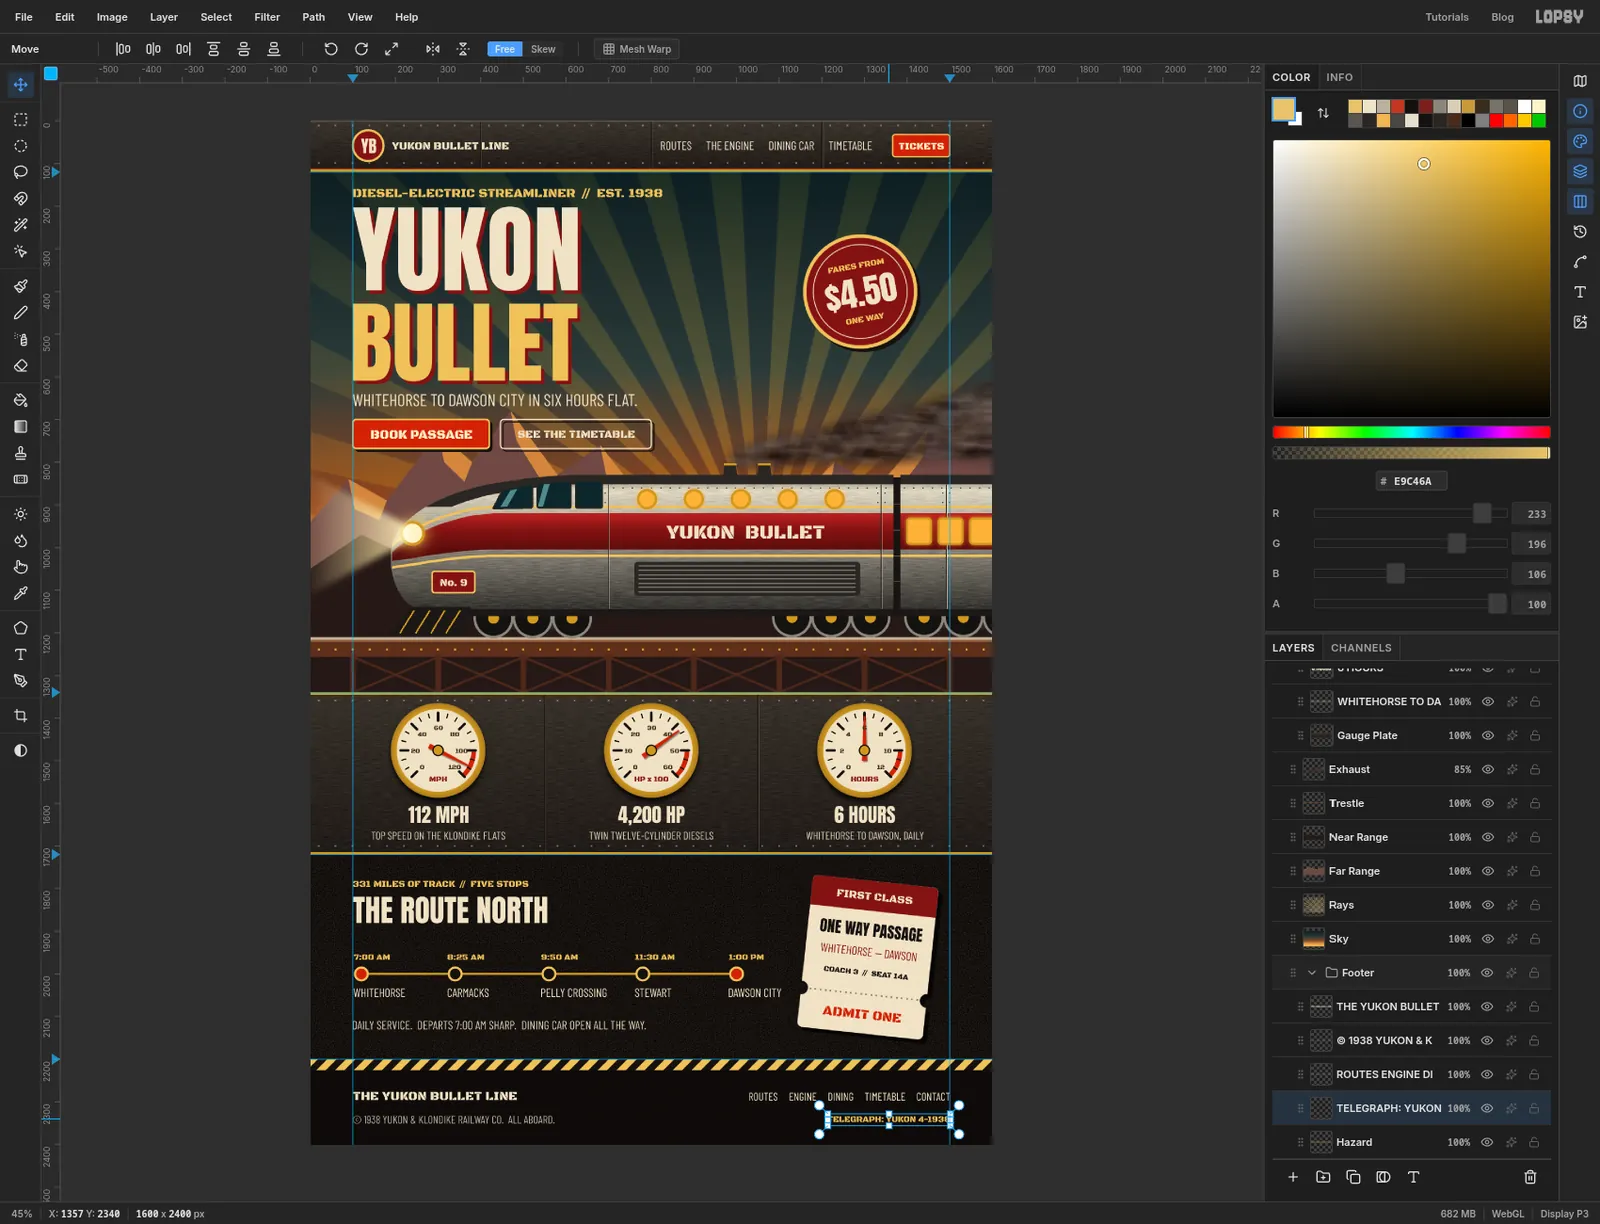
Set four lines in the footer, two on each margin:
THE YUKON BULLET LINEin Black Ops One at 30, cream, left edge on the 100 guide, at y 2276© 1938 YUKON & KLONDIKE RAILWAY CO. ALL ABOARD.in Barlow Condensed at 26 in , below it at y 2332ROUTES ENGINE DINING TIMETABLE CONTACTin Barlow Condensed at 26, cream, level with the wordmark, with its right edge on the 1500 guideTELEGRAPH: YUKON 4-1938in Black Ops One at 20, gold, level with the copyright line, right edge on the guide
There's no right-align needed for the last two. Set each one, then drag it until its last letter touches the guide.
-
Darken the corners
Click the ✦ button on the
Projectrow at the very top of the Layers panel. On a group, the drawer shows adjustments, and onProjectthey apply to the whole page. Click Add Adjustment, choose Vignette and set it to35. The corners sink back and the eye stays on the headline and the headlight. Close the drawer.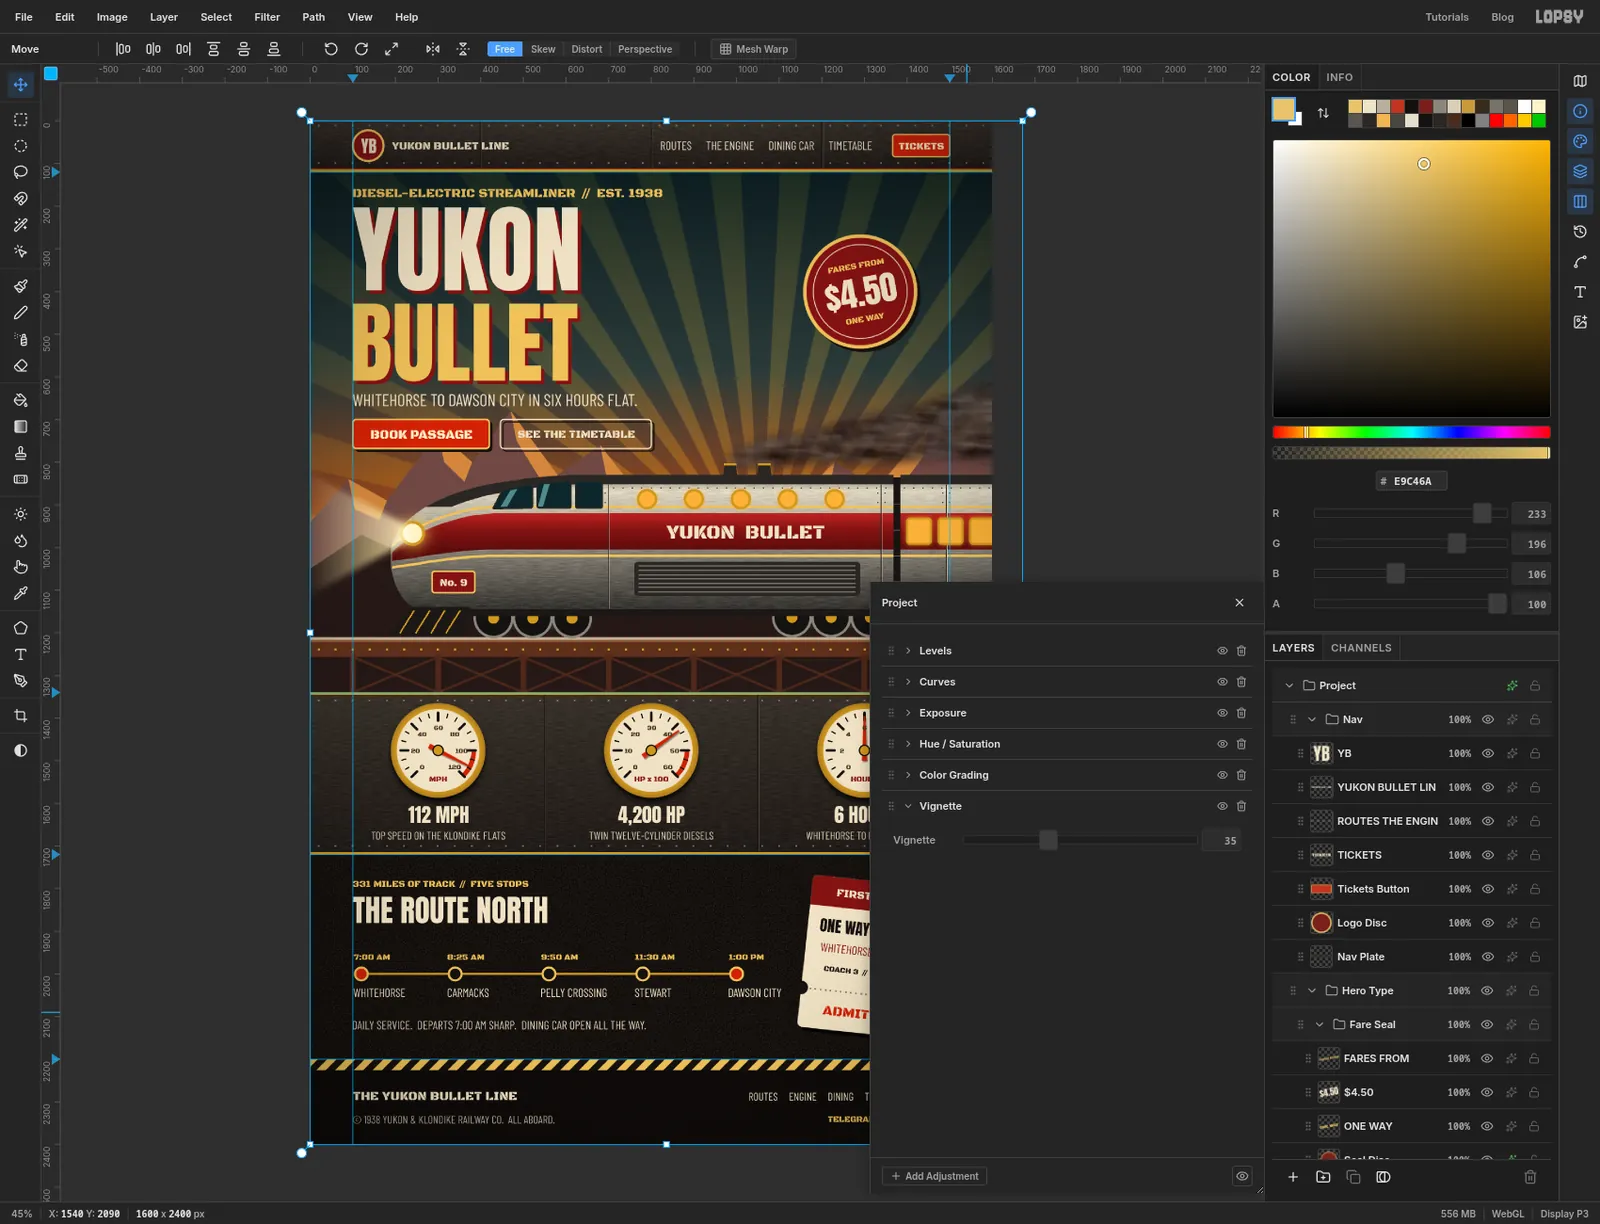
-
Add the grime
One last layer ties every section together. Add a layer named
Grimeand drag it to the very top of the stack, aboveNav. Set the foreground to mid grey , press Cmd+A, choose Edit → Fill and press Cmd+D.Choose Filter → Texture…, click Rough, and set Amount
55, Size70and Detail70. Then choose Filter → Add Noise… with Amount6. The page disappears behind grey marble for a moment.Set the layer's blend mode to Overlay and its opacity to 24%. Mid grey does nothing in Overlay, so only the lighter and darker patches show: steel, paint, type and sky all pick up the same uneven wear, as if the whole page had been through a few winters. Raise the opacity and it gets grubbier. Above about 35% the mountains start to look like marble, so stop before that.
Save your work with File → Save Project, and export with File → Quick Export PNG.