Design a Neo-Pop Roller Disco App Mockup
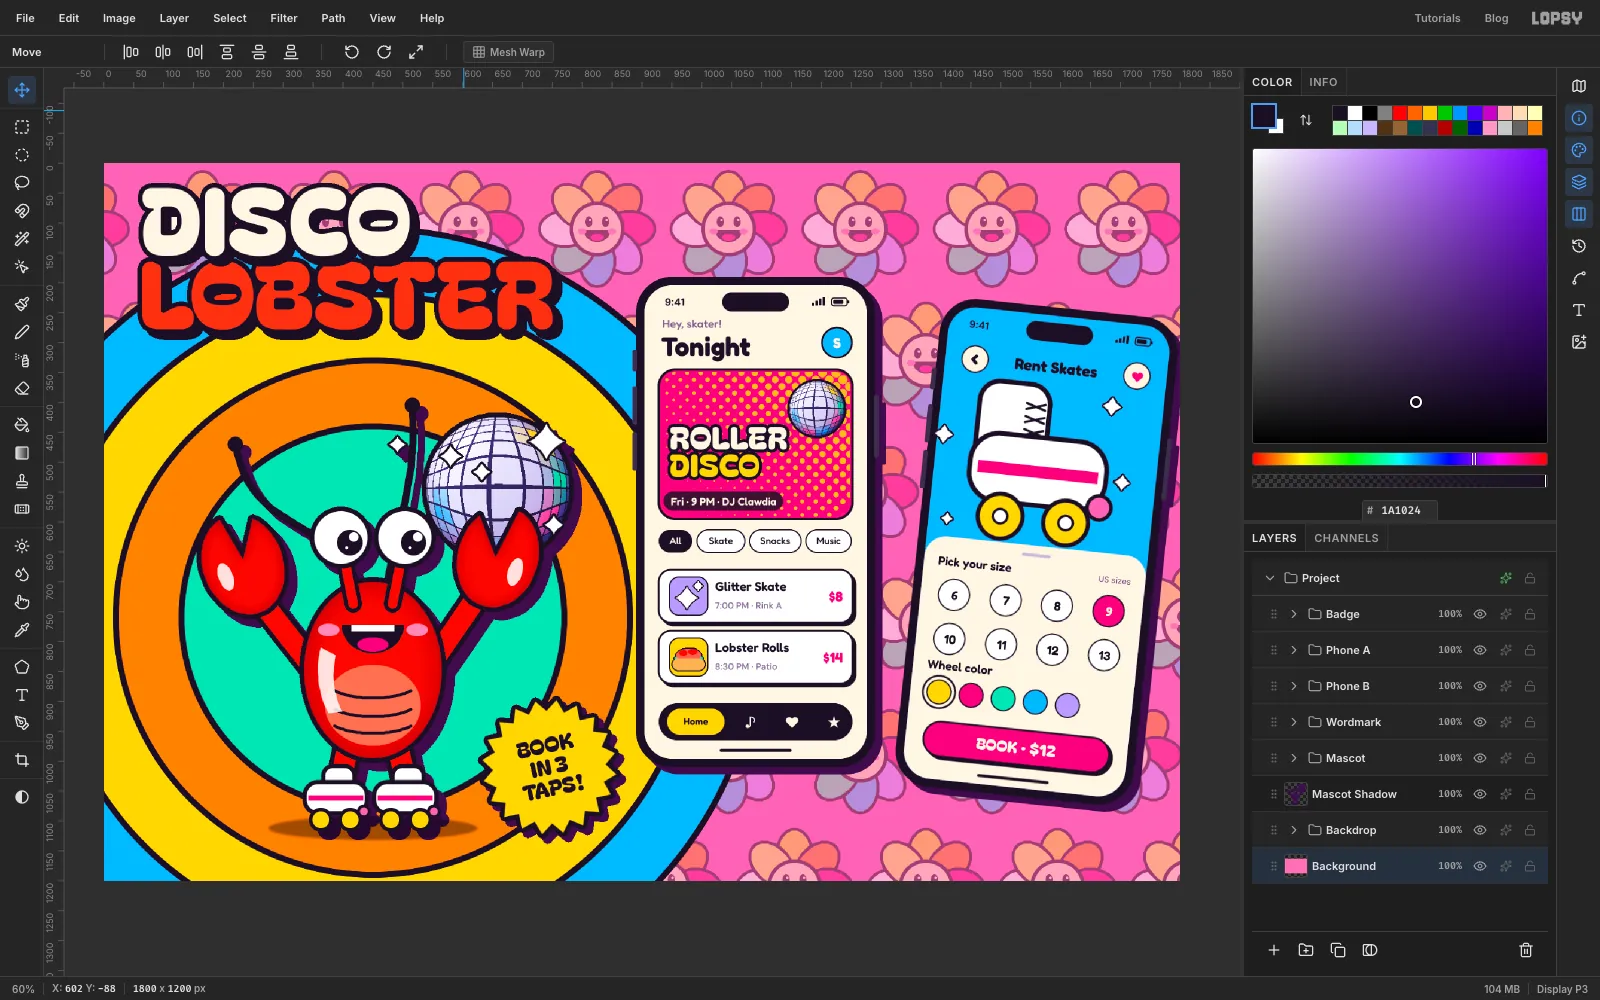
Build a neo-pop app mockup in Lopsy, with a smiling-flower wallpaper, a glossy lobster mascot with a mirror ball, two phone screens and a tilted phone group.
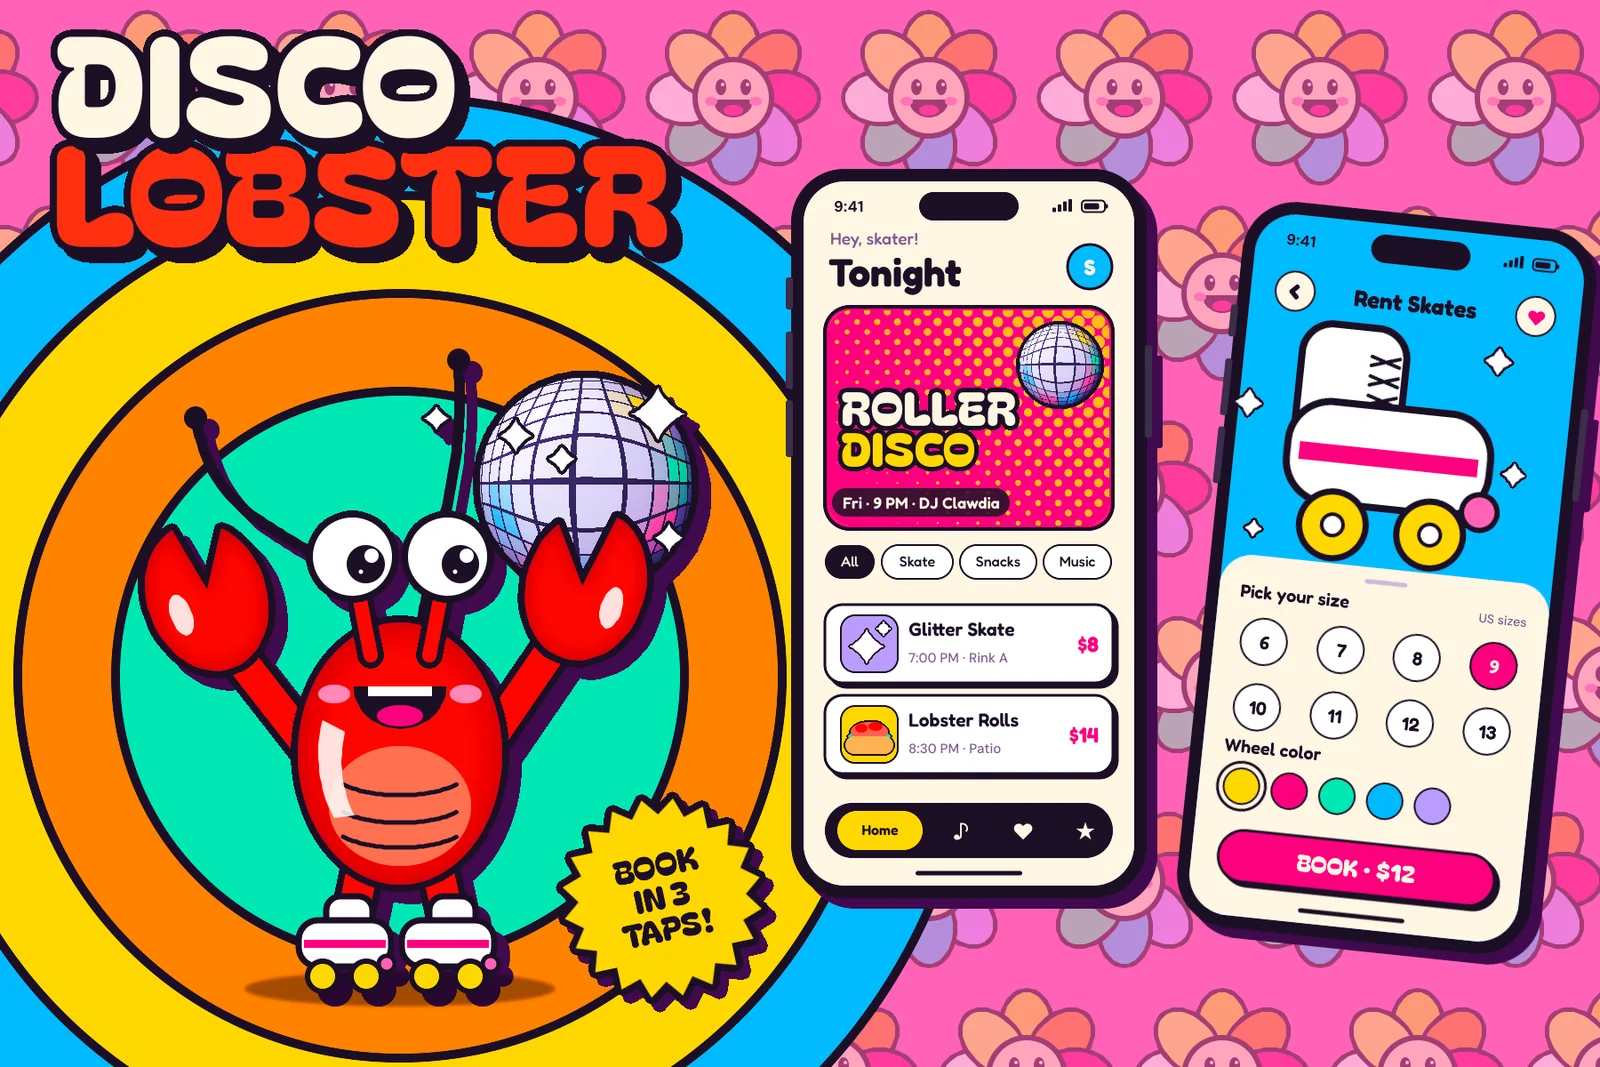
Neo-pop takes 1960s Pop Art and turns it up. Takashi Murakami's superflat paintings repeat flat, smiling flowers until they become a field. Jeff Koons makes balloon animals look like they're cast in mirror-polished steel. Both use the same visual language as toys, packaging and apps: flat saturated colour, thick black outlines and a shine that looks good enough to lick.
In this tutorial you'll use that language to present an imaginary app called Disco Lobster, for a roller rink with a lobster shack. The board has three parts on an 1800 × 1200 canvas:
- The stage: a wallpaper of smiling rainbow flowers made with Define Pattern and Fill with Pattern, behind concentric halo rings drawn with the Shape tool.
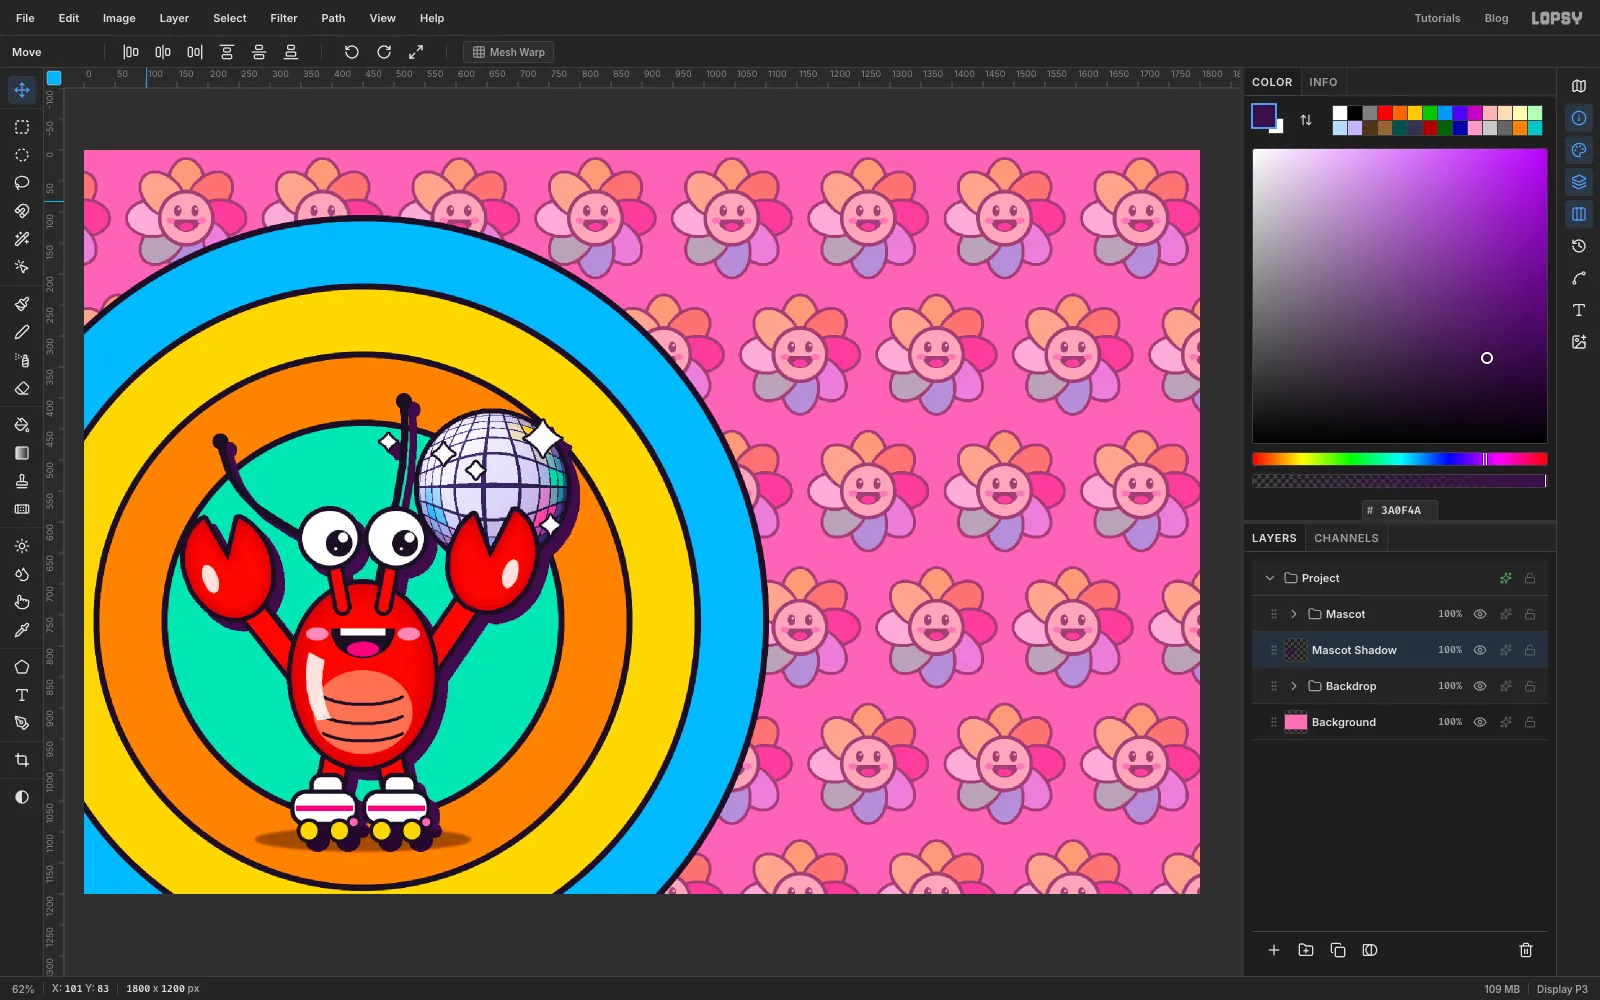
- The mascot: a glossy red lobster on roller skates, built from selections, fat brush lines and layer effects. It holds a mirror ball made with Pixelate, a Pencil grid and Liquify's Bloat, and it sits on a hard sticker shadow made with Copy Merged.
- Two phone screens: a home screen with a Halftone hero card, and a skate-rental screen with a size picker that's grouped and tilted with one rotation.
Along the way you'll use the Shape tool's click-to-size dialog for exact UI pieces, the Magic Wand to fill letter holes, Select → Inverse to clip a panel, Merge Down, copying and scaling pixels between layers, ruler guides and the grid. The fonts are Bagel Fat One for display type, Fredoka for UI text and DM Sans for small print.
The palette is candy-bright, held together by one dark ink:
-
Bubblegum
-
ink
-
plum shadow
-
Petals
-
Flower face
-
blush
-
Lobster
-
belly
-
shell shade
-
title red
-
Mirror ball
-
Cream
-
muted text
-
bun
-
Draw a smiling superflat flower
Create an 1800 × 1200 document. Select Background, set the foreground to bubblegum and fill it.
Rename Layer 1 to
Flower Tile. You'll draw one flower in a 220 × 220 px square in the top-left corner, centred on110, 110.- Petals. Each petal is an oval about 80 px long and 54 px wide, with its middle 54 px out from the centre, pointing outwards. Start with the top petal. Use the Lasso to trace a slightly fatter oval and fill it with ink. Choose Select → Shrink… by 5 and fill again with the petal colour, which leaves a 5 px ink rim. Work round clockwise in 45° steps: yellow, orange, magenta, lilac, sky blue, mint, white and pale yellow (the petal colours in the palette). Each new petal overlaps the one before it, so the outlines stack like paper.
- Face. Use the Elliptical Marquee with Shift to draw a 92 px circle on the centre and fill it with ink. Shrink by 6 and fill with .
- Features. The eyes are two small ink ovals about 12 × 18 px, either side of the centre and a little above it. For the grin, lasso a half circle about 44 px wide just below the centre and fill it with ink. Put a magenta oval in the bottom of it for a tongue. Add two pink ovals for cheeks, and click once in each eye with a 5 px white Brush for a glint.
Drag a Rectangular Marquee from the top-left corner to
220, 220and choose Edit → Define Pattern. Then deselect and delete theFlower Tilelayer. The pattern stays defined.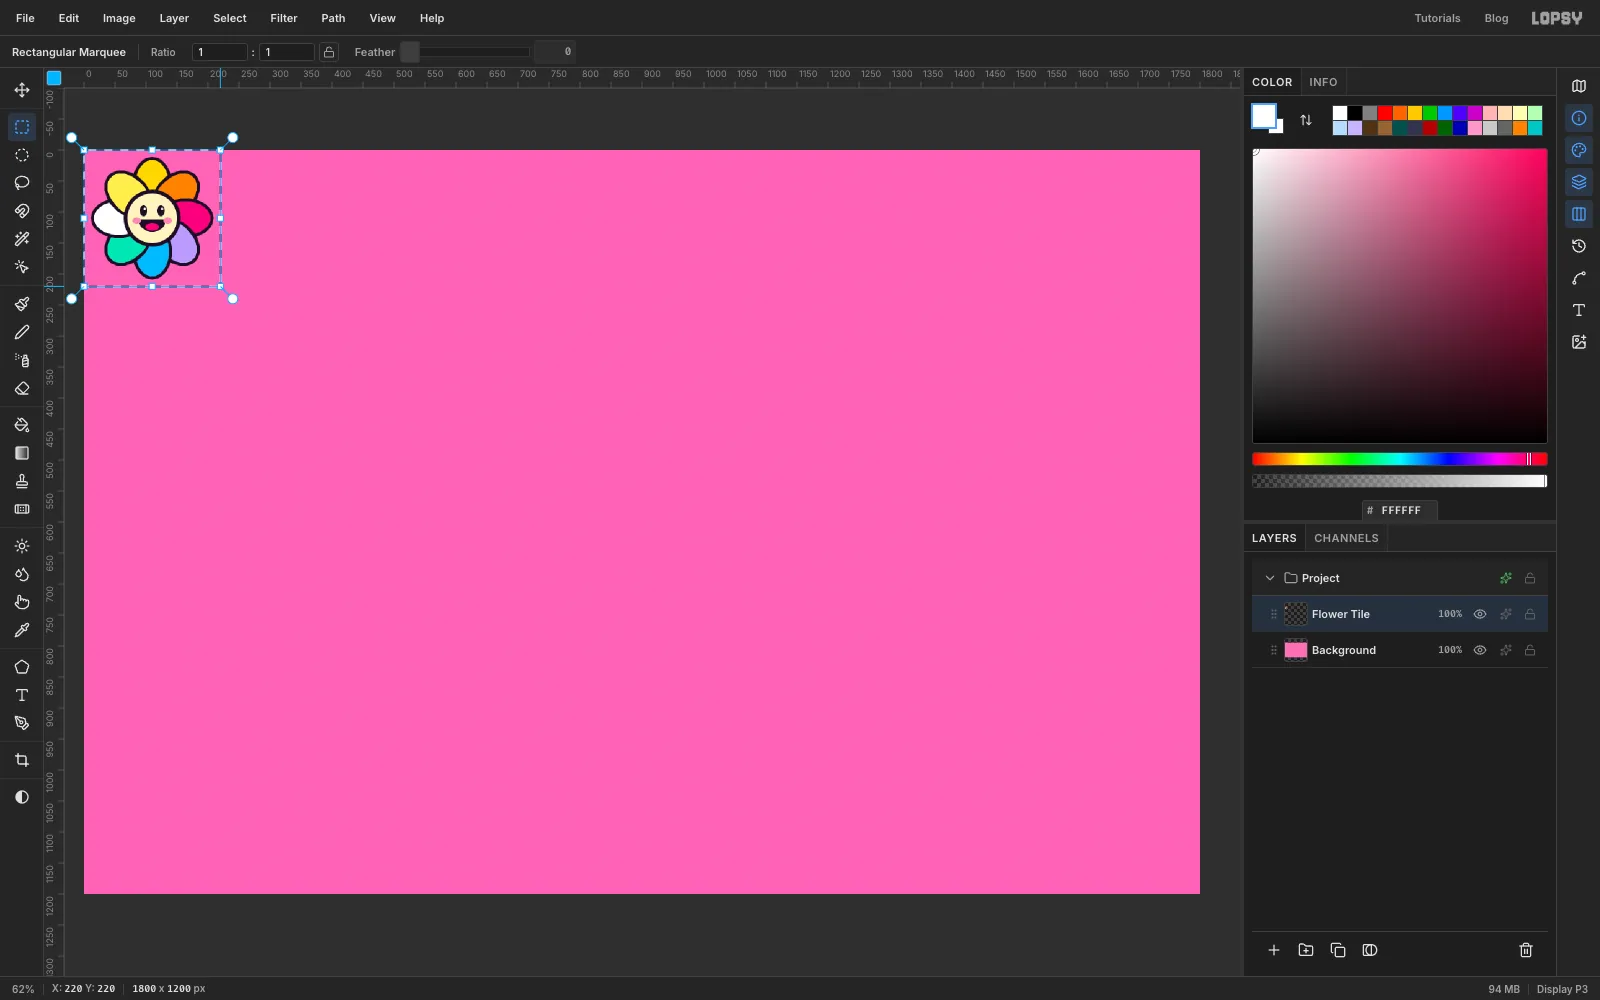
-
Fill a layer with the pattern
Click New Group in the Layers panel and name it
Backdrop. Add a layer inside it calledFlower Field, then choose Edit → Fill with Pattern…. Your flower is already selected. Set Row Stagger to 50%, so each row shifts half a tile like bricks, and Horizontal Offset to 25%. Click Apply.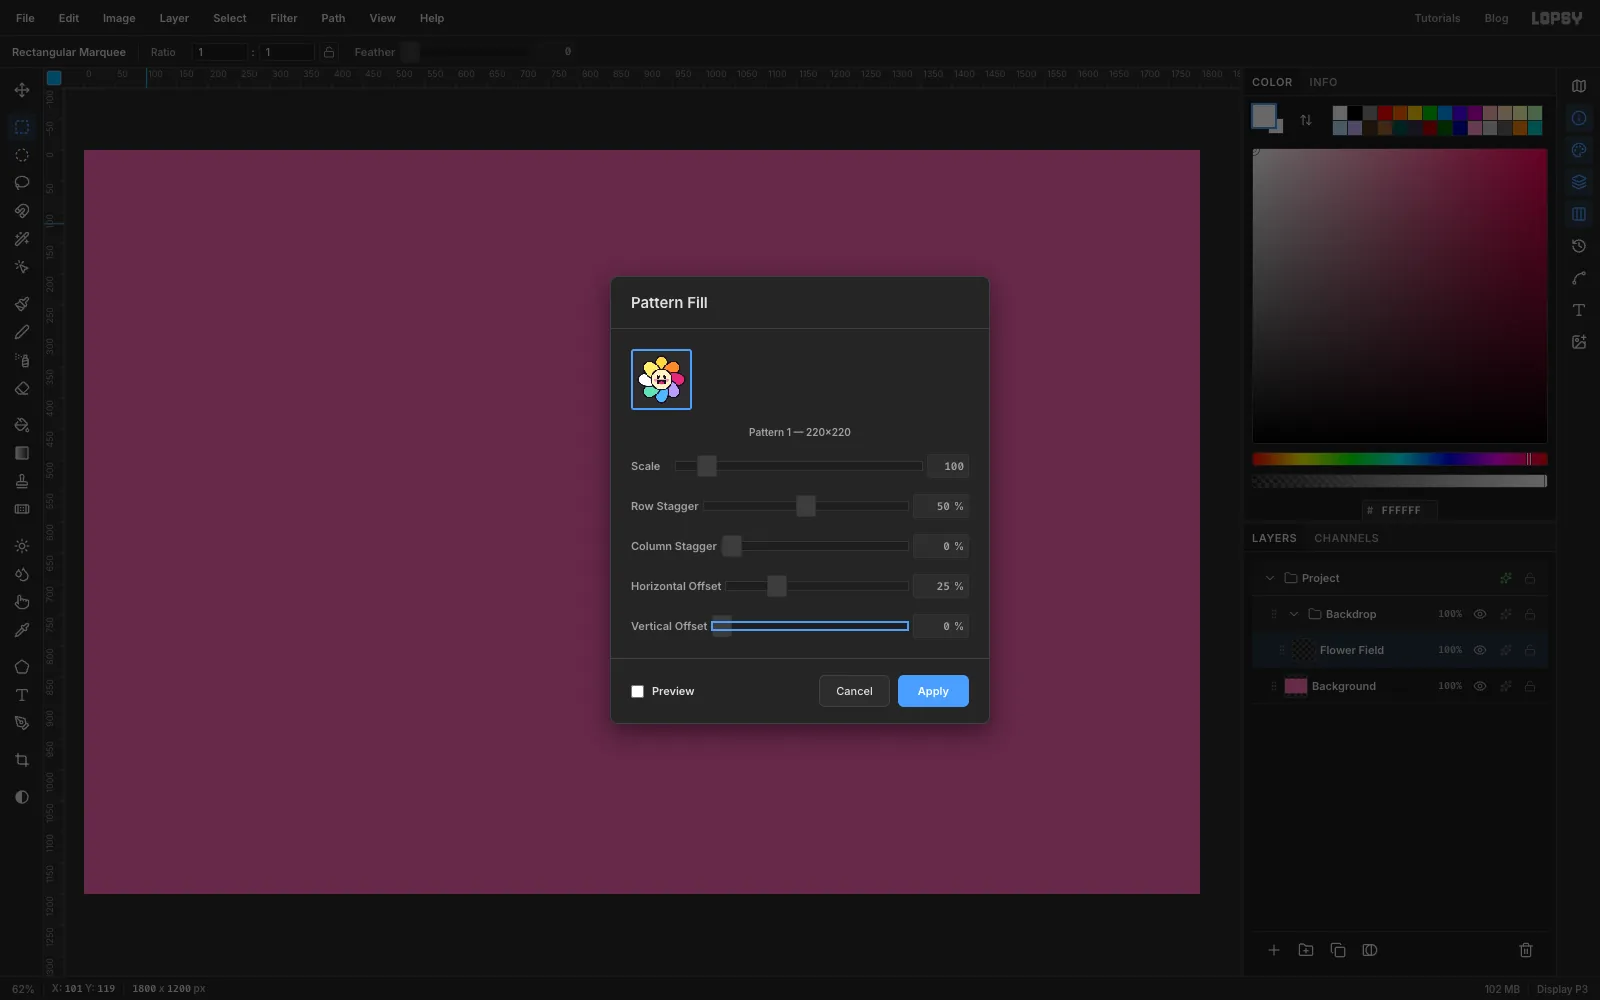
-
Knock the wallpaper back
At full strength the flowers would shout over everything, so set
Flower Fieldto 45% opacity. The pink shows through and the field turns into wallpaper.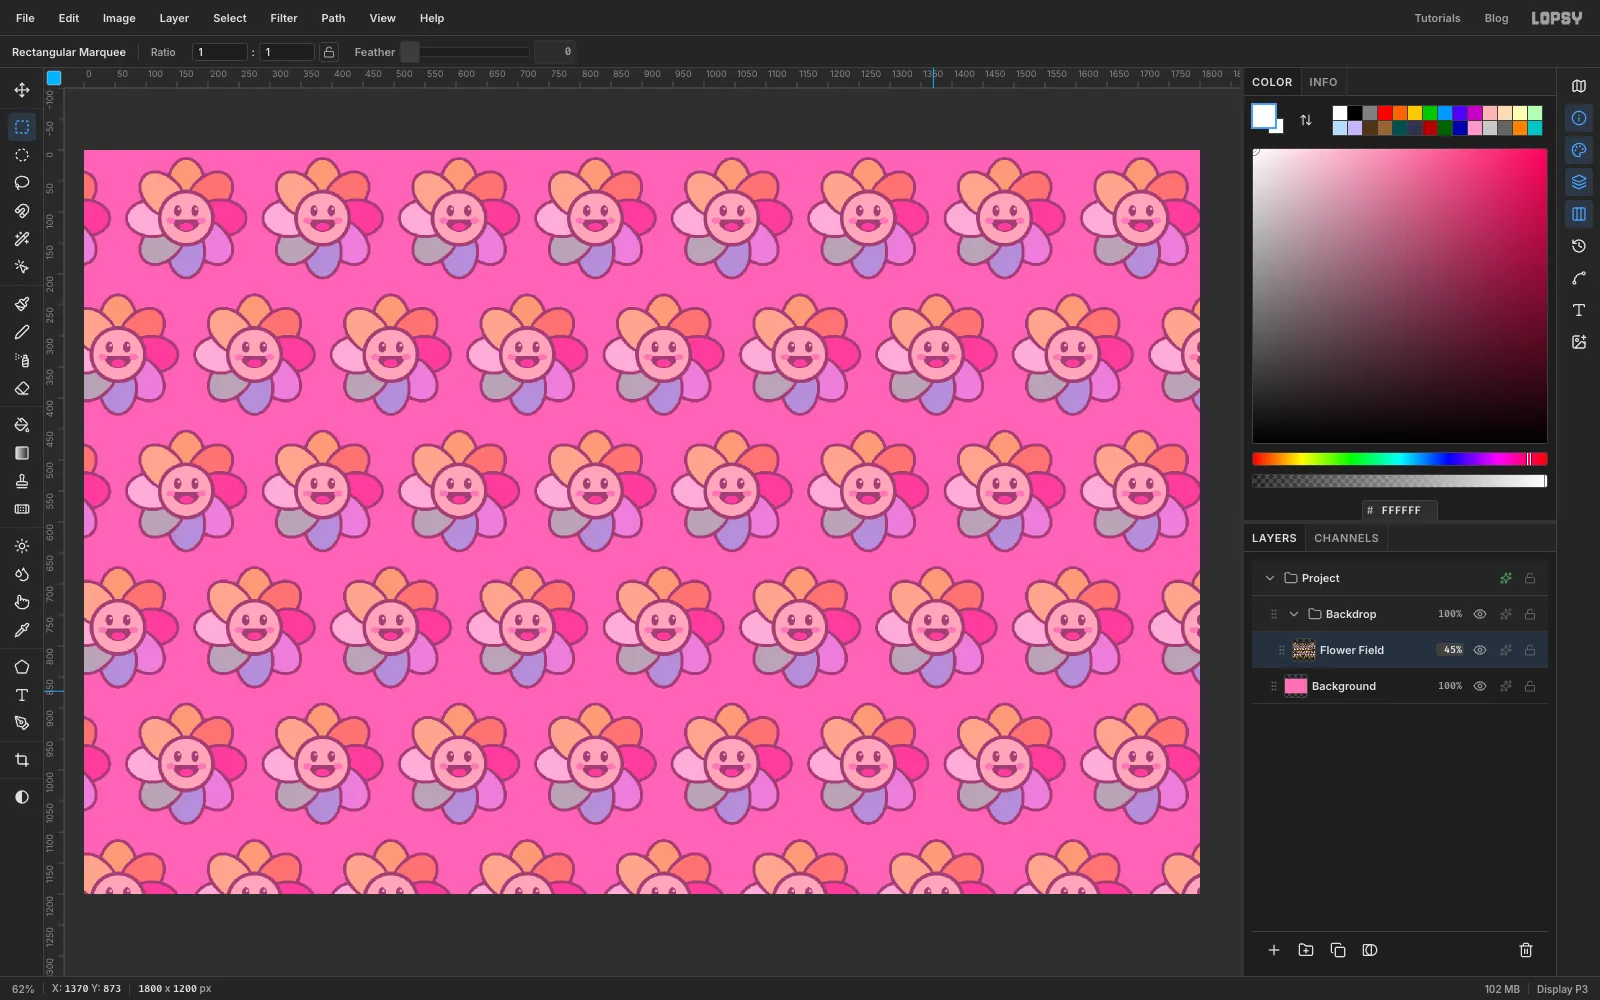
-
Stack the halo rings
Add a layer called
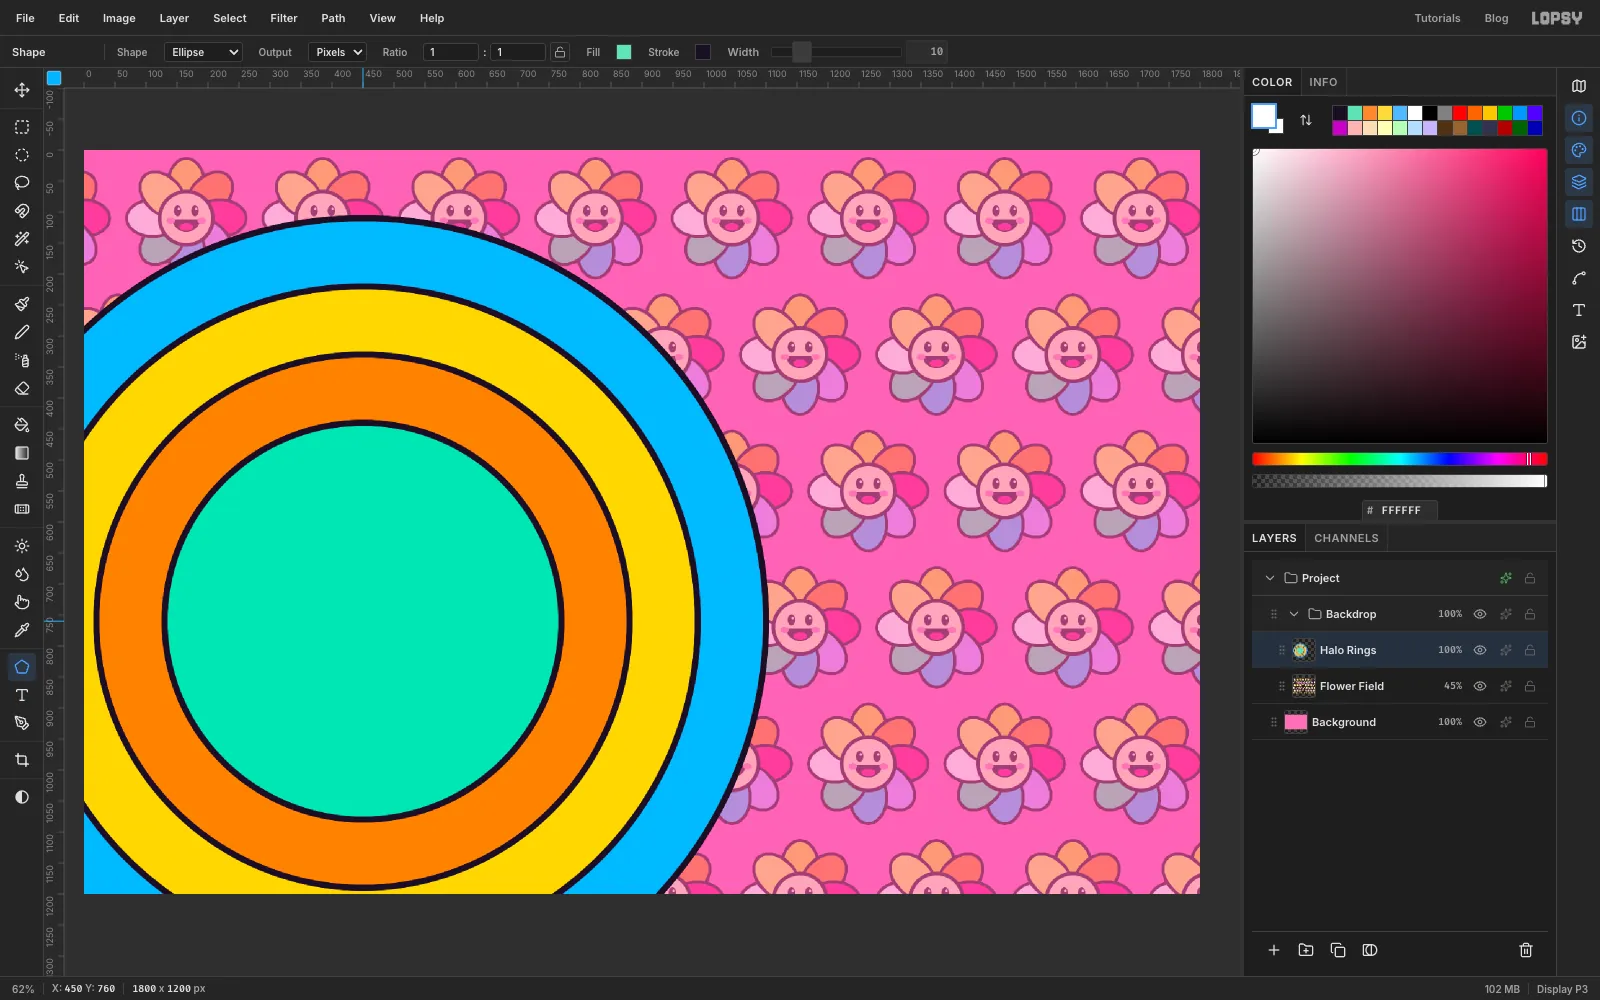
Halo Ringsabove the field. Pick the Shape tool, set Shape to Ellipse, and click the Stroke swatch to add an ink stroke with a Width of 10.A click without dragging opens the Shape Size dialog, which makes a shape of an exact size centred on the click. Click at
450, 760four times, working from the largest circle to the smallest and changing the fill colour each time:- 1300 × 1300 in sky blue
- 1080 × 1080 in yellow
- 860 × 860 in orange
- 640 × 640 in mint
-
Start the lobster with antennae
Collapse
Backdrop, click its row, and click New Group. Name the new groupMascot. All of the character's layers go inside it, each one above the last. The lobster stands on the vertical line through450.- Floor Shadow. On a layer called
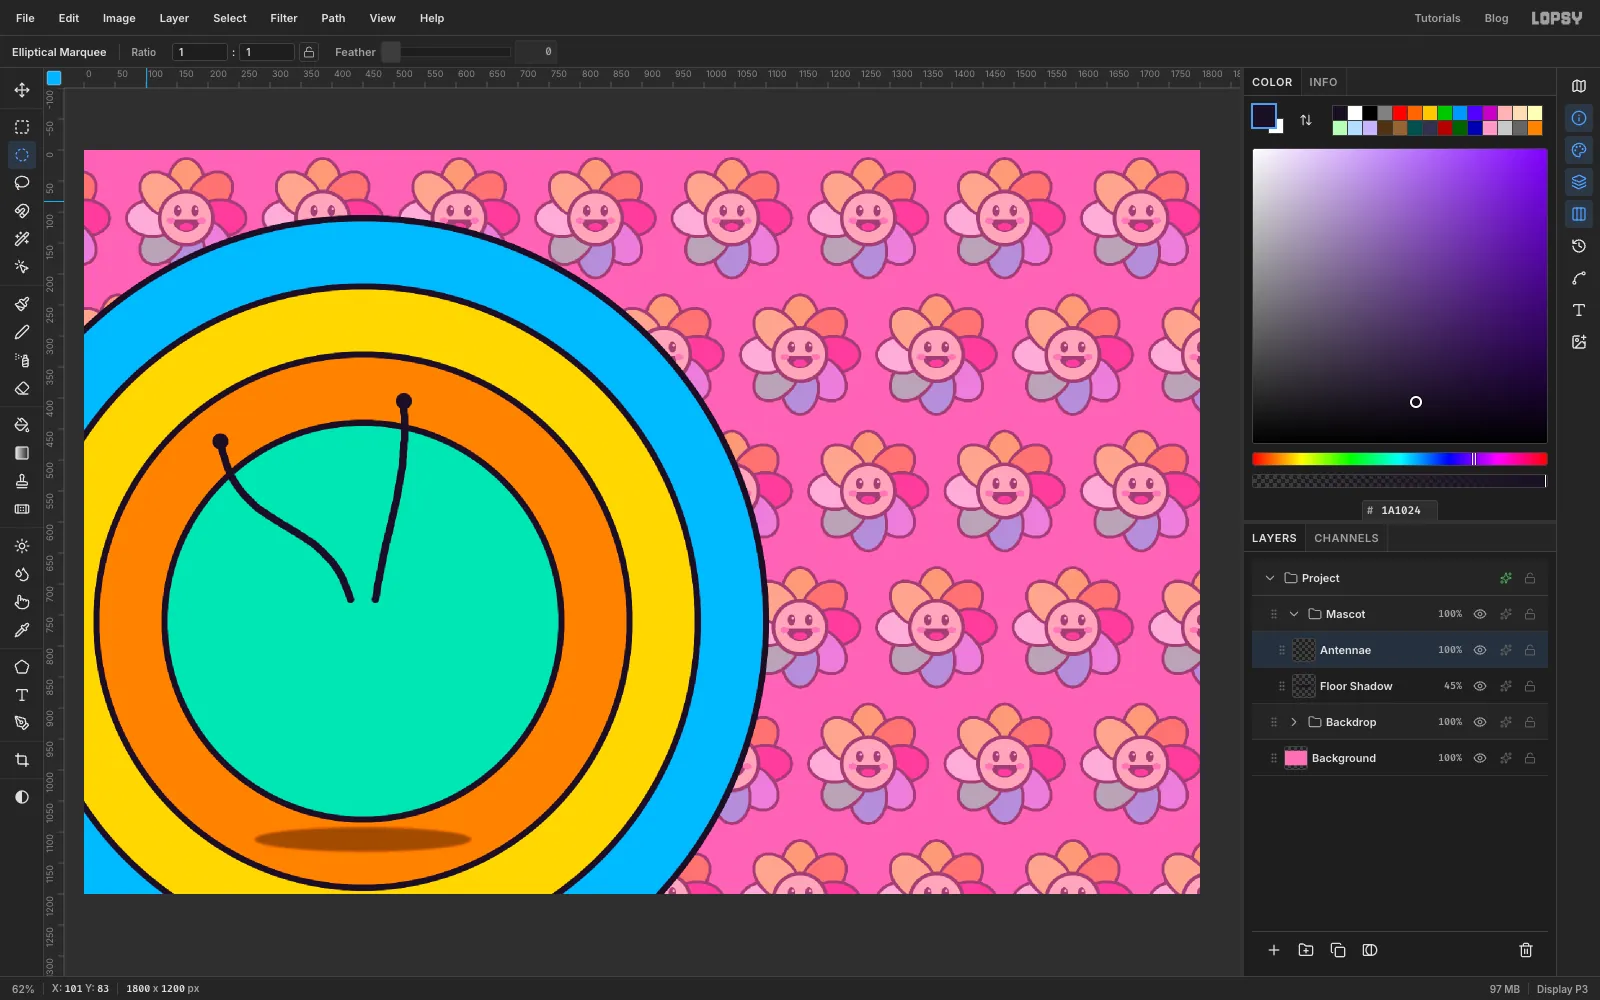
Floor Shadow, draw an elliptical marquee about 350 × 40 centred on450, 1110and fill it with ink. Deselect, run Filter → Gaussian Blur… at 6, set the layer to Multiply and lower it to 45%. - Antennae. On a layer called
Antennae, pick the Brush with ink, Size 13 and Hardness 100 in the options bar. Drag one long S-curve from430, 725up and out to220, 470, and another from470, 725to515, 405. Add a 26 px ink circle at each tip.
- Floor Shadow. On a layer called
-
Shade and pixelate a mirror ball
Add a layer called
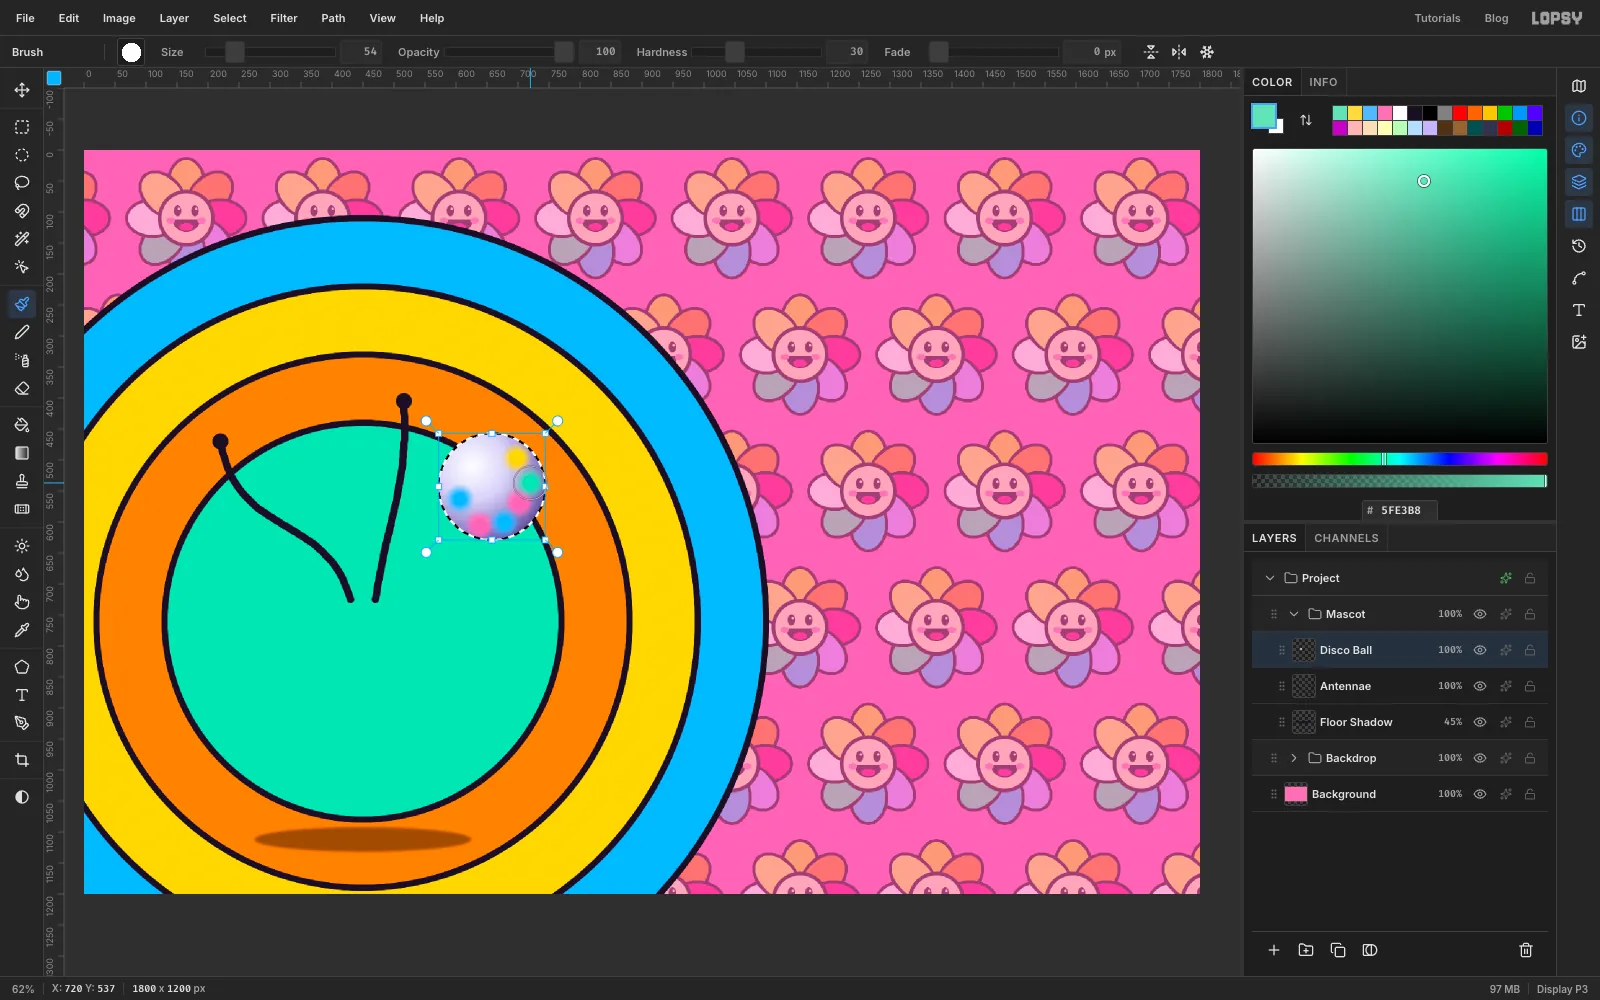
Disco Balland draw a 172 px circle selection centred on658, 543. Keep it selected for the whole of this section.- Shading. Pick the Gradient tool, set it to Radial, and open Advanced… to set four stops: white , lavender at 35%, violet at 75% and deep indigo at the end. Drag from just above and left of the centre to past the lower-right edge.
- Reflections. Switch to the Brush at Size 54 and Hardness 30. Click a couple of soft dabs each of pink, sky blue, yellow and mint around the lower half and the right edge.
- Facets. Run Filter → Pixelate… with a Block Size of 16. The selection keeps the tiles inside the circle.
-
Rule the grout
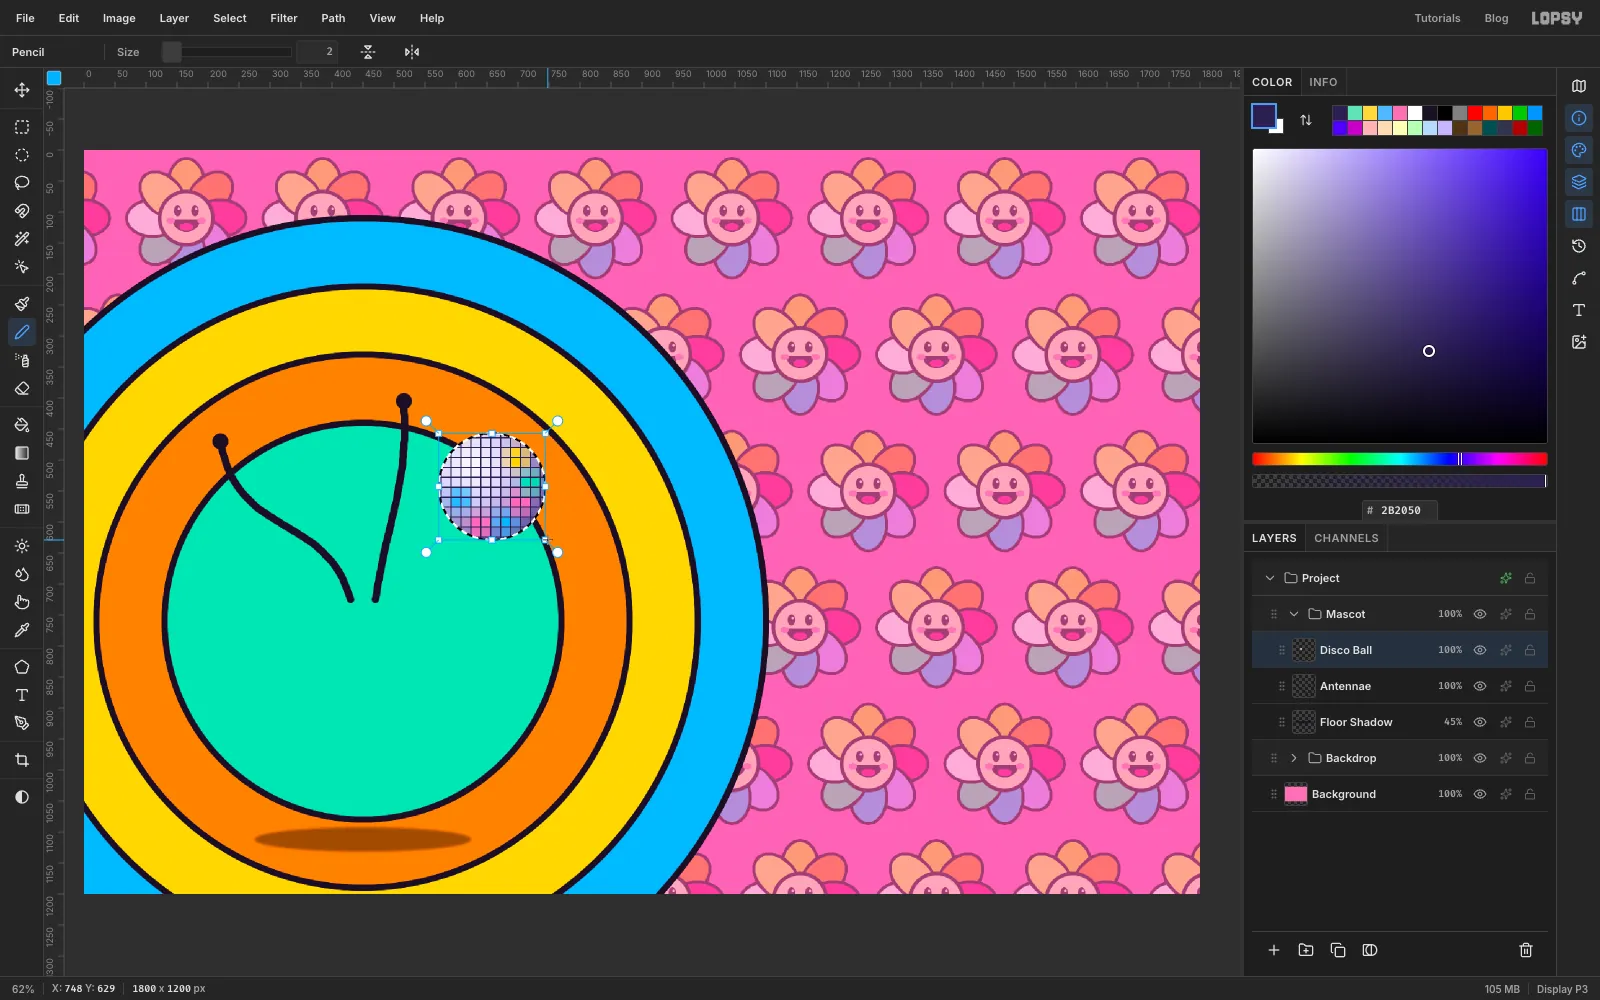
The ball is still selected. Pick the Pencil, Size 2, in deep indigo . On each vertical seam between two columns of tiles, click just above the circle and Shift-click just below it to draw a straight line. Then do the same on each horizontal seam between rows. The selection clips the lines to the ball, so they can overshoot.
-
Bulge the tiles with Liquify
A flat grid still reads as a checked disc, so round the ball off in two moves:
- Shine. With the ball still selected, add a layer called
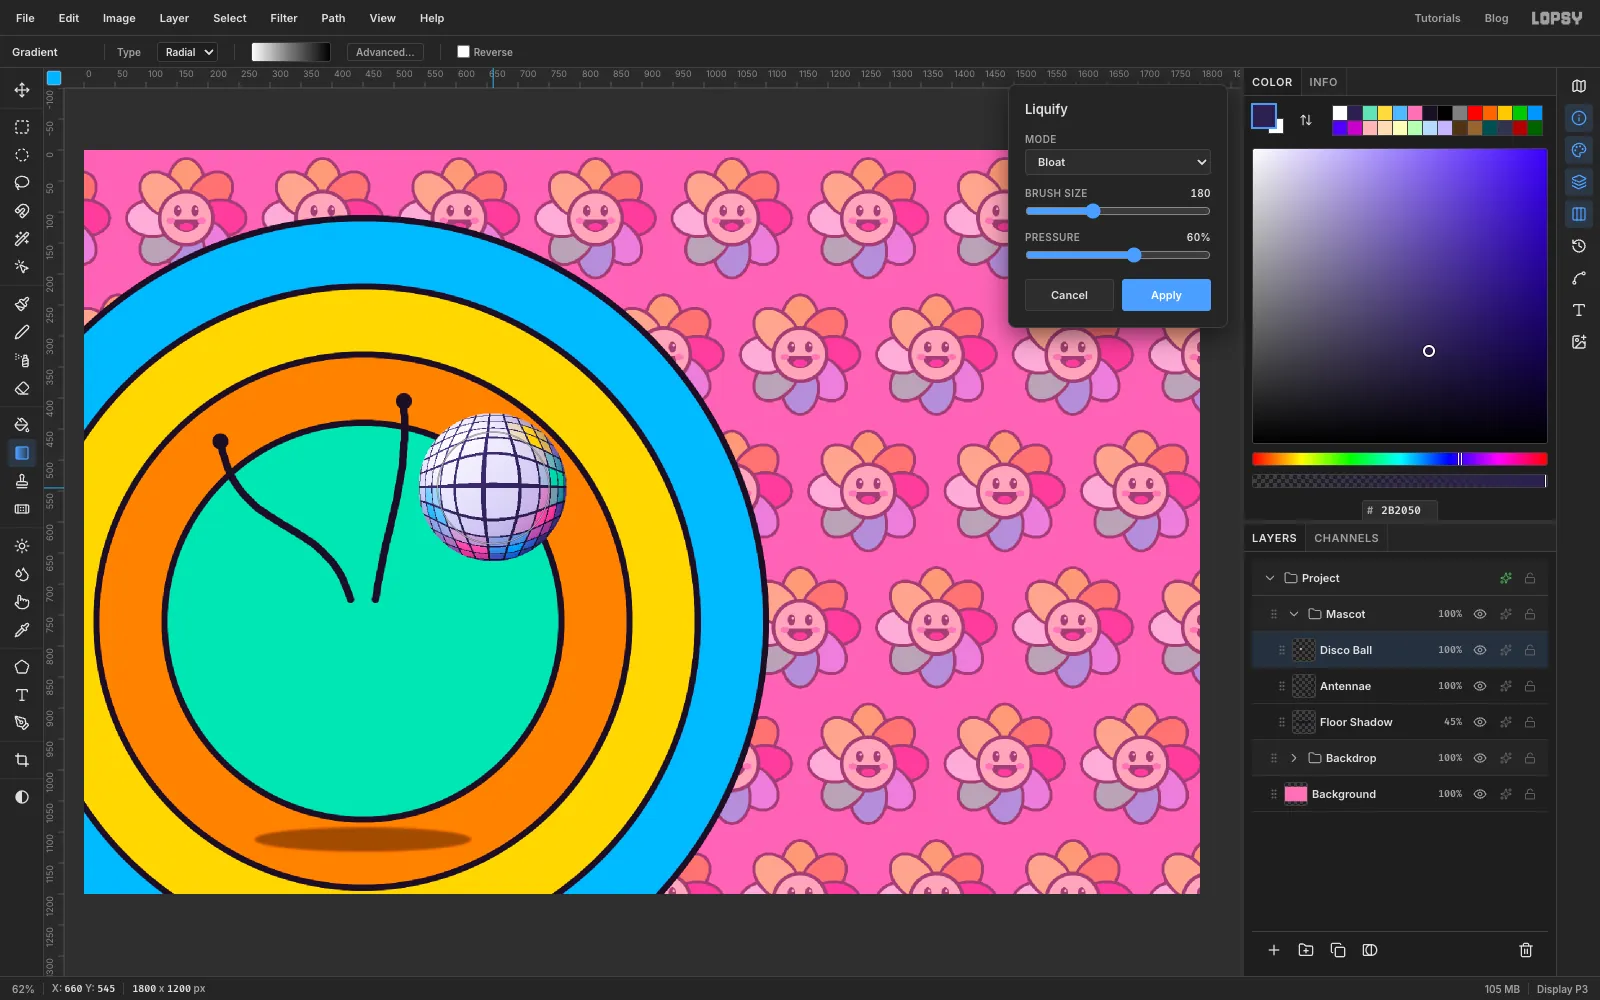
Ball Shine. Open the gradient's Advanced… editor and set three stops: white, mid grey at 45% and black. Drag a radial gradient from the upper left of the ball to past its lower-right edge. Set the layer to Overlay at 80%, then choose Layer → Merge Down to bake it intoDisco Ball. Deselect. - Curvature. Open Filter → Liquify…. Set Mode to Bloat, Brush Size to 180 and Pressure to 60%. Click four times in the middle of the ball. Each click magnifies the centre a little more, and the tiles curve like a globe. Click Apply, then give the layer an ink Stroke of 8.
- Shine. With the ball still selected, add a layer called
-
Add arms, legs and notched claws
- Limbs. On a layer called
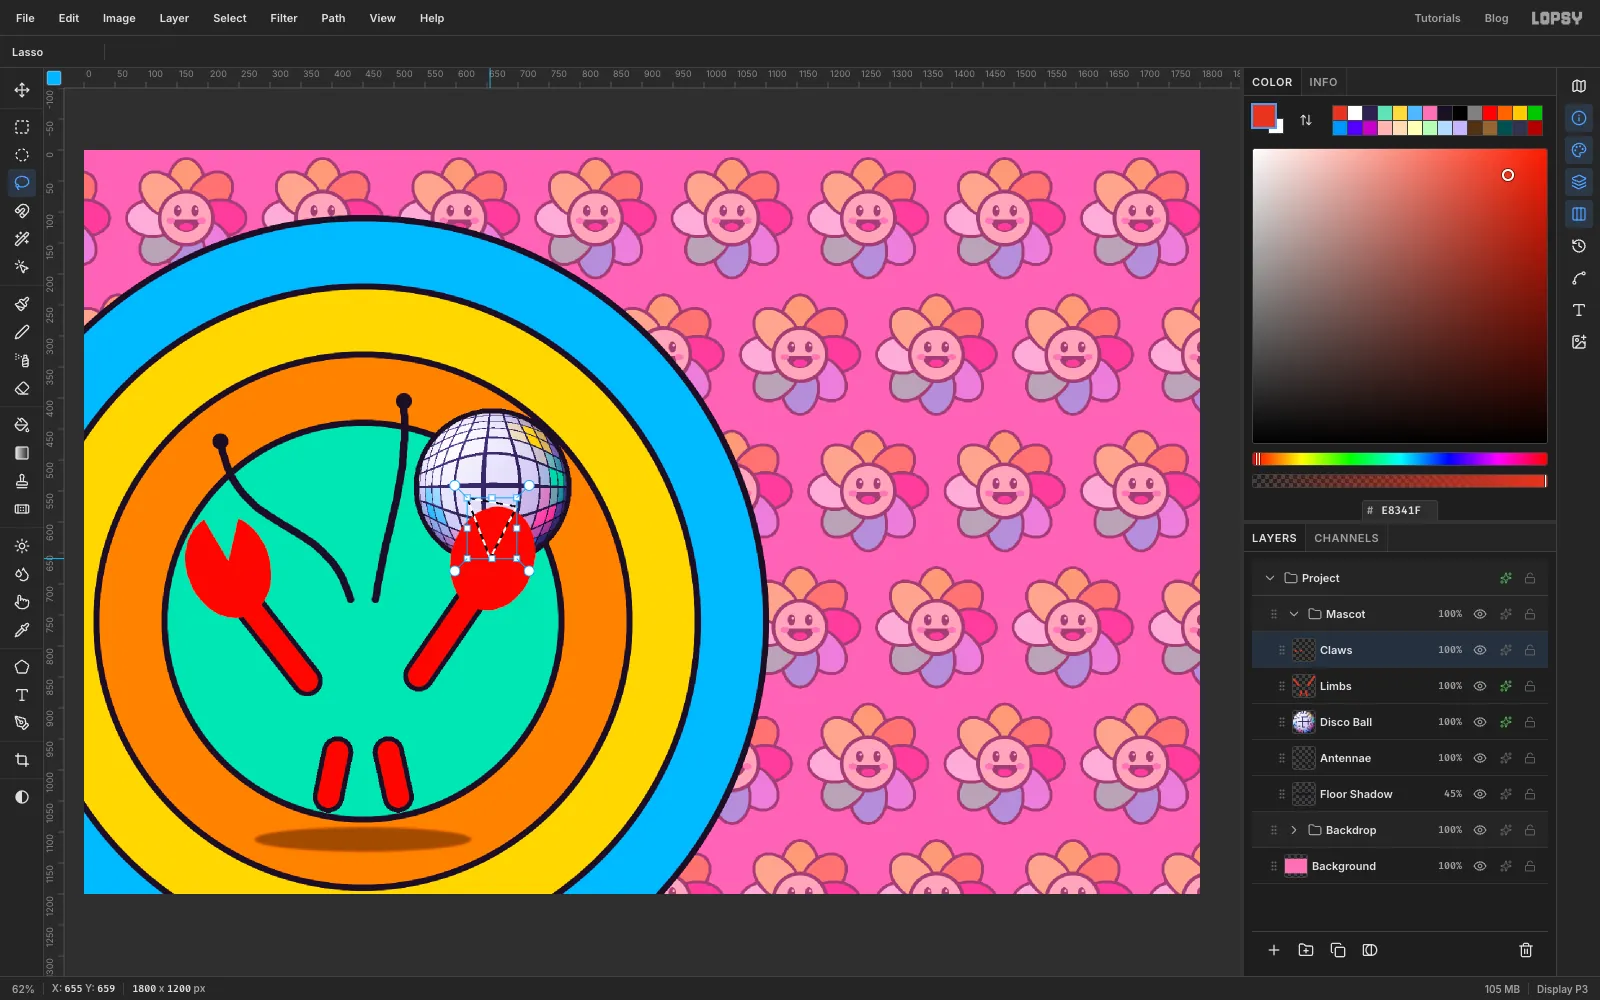
Limbs, use the Brush in lobster red at Size 36. Click and Shift-click a straight line for each limb: one arm from365, 800up to275, 684, the other from540, 848up to647, 692, and two short legs, from409, 971down to394, 1044and from491, 971down to507, 1044. The body will cover the inner ends. Add a Stroke of 8. - Claws. On a layer called
Claws, lasso two big ovals about 134 × 170 px around233, 671and659, 659, each tilted about 20° outwards, and fill them red. Then lasso a narrow V from the middle of each claw up through its top edge and press Delete. That notch turns a mitten into a pincer. - Give
Clawsa Stroke of 8 and an Inner Glow in shell shade , Size 28 and Opacity 70. The dark glow inside the edge makes the claws look inflated.
- Limbs. On a layer called
-
Shape the body and belly
- Body. On a layer called
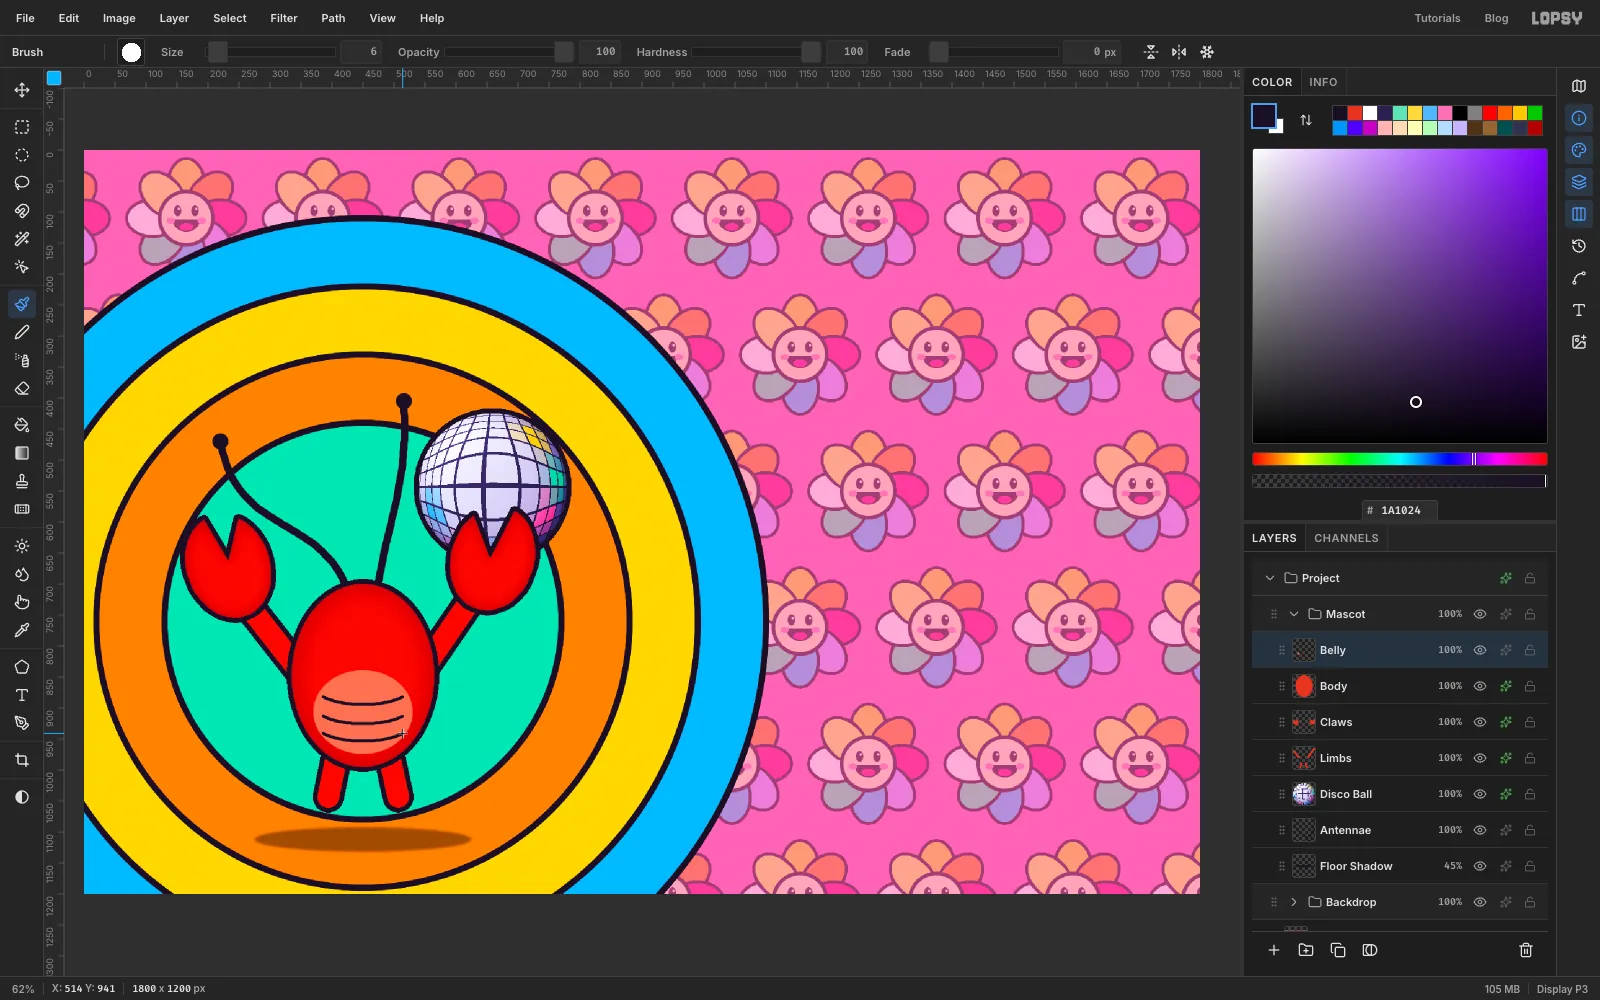
Body, fill an ellipse about 230 × 295 centred on450, 848with red. Give it a Stroke of 8 and an Inner Glow of at Size 55, 70%. - Belly. On a layer called
Belly, fill a 161 × 134 ellipse centred on450, 907with coral . With a 6 px ink brush, drag three gently smiling arcs across it for the shell segments.
- Body. On a layer called
-
Give it eyes and a big grin
- Eye Stalks. On a layer called
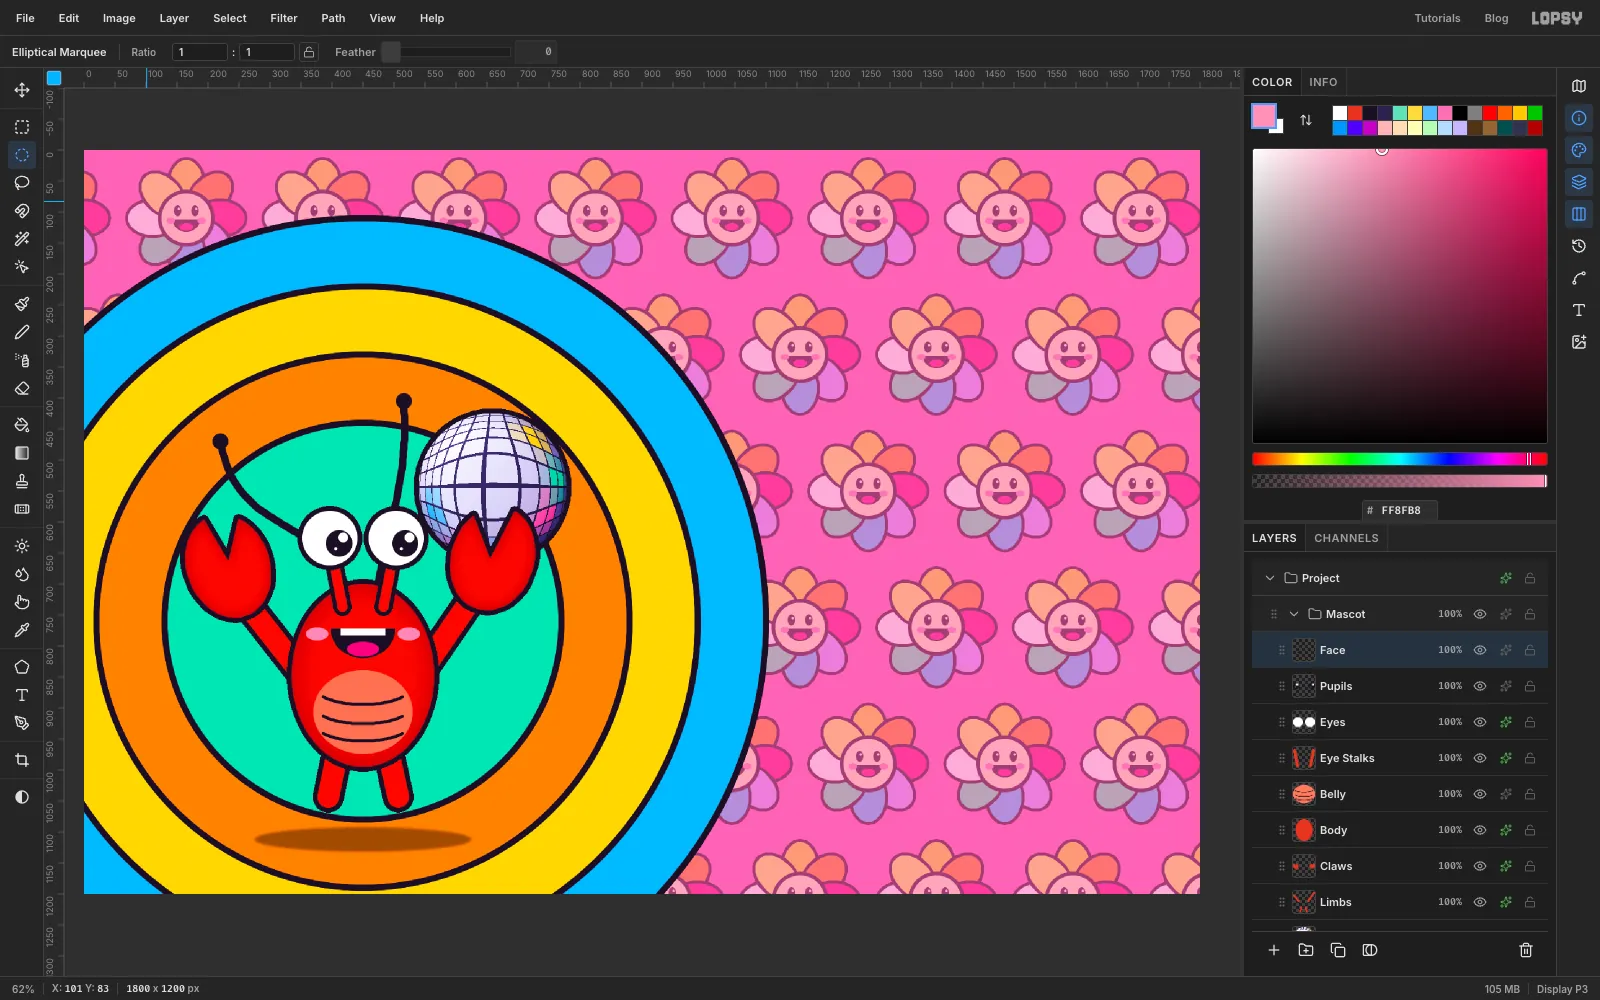
Eye Stalks, draw two short red lines with a 17 px brush from the top of the body up to about397, 626and503, 626. Add a Stroke of 7. - Eyes. On a layer called
Eyes, fill an 89 px white circle centred on each stalk tip. Add a Stroke of 8. - Pupils. On a layer called
Pupils, fill a 43 px ink circle in each eye, shifted to the right and down, so the lobster looks across at the phones. Add a 16 px white glint at the top right of each pupil and a 6 px brush dot at the bottom left. - Grin. On a layer called
Face, lasso a half circle about 105 px wide and 48 px deep just above the belly and fill it with ink. Add a 72 × 11 white strip along its top edge for teeth, and a magenta tongue at the bottom. Add pink cheeks either side.
- Eye Stalks. On a layer called
-
Add balloon gloss
Koons-style gloss comes from a few sharp white reflections, not soft airbrushing. On a layer called
Gloss, lasso a thin crescent along the left flank of the body, inside the outline, and fill it with white. Lasso a small white oval on each claw, away from the notch so the highlight stays inside the shape. Set the layer to 85%.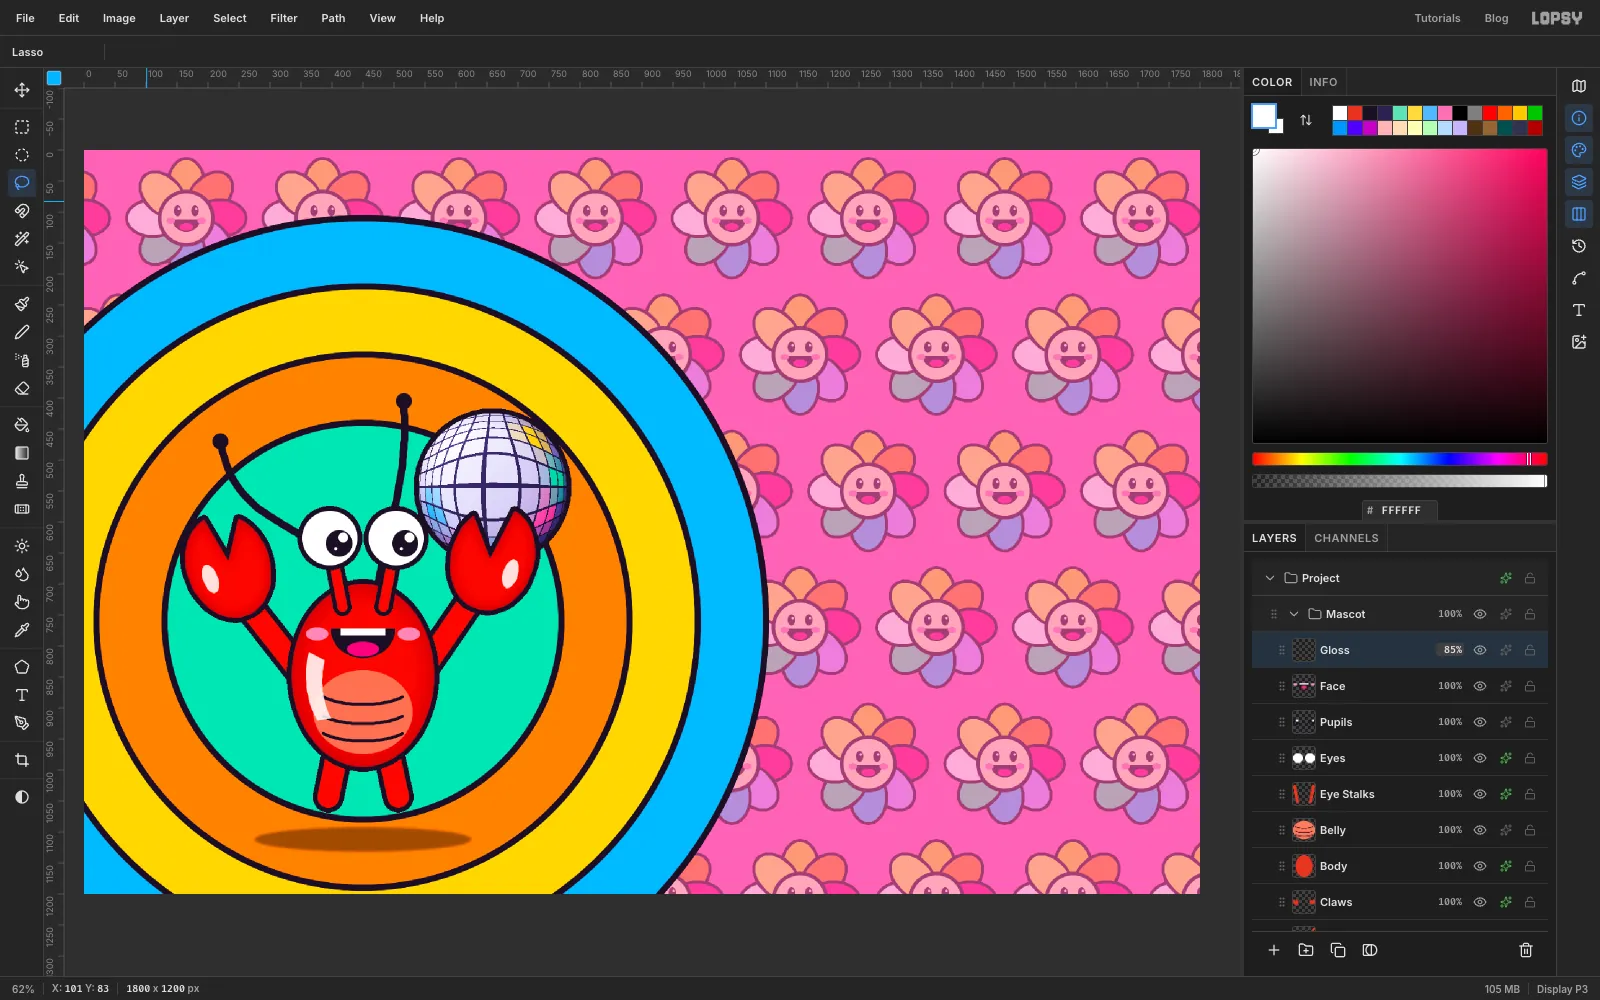
-
Put it on roller skates
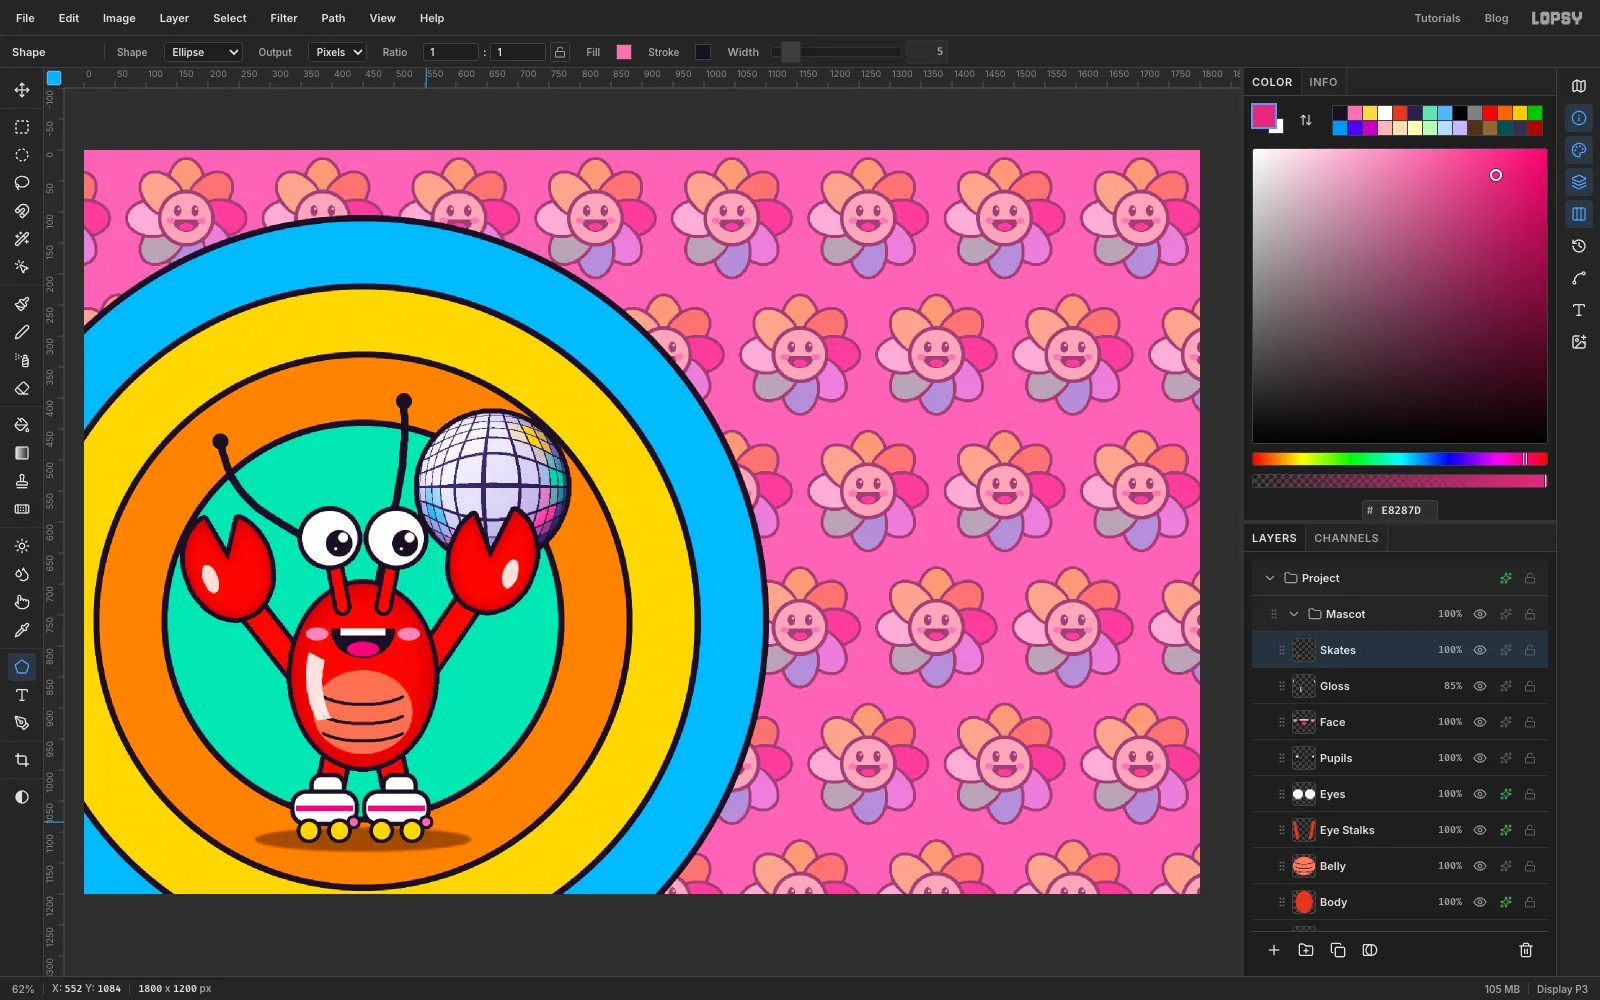
On a layer called
Skates, use the Shape tool's Rectangle with a white Fill and a 7 px ink Stroke. The Shape tool keeps its own fill and stroke colours, set with the two swatches in its options bar, not the foreground colour. Each skate is built from back to front:- Cuff. A 52 × 44 rectangle with Corner Radius 16, at the bottom of each leg, around
375, 1030and509, 1030. - Boot. A 104 × 52 rectangle, radius 22, about 30 px lower, so it overlaps the bottom of the cuff.
- Stripe. Marquee a 92 × 9 band across the middle of each boot and fill it with magenta.
- Wheels. Switch to Ellipse with a yellow fill and a 6 px ink stroke. Click-create two 34 px wheels under each boot.
- Toe stop. Add an 18 px pink circle at the front of each boot.
Leave a clear gap between the two boots so they read as a pair, not one long six-wheeled skate.
- Cuff. A 52 × 44 rectangle with Corner Radius 16, at the bottom of each leg, around
-
Scatter sparkles
Finish the character with a
Sparkleslayer. Lasso four-pointed stars with concave sides and fill them white. Put a large one at the top right of the ball, two small ones nearby, and one on the ball's upper-left facets as a specular glint. Add a Stroke of 4.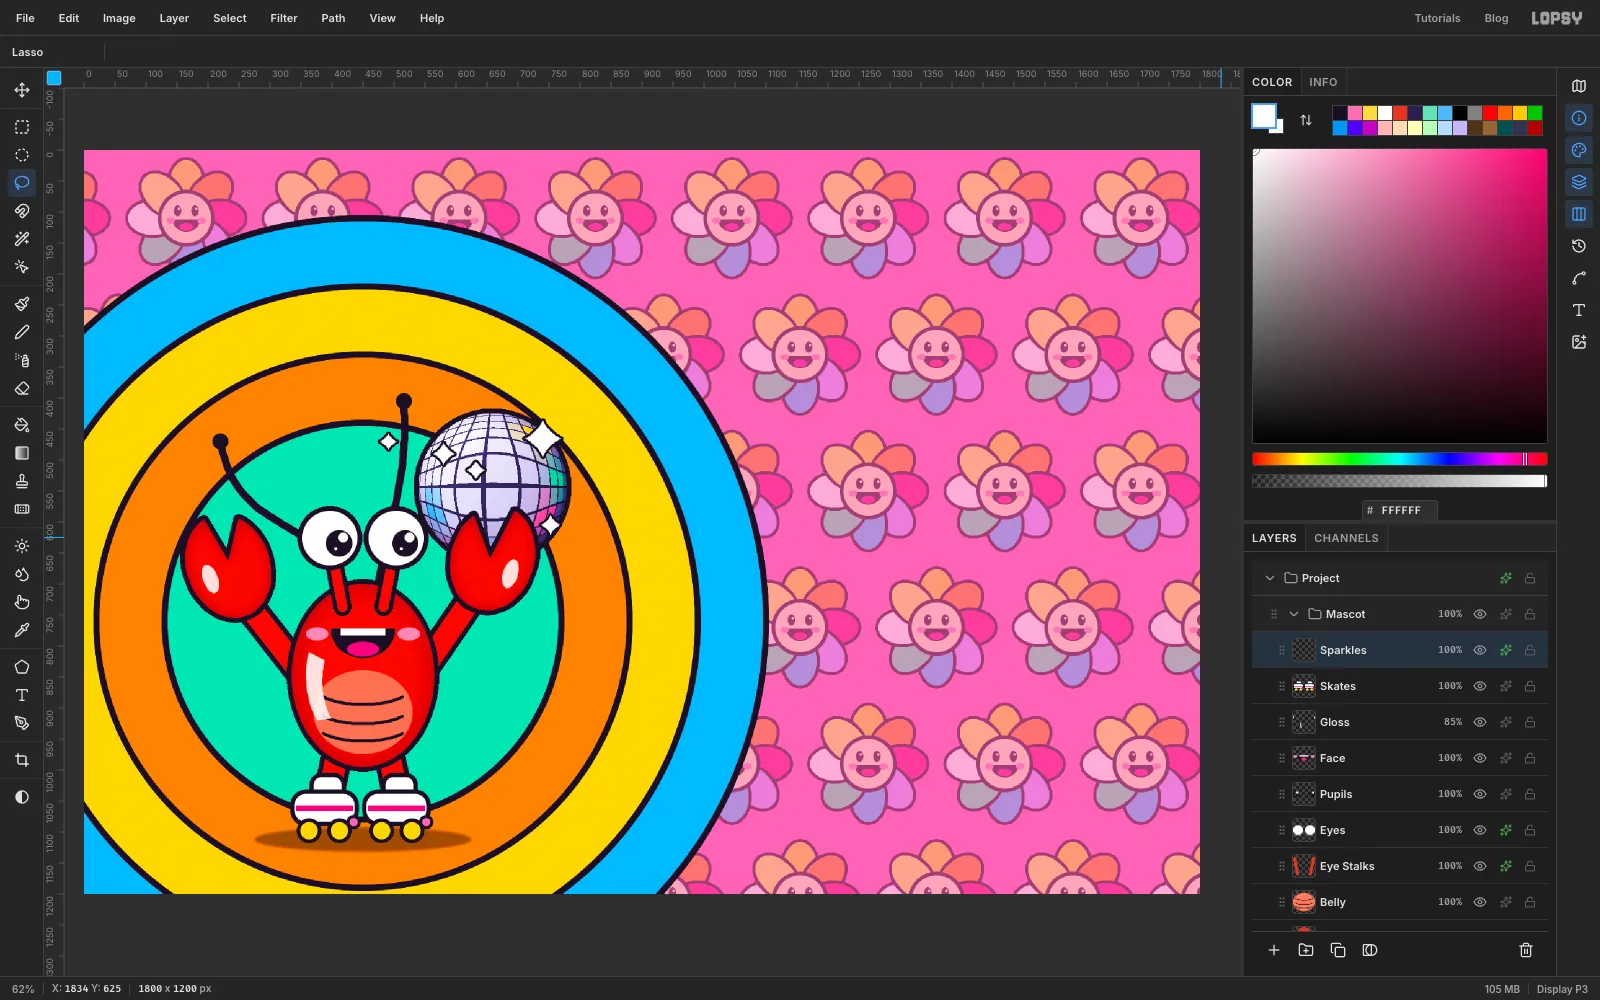
-
Copy the mascot merged
Layer effects don't work on groups, so make the shadow from pixels:
- Hide
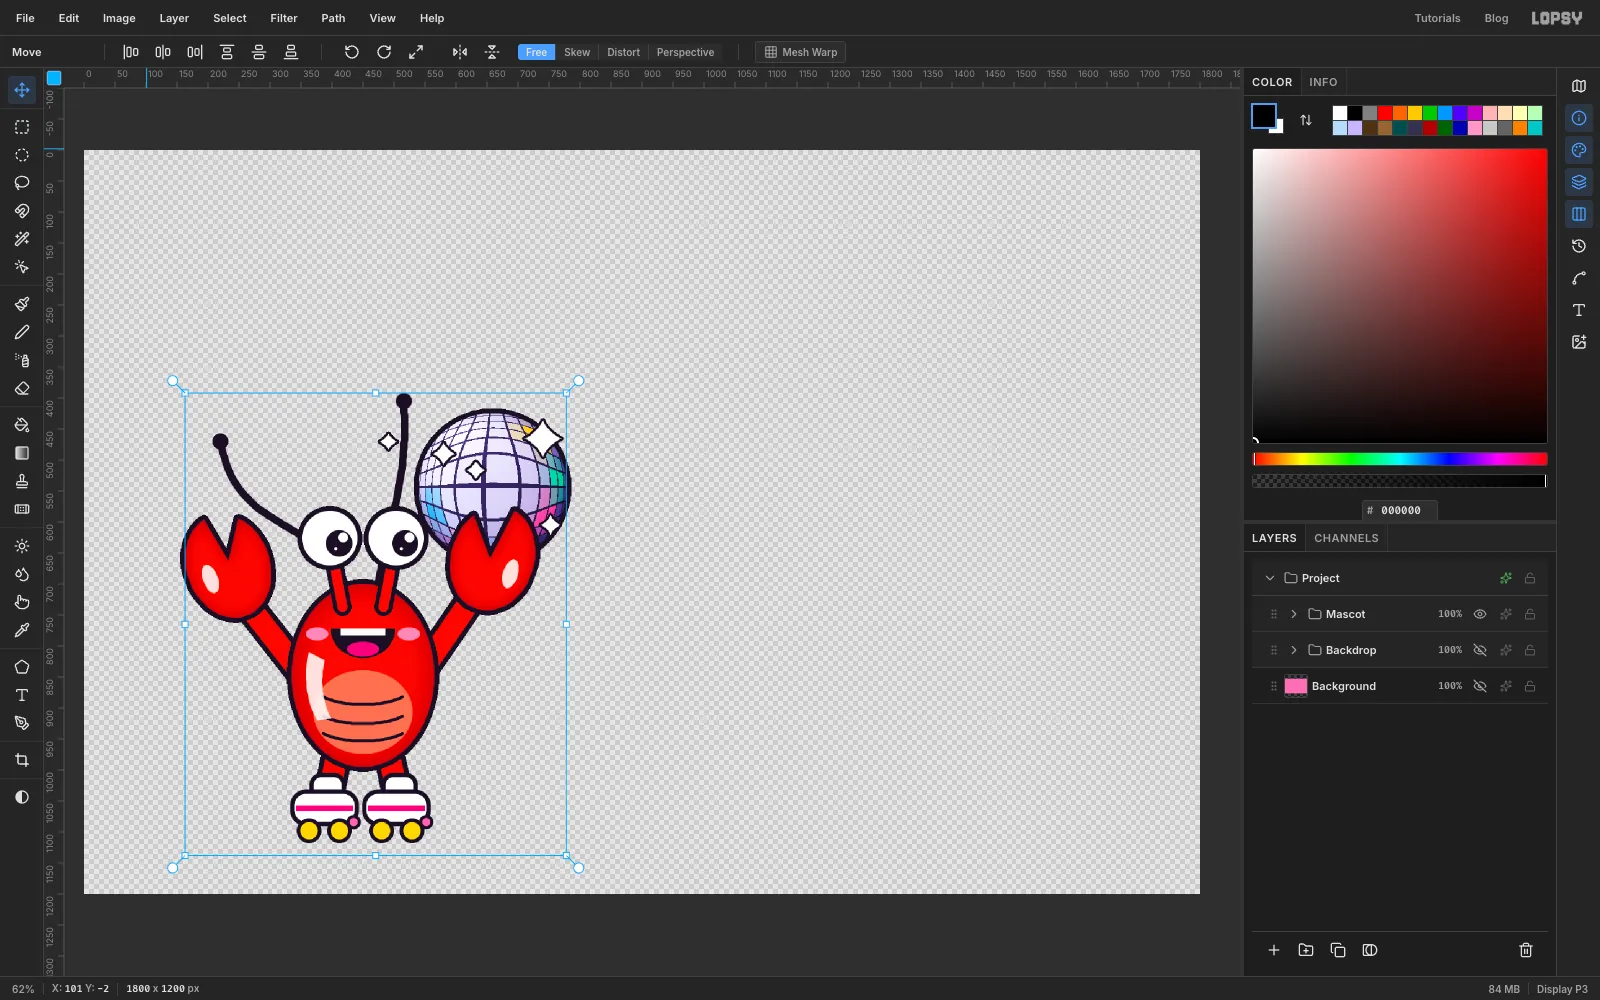
BackdropandBackgroundwith their eye icons. ExpandMascotand hideFloor Shadowtoo, then collapse it again. Only the lobster is visible. - Click the
Mascotgroup, press Cmd+A, and choose Edit → Copy Merged. Deselect, then show the three layers again. - Click the
Backdroprow and press Cmd+V. The copy pastes in place as a new layer betweenBackdropandMascot. Lopsy also selects the shape of the pasted pixels, so a fill will colour just the silhouette. - Rename it
Mascot Shadow, set the foreground to plum and fill. Deselect.
- Hide
-
Offset the hard shadow
With the Move tool, press Shift+Right once and Right four times, then the same with Down, to offset the silhouette 14 px down and to the right. A hard, unblurred shadow is the neo-pop way to lift a flat shape off the page.
-
Set the DISCO LOBSTER title
Collapse
Mascot, click its row, and make a new group calledWordmark. Add a layer inside it calledCounters. It sits under the type and will fill the holes in the letters.Pick the Text tool and choose Bagel Fat One at 156 px. Type
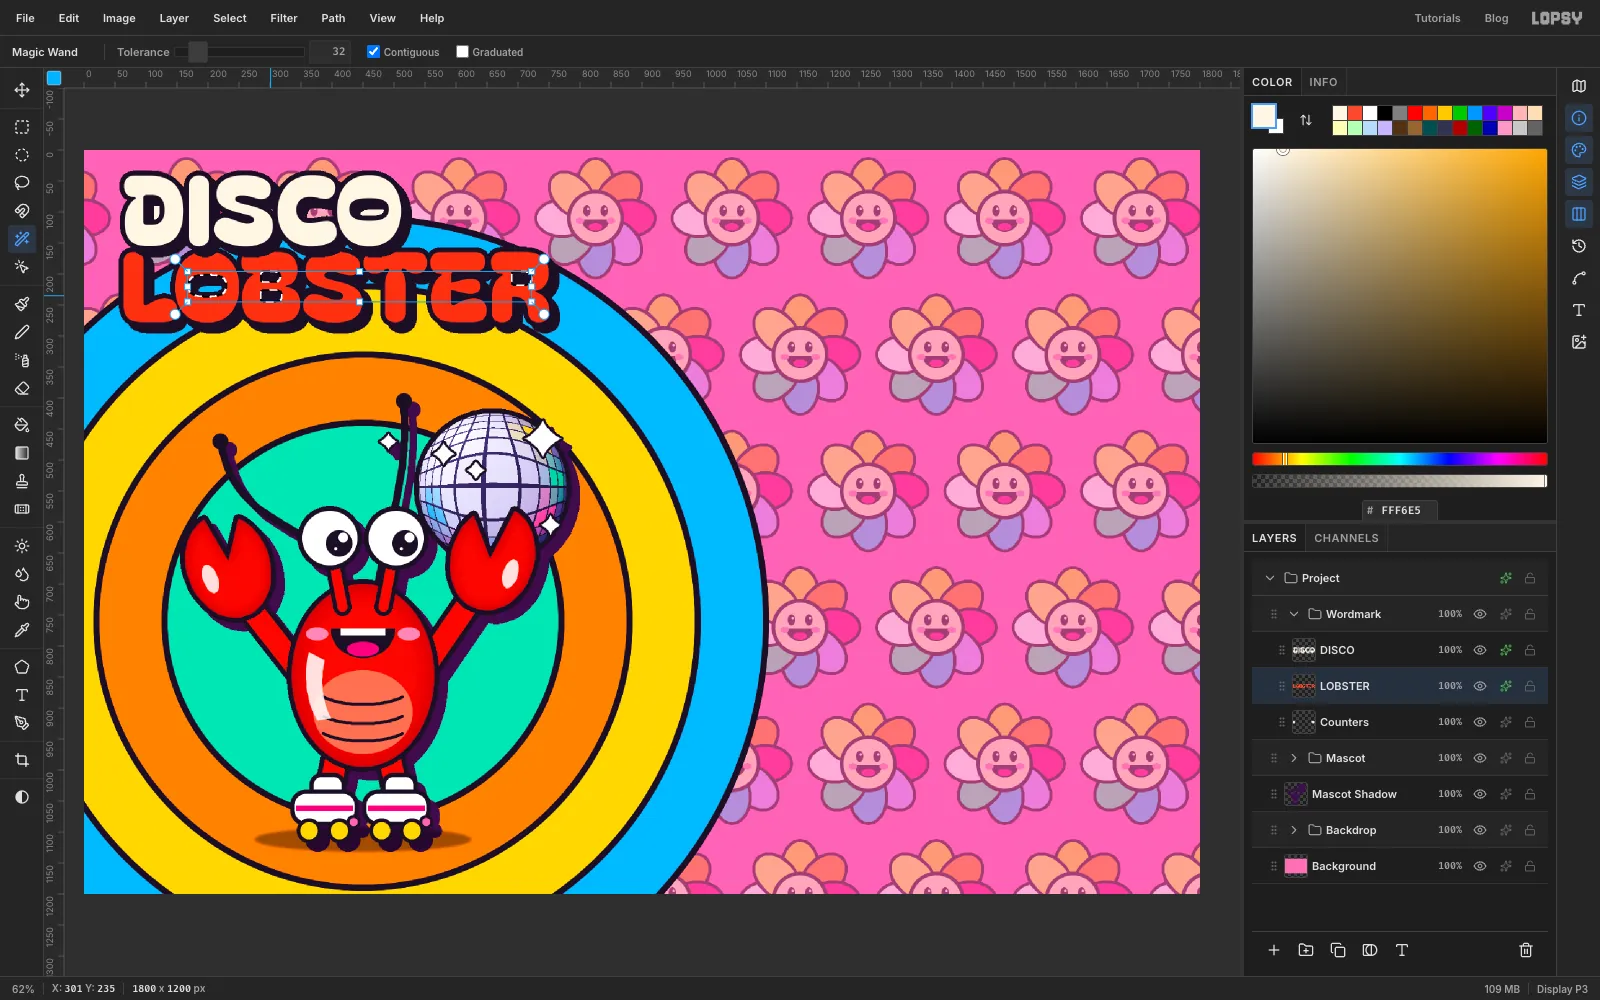
LOBSTERin title red . Then click theWordmarkrow (so the next settings don't restyle LOBSTER), click higher up the canvas and typeDISCOin cream . Give both an ink Stroke of 8 and a Drop Shadow in ink with Offset X and Y of 10, Blur 1, Spread 0 and Opacity 100. MoveDISCOso its top-left corner sits at64, 40, and putLOBSTER8 px below it, lined up on the left.The wallpaper shows through the holes in the letters (the counters), so plug them:
- Select the
DISCOlayer and pick the Magic Wand with Contiguous on. Click inside the D, then Shift-click inside the O. - Choose Select → Grow… by 4 so the fill will tuck under the letter edges.
- Select the
Counterslayer, fill with cream and deselect. - Select the
LOBSTERlayer. With the wand, click inside the O, then Shift-click both holes of the B and the hole of the R.
- Select the
-
Plug the letter counters
With LOBSTER's four counters selected, Grow the selection by 4, select
Counters, fill with title red and deselect. The letters now read as solid stickers, and nothing peeks through them.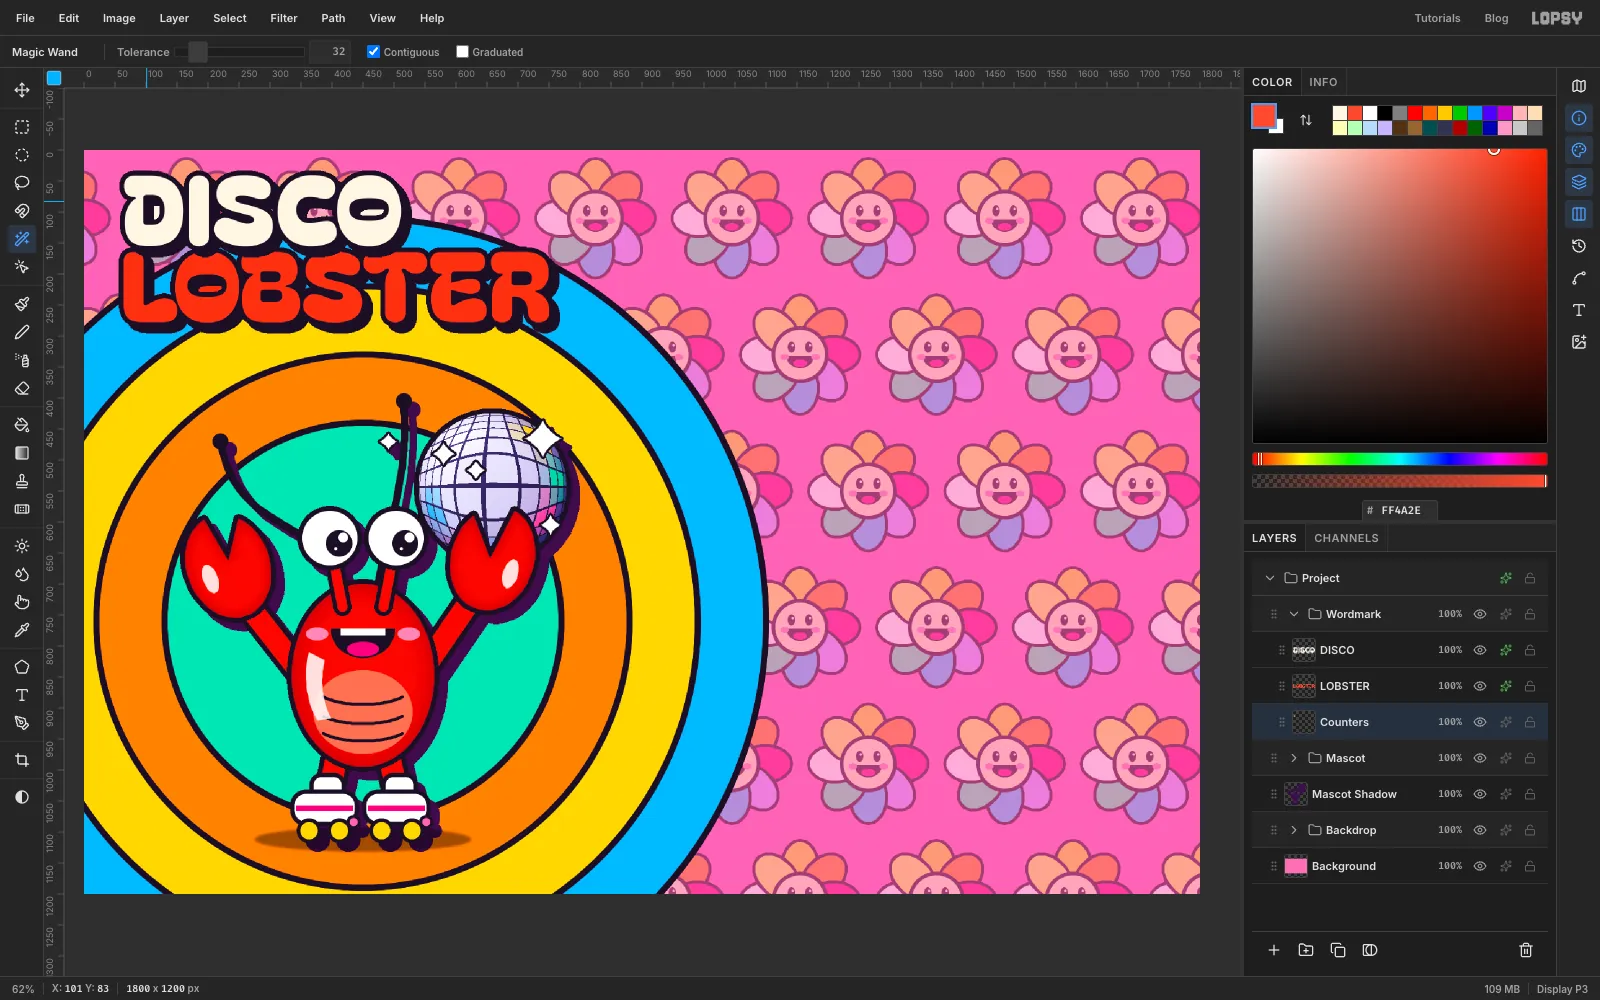
-
Build the home-screen phone
Collapse
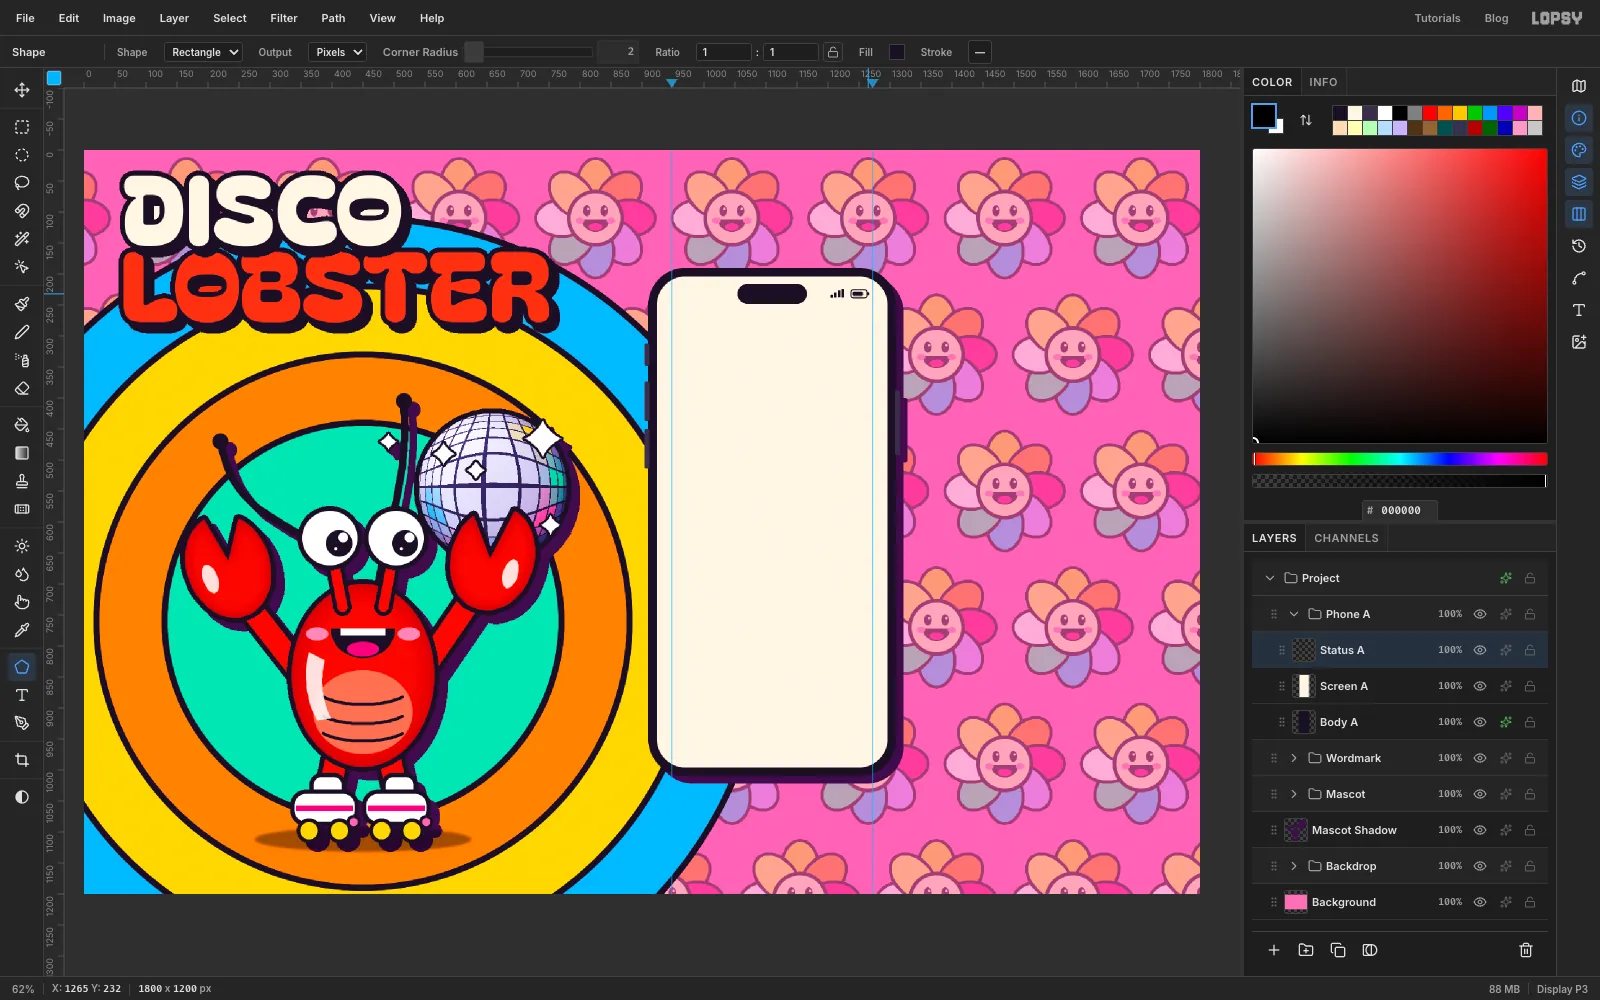
Wordmark, click its row, and make a group calledPhone A. Click the top ruler at948and1272to drop two vertical guides. They mark the left and right content margins of the screen. Every piece below is a click-created Rectangle from the Shape tool, centred on the click. Click the Stroke swatch and choose Remove stroke for now, because the phone parts have no outline.- Body A. On a layer called
Body A: ink, Corner Radius 60, 400 × 820, at1110, 600. Add the side buttons as 8 px wide rectangles in on both edges. Give the layer a Drop Shadow in plum with offsets of 12, Blur 1 and Opacity 100. - Screen A. On a layer called
Screen A: cream, Corner Radius 46, 372 × 792, at the same centre. - Status A. On a layer called
Status A: a 112 × 32 ink pill (radius 16) at1110, 232for the dynamic island, four tiny signal bars, and a battery made from an outline-only rectangle with a small filled one inside it.
- Body A. On a layer called
-
Print Ben-Day dots on the hero card
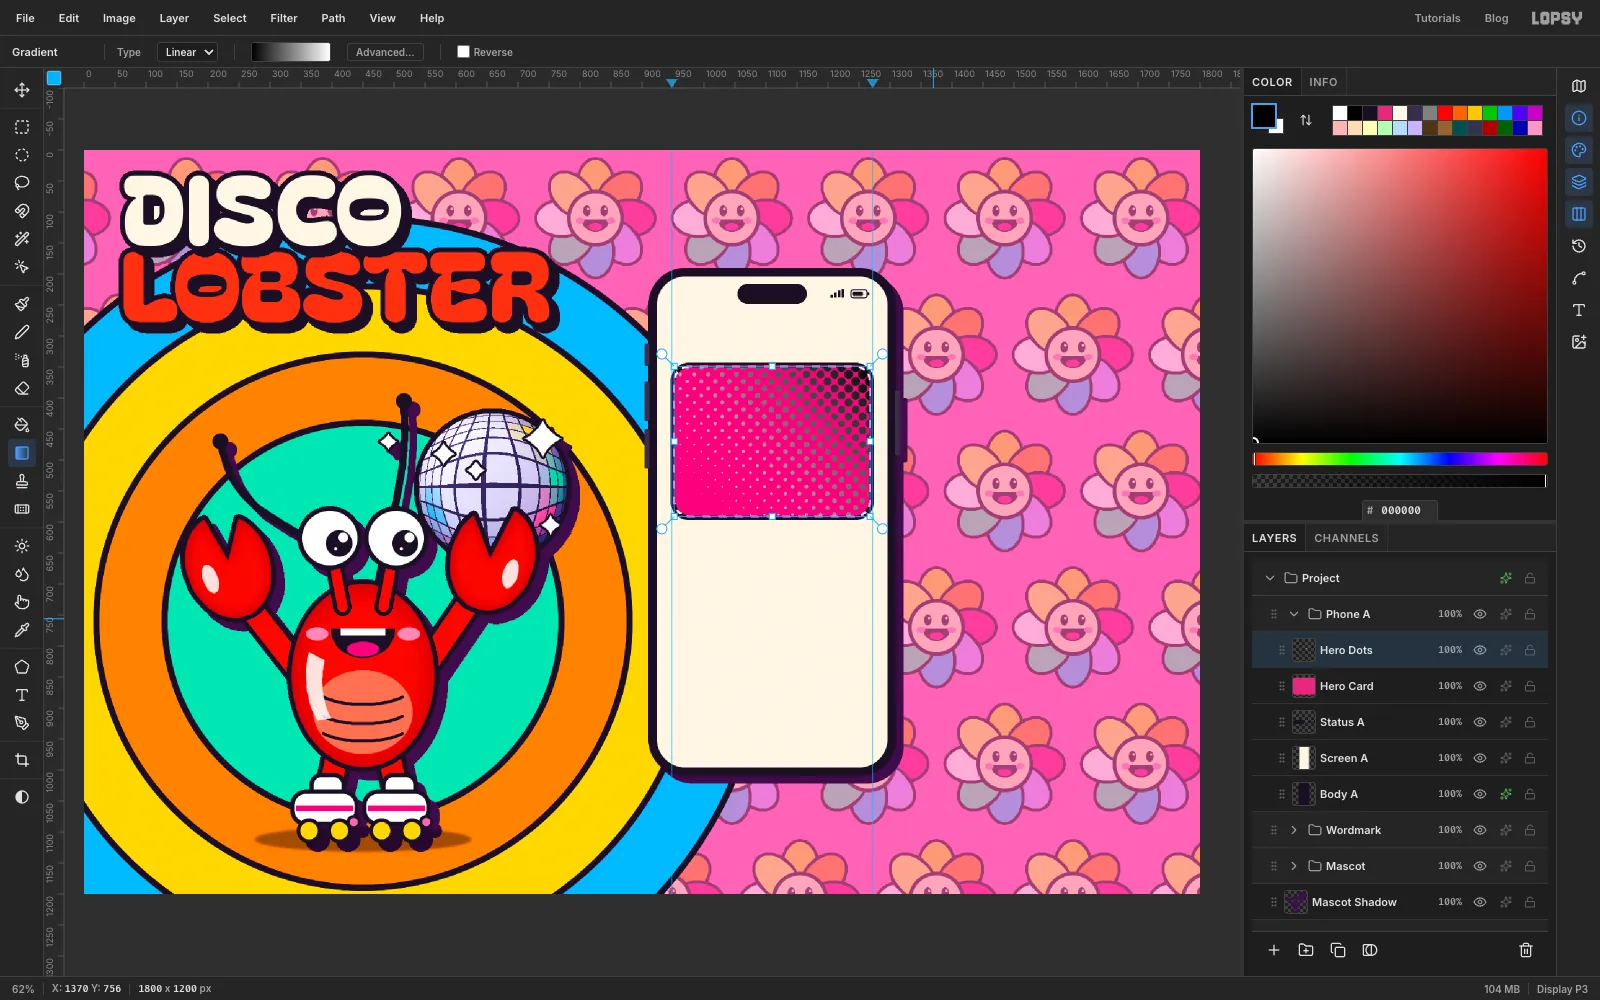
- On a layer called
Hero Card, click-create a 324 × 250 rectangle with Corner Radius 28 at1110, 470, filled magenta with a 4 px ink stroke. - Add a layer called
Hero Dots. Cmd-click theHero Cardthumbnail to select the card, and Shrink the selection by 6 to keep the dots inside the outline. - Set the gradient to Linear and, in Advanced…, to a plain black-to-white ramp. Drag it from the card's top-right corner to its bottom-left corner.
- Run Filter → Halftone… with Dot Size 16, Angle 45 and Softness 0.5. Each dot takes the tone under it and grows with how dark that tone is, so the dots are big and black at the top right and shrink to small grey specks at the bottom left.
- Deselect, add a yellow Color Overlay to turn the black dots yellow, and set the layer to 85%.
- On a layer called
-
Reuse the mirror ball
Expand
Mascot, selectDisco Ball, Cmd-click its thumbnail and press Cmd+C. CollapseMascot, clickHero Dotsand press Cmd+V. The copy lands on top of the original with the Move tool active. Rename itCard Ball. Hold Cmd and drag the bottom-right corner handle inwards until the ball is about 90 px across, then press Cmd+D to commit. Drag it into the card's top-right corner, about 16 px in from each edge, and give it a 4 px Stroke. The copy doesn't bring the original's effects with it, so you need to add the stroke again.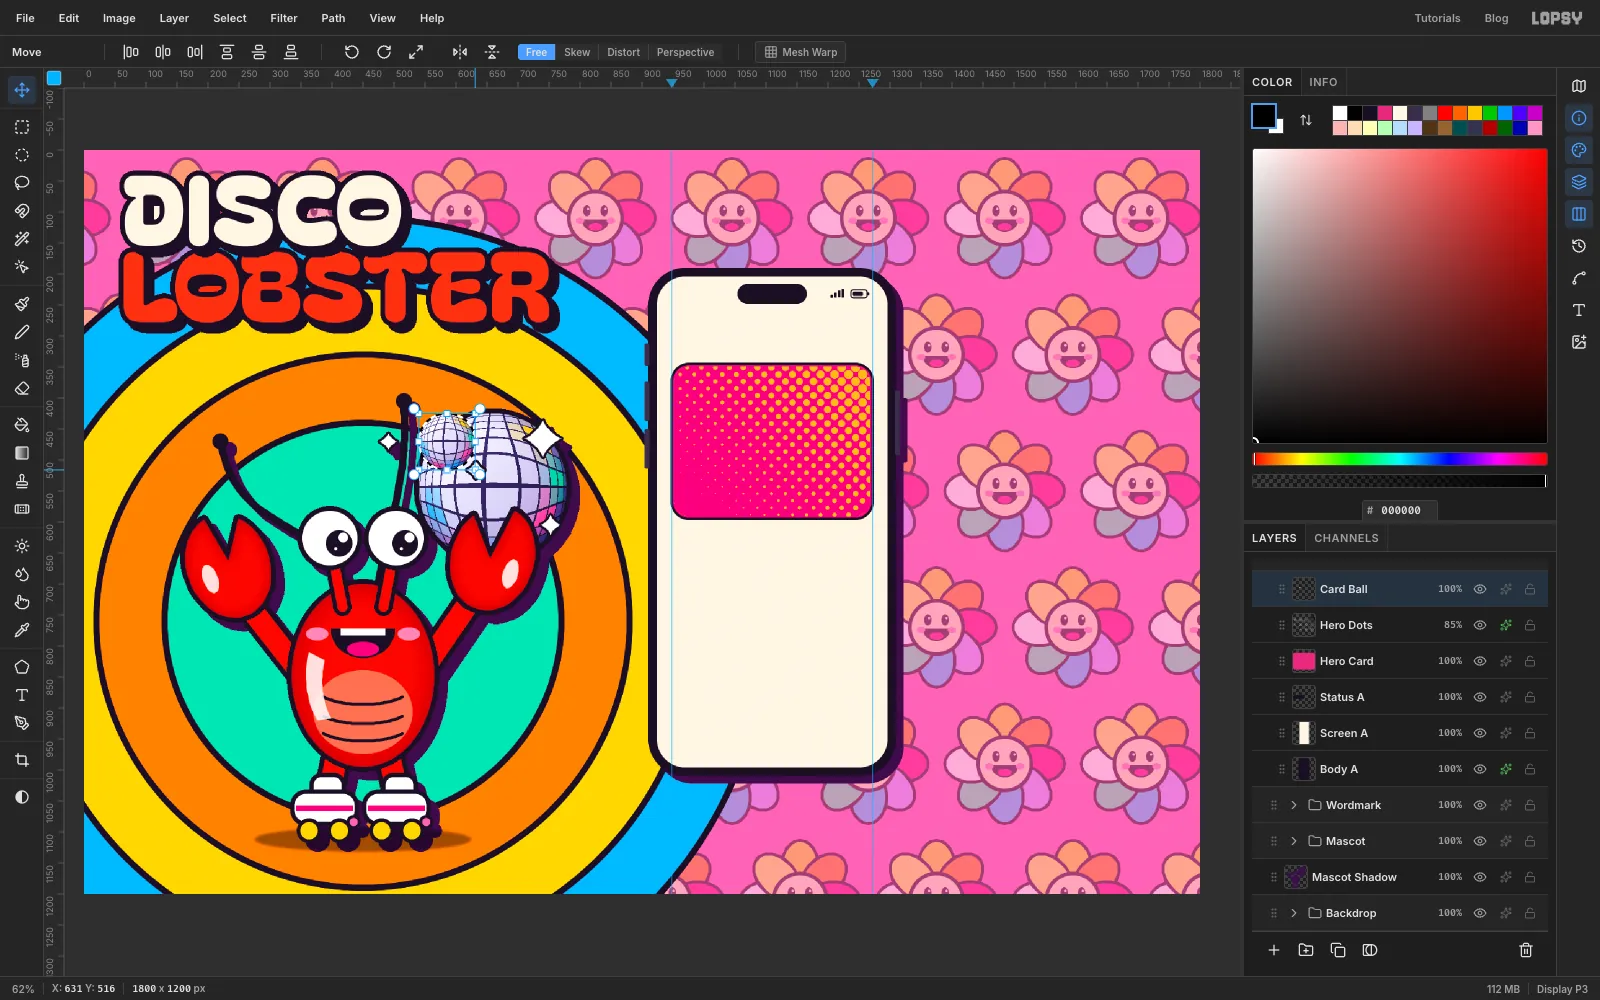
-
Add chips, cards and a tab bar
Keep to the guides for the left and right edges, and use the Shape tool for every piece:
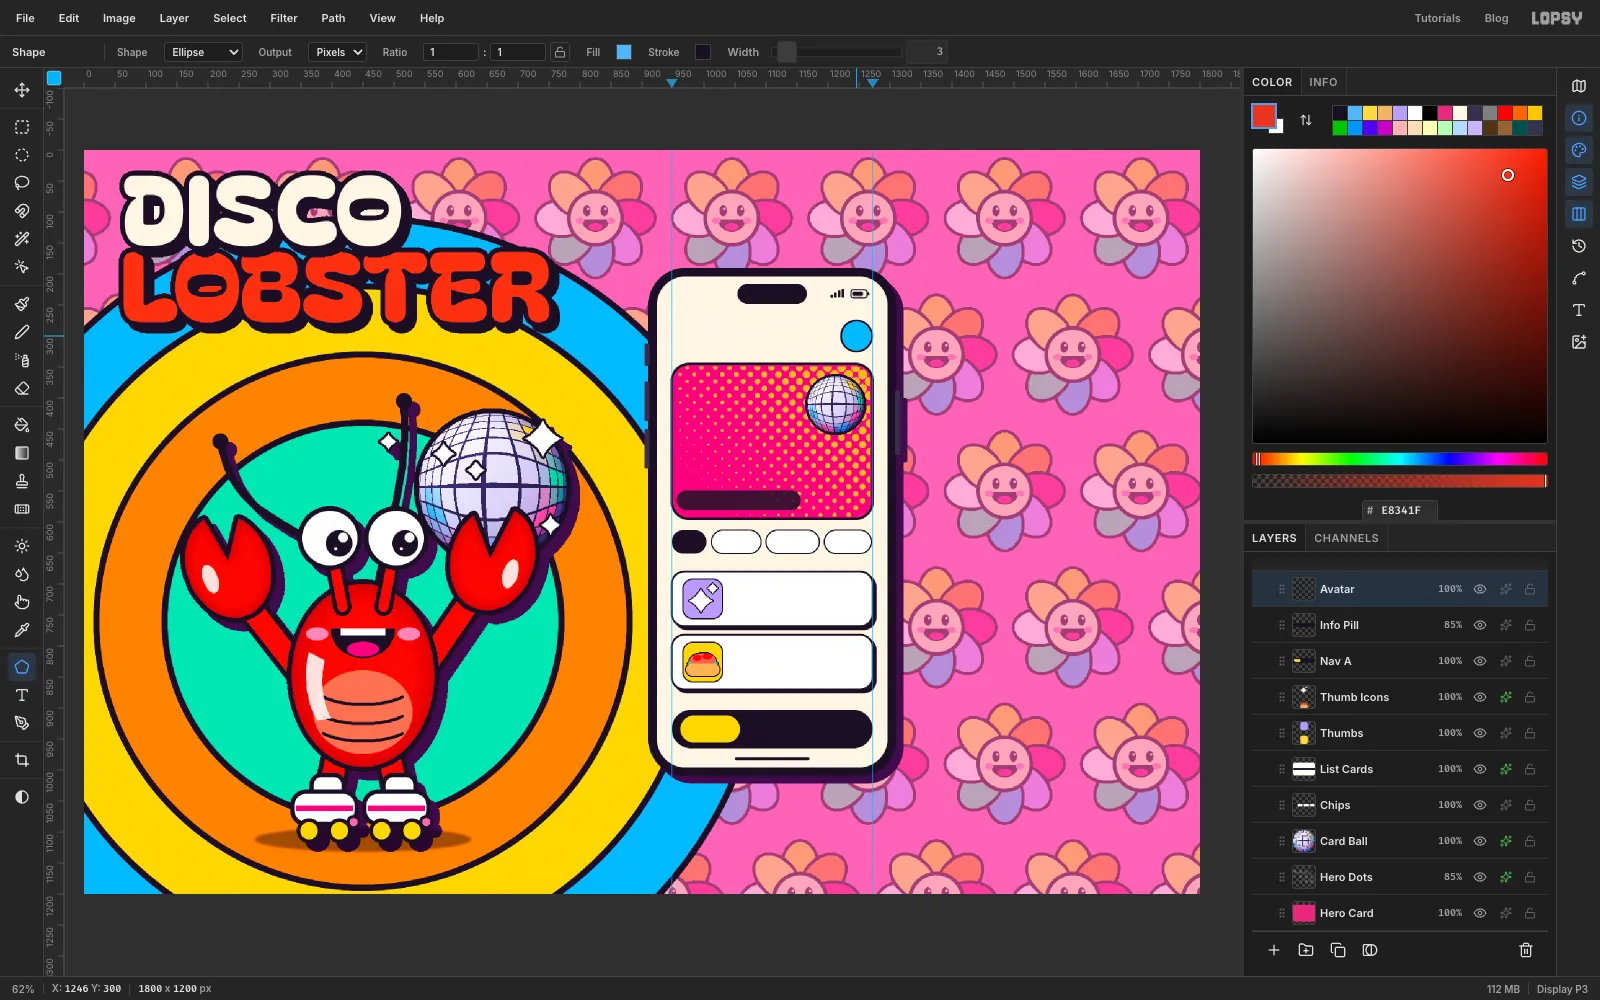
- Chips: on a layer called
Chips, a row of 38 px tall pills (radius 19) centred on y 632, starting at the left guide. The first is a 56 px wide ink pill with no stroke. Then add white pills 80, 86 and 76 px wide with a 2 px ink stroke, leaving 8 px gaps. - List Cards: on a layer called
List Cards, two white 324 × 88 rectangles, radius 20, with a 3 px stroke, centred aty 724andy 826. Give the layer an ink Drop Shadow with offsets of 5, Blur 1 and Opacity 100. - Thumbs: on a layer called
Thumbs, a 64 × 64 square with radius 16 and a 2 px stroke centred at x 998 on each card, in lilac and yellow. - Thumb Icons: on a layer called
Thumb Icons, lasso a white four-point sparkle for the skate party. For the lobster roll, stack a mint oval (lettuce), a coral mound with two red chunks, and a 54 × 20 bun-coloured rounded bar in front. Add a 2 px Stroke. - Nav A: on a layer called
Nav A, with no stroke, a 324 × 62 ink pill aty 934, a 96 × 44 yellow pill on its left end, and a 120 × 5 home indicator near the bottom of the screen. - Info Pill: on a layer called
Info Pill, a 200 × 32 ink pill with no stroke at1056, 565, at 85% opacity. It gives the event line a calm plate on top of the dots. - Avatar: on a layer called
Avatar, switch to Ellipse and make a 50 px sky-blue circle with a 3 px stroke at1246, 300.
- Chips: on a layer called
-
Type the home screen
Click the
Phone Agroup row before each new piece of text, so the Text options don't restyle the last text layer. Work from the bottom of the screen up, so each click lands in empty space rather than inside an existing line.- Tab bar:
Homein Fredoka SemiBold 16, ink, Align Center on the yellow pill. Then♪,♥and★in cream at 24 px, spaced along the bar. - Cards: the title in Fredoka SemiBold 21, the time below it in DM Sans Medium 15 in muted purple , and the price in Fredoka Bold 24 magenta with Align Right, lined up on the right guide. The cards read
Glitter Skate,7:00 PM · Rink A,$8andLobster Rolls,8:30 PM · Patio,$14. - Chips: Fredoka Medium 16, centred:
Allin cream, thenSkate,SnacksandMusicin ink. - Hero card:
Fri · 9 PM · DJ Clawdiain Fredoka SemiBold 18 cream, centred on the dark pill. Above it,DISCOin yellow andROLLERin cream, both Bagel Fat One 52 with a 5 px ink Stroke. - Header:
Tonightin Fredoka Bold 44,Hey, skater!above it in Fredoka Medium 19 muted purple,Scentred in the avatar, and9:41in DM Sans Bold 17.
Finally, collapse
Phone A, select the group and, with the Move tool, press Shift+Left twice. The whole phone slides 20 px left as one piece, which opens up a gap for the second phone.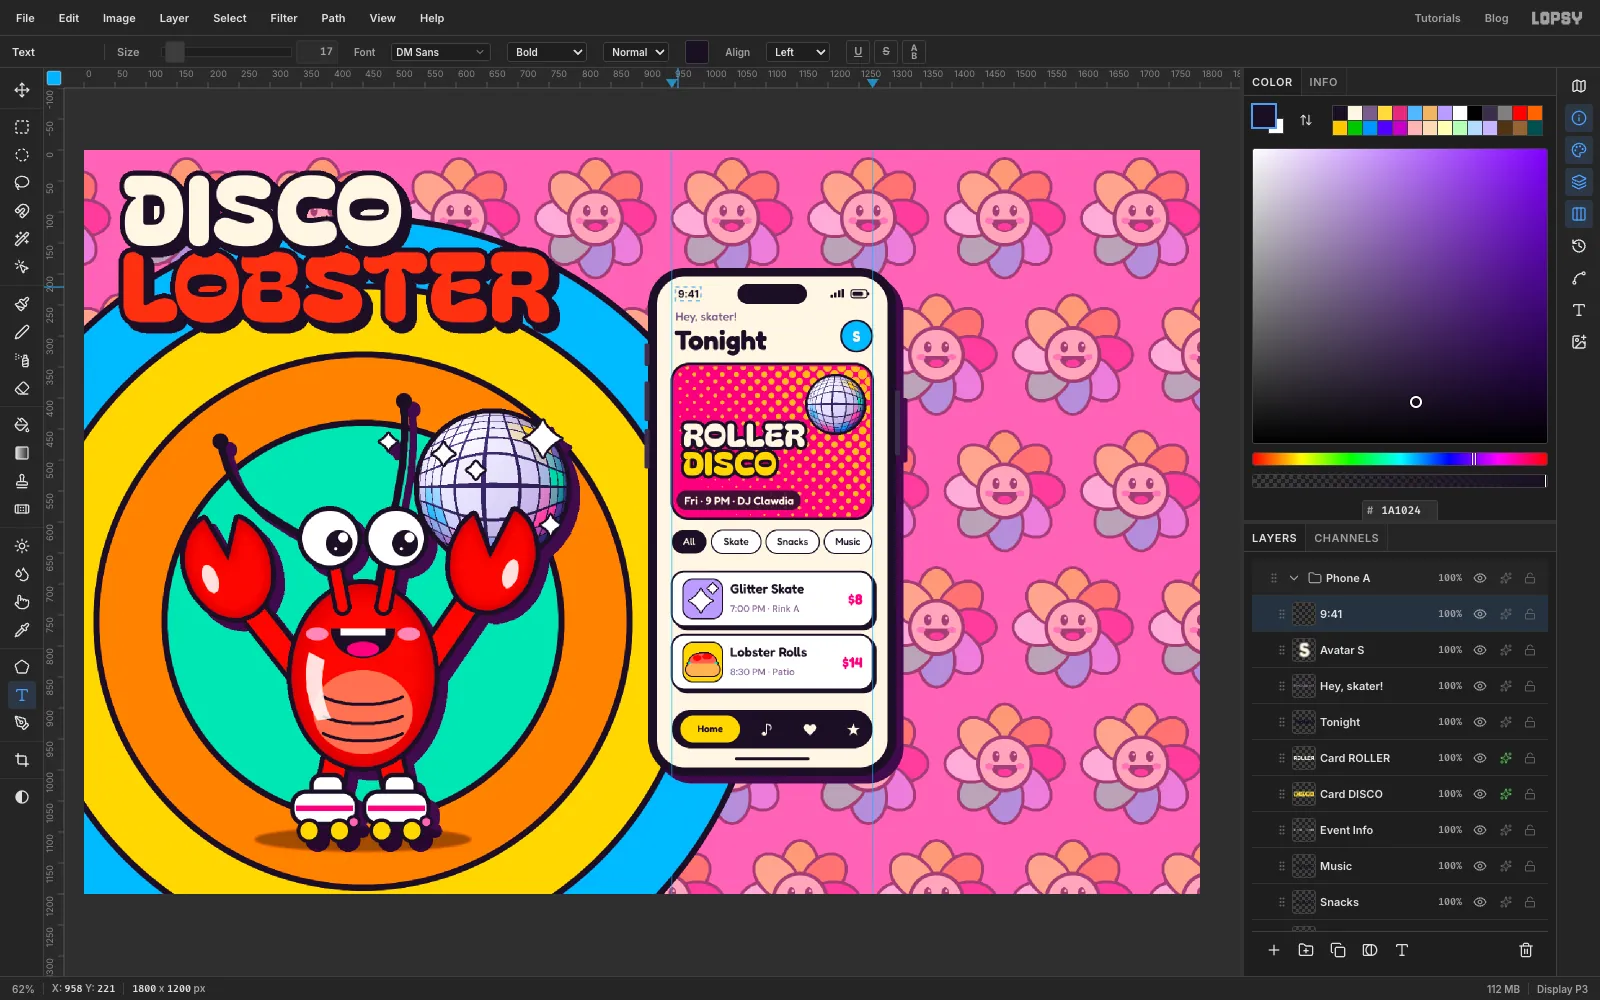
- Tab bar:
-
Build the skate-rental phone
Collapse
Phone A, click theWordmarkrow and make a new group calledPhone B. Because it sits belowPhone Ain the stack, the first phone overlaps it. Build it at1560, 650the same way as Phone A: a body with a 12 px plum drop shadow, a sky-blue screen, the status bar, and two 44 px cream circles with 2 px strokes for the back and favourite buttons.The hero is a big skate made from the same parts as the mascot's, at about twice the size, on a layer called
Big Skate. It faces right, so the toe stop is on the right and the tall shaft is at the heel on the left. That shaft is what makes it read as a boot rather than a car:- A 118 × 156 shaft with radius 34, centred on
1498, 450. - A 229 × 114 foot with radius 48, centred on
1548, 516. Both are white with 8 px ink strokes. - A 202 × 20 magenta stripe across the middle of the foot.
- Two 75 px yellow wheels with 7 px strokes, at
1493, 597and1603, 597, with 24 px white hubs. - A 40 px pink toe stop at
1656, 566.
Draw the laces as small ink crosses with a 5 px brush. On a layer called
Hero Sparkles, scatter a few white sparkles in the empty corners, clear of the skate, and give them a 3 px Stroke.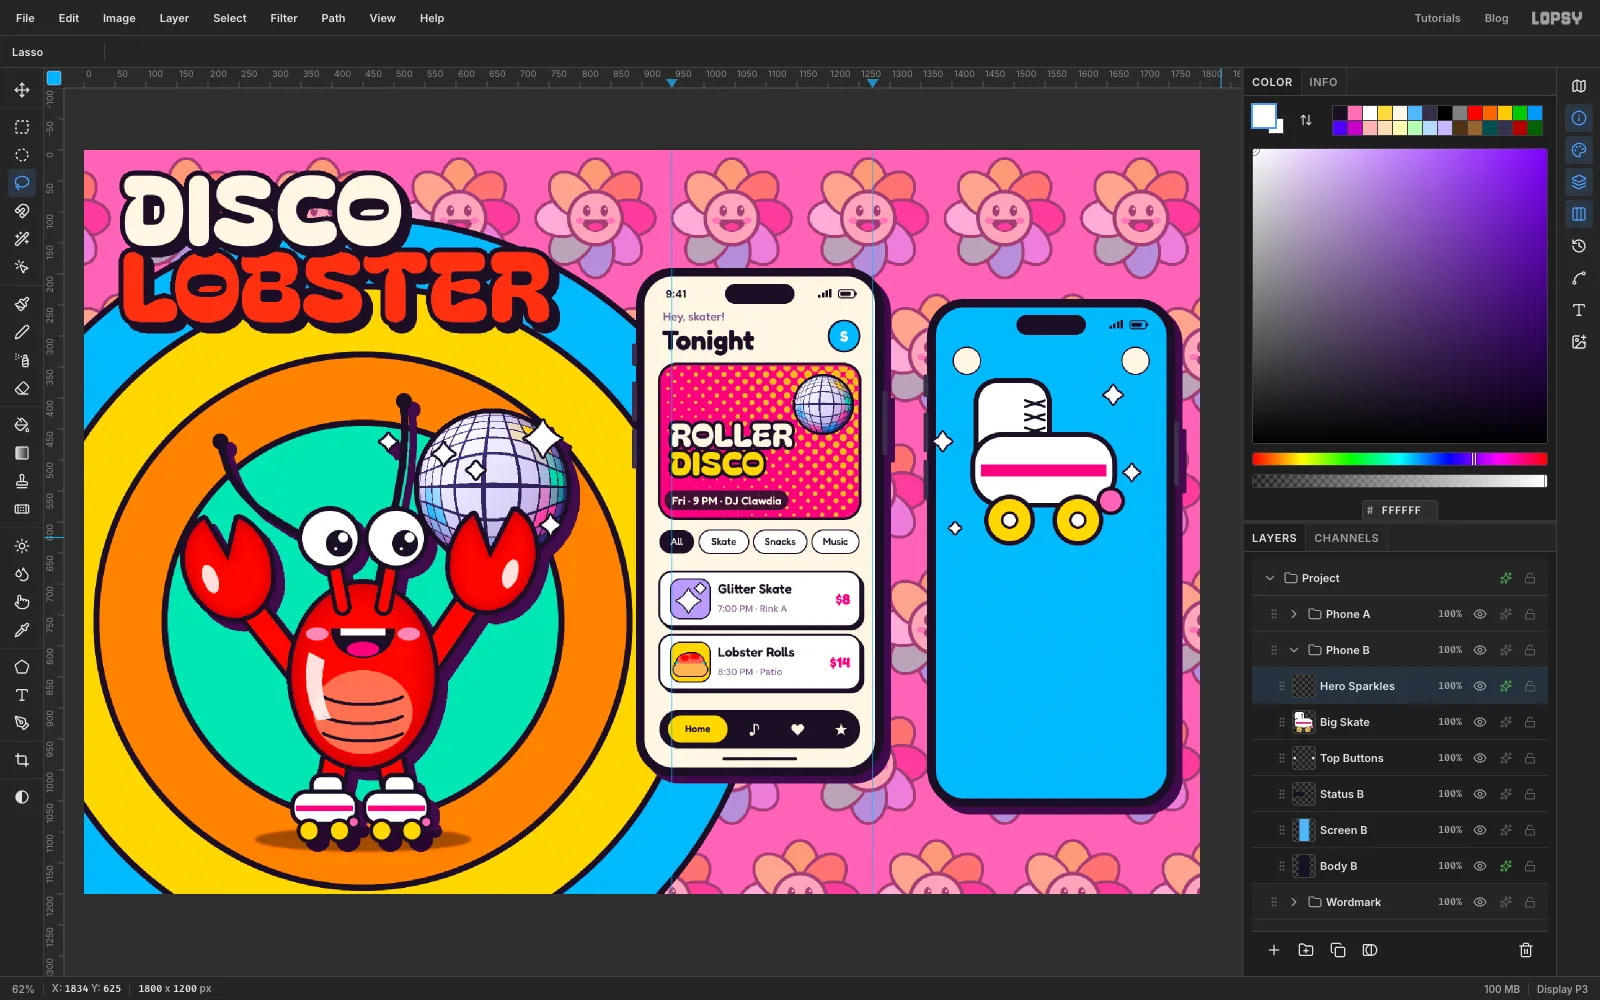
- A 118 × 156 shaft with radius 34, centred on
-
Clip a bottom sheet to the screen
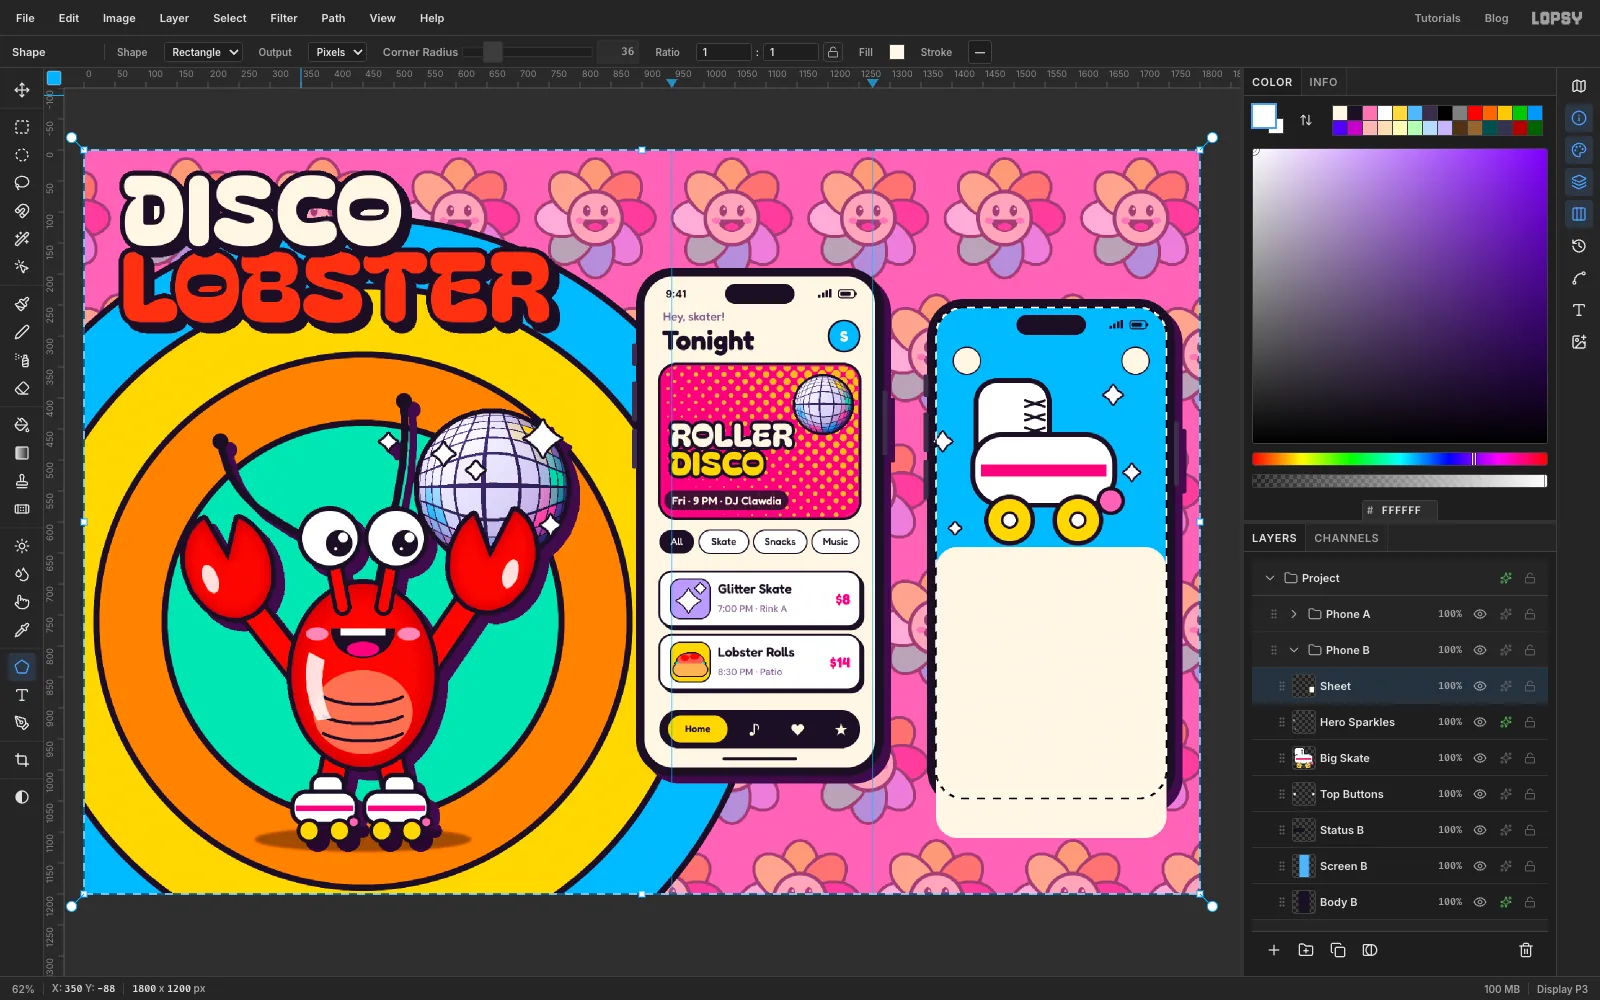
Next, add a bottom sheet, clipped to the screen:
- On a layer called
Sheet, click-create a 372 × 470 cream rectangle with radius 36, centred about 225 px below the middle of the phone. Its bottom hangs past the screen. - Cmd-click the
Screen Bthumbnail, selectSheet, and choose Select → Inverse. Now everything outside the screen is selected. - Press Delete to trim the sheet to the screen's rounded corners, then deselect. Add a small 48 × 5 grab handle in pale lilac at the top of the sheet, on the same layer.
- On a layer called
-
Add the size picker and button
Fill the sheet with controls, leaving at least 20 px between rows:
- Sizes: on a layer called
Sizes, eight 52 px white circles with 2 px strokes in two rows of four, 87 px apart, with 22 px between the rows. Fill size 9 with magenta. - Wheel Swatches: on a layer called
Wheel Swatches, five 40 px circles 54 px apart in yellow, magenta, mint, sky blue and lilac. Draw a 54 px outline-only ring around the yellow one to show it's selected. - CTA: on a layer called
CTA, a 312 × 58 magenta pill with a 3 px stroke and a 5 px hard ink shadow. It's the same width as the size grid, so the edges line up.
For the type, use Fredoka SemiBold 20 for
Pick your sizeandWheel color, withUS sizesin DM Sans muted purple on the right. Centre each size number in its circle in Fredoka SemiBold 21, cream on the selected one. SetBOOK · $12in Bagel Fat One 26 in cream, centred on the button, andRent Skatesin Fredoka Bold 26 at the top. Add a‹and a magenta♥in the two round buttons.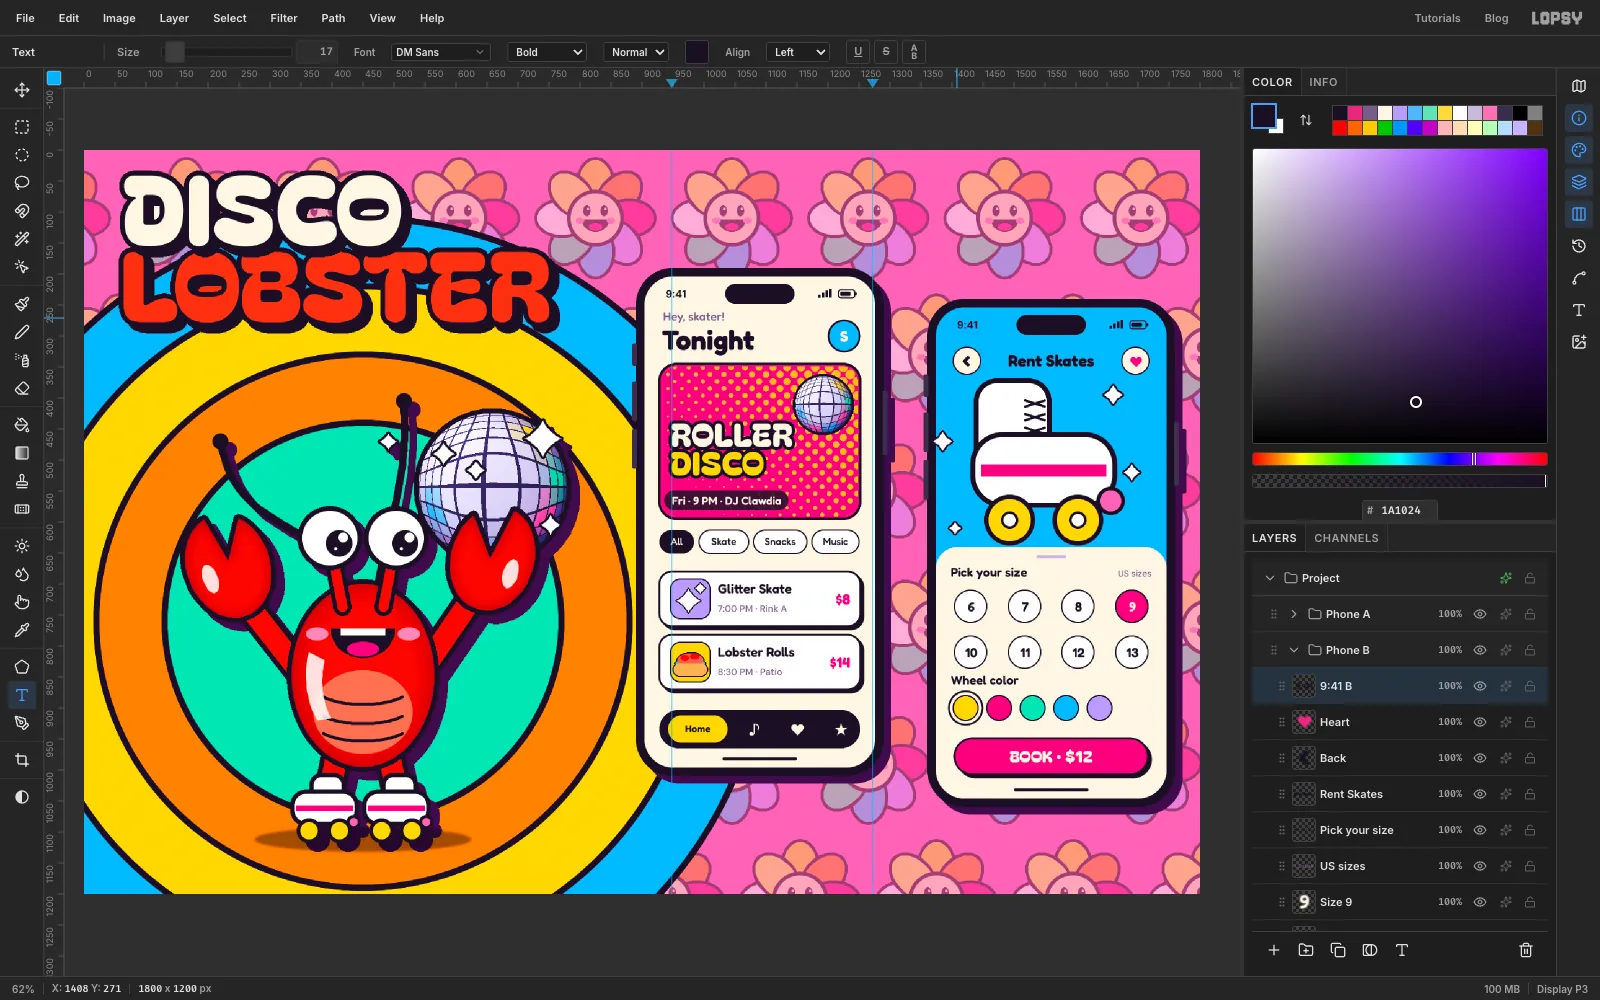
- Sizes: on a layer called
-
Tilt the phone as one group
Collapse
Phone Band click its row. With the Move tool, the transform box wraps the whole group. Hover just outside the top-right corner until the cursor turns into the rotate arrow, then drag clockwise about 6°. Press Cmd+D to commit. The body, screen, shapes and live text all turn together, and the text stays editable.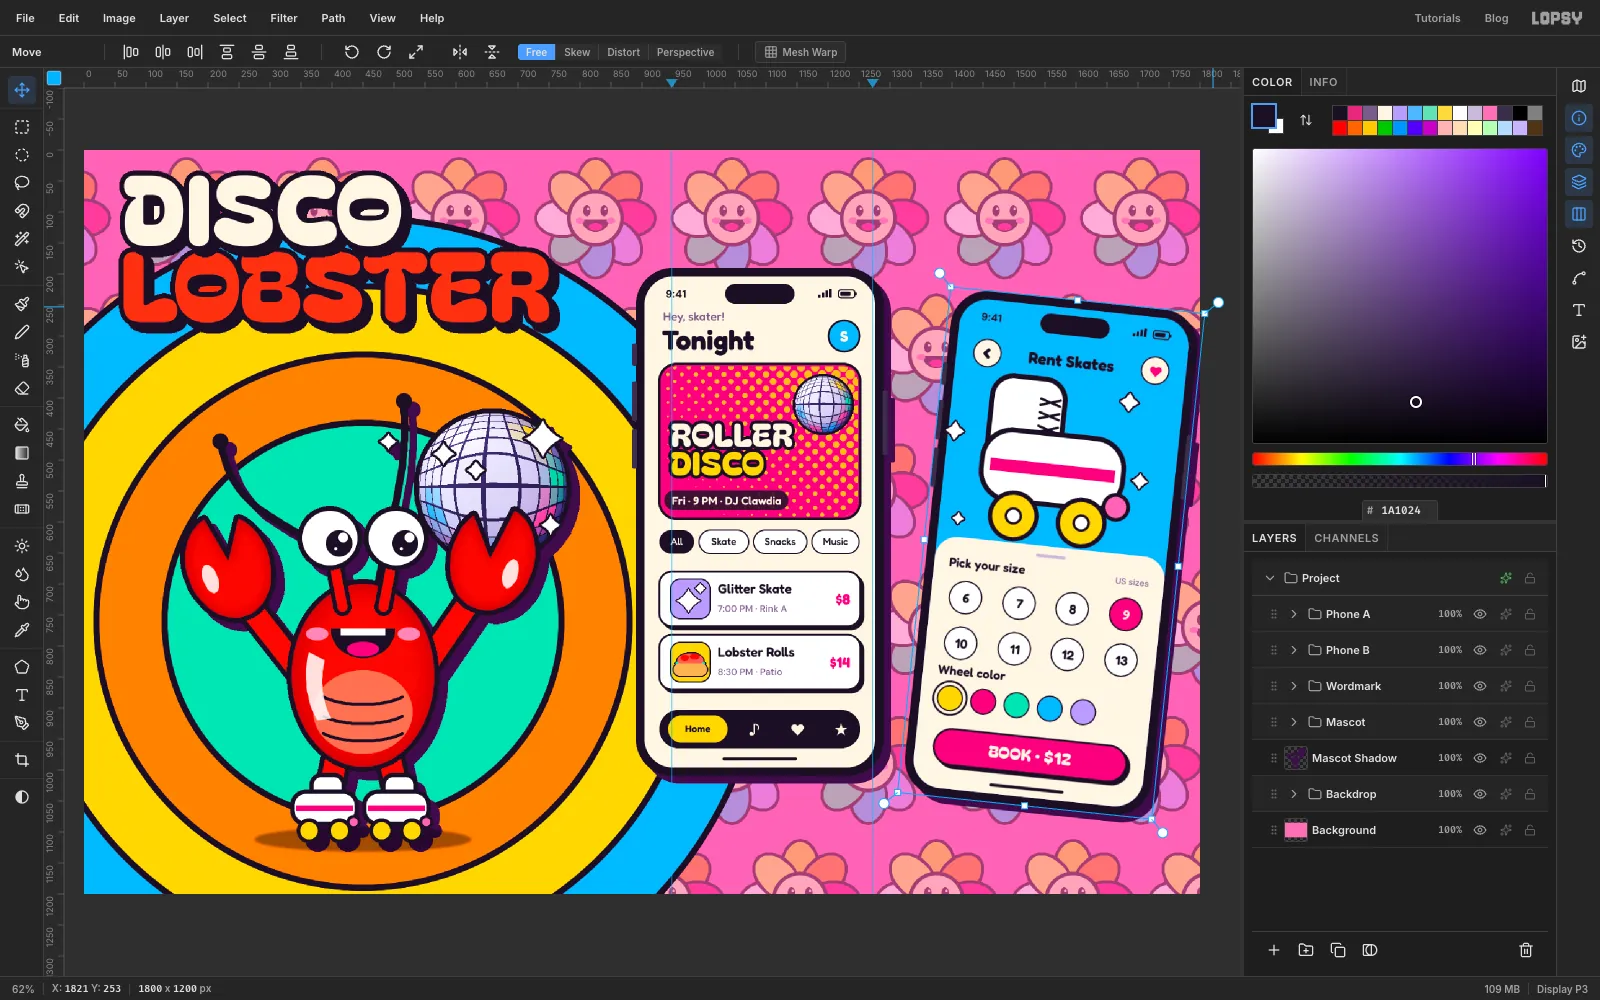
-
Draw a starburst badge
Collapse the phone groups, click
Phone Aand make a group calledBadgeon top. Turn on View → Show Grid to help you space the points evenly.On a layer called
Starburst, drag the Lasso round in a zig-zag centred on745, 1010. Go out to a point about 112 px from the centre and back in to about 94 px, twenty times, and close the loop. It doesn't have to be perfect, because the thick outline hides small wobbles. Fill it with yellow. Turn the grid off. Then give the layer an ink Stroke of 8 and a plum Drop Shadow with offsets of 9, Blur 1 and Opacity 100.Set
TAPS!,IN 3andBOOKin Bagel Fat One 36 in ink, with Align Center on the star's centre line. Do the bottom line first so each new click lands in clear space, and click theBadgerow before each one.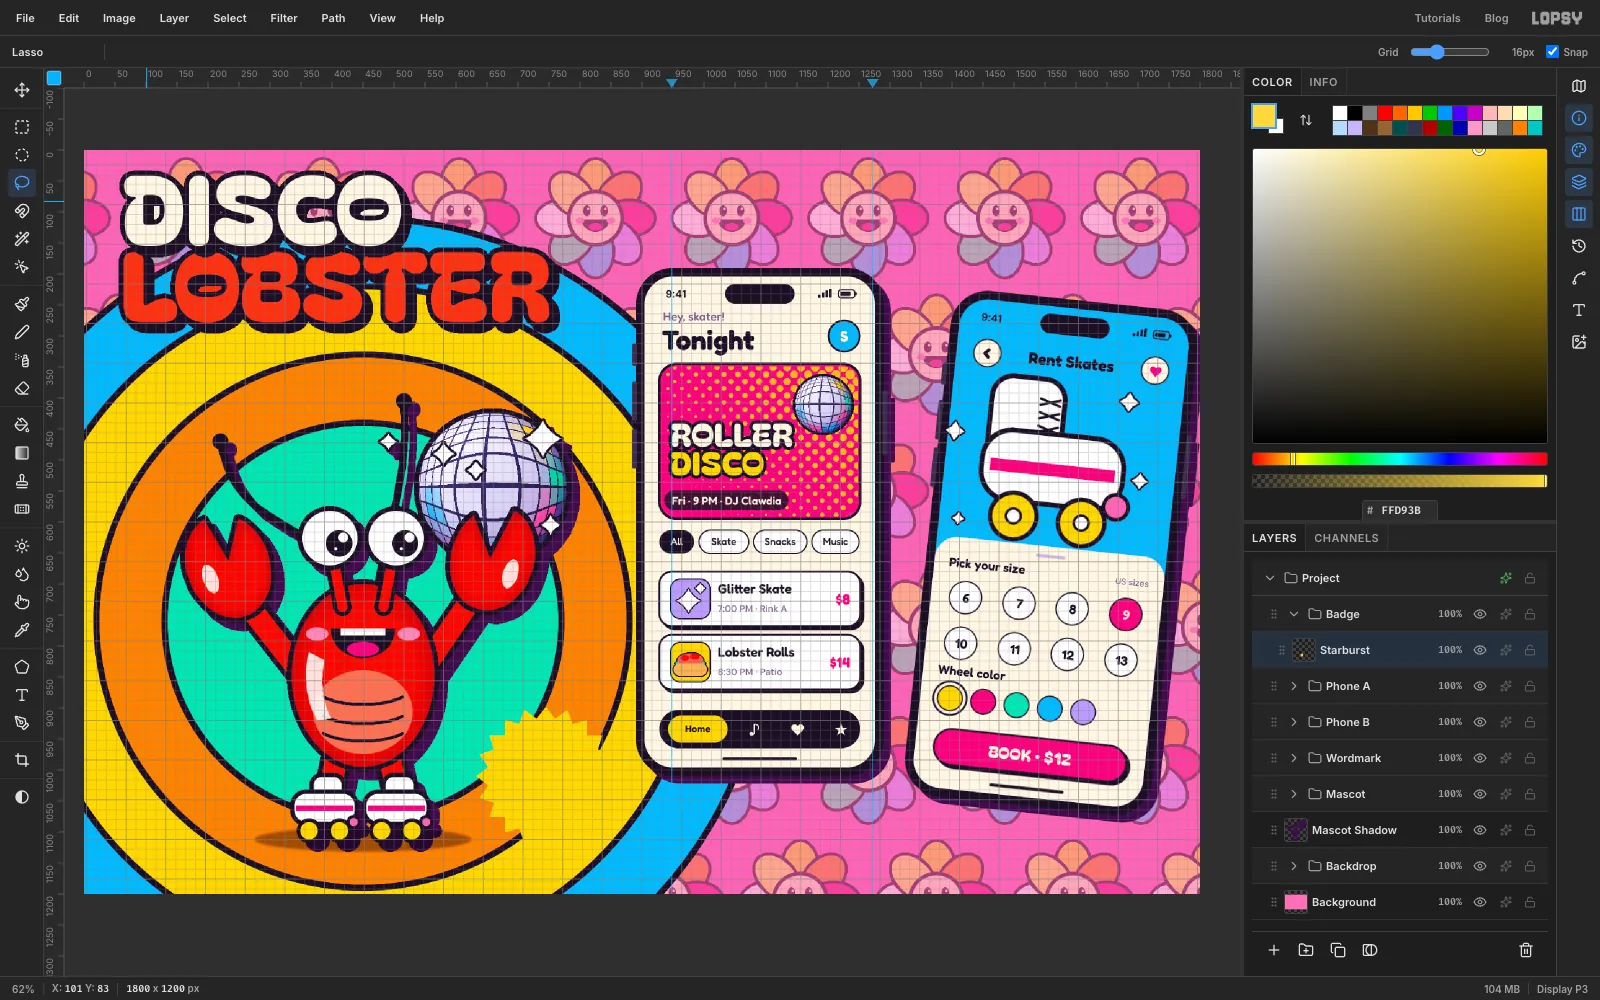
-
Tilt the badge
Collapse
Badge, select the group, and rotate it about 12° counter-clockwise with the corner handle, like you did with the phone. Press Cmd+D to commit. Keep the starburst at least 20 px clear of the phone's bezel. Near-misses look like mistakes.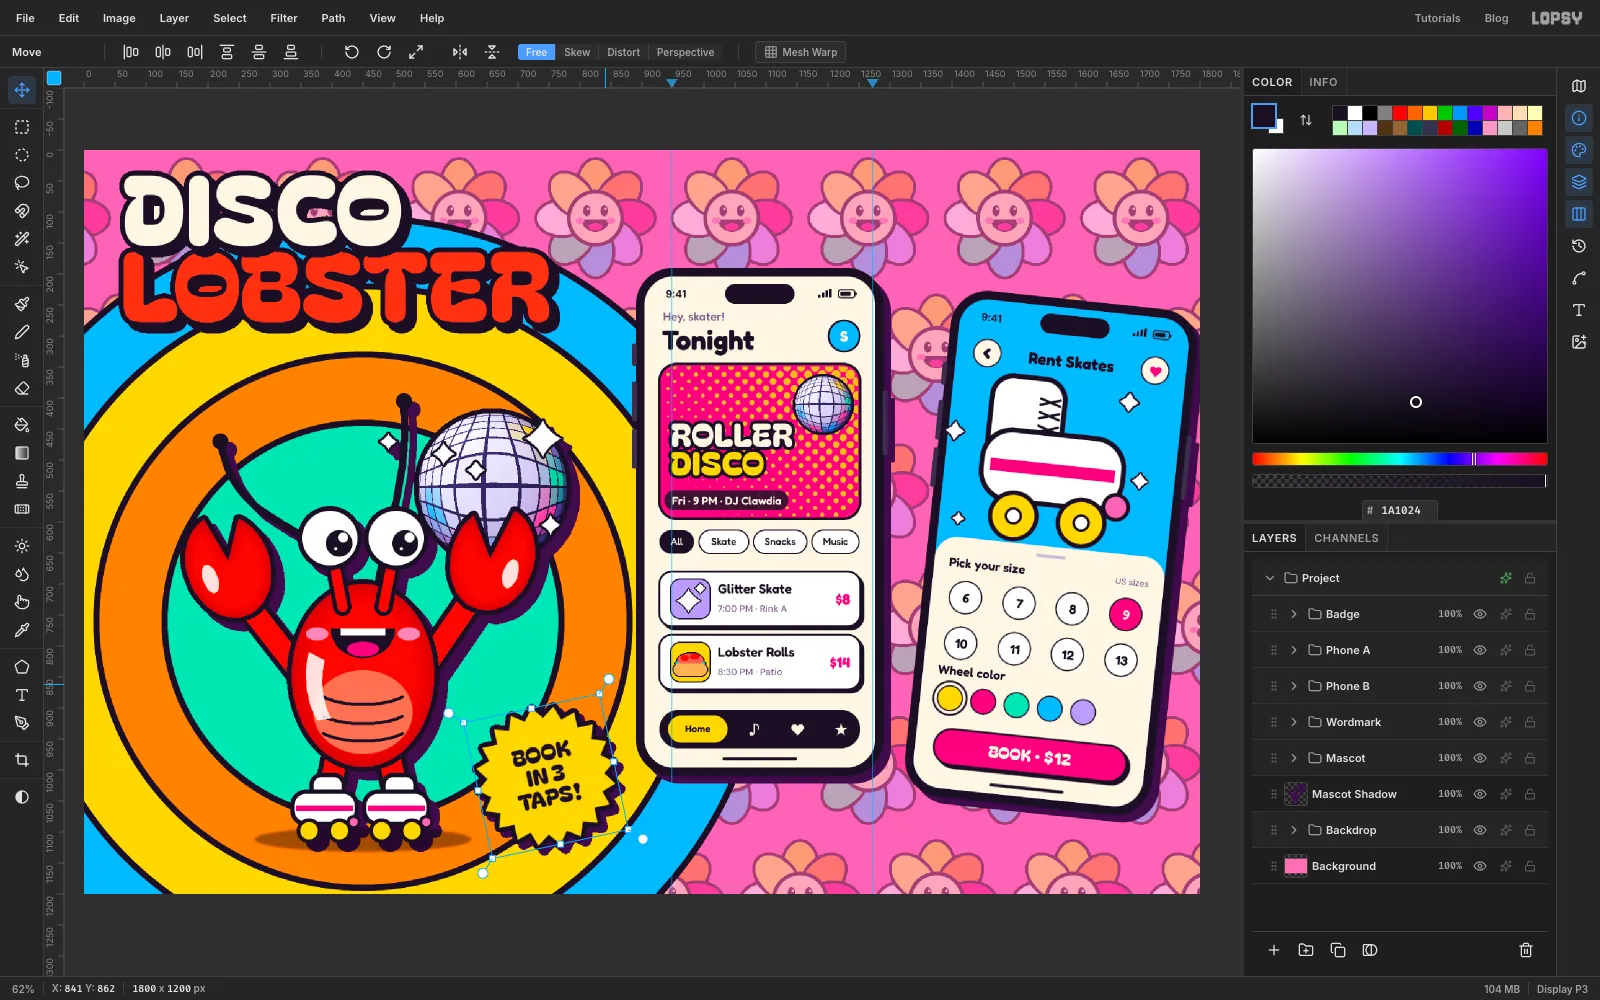
-
Finish and export
Turn off View → Show Guides, choose View → Fit to Screen, and look over the board as a whole. The hierarchy should run title, then mascot, then phones, with the softened wallpaper staying behind everything. Choose File → Quick Export PNG for the final image, and File → Save Project to keep the layered file.
For more UI mockups, try the grunge record store app or the technical illustration landing page.