Design an Op-Art Jellyfish Book Cover with a Vasarely Bulge
Make a 1960s op-art book cover in Lopsy, with a Vasarely-style bulging checkerboard jellyfish, Riley chevron stripes, Liquify, Mesh Warp and striped type.
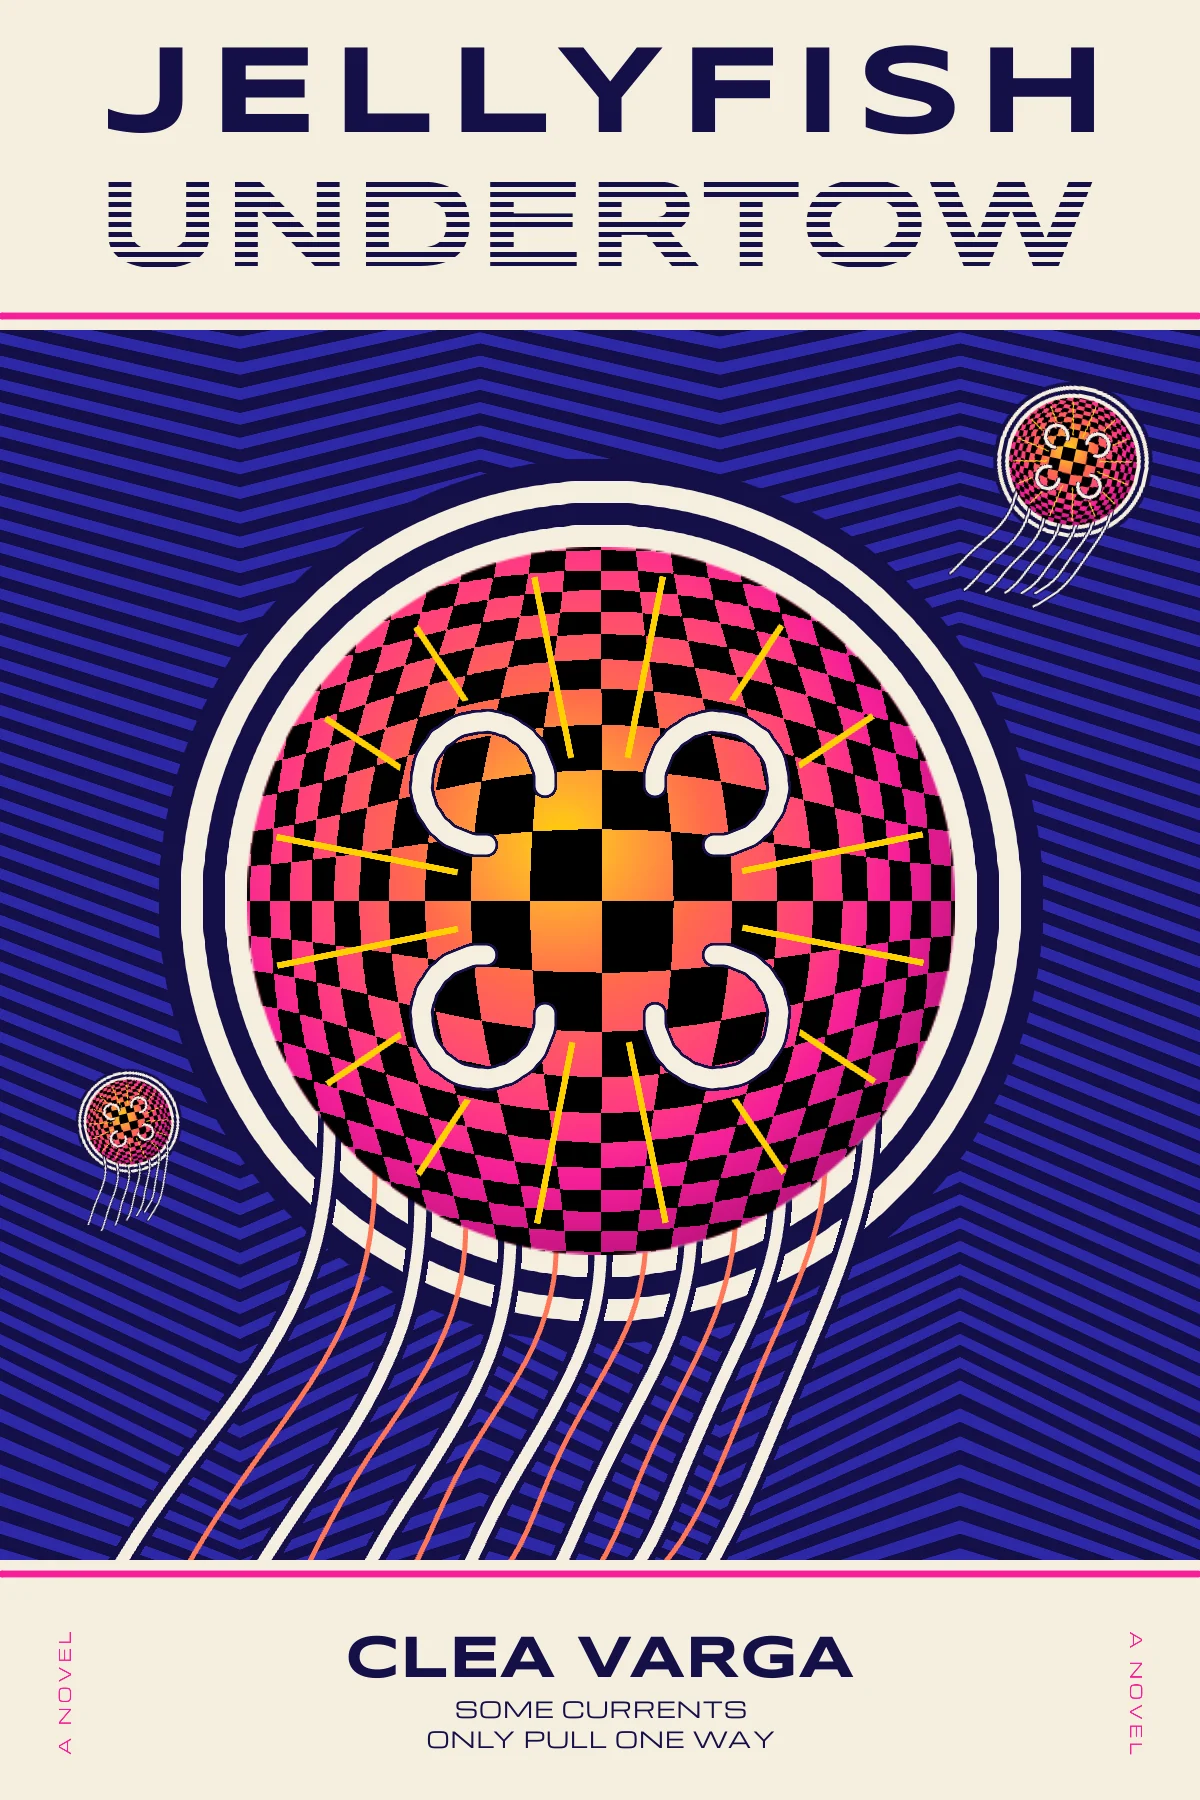
In the late 1950s Victor Vasarely painted Vega, a black-and-white checkerboard that swells in the middle as if a ball were pushing up through the canvas. Bridget Riley was soon filling canvases with stripes that seem to ripple while you look at them. Within a few years, paperback covers were full of both.
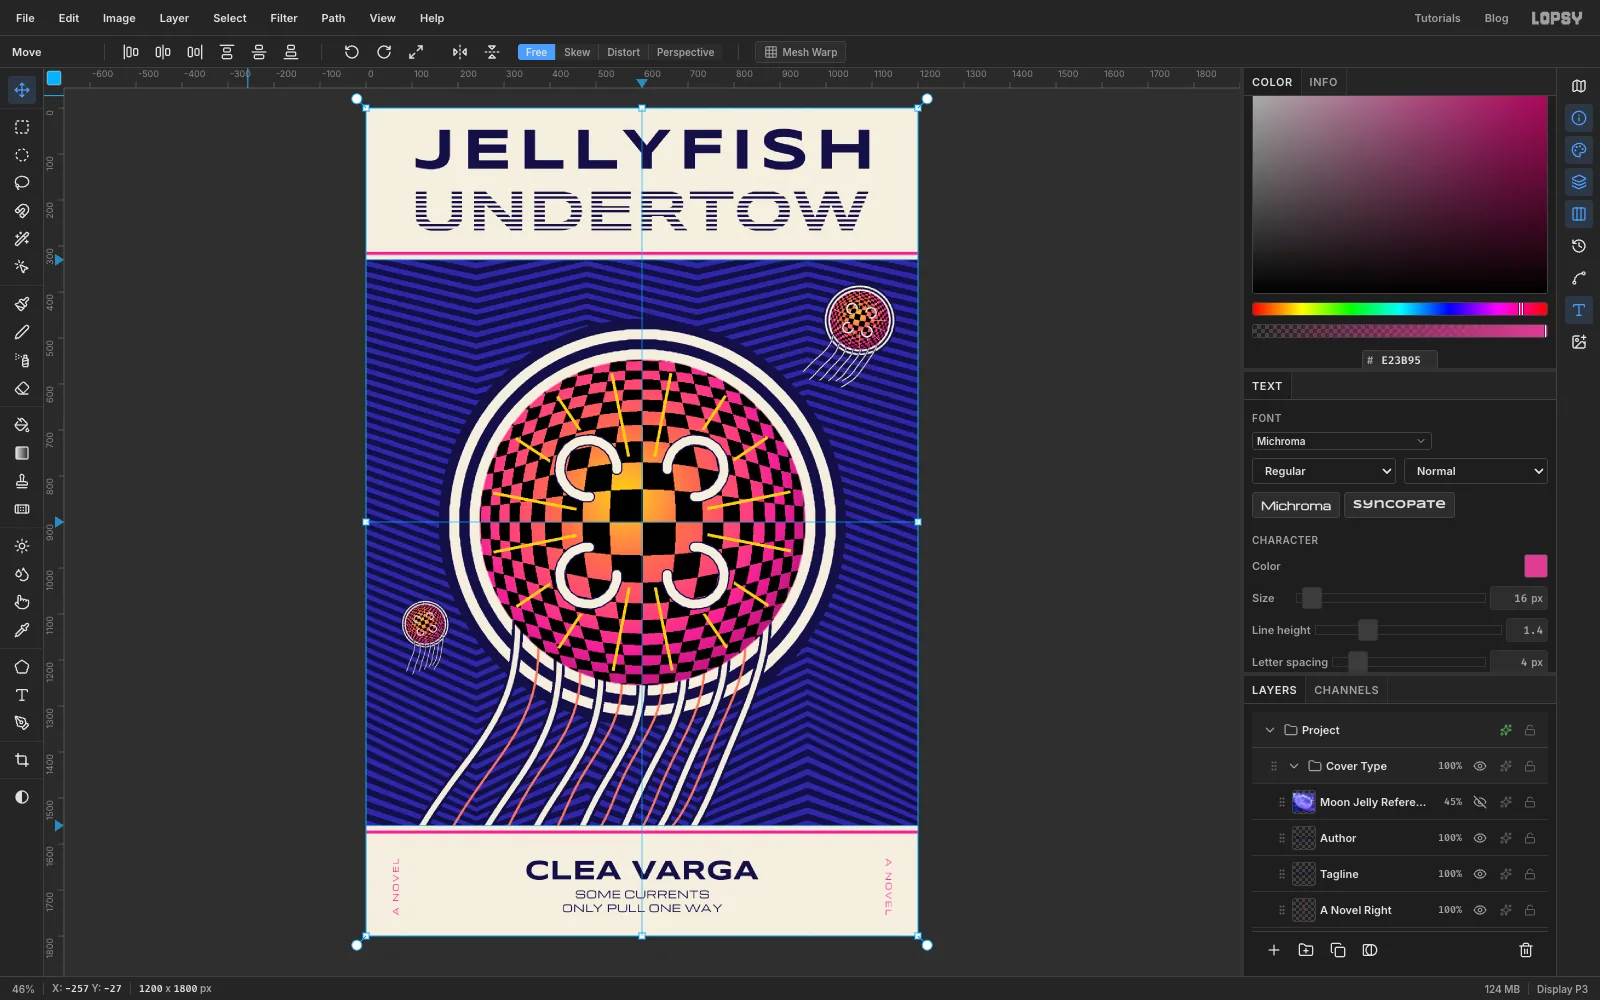
In this tutorial you'll make that kind of cover for Jellyfish Undertow, a made-up novel by a made-up author, Clea Varga. The cover is 1200 × 1800 px. In the middle, a moon jelly seen from below floats in a field of chevron stripes. Its bell is a Vega bulge: a checkerboard that you blow up into a dome with Liquify, then colour with a glowing gradient. Cream rings and long tentacles turn the bulge into an animal, and two small copies of it drift off into the current. Cream bands at the top and bottom hold the type, and the second word of the title is filled with stripes.
You'll work from a real photo of a moon jelly, Jellyfish 1 (Unsplash).jpg, a CC0 picture by Ferdinand Stöhr on Wikimedia Commons. You'll use it to size and place the bell, and to see where the canals and gonads go, then hide it.
The tools you'll use:
- guides, the Rectangular and Elliptical Marquee's exact-corner dialog, and Select → Inverse / Grow / Shrink
- Define Pattern and Fill with Pattern with offsets
- the Move tool's Mesh Warp, scale and rotation handles, and Rotate 90° buttons
- Liquify (Bloat), Threshold, Gaussian Blur and Sunburst
- the Gradient tool with a radial gradient and the Multiply blend mode
- the Pen tool, the Brush with Radial Symmetry, and the Stroke effect
- Edit → Copy Merged, Paste, Duplicate Layer and Group Layers
- live text in Syncopate Bold and Michroma
The palette:
-
Navy
-
stripe violet
-
ink
-
Cream
-
Bell glow
-
Magenta rules
-
coral strands
-
Set up a navy page with guides
Choose File → New, keep the units on Pixels, and make the document 1200 wide and 1800 high.
Click Background in the Layers panel, set the foreground colour to navy and choose Edit → Fill.
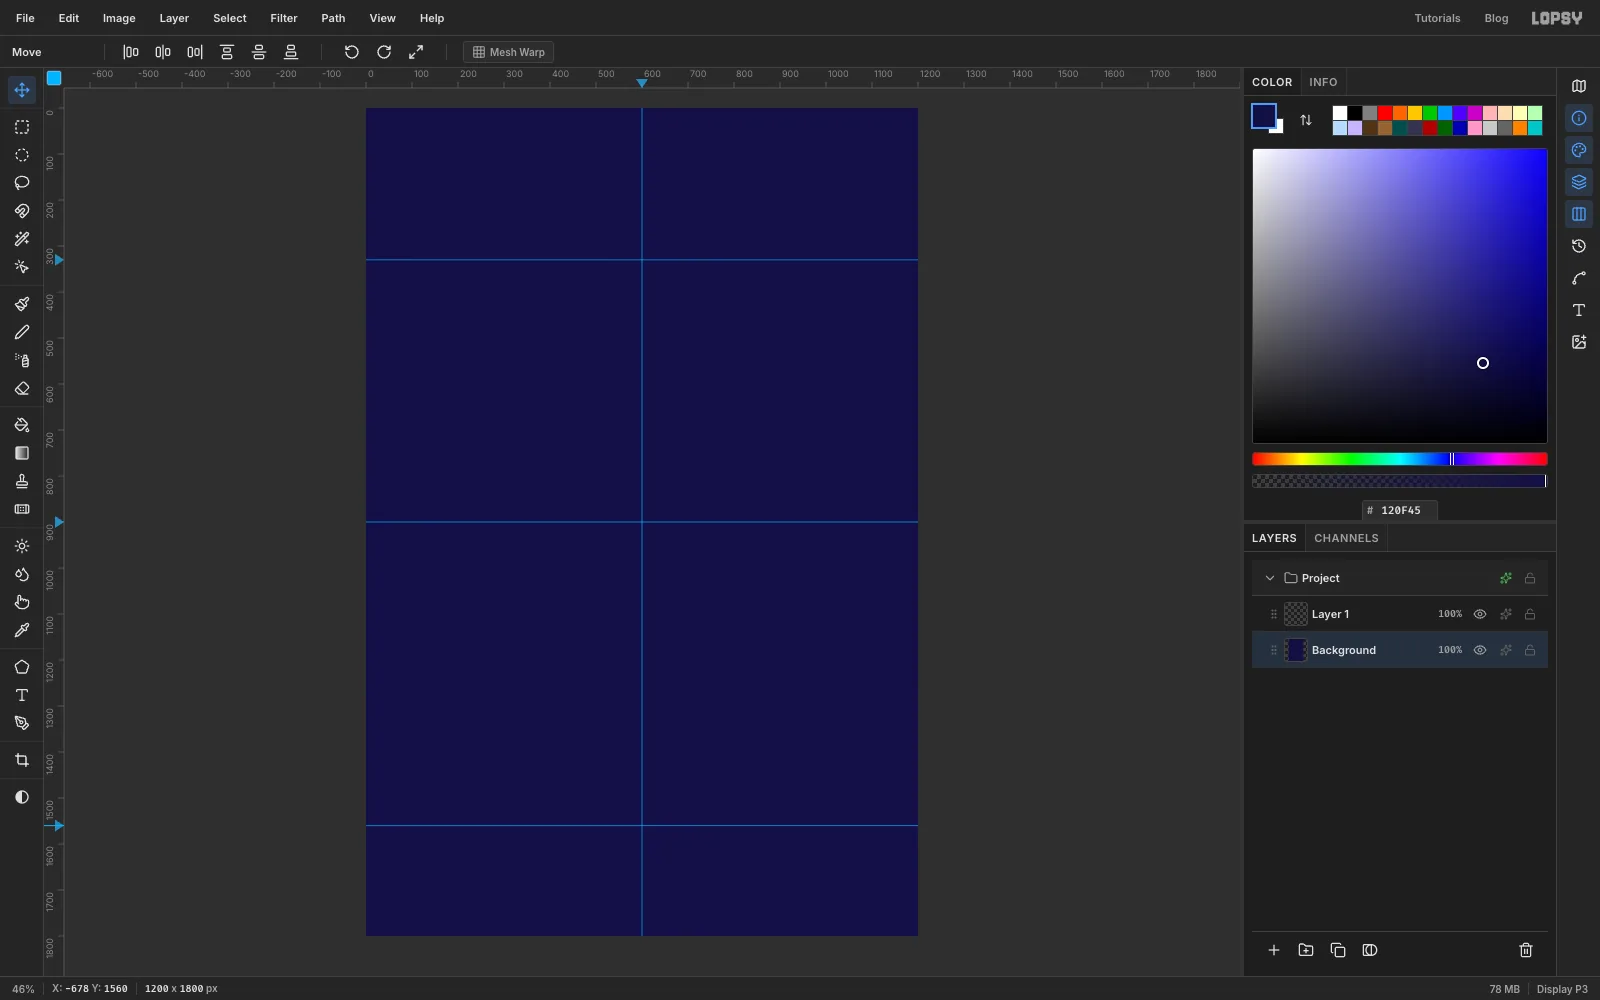
Now drop some guides. Click the top ruler at 600 for a vertical centre line. Then click the left ruler at 330, 900 and 1560. The top and bottom guides mark where the cream title and author bands will start. The guides cross at (600, 900), the centre of the page, and that's where the jellyfish's bell will go.
-
Fill the page with stripes
Riley's line paintings start from plain stripes, so make a stripe pattern first.
A new document comes with an empty Layer 1. Rename it Stripe Tile (double-click its name). Pick the Rectangular Marquee (M) and click once on the canvas without dragging. A dialog asks for the corners. Type From 0, 0 To 40, 12 and press Enter. Set the foreground to stripe violet and choose Edit → Fill.
Press Cmd+D to drop that selection (the corners dialog only opens when nothing is selected), click once more and enter From 0, 0 To 40, 24. That's the violet bar plus 12 px of nothing below it. Choose Edit → Define Pattern, press Cmd+D to deselect, and delete the Stripe Tile layer with the bin button at the bottom of the Layers panel.
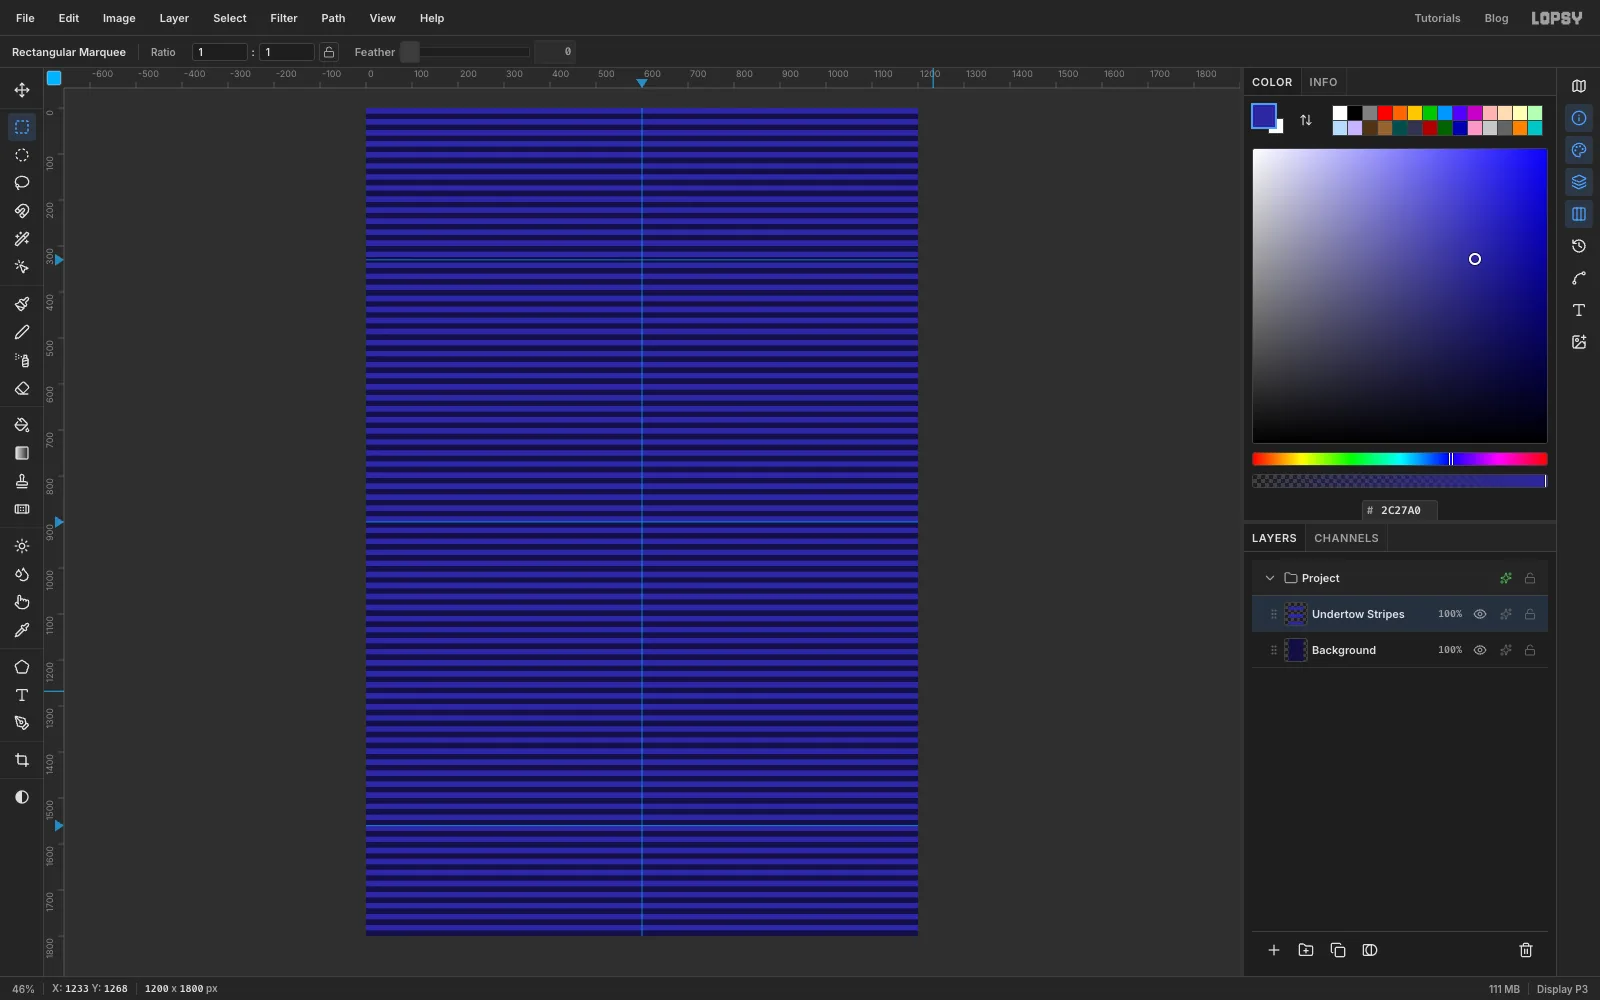
Click Add Layer and name the new layer Undertow Stripes. Choose Edit → Fill with Pattern…, pick your stripe tile and click Apply. The transparent half of the tile lets the navy show through, so you get even violet and navy stripes 12 px apart.
-
Bend the stripes into chevrons with Mesh Warp
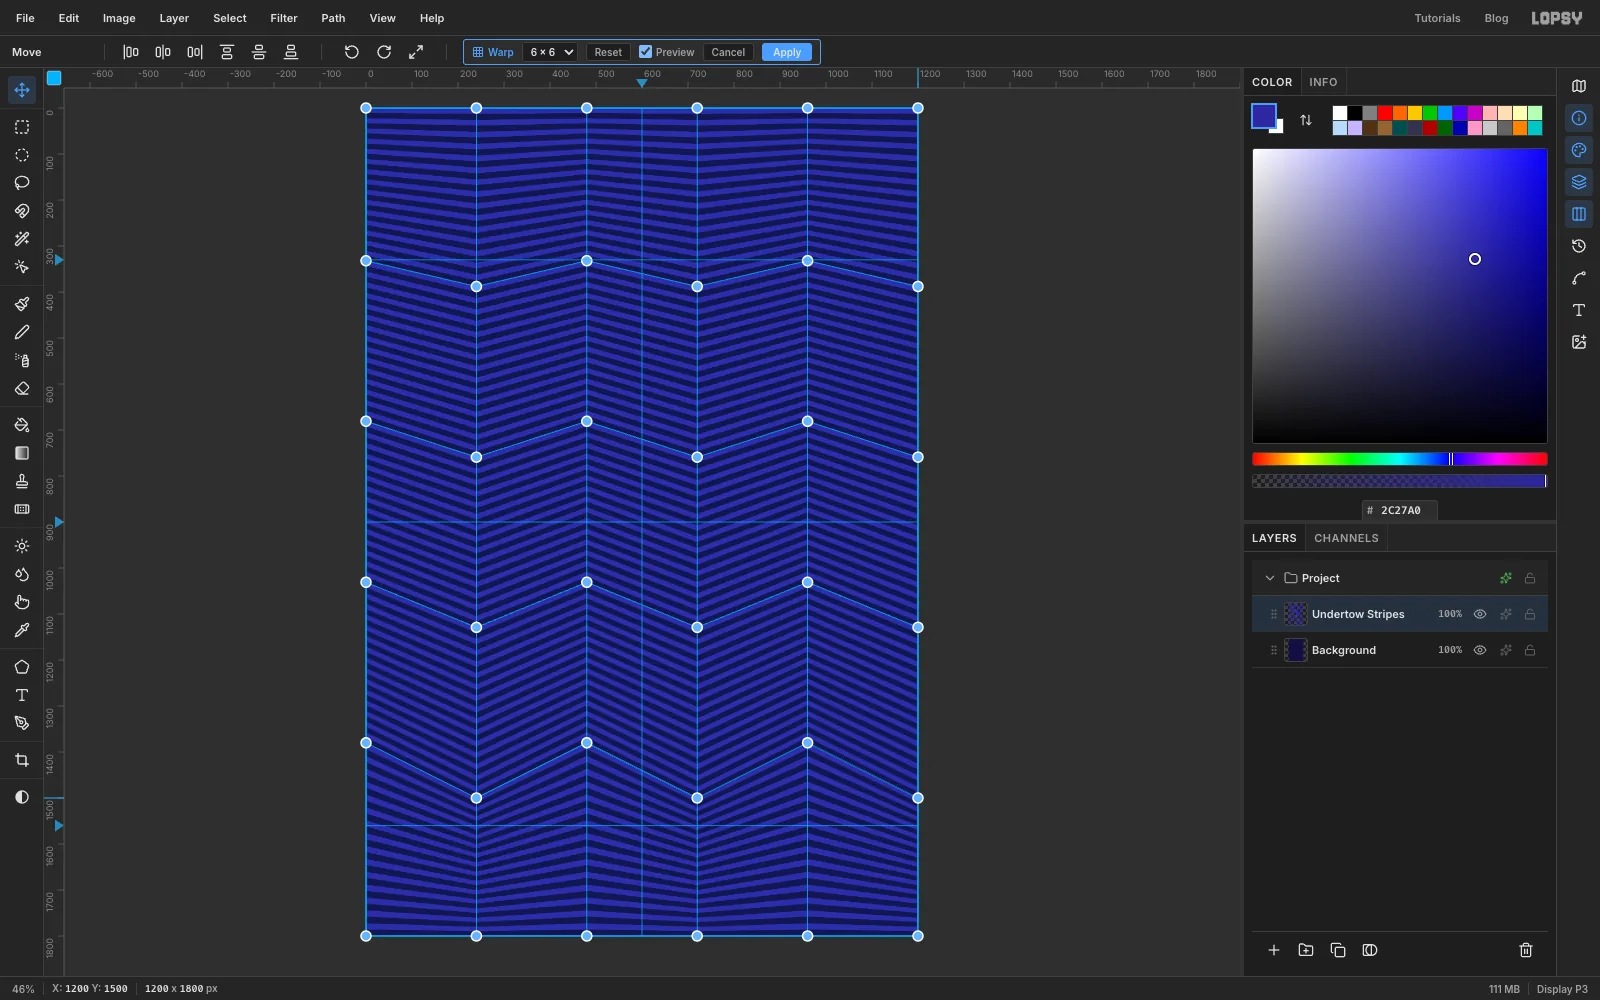
With Undertow Stripes still selected, switch to the Move tool (V) and click Mesh Warp in the options bar. Set the grid to 6 × 6 and tick Preview.
Leave the top and bottom rows of points alone, so the warp doesn't pull the stripes off the page. Then work down the columns:
- In the 1st, 3rd and 5th columns from the left, drag each point up.
- In the 2nd, 4th and 6th columns, drag each point down.
- Drag the points near the top only about 20 px. Make each row further down move a bit more, up to about 70 px for the row just above the bottom.
Mesh Warp bends straight between its points, so the stripes fold into sharp zigzag chevrons rather than soft waves. That's the look you want here: the chevrons get deeper toward the bottom, like a current getting stronger. Click Apply.
-
Drop in the reference photo
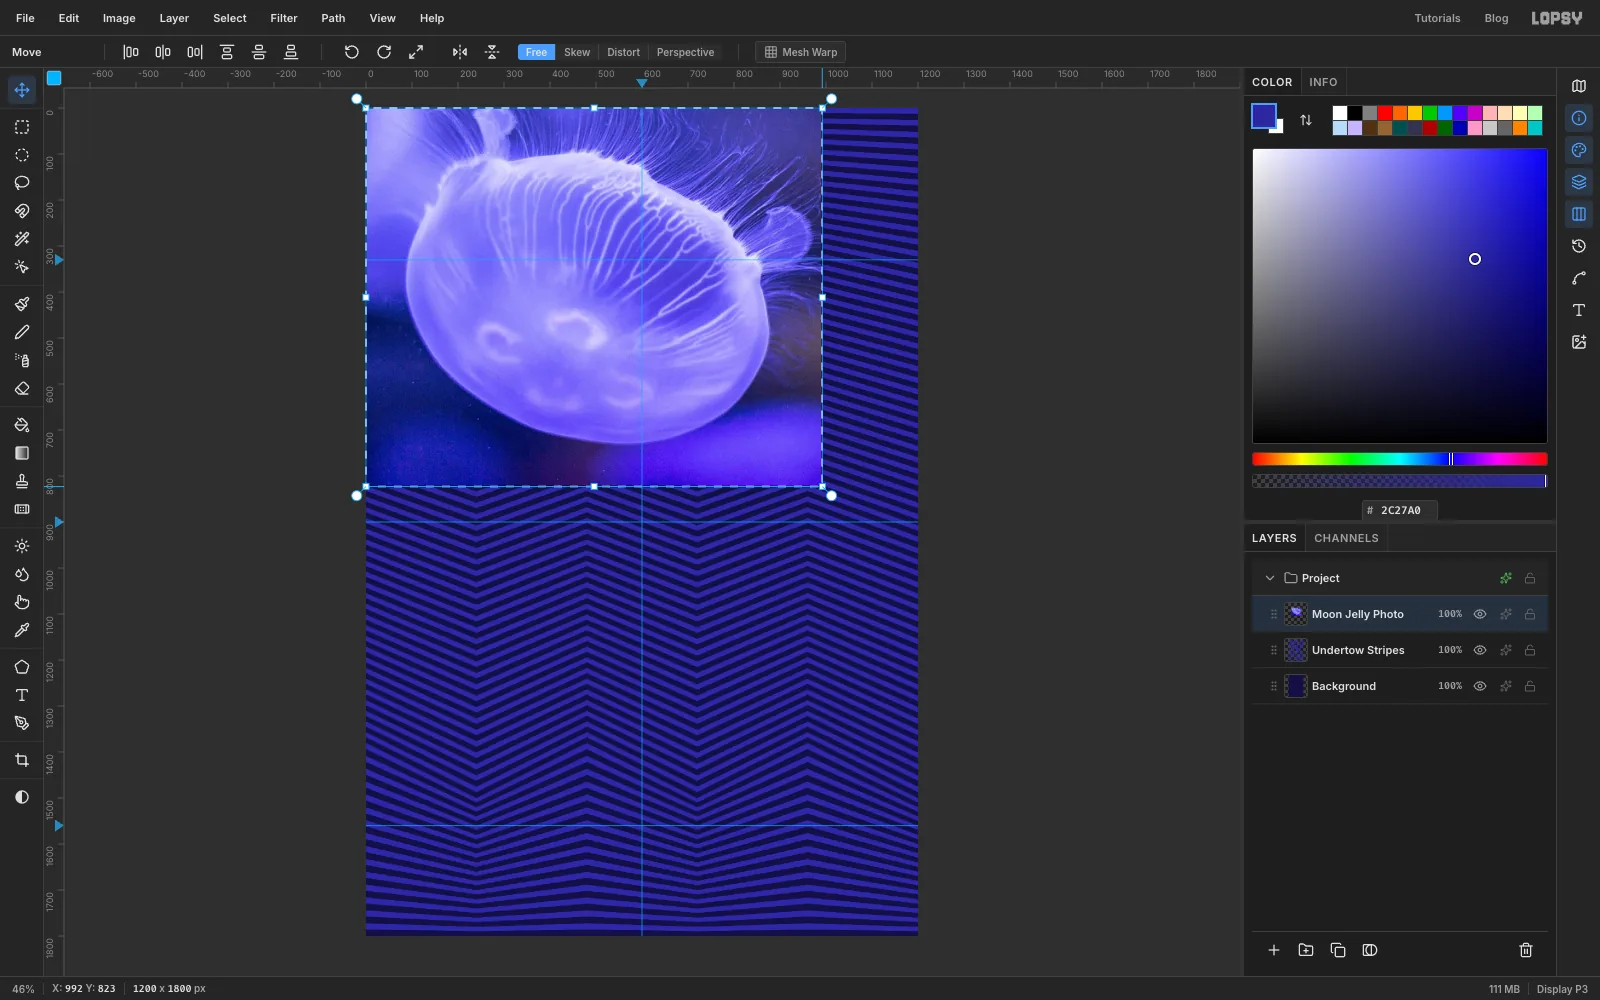
Download the moon jelly photo. It's a big landscape picture with plenty of empty water around the animal, so crop it to just the jellyfish in any photo app first (the crop used here is 820 × 680 px). Drag the file onto the canvas. It lands at the top left at its own size, as a new layer above the stripes. Rename the layer Moon Jelly Photo.
Switch to the Move tool. Hold Cmd (to keep the proportions) and drag the bottom-right corner handle outward until the jellyfish's bell is about 790 px across. With this crop that's about 1.2 times its size. Press Enter, then Cmd+D.
-
Line the photo up with the guides
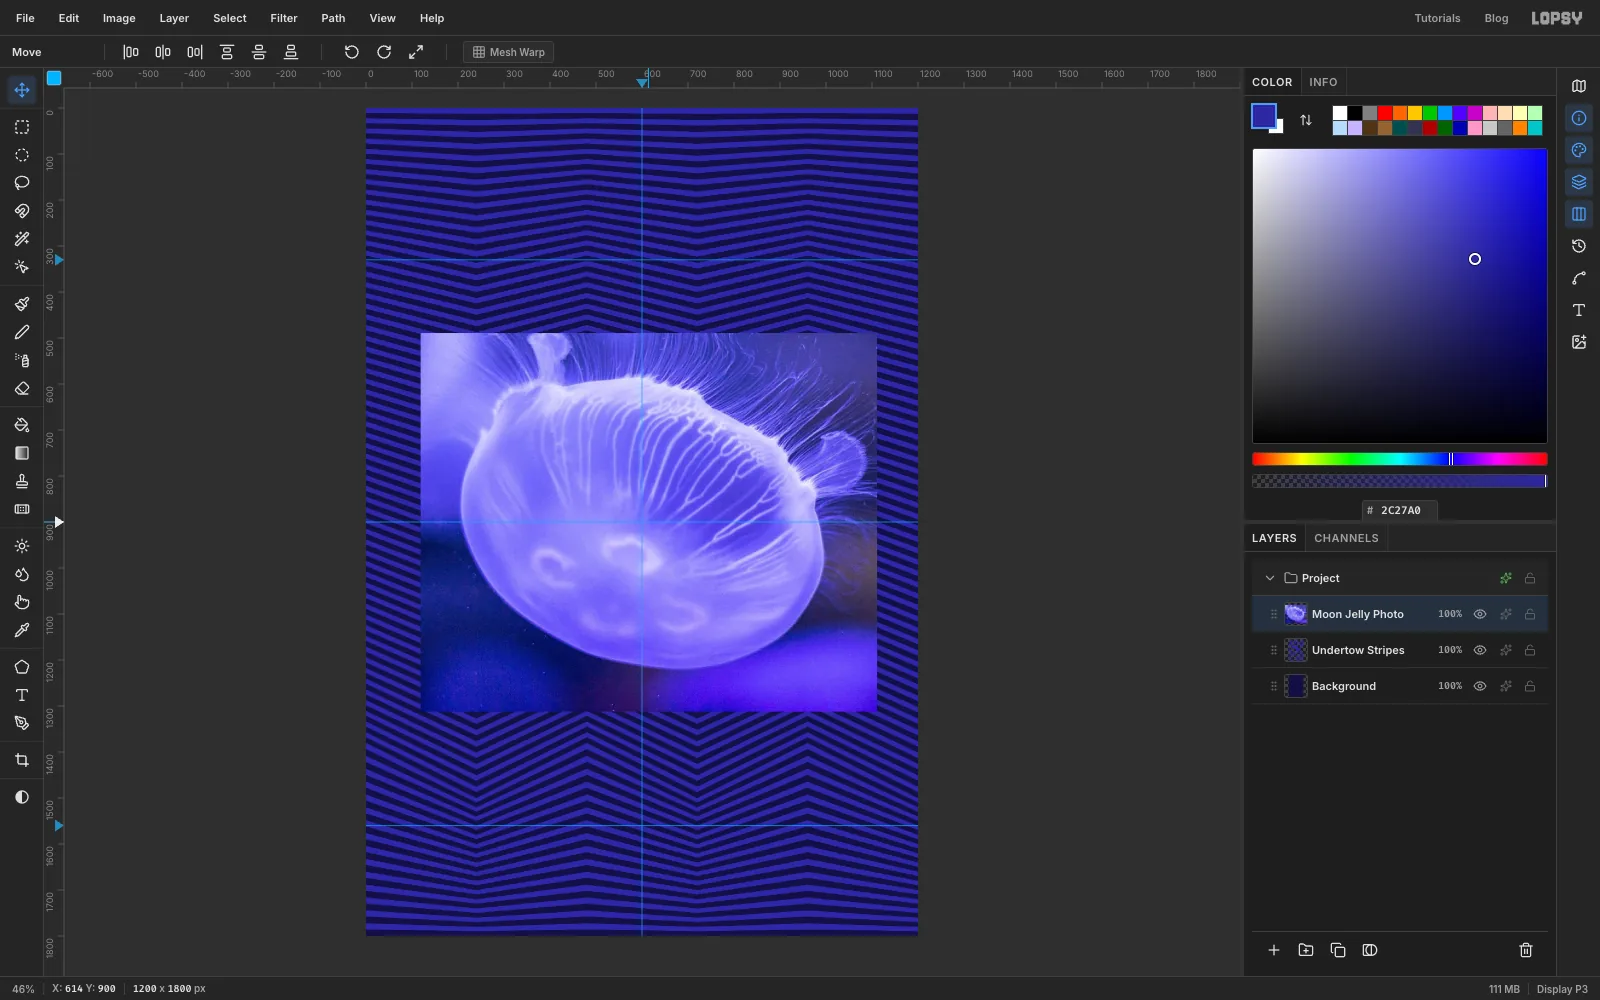
Drag the photo so the centre of the jellyfish's bell sits right where the centre guides cross. Then lower the layer's Opacity to 45% so you can see what you build under it.
The photo's bell is a slightly squashed oval, about 790 px across at its widest and narrower the other way. The op-art bell will be a circle that fits inside it: 708 px across, a radius of 354, centred on the guides.
-
Make a fine checkerboard
Click Undertow Stripes so the new layers land above it, under the photo.
Make a checker tile the same way as the stripes. Add Layer, name it Checker Tile, and set the foreground to cream . With the marquee dialog, select From 0, 0 To 16, 16 and choose Edit → Fill. Press Cmd+D, click again, select From 16, 16 To 32, 32 and fill that too. That's two cream squares on the diagonal. Press Cmd+D once more, select From 0, 0 To 32, 32, choose Edit → Define Pattern, press Cmd+D and delete the tile layer.
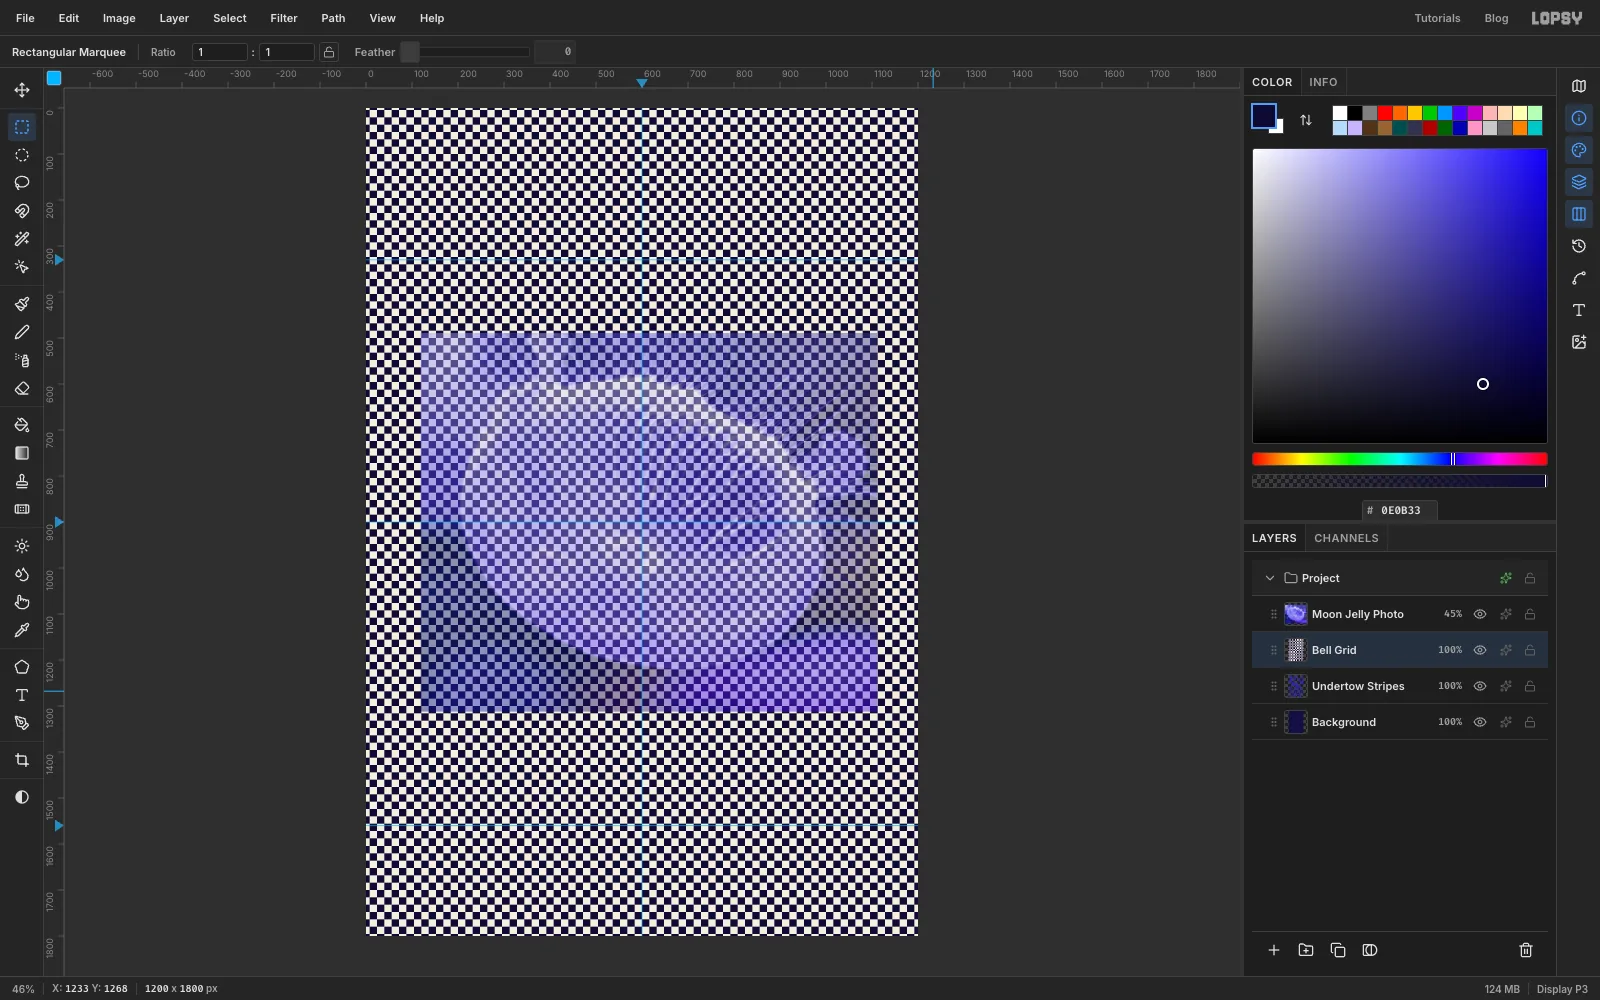
Add Layer again and name it Bell Grid. Fill it with ink , then choose Edit → Fill with Pattern… with the checker tile. Set Horizontal Offset to 25 and type 12.5 into the Vertical Offset box (the slider only moves in whole steps), then Apply.
Those offsets put the corner of four squares exactly on the page centre, where the bulge will be. The squares are 16 px, so a square edge falls every 16 px. 600 is 8 px past one, and 8 px is 25% of the 32 px tile. 900 is 4 px past one, which is 12.5%.
-
Blow the centre up with Liquify
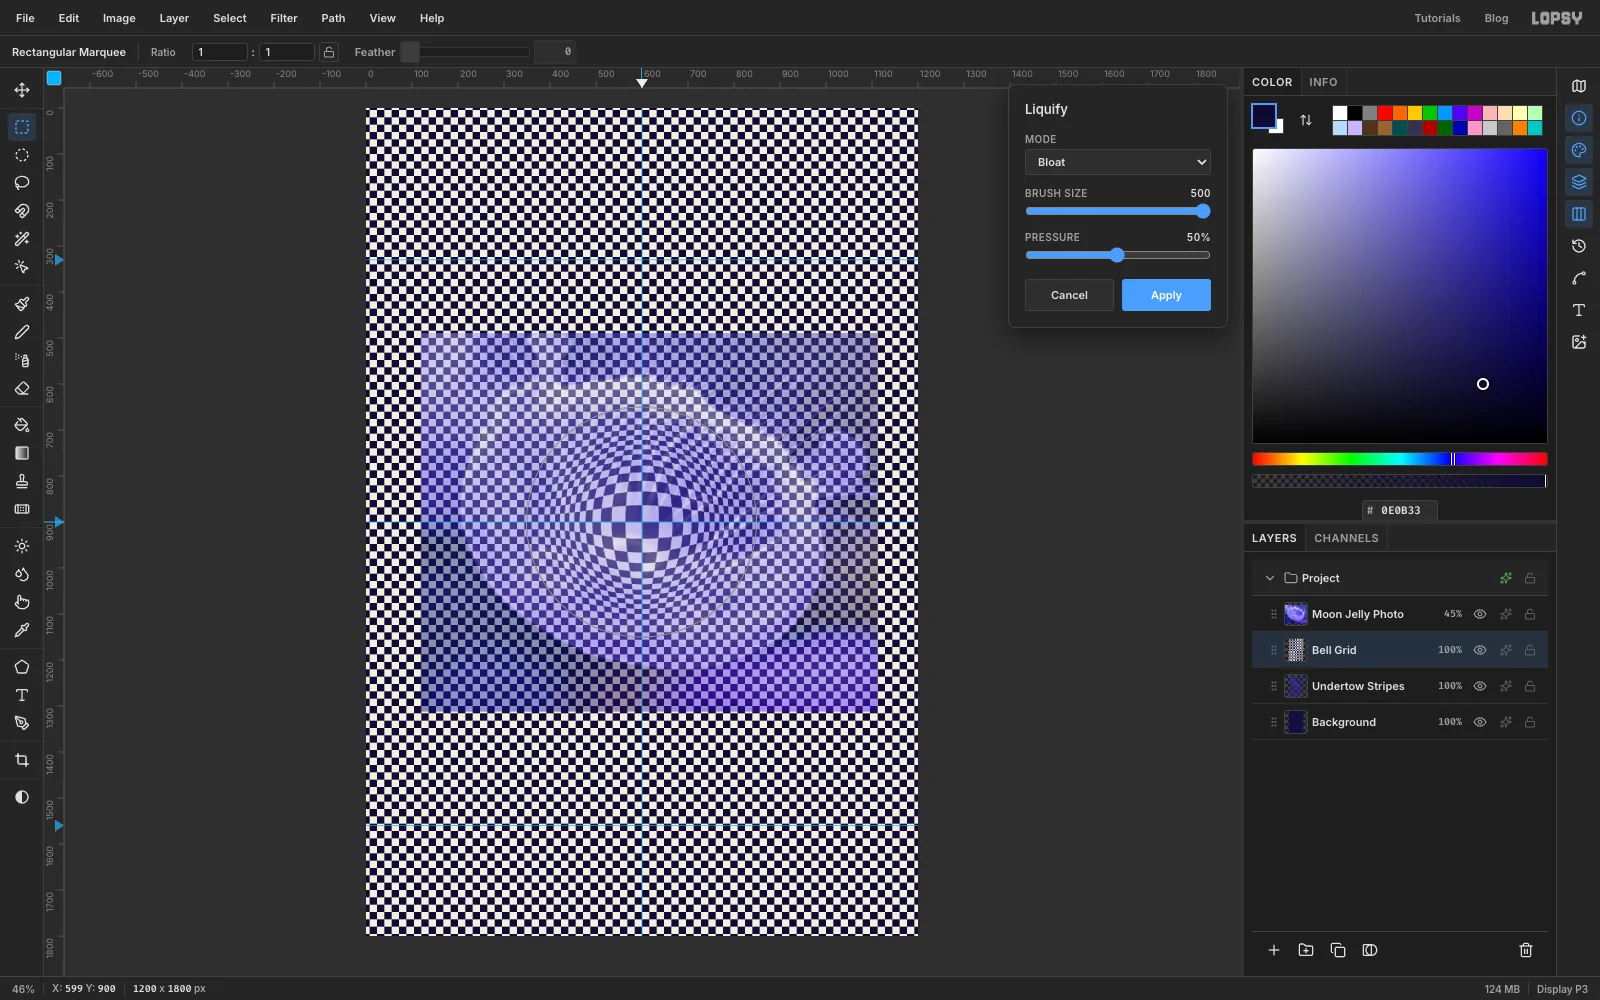
With Bell Grid selected, choose Filter → Liquify…. Set Mode to Bloat, Brush Size to 500 and Pressure to 50%.
Press the mouse button down where the guides cross and make tiny circles, a pixel or two across, while you watch the middle. Bloat adds a dab every time the pointer moves, so it works fast. Let go when the four middle squares are about three times their size. The squares near the brush's edge get squeezed smaller at the same time. If you overshoot, click Cancel and try again. Click Apply.
-
Keep only the dome
A Vega bulge has the biggest squares at the centre, getting steadily smaller toward the edge. Right at the edge of the Bloat brush the squares start to grow again. So keep only the inner part, where they're still shrinking.
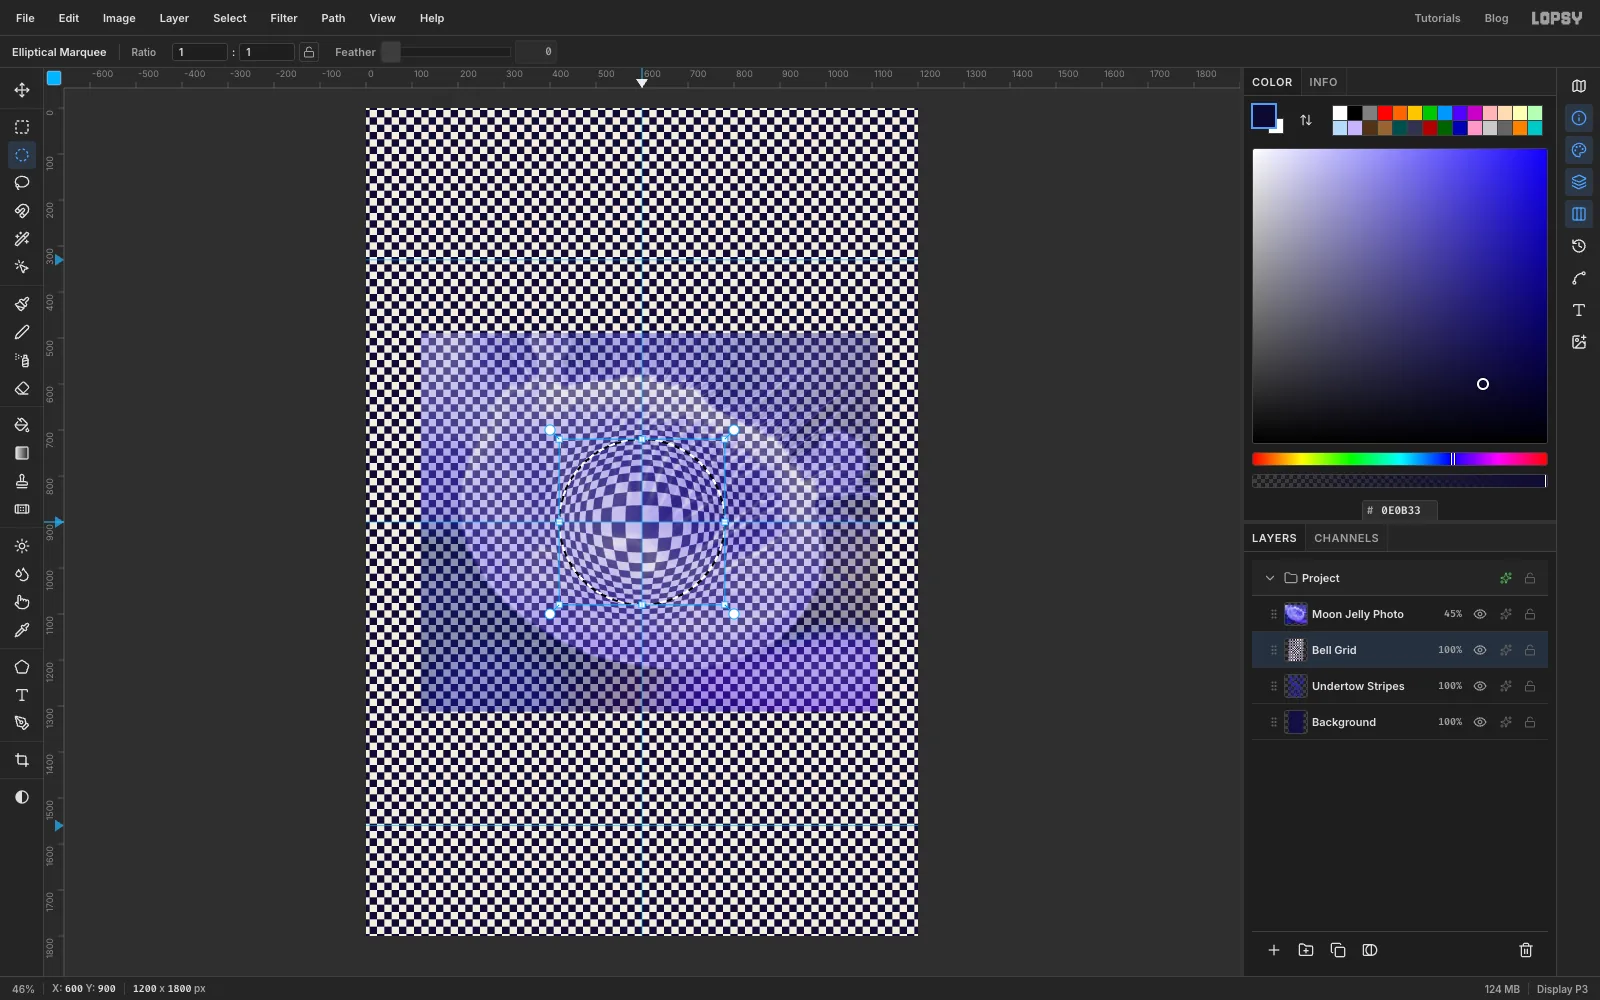
Pick the Elliptical Marquee, click once on the canvas, and enter From 420, 720 To 780, 1080. That's a circle with a radius of 180, centred on the guides. Choose Select → Inverse, press Delete and then Cmd+D. You're left with a small round dome.
-
Scale the dome up to bell size
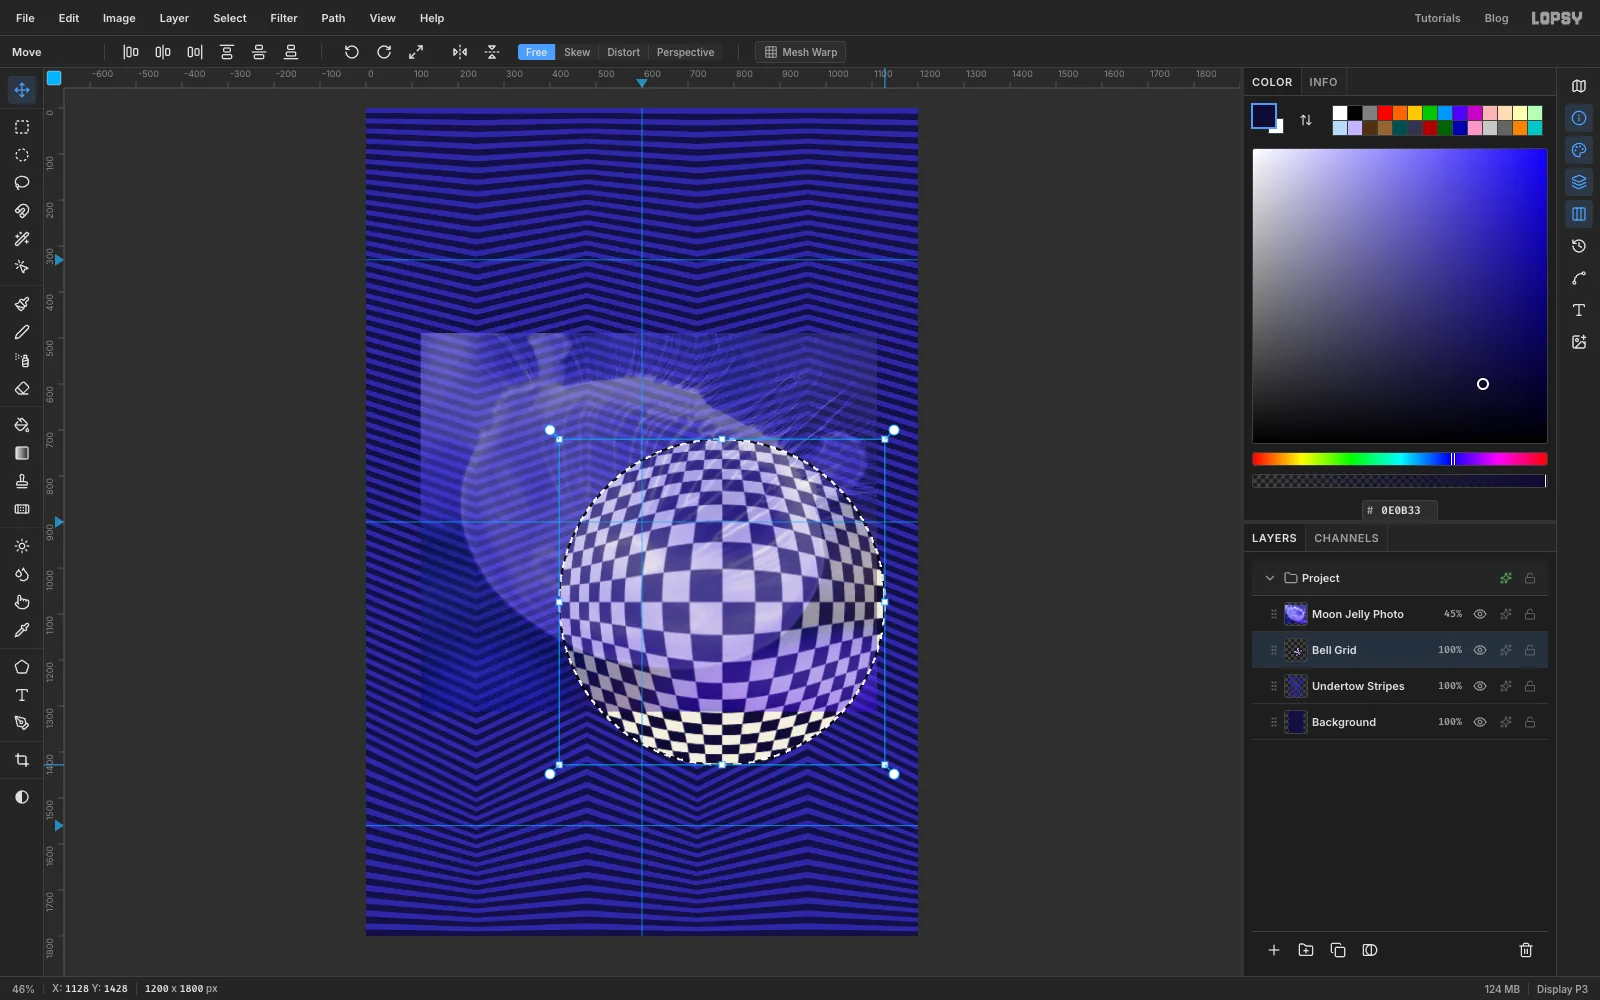
Cmd-click the Bell Grid thumbnail to select the dome. With the Move tool, hold Cmd and drag the bottom-right handle out until the dome is about 708 px across. That's about twice its size, and about the size of the photo's bell. Press Enter and Cmd+D.
Scaling from a corner moves the dome off centre. Drag it, or nudge it with the arrow keys, until it sits back on the guides' crossing.
-
Re-crisp the squares
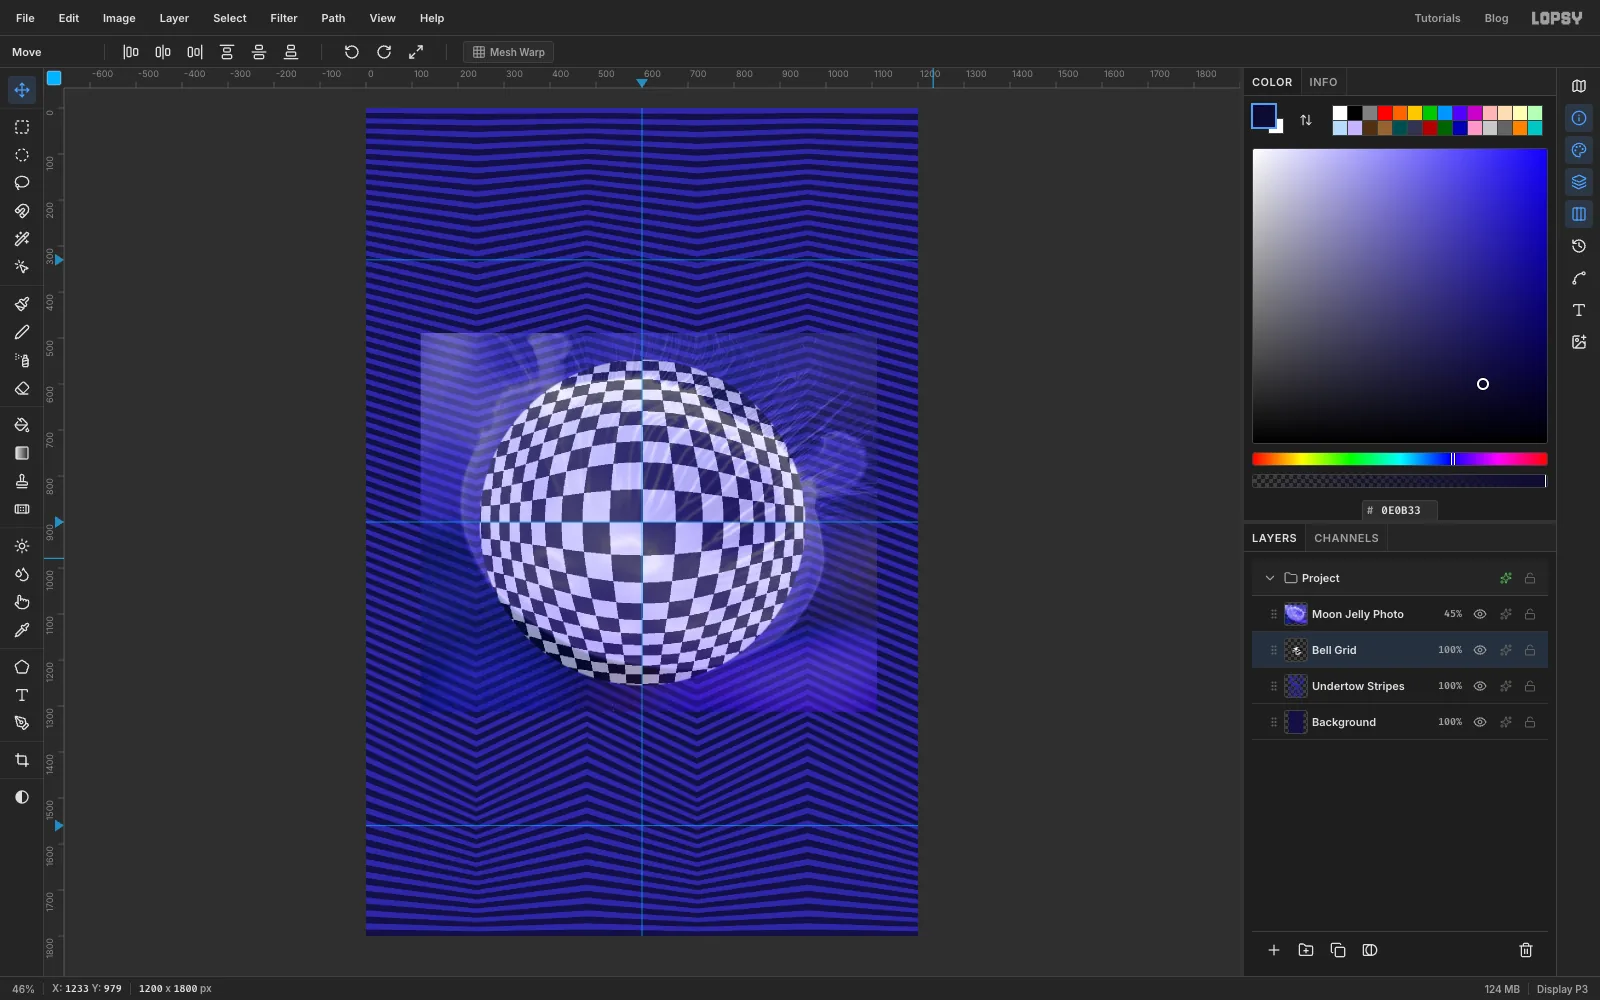
Doubling the size softens every square's edge. The dome only has two colours, so Filter → Threshold… at Level 128 snaps every pixel back to pure black or pure white. Then run Filter → Gaussian Blur… with Radius 1 to put back a hair of anti-aliasing, so the edges aren't stair-stepped.
(Threshold turns the cream squares pure white. That doesn't matter, because the next step colours them.)
-
Colour the bell with a glowing gradient
Click Add Layer and name the new layer Bell Colour. It lands right above Bell Grid. Cmd-click the Bell Grid thumbnail to load the dome as a selection.
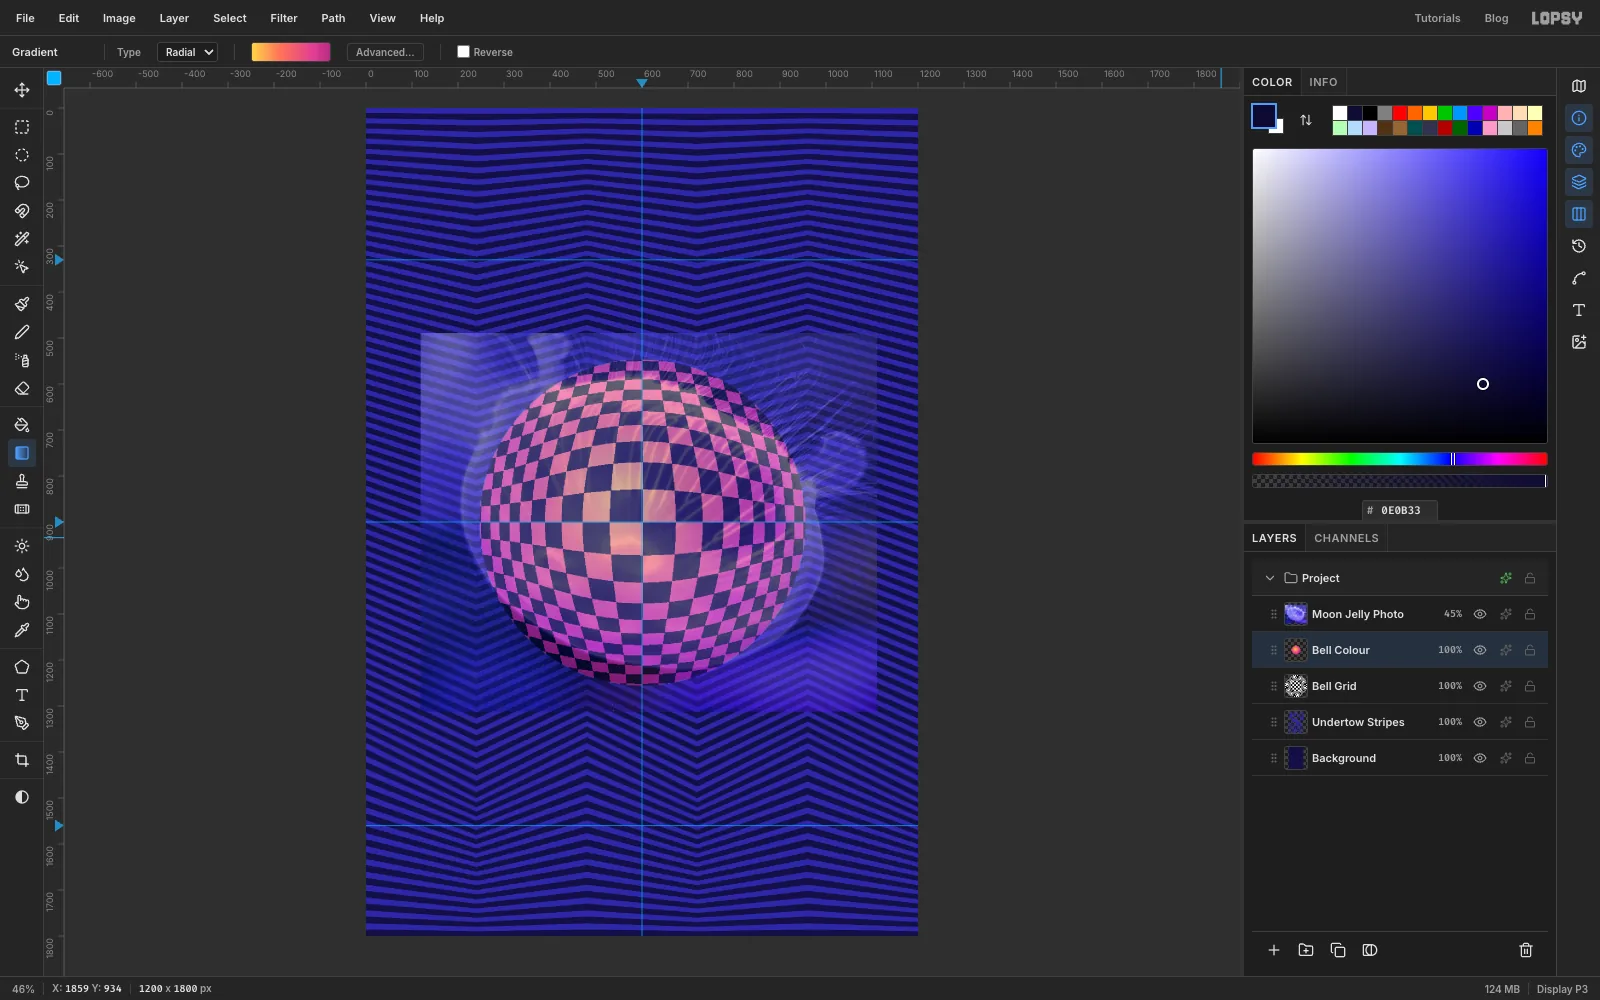
Pick the Gradient tool, set Type to Radial and click Advanced…. In the Gradient Editor, click the left stop handle and type lemon into the hex field, then click the right handle and type deep magenta . Click the bar at about 35% to add a stop there and make it coral , and click at about 80% for a magenta stop. Click Done.
Start the drag a little above and to the left of the centre, about 40 px left and 60 px up, and drag to just past the bell's right edge. The off-centre start makes the light look like it's falling on a sphere. Press Cmd+D.
Open the layer's effects (the sparkle button on its row) and set Blend to Multiply. White squares take the gradient's colour, and black squares stay black.
-
Add radial canals with Sunburst
The photo has done its job, so rename it Moon Jelly Reference and click its eye to hide it.
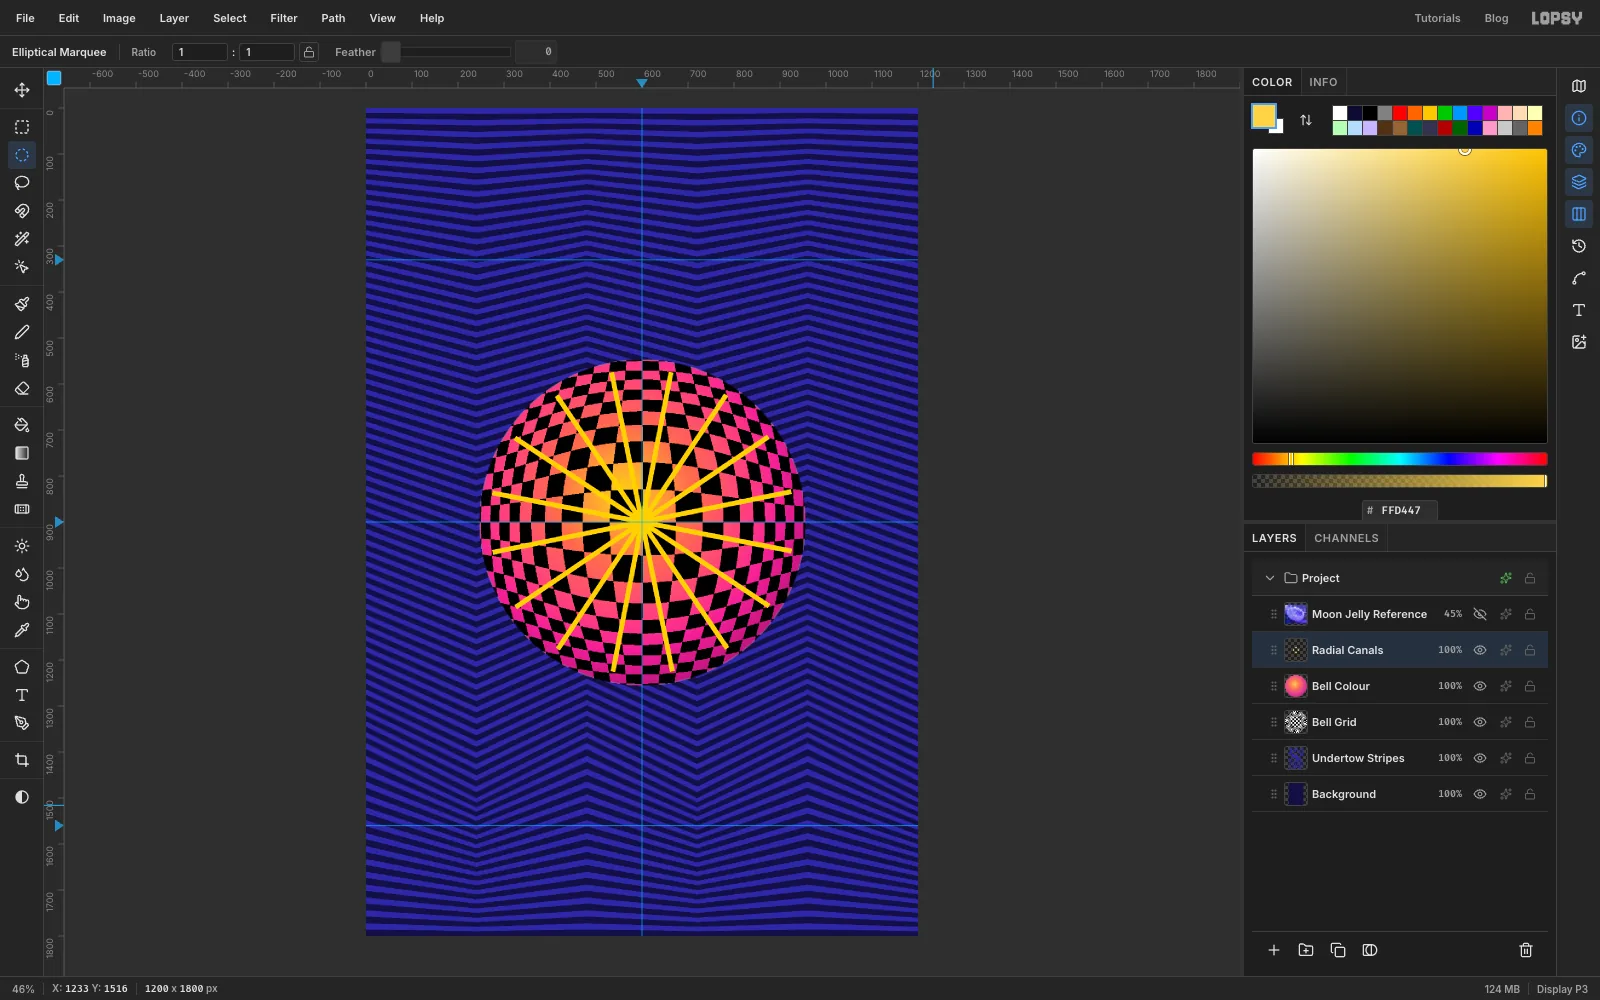
A moon jelly has thin canals running from its stomach out to the rim. Click Bell Colour and Add Layer, named Radial Canals. Make a circle marquee around the bell, From 246, 546 To 954, 1254, and choose Select → Shrink… by 22 so the canals stop short of the rim.
Set the foreground to lemon and choose Filter → Sunburst…. Use Rays 16, Width 5 (the lowest it goes), Taper 50 for straight-sided rays and Rotation 11. Leave the centre at 50 / 50, the middle of the page. Click Apply, then Cmd+D.
-
Thin the canals and clear the centre
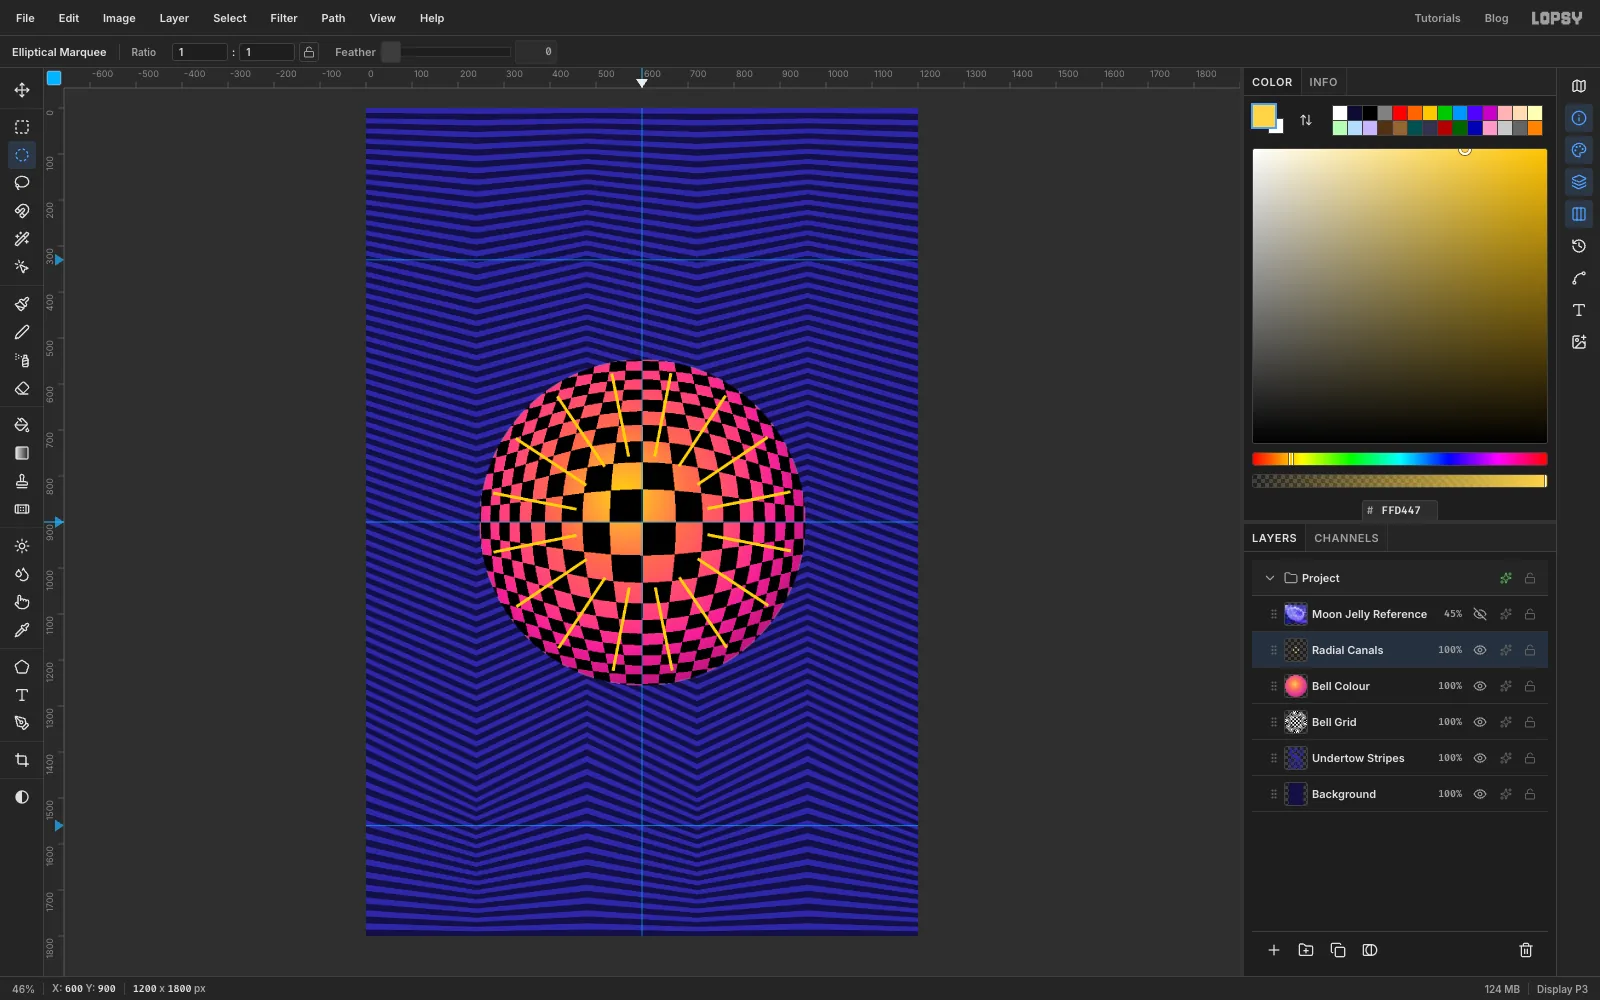
The rays come out about 10 px wide at the rim, which looks more like a sunburst than a jellyfish. To thin them, Cmd-click the Radial Canals thumbnail and choose Select → Shrink… by 2. Then choose Select → Inverse and press Delete. That shaves 2 px off each side of every ray. Press Cmd+D.
In a real moon jelly the canals start at the stomach, not the exact centre. Make a circle marquee From 455, 755 To 745, 1045 (radius 145), press Delete and Cmd+D. The canals now start just outside the big centre squares.
-
Ring the bell with halos
Op-art loves concentric rings, and they give the bell an outline. Click Undertow Stripes and Add Layer, named Halo Rings, so the rings sit under the bell.
Build the rings from the biggest one inward:
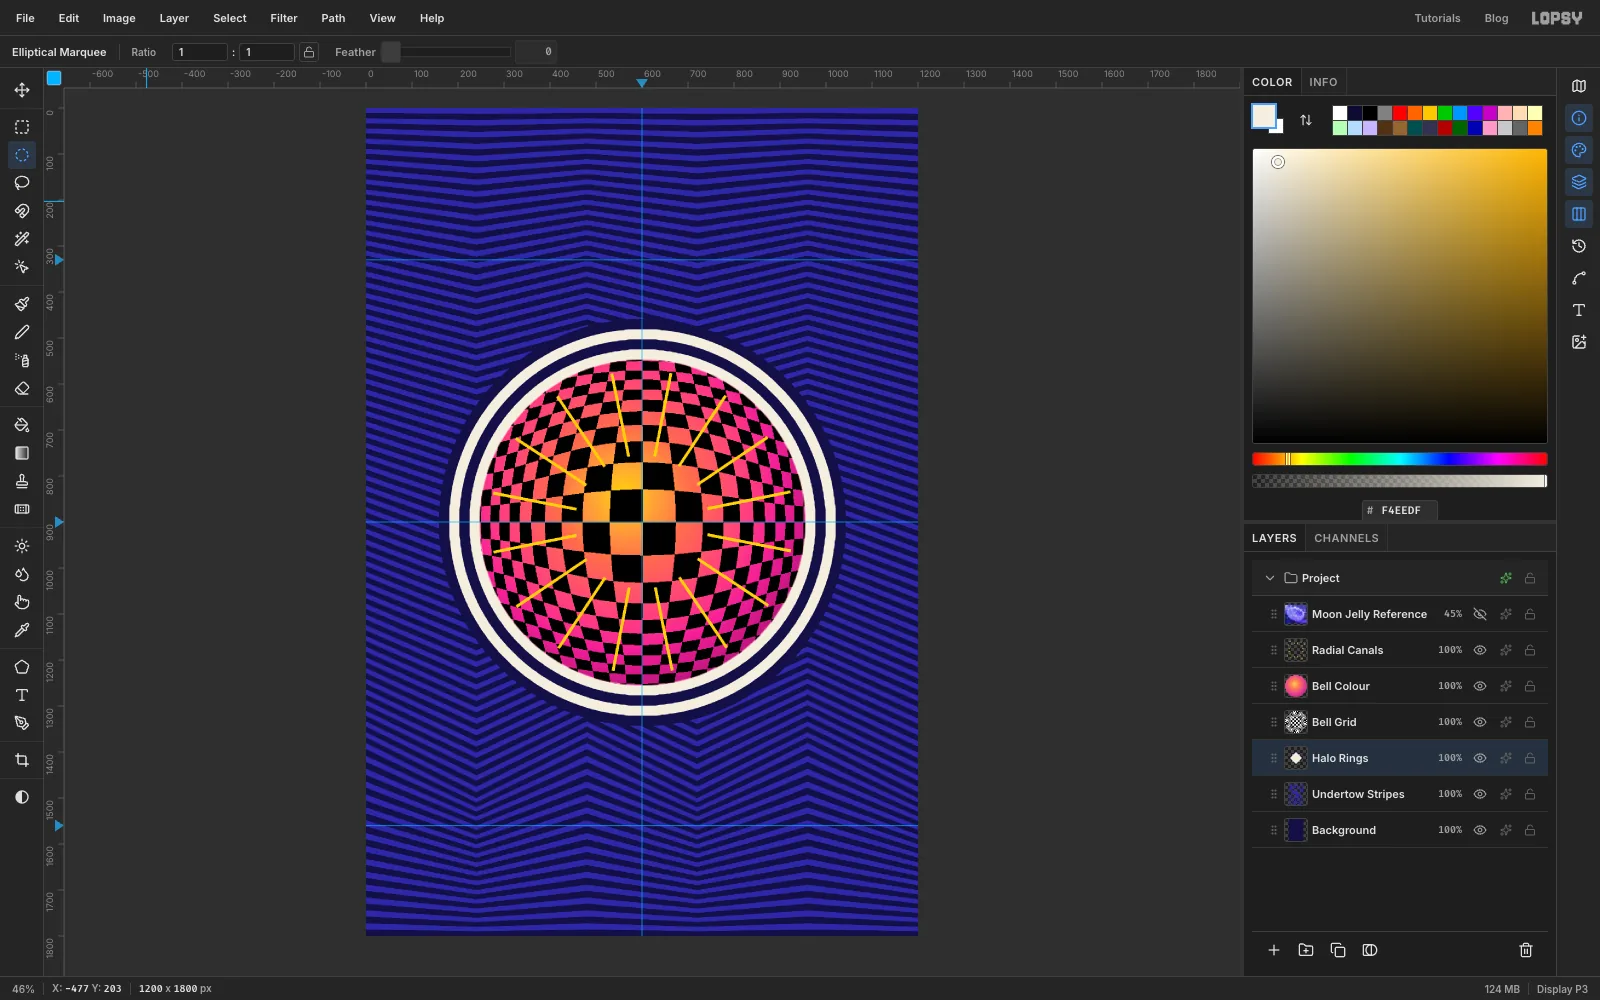
- Cmd-click the Bell Grid thumbnail, choose Select → Grow… by 88, set the foreground to navy and choose Edit → Fill.
- Cmd-click the thumbnail again, Grow by 66, and fill with cream .
- Again with Grow 44, filled navy.
- Finally Grow 22, filled cream.
Press Cmd+D. Each fill covers the middle of the one before, so you end up with two cream rings, each 22 px wide, separated by navy.
-
Draw the tentacles with the Pen
Click Halo Rings and Add Layer, named Tentacles. It goes above the rings and under the bell, so the tentacles look like they hang from the bell's rim.
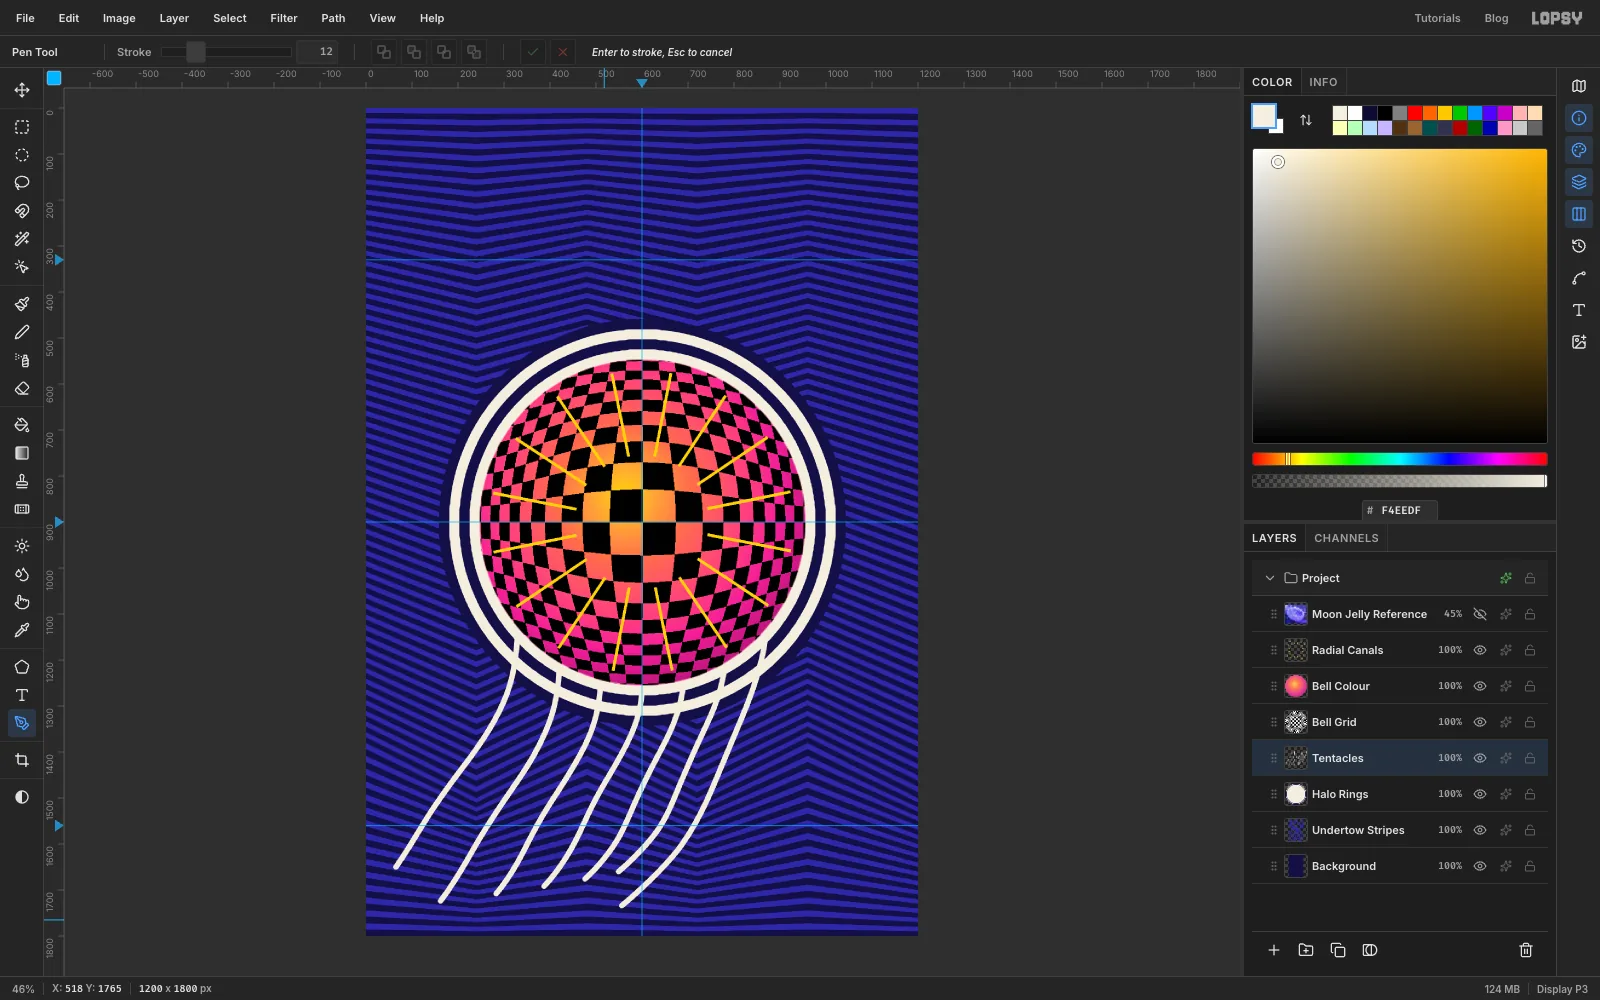
Pick the Pen tool (P), set Stroke to 12 in the options bar, and set the foreground to cream. For each tentacle:
- Start just inside the bottom of the bell, where the bell will hide the end.
- Click-and-drag downward to place five more points. Drag each one a little along the direction of the curve so it comes out smooth.
- Swing each point a little left and right to make a gentle S, and let the whole line drift left as it goes down. The bottom end should be about 200 px left of the top.
- End below the bottom guide. The cream band will cover the ends.
- Press Enter to stroke the path.
Draw seven of them, with their tops spread evenly across the underside of the bell, about 90 px apart, from about 270 px left of the centre guide to 270 px right of it. Give every one the same drift and nearly the same wave, so they flow side by side like a Riley line painting instead of crossing.
-
Outline the tentacles and add fine strands
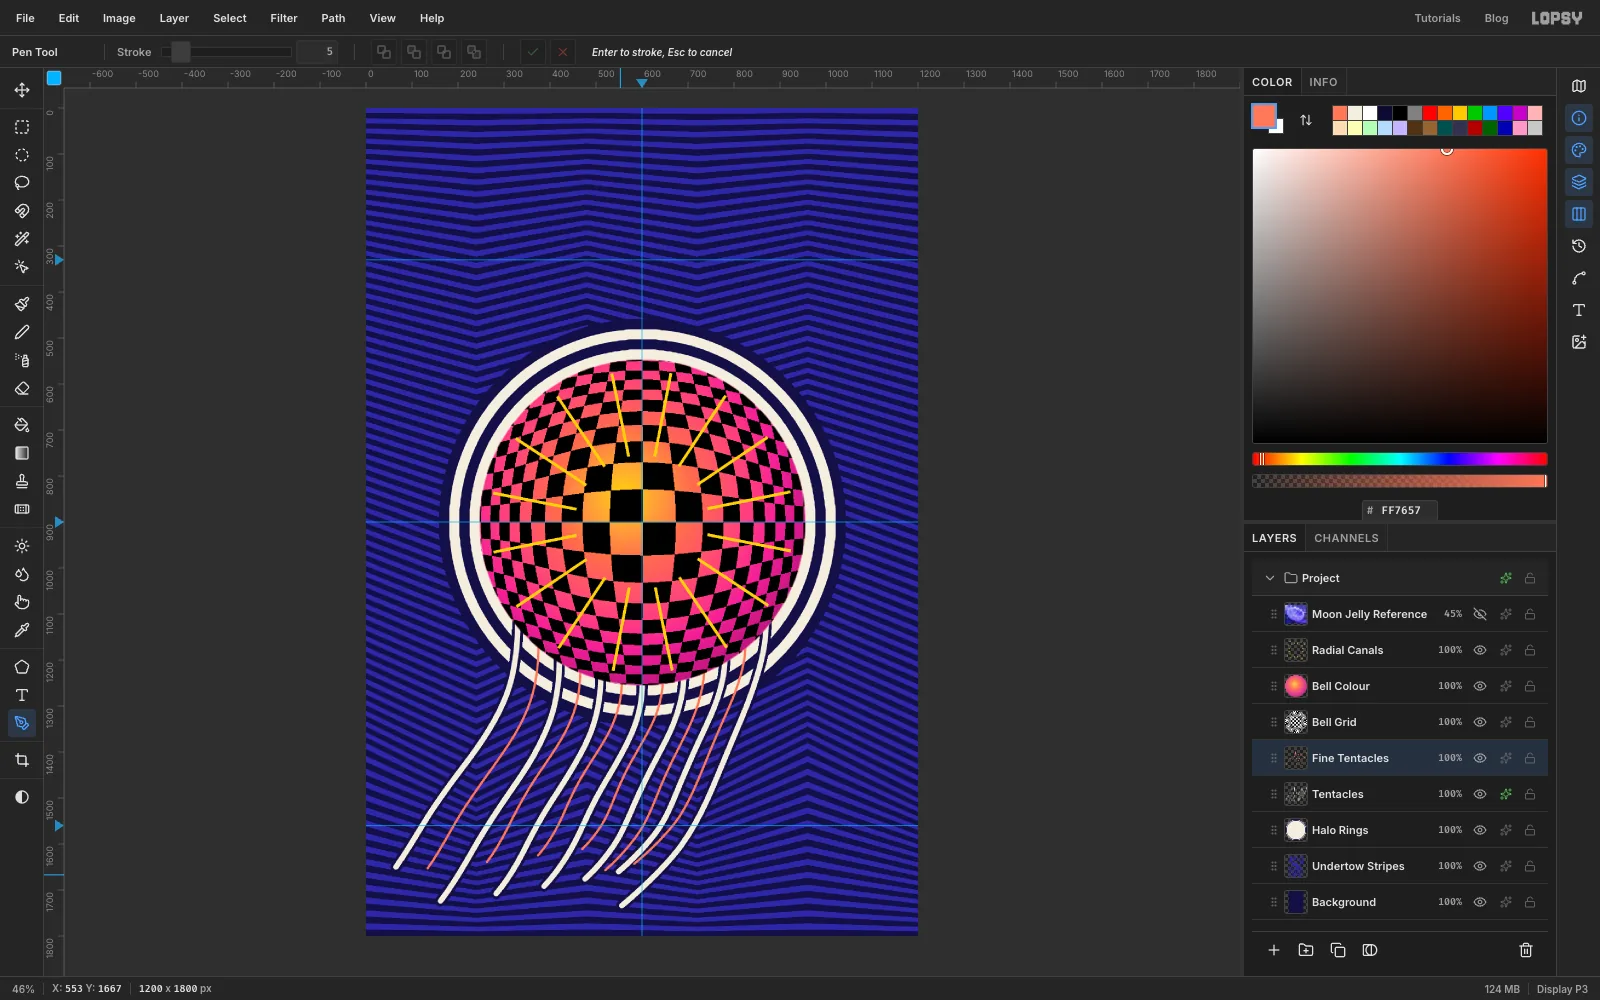
Where a cream tentacle crosses a cream ring, the two run together. Open the Tentacles layer's effects, turn on Stroke, and set it to navy with Width 6. Each tentacle now has a dark edge that keeps it separate.
Add Layer again, named Fine Tentacles. Set the Pen's Stroke to 5 and the foreground to coral . Draw six thinner strands the same way, one between each pair of cream tentacles, ending a little higher, just below the bottom guide.
-
Draw the four gonads with radial symmetry
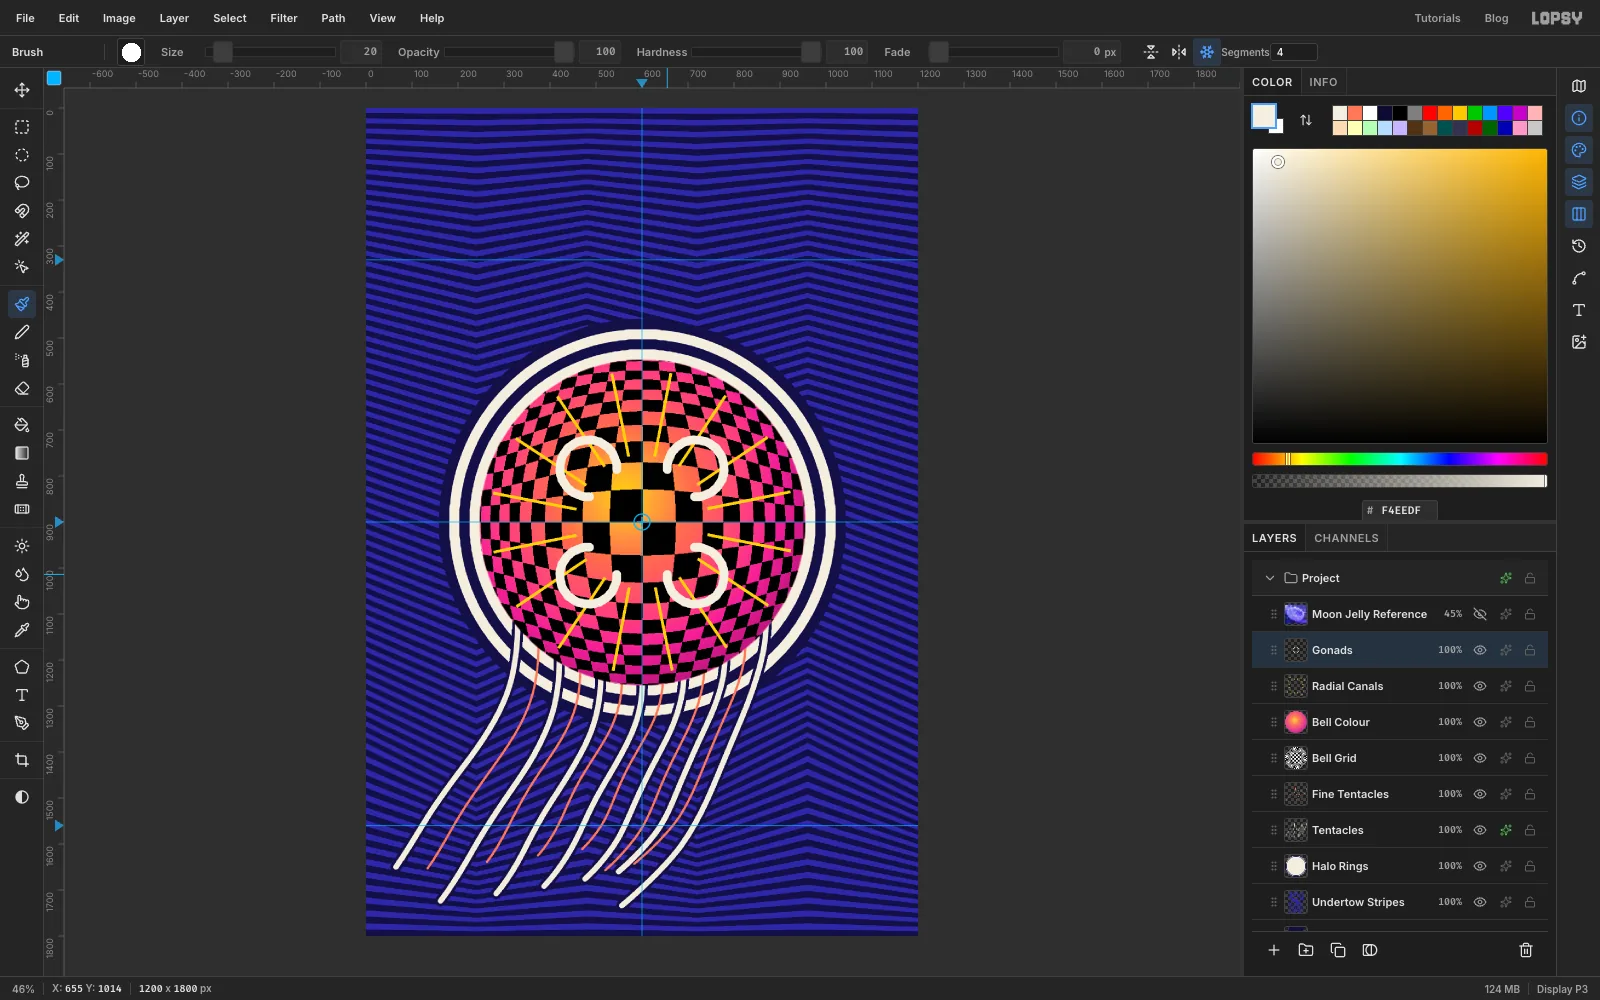
A moon jelly has four horseshoe-shaped gonads around its stomach. Turn the reference photo's eye back on for a moment to see them, then hide it again. Click Radial Canals and Add Layer, named Gonads.
Pick the Brush (B), set Size 20 and Hardness 100, and set the foreground to cream. Click the snowflake Radial Symmetry button in the options bar and set Segments to 4. The symmetry centre starts at the middle of the page, which is the middle of the bell.
Draw one horseshoe: a round C about 125 px across, out on the diagonal toward the lower right, about 165 px from the middle of the bell, with its open side facing the centre. Put it halfway between two canals. The other three appear at the same time, a quarter turn apart. Turn Radial Symmetry off again.
Give the layer a navy Stroke effect, Width 3, so the horseshoes read on both the pink and the black squares.
-
Clear the canals around the gonads
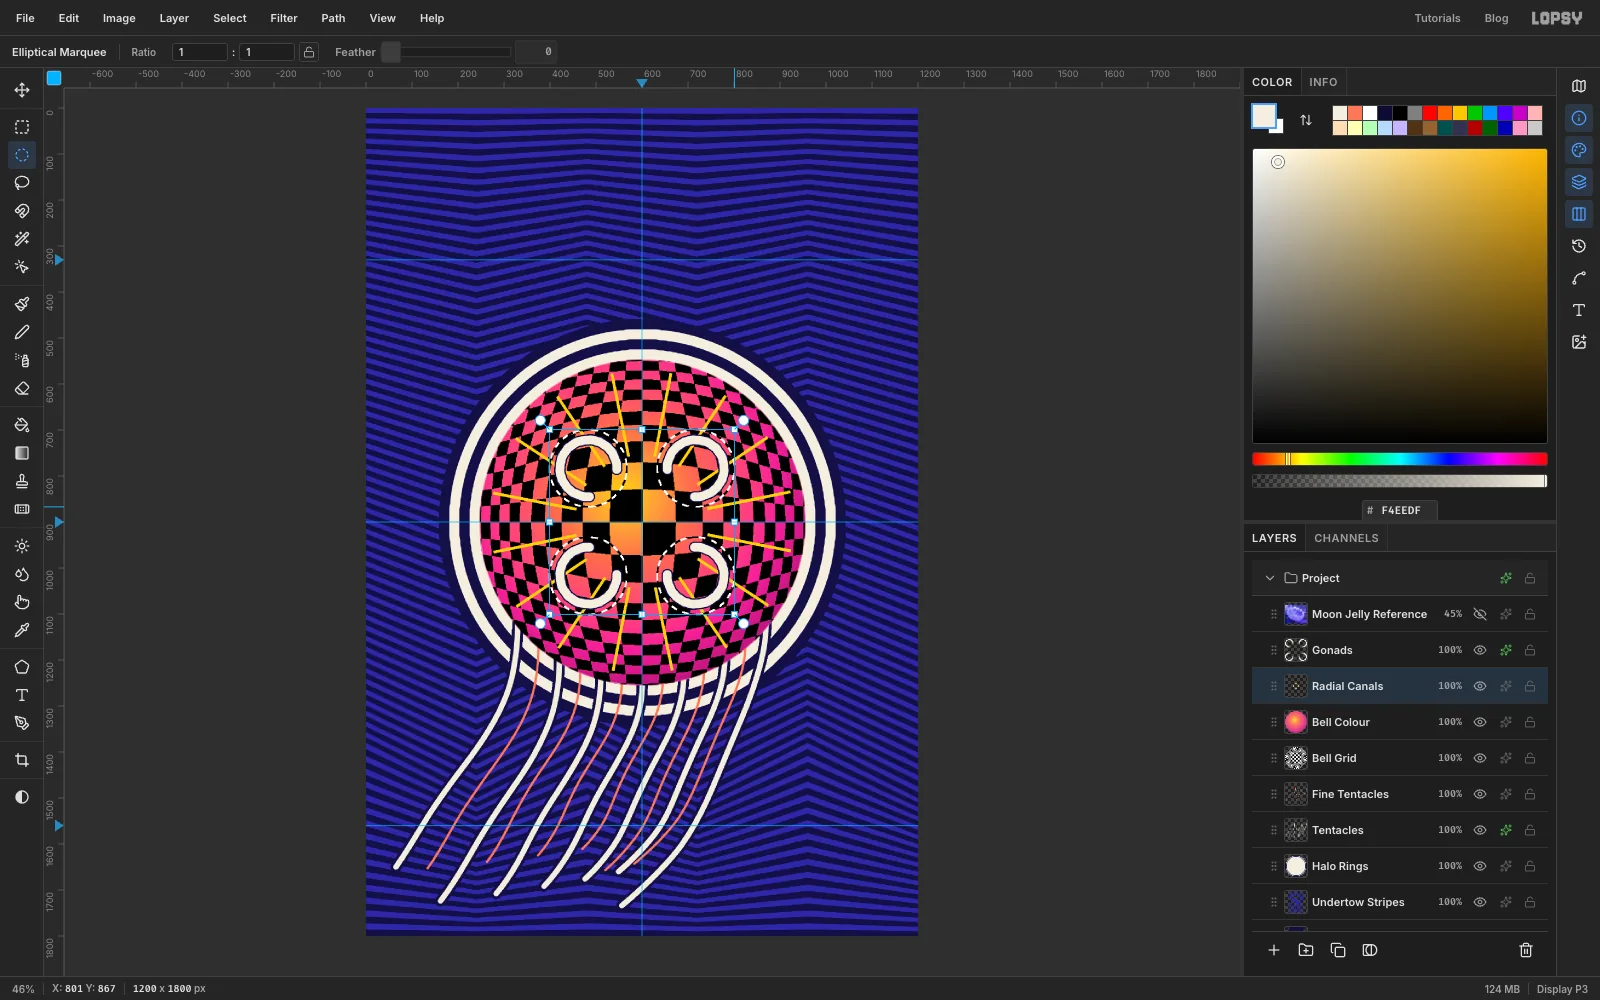
Where canals run through the horseshoes, they tangle into a mess. Click Radial Canals. With the Elliptical Marquee, hold Cmd (which keeps it a circle) and drag a circle about 168 px across around the first horseshoe. Then hold Cmd+Shift and drag a circle around each of the other three to add them to the selection.
Press Delete and Cmd+D. The canals now stop short of each gonad, and the horseshoes sit on clean checkerboard.
-
Copy the whole jellyfish
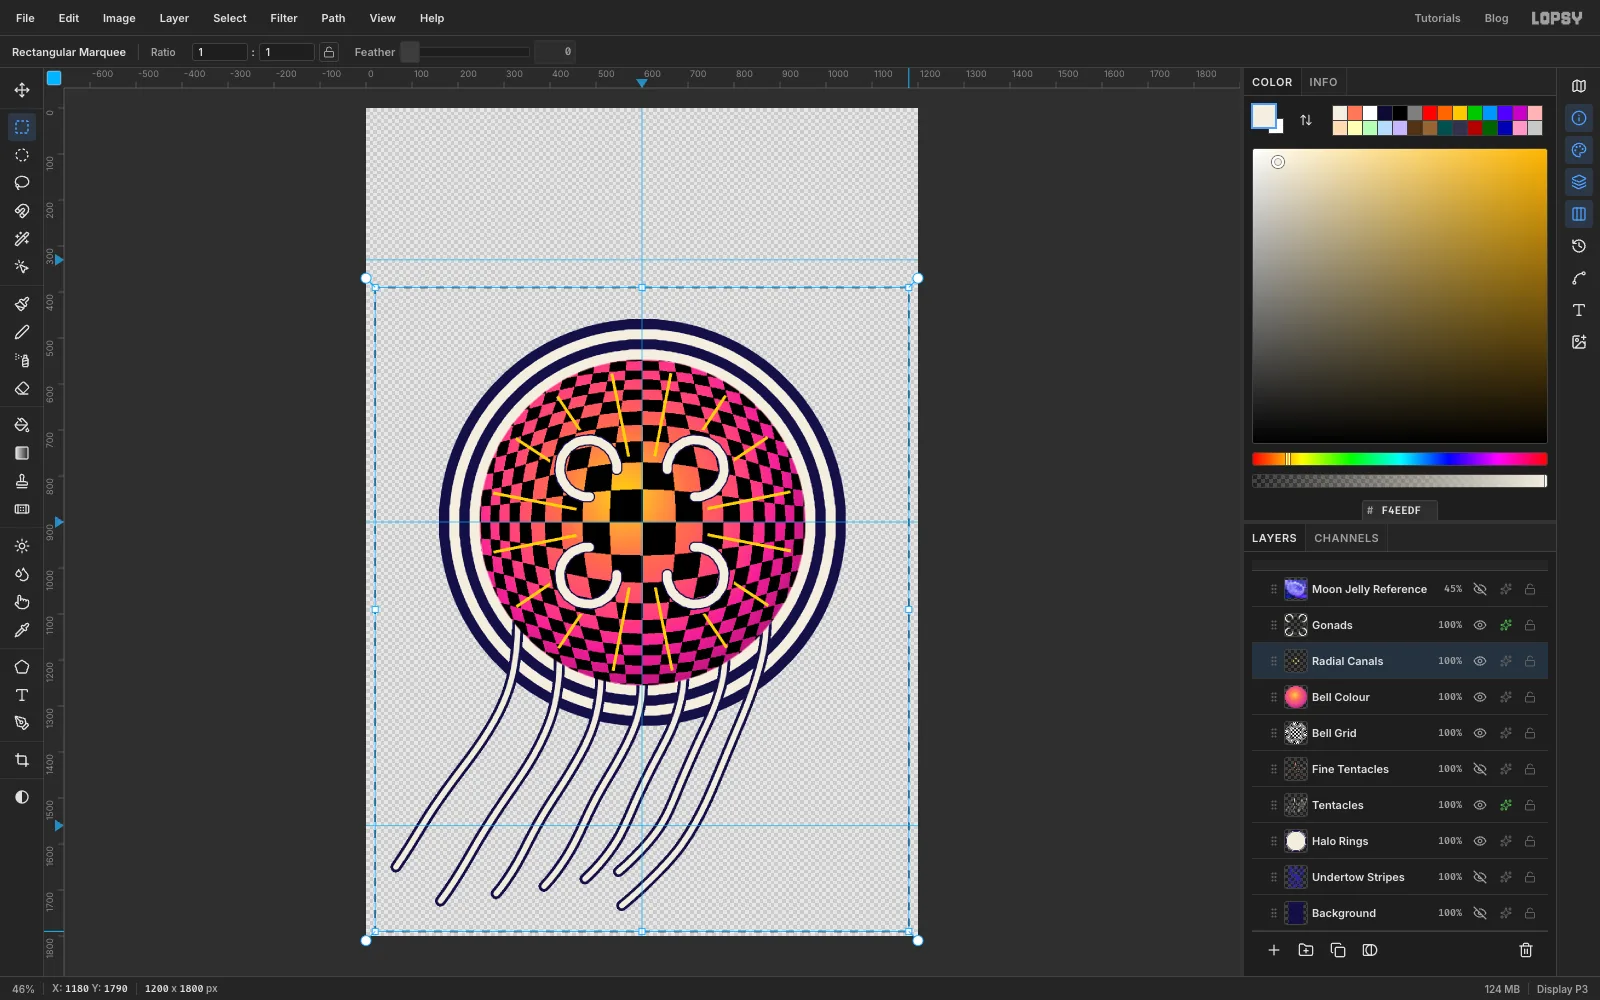
Small copies of the jellyfish, drifting off in the current, will add depth. To copy the jellyfish without its background, hide Background, Undertow Stripes and Fine Tentacles by clicking their eyes. The coral strands are too thin to survive being shrunk, so leave them out.
Draw a rectangular marquee around the whole jellyfish, from just below the top guide to near the bottom of the page. Choose Edit → Copy Merged. That copies what you see, all visible layers flattened together. Press Cmd+D and turn the three layers back on.
-
Shrink and turn the first copy
Click Undertow Stripes so the copy lands behind the big jellyfish, then choose Edit → Paste. The copy lands in exactly the place it came from, hidden behind the original, so you won't see anything change yet. Rename the new layer Juvenile.
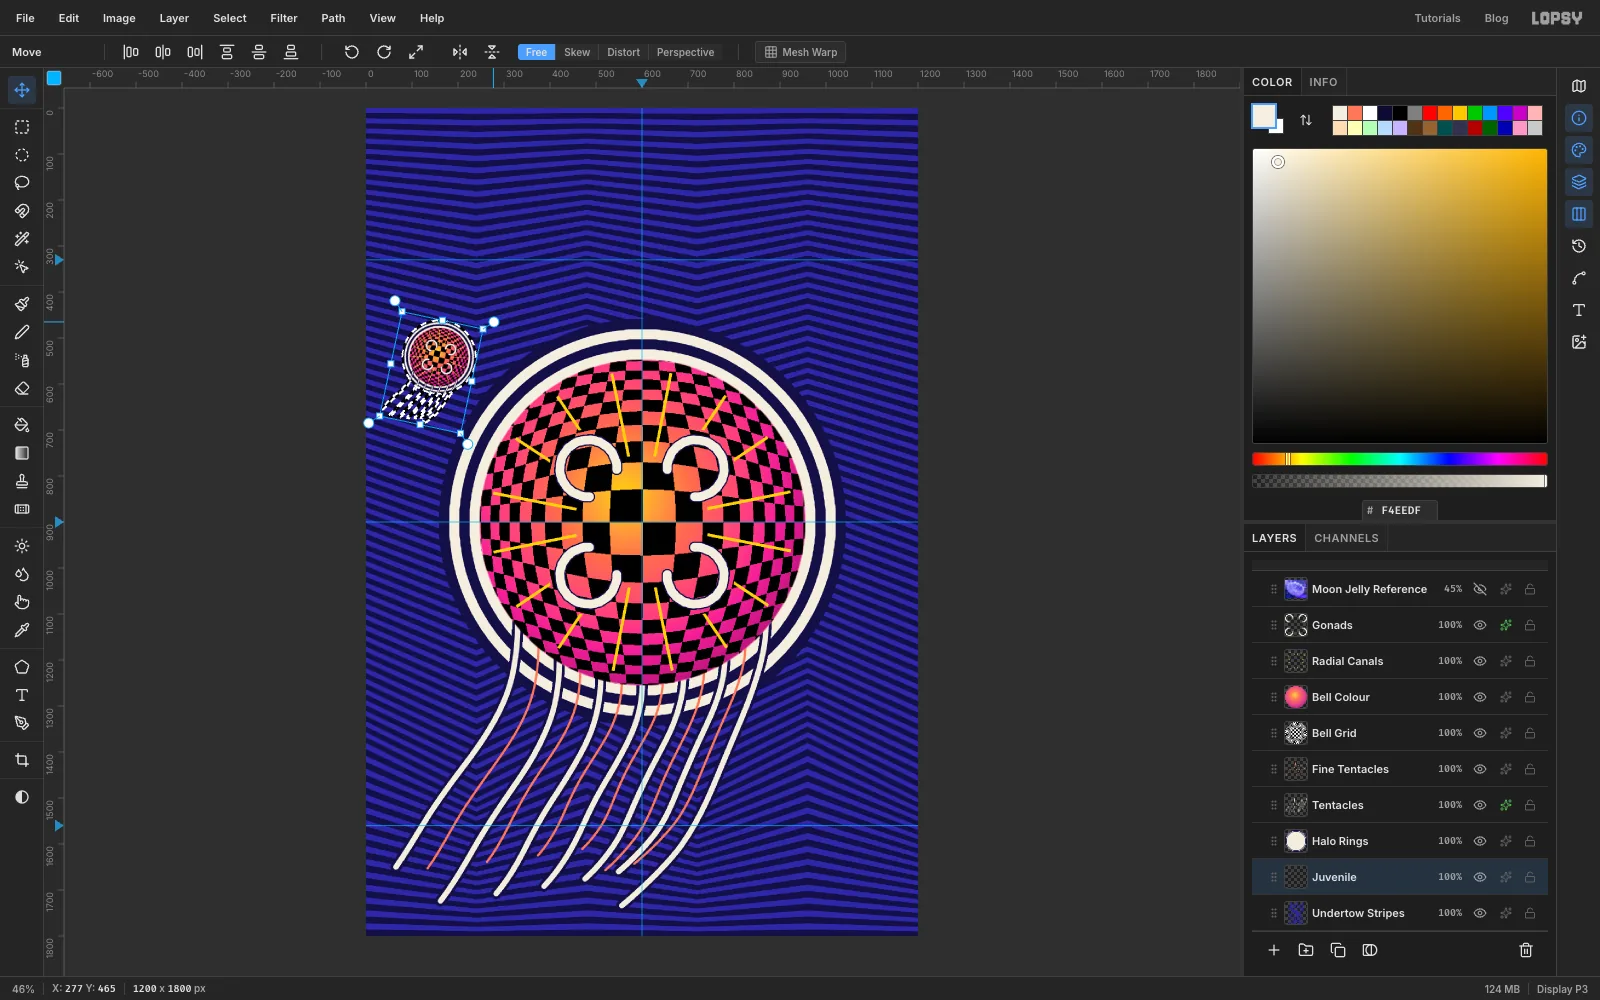
Cmd-click its thumbnail to show its handles. With the Move tool, hold Cmd and drag the bottom-right handle inward and up until the copy is about 18% of its size, around 180 px wide. It shrinks toward the top-left corner and peeks out from behind the big rings. Press Enter, then Cmd+D.
Cmd-click the thumbnail again and drag the rotation handle (just outside the top-right corner) a little clockwise, to about the tilt in the screenshot, so the juvenile looks like it's swimming against the current. Press Enter, then Cmd+D.
-
Set the juveniles adrift
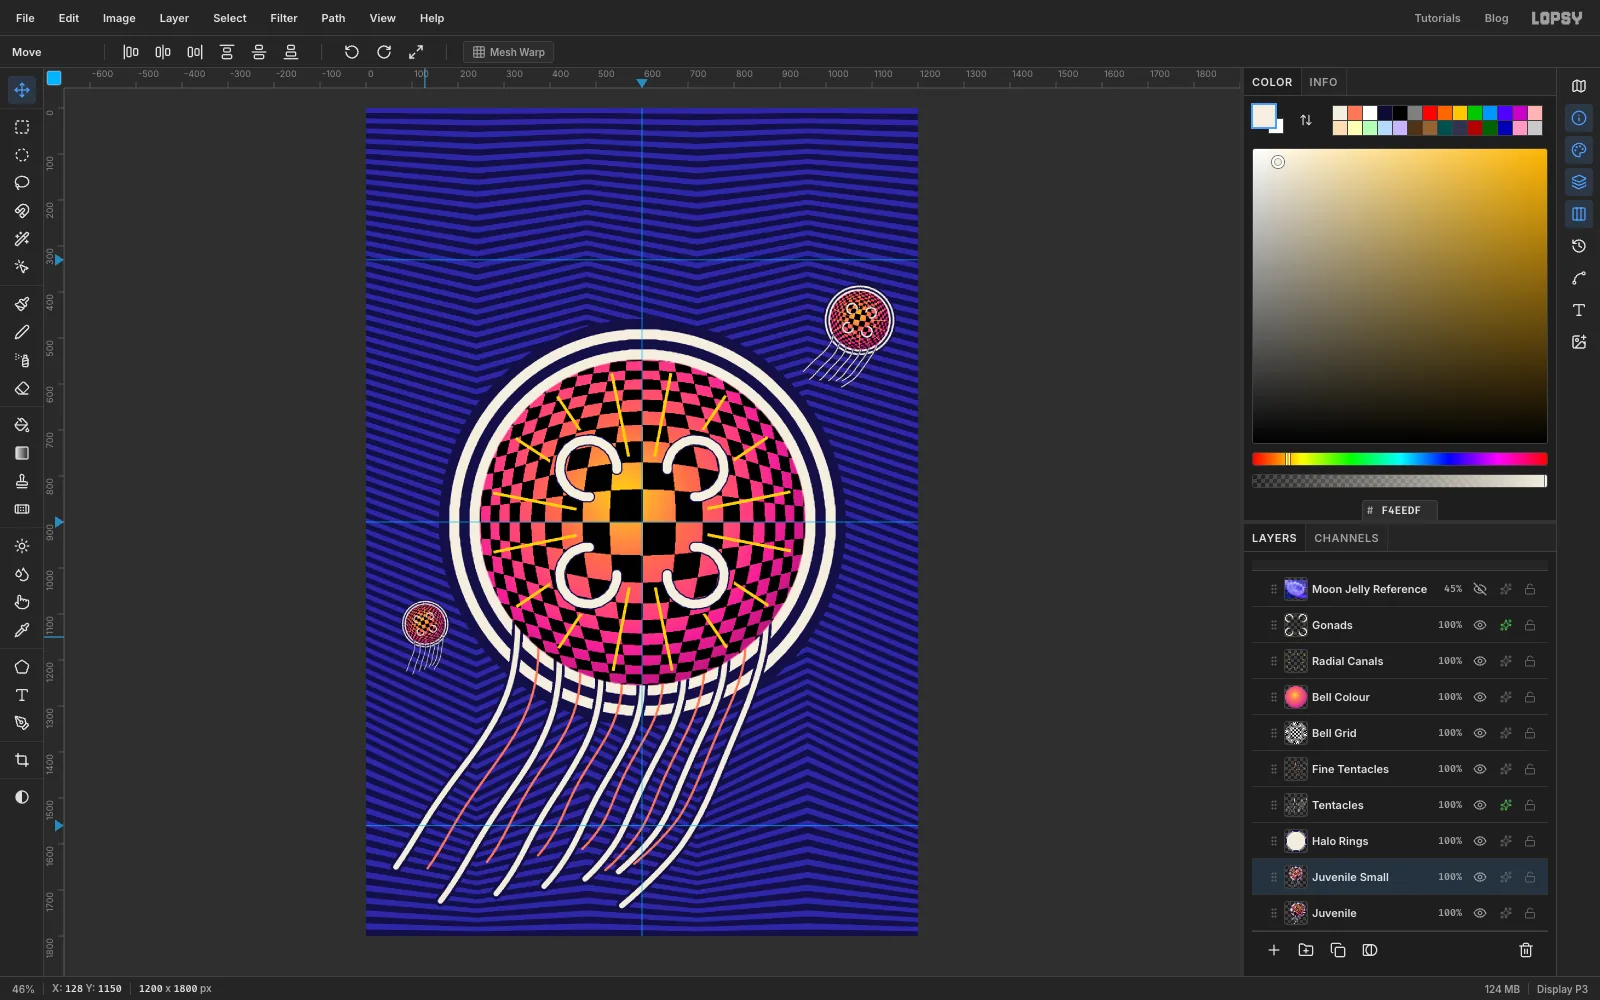
Drag the Juvenile into the open water at the upper right. Keep it about 50 px from the right edge and the top guide, and clear of the big jellyfish's outer ring.
Choose Edit → Paste again for a second copy and rename it Juvenile Small. Shrink it the same way to about 12%, turn it a little anticlockwise, and drag it to the left side, level with the bottom of the bell. Give it the same 50 px or more of space from the edge.
-
Lay down the cream bands
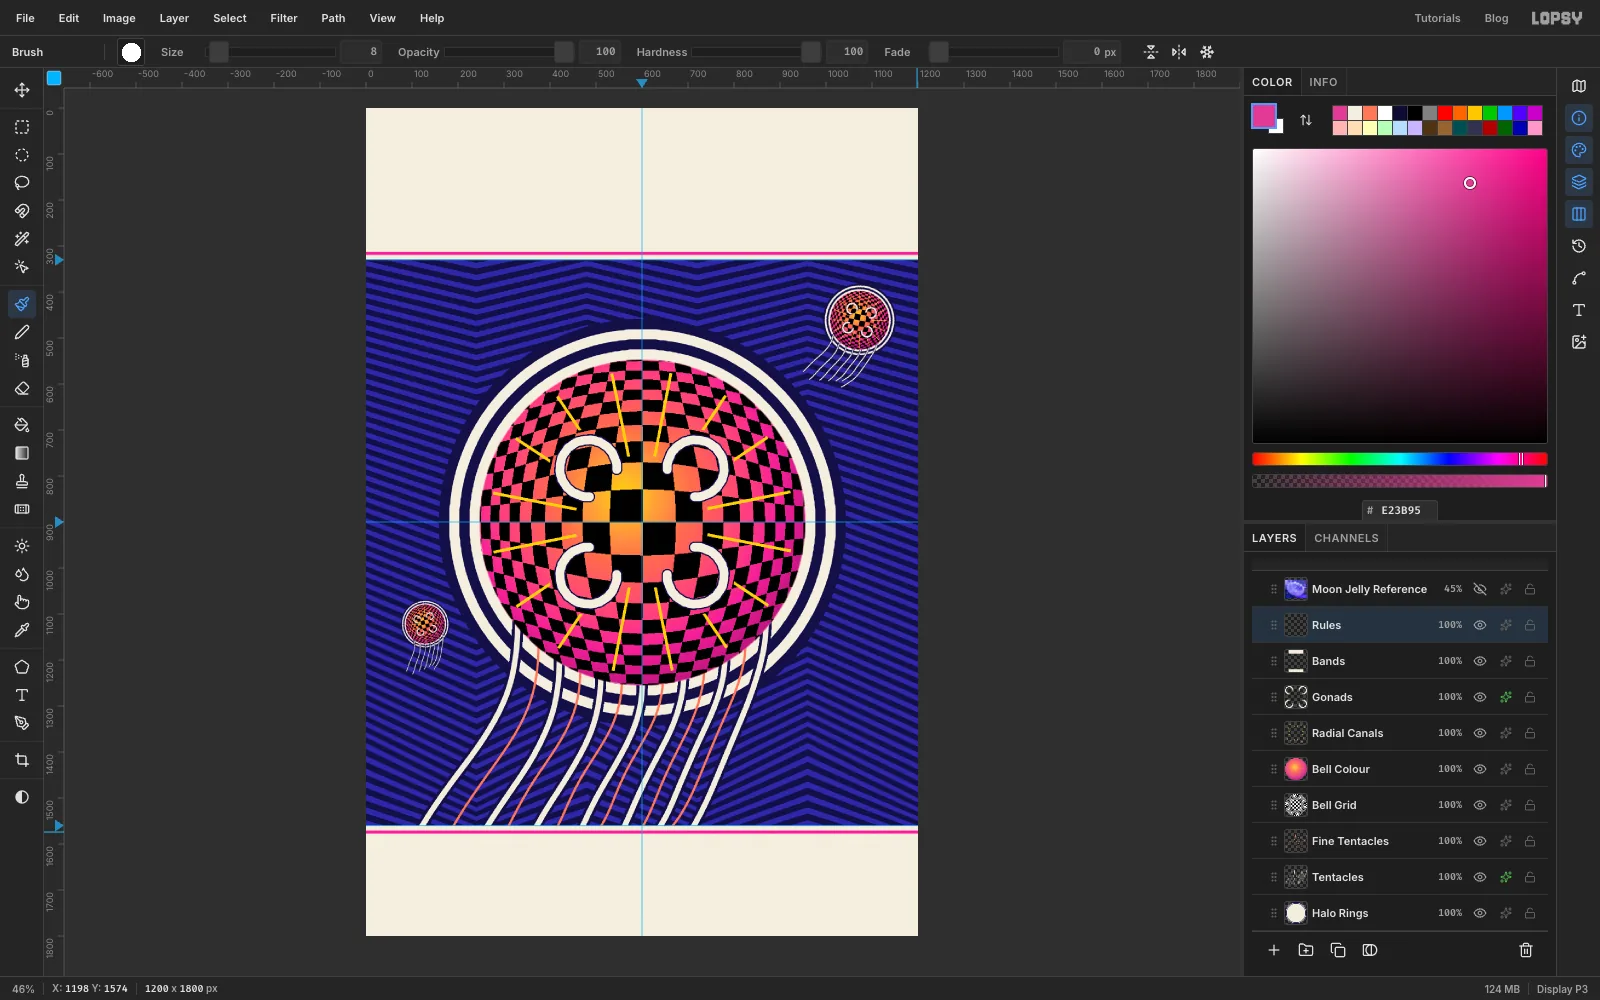
Click Gonads, the top layer of the jellyfish, and Add Layer, named Bands. Set the foreground to cream. Drag a rectangular marquee from above the top-left corner of the page down to the 330 guide (it snaps), and choose Edit → Fill. Do the same from the 1560 guide to below the bottom of the page.
Add Layer again, named Rules. Pick the Brush with Size 8 and set the foreground to magenta . Click at the left edge of the page about 14 px above the 330 guide, hold Shift and click at the right edge for a straight line. Draw the same line about 14 px below the 1560 guide, just inside the bottom band.
-
Set the title
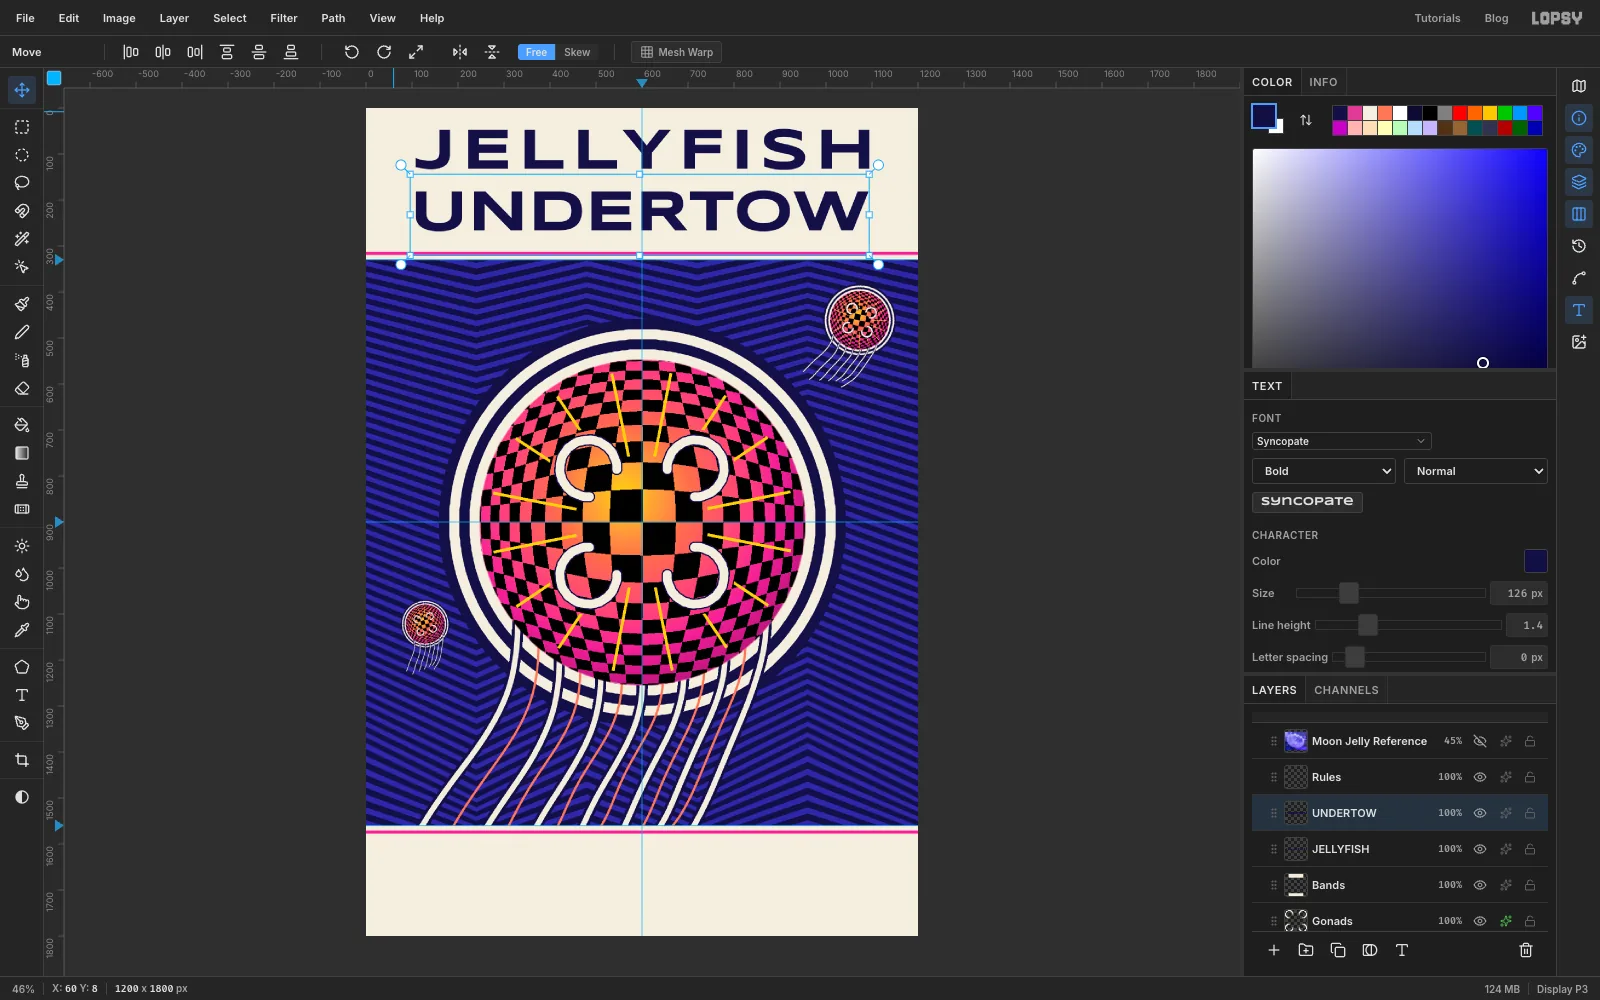
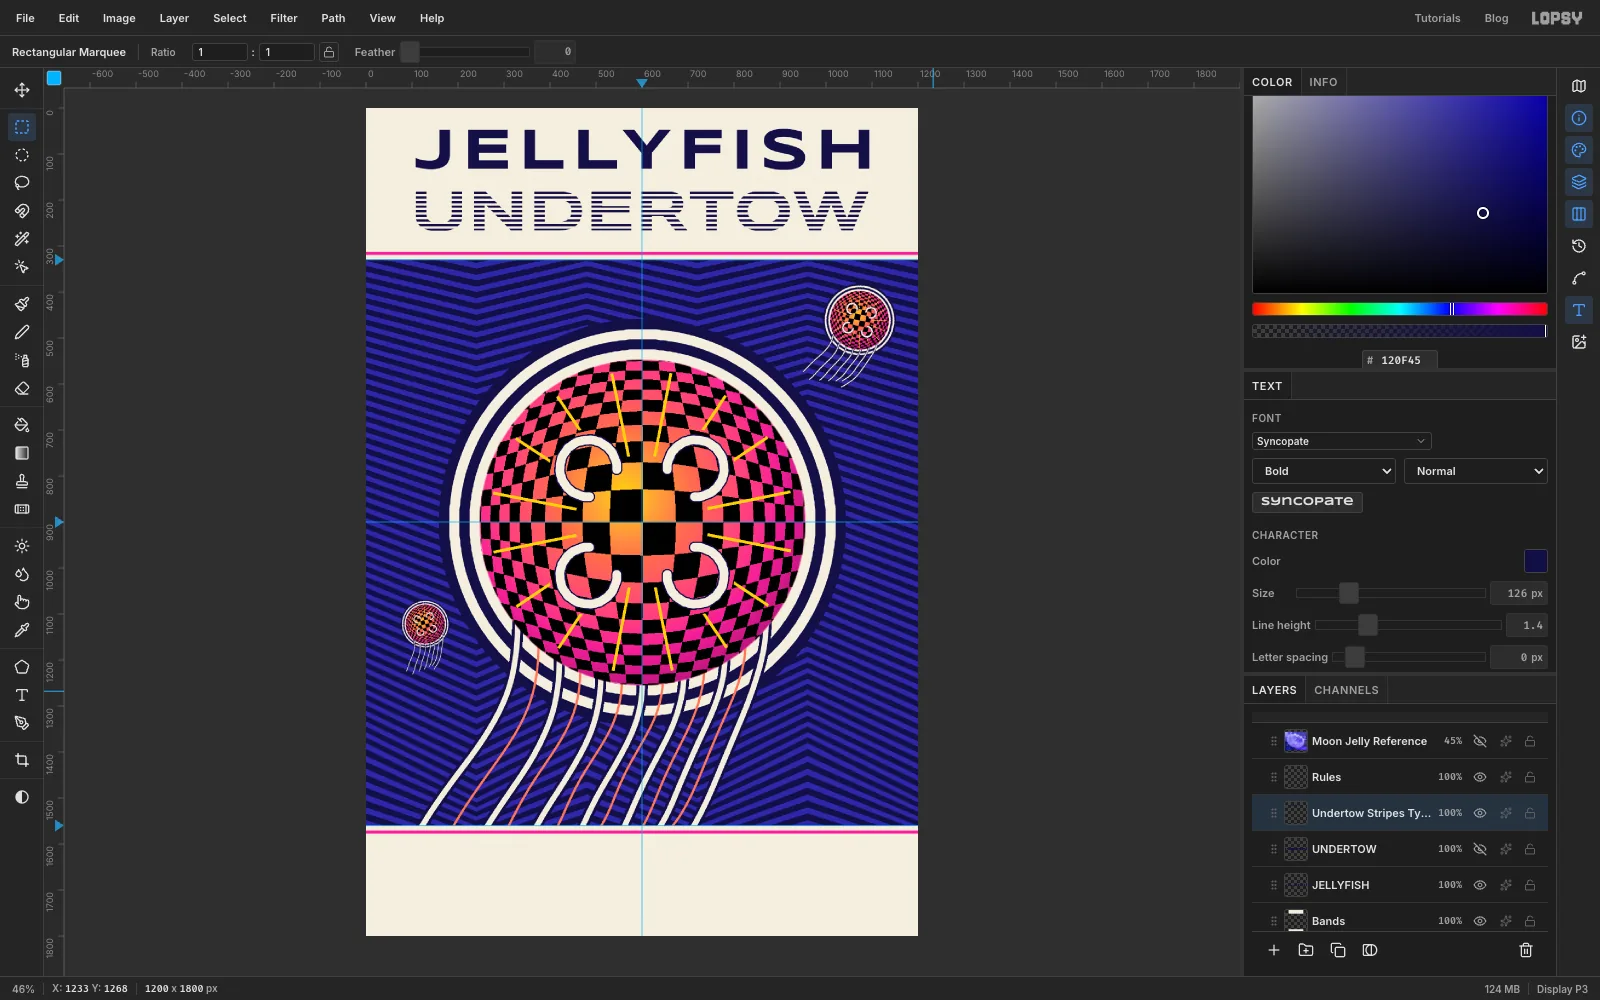
Click Bands. Changing the font, size or colour while a text layer is active restyles that layer, so always pick a plain layer before you set up new type. Pick the Text tool (T), choose Syncopate, Bold, size 126, colour navy.
Set the bottom line first. A click inside an existing line of text edits that line, so work upward. Click in the lower half of the top band, type UNDERTOW and press Tab. Click Bands again, click near the very top of the page, type JELLYFISH and press Tab.
JELLYFISH is narrower than UNDERTOW. Select it and set Letter spacing to 14 in the Text panel, so the two lines come out the same width.
Drag each line onto the centre guide with the Move tool. Put the top of JELLYFISH about 45 px below the top edge, and the top of UNDERTOW at about y 179. That leaves an even gap above, between and below the lines.
-
Fill UNDERTOW with stripes
Op-art type is often made of lines. Make one more pattern, a 40 × 10 tile with a 5 px navy bar at the top:
- Click Bands, Add Layer and name it Stripe Tile. Set the foreground to navy.
- Click the Rectangular Marquee once, enter From 0, 0 To 40, 5 and choose Edit → Fill. Press Cmd+D.
- Click again, enter From 0, 0 To 40, 10 and choose Edit → Define Pattern. Press Cmd+D and delete the tile layer.
Click UNDERTOW, Add Layer and name it Undertow Stripes Type. Cmd-click the UNDERTOW thumbnail to select the letters. Choose Edit → Fill with Pattern… with the new tile.
The pattern tiles from the top of the page, so set Vertical Offset so a bar starts exactly on the flat tops of the letters. Hover over the top of the U and read the Y in the status bar: here it's 182. (The round O pokes up a few pixels higher, which is why the line looked like it started at 179.) 182 is 2 px past a multiple of 10, and 2 px is 20% of the 10 px tile, so set Vertical Offset to 20. Click Apply, press Cmd+D, and hide the UNDERTOW text layer.
-
Set the author, the tagline and the first label
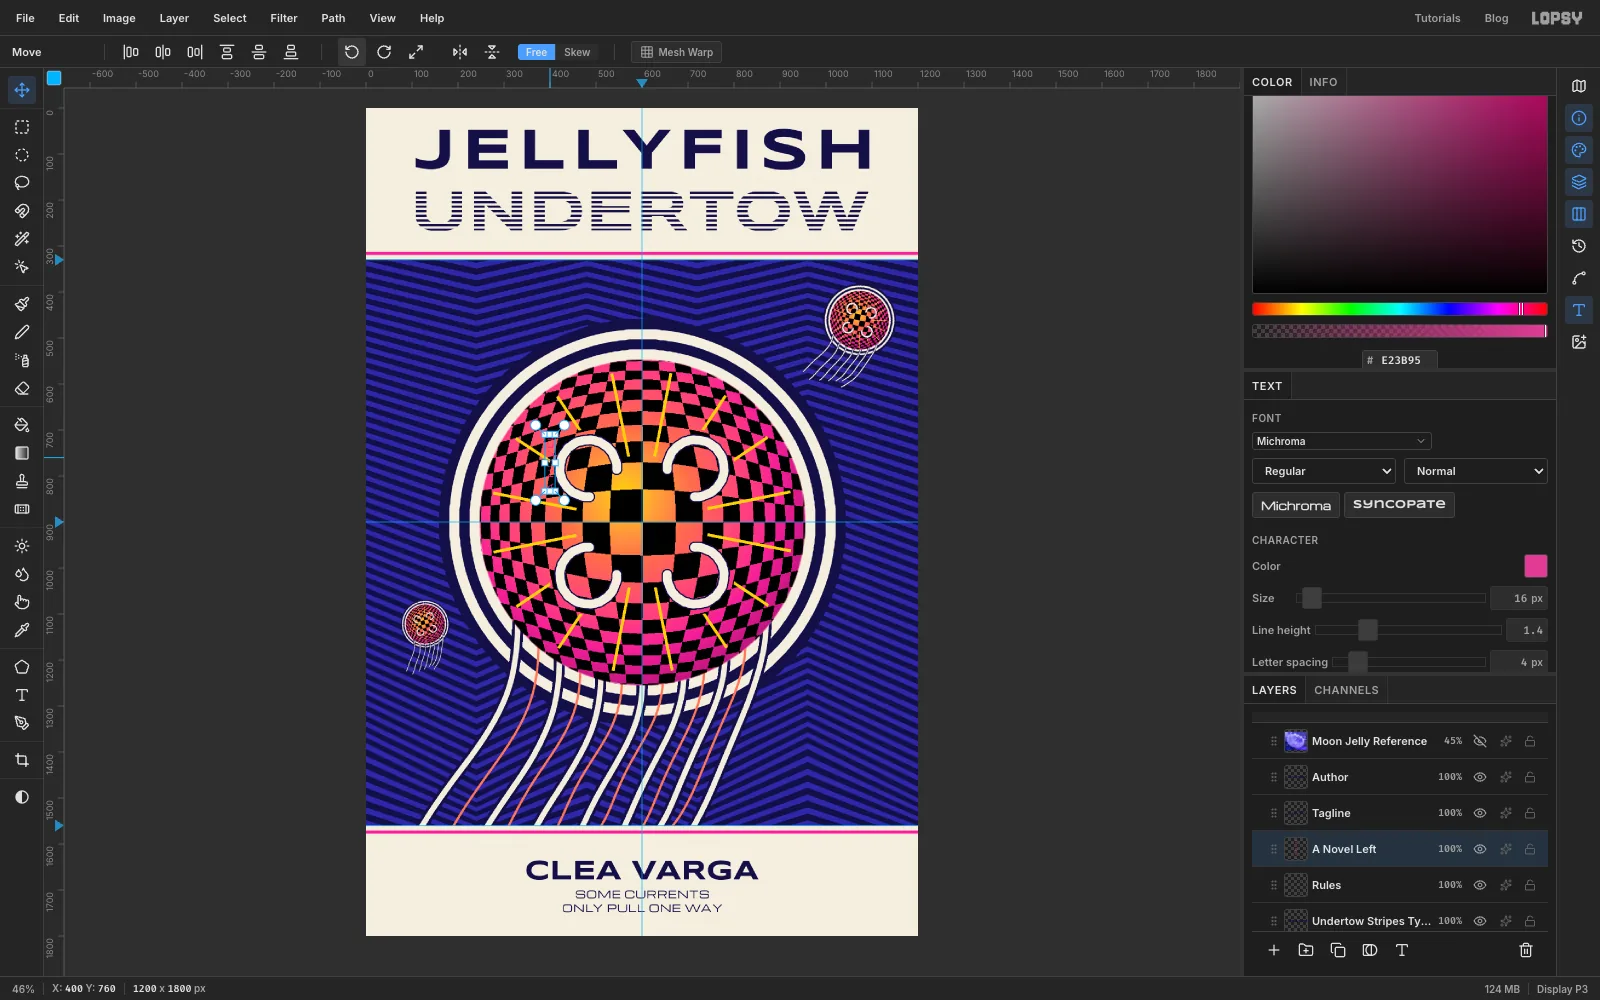
Click Rules. With the Text tool, choose Syncopate Bold 60 in navy. Click somewhere empty in the middle of the cover (clicking on existing type would edit it), type CLEA VARGA, press Tab and rename the layer Author. Move it to the centre guide with the tops of its capitals about 76 px below the bottom guide.
Click Rules again. Choose Michroma at 22, set Align to Center, click in an empty part of the cover again and type the tagline on two lines: SOME CURRENTS, Enter, ONLY PULL ONE WAY. Press Tab, rename the layer Tagline and set Letter spacing to 1. Move it under the name, centred, with about 24 px of space between them.
For the side label, click Rules once more, choose Michroma 16 in magenta , click in an empty spot and type A NOVEL. Press Tab, rename the layer A Novel Left and set Letter spacing to 4. With the Move tool, click Rotate 90° CCW in the options bar. It now reads from bottom to top.
-
Frame the author block with the labels
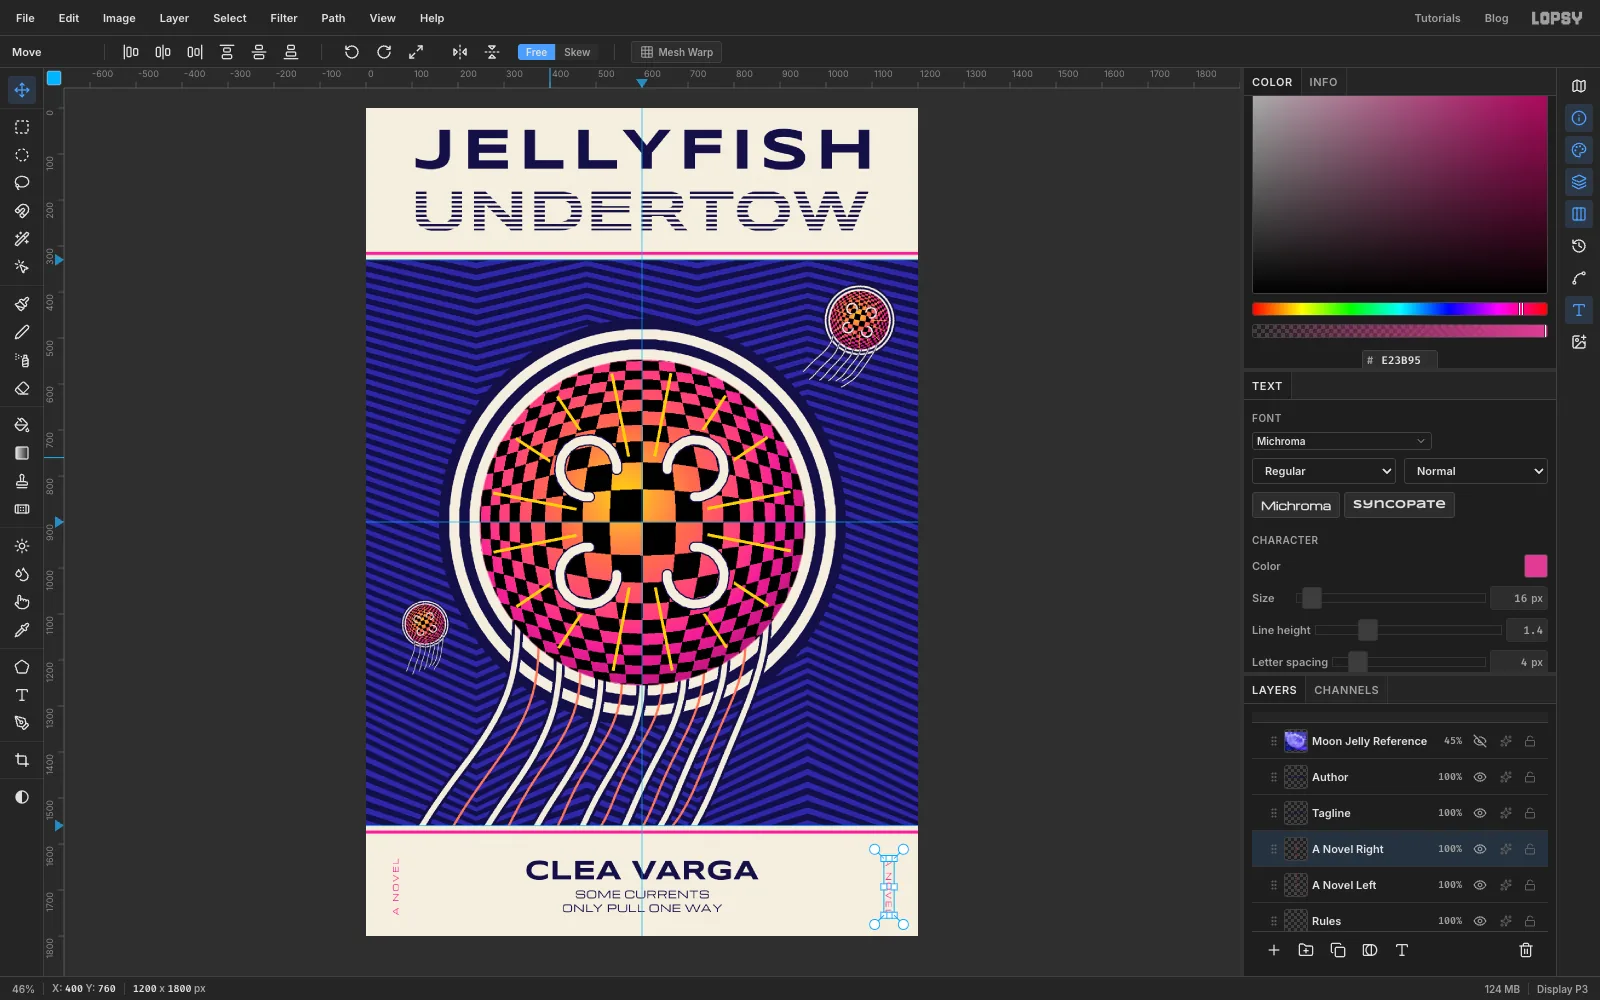
Drag A Novel Left into the left margin, about 64 px from the edge. Centre it vertically on the name and tagline taken together.
Click Duplicate Layer, rename the copy A Novel Right, and click Rotate 90° CW twice. It now reads from top to bottom, the way a spine does. Drag it to the same height, 64 px in from the right edge.
-
Group the layers and save
Tidy the Layers panel into groups. Click Halo Rings, Shift-click Gonads and choose Layer → Group Layers. Name the group Jellyfish. Do the same for the two juveniles (Juveniles) and for everything from Bands to the top of the stack (Cover Type). The hidden Moon Jelly Reference sits at the very top, so it ends up in Cover Type too. It stays hidden, so it does no harm, but you can delete it if you'd rather.
Now you can click a group and move it all at once. Try nudging the Jellyfish group and pressing Cmd+Z: the whole animal moves and comes back together.
Choose File → Save Project to keep the layers, then File → Export… for a PNG.