Design a Pennsylvania Dutch Quilt Zine Cover
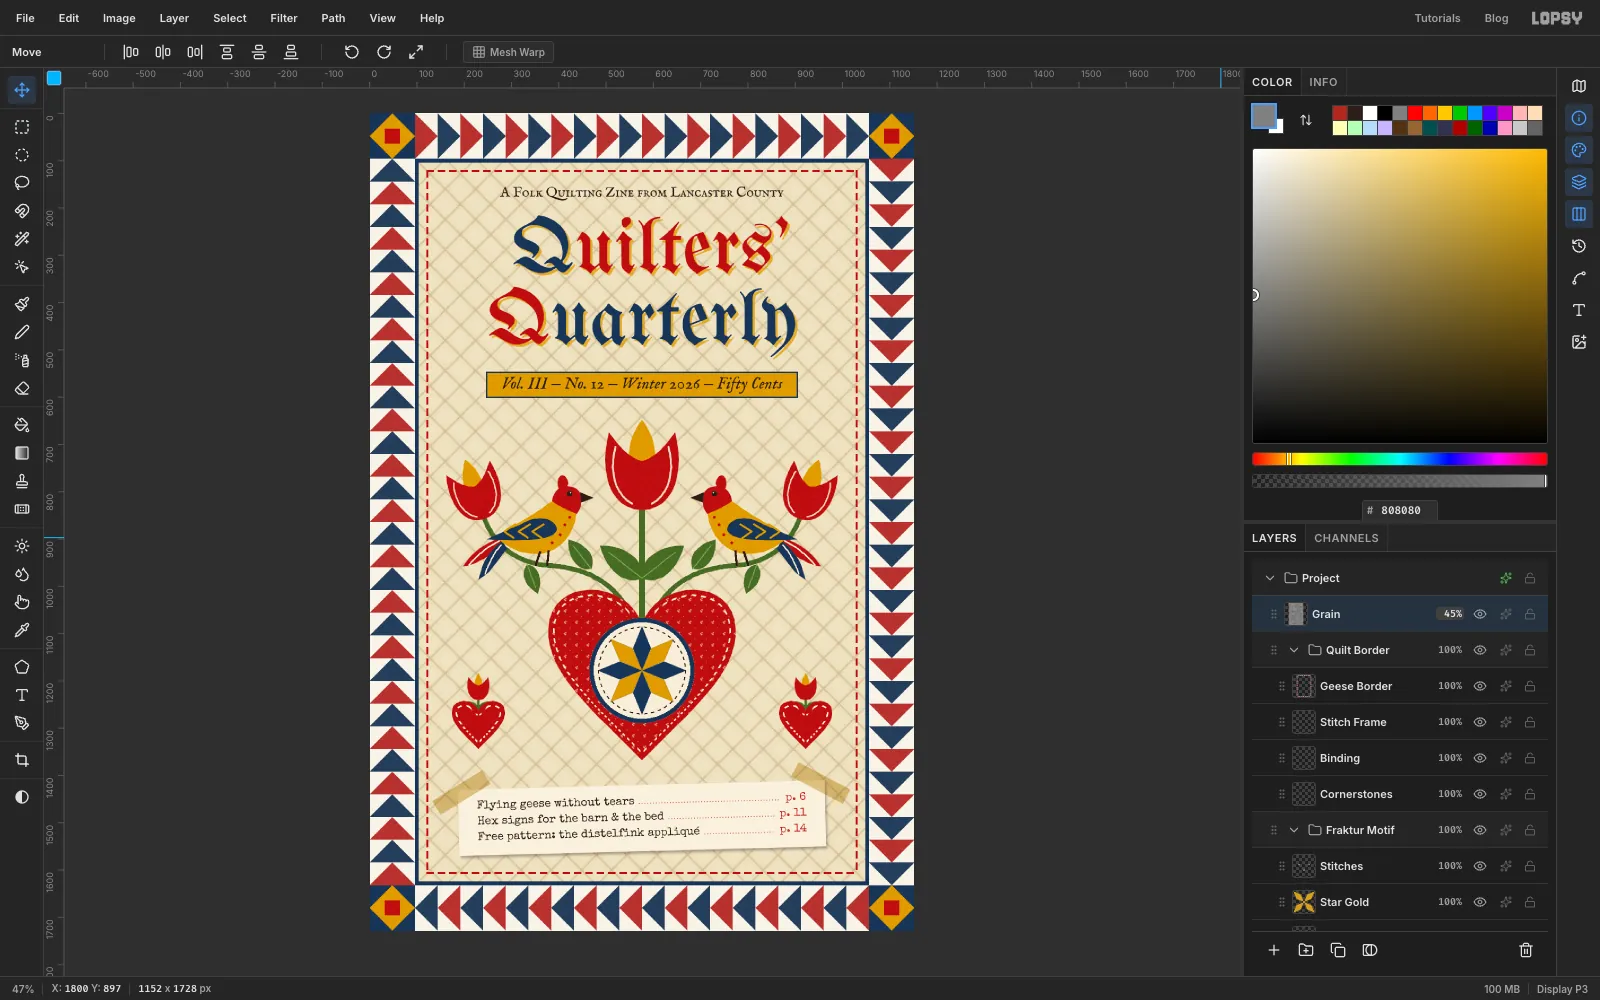
Make a folk art quilting zine cover in Lopsy with a flying-geese patchwork border, a hex-sign star, distelfink birds, appliqué stitches and blackletter type.
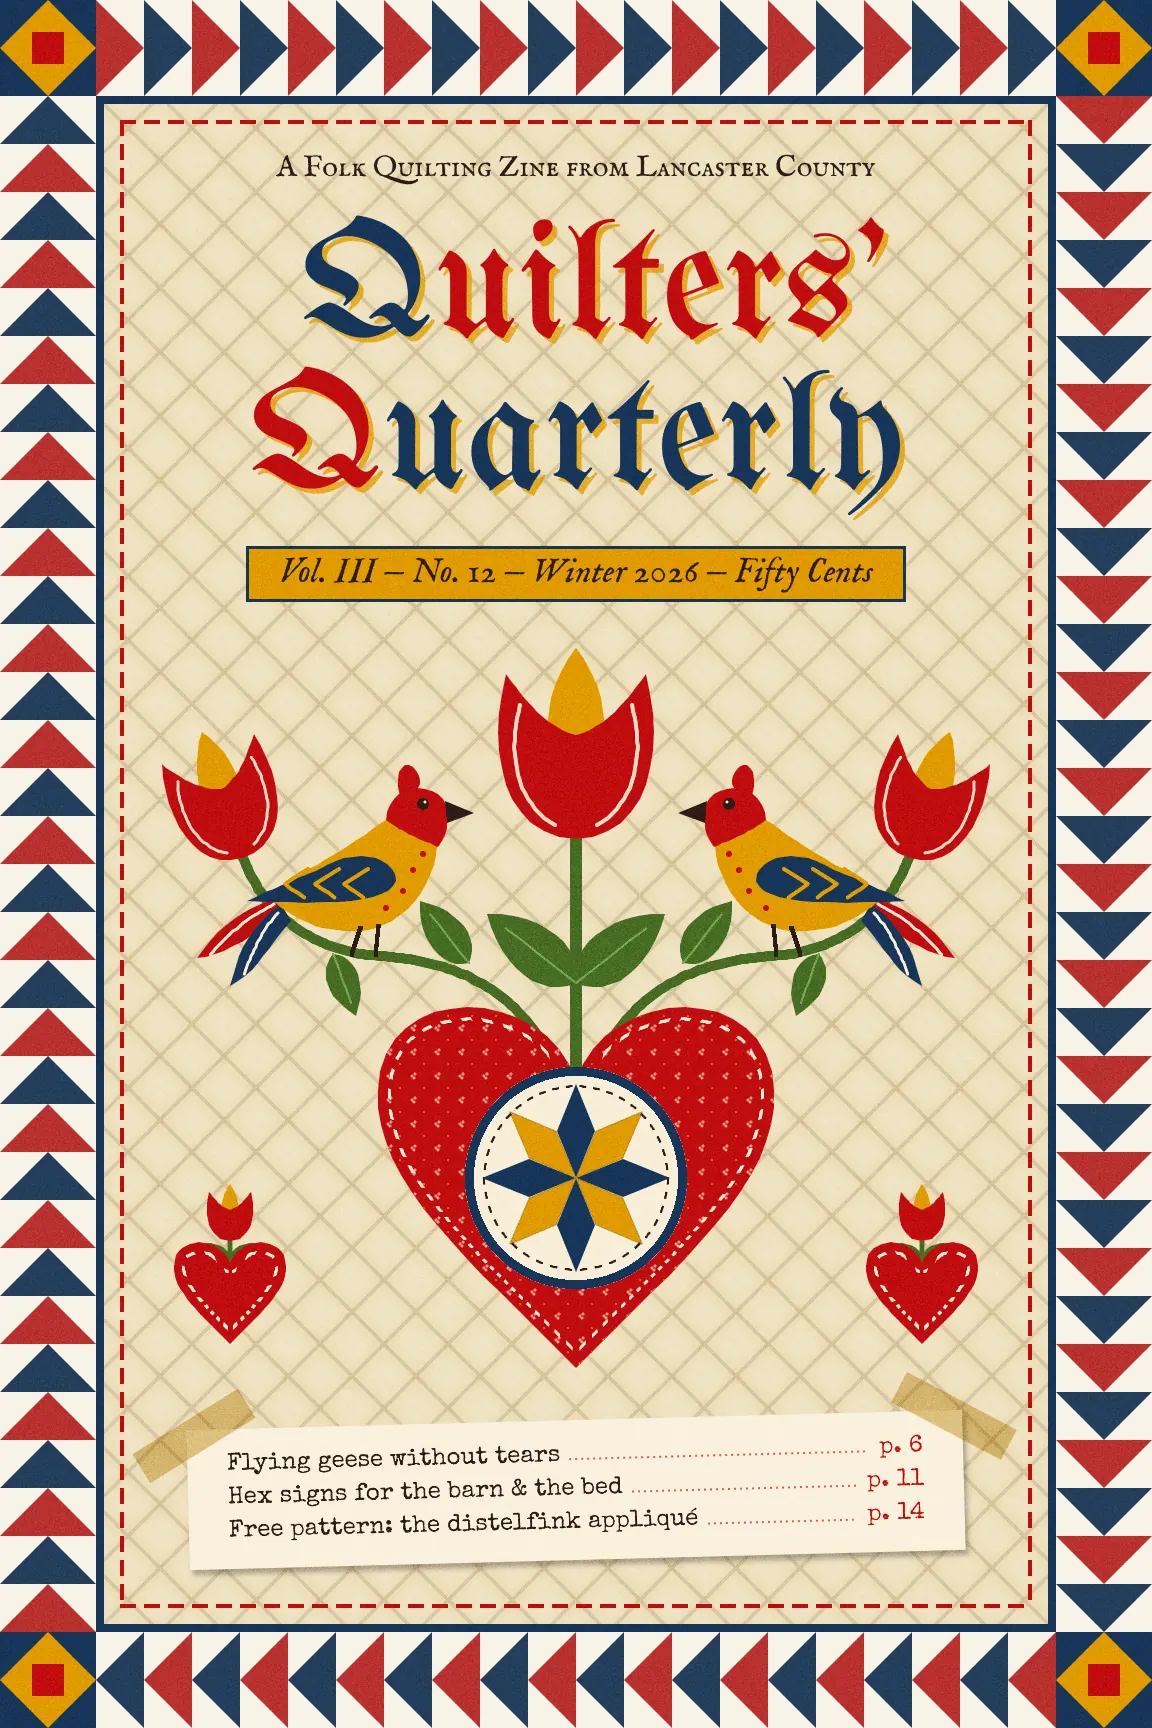
Pennsylvania Dutch fraktur is the illuminated folk art that German settlers painted on birth and marriage certificates from about 1750 to
- It has a short list of motifs that come back again and again:
- a heart in the middle
- tulips growing out of it
- a pair of distelfinks (stylised goldfinches) facing each other
- strict left–right symmetry
- a handful of bold colours
The same families made patchwork quilts and painted hex-sign stars on their barns, so the motifs sit naturally with quilt blocks.
In this tutorial you'll combine them on a cover for Quilters' Quarterly, an imaginary folk quilting zine. You'll build it at 1152 × 1728 px, a 2:3 zine page. The patchwork blocks are 96 px, six grid cells, so they tile the border exactly. Along the way you'll use:
- Define Pattern and Fill with Pattern for the border, the quilting and a calico print
- the Pen tool and Path to Selection for exact triangles
- Rotate 90°, Flip Horizontal and rotation handles to mirror and repeat shapes
- Grow and Shrink to make appliqué stitches, cut into dashes with the Sunburst filter
- Gaussian Blur, Emboss, Hue/Saturation and Add Noise
- layer groups, the Layers panel's drag-to-reorder, and group rotation
- text in UnifrakturMaguntia, IM Fell English, IM Fell English SC and Special Elite, with a different colour on one letter
The palette:
-
Muslin
-
cream
-
paper
-
Turkey red
-
Indigo
-
Mustard
-
Olive
-
leaf vein
-
Ink
-
Masking tape
New layers always appear above whichever layer is selected. Before each section you'll click a layer at the right place in the stack.
-
Fill the muslin and draw a quilting tile
Choose File → New, enter 1152 × 1728, and click Create. Click the Background row, set the foreground to muslin , and choose Edit → Fill.
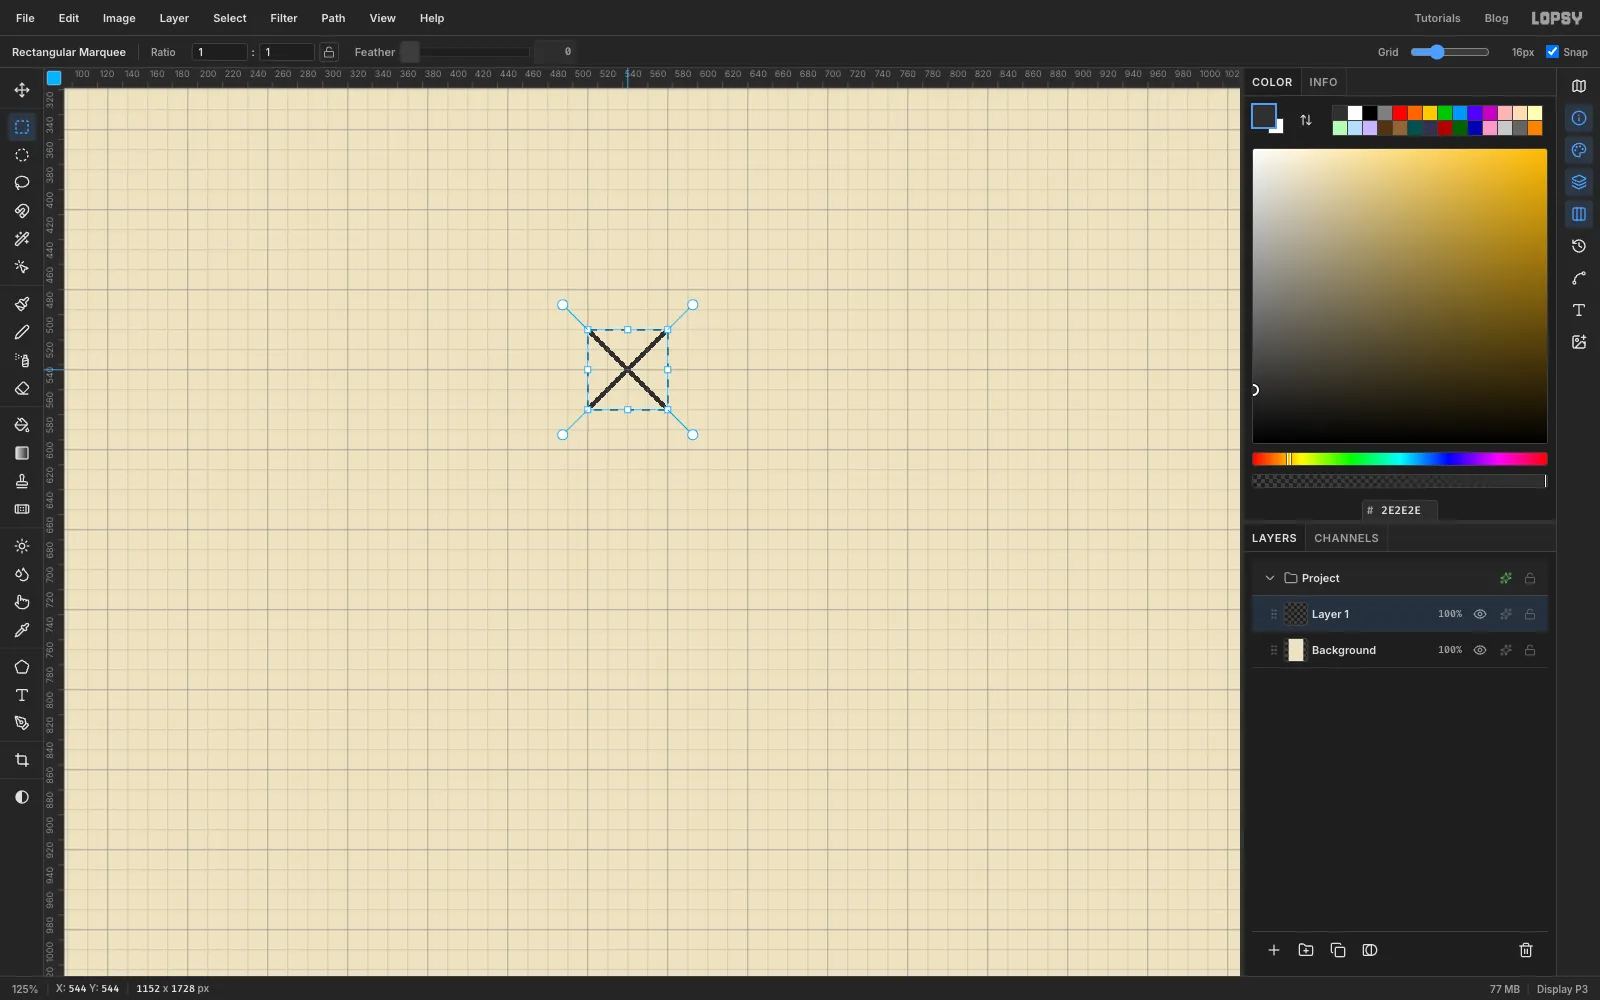
Click Layer 1. Turn on View → Show Grid (16 px cells) and zoom in a little above the centre of the page. You'll draw a 64 px tile, four grid cells wide, from 512, 512 to 576, 576. Pick the Pencil, set Size to 3 and the colour to . Click the tile's top-left corner and Shift-click its bottom-right corner to draw one diagonal. Then click the top-right corner and Shift-click the bottom-left corner to draw the other.
Select exactly that square with the exact-corners dialog. Choose Edit → Define Pattern. Press Delete to clear the tile, then deselect with Cmd+D.
-
Tile the quilting and give it puff
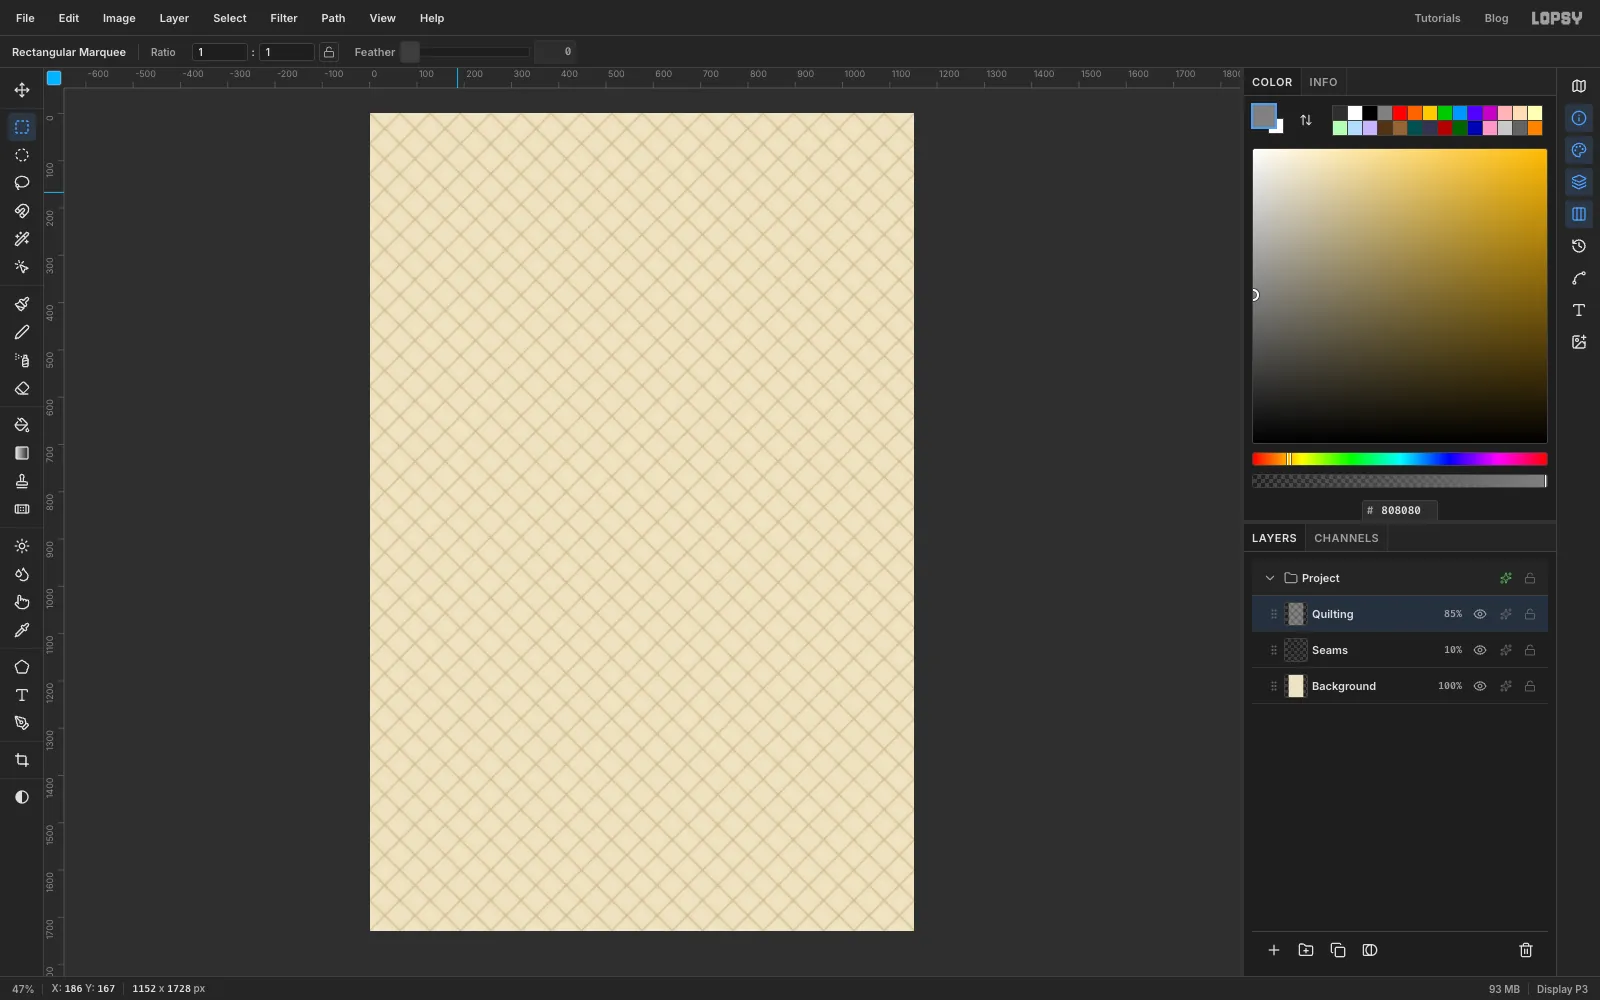
Choose View → Fit to Screen. Press Cmd+A, choose Edit → Fill with Pattern…, pick your cross tile, and click Apply. The crosses join up into a diamond lattice. Deselect, rename the layer Seams, set its blend mode to Multiply and its opacity to 10%.
Add a new layer called Quilting. Select all, fill it with , and run Fill with Pattern… again with the same tile. Deselect. Then run:
- Filter → Gaussian Blur… with Radius 14
- Filter → Emboss… with Angle 135, Strength 100 and Pillow Emboss
Set Quilting to Overlay at 85%. The grey disappears and each diamond looks gently padded, like wadding between two layers of cloth. Turn the grid off for now.
-
Draw a flying-geese block with the Pen
Click Quilting, click the New Group button, and name the group Quilt Border. Add a layer inside it called Geese Tile. Turn the grid back on and zoom in on the same spot as before.
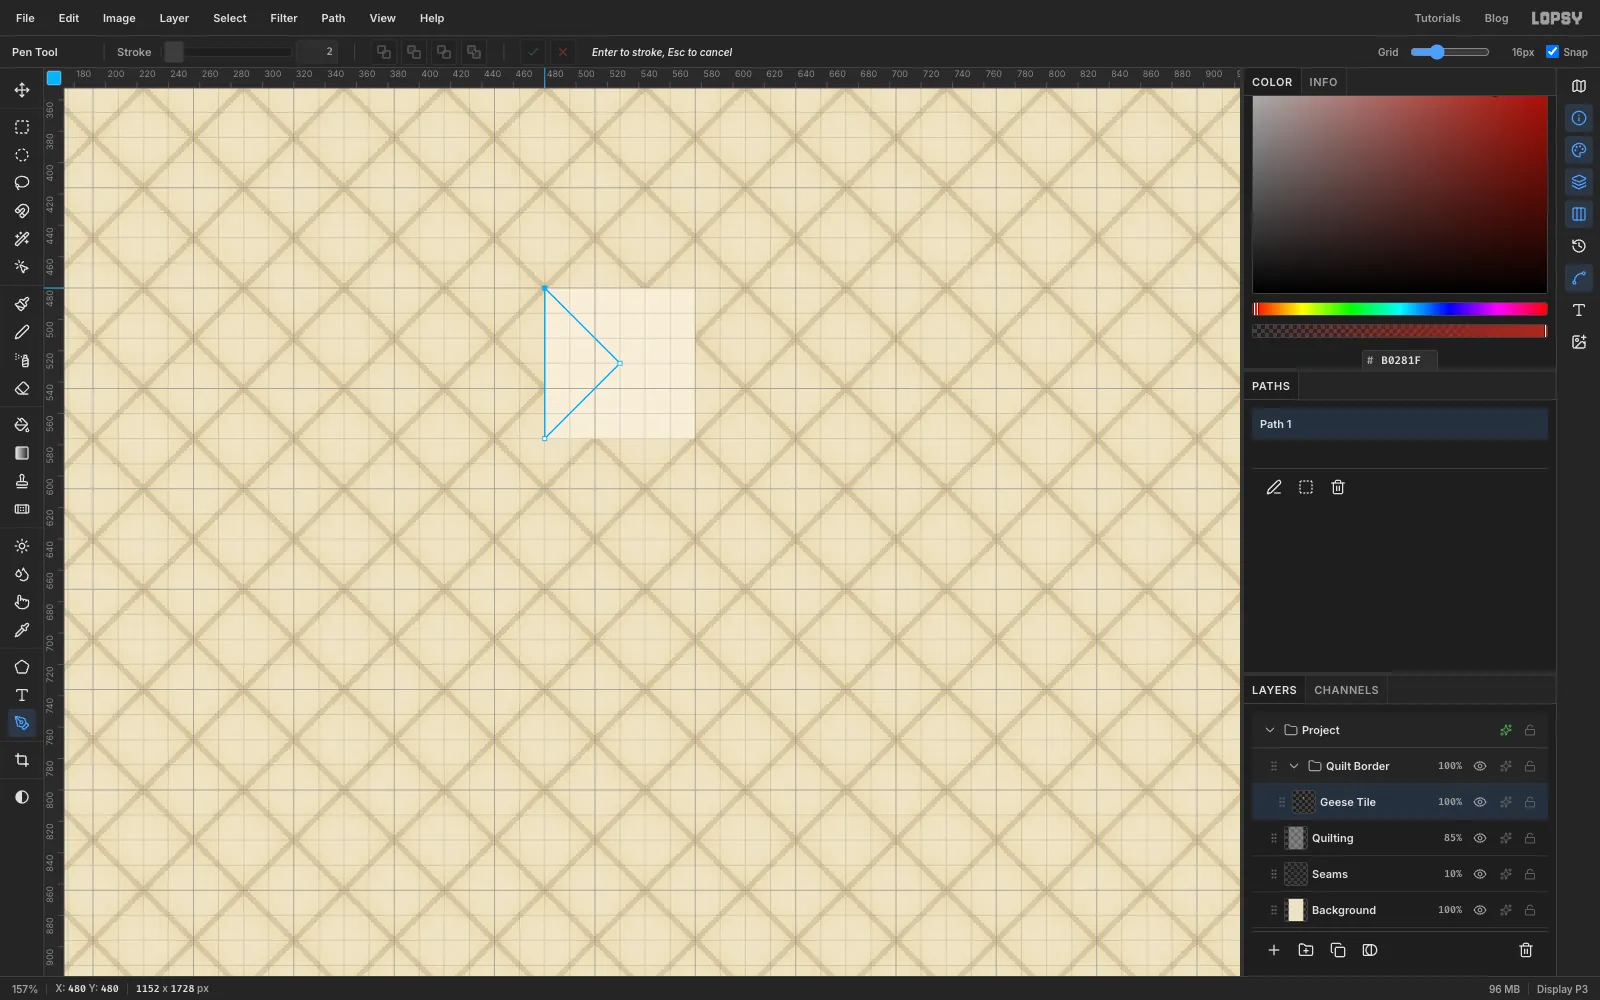
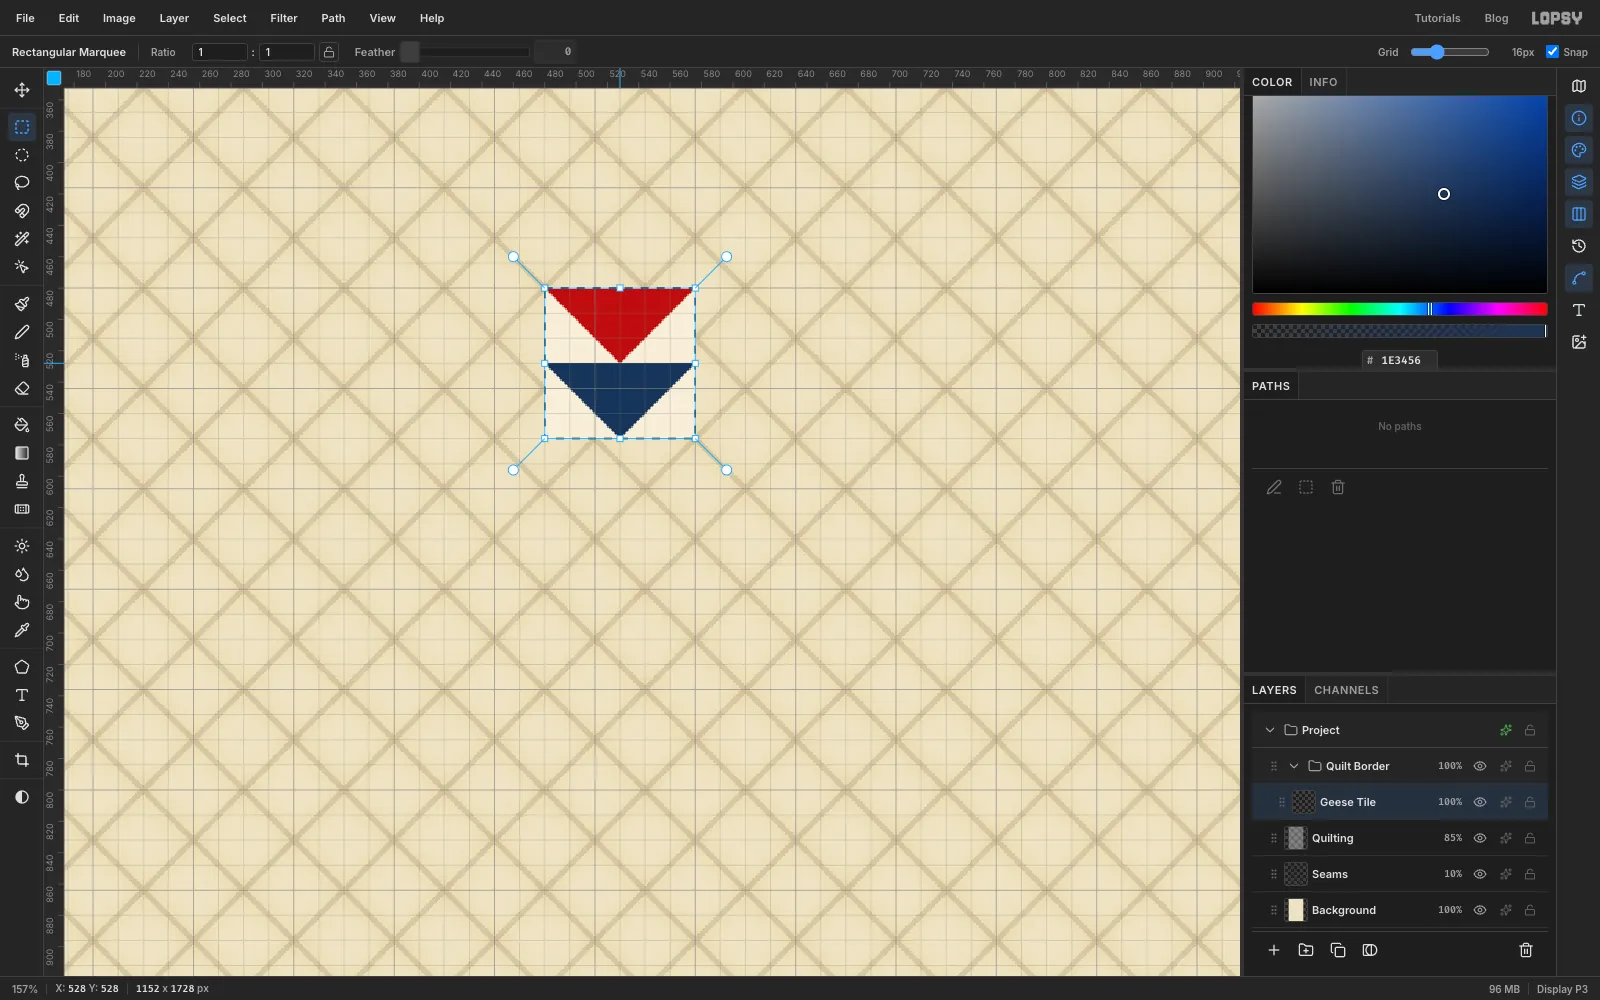
Make a 96 px square from 480, 480 to 576, 576 and fill it with cream . Deselect. A flying goose is a triangle twice as tall as it is deep. To draw it, pick the Pen and click:
- the square's top-left corner
- its exact centre
- its bottom-left corner
- the first anchor again, to close the path
In the Paths panel, click Path to Selection, then Delete Path because you won't need the path again. Fill the selection with turkey red and deselect.
Draw the second goose the same way, from the middle of the top edge to the middle of the right edge to the middle of the bottom edge. Fill it with indigo .
-
Save the block in four directions
Select the 96 px square again (480, 480 to 576, 576) and choose Edit → Define Pattern. That's the first pattern, with geese flying to the right.
Pick the Move tool and click Rotate 90° CW in the options bar. The geese now point down. Deselect, select the same square, and define a second pattern. Do it twice more so you have four patterns: right, down, left and up.
-
Fill the four border bands
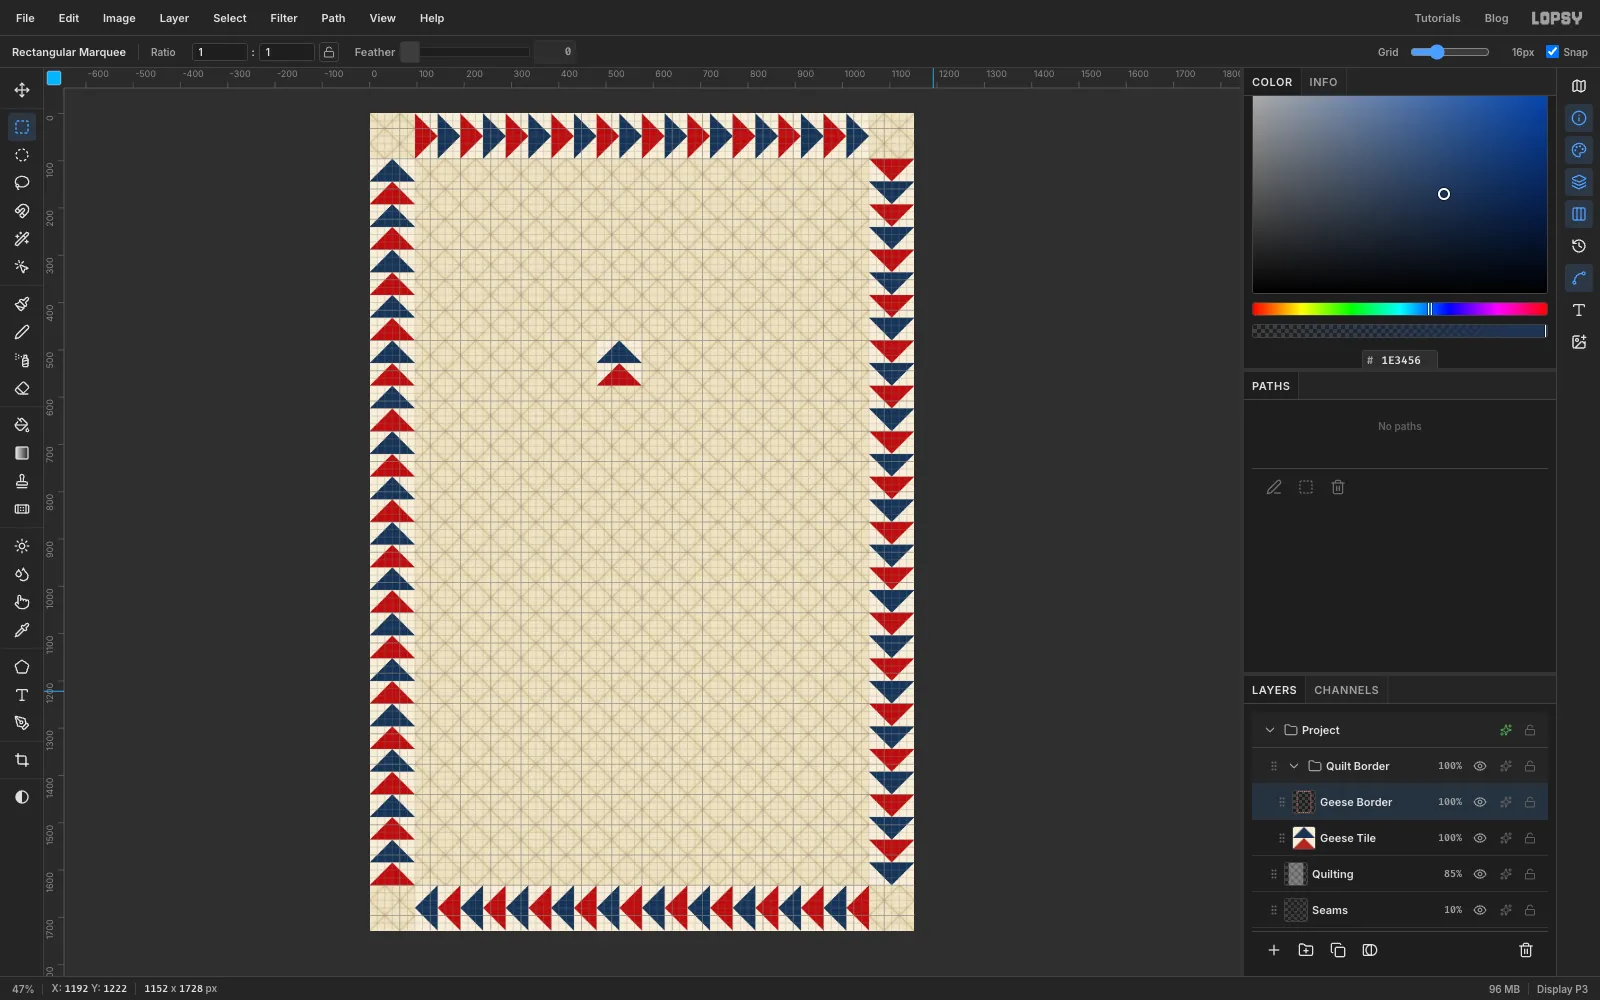
Choose View → Fit to Screen and add a layer called Geese Border. Leave the little tile where it is, because you'll reuse that layer. Make each band with the exact-corners dialog, then fill it with Fill with Pattern… and the matching pattern:
- Top: 96, 0 to 1056, 96, with the right pattern
- Right: 1056, 96 to 1152, 1632, with the down pattern
- Bottom: 96, 1632 to 1056, 1728, with the left pattern
- Left: 0, 96 to 96, 1632, with the up pattern
Lopsy anchors pattern tiles to the top-left corner of the document. The bands all start on multiples of 96, so every goose is whole and the geese fly clockwise around the page.
-
Add cornerstone blocks
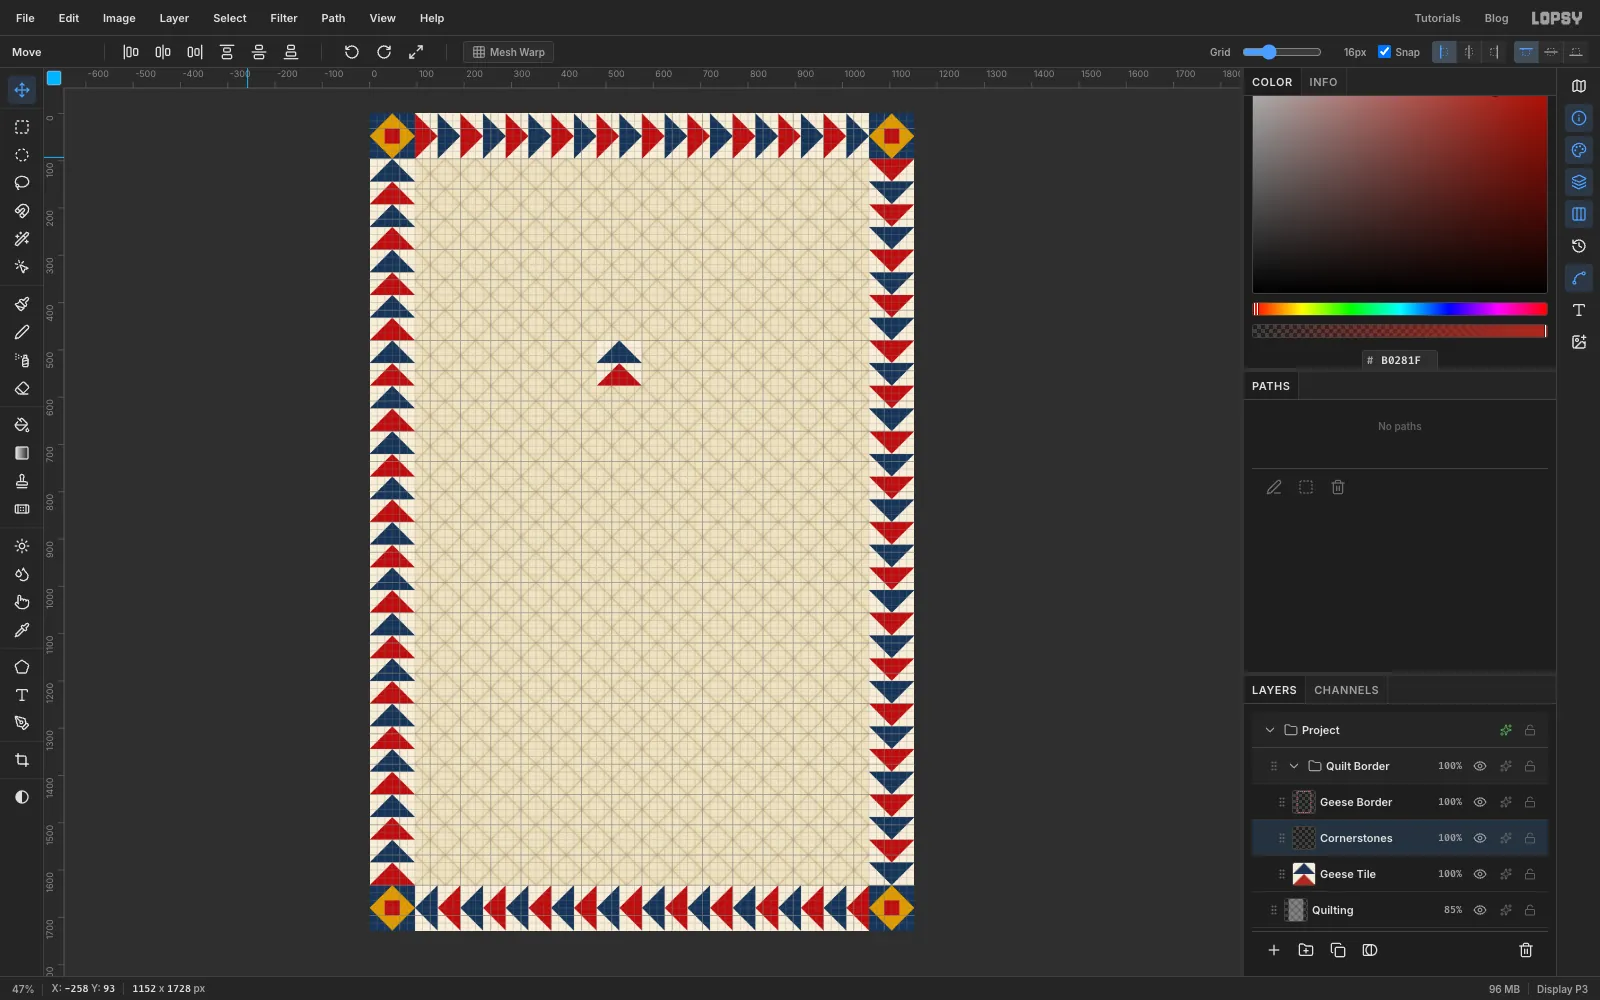
Click Geese Tile and add a layer called Cornerstones. Zoom into the middle again. Make the same 96 px square and fill it with indigo.
With the Pen, click the middle of each of the four edges and close the path. Choose Path to Selection, delete the path, and fill the diamond with mustard . Fill a 32 px square in the centre (512, 512 to 544, 544) with red. This is a square in a square block.
Choose Fit to Screen. With the Move tool, drag the block into the top-left corner. With the grid on, it snaps exactly into place. Then copy it to the other corners:
- Click Duplicate Layer.
- Drag the copy into the top-right corner.
- Choose Layer → Merge Down.
- Duplicate the layer again and drag the copy straight down into the bottom-left corner. Merge down.
- Do the same once more for the bottom-right corner.
-
Bind the edge and stitch a frame
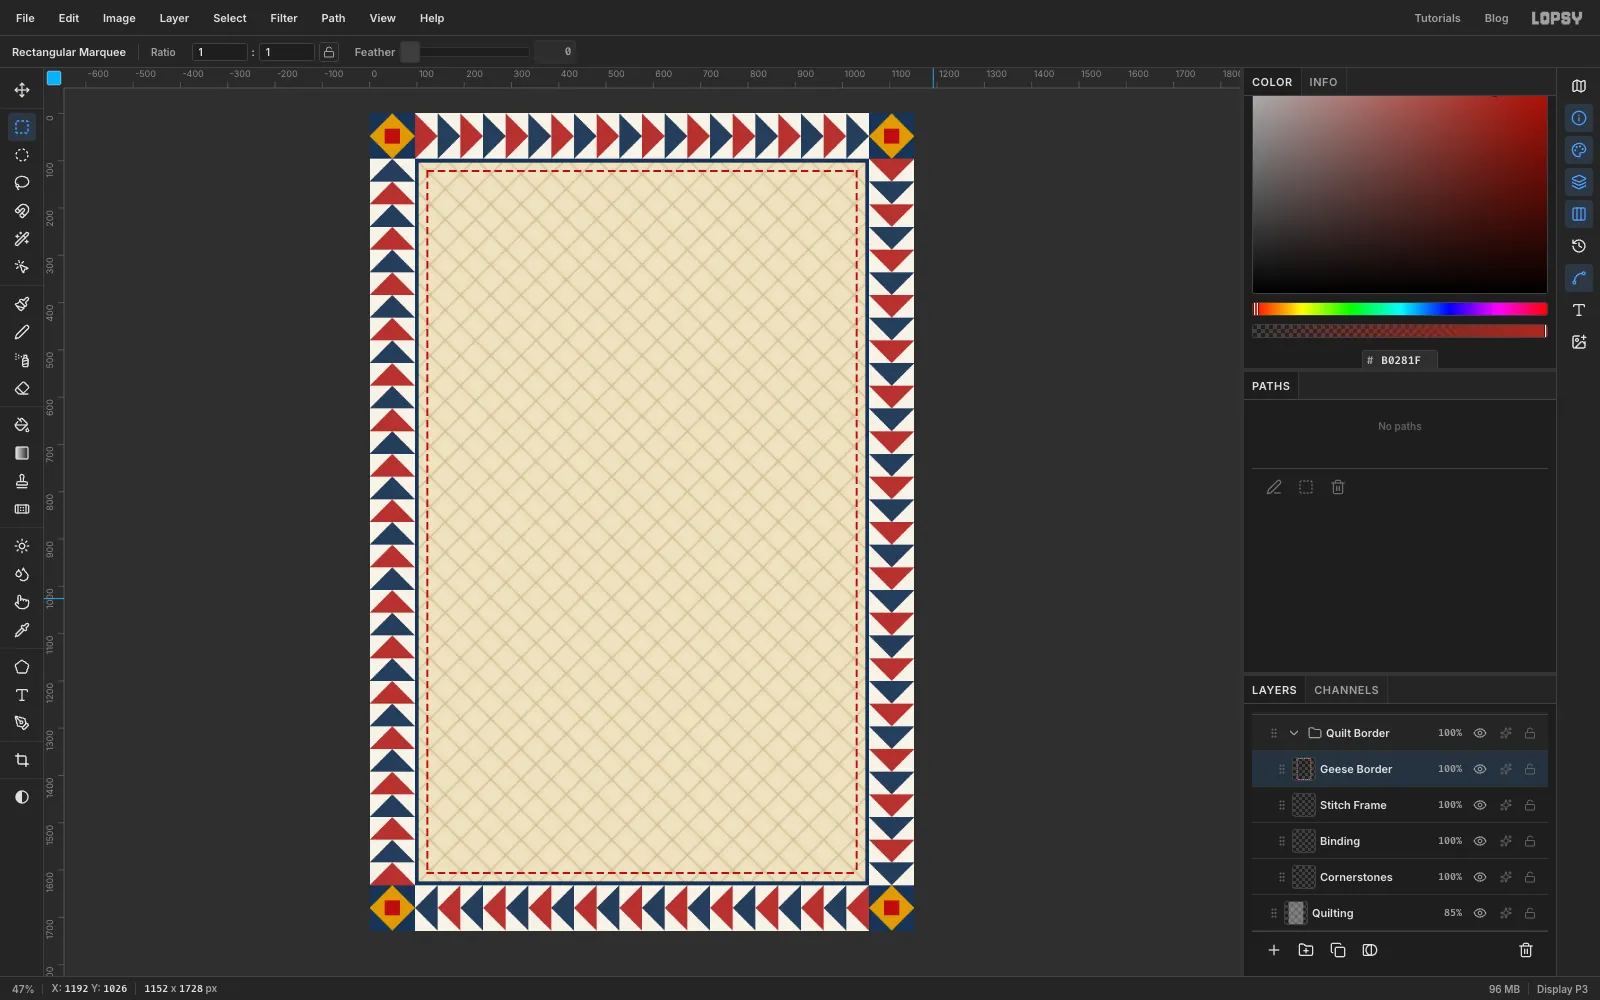
Turn the grid off. Add a layer called Binding. Select 96, 96 to 1056, 1632, fill it with indigo, then select 104, 104 to 1048, 1624 and press Delete. That leaves an 8 px navy binding.
Now make a running stitch. Click Geese Tile, press Cmd+A, then Delete to clear it. Zoom right in and make the dash tile:
- Fill a 16 × 4 px dash with red: 480, 480 to 496, 484.
- Select the dash plus 8 px of empty space after it (480, 480 to 504, 484) and define a pattern.
- Click Rotate 90° CW, deselect, select the upright dash with its gap (490, 470 to 494, 494), and define one more pattern.
Click Binding and add a layer called Stitch Frame. Make four thin strips, 16 px inside the navy binding, and fill each with Fill with Pattern…:
- Top: 120, 120 to 1032, 124, with the horizontal dash
- Bottom: 120, 1604 to 1032, 1608, with the horizontal dash
- Left: 120, 120 to 124, 1608, with the upright dash
- Right: 1028, 120 to 1032, 1608, with the upright dash
Delete the Geese Tile layer.
The geese are loud. Click Geese Border and run Filter → Hue/Saturation… with Saturation −25 and Lightness +3, so the masthead will win.
-
Cut out a calico heart
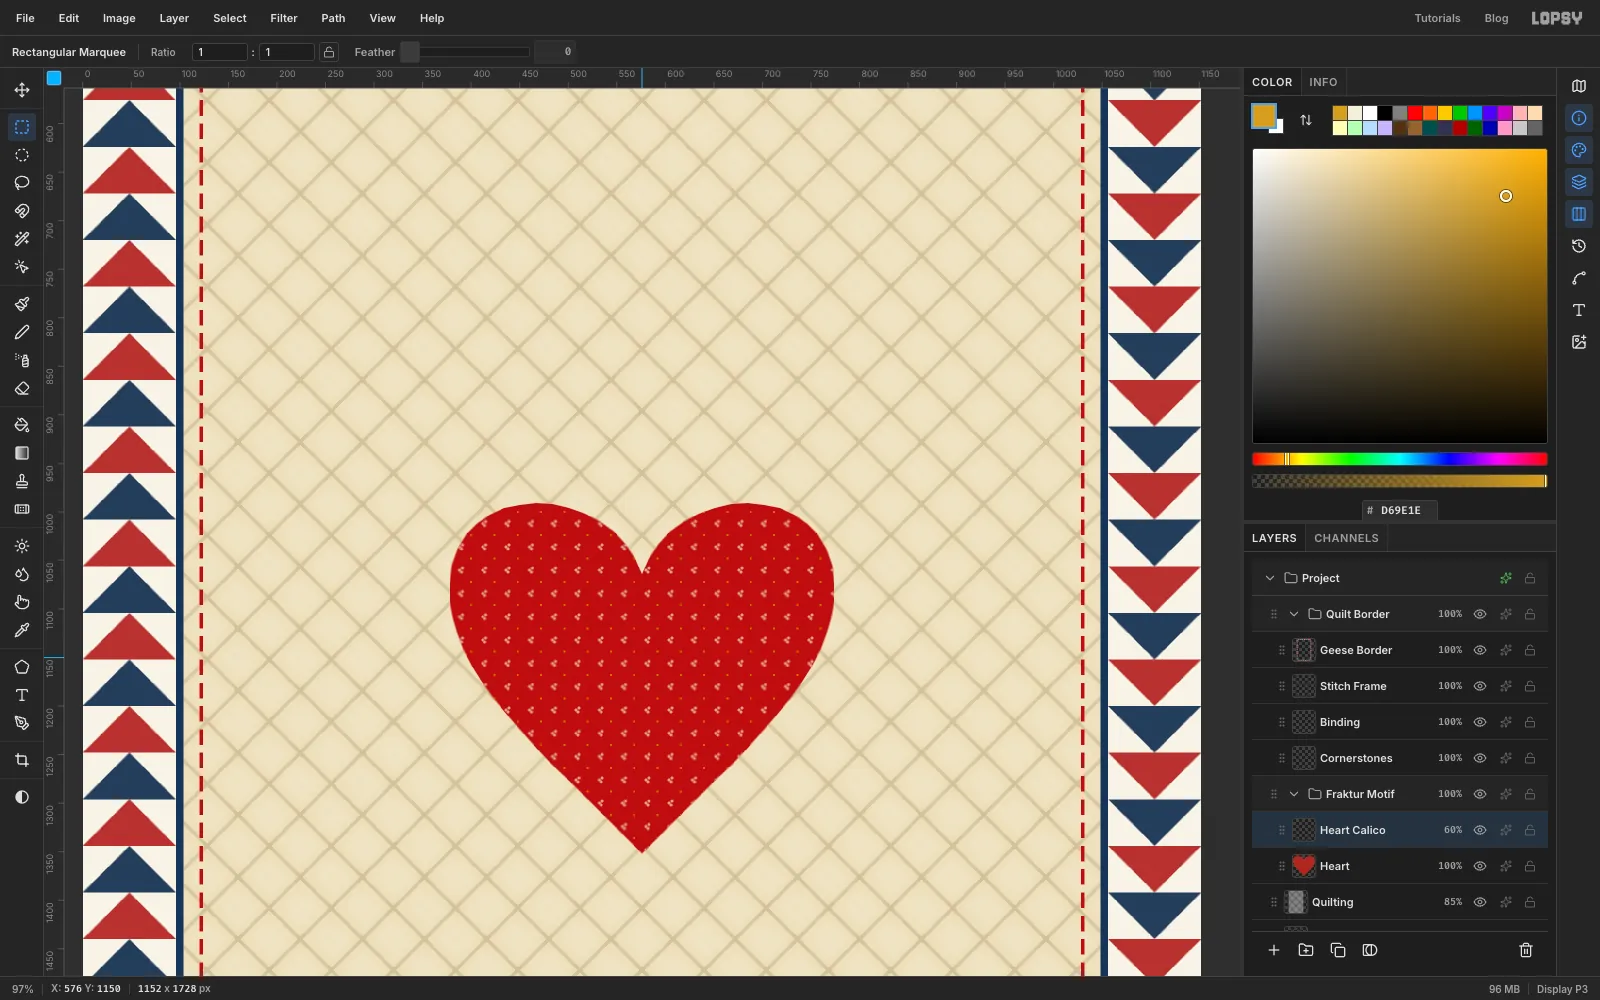
Click Quilting, make a New Group called Fraktur Motif, and add a layer called Heart. With the Lasso, draw a plump heart about 400 px wide, centred left to right. Its lobes top out at about y 995 and its tip sits at about y 1350. Fill it with turkey red.
Next, make a calico tile. Add a layer called Calico Tile and zoom into an empty spot. Pick the Brush, set Hardness to 100, and click three cream dots in a tiny cluster at Size 4. Add one mustard dot at Size 3 in the opposite corner. Select a 24 px square around them (for example 600, 288 to 624, 312), define a pattern, and delete the layer.
Click Heart and add a layer called Heart Calico. Cmd-click the Heart thumbnail to load the heart as a selection. Run Fill with Pattern… with the calico tile, deselect, and set the opacity to 60%.
-
Set the hex-sign disc and the first diamond
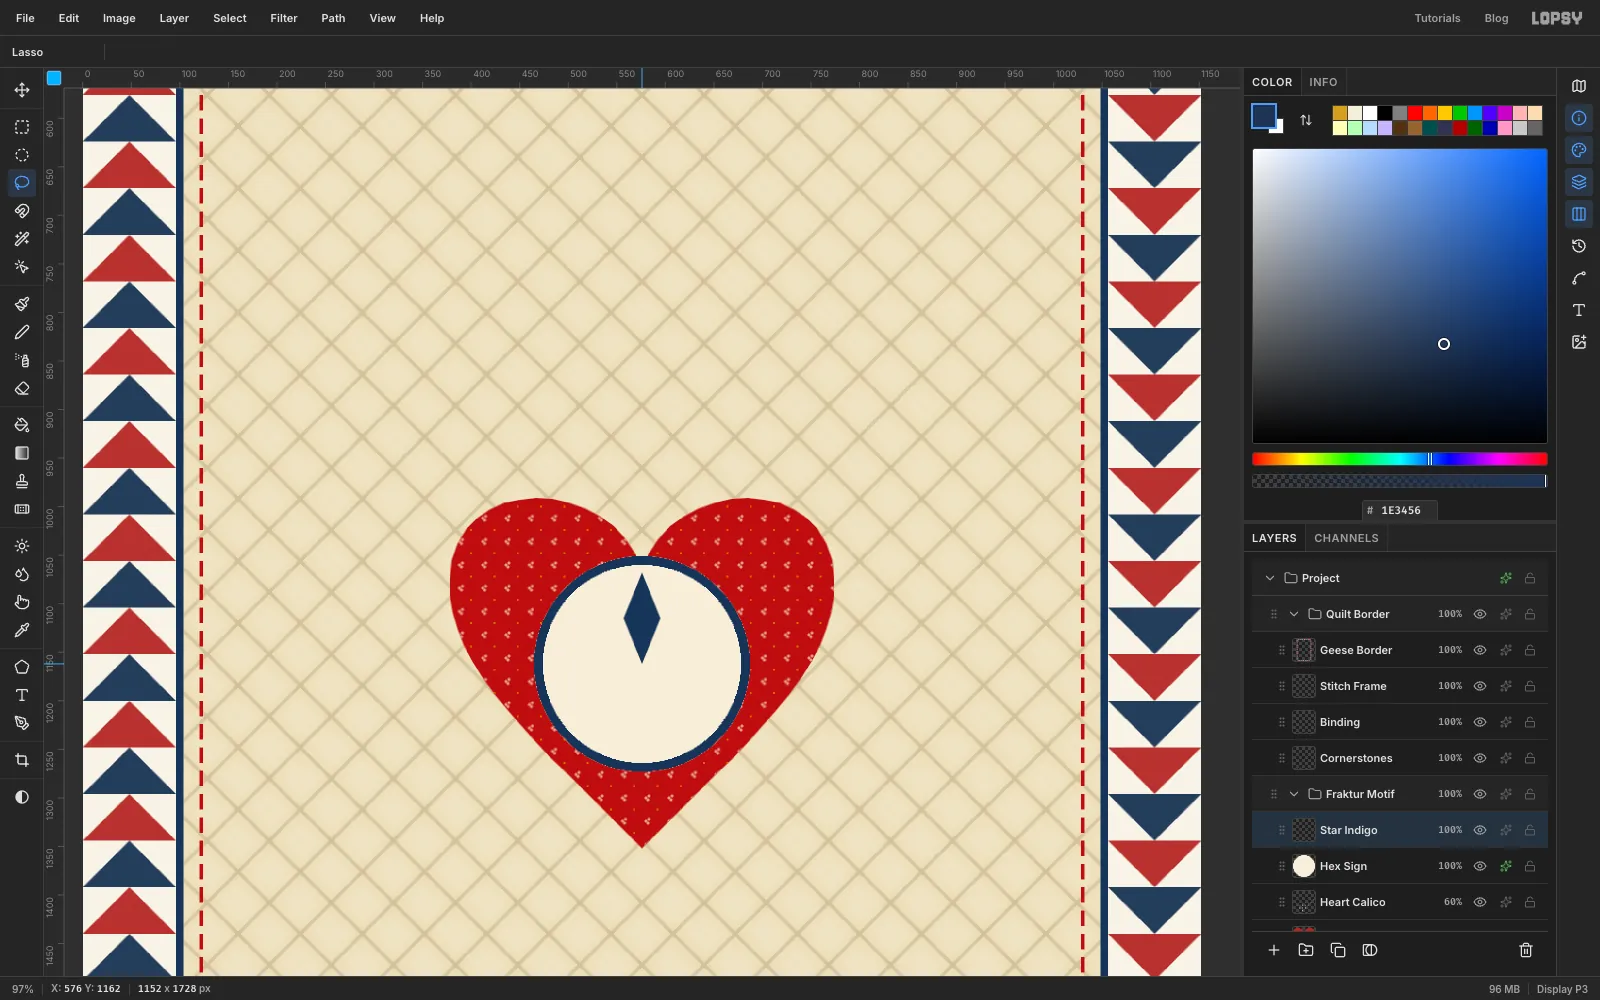
Add a layer called Hex Sign. With the Elliptical Marquee, drag a circle 222 px across, centred at 576, 1162, so it sits low in the heart and just overlaps its cleft. Fill it with cream. Click the layer's Layer effects button in the Layers panel, turn on Stroke with Width 9, indigo, position Inside, and close the drawer.
Add a layer called Star Indigo. With the Lasso, draw a long diamond:
- its sharp 45° point sits at the centre of the disc
- its far tip reaches 94 px straight up
- its two side corners sit halfway up, about 20 px either side
Fill it with indigo. Eight of these will make an eight-point Lemoyne star.
-
Turn a gold copy 45°
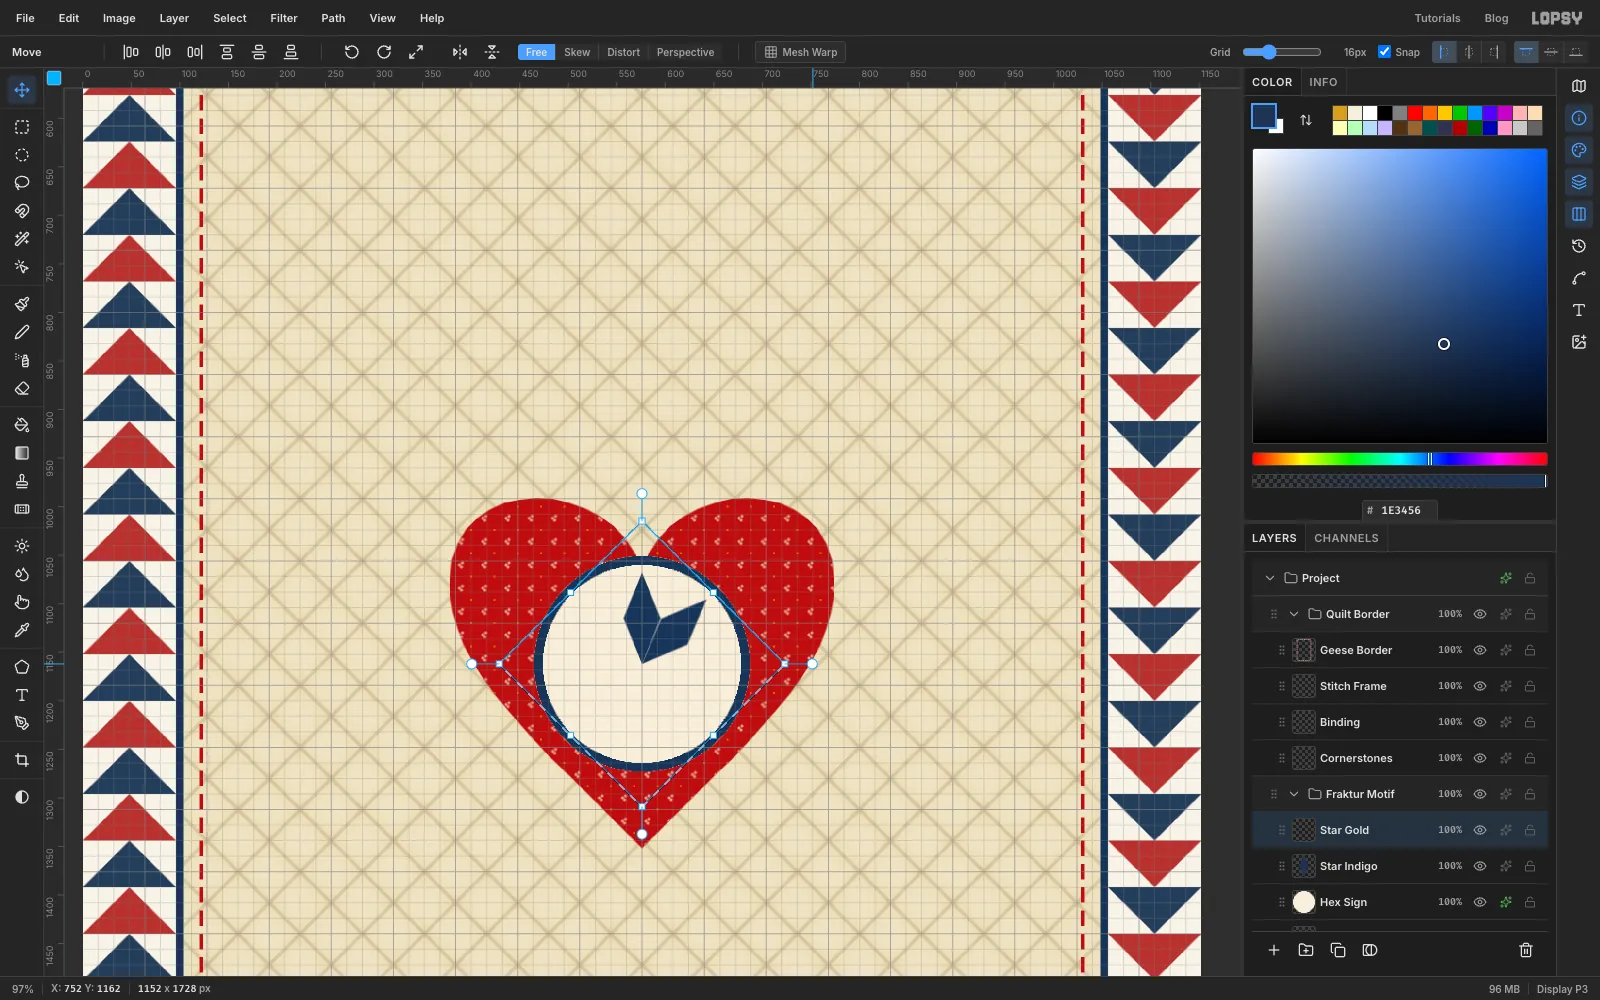
Click Duplicate Layer and rename the copy Star Gold. Turn on the grid, because with the grid showing, rotation handles snap in 15° steps. Select a square centred on the disc, from 472, 1058 to 680, 1266, so that its centre is the centre of the star.
With the Move tool, drag the corner rotation handle clockwise until the diamond turns exactly 45°. Deselect, then turn the grid off again. Cmd-click the Star Gold thumbnail and fill the selection with mustard.
-
Complete the eight-point star
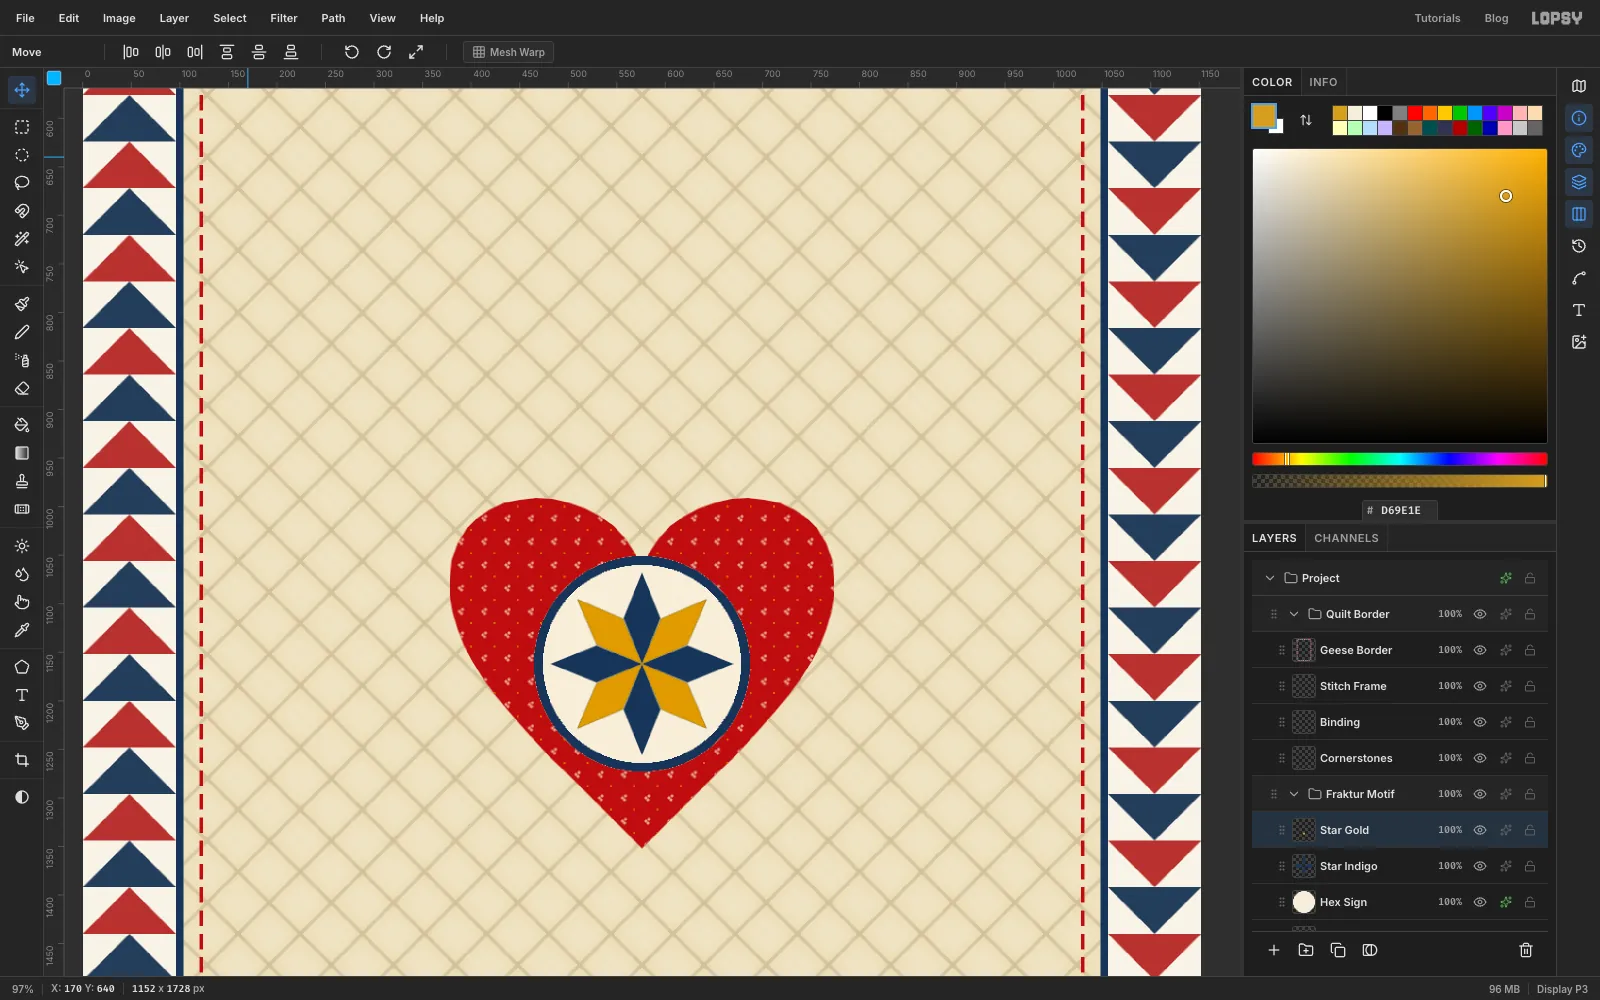
Click Star Indigo and copy it round the circle:
- Click Duplicate Layer.
- Select the same centred square and click Rotate 90° CW.
- Deselect and Merge Down. You now have two diamonds.
- Duplicate again, select the square, and click Rotate 90° CW.
- Select the square again and click Rotate 90° CW once more.
- Deselect and merge.
You need to select the square again in step 5 because after a Rotate 90° click, Lopsy reselects the rotated pixels. The next click would otherwise turn the diamonds about their own centre instead of the star's centre.
Do the same on Star Gold.
-
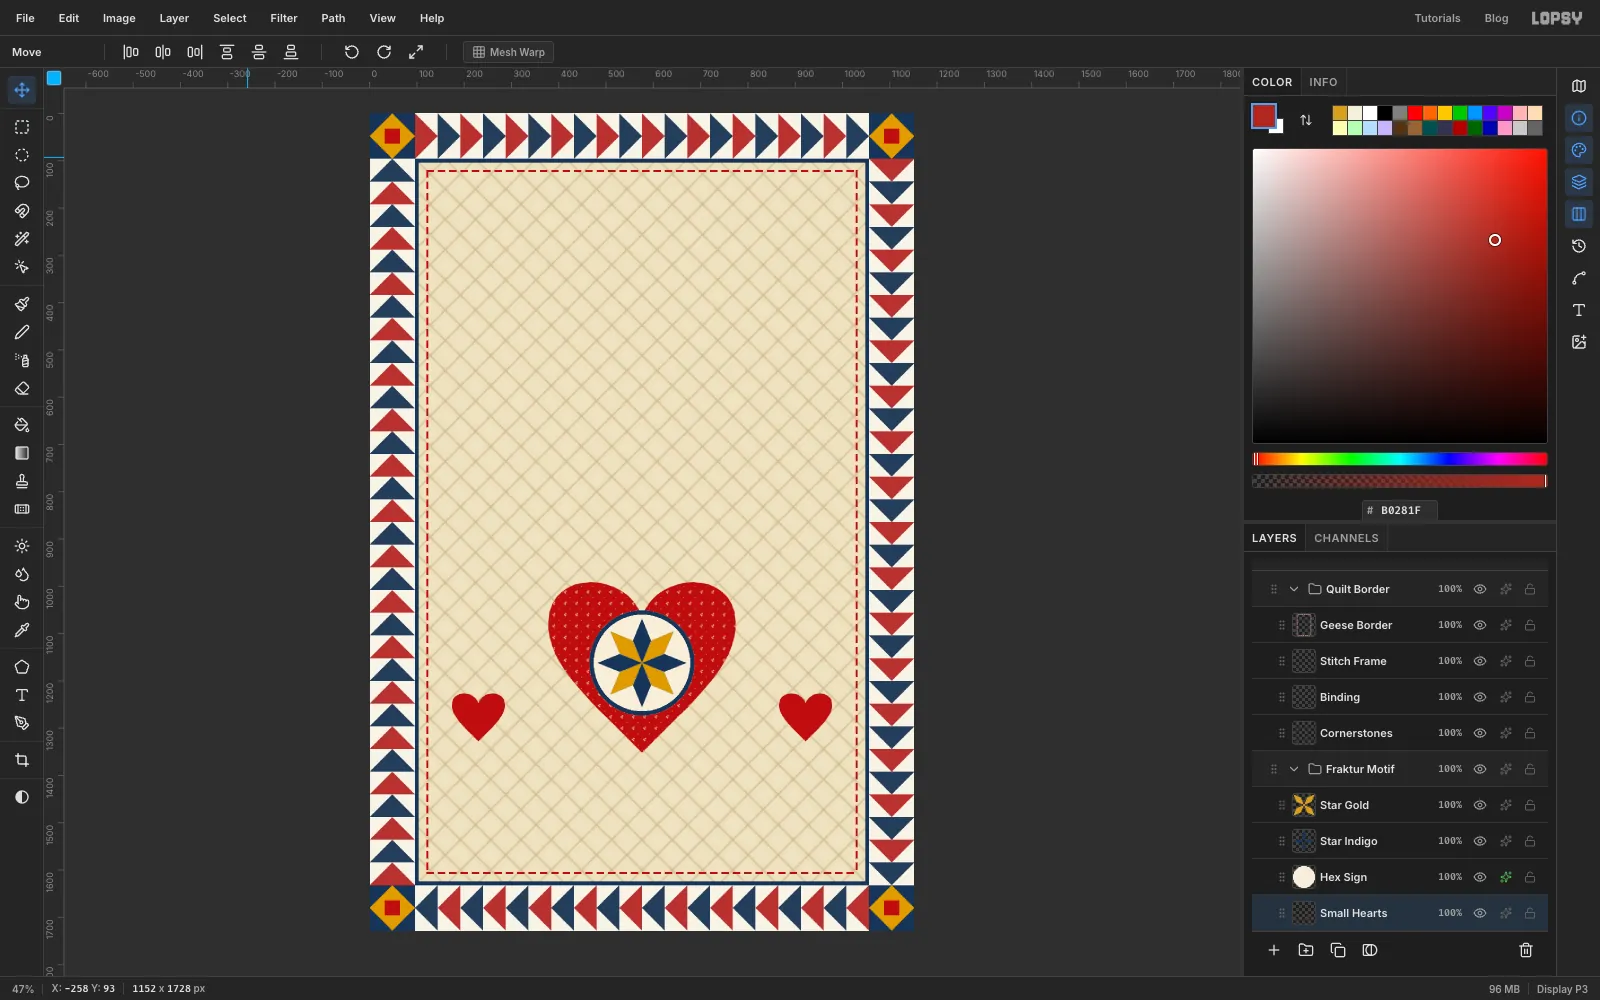
Add two small hearts
Click Heart Calico and add a layer called Small Hearts. Lasso a small heart about 110 px wide on the left, about a fifth of the way across and a little above the big heart's tip (centred at about 230, 1275), and fill it red. Duplicate the layer and drag the copy straight across to the same spot on the right, 692 px over, so it mirrors the first. The Info panel shows the position while you drag. Then merge down.
This is the classic fraktur three-heart arrangement.
-
Draw the left stem behind the heart
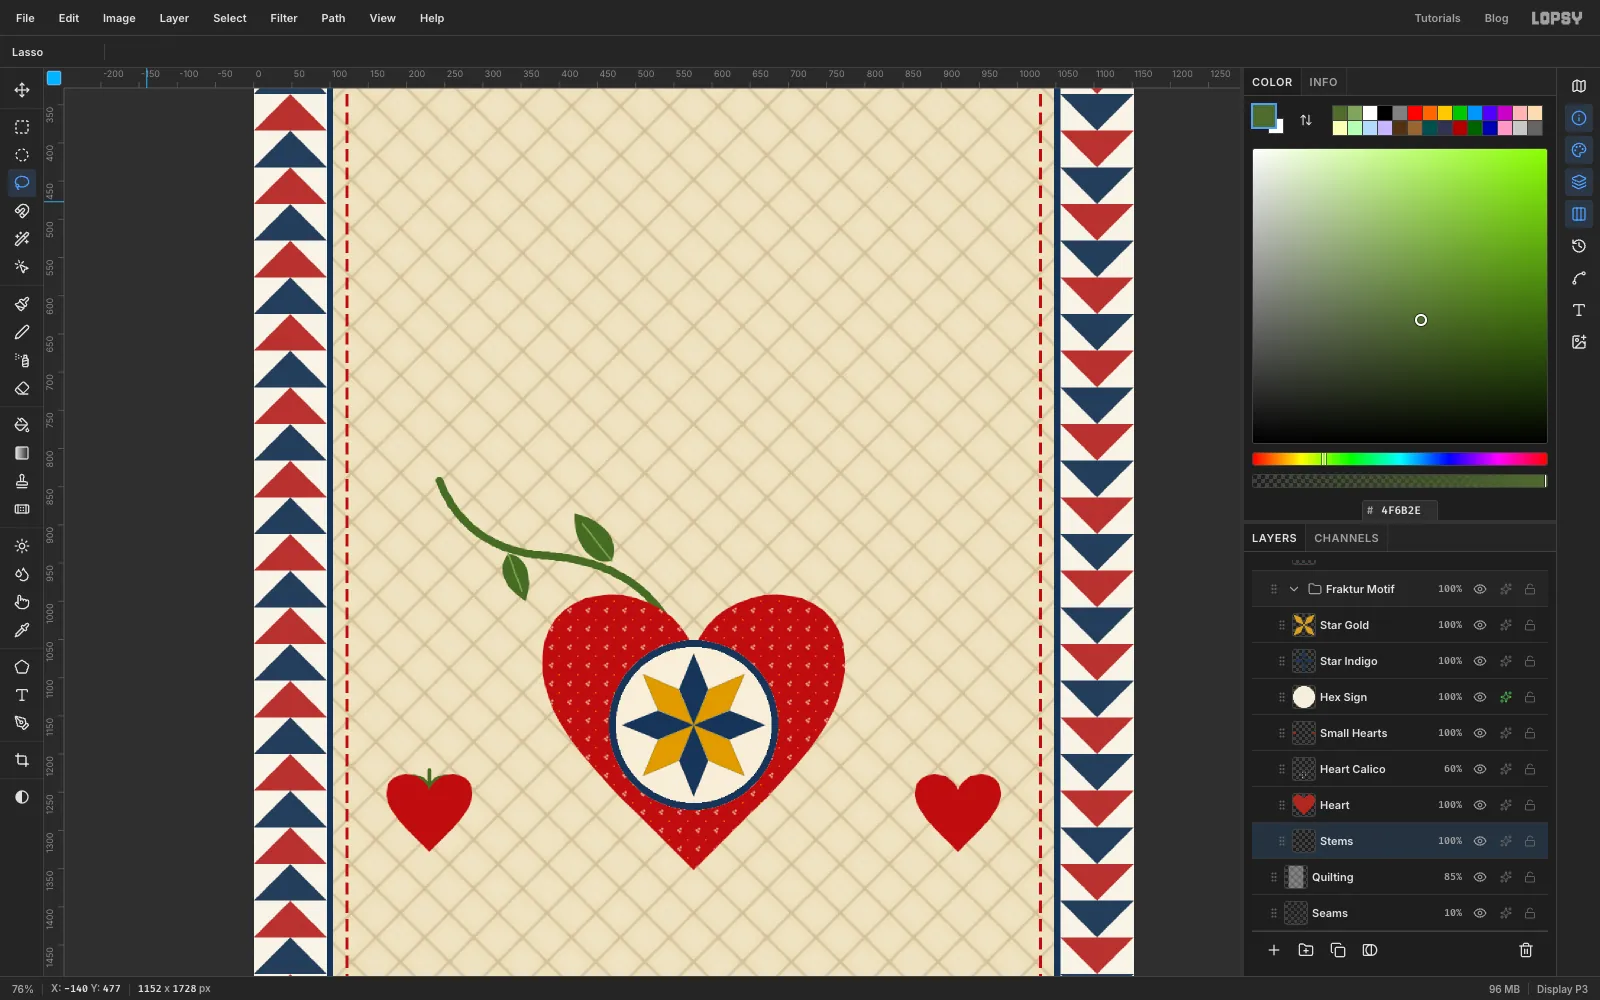
Click Heart and add a layer called Stems. In the Layers panel, drag Stems by its grip below Heart, so stems grow out from behind the heart.
Pick the Brush at Size 11, Hardness 100, in olive . Drag one smooth stroke out of the heart's cleft. Swing it left along a gentle S to about 200 px from the left edge, then turn it up to where a side tulip will sit.
Lasso two leaves on it: one pointing up-left near the heart, one hanging down further out. Fill them olive. Add a vein to each with a Size 3 brush stroke in .
Switch back to olive. On the left small heart, click its cleft and Shift-click about 30 px straight above it with the brush at Size 6. Then lasso two tiny leaves on that stem.
-
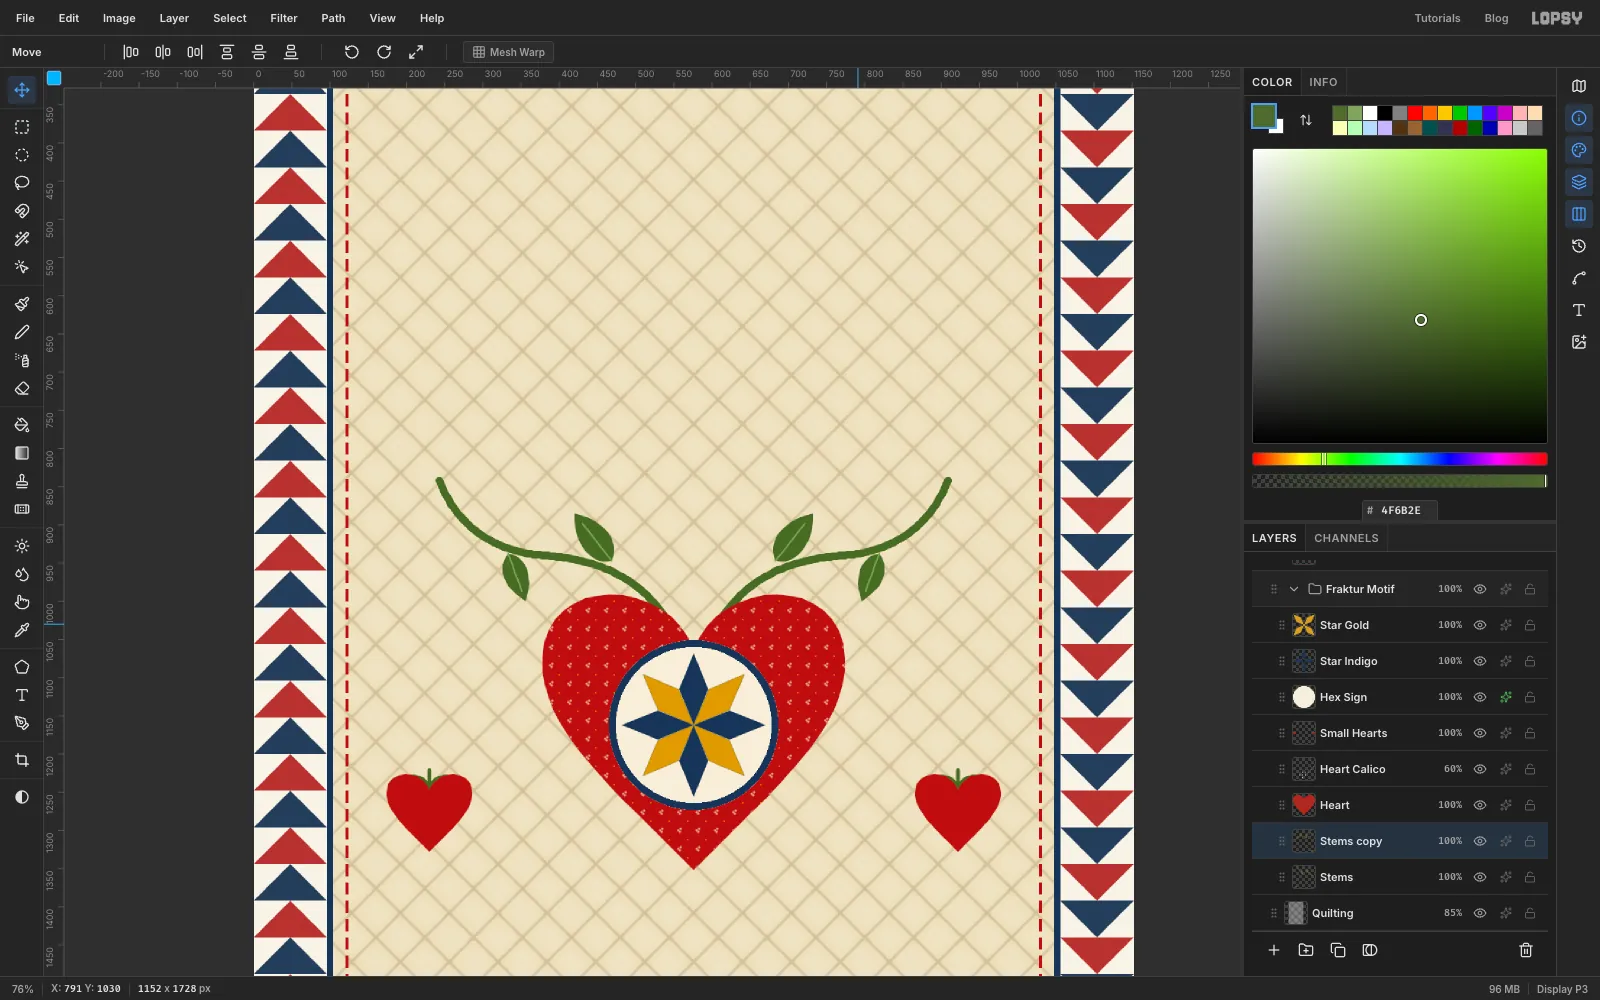
Mirror the stem to the right
Click Duplicate Layer. Select a box around everything you drew on the left: 150, 760 to 572, 1300. With the Move tool, click Flip Horizontal in the options bar. The copy flips inside the box.
Deselect, then drag the layer to the right by the page width minus the box's left and right edges. Here that's 1152 − 150 − 572 = 430 px. The same rule works for any box: the copy lands as an exact mirror image across the centre line. Merge down.
-
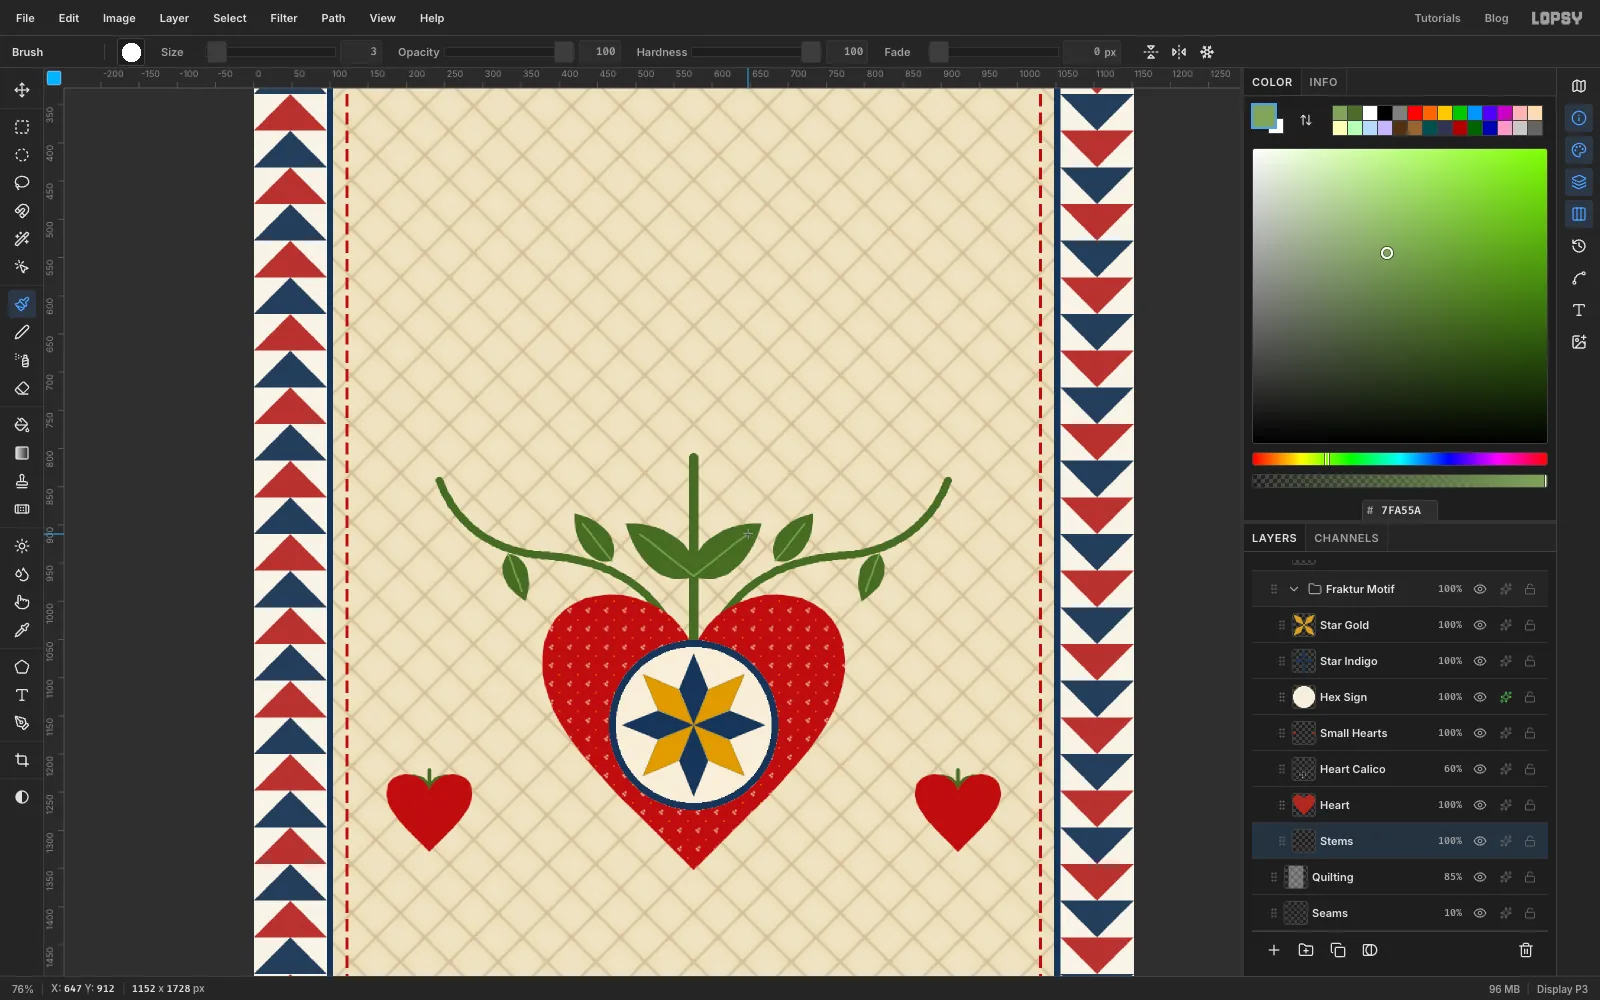
Add the centre stem
Switch back to olive and set the brush to Size 13. Click the heart's cleft, then Shift-click straight above it, about 260 px higher. Lasso a big pair of leaves halfway up, one on each side, and add their veins.
-
Paint a side tulip and a bud
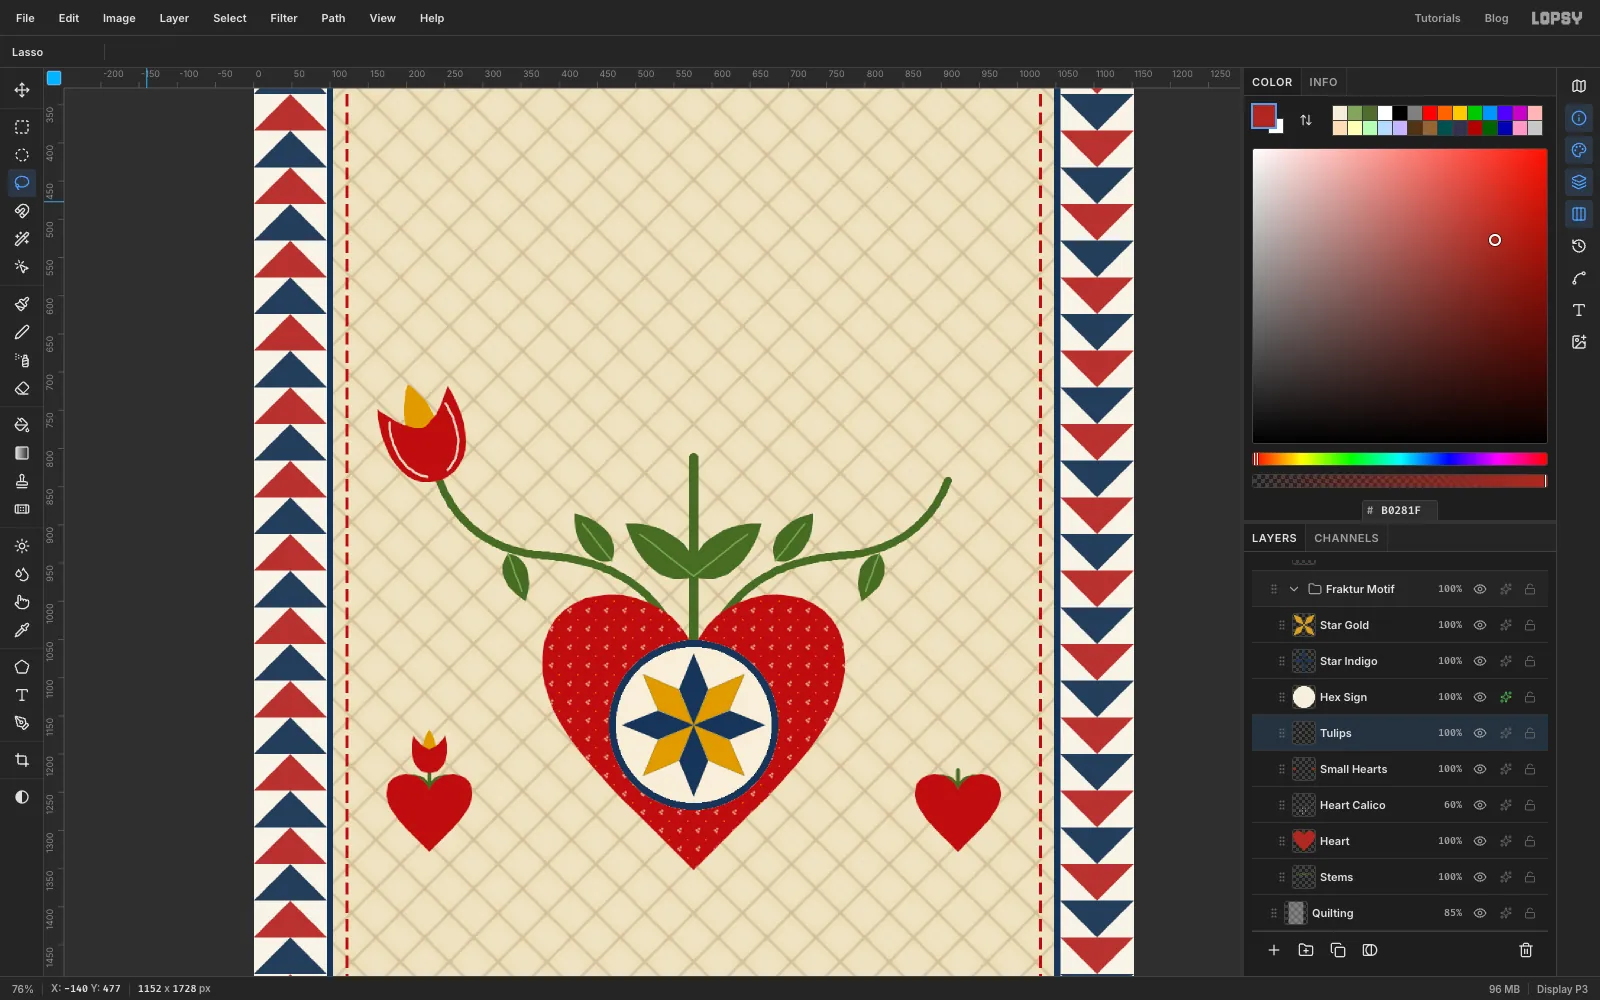
Click Small Hearts and add a layer called Tulips. A fraktur tulip is two lasso shapes, built up in this order:
- With the Lasso, draw the pointed mustard centre petal (a flame shape) and fill it.
- Over it, draw the red cup. It has two outer petals that curl out to points and a dip in the middle where the flame shows through.
Draw it in place at the top of the left stem, already leaning about 20° outwards, so you don't need to rotate it afterwards.
With the Brush at Size 4, Opacity 90%, in cream, paint one curved highlight stroke inside each outer petal.
Draw a tiny version of the tulip, about 55 px tall, on top of the small heart's stem.
-
Mirror the tulips and add the big one
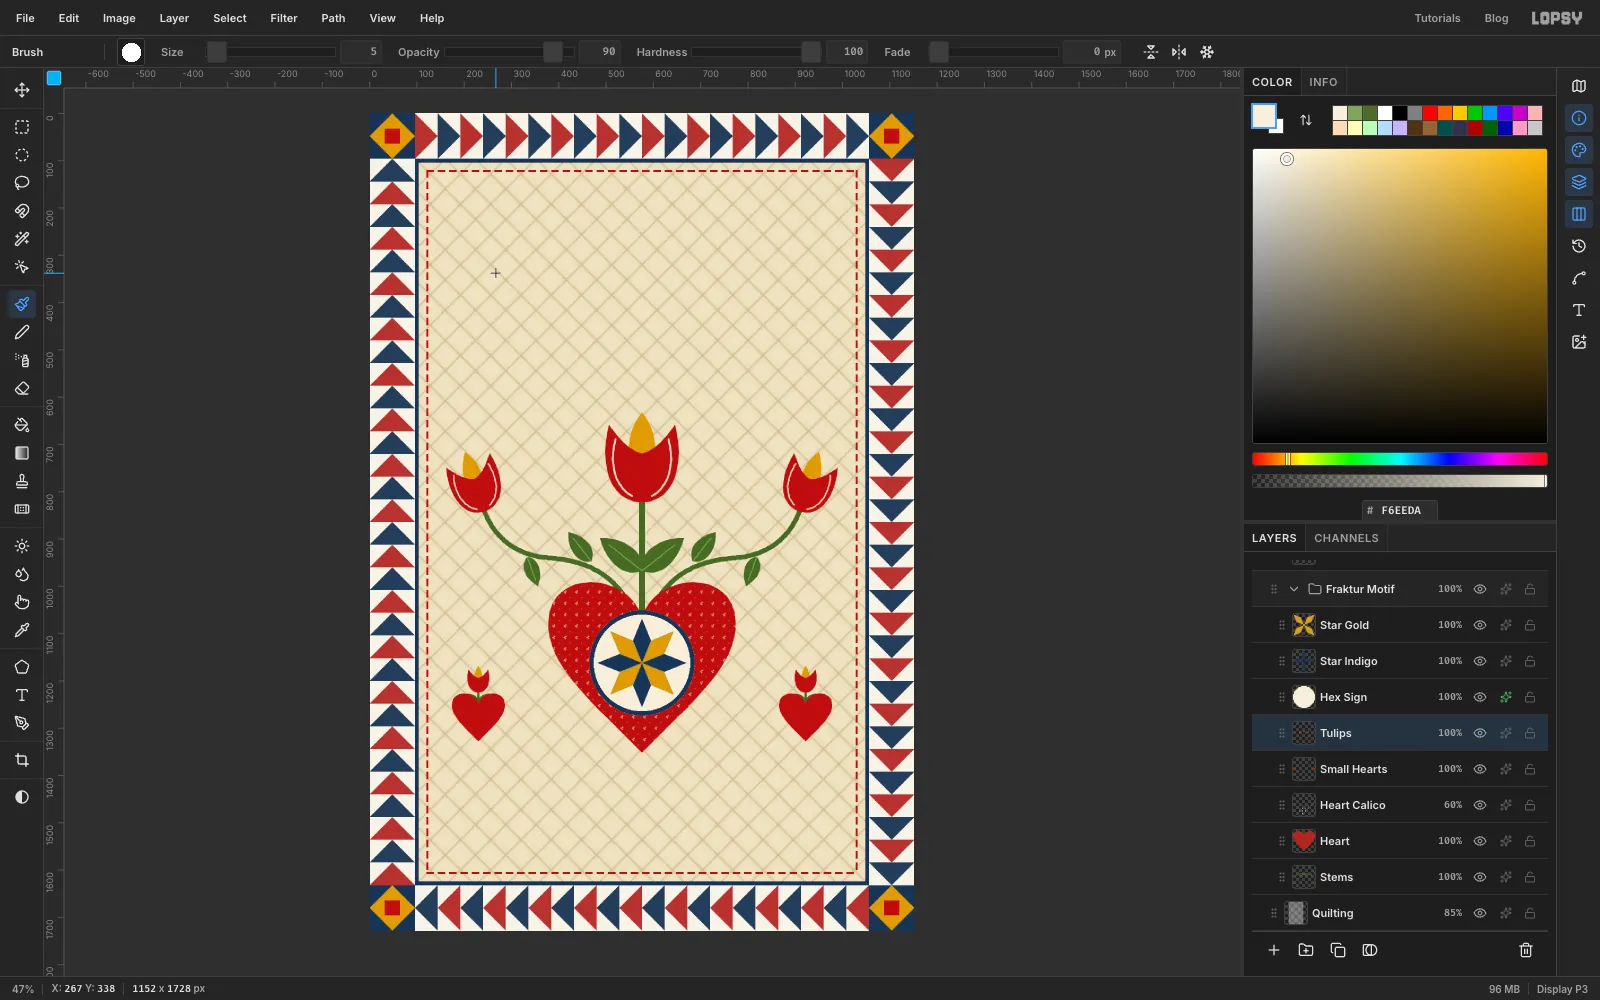
Mirror the side tulip and bud the same way as the stem. Duplicate the layer and select 110, 650 to 340, 1250. Click Flip Horizontal, deselect, drag 702 px right (1152 − 110 − 340), and merge down.
Then draw the big upright tulip on top of the centre stem. It's about 175 px tall, with the same flame, cup and highlight strokes, the highlights at Size 5. Set the brush Opacity back to 100% afterwards.
-
Shape the distelfink's body and tail
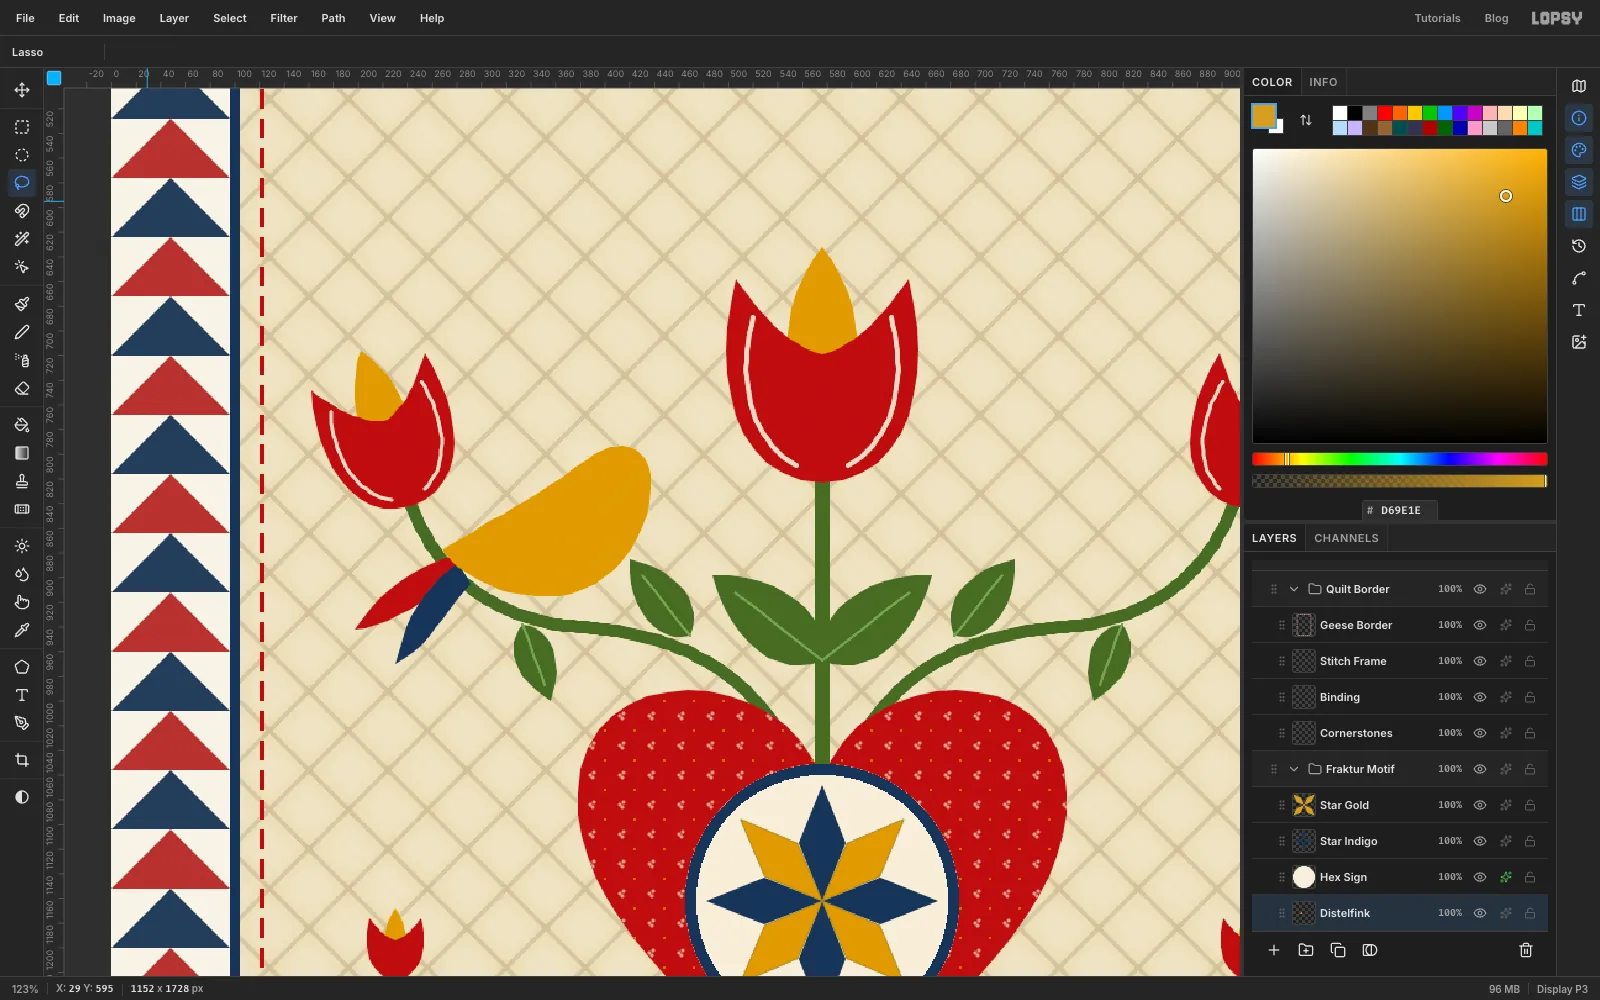
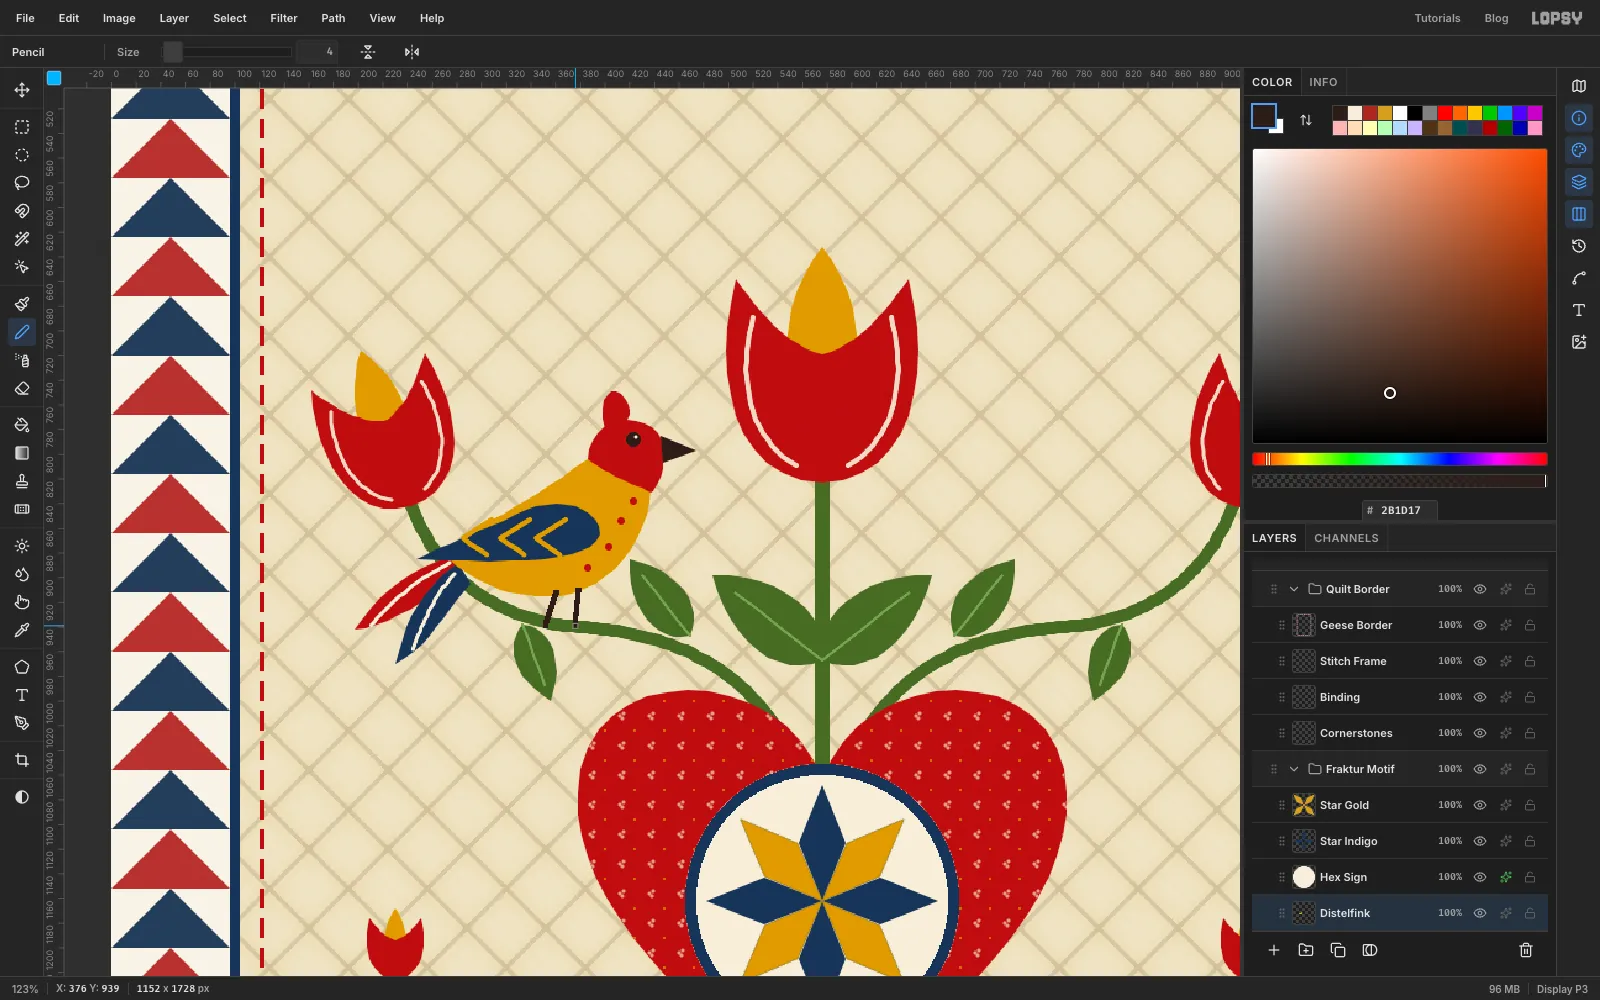
Click Tulips and add a layer called Distelfink. Zoom in on the left stem. The bird is about 170 px long from beak to tail and perches midway along the stem, facing the centre tulip.
With the Lasso, draw two long tail feathers. They start at the back of the body and droop down and back over the stem. Fill the upper one red and the lower one indigo.
Then lasso the body, a mustard teardrop with a round breast that faces the centre tulip. Fill it mustard.
-
Add the head, crest and wing
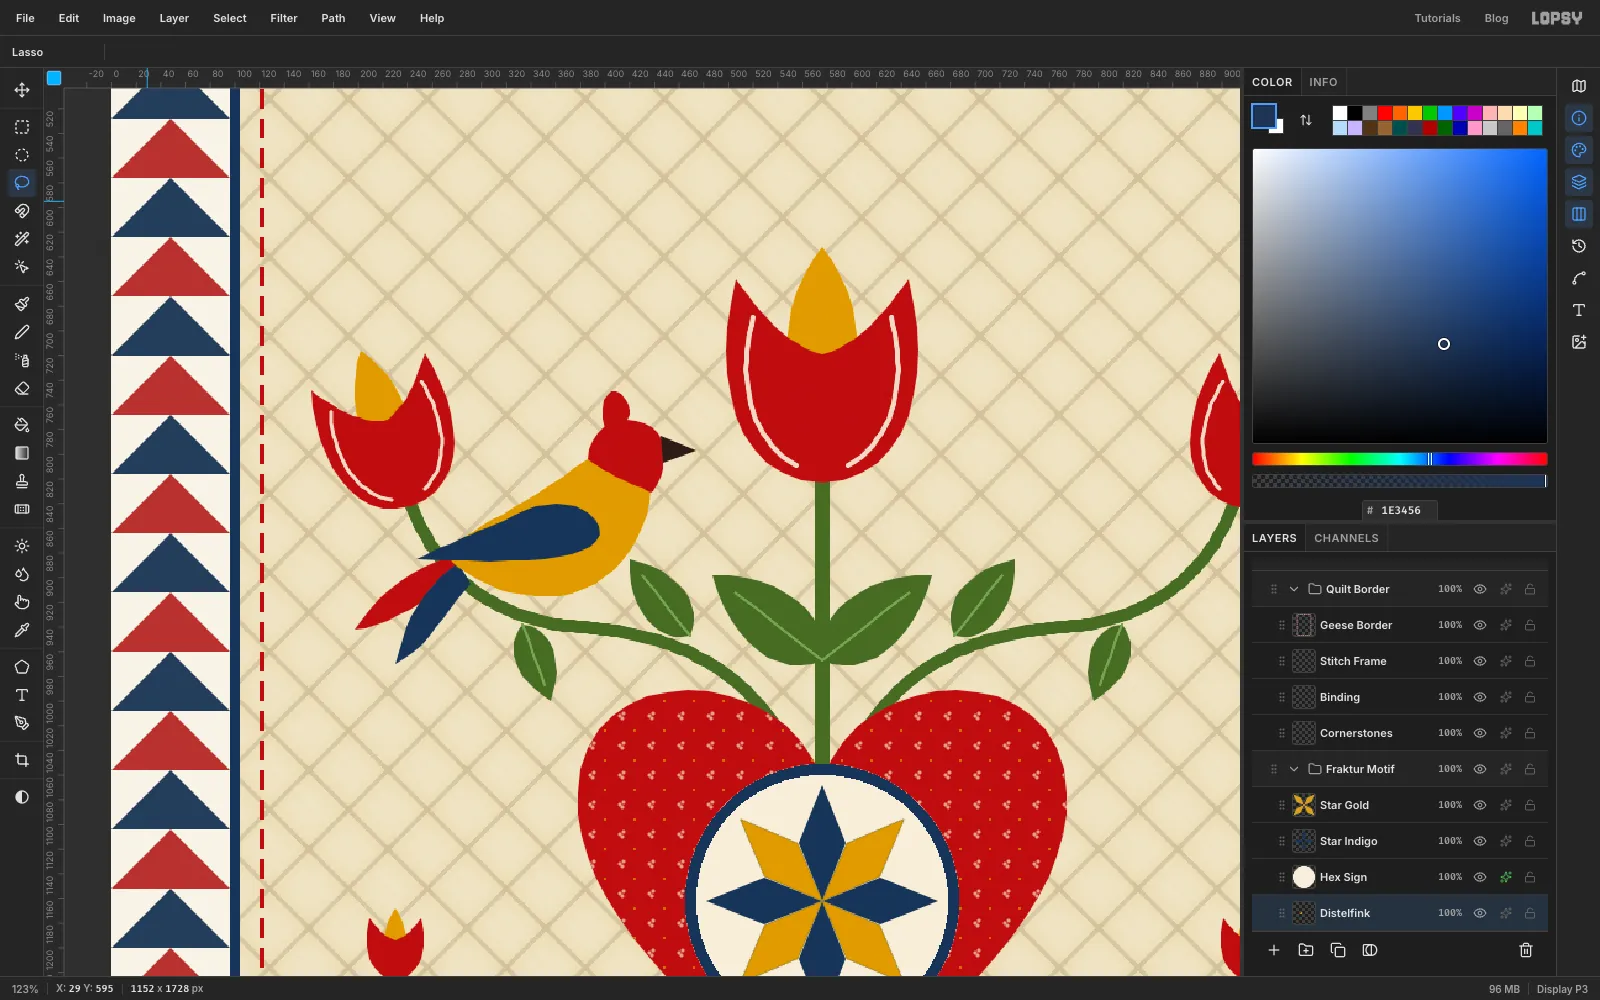
Lasso a round red head on the front of the body. Add a small red crest that overlaps the crown, so it reads as part of the head and not a separate blob. Then add a little ink triangle for the beak. Last, lasso an indigo almond for the wing. Point it back toward the tail and let it overlap the body.
-
Paint the bird's details and legs
With the Brush:
- Size 5, mustard: three small chevrons across the wing
- Size 4, cream: one line along each tail feather
- Size 7, red: a few dots down the breast
- Size 13, ink: one click for the eye, then a Size 4 cream click for the highlight
For the legs, pick the Pencil at Size 4 in ink. Shift-click two short lines from the belly down onto the stem.
-
Mirror the bird
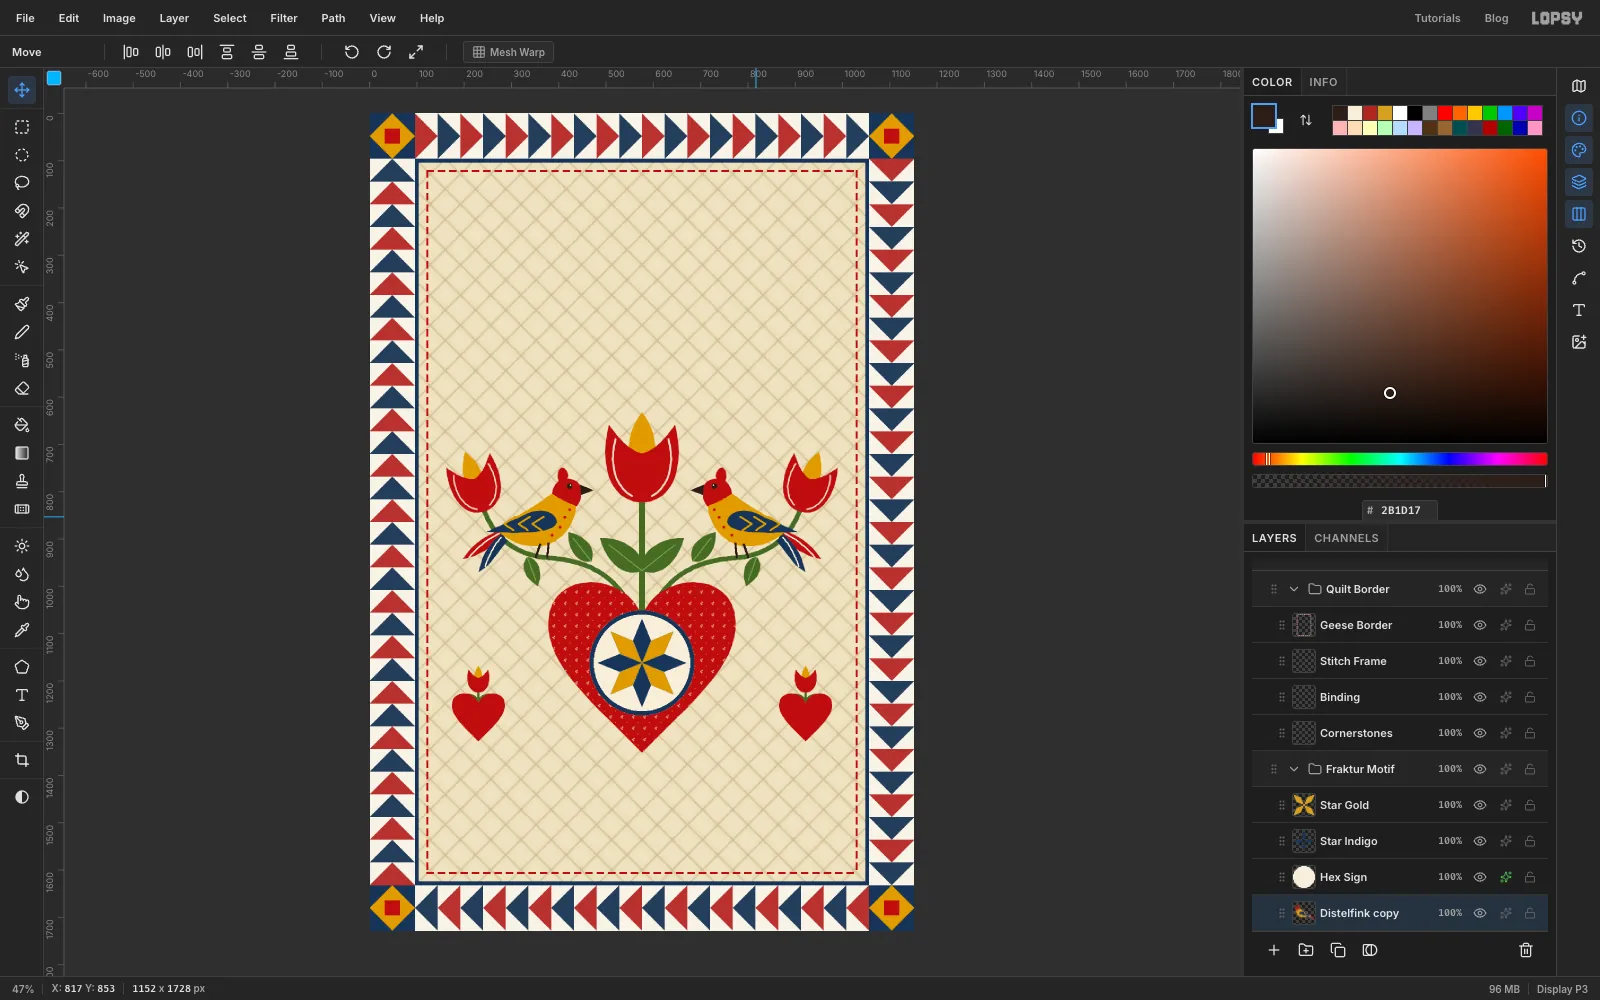
Duplicate the layer, select 180, 715 to 490, 990, and click Flip Horizontal. Deselect, drag the copy 482 px right, merge down, and rename the layer Distelfinks.
-
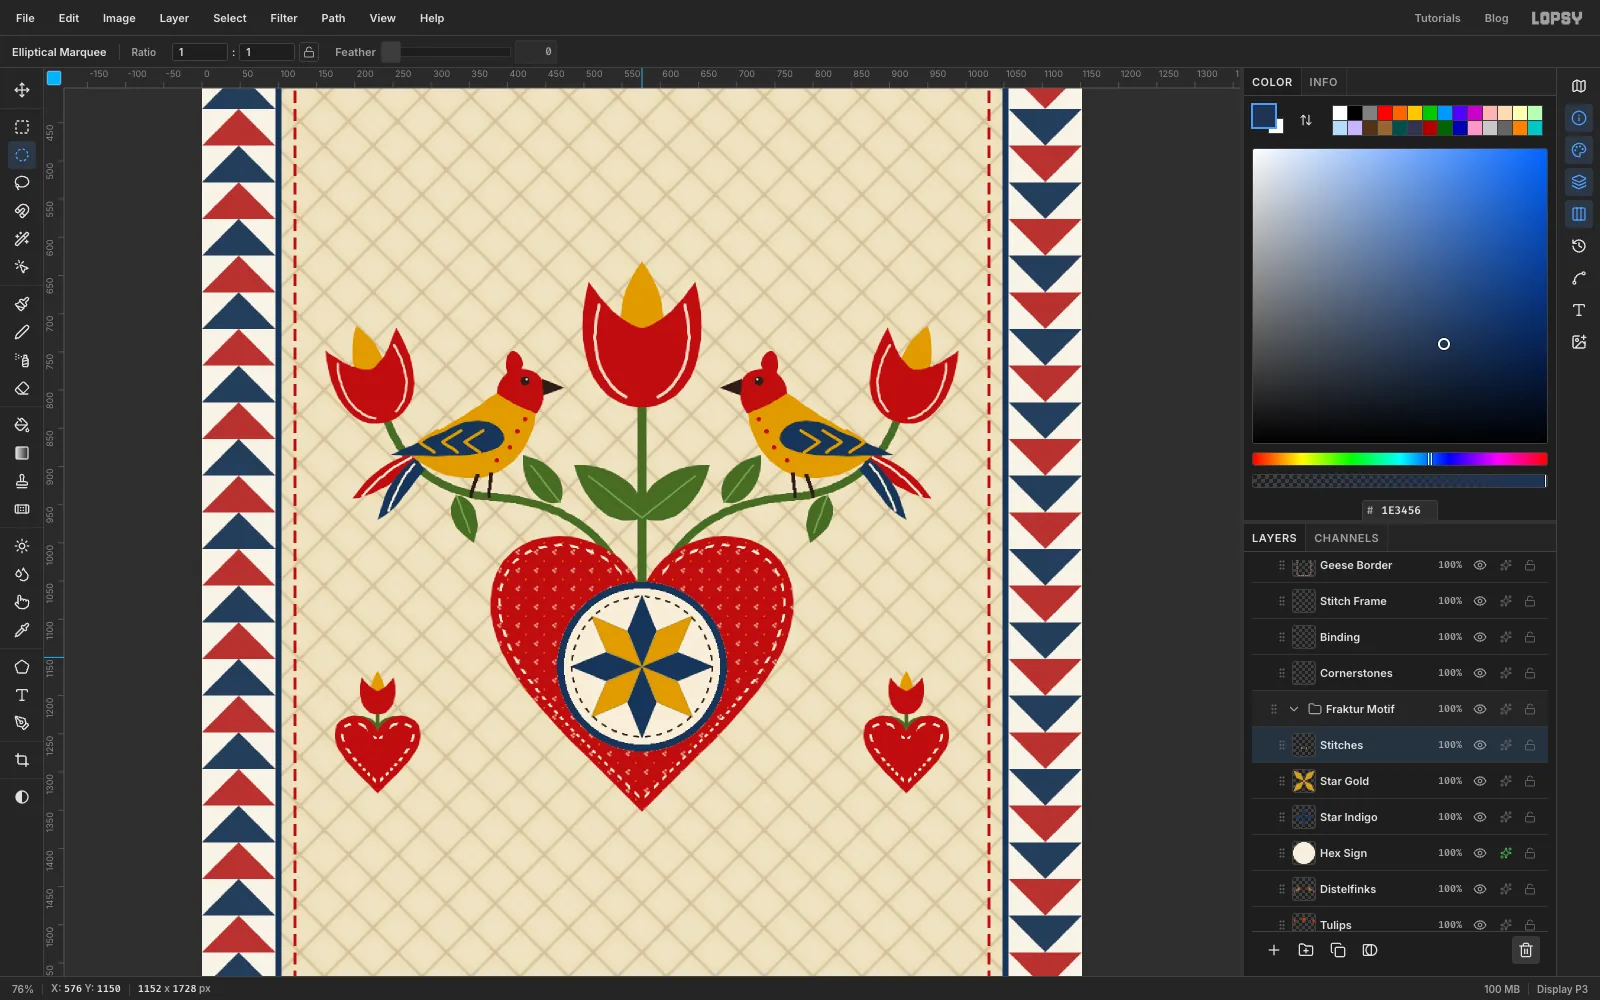
Make the appliqué stitch rings
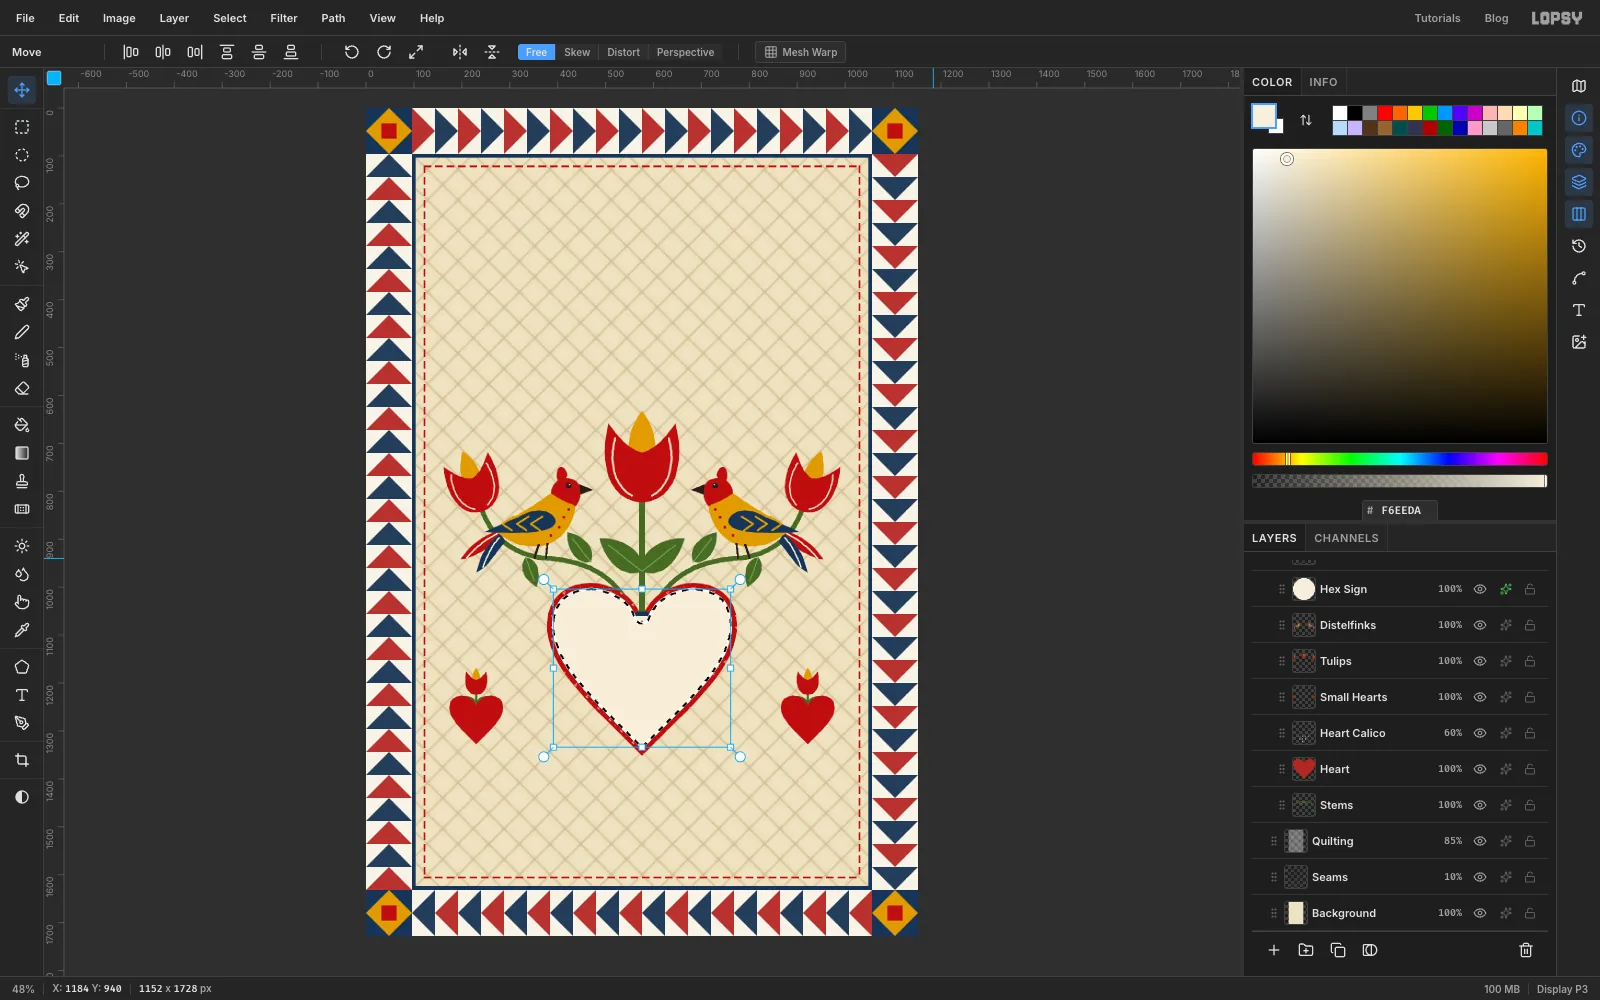
Appliqué pieces are sewn down with a running stitch just inside their edge. Start each stitch line as a thin ring. Add a layer called Stitches and drag it to the top of the Fraktur Motif group.
For the big heart:
- Cmd-click the Heart thumbnail.
- Choose Select → Shrink… 10.
- Fill the selection with cream.
- Choose Shrink… 3 again and press Delete.
That leaves a 3 px ring exactly 10 px inside the heart, sharp tip included.
Do the same for Small Hearts, with Shrink 8, then 3.
The disc sits over the heart's ring, so clear that part first: Cmd-click Hex Sign, Grow 10, press Delete. Then make the disc's own ring in ink: Cmd-click Hex Sign, Shrink 18, fill, Shrink 2, Delete.
-
Fan out a Sunburst stitch cutter
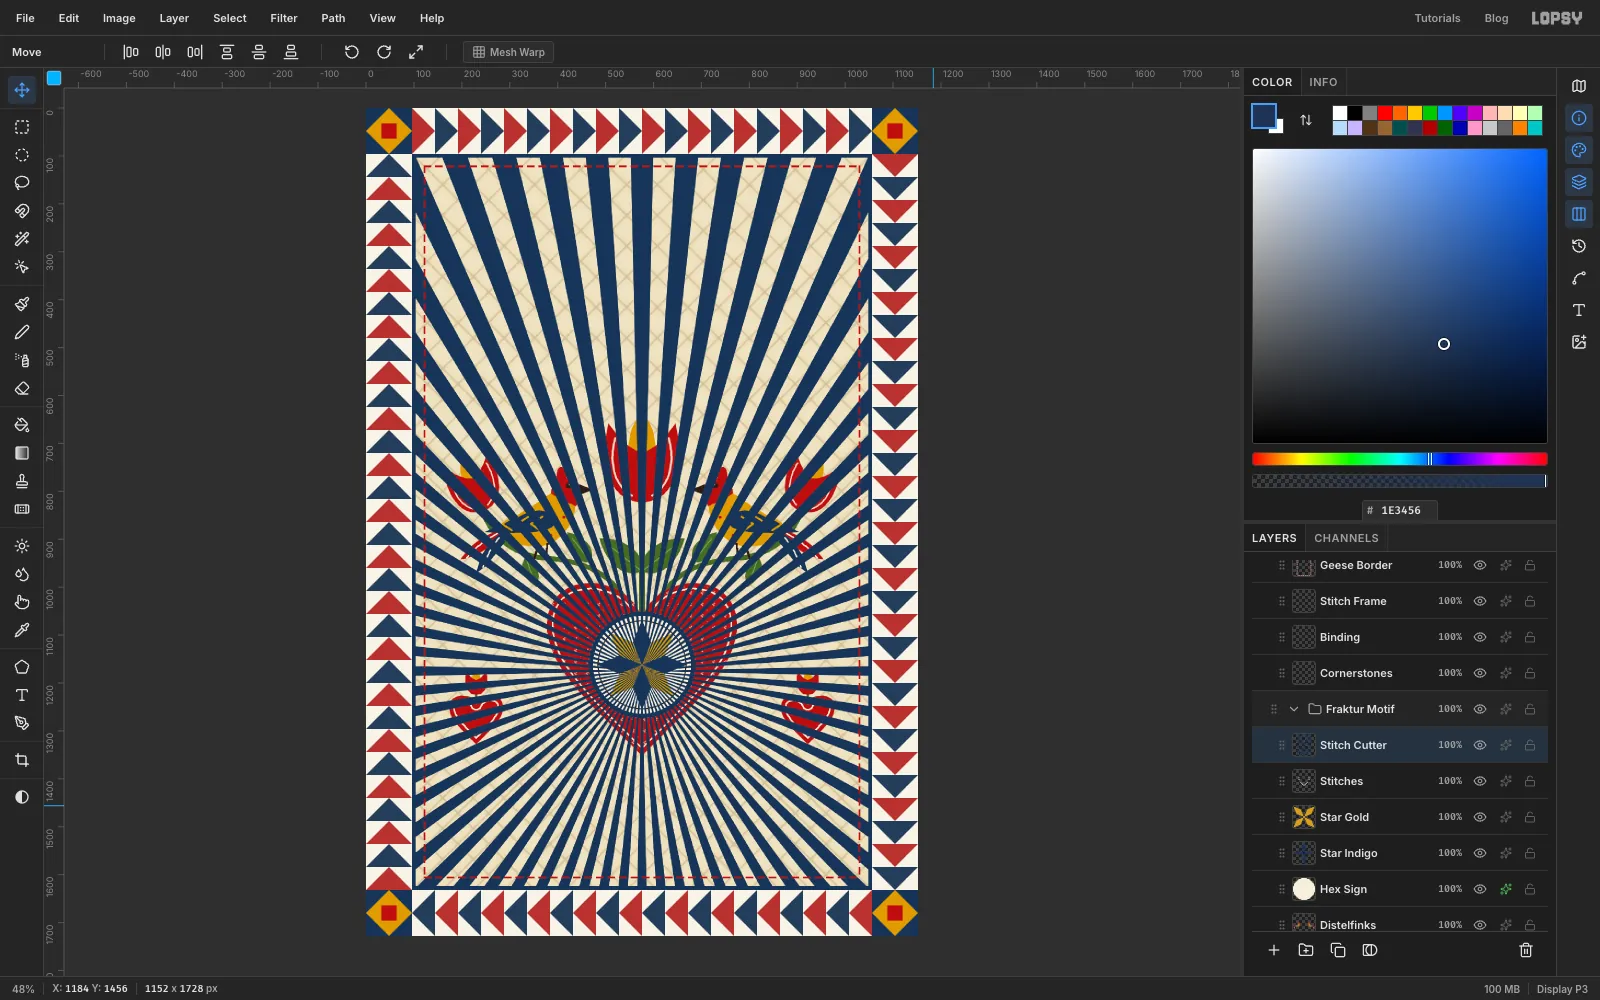
Add a layer called Stitch Cutter and set the foreground to any solid colour. Choose Filter → Sunburst… with these settings:
- Rays 72 and Width 50
- Length 100
- Taper, Fade and Softness at 0
- Center X 50, Center Y 68, so the burst starts in the middle of the heart
Width 50 makes each ray as wide as the gap next to it, so the dashes and gaps come out about equal. The rays cross the ring roughly at right angles, the way stitches run across a seam.
The disc and the small hearts are smaller, so they need their own, finer bursts:
- With the Elliptical Marquee, draw a circle just inside the disc, press Delete, and run Sunburst with Rays 40 and Center Y 67.
- Draw a circle about 145 px across round the left small heart, press Delete, and run Sunburst with Rays 20, Center X 20 and Center Y 74.
- Repeat for the right small heart with Center X 80.
-
Cut the rings into running stitches
Click Stitches, Cmd-click the Stitch Cutter thumbnail, and press Delete. Everywhere a ray crossed a ring, the ring is cut, and what's left is a row of evenly spaced dashes. Deselect and delete the Stitch Cutter layer.
-
Add the issue strip
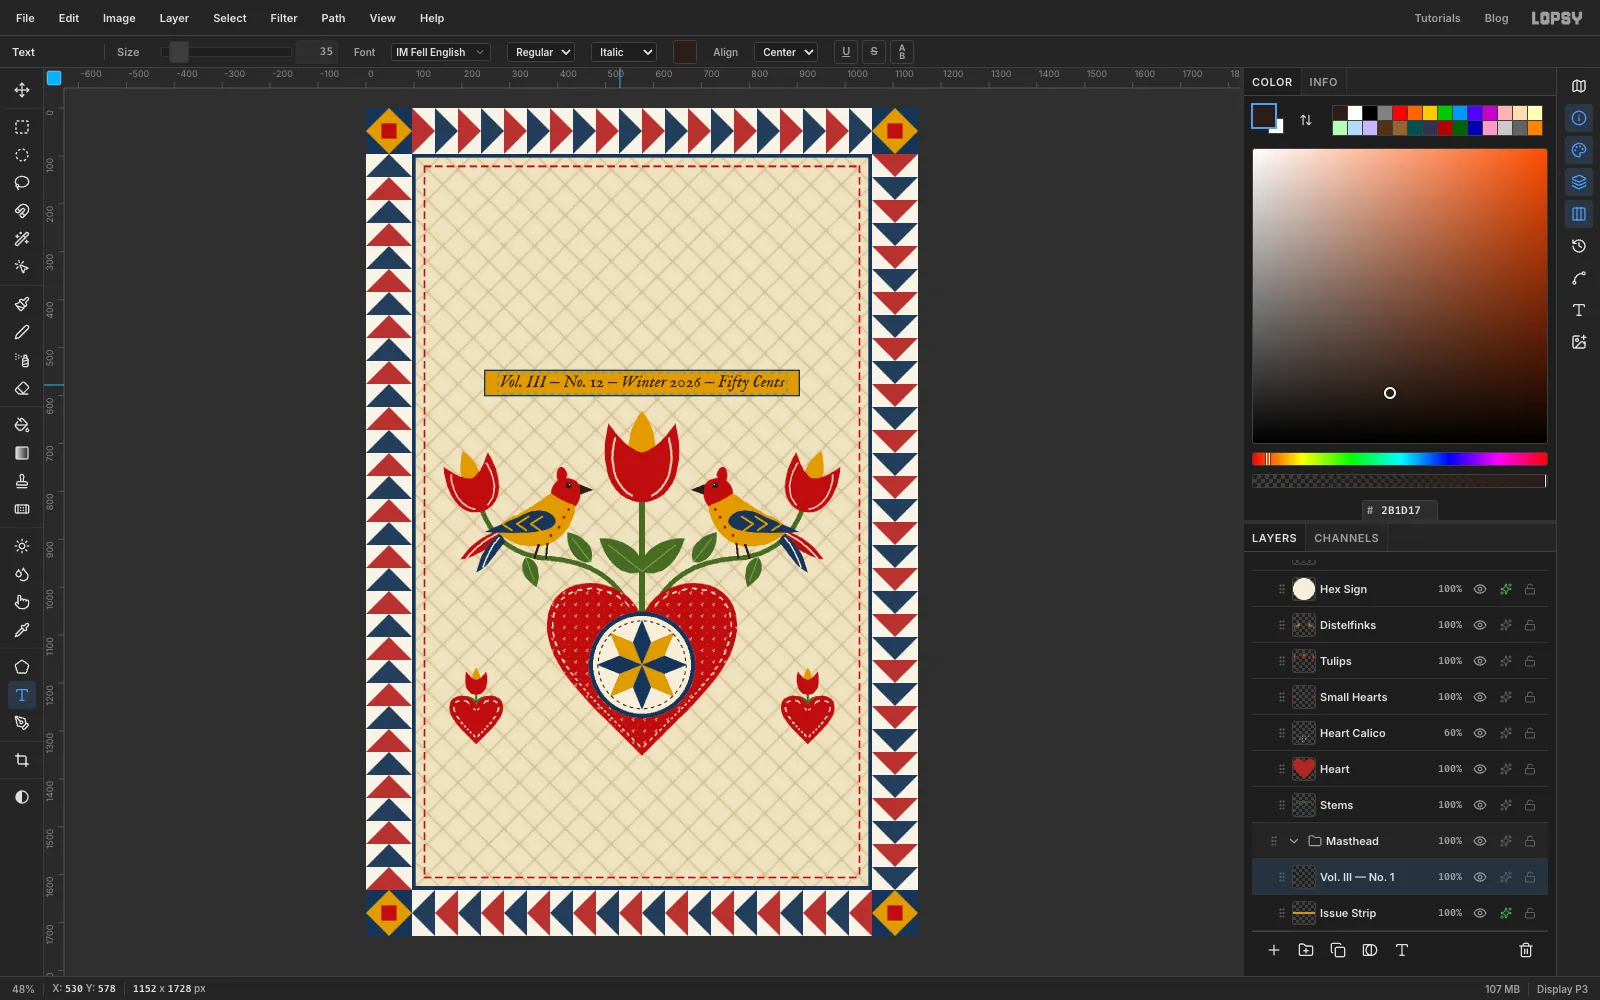
Click Quilting, make a New Group called Masthead, and add a layer called Issue Strip. Select 246, 546 to 906, 602 and fill it mustard. Give it a Stroke effect: Width 3, indigo, Inside.
Pick the Text tool. In the options bar set:
- font IM Fell English
- Size 35
- style Italic
- Align: Center
- foreground ink
Where you click is the top of the text's line, and the letters hang a little below it. Click on the centre line just inside the top of the strip, and type:
Vol. III — No. 12 — Winter 2026 — Fifty Cents
Click the ✓ to commit. If it isn't centred top to bottom, nudge it with the Move tool and the arrow keys.
-
Set "Quarterly" with a red initial
Work up the page from here, so that no new click lands inside an earlier line of text and edits it.
Click the Issue Strip row first. The text options change the selected text layer, and you don't want to restyle the strip's line. Set the font to UnifrakturMaguntia, Size 168, style Normal, centred, with the foreground indigo.
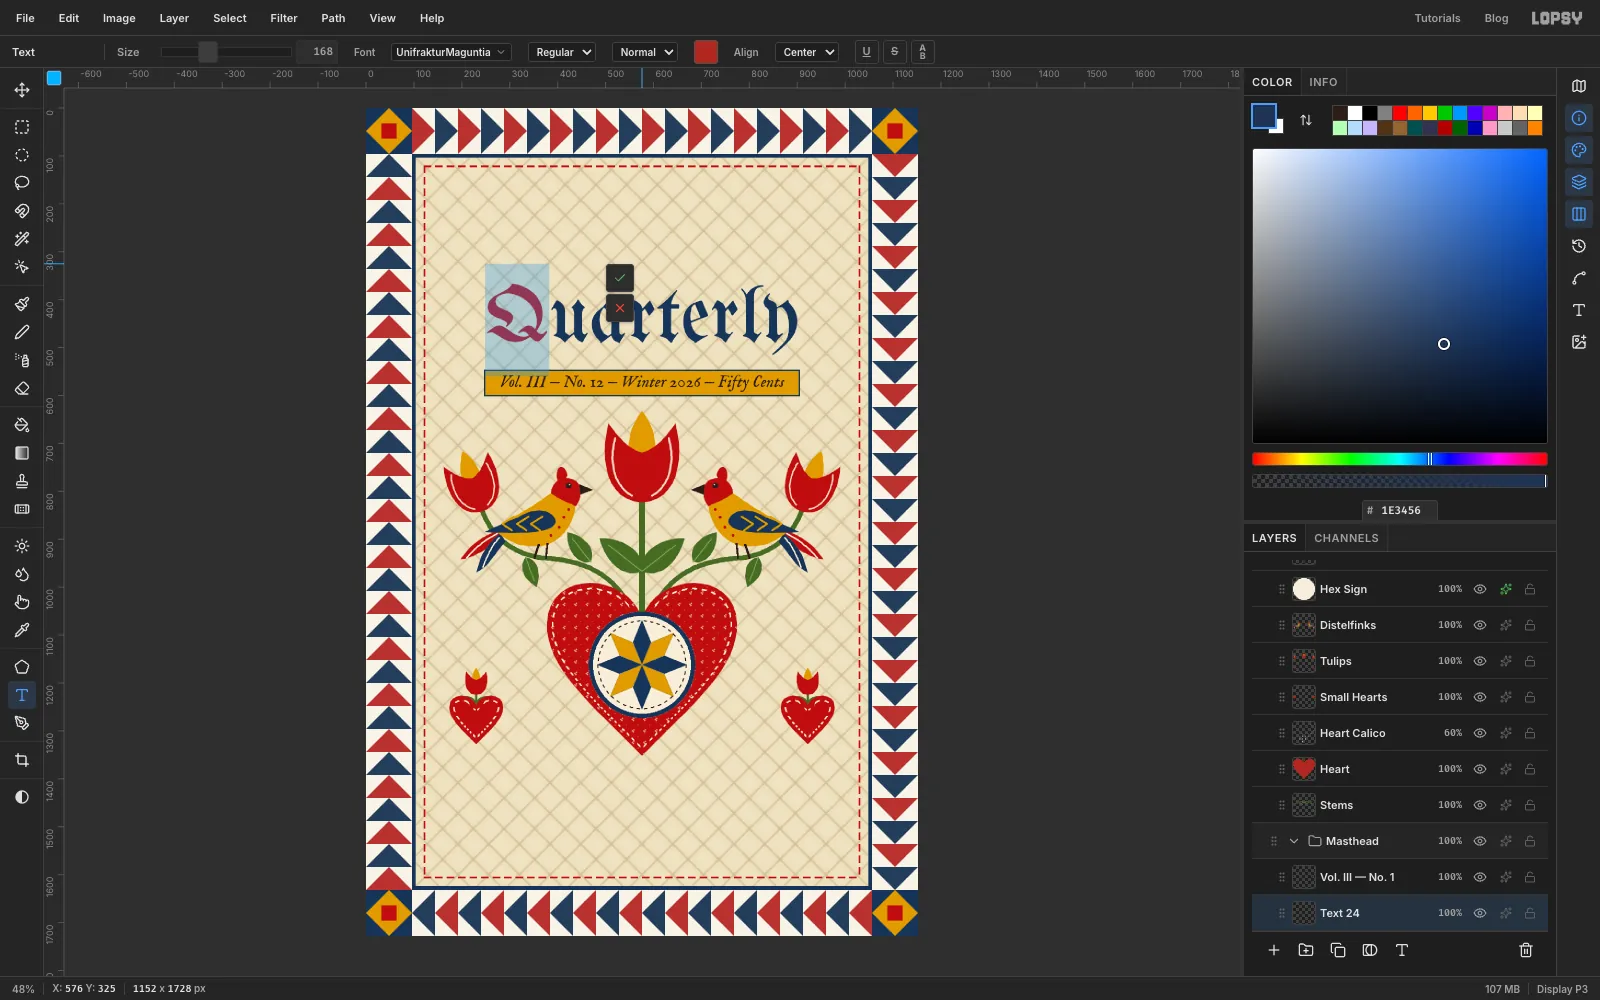
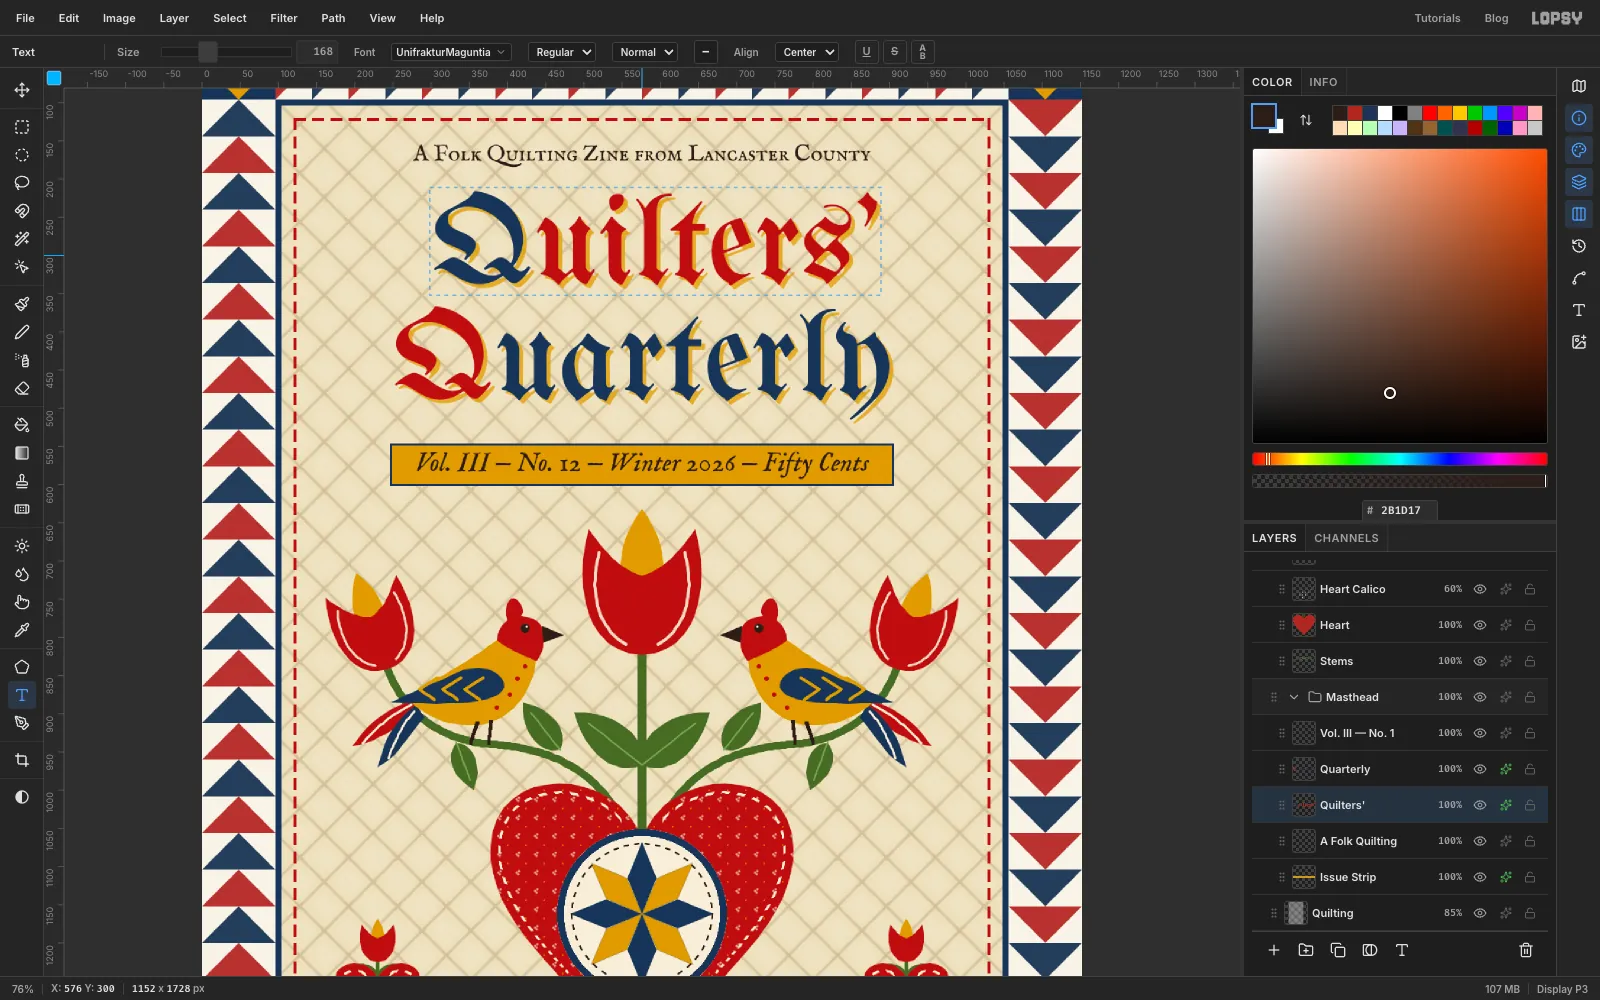
Click the centre line about 220 px above the strip. At this size the letters start about 40 px below your click, so the tail of the y ends up about 30 px above the strip. Type Quarterly. Press Home, then Shift+Right to select just the Q. Click the Text color swatch and enter red . Commit.
In fraktur this is called rubrication: a red initial letter.
-
Set "Quilters'" and the tagline
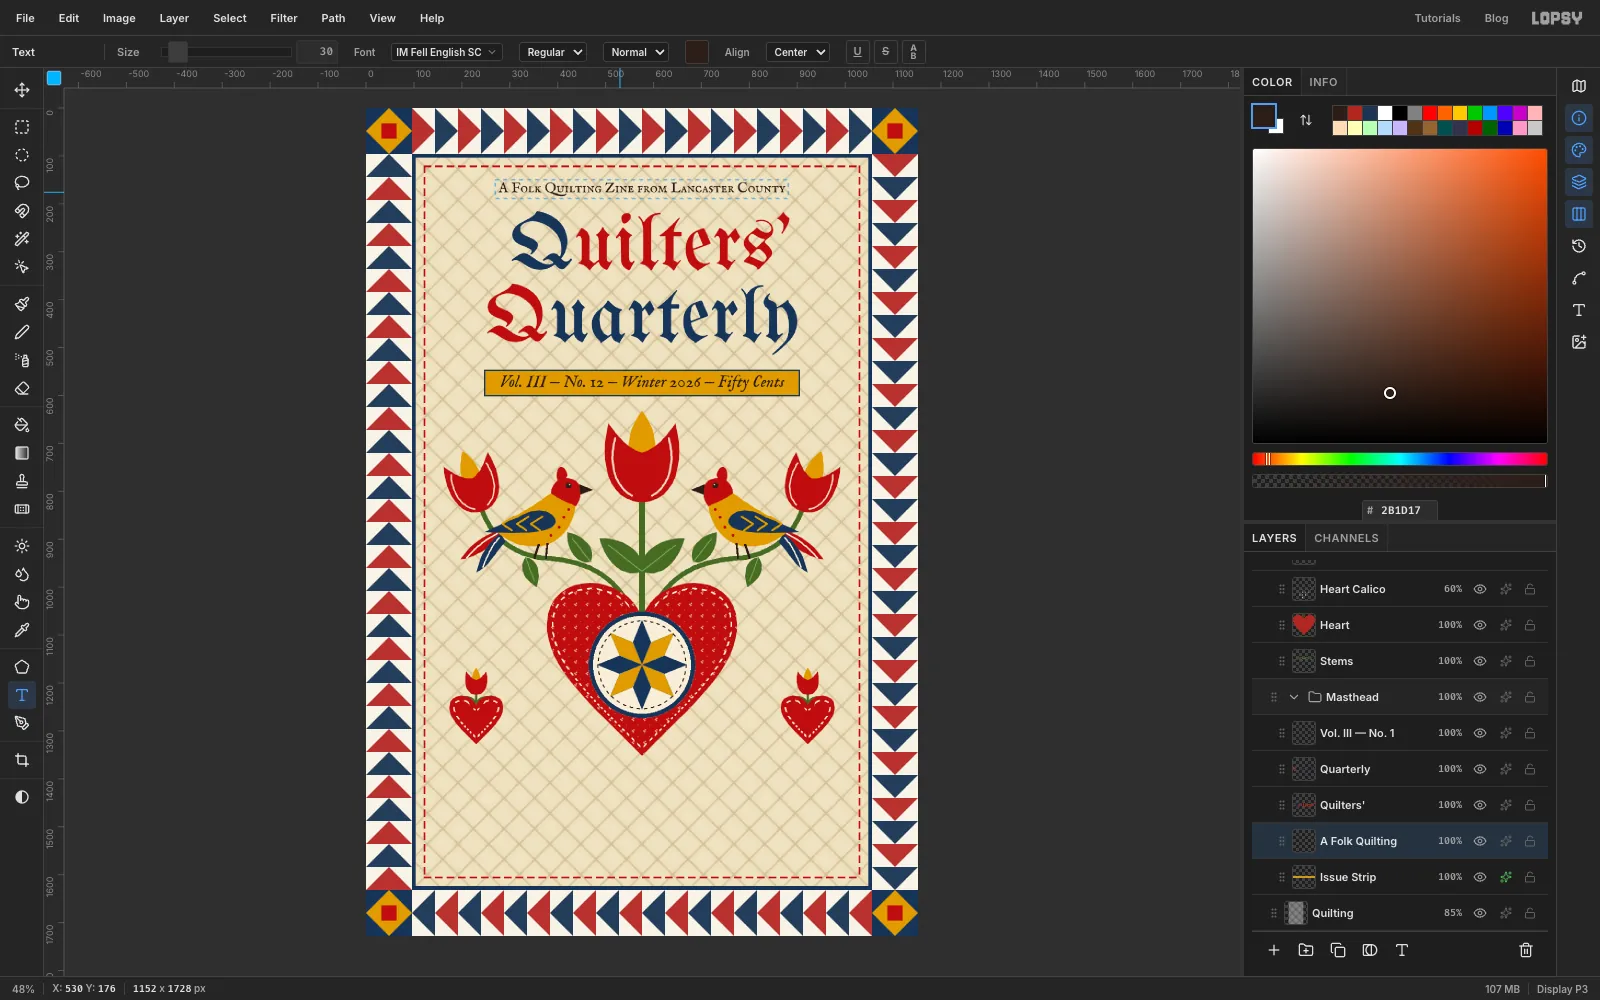
Click Issue Strip again and switch the foreground to red. Click about 150 px above where you clicked for Quarterly and about 18 px right of the centre line, and type Quilters'. Point text centres on its full width, apostrophe included, so this nudge centres the word itself.
Select the Q and colour it indigo, the opposite of the line below. Commit.
Click Issue Strip once more. Set IM Fell English SC, Size 30, in ink, centred, and click about 30 px above Quilters' to type A Folk Quilting Zine from Lancaster County. Aim for about 30 px of space between each line.
-
Give the title a sign-painter's shadow
On Quarterly and then Quilters', turn on Drop Shadow with:
- Offset X 5 and Offset Y 5
- Blur 0, Spread 0 and Opacity 100%
- mustard
It reads as a second colour of paint, not a shadow.
-
Move the whole motif down
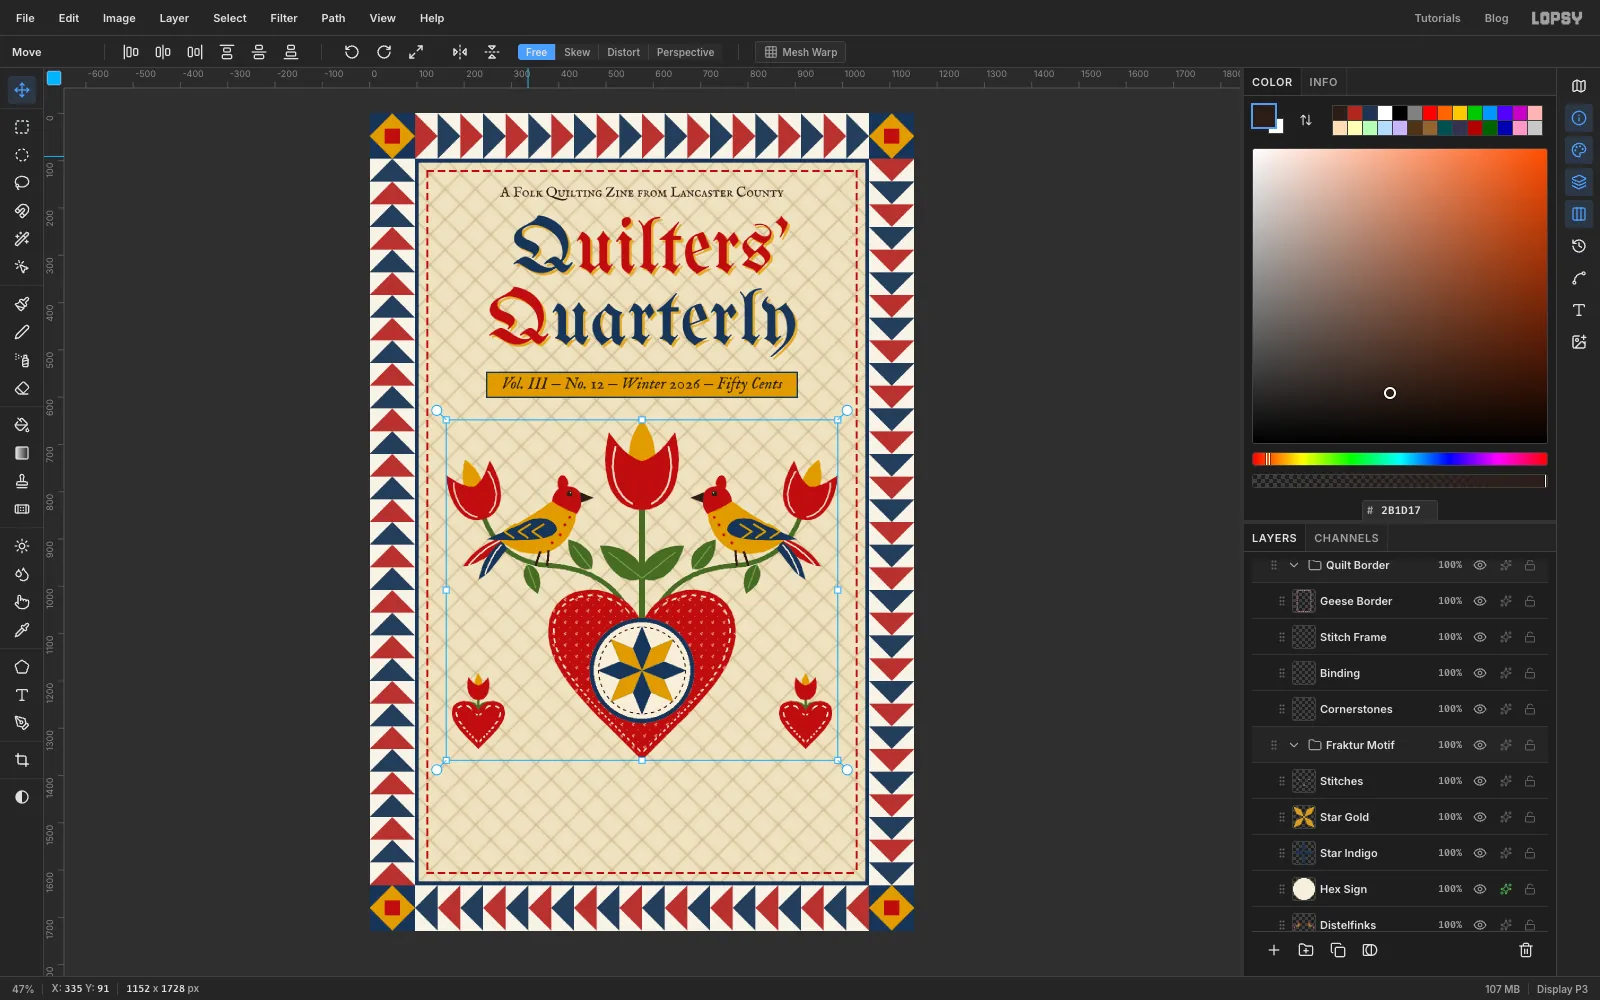
The tulip now crowds the issue strip. Click the Fraktur Motif group row, pick the Move tool, and nudge it 16 px down with the arrow keys (Shift + an arrow moves 10 px at a time). Everything in the group moves together, and the gap under the strip is now about 45 px.
-
Type the contents slip
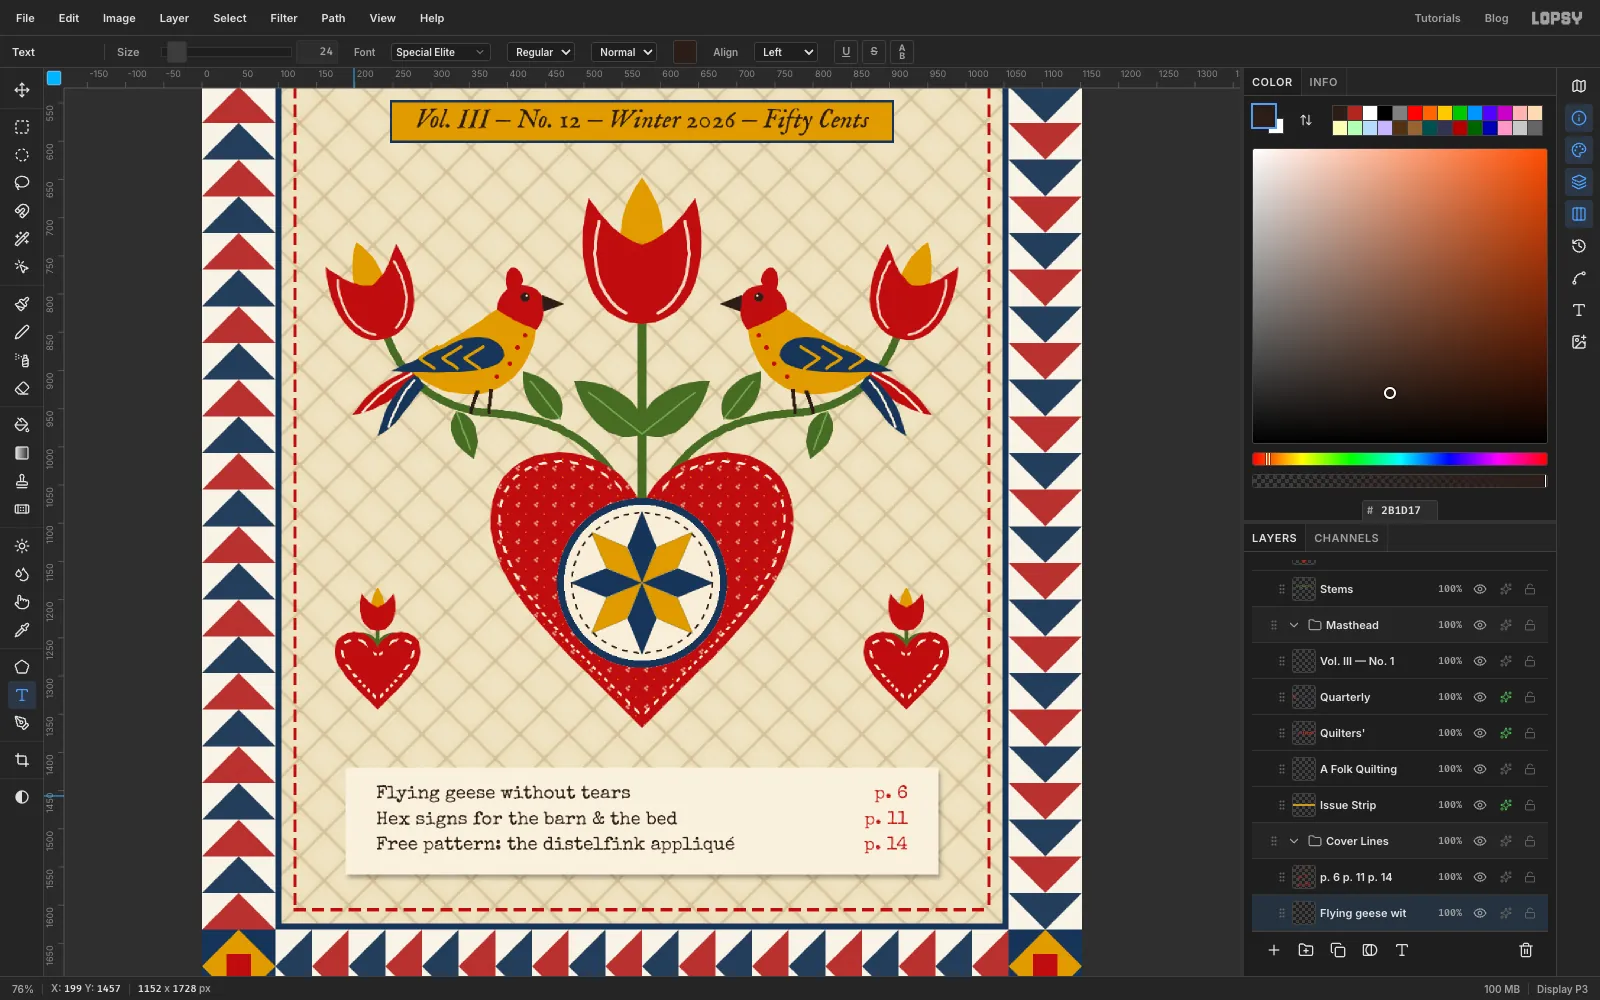
Click Quilting, make a New Group called Cover Lines, and add a layer called Cover Slip. Select 188, 1420 to 964, 1560 and fill it with paper . Give it a soft Drop Shadow: Offset 3 / 5, Blur 8, Opacity 35%, in ink.
With the Text tool, set Special Elite at Size 24:
- Align: Right, in red, click 40 px in from the slip's right edge and about 20 px below its top. Type p. 6, p. 11 and p. 14 on three lines, pressing Enter between them.
- Click Cover Slip again. Align: Left, in ink, click 40 px in from the left edge at the same height, and type the article titles on three lines:
- Flying geese without tears
- Hex signs for the barn & the bed
- Free pattern: the distelfink appliqué
-
Draw dotted leaders
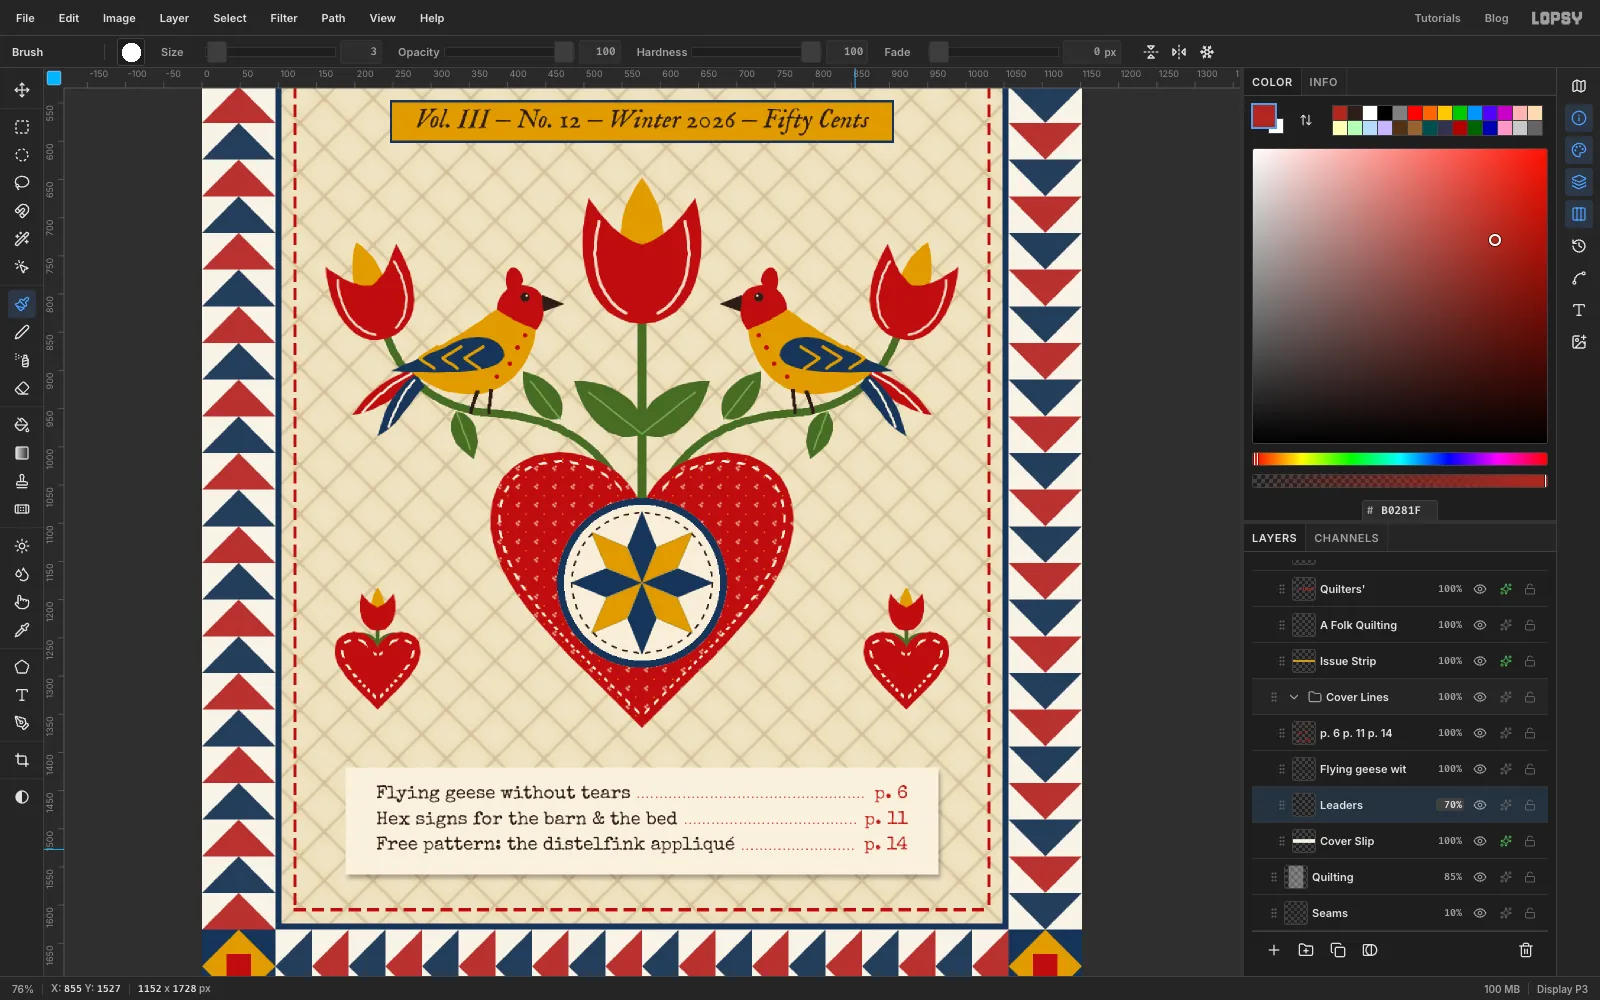
Click Cover Slip and add a layer called Leaders. Pick the Brush at Size 3, open the Brushes panel from the brush-tip thumbnail, and set Spacing to 200%. Each dab now lands on its own, as a dot.
In red, click just after the end of each title, on its baseline, and Shift-click just before its page number. Set the layer to 70%.
-
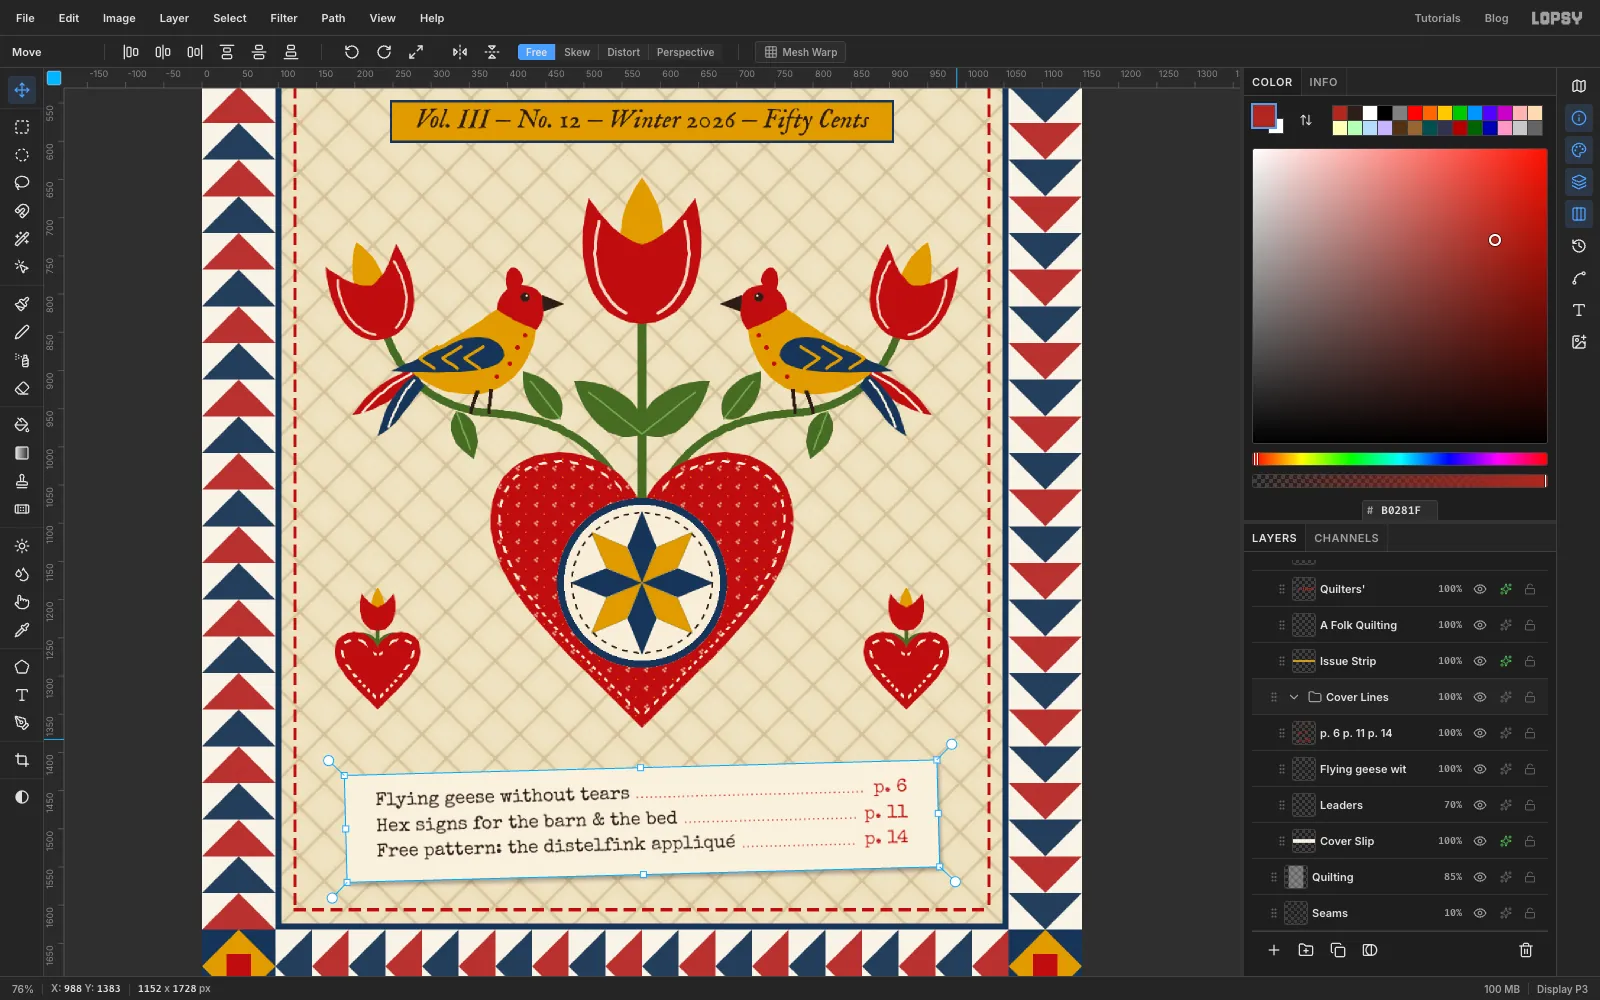
Tilt the slip
Click the Cover Lines group row and pick the Move tool. Handles appear around the whole slip. Make sure the grid is off, so the rotation doesn't snap. Drag a corner rotation handle counter-clockwise about 1.5°, then press Cmd+D to commit. The text layers turn with the paper and stay editable.
-
Tape the slip down
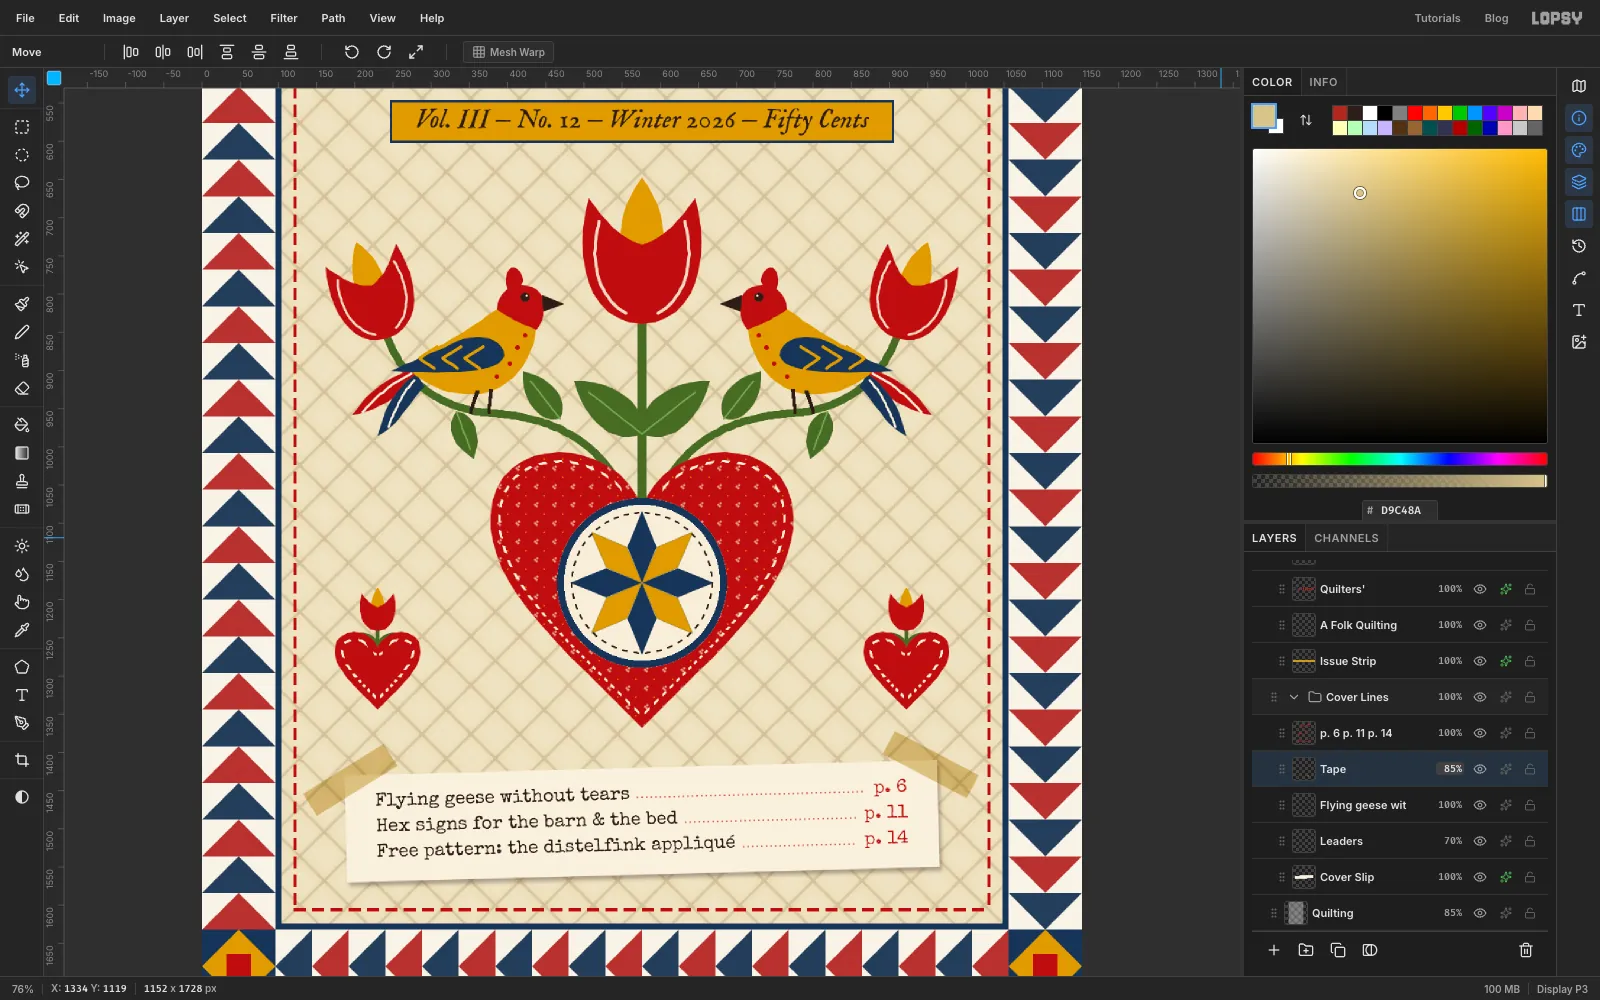
Click the titles layer (Flying geese wit… in the panel) and add a layer called Tape. Select a strip about 120 × 35 px centred on the slip's top-left corner and fill it with . Rotate it about 30° counter-clockwise with the Move tool's corner handle, then deselect. Make a second strip over the top-right corner and turn it about 30° clockwise. They look better if the angles aren't quite equal.
Set Tape to Multiply at 85%, so the paper and quilting show through like real masking tape.
-
Add print grain
Click Quilting and add a layer called Grain. Drag it by its grip to the very top of the stack, above Quilt Border. Select all and fill it with , then run Filter → Add Noise… with Amount 70, Mono and Uniform. Set it to Overlay at 45%.
Save with File → Save Project, then choose File → Quick Export PNG.