Make a Photocopied Zine Magazine Cover
Design a two-colour photocopied zine cover in Lopsy with a cut-out toad photo, toner dropout, halftone, Dymo labels, tape, a rubber stamp and copier grain.
Zines are the magazines people make at the kitchen table. They're cut up, glued down, typed, hand-written, then photocopied or run through a risograph in one or two inks. The look comes from the process. Photos go through the copier and come out as harsh black and white. The second ink never lines up exactly with the black. Bits of tape, labels and scraps sit on the page at odd angles, and the copier adds its own dirt: specks, grain and a dark shadow where the lid didn't close.
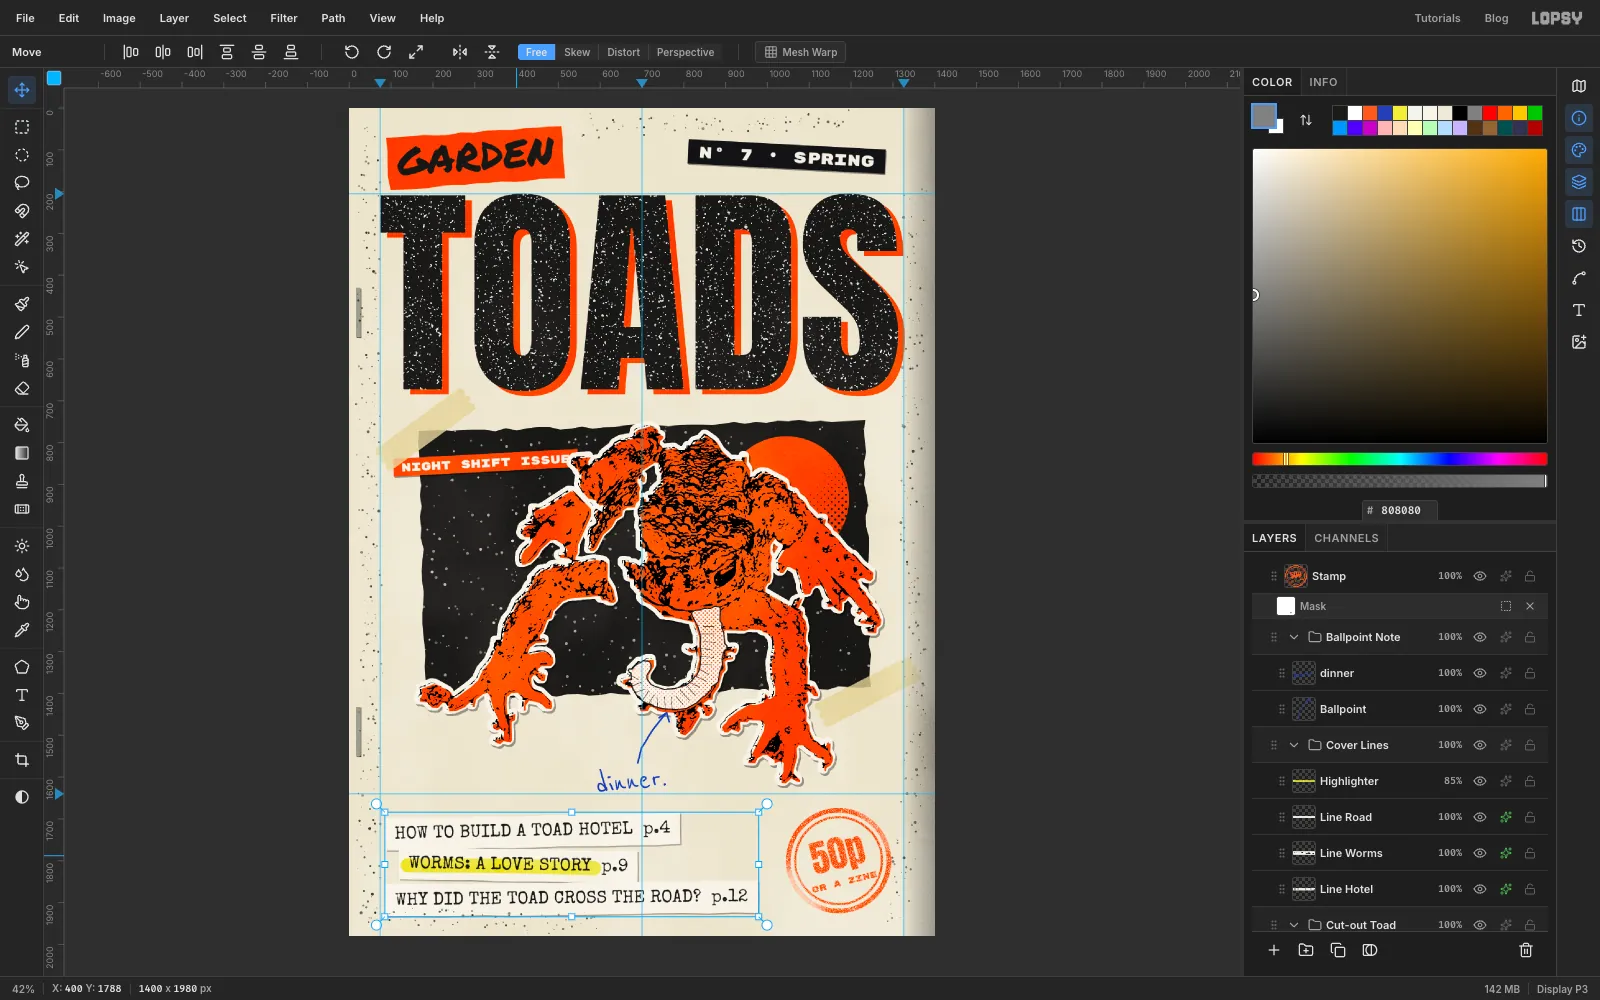
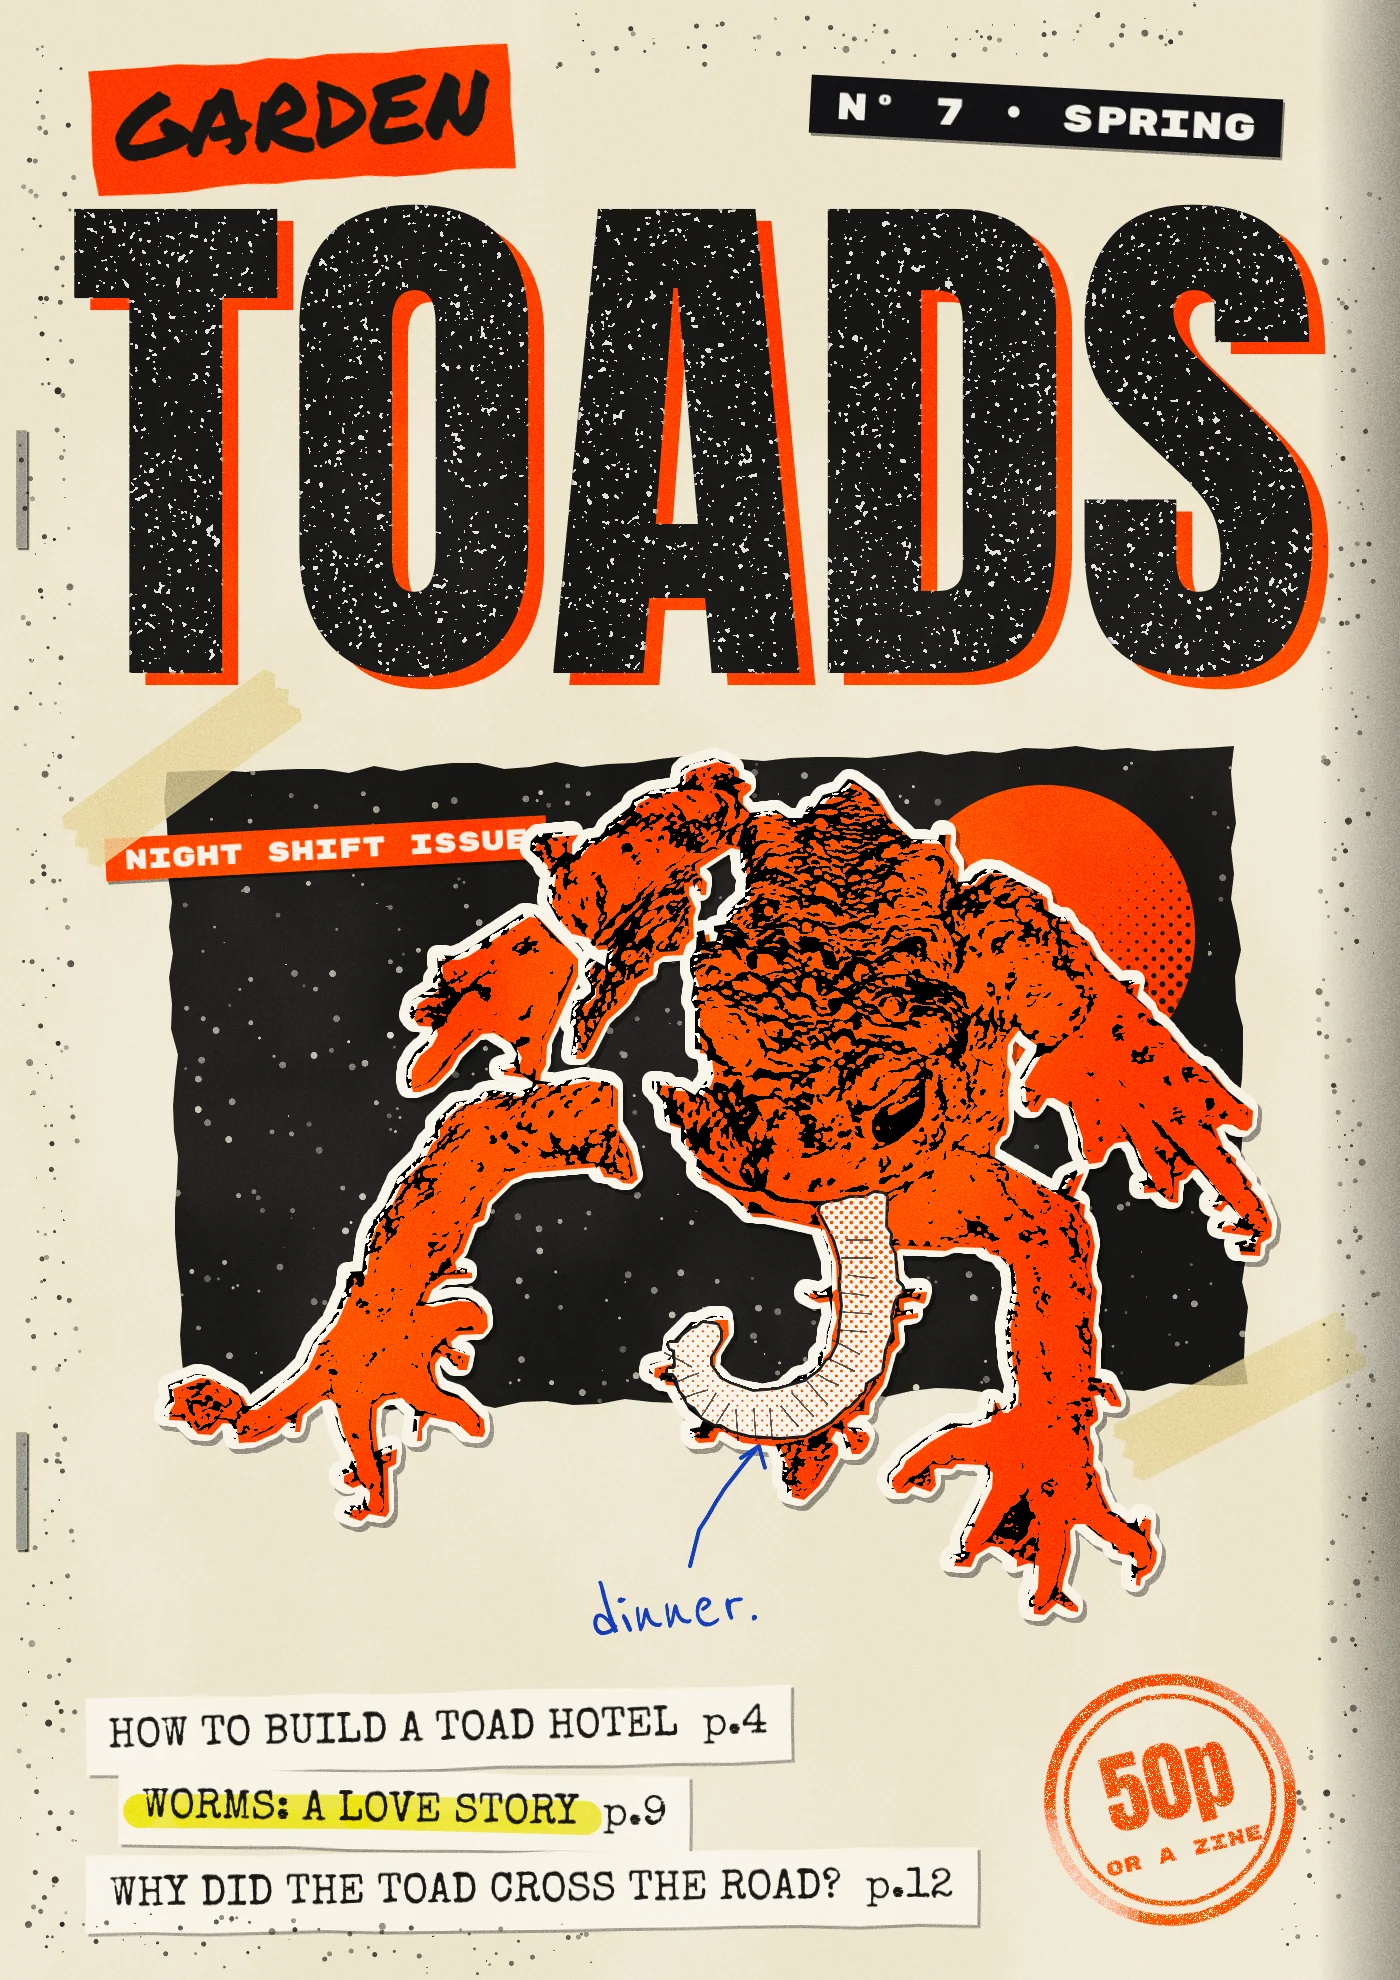
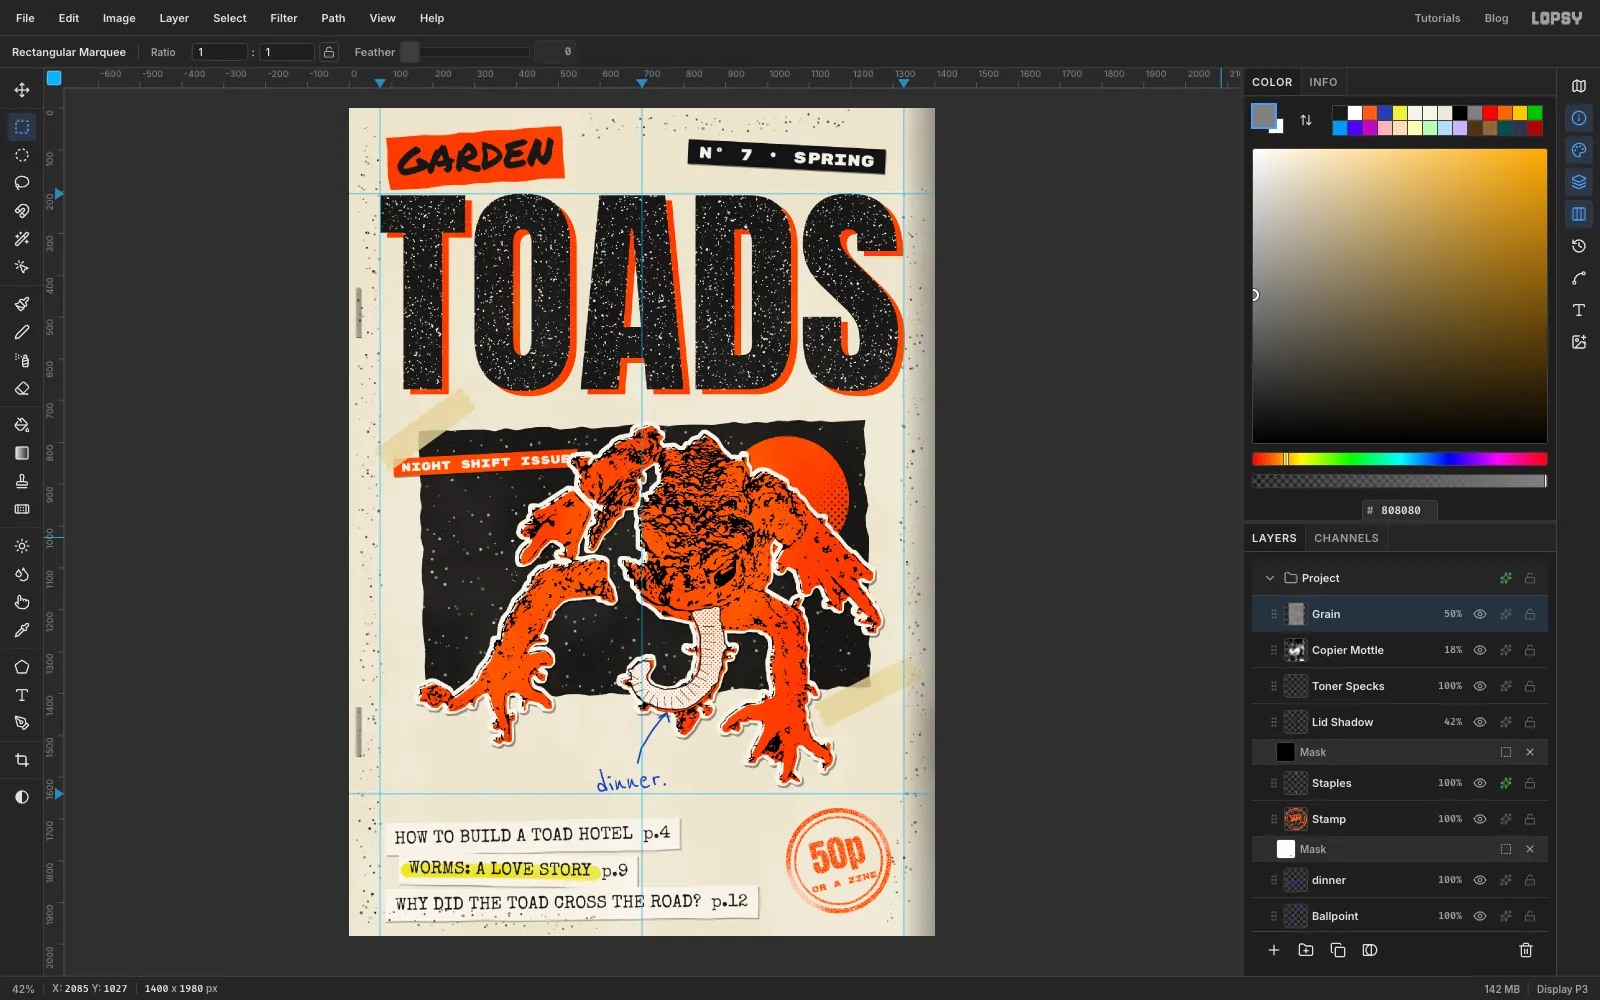
In this tutorial you'll make the cover of Garden Toads, a naturalist zine, issue 7, The Night Shift Issue. It's 1400 × 1980 px, a tall A-series page. The finished cover has:
- a huge TOADS masthead with an orange plate printed off register and irregular toner dropout
- a torn orange garden strip and two Dymo-style labels
- a real toad photo turned into a two-ink photocopy and cut out with a white paper margin
- a torn black night panel with a halftone-shaded orange moon and stars
- masking tape, typewritten cover lines on paper scraps, a highlighter swipe and a ballpoint note
- a worn rubber stamp, staples, and copier grain, mottle and lid shadow over the whole sheet
The tools you'll use:
- the Lasso, both Marquee tools with Shift (add) and Alt (subtract), and Select → Inverse / Grow / Shrink
- Edit → Fill, the Gradient tool, the Brush, Spray, Eraser and Text tools
- Filter → Add Noise, Gaussian Blur, Threshold, Halftone, Desaturate and Clouds
- the Drop Shadow, Color Overlay, Stroke and Inner Glow effects, and the Multiply, Lighten, Soft Light and Overlay blend modes
- layer masks, Merge Down, Copy and Paste, the Move tool's scale and rotate handles, guides and groups
The toad is a free photo from Wikimedia Commons: a common toad eating a worm in a garden near Cologne by Dr. Thomas Siems, released into the public domain (CC0). Download it before you start. Any high-contrast animal photo on a dark background works the same way.
The fonts are free Google Fonts from Lopsy's font picker: Anton for the masthead and the stamp price, Permanent Marker for garden, Rubik Mono One for the labels, Special Elite for the typewritten lines and Reenie Beanie for the ballpoint note.
There are only two "inks", toner black and fluoro orange. Everything else is paper or something added by hand afterwards:
-
Copy paper
-
paper scraps
-
Toner black
-
Dymo tape
-
Dymo letters
-
Fluoro orange
-
Masking tape
-
staples
-
Ballpoint blue
-
highlighter
-
Working grey
for noise and grain layers
-
Set up the paper and guides
Open Lopsy. In the New Document dialog set Width to
1400and Height to1980and click Create.- Click the empty
Layer 1and delete it with the bin button at the bottom of the Layers panel. You'll add layers as you need them. - Click Background, type
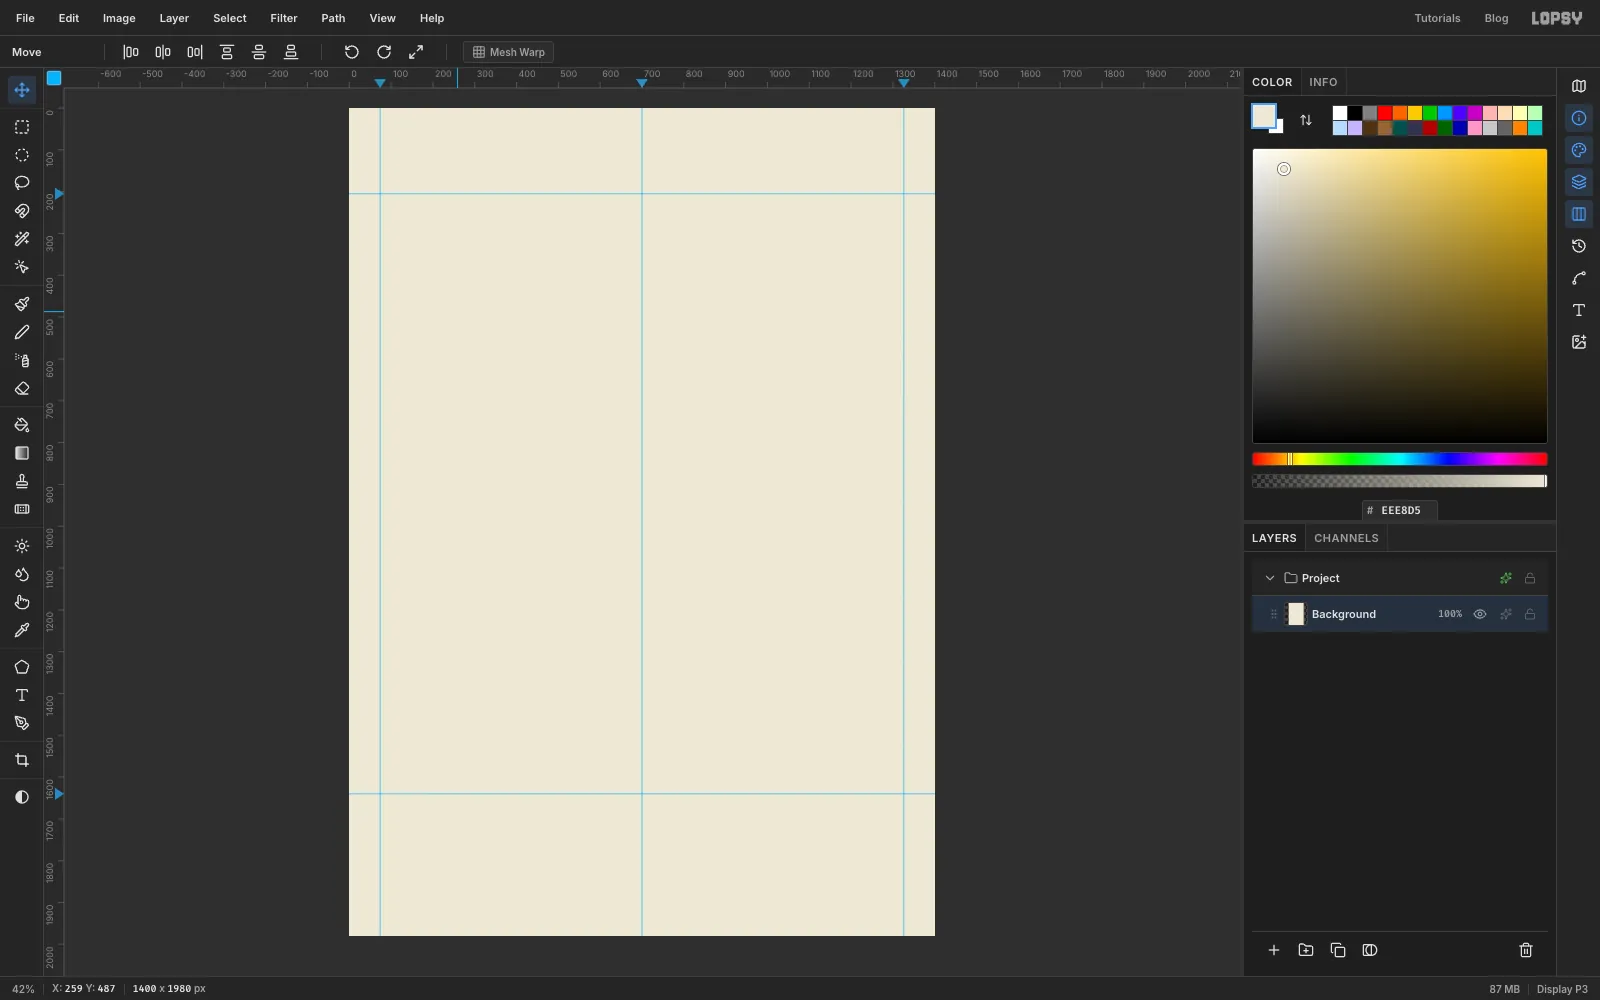
EEE8D5into the hex field of the Color panel, and choose Edit → Fill. - Click the top ruler at 74, 700 and 1326 to drop three vertical guides: the two side margins and the centre line.
- Click the left ruler at 205 (the top of the masthead) and 1640 (the top of the cover-line area).
- Click the empty
-
Set the masthead
The masthead is one word, set as big as the page allows.
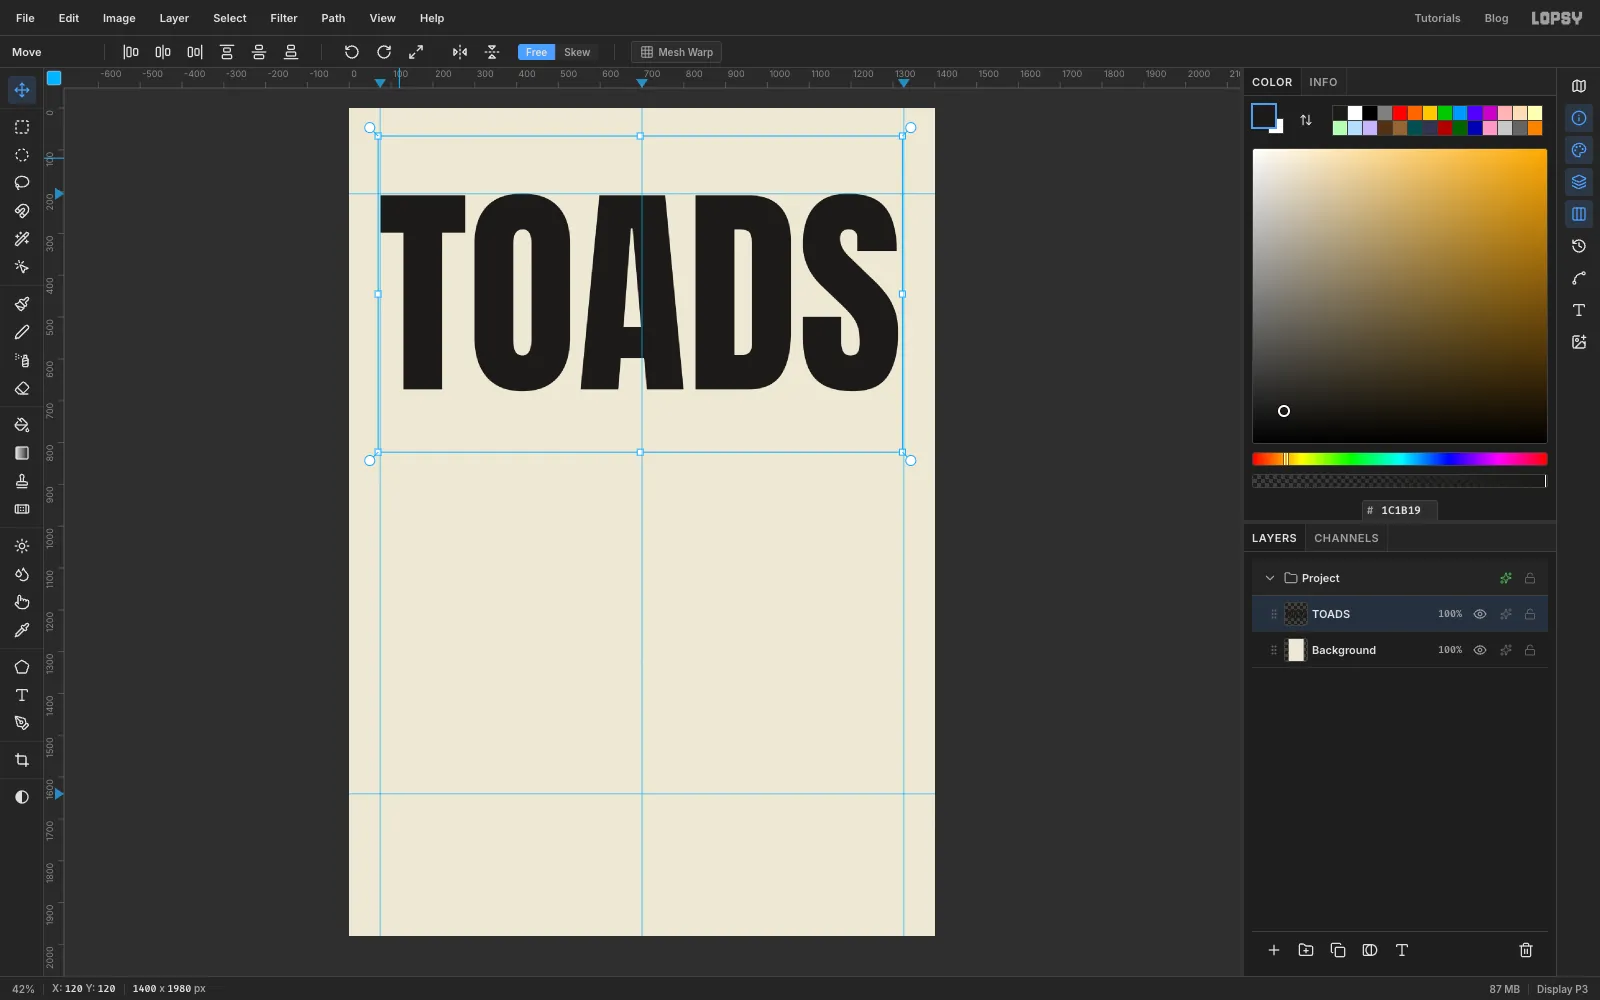
- Pick the Text tool (T). In the options bar choose Anton and set Size to
540. Set the foreground colour to . - Click in the empty paper near the top of the page and type
TOADS. Press Tab to finish. - Switch to the Move tool (V) and drag the word until the top of the letters sits on the 205 guide and the T's left edge is on the 74 guide. The S ends just short of the right margin.
- Pick the Text tool (T). In the options bar choose Anton and set Size to
-
Add the orange plate
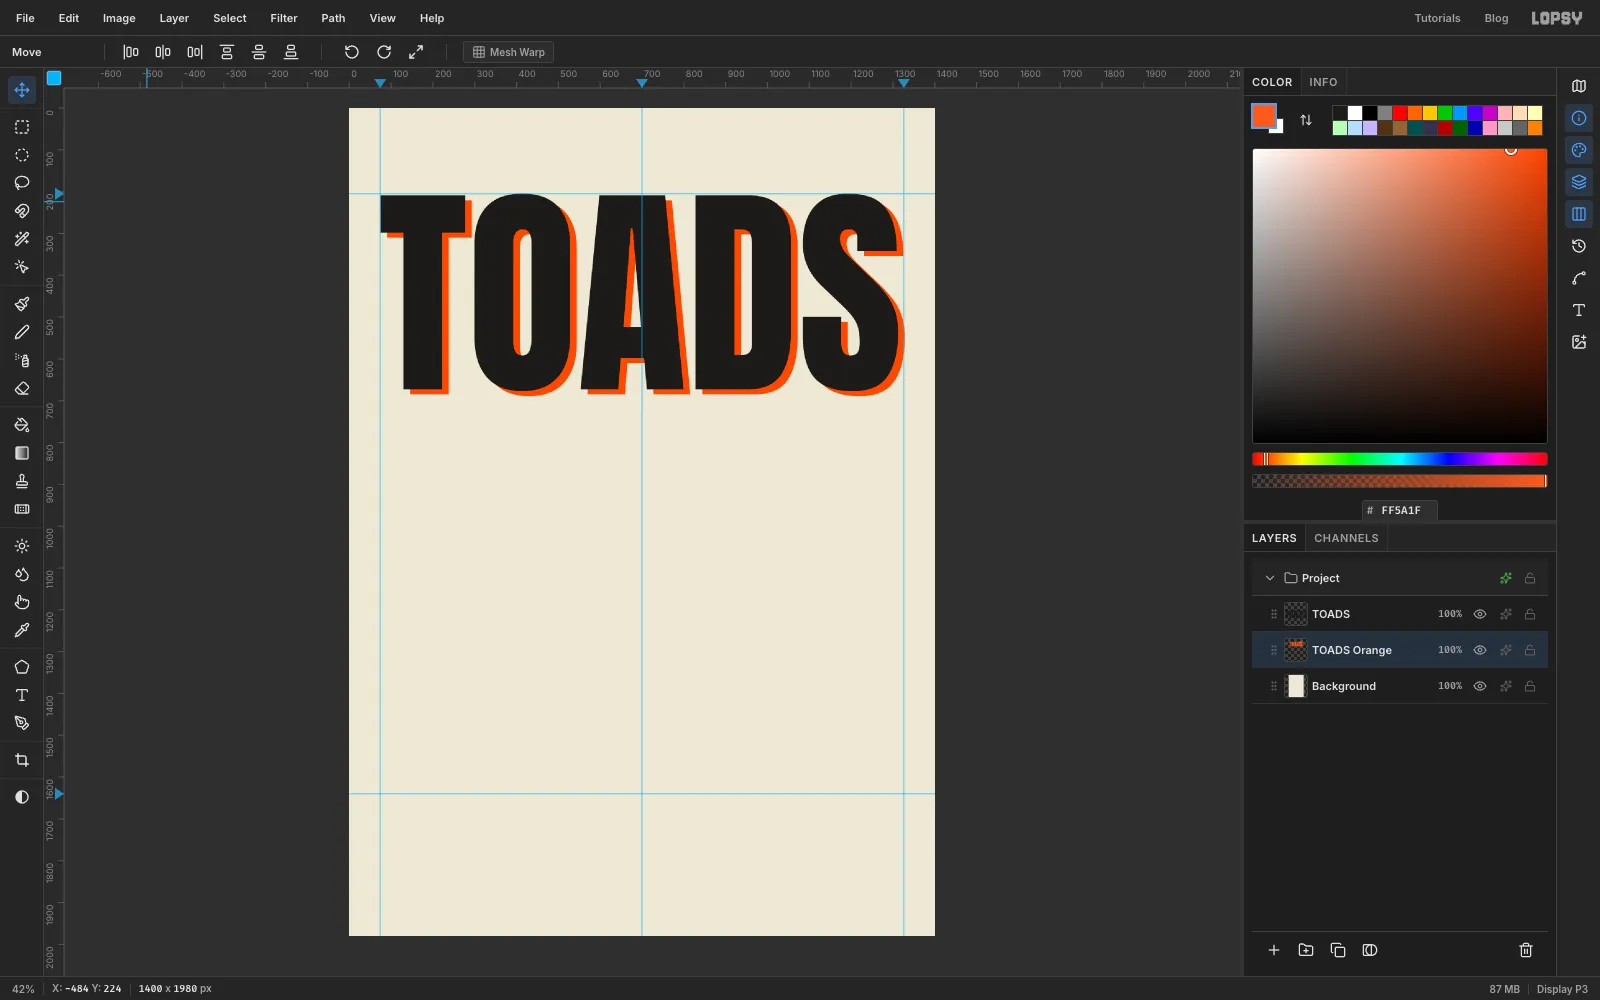
On a riso or a two-colour copier, each ink is a separate pass, and the passes never line up perfectly. Fake that with a second copy of the letters.
- Cmd-click the TOADS thumbnail in the Layers panel. That loads the letter shapes as a selection.
- Click Background, add a layer with +, and name it
TOADS Orange(double-click a name to rename it). - Set the foreground to , choose Edit → Fill, and press Cmd+D to deselect.
- With the Move tool, press Shift+Right once and Right six times, then Shift+Down once and Down twice. The orange slides 16 px right and 12 px down, under the black.
-
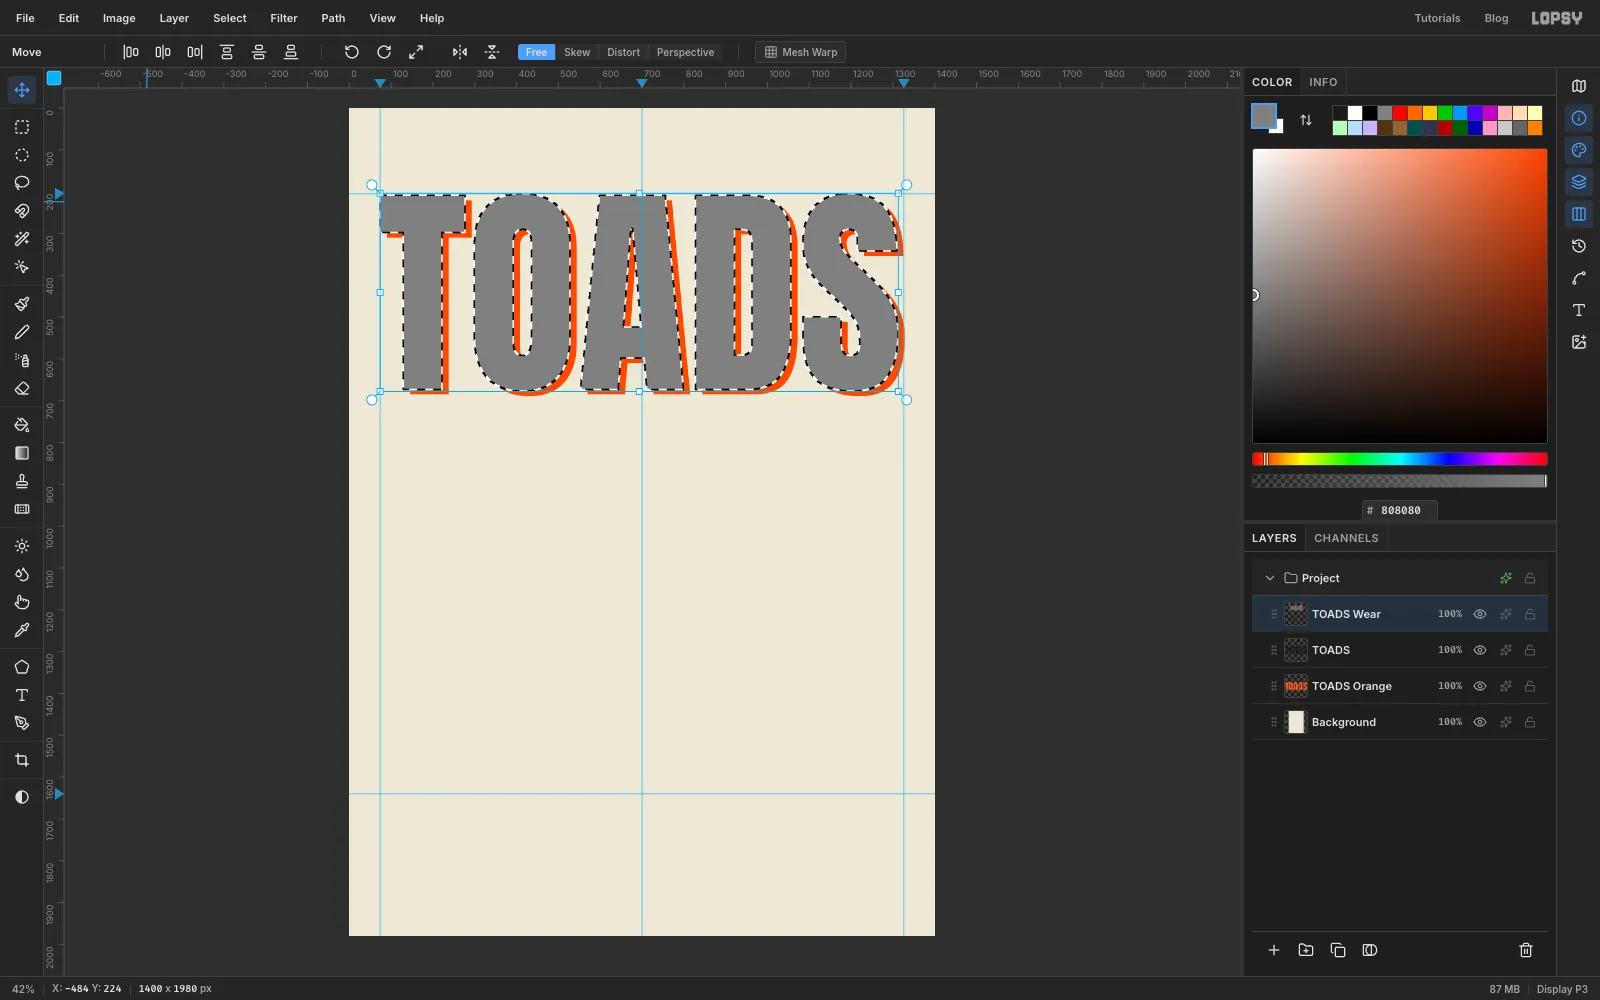
Start the toner wear layer
Photocopied black is never solid. The toner drops out in little irregular flecks. You'll build those flecks from noise.
- Cmd-click the TOADS thumbnail again, then click the TOADS layer.
- Add a layer and name it
TOADS Wear. - Set the foreground to , choose Edit → Fill, then press Cmd+D.
-
Turn noise into toner dropout
Now run three filters on the grey layer:
- Filter → Add Noise: Amount
100, Mode Mono. The grey turns into salt-and-pepper. - Filter → Gaussian Blur: Radius
4. The noise softens into blotches. - Filter → Threshold: Level
138. Only the brightest blotches stay white; everything else turns black.
Open the layer's effects drawer (the fx button on its row) and set the blend mode to Lighten. The black parts disappear and only the white flecks show. Set the layer's opacity to
88%so the flecks read as paper, not pure white.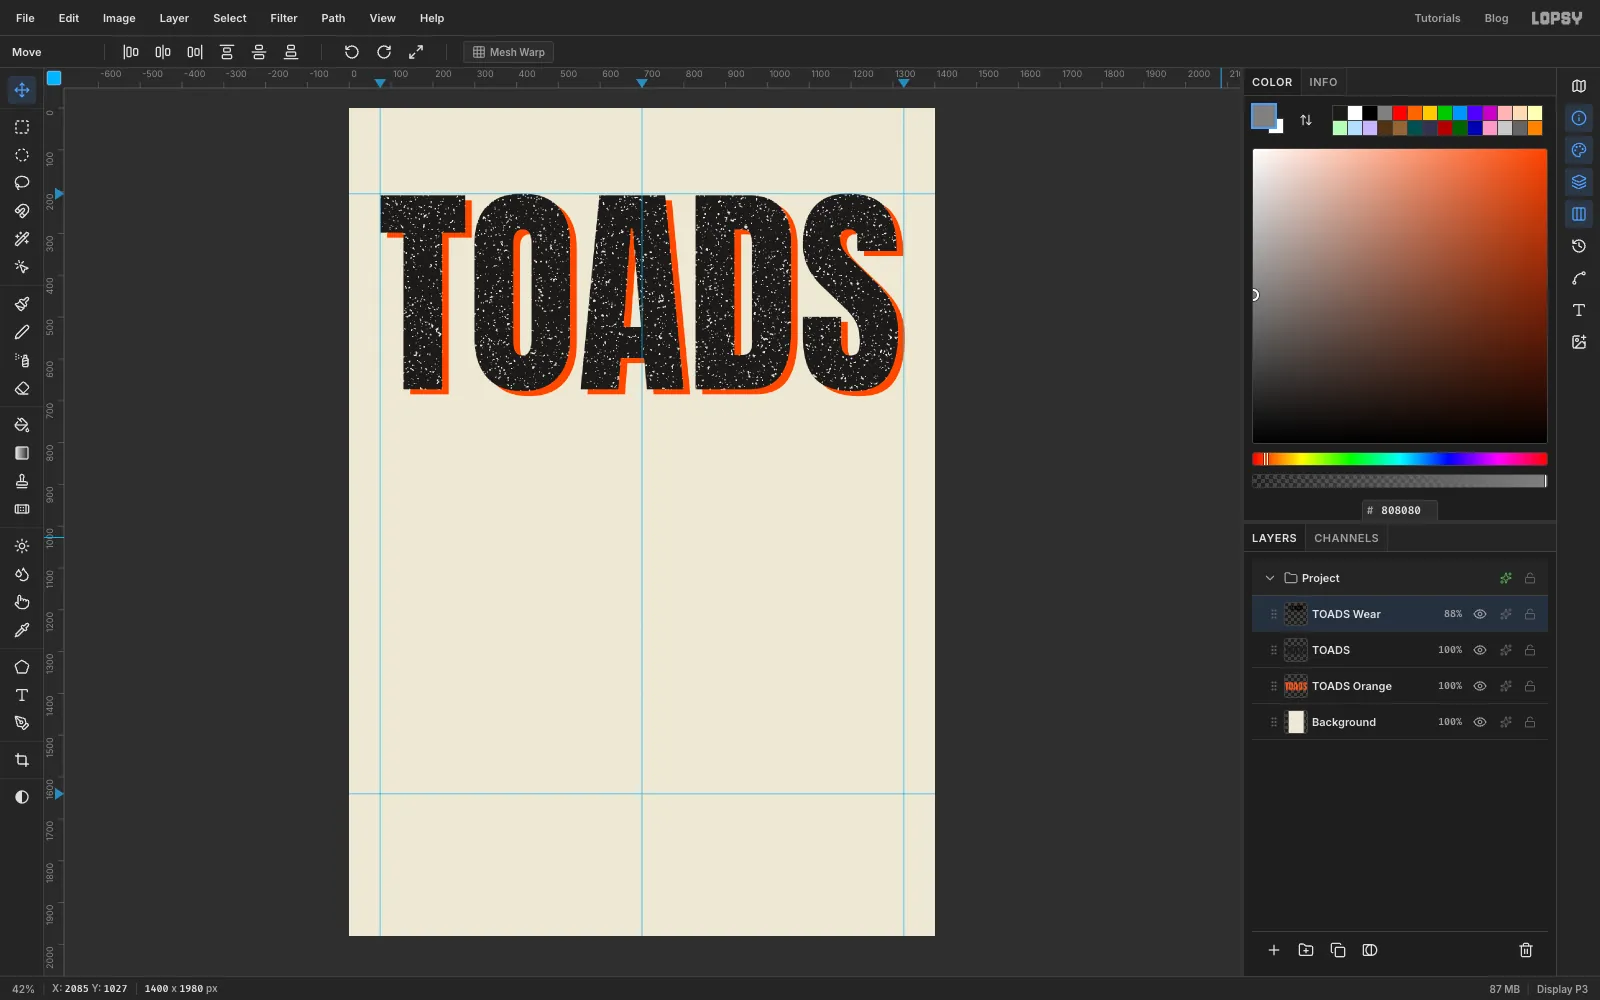
- Filter → Add Noise: Amount
-
Make the "garden" strip
- Click TOADS Wear and add a layer called
Garden Strip. - Pick the Lasso (L) and draw a strip across the top-left corner, from about
92, 58to512, 182. Keep the sides nearly straight with just a little wobble, like paper torn against a ruler. - Fill it with and deselect.
- Pick the Text tool, choose Permanent Marker at Size
112, set the colour to , click in empty paper above the masthead and typegarden. Permanent Marker only has capitals, so it comes out as GARDEN. Press Tab. - Move the word onto the middle of the strip.
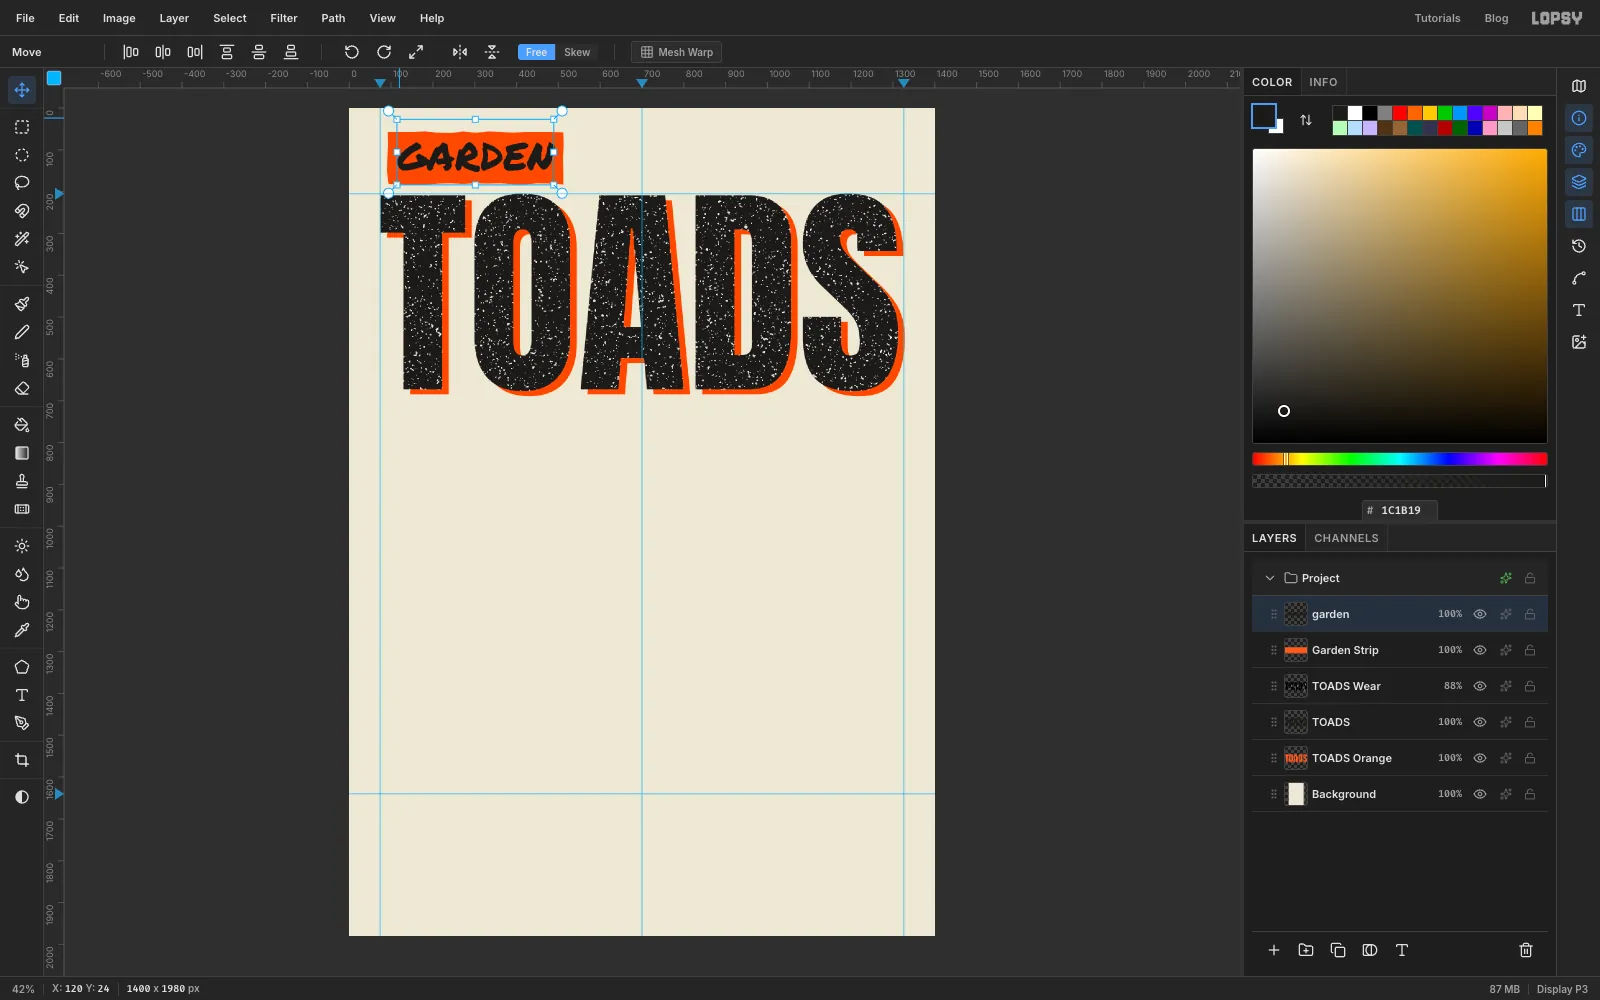
- Click TOADS Wear and add a layer called
-
Tilt the strip
- With the
gardentext layer selected, choose Layer → Merge Down. The word is now part of the strip. - Draw a Rectangular Marquee (M) just around the strip.
- Switch to the Move tool. Drag the round handle just outside the top-right corner a little anticlockwise, about 4°, so the strip rises to the right. Press Enter, then Cmd+D.
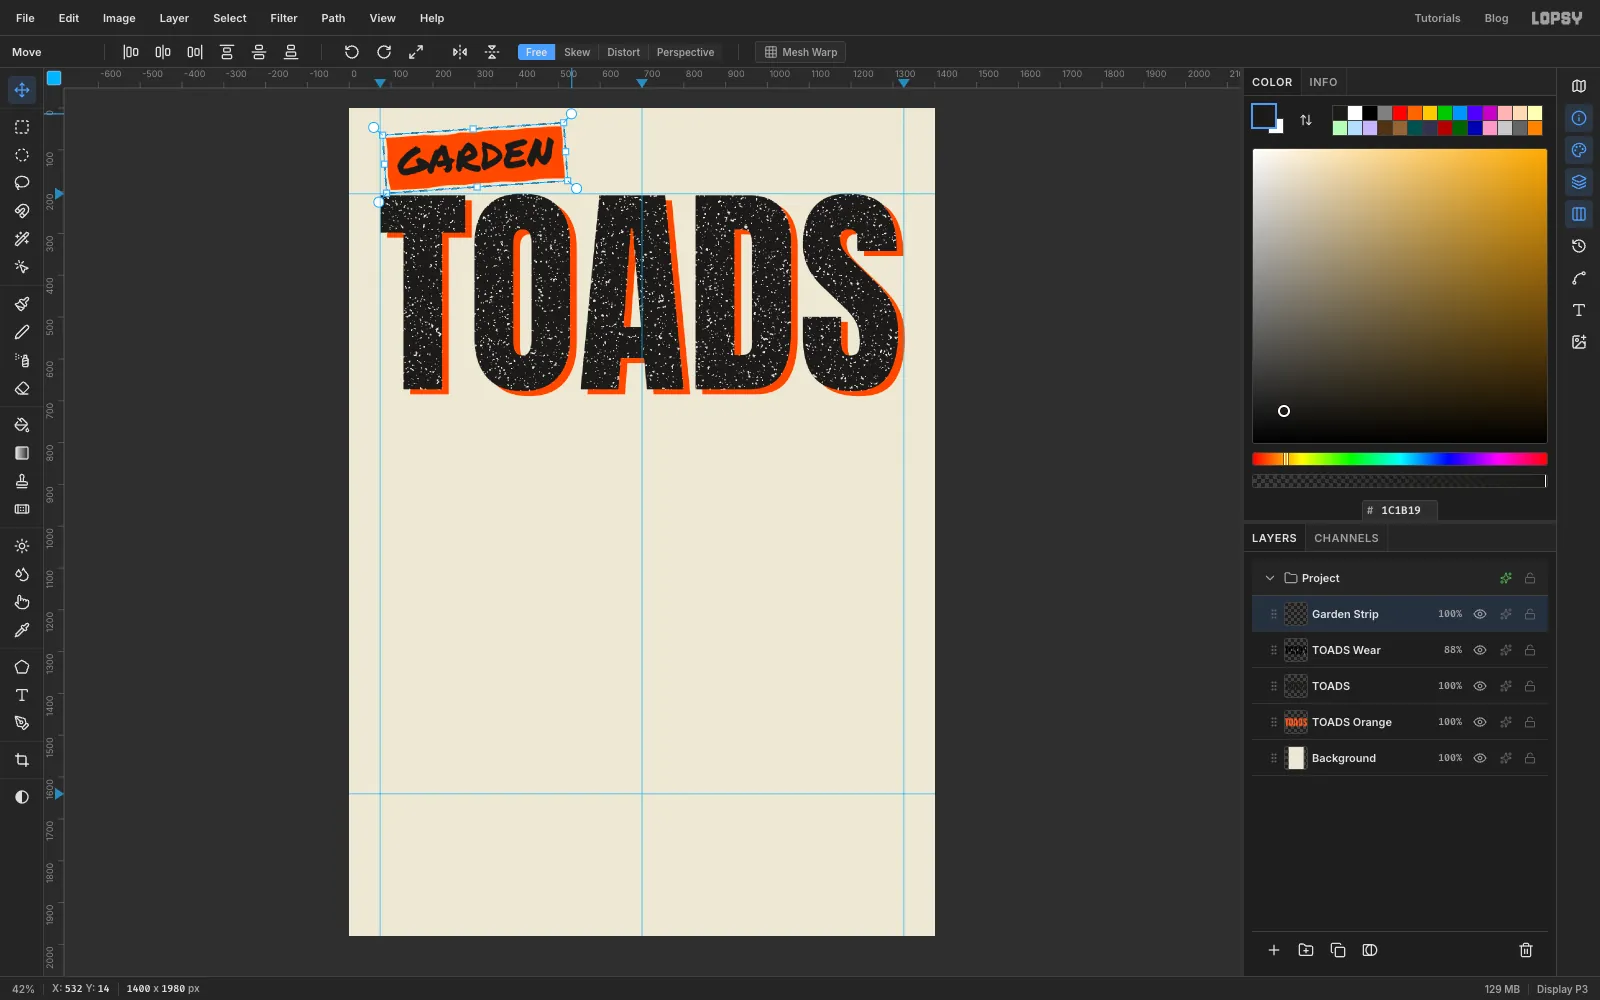
- With the
-
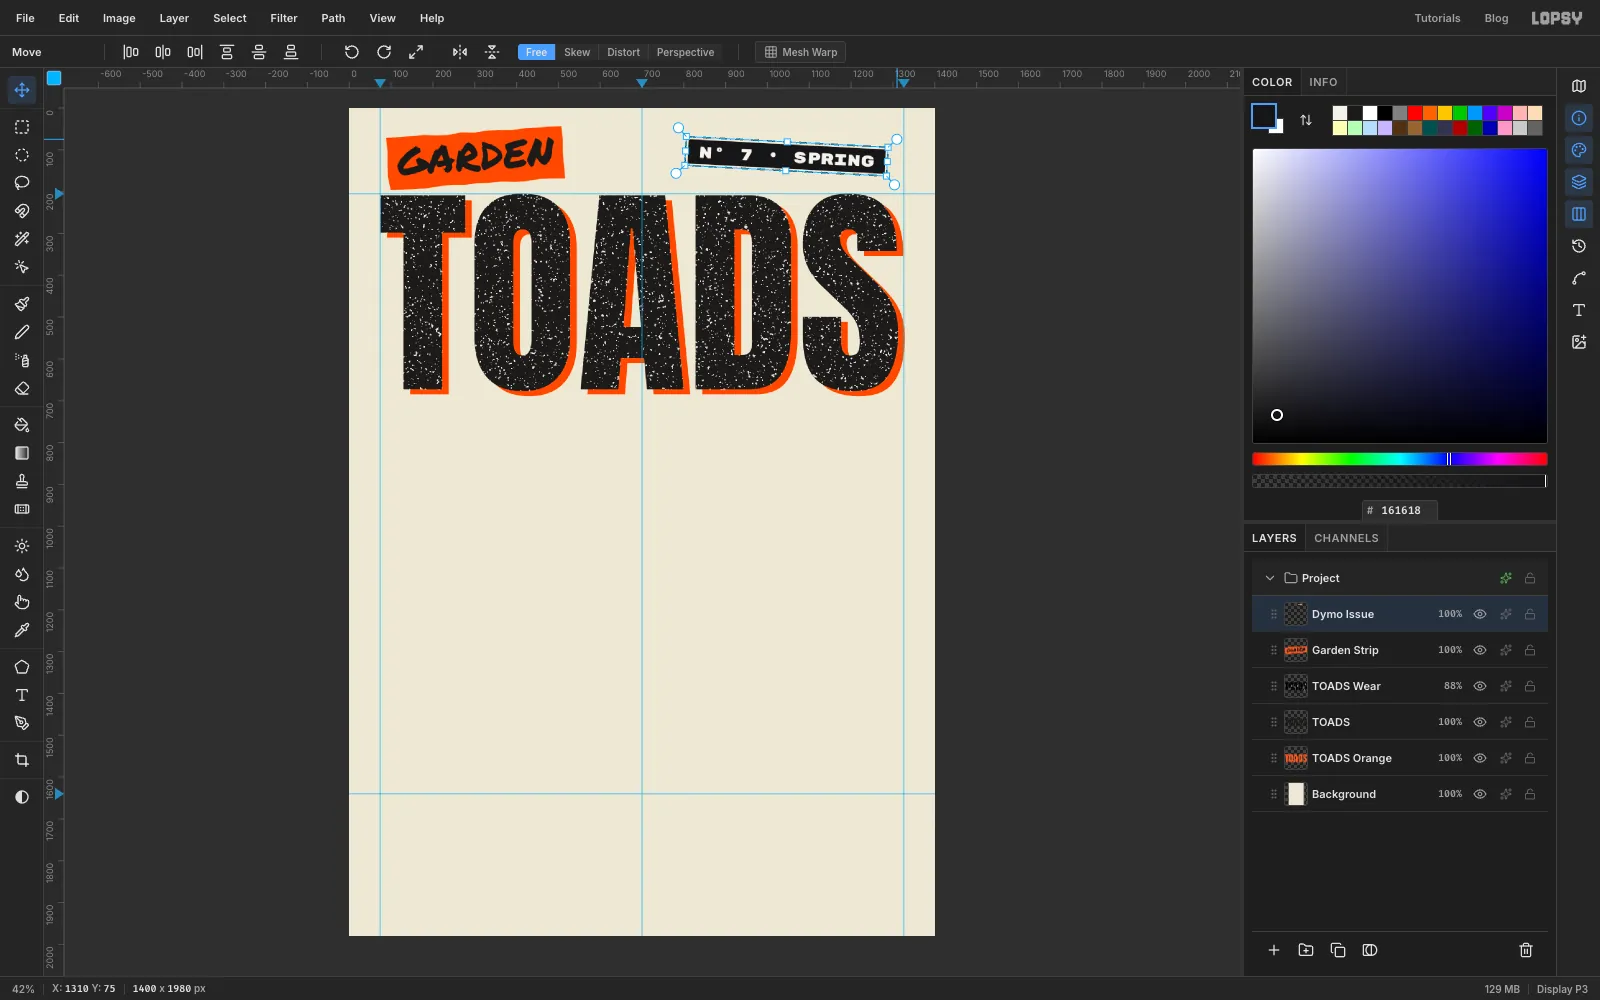
Make a Dymo label for the issue number
Embossed label-maker tape is a zine favourite. It's white letters on a black strip.
- Add a layer called
Dymo Issue. - With the Text tool, choose Rubik Mono One at Size
38, colour . Click in empty paper and typeNº 7 · SPRING. Press Tab and move the text so it's centred at about1046, 116, clear of the darker right edge you'll add at the end. - Click the Dymo Issue layer. Draw a marquee around the text with about 28 px spare at each end and 16 px above and below. Fill it with and deselect.
- Click the text layer and choose Layer → Merge Down.
- Marquee the label and rotate it about 3° clockwise with the Move tool's corner handle. Press Enter and deselect.
- In the effects drawer, turn on Drop Shadow: Offset X
2, Offset Y3, Blur0, Opacity40. A hard, thin shadow reads as a raised strip on a copy. A soft blur would look like a photograph.
- Add a layer called
-
Tear out the night panel
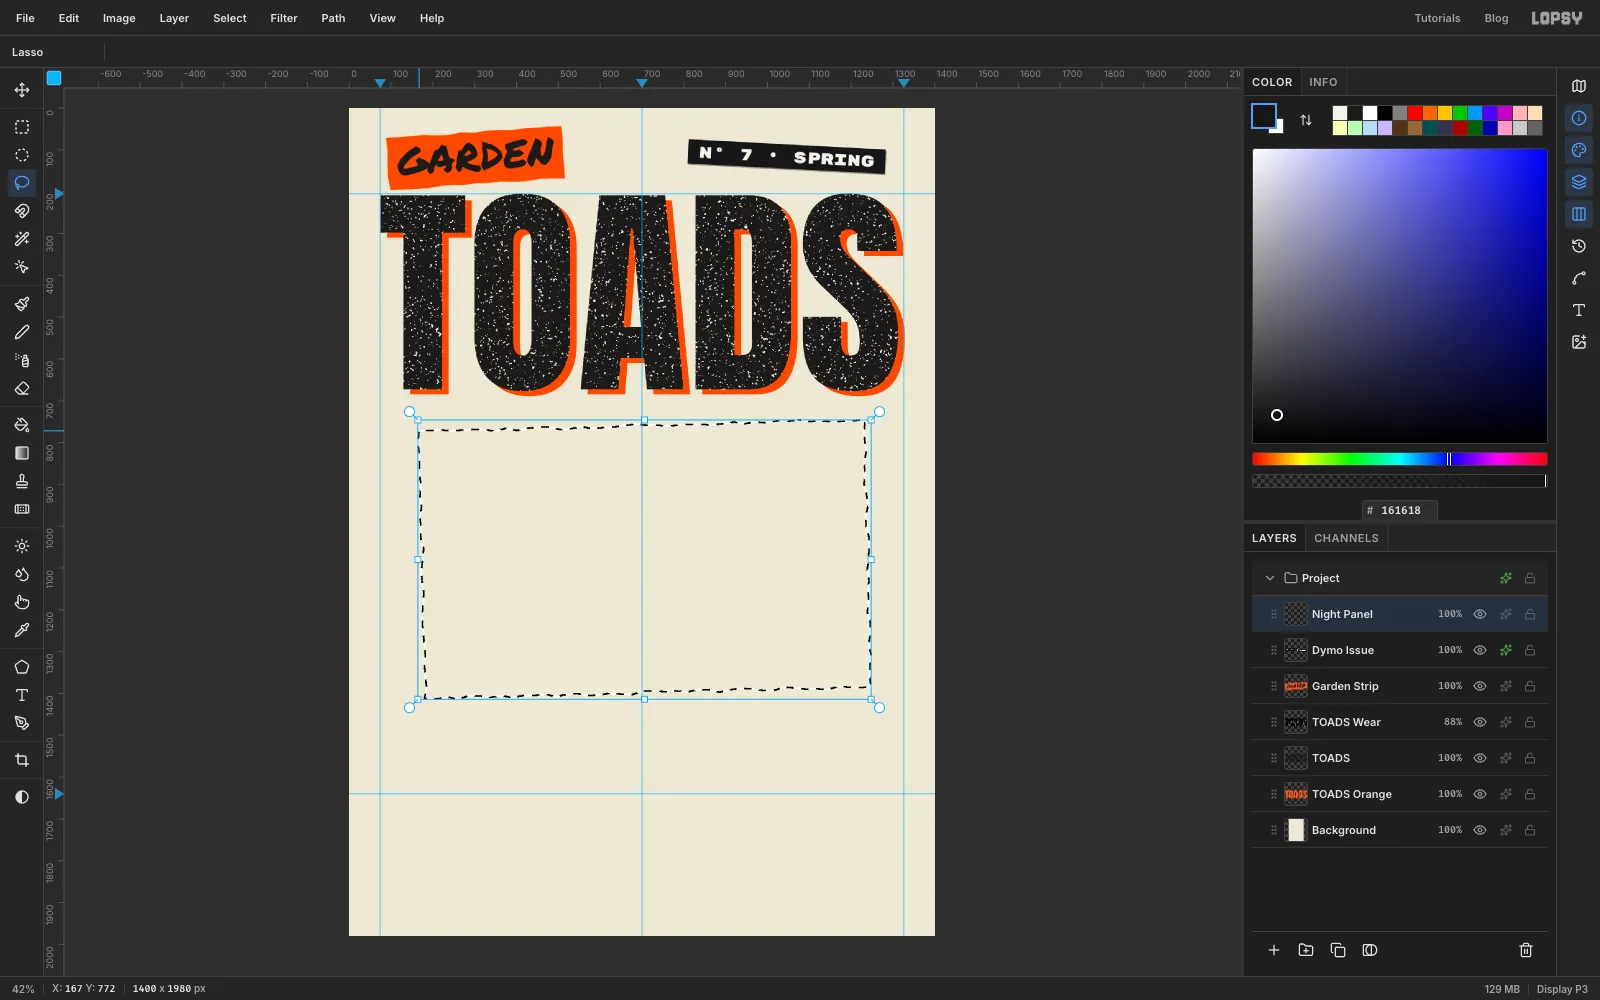
- Click Dymo Issue and add a layer called
Night Panel. - With the Lasso, draw a rectangle from about
175, 760to1240, 1398, tilted very slightly anticlockwise. Keep the edges ragged, like paper torn by hand. - Fill it with and deselect.
- Click Dymo Issue and add a layer called
-
Add the moon
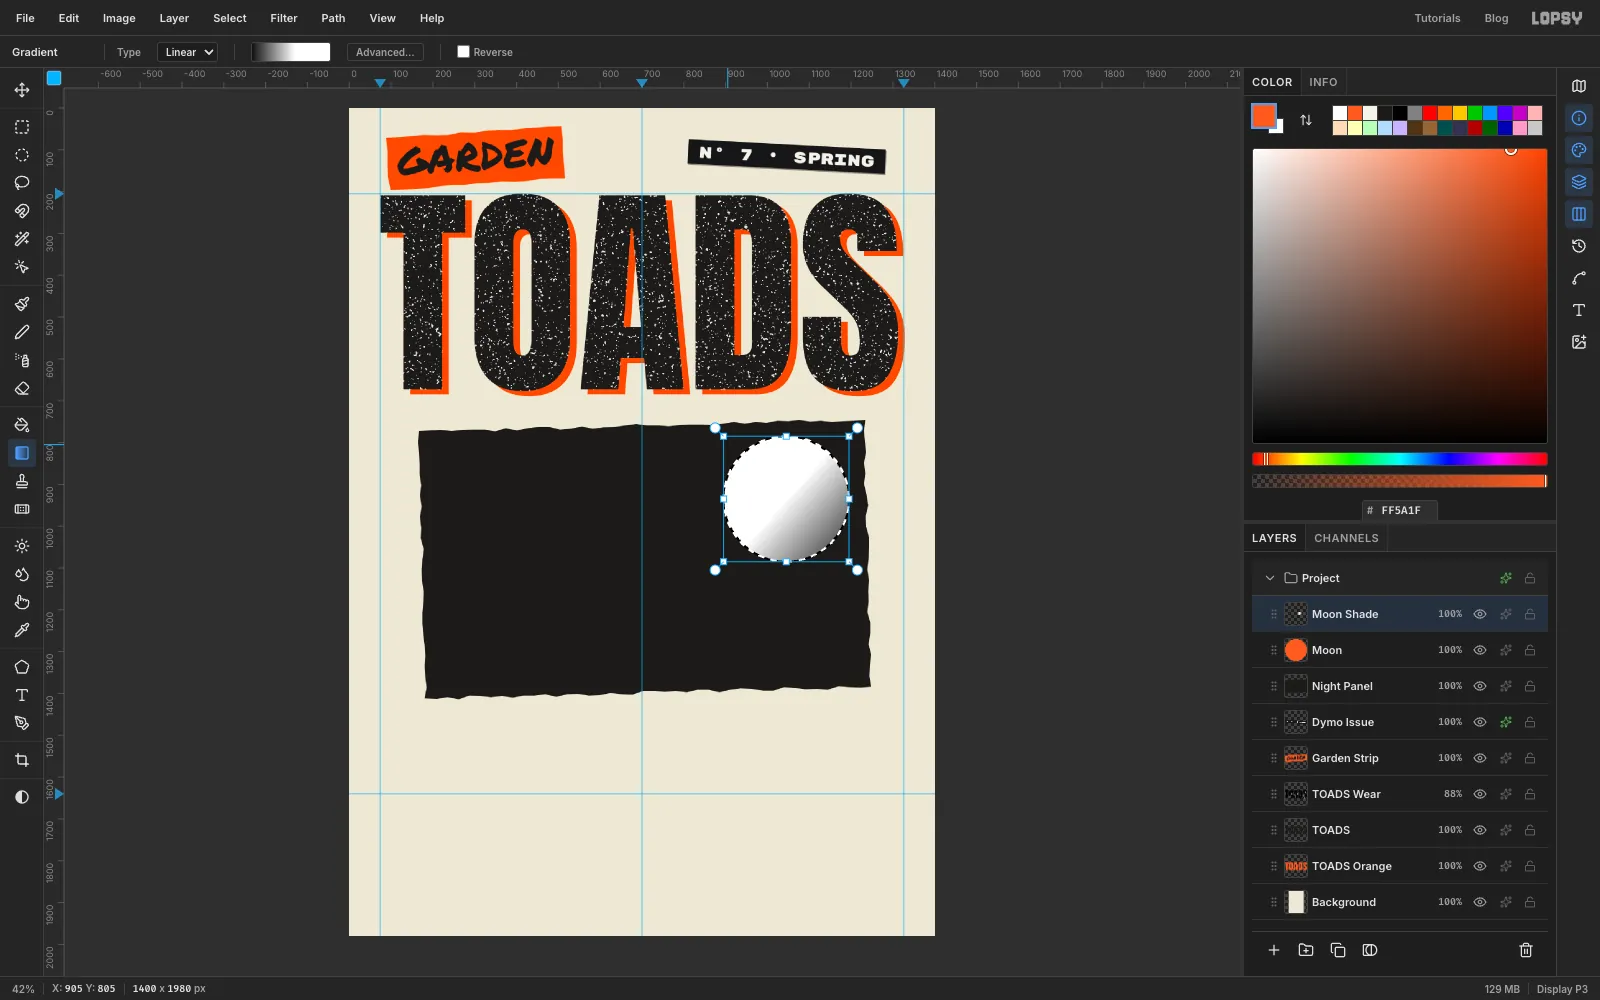
- Add a layer called
Moon. With the Elliptical Marquee, click once on the canvas (don't drag). In the dialog enter From895, 785and To1195, 1085and press Enter. That's a 300 px circle near the panel's top-right corner. - Fill it with , then run Filter → Add Noise with Amount
14, Mono, so the ink isn't perfectly flat. - Keep the selection and add a layer called
Moon Shade. - Pick the Gradient tool from the toolbox (it has no shortcut; G is the paint bucket), set it to Linear, and open Advanced…. Make three stops: at the left, a little past the middle, and at the right. Click Done.
- Drag from just outside the moon's lower-right edge up to its upper-left. The shading sits on the lower right.
- Add a layer called
-
Halftone the moon's shading
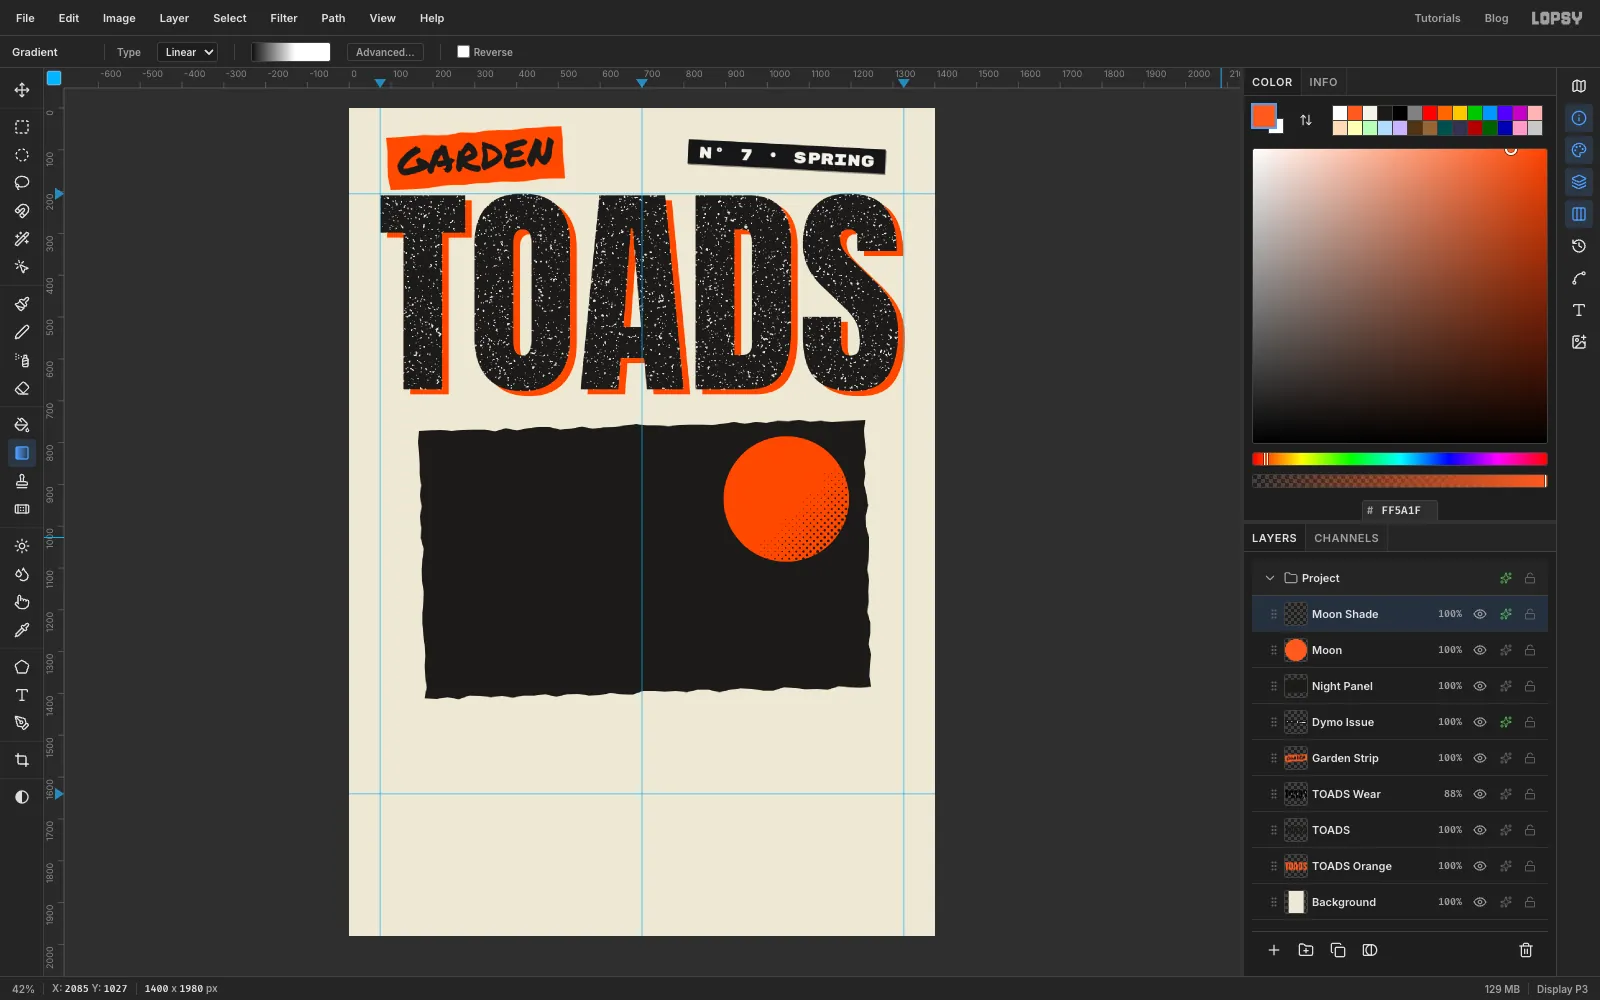
- Press Cmd+D, then choose Filter → Halftone: Dot Size
12, Angle45, Softness0.5. White prints nothing, so only the dark side turns into dots. - The dots are grey. In the effects drawer turn on Color Overlay and set it to to make them toner black.
- Press Cmd+D, then choose Filter → Halftone: Dot Size
-
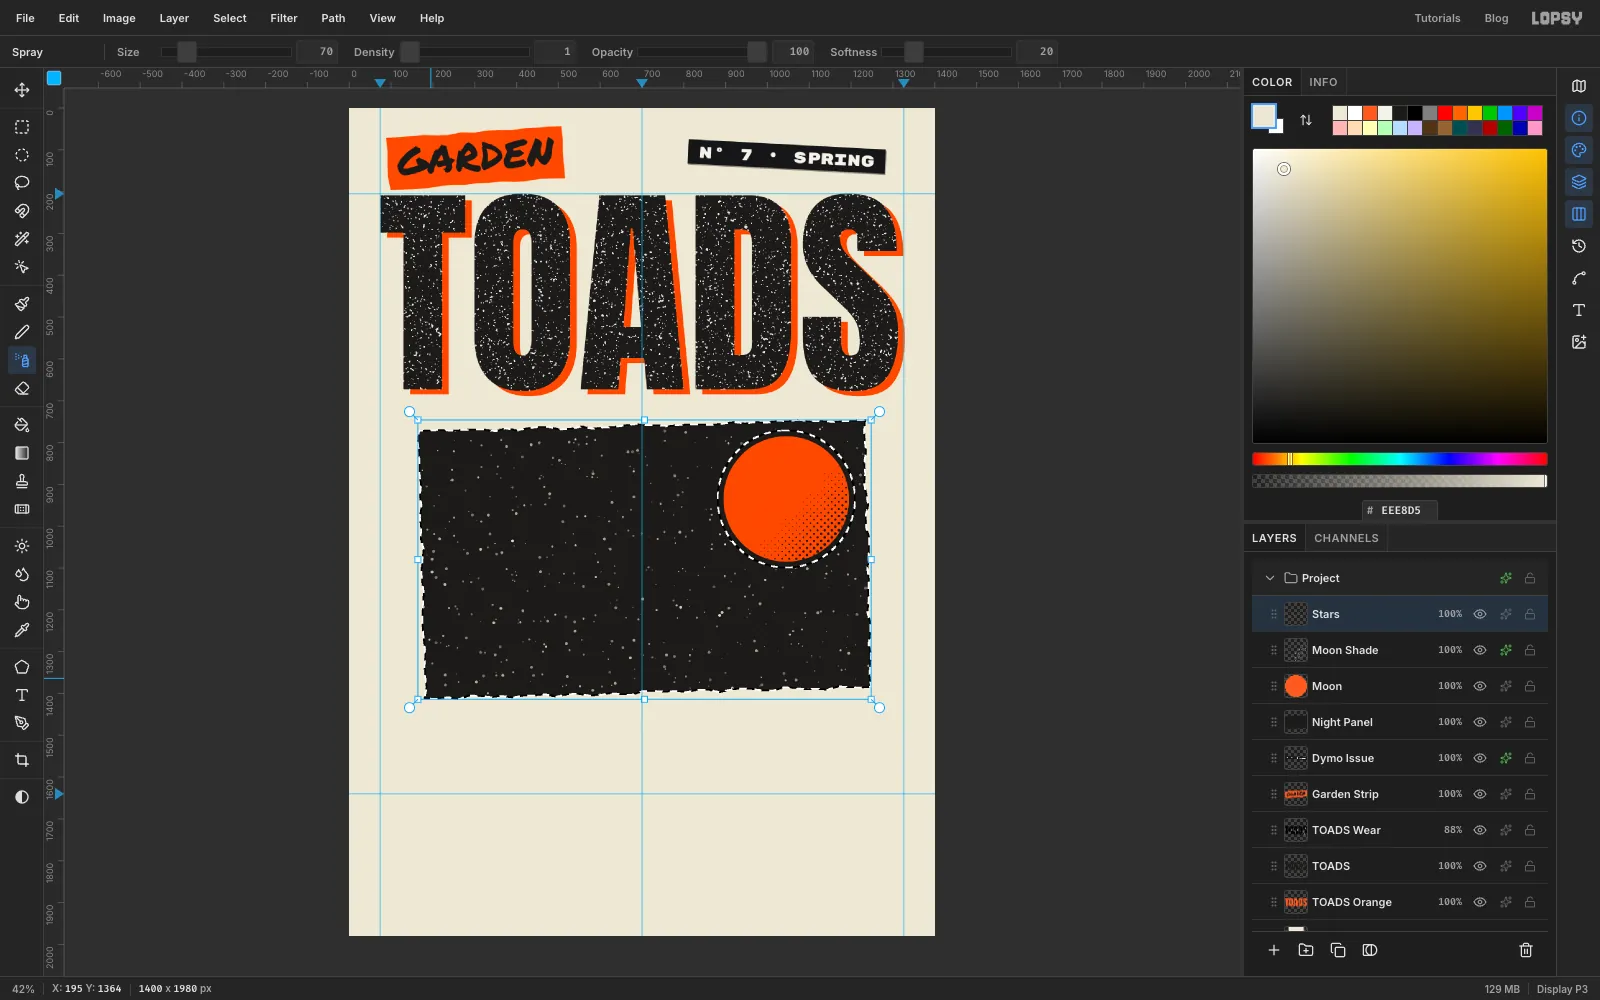
Spray the stars
- Cmd-click the Night Panel thumbnail to select the panel.
- Pick the Elliptical Marquee, hold Alt and drag a circle a little bigger than the moon over it. That subtracts the moon, so no stars land on it.
- Add a layer called
Stars. Set the foreground to . - Pick Spray (J) and set Size
70, Density1, Softness20, Opacity100. - Zigzag across the panel from top to bottom. The selection keeps every speck inside the panel. Deselect.
-
Drop in the toad photo
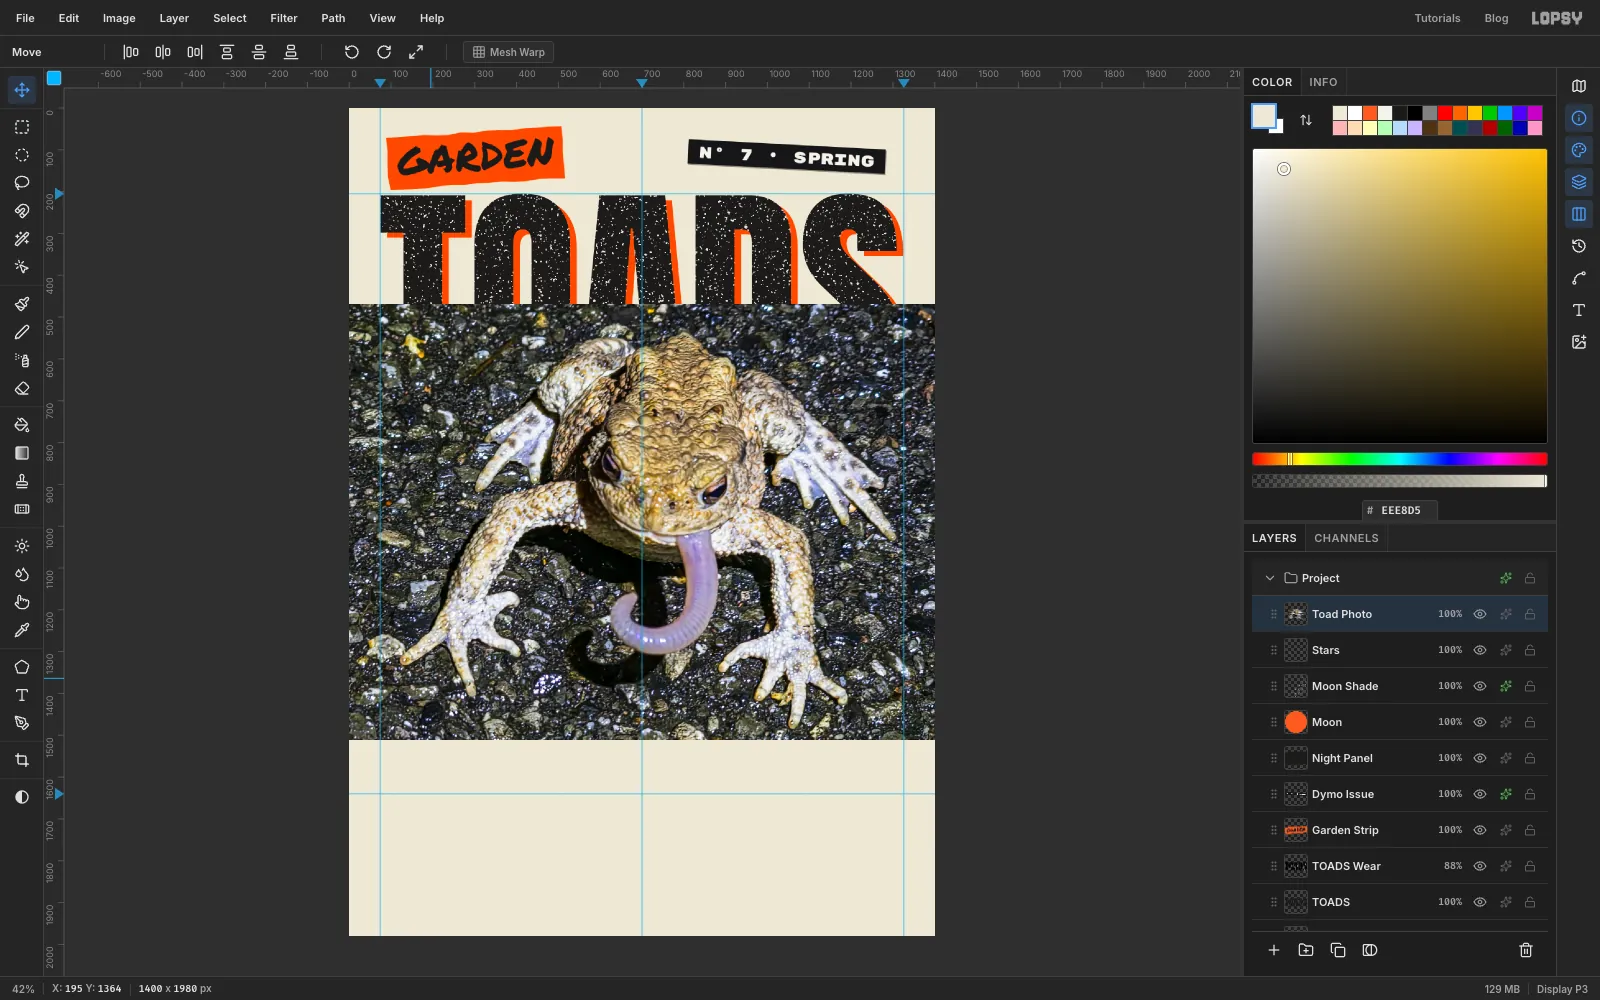
- Click Stars. Drag the downloaded toad photo from your desktop onto the canvas. Lopsy shrinks it to fit the page.
- Rename the new layer
Toad Photo. A dropped image arrives selected, so press Cmd+D first, then choose Filter → Desaturate.
-
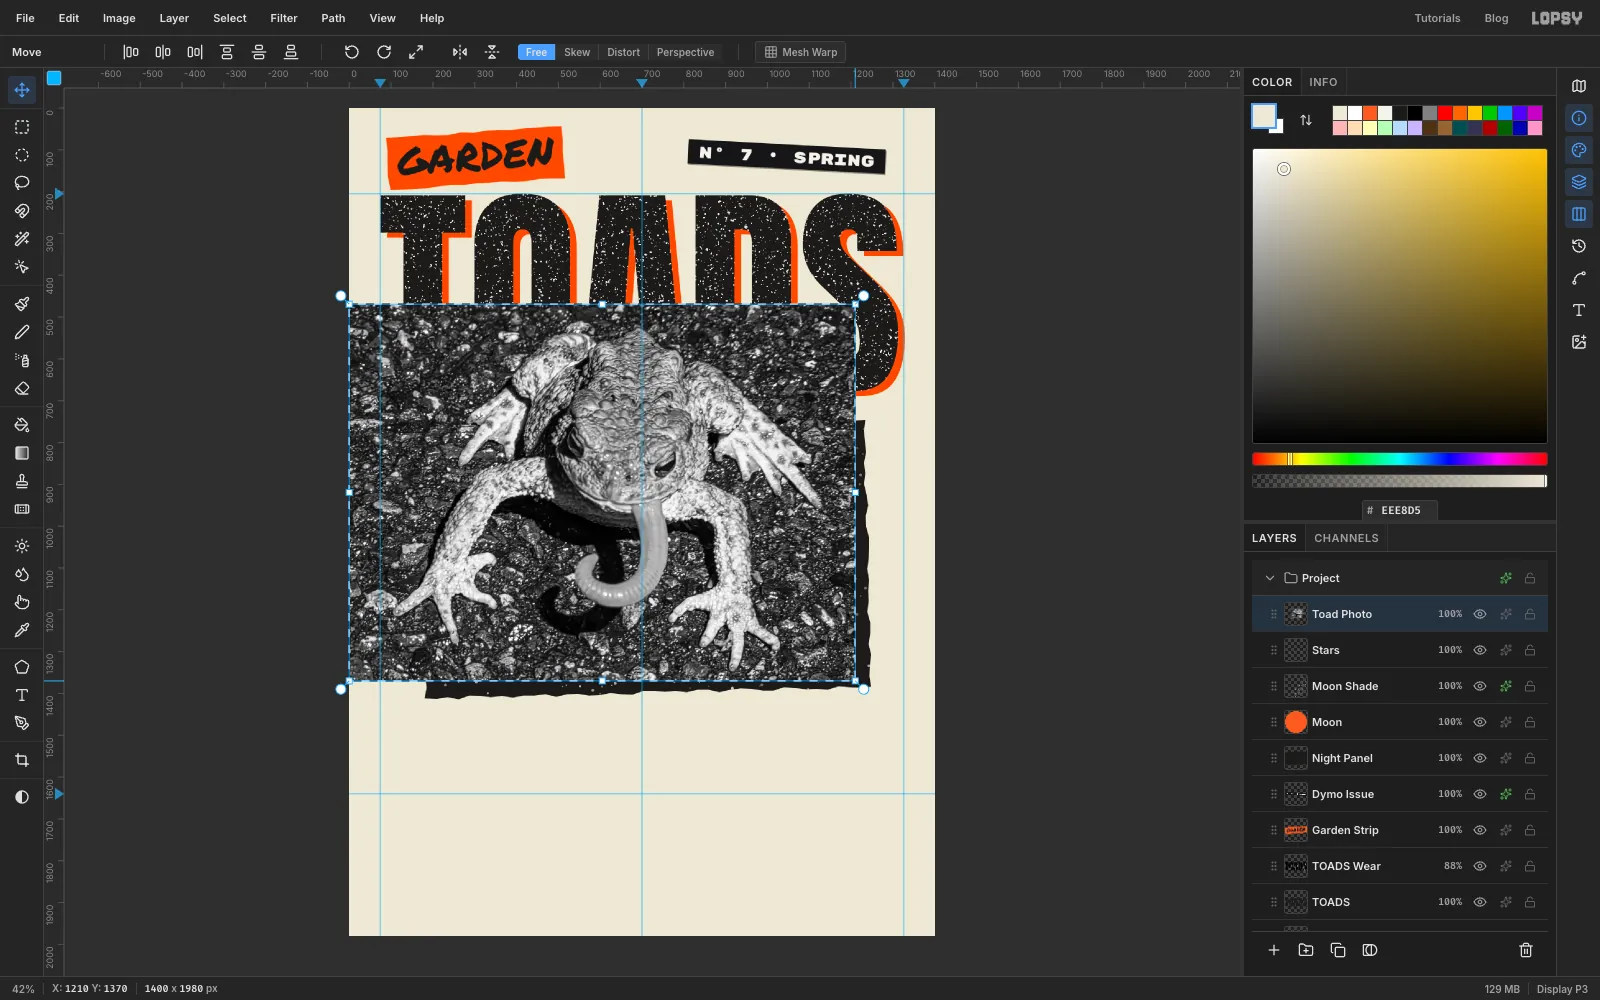
Scale the photo down
- Draw a marquee exactly around the photo.
- With the Move tool, hold Cmd (to keep the proportions) and drag the bottom-right handle inwards until the photo is about
1210px wide. The photo starts at the left edge of the page, so stop when the cursor's X in the status bar reads about1210. Press Enter and deselect. - Drag the photo so its centre is at about
745, 1170. The toad's head should overlap the panel's top edge and its feet should hang below the panel.
-
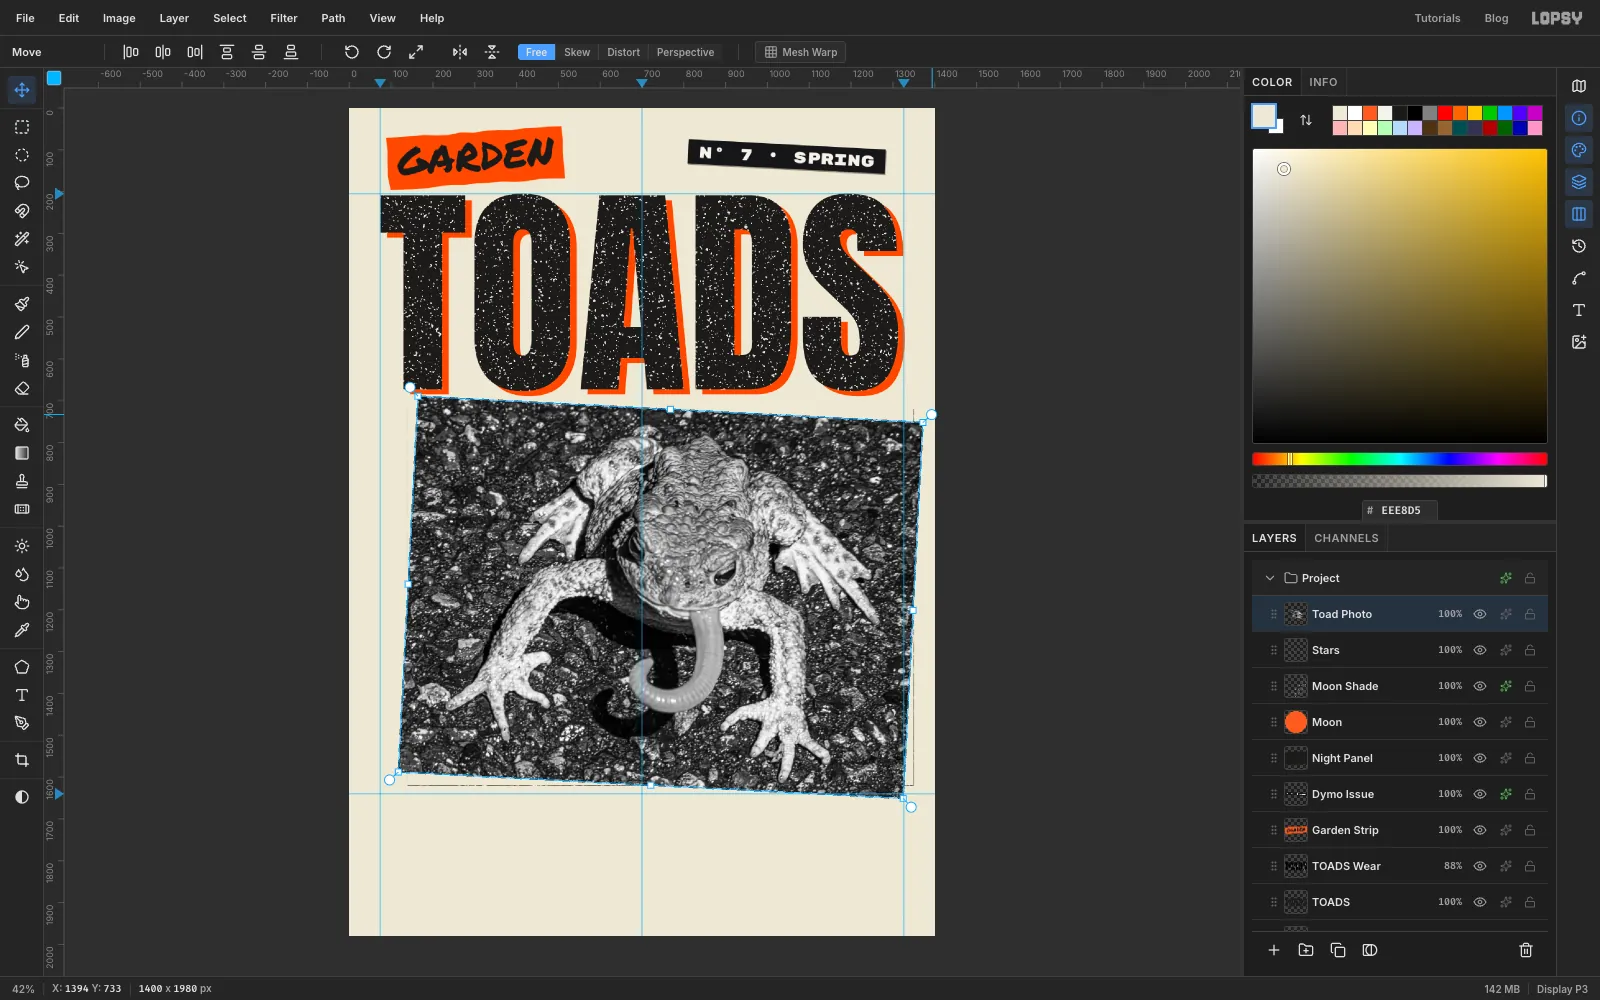
Tilt the photo
Marquee the photo again and drag the top-right rotation handle about 3° clockwise. Press Enter and deselect. A slight tilt makes it feel pasted down by hand.
-
Trace the toad
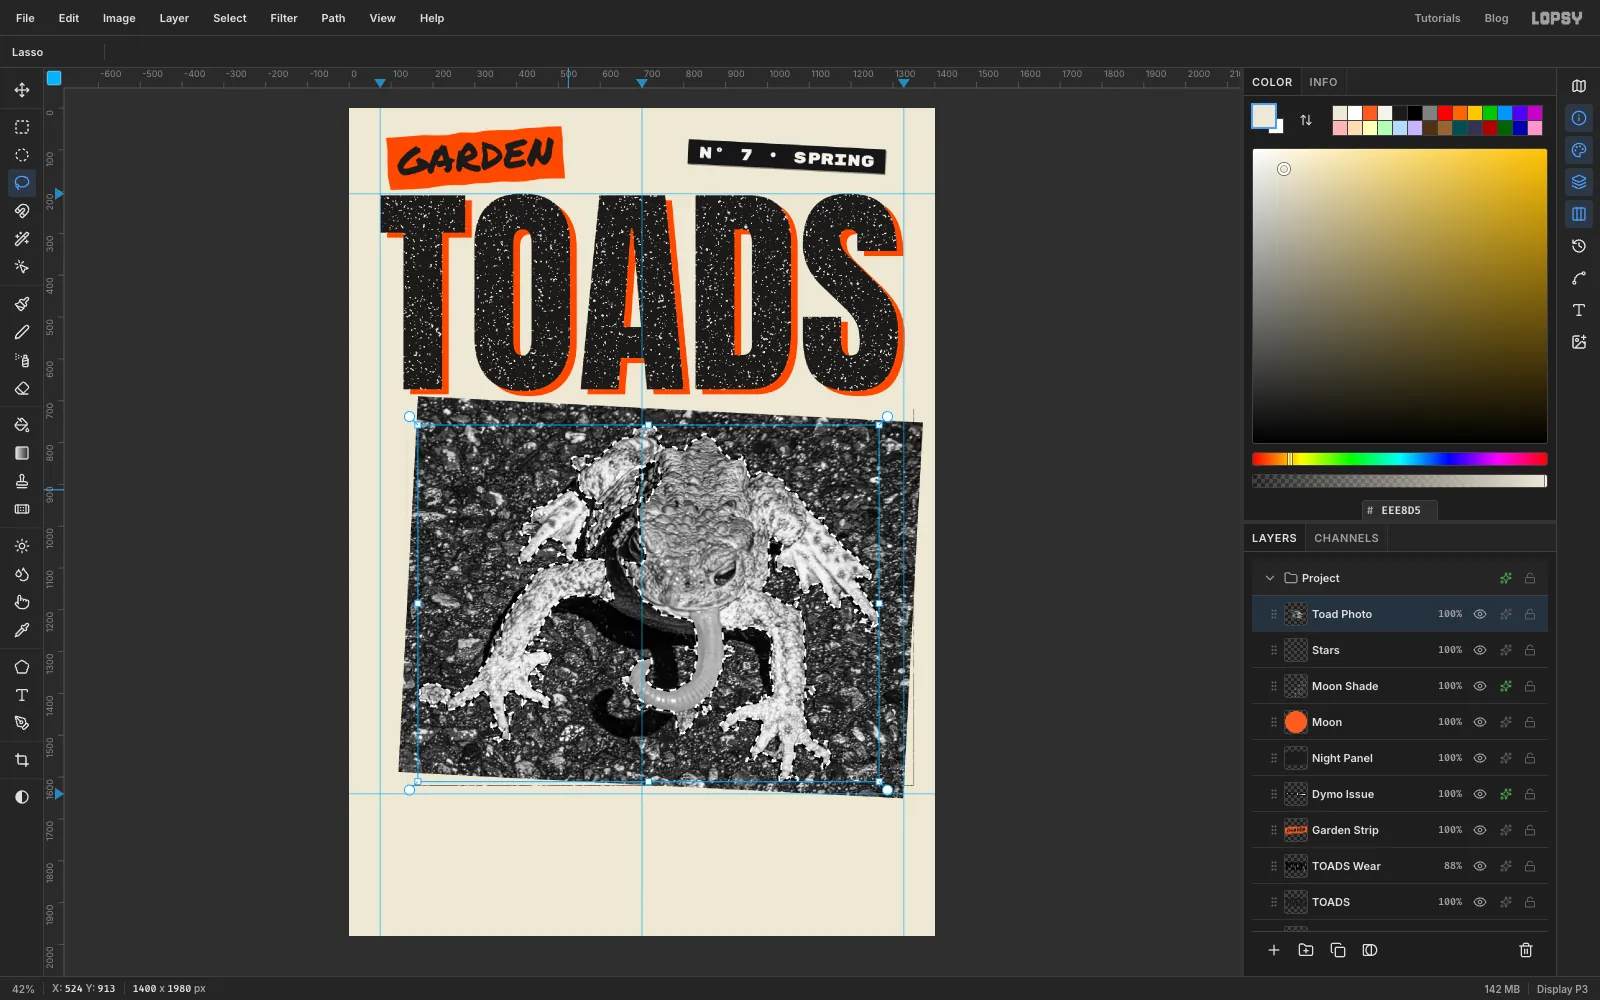
Zoom in so you can see the edges. With the Lasso, trace around the toad: the head, the body, the worm hanging from its mouth, both right legs and the left shoulder and forearm, all in one go. Follow the light skin and leave out the dark shadow on the ground.
The left hind leg is separated from the body by shadow, so trace it as a second piece. Hold Shift as you start the second drag to add it to the selection.
-
Cut the toad out
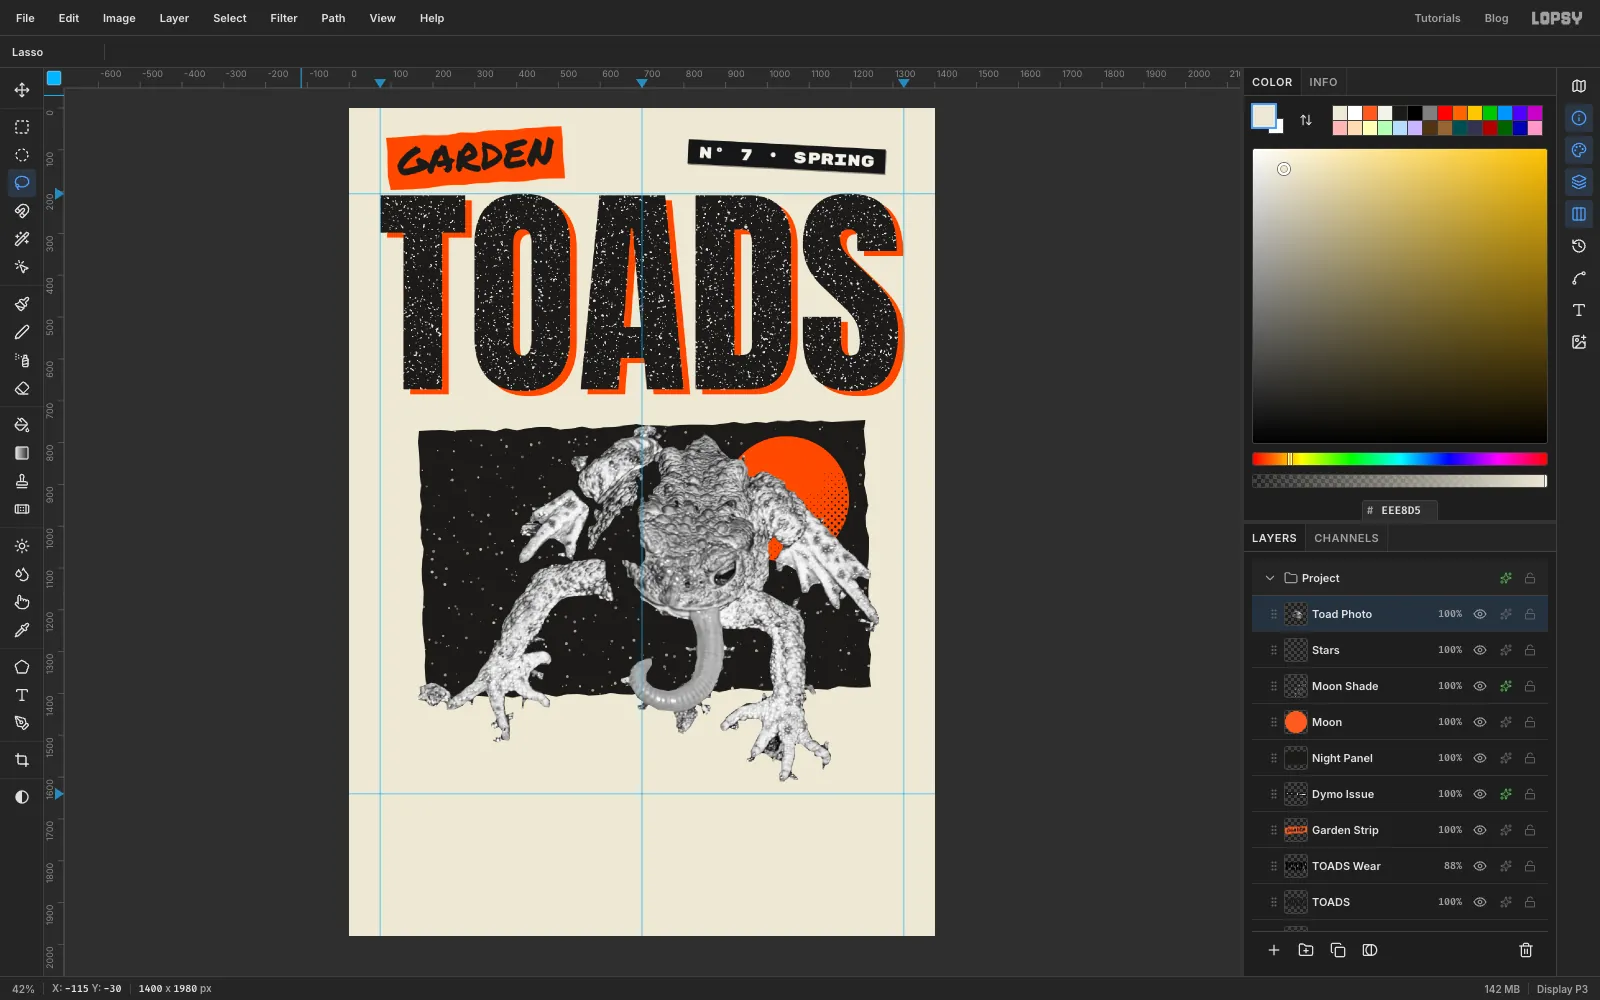
Choose Select → Inverse, press Delete to clear the background, and deselect.
-
Add the white scissor margin
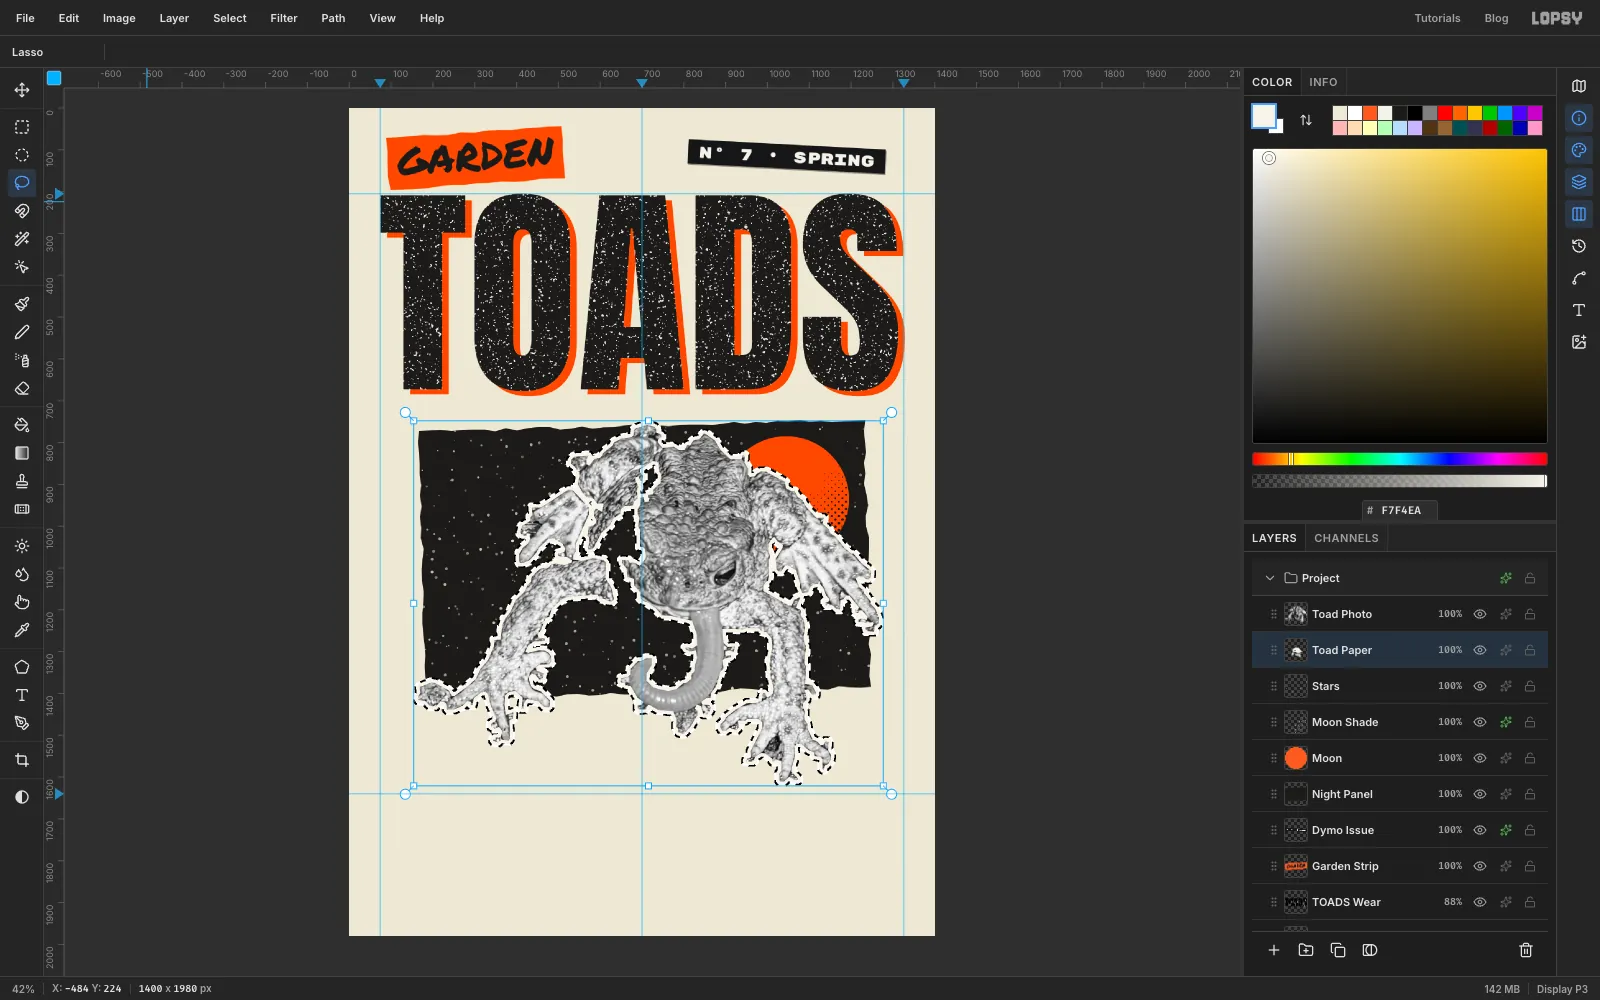
- Cmd-click the Toad Photo thumbnail, then choose Select → Grow and enter
10. - Click Stars and add a layer called
Toad Paper. It sits under the photo. - Fill with . The screenshot shows this moment, with the selection still active.
- Deselect, then turn on Drop Shadow: Offset X
4, Offset Y5, Blur0, Opacity35. It's a thin, hard shadow, like a sheet of paper on a copier glass.
- Cmd-click the Toad Photo thumbnail, then choose Select → Grow and enter
-
Lay the orange plate under the toad
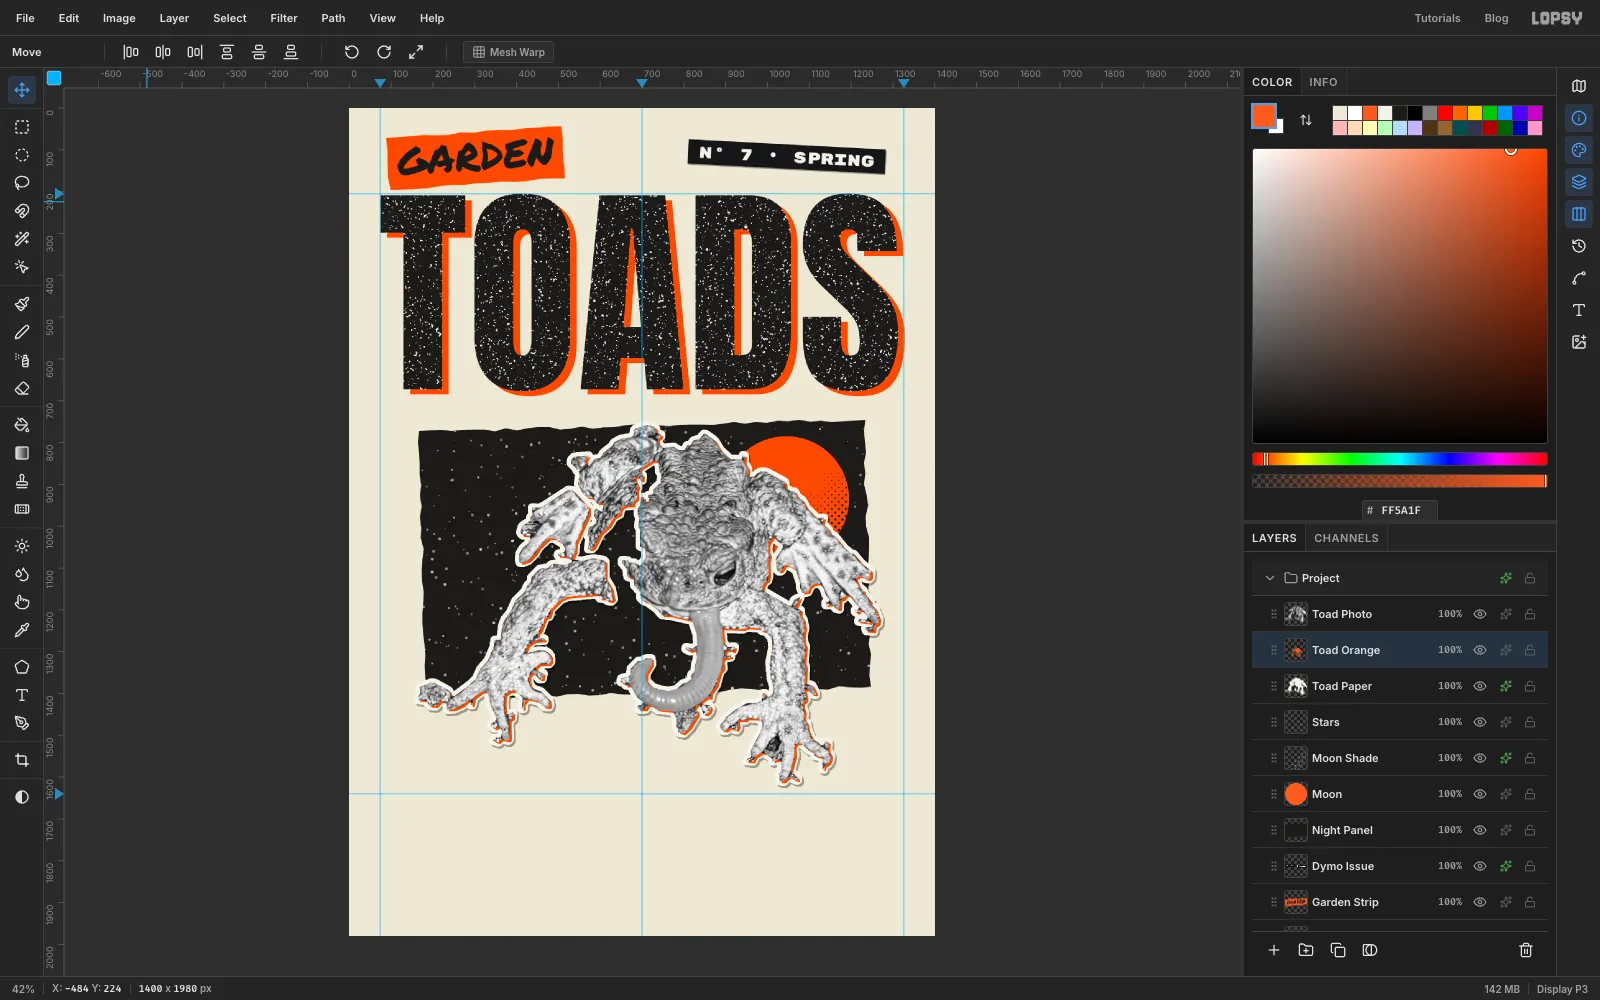
- Cmd-click the Toad Photo thumbnail again, click Toad Paper, and add a layer called
Toad Orange. - Fill it with and deselect.
- With the Move tool, nudge it Right 5 times and Down 4 times. Just like the masthead, the second ink is off register.
- Cmd-click the Toad Photo thumbnail again, click Toad Paper, and add a layer called
-
Photocopy the toad
Click Toad Photo and choose Filter → Threshold with Level
132. A cheap copier does exactly this to a photo. Every tone becomes either toner or bare paper. The warts, the eye and the line of the mouth come out in heavy black.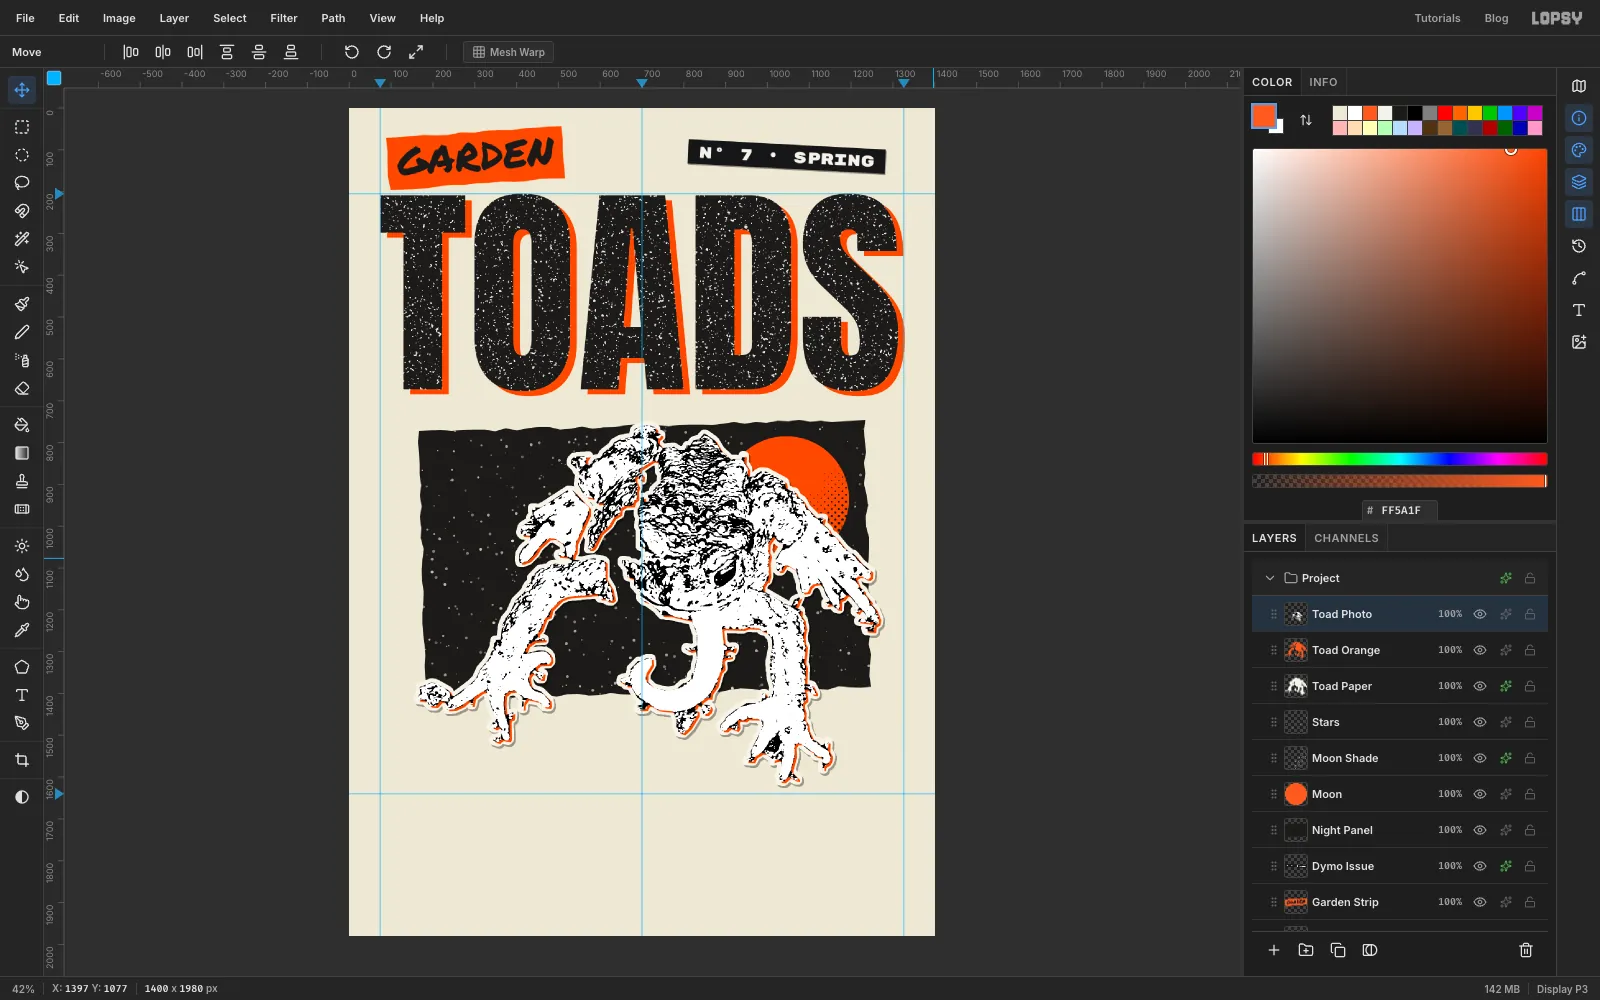
-
Print the black over the orange
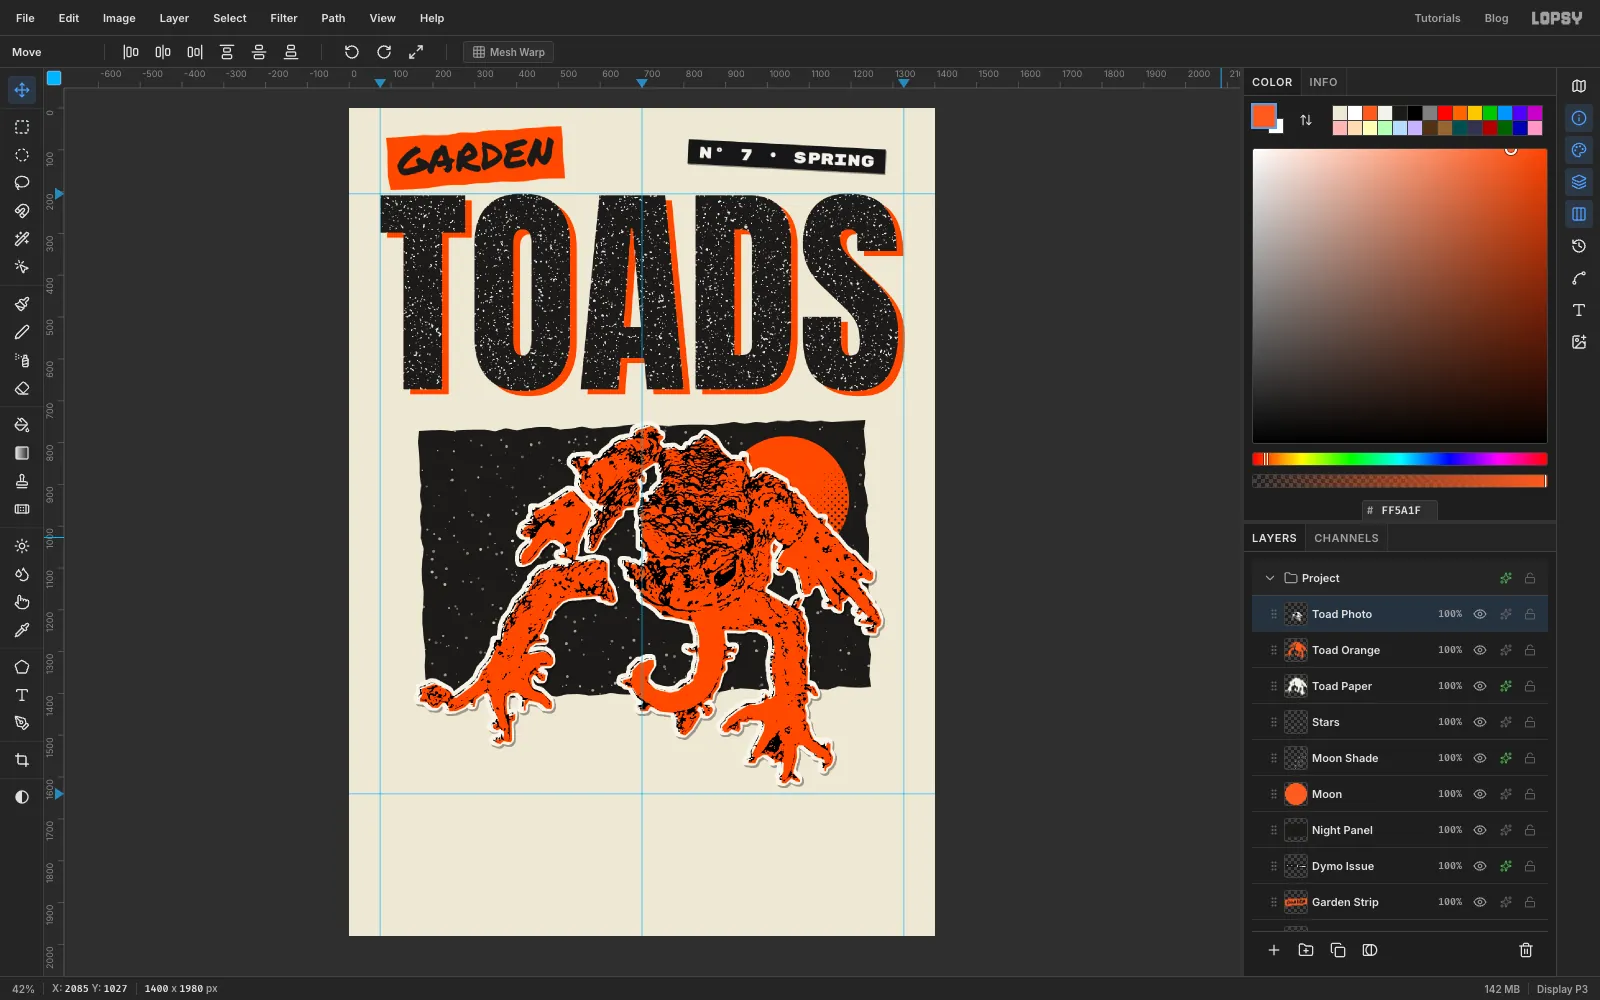
Set Toad Photo's blend mode to Multiply. White multiplies to nothing, so the orange shows through, while black stays black. That's two-ink printing in one click.
-
Trace the worm
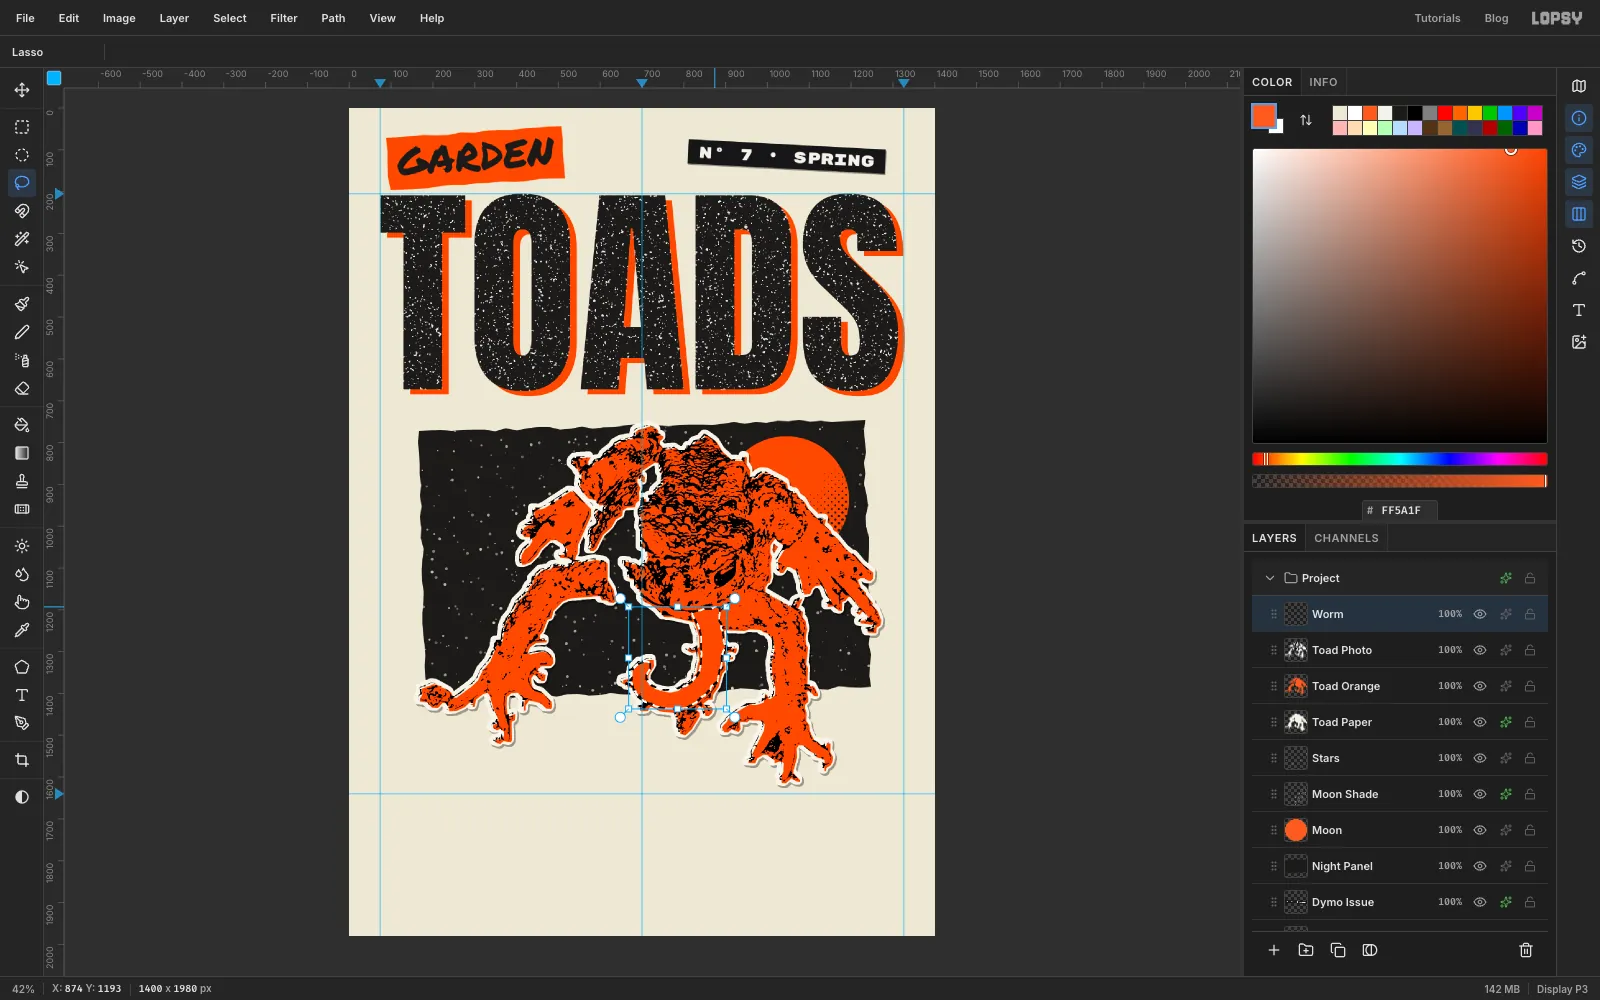
At this point the worm is the same orange as the toad, so it reads like a tail. Give it its own look:
- Click Toad Photo and add a layer called
Worm. - With the Lasso, trace around the worm from the mouth, down and round the curl to the tip.
- Fill with . Keep the selection.
- Click Toad Photo and add a layer called
-
Finish the worm
- Add a layer called
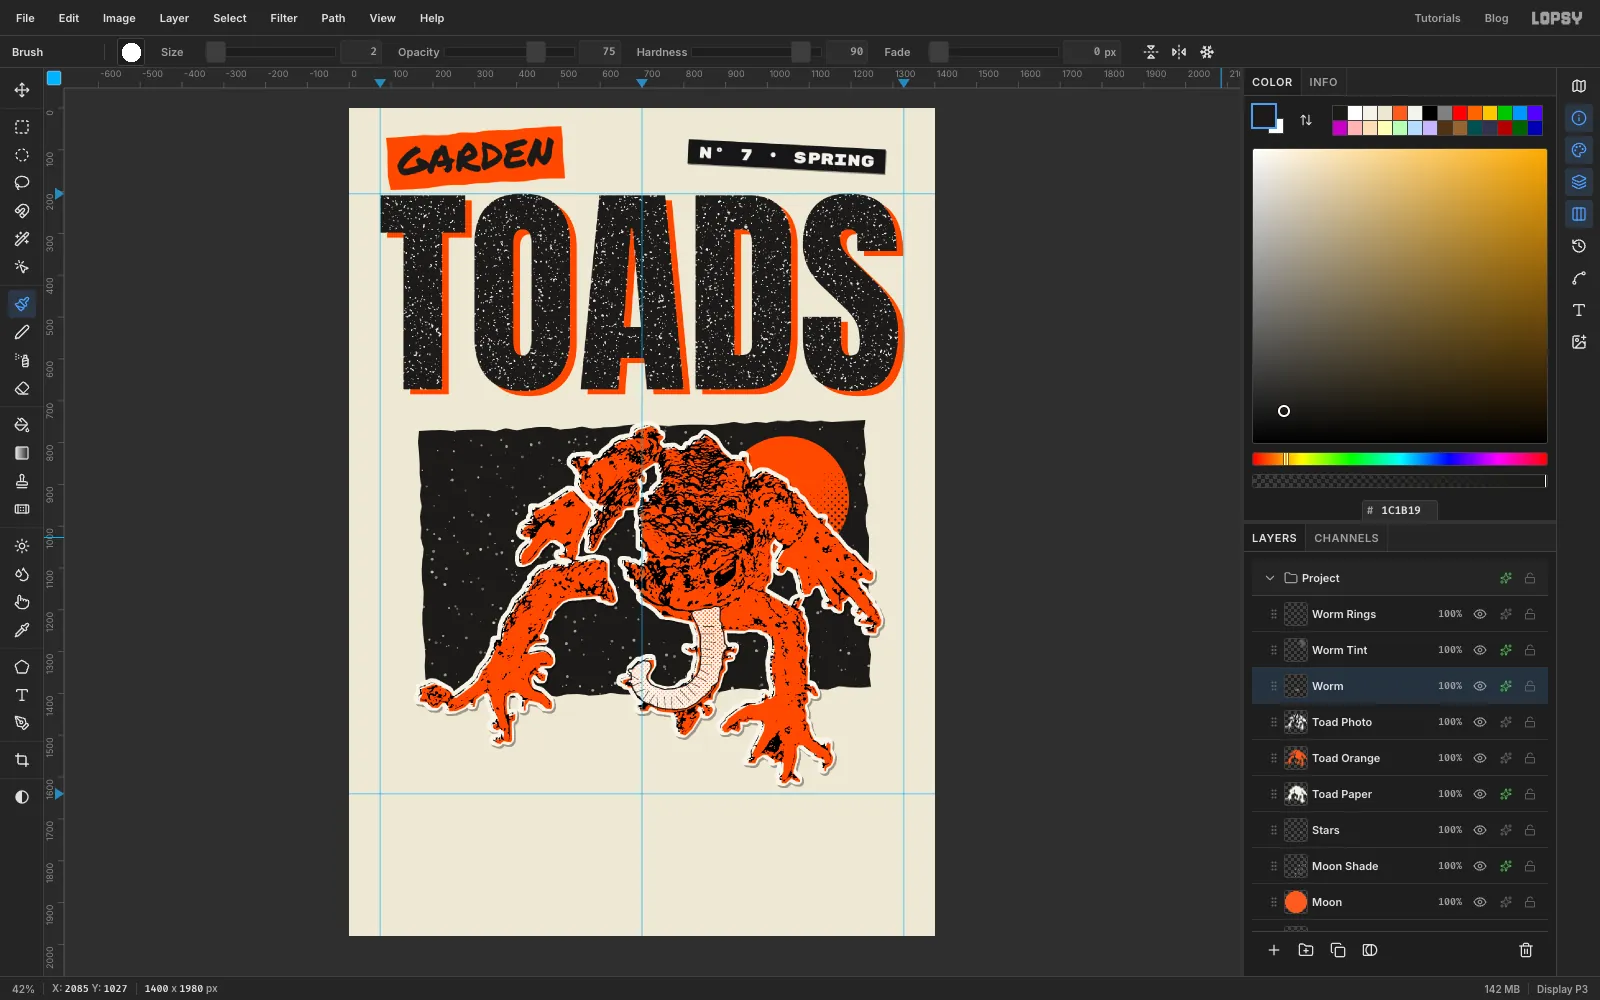
Worm Tint. With the Gradient tool, open Advanced…, delete the middle stop left over from the moon, and set the two ends to and . Drag from the mouth to the tip of the tail, then deselect. - Choose Filter → Halftone: Dot Size
7, Angle45, Softness0.4. Turn on Color Overlay with . That's an orange tint screen, the way a riso prints a lighter shade of an ink. - Add a layer called
Worm Rings. Pick the Brush (B) at Size2, Opacity75, Hardness90, colour . Draw short strokes across the worm about every 18 px. Stop each one a little short of the edges, and vary them slightly. - Click the Worm layer and turn on Stroke: Width
3, colour , position Outside (the default).
- Add a layer called
-
Label the night panel
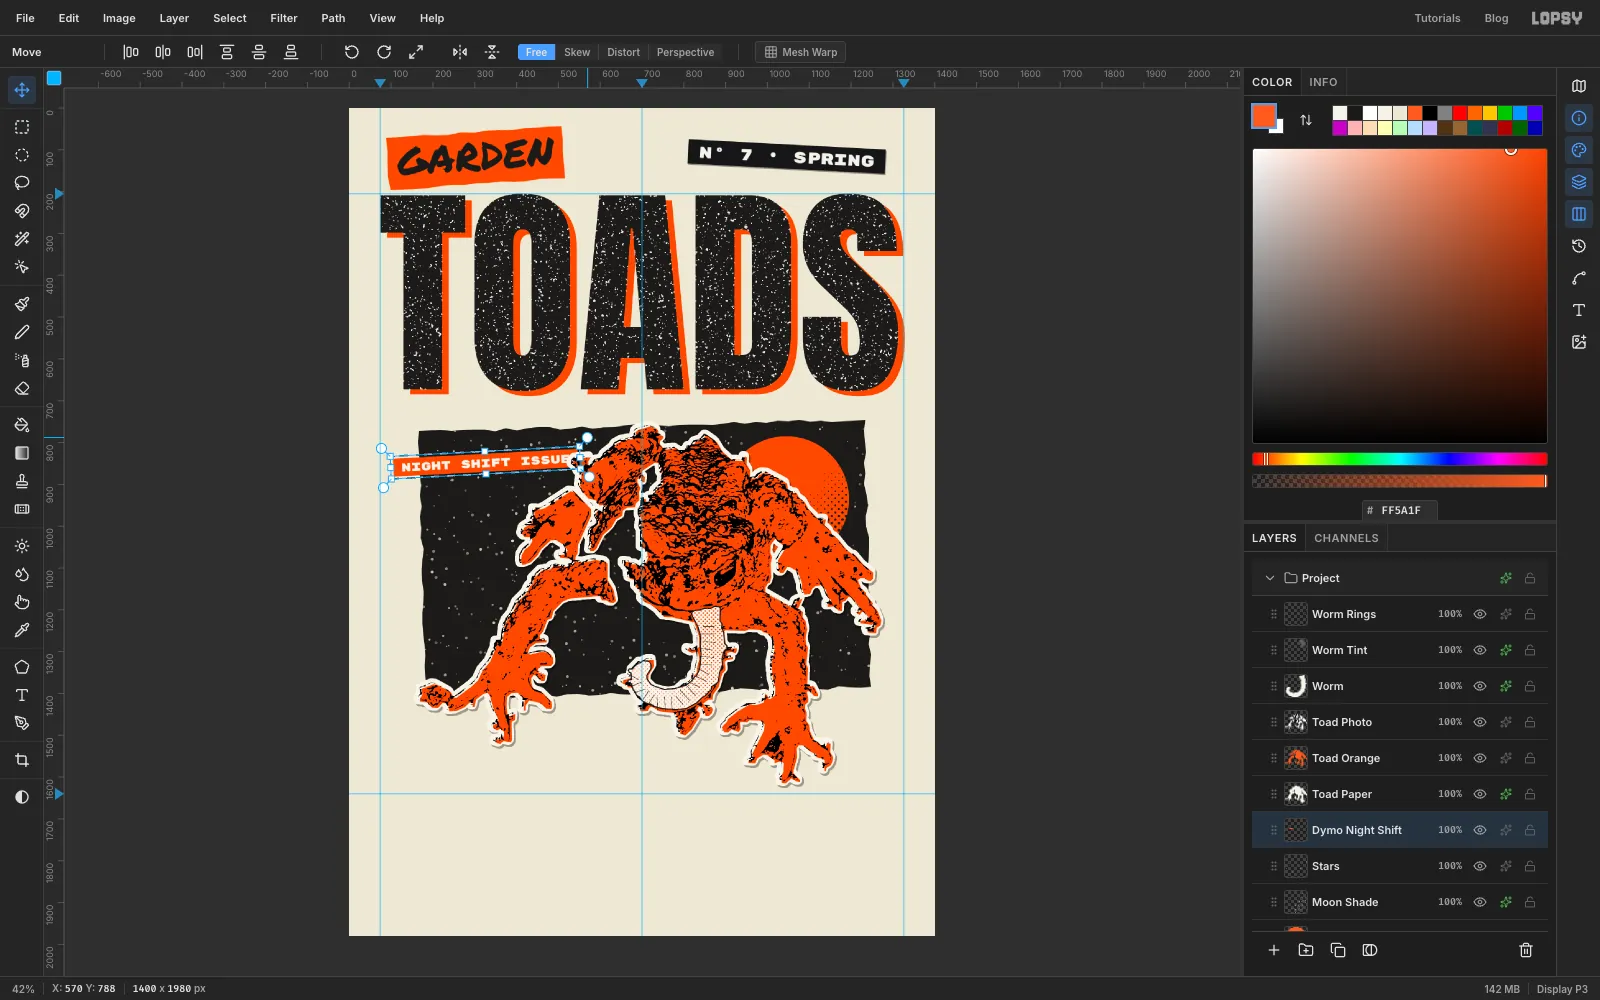
Make a second Dymo label the same way as the first, but on orange tape:
- Click Stars so the label ends up under the toad, then add a layer called
Dymo Night Shift. - Type
NIGHT SHIFT ISSUEin Rubik Mono One at Size28, colour . Move it to the panel's top-left corner, just clear of the toad's shoulder (its centre is at about326, 848). - Click the Dymo Night Shift layer, draw a marquee around the text with about 21 px spare at each end and 12 px above and below, and fill it with . Deselect.
- Click the text layer, Merge Down, rotate the label about 3° anticlockwise, and add the same hard Drop Shadow as before.
- Click Stars so the label ends up under the toad, then add a layer called
-
Tape the panel down
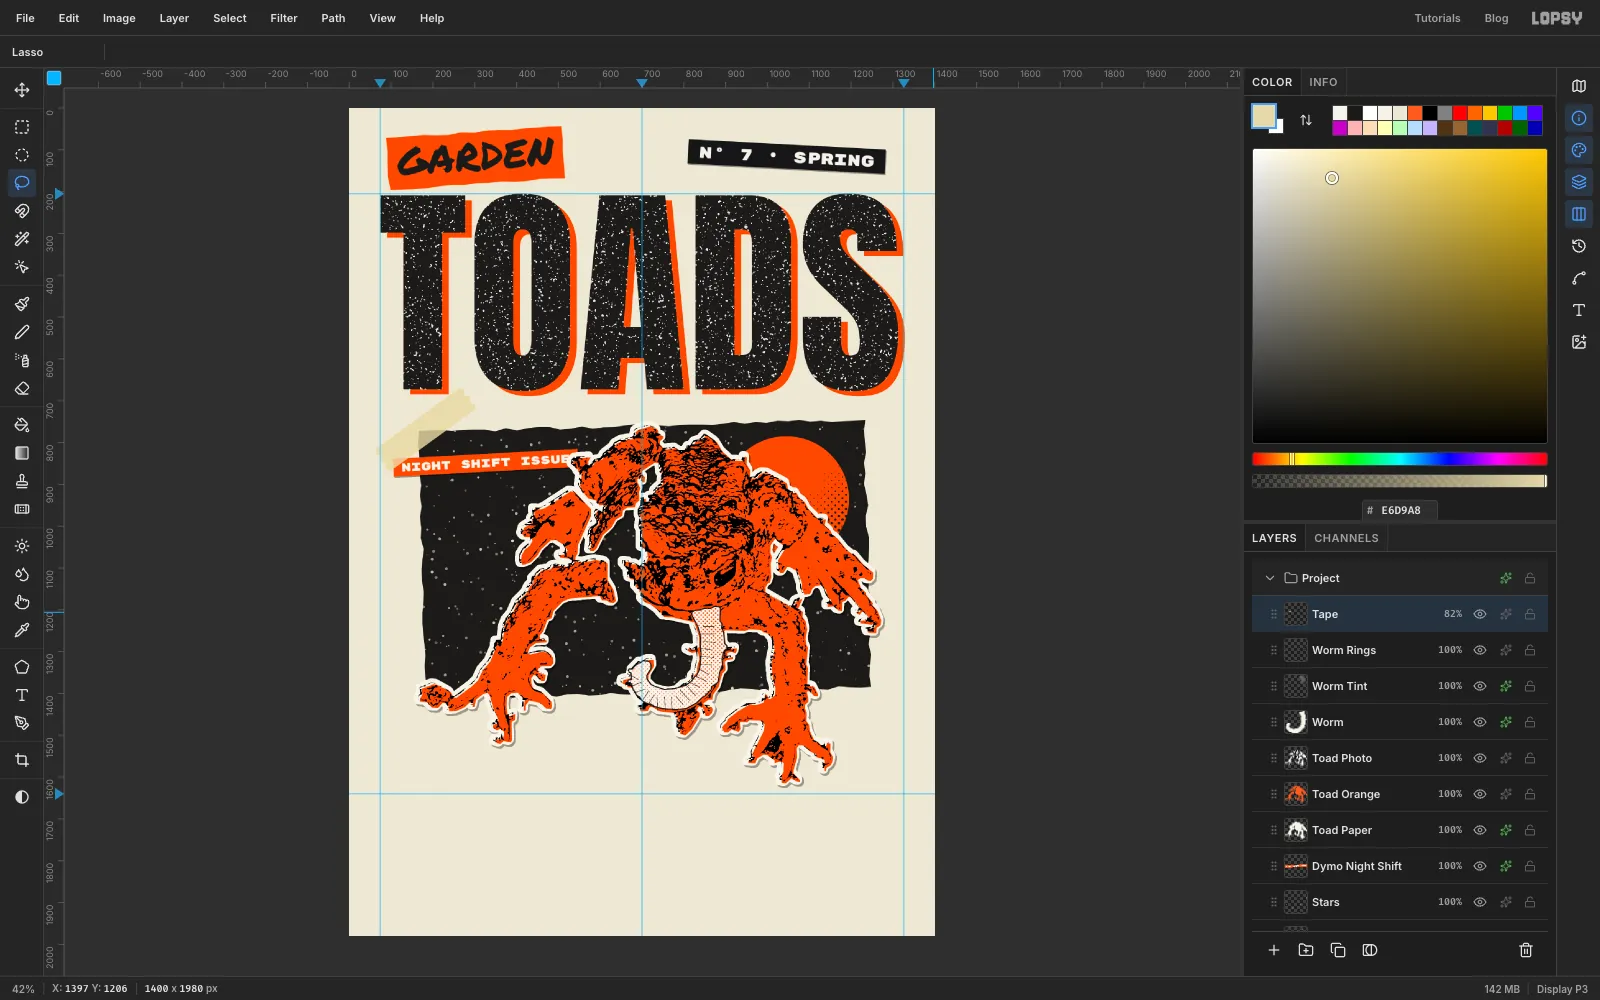
- Click Worm Rings and add a layer called
Tape. The tape sits on top of the toad and the worm. - With the Lasso, draw a strip about 250 × 64 px across the panel's top-left corner, at roughly 36° so it runs down to the right. Make the two short ends zigzag, like tape torn off the roll.
- Fill with and deselect. Run Filter → Add Noise with Amount
10, Mono, for a papery texture, and set the layer's opacity to82%so the corner shows through.
- Click Worm Rings and add a layer called
-
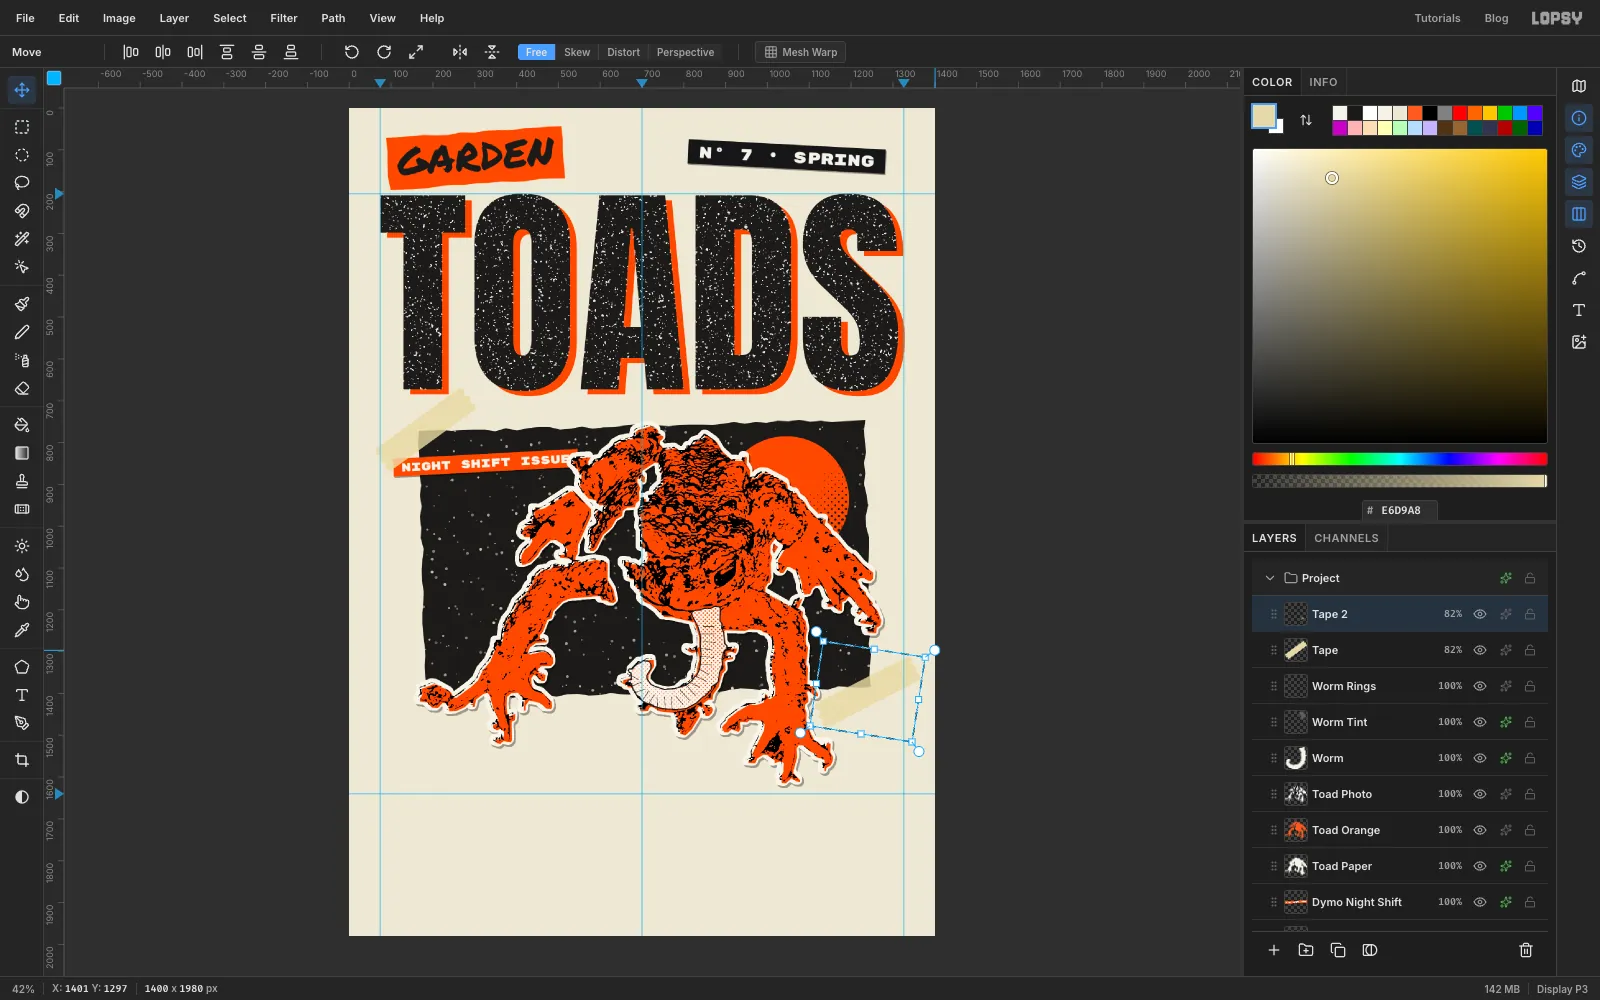
Copy the tape to the opposite corner
- Cmd-click the Tape thumbnail, press Cmd+C then Cmd+V. The copy is pasted in place as a new layer. Rename it
Tape 2. - Drag it with the Move tool down to the panel's bottom-right corner, then press Cmd+D.
- Set its opacity to
82%too. A pasted copy comes in at 100%. - Marquee it and rotate it about 9° clockwise so the two strips aren't identical. Press Enter and deselect.
- Cmd-click the Tape thumbnail, press Cmd+C then Cmd+V. The copy is pasted in place as a new layer. Rename it
-
Type the cover lines on paper scraps
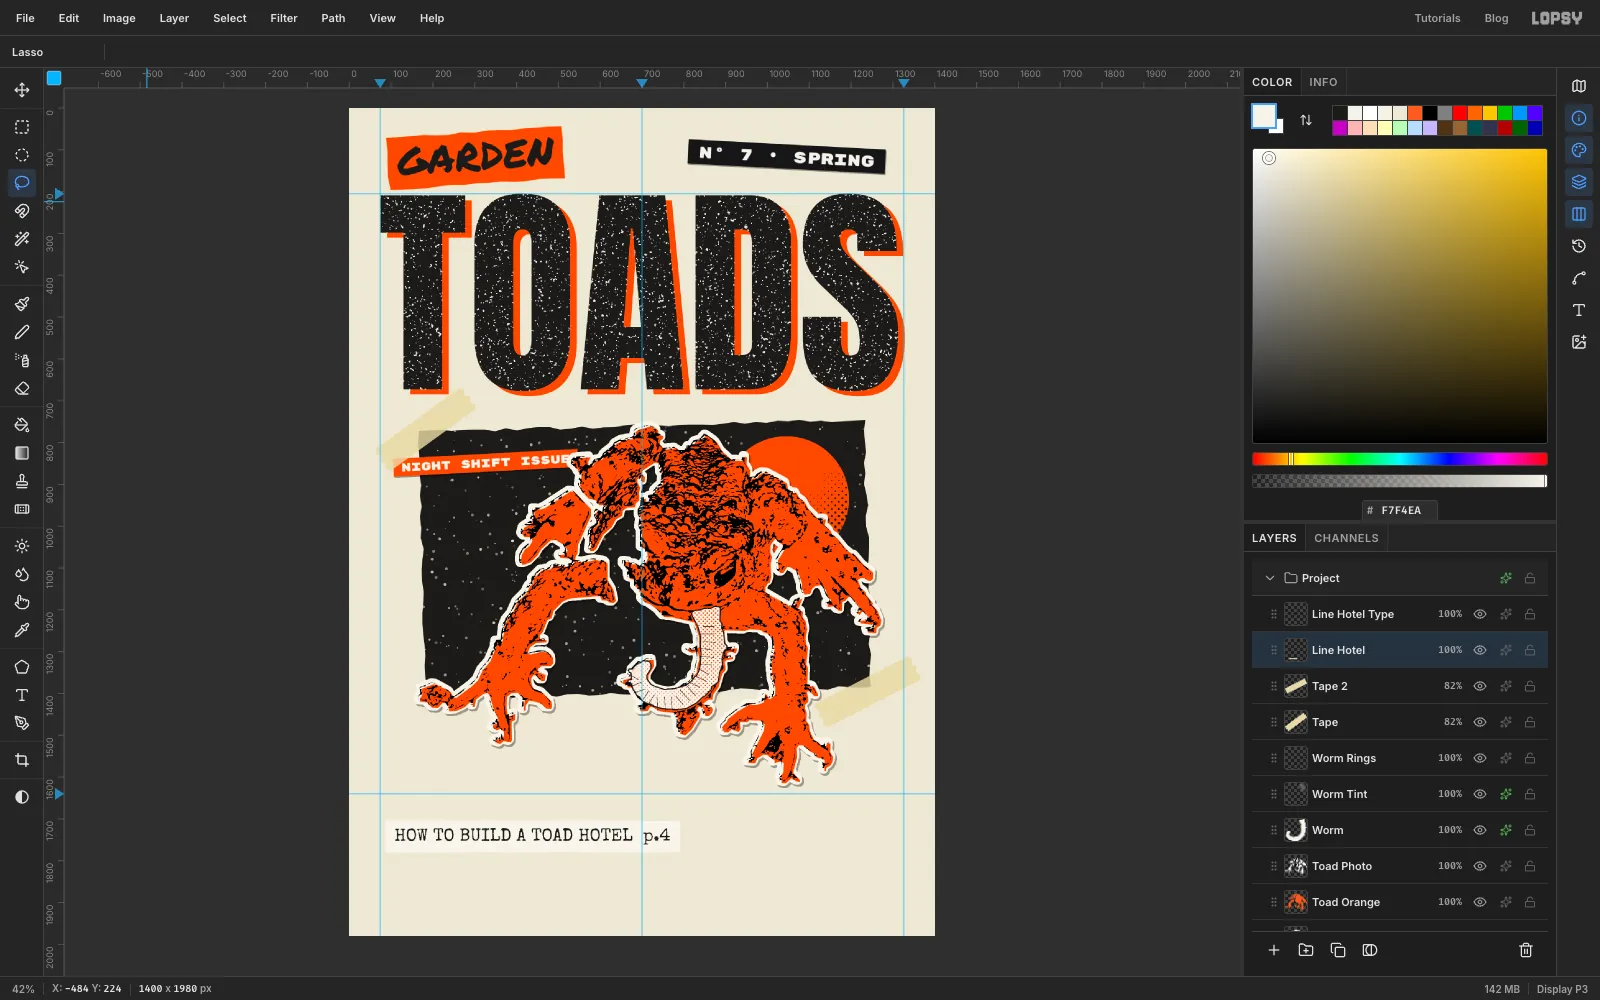
Each cover line is typed, cut out and stuck down separately.
- Click Tape 2 and add a layer called
Line Hotel. - With the Text tool, choose Special Elite at Size
42, colour . Click in empty paper near the bottom and typeHOW TO BUILD A TOAD HOTEL p.4(two spaces before the page number). Press Tab and move it so the text starts a little in from the left margin, about 80 px below the cover-line guide (around110, 1722). I renamed the text layerLine Hotel Typeto keep track of it, but the name doesn't matter because it's merged in the next step. - Click Line Hotel. With the Lasso, draw a scrap around the text with about 24 px of paper at each end and 18 px above and below. Use slightly uneven, scissor-cut sides. Fill with and deselect.
- Click Tape 2 and add a layer called
-
Tilt each scrap
Every scrap gets the same three moves:
- Click its text layer and choose Layer → Merge Down, so the type is part of the scrap.
- Marquee the scrap and rotate it by about a degree. Press Enter and deselect.
- Add a Drop Shadow: Offset X
3, Offset Y3, Blur0, Opacity30.
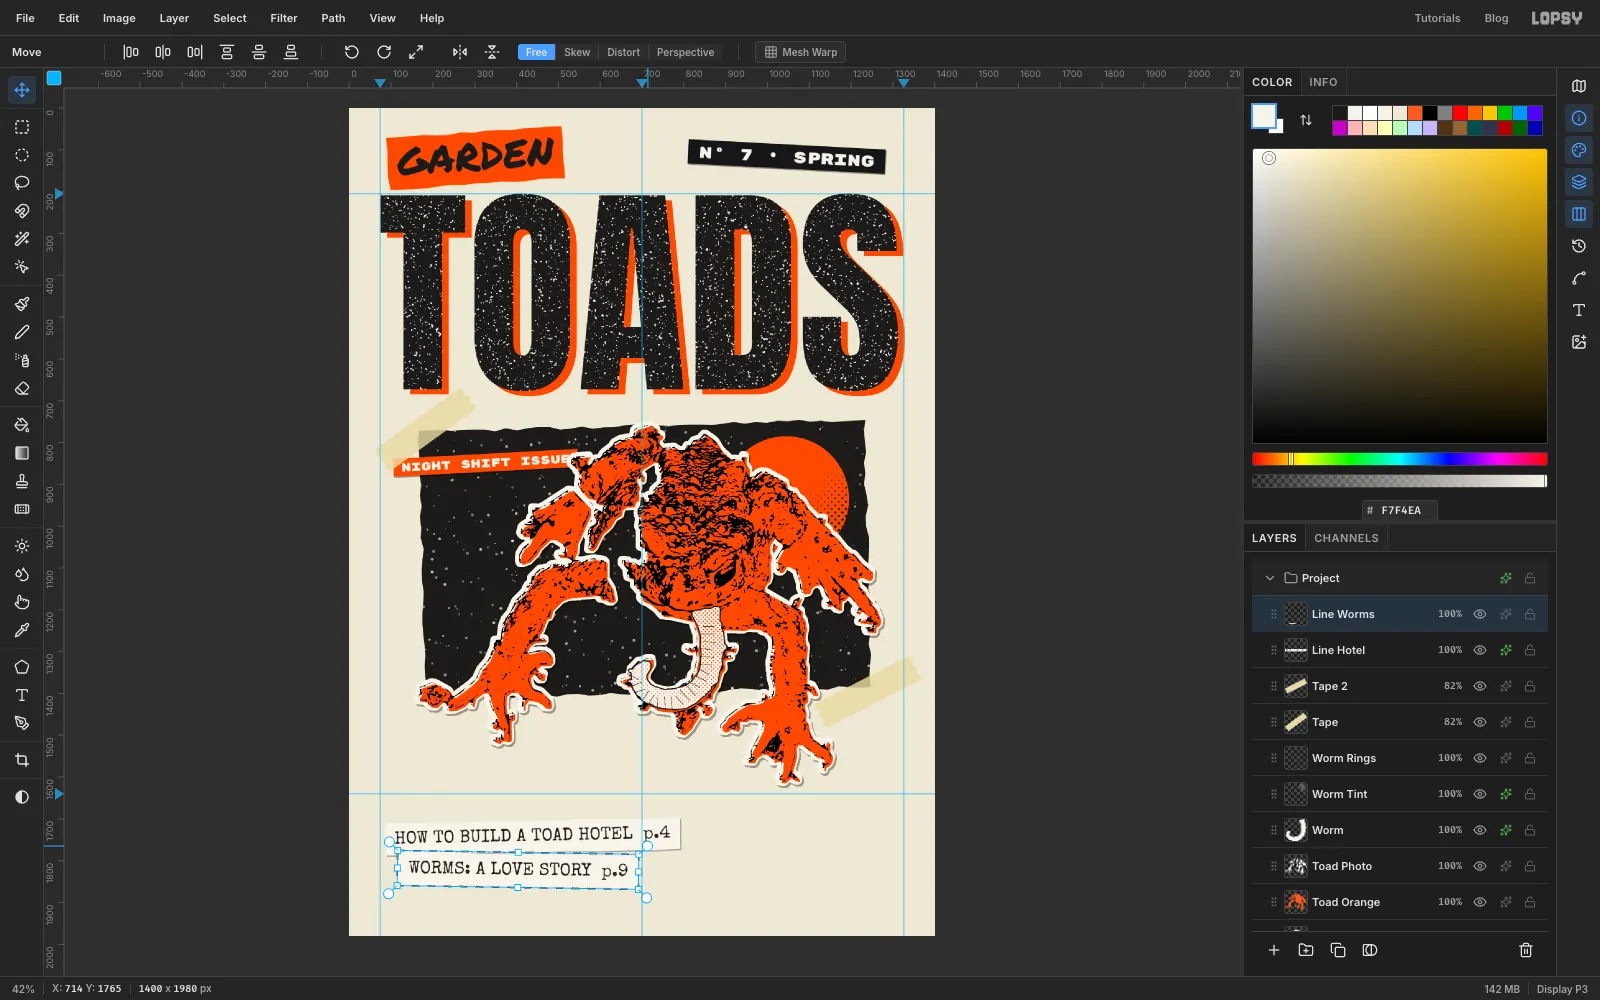
Tilt the hotel line about 1° anticlockwise. Then make the other two lines the same way as the first, each new layer on top of the previous one, about 80 px further down the page:
Line Worms:WORMS: A LOVE STORY p.9, indented about 30 px more than the others (around142, 1802), tilted about 1° clockwise. That's the one in the screenshot.Line Road:WHY DID THE TOAD CROSS THE ROAD? p.12, back at the left (around110, 1882), tilted about 0.6° anticlockwise.
The indent and the alternating tilts keep the three scraps from stacking like a neat list.
-
Swipe the highlighter
- Add a layer called
Highlighterand set the foreground to . - Pick the Brush at Size
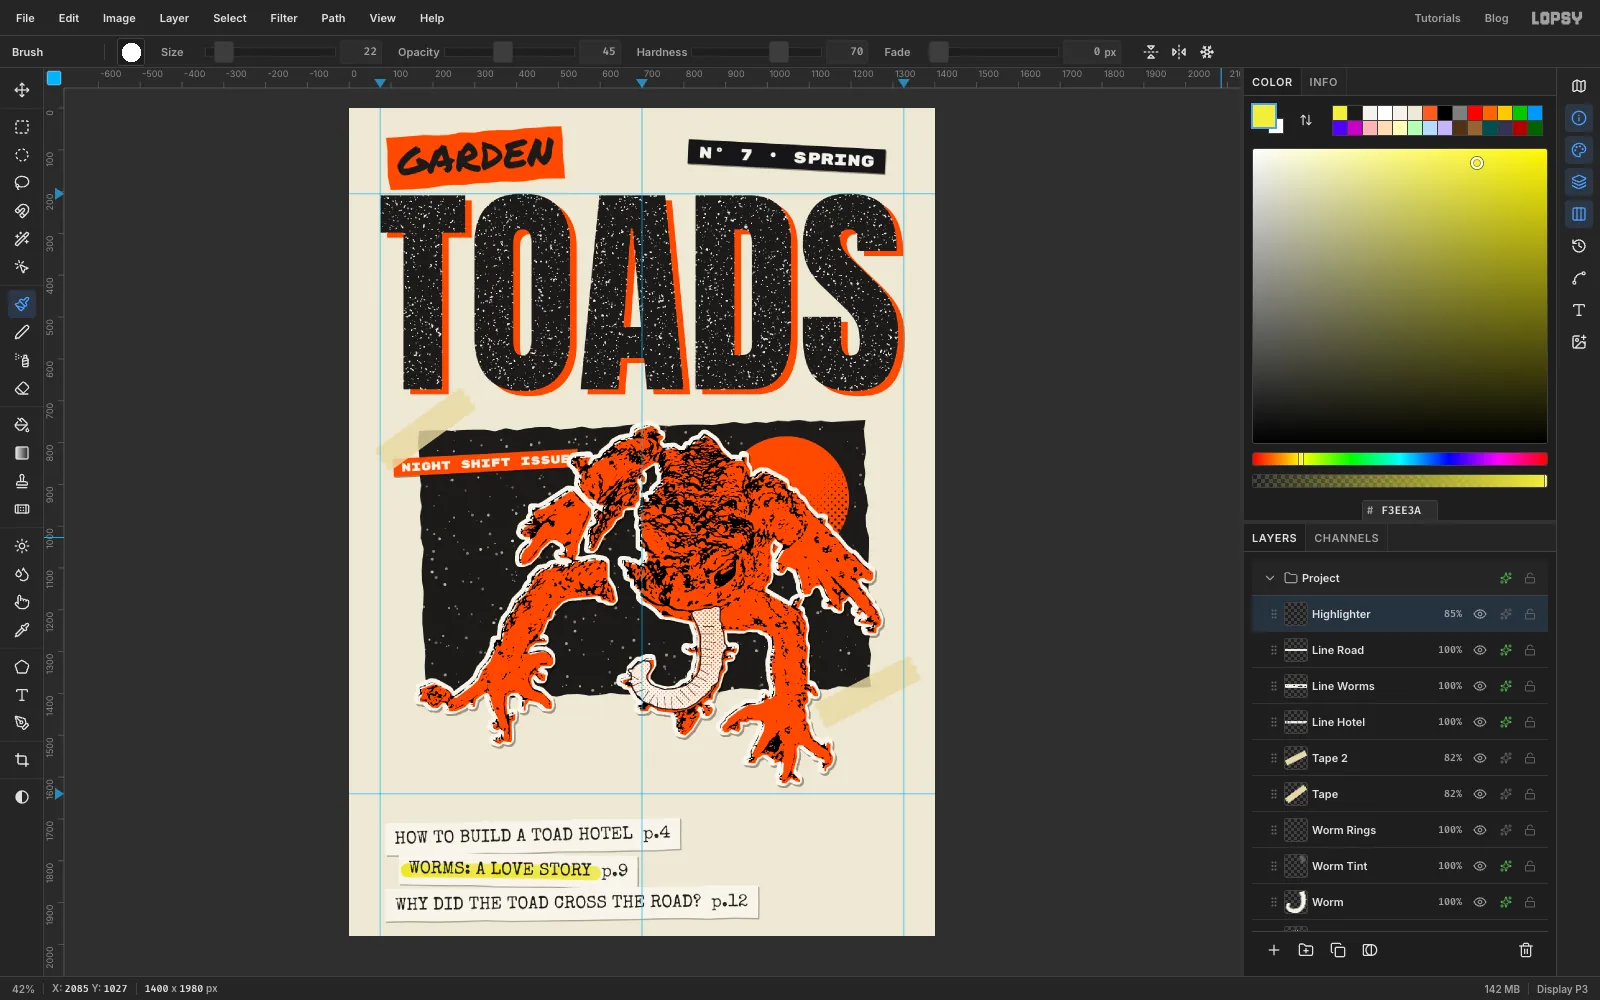
36, Opacity80, Hardness90. Click just before the W of WORMS, then Shift-click about 15 px past the Y of STORY, following the scrap's tilt and sitting a touch below the middle of the letters. - Make a second, thinner pass at Size
22, Opacity45, Hardness70, starting a little later and ending a little earlier, so the colour is uneven like a real marker. - Set the layer to Multiply at
85%, so the type shows through.
- Add a layer called
-
Write the ballpoint note
- Add a layer called
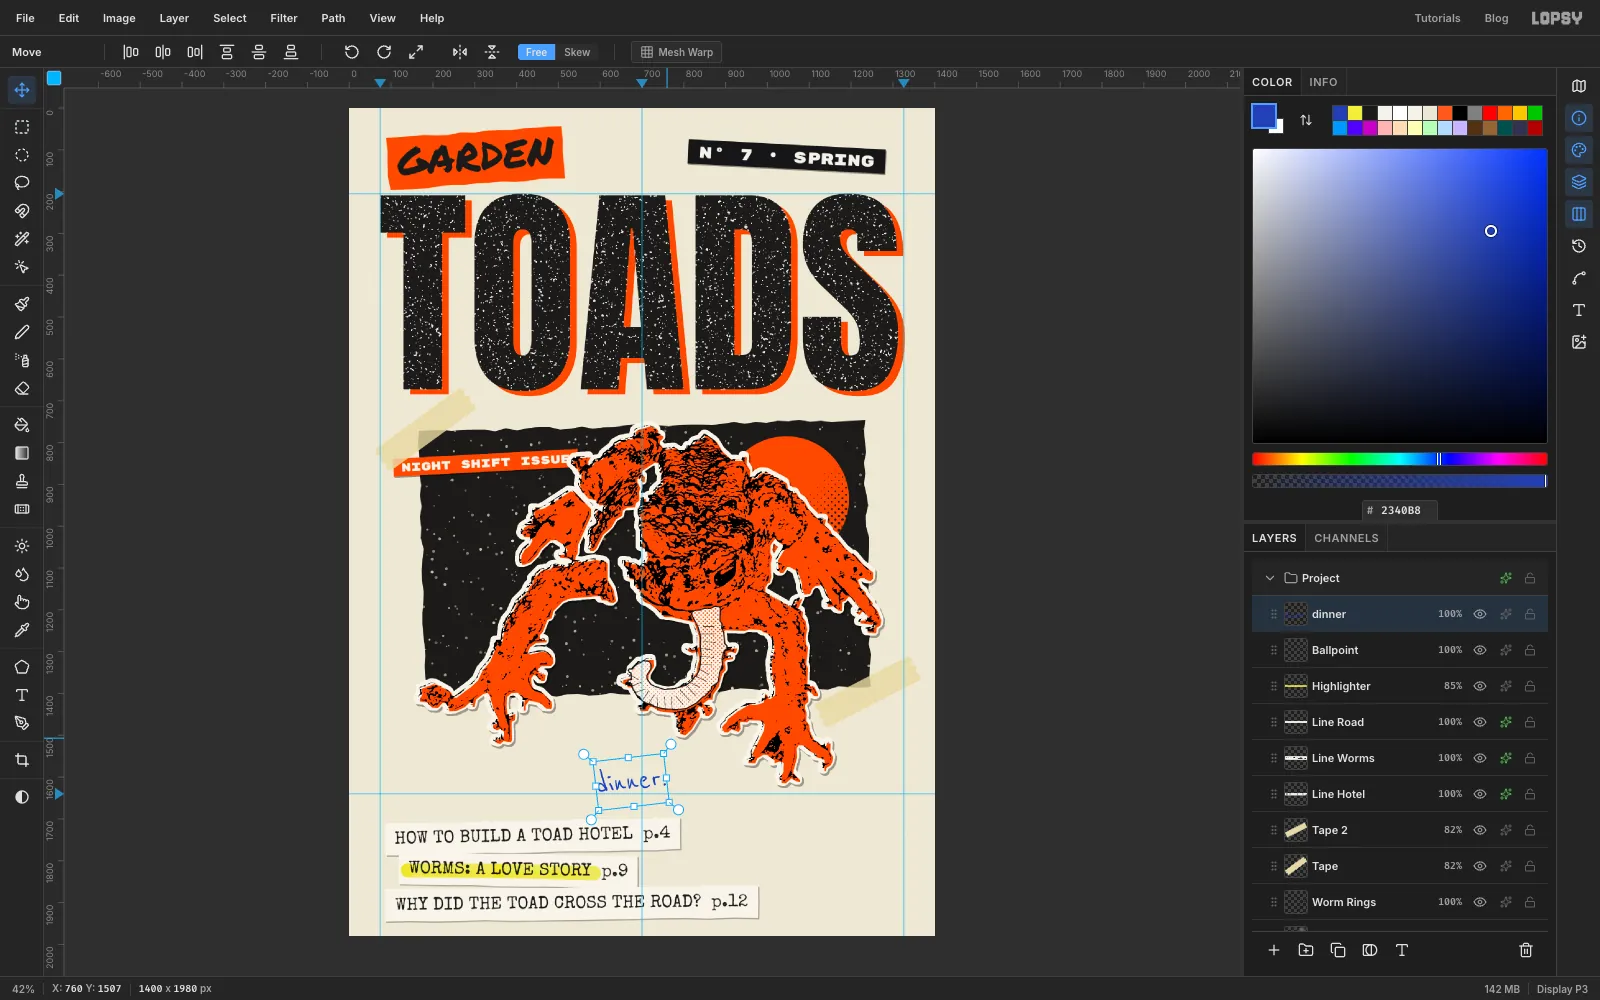
Ballpoint. - With the Text tool, choose Reenie Beanie at Size
84, colour . Click in the empty paper between the toad's feet and the cover lines and typedinner.. Press Tab and move it to about592, 1572. - With the Move tool, hover just outside the text's top-right corner until the rotate cursor appears, and drag it about 7° anticlockwise. Text stays editable when you rotate it this way.
- Add a layer called
-
Draw the arrow
Click the Ballpoint layer. With the Brush at Size
5, Opacity100, Hardness90, draw a slightly curved line from the top of the note up to the underside of the worm's curl. Then add two short strokes at the tip for the arrowhead.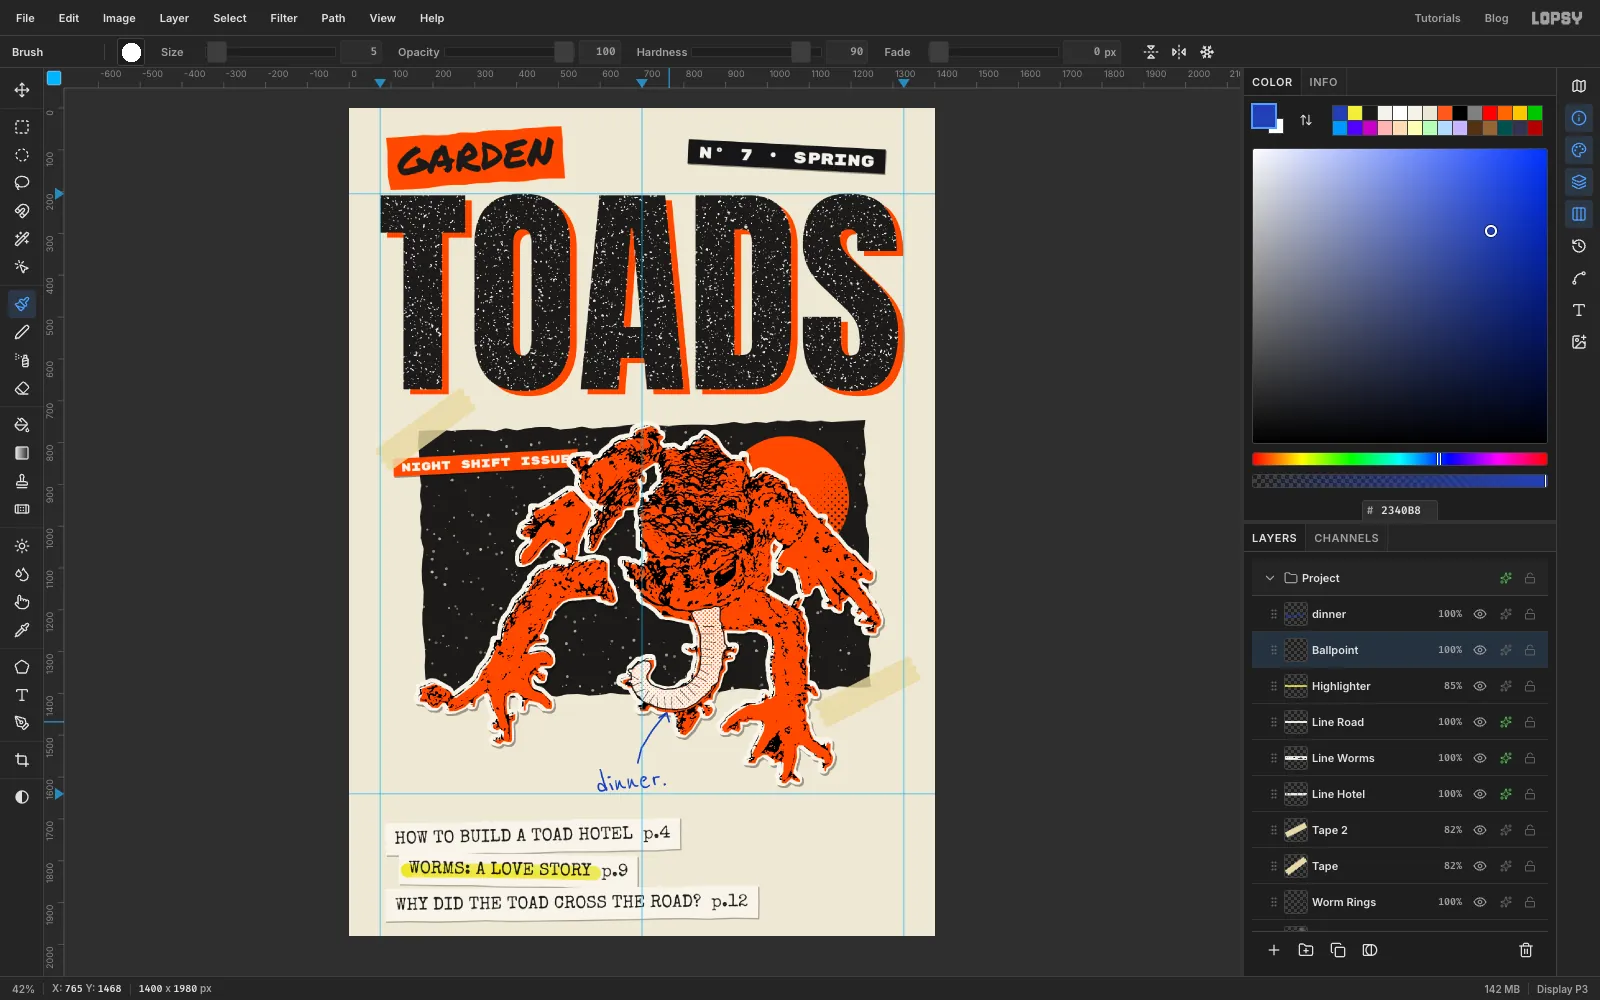
-
Build the rubber stamp
- Click the dinner text layer and add a layer called
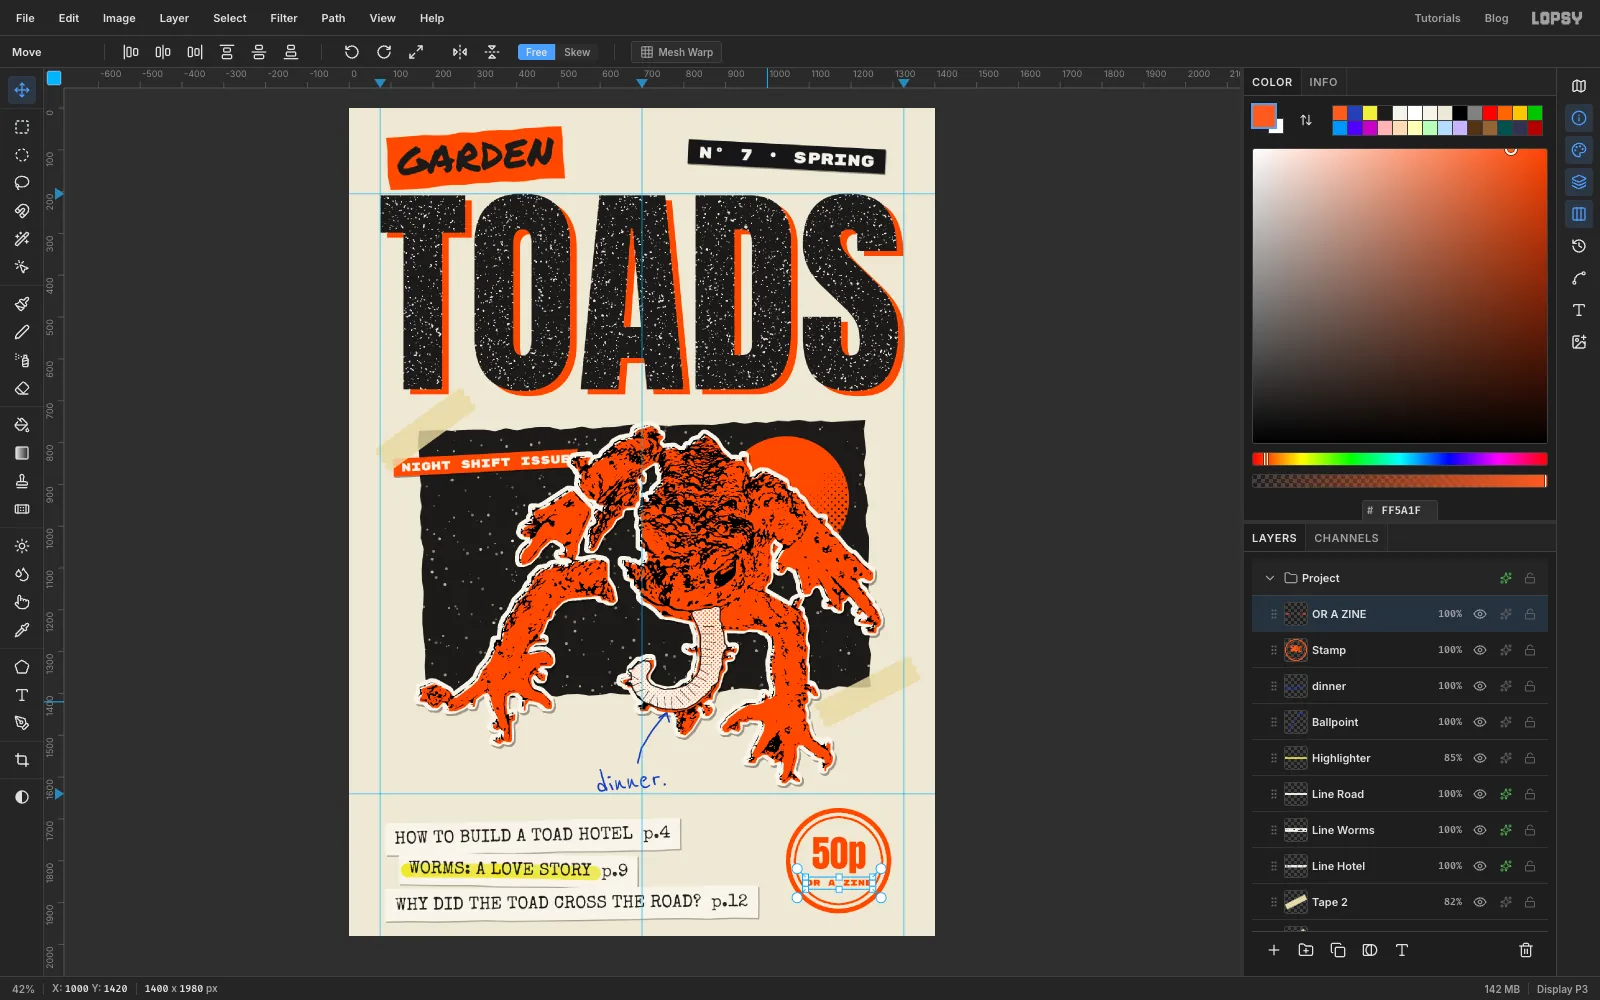
Stamp. With the Elliptical Marquee, click once and enter From1044, 1674and To1296, 1926. - Fill it with .
- Choose Select → Shrink, enter
11, and press Delete. That leaves a ring. - Shrink by
8again and Edit → Fill, then Shrink by5and press Delete. Now there's a thin inner ring. Deselect. - Type
50pin Anton at Size88in orange, centre it in the rings just above the middle, and Merge Down right away. - Type
OR A ZINEin Rubik Mono One at Size21and centre it under the price. That's the moment in the screenshot.
- Click the dinner text layer and add a layer called
-
Stamp it at an angle
With the
OR A ZINEtext layer selected, choose Layer → Merge Down. Then marquee the stamp and rotate it about 14° anticlockwise. Press Enter and deselect.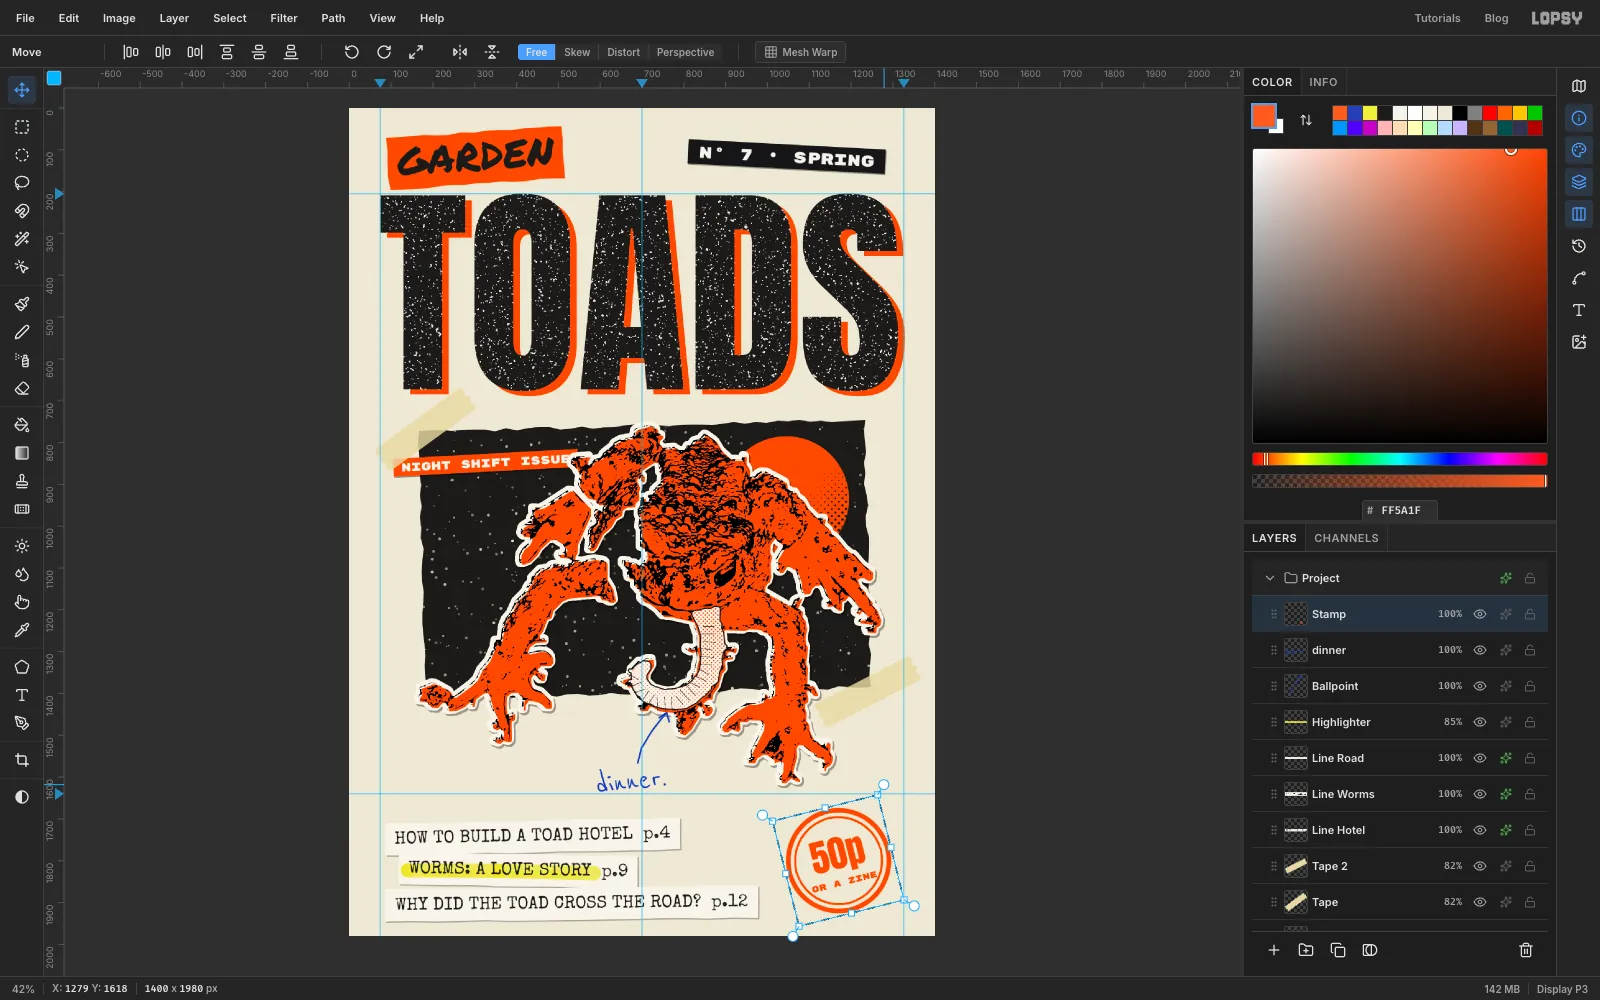
-
Wear the stamp
A real stamp never prints evenly.
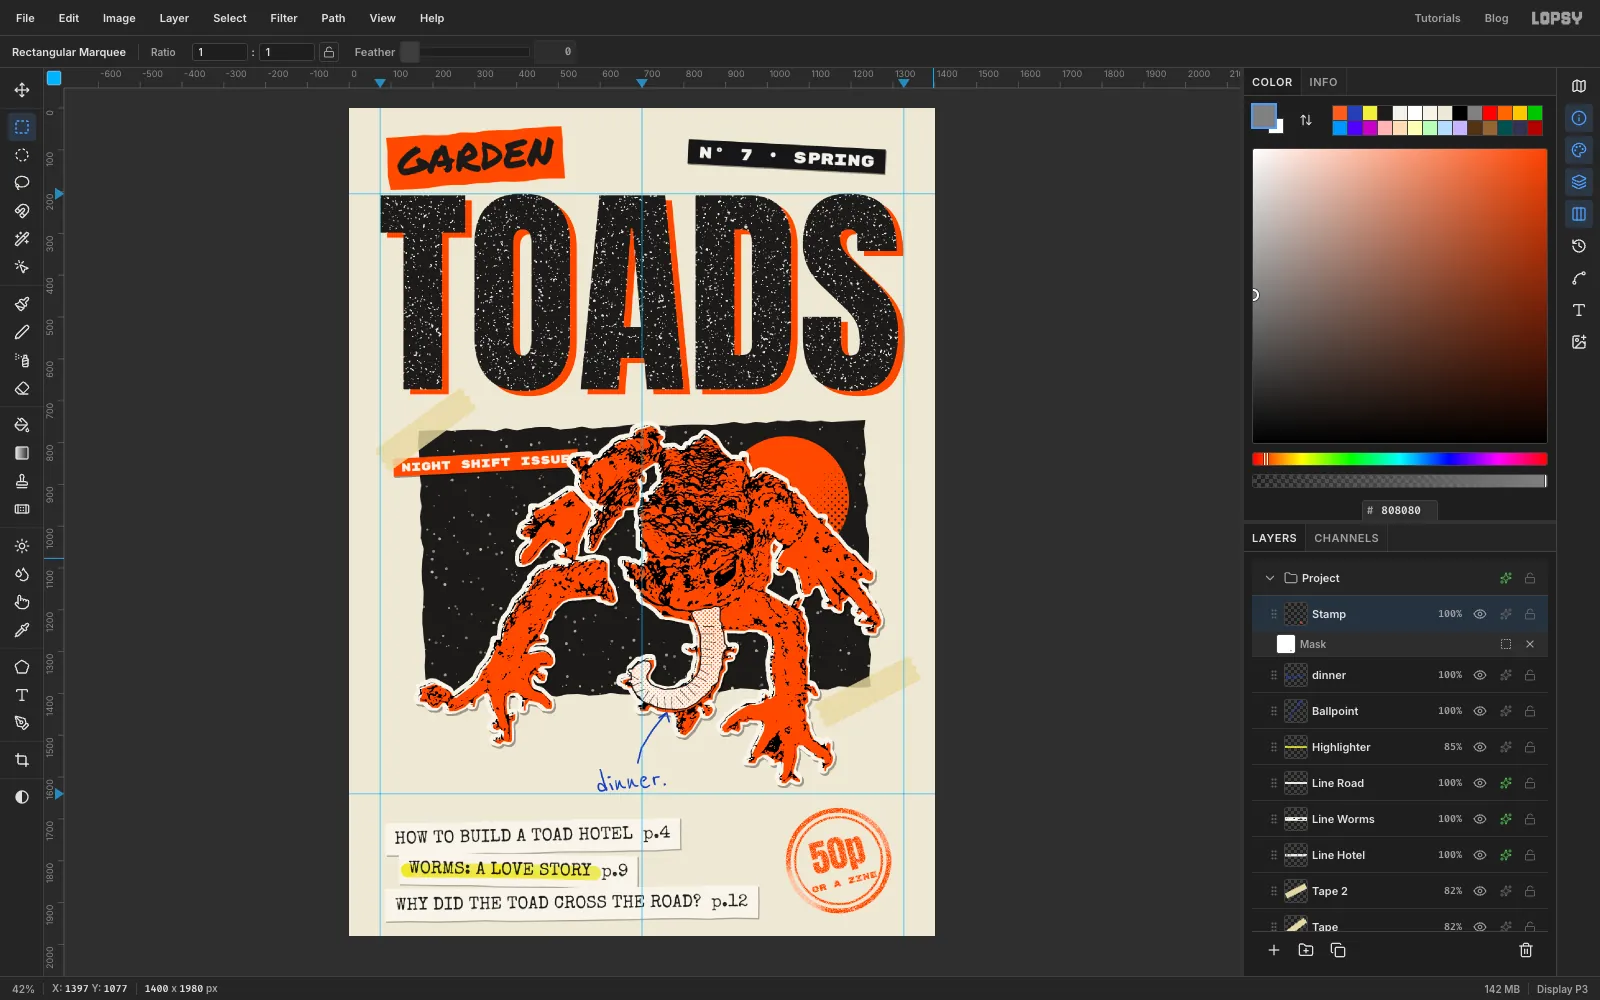
- Pick the Eraser (E) at Size
46and Opacity14. Make one light pass over the upper-right of the outer ring. Then raise the Opacity to30and make a pass over the lower-left arc, so that side looks ink-starved. - Click Add Mask at the bottom of the Layers panel, then click the mask thumbnail on the Stamp row to edit the mask.
- Draw a marquee around the stamp, fill it with , and deselect.
- Run Filter → Add Noise (Amount
100, Mono), Filter → Gaussian Blur (Radius1), and Filter → Threshold (Level98). The mask becomes mostly white with black specks, and each speck knocks a hole in the ink. - Click the Stamp layer's name to go back to editing the layer itself.
- Pick the Eraser (E) at Size
-
Add staples and the lid shadow
- Add a layer called
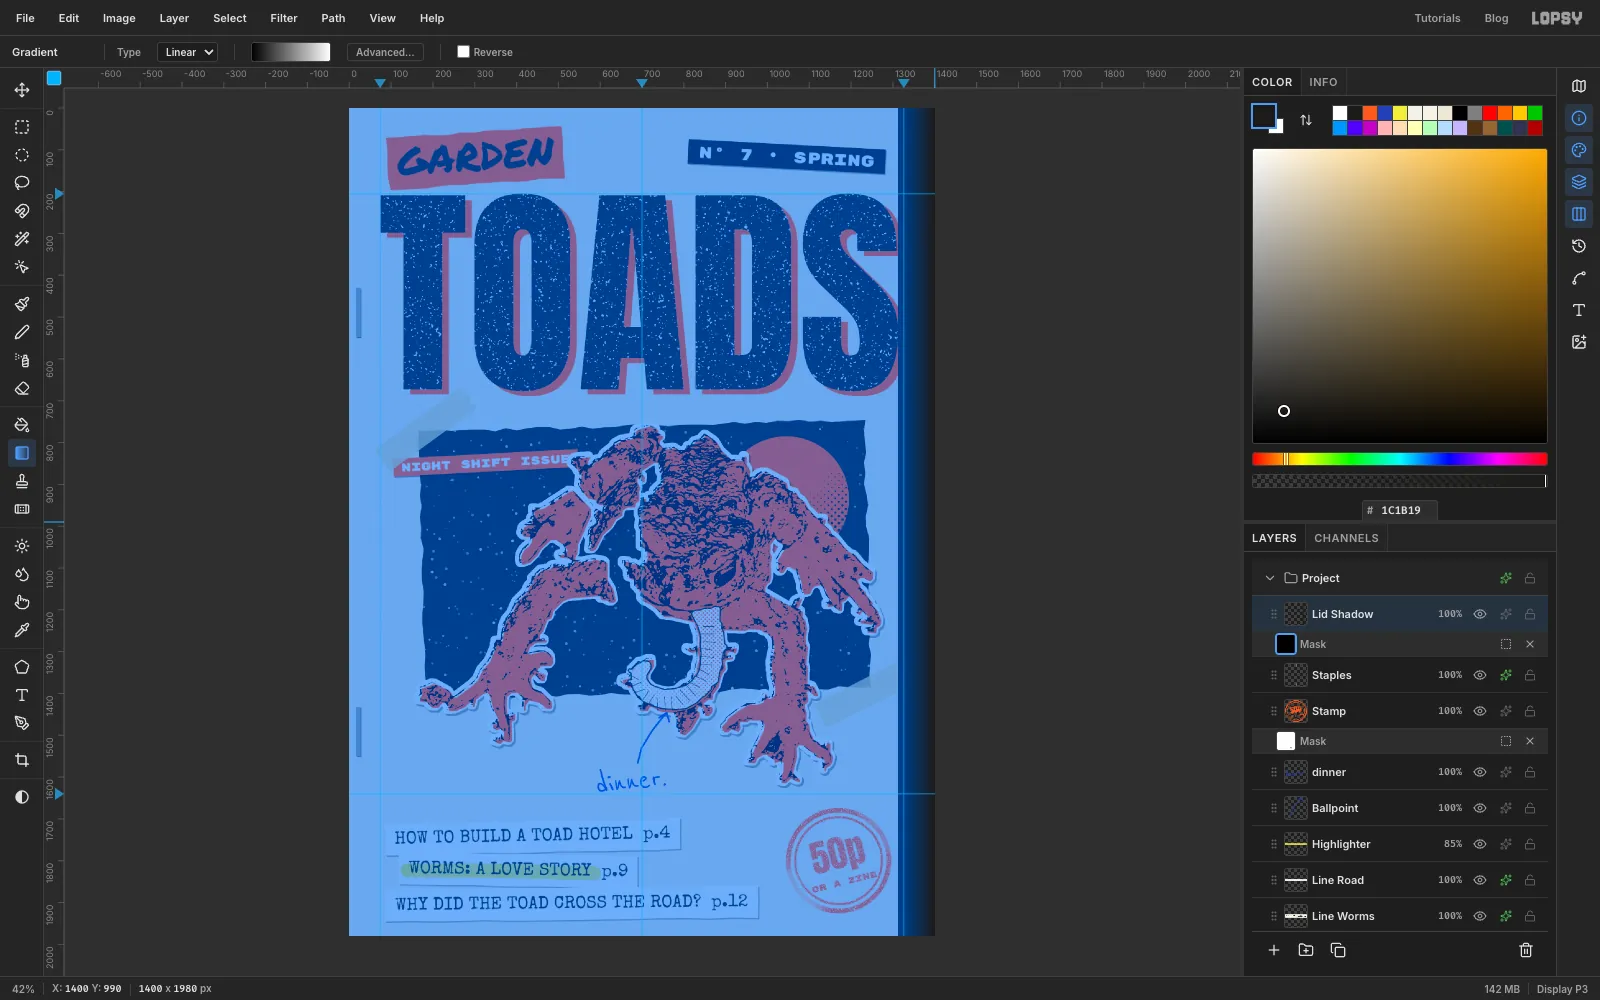
Staples. Draw two thin upright marquees hugging the left edge, each about 11 × 118 px: one level with the middle of the masthead, and one (hold Shift to add it) just below the night panel. Fill with and deselect. Turn on Drop Shadow (Offset X2, Offset Y2, Blur2, Opacity60) and Inner Glow (Size3, Opacity70). - Add a layer called
Lid Shadow. Marquee a narrow band about 90 px wide down the whole right edge, fill it with , and deselect. - Click Add Mask, then click the new mask thumbnail. In the Gradient tool's Advanced… editor, set the two stops to black and white . Then drag from just inside the band's left edge to the right edge of the page. The blue overlay shows where the mask hides the layer. Here that's everything left of the band.
- Click the Lid Shadow layer's name to leave the mask. Set the layer to Multiply at
42%.
- Add a layer called
-
Dirty up the copy
Three layers make it look like it came out of a real copier:
- Toner specks: add a layer called
Toner Specks. Set the foreground to and pick Spray at Size60, Density2, Softness0. Drag down the left edge, along the bottom, down the right edge and across the top. - Mottle: add a layer called
Copier Mottleand choose Filter → Clouds with Scale6. Set it to Soft Light at18%. The toner density now varies gently across the page. - Grain: add a layer called
Grain. Draw a marquee over the whole page, fill it with , deselect, and run Filter → Add Noise with Amount70, Mono. Set it to Overlay at50%.
- Toner specks: add a layer called
-
Group the layers
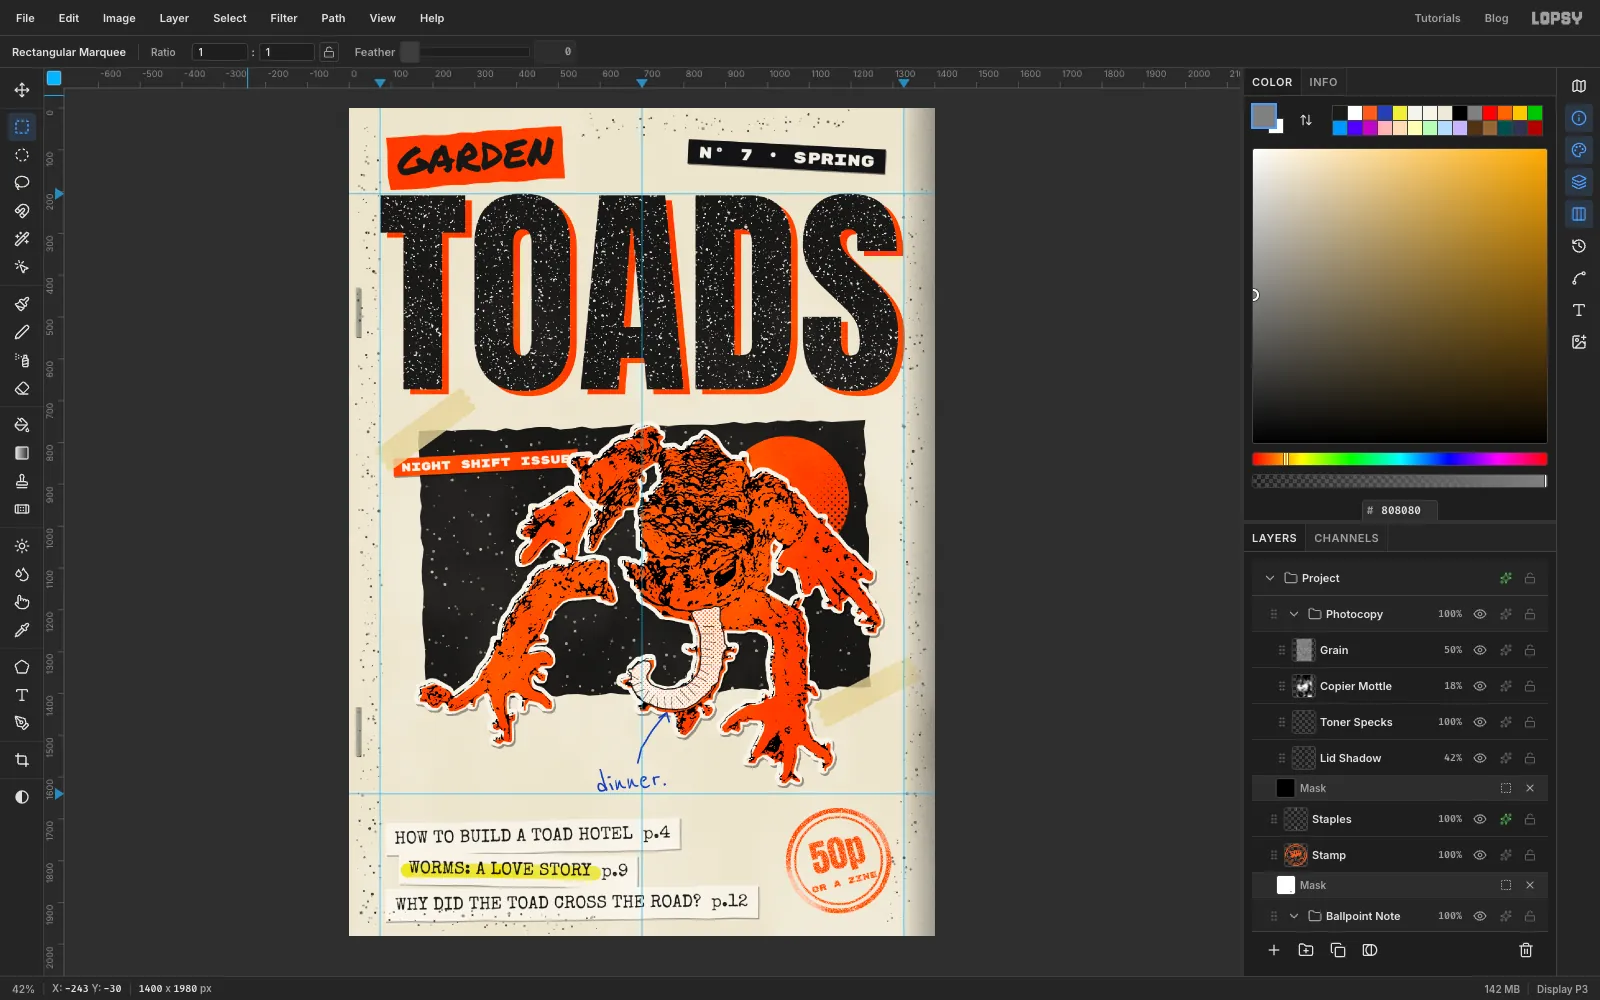
Tidy the stack into groups. For each one, click the bottom layer of the run, Shift-click the top one, and choose Layer → Group Layers. Then rename the group:
Masthead: TOADS Orange up to Dymo IssueNight Sky: Night Panel up to Dymo Night ShiftCut-out Toad: Toad Paper up to Tape 2, which takes in the photo, the worm layers and both tapesCover Lines: Line Hotel up to HighlighterBallpoint Note: Ballpoint and dinnerPhotocopy: Lid Shadow up to Grain
-
Nudge the cover lines as a block
Click the Cover Lines group and drag the scraps up about 12 px with the Move tool. The whole block moves as one, which leaves a comfortable margin at the bottom of the page. If you change your mind, Cmd+Z puts it back and Cmd+Shift+Z moves it again.
Finally, choose View → Show Guides to hide the guides, then File → Quick Export PNG for the finished cover and File → Save Project to keep the layers.