Make a Skeuomorphic Enigma Machine Magazine Cover
Build a photoreal Enigma machine in Lopsy, with walnut grain, brushed aluminium, glowing lamps and Bakelite keys, then set a gold-foil magazine cover around it.
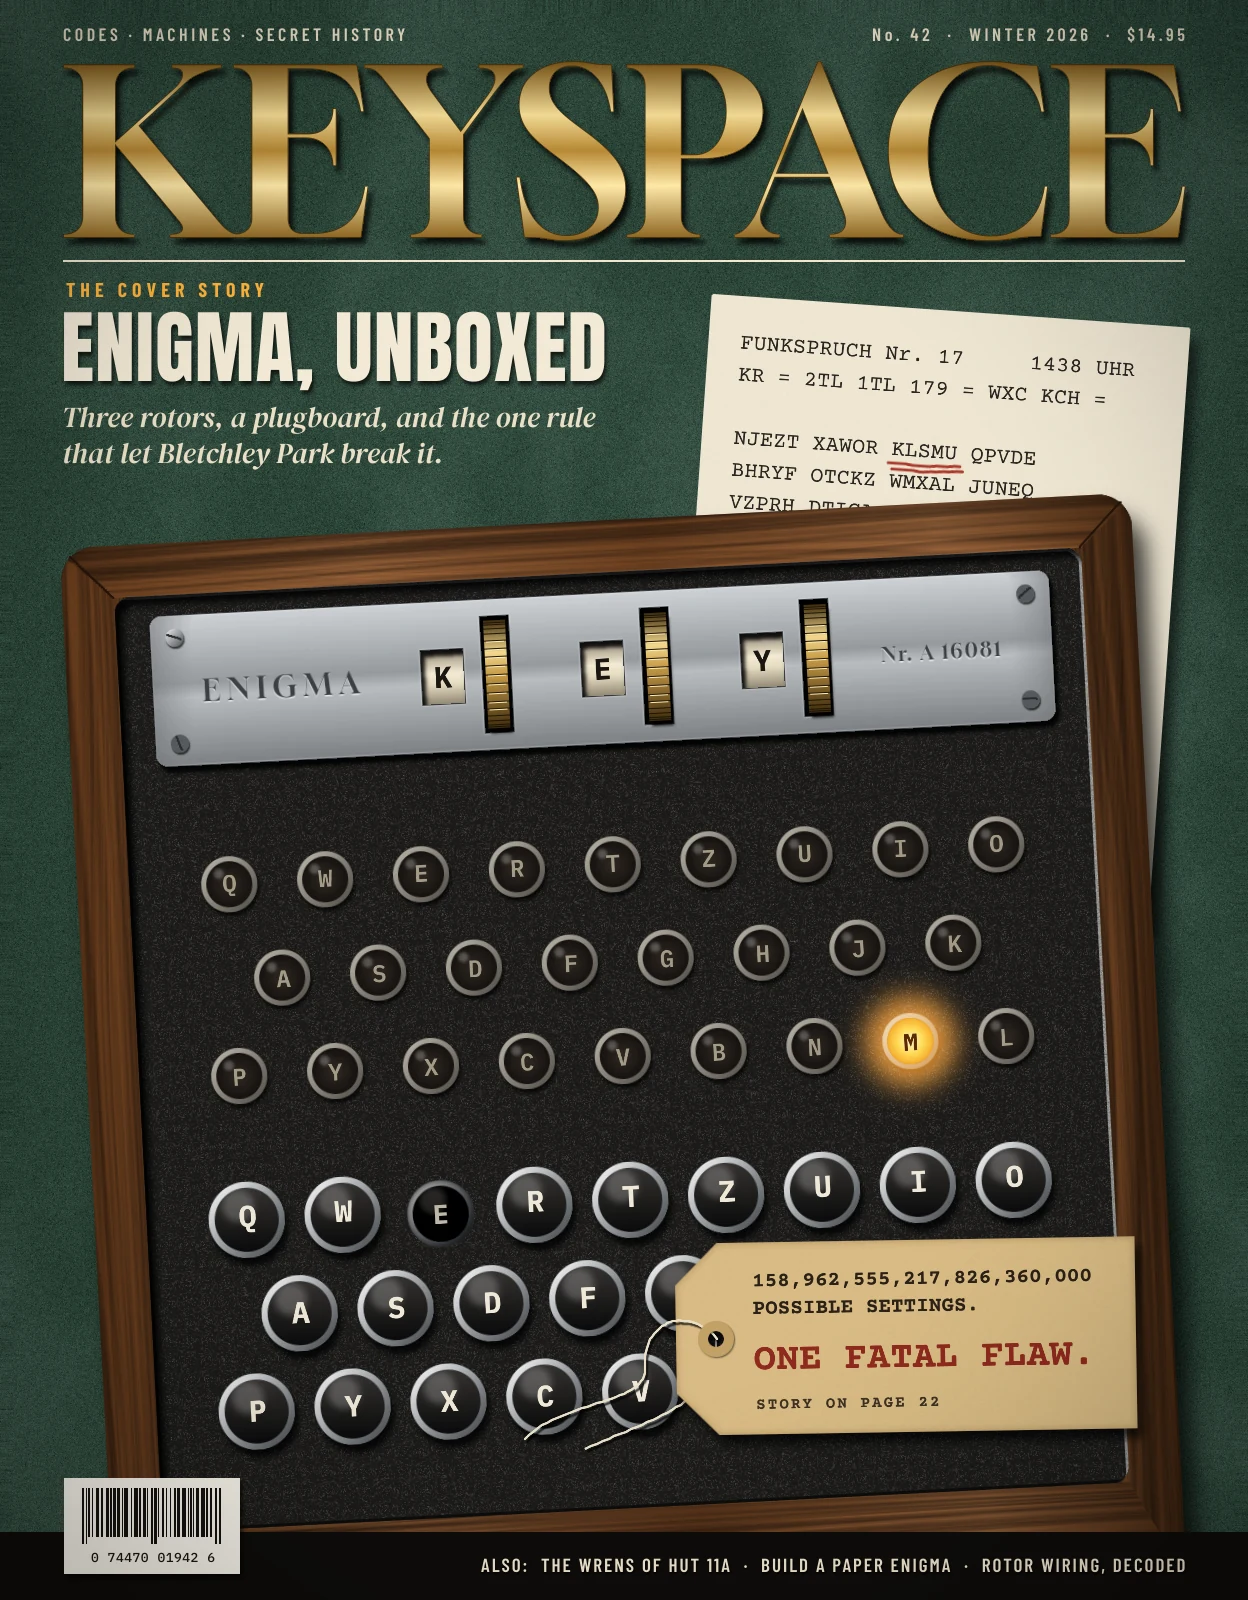
Skeuomorphism is the art of making a picture of a thing look like the thing: wood that has grain, metal that has been brushed, glass that catches the light, buttons that sink when you press them. It was the house style of early iPhone apps, and it works because every material follows the same few rules. There is one light source, so every highlight sits on the same side. Every raised part throws a shadow the same way. Every recessed part has a shadow inside its top edge. And every surface has a texture, even if it's faint.
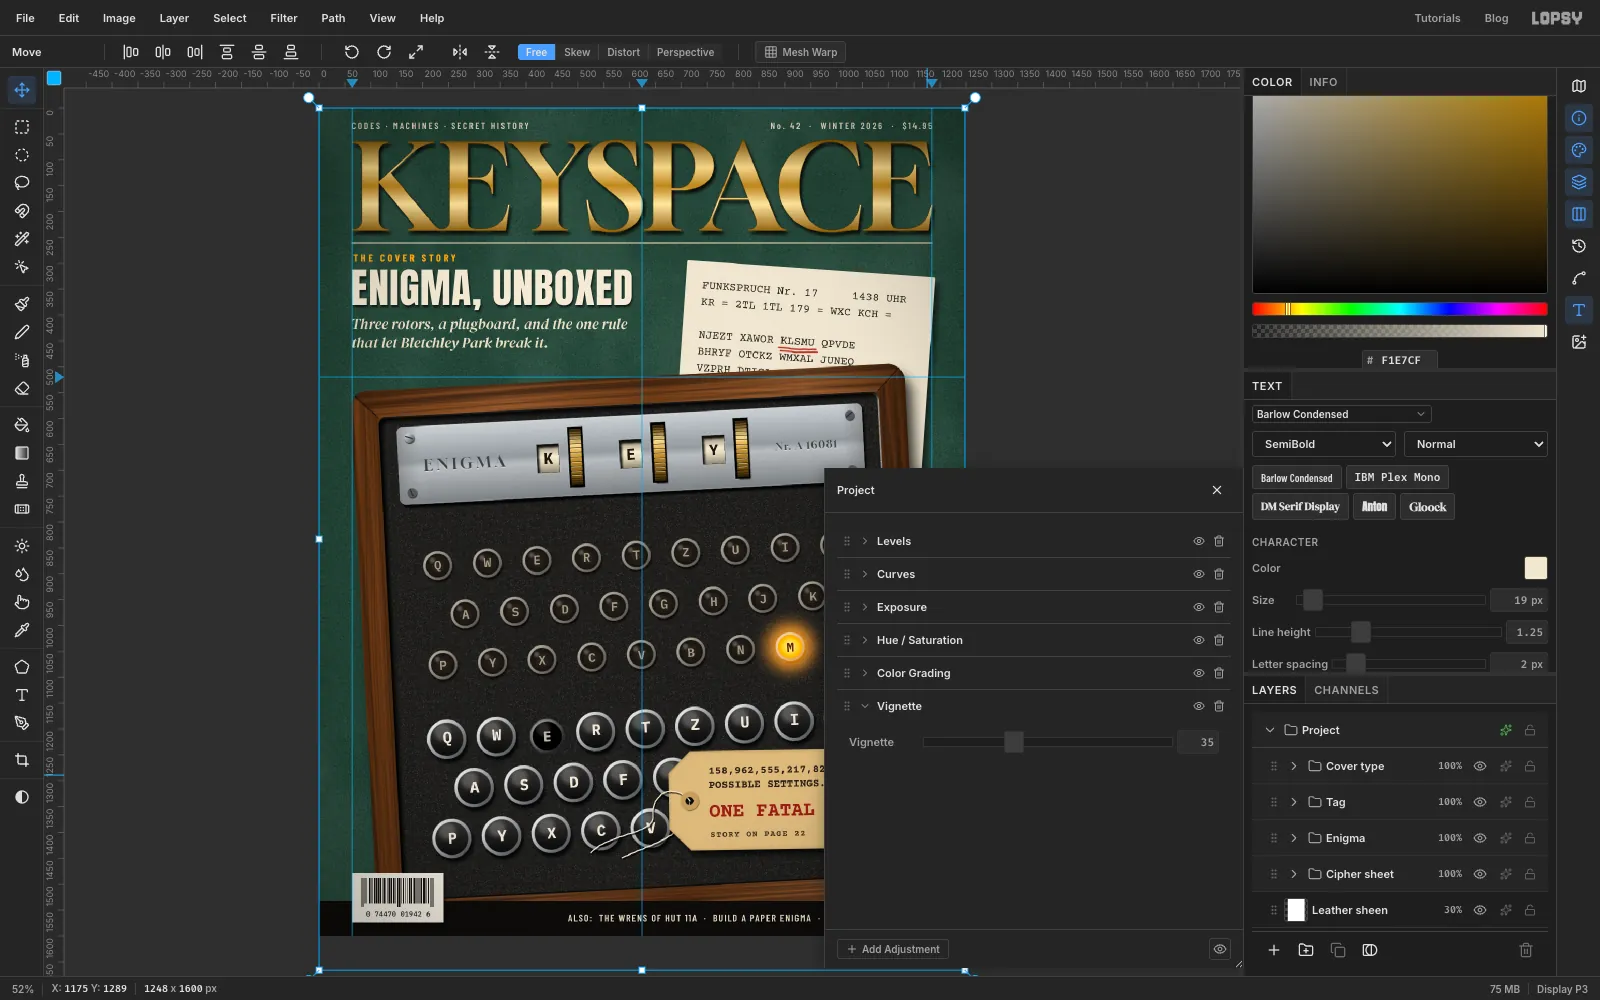
In this tutorial you'll use those rules to build an Enigma cipher machine from scratch, then design a magazine cover around it: KEYSPACE, a made-up quarterly about codes and secret history. The cover is 1248 × 1600 px, close to the shape of a US magazine. You'll build it in this order:
- a green leather desk and a typed cipher sheet
- a walnut case with real-looking grain on the sides and rails
- a crinkle-paint panel and a brushed-aluminium rotor plate with windows, brass thumbwheels, screws and engraved lettering
- 26 lamps and 26 keys, each drawn once and repeated with Fill with Pattern, with one lamp lit and one key pressed
- a manila tag on a loop of twine
- a gold-foil masthead, cover lines, a barcode and a footer
Light comes from the top-left throughout. Whenever you add a shadow, it goes down and to the right; whenever you add a highlight, it goes up and to the left.
You'll use:
- guides, the Shape tool's click-to-create size dialog, and the Rectangular and Elliptical Marquee, including the exact-corners dialog and Shift/Option to add and subtract
- the Lasso, Select → Inverse, Grow, Feather, and Cmd-clicking layer thumbnails to load a shape as a selection
- Add Noise, Gaussian Blur, Motion Blur, Emboss, Fibers, Clouds and Brightness/Contrast
- Define Pattern and Fill with Pattern with Row Stagger
- the Gradient tool (linear and radial), the Brush and the Pencil
- the Move tool's Rotate 90° CW button, corner scale and rotate handles, Cut, Copy, Paste, Duplicate Layer and Merge Down
- groups, rotated as a whole
- Overlay, Hard Light, Soft Light and Screen blend modes
- the layer effects Drop Shadow, Inner Glow and Stroke, and a Vignette adjustment on the whole document
- live text in Gloock, IBM Plex Mono, Courier Prime, Anton, Barlow Condensed and DM Serif Display
The palette:
-
Leather
-
Walnut
-
Crinkle paint
-
Aluminium
-
Brass
-
Ivory rotor rings
-
cipher paper
-
manila
-
Lamp amber
-
Masthead gold
-
Cream type
-
amber kicker
-
brick red
-
ink
-
Set up the page and the leather
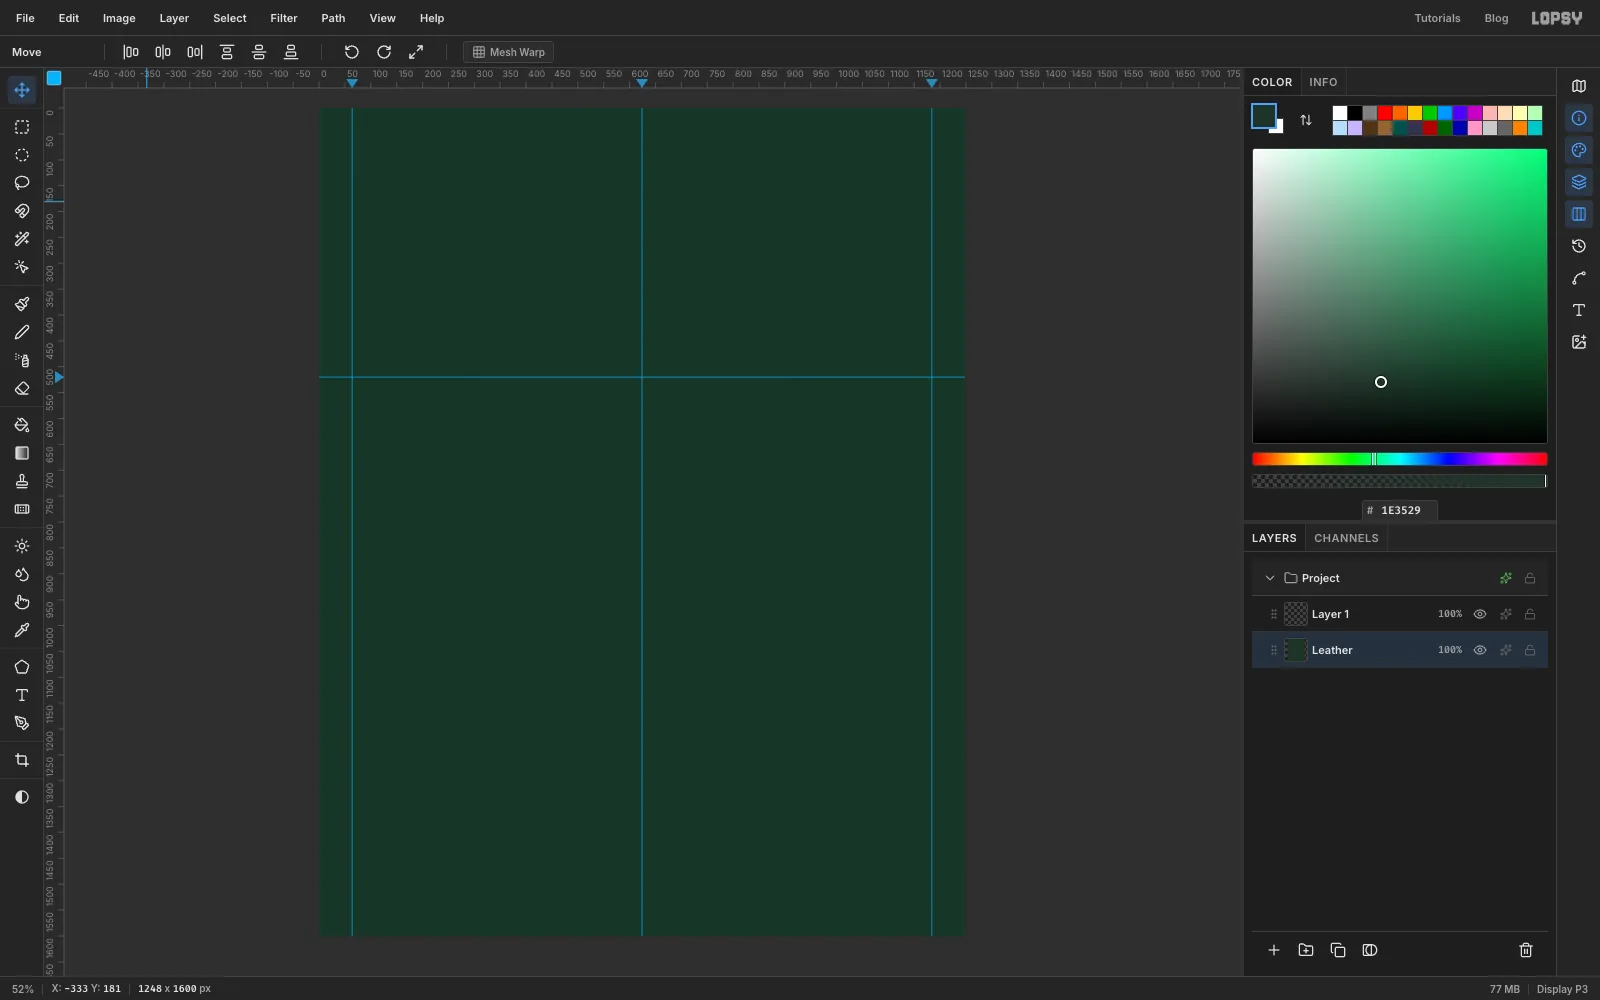
Choose File → New, keep the units on Pixels, and make the document 1248 wide and 1600 high.
Click the top ruler to drop vertical guides at 64, 624 and 1184. The outer two are the margins every line of type will hang from, and the middle one is the centre line. Click the left ruler to drop one horizontal guide at 520: that's where the top of the machine will be.
Select the Background layer, rename it Leather (double-click its name), set the foreground colour to and choose Edit → Fill.
-
Give the leather a grain and a sheen
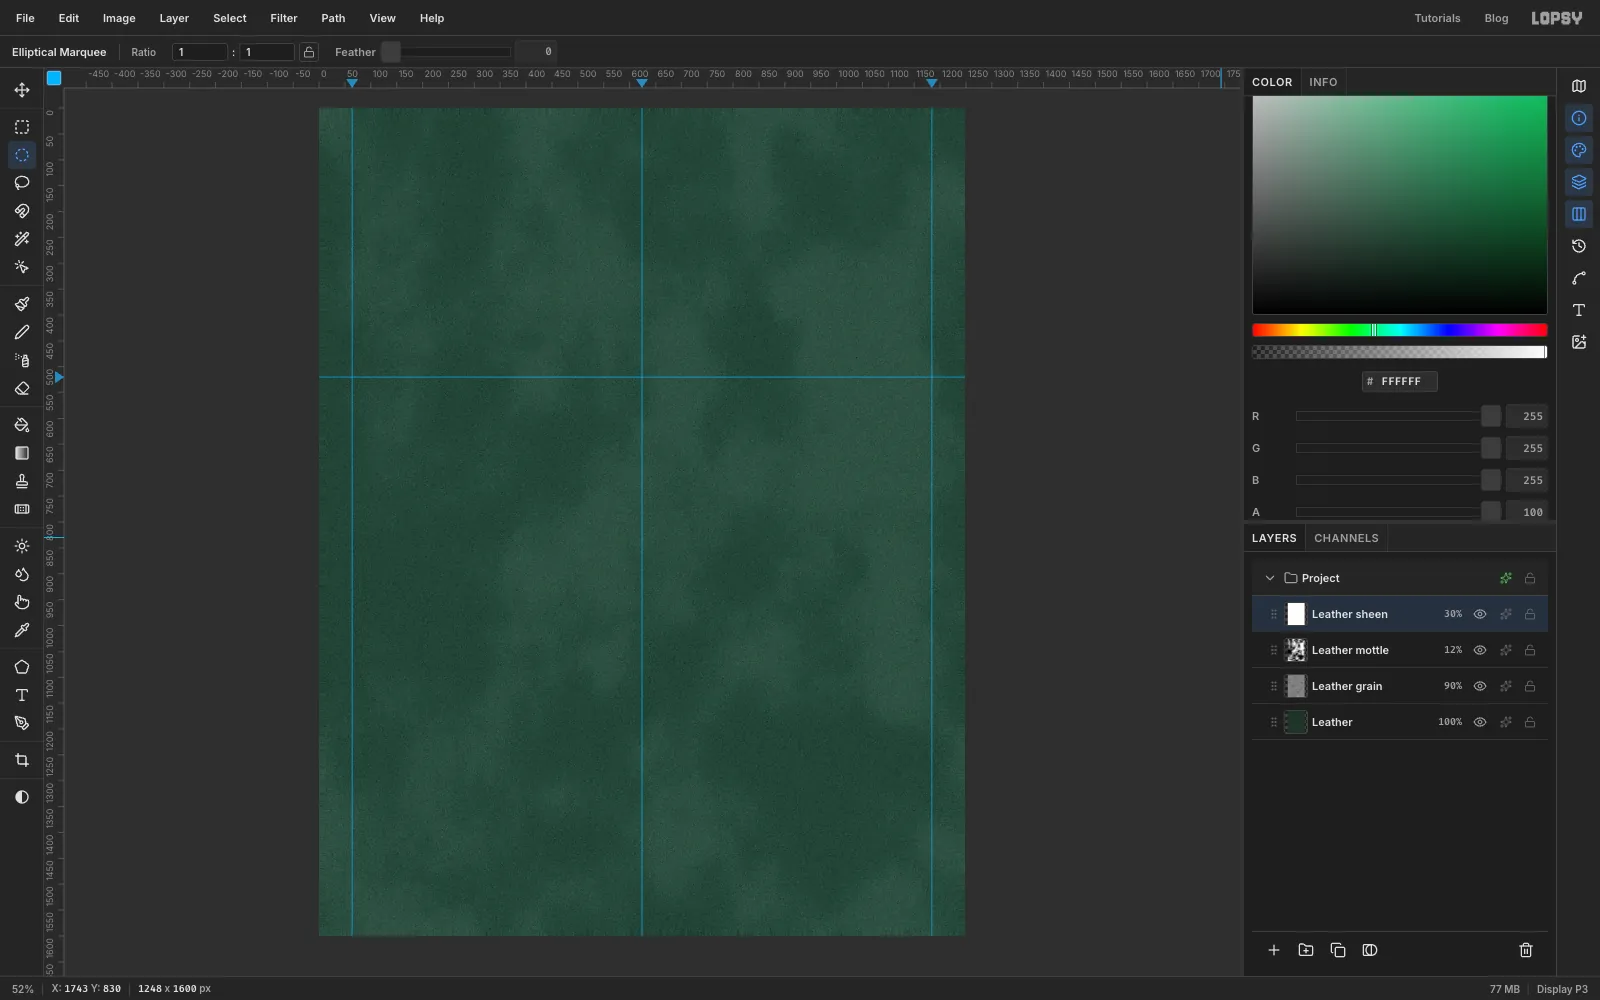
Leather isn't flat colour. It has a fine pebble grain, a few darker patches, and it shines where the light hits it.
- Rename the empty Layer 1 to Leather grain, fill it with mid grey , then run Filter → Add Noise (Amount 100, Mono, Gaussian), Filter → Gaussian Blur (Radius 1.6) and Filter → Emboss (Angle 135, Strength 90). The blur clumps the noise into pebbles, and Emboss turns them into little bumps lit from the top-left. Open the layer's effects drawer with the ✦ button on its row, set the blend mode to Overlay, and set the layer's opacity to 90%. Overlay ignores the grey and keeps only the bumps.
- Click Add Layer, name it Leather mottle, and run Filter → Clouds with Scale 9. Set it to Soft Light at 12% for faint, uneven patches.
- Add a layer called Leather sheen. With the Elliptical Marquee, drag a big circle centred near the top-left corner, about 1000 px across, so most of it hangs off the page. Choose Select → Feather with 250, fill it white, deselect with Cmd+D, and set the layer to Soft Light at 30%.
-
Type the cipher message
The coded sheet will sit under the machine, so build it first.
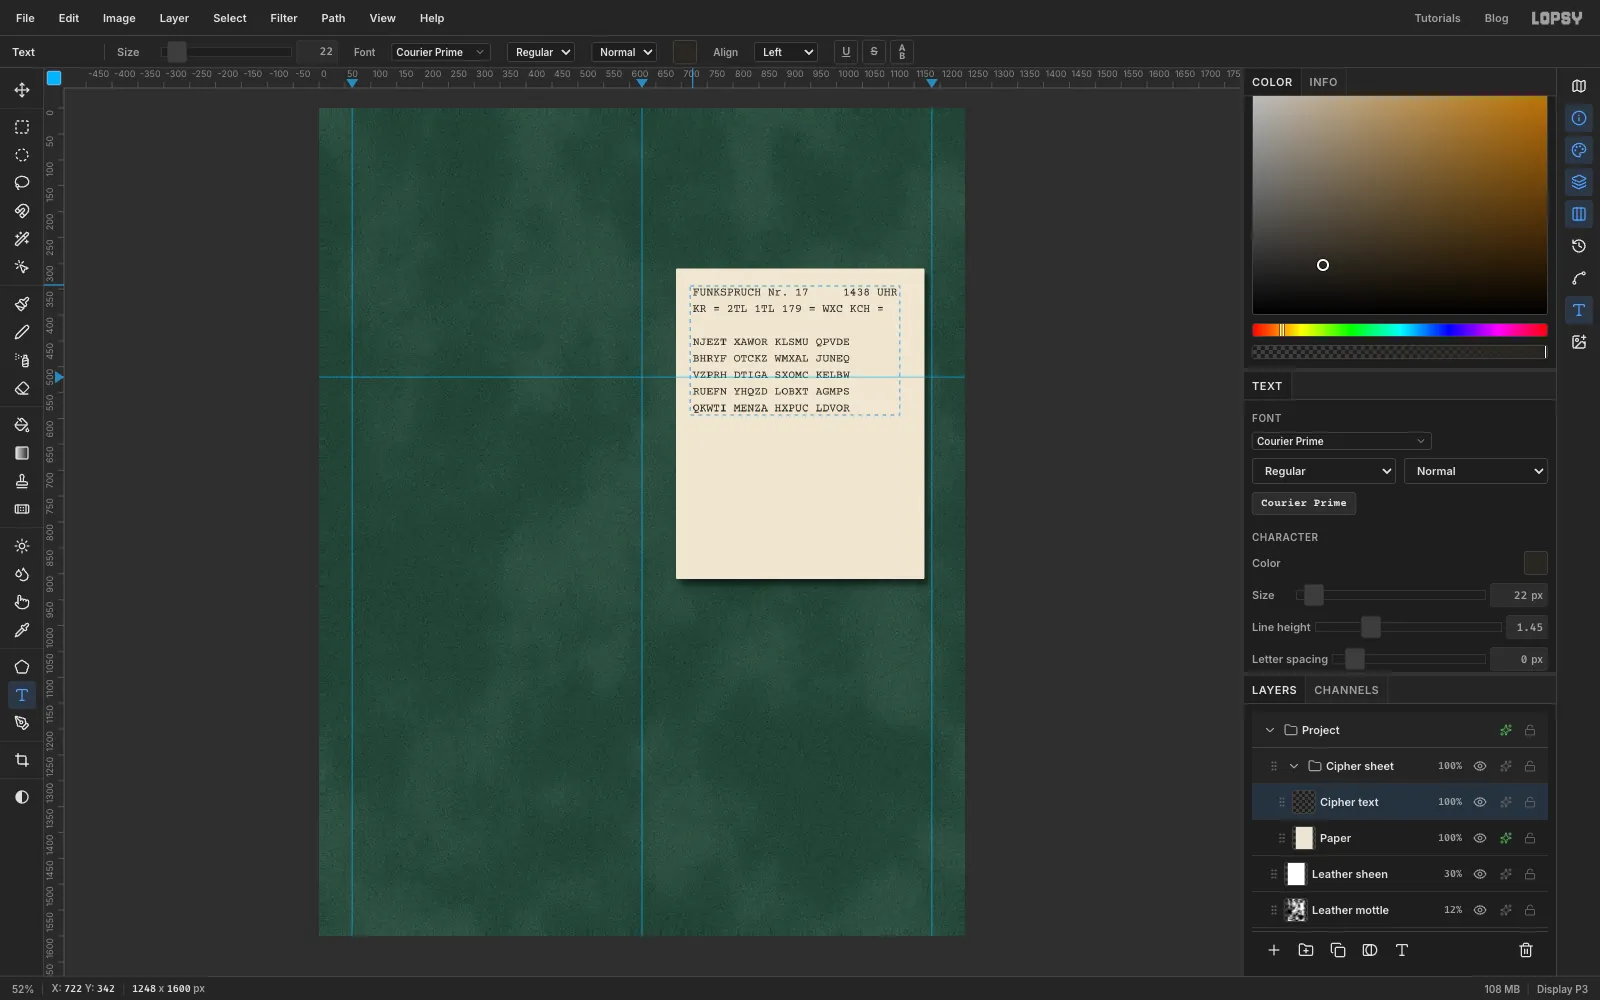
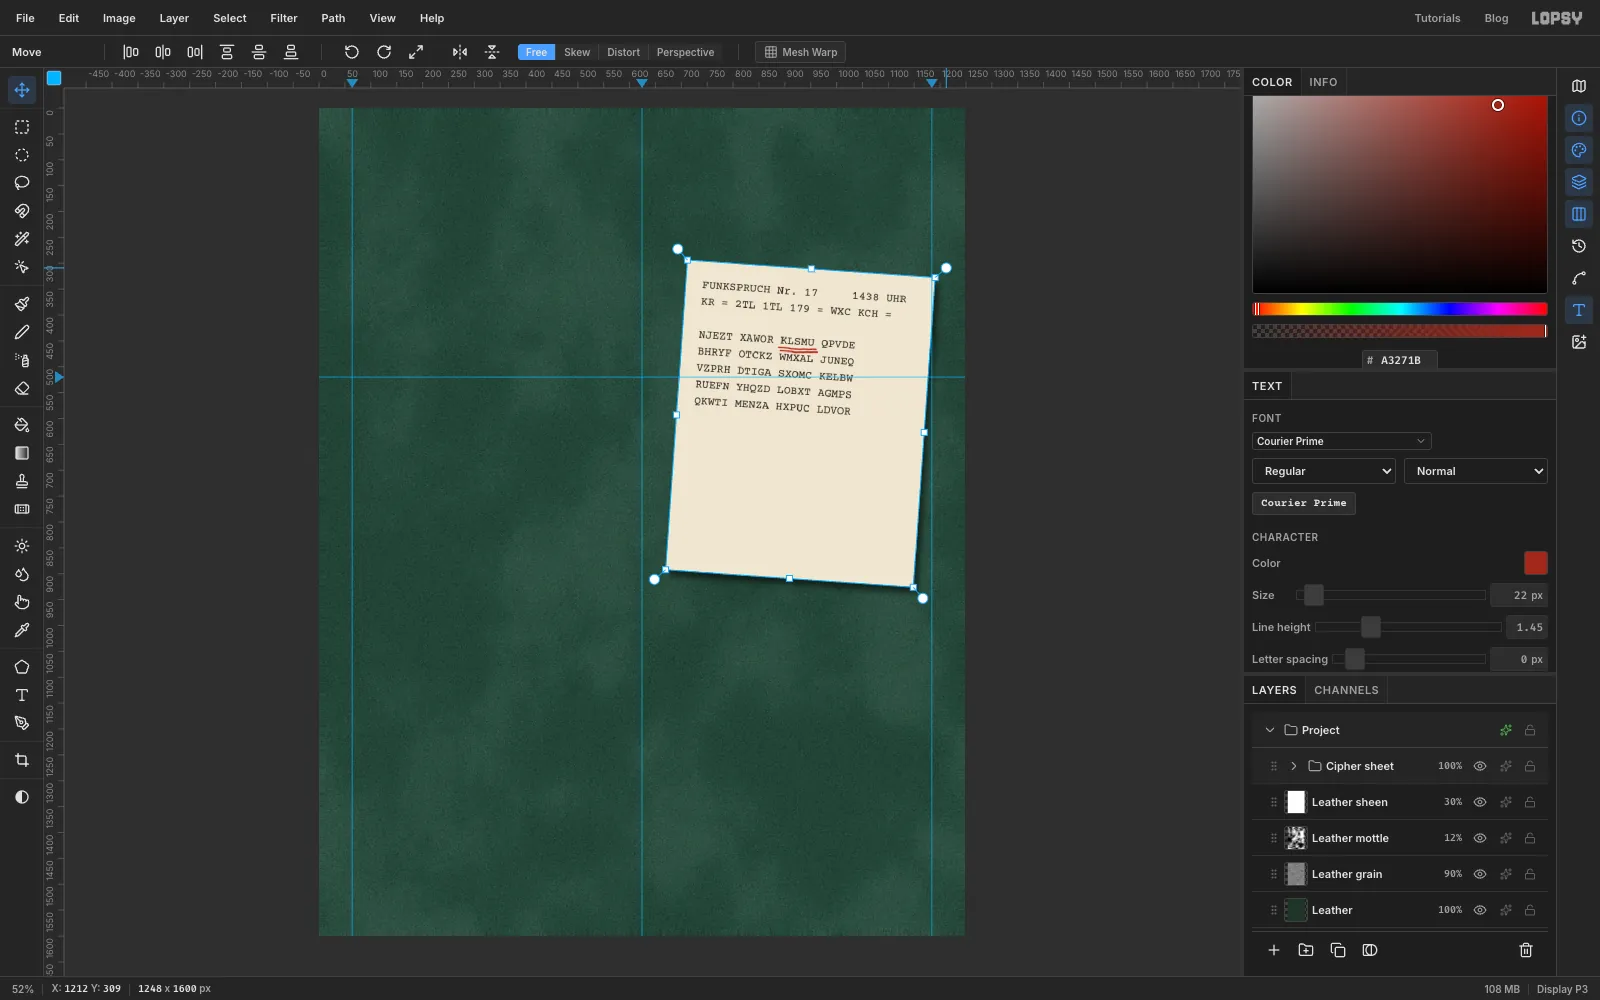
With Leather sheen selected, click New Group and name it Cipher sheet. Inside it, add a layer called Paper. Pick the Shape tool, set Shape to Rectangle, Output to Pixels, Corner Radius to 3, and make sure there's a fill. Click once, without dragging, at about 930 px across and 610 px down. A Shape Size dialog opens: type 480 × 600 and press Enter. The shape is drawn centred on your click.
Shapes come out white. Cmd-click the Paper thumbnail, fill the selection with , and add Filter → Add Noise at Amount 8 (Mono, Gaussian) for a little paper tooth. Deselect, then open the effects drawer and turn on Drop Shadow with Offset X 8, Offset Y 12, Blur 18 and Opacity 55.
Pick the Text tool, choose Courier Prime at size 22 in , click near the top-left of the sheet, and type this message, one line at a time, pressing Enter after each line:
FUNKSPRUCH Nr. 17 1438 UHR(with five spaces before the time, so it sits at the right)KR = 2TL 1TL 179 = WXC KCH =- an empty line
NJEZT XAWOR KLSMU QPVDEBHRYF OTCKZ WMXAL JUNEQVZPRH DTIGA SXOMC KELBWRUEFN YHQZD LOBXT AGMPSQKWTI MENZA HXPUC LDVOR
Press Tab to commit, rename the layer Cipher text, and set Line height to 1.45 in the Text panel. Only the top few lines will show; the rest will be hidden under the machine.
-
Mark the sheet and tilt it
A codebreaker has been at this sheet. Select the Cipher text layer and add a layer called Red pencil above it. Pick the Brush at size 4, Hardness 80, Opacity 90%, in , and draw two short, slightly wobbly strokes under the group KLSMU: one right under the letters and one a few pixels lower.
Now tilt the whole sheet. Collapse the Cipher sheet group with its arrow and click its row, so the group is selected. Pick the Move tool. A transform box appears around the sheet. Move the pointer just outside the top-right corner handle until it becomes a rotate cursor, drag down about 4°, and press Enter to apply.
-
Draw the walnut case
With the Cipher sheet group still selected, click New Group and name it Enigma. Everything that belongs to the machine goes in here, so you can turn it later in one move.
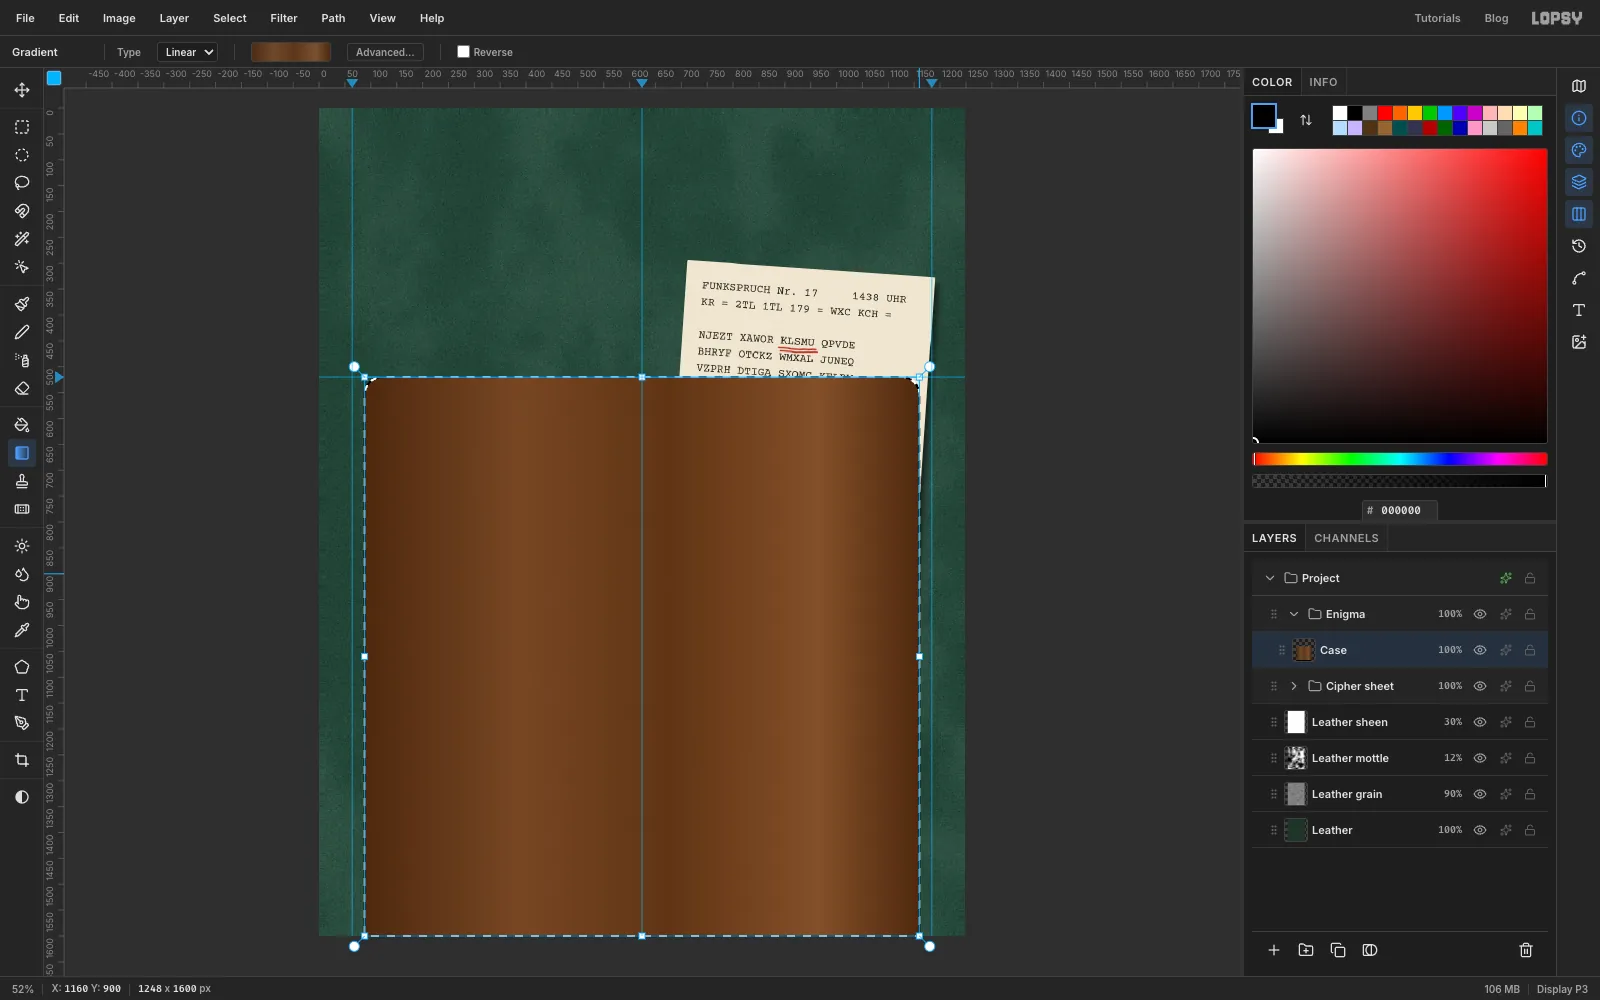
Add a layer called Case. With the Shape tool still on Rectangle, set Corner Radius to 34 and click once at 624, 1080 (on the centre guide, well below the horizontal guide). Make it 1072 × 1120. Its top edge lands on the 520 px guide, and its bottom runs a little off the page, which is what you want: the machine is cropped by the bottom of the cover.
Cmd-click the Case thumbnail. Pick the Gradient tool, set it to Linear, open the gradient editor and set five stops: , at 28%, at 55%, at 82% and at the end. Drag from the left edge of the case to the right edge, holding Shift to keep it level. The uneven bands read as boards of wood rather than a smooth gradient.
-
Add the vertical grain
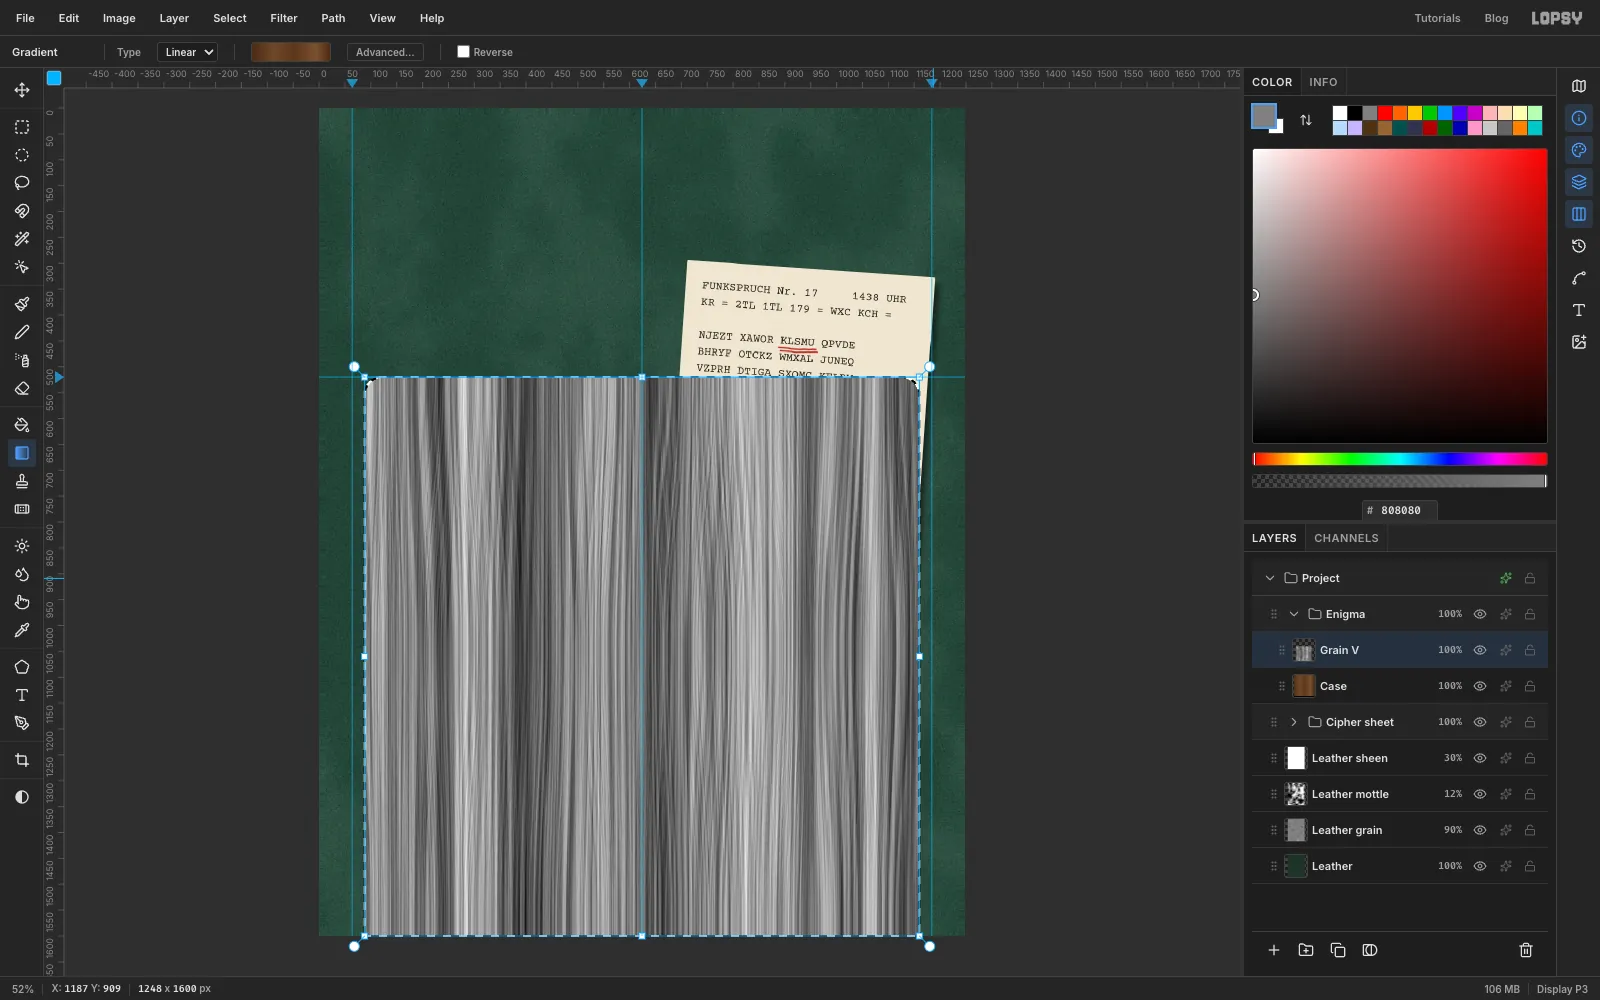
Keep the case selected. Add a layer called Grain V and fill the selection with . Run Filter → Fibers with Variance 40 and Strength 50. Fibers draws long vertical strands, like grain running down a plank, and stays inside the selection.
The top and bottom rails of a real box run sideways, so their grain should too. With the Lasso, draw a trapezoid around the top rail. The panel you'll add next will start 52 px inside the case on every side, at 140, 572 and 1108, 572 at the top. Start just outside the case's top-left corner, go across to just outside its top-right corner, then in to 1108, 572, along to 140, 572, and back to the start. Hold Shift and draw the matching trapezoid around the bottom rail: from 140, 1508 to 1108, 1508, then out and down past the case's bottom corners, off the bottom of the page. Press Delete to clear the fibres from both rails, then deselect.
-
Make sideways grain for the rails
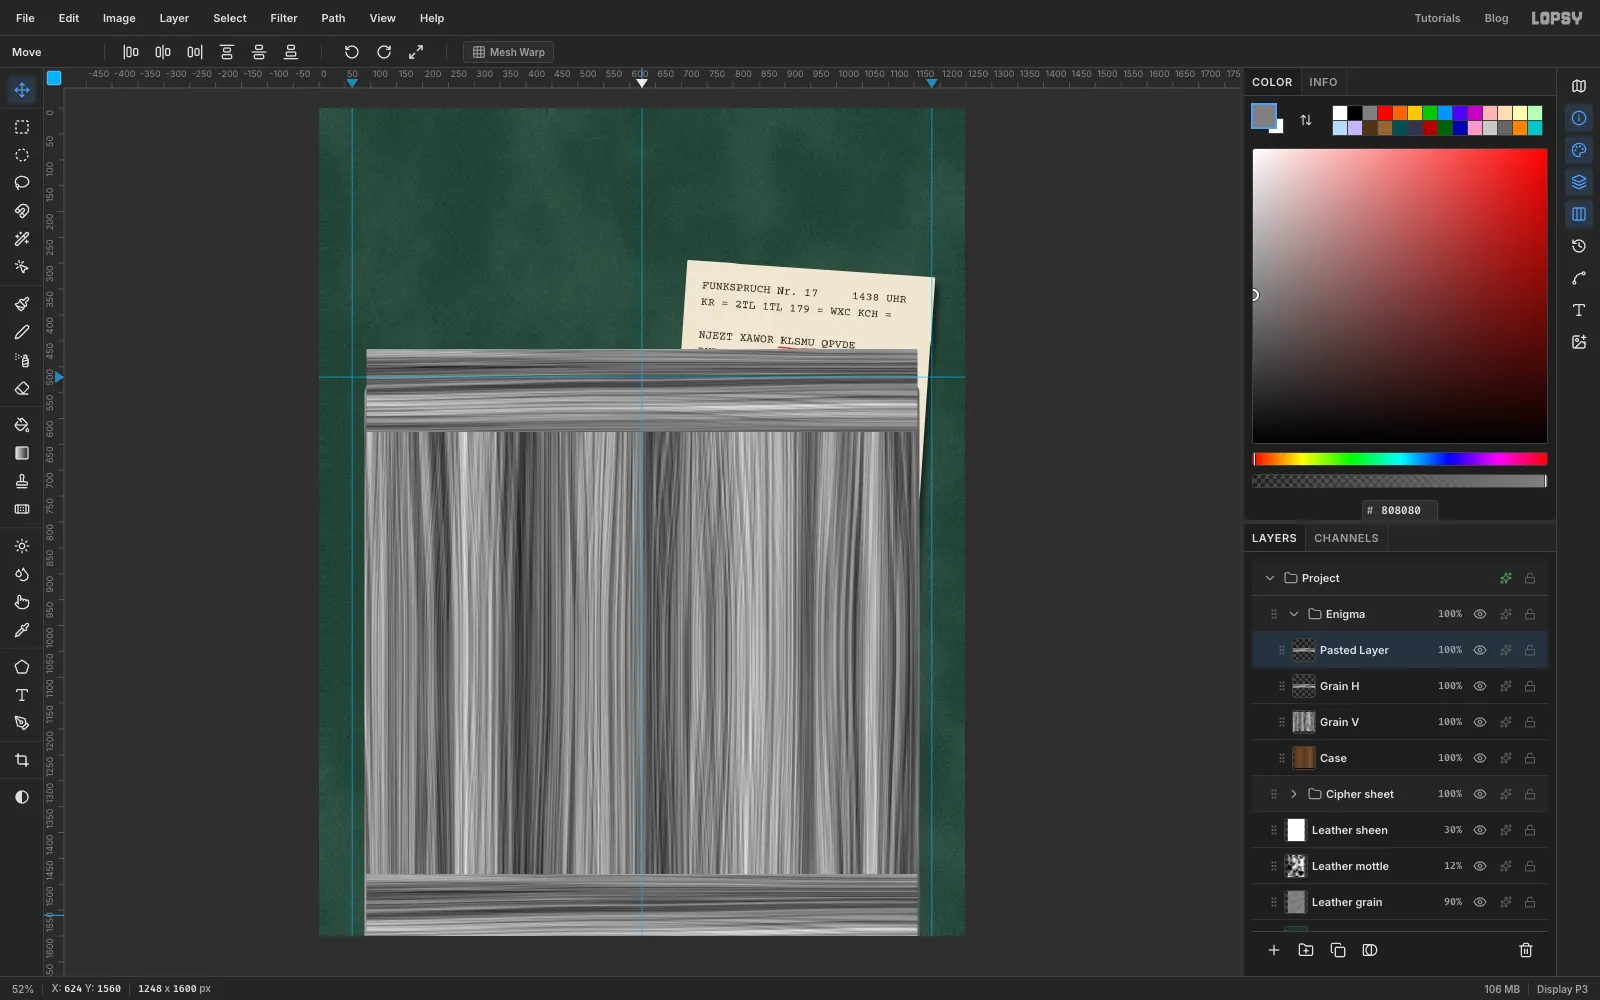
Fibers only draws vertical strands, so draw them on a tall strip and turn the strip on its side.
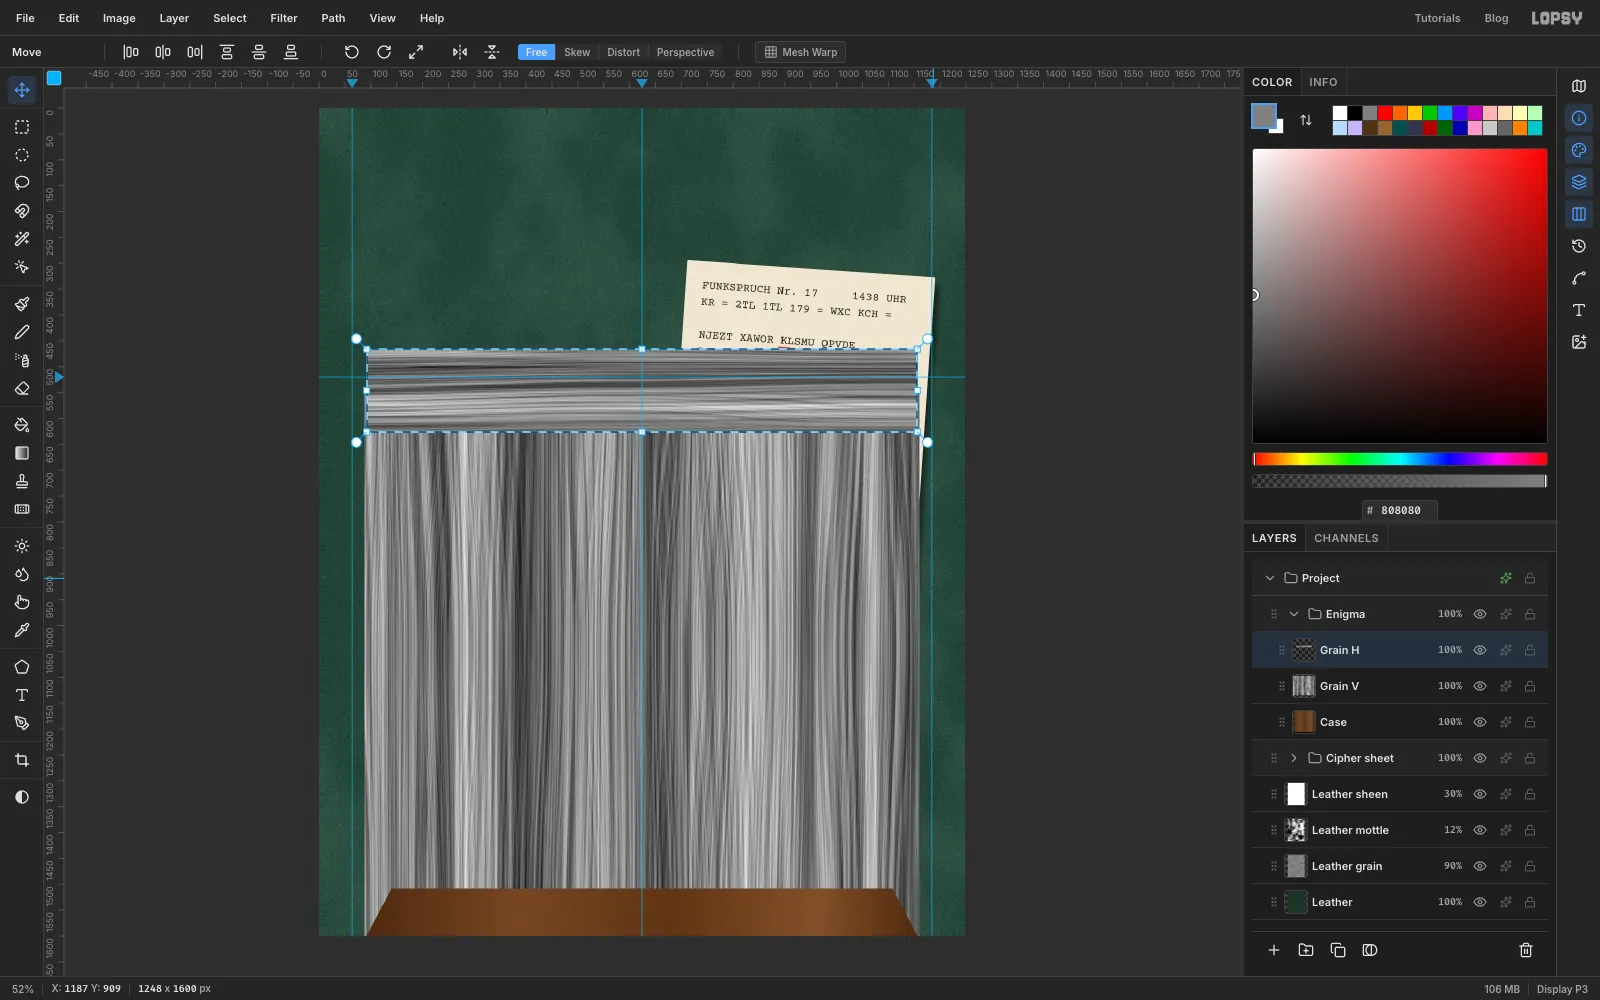
Add a layer called Grain H. With the Rectangular Marquee, select a strip 160 px wide and about 1064 px tall, centred on the centre guide, from near the top of the page down to about 1078 px. Clicking once with the marquee without dragging opens the exact-corners dialog, so you can type 544, 14 and 704, 1078. Fill it with and run Fibers again with the same settings.
Pick the Move tool and click Rotate 90° CW in the options bar. The strip turns about its own centre and lands across the top rail. Deselect.
-
Copy the grain to the bottom rail
Select the turned strip again (the marquee dialog makes this easy: 90, 466 to 1158, 626), press Cmd+C, then Cmd+V. The copy lands on a new layer in the same place. Deselect, and with the Move tool drag the copy straight down about 1014 px, until it covers the bottom rail. Choose Layer → Merge Down to merge it into Grain H.
-
Trim the grain and blend it in
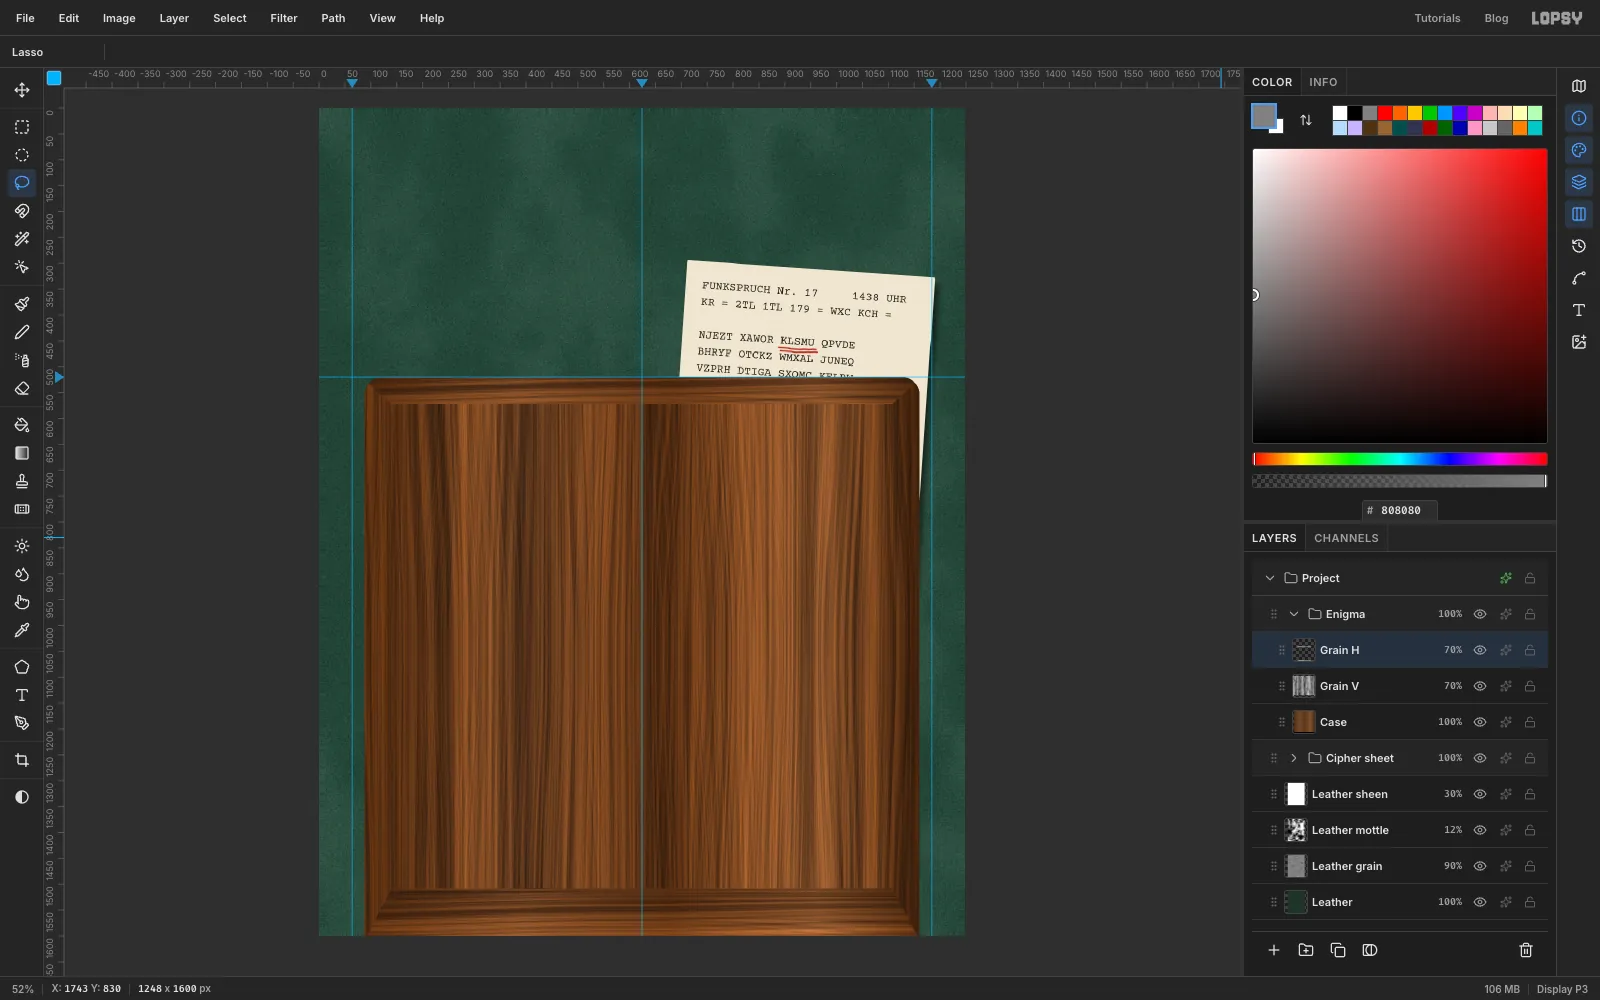
Lasso the two rail trapezoids again (the second with Shift), choose Select → Inverse and press Delete. That clears the strips everywhere except the rails. Then Cmd-click the Case thumbnail, choose Select → Inverse and press Delete again to trim the strips to the rounded corners. Deselect.
Set both Grain V and Grain H to Overlay at 70%. The grey disappears and only the light and dark streaks show, so the brown gradient underneath becomes walnut.
Add a layer called Mitres. Pick the Pencil at size 2 in . At each top corner, click the panel's corner (52 px in from both edges) and Shift-click the case's outer corner, to draw the 45° joint where two boards meet. The bottom rail is much deeper than the sides, and its change of grain already shows the joint, so it doesn't need a line.
-
Paint the panel in crinkle finish
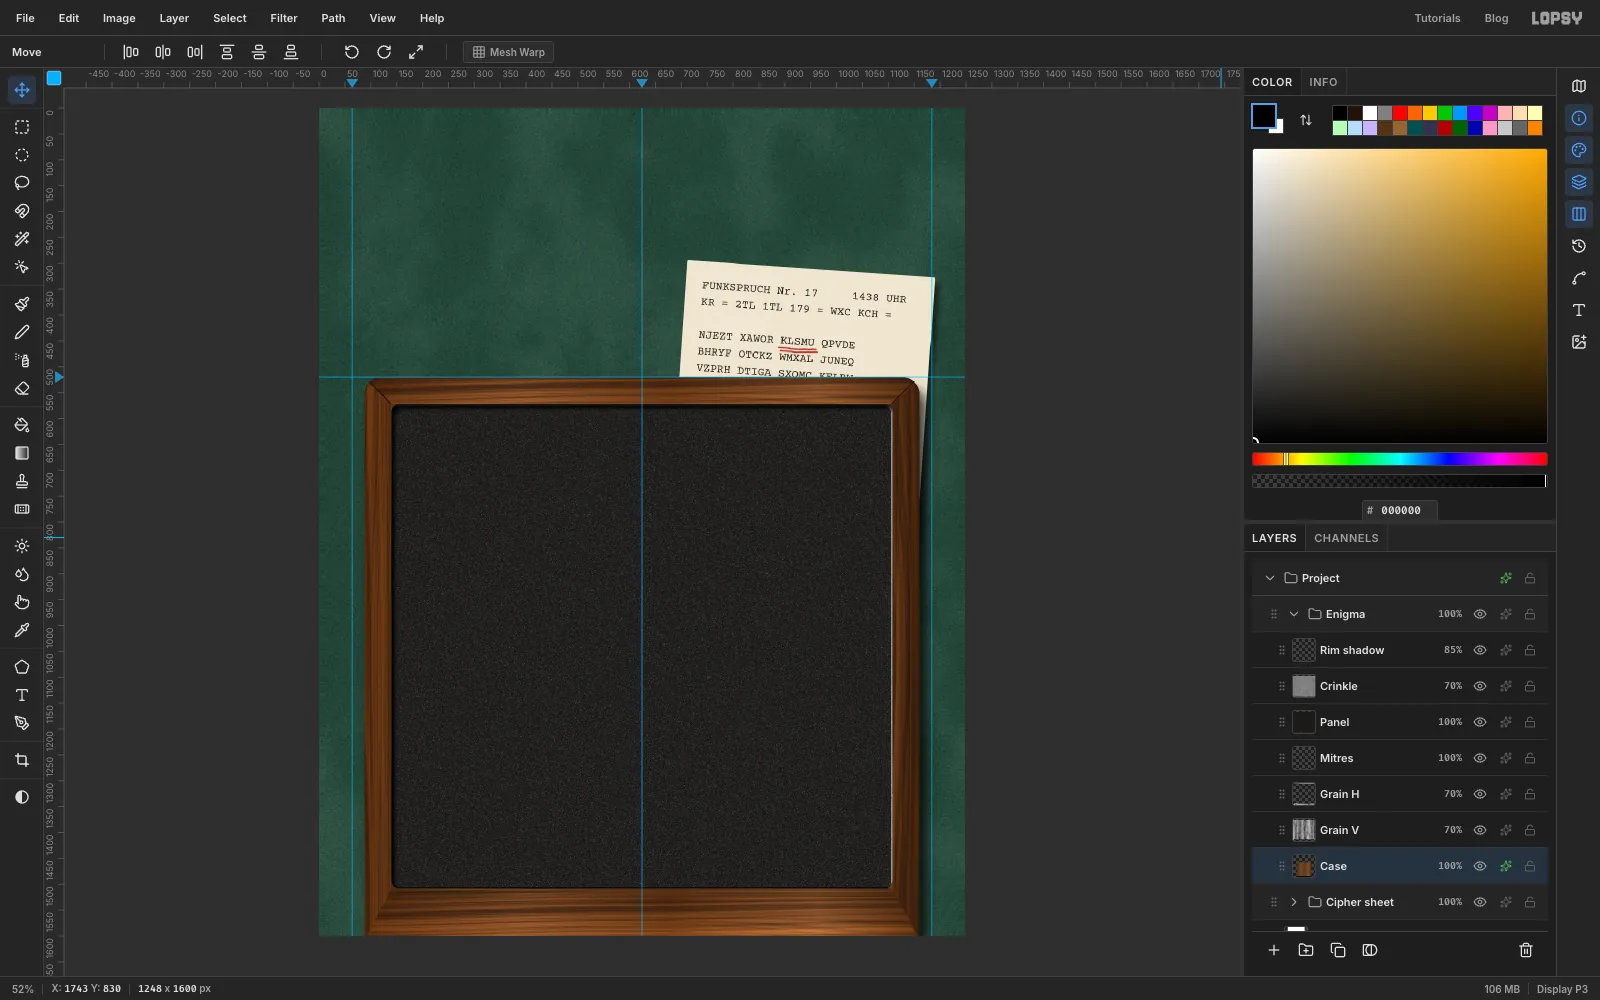
Add a layer called Panel. Use the Shape tool to click-create a 968 × 936 rectangle with Corner Radius 16 at 624, 1040. Cmd-click it and fill it with .
Enigmas were painted in a black wrinkle finish. Keep the selection, add a layer called Crinkle, fill it with , and run Add Noise (Amount 60, Mono, Gaussian), Gaussian Blur (Radius 0.8) and Emboss (Angle 135, Strength 40). Deselect and set it to Hard Light at 70%. Hard Light keeps the bumps visible on near-black, where Overlay would hide them.
The wooden rim stands above the panel, so it should cast a shadow inside the panel's top-left edge. Add a layer called Rim shadow:
- Cmd-click Panel, choose Select → Grow with 40, and fill with black.
- Cmd-click Panel again and press Delete. You now have a black frame around the panel.
- Deselect, run Gaussian Blur at 10, and with the Move tool nudge the layer 7 px right and 9 px down with the arrow keys.
- Cmd-click Panel, choose Select → Inverse, press Delete and deselect. Set the layer to 85% opacity.
Finally select Case and add two effects: an Inner Glow in at Size 14 and Opacity 55, which darkens the rounded outer edge of the wood, and a Drop Shadow with Offset X 14, Offset Y 22, Blur 34 and Opacity 75, so the machine sits on the desk.
-
Add the rotor rings
The rotors sit under a metal plate, and you see one letter of each through a little window. Draw the rotor rings first, then lay the plate over them.
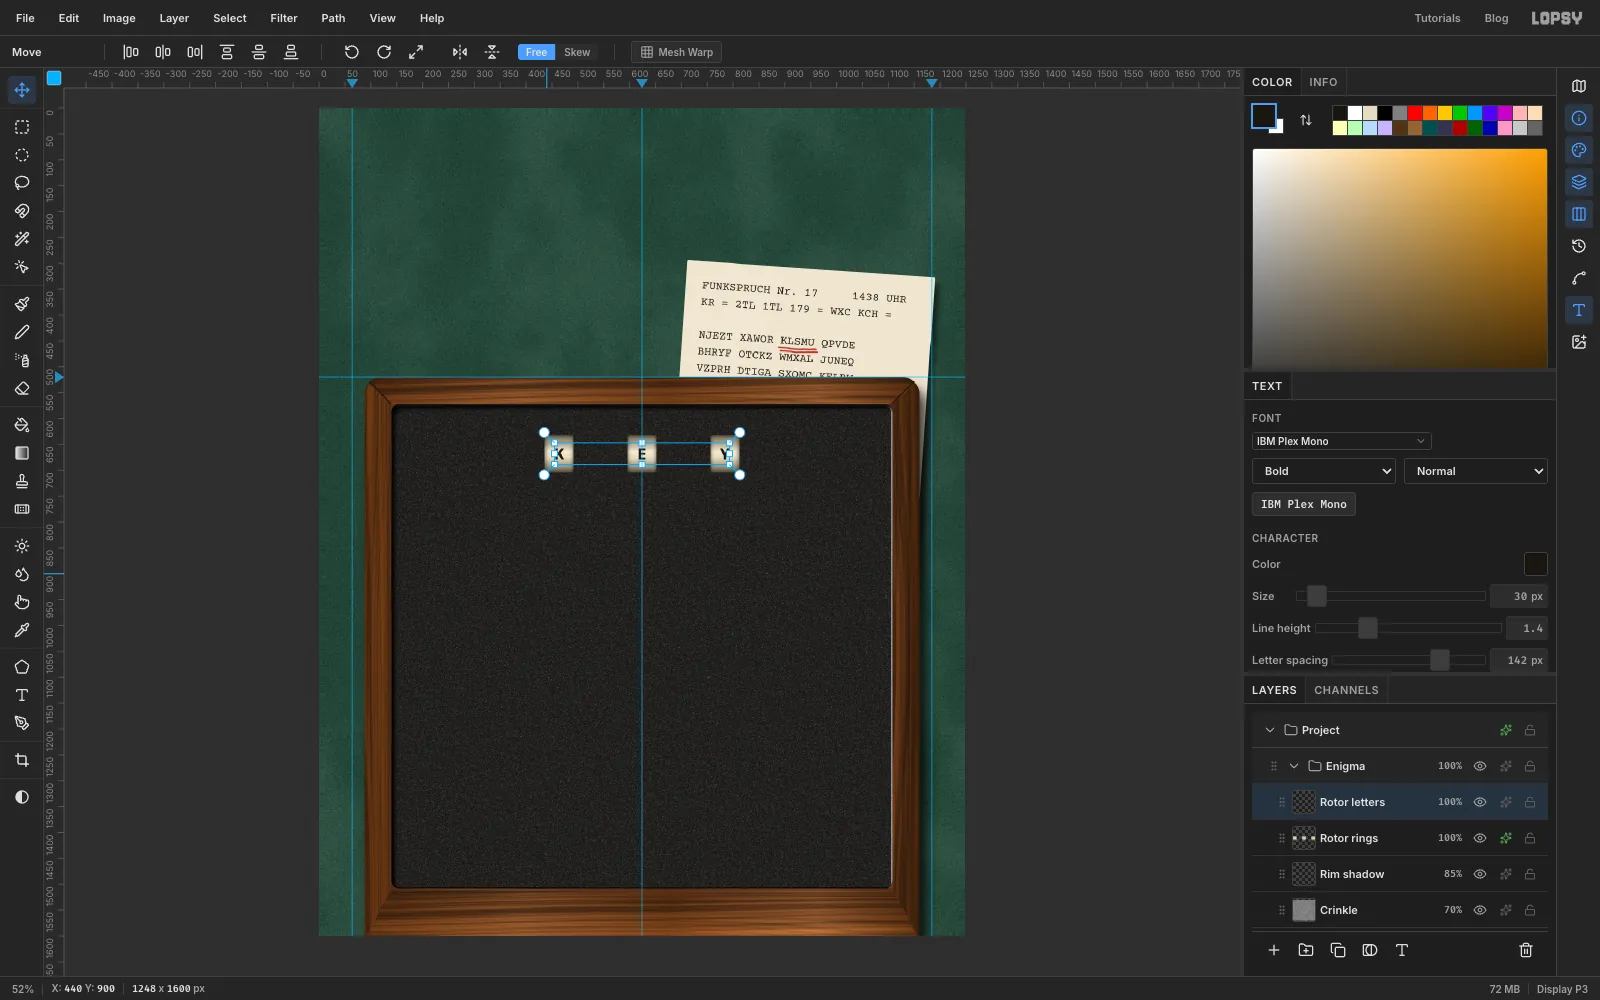
Select Rim shadow and add a layer called Rotor rings. With the Rectangular Marquee, drag three rectangles 56 × 72, holding Shift for the second and third so they add up: 436, 632 to 492, 704; 596, 632 to 652, 704; and 756, 632 to 812, 704. The pointer position shows in the status bar while you drag. They're centred on 464, 624 and 784 across. Fill them with ivory , then drag a vertical Linear gradient from their top edge to their bottom edge with stops , at 45%, at 60% and . Dark top and bottom edges make them read as the curved face of a wheel. Deselect, and give the layer a black Inner Glow at Size 12, Opacity 80.
Now the letters. Pick the Text tool, choose IBM Plex Mono, Bold, size 30, colour , click in an empty part of the panel and type KEY. Commit with Tab, rename the layer Rotor letters, and set Letter spacing to 142.
Why 142? IBM Plex Mono is a monospaced font: every letter is 0.6 of the type size wide, so 18 px at size 30. The windows are 160 px apart, and 160 − 18 = 142. Switch to the Move tool and nudge the text with the arrow keys until the E sits in the middle tile.
-
Brush the aluminium plate
Add a layer called Slots and fill three dark rectangles, 30 × 118, each centred 54 px to the right of a window: 503, 609 to 533, 727; 663, 609 to 693, 727; and 823, 609 to 853, 727 (drag the first, Shift-drag the others). These are the holes the thumbwheels poke through.
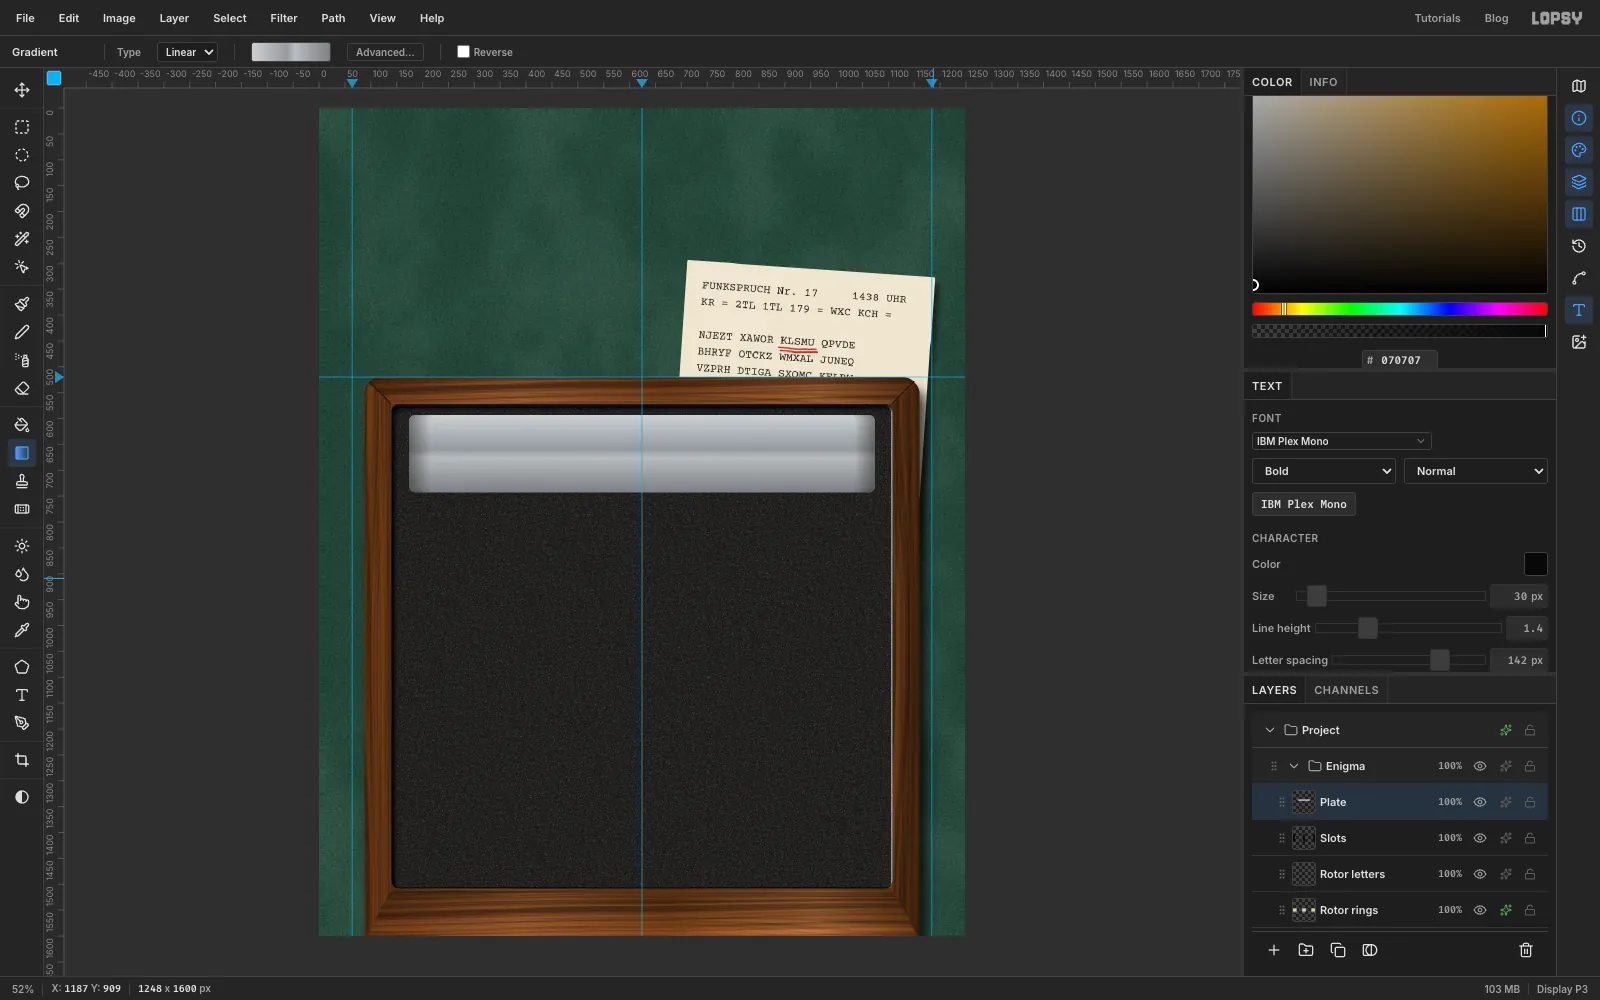
Add a layer called Plate. Click-create a 900 × 150 rectangle with Corner Radius 12 at 624, 668. Cmd-click it and drag a vertical Linear gradient from its top edge to its bottom edge: , at 45%, at 55% and . Then, still selected:
- Add Noise, Amount 30, Mono, Gaussian.
- Motion Blur, Angle 0, Distance 80.
The blur drags every speck of noise into a short horizontal line. That's exactly what brushed metal looks like. Deselect.
-
Cut the windows and slots
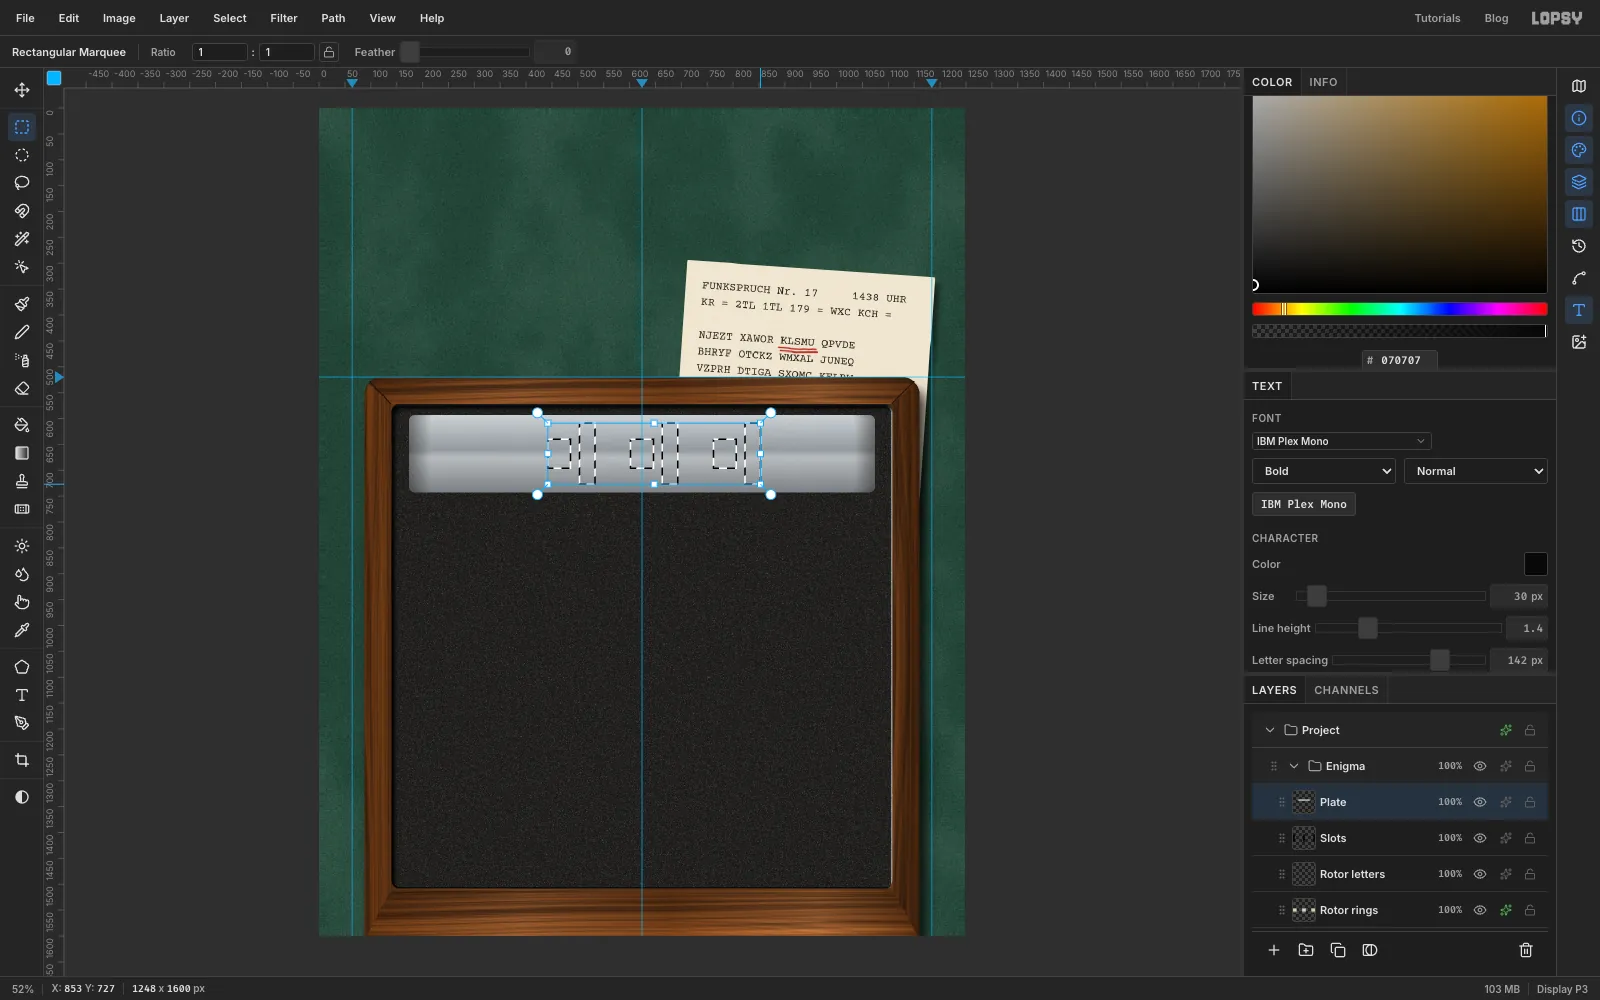
Still on Plate, drag a 44 × 56 rectangle over each window (442, 640 to 486, 696, then the same 160 and 320 px further right), holding Shift for every one after the first, and add the three slot rectangles from the last step the same way. Press Delete to punch them all out. The ivory rings and the dark slots now show through, framed by the plate. Deselect.
Give Plate three effects:
- Drop Shadow, Offset X 4, Offset Y 6, Blur 6, Opacity 90. Because the windows are holes in the plate, this shadow falls inside their top and left edges, so the letters look sunk below the metal.
- Inner Glow in white, Size 3, Opacity 70: a bright bevel on the plate's edge.
- Stroke, Width 1, : a crisp dark outline.
-
Knurl a brass thumbwheel
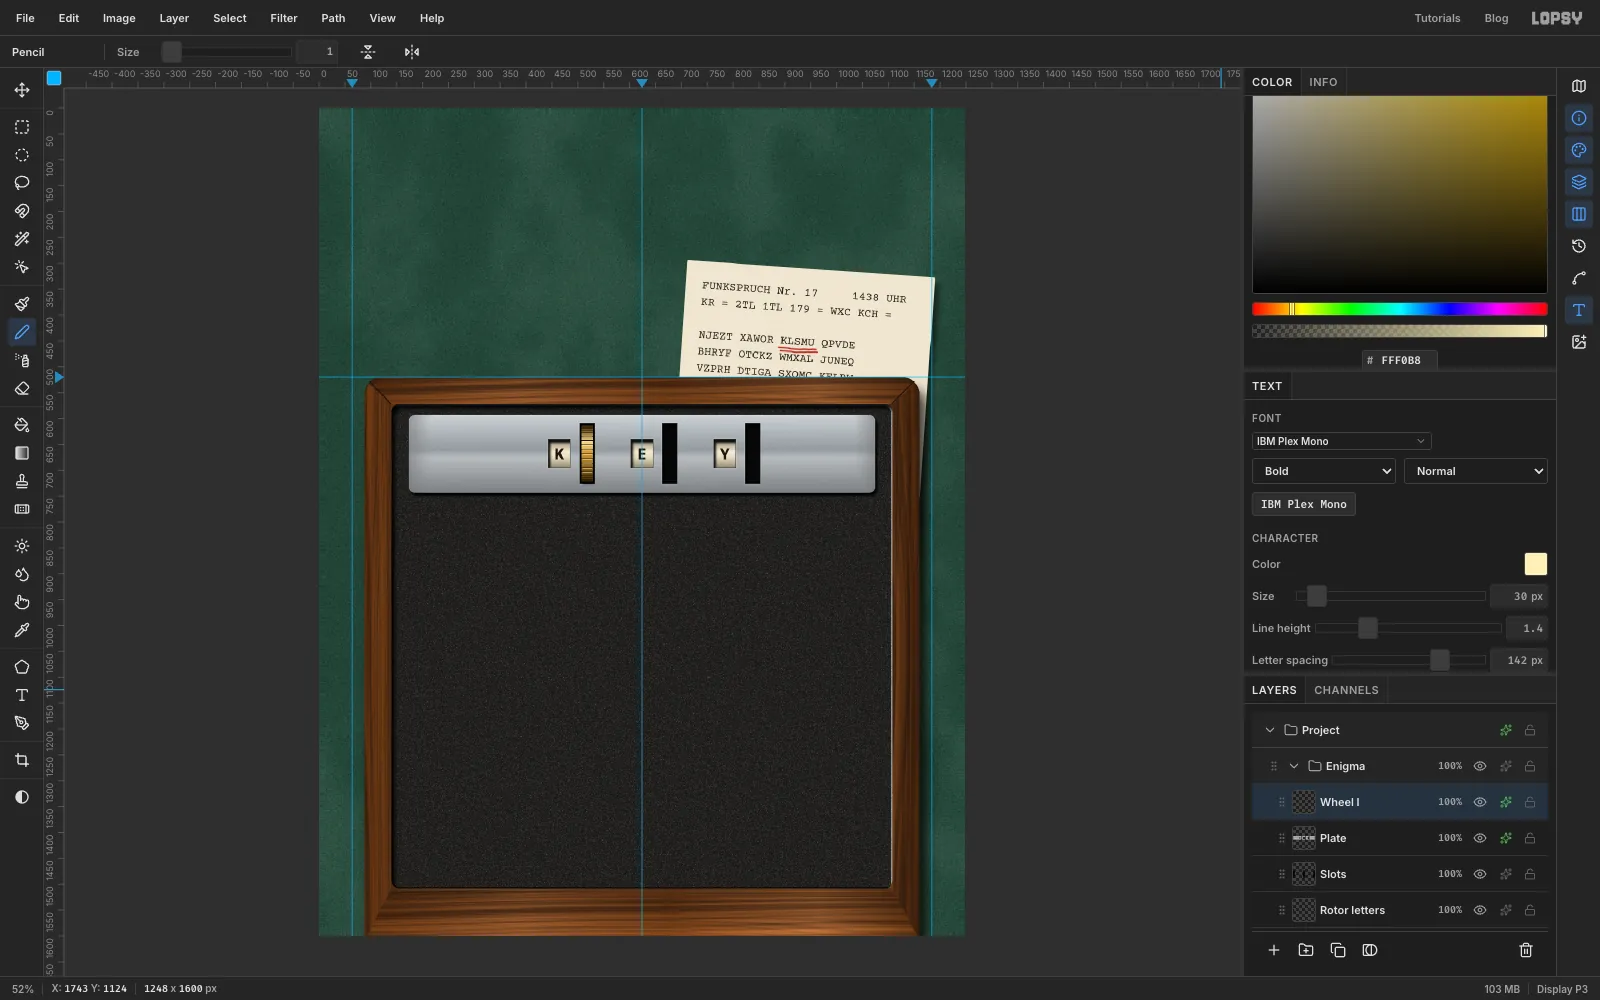
Add a layer called Wheel I. Select a 22 × 108 rectangle centred in the first slot and drag a vertical Linear gradient over it from top to bottom: , at 30%, at 50% and . The bright band near the top makes it read as a lit cylinder. Deselect.
Now the grip ridges. Pick the Pencil at size 1 in . Click at the wheel's left edge and Shift-click at its right edge to draw a hairline straight across, and repeat for about 17 lines. Space them about 8 px apart in the middle and closer together towards the top and bottom: the wheel is round, so its ridges crowd together where it curves away from you. Then switch to and draw a short bright line just under each of the middle dark lines. Dark groove plus bright ridge is what makes knurling look three-dimensional.
Give the wheel a Drop Shadow: Offset X 3, Offset Y 5, Blur 4, Opacity 90.
-
Add the other wheels, screws and engraving
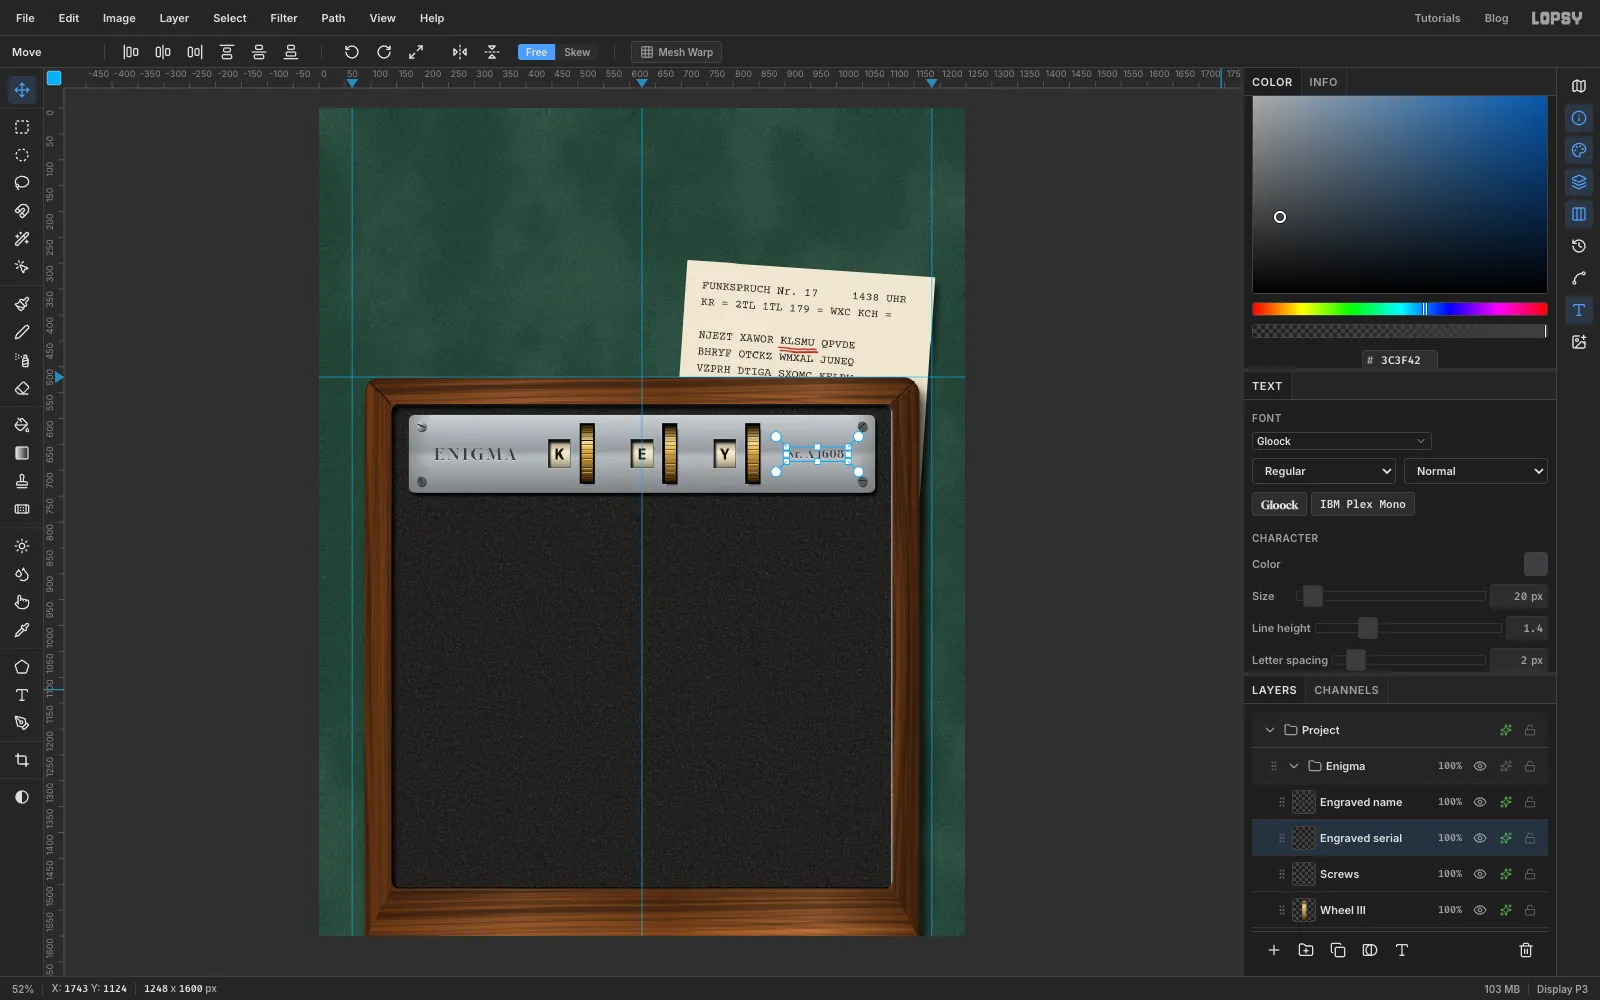
Click Duplicate Layer and move the copy 160 px to the right with the Move tool, into the second slot; use the arrow keys to land it exactly. Duplicate again and move that copy 320 px from the first wheel, into the third slot. Name them Wheel II and Wheel III.
Add a layer called Screws. With the Elliptical Marquee, drag four 18 px circles, one about 24 px in from each corner of the plate (centred near 198, 615 and 1050, 615 at the top, and 198, 721 and 1050, 721 at the bottom), holding Shift to add them up. Fill them with steel grey ; for extra shine, drag a short diagonal Linear gradient from to across a screw. Deselect, and with the Pencil at size 2 in , draw a slot across each screw at a different angle: real screws never line up. Add a small Drop Shadow (Offset X 1, Offset Y 2, Blur 2, Opacity 70).
For the engraving, select Screws first, then make two text layers in Gloock in : ENIGMA at size 30 with Letter spacing 7, named Engraved name and centred in the space to the left of the first window, and Nr. A 16081 at size 20 with Letter spacing 2, named Engraved serial, to the right of the last wheel. Give each a Drop Shadow in white with Offset X 0, Offset Y 1.5, Blur 1 and Opacity 70. A thin light edge under dark letters is the classic engraved look: the bottom lip of each cut catches the light.
-
Draw one lamp
The lampboard has 26 identical lamps. Draw one, turn it into a pattern, and let Lopsy repeat it.
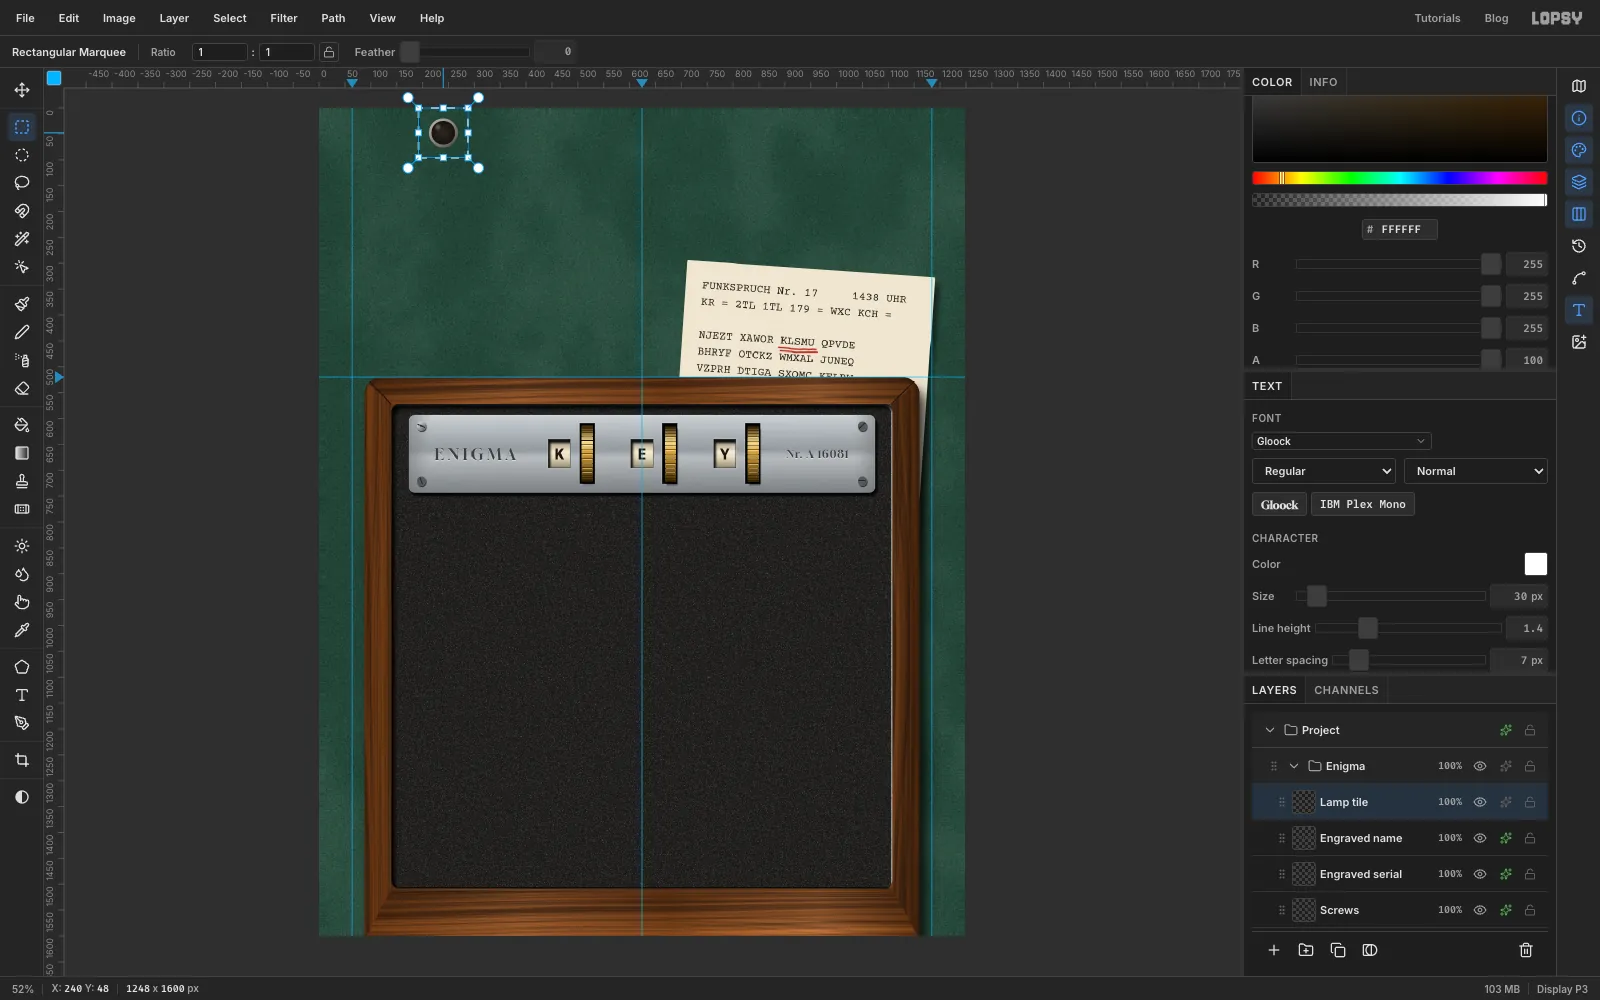
Select Engraved name and add a layer called Lamp tile. Draw it in an empty spot near the top of the page, inside the square from 192, 0 to 288, 96, so its centre is at 240, 48:
- Select a 56 px circle centred there. Use the exact-corners dialog (click once with the Elliptical Marquee: 212, 20 to 268, 76). Dragging near a guide can snap the edges to it and squash the circle.
- Fill it, then drag a diagonal Linear gradient across it from at the top-left to at the bottom-right. This is the metal bezel. Deselect with Cmd+D, because the exact-corners dialog only opens when nothing is selected.
- Select a 46 px circle with the same centre (217, 25 to 263, 71) and drag a Radial gradient from the centre to the edge, to . This is the smoked-glass lens.
- For a glint, select a small circle about 10 px across just up and left of centre, Feather it by 3, and fill it white at 25% opacity (set the colour's A value to 25). Deselect.
Select the whole 96 × 96 square (192, 0 to 288, 96) and choose Edit → Define Pattern. Then delete the Lamp tile layer: the pattern keeps a copy.
-
Fill the lampboard
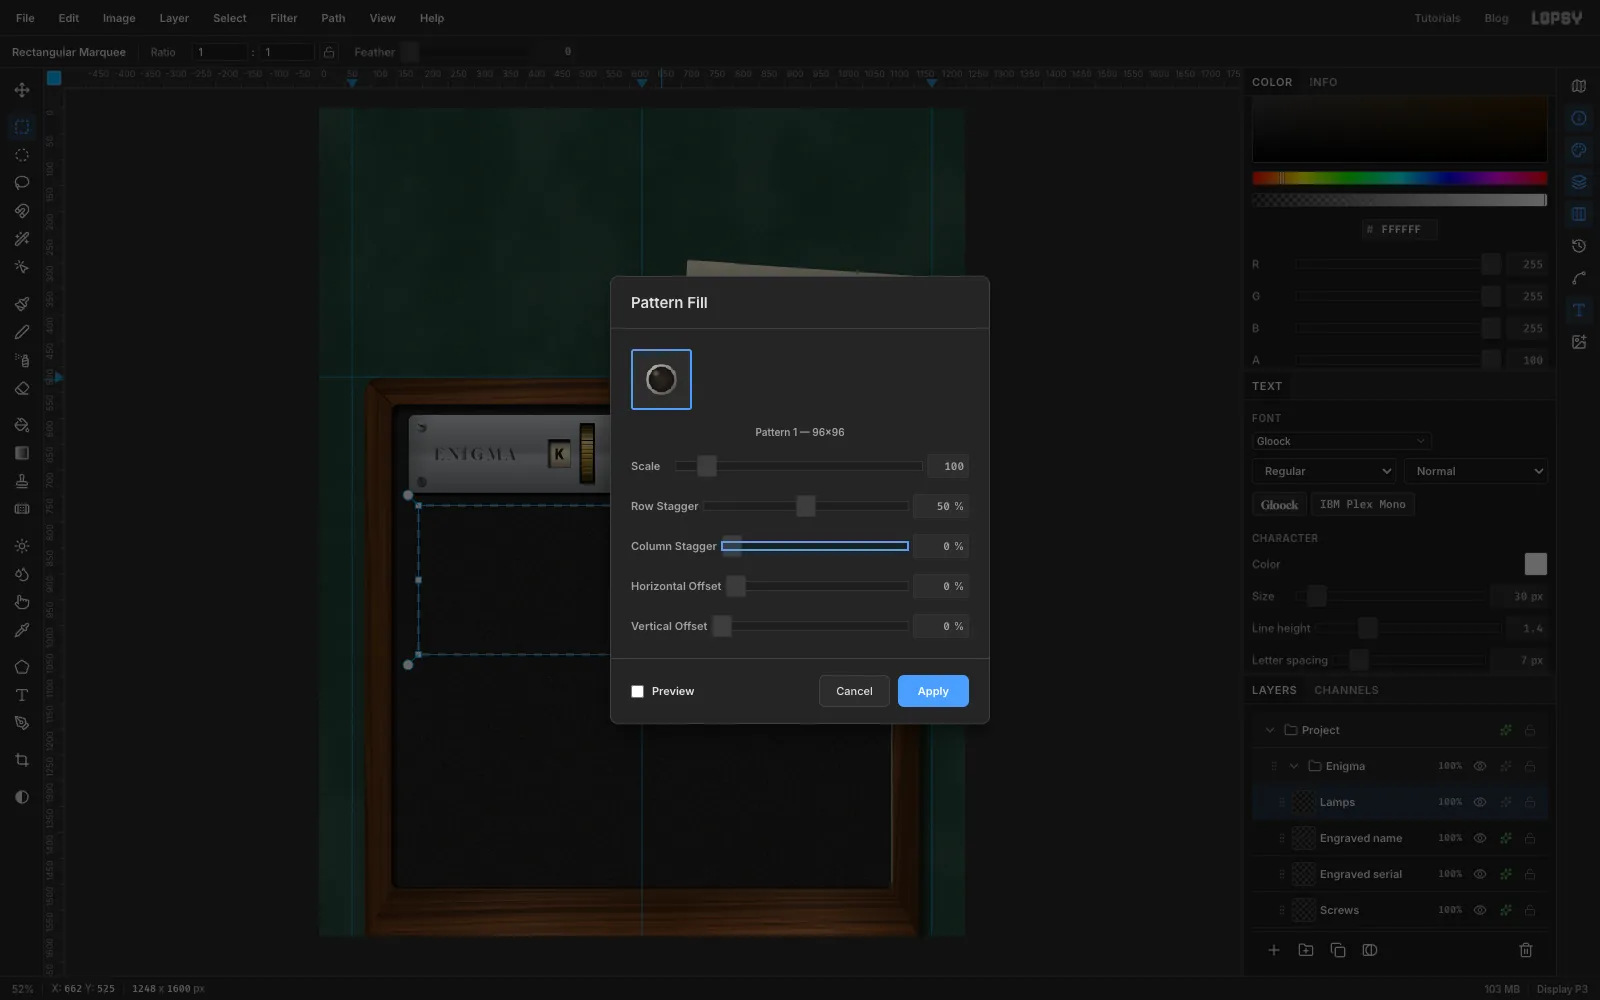
Add a layer called Lamps. Select the rectangle from 192, 768 to 1056, 1056. That's nine lamps wide and three rows tall.
Choose Edit → Fill with Pattern, click the lamp pattern, and set Row Stagger to 50%. Row Stagger shifts each row of tiles sideways by half a tile, which is exactly how the rows of an Enigma, and of a typewriter, are offset. Click Apply.
-
Trim the middle row and lower the lamps
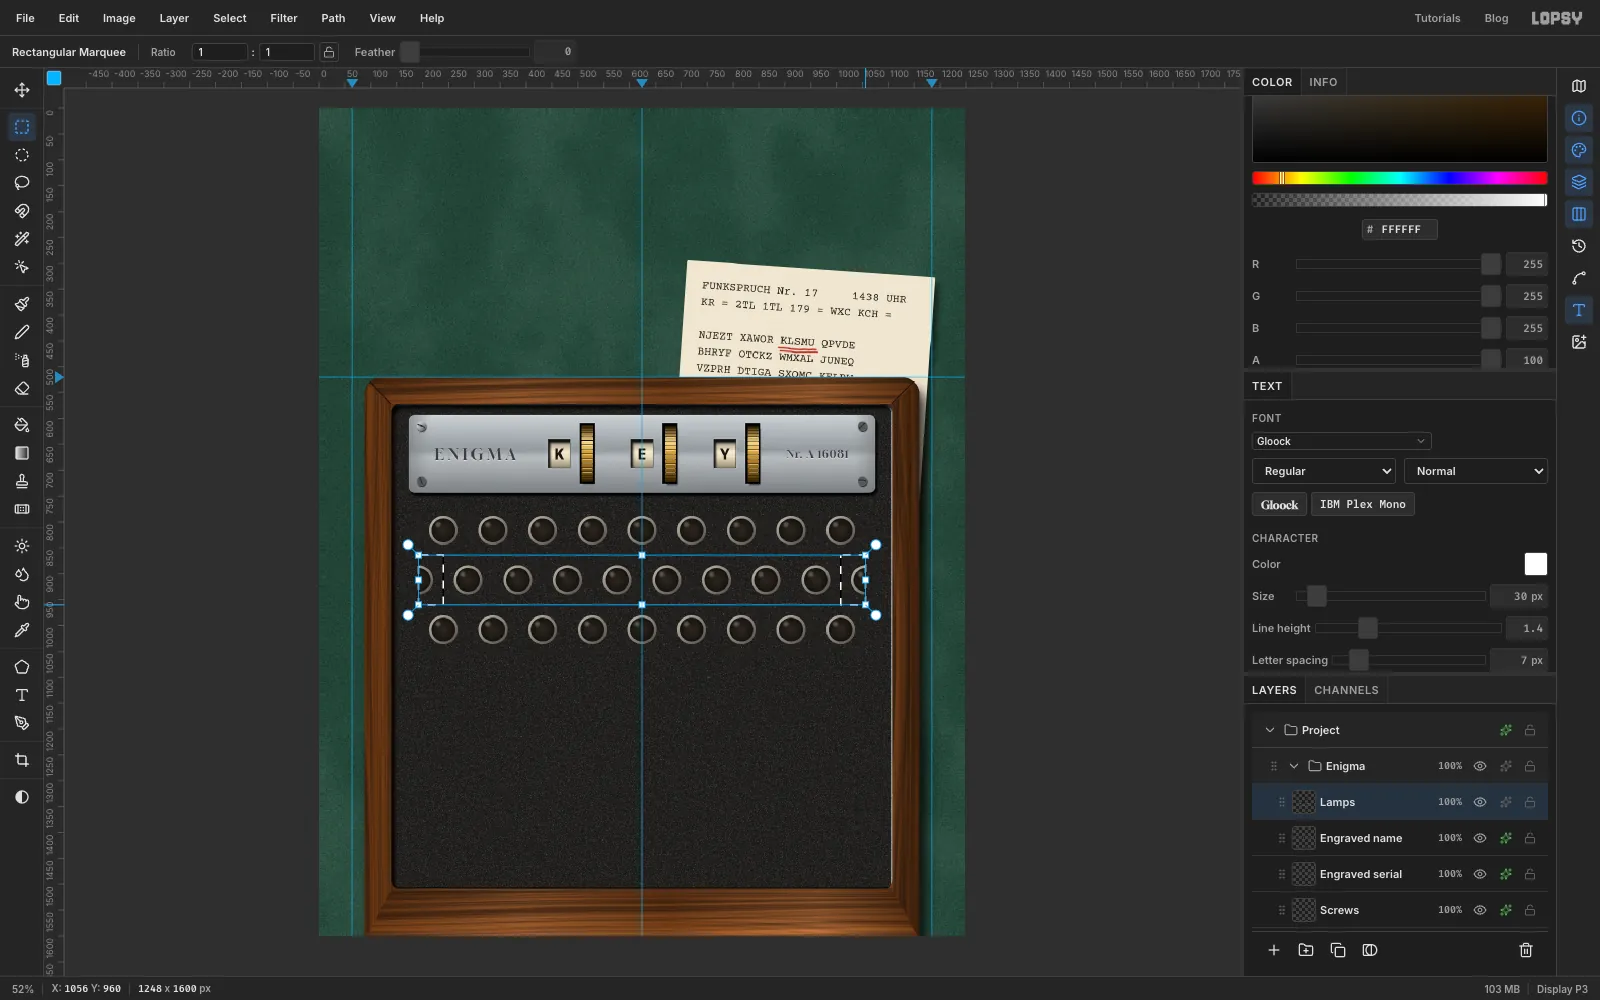
Because the middle row is shifted by half a lamp, it has a half lamp at each end. Select the left 48 px of the middle row and, with Shift, the right 48 px, and press Delete. The middle row now has eight whole lamps, like the real machine. Deselect.
The lamps sit a little close to the plate. With the Move tool, drag the Lamps layer down 48 px (half a row), using the arrow keys to land it exactly. Add a Drop Shadow: Offset X 2, Offset Y 4, Blur 5, Opacity 70.
-
Letter the lamps
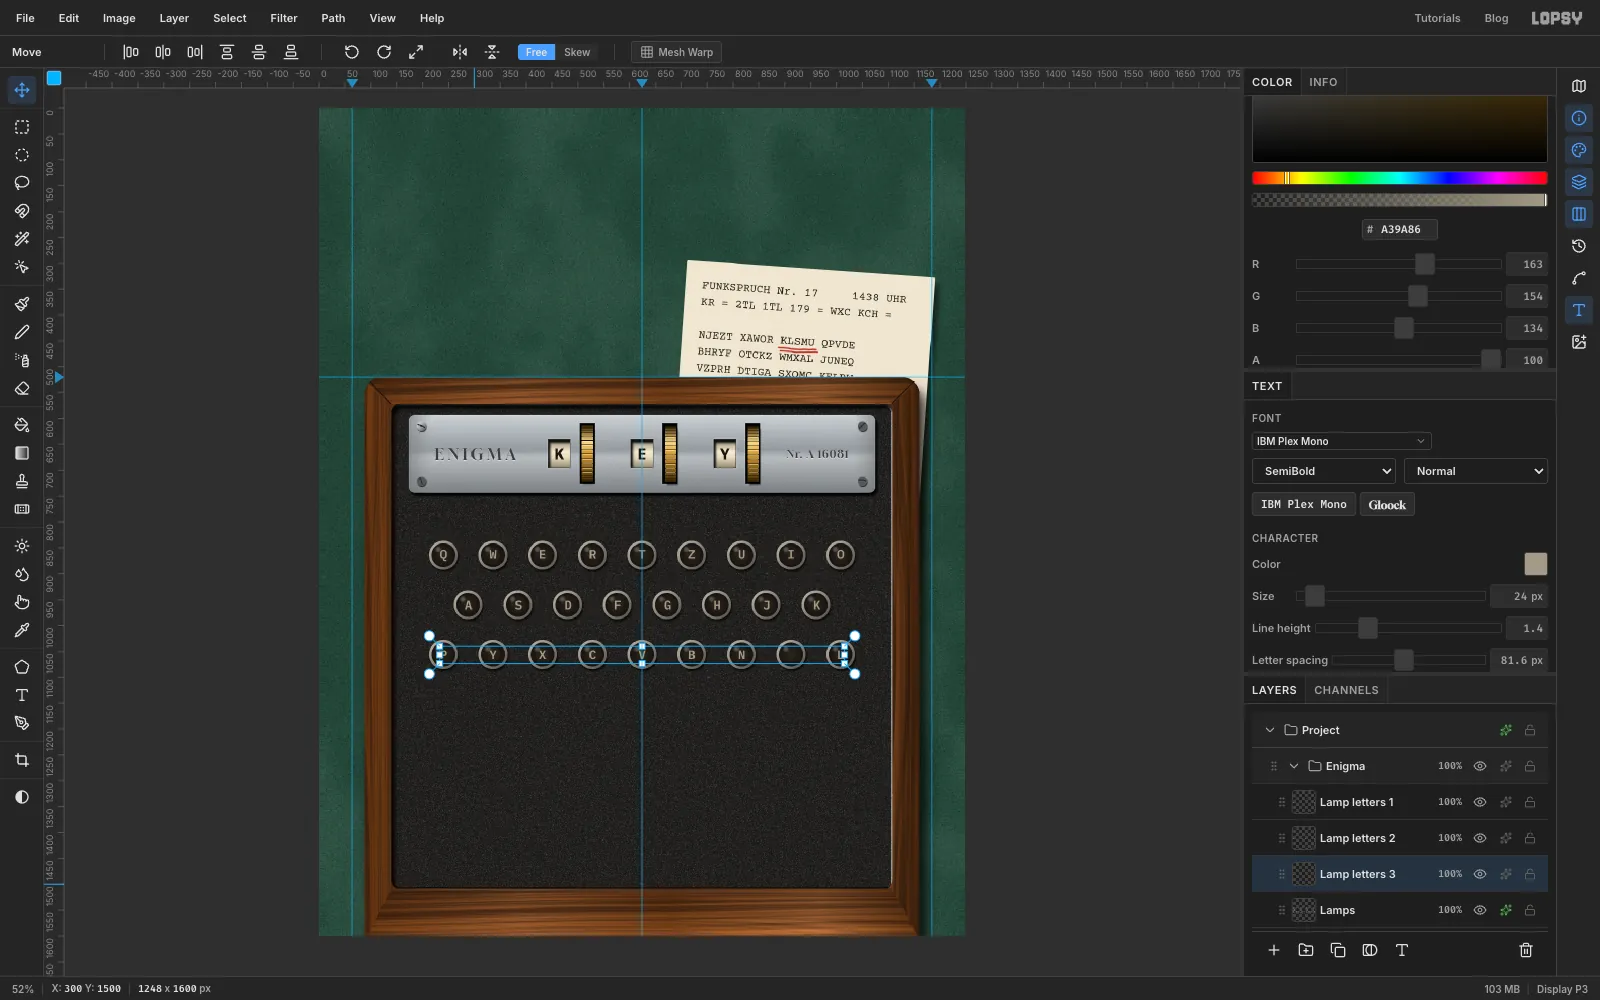
The Enigma's letters follow a German QWERTZ typewriter, except that P and L moved down to the bottom row. With Lamps selected each time, make three text layers in IBM Plex Mono, SemiBold, size 24, colour , set Letter spacing to 81.6 on each, and name them Lamp letters 1, 2 and 3, top to bottom. The lamps are 96 px apart and each letter is 24 × 0.6 = 14.4 px wide, so 96 − 14.4 = 81.6.
QWERTZUIOASDFGHJKPYXCVBN L, with a space instead of the M, which you'll light up separately
Click each one into empty space, then nudge it with the Move tool until its first and last letters sit in the middle of the first and last lenses. In a monospaced font, the letters in between fall into place on their own.
-
Light the M lamp
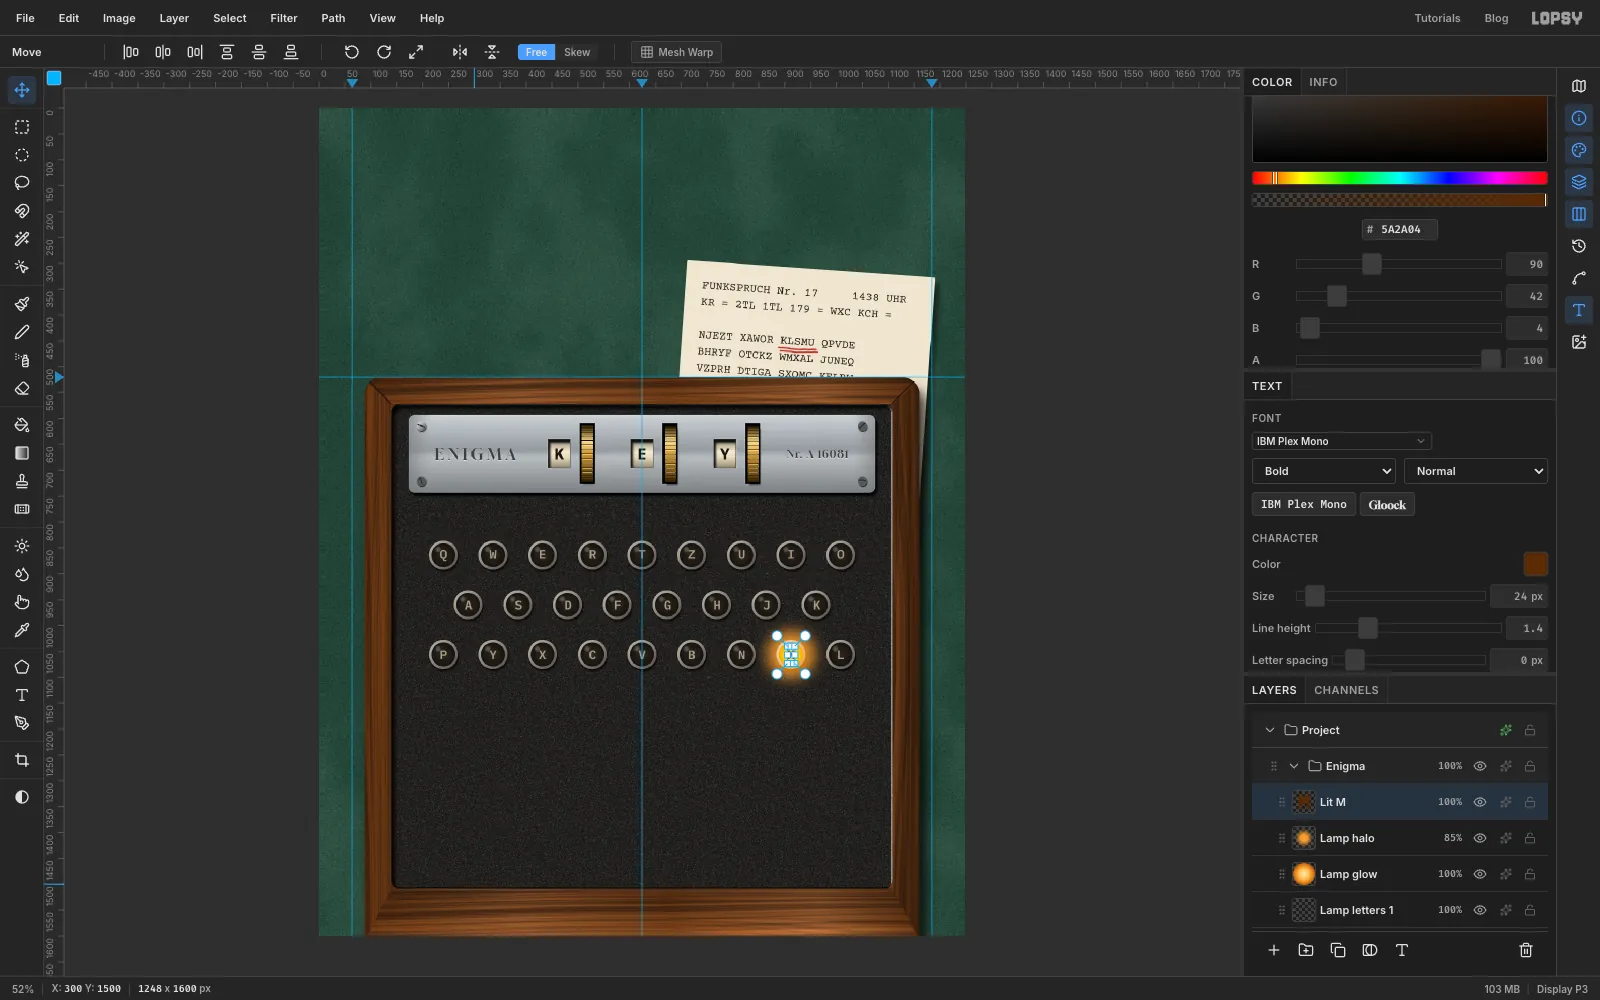
Select Lamp letters 1 and add a layer called Lamp glow. Select a 46 px circle over the empty lens in the bottom row and drag a Radial gradient from its centre to its edge: , at 55% and . Deselect.
Add a layer called Lamp halo. Select a circle about 92 px across on the same lamp, fill it with , deselect, and run Gaussian Blur at 40. Set it to Screen at 85%. Screen only ever lightens, so the halo warms the panel and the neighbouring bezels without muddying them.
Add the letter on top: M in IBM Plex Mono Bold size 24, in dark amber , named Lit M and nudged into the centre of the lit lens. On the real machine the letters were printed dark on the lamp glass, so the lit one shows a dark letter against the bright bulb.
-
Draw one key
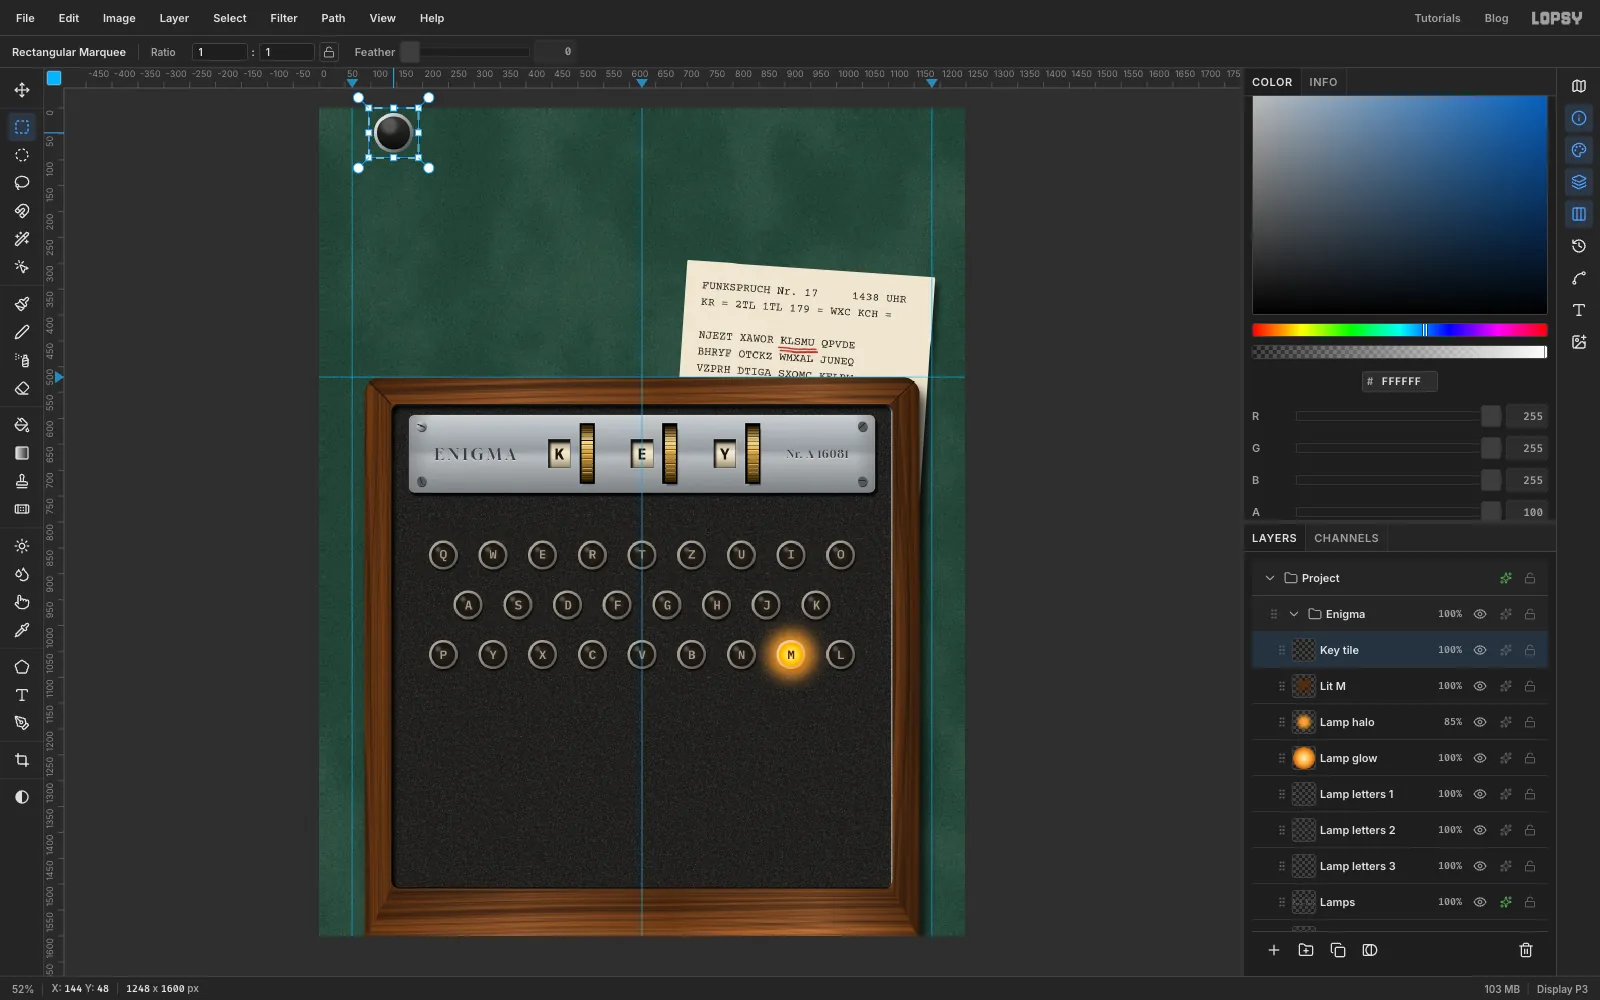
Keys work the same way. Select Lit M, add a layer called Key tile, and draw it centred at 144, 48, inside the square from 96, 0 to 192, 96:
Deselect between the circles so the exact-corners dialog opens each time.
- A 76 px circle with a diagonal Linear gradient, → → , from top-left to bottom-right: the chrome rim.
- A 64 px circle with a vertical gradient, to : the Bakelite cap.
- A 32 px circle a little up and left of centre, Feathered by 7, filled white at 22%: the gloss.
Select the 96 × 96 square, choose Edit → Define Pattern, and delete the tile layer.
-
Fill the keyboard
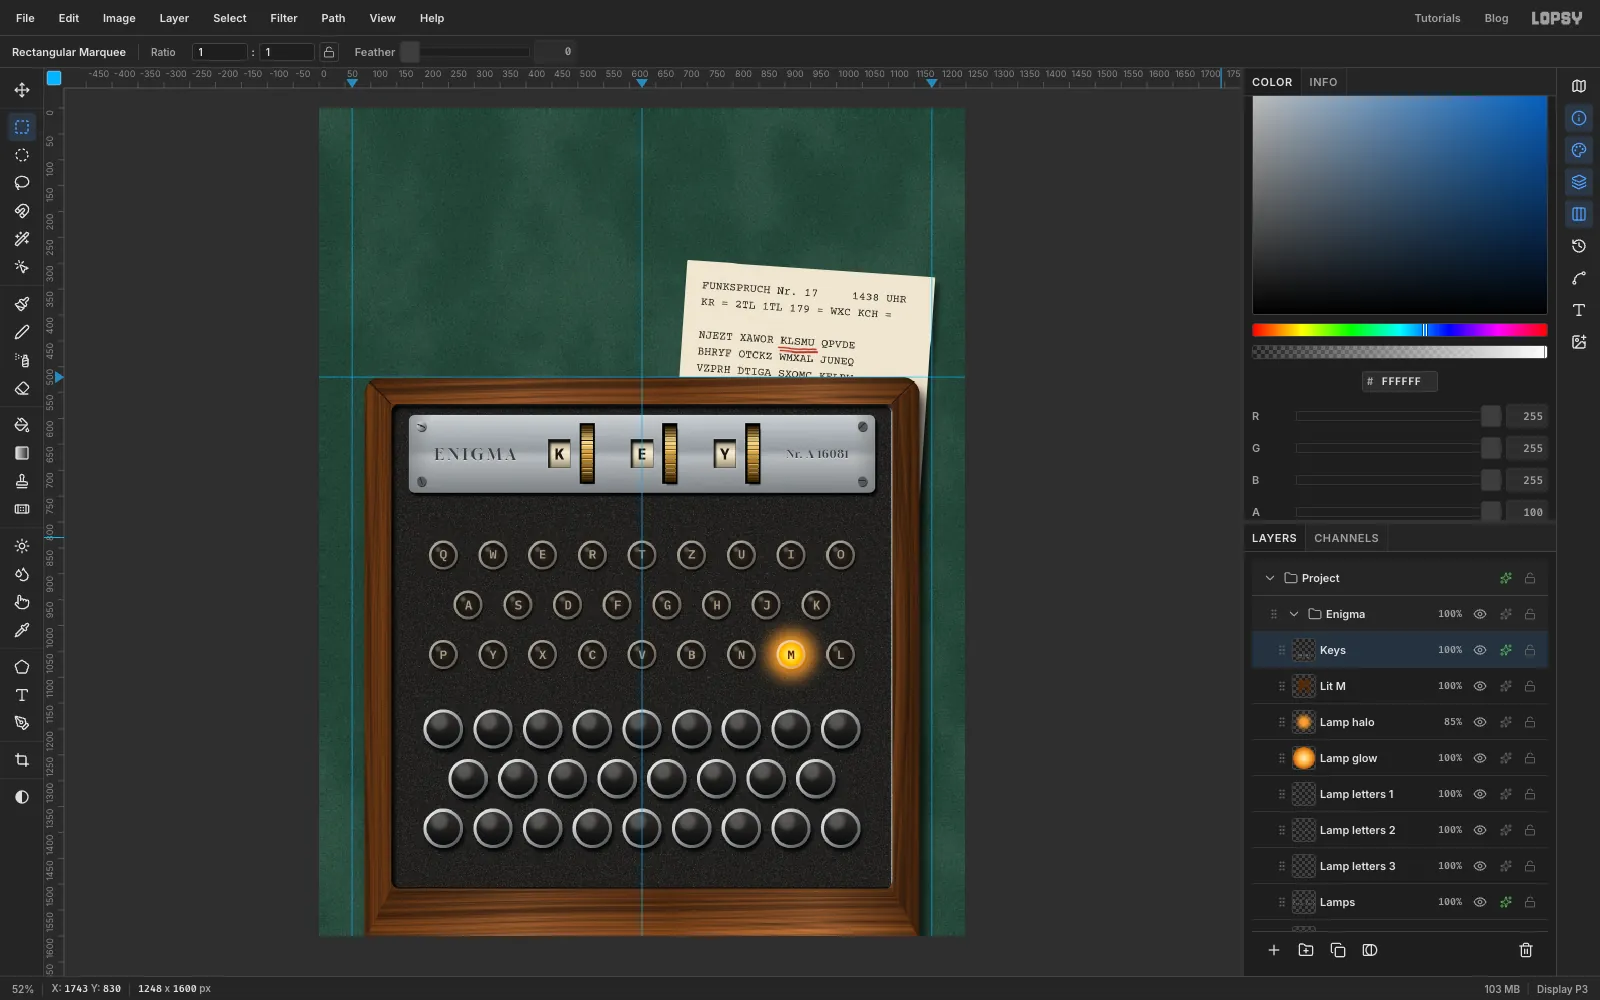
Add a layer called Keys. Select the rectangle from 192, 1152 to 1056, 1440, choose Edit → Fill with Pattern, click the key pattern (the newest one), set Row Stagger to 50% and click Apply. Delete the two half keys at the ends of the middle row, just as you did for the lamps.
Add a Drop Shadow with Offset X 4, Offset Y 8, Blur 9, Opacity 80. The keys stand taller than the lamps, so their shadow is longer.
-
Press the E key
Somebody has just pressed E, and that's what lit the M. Never the same letter: an Enigma could never encrypt a letter as itself, the flaw the cover story is about.
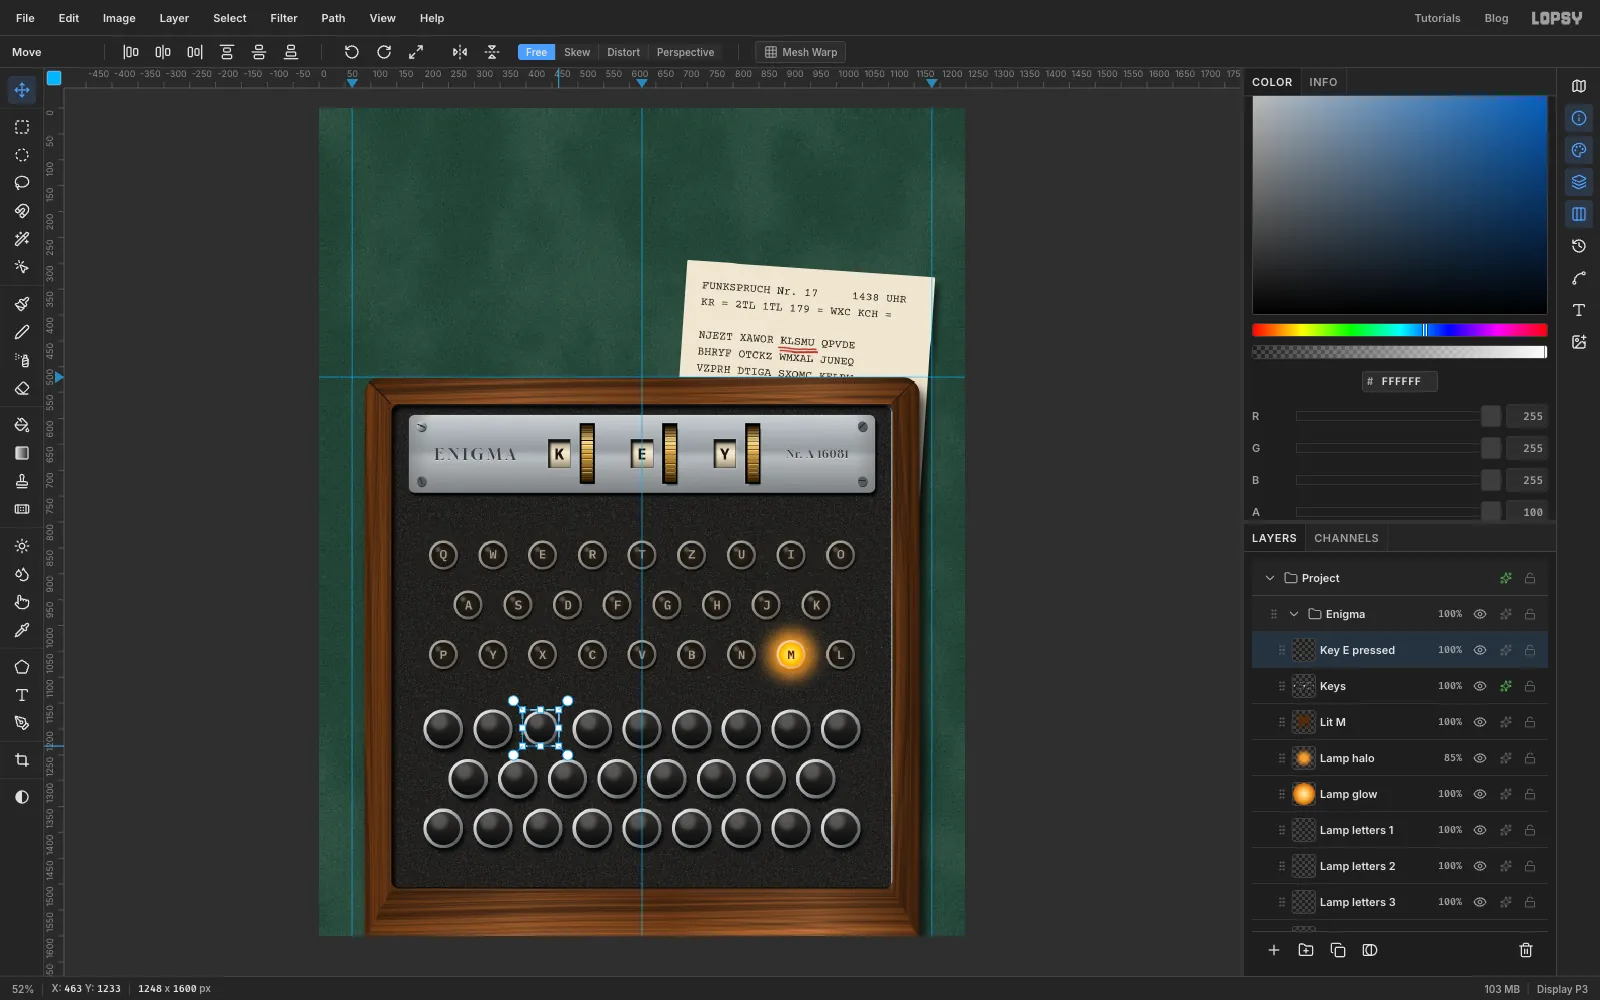
Select the E key (third in the top row) with a circle about 80 px across and press Cmd+X, then Cmd+V. The key comes back on its own layer, in the same place; name it Key E pressed. With the Move tool, nudge it 3 px down with the arrow keys, so it sits a little lower than its neighbours.
Make it smaller, as if it has dropped into the machine. Select a box just around the key, then hold Cmd and drag the bottom-right corner handle about 10 px up and left, to about 87%. Press Enter, deselect and nudge it back to the centre of its gap.
Then:
- Filter → Brightness/Contrast, Brightness −22, Contrast −10, so it falls into shade.
- A black Inner Glow, Size 9, Opacity 65, in place of a drop shadow. A pressed key doesn't stand up, so it casts no shadow; its edges are shaded instead.
-
Letter the keys
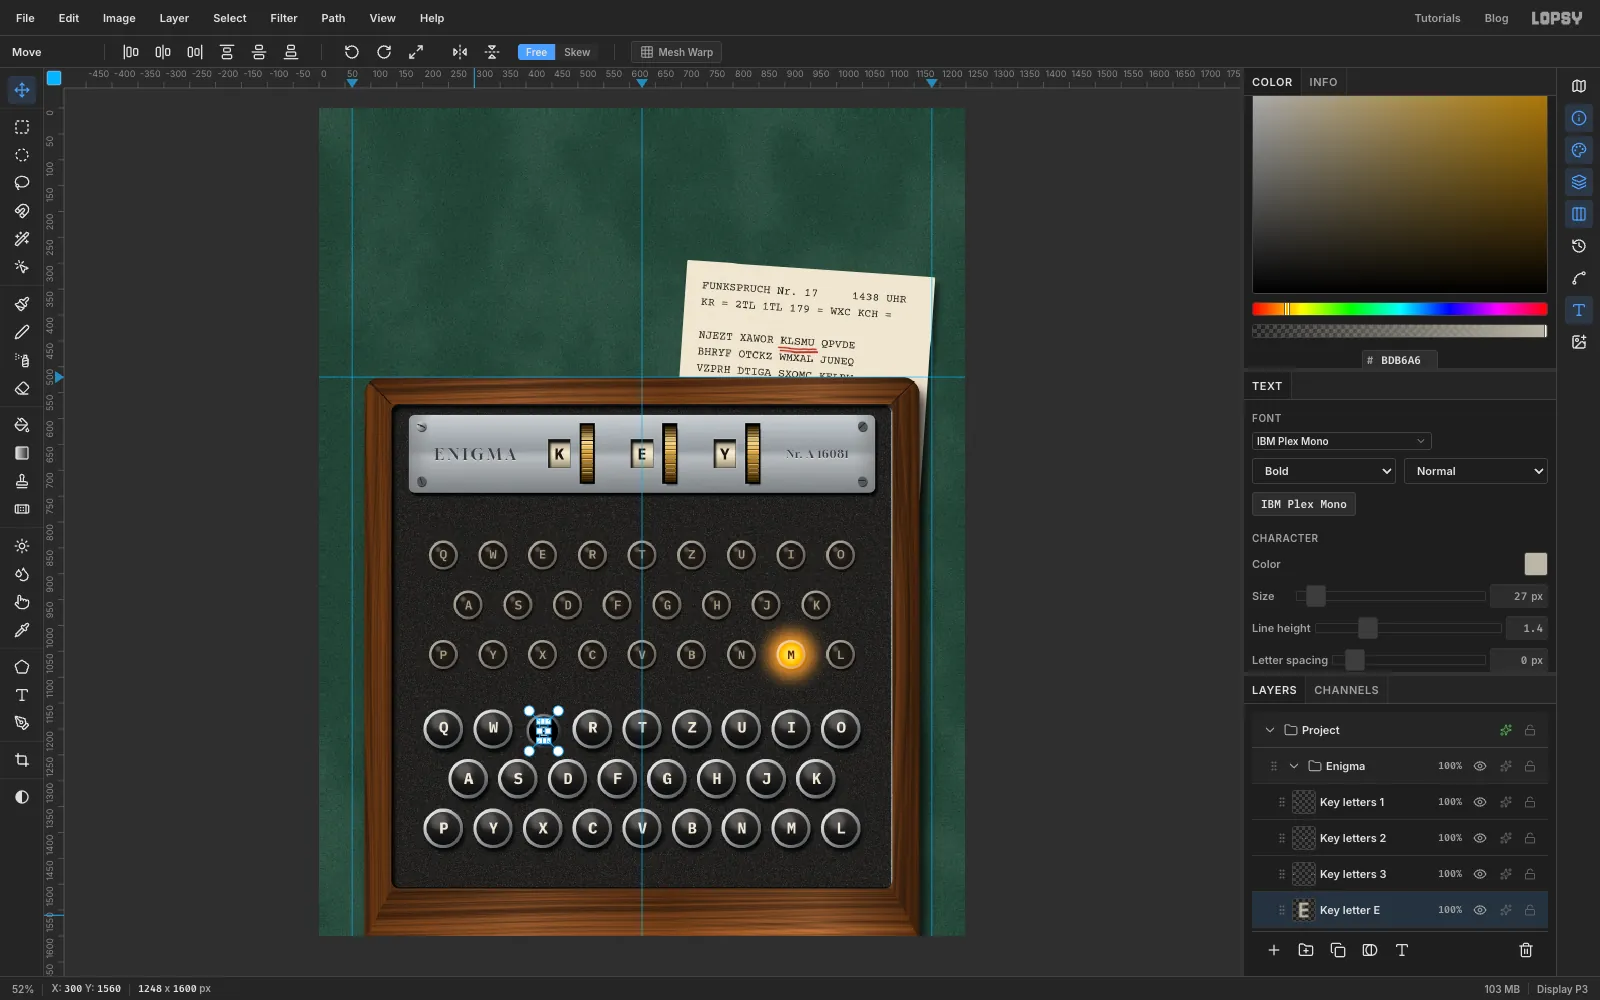
With Key E pressed selected each time, make three text layers in IBM Plex Mono, Bold, size 30, colour , with Letter spacing 78 (96 − 30 × 0.6), named Key letters 1, 2 and 3:
QW RTZUIO(with a space instead of the E)ASDFGHJKPYXCVBNML
Centre each row on its keys as you did for the lamps. Then make a separate E at size 27 in a dimmer , name it Key letter E, and nudge it onto the pressed key, a couple of pixels below the other letters in its row.
-
Turn the whole machine
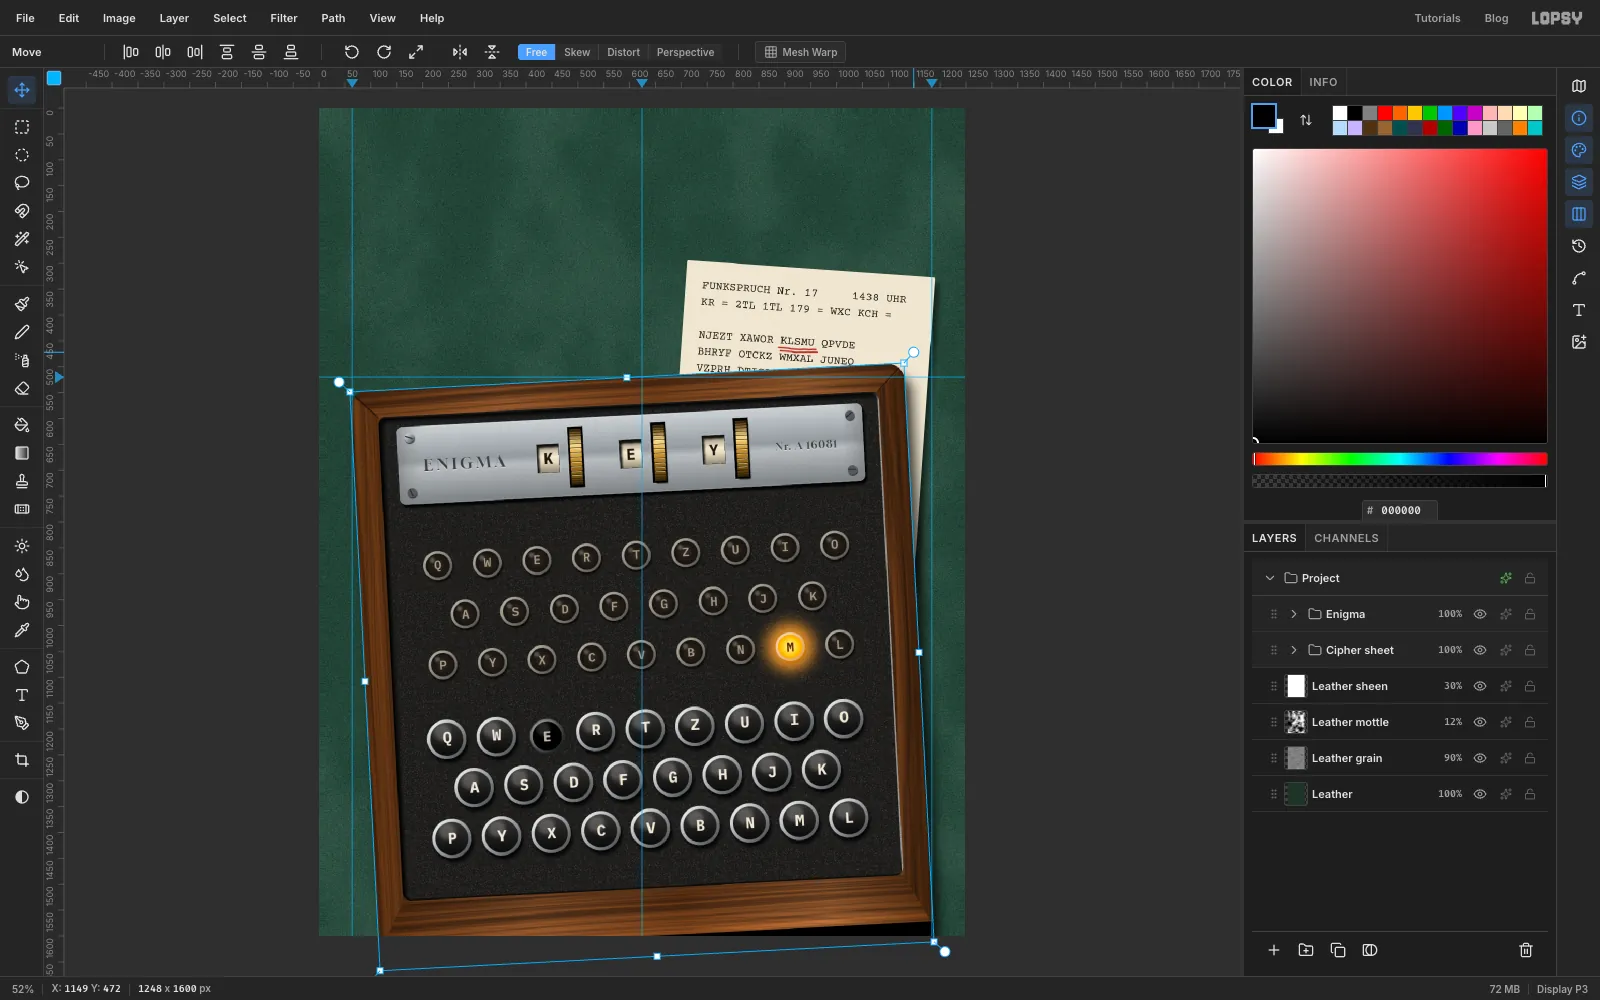
A machine sitting perfectly square looks like a diagram. Collapse the Enigma group and click its row to select the whole group. Pick the Move tool: the transform box wraps everything in the group. Drag just outside the top-right corner handle upwards to turn it about 3° anticlockwise, and press Enter.
Every layer turns together, including the live text and the effects, and the shadows still fall down and to the right because effects are drawn after the turn.
-
Cut the manila tag
With the collapsed Enigma group selected, click New Group and name it Tag. Add two layers inside it: Twine under first (leave it empty for now), then Tag card.
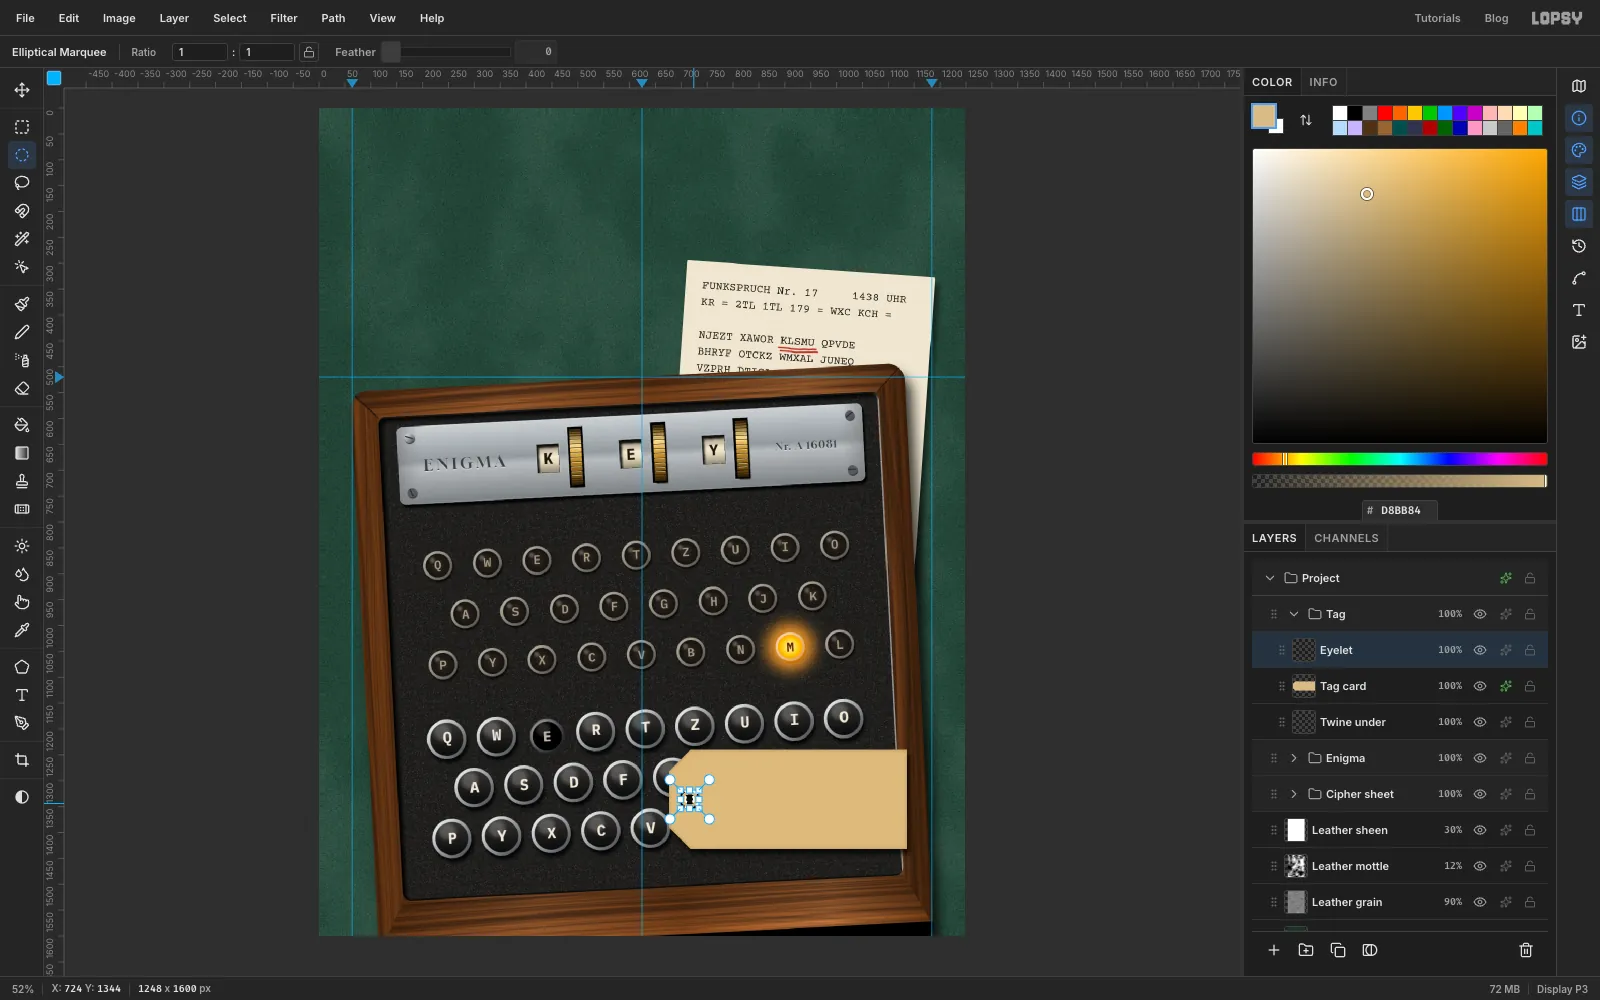
On Tag card, use the Lasso to draw the classic shipping-tag shape: a rectangle about 460 × 192 px whose left end has its two corners clipped off at 45° by about 40 px. Place it over the right half of the keys, with its top edge in the gap between the first and second rows of keys and its right end hanging over the wooden rail. Fill it with manila and add Add Noise at 10 (Mono, Gaussian). Deselect. Select a 16 px circle about 40 px in from the pointed end and press Delete to punch the string hole.
Give the card an Inner Glow in at Size 12, Opacity 45, which looks like the edges have been handled, and a Drop Shadow with Offset X 6, Offset Y 10, Blur 14, Opacity 70.
Add a layer called Eyelet. Drag a 36 px circle centred on the hole, then hold Option and drag a smaller circle, about 16 px across, right over the hole to subtract it, leaving a ring. Fill it with and add a small Drop Shadow (Offset X 1, Offset Y 1, Blur 2, Opacity 50).
-
Type the tag
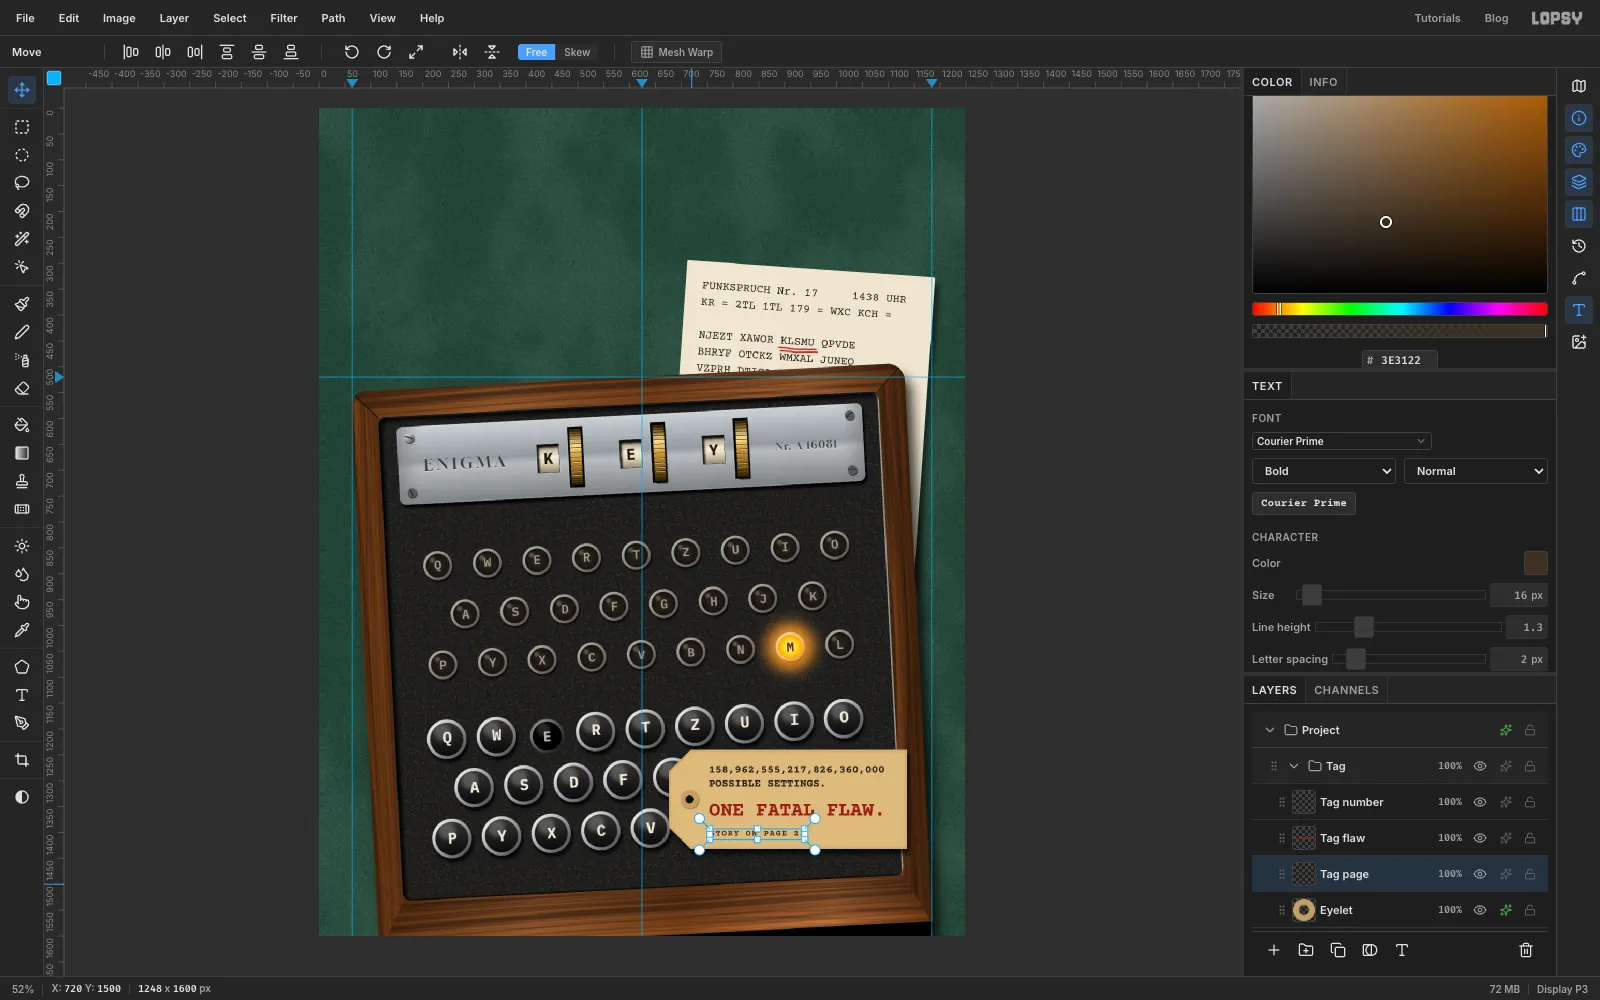
With Eyelet selected each time, add three text layers in Courier Prime, Bold:
- Tag number:
158,962,555,217,826,360,000and, on a second line,POSSIBLE SETTINGS.at size 21 in , with Line height 1.3. That really is the number of possible daily keys for the army's three-rotor Enigma. - Tag flaw:
ONE FATAL FLAW.at size 38 in brick red . - Tag page:
STORY ON PAGE 22at size 16 in , Letter spacing 2.
Line up their left edges about 38 px right of the eyelet. Keep the right margin about the same as the space between the eyelet and the text.
- Tag number:
-
Tilt the tag and thread the twine
Collapse the Tag group, select it, and with the Move tool turn it about 1° anticlockwise from its top-right rotate handle. Press Enter. It now lies almost, but not quite, square with the keys, as if somebody dropped it there.
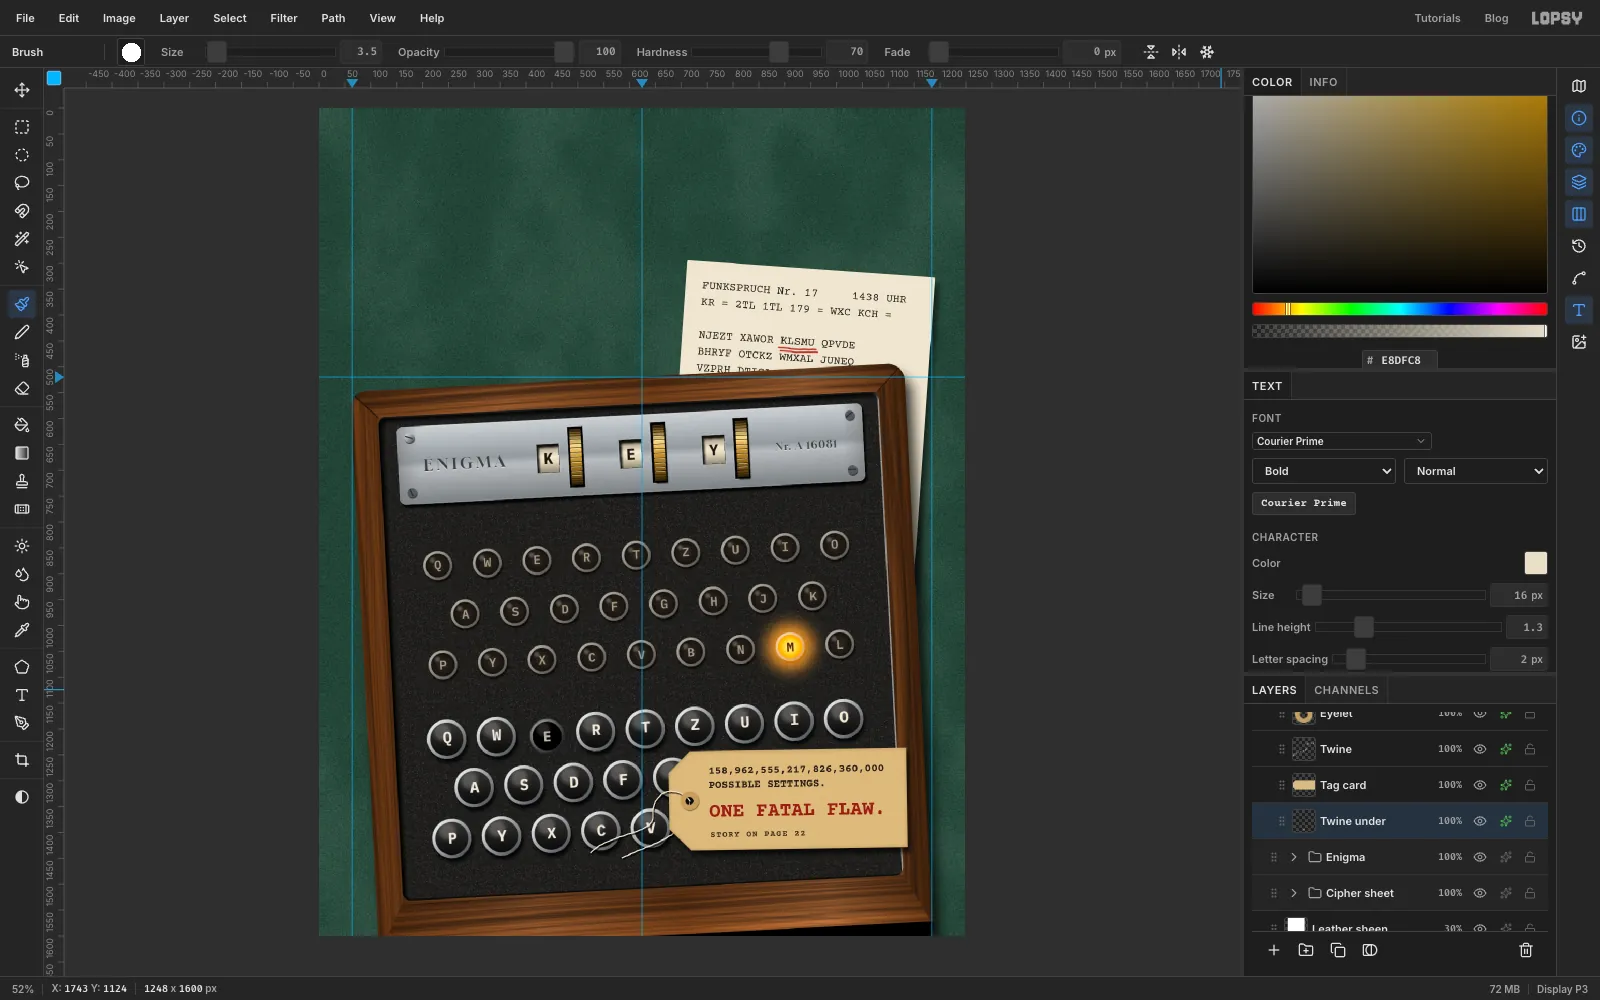
Expand the group again. Select Tag card and add a layer called Twine. Pick the Brush at size 3.5, Hardness 70, in . Start in the middle of the eyelet hole and drag a loop up and out to the left, then down and away across the keys, so the strand looks like it comes out of the hole. The layer sits under Eyelet, so the brass ring stays on top of the string, as it would on a real tag. Add a Drop Shadow with Offset X 2, Offset Y 3, Blur 2, Opacity 75: thin, close shadows keep it lying flat on the keys.
Select the empty Twine under layer and draw the other end of the loop from the hole down under the tag's edge. Because this layer is under the card, the string seems to go through the hole. Give it the same drop shadow.
-
Set the gold masthead
With the collapsed Tag group selected, click New Group and name it Cover type.
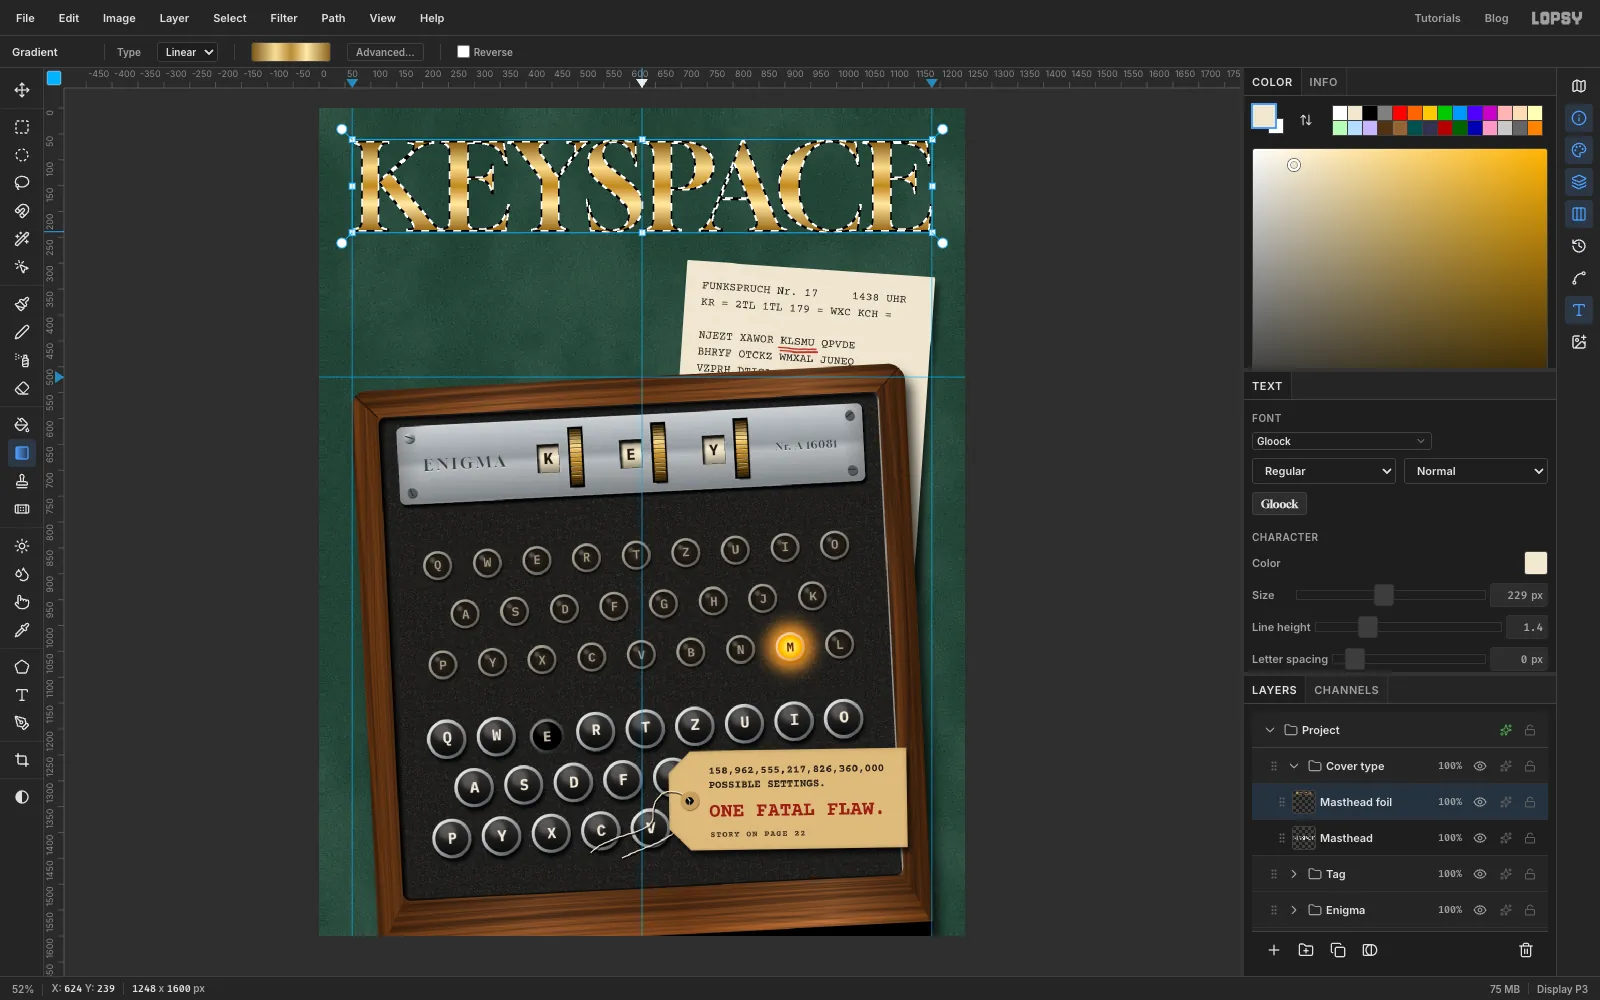
Pick the Text tool, choose Gloock in cream , and type KEYSPACE in an empty spot. Name the layer Masthead. Change the Size in the Text panel until the word runs exactly from the 64 px guide to the 1184 px guide, about 229, then move it so the tops of the letters are about 62 px from the top of the page.
Now gild it. Cmd-click the Masthead thumbnail to select the letter shapes, add a layer called Masthead foil, and drag a vertical Linear gradient from the top of the letters to the bottom with five stops: , at 30%, at 50%, at 70% and . Alternating light and dark bands are what make a gradient read as polished metal rather than yellow. Deselect, then add a 1 px Stroke in and a Drop Shadow with Offset X 4, Offset Y 6, Blur 8, Opacity 80.
-
Set the cover lines
Add a layer called Rules. With the Pencil at size 2 in cream , click at the left guide about 22 px under the masthead and Shift-click at the right guide to draw a rule across the page.
With Rules selected before each one, add the type, naming each layer as given. Every left-aligned line starts on the 64 px guide, and the one right-hand line ends on the 1184 px guide:
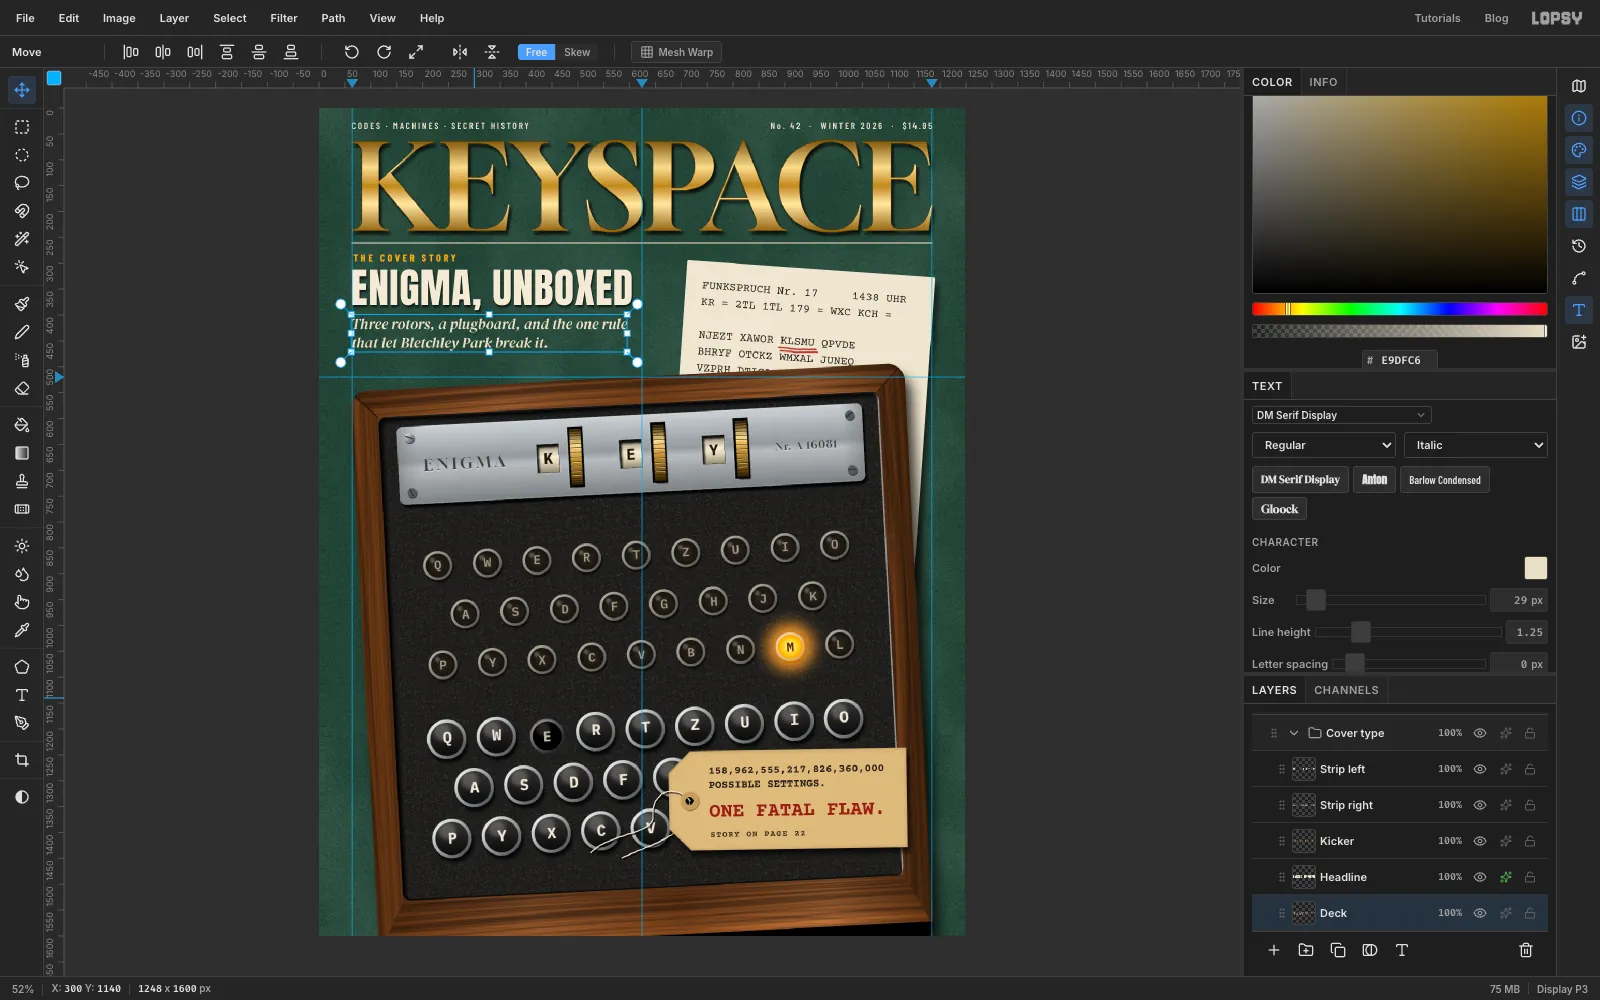
- The folio, in Barlow Condensed SemiBold 18, , Letter spacing 3.5, with the tops of its capitals about 28 px from the top of the page: Strip left
CODES · MACHINES · SECRET HISTORYat the top left, and Strip rightNo. 42 · WINTER 2026 · $14.95at the top right, on the same line. - The Kicker
THE COVER STORYin Barlow Condensed Bold 20, amber , Letter spacing 5, about 22 px under the rule. - The Headline
ENIGMA, UNBOXEDin Anton 80, , Letter spacing 1, about 16 px under the kicker, with a Drop Shadow (Offset X 2, Offset Y 4, Blur 6, Opacity 70). - The Deck in DM Serif Display Italic 29, , Line height 1.25, about 18 px under the headline:
Three rotors, a plugboard, and the one rule/that let Bletchley Park break it.
- The folio, in Barlow Condensed SemiBold 18, , Letter spacing 3.5, with the tops of its capitals about 28 px from the top of the page: Strip left
-
Add the footer band and barcode
Select Rules, add a layer called Footer band, and fill the strip from 1532 px down to the bottom of the page with .
Add a layer called Barcode sticker and fill a 176 × 96 rectangle from 64, 1478 to 240, 1574 with . Give it a Drop Shadow (Offset X 3, Offset Y 5, Blur 6, Opacity 60).
Add a layer called Barcode. With the Rectangular Marquee, drag a thin vertical bar near the left of the sticker, then hold Shift and keep adding bars from left to right, between 1 and 4 px wide with 1 to 3 px gaps. Run the bars from about 1488 to 1537 px down, and make the two bars at each end and two in the middle about 7 px longer: those are the guard bars every real barcode has. Fill all the bars at once with and deselect. Under them, add
0 74470 01942 6in IBM Plex Mono Medium 13, , Letter spacing 0.5, centred on the sticker.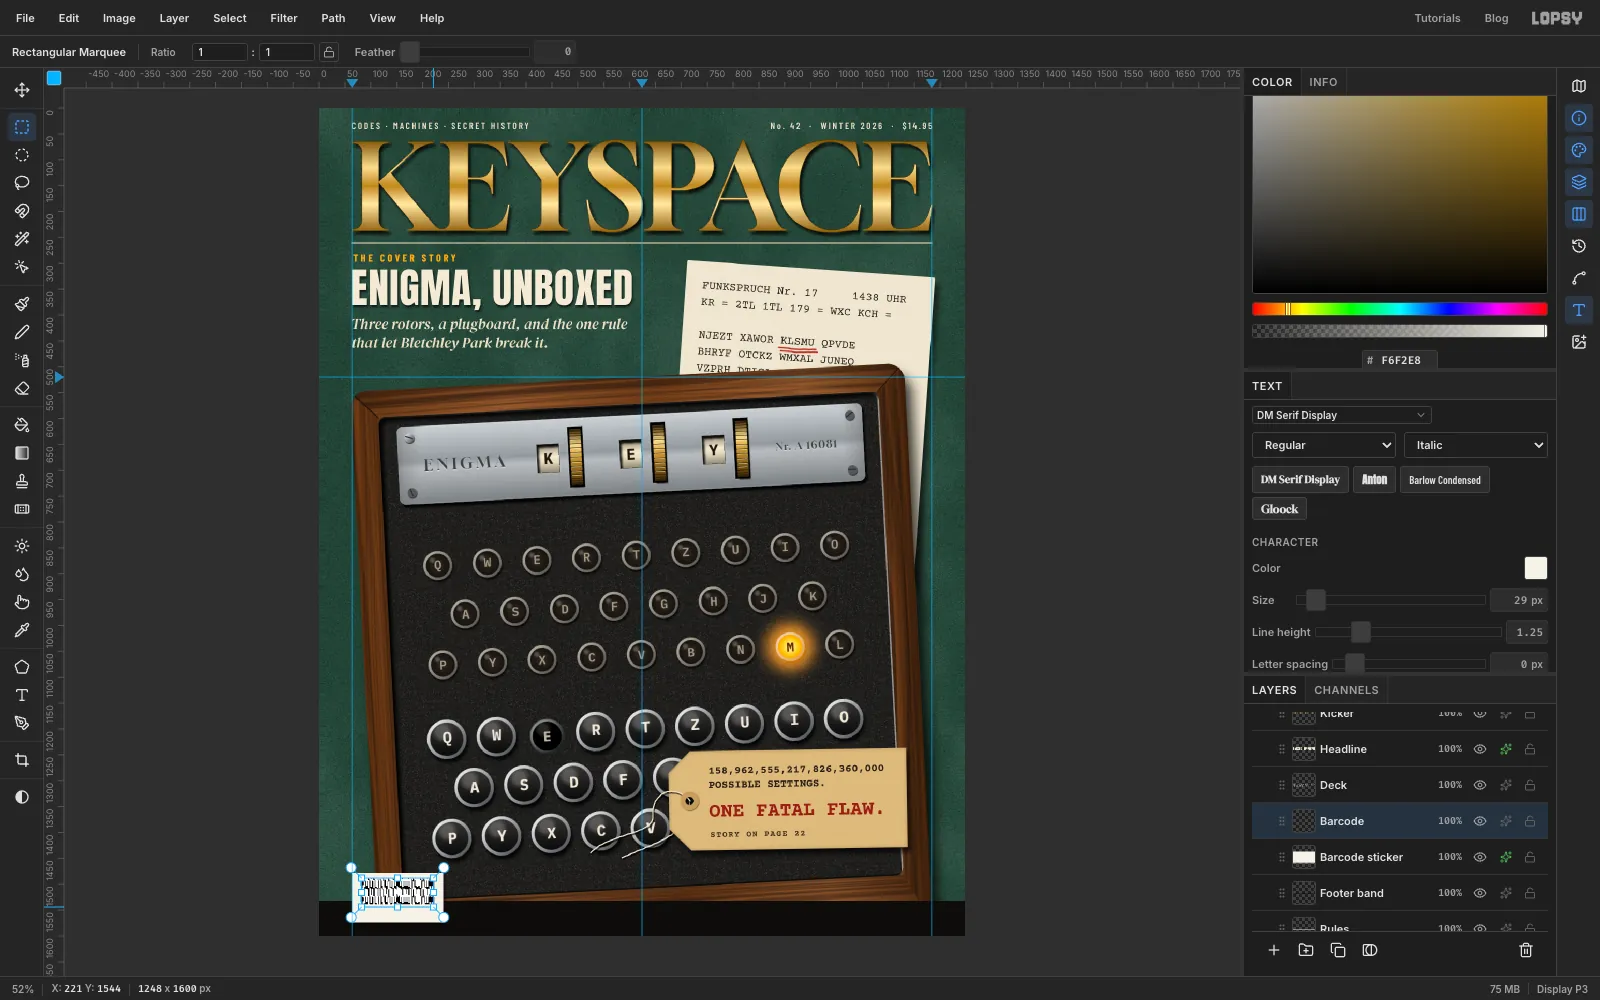
-
Finish with the footer line and a vignette
Select Barcode, then add the last cover line in Barlow Condensed SemiBold 19, , Letter spacing 2:
ALSO: THE WRENS OF HUT 11A · BUILD A PAPER ENIGMA · ROTOR WIRING, DECODED. Move it so it ends on the 1184 px guide and its baseline lines up with the bottom of the barcode sticker. Give it a small Drop Shadow (Offset X 1, Offset Y 2, Blur 3, Opacity 80).Last, darken the corners so the eye stays in the middle. Collapse Cover type, click the Project row at the top of the Layers panel and open its ✦ drawer. Click Add Adjustment, choose Vignette and set it to 35. Do this last, so you judge it on the finished cover.
Save with File → Save Project and export with File → Quick Export PNG.