Design a Skeuomorphic Hi-Fi Tuner Album Cover
Build a vintage radio-tuner album cover in Lopsy with walnut, brushed aluminium, a glowing quartz dial, a VU meter and engraved knobs.
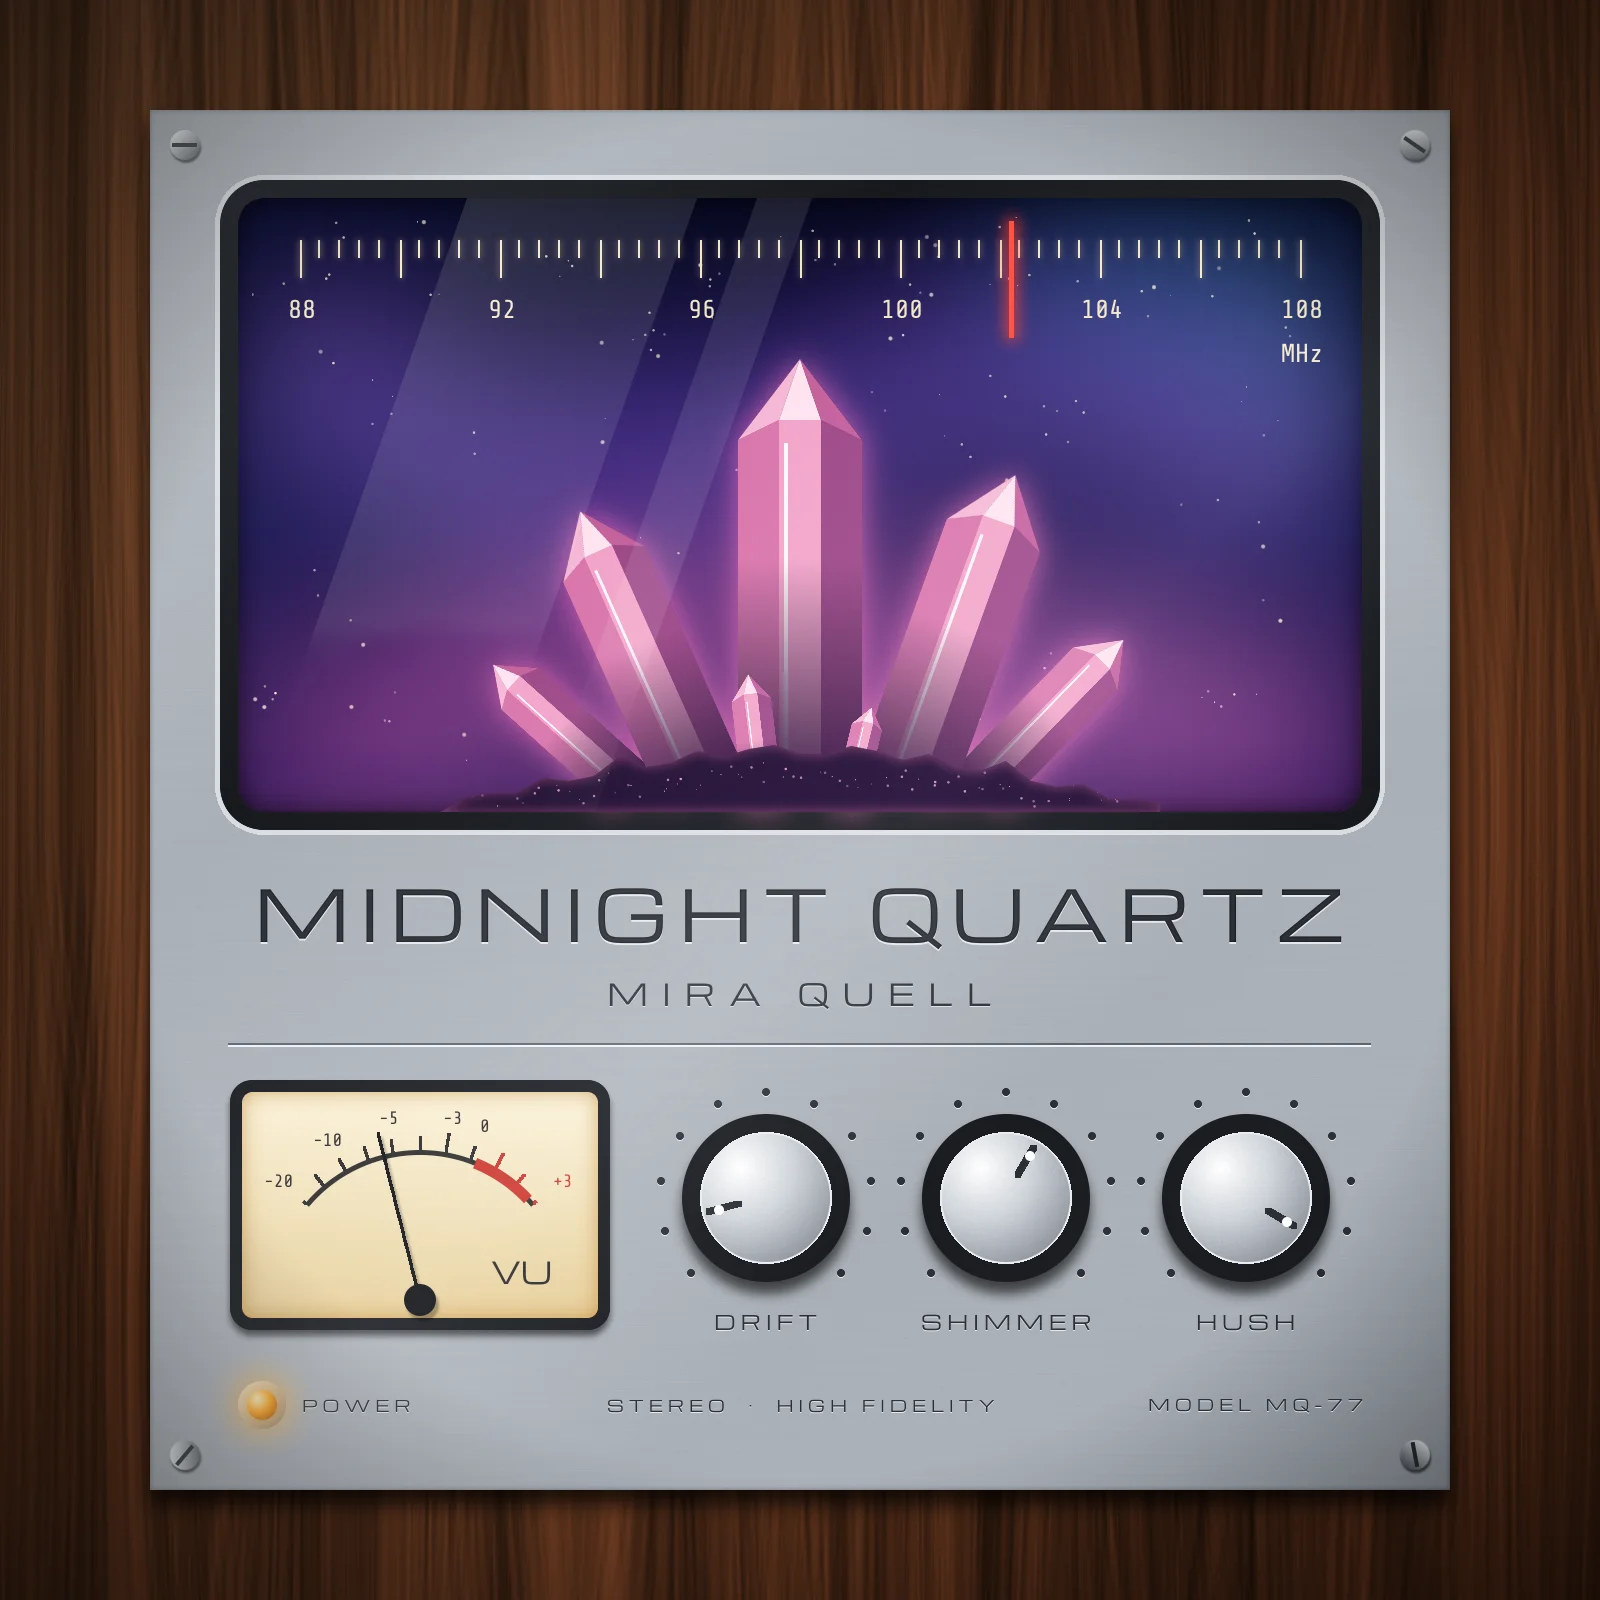
Skeuomorphic design makes a flat picture look like a real object, with real materials, real light and real wear. In this tutorial the album cover is the object. Midnight Quartz, a record by the imaginary artist Mira Quell, is dressed up as the front panel of a 1970s hi-fi tuner. The radio dial window doubles as the artwork: a cluster of rose-quartz crystals glowing in a night sky.
The canvas is 1600 × 1600 px. Nothing in it is painted freehand. The wood, the metal and the glass are filters and gradients. The crystals are flat polygons drawn with the Lasso, then copied, scaled and rotated. Everything else is simple shapes plus a few carefully chosen layer effects.
Along the way you'll use:
- ruler guides, the grid with Snap, and groups
- the Fibers, Add Noise, Motion Blur and Gaussian Blur filters
- Linear and Radial gradients with transparent stops
- the Shape tool, the Rectangular and Elliptical Marquee, the Lasso, and selections made from a layer's pixels with Cmd-click
- Select → Inverse and Shrink, plus adding, subtracting and intersecting selections
- Duplicate Layer, scaling and rotating with the transform handles, layer reordering and Merge Down
- Define Pattern and Fill with Pattern
- the Brush, Pencil, Spray and Eraser
- live text with letter spacing, in Michroma and Share Tech Mono
- Drop Shadow, Inner Glow, Outer Glow and Stroke, with the Overlay, Soft Light, Screen and Multiply blend modes
- Copy and Paste (which pastes in place)
The palette:
-
Walnut
-
Aluminium
-
highlight
-
engraving ink
-
Bezel
-
rim
-
Night sky
-
Nebula
-
Quartz
-
Quartz glow
-
rock
-
druzy sparkle
-
Dial cream
-
tuning red
-
VU face
-
VU red
-
Lamp
-
Set up the canvas and grow the walnut
Create a new document
1600×1600px with a white background. Click the top ruler at x150,800and1450, and the left ruler at y110and1490, to drop guides. The outer four mark the edges of the metal panel, and the one at 800 is the centre line.Double-click the
Backgroundrow and rename itWalnut, then fill it with .Rename
Layer 1toWood Grainand choose Filter → Fibers…. Set Variance to40and Strength to48, and apply. Fibers makes long vertical streaks, which is already close to wood. To smear them into a real grain, choose Filter → Motion Blur… with Angle90and Distance30.Open the layer's effects drawer, set the blend mode to Overlay, and lower the layer's opacity to
70%. The grey streaks now tint the brown underneath into light and dark grain.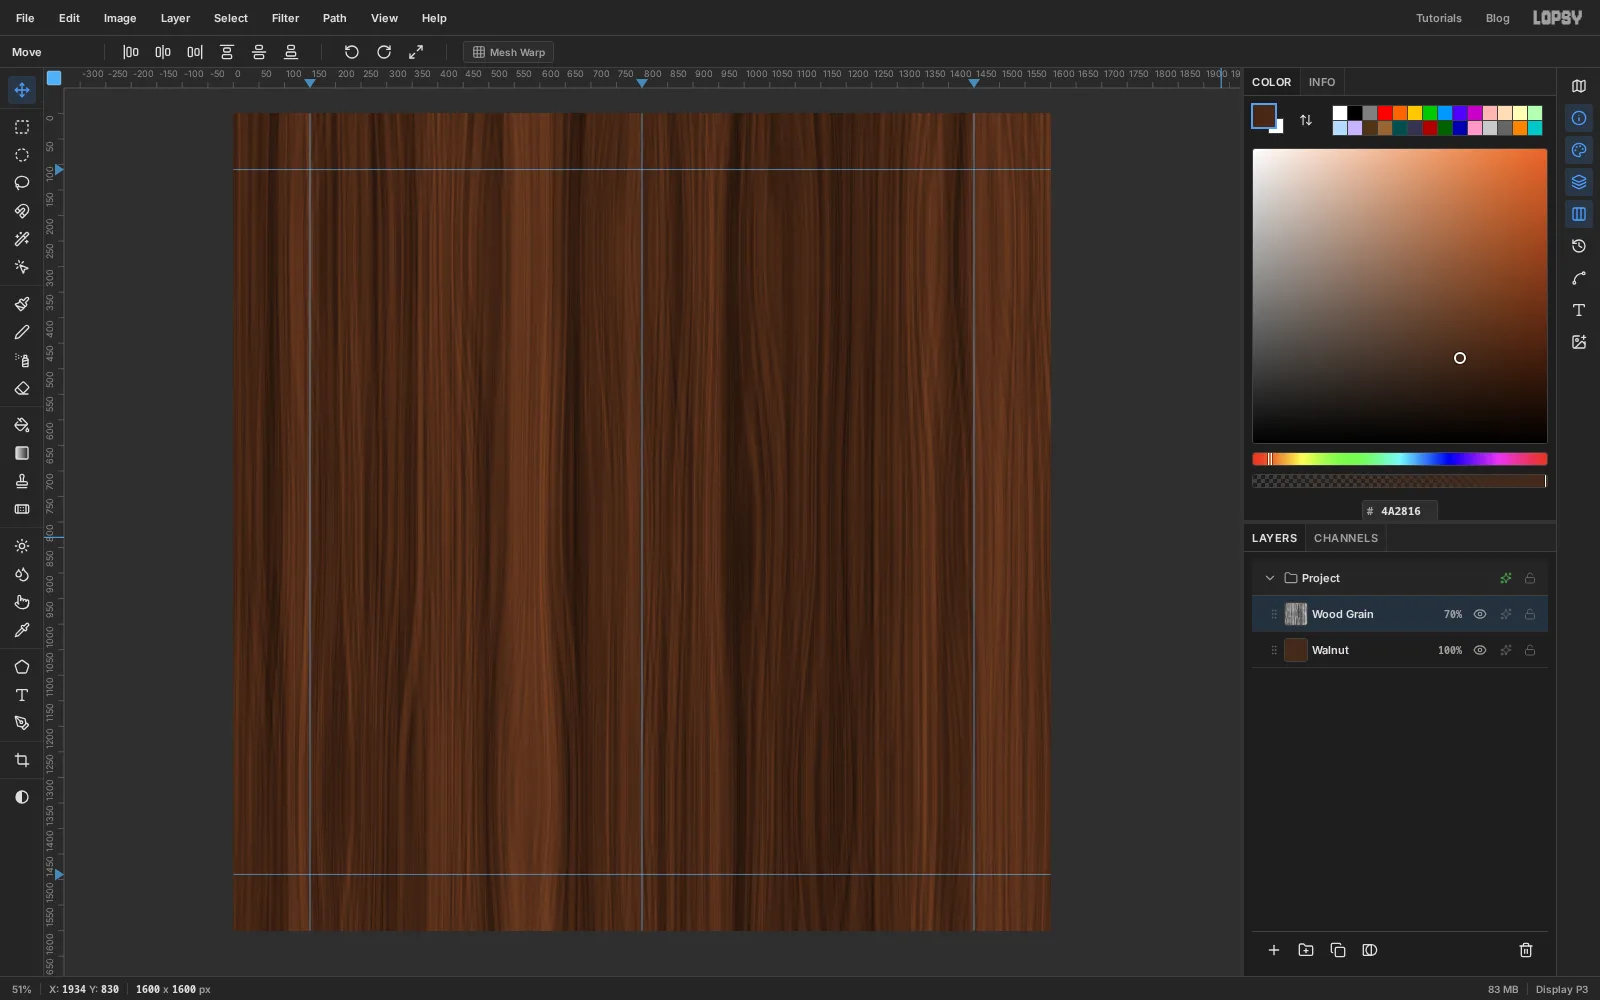
-
Brush the aluminium faceplate
Add a layer named
Faceplateand fill the whole layer with . Don't select the panel first. Motion Blur samples past the edge of a selection, which would leave dark smears down both sides.- Choose Filter → Add Noise…, set Amount to
40, click Mono and Gaussian, and apply. - Choose Filter → Motion Blur… with Angle
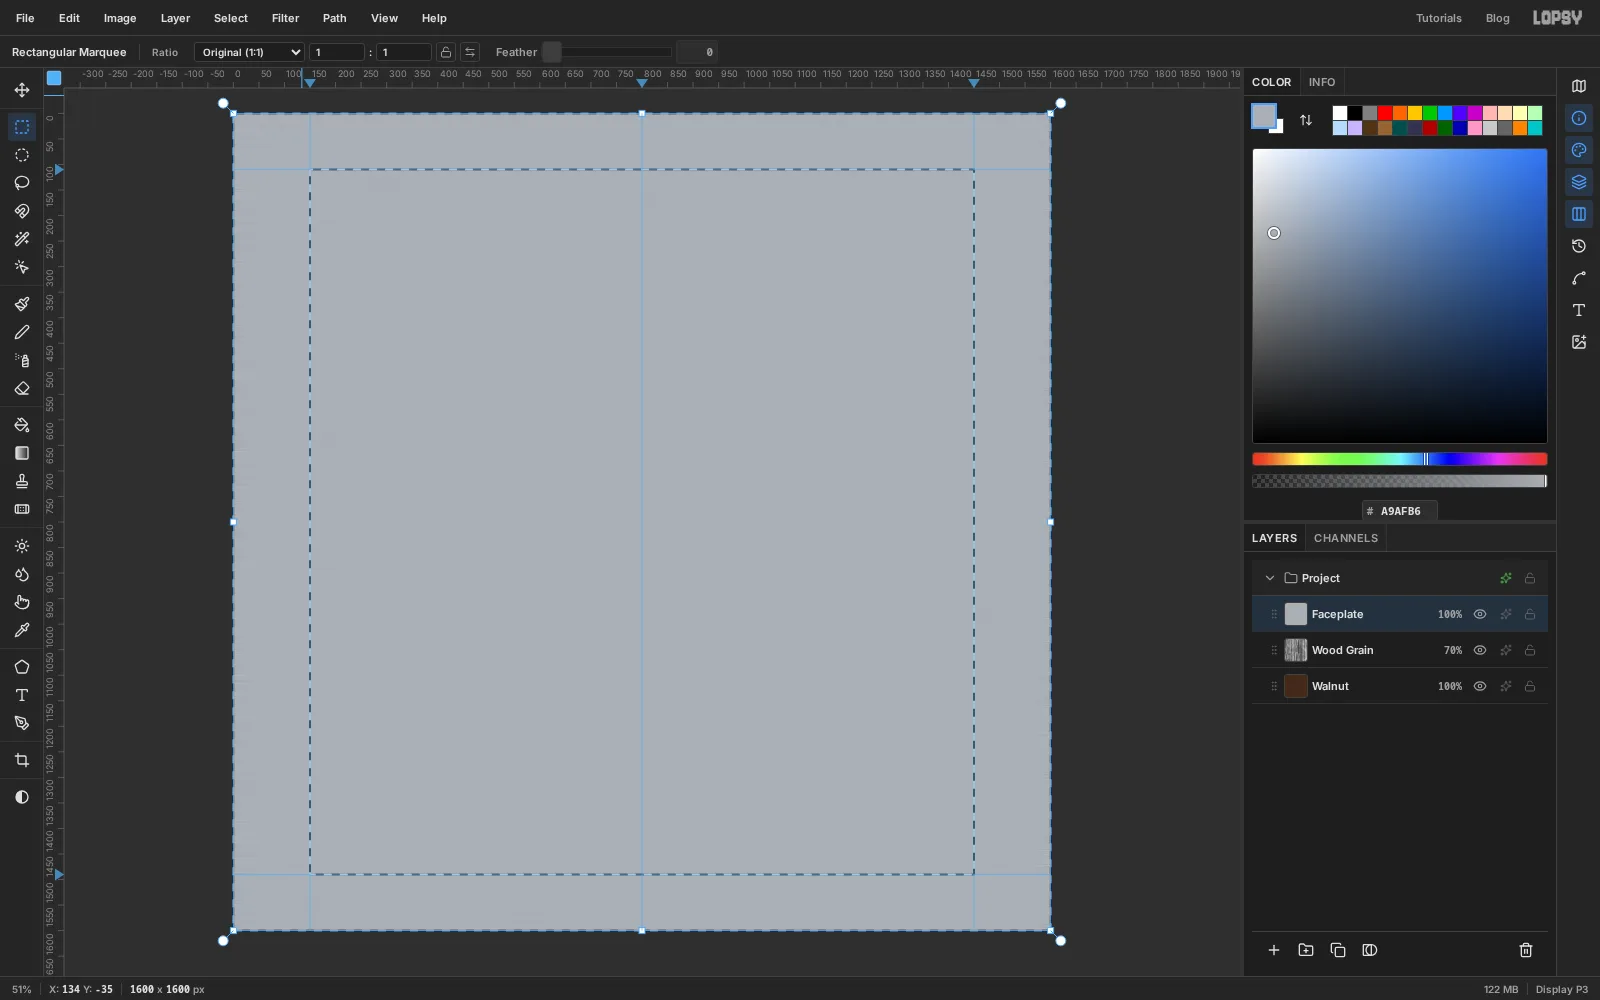
0and Distance90. The speckles stretch into fine horizontal brush marks. - With the Rectangular Marquee (M), drag from the top left guide crossing (
150, 110) to the bottom right one (1450, 1490). The marquee snaps to the guides. - Choose Select → Inverse and press Delete. Then press Cmd+D.
You're left with a clean brushed panel and walnut showing all around it.
- Choose Filter → Add Noise…, set Amount to
-
Add a sheen and lift the panel
Real brushed metal catches light in broad bands. Add a layer named
Sheenand Cmd-click theFaceplatethumbnail to select the panel.Pick the Gradient tool, set Type to Linear and open Advanced…. Build five stops:
- white, 55% opacity, at the left end
- white, 0% opacity, at the 30% mark
- white, 40% opacity, at the 55% mark
- white, 0% opacity, at the 70% mark
- black, 35% opacity, at the right end
Drag from the panel's top left corner to its bottom right corner, press Cmd+D, and set the layer's blend mode to Soft Light.
Select
Faceplateand give it a Drop Shadow: Offset X0, Offset Y14, Blur30, Opacity75. The shadow is subtle against the dark wood, but it stops the panel looking painted on.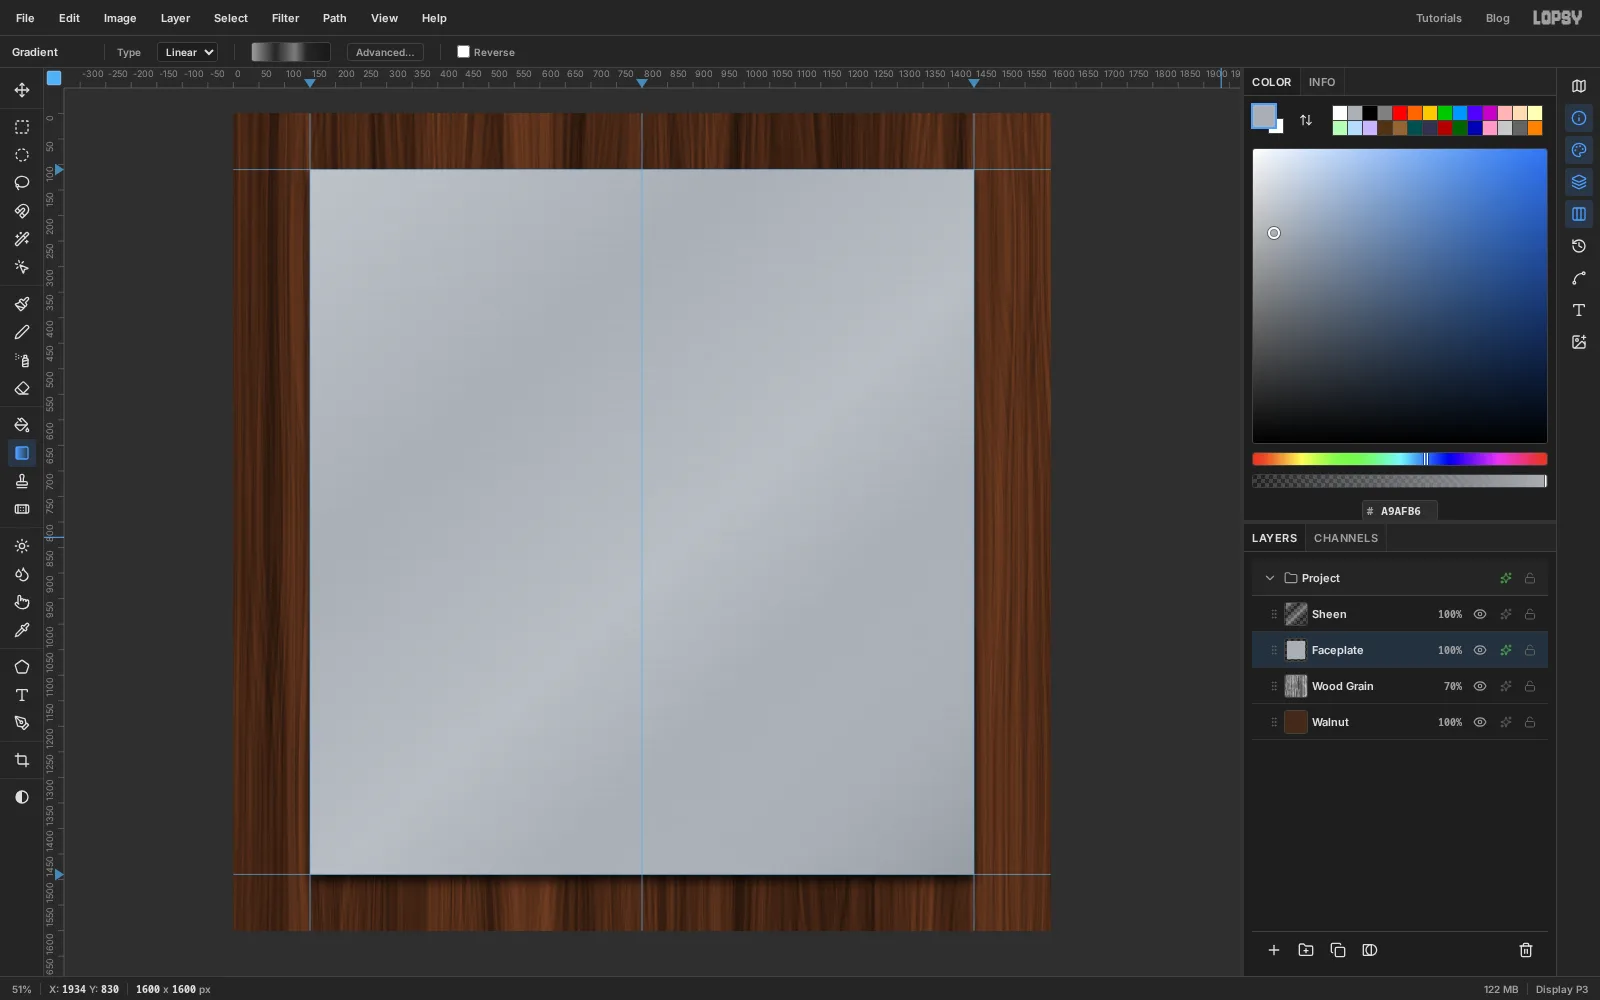
-
Cut the display window
Add a layer named
Display Bezel. Pick the Shape tool (U), set Shape to Rectangle and Corner Radius to44. Click the Fill swatch and set it to .The Shape tool draws from the centre outwards. Press at the centre of the window,
800, 505, and drag out to1380, 830. That makes a box from220, 180to1380, 830.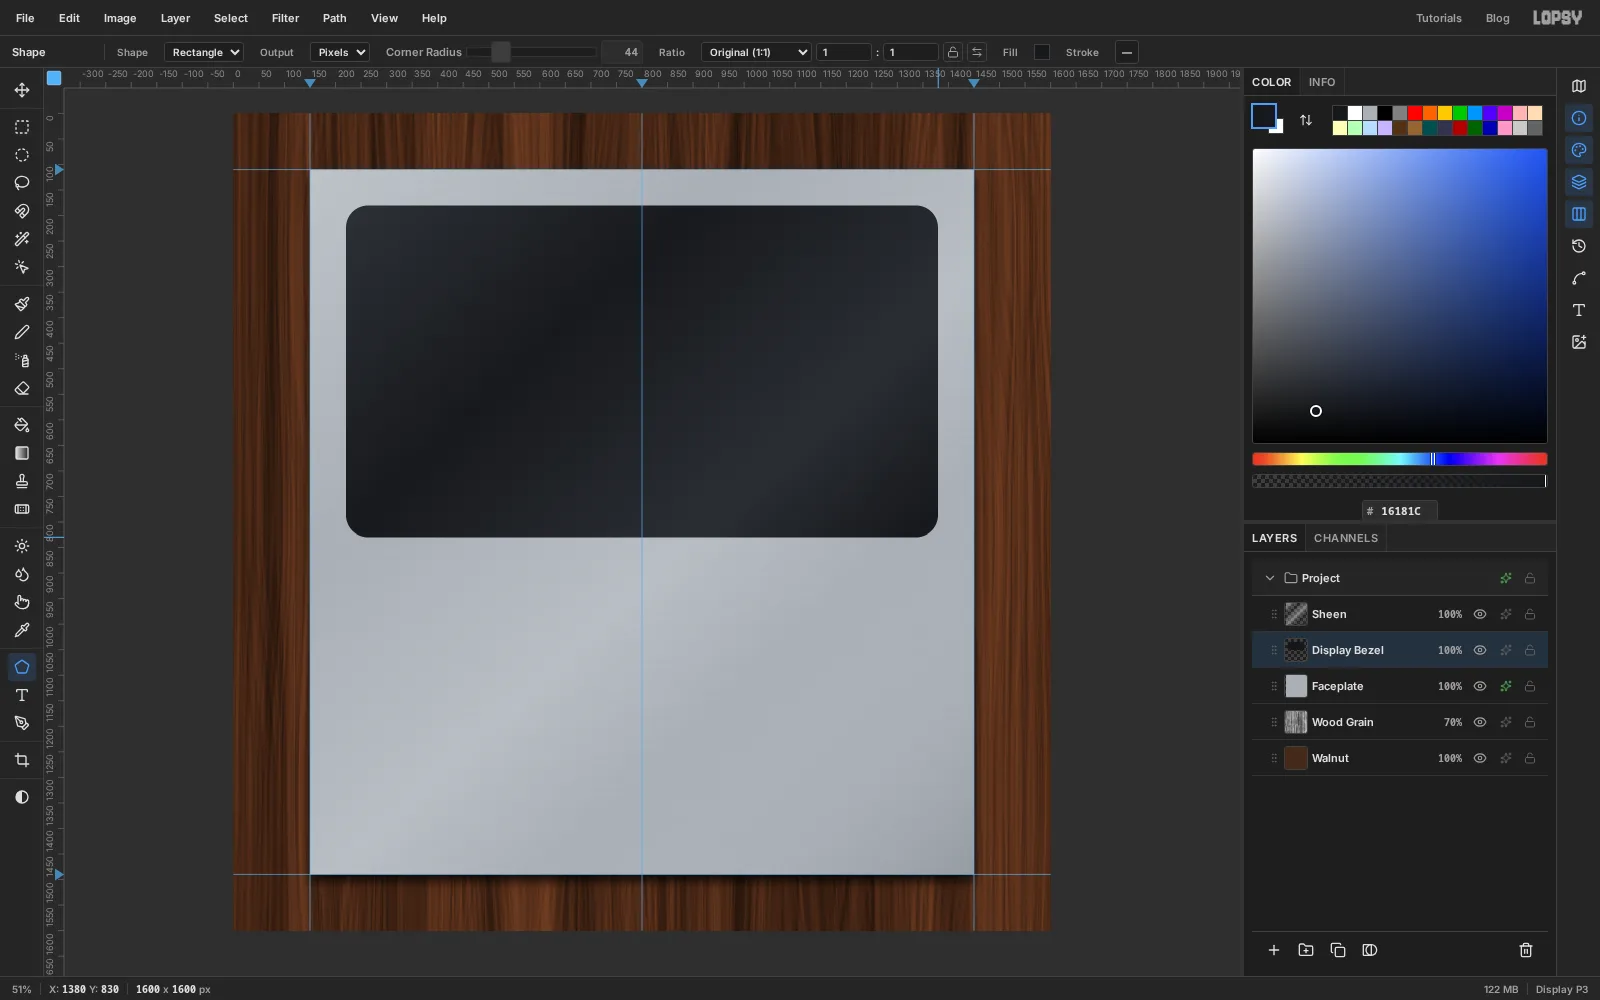
-
Fill the window with night sky glass
First give
Display Bezela Stroke: Width5, colour , position outside. That's the polished chrome rim around the window.Add a layer named
Display Glass. Cmd-click theDisplay Bezelthumbnail, then choose Select → Shrink… and shrink by18px. That leaves a black lip of bezel all the way round.With the Gradient tool, set three stops: , at about 55%, and . Drag from the top of the window straight down to the bottom, then press Cmd+D.
Add an Inner Glow in black, Size
40, Opacity85. Glass that is set back in a frame always looks darker at its edges.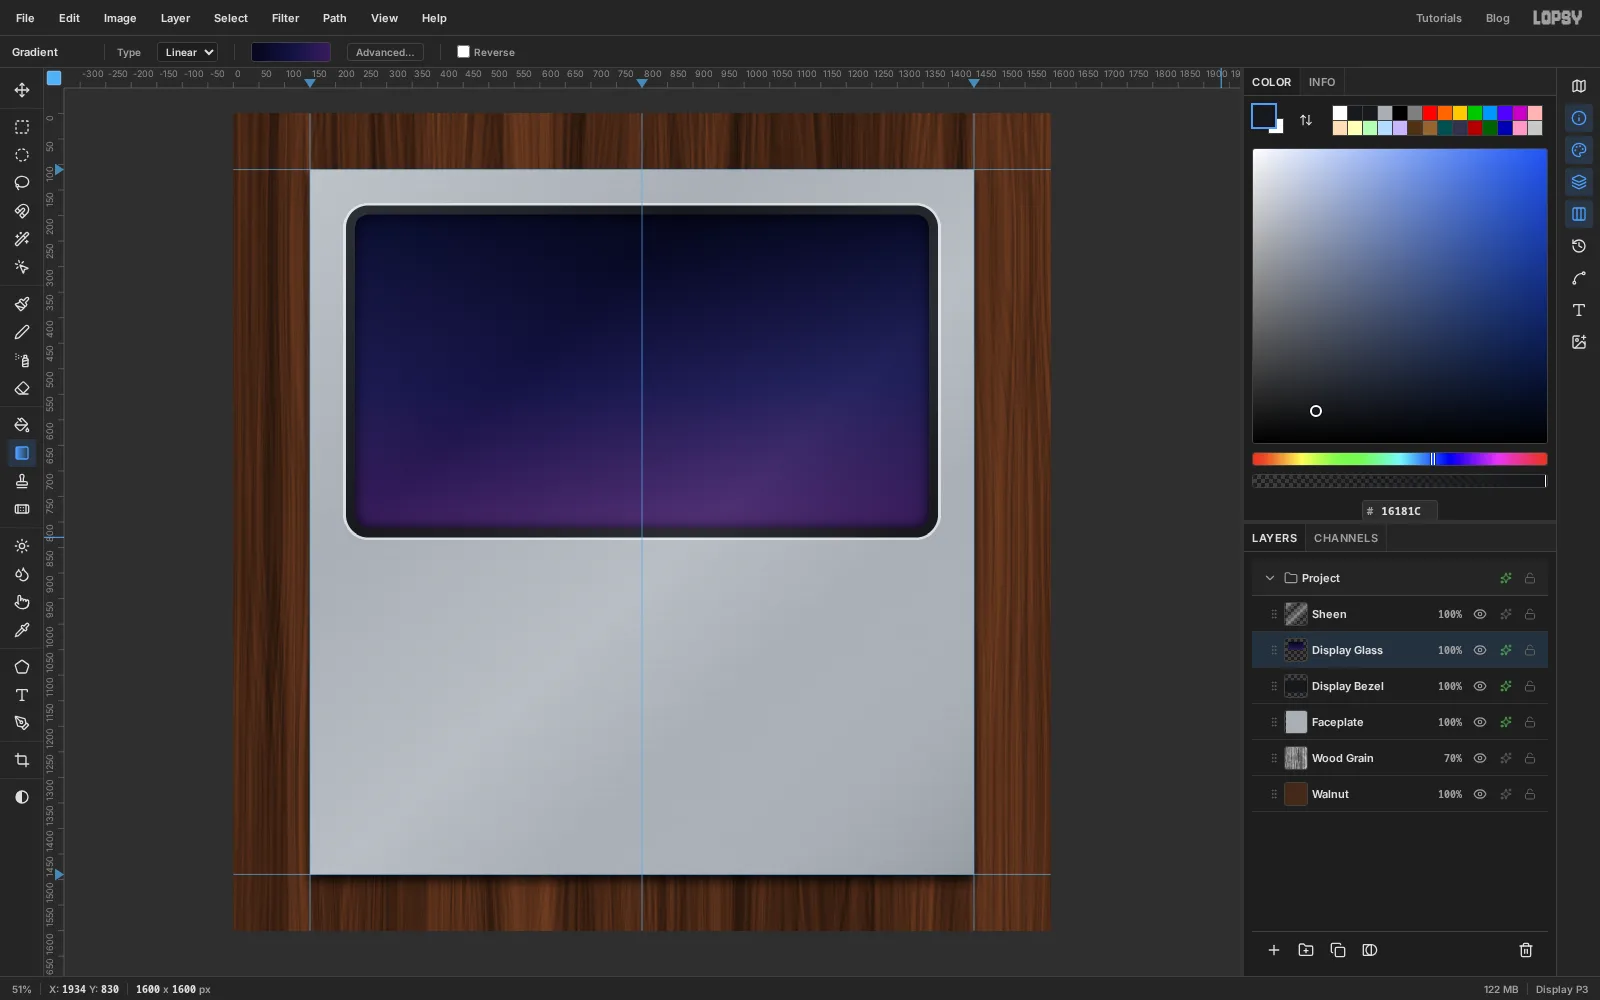
-
Paint a nebula
Add a layer named
Nebulaand Cmd-click theDisplay Glassthumbnail so you can't paint outside the window.Pick the Brush (B) with Size
260, Hardness0and Opacity70. Paint one long, gently curved stroke of across the lower third, and another of across the upper middle. Drop the size to180and add a short stroke of in the top right corner.Keep the selection, and choose Filter → Gaussian Blur… with Radius
70. Then press Cmd+D and set the layer's blend mode to Screen. The strokes melt into a soft aurora that lightens the sky without hiding it.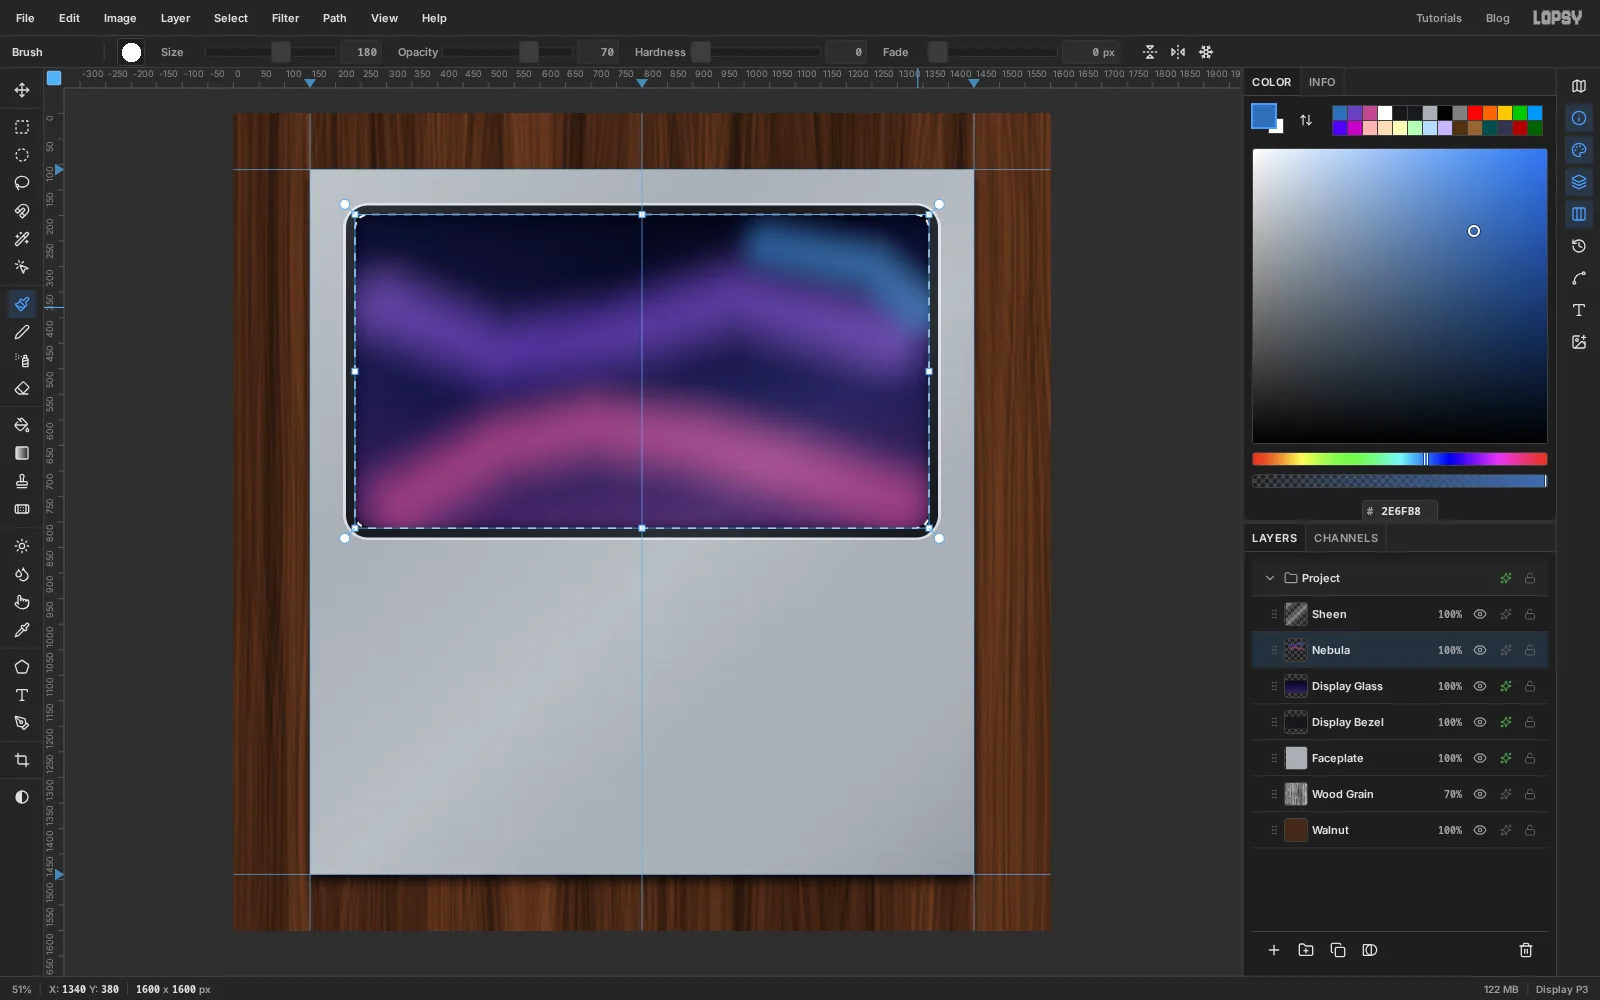
-
Scatter the stars
Add a layer named
Stars. Cmd-clickDisplay Glassagain and shrink the selection by14px, so no stars sit right against the frame.Pick the Spray tool (J) with Size
46, Density2and Opacity100, and set the colour to . Click, don't drag, about seventy times around the window. Click more often near the top and only now and then near the bottom, where the nebula is brightest. Press Cmd+D when you're done.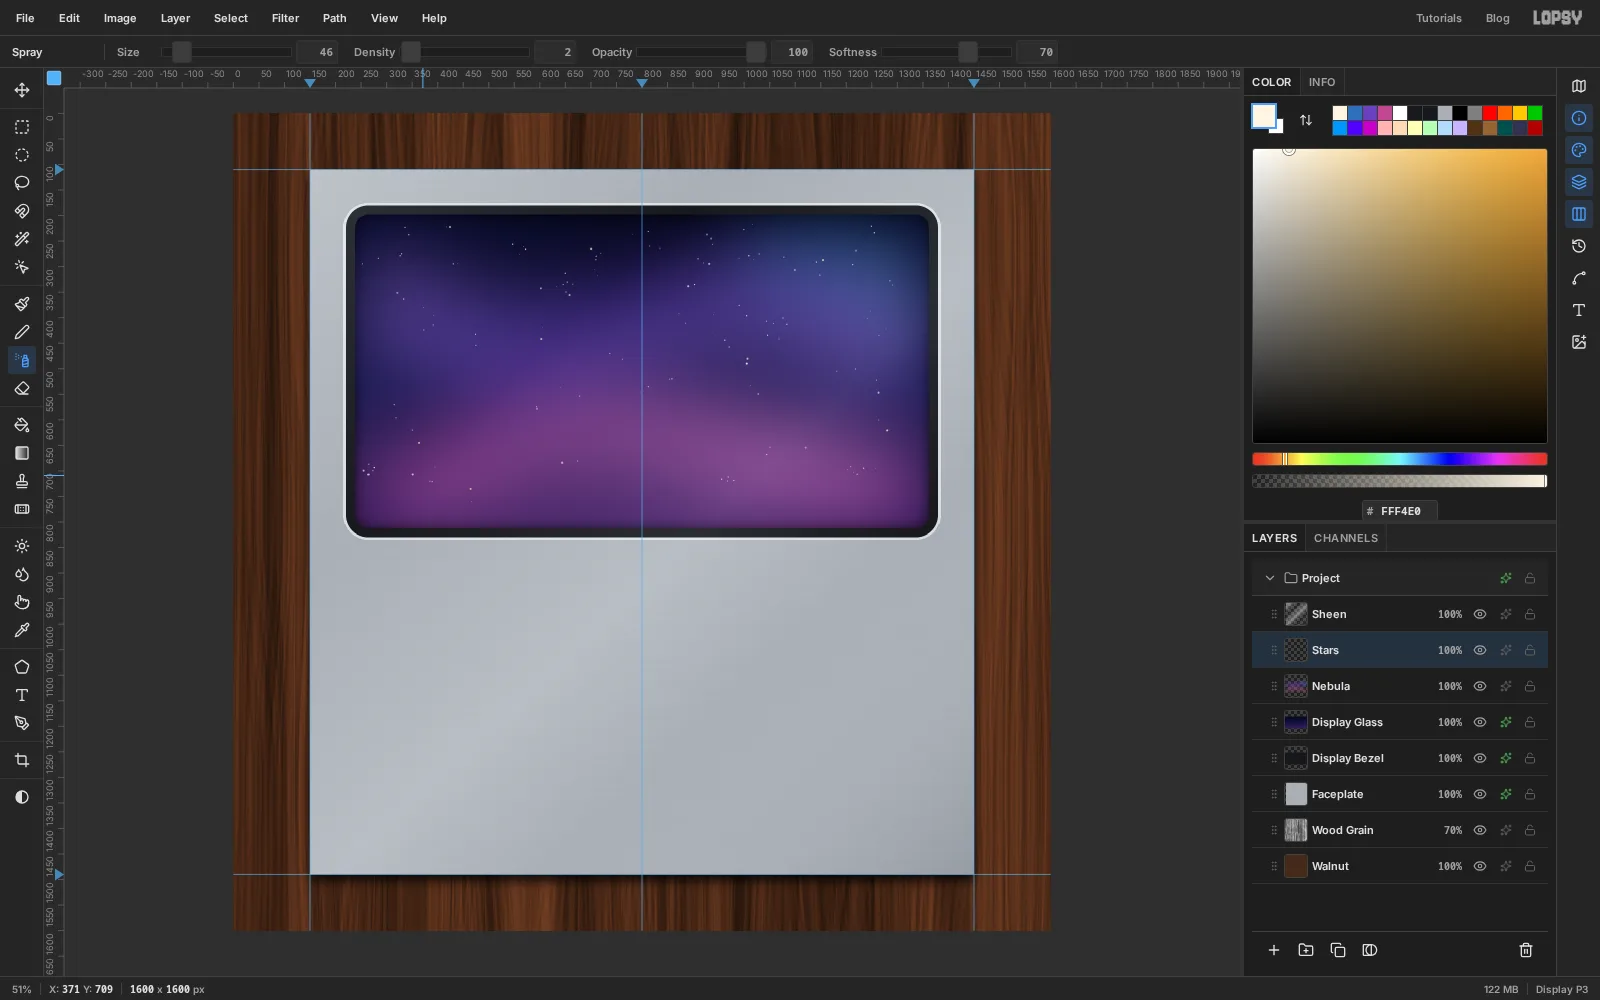
-
Draw one quartz crystal, facet by facet
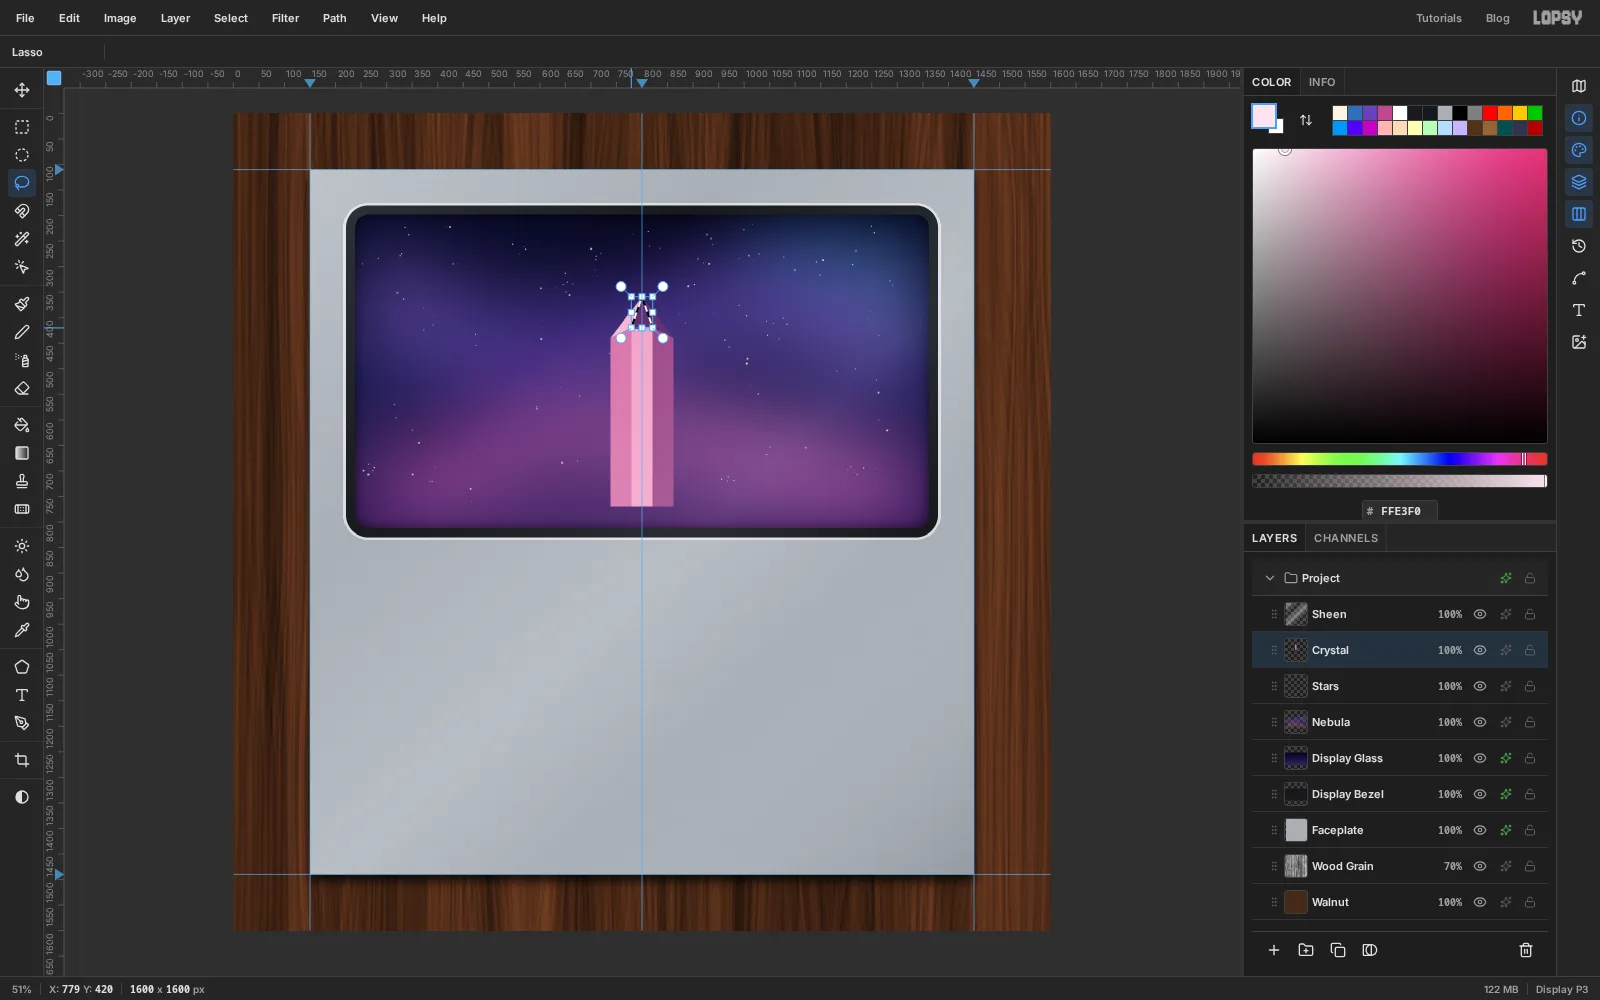
A quartz crystal is a six-sided prism with a pointed tip. From the front you see three long faces and three triangular facets at the top. Lit from the top left, each one is a different shade of pink.
Add a layer named
Crystal. The crystal stands on800, 770, is 124 px wide and reaches up to800, 359.- With the Lasso (L), draw the whole outline: a rectangle from
738, 770up to y440, topped by a point at800, 359. Drag in straight runs from corner to corner. Fill it with and press Cmd+D. - Split the body into three strips, each about 41 px wide: the left face from x
738to779, the middle from779to821, the right from821to862. Lasso each one and fill it: left , middle , right . Let the middle strip run 20 px higher than the outer two, so its top edge meets the point. - Lasso the three triangles at the tip, all meeting at the point
800, 359. The left one runs from738, 440to779, 420; fill it . The middle one sits on top of the middle strip, from779, 420to821, 420; fill it . The right one runs from821, 420to862, 440; fill it .
The dark first fill sits under every facet, so there are no gaps between the shapes.
- With the Lasso (L), draw the whole outline: a rectangle from
-
Add a glint and shade the base
Pick the Pencil (N) at Size
4with . Click near the bottom of the middle face, just inside its left edge, then Shift-click near its top. That draws a straight glint, the kind of line you'd see where light runs along a crystal's edge.Cmd-click the
Crystalthumbnail. With the Gradient tool, set two stops, both : 90% opacity at the left and 0% at the right. Drag from the crystal's base up to about y560, then press Cmd+D. The bottom of the crystal now sinks into shadow, ready to be buried in rock.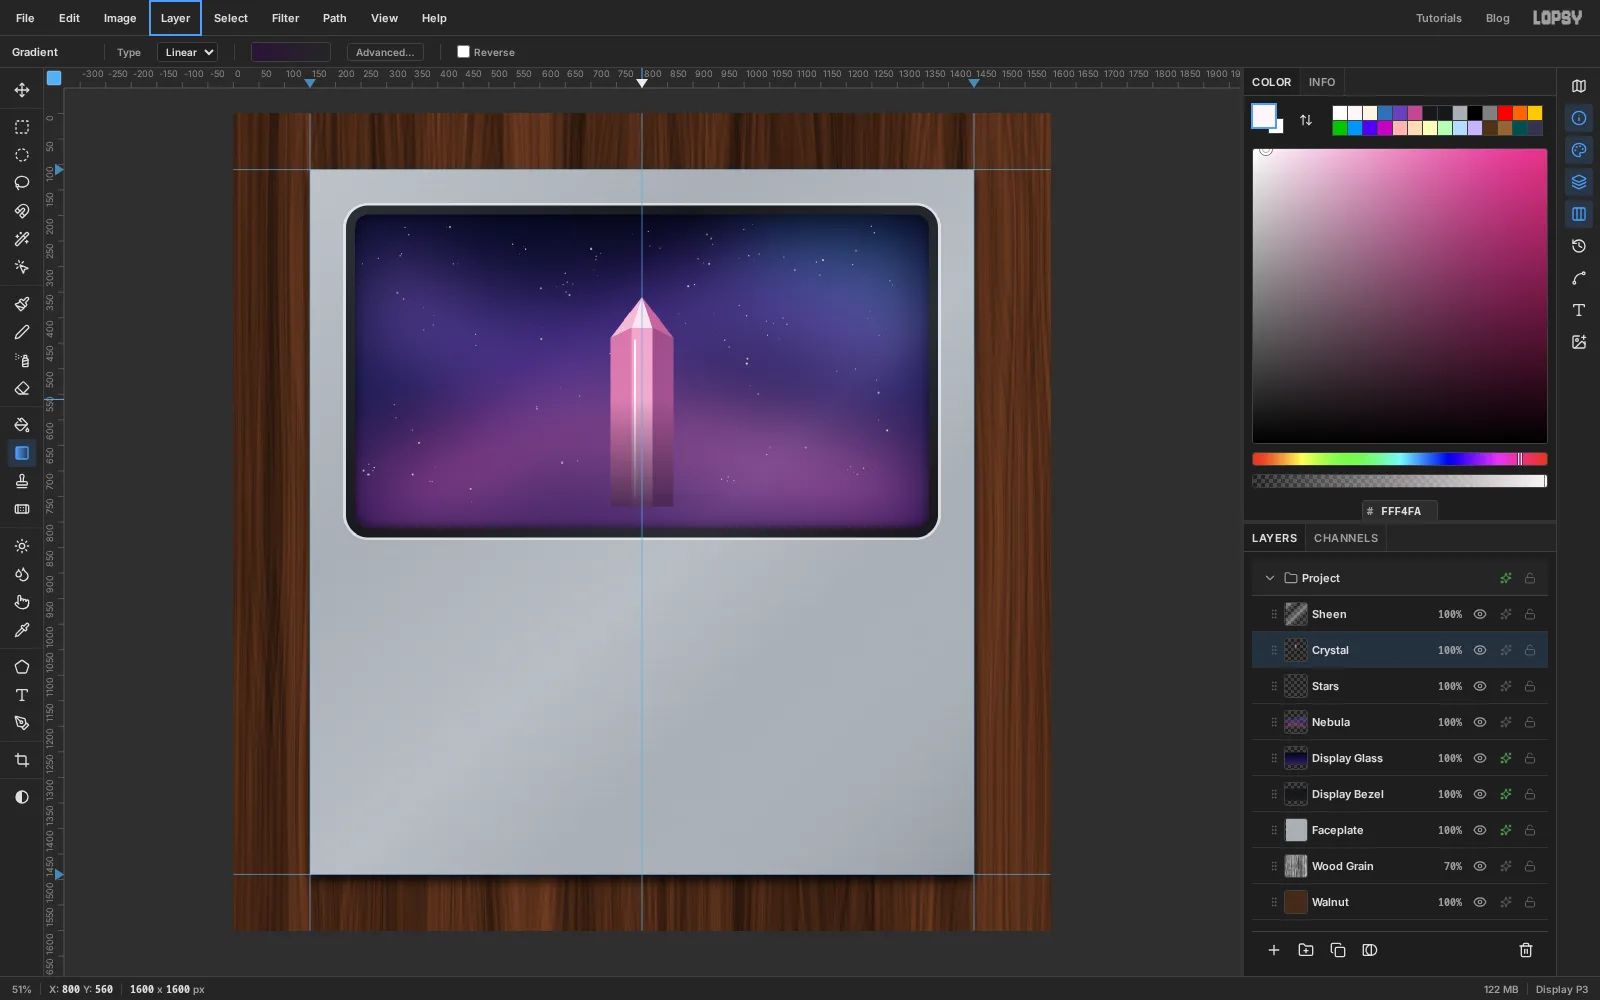
-
Copy, scale and rotate the crystal
The rest of the cluster is copies of this crystal.
- With
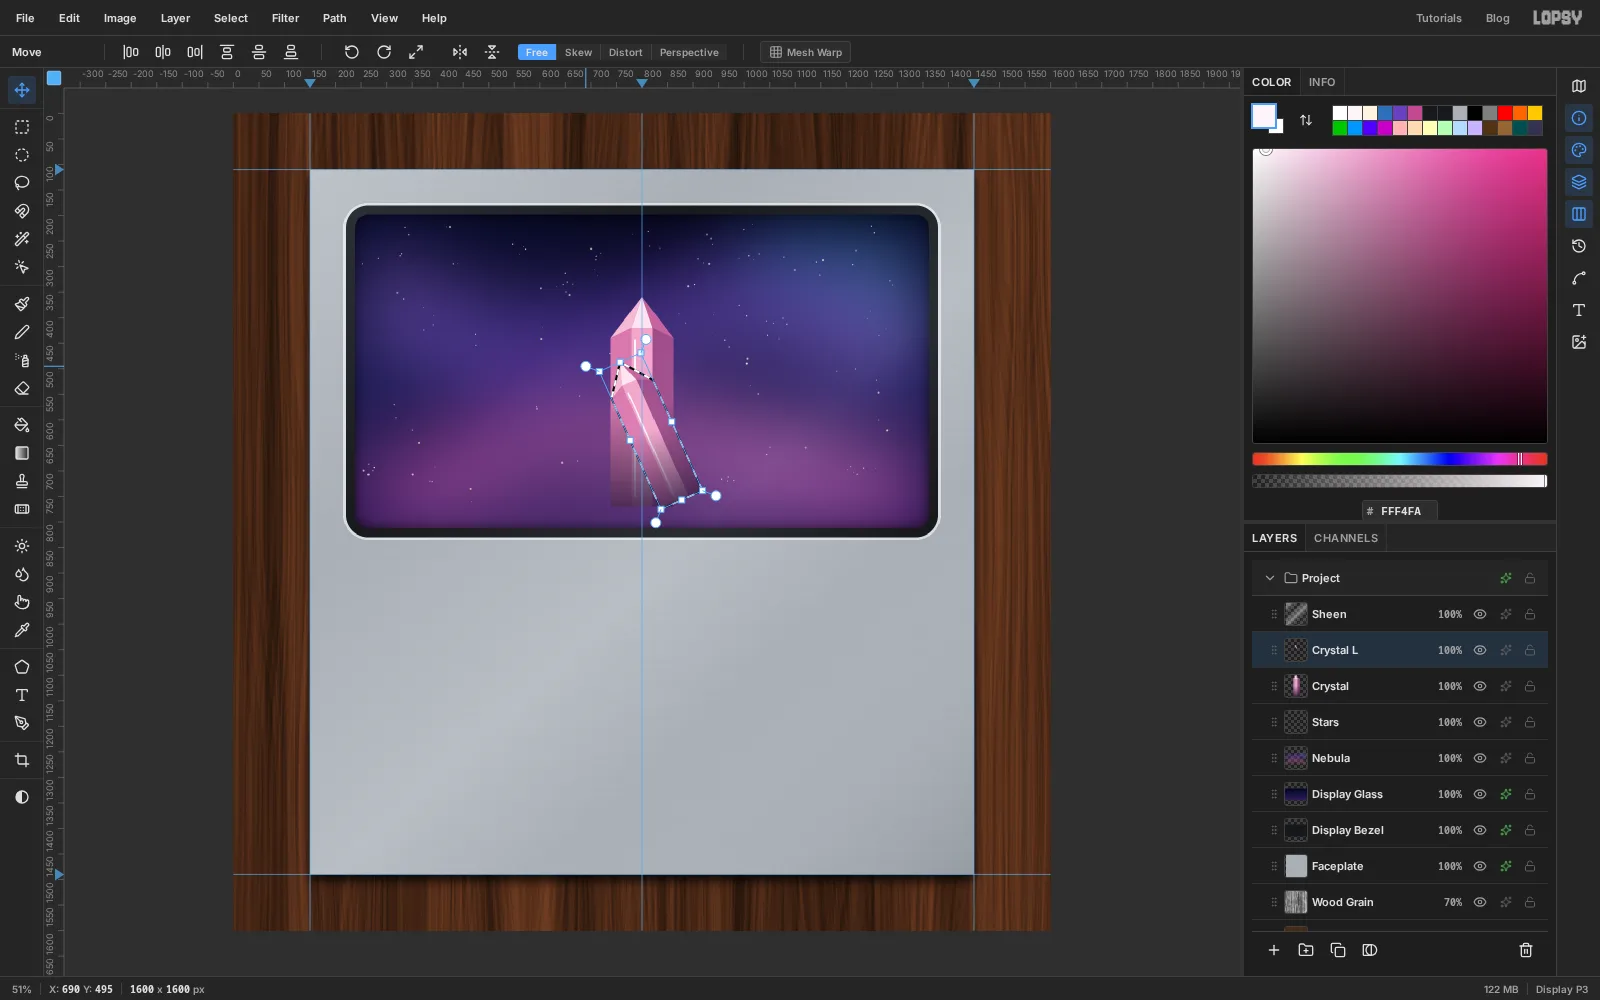
Crystalselected, click Duplicate Layer at the bottom of the Layers panel and rename the copyCrystal L. - Cmd-click its thumbnail to select its pixels and switch to the Move tool (V).
- Hold Cmd and drag the top left corner handle down and to the right until the selection is about 72% as tall. Cmd keeps the proportions.
- Drag the round rotation handle just outside a corner to tilt the crystal about 24° to the left. Press Enter to commit, then Cmd+D.
- Drag it with the Move tool until its base sits at about
712, 790, beside the original.
- With
-
Grow the cluster
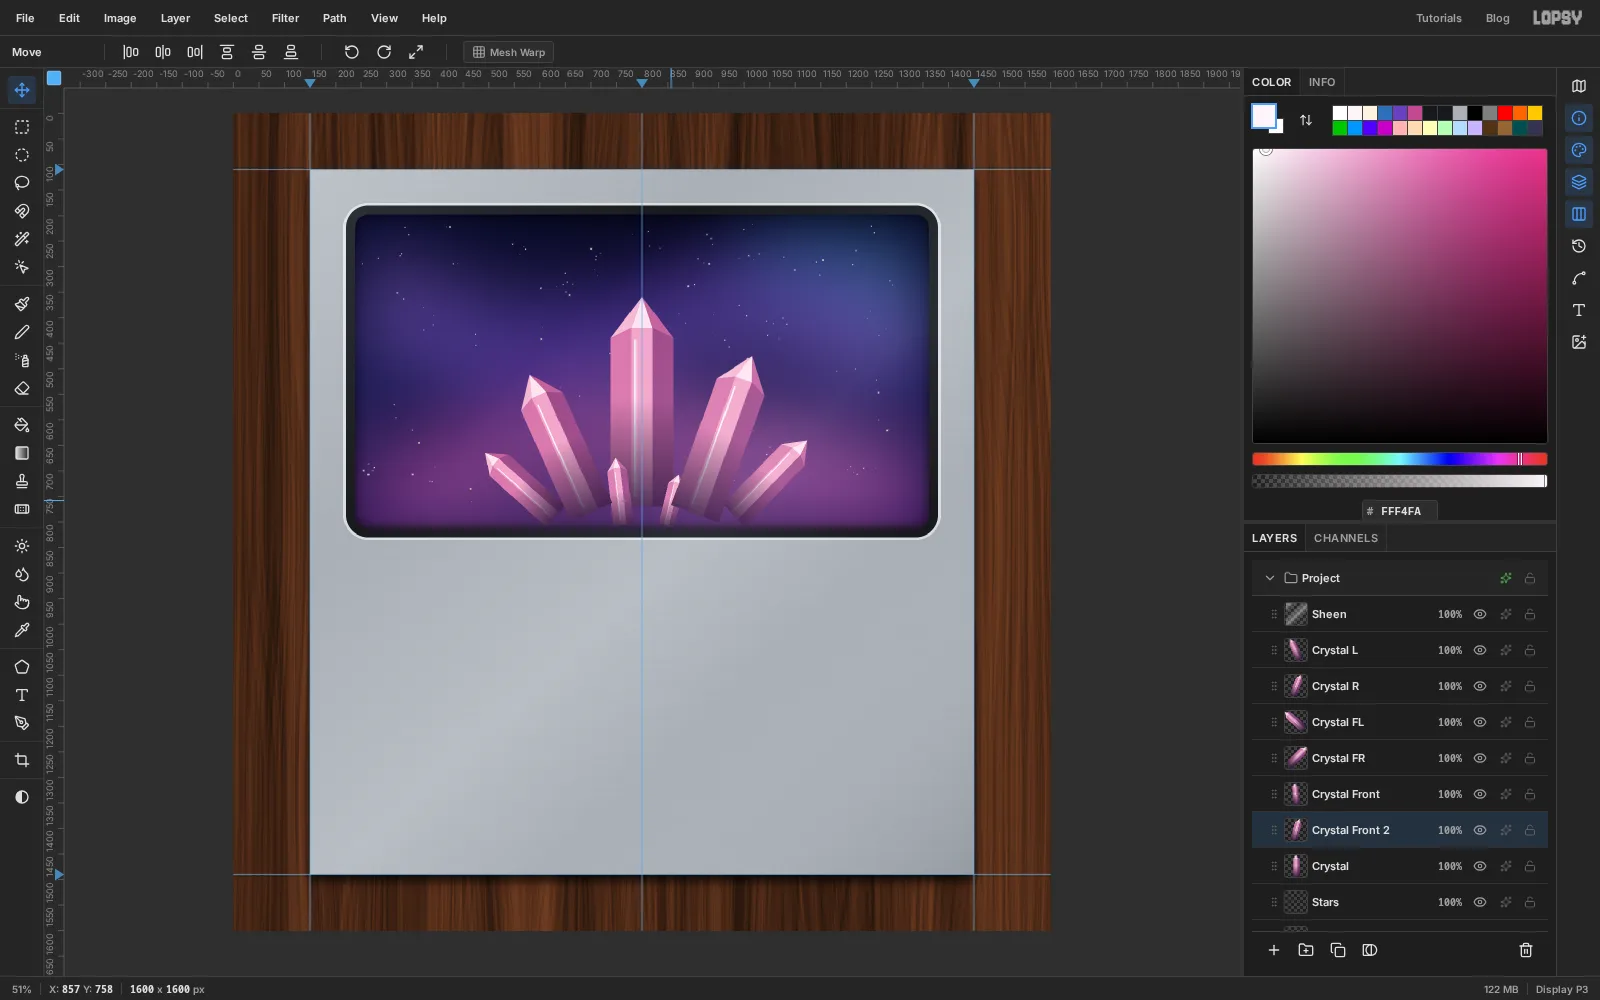
Repeat the last step for five more copies, always duplicating the original
Crystal:Crystal R: 80% of the height, tilted 20° right, base at about892, 792Crystal FL: 45%, tilted 48° left, base at about640, 798Crystal FR: 50%, tilted 44° right, base at about968, 798Crystal Front: 32%, tilted 7° left, base at about765, 806Crystal Front 2: 25%, tilted 14° right, base at about845, 808
The two big ones lean in towards the middle, the two small ones splay out low, and the two tiny ones stand in front of the main crystal's base. Varying the size and the angle is what makes the copies read as a natural cluster.
-
Stack, merge and light the cluster
The order of the layers decides which crystal is in front. Drag rows by their grip on the left of the Layers panel:
- Drag
CrystalaboveCrystal L, so the main crystal sits in front of the four leaning ones. - Drag
Crystal Frontand thenCrystal Front 2aboveCrystal.
When the order looks right, select the top crystal layer and choose Layer → Merge Down six times, until they're all one layer. Rename it
Quartz.Give
Quartzan Outer Glow in , Size45, Opacity70. Now the cluster looks lit from inside.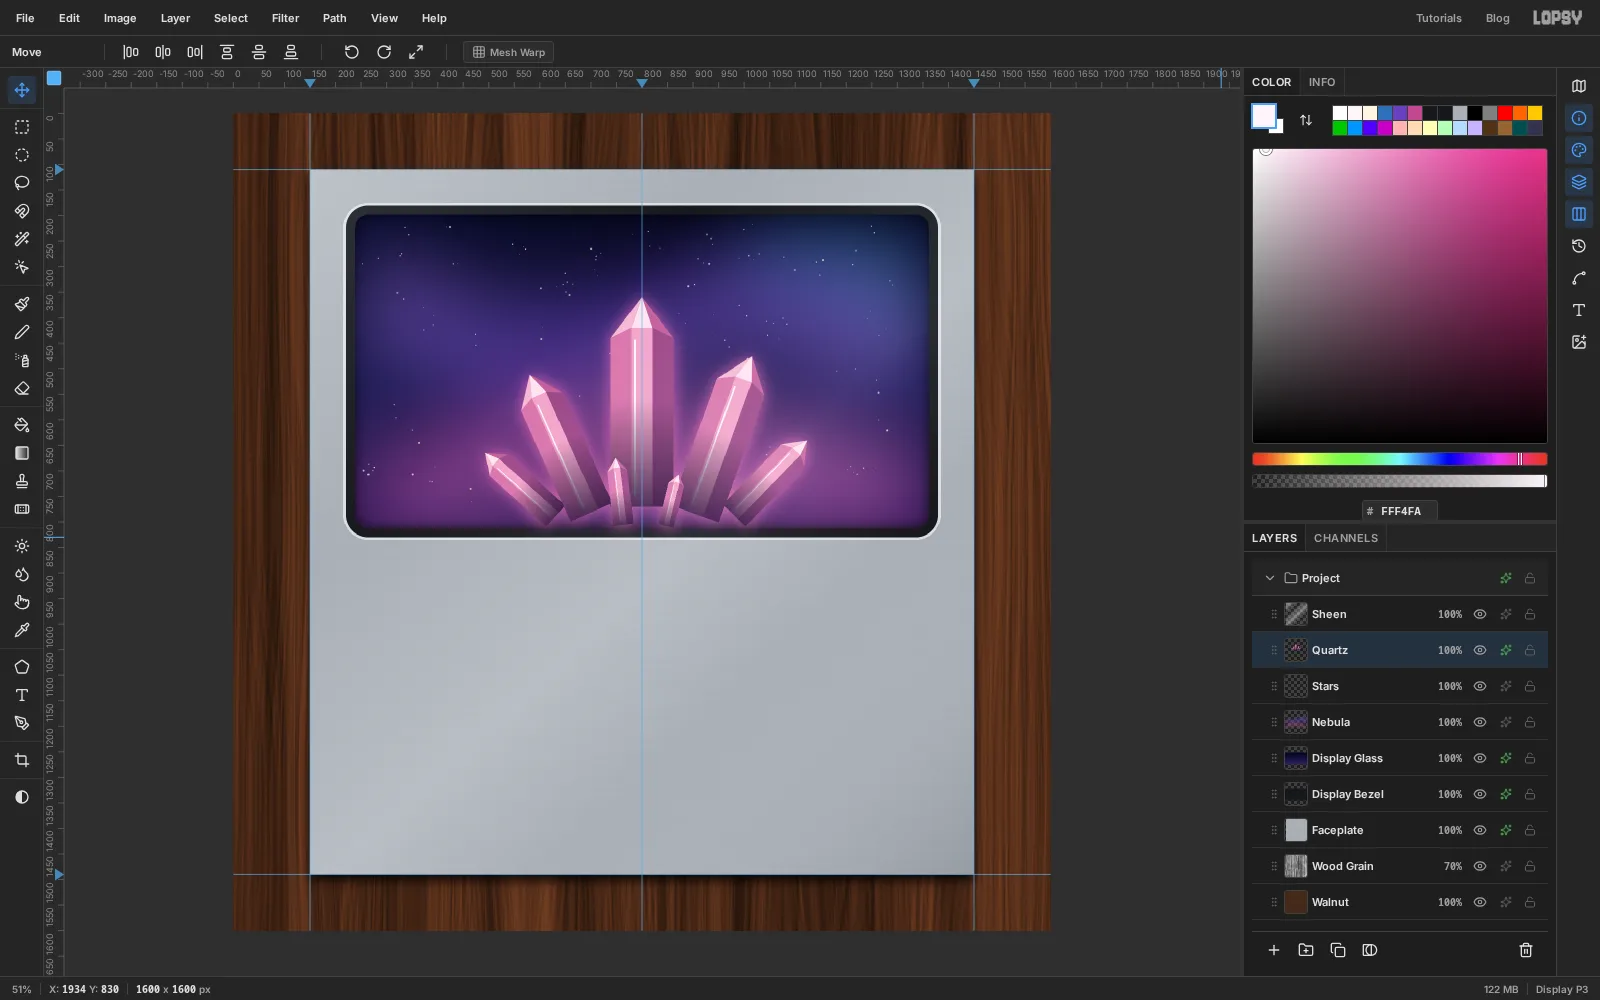
- Drag
-
Bury the bases in rock
A druse is the glittering crust of little crystals that big ones grow out of. Add a layer named
Druse. With the Lasso, draw a low, lumpy mound from about440, 812to1160, 812, rising to about y750in the middle. Make the top edge bumpy rather than smooth, and finish the shape below the window.To trim it to the glass, hold Cmd+Shift+Alt and click the
Display Glassthumbnail. That intersects your selection with the window.Fill with . Then pick the Spray tool at Size
30, Density3, with , and click along the top of the mound to scatter tiny sparkles. Press Cmd+D and add an Inner Glow in , Size18, Opacity60.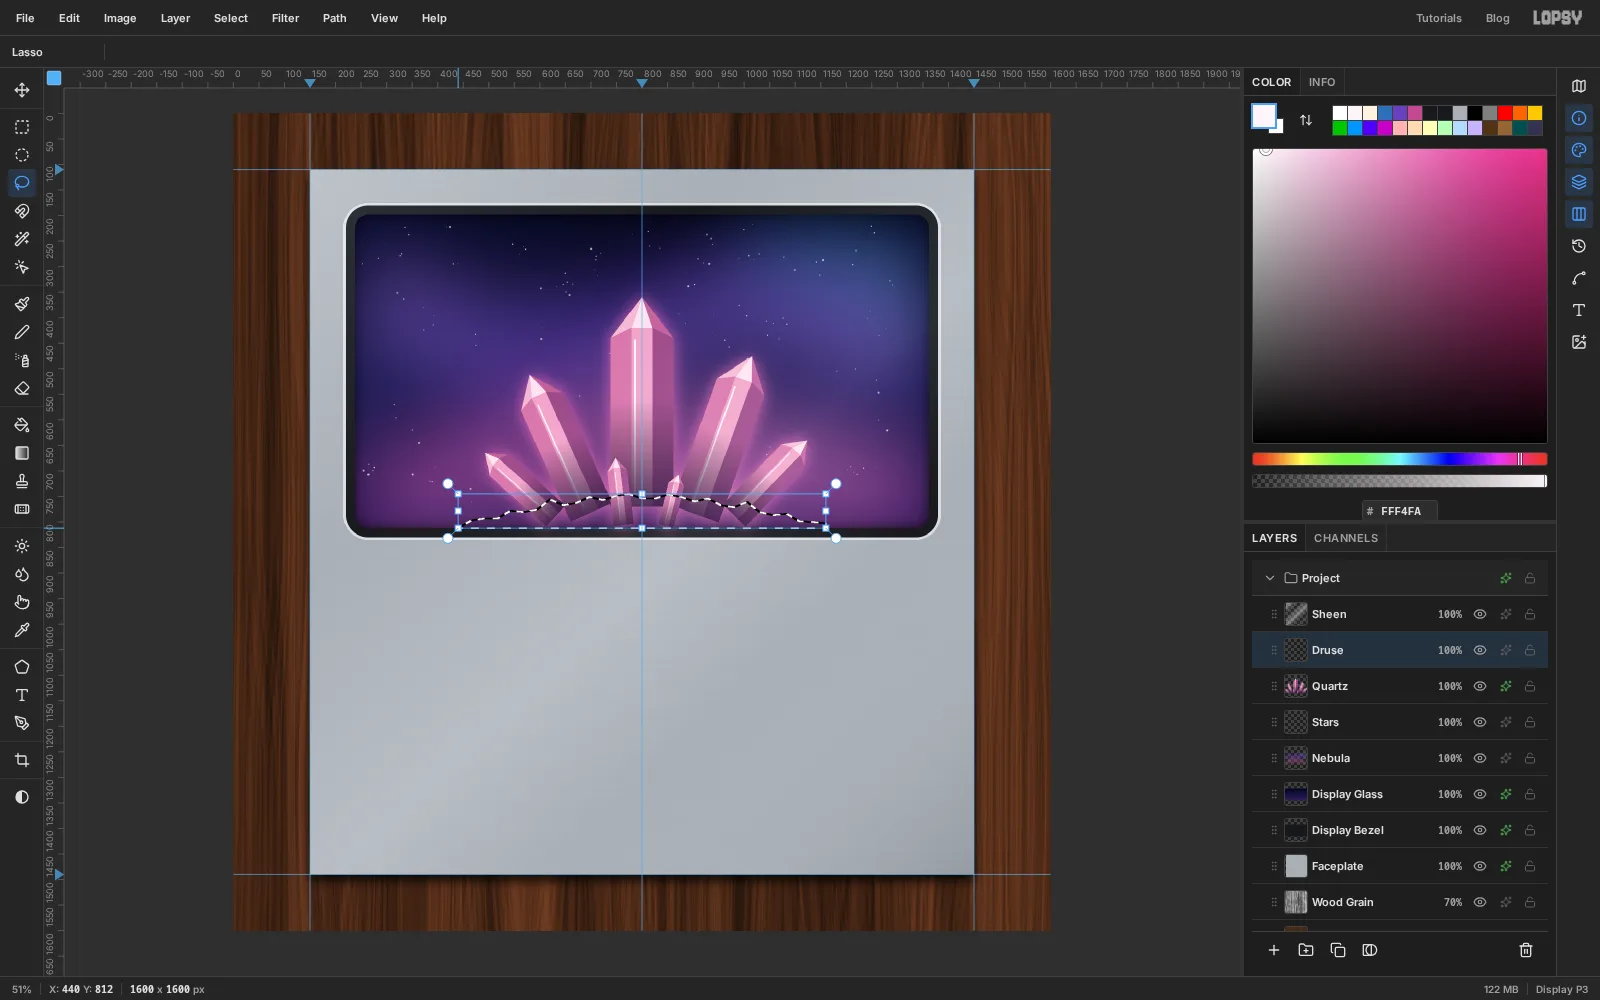
-
Make a dial tick pattern
A radio dial has hundreds of evenly spaced ticks. Draw one repeat and let a pattern do the rest.
- Add a layer named
Tick Tile. Pick the Pencil at Size3in . Click at301, 241and Shift-click at301, 276for a long tick. - Set Size to
2and draw four short ticks from y241to258, at x320,340,360and380. - With the Rectangular Marquee, select exactly
300, 240to400, 280. Choose Edit → Define Pattern, press Cmd+D, and delete theTick Tilelayer. - Add a layer named
Dial Scaleand select300, 240to1304, 280. Choose Edit → Fill with Pattern… and apply it at 100%.
The pattern tiles from the canvas's top left corner, so the 100 × 40 tile lines up exactly with x
300and y240. Every hundred pixels you get a long tick, with four short ones between. Press Cmd+D and add an Outer Glow in , Size10, Opacity55, so the scale looks backlit.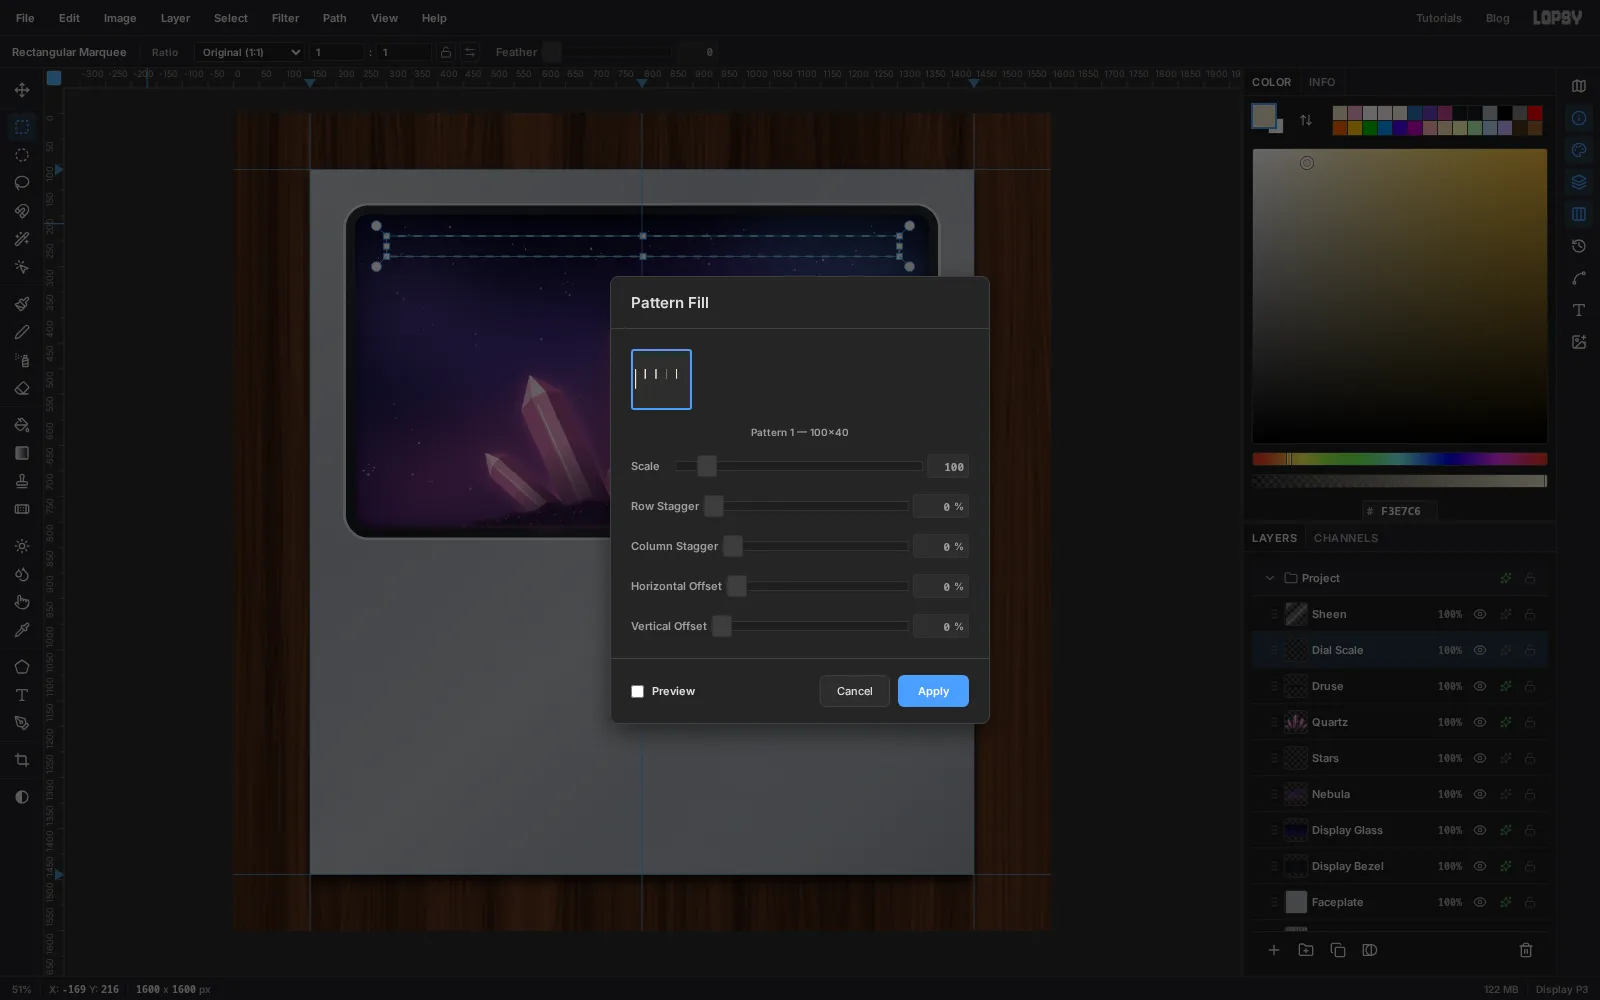
- Add a layer named
-
Number the dial and set the needle
Pick the Text tool (T) and set the font to Share Tech Mono, Size
26, colour . Click under the first long tick and type88, then press Tab to commit.Repeat for
92,96,100,104and108under every second long tick (x500,700,900,1100and1300). Centre each number on its tick with the Move tool and the arrow keys, at about y308. Add a smallMHzunder the108.Add a layer named
Tuning Needle. With the Pencil at Size5in , click at1012, 224and Shift-click at1012, 336. Give it an Outer Glow in , Size18, Spread40, Opacity90. Spread matters for thin shapes. Without it, the glow of a 5 px line fades to almost nothing.Select
Dial Scale, every number,MHzandTuning Needle, and choose Layer → Group Layers. Name the groupDial.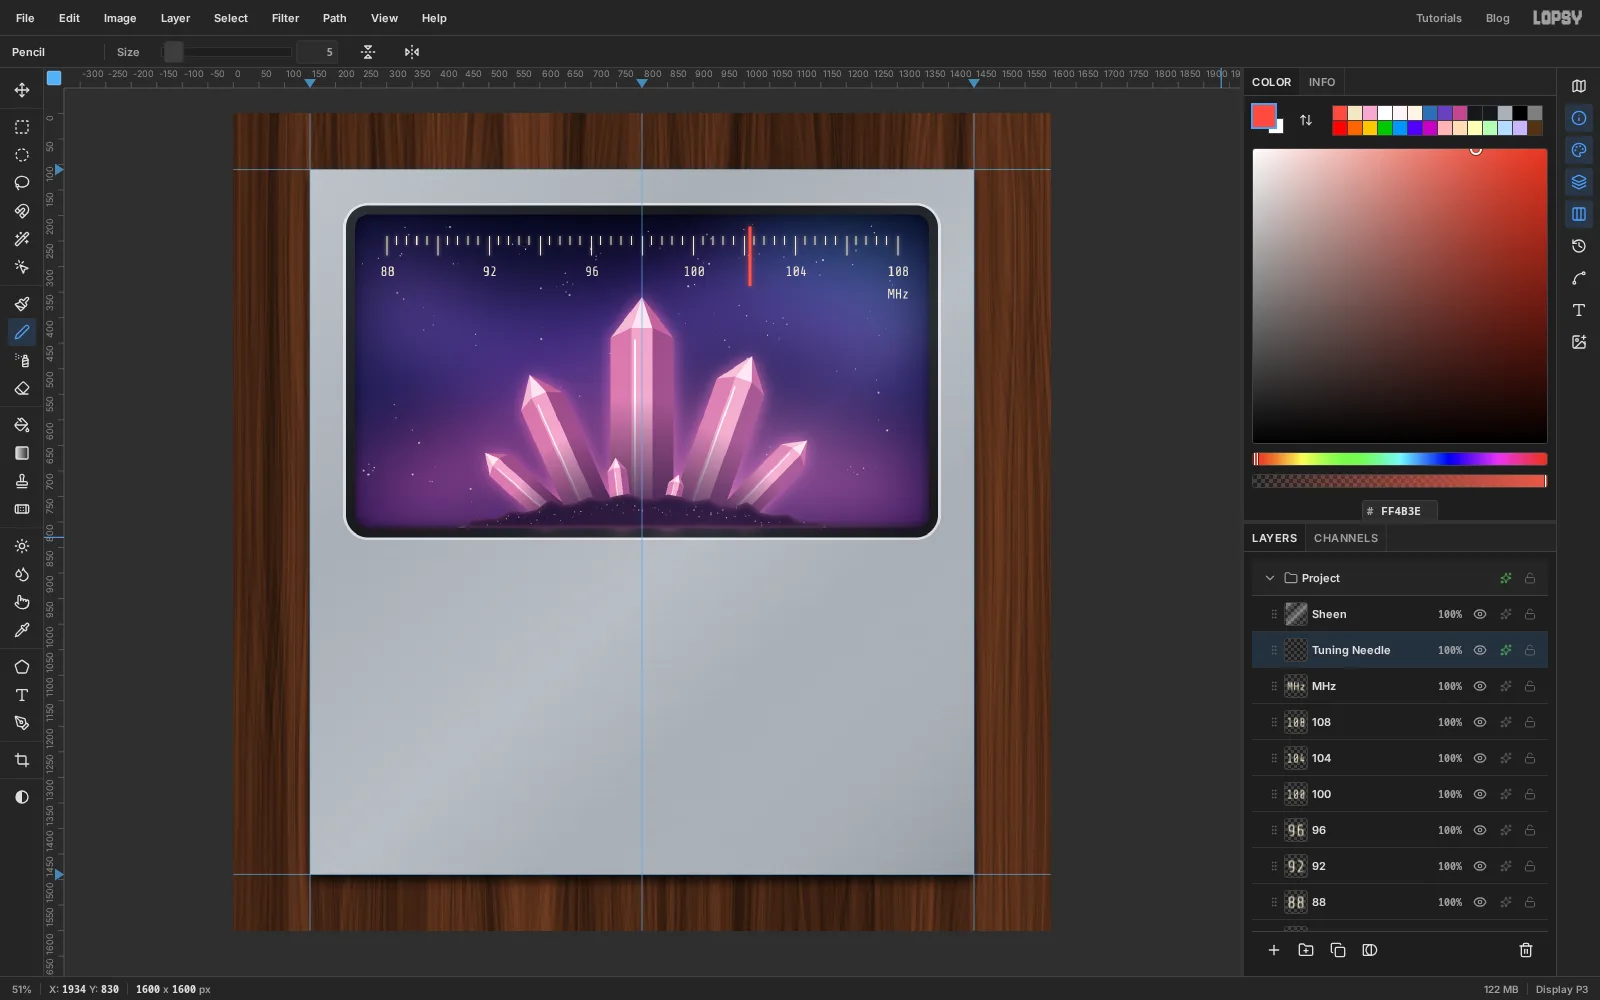
-
Add glare to the glass
Collapse the
Dialgroup, select it, and add a layer namedGlass Glareabove it. A new layer added while an expanded group is selected goes inside that group, so keep groups collapsed when you're adding layers next to them. With the Lasso, draw a wide diagonal band from the top of the window down towards the bottom left. Hold Shift and add a thinner parallel band to its right. Then hold Cmd+Shift+Alt and click theDisplay Glassthumbnail to trim both bands to the window.Fill with white, press Cmd+D, and lower the layer's opacity to
9%. Pick the Eraser (E) at Size360and Opacity70, and stroke once along the bottom of the bands, so the reflection fades out instead of ending in a hard line.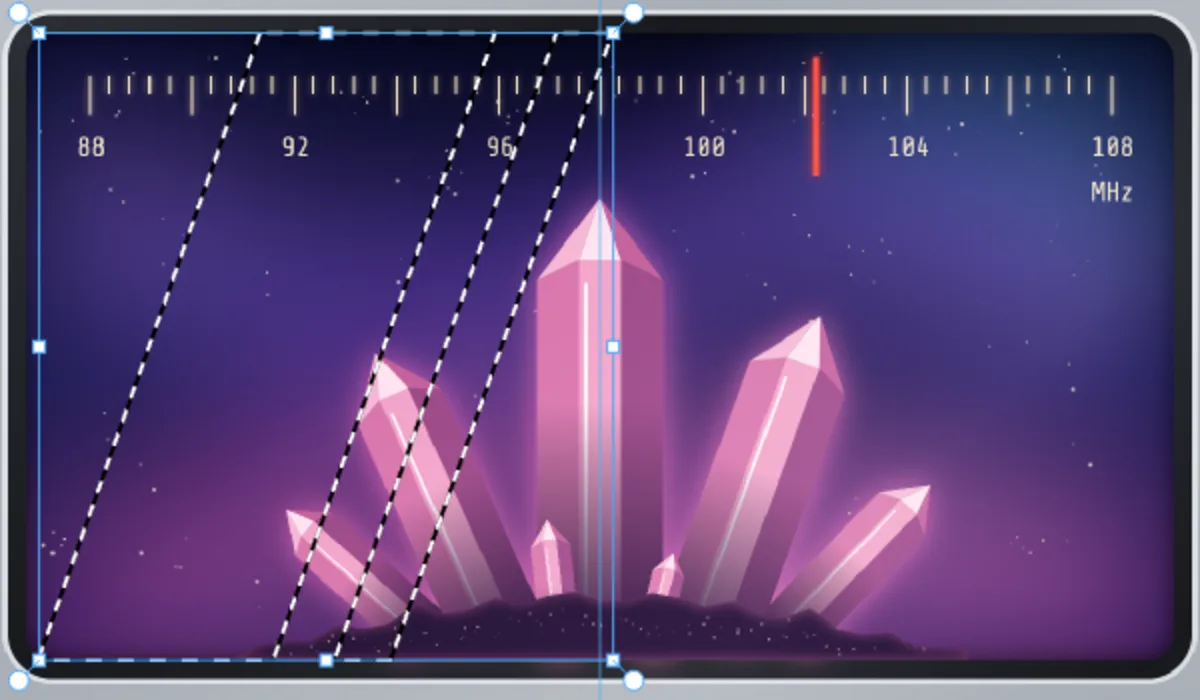
-
Engrave the title
The title is engraved into the metal: dark letters with a thin bright lip along the bottom edge, where the cut catches the light.
Select a non-text layer first. With the Text tool active, any change you make to the font or size applies to the selected text layer, which isn't what you want here. Then set the font to Michroma, Size
70, colour . Click in empty space below the window and typeMIDNIGHT QUARTZ, then press Tab.Open the Text panel and set Letter spacing to
10px. The title is now 1080 px wide. Use the Move tool and arrow keys to centre it on the guide at x800, with its capitals running from y888to948.Add a Drop Shadow in : Offset X
0, Offset Y2, Blur0, Opacity80. Then add an Inner Glow in black, Size3, Opacity100, so the letters look cut in rather than printed on.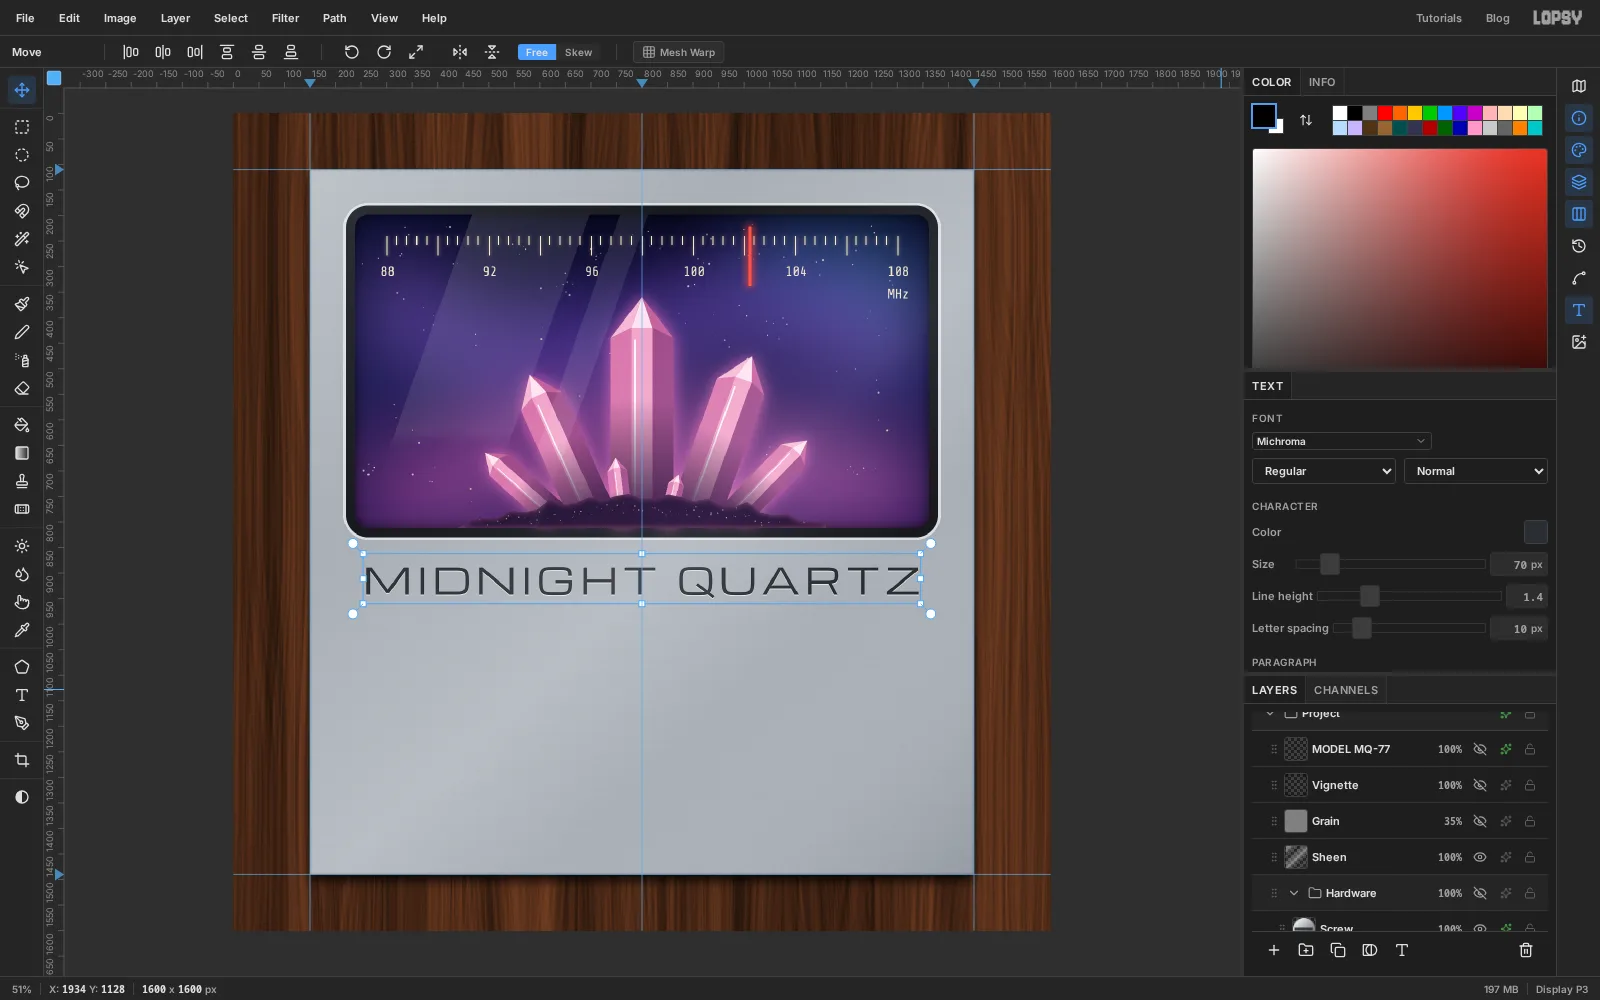
-
Add the artist and an engraved rule
Select a non-text layer again before you change anything, or the new settings will restyle the title. Text settings also carry over to the next layer you create, so set all three: Michroma, Size
30, Letter spacing14. TypeMIRA QUELLand centre it at800, 995. Give it the same light drop shadow as the title. At less than half the title's size, but bigger than every label to come, it reads second.Add a layer named
Rule. With the Pencil at Size2, draw a line of from230, 1044to1370, 1044(click, then Shift-click). Draw a second line of two pixels lower. Dark above light is how a groove looks when the light comes from above.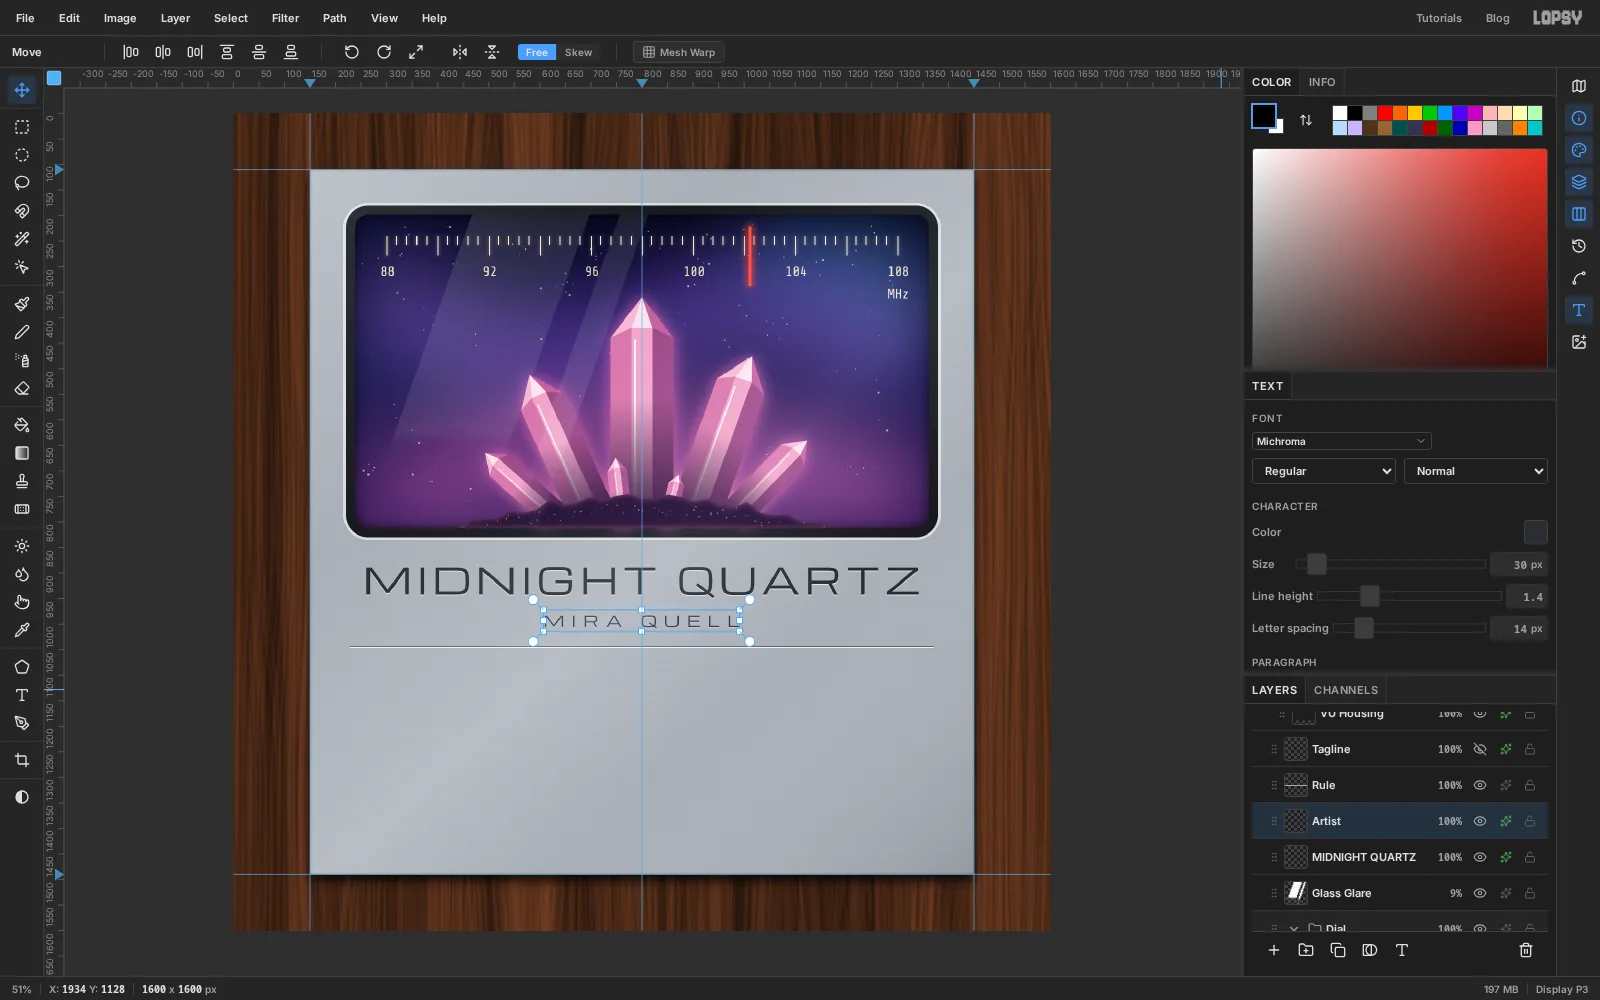
-
Build the VU meter housing
Add a layer named
VU Housing. With the Shape tool still on Rectangle, set Corner Radius to22and the fill to , then drag from the centre420, 1205out to610, 1330. Add a Drop Shadow: Offset Y6, Blur10, Opacity60.Add a layer named
VU Face. Cmd-click the housing thumbnail and Shrink the selection by12px. Fill it with a linear gradient from at the top to at the bottom, and press Cmd+D. Add an Inner Glow in , Size30, Opacity65. That's the look of an old meter lit by a bulb behind its face.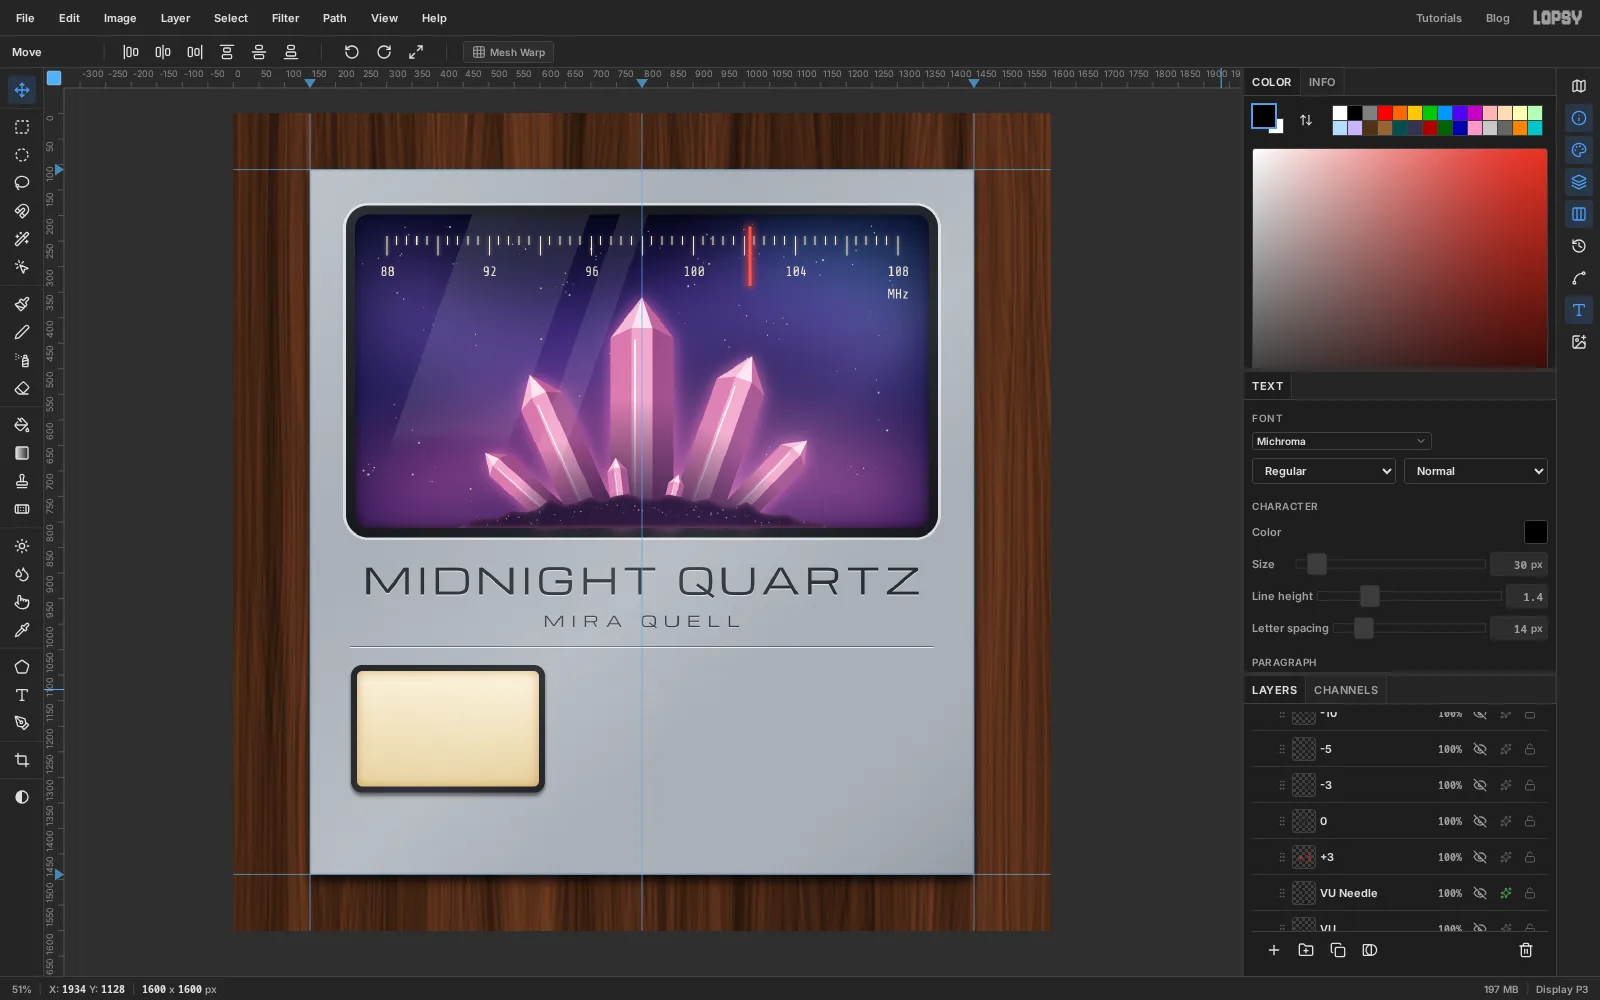
-
Draw the meter scale
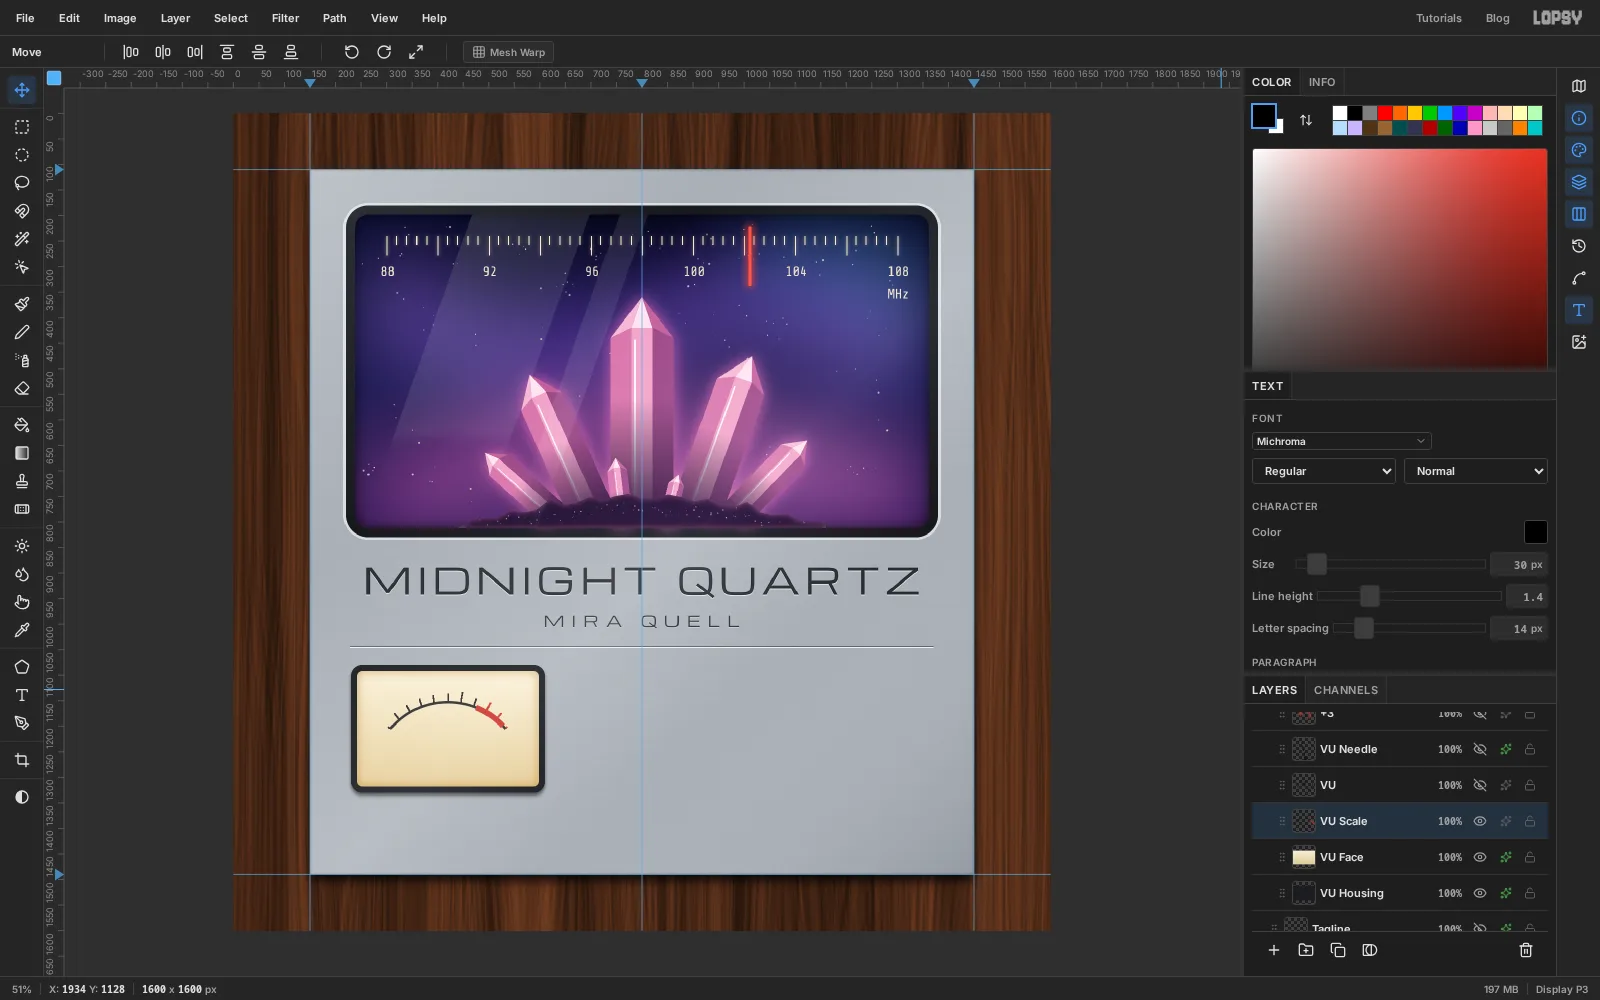
The needle pivots at
420, 1300, near the bottom of the face, and every part of the scale is centred on that point. Add a layer namedVU Scale.- With the Elliptical Marquee, drag a circle from
270, 1150to570, 1450(radius 150 around the pivot). Hold Alt and drag a second circle from275, 1155to565, 1445to cut out the middle. You now have a 5 px ring. - With the Lasso, hold Shift+Alt and draw a wedge: start at the pivot, go out to
221, 1133, sweep up over the top of the face to619, 1133, and back to the pivot. That's 50° either side of straight up. The wedge intersects the ring, leaving only the top arc. Fill it with , then press Cmd+D. - Do the same again with a slightly thicker ring (circles from
267, 1147to573, 1453and from278, 1158to562, 1442), intersected with a wedge from the pivot out to517, 1059and619, 1133. Fill it with for the red overload zone. - With the Pencil at Size
3in , draw nine radial ticks. Each one is a click on the arc and a Shift-click just outside it:
324, 1185to316, 1176345, 1170to336, 1155(long)369, 1159to365, 1148394, 1152to391, 1135(long)420, 1150to420, 1138446, 1152to449, 1135(long)471, 1159to475, 1148495, 1170to504, 1155(long), in516, 1185to524, 1176, in
- With the Elliptical Marquee, drag a circle from
-
Label the meter
Before you type, open the Text panel and set Letter spacing back to
0. Text settings carry over to the next layer you create, so the meter labels would otherwise inherit the artist line's wide spacing.Use Share Tech Mono at Size
18, colour . Type each label, then centre it on its point with the Move tool and the arrow keys:-20at278, 1180, beside the left end of the arc-10at327, 1139-5at388, 1117-3at452, 11170at484, 1125, where the red begins+3in at562, 1180, beside the right end
Finally type
VUin Michroma Size30and centre it at about520, 1272, in the lower right of the face where the needle won't cross it.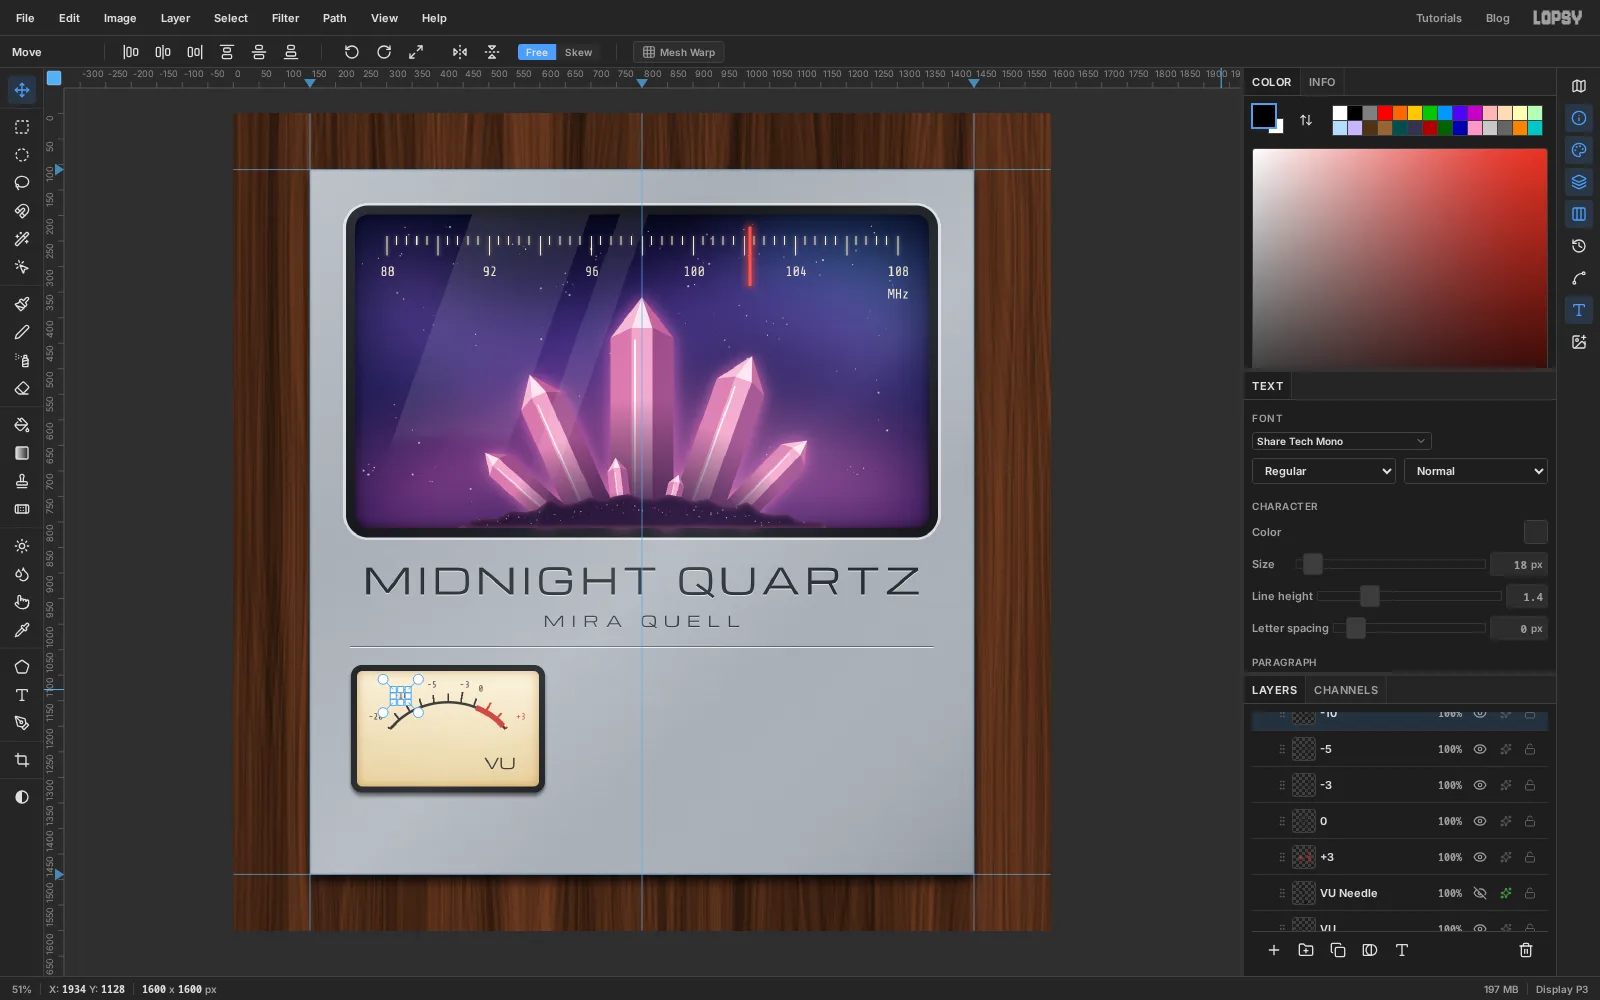
-
Add the needle
Add a layer named
VU Needle. With the Pencil at Size3in , click the pivot at420, 1300and Shift-click about 172 px away, 14° left of vertical (at378, 1133).With the Elliptical Marquee, draw a 32 px circle centred on the pivot and fill it with the same colour, so the needle looks pinned in place. Add a soft Drop Shadow (Offset X
3, Offset Y5, Blur4, Opacity35). The shadow lifts the needle off the face, as if there's a little space behind the glass.Group all the meter layers as
VU Meter.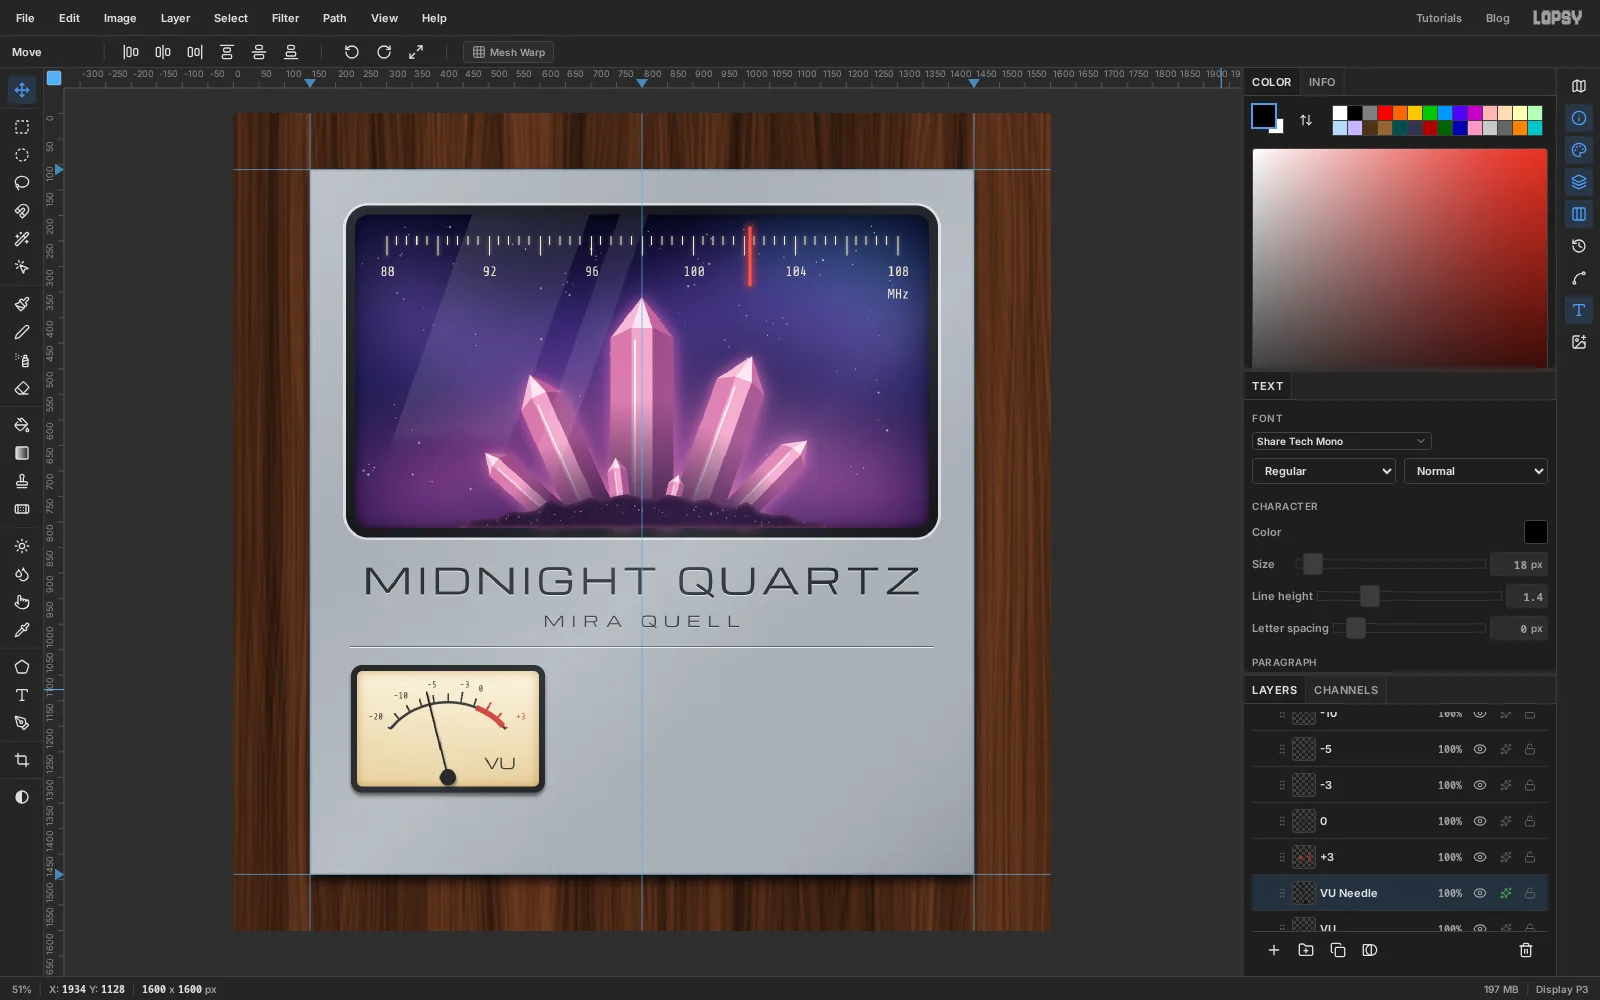
-
Build the first knob
The knob is centred at
765, 1197and is made of three layers. Add them in this order, so each new one lands on top:Knob Ticks: pick the Brush at Size9, Hardness100, in . Click eleven dots on a circle 106 px from the centre, every 27° from the lower left round to the lower right:690, 1272,664, 1230,660, 1180,679, 1135,717, 1103,765, 1091,813, 1103,851, 1135,870, 1180,866, 1230and840, 1272. Give the layer a light Drop Shadow like the title's (, Offset Y1, Blur0, Opacity80), so the dots look stamped into the metal.Knob Skirt: fill an 84 px radius circle with . Add a Drop Shadow: Offset Y12, Blur18, Opacity65.Knob Cap: select a 64 px radius circle. Set a Radial gradient: , then at 40%, then . Drag from just up and left of the centre to beyond the bottom right edge, so the brightest spot sits upper left. Add Noise of6(Mono) to take the plastic sheen off, press Cmd+D, and add a 2 px Stroke for the polished rim.
Select the three layers and choose Layer → Group Layers. Name the group
Knob 1, and collapse it before you go on. A new layer added while an expanded group is selected goes inside that group.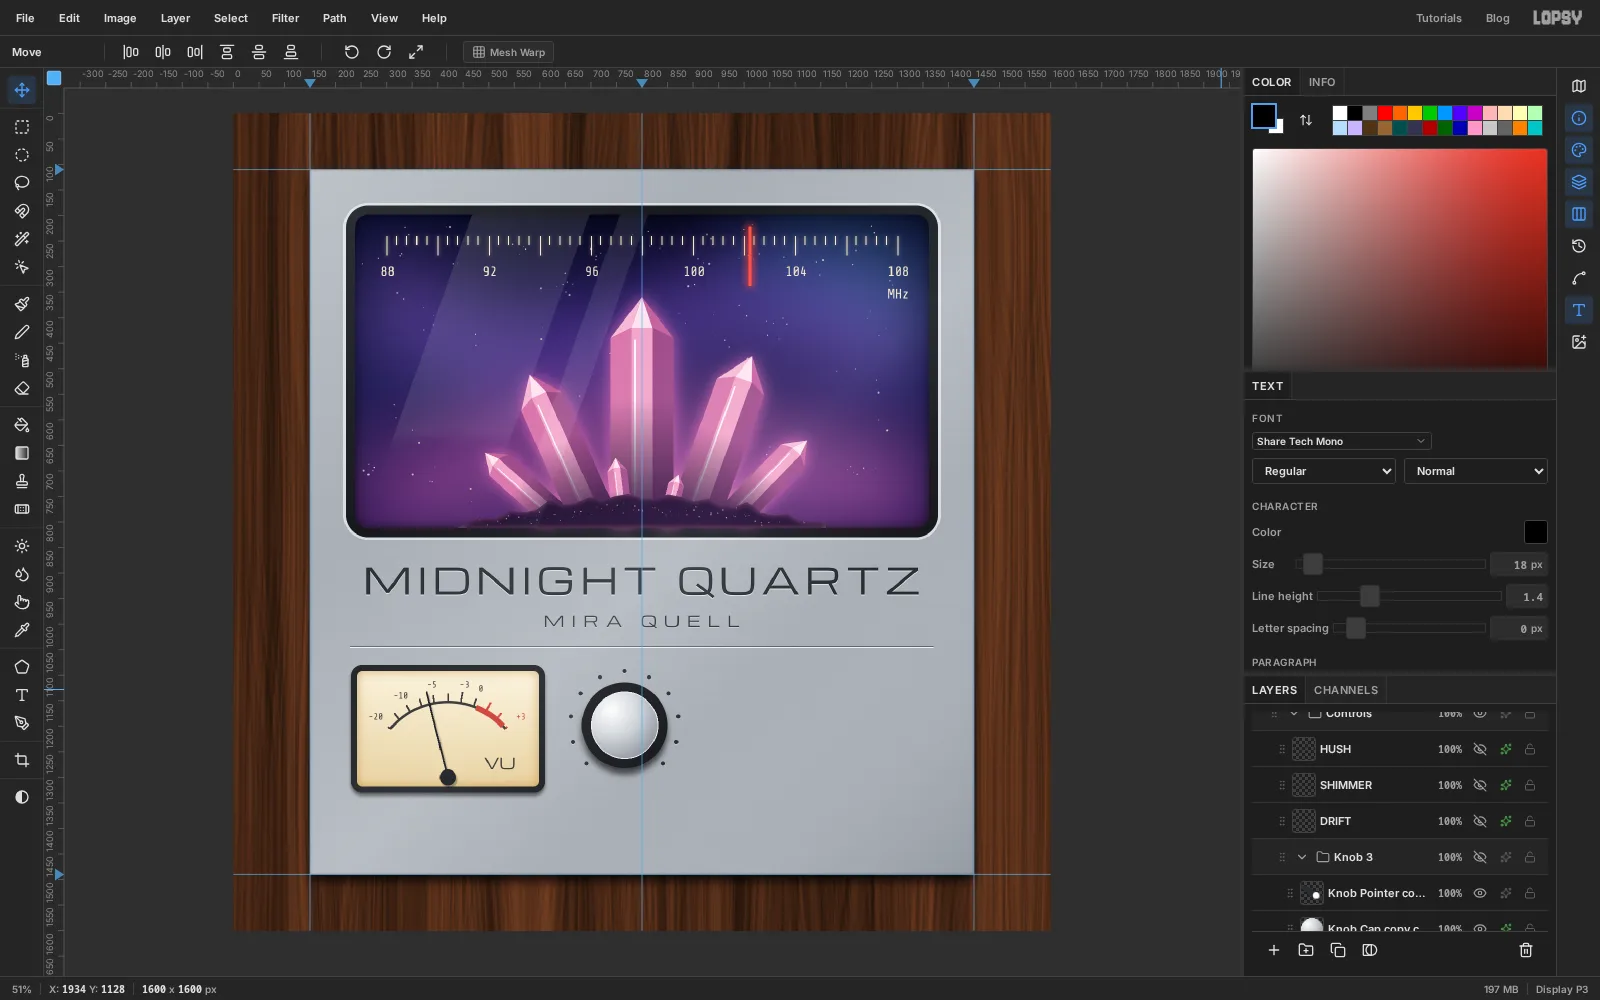
-
Duplicate the knob on the grid
Press Cmd+' to show the grid. The options bar shows Grid
16pxwith Snap ticked. Showing the grid turns snapping on, so leave the View → Snap to Grid menu item alone. Clicking it would switch snapping off again.With
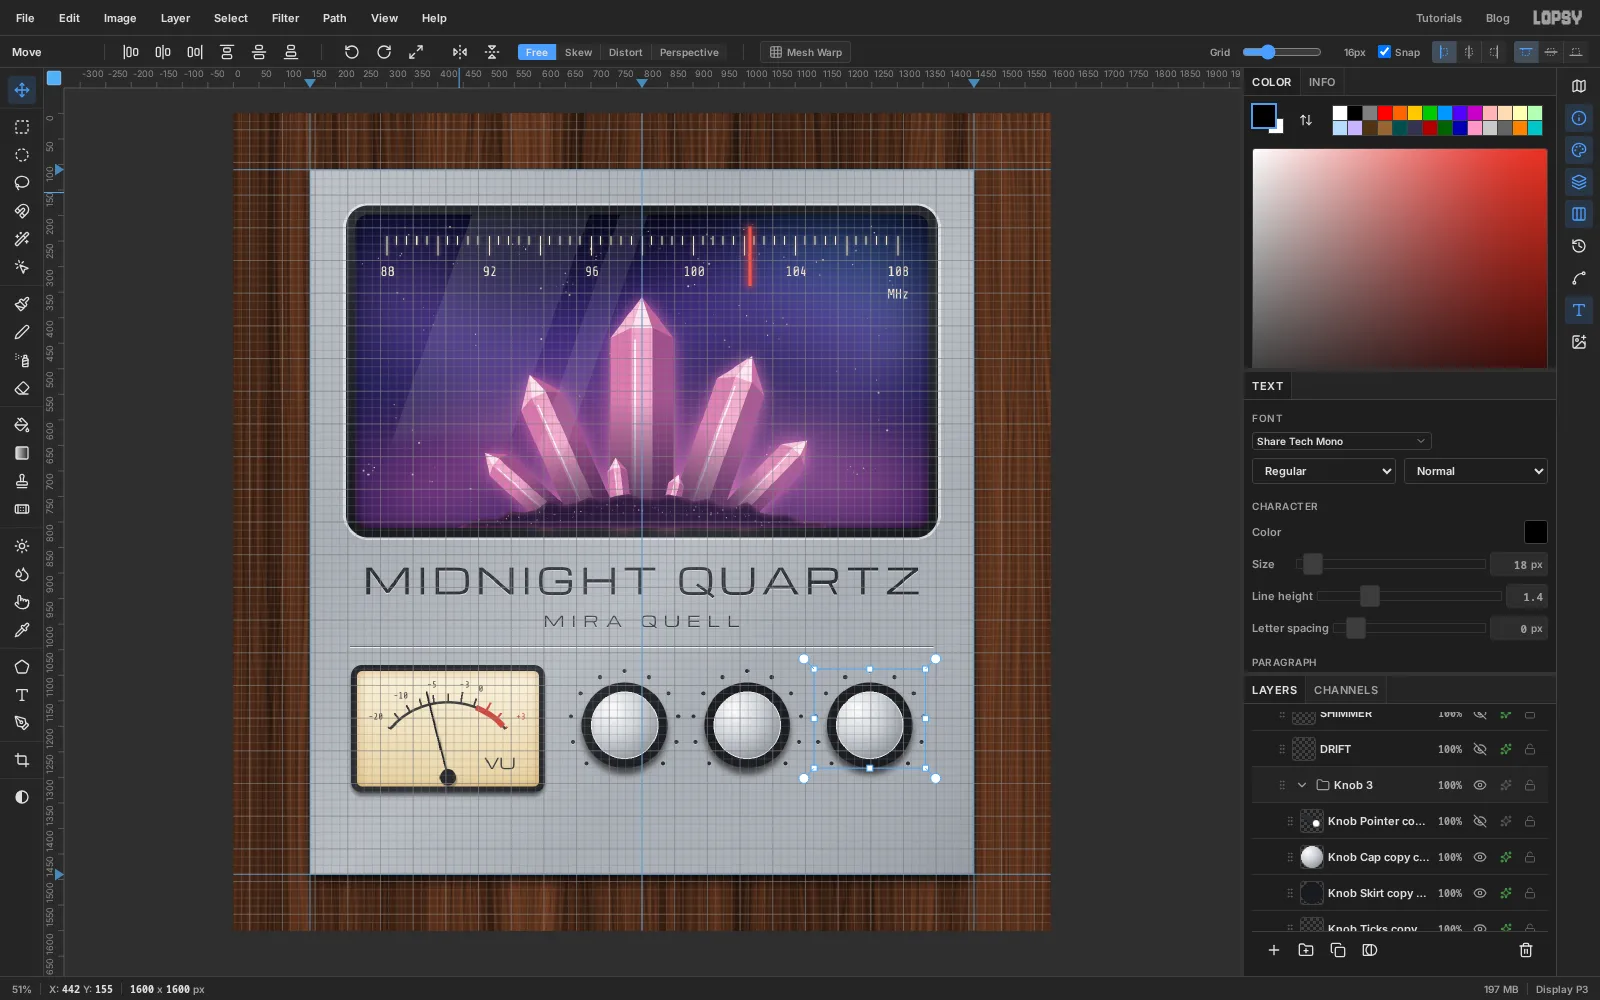
Knob 1selected, click Duplicate Layer, rename the copyKnob 2, and drag it 240 px to the right with the Move tool. With snapping on, the drag moves in whole 16 px cells, so 240 px (fifteen cells) is easy to hit exactly. DuplicateKnob 2, rename itKnob 3and drag it another 240 px. The knobs are now centred at about x765,1005and1245. Together with the VU meter, the row runs from x230to about1355, roughly centred on the panel.Press Cmd+' again to hide the grid before you nudge anything else. While snapping is on, each arrow-key nudge moves a whole grid cell.
-
Set the pointers and label the knobs
Expand each knob group, select its
Knob Capand add a layer namedKnob Pointerabove it. With the Pencil at Size6in , draw a short line from near the centre out towards the rim (click, then Shift-click). Then select a circle of 5 px radius near the outer end and fill it with white. Turn each knob to a different setting:Knob 1, about 8 o'clock: line740, 1204to710, 1212, dot at719, 1209Knob 2, about 1 o'clock: line1018, 1174to1034, 1148, dot at1029, 1155Knob 3, about 4 o'clock: line1268, 1210to1294, 1226, dot at1287, 1221
Different settings make the panel look used rather than freshly assembled.
For the labels, use Michroma Size
20with Letter spacing5in . TypeDRIFT,SHIMMERandHUSH, centre each under its knob at y1322, and give each the light engraving Drop Shadow (, Offset Y1, Blur0, Opacity80). Collapse the knob groups, then group the three knobs and their labels asControls.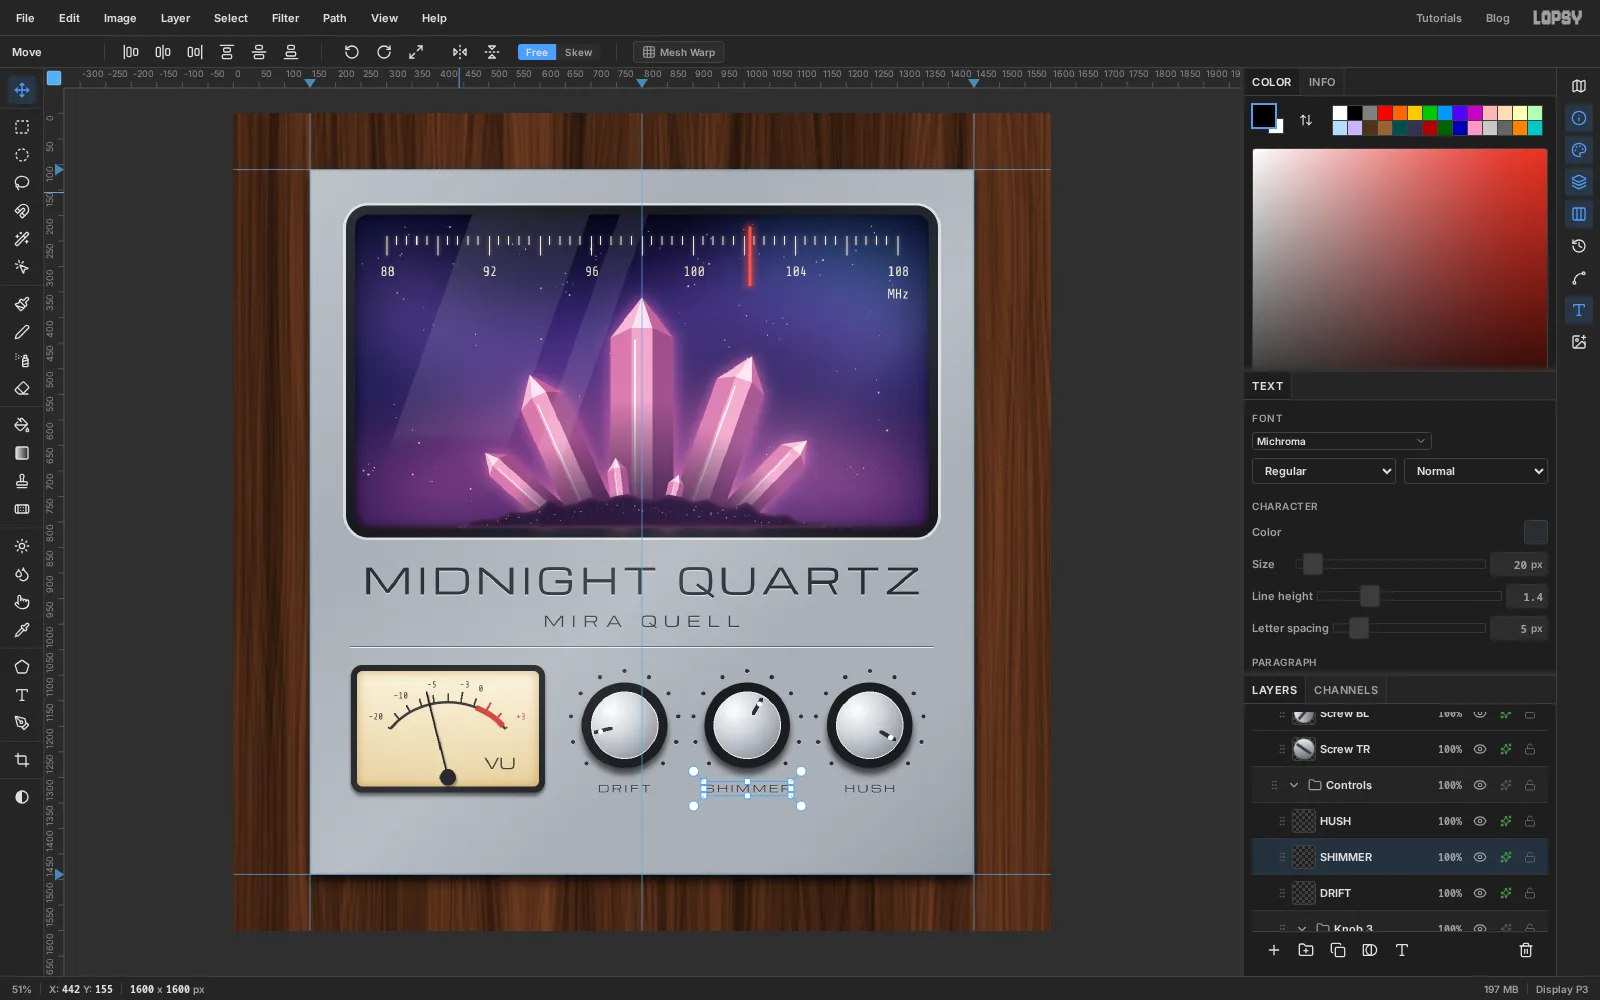
-
Add the lamp, screws and small print
Pilot lamp. On a layer named
Lamp Bezel, select a circle of 24 px radius centred on262, 1405and fill it with a linear gradient from to , top left to bottom right. On a newPilot Lamplayer above it, select a circle of 15 px radius on the same centre and fill it with a radial gradient from through to , starting just above and left of centre. Add an Outer Glow in with Size40, Spread55, Opacity90. Again, a small shape needs Spread before its glow shows.Small print. In Michroma Size
16, letter spacing5, typePOWERjust right of the lamp,STEREO · HIGH FIDELITYcentred on the centre guide andMODEL MQ-77ending at x1362, the same distance from the panel edge as the lamp. Give all three the same vertical centre, y1405, so they share a baseline, and give each the light engraving shadow (, Offset Y1, Blur0, Opacity80).Screws. On a layer named
Screw, select a circle of 15 px radius centred on185, 145, fill it with a linear gradient from to (top left to bottom right), and draw a 4 px slot of across it with the Pencil. Add a small Drop Shadow (Offset X1, Offset Y3, Blur3, Opacity55).Cmd-click the screw's thumbnail, press Cmd+C and then Cmd+V. The copy is pasted in place on a new layer. Name it
Screw TRand drag it 1230 px to the right with the Move tool. Paste two more copies,Screw BLandScrew BR, for the bottom corners (1310 px down). Rotate each copy's slot to a different angle with the rotation handle. Screws are never all lined up in real life.Paste copies pixels, not layer effects, so the copies have no shadow yet. Give each one the same Drop Shadow as the first screw.
Group the two lamp layers and the four screws as
Hardware. The three lines of small print can stay on their own.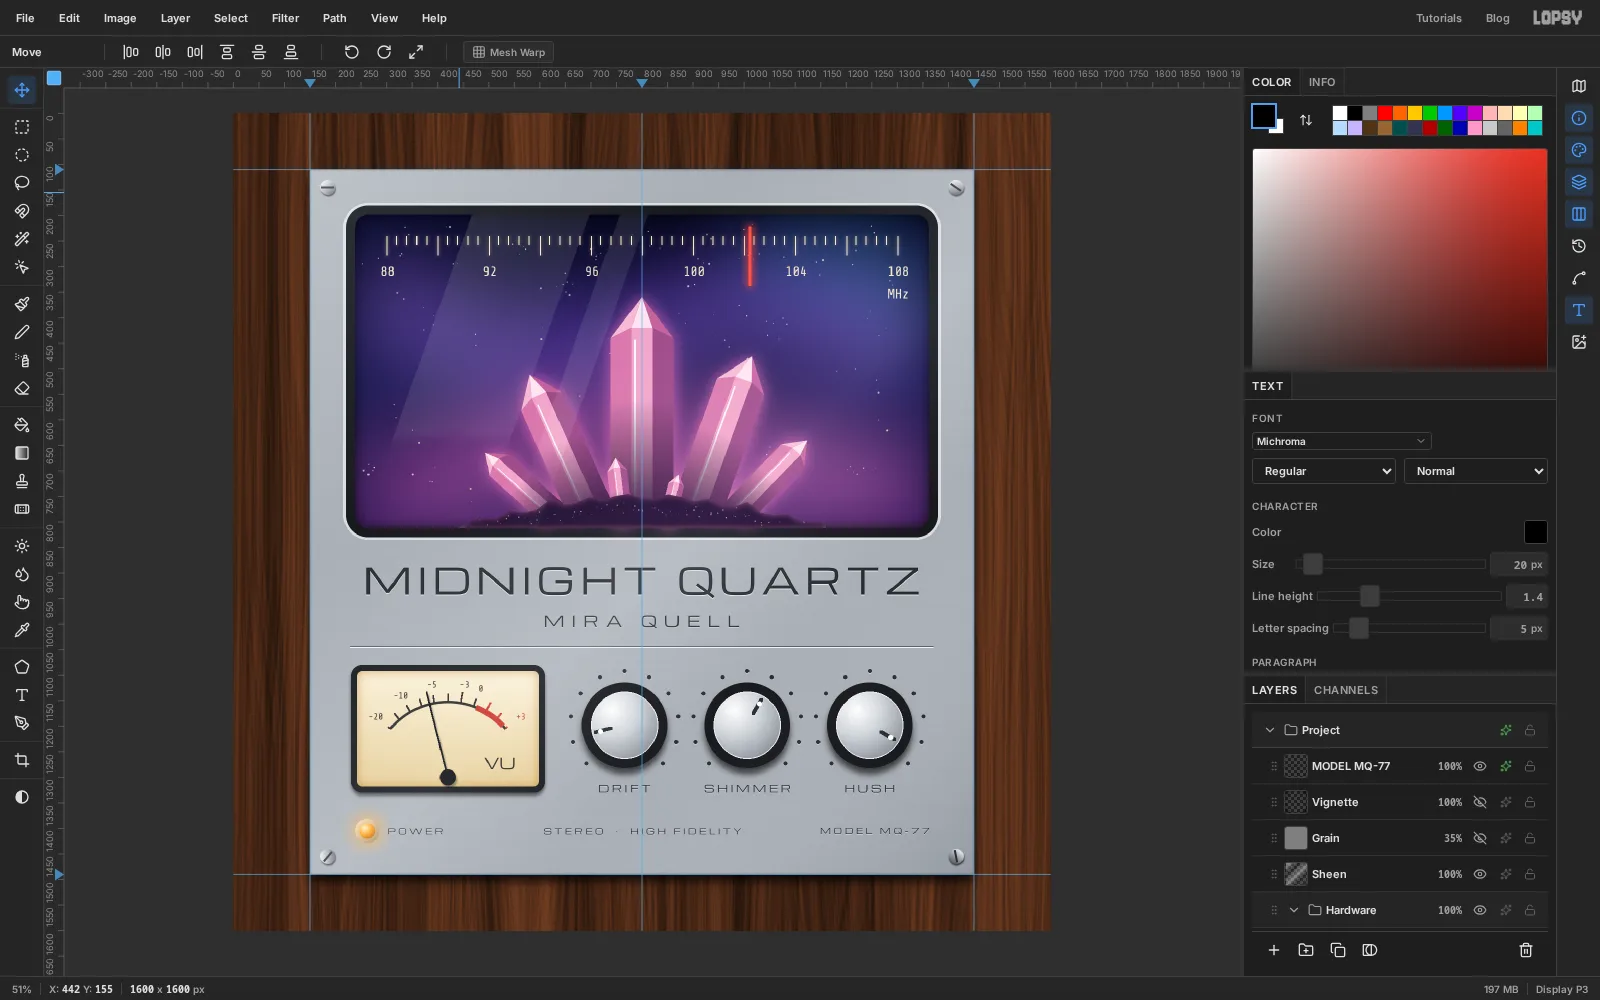
-
Finish the materials
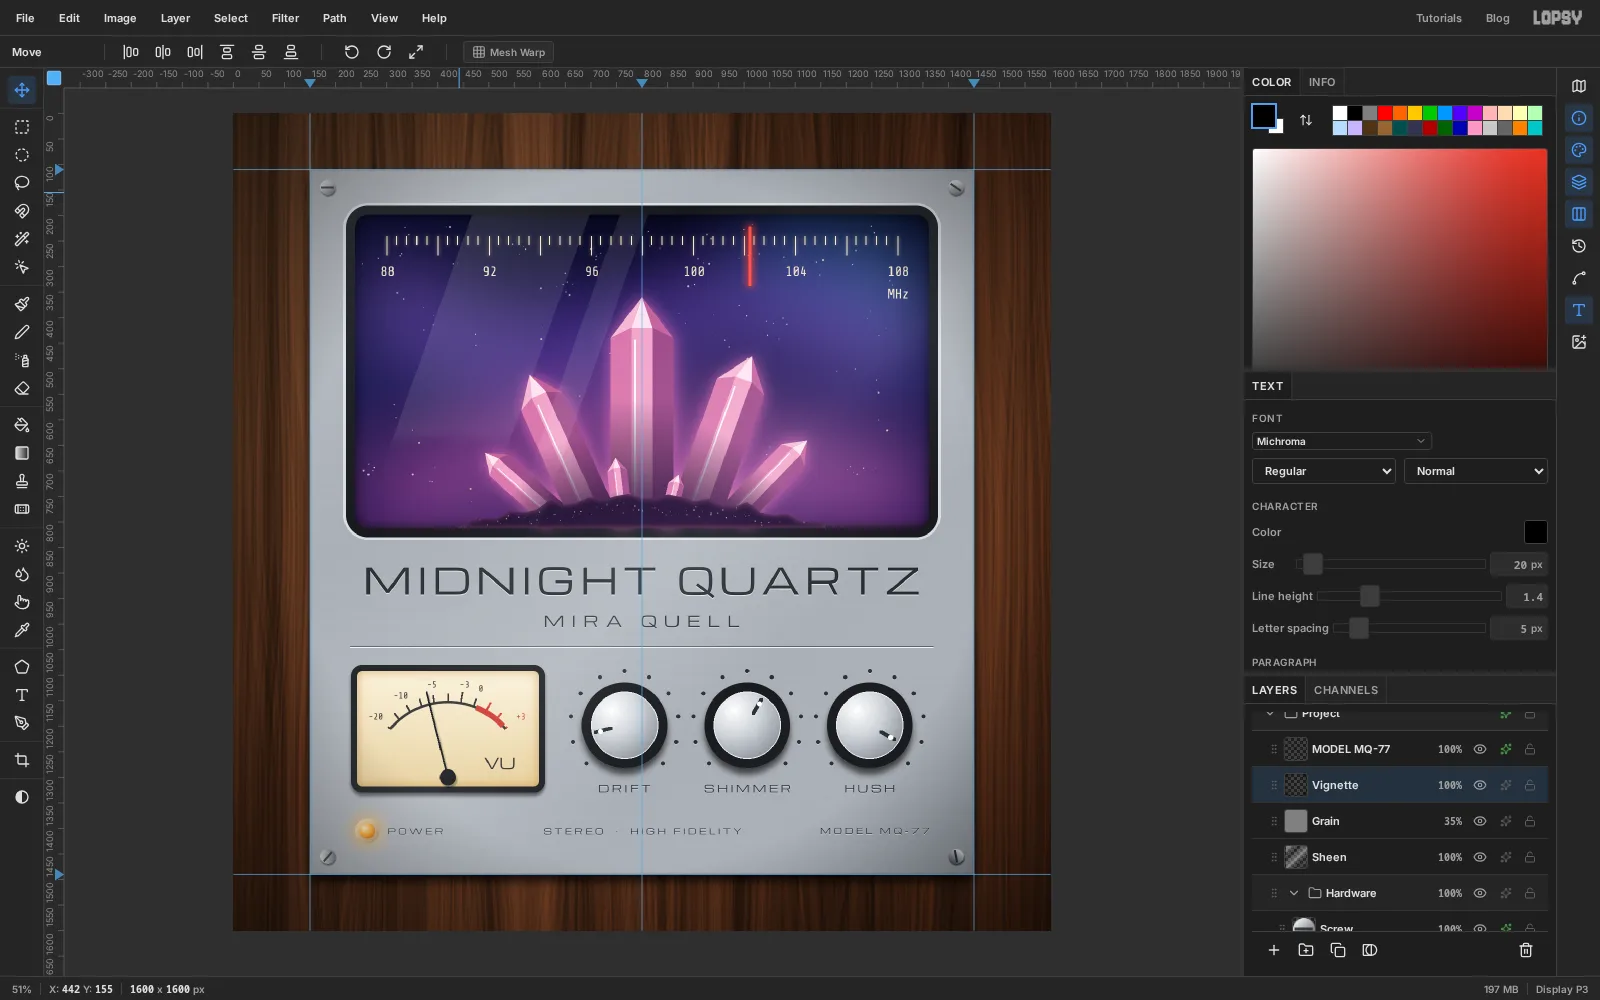
Four last layers make the materials convincing:
- Brushed Grain. Select
Faceplateand add a layer above it. Fill it with , add Noise of70(Mono, Gaussian) and a horizontal Motion Blur of100. Then Cmd-clickFaceplate, choose Select → Inverse and delete. Set it to Overlay at60%. Also giveFaceplatean Inner Glow in , Size8, Opacity45, for a hint of edge thickness. - Varnish. Above
Wood Grain, add a layer with a linear gradient of three stops: white at 35% opacity on the left end, white at 0% opacity at the 45% mark, and black at 35% opacity on the right end. Drag it from the top left corner to the bottom right and set it to Soft Light. The walnut now has a polished sheen. - Grain. At the very top of the stack, fill a layer with and add Noise of
18(Mono, Gaussian). Set it to Overlay at35%, so the flat colours pick up a little film texture. - Vignette. Above that, add a layer with a Radial gradient of three stops: black at 0% opacity at the left end and again at the 60% mark, and black at 55% opacity at the right end. Drag it from the centre to a corner, and set it to Multiply.
Hide the guides with Cmd+;, save the project, and use File → Quick Export PNG for the finished cover.
- Brushed Grain. Select