Make a Zine-Style App Mockup with Ransom-Note Type
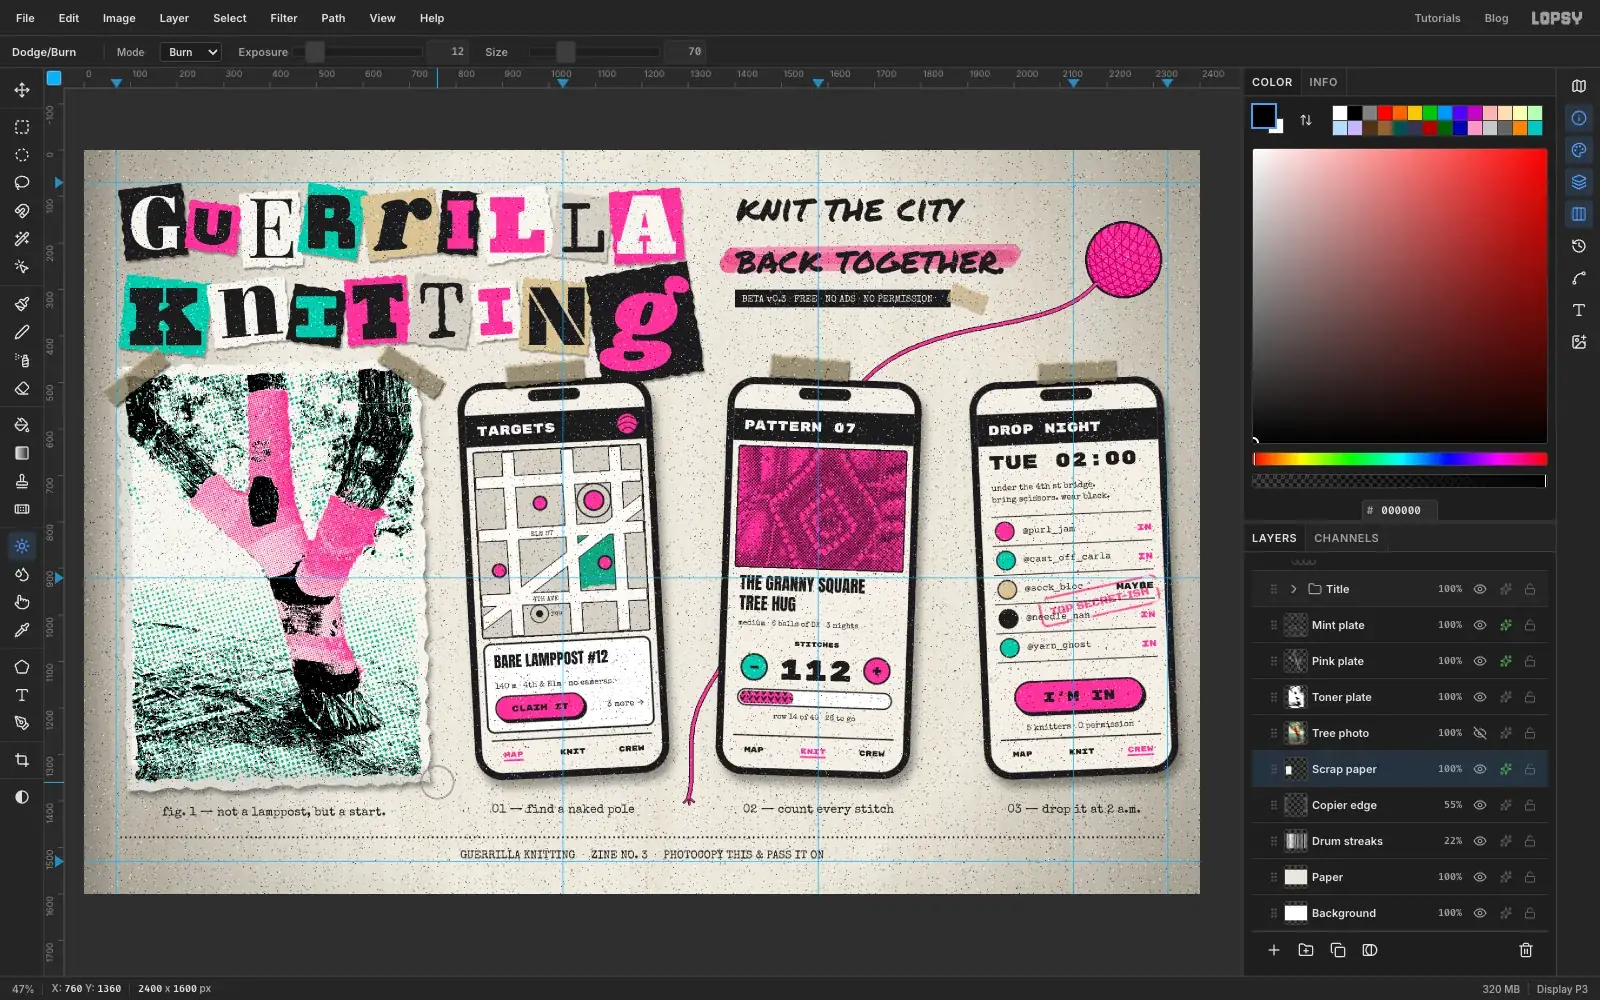
Design a photocopied, cut-and-paste zine board for a yarn-bombing app in Lopsy, with ransom-note letters, a risograph photo and three phone screens.
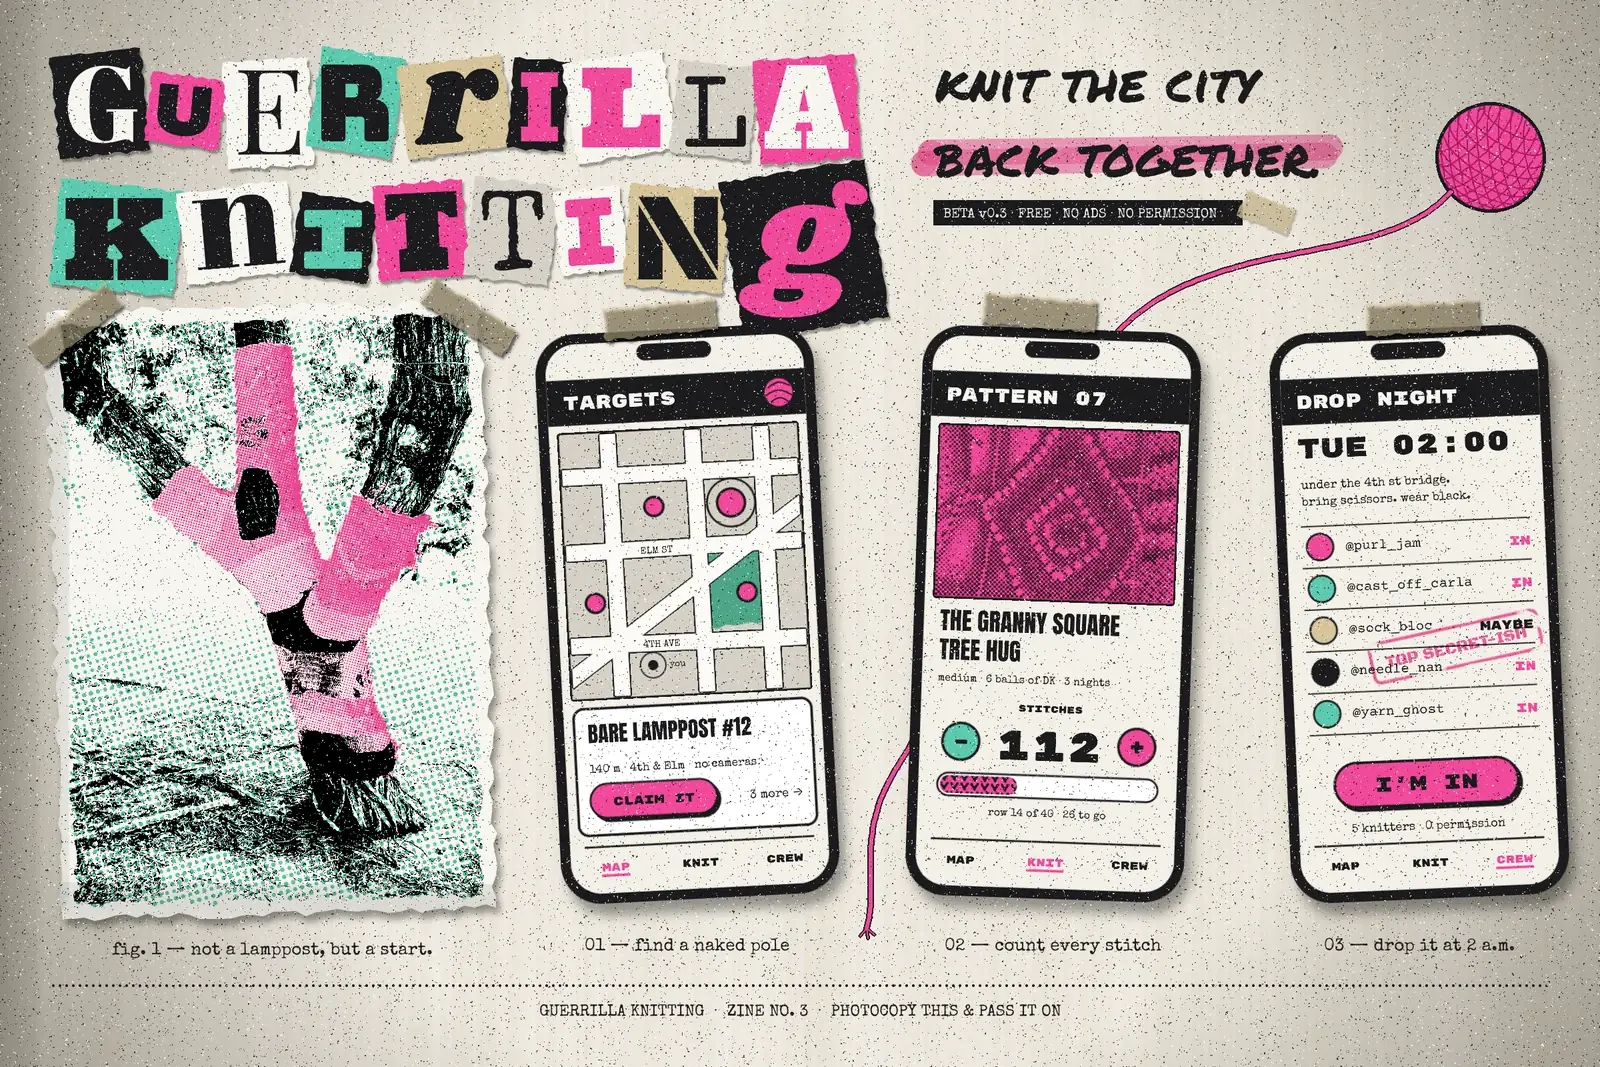
Zines are cheap, self-published magazines, photocopied in someone's bedroom and passed around by hand. Their look comes straight from how they're made. Headlines are letters cut out of magazines and glued down ransom-note style. Photos are pushed through a copier until they turn into hard black and white. There are bits of tape, typewriter captions, and the grey speckle a tired copier leaves on every page. Risograph printers added a second and third ink, usually a fluorescent pink and a mint, printed slightly out of line with the black.
In this tutorial you'll use that language to present an app. Guerrilla Knitting is an imaginary app for yarn-bombing crews, the people who wrap trees, lampposts and bike racks in knitting overnight. The board is 2400 × 1600 px and holds:
- a ransom-note title
- a three-colour risograph treatment of a real yarn-bombed tree
- three phones taped down: a map of bare lampposts, a knitting pattern with a stitch counter, and a crew list for the night of the drop
- a marker tagline, a ball of yarn whose thread runs behind a phone, captions and a cut line
You'll need two photos from Wikimedia Commons. Both are marked CC0, so you can use them freely:
- Yarn bombing en Cornellá de Llobregat.JPG, a tree whose trunk is wrapped in orange, red, yellow and blue knitting. Download the 1280 px wide version.
- Yarn-Bombed-Tree-Ulverstone-20160307-005.jpg, a tree wrapped in crocheted granny squares. Again, the 1280 px version.
The tools you'll use:
- Add Noise, Fibers, Threshold, Brightness/Contrast, Halftone, Desaturate and Gaussian Blur
- the Lasso (including Alt to subtract and Shift to add), the Rectangular and Elliptical Marquee with their exact-size dialogs, and Select → Feather / Inverse
- Copy and paste in place, and Cmd-click on a layer thumbnail to load its shape as a selection
- the Shape tool's click-to-size dialog, with corner radius, fill and stroke
- Define Pattern and Fill with Pattern
- the Brush, Pencil, Eraser and Burn tools, and Shift-click for straight lines
- live text in thirteen Google fonts
- groups that you scale and rotate as one piece with the Move tool's handles
- layer effects: Drop Shadow, Stroke and Color Overlay, plus the Multiply and Screen blend modes
The palette is copier paper, toner and two riso inks:
-
Paper
-
scrap white
-
phone screen
-
Toner black
-
Fluorescent pink
-
dark yarn pink
-
Mint
-
Kraft tape
-
newsprint grey
-
Paint the copier paper
Choose File → New, keep the units on Pixels, and make the document 2400 wide and 1600 high with a white background.
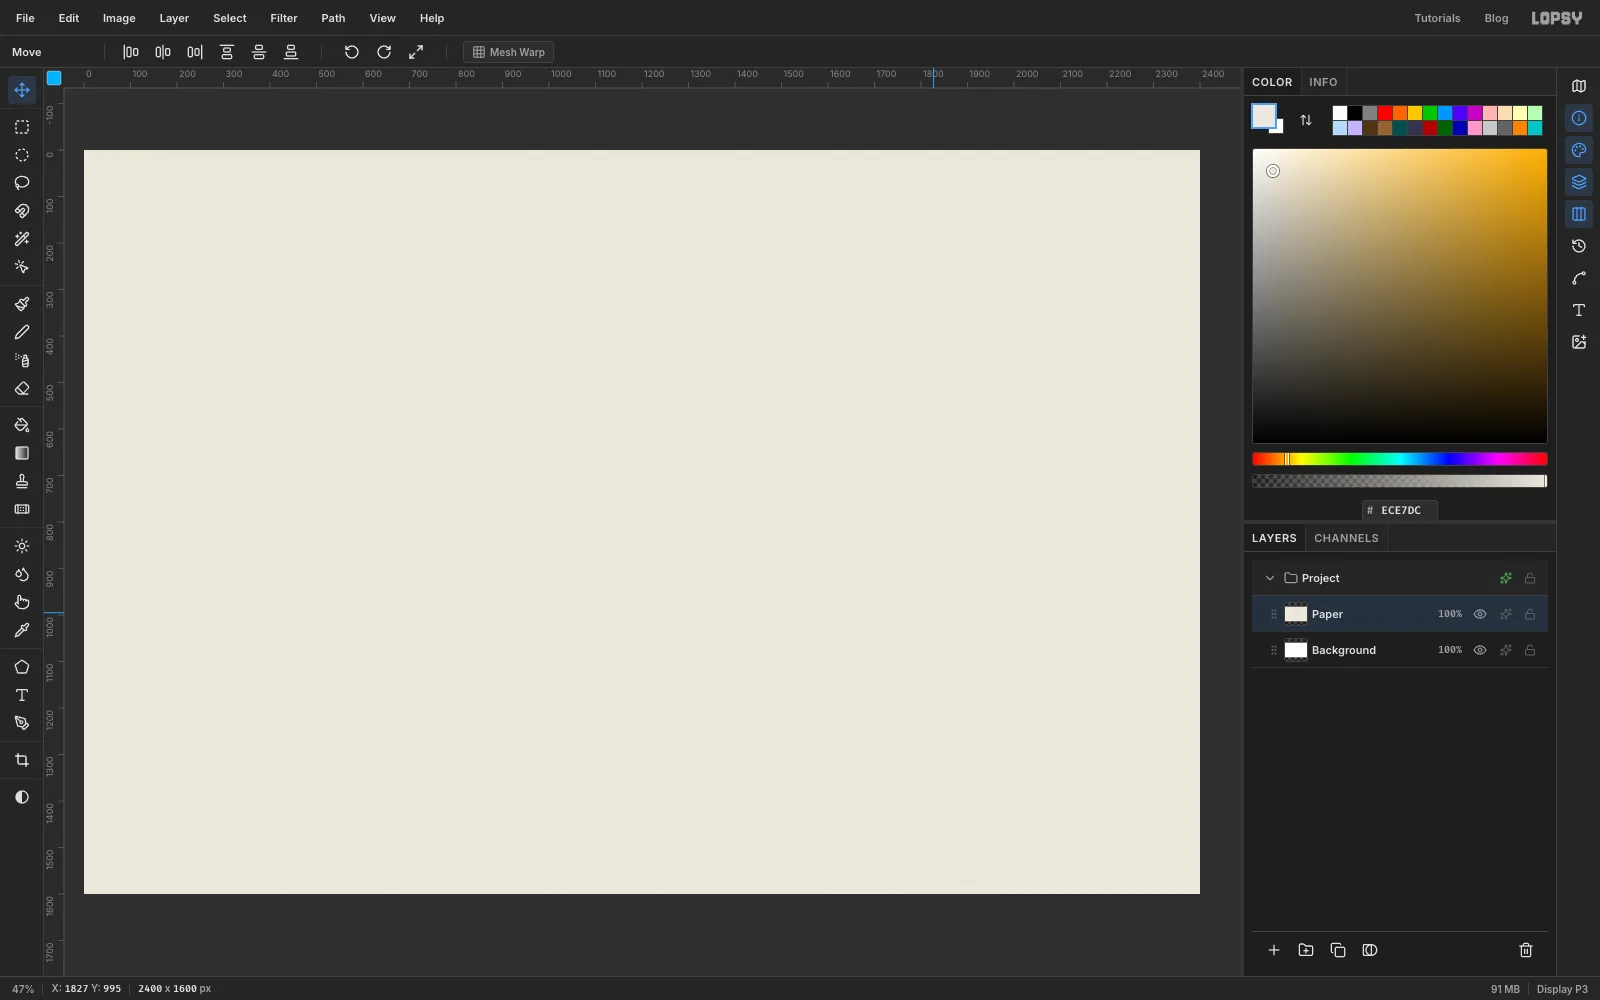
Click the empty Layer 1, rename it Paper, set the foreground to paper and choose Edit → Fill. Then choose Filter → Add Noise…, pick Mono and Gaussian, set Amount to 12 and click Apply. It's a faint tooth, but it stops the board looking like flat screen colour.
-
Add copier drum streaks
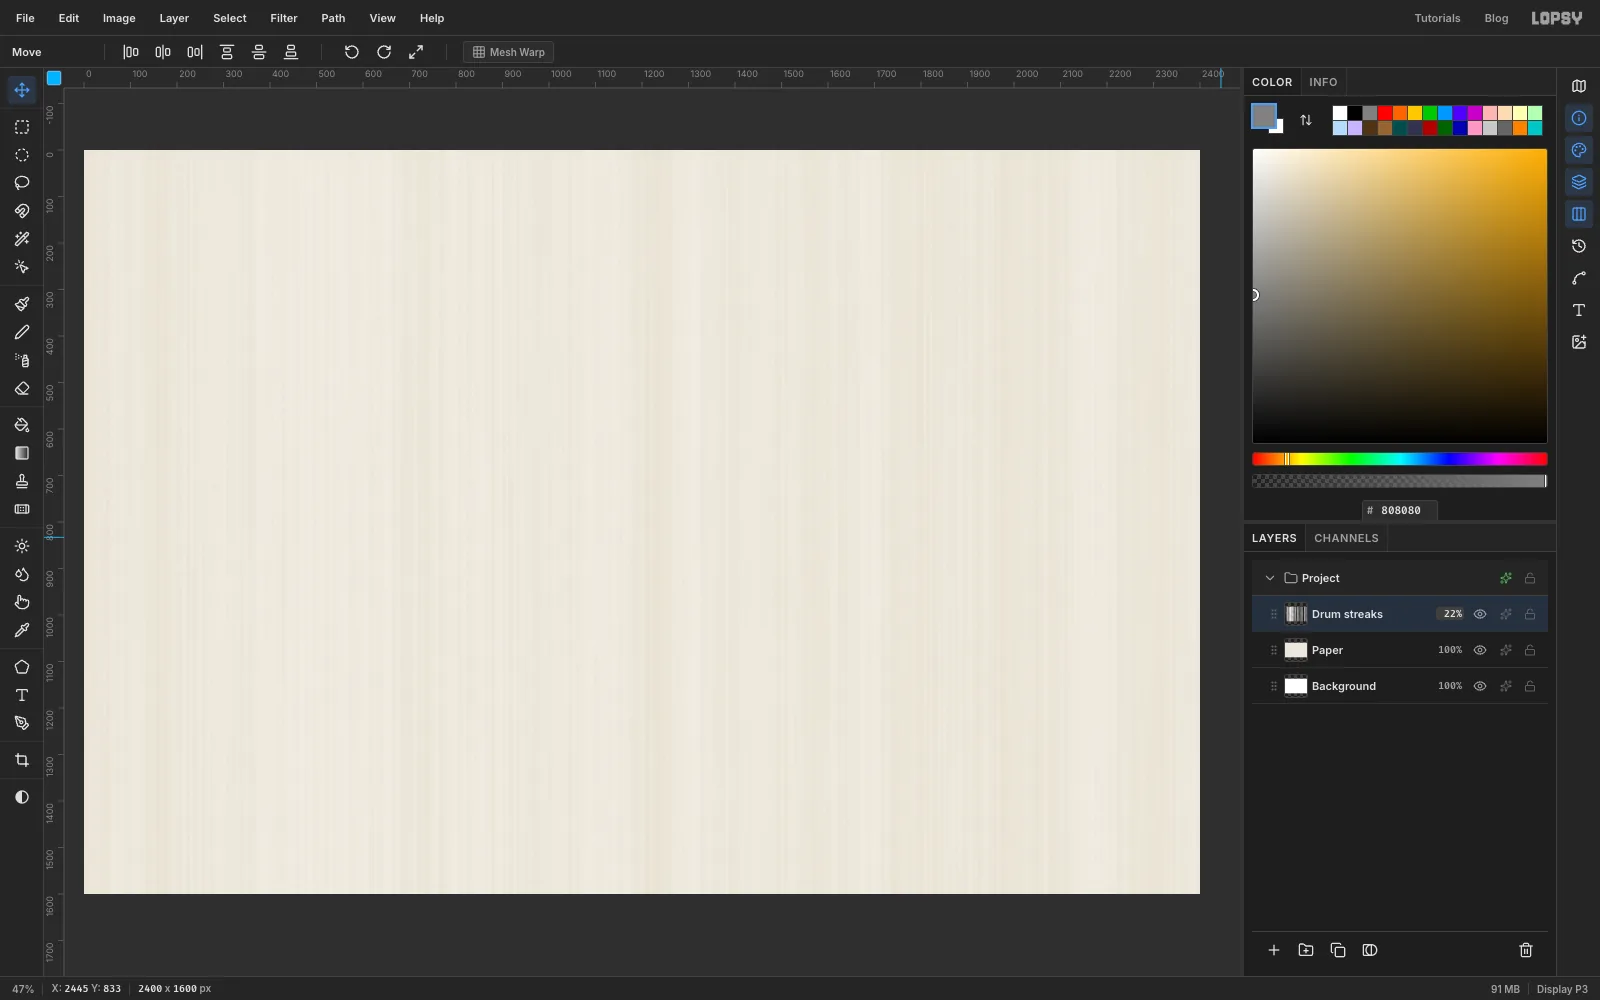
Copiers leave thin vertical stripes where the drum is worn. Click Add Layer and name the layer Drum streaks. Fill it with mid-grey , then choose Filter → Fibers… and set Variance to 40 and Strength to 64. A high Strength makes the fibres run straight down.
Choose Filter → Desaturate, then Filter → Brightness/Contrast… with Contrast at 60. Open the layer's effects with the sparkle button on its row, set the Blend to Overlay, and close the drawer. Finally click the layer's opacity and set it to 22%. On Overlay, mid-grey disappears, so only the light and dark streaks show.
-
Darken the edges like a copier lid
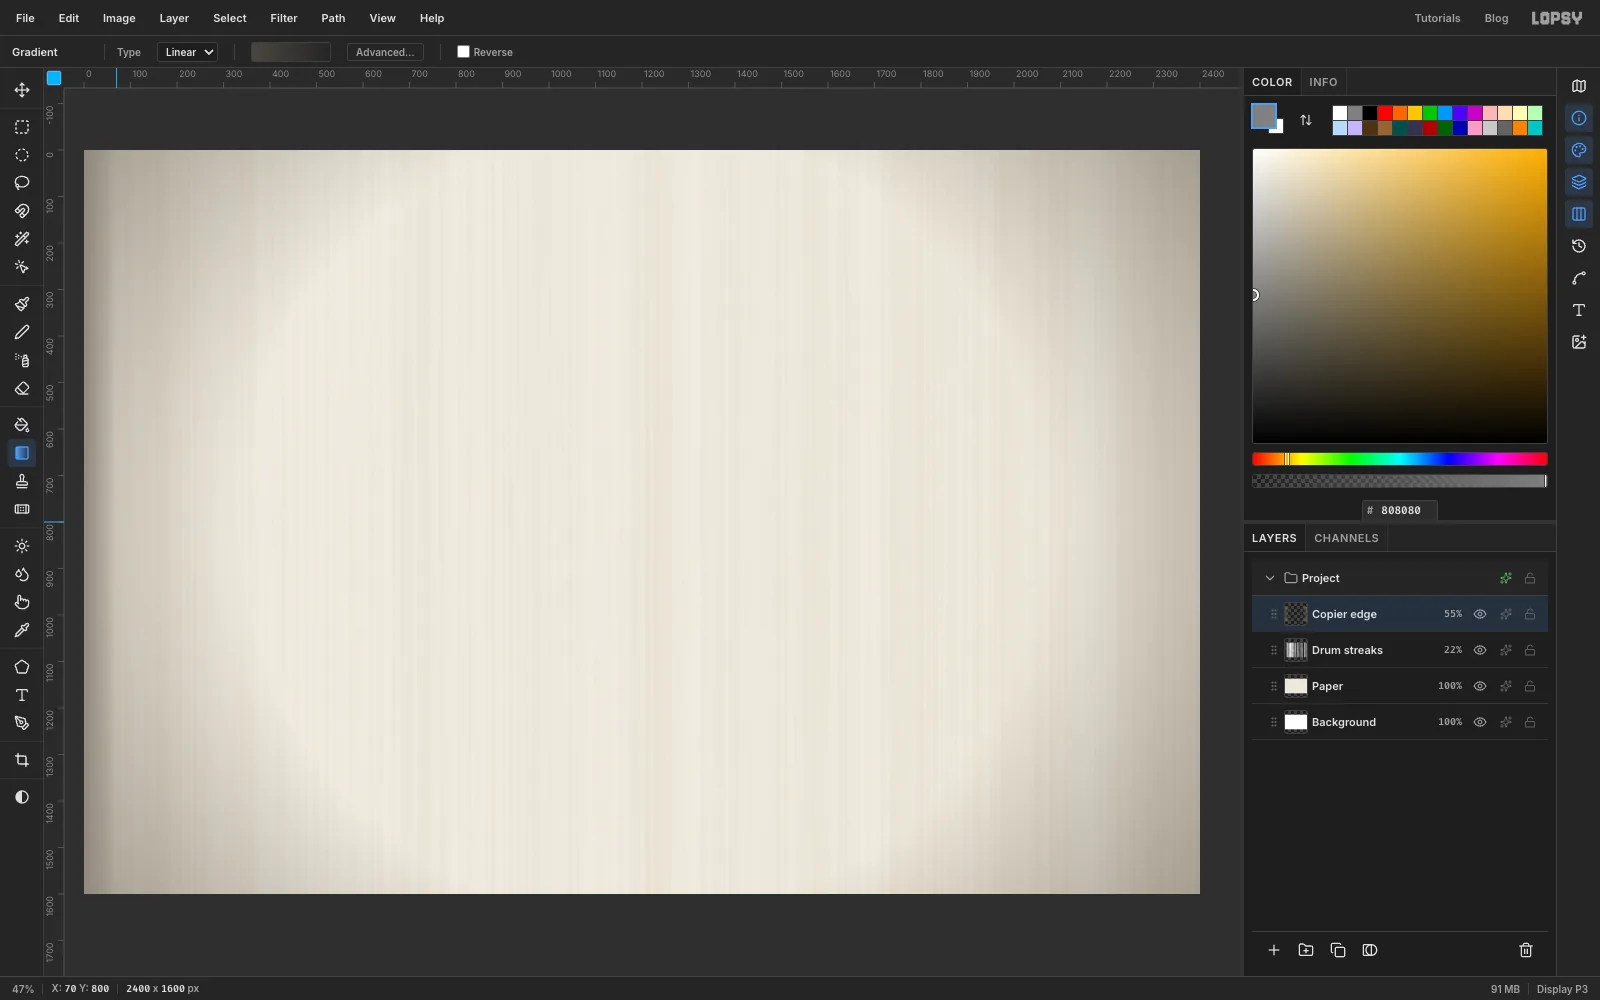
Add a layer called Copier edge. Pick the Gradient tool, set Type to Radial, and click Advanced… to open the editor. Make three stops, all :
- at the left end, opacity 0%
- at 60% along, opacity 0%
- at the right end, opacity 100%
Click Done, then drag from the centre of the board out to the bottom-right corner. Set the layer to Multiply at 55%.
Then switch the gradient to Linear with two stops in , solid on the left and transparent on the right. Drag a short gradient, about 70 px, in from the left edge. It's the dark band you get when the copier lid doesn't quite close.
-
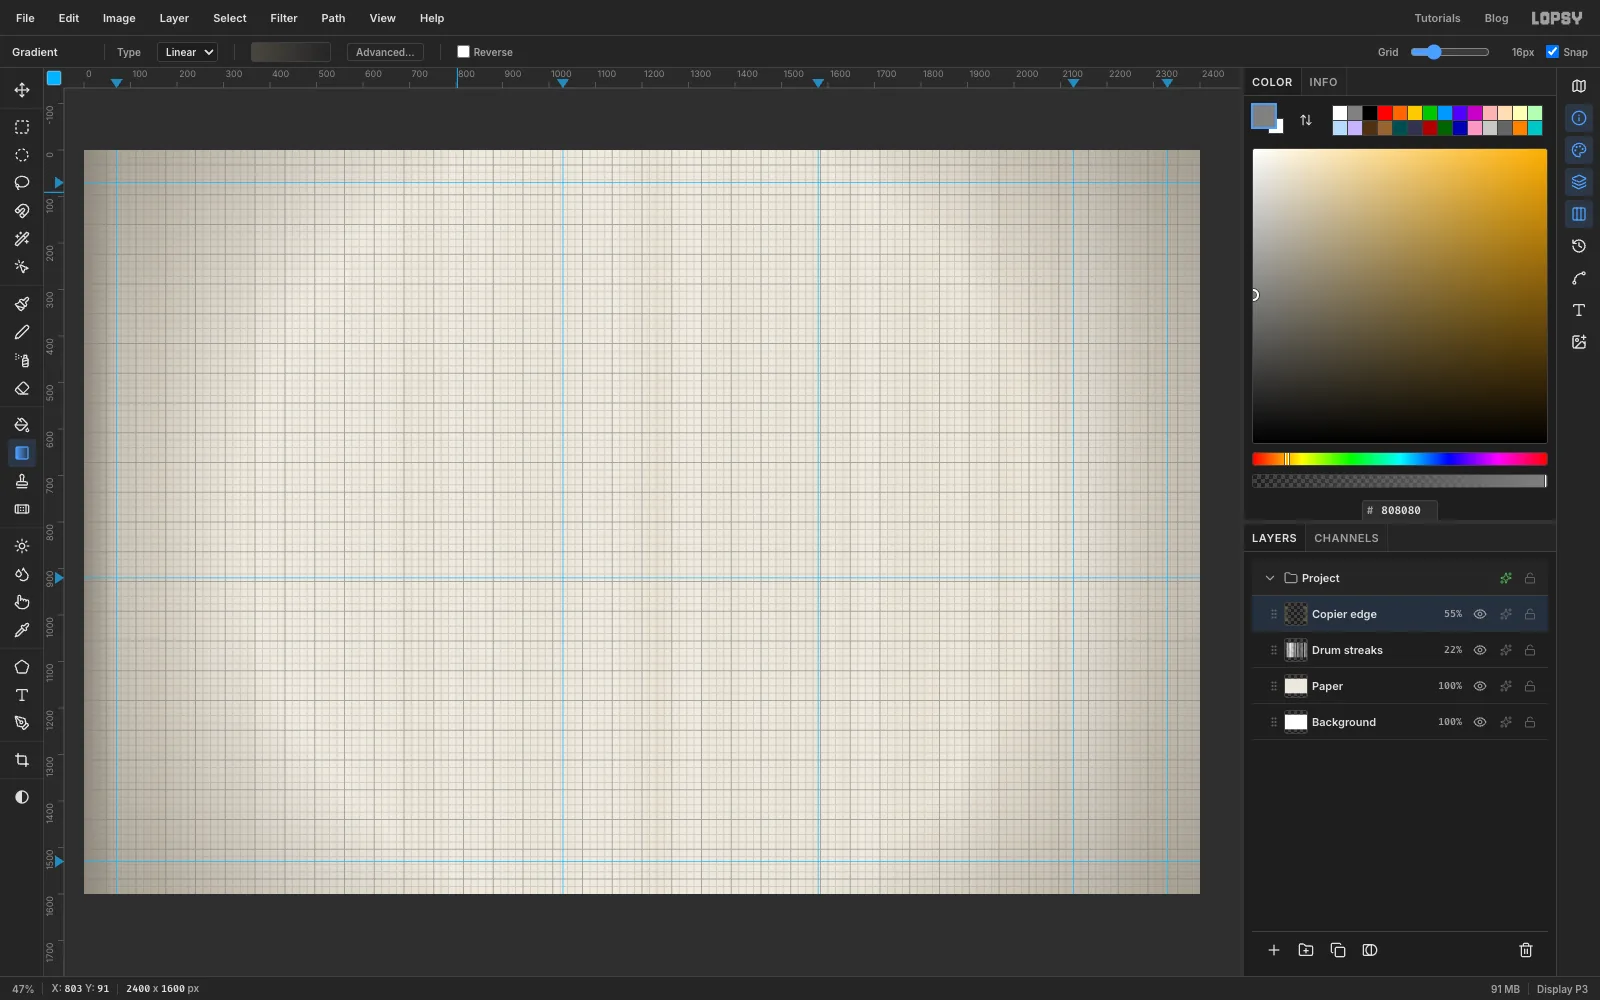
Set guides for the layout
Click the top ruler to drop vertical guides and the left ruler for horizontal ones:
- vertical guides at 70 and 2330 for the margins, and at 1030, 1579 and 2128 for the centre lines of the three phones
- horizontal guides at 70 and 1530, and one at 920 for the middle of the phones
Choose View → Show Grid to check the spacing. Turn it off again once you're happy.
-
Paste the tree and scale it down
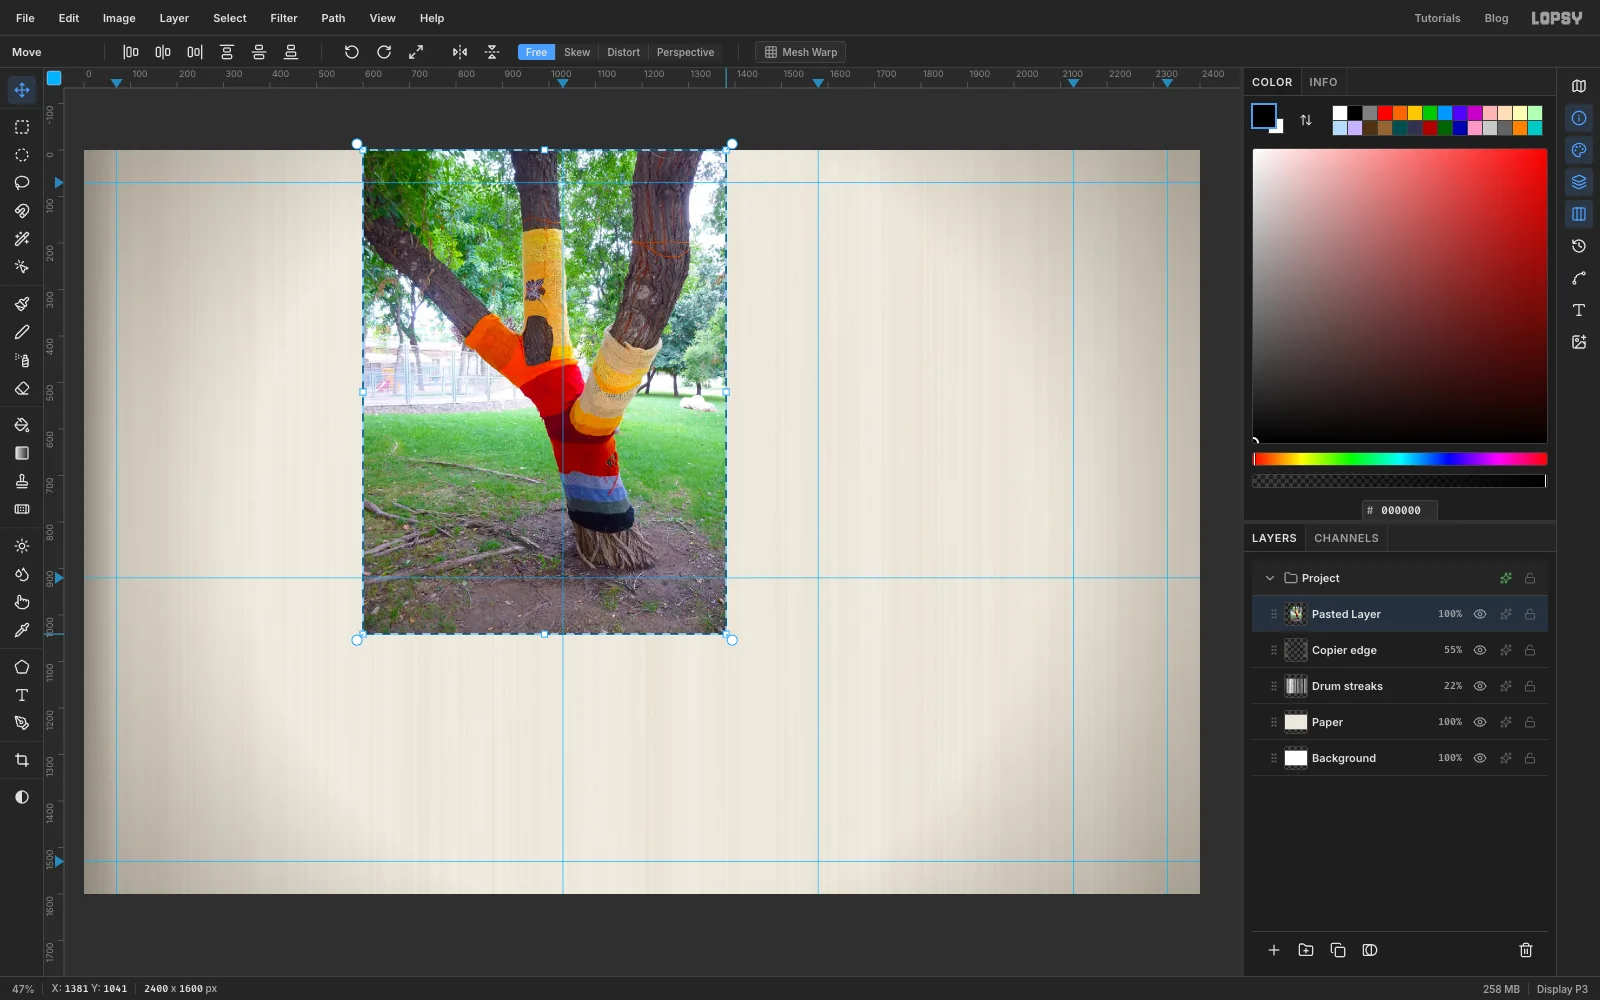
Open the Cornellá photo in your browser or Preview, copy it, and press Cmd+V in Lopsy. A pasted image bigger than the canvas is shrunk to fit and arrives already selected, with the Move tool active.
Hold Cmd and drag the bottom-right handle up and to the left until the photo is about 780 px wide. Cmd keeps the proportions. Press Cmd+D to commit the scale, and rename the layer Tree photo.
-
Move the photo into the left column
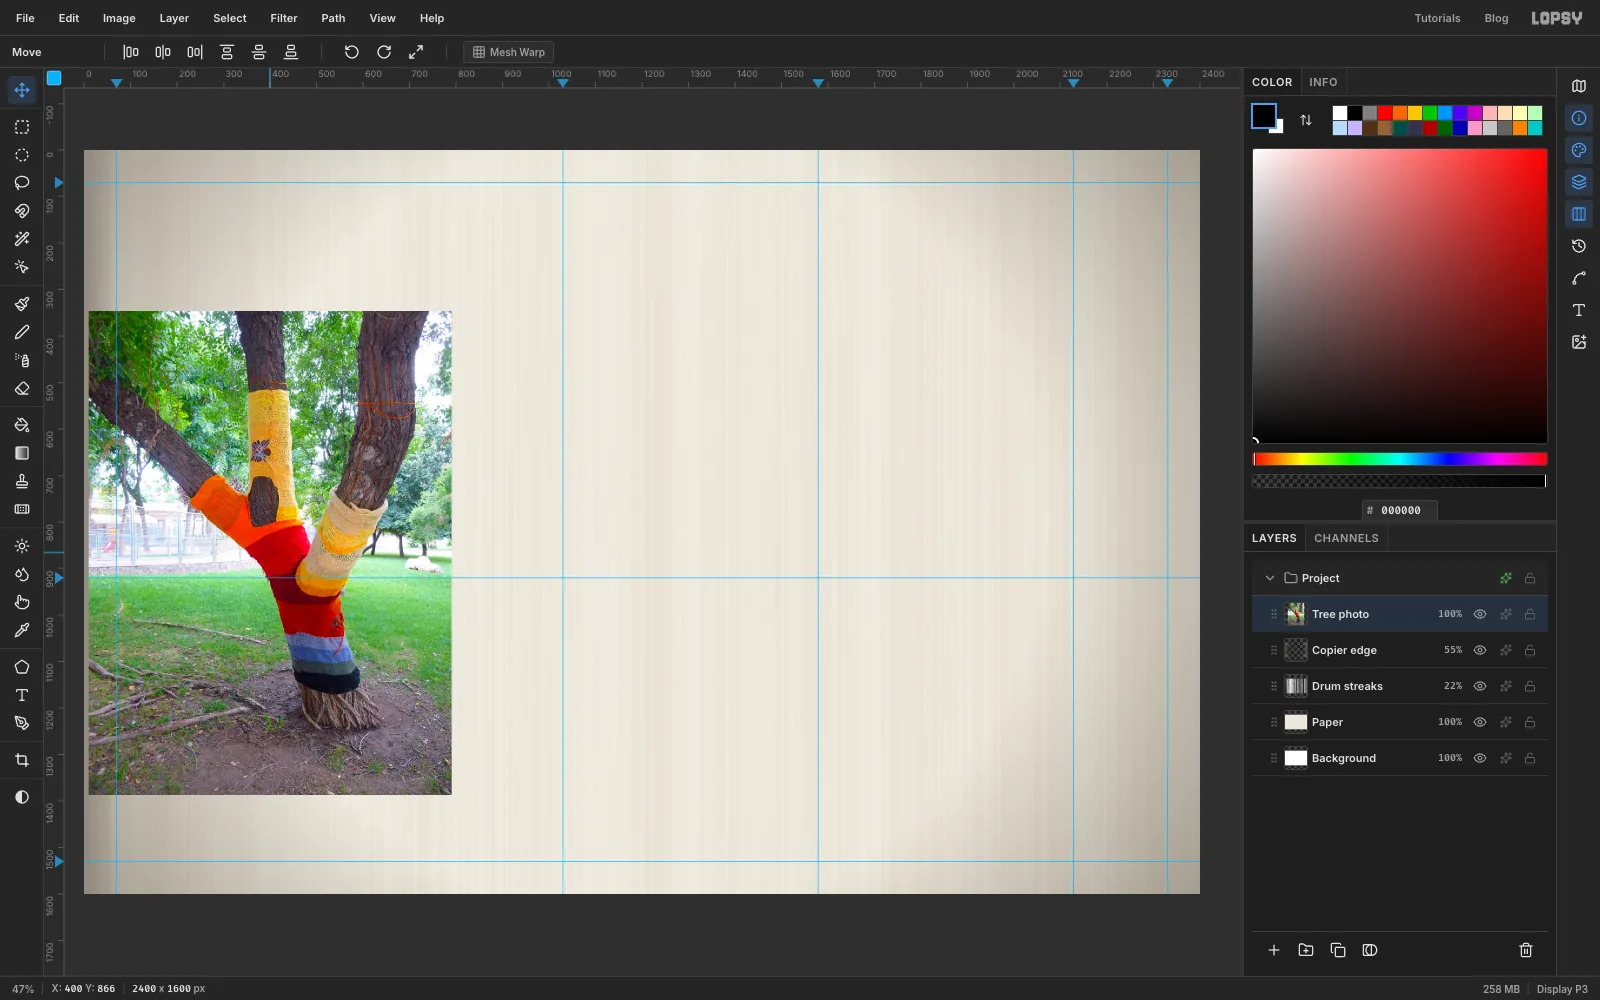
Drag the photo into the left column. Put the knitted trunk roughly in the middle of the column, from just under the title area at about y 480 down to about y 1350. The photo is bigger than the space, and that's fine: you'll tear the edges off in the next step.
Use the arrow keys for the last few pixels. Each press moves the layer 1 px, and Shift makes it 10 px.
-
Tear the photo out with the Lasso
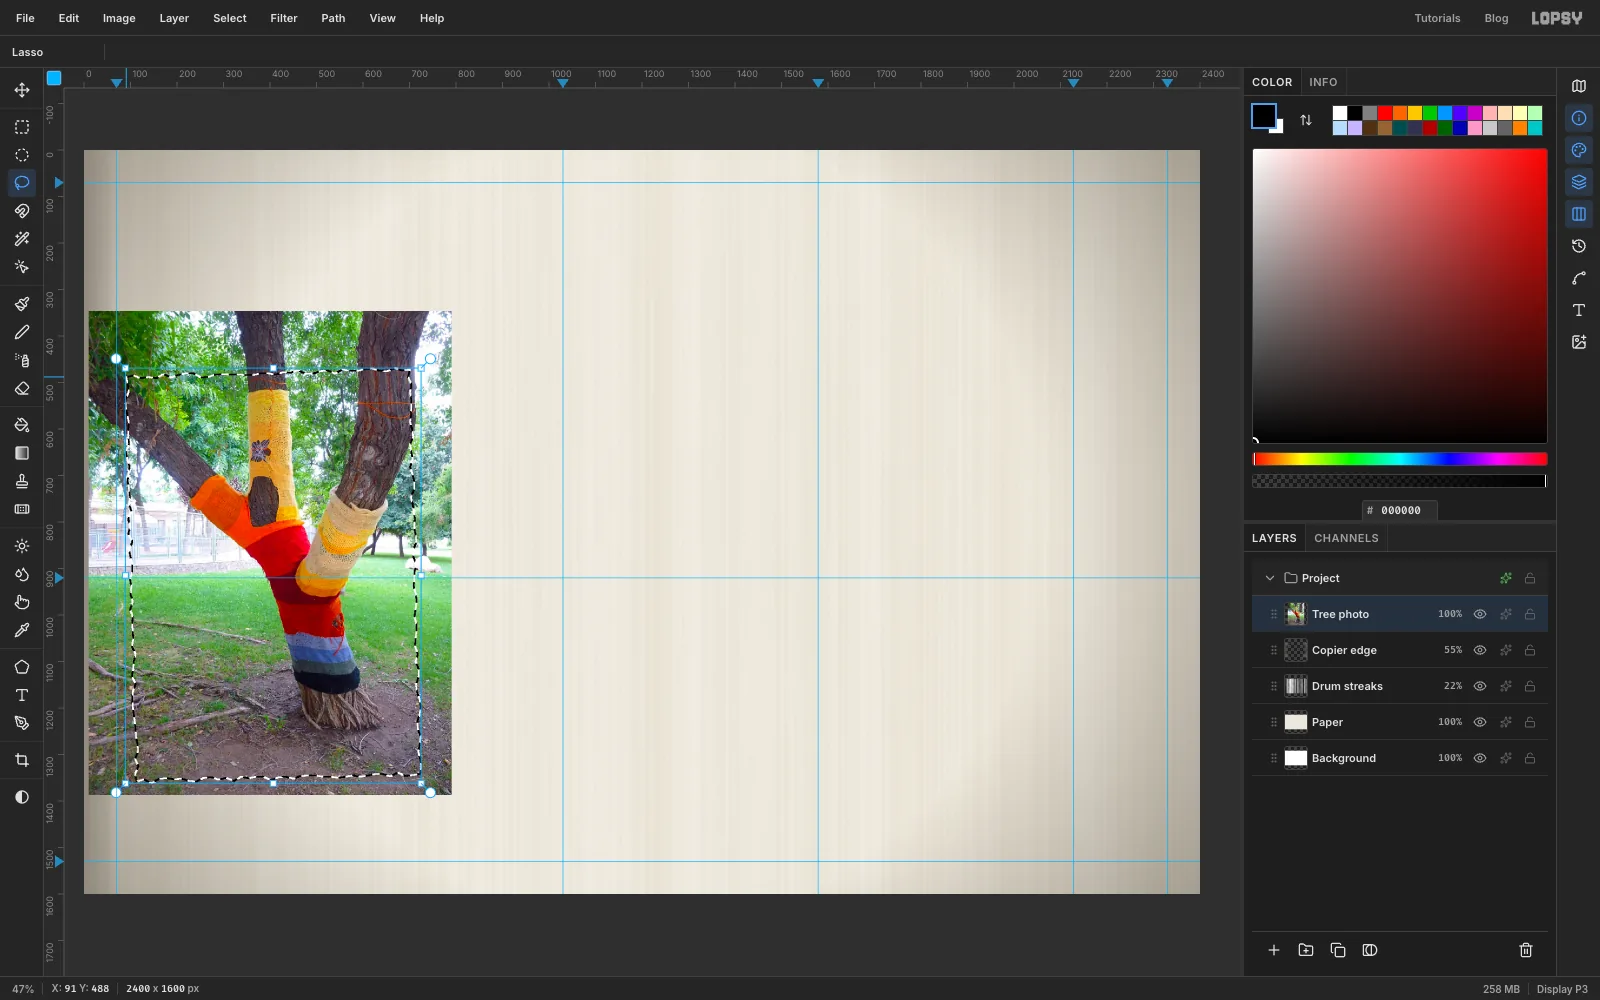
Pick the Lasso. Draw a rough rectangle inside the photo, about 610 px wide and 870 px tall, with its top just under the title area and its left edge on the margin guide. Wobble your hand every couple of centimetres so the edge looks torn rather than cut, and tilt the rectangle a degree or so.
-
Copy the torn piece onto its own layer
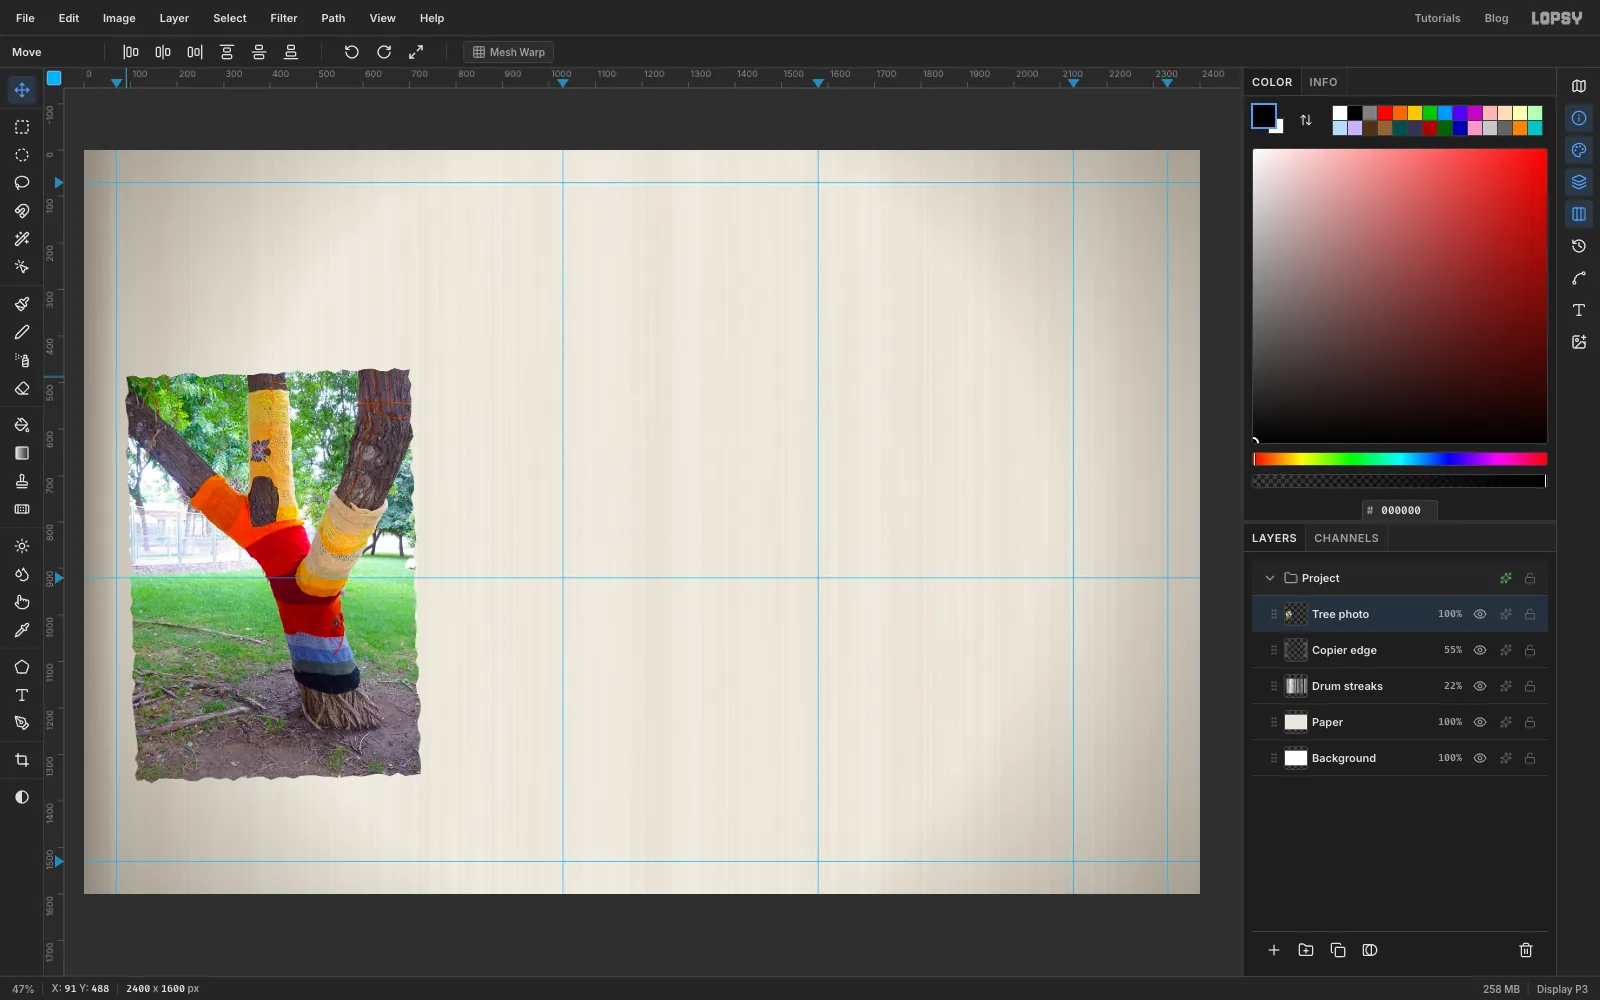
With the torn selection still active, press Cmd+C and then Cmd+V. Lopsy pastes content copied inside the app back in place, so the scrap lands exactly where it was, on a new layer.
Delete the old, full Tree photo layer and rename the new one Tree photo. Why not just invert and delete? An inverted selection stops at the canvas edge, so pixels hanging off the canvas would survive. The filters later on would turn them into stray dots along the border. A copy only holds what you selected.
-
Print the black toner plate
White backing. Click Copier edge and add a layer called Scrap paper (it must sit under the photo). Lasso a torn rectangle about 20 px bigger than the photo on every side. Fill it with , then deselect. Add a Drop Shadow: Offset X 6, Offset Y 10, Blur 16, Opacity 40.
Plates. Click Tree photo and choose Layer → Duplicate Layer three times. Name them from the top down: Mint plate, Pink plate, Toner plate. The order doesn't matter much, because every plate ends up on Multiply. Hide Tree photo, Mint plate and Pink plate with their eye icons, so you only see the plate you're working on.
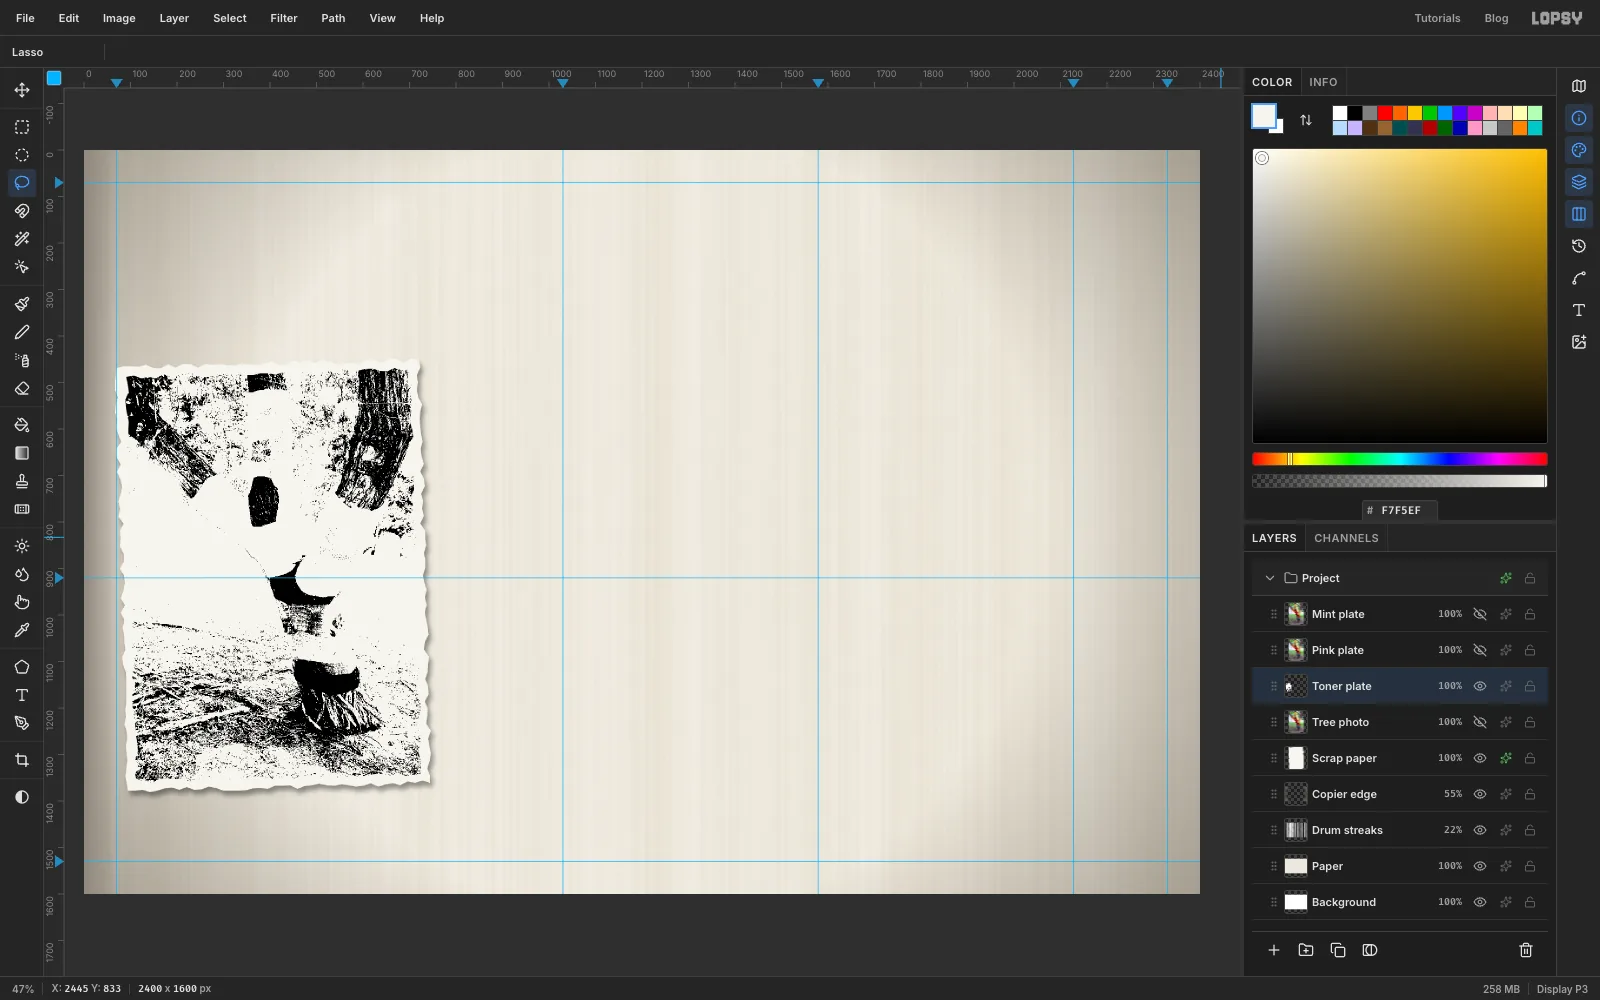
Toner. On Toner plate, choose Filter → Desaturate, then Brightness/Contrast… with Contrast 30.
Next, brighten the knitting a little so only its darkest stitches print black:
- Lasso around the knitted sleeves.
- Hold Alt and lasso the bare patch of bark inside the yellow sleeve to take it out.
- Run Brightness/Contrast… with Brightness 12.
Deselect, run Filter → Threshold… at 78, and set the layer to Multiply. Everything below level 78 turns solid black, and everything above disappears into the paper.
-
Select just the knitting
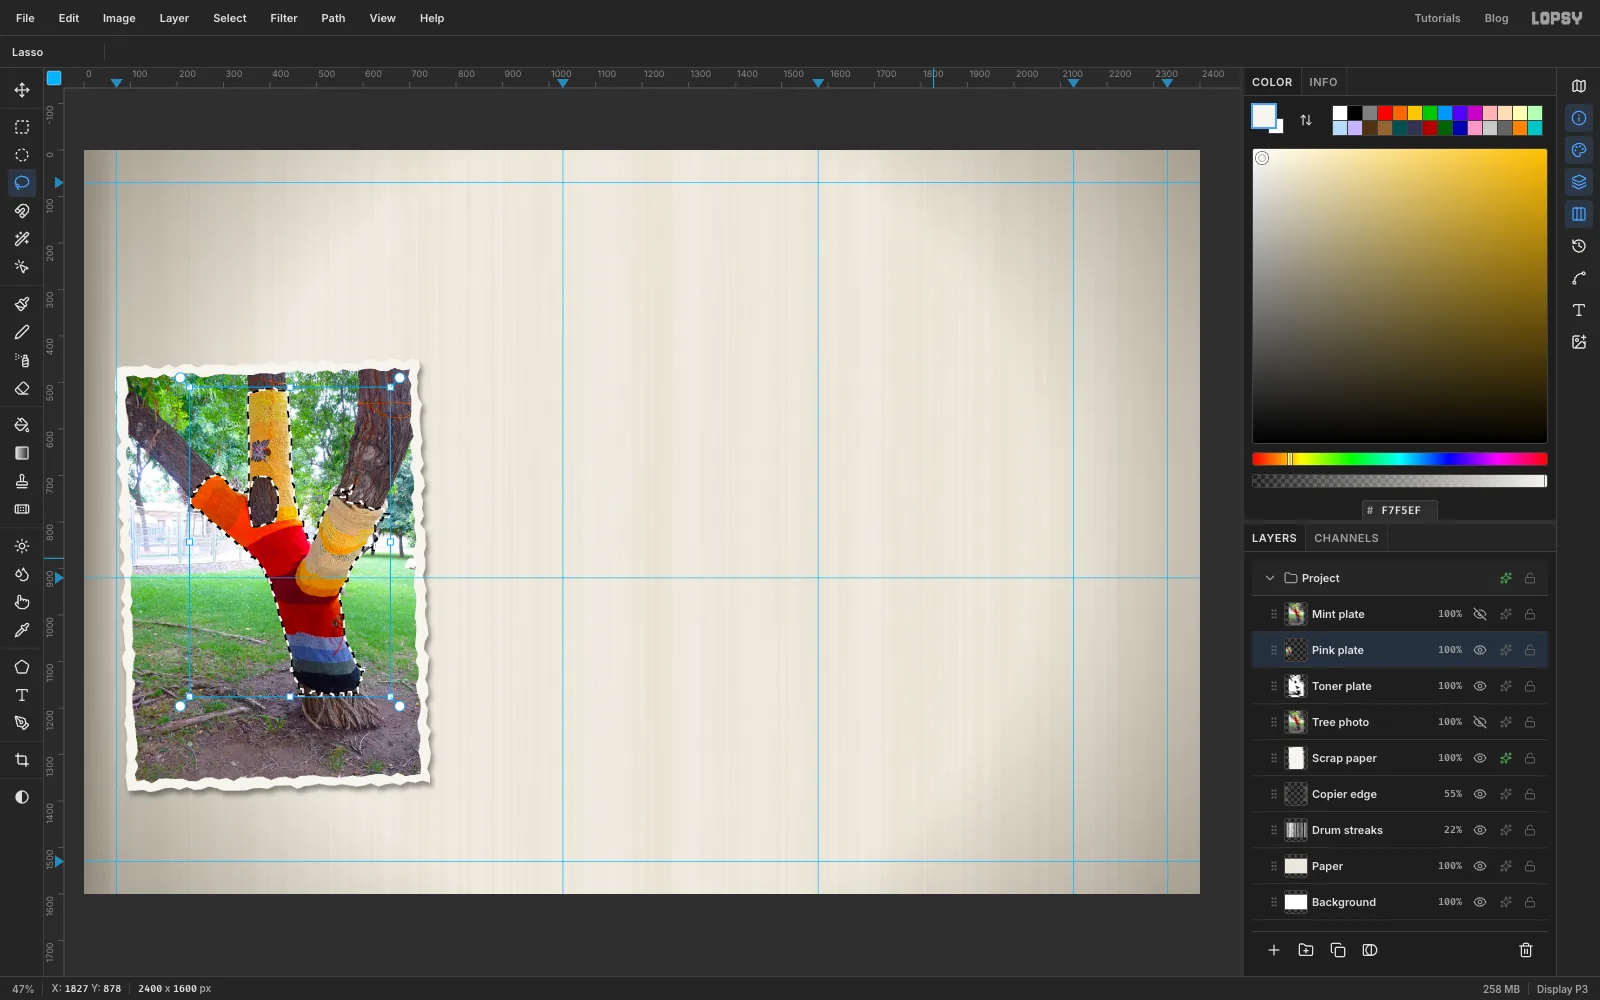
Show Pink plate and click its row. Zoom in and use the Lasso to trace the outline of all the knitted sleeves in one go: the yellow sleeve up the middle, the orange arm on the left, the red-to-navy trunk, and the cream-and-yellow sleeve on the right. Follow the real edges closely and take your time. This outline is what makes the pink look printed rather than pasted on.
Then hold Alt and lasso around the bark showing through the hole in the yellow sleeve, following its rough edge. Finish with Select → Feather… at 1 px, which softens the cut without blurring it.
-
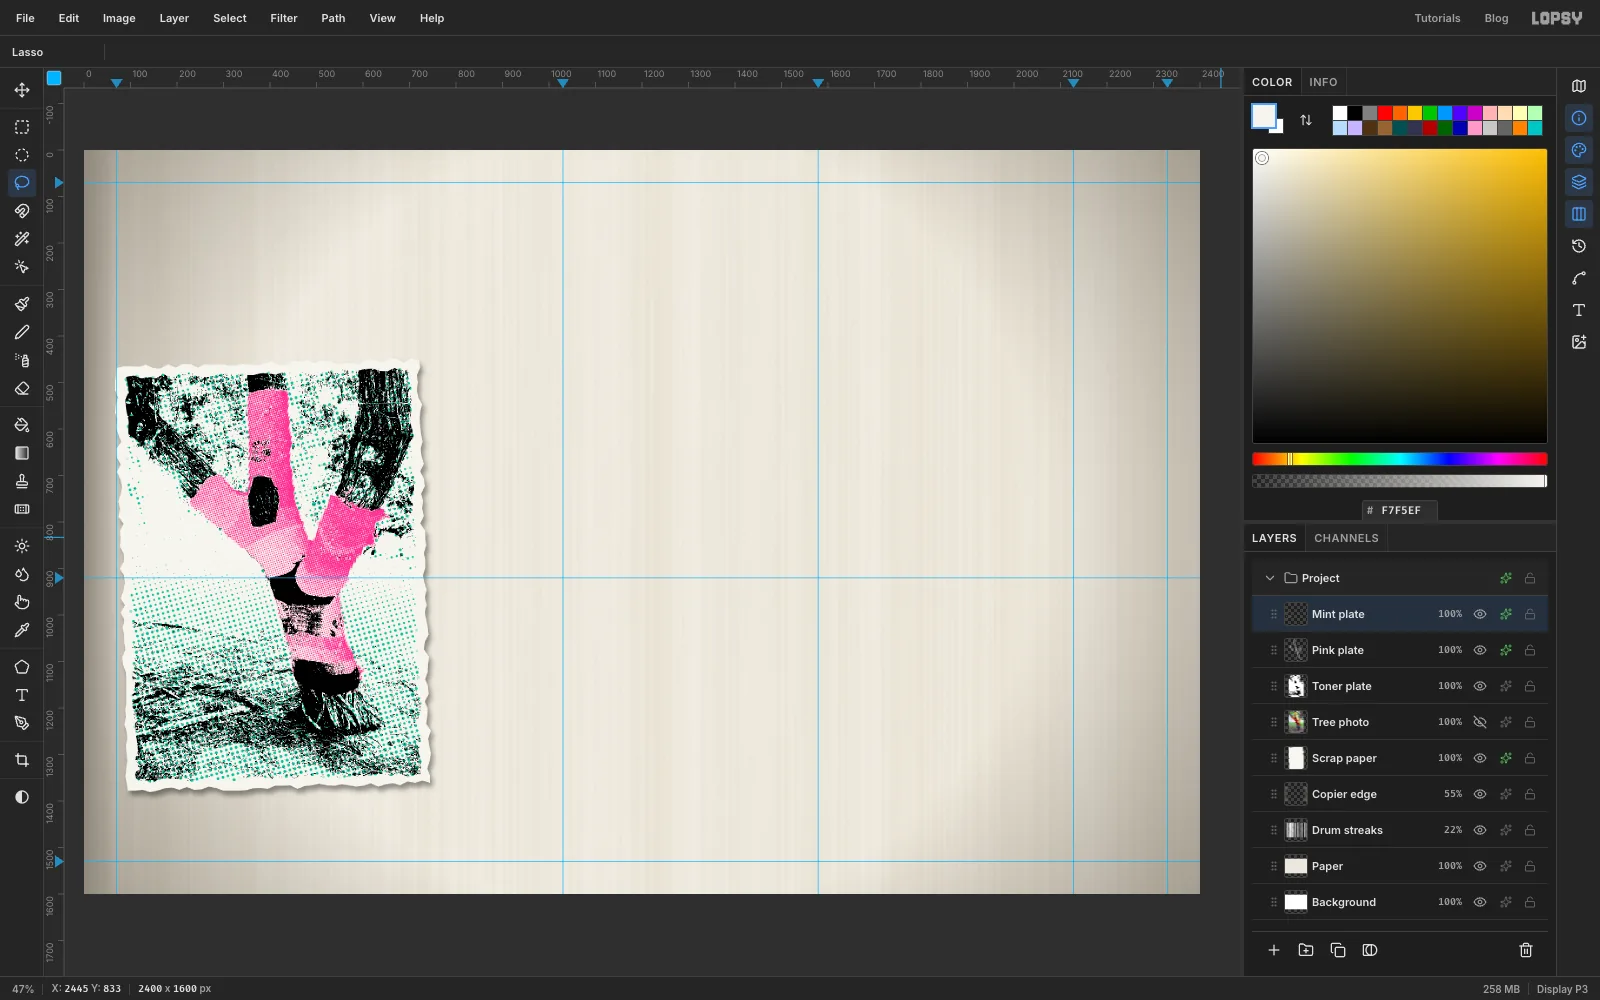
Halftone the pink plate
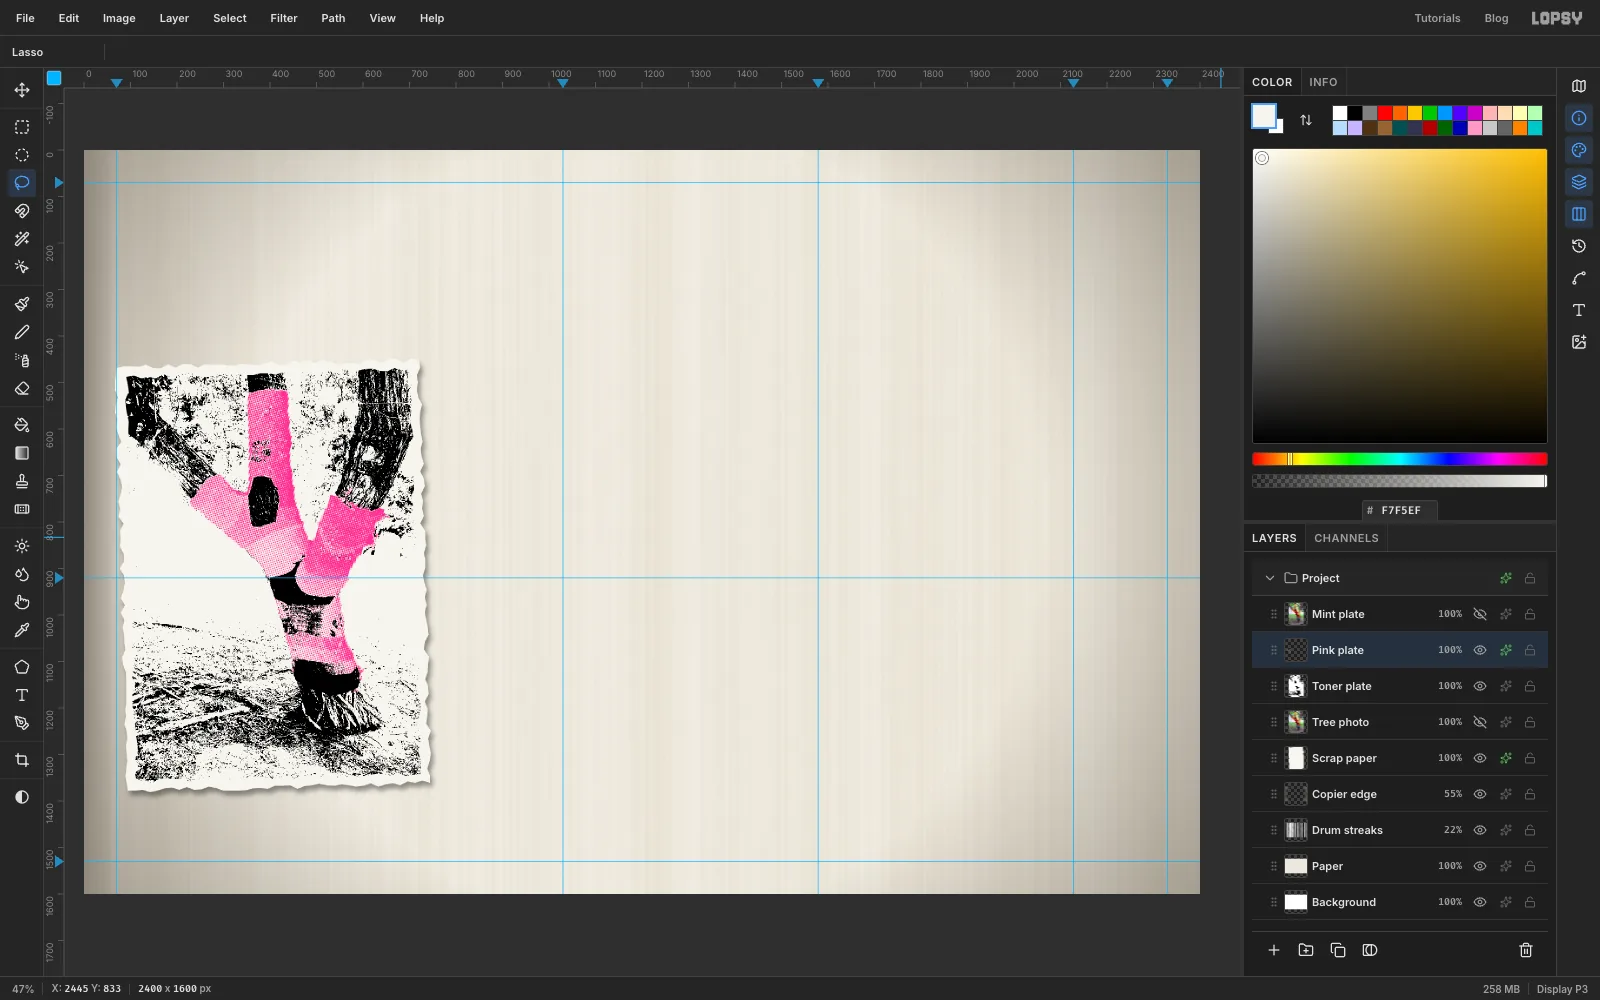
Choose Select → Inverse and press Delete, so only the knitting is left on Pink plate. Deselect.
Run Filter → Desaturate, then Filter → Invert. Inverting means the brightest yarn turns darkest and so gets the biggest dots. Choose Filter → Halftone…: Dot Size 7, Density 1.8, Angle 75, Softness 0.5.
Add a Color Overlay in pink and set the layer to Multiply.
-
Halftone the mint plate
Show Mint plate and click it. Lasso the knitting again exactly as before: the sleeves, then Alt around the bark hole, then Feather 1 px. (You can't Cmd-click the pink plate for this, because it's only dots now.) Press Delete so the mint stays out of the pink areas. Deselect.
Then:
- Filter → Desaturate.
- Brightness/Contrast… with Contrast 22.
- Halftone… with Dot Size 11 and Angle 15. Use a different angle from the pink so the two screens don't fight.
- Add a Color Overlay in mint and set the layer to Multiply.
-
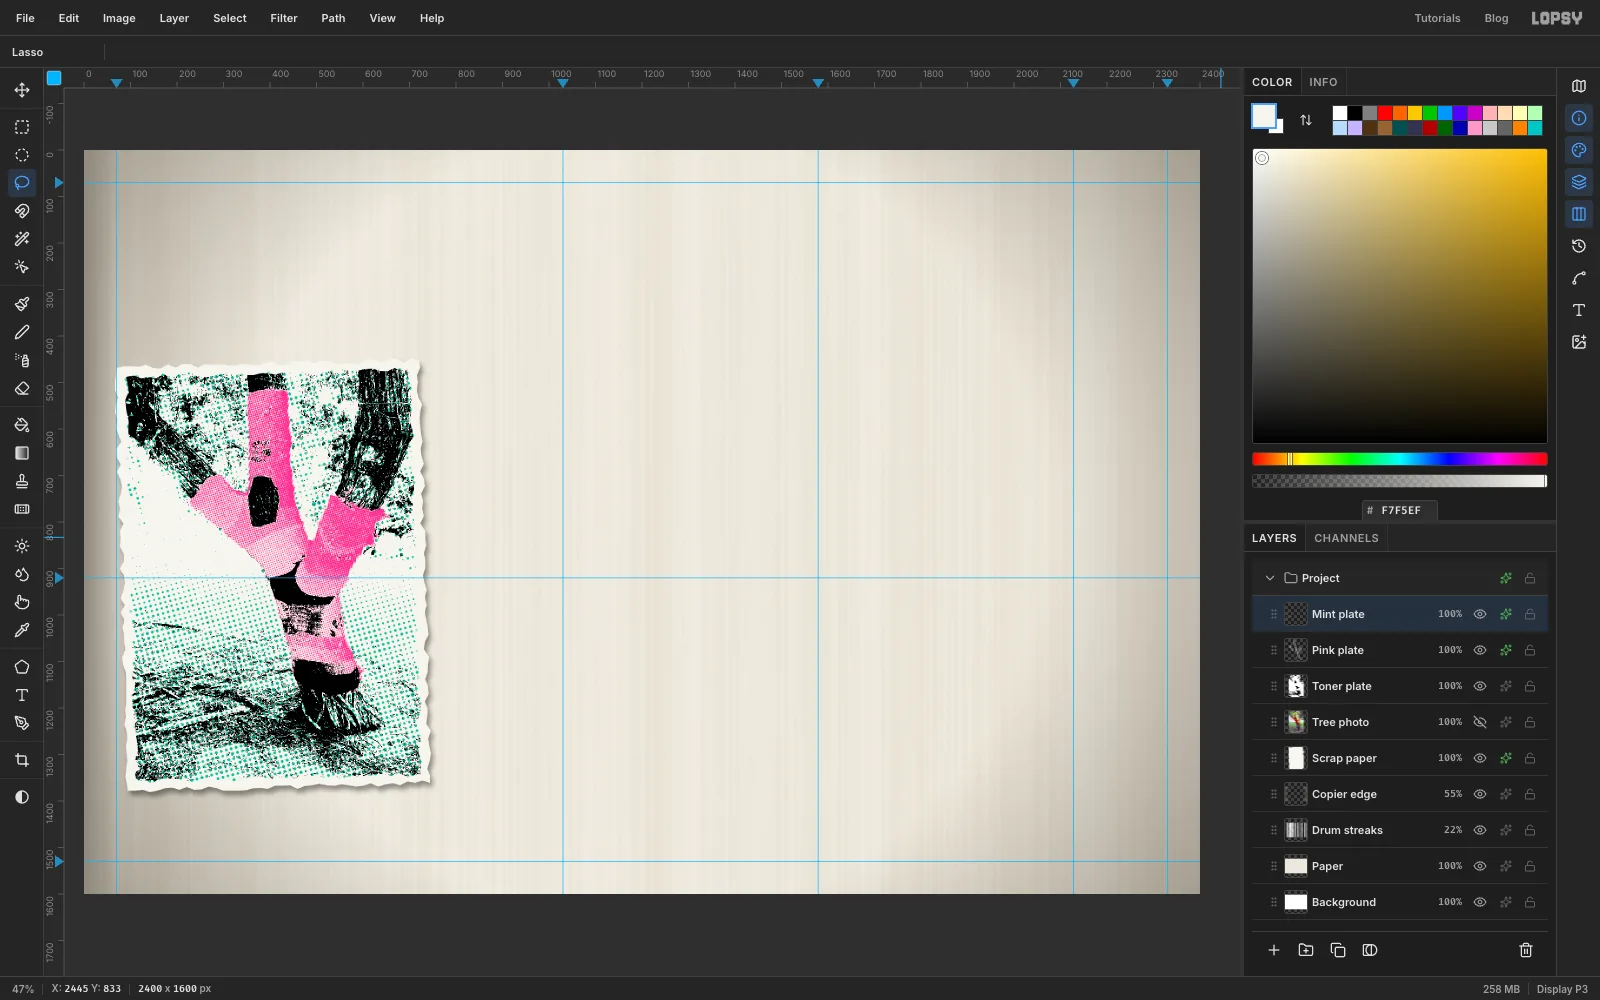
Knock the plates out of register
Real risograph plates never line up perfectly. Click Pink plate and, with the Move tool, nudge it 6 px left and 4 px down with the arrow keys. Then nudge Mint plate 6 px right and 4 px up.
The tree is finished. You won't touch these layers again until a little edge-ageing at the very end.
-
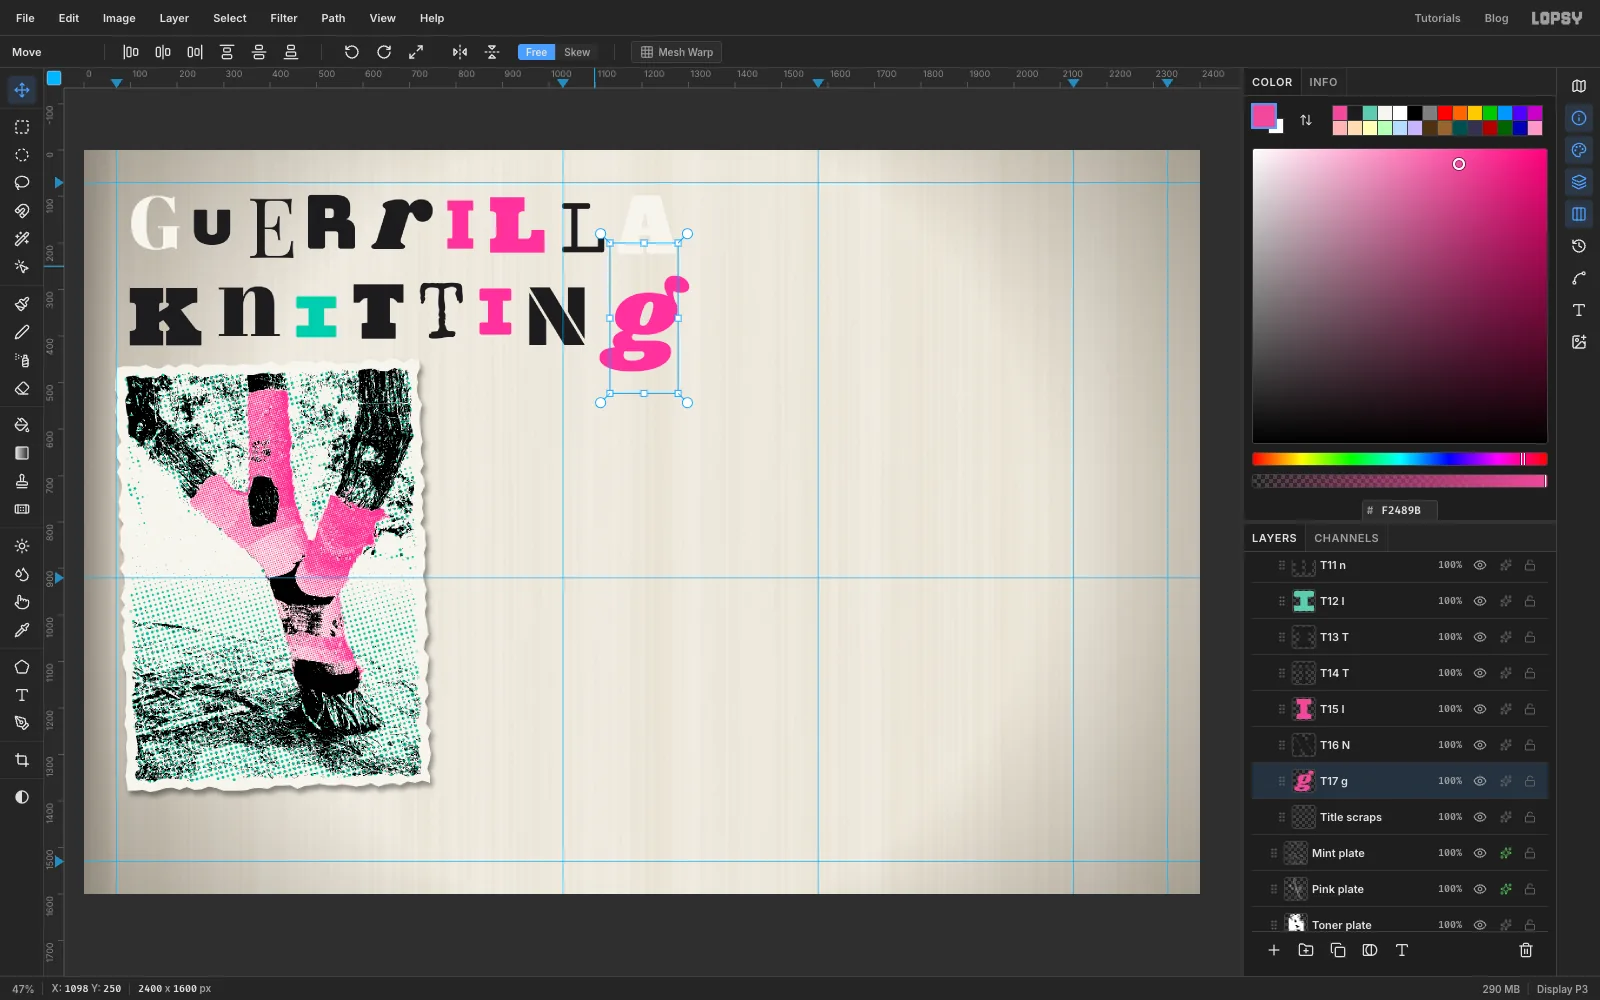
Type the ransom-note letters
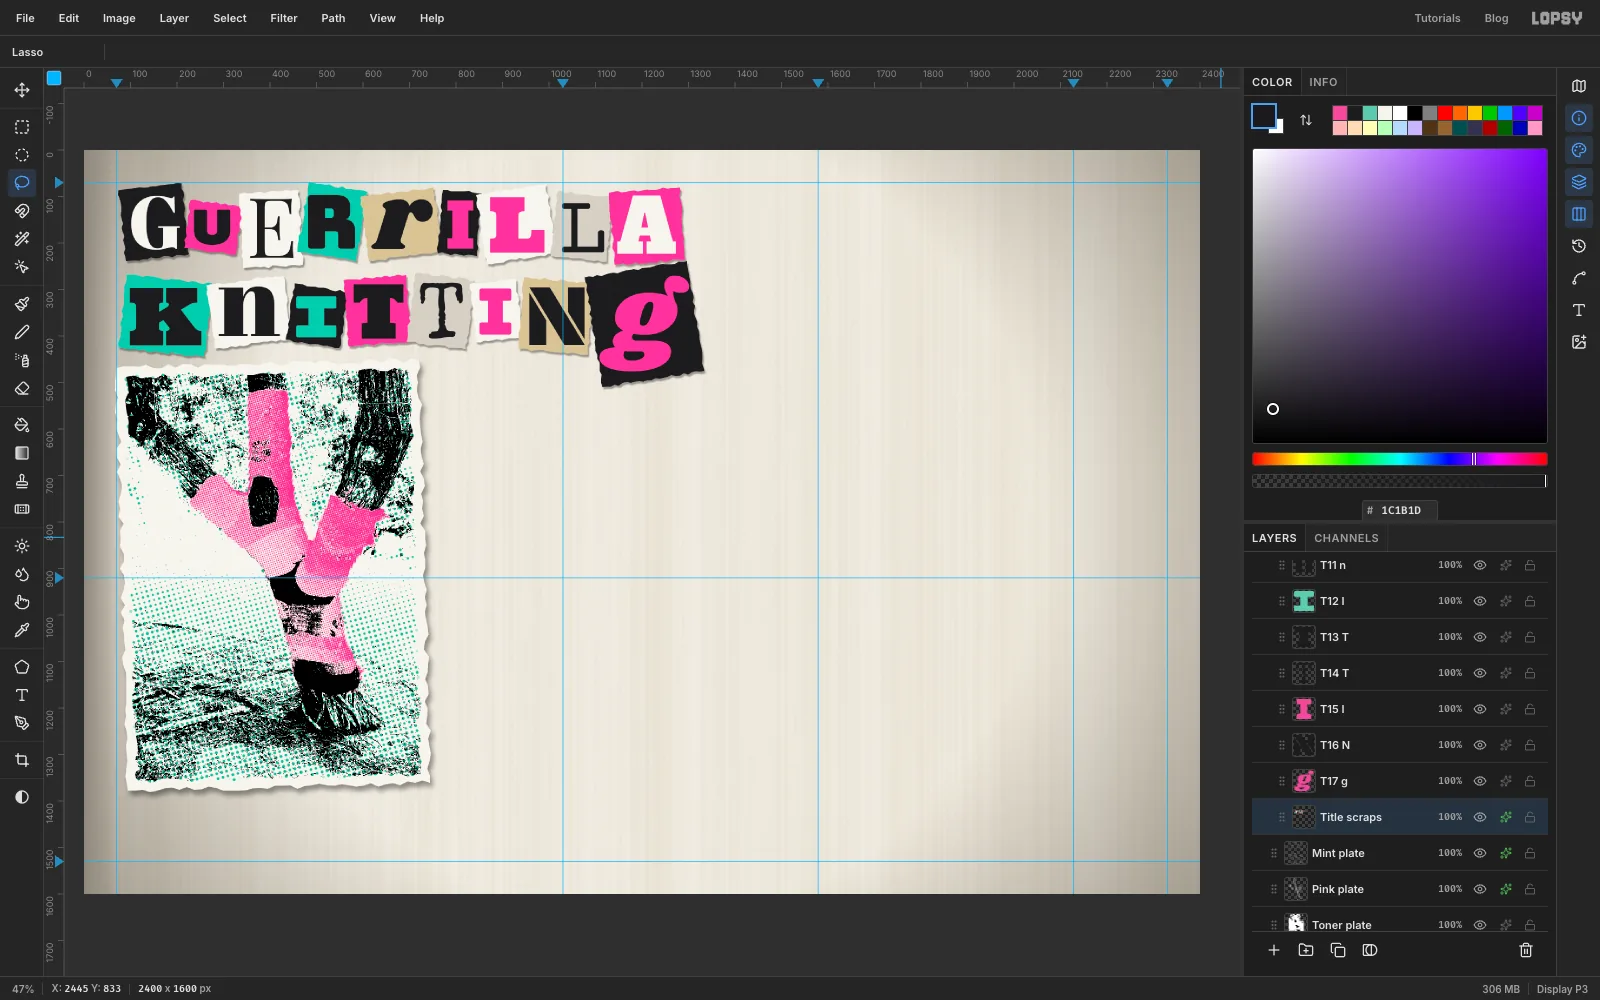
Click Mint plate and click New Group (the folder button). Name the group Title, then add a layer inside it called Title scraps. The letters go on top of the scraps, but you'll type them first so you can size the scraps to fit.
Every letter is its own text layer in a different font. Before each one, click the Title scraps row so the Text tool's settings don't restyle the letter you just made. Then pick the font, size and colour, click with the Text tool, type the letter, and press Tab to commit.
Work left to right in two rows, leaving a gap of about 30 px after each letter.
- Row 1 (centred about y 160):
GAbril Fatface 176 in white;URubik Mono One 130;EPlayfair Display SC 167;RBungee 151;rShrikhand 178;IBlack Ops One 162 in pink;LUltra 151 in pink;LCourier Prime 178;AAlfa Slab One 159 in white - Row 2 (centred about y 350):
KUltra 167;nAbril Fatface 202;IRubik Mono One 148 in mint;THoltwood One SC 140;TSpecial Elite 189;IBungee 167 in pink;NBlack Ops One 167;gShrikhand 202 in pink
Unless a colour is given, a letter is toner black . The sizes already vary from letter to letter. Let some letters sit a little high or low too, nudging them with the arrow keys. A ransom note never sits on one baseline.
- Row 1 (centred about y 160):
-
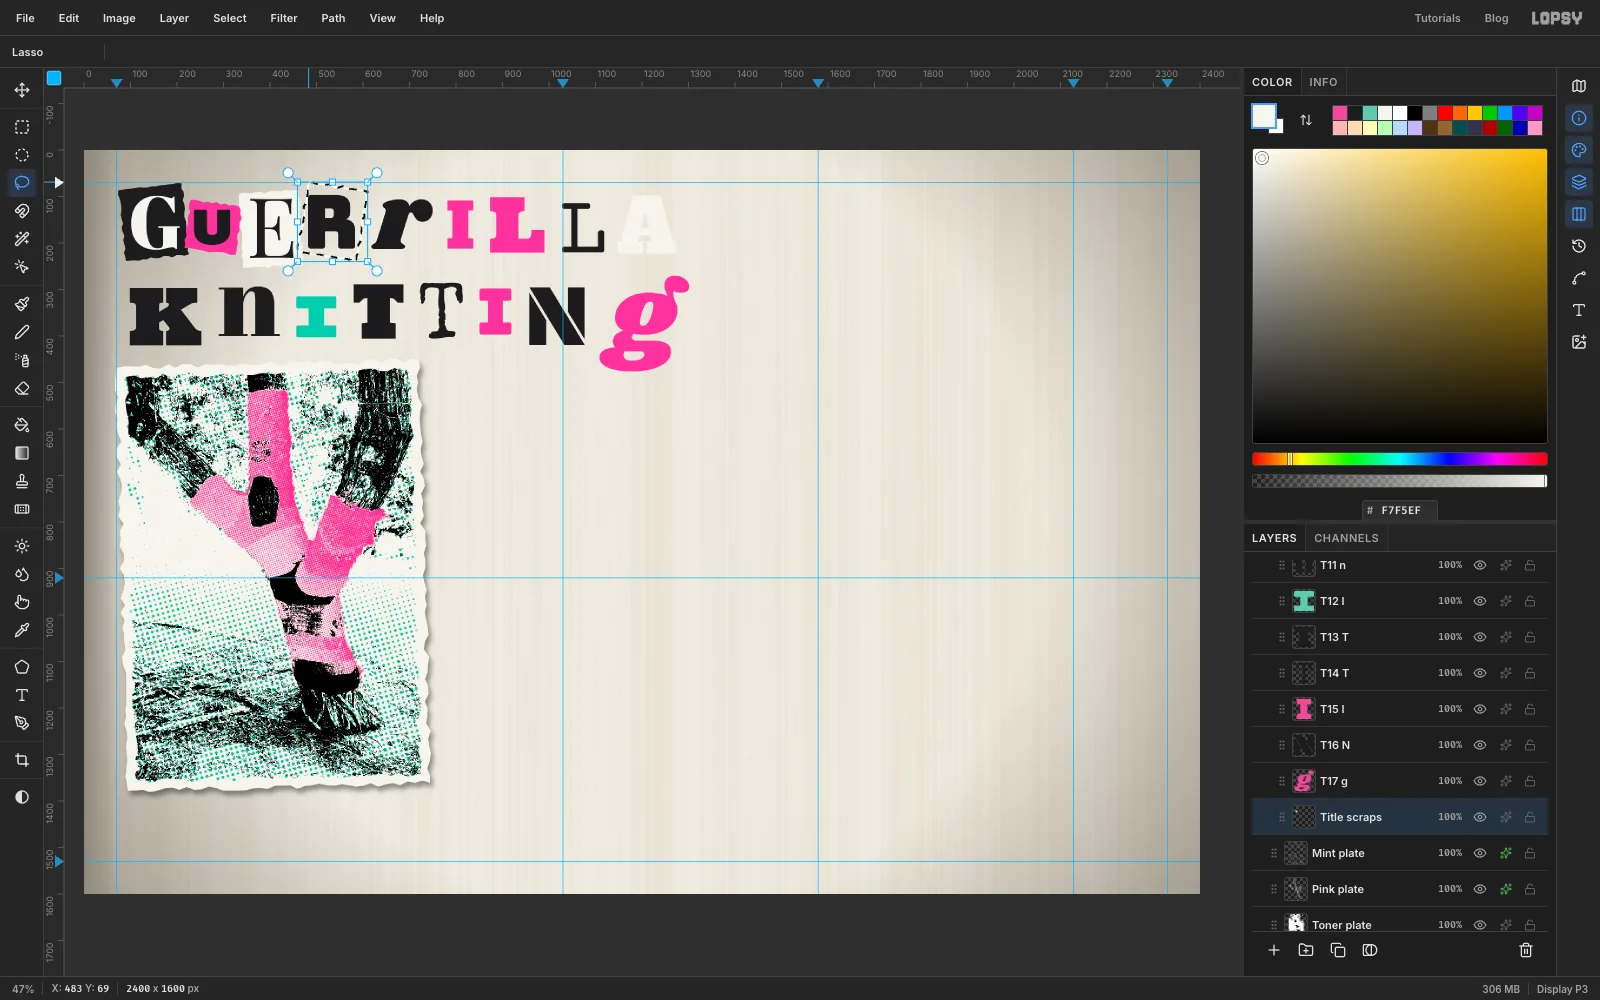
Cut a paper scrap for each letter
Click Title scraps. For each letter, lasso a small torn rectangle around it, about 12–20 px clear of the letter on each side. Tilt each one by its own angle, anywhere between about 4° and 9° either way, and fill it with its paper colour:
- black behind the G, the Black Ops One I, the Rubik Mono I and the g
- pink behind U, A and the Holtwood T
- mint behind R and K
- white behind E, L, n and the Bungee I
- kraft behind r and N
- newsprint grey behind the Courier L and the Special Elite T
-
Give the scraps texture and a shadow
Deselect, then on Title scraps run Add Noise… at 16, Mono, Gaussian. It gives the flat colour a printed grain. Add a Drop Shadow: Offset X 3, Offset Y 5, Blur 4, Opacity 35. Every scrap now lifts off the paper by the same amount.
-
Tilt a few letters
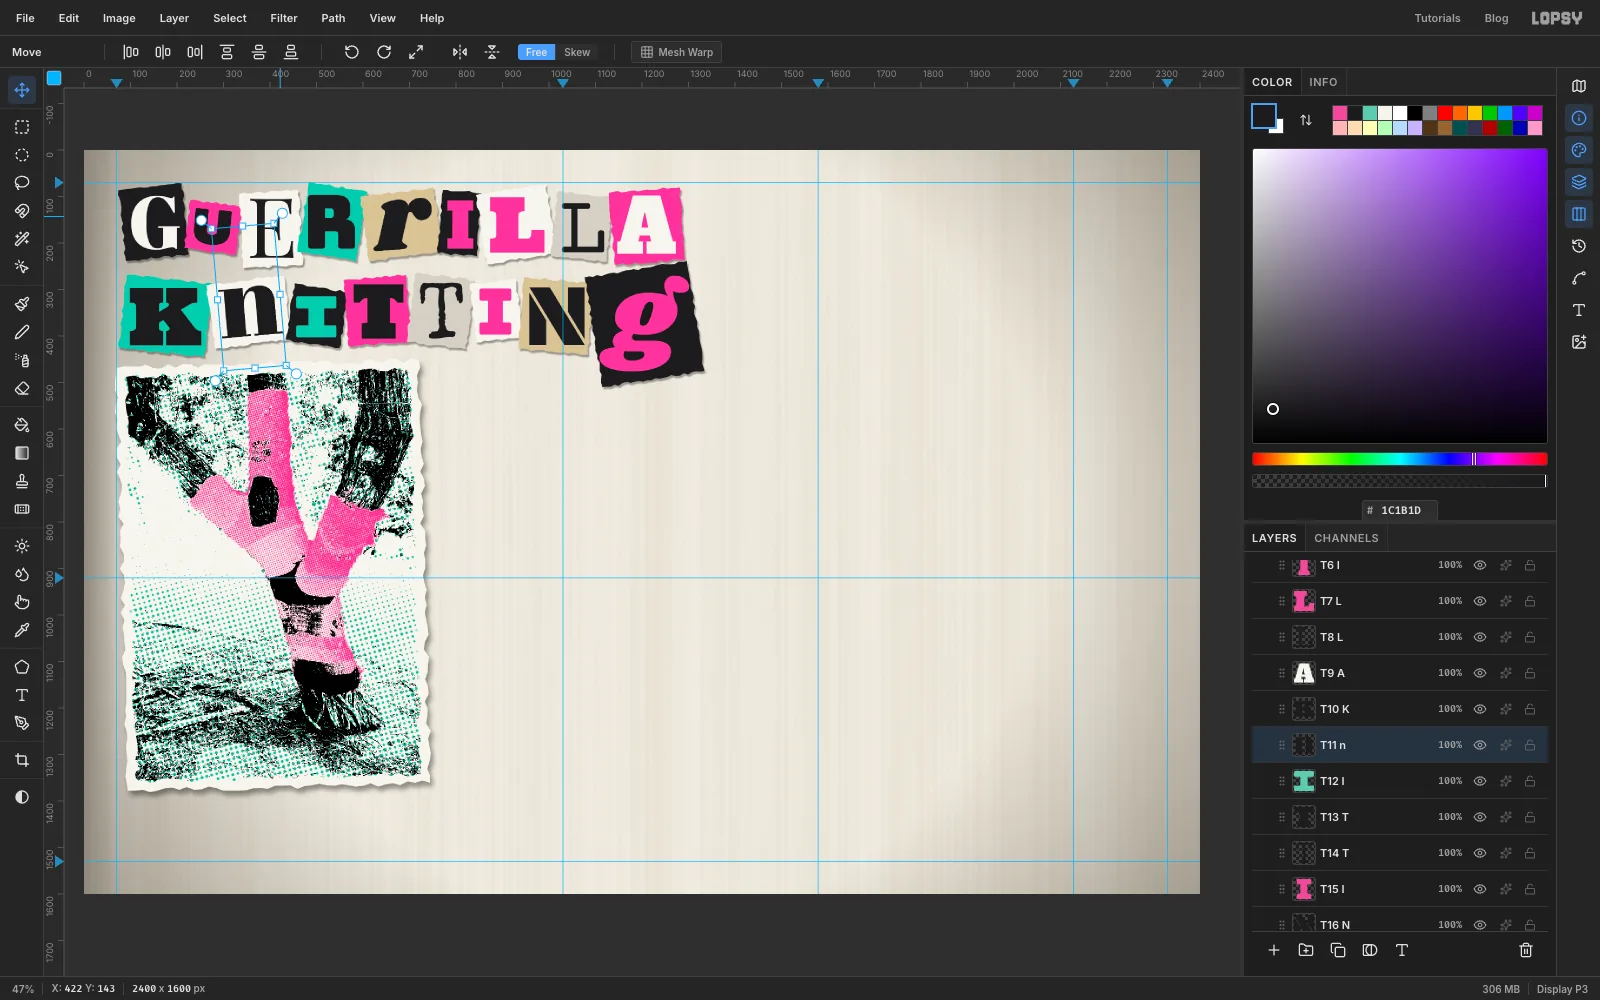
Pick five letters to tilt with their scraps: the U, the r, the n, the Holtwood T and the Bungee I. Click a letter's row, choose the Move tool, and drag the round handle just outside its top-right corner around a few degrees, the same way as its scrap. Press Cmd+D to commit.
The letters stay live text, so you can still fix a typo later. Collapse the Title group when you're done.
-
Build the first phone frame
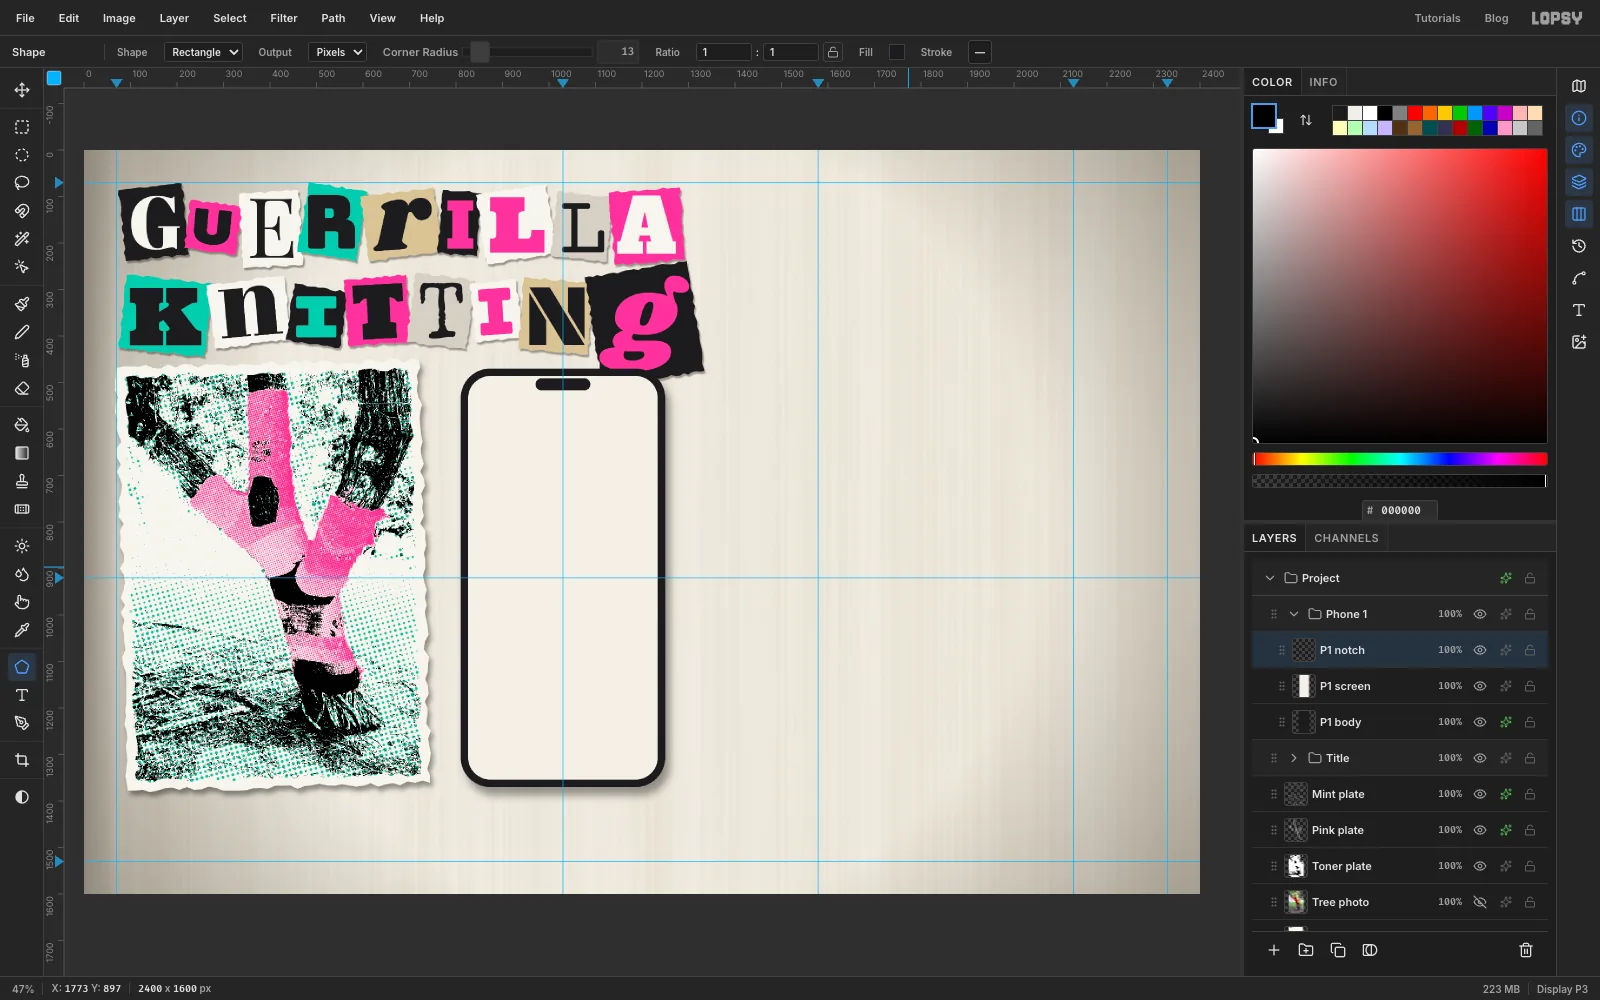
With Title collapsed and selected, click New Group and name it Phone 1. Layers you add now go inside it.
Body. Add a layer P1 body. Pick the Shape tool, set Shape to Rectangle, Corner Radius 64, fill and no stroke. Click once on the first phone's centre line at y 920, without dragging. The Shape Size dialog opens: enter 440 × 900 and click Create. The shape is centred on your click.
Run Add Noise… at 22 on the body, so the black looks like toner rather than ink. Add a Drop Shadow: Offset X 10, Offset Y 18, Blur 26, Opacity 38.
Screen and notch. Add P1 screen, set the radius to 48 and the fill to , and click the same centre point at 408 × 868. Add P1 notch: a 118 × 26 black pill with radius 13, near the top of the screen.
-
Draw the map with the Brush inside a marquee
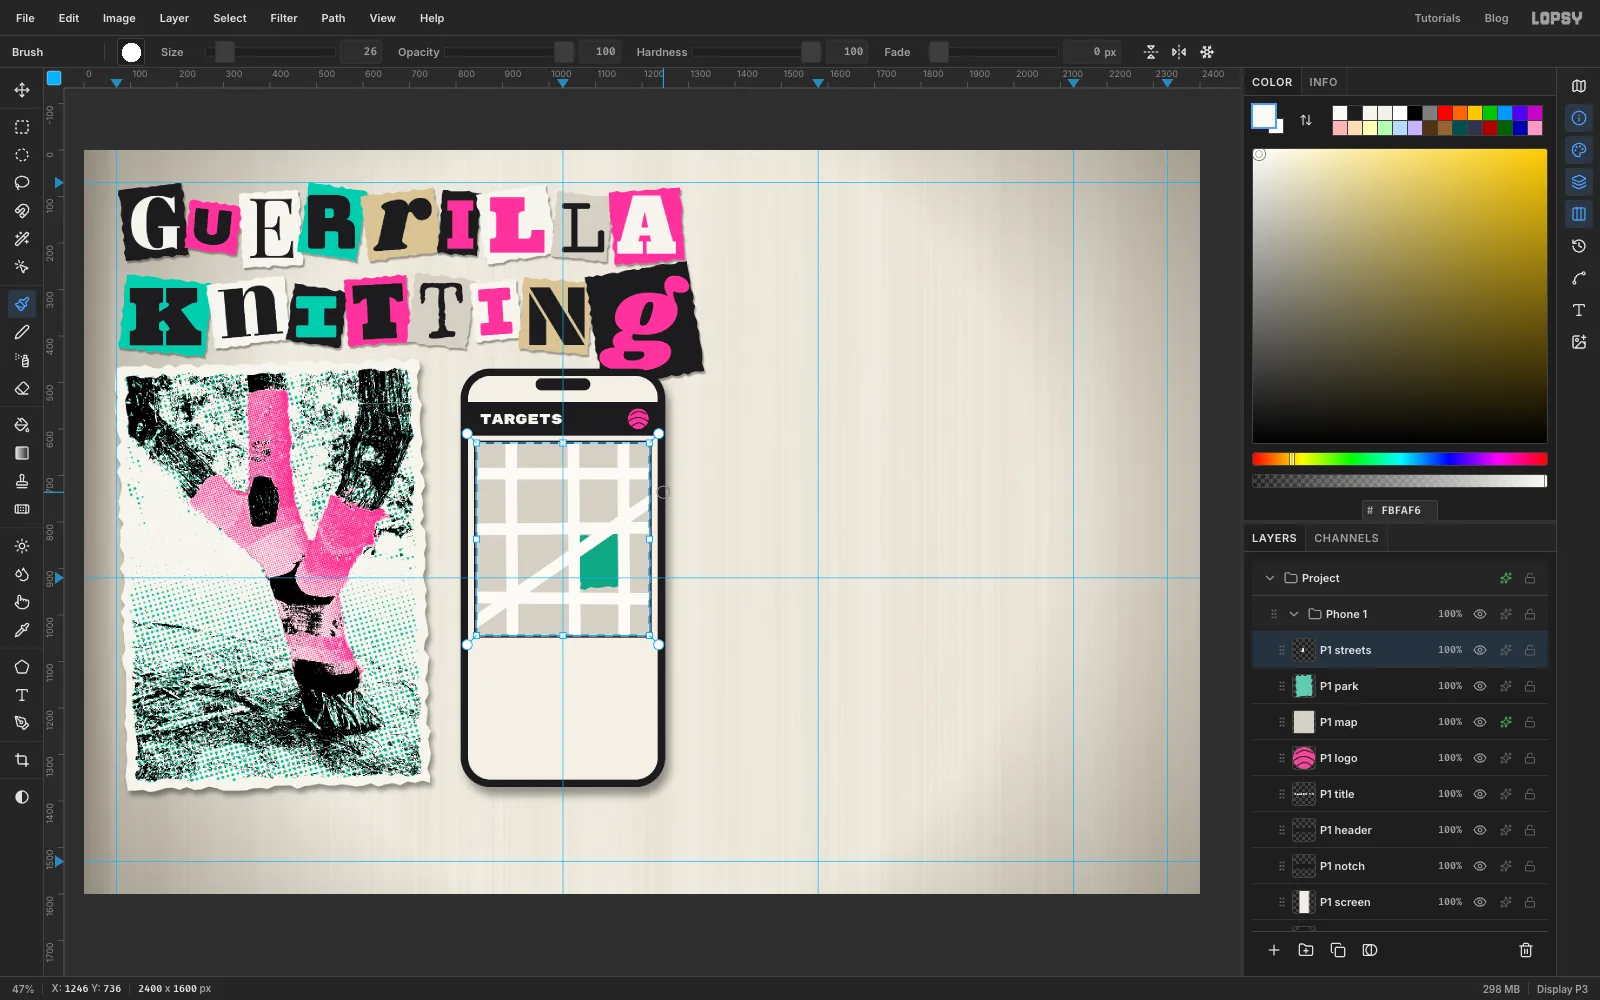
Header. Add P1 header. Use the Rectangular Marquee to select a 72 px bar across the top of the screen, just under the notch, and fill it black. Run Add Noise… at 22 again. Type
TARGETSin Rubik Mono One 30 in on the left of the bar.For the logo, add P1 logo, fill a small pink circle at the right of the bar, Cmd-click its thumbnail, and draw three curved strokes across it with a 3 px black Brush to make a ball of yarn.
Map. Add P1 map. Select a block under the header the full width of the screen, minus 16 px each side, and about 420 px tall. Fill it with newsprint . Add Add Noise… at 18, and a Stroke of 3 in black.
Park. Add P1 park and lasso a slightly ragged patch about 85 × 115 px, a little right of the map's centre. The streets you paint next run along its edges. Fill it mint, deselect, and set the layer to Multiply.
Streets. Add P1 streets. Select the map block again, just inside its edge. Pick the Brush at Size 26, Hardness 100, in . For each street, click where it starts and Shift-click where it ends. Draw three across, three down and one diagonal. Start and end each street past the edge of the map: the marquee clips them.
Deselect and give the streets a Stroke of 2 in black.
-
Drop pins on the map
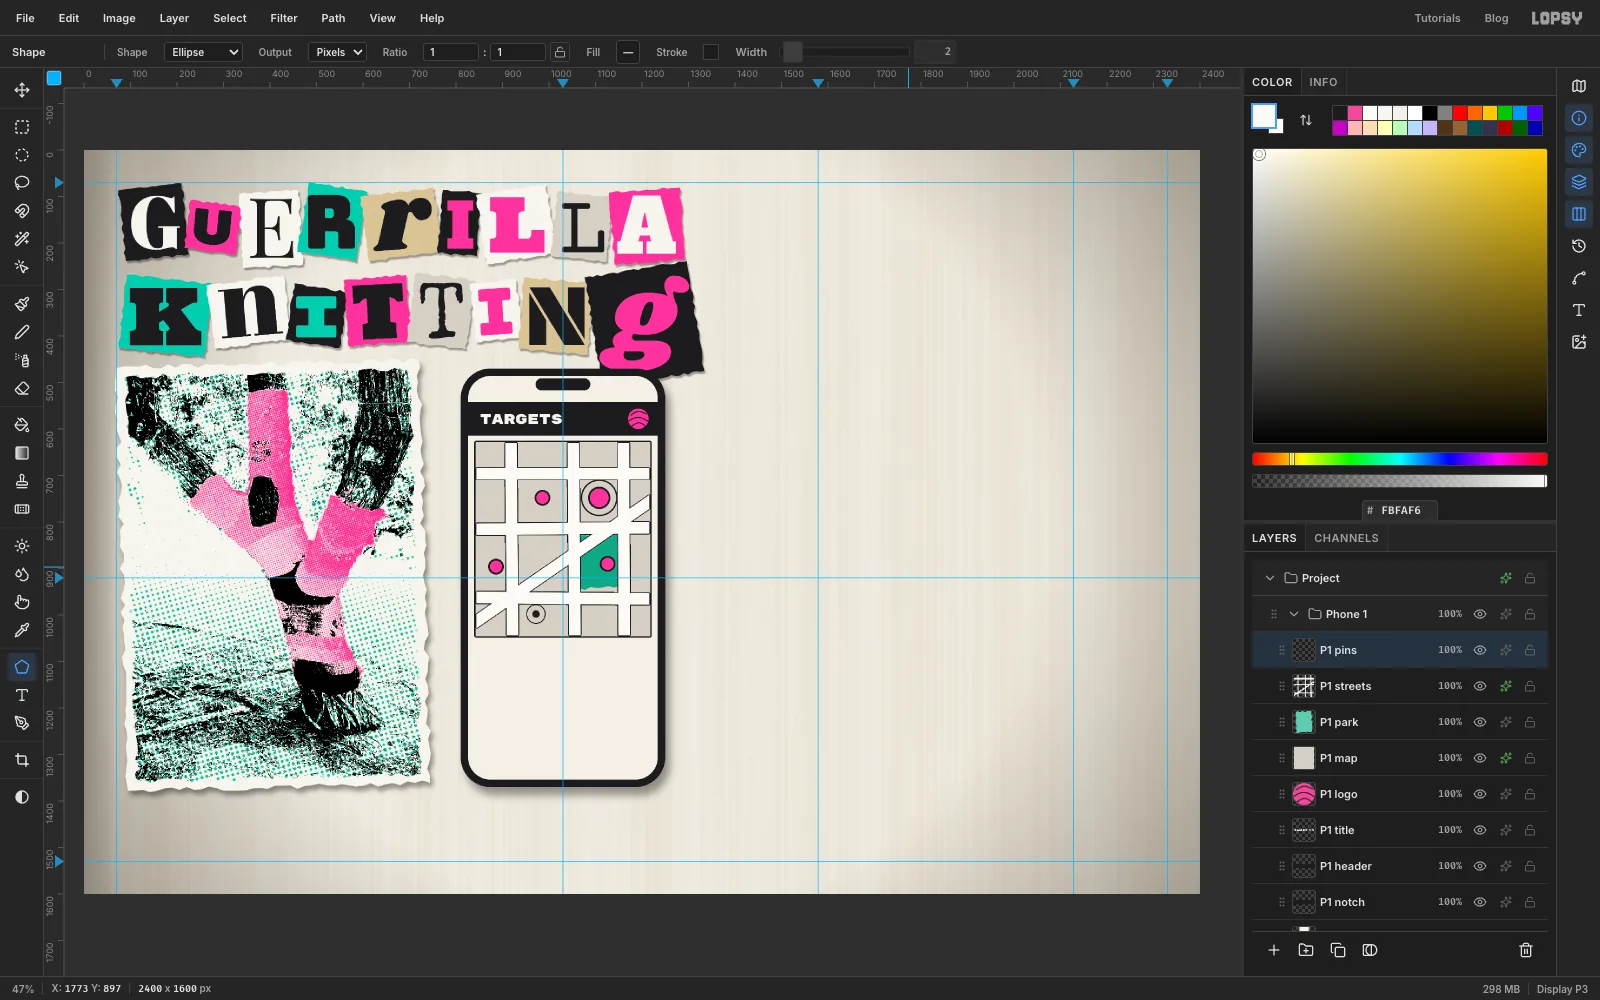
Add P1 pins. Set the Shape tool to Ellipse with a pink fill and a 4 px black stroke. Click-to-size three 30 px pins on street corners and one bigger 44 px target. Then switch the fill off and click a 76 px ring centred on the target pin.
For the "you are here" marker, make a 16 px black dot near the bottom-left of the map and a 40 px ring around it (fill off, 2 px stroke).
-
Add the card and its button
Card and button. Add P1 card. With the Shape tool, click-to-size a white 376 × 200 rectangle, radius 16, with a 4 px black stroke, under the map. On a new layer P1 button, make a pink 200 × 54 pill, radius 28, with a 3 px stroke. Give it a hard Drop Shadow: Offset X 5, Offset Y 5, Blur 1, Opacity 100, in black.
Tab bar. On P1 card, draw a 3 px Pencil rule across the bottom of the screen (click, then Shift-click).
Text. Create the text from the bottom of the screen upwards, so you never click inside a line you've already typed. As with the title, click P1 button before you set up each line:
- the tabs
MAP(pink),KNITandCREWin Rubik Mono One 17, spaced evenly under the rule 3 more →in Special Elite 19, to the right of the buttonCLAIM ITin Rubik Mono One 19, centred on the button140 m · 4th & Elm · no camerasin Special Elite 18, between the card title and the buttonBARE LAMPPOST #12in Anton 34, at the top left of the card- the street names
ELM STand4TH AVEin Special Elite 15, each centred on a white street, andyouin Special Elite 14, just right of the marker
Finally, underline the pink
MAPtab with a 4 px pink pencil line.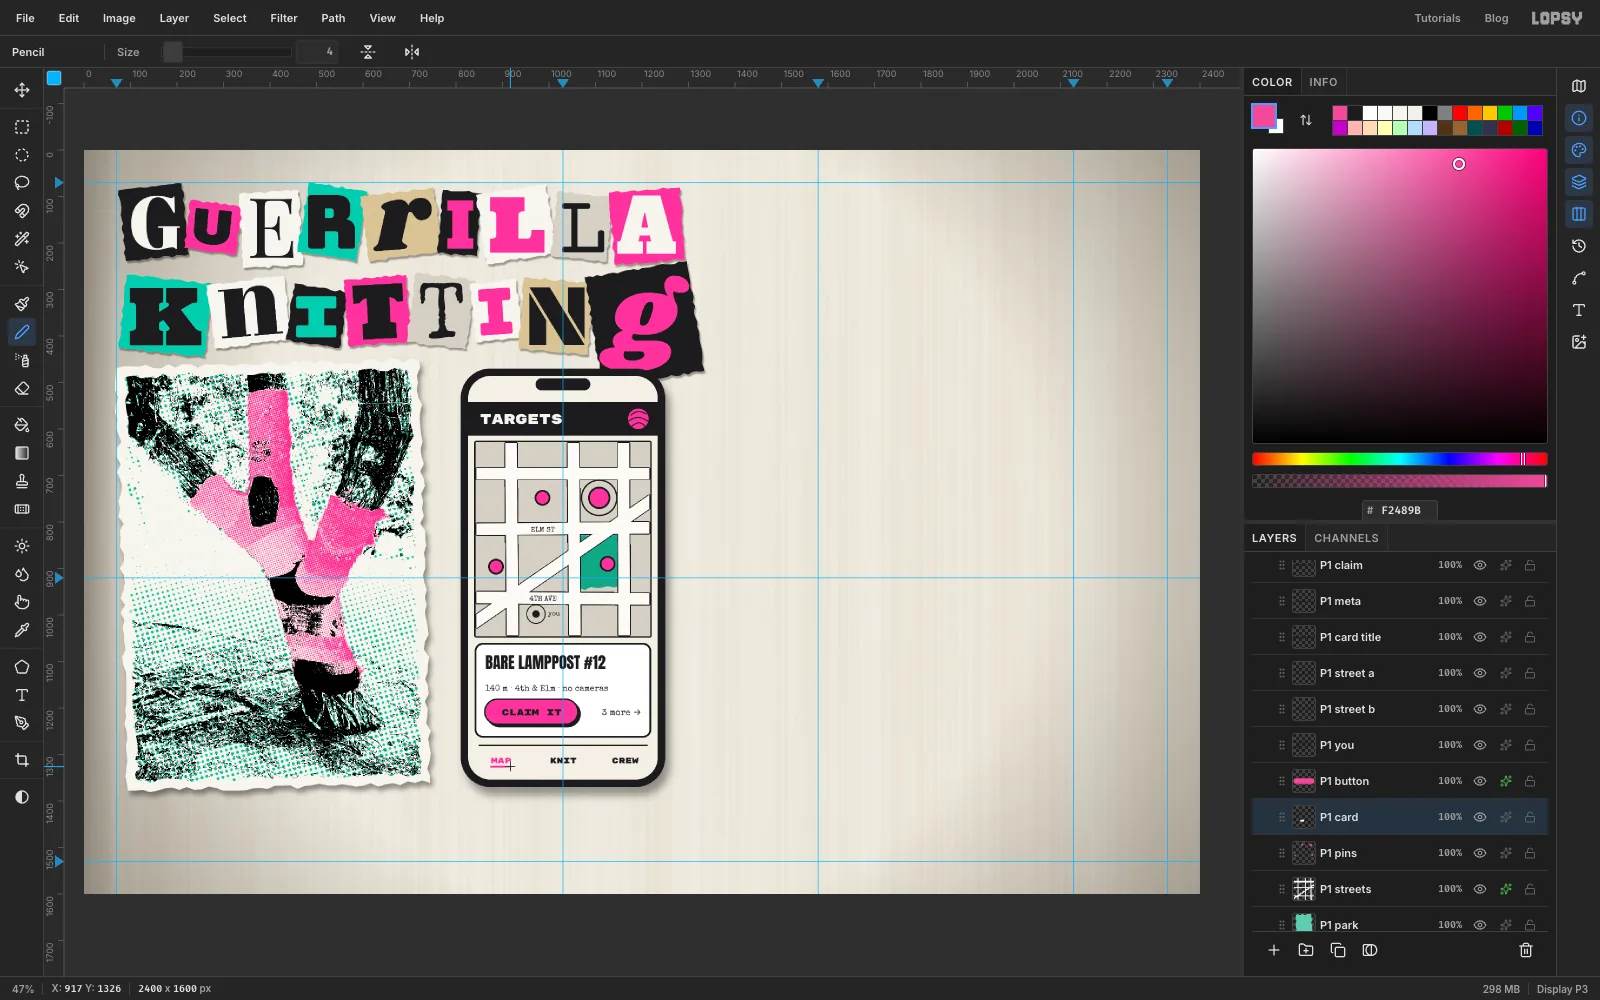
- the tabs
-
Scale the phone and tilt it
Collapse Phone 1 and click its row. Make sure nothing is selected (Cmd+D), then pick the Move tool. The handles now frame the whole group.
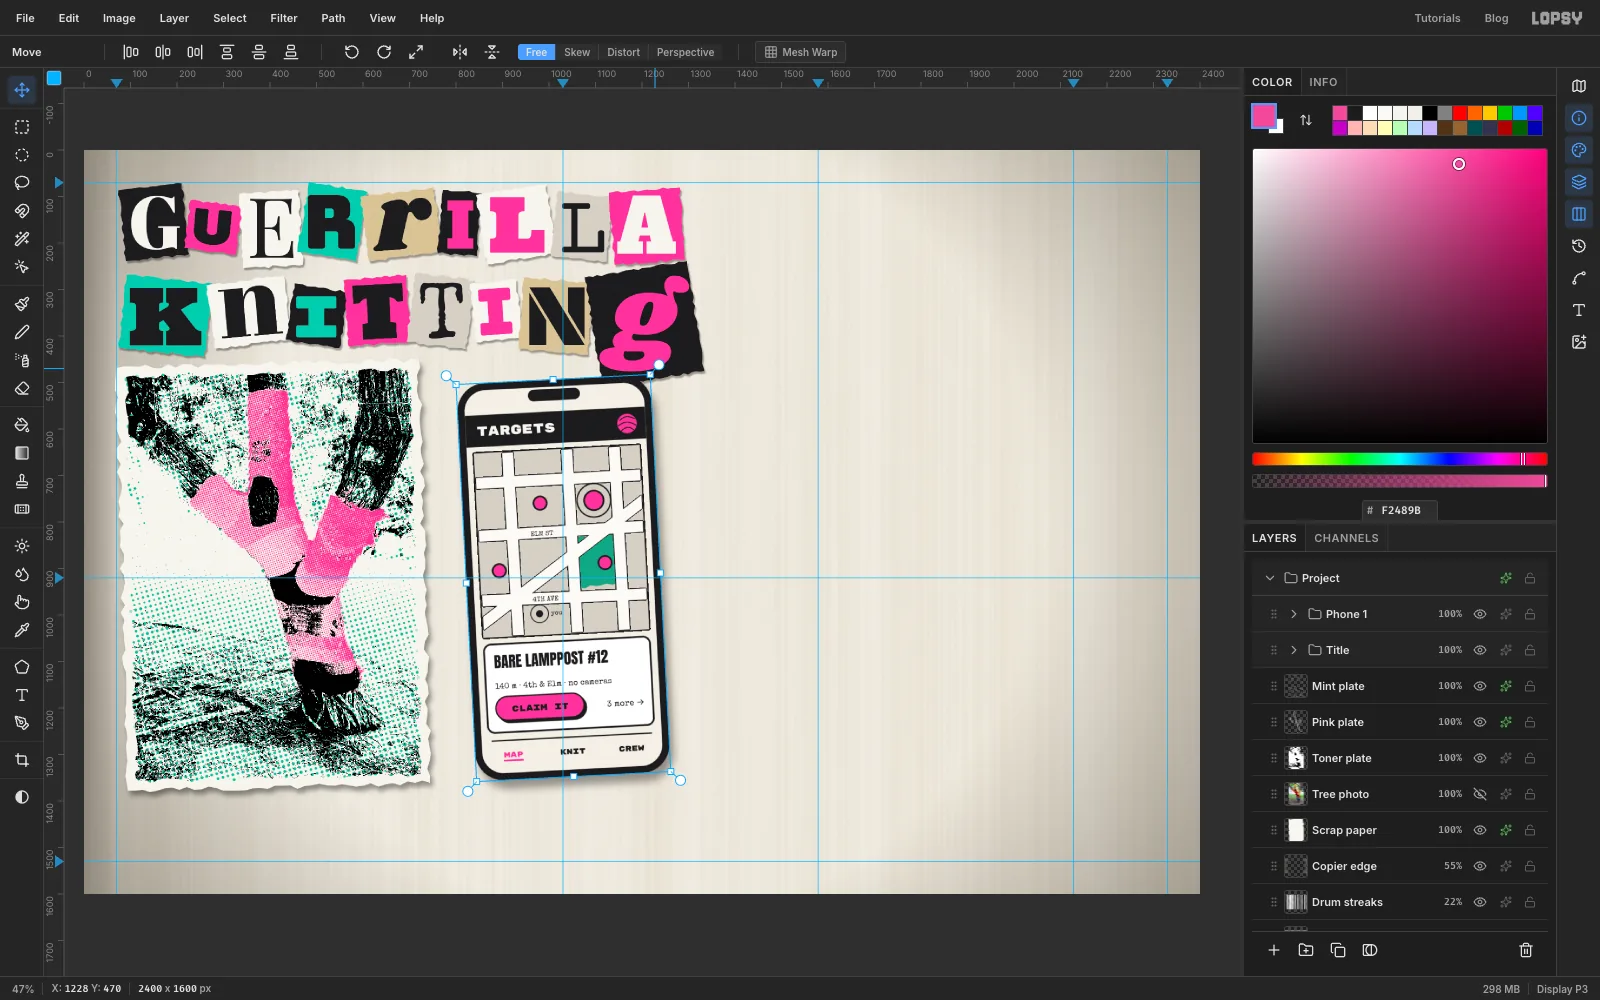
- Hold Cmd and drag the bottom-right handle in about 5% to scale the whole phone, text and all, to 95%. Press Cmd+D.
- Nudge the group back so it's centred on its guide.
- Drag the top-right rotate handle 3° counter-clockwise, and press Cmd+D.
-
Crop a photo for the pattern screen
Frame. Collapse Phone 1 and keep its row selected, so the next group is a sibling, not a child. Click New Group, name it Phone 2, and build the frame the same way as phone 1 on the middle guide, with a black header reading
PATTERN 07. Draw the 3 px Pencil tab-bar rule near the bottom of the screen as well.Window. Add P2 photo paper and select a window 376 × 270 px under the header. Fill it pink and give it a black Stroke of 3.
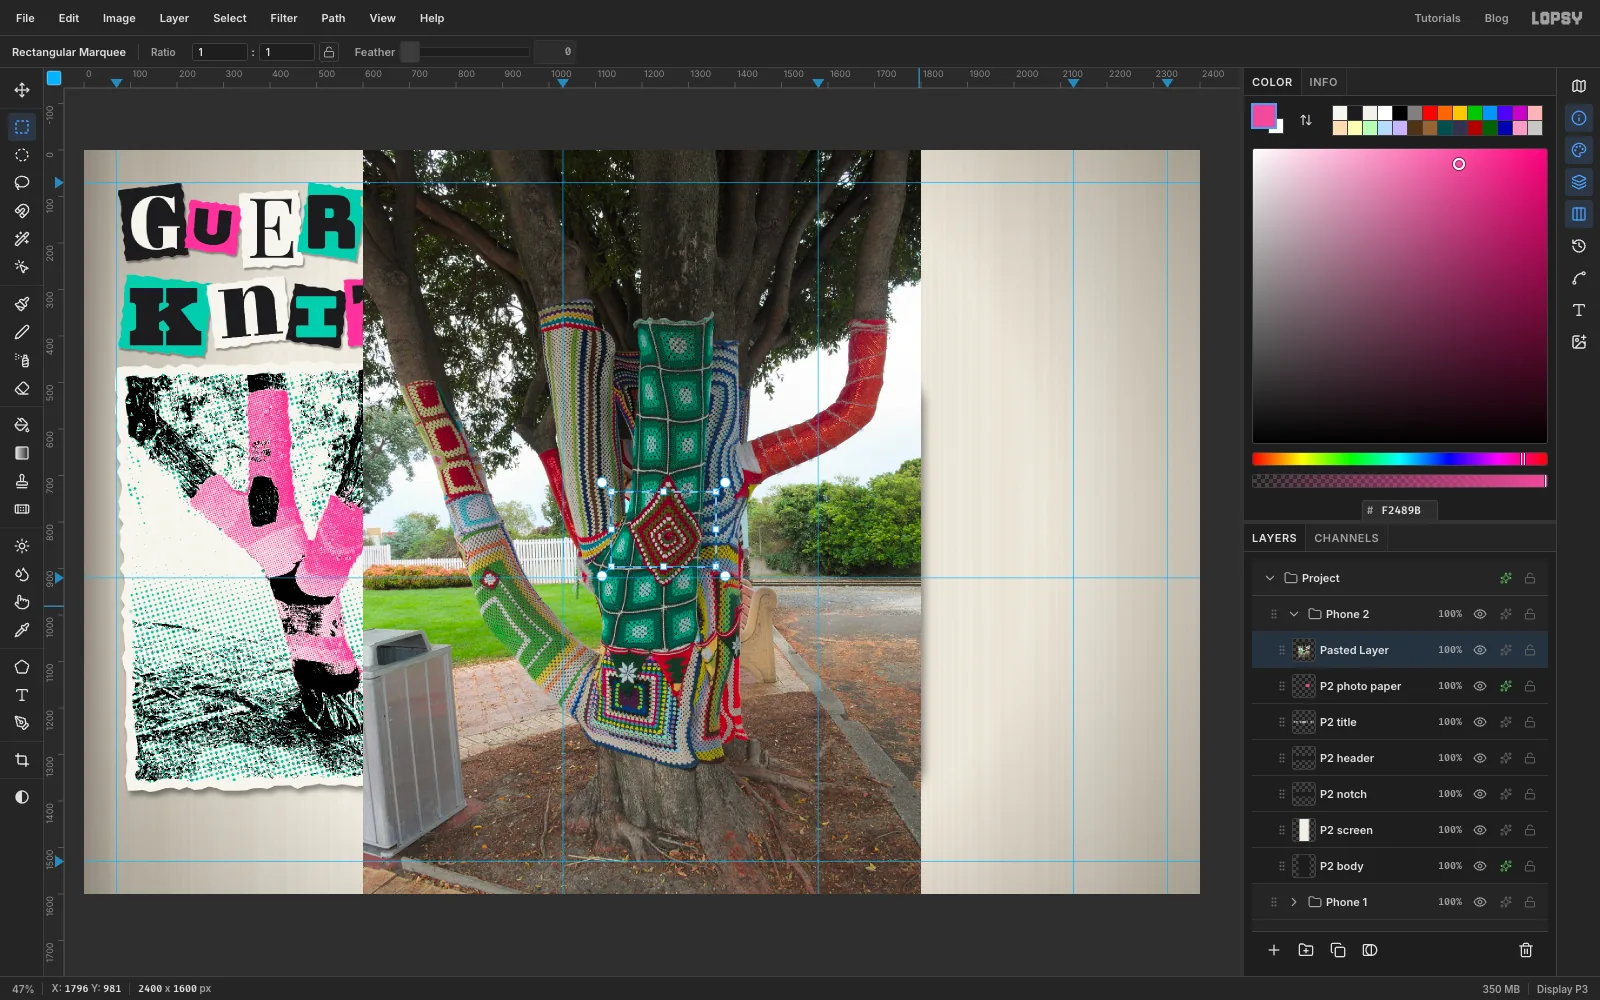
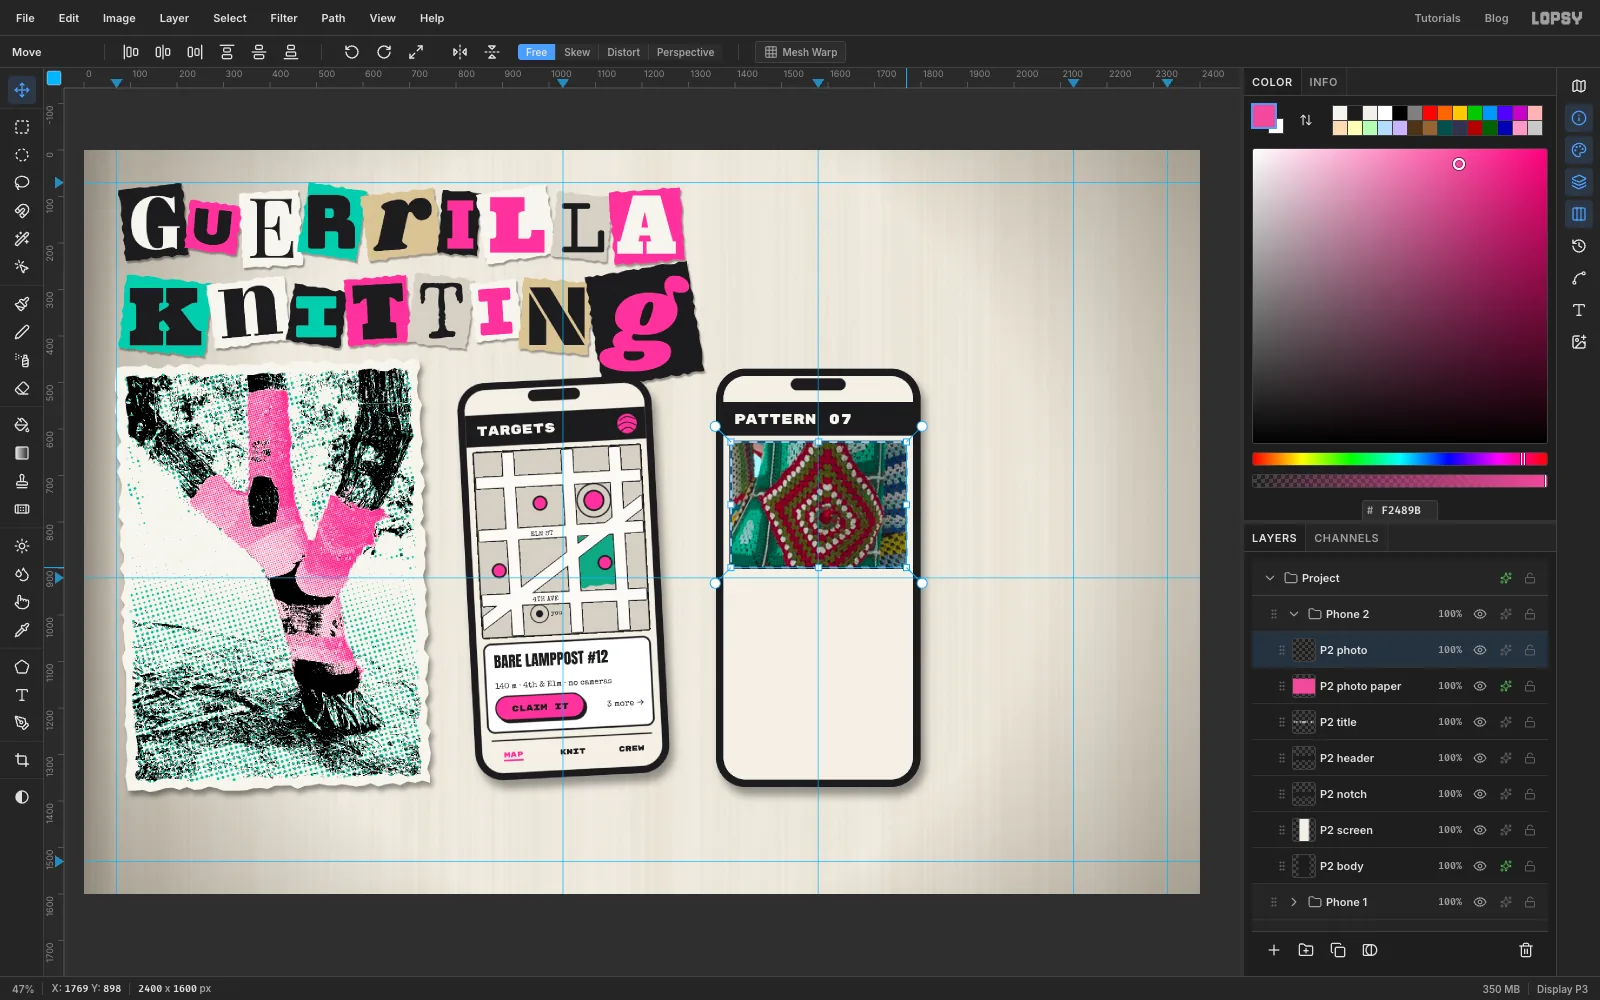
Photo. Paste the Ulverstone granny-square photo. Draw a marquee tightly around the red crocheted diamond on the trunk, with a few green squares around it. Keep the marquee the same shape as the window: click once with the Rectangular Marquee and enter a box about 240 × 172 px around the diamond. Press Cmd+C, then Cmd+V to paste just that crop in place. Delete the full photo layer and rename the crop P2 photo.
-
Scale the crop to fit the window
Drag the crop so its top-left corner sits on the window's top-left corner. Cmd-click its thumbnail to select it. Then, with the Move tool, hold Cmd and drag the bottom-right handle out until the crop just covers the window. Press Cmd+D.
Select the window rectangle again, choose Select → Inverse, and press Delete to trim any overhang. Deselect.
-
Halftone the pattern photo
Don't Desaturate this one. Lopsy's Desaturate turns every strong hue into the same mid-grey, so the red diamond and the green squares would vanish into each other. Instead:
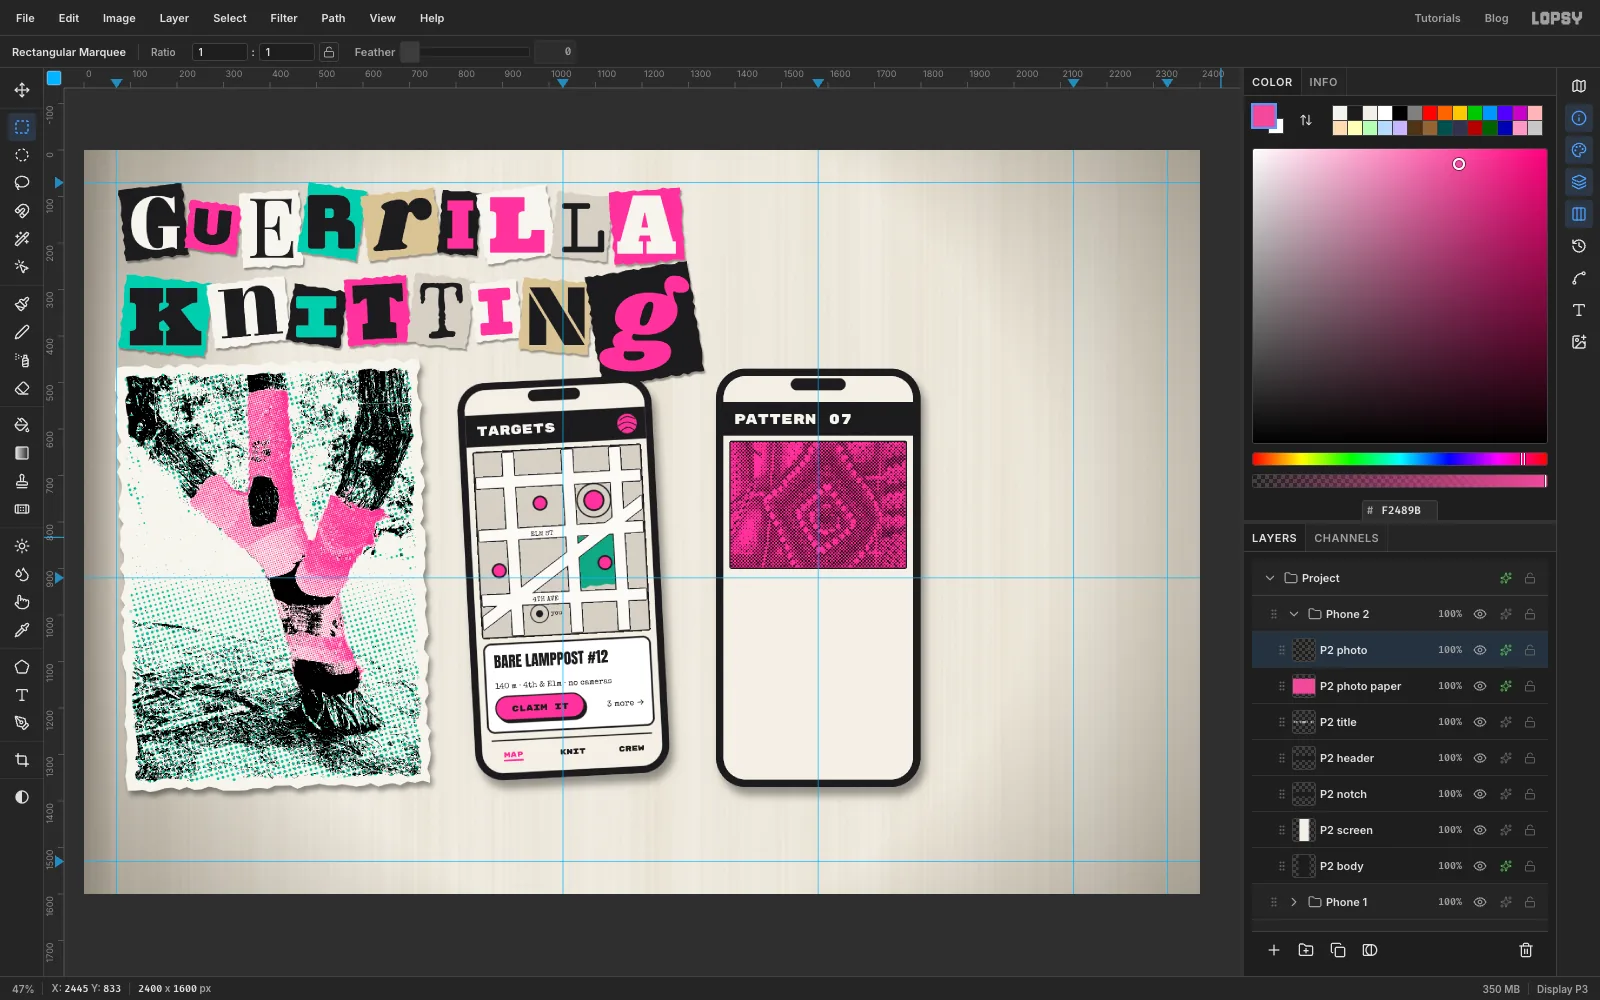
- Run Brightness/Contrast… with Brightness 12 and Contrast 45.
- Run Halftone… with Dot Size 5, Angle 45 and Softness 0.4. Halftone reads the brightness of the colour photo directly.
- Add a black Color Overlay and set the layer to Multiply.
The pink paper shows through the gaps between the dots.
-
Draw a knit stitch and define it as a pattern
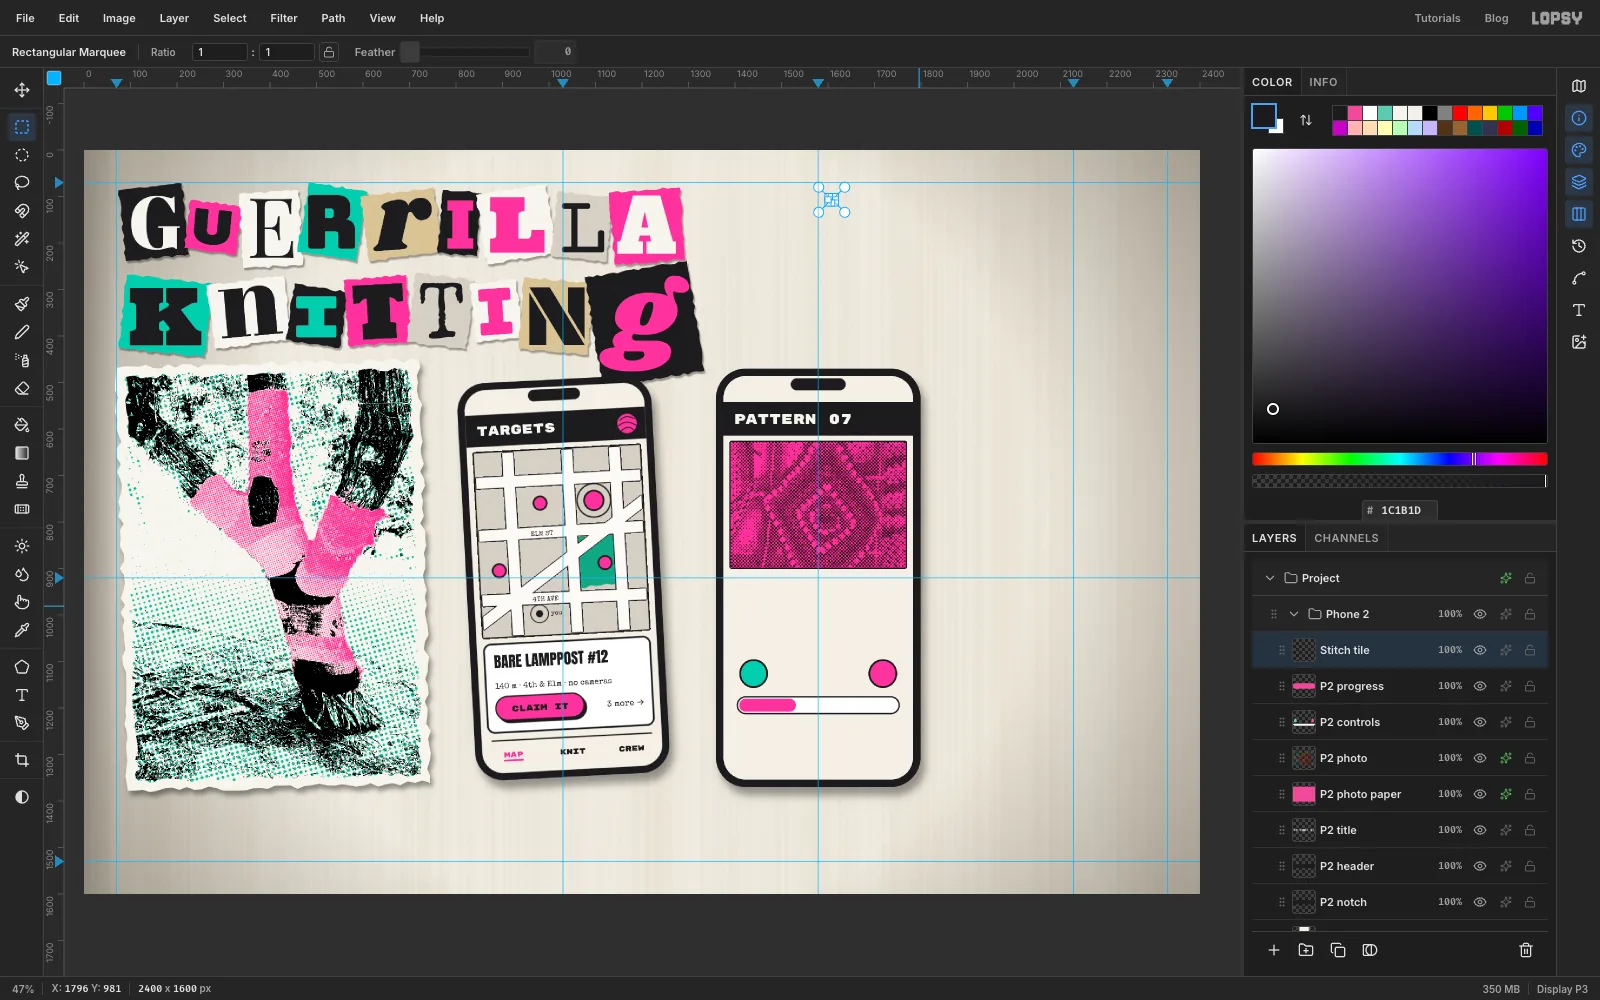
Controls. Add P2 controls. Click-to-size:
- a 58 px mint circle with a 4 px black stroke on the left of the screen, about 230 px above its bottom edge, for minus
- a matching pink one on the right, for plus
- a white 348 × 36 pill about 70 px below them, centred, with a 3 px black stroke and radius 18, for the progress bar
Then add a layer P2 progress and click-to-size a pink 122 × 28 pill, radius 14, at the left end of the bar. That's 14 rows out of 40.
Stitch tile. Add a temporary layer and zoom in on the empty strip above the middle phone. Use the Pencil at Size 3 to draw one knit stitch, a small V about 10 px wide and 9 px deep. Click its top-left point, Shift-click the bottom point, then Shift-click the top-right point.
Click once with the Rectangular Marquee and enter a 16 × 14 box around the V, so the stitch has a little air on every side. Choose Edit → Define Pattern. Then delete the temporary layer.
-
Fill the progress bar with stitches
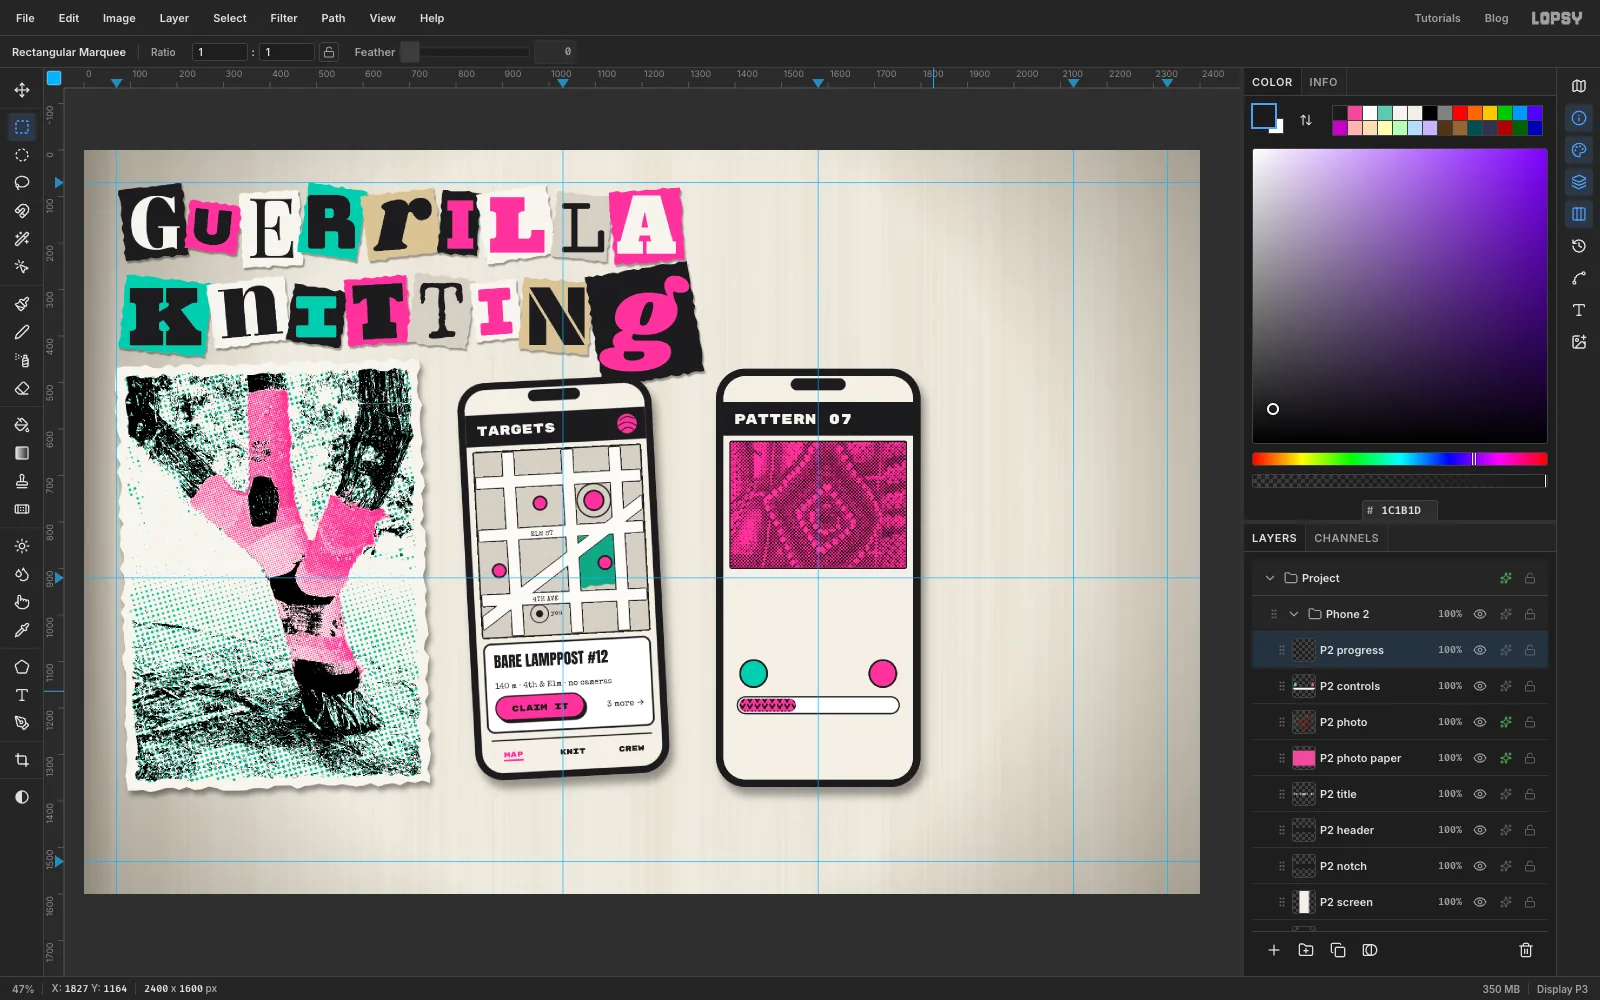
Cmd-click the P2 progress thumbnail to select it. Choose Edit → Fill with Pattern…, pick your stitch, and click Apply. The pattern tiles across the selection, so the bar fills with rows of knitting.
-
Finish the pattern screen
Add the text from the bottom up:
- The tabs, with
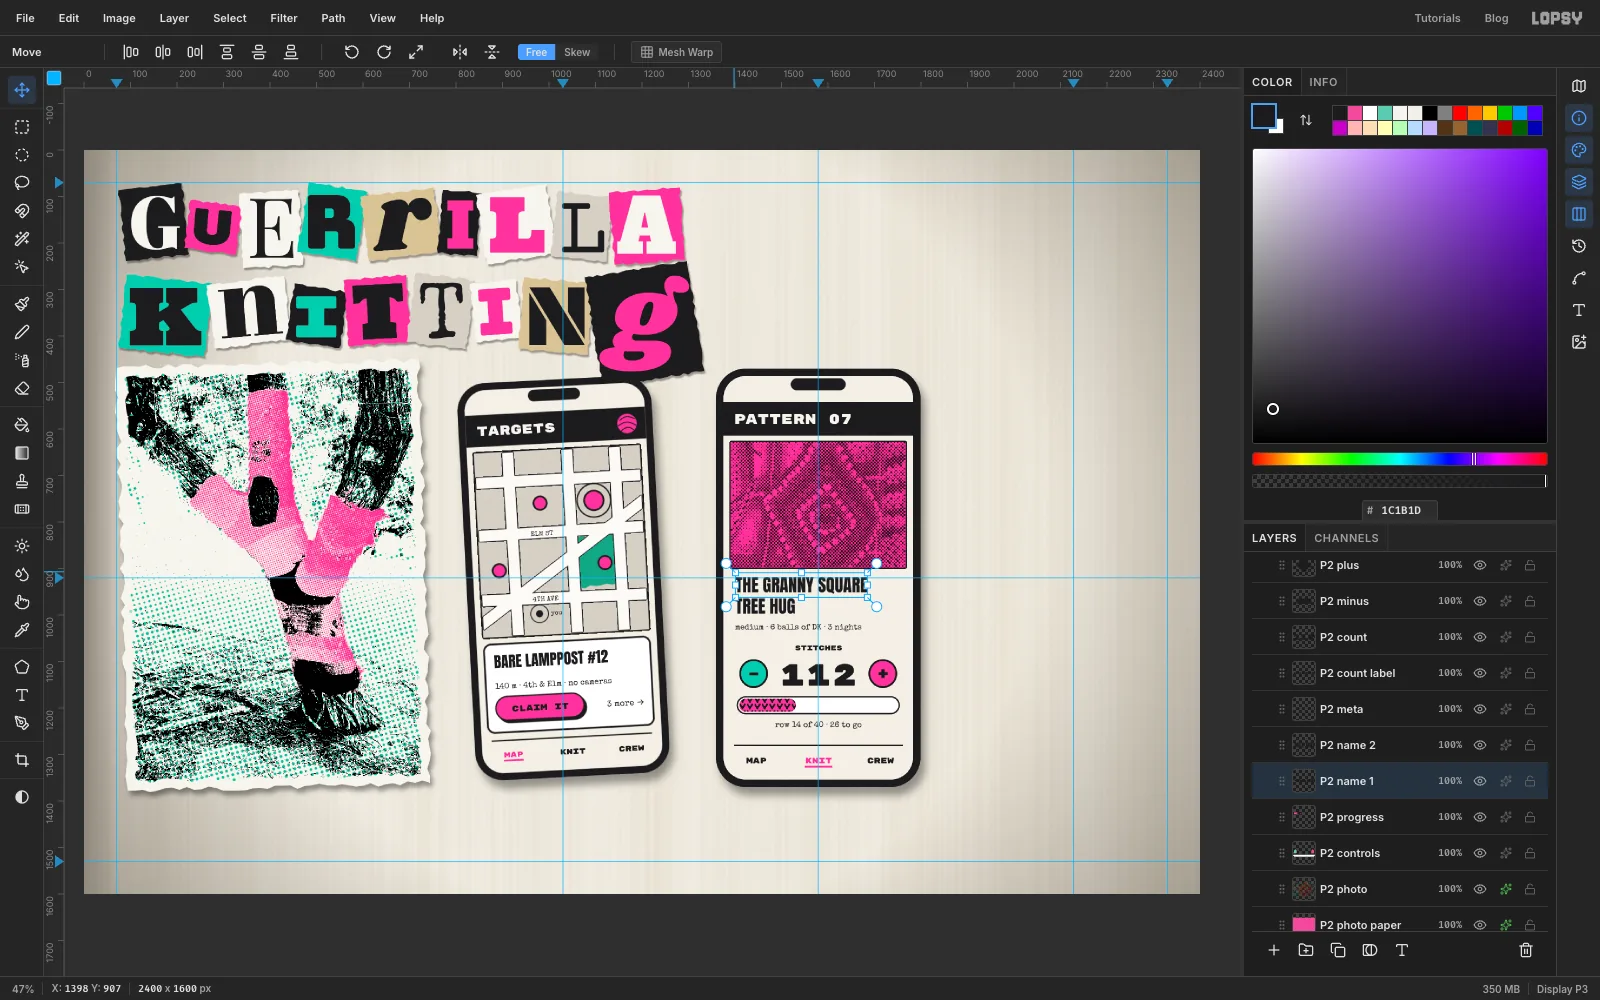
KNITpink and underlined this time. row 14 of 40 · 26 to goin Special Elite 17.+and–in Rubik Mono One 34, centred on their buttons.112in Rubik Mono One 66, centred between the buttons.STITCHESin Rubik Mono One 15.medium · 6 balls of DK · 3 nightsin Special Elite 17.- The title in Anton 38, as two separate layers so the leading stays tight:
TREE HUGfirst, thenTHE GRANNY SQUAREabove it.
Scale the Phone 2 group to 95% and tilt it 2° clockwise, as you did for phone 1.
- The tabs, with
-
Lay out the crew list
Collapse Phone 2, keep it selected, and make Phone 3 the same way on the right-hand guide, with a header reading
DROP NIGHTand the tab-bar rule.Rows. Add P3 crew. Click-to-size five 42 px avatar circles down the left of the screen, the first about 195 px below the header and each 66 px below the last, filled pink, mint, kraft, black and mint, each with a 3 px black stroke. Draw a 2 px Pencil rule between the rows, plus one above and one below the list.
Button. Add P3 button: a pink 290 × 70 pill with a 4 px stroke and the same hard black shadow as
CLAIM IT.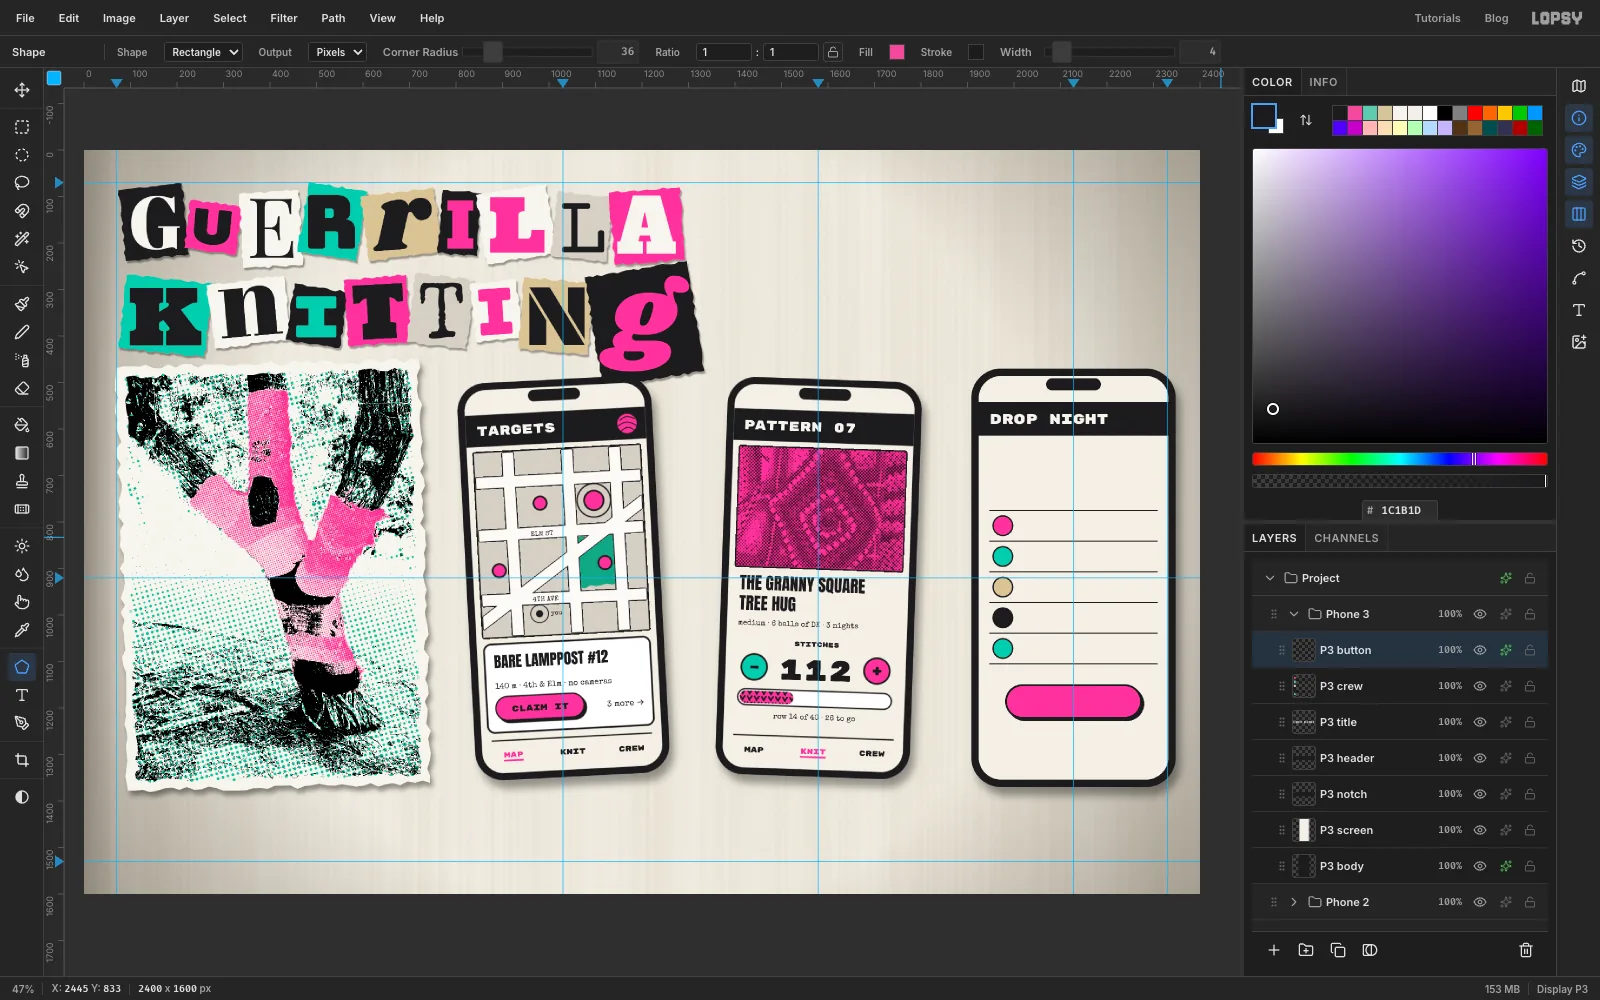
-
Type the crew and make a stamp off to the side
Text. Create the text from the bottom up again:
- The tabs, with
CREWpink and underlined. 5 knitters · 0 permissionin Special Elite 19, andI'M INin Rubik Mono One 32 on the button.- For each crew row, the status tag, then the handle. The tags are Rubik Mono One 20, right-aligned about 25 px in from the screen's right edge and sitting on the handle's baseline: pink
IN, or blackMAYBEfor sock_bloc. The handles are Courier Prime 22:@purl_jam,@cast_off_carla,@sock_bloc,@needle_nanand@yarn_ghost. - The two-line note
under the 4th st bridge./bring scissors. wear black.in Special Elite 19, just above the list. Rename its layer P3 where.
Stamp. The stamp will sit on top of the crew list, so build it somewhere empty first, where your clicks can't land in the existing text.
Click the P3 where row (the note), click New Group and name it P3 stamp. Inside it, add a layer and click-to-size a 270 × 62 rectangle in the empty space above the phones: radius 10, no fill, a 5 px pink stroke. Type
TOP SECRET-ISHin Black Ops One 26 in pink, centred in the box.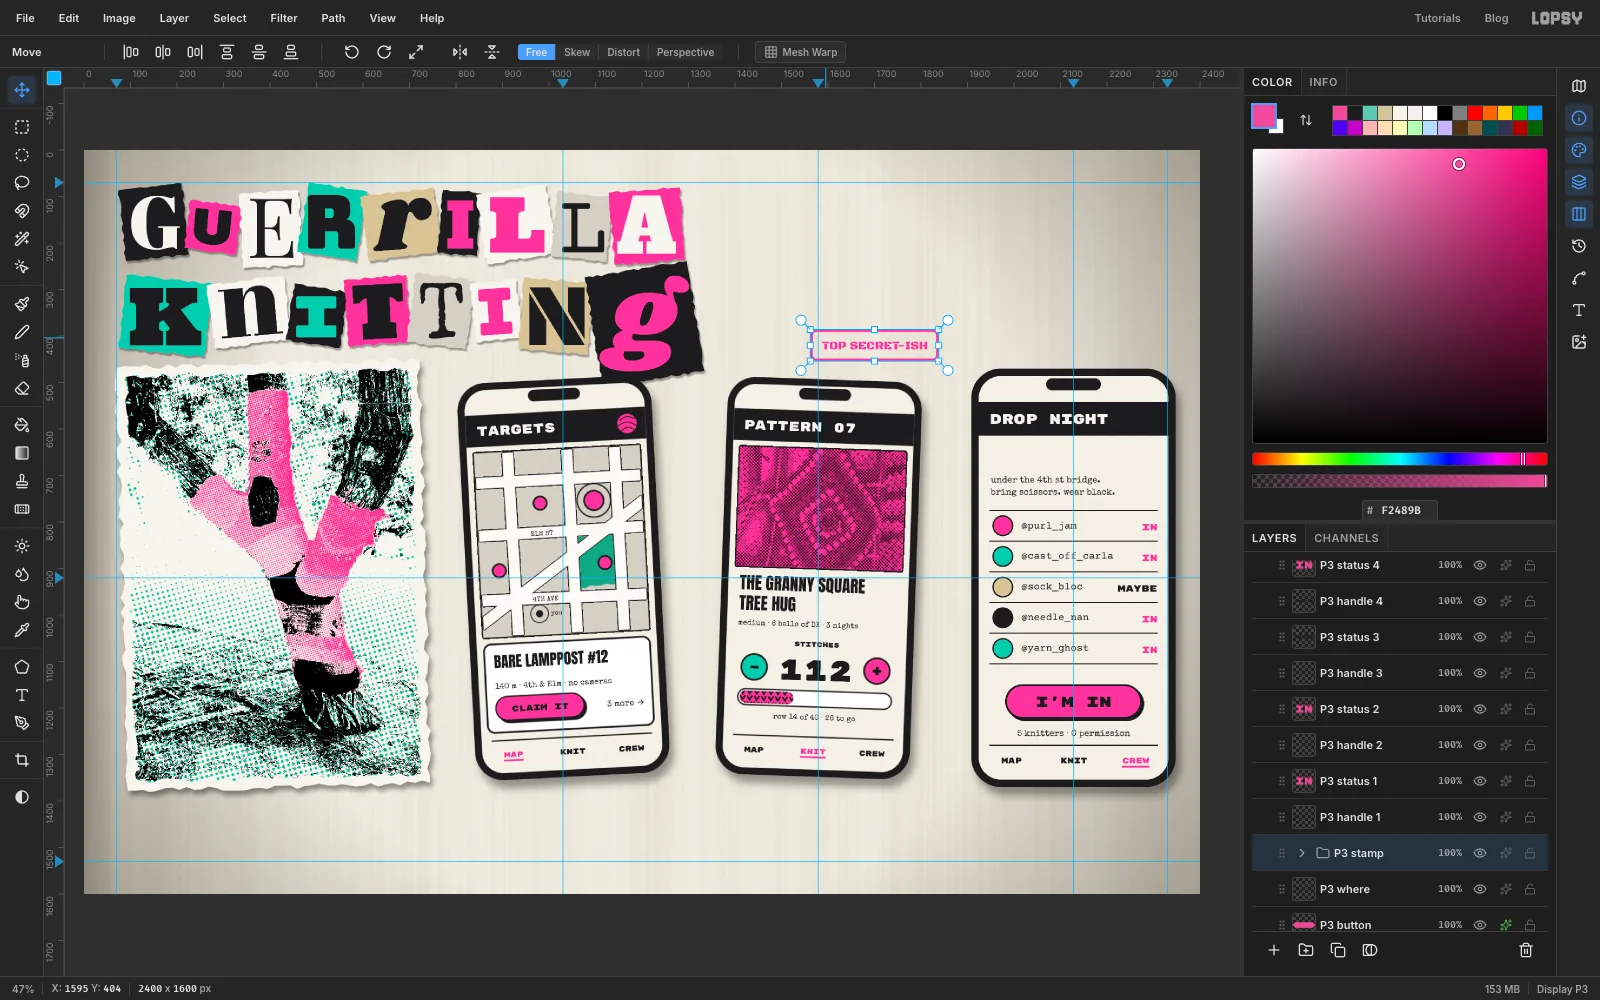
- The tabs, with
-
Drag the stamp on and turn it
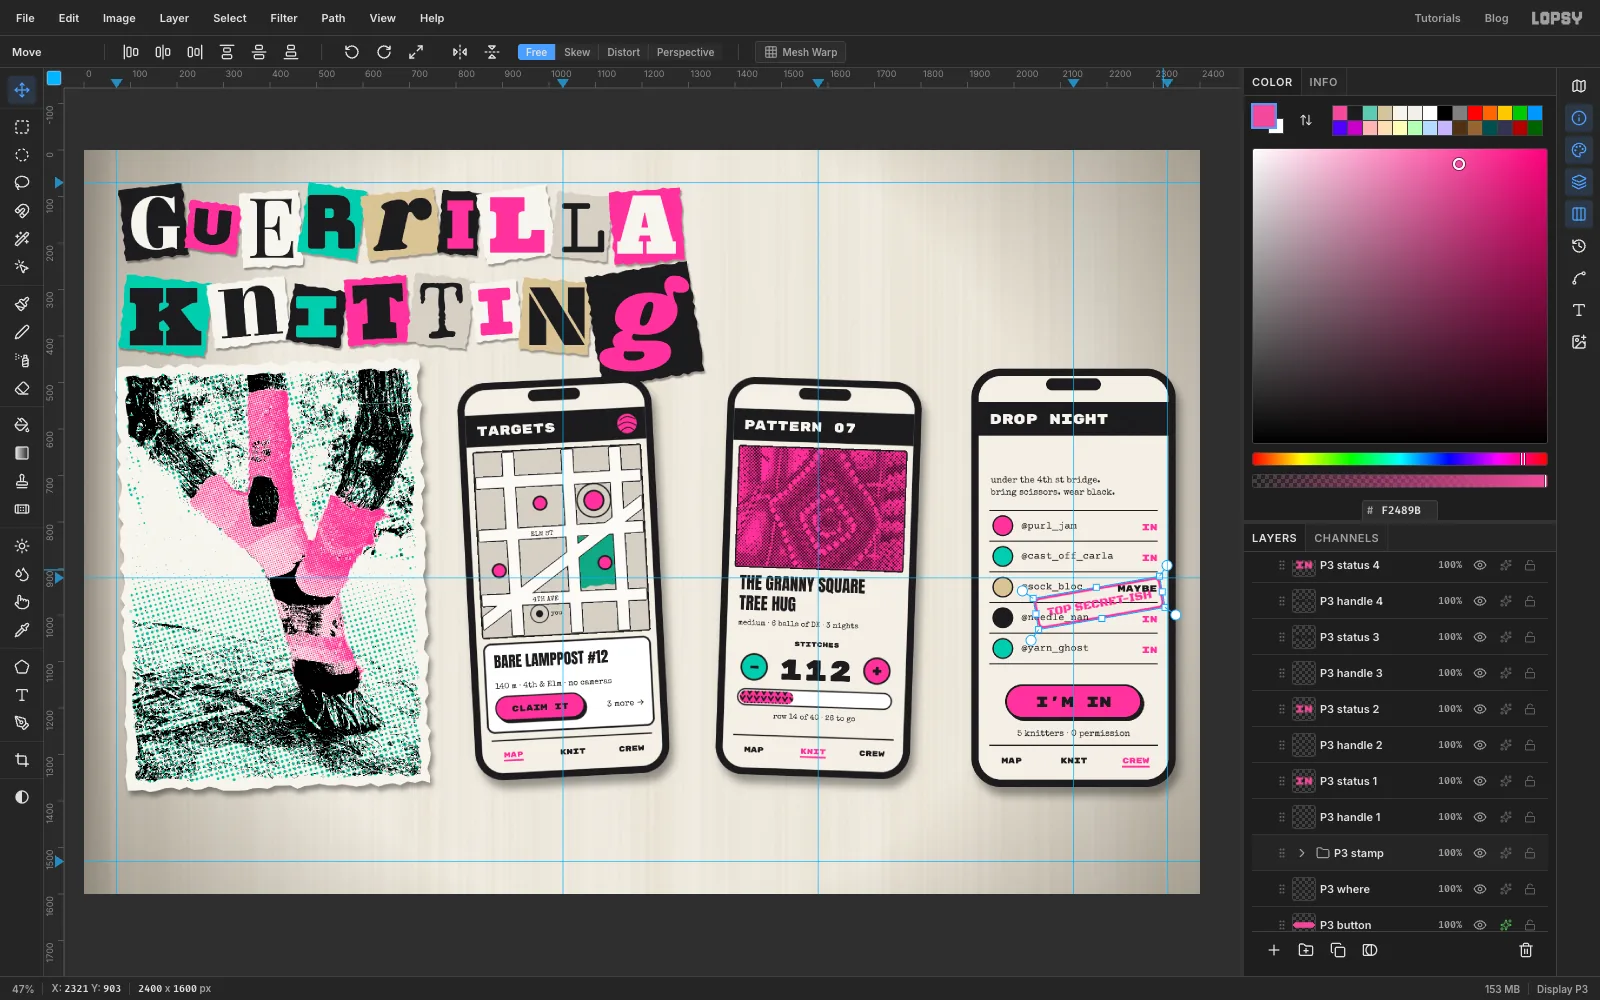
Collapse P3 stamp, click its row and deselect. With the Move tool, drag the stamp down onto the crew list, centred across the
@sock_blocand@needle_nanrows. Rotate it 10° counter-clockwise with the rotate handle and press Cmd+D.Set the group's blend to Multiply at 85%, so the rows show through the ink like a real stamp.
-
Add the time and tilt the last phone
Type
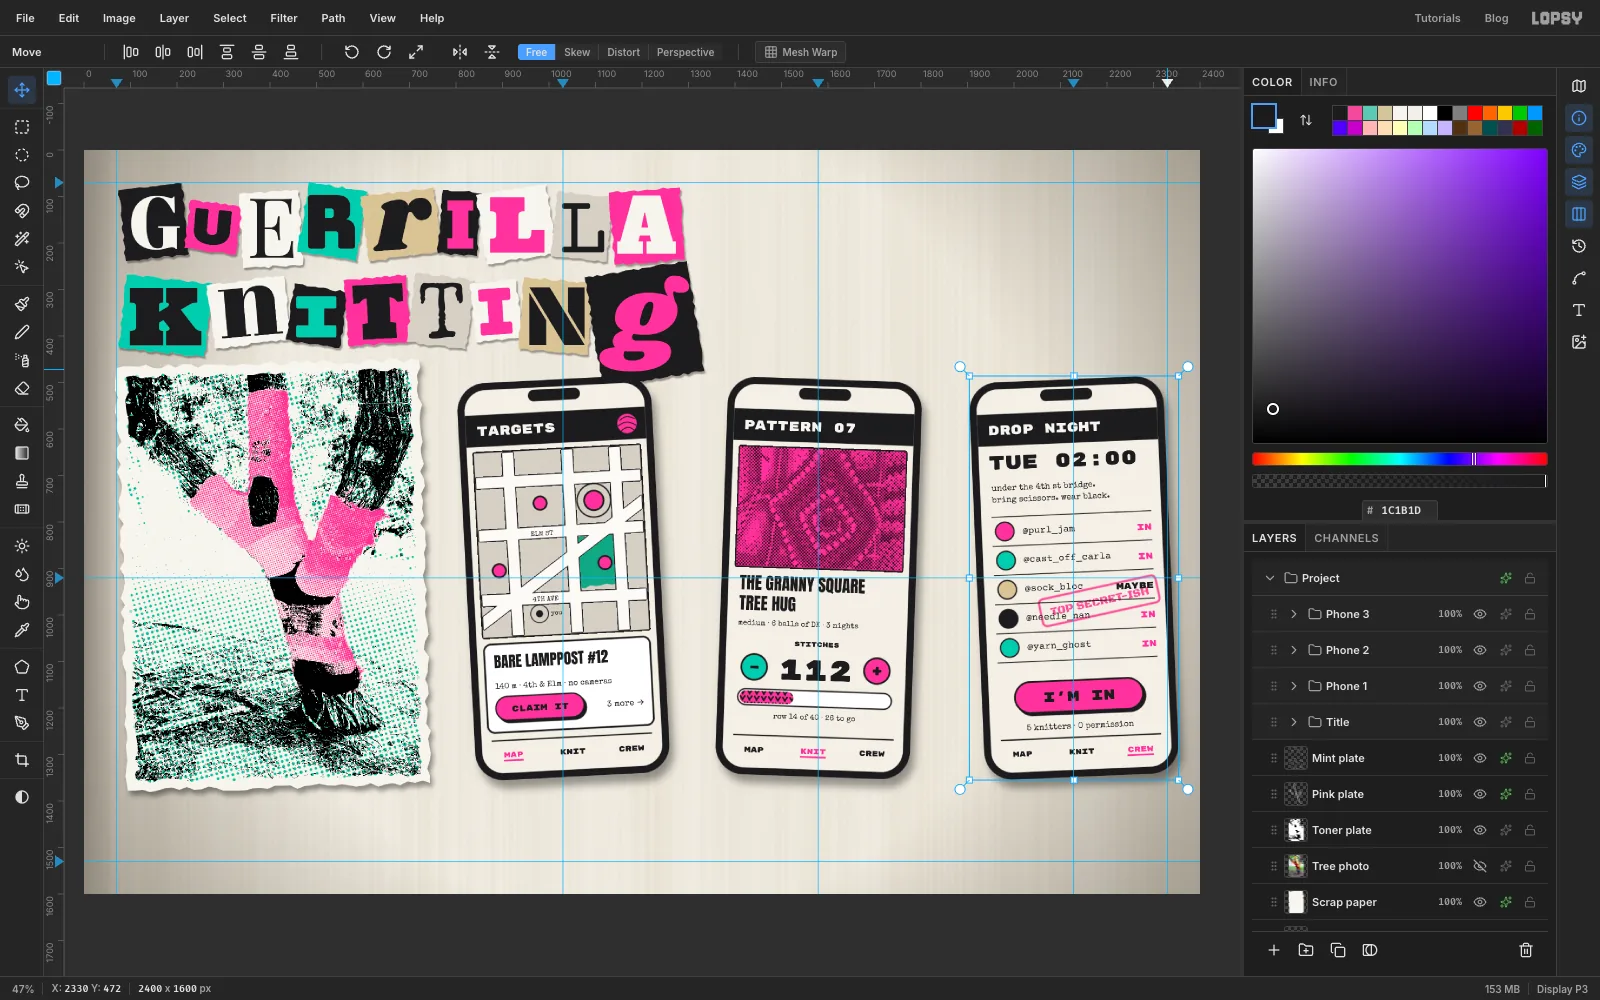
TUE 02:00in Rubik Mono One 44 at the top of the screen, above the two-line note.Scale Phone 3 to 95% and tilt it 2.5° counter-clockwise. The three phones now lean different ways, like they were stuck down by hand.
-
Write the tagline in marker
Click the collapsed Title group and make a new group called Doodles. Because the phone groups are above it, anything inside Doodles sits behind the phones. Add three layers inside it: Highlighter, Yarn ball and Yarn thread.
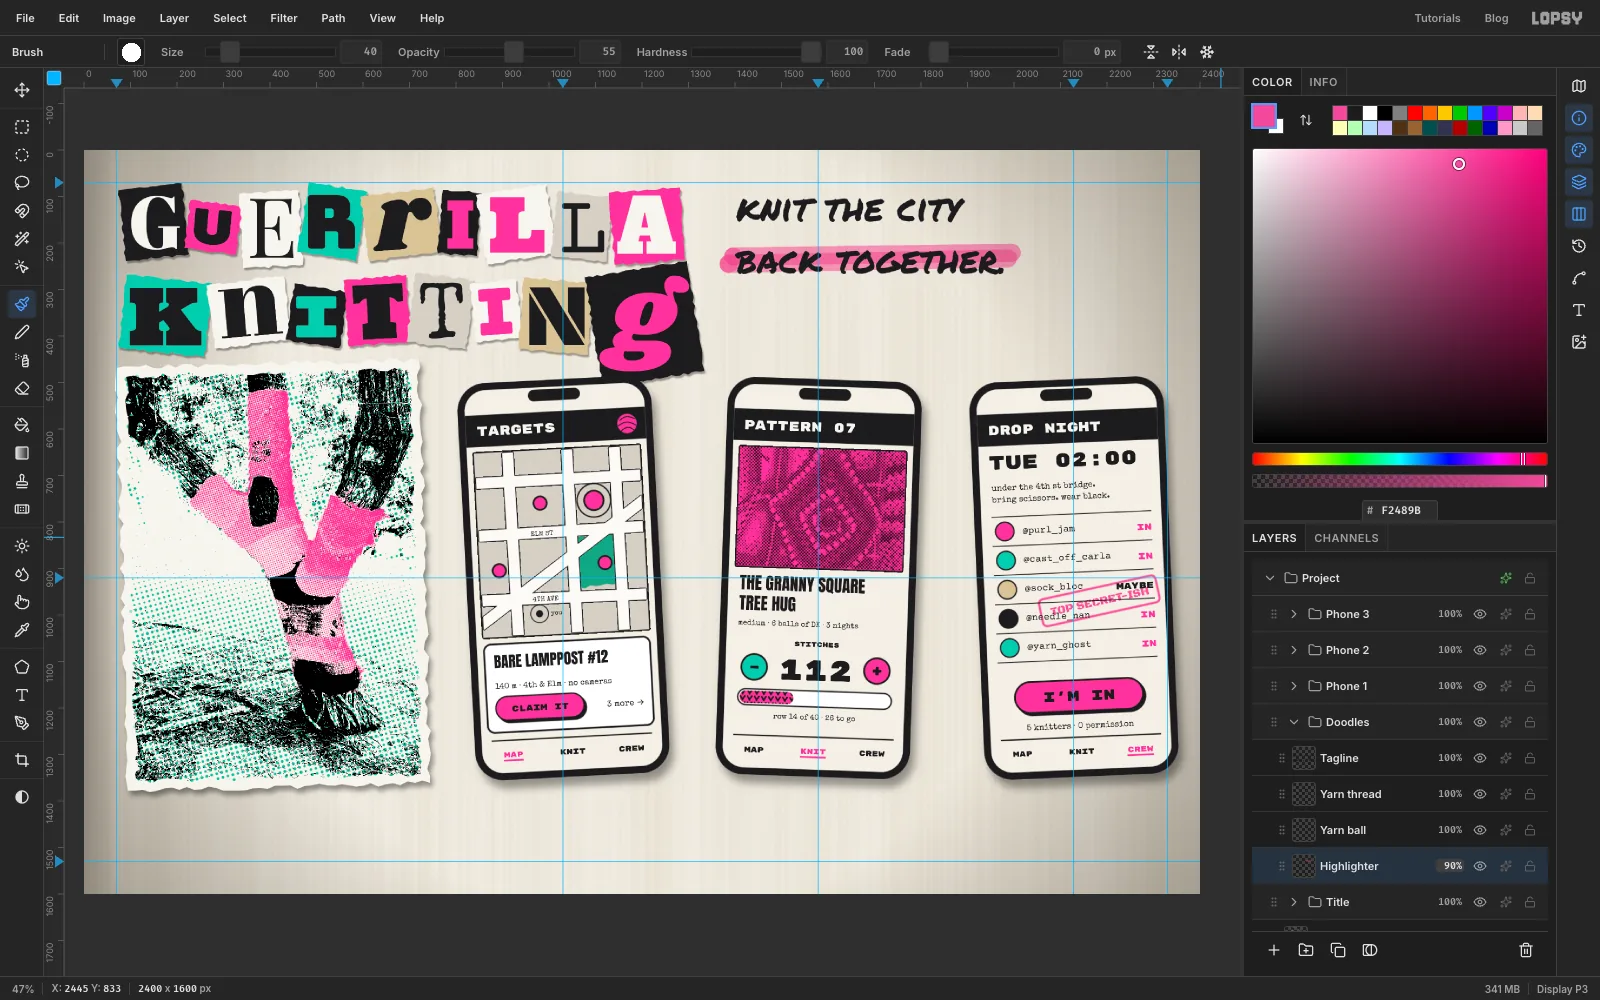
Tagline. Type
knit the cityandback together.(press Enter between them) in Permanent Marker 80, black, at the top right of the board. Start it about 100 px right of the title's last letter, just under the top margin guide.Highlighter. Click Highlighter and set the Brush to Size 40, Hardness 100, Opacity 55, in pink. Draw two straight passes along the second line, using click and Shift-click, the second a few pixels higher than the first. Where they overlap the ink doubles up, like a chisel marker. Set the layer to Multiply at 90%.
-
Wind a ball of yarn
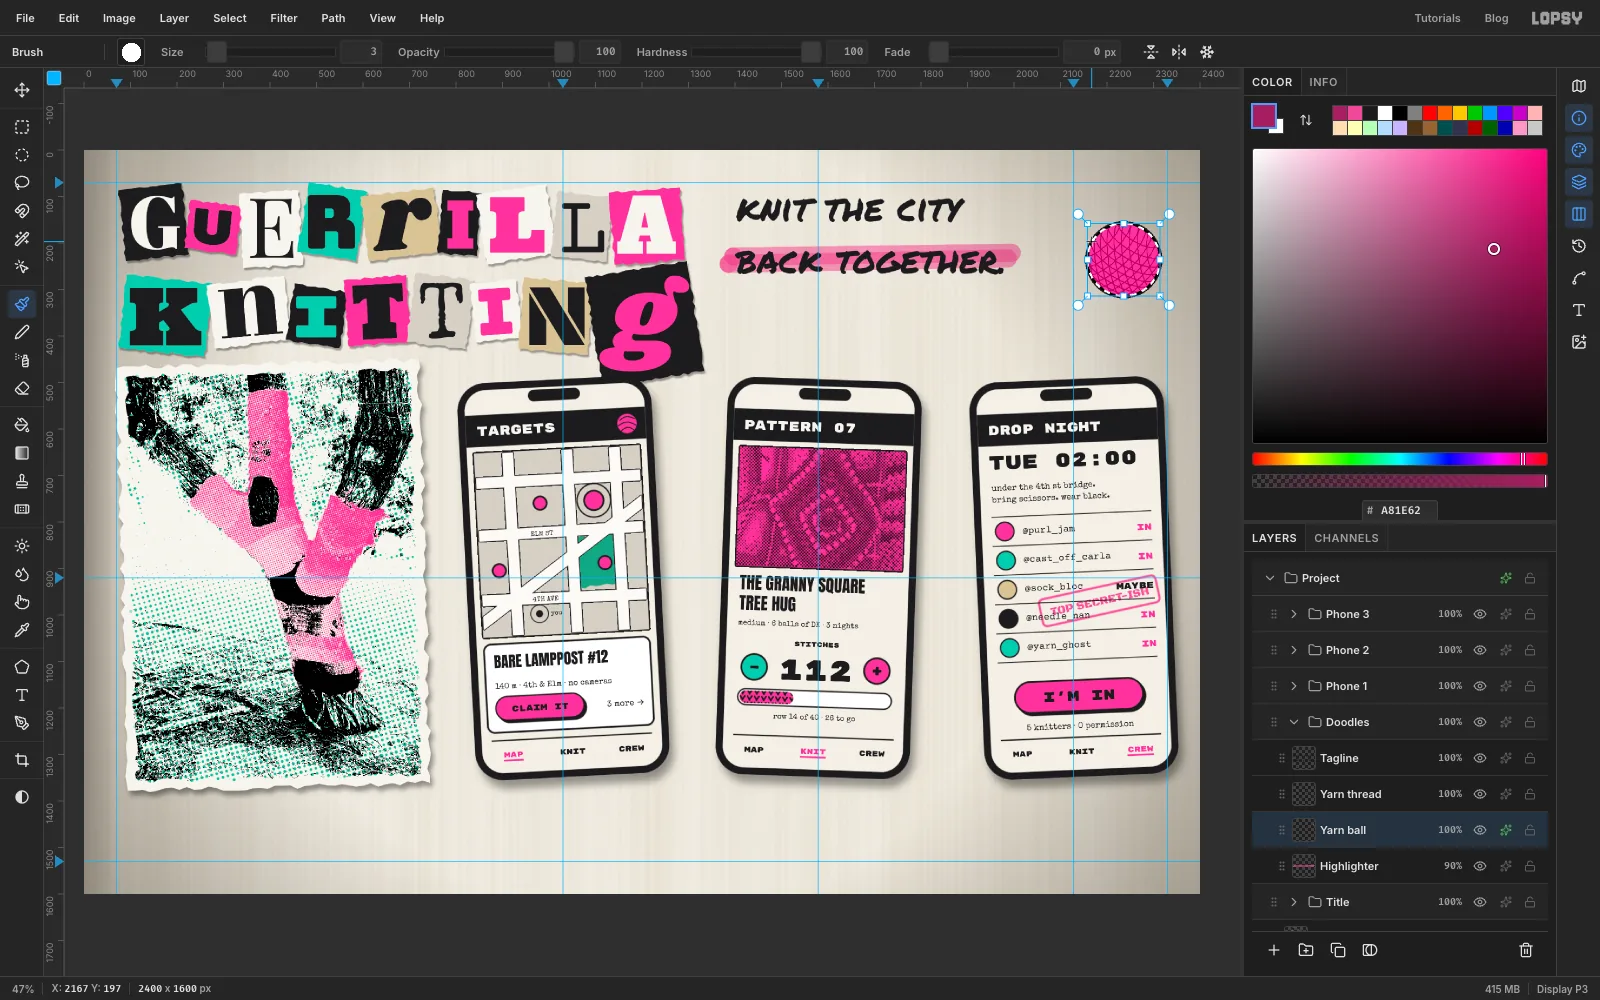
On Yarn ball, select a 156 px circle with the Elliptical Marquee, top right next to the tagline, and fill it pink. Give it a black Stroke of 5.
Cmd-click the thumbnail so your strokes stay on the ball. Then set the Brush to Size 3, Hardness 100, in dark pink . Draw three bands of wraps, each a set of nine gently curved strokes running parallel across the ball:
- one band tilted up to the right, at about 30°
- one crossing it, tilted the other way at about 45°
- a short band running almost vertically
Curve each strand the same way, as if it's wrapping around the front of a sphere. Then deselect.
-
Run the thread behind a phone
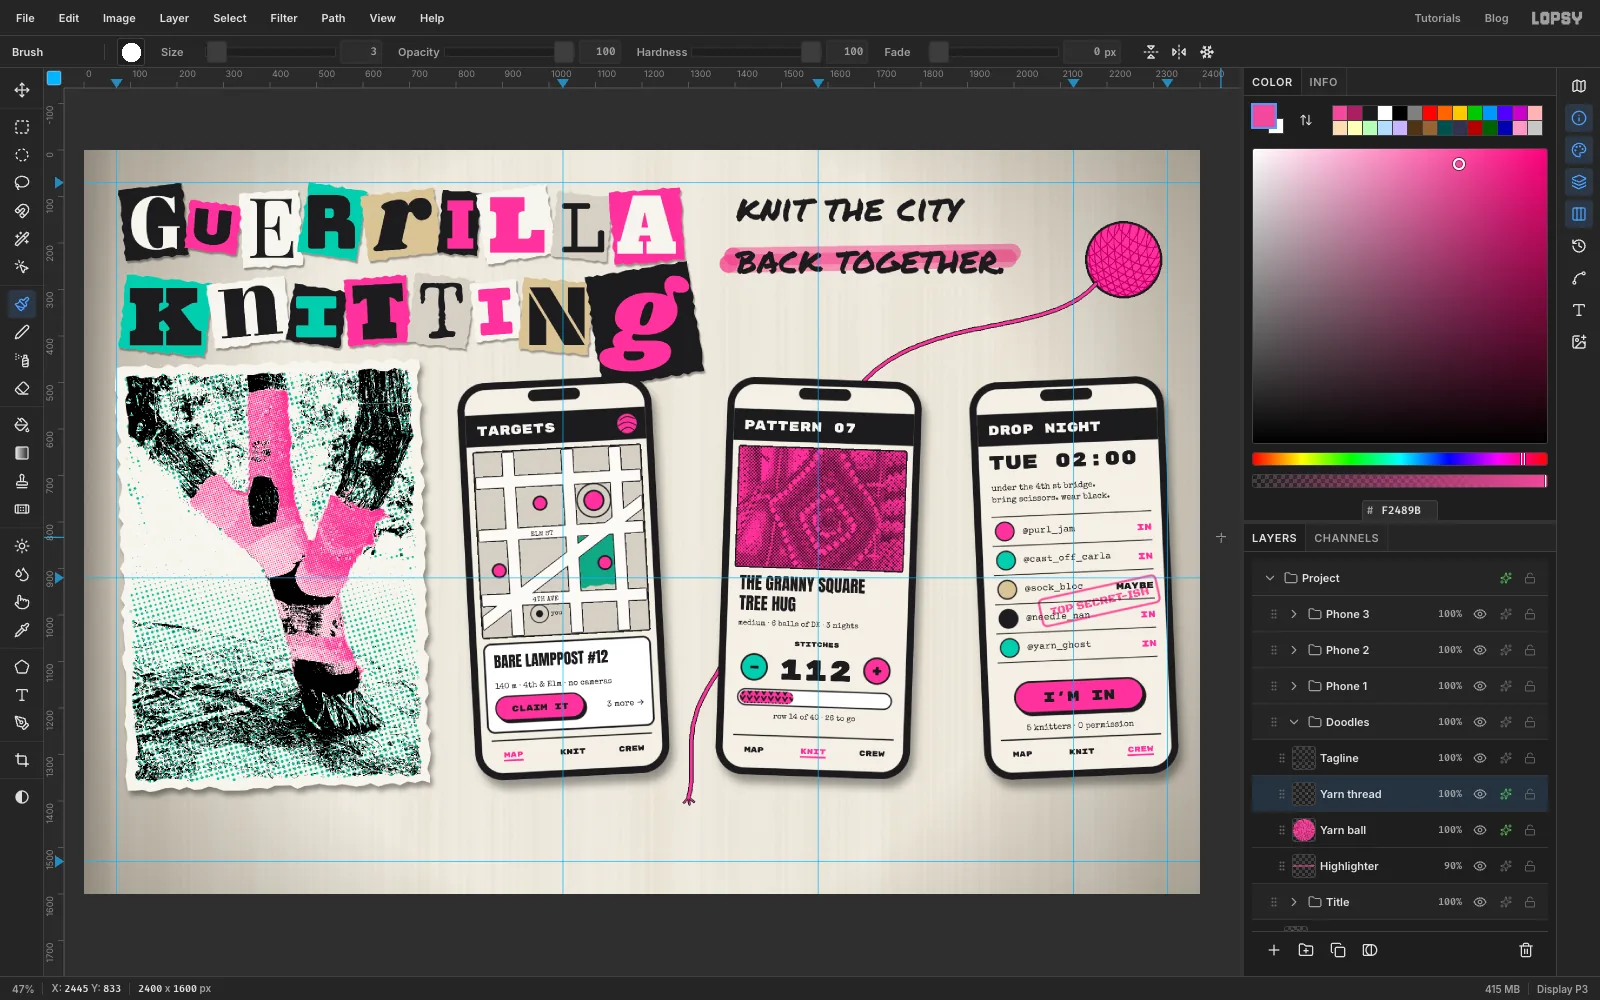
On Yarn thread, set the Brush to Size 7 in pink. Draw one long stroke:
- leave the ball at its lower left
- loop down behind the middle phone's top-right corner
- carry on behind the phone
- come out of its left side, low down
- drape down the gap between phones 1 and 2
Because the thread is in Doodles, below the phones, the middle stretch hides behind the phone on its own.
End it about 120 px above the bottom margin guide, where the captions will go. Switch to Size 3 and draw three short strands splitting off the end for a frayed tail. Give the thread a black Stroke of 2.
-
Tape everything down
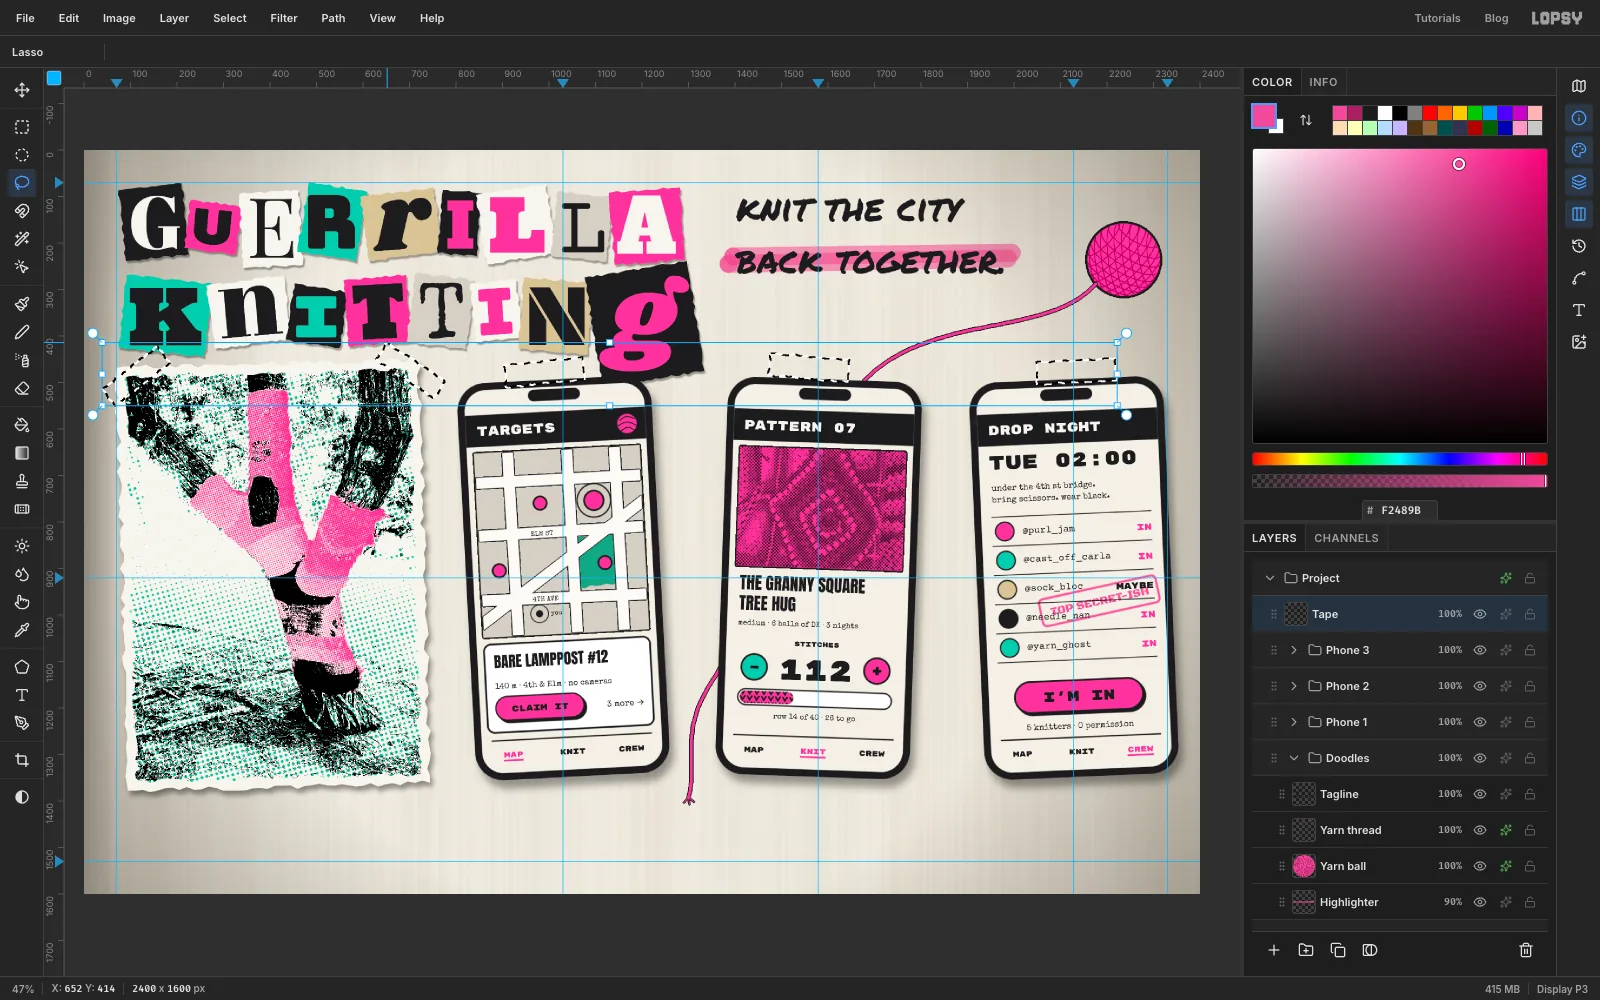
Click Phone 3, the top group in the stack, and add a layer called Tape. Lasso a torn strip about 170 × 48 across the top of each phone, hold Shift to add the next, and do the same for two 150 × 44 strips across the photo's top corners at steep angles.
Fill the whole selection with kraft and deselect. Add Add Noise… at 14, set the layer to 50%, and give it a Drop Shadow: Offset X 3, Offset Y 5, Blur 6, Opacity 60.
-
Add the captions, cut line and label
Cut line. Add a Cut line layer. Open the brush presets and set Spacing to 200, then, in black at Size 5, click on the left margin guide about 50 px above the bottom guide and Shift-click level with it on the right margin guide. The big spacing turns the stroke into a dotted line. Set the spacing back to 25 afterwards.
Captions. Type these in Special Elite 26, centred on one baseline under the photo and each phone:
fig. 1 — not a lamppost, but a start.01 — find a naked pole02 — count every stitch03 — drop it at 2 a.m.
Under the cut line, centre the footer
GUERRILLA KNITTING · ZINE NO. 3 · PHOTOCOPY THIS & PASS IT ONin Special Elite 24.Label. Type
BETA v0.3 · FREE · NO ADS · NO PERMISSIONin Special Elite 20 in , under the tagline and lined up with its left edge. On a layer below the text, fill a black strip behind it with 16 px of padding on the left and 40 px on the right. Run Add Noise… at 22 on the strip. Then, on a layer above the text, lasso a small torn scrap over the strip's right end, clear of the text. Fill it kraft and set it to 75% with the same shadow as the other tape.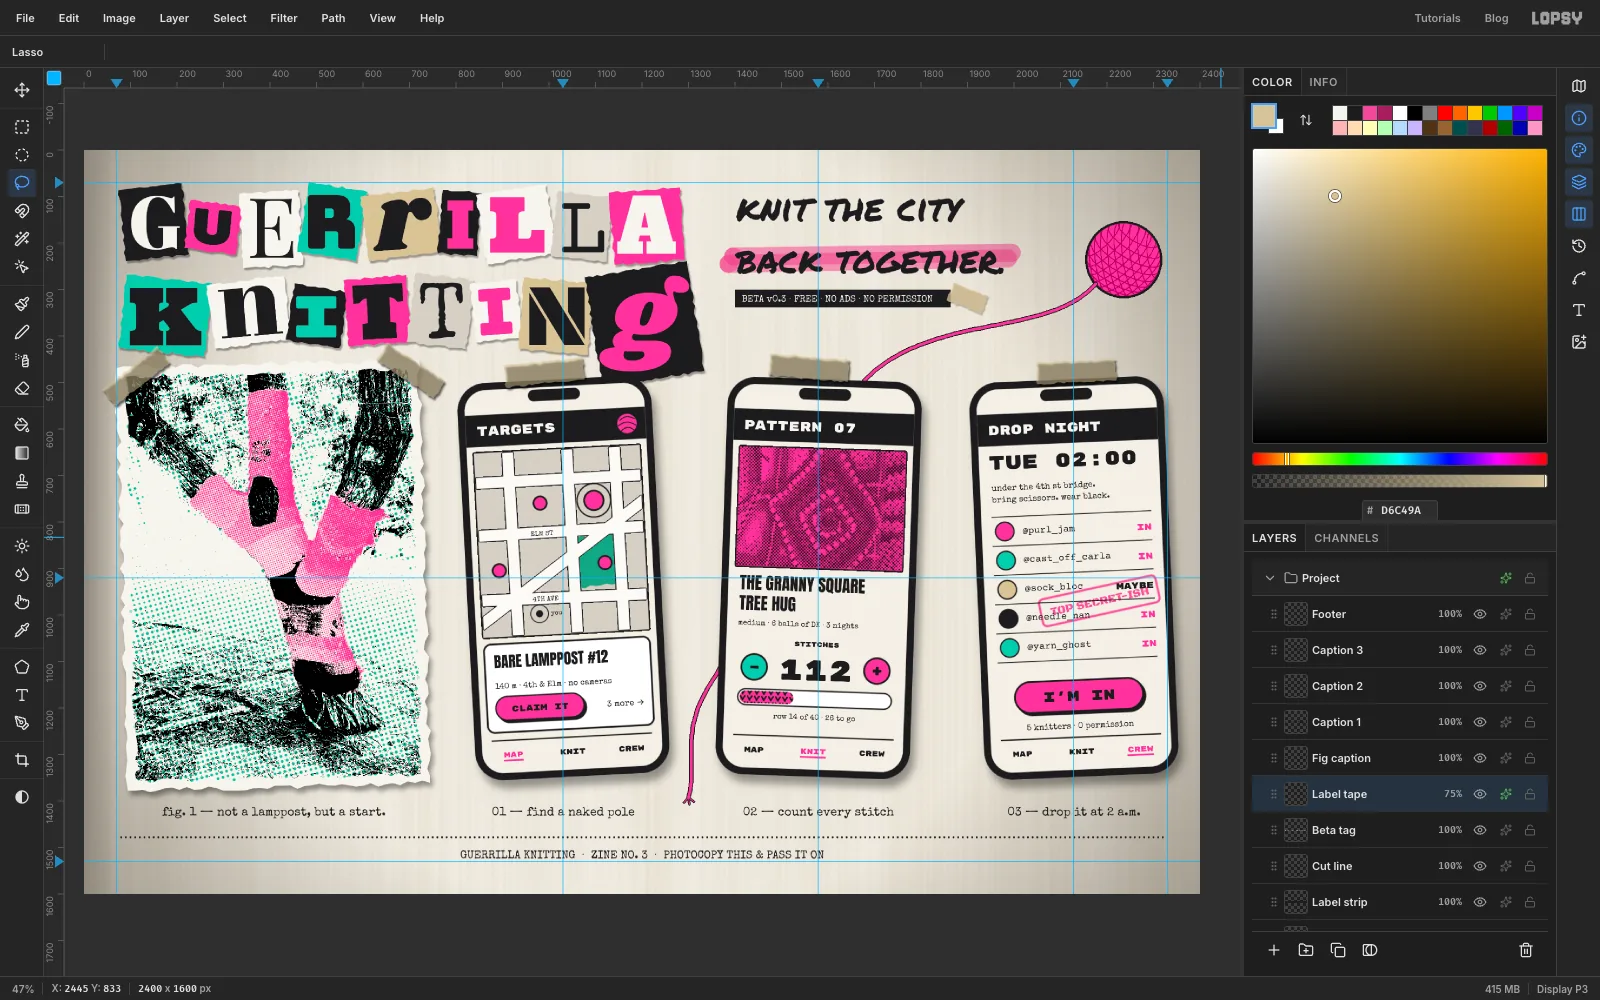
-
Photocopy the whole board
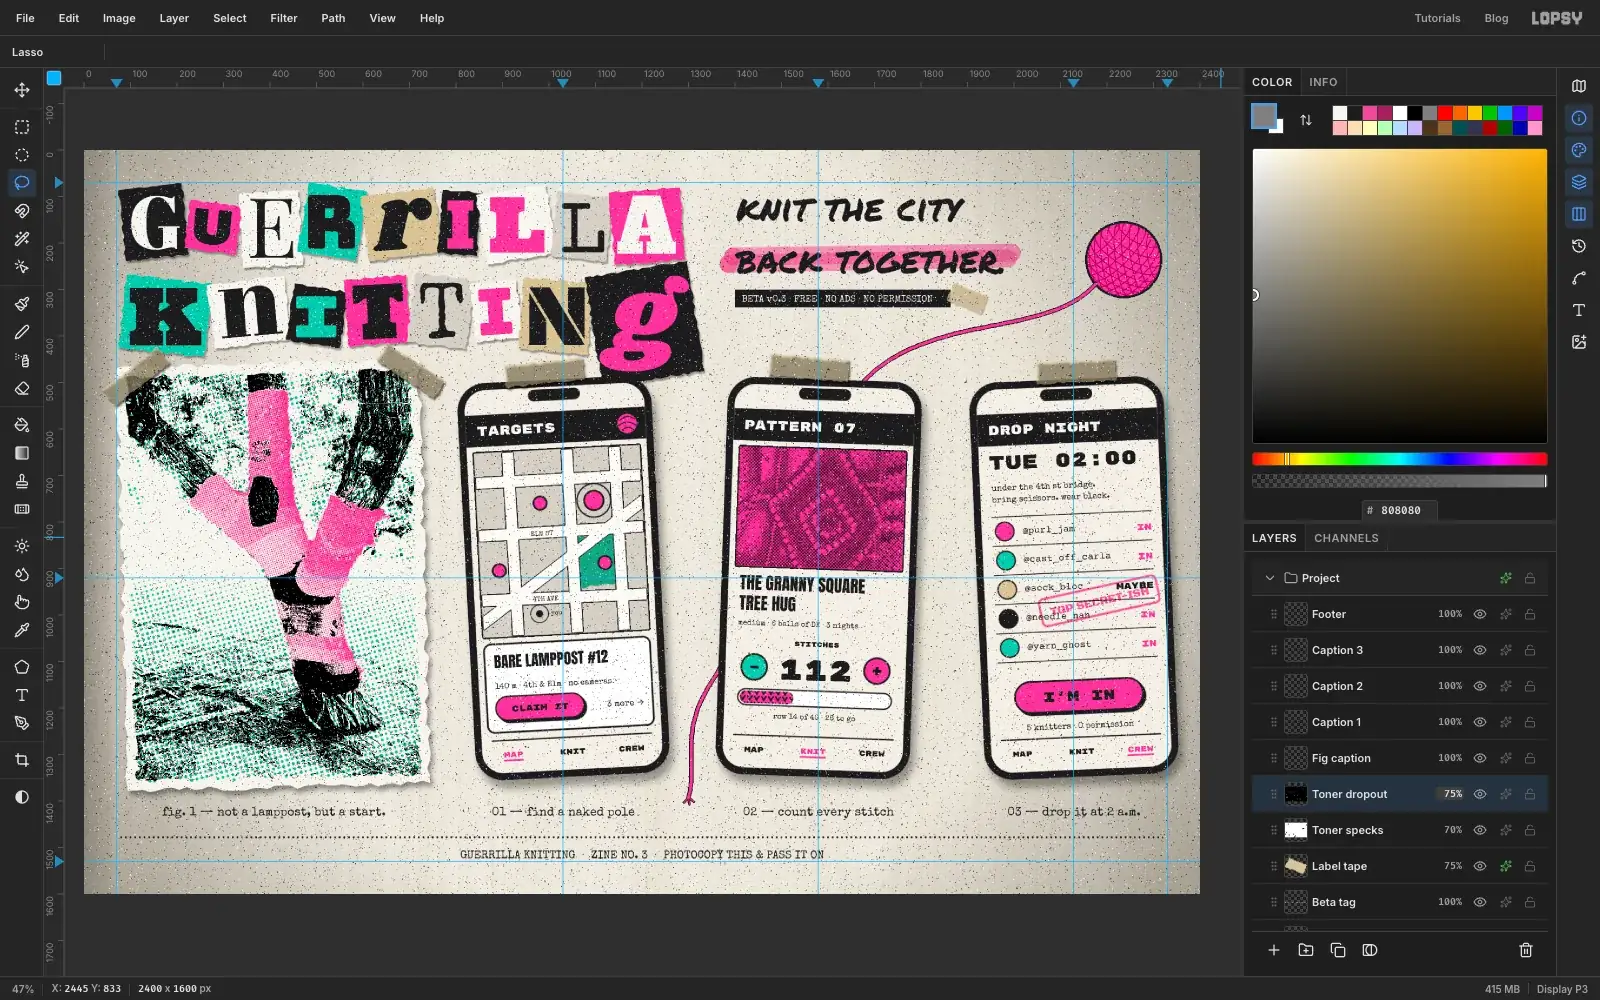
Make two layers at the very top of the stack.
Toner specks. Fill a layer with mid-grey . Run Add Noise… at 100, Mono, Uniform, then Gaussian Blur… at 2, then Threshold… at 103. Set it to Multiply at 70%.
Start from mid-grey, not white. Add Noise only moves pixels about 50 levels either way, so on white the threshold would never catch anything. The blur clumps the specks into 1–4 px blots, like real toner.
Toner dropout. Do the same on a second layer, but threshold at 153 and set it to Screen at 75%. White specks disappear on paper but show up in the black bezels, headers and scraps, where a copier drops out.
-
Wear the stamp and age the photo edge
Stamp. Expand Phone 3 and P3 stamp, and click the stamp's rectangle layer. Pick the Eraser at Size 18, Opacity 60, and drag five or six short strokes across the border. A rubber stamp never inks evenly.
Photo edge. Click Scrap paper, pick the Burn tool at Exposure 12, Size 70, and run it down the left edge and along the bottom of the white backing. Old photocopies go grubby at the edges first.
Save with File → Save Project, then File → Quick Export PNG.